Skip to content
DisclaimerTerms Of UseGDPR PolicyCookie Policy

juliesdish

  • Home
  • Drinks
  • Appetizers
  • Dinner
  • Dessert
  • About
  • Contact
  • Privacy Policy
DisclaimerTerms Of UseGDPR PolicyCookie Policy

NO-ING-IMG

The main ingredients create a hearty dish packed with flavor. Here’s what you need: - 2 cups canned pumpkin puree - 1 can (15 oz) black beans, drained and rinsed - 1 cup corn kernels (fresh, frozen, or canned) - 2 cups enchilada sauce (store-bought or homemade) - 8 corn tortillas - 1 cup shredded cheese (cheddar or Mexican blend) You can add fun twists with these optional ingredients: - Additional vegetables like bell peppers or spinach - Avocado slices for serving - Sour cream for a creamy topping Seasonings bring out the best in your enchiladas. Use these: - 1 tsp cumin - 1 tsp chili powder - 1/2 tsp garlic powder - Salt and pepper to taste - 1/4 cup fresh cilantro, chopped (for garnish) These ingredients and seasonings blend together to make a delightful meal. Enjoy the mix of pumpkin and black beans, plus the delicious sauce! Start by grabbing a large bowl. Add 2 cups of pumpkin puree. Next, open your can of black beans. Drain and rinse them well, then toss them in the bowl. Now, add 1 cup of corn kernels. You can use fresh, frozen, or canned corn. Sprinkle in 1 teaspoon of cumin, 1 teaspoon of chili powder, and 1/2 teaspoon of garlic powder. Season it all with salt and pepper to taste. Mix everything until it’s well combined. This mixture gives the enchiladas a rich and creamy flavor. Before you start assembling, lightly grease the bottom of your slow cooker. You can use cooking spray or a little oil. Next, spread about 1/4 cup of enchilada sauce evenly on the bottom. Take a corn tortilla and spoon a generous amount of the pumpkin mixture into the center. Roll the tortilla tightly, making sure the filling stays inside. Place it seam-side down in the slow cooker. Repeat this for all 8 tortillas. Once all the enchiladas are in, pour the rest of the enchilada sauce over the top. Make sure they are well covered. Now, sprinkle 1 cup of shredded cheese on top. Cover your slow cooker with the lid. Set it to cook on low for 4-6 hours or on high for 2-3 hours. The enchiladas are ready when they are heated through and the cheese is bubbly. After cooking, let them sit for about 10 minutes. This resting time helps the flavors meld together. Before serving, sprinkle fresh chopped cilantro on top for a bright touch. Enjoy your delicious slow cooker pumpkin black bean enchiladas! To make these enchiladas truly shine, focus on the spices. Cumin and chili powder add warmth. I often taste the mixture before rolling it. Adjust salt and pepper as needed. For more depth, add a dash of smoked paprika. It brings a nice touch. You can also mix in some lime juice for brightness. This adds a fresh flavor that pairs well with pumpkin. Slow cooking times can vary by device. Always check your enchiladas after the minimum time. If they need more time, keep cooking. On low, aim for 4-6 hours. On high, 2-3 hours works well. The cheese should melt and bubble. The enchiladas should feel warm throughout. If you have a timer, use it to remind you to check. Good presentation makes a meal more fun. Serve the enchiladas on a colorful plate. Drizzle extra enchilada sauce over the top. This adds a pop of color. Top with avocado slices for creaminess. Fresh cilantro also adds a nice touch. A squeeze of lime right before serving can elevate the dish. It looks good and tastes even better! {{image_2}} For a more colorful dish, add veggies like bell peppers or zucchini. You can also toss in spinach or kale for a healthy twist. These greens add flavor and nutrients to the enchiladas. If you want to change the protein, you can use lentils or chickpeas. Both will give a hearty texture. For a twist, try adding shredded jackfruit for a unique flavor and a fun texture. While corn tortillas are classic, you can use flour tortillas for a softer bite. Gluten-free tortillas are also a great option for those with dietary needs. Choose what fits your taste best! After you enjoy your enchiladas, let them cool. Place leftovers in an airtight container. They last up to three days in the fridge. This way, you can savor them later! To freeze enchiladas, wrap them well. Use plastic wrap or foil. Place them in a freezer-safe bag. They stay good for up to three months. When ready to eat, thaw them in the fridge overnight. Reheat enchiladas in the oven for the best texture. Preheat to 350°F (175°C). Cover them with foil to keep moisture in. Heat for about 20 minutes. You can also use the microwave. Heat in 1-minute intervals until hot. Enjoy your tasty meal again! To add heat, use diced jalapeños in the pumpkin mixture. You can also mix in hot sauce or cayenne pepper. For a simple touch, sprinkle red pepper flakes on top before serving. Adjust the spice level based on your taste. Yes, you can use pinto beans or kidney beans instead of black beans. Each type will give a slightly different flavor and texture. Just remember to drain and rinse them well. Feel free to explore different beans to find your favorite. Great side dishes include Spanish rice or a fresh salad. You can also serve them with guacamole and tortilla chips. For a refreshing touch, try a corn and avocado salad. These options balance the flavors and make your meal complete. In this blog post, we explored making pumpkin enchiladas from start to finish. We covered key ingredients, step-by-step cooking instructions, and helpful tips. We also looked at tasty variations and storage info to keep your meal fresh. Remember, you can adjust flavors and ingredients to fit your taste. Whether you keep it classic or try something new, homemade enchiladas are fun to make and enjoy. Get creative, and happy cooking!

Savory Slow Cooker Pumpkin Black Bean Enchiladas

Are you ready to spice up your dinner routine? These Savory Slow Cooker Pumpkin Black Bean Enchiladas are not just

- 1 cup fresh raspberries - 2 tablespoons sugar - 1 tablespoon lemon juice Fresh raspberries bring a burst of flavor to this mousse. I love using ripe, juicy berries for the best taste. The sugar helps balance the tartness. A touch of lemon juice adds a bright kick, enhancing that raspberry flavor. - 1 cup cream cheese, softened - 1/2 cup powdered sugar - 1 teaspoon vanilla extract For the base, I use softened cream cheese. It gives the mousse a rich, creamy texture. Powdered sugar sweetens the mix smoothly. A hint of vanilla extract adds warmth and depth. - 1 cup heavy cream - Zest of 1 lemon - Optional: mint leaves for garnish Heavy cream is key for fluffiness. I whip it until stiff peaks form for the perfect airy texture. Lemon zest brightens the flavor, making it fresh. If you want, mint leaves make a lovely garnish, adding color and an herbal note. {{ingredient_image_1}} First, gather your ingredients. You will need fresh raspberries, sugar, and lemon juice. In a small bowl, combine 1 cup of fresh raspberries, 2 tablespoons of sugar, and 1 tablespoon of lemon juice. Use a fork to gently mash the raspberries. This helps release their juices. Let this mixture sit for about 10 minutes. This marinating time boosts the flavor and makes the raspberries sweet and tangy. Now, let’s make the creamy base. In a large mixing bowl, take 1 cup of softened cream cheese. Add 1/2 cup of powdered sugar and 1 teaspoon of vanilla extract. Beat these together until the mixture is smooth and creamy. Next, add the zest of 1 lemon. This will give your mousse a bright taste. Mix it until everything is well blended. Next, we need to whip the cream. In another bowl, pour in 1 cup of heavy cream. Use an electric mixer to whip it until stiff peaks form. This means the cream should hold its shape. Now, it’s time to fold. Carefully add the whipped cream into the cream cheese mixture. Use a spatula and fold gently to keep the air in the whipped cream. This makes your mousse light and airy. Now for the fun part! Gently fold in the marinated raspberries. Make sure to leave some chunks for texture. Once mixed, spoon the mousse into serving glasses or bowls. For the best results, chill the mousse in the refrigerator for at least 2 hours. This helps it firm up nicely. To get the best texture for your mousse, start with the right cream cheese. I prefer using full-fat cream cheese. It gives the mousse a rich and smooth base. Look for a brand that you love, as it greatly impacts the taste. Make sure your cream cheese is at room temperature. This step is key. Cold cream cheese does not blend well. It can create lumps in your mousse. Leave it out for about 30 minutes before you start mixing. You can boost the flavors of your mousse by adding more citrus or berries. Try adding a splash of orange juice or zest for a fresh twist. Blueberries also work great if you want to switch things up. They add a sweet and tangy layer to your dish. Before serving, drizzle honey on top. This extra touch adds sweetness and a lovely shine. It makes your mousse look even more tempting. How you serve your mousse can make a big difference. Use clear glasses or jars to show off those beautiful layers. You can also use small cups for a fun twist. This style is great for parties or brunch. Garnish your mousse for a gourmet touch. Place a few whole raspberries on top. Add a mint leaf for color. This simple trick makes your dish look fancy and inviting. Pro Tips Use Room Temperature Cream Cheese: Ensuring your cream cheese is at room temperature will help achieve a smooth consistency without lumps. Whip Cream to Stiff Peaks: Make sure to whip the heavy cream until stiff peaks form, as this will give your mousse a light and airy texture. Experiment with Citrus: Feel free to add more citrus zest or juice according to your taste preference, as it enhances the overall flavor profile. Chill for Best Results: Allowing the mousse to chill for at least 2 hours helps it to set properly and improves the flavors. {{image_2}} You can easily switch up the flavors of this mousse. Try using blueberries or strawberries instead of raspberries. Both fruits add a unique taste and color. You can blend these fruits into the cream cheese base just like the raspberries. Adding citrus zest can also enhance the flavor. Consider using lime or orange zest for a fresh twist. This will give your mousse a bright and zesty kick. If you need to make it gluten-free, you’re in luck! All the ingredients in this recipe are naturally gluten-free. Just double-check your sugar and vanilla extract for any hidden gluten. For a dairy-free option, replace cream cheese with a dairy-free cream cheese. Use coconut cream instead of heavy cream for a rich texture. You can also swap regular sugar for sugar substitutes. Options like stevia or monk fruit work well. This keeps the mousse sweet without the extra calories. You can easily scale this recipe to serve more people. Simply double or triple the ingredients. This makes it perfect for larger gatherings or parties. If you want mini versions, use small cups or jars. These are great for appetizers or brunch. Each guest can enjoy their own little treat! Raspberry Lemon Cheesecake Mousse lasts for about 3 days in the fridge. Store it in an airtight container to keep it fresh. This helps prevent the mousse from absorbing any strange smells. If you use glass or plastic containers, ensure they are clean and dry before adding the mousse. You can freeze Raspberry Lemon Cheesecake Mousse, but it may change the texture. To freeze, place the mousse in a freezer-safe container. Leave some space at the top for expansion. When you want to enjoy it, thaw the mousse overnight in the fridge. This keeps it creamy. Avoid thawing it in the microwave, as it can ruin the texture. Re-serve it chilled, and it will be just as delightful! Yes, you can make this mousse ahead of time. It tastes even better after chilling. I recommend chilling it for at least 2 hours. This allows the flavors to mix well. You can store it in the fridge for up to 2 days before serving. Just be sure to cover it well to keep it fresh. If you can't find fresh raspberries, frozen ones work well too. Just let them thaw before adding them to the recipe. You can also use raspberry puree. This gives a smooth texture and strong flavor. Other fruits like strawberries or blueberries can be fun alternatives too. To lighten the mousse, try using less heavy cream. You can replace some of the cream with yogurt or mascarpone. This keeps the creaminess while cutting down on fat. Another option is to fold in more whipped egg whites. This adds air and makes the mousse fluffy. This mousse combines fresh raspberries with a creamy cheese base, creating a delightful treat. Following the simple steps ensures perfect results every time. You can adjust flavors and portion sizes to fit your needs. Remember, proper storage keeps it fresh longer. So, whip up this easy and tasty dessert for any occasion. Enjoy sharing it with friends and family!

Raspberry Lemon Cheesecake Mousse Delightful Treat

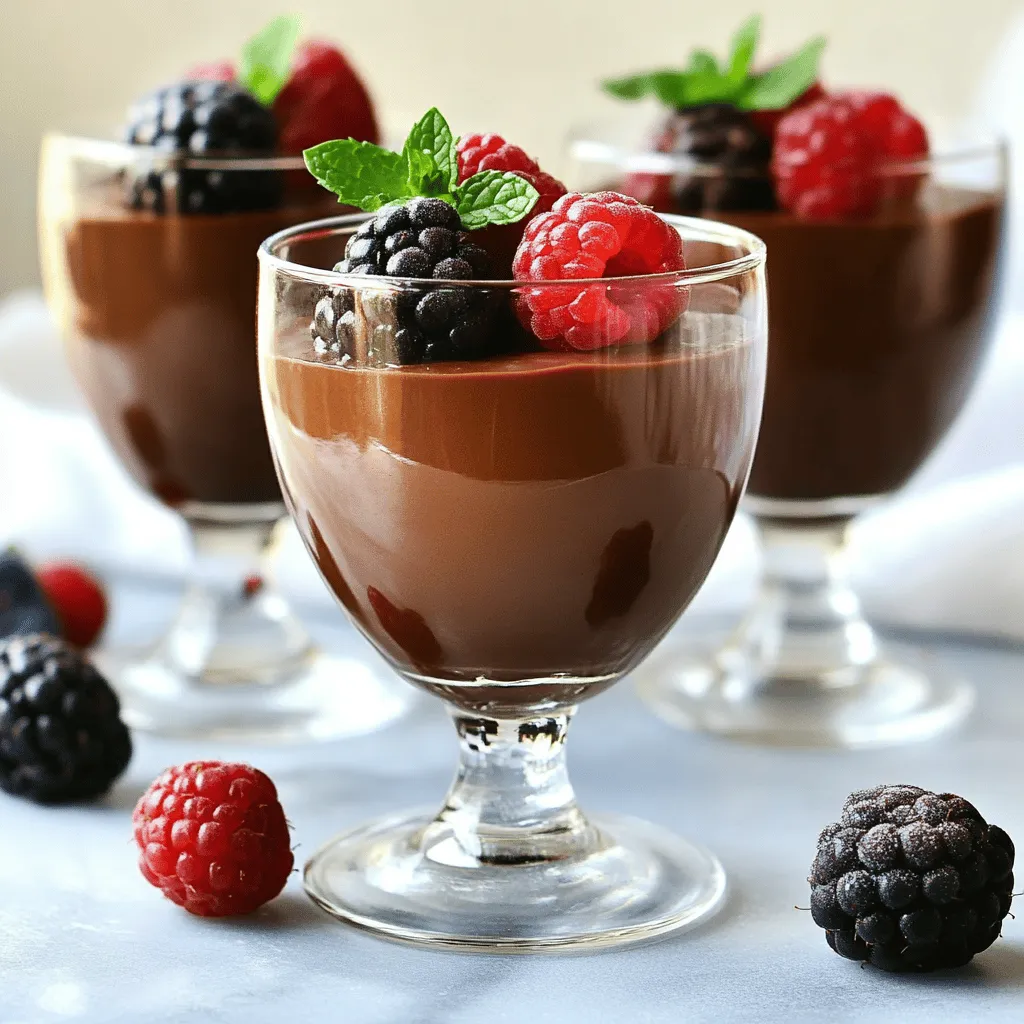
Get ready to indulge in a sweet, tangy treat with my Raspberry Lemon Cheesecake Mousse! This light and creamy dessert

To make the Cherry Almond Coffee Cake, gather these ingredients: - 1 cup all-purpose flour - 1 cup almond flour - 1 cup granulated sugar - 1/2 cup unsalted butter, softened - 2 large eggs - 1/2 cup sour cream - 1 teaspoon vanilla extract - 1 teaspoon almond extract - 1 teaspoon baking powder - 1/2 teaspoon baking soda - 1/4 teaspoon salt - 1 cup fresh cherries, pitted and halved - 1/2 cup sliced almonds - Powdered sugar, for dusting If you want to switch things up, here are some ideas: - Use coconut flour instead of almond flour for a different flavor. - Greek yogurt can replace sour cream for a healthy twist. - Swap fresh cherries for frozen ones if out of season. Just thaw them first. - Try honey or maple syrup instead of granulated sugar for a natural sweetener. Understanding measurements can help you adjust recipes. Here are some common conversions: - 1 cup = 8 fluid ounces - 1/2 cup = 4 fluid ounces - 1 teaspoon = 5 milliliters - 1 tablespoon = 15 milliliters These conversions can help you scale the recipe up or down as needed. Start by preheating your oven to 350°F (175°C). Grease and flour a 9-inch round cake pan or line it with parchment paper. In a large bowl, cream together the softened butter and granulated sugar until the mixture is light and fluffy. This step is key for making a soft cake. Next, beat in the eggs one at a time. Make sure each egg is mixed in fully before you add the next one. Then, add the sour cream, vanilla extract, and almond extract. Mix everything until it is well combined. In a separate bowl, whisk together the all-purpose flour, almond flour, baking powder, baking soda, and salt. Slowly add this dry mixture to the wet mixture. Stir gently until just combined. Be careful not to overmix, as this can make the cake tough. Finally, gently fold in the fresh cherry halves. This ensures the cherries are spread evenly throughout the batter. Pour the batter into your prepared cake pan and smooth the top with a spatula. Sprinkle sliced almonds on top for an added crunch. Now it’s time to bake! Place the cake pan in the preheated oven. Bake for 35-40 minutes. Check if it’s done by inserting a toothpick into the center. If it comes out clean, your cake is ready. If not, give it a few more minutes. After baking, remove the cake from the oven. Let it cool in the pan for 10 minutes. Then, transfer it to a wire rack to cool completely. This cooling step is important for the best texture. Once the cake is cool, dust the top with powdered sugar for a nice touch. Slice and serve your Cherry Almond Coffee Cake to family and friends. Enjoy this delightful treat with coffee or tea! To keep your cake moist, use sour cream. It adds richness and prevents dryness. Mixing the butter and sugar well also helps trap air. This makes the cake light. Do not overmix your batter. Gently fold in the cherries. This method keeps the cake fluffy. Ovens can vary in heat. Start checking your cake at 35 minutes. Insert a toothpick in the center. If it comes out clean, your cake is ready. If it still has batter, give it a few more minutes. Check again to avoid overbaking. Dust your cake with powdered sugar for a lovely finish. You can use a fine sieve for even coverage. Add extra sliced almonds on top for a nice crunch. Serve with fresh cherries on the side for color. A pretty plate can make your cake stand out even more. {{image_2}} You can make this cake gluten-free. Use a 1:1 gluten-free flour blend instead of all-purpose flour. This swap works well with almond flour. The texture may change slightly, but the taste stays great. Just follow the same steps in the recipe. Cherry almond coffee cake is versatile. You can use other fruits for fun flavors. Try blueberries, raspberries, or peaches. Each fruit gives a new twist. Dice the fruit and fold it into the batter just like with cherries. Adjust the sugar based on the fruit’s sweetness. Add extra flavor to this cake easily. Consider adding lemon zest for a fresh taste. A pinch of cinnamon or nutmeg also works well. You can mix in a splash of orange juice with the wet ingredients. These small changes make a big difference. Each bite will surprise your taste buds! To keep your Cherry Almond Coffee Cake fresh, store it in an airtight container. Place it at room temperature for up to three days. If you want it to last longer, the fridge is a good option. Just be aware that the cake may dry out a bit in the fridge. Wrap it well in plastic wrap to keep moisture in. When you want to enjoy your cake again, reheating is simple. Preheat your oven to 350°F (175°C). Place a slice of cake on a baking sheet. Cover it with foil to keep it moist. Heat for about 10 minutes. You can also use a microwave. Heat a slice for 15 to 20 seconds. This method works well but might make the cake a bit soft. Freezing your Cherry Almond Coffee Cake is easy. First, let it cool completely. Slice the cake into portions for easy thawing. Wrap each slice in plastic wrap, then place them in a freezer bag. Be sure to squeeze out the air before sealing. You can freeze the cake for up to three months. When ready to eat, thaw it in the fridge overnight. Enjoy your delightful treat any time! Yes, you can make this cherry almond coffee cake ahead of time. I suggest baking it a day before you plan to serve it. This cake tastes even better after sitting for a bit. Just store it in an airtight container at room temperature. This keeps the cake moist and fresh. If you don’t have sour cream, use plain yogurt. Greek yogurt works too. Both options give a nice creaminess and tang. You can also mix cream cheese with a little milk for a similar texture. These substitutes maintain the cake's rich flavor. This cherry almond coffee cake lasts about three days at room temperature. If you need it to last longer, store it in the fridge. It can last up to a week when chilled. Make sure it’s in an airtight container to keep it fresh. You learned about the key ingredients needed for your cake and their alternatives. We talked about how to prep the batter, bake, cool, and serve the cake. Tips on keeping it moist and enhancing its look were shared too. You also saw how to adapt the recipe for gluten-free options and different flavors. Lastly, we covered how to store and reheat your cake properly. Enjoy your baking journey and share your delicious creations with others!

Cherry Almond Coffee Cake Bakery Delightfully Simple

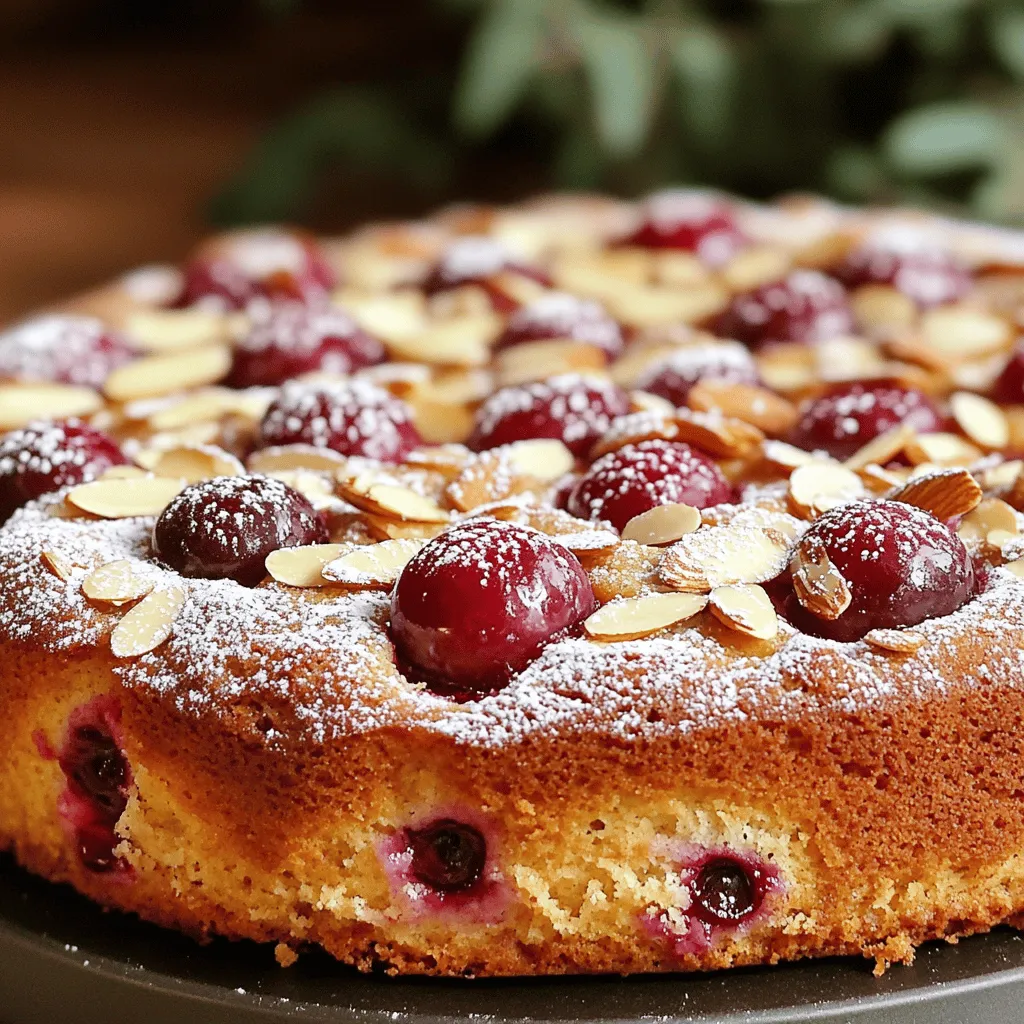
Welcome to the world of Cherry Almond Coffee Cake! This delightful recipe combines sweet cherries and nutty almond flavors, creating

- 2 pounds boneless, skinless chicken thighs - 1 tablespoon olive oil - 1 medium onion, chopped - 3 cloves garlic, minced - 1 can (14.5 oz) diced tomatoes with green chilies - 2 tablespoons chipotle peppers in adobo sauce, chopped - 1 tablespoon smoked paprika - 1 tablespoon ground cumin - 1 teaspoon chili powder - 1 teaspoon oregano - Salt and pepper to taste - Fresh cilantro, for garnish - Corn or flour tortillas - Avocado slices and lime wedges, for serving In this recipe, the chicken thighs are the star. They stay juicy and soak up all the flavors. Olive oil helps to sauté the onion and garlic, which adds a sweet base. The diced tomatoes bring in a nice tang, while chipotle peppers give it that smoky kick. Smoked paprika and ground cumin add depth to the dish. Don’t forget to adjust the salt and pepper to your taste. For the toppings, fresh cilantro brightens up your tacos. You can choose between corn or flour tortillas, depending on what you like. Avocado slices and lime wedges add a creamy and zesty finish. 1. Start by heating one tablespoon of olive oil in your slow cooker. If your slow cooker has a sauté function, use that. 2. Add one medium onion, chopped, and three cloves of minced garlic. Stir until the onion turns translucent. 3. Next, layer in two pounds of boneless, skinless chicken thighs. 4. Pour in one can of diced tomatoes with green chilies. 5. Add two tablespoons of chopped chipotle peppers in adobo sauce. 6. Sprinkle in one tablespoon of smoked paprika, one tablespoon of ground cumin, and one teaspoon of chili powder. 7. Finally, add one teaspoon of oregano, and season with salt and pepper to taste. Stir all the ingredients well. 1. Cover the slow cooker with its lid. 2. Cook on low for 6-8 hours or on high for 4-5 hours. The chicken should be tender and easy to shred. 3. Once the cooking time is up, use two forks to shred the chicken right in the slow cooker. Mix it with the juices for flavor. 1. Warm your corn or flour tortillas in a skillet or microwave until they are soft and pliable. 2. Take a tortilla and fill it with the shredded chipotle chicken. 3. Top with fresh cilantro, avocado slices, and a squeeze of lime for a burst of flavor. 4. Serve your tacos warm, and enjoy every bite! To achieve juicy chicken, use boneless, skinless chicken thighs. These thighs stay moist during cooking. Cook them on low for 6-8 hours. If you’re in a hurry, high heat works too. Set it for 4-5 hours. Always check the chicken for tenderness. There are many ways to serve these tacos. Try topping them with fresh avocado slices and a squeeze of lime. Add some chopped cilantro for a burst of flavor. You can serve them with a side of rice or beans. A simple salad pairs well too. Store leftovers in an airtight container in the fridge. They last for about three days. For best results, shred the chicken before storing. When you’re ready to eat, reheat in the microwave or on the stove. Add a splash of water to keep it moist. Enjoy! {{image_2}} You can swap chicken thighs for other meats. Try chicken breasts for a leaner option. Pork can also work well. If you want to go plant-based, use jackfruit. It shreds nicely and takes on flavors well. Tofu is another great choice. Just make sure to press it first to remove extra water. To add more heat, include jalapeños or cayenne pepper. Smoked paprika brings a nice depth, but you could try chipotle powder for more kick. Experiment with toppings too! Add pickled onions for tang, or crumbled queso fresco for creaminess. Fresh radishes add a crunchy bite. Each twist can change the taco game! You can choose between soft or crunchy tacos. Soft tortillas are warm and easy to fold. Crunchy tacos give a fun texture and a satisfying crunch. Want something different? Try a burrito! Just wrap your filling in a large tortilla. Salad lovers can use the chicken as a topping for a fresh salad. Mix in greens and your favorite veggies for a hearty meal. To freeze cooked chicken, let it cool first. Place the chicken in airtight bags or containers. Remove as much air as possible. Label each bag with the date. You can keep it in the freezer for up to three months. You can store leftover tacos in the fridge for up to three days. To keep them fresh, wrap them tightly in plastic wrap or foil. Use a sealed container for added protection. To reheat chicken, place it in a pan over medium heat. Stir often until heated through. You can also microwave it on low power. For tortillas, warm them in a skillet for a minute on each side. This helps restore moisture and keeps them soft. You can use chicken breasts instead of thighs. They work well, but they may dry out more. If you want a different protein, try pork or beef. Tofu is a great choice for a vegetarian option. It absorbs flavors nicely. Yes, you can. Use a stovetop pot or pressure cooker instead. For the stovetop, cook on medium heat for about 30-40 minutes. Stir often to prevent sticking. If using a pressure cooker, set it to high for about 15 minutes. Always check that the chicken is cooked through. To add heat, increase the chipotle peppers in adobo sauce. You can also add cayenne pepper or hot sauce. If you like fresh heat, toss in some sliced jalapeños. Adjust to your taste for the perfect kick! This blog post covered how to make chipotle chicken tacos using simple ingredients and easy steps. We discussed the main components, from cooking the chicken to assembling the tacos. I also shared tips for perfecting your dish and variations to explore. In conclusion, making these tacos can be quick and fun. Enjoy your cooking journey and impress everyone with your tasty tacos!

Chipotle Chicken Tacos Slow Cooker Simple Recipe

Welcome to a flavor adventure! My Chipotle Chicken Tacos Slow Cooker Simple Recipe makes dinner easy and delicious. With tender

- 1 cup graham cracker crumbs - 1/4 cup melted butter - 8 oz cream cheese, softened - 1/2 cup powdered sugar - 1 teaspoon vanilla extract - Zest of 1 lemon - 1/4 cup fresh lemon juice - 1 cup heavy whipping cream - 1 cup fresh blueberries - 2 tablespoons honey (optional, adjust to taste) These ingredients make the base for my Lemon Blueberry Cheesecake Cups. Each item has a role that makes this treat special. Graham cracker crumbs form a crunchy crust. The melted butter binds them together. Both create a strong base for the creamy filling. Next, we need cream cheese. It gives the cheesecake its rich flavor. Make sure to soften it first. This way, it mixes well and becomes smooth. Powdered sugar adds sweetness. It blends better than granulated sugar. The vanilla extract gives a warm flavor that pairs nicely with lemon. Lemon zest and fresh lemon juice brighten the filling. They bring a burst of citrus flavor that makes every bite refreshing. Heavy whipping cream adds lightness. Whipping it until stiff peaks form gives the cheesecake a fluffy texture. It makes the dessert feel light and airy. Fresh blueberries are the star topping. They add color and freshness. Honey is optional but can enhance sweetness. Adjust it to your taste. Gather these ingredients, and you're ready to create a delightful dessert. Each one plays a vital part in making these cheesecake cups a hit! To start, grab a mixing bowl. Add 1 cup of graham cracker crumbs and 1/4 cup of melted butter. Mix them well until the crumbs look wet. This step makes your crust tasty and firm. Next, divide this mixture into your serving cups. Press it down firmly with your fingers. Make sure the crust is even at the bottom. Now, let’s make the filling. Take 8 oz of softened cream cheese and put it in a large bowl. Beat it with an electric mixer until it’s smooth. Then, add in 1/2 cup of powdered sugar, 1 teaspoon of vanilla extract, the zest of 1 lemon, and 1/4 cup of fresh lemon juice. Mix until it’s creamy and well combined. In a separate bowl, pour 1 cup of heavy whipping cream. Whip it until you see stiff peaks form. This is key for a light texture. Gently fold the whipped cream into the lemon cream cheese mixture. Be careful not to mix too hard; you want to keep that airy feel. Now it's time to build the cups. Spoon the lemon cheesecake mixture on top of your crusts in each cup. Spread it evenly. Then, top each cup with fresh blueberries. If you like, drizzle some honey on top for added sweetness. Finally, don’t skip this step. Refrigerate your cheesecake cups for at least 2 hours. This helps them set well. The cold makes each bite refreshing and delicious. To get the right texture for your cheesecake cups, start with softened cream cheese. This step is key. Soft cream cheese mixes better and gives a smooth filling. If it's cold, it won't blend well. Leave it out for about 30 minutes before you start. Whipping the cream is also important. You need stiff peaks for the best results. This means the cream holds its shape well. Use a chilled bowl and beaters to help. Once you reach stiff peaks, fold it gently into the cream cheese mix. This keeps your filling light and airy. Serving these cheesecake cups chilled makes a big difference. The flavors come alive when cold. After making them, chill them for at least 2 hours. This helps the filling set and taste fresh. For a beautiful touch, garnish each cup with blueberries and a sprinkle of lemon zest. This adds color and makes each cup look inviting. Place an extra blueberry on top for a fun pop of color. It makes the dessert even more special. You can adjust the sweetness with honey. If you like it sweeter, add more honey to taste. Mix it in after you combine the cream cheese and other ingredients. This way, you control the sweetness level. Adding lemon zest can boost the lemon flavor. You may also try other fruits like strawberries or raspberries for a twist. This gives you a chance to customize each cup to your liking. {{image_2}} You can switch up the fruit toppings for fun. Strawberries or raspberries work great. They add a sweet and tart flavor that pairs well with the creamy cheesecake. You can also mix and match seasonal fruits. Try peaches in summer or apples in fall for a new taste. To change the flavor, think about adding a drizzle of chocolate or caramel. This will give your cheesecake cups a rich touch. You can also add mint leaves for a fresh twist. Just chop a few leaves and mix them into the filling. Mint brings a nice balance to the lemon. If you need gluten-free options, use gluten-free graham cracker crumbs for the crust. You can find these at most grocery stores. For a vegan version, swap the cream cheese and heavy cream with coconut cream. This keeps the cups creamy while being plant-based. To store leftovers, keep the cheesecake cups in an airtight container. This helps keep them fresh. You can also cover them with plastic wrap. They will stay good in the fridge for about three days. This ensures you enjoy them at their best. Can cheesecake cups be frozen? Yes, you can freeze them, but the texture may change. To freeze, place the cups in a freezer-safe container. Make sure they are sealed well to prevent ice crystals. Best practices for thawing include moving the cups to the fridge overnight. This helps them defrost slowly. Avoid using the microwave, as it can make the texture grainy. Enjoy your cheesecake cups after thawing for a delicious treat! Yes, you can use different types of cream cheese. Neufchâtel cheese is a great option. It's lower in fat but has a similar taste. You can also try vegan cream cheese for a dairy-free version. Just keep in mind that the texture may change slightly. These cheesecake cups last about 3 to 5 days in the fridge. Store them in airtight containers to keep them fresh. After a few days, the flavors may fade, but they should still taste good. Fresh blueberries are best for flavor and texture. They add a nice burst of juice. If you use frozen blueberries, they might release extra water. This can make the cheesecake cups a bit watery. If using frozen berries, let them thaw and drain them first. You can substitute heavy cream with half-and-half or coconut cream. Both will change the texture a bit. Coconut cream gives a nice flavor but is richer. Half-and-half will make it less creamy but still tasty. In this blog post, we explored how to create delicious cheesecake cups. You learned about key ingredients like cream cheese and fresh lemons. We covered step-by-step instructions for making the crust and filling. I shared helpful tips to achieve the best texture and flavor. You can also try different topping ideas or dietary modifications. Finally, I discussed storage options to keep your treats fresh. Enjoy making these cheesecake cups your way!

Lemon Blueberry Cheesecake Cups No Bake Delight

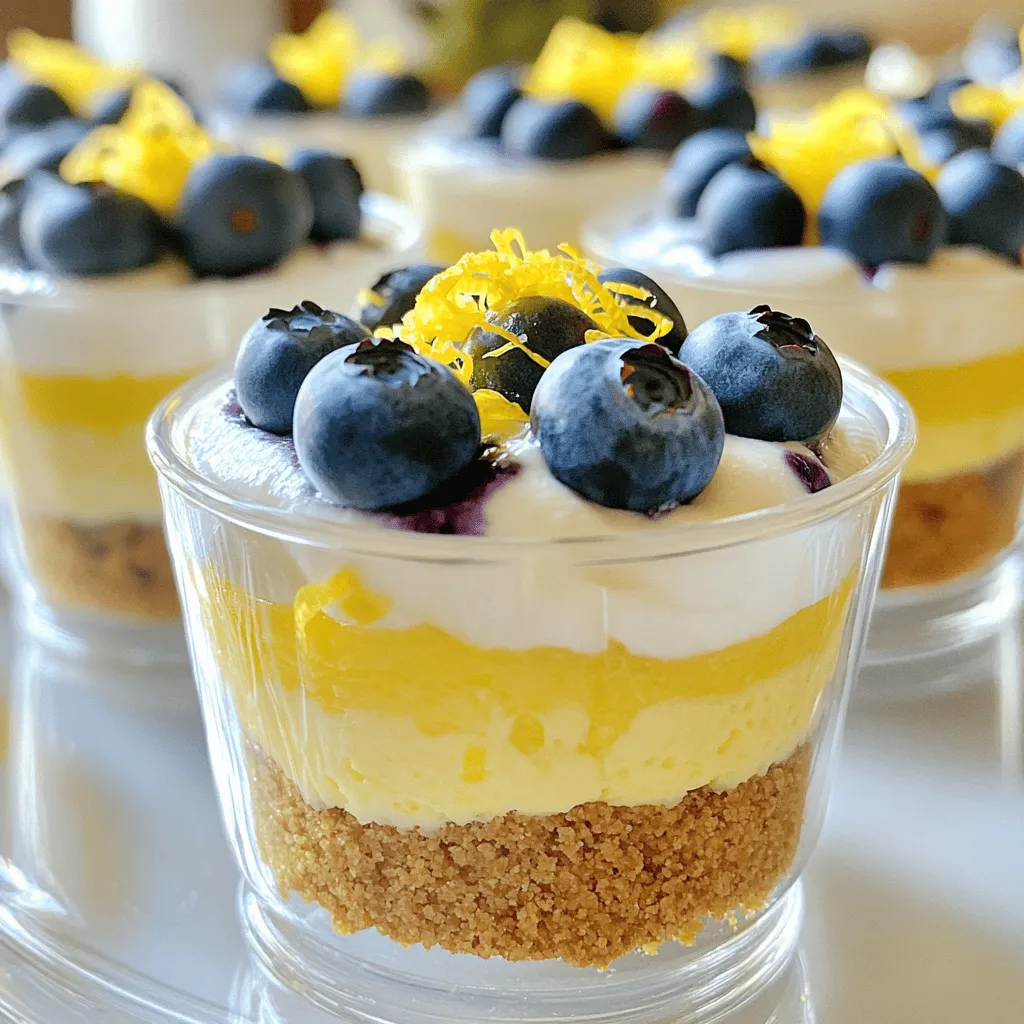
Looking for a sweet treat that’s quick and easy? These Lemon Blueberry Cheesecake Cups require no baking! Just creamy, tangy

- 4 salmon fillets - 2 cups broccoli florets - 1 bell pepper, sliced - 1 cup snap peas The main ingredients are simple yet flavorful. Salmon fillets shine as the star, rich in omega-3s. Broccoli florets add crunch and color. Bell pepper offers sweetness, while snap peas bring a fresh snap to every bite. - 1/4 cup soy sauce (or tamari for gluten-free) - 2 tablespoons honey (or maple syrup) - 1 tablespoon sesame oil - 2 cloves garlic, minced - 1 teaspoon ginger, grated The sauce is what makes this dish pop. Soy sauce gives a savory base. Honey or maple syrup adds sweetness. Sesame oil brings a nutty flavor, while garlic and ginger add depth. Together, they create a perfect teriyaki glaze. - 1 tablespoon sesame seeds - Salt and pepper to taste - Optional: green onions, chopped, for garnish Garnishes elevate the dish. Sesame seeds add a nice crunch. A sprinkle of salt and pepper enhances flavor. Chopped green onions are optional but add freshness. They make your dinner not just tasty but also pretty. - Preheat your oven to 400°F (200°C). This step is key. A hot oven cooks the salmon well. - In a small bowl, mix the soy sauce, honey, sesame oil, garlic, and ginger. Whisk until smooth. This teriyaki sauce is what makes the dish shine. - Grab a large sheet pan. Arrange the broccoli, bell pepper, and snap peas on it. This mix adds color and crunch. - Drizzle half of the teriyaki sauce over the veggies. Add salt and pepper to taste. Toss the vegetables to coat them well. You want every bite to burst with flavor. - Push the veggies to the edges of the pan. This makes space for the salmon. Place the salmon fillets in the center, skin-side down. - Brush the remaining teriyaki sauce over the salmon. This helps keep the fish moist while baking. - Bake everything for 15-20 minutes. Check for doneness by using a fork. The salmon should flake easily and look opaque. The veggies should stay bright and tender. - Once done, take the pan out of the oven. Sprinkle sesame seeds on top for a nice finish. If you like, add chopped green onions for extra flavor. Serve hot, and enjoy your meal! To ensure your salmon is cooked perfectly, follow these simple steps: - Use a thermometer: Check the internal temperature. It should be 145°F (63°C). - Avoid overcooking: Salmon cooks fast. Keep an eye on it after 15 minutes. - Flake with a fork: When done, it should flake easily. This means it's ready. To keep your vegetables crisp, try these tips: - Don’t overcrowd the pan: Leave space between the veggies. This helps them roast evenly. - Use fresh produce: Fresh broccoli, snap peas, and bell peppers taste better and stay crunchy. - Toss lightly: Coat the veggies gently with sauce. Too much sauce can make them soggy. To add more flavors to the teriyaki sauce, consider these ideas: - Add sesame seeds: Toasted sesame seeds can give a nice crunch. - Include chili flakes: If you like spice, a pinch of chili flakes adds heat. - Try citrus zest: Grate some lime or orange zest for a fresh twist. Adjusting sweetness and spice levels can make the dish perfect for you: - Sweetness: Add more honey or maple syrup if you prefer a sweeter taste. - Spice: For a kick, mix in some sriracha or hot sauce. Start small, then taste. Pair your teriyaki salmon with these options: - Rice: Serve over white or brown rice. It absorbs the sauce well. - Noodles: Lo mein or soba noodles are also great choices. They add texture. For side dish suggestions, try these: - Cucumber salad: It’s refreshing and light next to the rich salmon. - Miso soup: A warm bowl of miso soup can round out your meal nicely. - Edamame: Steamed edamame adds protein and is fun to eat. {{image_2}} You can change up the veggies in this dish. Try carrots, green beans, or zucchini. Each offers a unique taste and texture. If you want to swap the salmon, chicken or tofu work well too. Chicken has a mild flavor that absorbs the sauce well. Tofu is a great plant-based option that soaks up the teriyaki sauce nicely. Want to spice things up? Add some red pepper flakes or sriracha to the teriyaki sauce for a spicy kick. You can also mix in citrus flavors. A squeeze of fresh orange or lime juice adds a bright twist. This gives the dish a sweet and tangy taste that pairs perfectly with the salmon. If you need gluten-free options, use tamari instead of soy sauce. This keeps all the flavor without gluten. For a vegan twist, replace the salmon with tofu and swap honey for maple syrup. These changes keep the dish tasty while meeting dietary needs. Enjoy your meal without worries! To store leftovers, let your teriyaki salmon and broccoli cool first. Place the food in an airtight container. This keeps it fresh longer. You can refrigerate it for up to three days. If you want to store it longer, freeze it. Divide the meal into portions before freezing. This way, you can take out only what you need later. When it's time to enjoy your leftovers, there are a few ways to reheat them. The best method is using the oven. Preheat it to 350°F (175°C). Place the salmon and veggies in a baking dish. Cover it with foil to keep it moist. Heat for about 15 minutes. You can also use the microwave. If you do, use a microwave-safe dish and cover it. Heat in short bursts and check often. This helps keep the flavors intact. In the fridge, this dish lasts around three days. If you freeze it, aim to eat it within three months for the best taste. Signs of spoilage include a sour smell or a slimy texture. If you notice either, it's best to toss the dish. Keeping an eye on your leftovers ensures you enjoy them safely. It takes about 15 to 20 minutes to cook salmon on a sheet pan. The salmon is done when it flakes easily with a fork. For best results, check it at the 15-minute mark. This way, you can stop cooking right when it’s perfect. Yes, you can use frozen salmon for this recipe. Just make sure to thaw it first. Thawing helps the salmon cook evenly. I recommend placing it in the fridge overnight or using cold water for a quicker thaw. To keep salmon moist, don’t overcook it. Use a timer and check for doneness. Also, brush the salmon with teriyaki sauce before cooking. This adds flavor and moisture. If you want, cover the salmon with foil in the first half of cooking. Yes, you can make teriyaki sauce in advance. Store it in a sealed container in the fridge. It stays fresh for about a week. This saves time when you are ready to cook. Just give it a good stir before using it again. This article covered how to make a tasty salmon dish with fresh veggies. We explored key ingredients like salmon, broccoli, and bell peppers, plus a flavorful teriyaki sauce. I shared tips for cooking the salmon just right and keeping veggies crisp. You can easily mix and match ingredients for different tastes or diets. In closing, this recipe not only makes dinner fun but is also healthy and simple. Enjoy your meal prep and the delicious results!

Teriyaki Salmon & Broccoli Sheet Pan Delicious Dinner

Looking for an easy and tasty dinner idea? Try my Teriyaki Salmon & Broccoli Sheet Pan recipe. This dish is

- 1 cup all-purpose flour - 1 tsp baking powder - 1/2 tsp salt - 1/4 tsp black pepper - 1/2 cup shredded sharp cheddar cheese - 2-3 fresh jalapeños, finely chopped (seeds removed for less heat) - 1/2 cup cream cheese, softened - 1/4 cup milk - 1 egg, beaten - Cooking spray The main ingredients in jalapeño cheddar bites create a perfect mix of flavor and texture. The all-purpose flour gives structure, while the baking powder helps the bites puff up. Salt and black pepper add a bit of seasoning. The sharp cheddar cheese provides a rich, cheesy taste that pairs well with jalapeños. - Chopped green onions - Crumbled bacon bits - Garlic powder If you want more flavor, consider adding chopped green onions or crumbled bacon bits. Garlic powder can also enhance the taste, giving it a nice kick. These options bring new layers and make each bite even tastier. - Whole wheat flour for all-purpose flour - Pepper jack cheese instead of cheddar cheese - Greek yogurt for cream cheese You can swap whole wheat flour for all-purpose flour for a healthier option. Try pepper jack cheese if you want extra spiciness. Greek yogurt can replace cream cheese and still keep the bites creamy. These swaps let you enjoy the recipe while catering to your tastes. Start by getting a large mixing bowl. Add 1 cup of all-purpose flour, 1 teaspoon of baking powder, 1/2 teaspoon of salt, and 1/4 teaspoon of black pepper. Mix these dry ingredients well. This blend gives the bites a nice flavor. Next, fold in 1/2 cup of shredded sharp cheddar cheese and 2-3 finely chopped jalapeños. If you want less heat, remove the seeds from the jalapeños. In another bowl, take 1/2 cup of softened cream cheese. Mix it with 1/4 cup of milk and 1 beaten egg. Stir until the mixture is smooth. Now, add this wet mix to your dry ingredients. Stir gently until a dough forms. Be careful not to overmix. It's time to preheat your air fryer. Set it to 350°F (175°C). Preheating helps the bites cook evenly. While it heats, you can prepare the dough mounds. Once the air fryer is ready, use a spoon or cookie scoop to drop small mounds of dough. Place them on parchment paper or directly in the air fryer basket. Leave some space between each mound. Lightly spray the tops with cooking spray. This helps them get crispy. Air fry the jalapeño cheddar bites for about 8-10 minutes. They should turn golden brown and puffed up. Let them cool slightly before serving. Enjoy these tasty bites! To get the right texture for jalapeño cheddar bites, follow these steps: - Use fresh ingredients. Fresh jalapeños and cheese make a big difference. - Mix gently. Overmixing can make the bites tough. Just combine until smooth. - Don’t skip the cream cheese. It adds creaminess and helps bind the dough. Here are some pitfalls to watch out for: - Using too much flour. This can make the bites dry. Measure carefully. - Forgetting to spray the bites. A light spray helps them crisp up. - Not spacing them out. Give each bite room to puff up. This keeps them from sticking. These bites shine with fun dips and sides: - Serve with ranch dressing for a cool contrast. - Pair with salsa for a spicy kick. - Add a side of pickled veggies for crunch and flavor. Enjoy them as a snack, appetizer, or party treat! {{image_2}} You can spice up your jalapeño cheddar bites easily. Add diced habaneros for more heat. You can also mix in some chopped green onions for a fresh taste. If you like smoky flavors, try adding smoked paprika. This twist will give your bites a unique flavor. To make these bites vegetarian, you can skip the jalapeños. Instead, use bell peppers for a mild flavor. You can also add corn or black beans for extra texture. Just be sure to chop everything finely. This way, the bites stay together and cook well. Experiment with different types of cheese for a new flavor. Pepper jack cheese gives a nice kick. If you prefer something milder, use mozzarella or Monterey Jack. You can even blend different cheeses for a rich taste. Just make sure they melt well in the air fryer. To keep your jalapeño cheddar bites fresh, let them cool first. Place them in an airtight container. Store them in the fridge for up to three days. You can also wrap them in plastic wrap before placing them in the container to keep them extra fresh. When you want to enjoy leftovers, the air fryer is your best friend. Preheat it to 350°F (175°C). Place the bites in the air fryer basket. Heat for about 3-5 minutes until warm. This helps to restore the crispiness. You can also use a microwave, but they won't be as crispy. Heat them in short bursts of 30 seconds, checking often. You can freeze jalapeño cheddar bites for up to three months. Arrange them on a baking sheet in a single layer. Freeze until solid, then transfer them to a freezer bag. To thaw, just leave them in the fridge overnight. For a quick thaw, use the microwave. Then, reheat in the air fryer for a perfect snack! Yes, you can make these bites ahead of time. Prepare the dough and form the bites. Then, place them on a baking sheet and cover with plastic wrap. Refrigerate for up to 24 hours. When ready, air fry them straight from the fridge. This saves time when you want a quick snack. I love serving jalapeño cheddar bites with a few tasty sauces. Here are some great options: - Sour cream: This cools down the heat. - Ranch dressing: A classic pairing that adds creaminess. - Salsa: For a fresh, tangy kick. - Cheese sauce: Because more cheese is always better! No, this recipe uses all-purpose flour, which contains gluten. If you need a gluten-free option, use a gluten-free flour blend. Make sure to check that all other ingredients are also gluten-free. This way, you can enjoy these bites safely! In this blog post, we covered how to make delicious jalapeño cheddar bites. I shared the key ingredients, cooking steps, and helpful tips to achieve the best flavor and texture. We also explored tasty variations and how to store your bites. Jalapeño cheddar bites can be a fun treat for any gathering. The recipe is simple but delivers great taste. Remember to try different spices or cheese for added flair. Enjoy making and sharing your bites!

Jalapeño Cheddar Bites Air Fryer Easy Snack Recipe

Looking for a tasty snack that’s easy to make? You’re in the right place! My Jalapeño Cheddar Bites are perfect

- 1 cup low-fat cottage cheese - 1/2 cup unsweetened cocoa powder - 1/4 cup honey or maple syrup - 2 tablespoons almond milk (or any milk of choice) - 1 teaspoon vanilla extract - 1/4 teaspoon salt - A pinch of cinnamon (optional) - Fresh berries and mint leaves for garnish (optional) 1. Low-fat cottage cheese: This is high in protein and helps build muscle. It also contains calcium for strong bones. 2. Unsweetened cocoa powder: Rich in antioxidants, cocoa helps improve heart health and boosts mood. 3. Honey or maple syrup: These natural sweeteners provide quick energy. They are better options than refined sugar. 4. Almond milk: A low-calorie milk that is dairy-free. It’s great for those who want fewer calories or are lactose intolerant. 5. Vanilla extract: This adds flavor without extra calories. It can also enhance the sweetness of the mousse. 6. Salt: A small amount boosts flavor and helps balance the sweetness. 7. Cinnamon: This spice adds warmth and may help with blood sugar control. 8. Fresh berries and mint leaves: These are not just pretty; they add vitamins and a fresh taste. - Cottage cheese: You can use Greek yogurt for a thicker texture. - Cocoa powder: Carob powder is a good swap if you want a different flavor. - Honey or maple syrup: Agave nectar works well for a vegan option. - Almond milk: Any milk, like oat or soy, can replace almond milk. - Cinnamon: Nutmeg or cardamom can add a new twist if you prefer. - Fresh berries: Use any fruit you like, such as sliced bananas or peaches. To start, gather all your ingredients. You will need one cup of low-fat cottage cheese, half a cup of unsweetened cocoa powder, a quarter cup of honey or maple syrup, two tablespoons of almond milk, one teaspoon of vanilla extract, a quarter teaspoon of salt, and a pinch of cinnamon if you like. 1. Place the cottage cheese in a blender or food processor. 2. Blend until it is smooth and creamy. This step helps get rid of any lumps. 3. Next, add the cocoa powder, honey or maple syrup, almond milk, vanilla extract, salt, and cinnamon. 4. Blend again until fully combined. The mixture should be smooth and chocolatey. 5. Taste it and add more sweetener if you want. For the best texture, blend your ingredients well. If you see lumps, keep blending. If your blender struggles, add a little more almond milk. This will help everything mix better. Use a spatula to scrape down the sides of the blender. This ensures all the ingredients combine evenly. Aim for a thick, creamy texture. After blending, transfer the mousse into individual cups or bowls. Chill them in the refrigerator for at least 30 minutes. This step is key! Chilling helps the mousse set up and become creamier. It also allows the flavors to meld together. Before serving, top with fresh berries and a mint sprig. This adds a nice touch and fresh flavor. To make your mousse even more exciting, try adding a pinch of cinnamon. It gives a warm touch to the chocolate flavor. You can also mix in some espresso for a coffee kick. This adds depth and a nice twist. If you like nuts, consider adding chopped walnuts or almonds. They provide crunch and a fun texture. Presentation matters! Serve your mousse in clear cups. This way, everyone can see the rich chocolate color. Layer the mousse with fresh berries for a splash of color. Use raspberries or strawberries for a sweet contrast. A sprig of mint on top adds freshness and looks great. One common mistake is not blending enough. Make sure your cottage cheese is smooth. If it’s lumpy, your mousse will not be creamy. Another mistake is skipping the chill time. Allowing the mousse to chill helps it set properly. This makes it taste better. Lastly, adjust sweetness to your liking. Taste before serving and add more honey or syrup if needed. {{image_2}} You can make a dairy-free version of this mousse easily. Use silken tofu instead of cottage cheese. It blends well and gives a creamy texture. Choose a plant-based milk like almond, soy, or oat milk. This keeps the mousse rich without any dairy. Want to change things up? Try adding a tablespoon of espresso powder for a coffee kick. It pairs perfectly with chocolate. You can also mix in some peanut butter. Just two tablespoons will add a nutty taste and creaminess. Sweetness is key for this dessert. If you prefer less sugar, use a sugar substitute like stevia or monk fruit. Start with a smaller amount, then taste and adjust. This way, you can keep it healthy without losing flavor. Feel free to get creative with these variations. Each twist can make your Cottage Cheese Chocolate Mousse unique! Storing leftover Cottage Cheese Chocolate Mousse is simple. First, let the mousse cool in the fridge. Use airtight containers to keep it fresh. You can also cover bowls with plastic wrap. This keeps the mousse from drying out or absorbing odors. In the fridge, your mousse lasts about 3 to 5 days. If you want to save it longer, freeze it. In the freezer, it stays good for about 1 month. Just remember to thaw it in the fridge when you’re ready to eat. When serving leftover mousse, check the texture first. It might need a quick stir. If it seems a bit thick, mix in a splash of almond milk. This helps restore its creamy texture. Top it with fresh berries and mint again for a nice touch. Yes, you can use Greek yogurt in place of cottage cheese. Greek yogurt adds creaminess and a slight tang. This swap also boosts protein. Just remember, the texture may change a bit. Blend it well to get a smooth mousse. This dessert has about 150 calories per serving. Each mousse is rich in protein and lower in fat. The calories come from cottage cheese, cocoa powder, and sweeteners. You can adjust ingredients to fit your needs, like using less honey. Absolutely! Cottage Cheese Chocolate Mousse is perfect for meal prep. You can make it ahead and store it in the fridge. Just keep it in airtight containers. It stays fresh for up to three days. This makes it a great healthy snack or dessert option. This blog post covered all aspects of making Cottage Cheese Chocolate Mousse. We discussed key ingredients and their health benefits. You learned preparation steps and tips for blending. We also explored ways to enhance flavor and avoid common mistakes. Lastly, we provided storage tips and answered your pressing questions. Enjoy making this dessert and feel free to customize it. With a few tweaks, you can make it fit your taste. Happy cooking!

Cottage Cheese Chocolate Mousse Protein Delight

Indulging in dessert doesn’t mean sacrificing health. You can enjoy a rich, creamy treat that’s good for you! My Cottage

To make crispy honey garlic shrimp bites, you need: - 1 lb large shrimp, peeled and deveined - 1/2 cup all-purpose flour - 1/2 cup cornstarch - 1 teaspoon baking powder - 1 teaspoon garlic powder - 1 teaspoon onion powder - 1/2 teaspoon paprika - Salt and pepper to taste - 1 cup sparkling water (or regular water) - Oil for frying These ingredients create a light and crispy coating that perfectly hugs the shrimp. This sauce adds a sweet and savory kick. Gather these items: - 1/3 cup honey - 2 cloves garlic, minced - 2 tablespoons soy sauce - 1 tablespoon rice vinegar - 1 teaspoon sesame oil - 1/2 teaspoon red pepper flakes (optional) - Chopped green onions for garnish The garlic and honey blend beautifully, making the shrimp irresistible. If you need substitutes, here are some ideas: - Use shrimp with shells on for more flavor. - Swap cornstarch with potato starch for extra crunch. - Replace honey with maple syrup for a different sweetness. - Use lime juice instead of rice vinegar for a zesty twist. These swaps will keep the flavor strong while making it work for your needs. Start by patting the shrimp dry. Use paper towels to soak up any extra moisture. This step is key for getting that crispy texture. Wet shrimp will steam instead of fry. You want them nice and dry! In a large bowl, mix the dry ingredients. Combine 1/2 cup all-purpose flour, 1/2 cup cornstarch, 1 teaspoon baking powder, 1 teaspoon garlic powder, 1 teaspoon onion powder, and 1/2 teaspoon paprika. Add salt and pepper to taste. Slowly add 1 cup of sparkling water. Whisk until you have a smooth batter. It should look like pancake batter. Heat about 2 inches of oil in a deep skillet or pot. Aim for 350°F (175°C). To check if the oil is ready, drop a bit of batter in. It should sizzle and rise. Dip each shrimp in the batter, coating it well. Place them gently in the hot oil. Fry in batches to keep them from sticking together. Cook for 2-3 minutes on each side until golden brown. In a small saucepan, mix 1/3 cup honey, 2 minced garlic cloves, 2 tablespoons soy sauce, 1 tablespoon rice vinegar, and 1 teaspoon sesame oil. If you like heat, add 1/2 teaspoon red pepper flakes. Stir this over medium heat for about 3-4 minutes. You want the sauce warm and slightly thick. In a large bowl, toss the crispy shrimp with the honey garlic sauce. Make sure each piece is coated well. Transfer the shrimp to a serving platter. For a fresh touch, sprinkle chopped green onions on top. Enjoy your crispy honey garlic shrimp bites! To make shrimp extra crispy, start with dry shrimp. Use paper towels to pat them dry. This step helps the batter stick and fry well. Next, use a mix of flour and cornstarch. The cornstarch makes the shrimp crunchier. When making the batter, add sparkling water. The bubbles in the water create a light and crispy coating. Fry the shrimp in hot oil, around 350°F (175°C). Fry them in small batches to keep them from steaming. The right oil makes all the difference. Use oils with high smoke points, like canola or peanut oil. These oils can handle high heat without burning. They also give a nice flavor to the shrimp. Avoid olive oil for frying, as it burns easily. Get ready by prepping all ingredients first. Measure the flour, cornstarch, and spices ahead of time. This step makes cooking faster and smoother. If you want to save time, use store-bought honey garlic sauce. You can also prep the shrimp in advance. Just coat and fry them when you are ready to eat. {{image_2}} To add some heat, try spicy honey garlic shrimp bites. Start with the same shrimp and batter. For the sauce, increase the red pepper flakes to one teaspoon. You can also add a splash of sriracha or chili paste. This gives a nice kick to the dish. The sweet honey balances the heat well. Serve with lime wedges for extra flavor. No shrimp? No problem! You can make a vegetarian version using cauliflower or tofu. Cut cauliflower into bite-sized pieces or use firm tofu, cubed. Follow the same batter recipe and frying method. The honey garlic sauce works just as well on these veggies. This way, everyone can enjoy the flavor explosion. Get creative with sauces! Try a sweet chili sauce for a fruity twist. Or mix soy sauce with a touch of maple syrup for a new flavor. You can also make a garlic butter sauce for a rich taste. These sauces can change the whole dish. Experiment and find your favorite! To store leftover shrimp, first let them cool. Place the shrimp in an airtight container. You can keep them in the fridge for up to 2 days. Make sure to layer them with paper towels. This helps absorb moisture and keeps them crispy longer. When reheating shrimp, use the oven. Preheat it to 350°F (175°C). Spread the shrimp on a baking sheet. Heat for about 10 minutes until they are warm and crispy again. Avoid using the microwave. It may make the shrimp soggy. If you want to freeze shrimp, first cool them completely. Place them in a single layer on a baking sheet. Freeze for about 1 hour until solid. Then, transfer them into a freezer-safe bag. Remove as much air as possible. You can store them for up to 3 months. Thaw in the fridge before reheating. Yes, you can use frozen shrimp. Just make sure to thaw them first. Place them in the fridge overnight or run them under cold water. This will help them cook evenly. Pat them dry before coating to remove extra moisture. This step is key for crispiness. These shrimp bites pair well with many sides. Try serving them with: - Steamed rice - Fried rice - Noodles - Fresh salad - Vegetable stir-fry These options will enhance the meal and balance the flavors. Frying shrimp takes about 2-3 minutes per side. Look for a golden brown color. Cooking time may vary based on the size of your shrimp. Always monitor them closely to avoid overcooking. Yes, you can bake them! Preheat your oven to 400°F (200°C). Place the coated shrimp on a baking sheet lined with parchment paper. Spray them lightly with cooking oil. Bake for about 15-20 minutes, flipping halfway through. This method offers a healthier option but may lack some crispiness. Shrimp bites are easy and fun to make. You saw how to prepare the shrimp, make a tasty sauce, and achieve a crispy coating. Don’t forget the tips for frying and storage. You can even try spicy or vegetarian options. These shrimp bites fit any meal or snack. Keep these ideas in mind, and enjoy making this dish your own. It’s time to impress your friends and family with your cooking skills!

Crispy Honey Garlic Shrimp Bites Easy Flavor Explosion

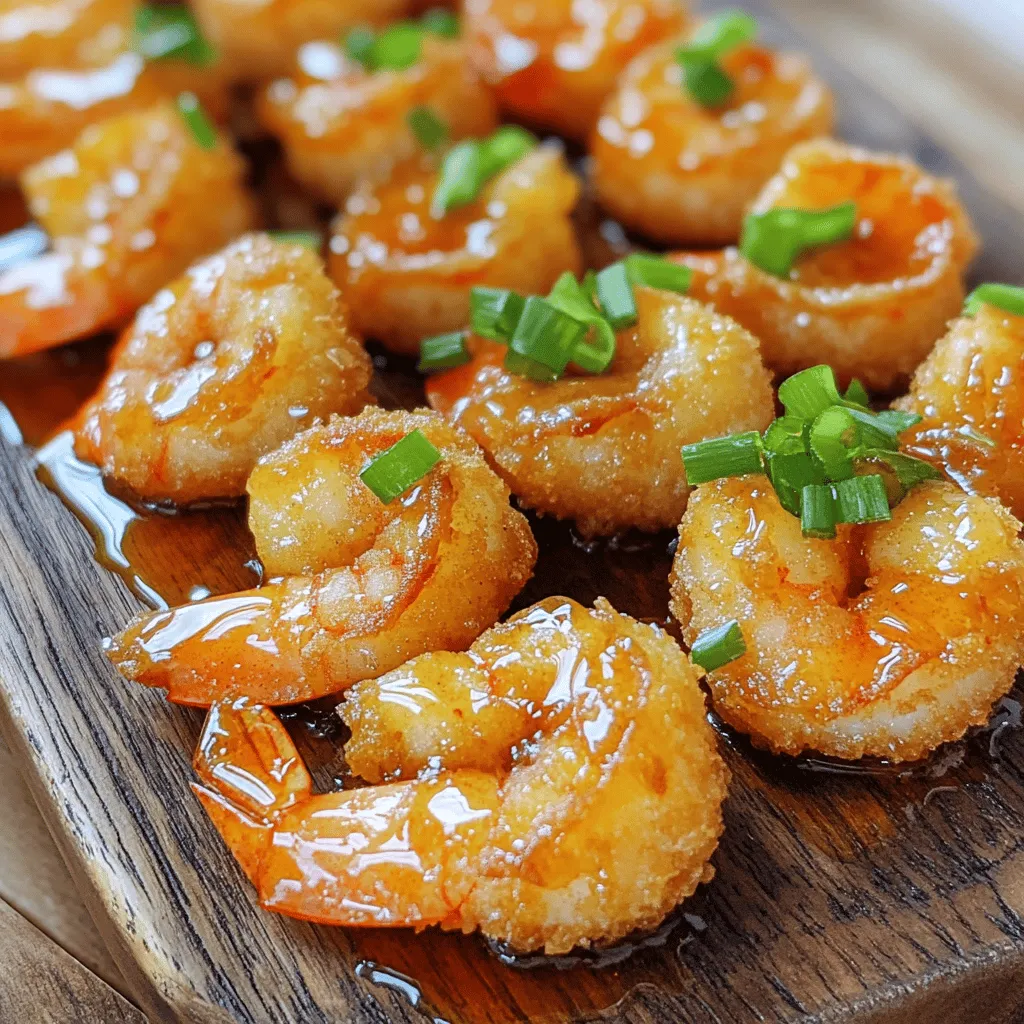
Get ready to treat your taste buds! These Crispy Honey Garlic Shrimp Bites pack a burst of flavor in every

To make cozy loaded sweet potato chili, gather these key ingredients: - 2 large sweet potatoes, peeled and diced - 1 can (15 oz) black beans, drained and rinsed - 1 can (15 oz) kidney beans, drained and rinsed - 1 can (15 oz) diced tomatoes with green chilies - 1 large onion, diced - 3 cloves garlic, minced - 1 bell pepper (any color), chopped - 2 cups vegetable broth - 2 tablespoons chili powder - 1 tablespoon cumin - 1 teaspoon smoked paprika - Salt and pepper to taste - Olive oil for sautéing These ingredients create a rich and hearty dish that warms you up. To make your chili even better, add some fun toppings: - Diced avocado - Fresh cilantro - Shredded cheese - A dollop of sour cream These toppings add flavor and texture. They also make your chili look great. If you have dietary needs, you can swap some ingredients: - Use white beans or lentils instead of black or kidney beans. - Swap vegetable broth with chicken broth for more flavor. - Try using sweet corn for a touch of sweetness. These substitutions allow you to enjoy the chili while meeting your needs. To make this chili, start with the sweet potatoes. Peel and dice them into small cubes. This helps them cook evenly. Next, dice the large onion and chop the bell pepper. Mince the garlic cloves. Set these veggies aside. This prep takes about 10 minutes. In a large pot, heat 2 tablespoons of olive oil over medium heat. Add the diced onion and bell pepper. Sauté for about 5 minutes until they soften. Stir in the minced garlic and cook for 1 more minute. You want it to smell nice! Now, add the diced sweet potatoes, chili powder, cumin, smoked paprika, salt, and pepper. Stir well to coat the sweet potatoes with the spices. Pour in the diced tomatoes with their juice and vegetable broth. Mix everything together. Bring the chili to a boil. Then, reduce the heat to low. Cover the pot and let it simmer for 25 to 30 minutes. You want the sweet potatoes to be tender. After that, stir in the black beans and kidney beans. Let the chili simmer for another 5 to 10 minutes. This helps all the flavors blend. Taste the chili and adjust the seasoning if needed. Serve the chili in warm bowls. Top it with diced avocado, fresh cilantro, and shredded cheese. You can also add a dollop of sour cream for extra creaminess. Enjoy your cozy meal! To get the best texture in your chili, focus on the sweet potatoes. Cut them into even cubes. This helps them cook at the same rate. When you sauté the onions and peppers, let them soften first. This builds a nice base for flavor. After adding the spices, stir well. This coats the sweet potatoes and enhances taste. Simmer the chili gently. This lets all the flavors blend together. When choosing sweet potatoes, look for firm ones with smooth skin. Avoid any with soft spots or blemishes. You can use orange or purple sweet potatoes for a twist. For spices, fresh is best. Use whole spices if possible. Grind them yourself for a more vibrant flavor. For the beans, canned is quick and easy. Rinse them well to remove excess salt. You can prep the sweet potatoes and chop the veggies ahead of time. Store them in the fridge for up to two days. This saves time on busy days. You can also make the chili a day in advance. Let it cool, then store it in an airtight container. Reheat it gently on the stove when you are ready to serve. This helps flavors deepen. {{image_2}} To make this chili fully plant-based, swap the toppings. Use avocado and cilantro instead of cheese and sour cream. The base is already vegan-friendly. The beans and sweet potatoes give great flavor and texture. If you want more plant goodness, add corn or mushrooms for extra taste. Not everyone likes heat. To make it milder, skip the chili powder or use less. You can also add a bit of sugar to balance flavors. For those who love spice, add more chili powder or diced jalapeños. You can always add hot sauce at the end for a kick. Feel free to mix up the beans. If you prefer pinto or navy beans, go for it! You can also change up the veggies. Carrots, zucchini, or even spinach would work well. The key is to keep it colorful and nutritious. Use what you have on hand for a fun twist. To keep your cozy loaded sweet potato chili fresh, store it in an airtight container. Place it in the fridge if you plan to eat it within a few days. For longer storage, freeze it. Make sure to let the chili cool completely before freezing. Use freezer-safe containers or bags to prevent freezer burn. Label your containers with the date, so you know when to use them. When you're ready to enjoy your chili again, reheat it gently. You can use the stove or microwave. If using the stove, pour the chili into a pot and heat over low to medium heat. Stir often to avoid sticking. For the microwave, place the chili in a microwave-safe bowl and cover it loosely. Heat in short bursts, stirring in between, until it's hot. This way, you keep the flavors fresh. When stored correctly, your chili can last up to five days in the fridge. If you freeze it, the chili can last up to three months. However, for the best taste, try to eat it within a month. Over time, the flavors can fade, but it will still be safe to eat. Always check for any signs of spoilage before enjoying your leftovers. Yes, you can use canned sweet potatoes. They save time and effort. Just drain and rinse them. Use about 2 cups of canned sweet potatoes. Keep in mind that they are softer. This may change the texture of your chili a bit. To thicken your chili, try these tips: - Let it simmer longer. This helps reduce the liquid. - Mash some of the sweet potatoes. This adds body to the chili. - Stir in a tablespoon of cornstarch mixed with water. This thickens quickly. - Add a handful of cornmeal. This gives a nice texture, too. Here are some great sides: - Cornbread: It pairs well and soaks up the chili. - Rice: A nice base to enjoy the chili on top. - Salad: A fresh side adds crunch and balance. - Tortilla chips: Perfect for dipping and adds crunch. This blog post covered how to make a delicious loaded sweet potato chili. We explored key ingredients like sweet potatoes and beans, suggested tasty toppings, and shared substitutions for different diets. I provided step-by-step instructions for prep and cooking, along with tips for the perfect texture and flavor. Finally, we discussed storage options and answered common questions. With these insights, you can now create a satisfying dish that’s flexible and full of flavor. Enjoy making your chili just the way you like it!

Cozy Loaded Sweet Potato Chili Flavorful and Hearty Dish

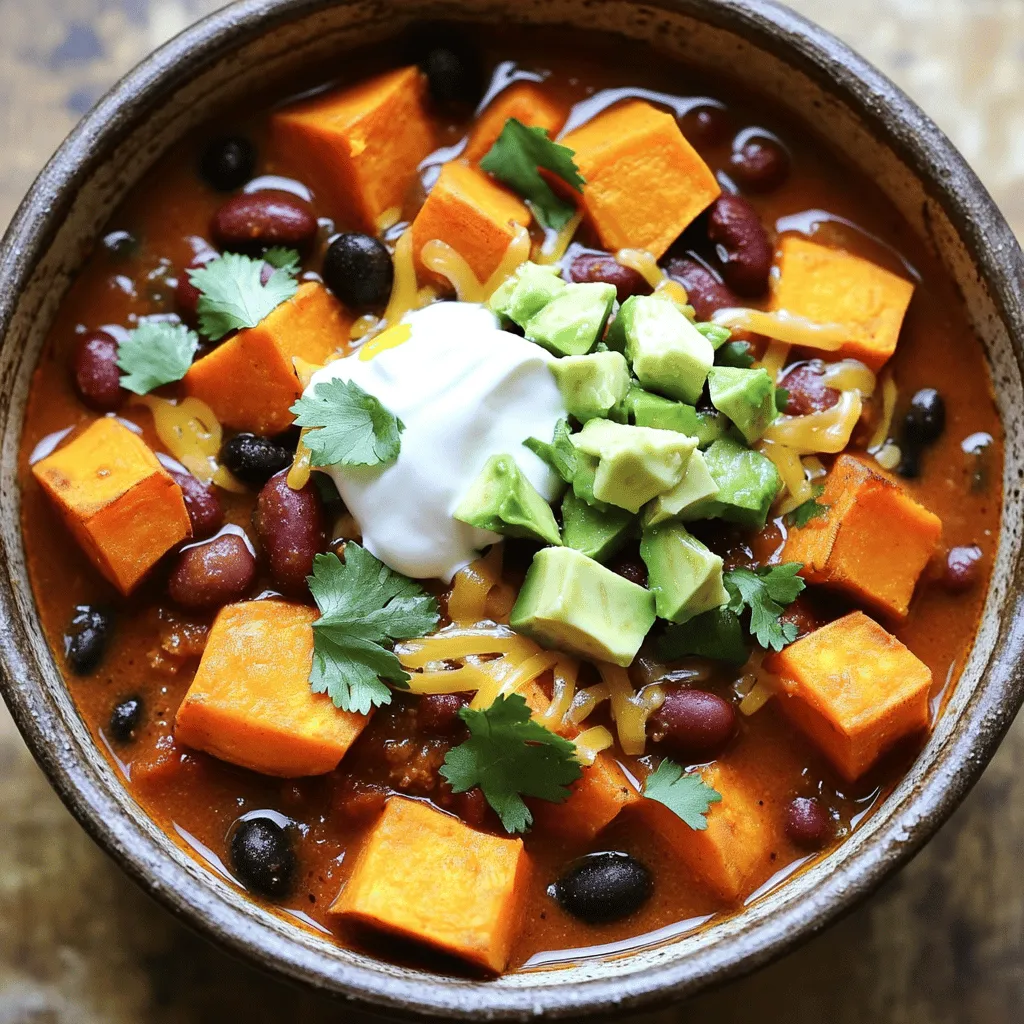
Warm up your dinner routine with my Cozy Loaded Sweet Potato Chili! This hearty dish brims with flavor and nutrition.

Older posts
Newer posts
← Previous Page1 … Page27 Page28 Page29 … Page84 Next →

dsad

© 2026 juliesdish • Built with GeneratePress

Our Policies

  • Copyright Policy
  • Cookie Policy
  • GDPR Policy
  • Privacy Policy
  • Disclaimer
  • Terms Of Use

More Information

  • Home
  • About
  • Contact
  • Appetizers
  • Dessert
  • Dinner
  • Drinks
©2026, juliesdish About Back To Top