Skip to content
DisclaimerTerms Of UseGDPR PolicyCookie Policy

juliesdish

  • Home
  • Drinks
  • Appetizers
  • Dinner
  • Dessert
  • About
  • Contact
  • Privacy Policy
DisclaimerTerms Of UseGDPR PolicyCookie Policy

NO-ING-IMG

To make pumpkin cheesecake crumble bars, you need these tasty items: - 1 ½ cups graham cracker crumbs - ½ cup unsalted butter, melted - 1 cup all-purpose flour - ½ cup brown sugar, packed - 1 teaspoon ground cinnamon - ½ teaspoon nutmeg - 1 cup pumpkin puree - 1 package (8 oz) cream cheese, softened - ½ cup granulated sugar - 2 large eggs - 1 teaspoon vanilla extract - ¼ teaspoon salt - ½ cup chopped pecans (optional) Each ingredient plays a key role in the flavor and texture. If you need to swap some items, here are some ideas: - Use almond flour instead of all-purpose flour for a gluten-free option. - If you lack graham crackers, try digestive biscuits for a similar crust. - Coconut sugar can replace brown sugar for a less processed choice. - You can use pumpkin spice if you do not have cinnamon and nutmeg. Feel free to customize your bars! Here are some fun extras to consider: - Add chocolate chips for a sweet twist. - Drizzle caramel sauce on top for a rich flavor. - Mix in some dried cranberries for a tart contrast. - Chopped pecans add a nice crunch, but you can skip them if you prefer. These ingredients create a delightful mix of flavors and textures. Enjoy experimenting with your own touches! Start by preheating your oven to 350°F (175°C). Grab an 8-inch square baking pan. Line it with parchment paper. Let the paper hang over the sides. This helps you lift the bars out later. In a medium bowl, mix 1 ½ cups of graham cracker crumbs with ½ cup of melted butter. Stir until it's mixed well. Press this mixture firmly into the bottom of the baking pan. Make sure it is even and packed tight. In a large bowl, beat 1 package of softened cream cheese and ½ cup of granulated sugar. Mix until smooth. Add 1 cup of pumpkin puree, 2 large eggs, 1 teaspoon of vanilla extract, and ¼ teaspoon of salt. Blend until creamy and well combined. Sprinkle half of the flour, brown sugar, cinnamon, and nutmeg mixture over the crust. Pour the pumpkin cheesecake filling on top of the crust. Spread it evenly with a spatula. Then, take the remaining crumble mixture and sprinkle it over the filling. Optionally, add ½ cup of chopped pecans for extra crunch. Bake your bars in the preheated oven for 30-35 minutes. They are done when the center is set and a toothpick comes out clean from the edges. After baking, let the pan cool for at least 1 hour. Then, refrigerate for at least 2 hours. This step helps the bars to set perfectly. Once cooled, lift them out using the parchment paper. Cut into squares and enjoy! To get a great crust, use fresh graham cracker crumbs. You can crush the crackers in a food processor for a fine texture. Mix the crumbs with melted butter until they look like wet sand. Press the mixture firmly into the bottom of your baking pan. This helps it hold together well when baked. Make sure to press all the way to the edges. A sturdy crust is key for great bars. For a smooth filling, let your cream cheese soften at room temperature. This helps it blend well with other ingredients. Beat the cream cheese and sugar together until they are smooth before adding pumpkin. Adding the eggs one at a time can also help keep the texture creamy. Make sure to mix just enough to combine everything. Over-mixing can add air and make your filling puff up. One common mistake is not baking long enough. The center should be set and a toothpick should come out clean. If it’s too wobbly, bake a few more minutes. Another mistake is skipping the cooling time. Let your bars cool completely in the pan before cutting. This helps them set better. Finally, don’t forget to chill them in the fridge for at least two hours. Chilling improves the flavor and texture. {{image_2}} You can make these bars healthier with a few swaps. Use whole wheat flour instead of all-purpose flour. This adds fiber and nutrition. You can also replace granulated sugar with coconut sugar. Coconut sugar has a lower glycemic index. For a lower-fat option, swap cream cheese with Greek yogurt. It keeps the creamy texture while cutting fat. Want to mix it up? You can add chocolate or caramel for extra flavor. Drizzle caramel sauce on top before baking. You can also fold in chocolate chips into the cheesecake mix. Dark chocolate chips work great for a rich taste. For a fun twist, add a pinch of orange zest. This will brighten the flavor and make it special. If you need gluten-free options, use almond flour or gluten-free graham crackers. These will keep the crust tasty and safe for gluten-free eaters. For a vegan version, replace eggs with flax eggs. Just mix one tablespoon of ground flaxseed with three tablespoons of water. Let it sit for five minutes to thicken. Use a vegan cream cheese to keep the creamy texture. These swaps let everyone enjoy these tasty bars! To keep your pumpkin cheesecake crumble bars fresh, store them in an airtight container. This will help keep the bars moist and tasty. Make sure they are fully cooled before you cover them. If you have leftover bars, you can layer them with parchment paper to avoid sticking. When stored properly, these bars can last in the fridge for about five days. If you want to keep them longer, freezing is a great option. Just remember to wrap them well to prevent freezer burn. To freeze the bars, cut them into squares first. Wrap each piece tightly in plastic wrap, then place them in a freezer bag. They can last up to three months in the freezer. When you're ready to enjoy them, thaw them in the fridge overnight. For a warm treat, reheat in the oven at 350°F (175°C) for about 10 minutes. This will bring back their delightful texture. Yes, you can use fresh pumpkin. First, cook the pumpkin until soft. Then, mash it to get a smooth puree. This makes your bars taste fresh and bright. Just be sure to measure the same amount as canned pumpkin. Your bars are done when the center is set. Insert a toothpick into the edges. If it comes out clean, they are ready. The top should look slightly golden, and the edges should pull away from the pan. Absolutely! You can make these bars one day ahead. After baking, let them cool. Then, cover and refrigerate. This will help the flavors meld. Plus, they will be ready to serve when you need them. These bars pair well with whipped cream. A drizzle of caramel sauce adds richness. You can also serve them with a scoop of vanilla ice cream for extra delight. Don’t forget a sprinkle of cinnamon for that cozy touch! This blog post covered all you need for Pumpkin Cheesecake Crumble Bars. We discussed the ingredients, including measurements, optional add-ins, and substitutions. The step-by-step instructions made the baking easy. Tips helped to avoid common mistakes and perfect your bars. Variations showed ways to switch flavors or make it healthier. Lastly, the storage info ensures your treats last longer. Enjoy making and sharing these bars, knowing they will impress friends and family.

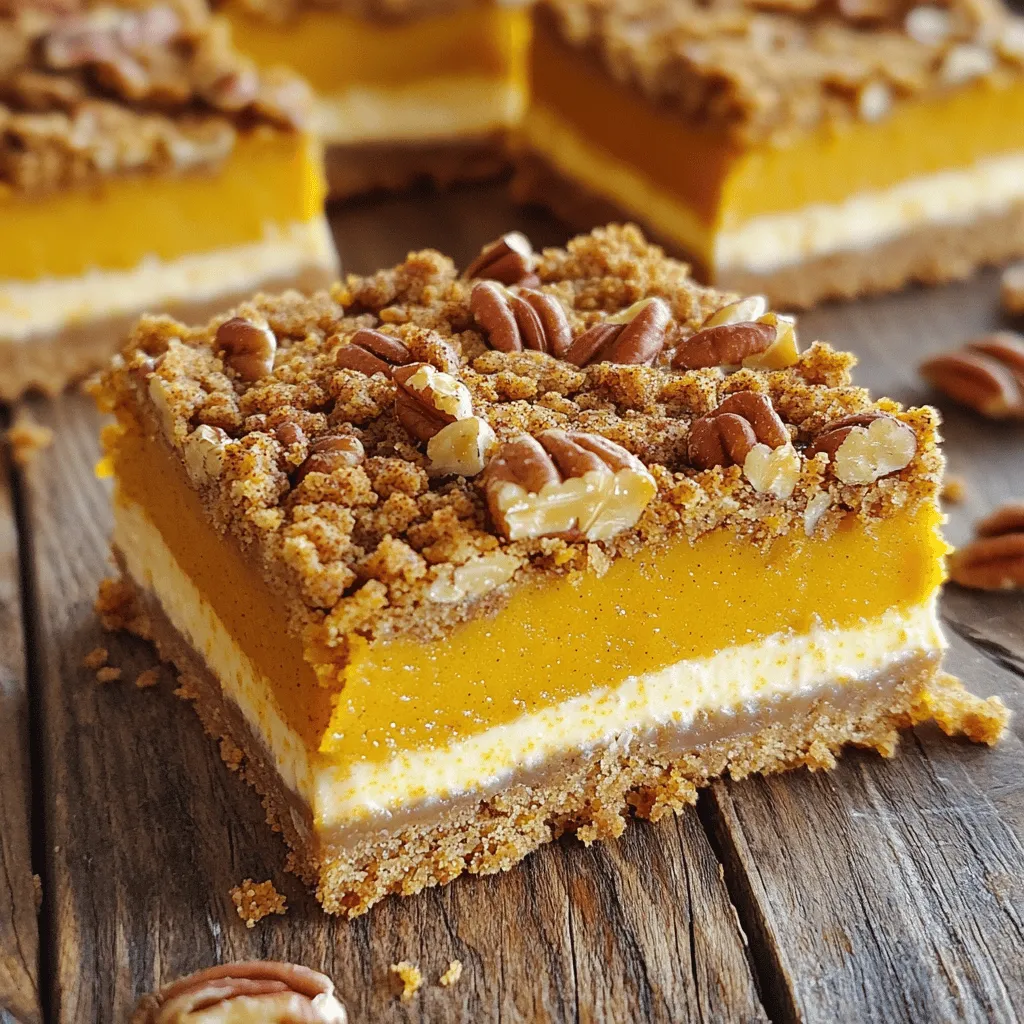
Pumpkin Cheesecake Crumble Bars Irresistible Fall Treat

Fall is here, and it’s time to enjoy a sweet and creamy delight: Pumpkin Cheesecake Crumble Bars! I’ll guide you

- 1 pound broccoli florets - 3 tablespoons olive oil - 4 cloves garlic, minced - 1 teaspoon onion powder - 1/2 teaspoon red pepper flakes (optional) - 1/2 teaspoon salt - 1/2 teaspoon black pepper - 1/2 cup grated Parmesan cheese - Zest and juice of 1 lemon Gathering fresh ingredients is key for great taste. I love using vibrant broccoli florets. They should look bright and firm. The olive oil adds richness and helps the broccoli get crispy. Fresh garlic brings a strong flavor that pairs well with Parmesan. Next, I add onion powder for a sweet kick. If you like heat, add the red pepper flakes. Salt and pepper balance the flavors. For the finishing touches, grated Parmesan cheese adds a savory note. Lastly, lemon zest and juice brighten the dish and bring a fresh taste. This combination creates a delicious side dish that everyone will love. Rinse the broccoli florets under cold water. This step is key for cleaning. After rinsing, dry them well with a kitchen towel. Make sure they are dry to help them crisp up in the air fryer. In a large bowl, combine the broccoli florets with olive oil, minced garlic, onion powder, red pepper flakes (if you want heat), salt, and black pepper. Toss everything well. You want each floret covered in the seasoning. This mixture adds great flavor. Preheat your air fryer to 400°F (200°C). Place the seasoned broccoli in the basket. Keep them in a single layer. This helps them cook evenly. If you have a small air fryer, you might need to cook in batches. Cook the broccoli for 8-10 minutes. Shake the basket halfway through. This ensures even cooking. The broccoli should be bright green and crisp-tender with some charred edges. Once the broccoli is done, take it out of the air fryer. Sprinkle the grated Parmesan cheese over the hot broccoli right away. Toss quickly to coat. The heat will make the cheese melt slightly. Next, add lemon zest and juice. Toss gently to mix everything. Taste it to see if it needs more salt or pepper. To get that perfect crispy texture, you must dry the broccoli well. After rinsing, pat it dry with a towel. This step helps the broccoli crisp up nicely in the air fryer. Avoid overcrowding the basket; give each floret space to breathe. If there are too many pieces, they may steam rather than fry. Cook in batches if needed. Feel free to adjust the seasonings to your taste. If you like heat, add more red pepper flakes. For a different kick, try cayenne pepper or smoked paprika. You can also play with other herbs like thyme or rosemary for extra flavor. Presentation matters! Serve the garlic Parmesan broccoli in a nice bowl. Garnish with extra lemon zest and a sprinkle of Parmesan for a bright look. Pair it with grilled chicken or fish for a complete meal. You can also enjoy it as a side to pasta dishes, giving a fresh touch to your plate. {{image_2}} You can make this dish even better by adding different cheese options. Cheddar brings a sharp taste. Feta cheese adds a nice tang. You might also try goat cheese for creaminess. Each cheese gives its own unique flavor. Just sprinkle it on after air frying, like you did with Parmesan. Broccoli is great, but other vegetables work well too. Cauliflower florets air fry just like broccoli. Brussels sprouts can also shine with this recipe. Carrots add sweetness and color. Just remember to cut them into similar sizes for even cooking. This way, you can mix and match for more variety. This recipe is easy to adapt. For a vegetarian option, just keep using the same ingredients. To make it gluten-free, check the cheese label to ensure no gluten is present. You can also use dairy-free cheese if you like. These changes let everyone enjoy this tasty dish! To keep your Air Fryer Garlic Parmesan Broccoli fresh, store it in an airtight container. Place the container in the fridge. It will stay good for about 3-4 days. Make sure the broccoli is cool before sealing it. This prevents moisture buildup and keeps it crisp. To reheat, use your air fryer for the best texture. Preheat it to 350°F (175°C). Place the broccoli in the basket and heat for about 3-5 minutes. This will help restore its crispiness. You can also use the microwave, but it may make the broccoli soft. If using the microwave, heat in short bursts and check often. You can freeze Air Fryer Garlic Parmesan Broccoli, but it may change texture. First, let it cool completely. Then, place it in a freezer-safe bag. Remove as much air as possible before sealing. It can last up to 3 months in the freezer. When ready to eat, thaw in the fridge overnight. Reheat in the air fryer for the best result. Yes, you can use frozen broccoli. However, it will change the texture. Frozen broccoli tends to be softer after cooking. This means it may not get as crispy as fresh broccoli. If you choose frozen, cook it for a few extra minutes. Make sure to shake the basket often for even cooking. To make this dish ahead, cook the broccoli and let it cool. Store it in an airtight container in the fridge. For reheating, place it back in the air fryer for about 5 minutes at 350°F. This brings back some crispiness. You can also reheat in the oven for best results. The best air fryer temperature for vegetables is 400°F (200°C). This high heat helps to cook them quickly while keeping them crisp. For softer veggies, you can lower the heat to around 350°F. Always adjust based on your air fryer model and the vegetable type. This blog post covered how to make crispy air-fried broccoli. We explored essential ingredients like broccoli, garlic, and Parmesan. I gave you detailed steps for preparation, air frying, and serving. You learned tips for achieving perfect crispiness and variations to try. In the end, air-fried broccoli is both tasty and simple. Enjoy this healthy side dish regularly! It pairs well with many meals and can be customized easily. Happy cooking!

Air Fryer Garlic Parmesan Broccoli Flavorful Side Dish

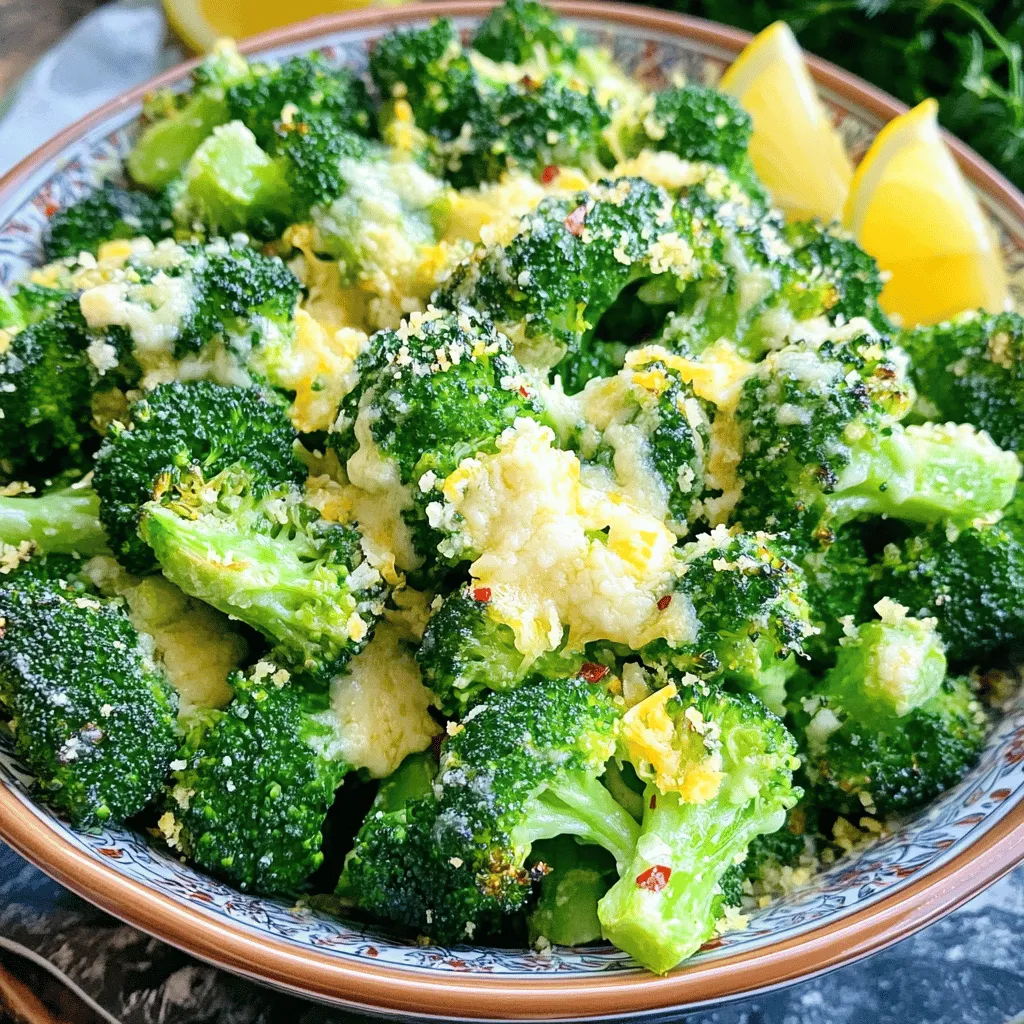
Are you ready to elevate your veggie game? This Air Fryer Garlic Parmesan Broccoli is the perfect side dish that

- 1 cup apple cider - 1/4 cup fresh lime juice - 1 tablespoon agave syrup or honey - 1 teaspoon ground cinnamon - 1/2 teaspoon ground ginger - 1/4 teaspoon cayenne pepper (optional) - Ice cubes - Apple slices (for garnish) - Cinnamon sticks (for garnish) - Salt or cinnamon-sugar (for rimming glasses) To create a tasty Apple Cider Margarita, gather these simple ingredients. Use fresh apple cider for the best taste. Lime juice adds a nice zing. The agave syrup or honey sweetens the drink just right. Ground cinnamon and ginger bring warmth and spice. If you like a kick, add cayenne pepper. You will need ice cubes to chill the drink. For garnish, thin apple slices and cinnamon sticks look lovely. Lastly, prepare salt or cinnamon-sugar to rim your glasses. This adds flavor and style. Get ready to mix a fun fall drink! Start by rimming your glasses. Pour lime juice onto a small plate. On a separate plate, mix salt and ground cinnamon or cinnamon-sugar. Dip the rim of each glass into the lime juice first. Then, dip it into the salt or cinnamon-sugar mix. This step adds flavor and looks great. Now, let's mix our drink. In a cocktail shaker, combine the apple cider, fresh lime juice, agave syrup, ground cinnamon, ground ginger, and cayenne pepper if you want some heat. This mix gives your margarita a fun twist. Next, fill the shaker with ice cubes. Shake it vigorously for about 15 seconds. This helps chill the drink and mix all the flavors well. After shaking, strain the mixture into the prepared glasses filled with ice. For a lovely finish, garnish each drink with thin apple slices and a cinnamon stick. These simple touches make your drink look pretty and taste even better. Serve immediately and enjoy the refreshing flavors! To make your Apple Cider Margarita even better, consider these tips. Adding more spice can boost flavor. A dash of nutmeg or more cinnamon adds warmth. If you want it sweeter, use more agave syrup or honey. This small change can make a big difference. Always choose high-quality apple cider. Fresh, unfiltered cider gives the best taste. Look for options with no added sugar. This will keep your drink pure and tasty. How you serve your drink matters. Garnishing can make it pop. Try thin apple slices on the rim. A cinnamon stick can add style and aroma. For glassware, use clear highball glasses. They show off the drink's color beautifully. You can also use mason jars for a rustic feel. Rimming the glasses adds flair. Use lime juice and salt or cinnamon-sugar for a fun touch. Every drink can fit your taste. If you like more sweetness, add extra agave syrup. For a spicier kick, increase the cayenne pepper. Taste as you mix to find what you love. This drink is flexible, so feel free to experiment. Adjusting the balance gives you the perfect sip every time. {{image_2}} If you want a fun drink without alcohol, try the mocktail version. Use only apple cider and lime juice. You can add agave syrup for sweetness. This drink stays just as refreshing! You can mix it up by adding cranberry juice. This gives a nice tartness. Another option is ginger beer for a spicy kick. You can also infuse the drink with spices like nutmeg. This adds a warm, cozy flavor. For the holidays, you can make this drink festive. Use star anise for a holiday touch. You can also add a splash of pomegranate juice for color. This makes the drink look beautiful and taste great! To keep your apple cider fresh, store it in the fridge. Use an airtight container. This helps prevent any bacteria from ruining it. Lime juice should also go in the fridge. A small bottle works well for this. Both can last up to a week when stored properly. You can make parts of this drink ahead of time. Mix the apple cider, lime juice, and agave syrup in advance. Store this mixture in the fridge. You can prepare the glasses by rimming them with salt or cinnamon-sugar before guests arrive. This saves time when you want to serve. Keep your garnishes fresh by storing them in a cool place. Apple slices can brown quickly. To prevent this, dip them in lemon juice. This keeps them looking fresh for longer. Cinnamon sticks can be stored in a dry place. They last for a long time and won't lose flavor. The best apple cider for margaritas is fresh, sweet cider. Look for cider without preservatives. This gives a pure apple taste. Some brands may add spices; avoid those for a classic margarita. Yes, you can make this cocktail in large batches. Just multiply the ingredients by the number of servings you need. Mix everything in a big pitcher. This makes serving easy and keeps the fun going. To adjust for more servings, simply multiply each ingredient by the number of drinks you want. For example, for four drinks, use 2 cups of cider, 1/2 cup of lime juice, and so on. Keep the ratios the same for the best taste. You can prepare the drink ahead of time, but don’t add ice until you serve it. Mix the ingredients and chill them in the fridge. This keeps the drink fresh and tasty when ready to enjoy. You can use honey or maple syrup instead of agave syrup. Both add sweetness and flavor. Adjust the amount to taste since honey and maple syrup can be sweeter than agave. This guide shows you how to make a great Apple Cider Margarita. We covered the key ingredients, easy steps, and some smart tips for flavor. You can even make a fun mocktail version. Remember to play with flavors and presentations to make it your own. Enjoy your drink and impress your friends with this fall favorite!

Apple Cider Margarita Refreshing Fall Cocktail Recipe

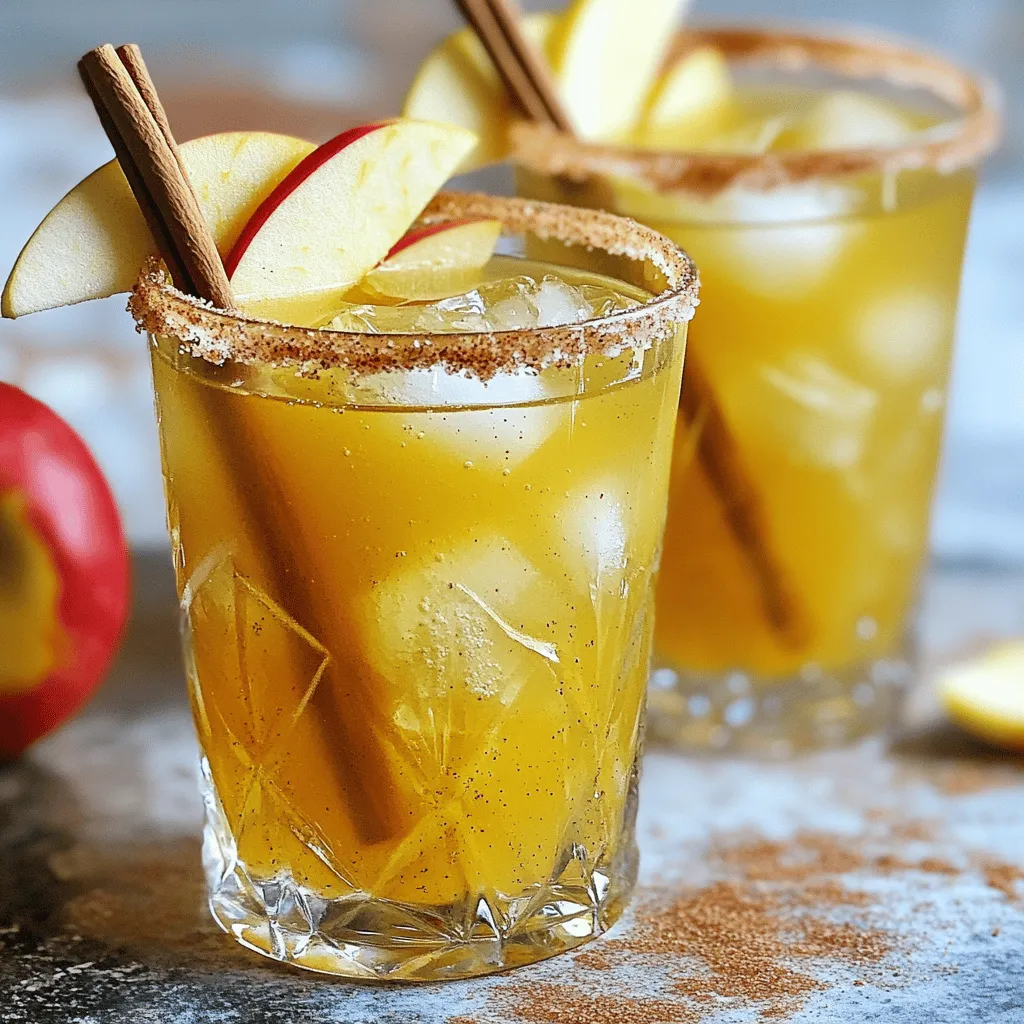
Fall is here, and it’s time to spice up your cocktail game! The Apple Cider Margarita is a fun twist

- 1 lb boneless, skinless chicken breasts - 1 can (14.5 oz) diced tomatoes with green chilies - 1 can (15 oz) black beans, rinsed and drained - 1 can (15 oz) corn, drained - 1 small onion, diced - 2 cloves garlic, minced - 4 cups chicken broth - 1 tablespoon chili powder - 1 teaspoon cumin - 1 teaspoon paprika - Salt and pepper to taste - 1 tablespoon olive oil - Fresh lime juice (from 1 lime) - Tortilla strips for garnish - Shredded cheese for garnish (optional) - Fresh cilantro for garnish (optional) The chicken is the star of this soup. It gives the dish a hearty base. Choose boneless and skinless chicken breasts for a lean option. They cook well in the slow cooker and shred easily. Diced tomatoes with green chilies add flavor and a bit of heat. They also give the soup a nice color. Black beans and corn add texture and nutrition. They make the soup filling and satisfying. Onion and garlic are key for a great base. They add depth and aroma to the dish. Chicken broth enhances the flavor, making each bite rich and warm. Spices like chili powder, cumin, and paprika bring warmth and earthiness. They create a lovely balance, making the soup more exciting. Garnishes can elevate your soup. Add tortilla strips for crunch. They give a nice texture contrast. Shredded cheese can add creaminess. I suggest using your favorite cheese for extra flavor. Fresh cilantro adds a burst of freshness. If you're a fan of lime, squeeze some juice on top for extra brightness. For a twist, try adding avocado slices or jalapeños. You can also swap black beans for pinto beans. This soup is versatile and can adapt to your taste! Start by seasoning the chicken breasts. Use salt, pepper, chili powder, cumin, and paprika. Rub the spices evenly on both sides. Next, heat olive oil in a skillet over medium-high heat. Sear the chicken breasts for about 2-3 minutes on each side. This step gives them a nice brown color, which adds flavor. Grab your slow cooker and add the diced onion and minced garlic. Then, pour in the canned tomatoes with green chilies, black beans, and corn. Finally, add the chicken broth. Stir everything together well. This mix of fresh and canned ingredients creates a rich base for the soup. Cover the slow cooker and set it to cook. If you use the low setting, it will take 6-7 hours. For the high setting, it only takes 3-4 hours. Make sure the chicken is fully cooked and can be easily shredded. This will ensure your soup has the best texture and flavor. To make your soup taste great, start with salt and pepper. Use fresh spices like chili powder, cumin, and paprika. These spices add depth and warmth. Always taste the soup before serving. Adjust the seasoning as needed. If you want more heat, add a bit of cayenne pepper. Remember, seasoning is key to a delicious soup. To give your soup a rich, creamy texture, you can add cream or sour cream. Just stir it in at the end. For a lighter option, mash some of the black beans in the soup. This thickens it without adding extra fat. You can also blend a portion of the soup and mix it back in. This adds creaminess while keeping the chunky texture. One common mistake is not searing the chicken. This step adds flavor and color to your dish. Another mistake is overcooking the soup. It can become too thick and lose flavor. Make sure to check the chicken for doneness. Lastly, do not skip the lime juice. It brightens the flavors and balances the soup. {{image_2}} To make a vegetarian version of this soup, swap the chicken for extra beans. Use one can of kidney beans and one can of black beans. Add diced bell peppers for more flavor and crunch. You can also use vegetable broth instead of chicken broth. This will keep the soup hearty and filling. If you enjoy heat, add jalapeños or serrano peppers. You can dice them and mix them in with the onions and garlic. For a smoky flavor, try adding chipotle peppers in adobo sauce. A few drops of hot sauce just before serving can also kick it up a notch. You can replace the canned tomatoes with fresh tomatoes if you prefer. Just chop up about four ripe tomatoes. Instead of corn from a can, fresh or frozen corn works great too. If you do not have black beans, pinto beans are a good alternative. Just be sure to rinse and drain them. To store your leftover soup, let it cool first. Transfer the soup to an airtight container. Make sure to seal it tightly. Label the container with the date. This helps you keep track of freshness. Store it in the fridge for up to three days. If you want to keep it longer, consider freezing it. Freezing is a great option for this soup. First, let it cool completely. Then, pour the soup into freezer-safe bags or containers. Leave some space for the soup to expand. Seal the containers tightly and label them. This soup can last up to three months in the freezer. When you are ready to eat it, just thaw it in the fridge overnight. When you want to enjoy your soup again, you can reheat it easily. For best results, thaw frozen soup overnight in the fridge. Pour the soup into a pot and heat on medium. Stir it often to prevent sticking. You can also use the microwave for quick reheating. Place it in a microwave-safe bowl and heat in short intervals, stirring in between. Enjoy your warm soup with your favorite toppings! Yes, you can use frozen chicken. Just add it straight to the slow cooker. You may need to cook it longer. Make sure it reaches 165°F to be safe. This method saves time if you forget to thaw. You can serve many things with Chicken Tortilla Soup. Here are some ideas: - Warm tortillas or tortilla chips - Sour cream for creaminess - Avocado slices for a fresh touch - Fresh lime wedges for extra zing - A side salad for crunch These options add more flavor and texture to your meal. The soup lasts about 3-4 days in the fridge. Make sure to store it in an airtight container. If you want to keep it longer, freeze it. This way, you can enjoy it later. Just thaw it before reheating. This article explored the key elements of making Slow Cooker Chicken Tortilla Soup. We covered the full ingredient list, preparation steps, and essential tips and tricks. Whether you want it spicy, vegetarian, or creamy, you have many options to customize your soup. Remember to store leftovers properly to keep your dish delicious. Enjoy experimenting with this versatile recipe. With just a few adjustments, you can make each bowl perfect every time.

Satisfying Slow Cooker Chicken Tortilla Soup Recipe

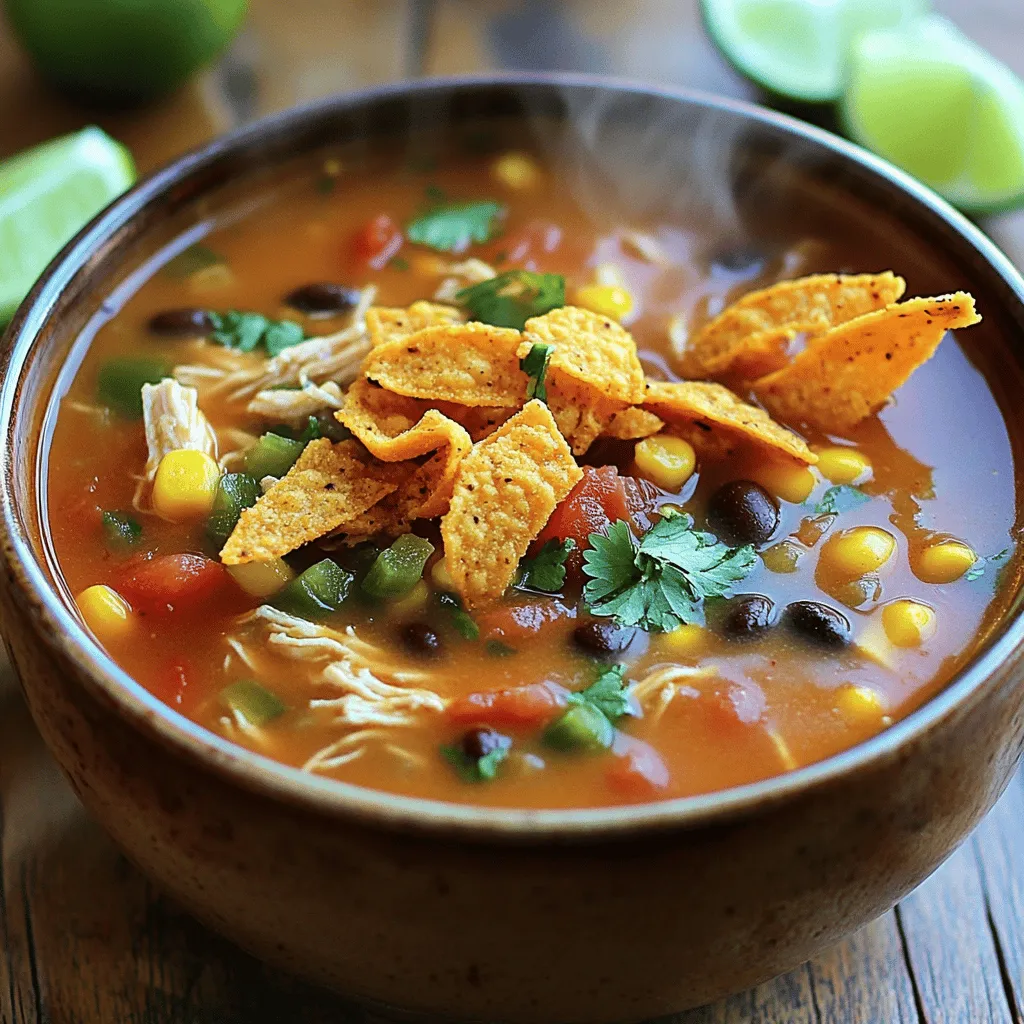
If you crave a warm and hearty meal, my Slow Cooker Chicken Tortilla Soup is perfect. This easy dish combines

- 4 boneless, skinless chicken thighs - 2 tablespoons smoked paprika - 1 teaspoon garlic powder - 1 teaspoon onion powder - 1 teaspoon dried oregano - 1 teaspoon salt - ½ teaspoon black pepper - 1 red bell pepper, cut into strips - 1 yellow bell pepper, cut into strips - 1 purple onion, sliced - 2 zucchinis, sliced into half-moons The main ingredients in this recipe focus on flavor and texture. The chicken thighs bring a juicy, tender bite. Smoky paprika adds a rich, warm taste that makes the dish shine. The spices, such as garlic and onion powder, bring depth, while dried oregano adds a hint of earthiness. Fresh vegetables are key to a balanced meal. The bell peppers offer sweetness and crunch. Zucchini contributes a soft texture when cooked, and onion adds sharpness, creating a perfect mix. - 2 tablespoons olive oil - Fresh parsley, chopped (for garnish) Olive oil is essential for coating the veggies. It helps them roast nicely and keeps everything moist. Fresh parsley adds a vibrant pop of color and a fresh taste when sprinkled on top before serving. - Sheet pan - Mixing bowl - Meat thermometer Using a sheet pan is ideal for this recipe. It allows everything to roast evenly, maximizing flavor. A mixing bowl helps combine the spices and coat the vegetables easily. A meat thermometer ensures that the chicken is cooked safely, reaching an internal temperature of 165°F (74°C). These ingredients and tools make the cooking process simple, allowing you to create a delicious meal with ease. - Preheat the oven to 425°F (220°C). - In a small bowl, mix together smoked paprika, garlic powder, onion powder, oregano, salt, and black pepper. This spice mix will add a lovely flavor to your dish. - Rub the spice mix all over the chicken thighs. Make sure to coat them well for maximum flavor. - Place the seasoned chicken thighs in the center of a large baking sheet. This will be the star of your dish. - In a large bowl, combine the sliced bell peppers, onion, and zucchini. - Drizzle the vegetables with olive oil and toss them until they are well-coated. This step adds flavor and helps them roast nicely. - Arrange the veggies around the chicken on the baking sheet. They will cook alongside the chicken and soak up those tasty juices. - Bake the pan in the oven for about 25-30 minutes. - Check the chicken for doneness. It should reach an internal temperature of 165°F (74°C). Ensure the veggies are tender and slightly caramelized. For tasty chicken, season it well. Use smoked paprika, garlic powder, and onion powder. Rub the spice mix all over the chicken thighs. Make sure every inch gets covered. This adds flavor and makes the chicken shine. A meat thermometer is key for cooking chicken safely. Insert it into the thickest part of the thigh. The chicken is done when it reaches 165°F (74°C). This ensures it is juicy and safe to eat. You can change up the veggies based on what you have. Try carrots, broccoli, or sweet potatoes. Each vegetable brings its own flavor and texture. Cooking time matters, too. Some veggies cook faster than others. For softer veggies, like zucchini, 25 minutes works well. For firmer ones, like carrots, you may need an extra 5-10 minutes. Always check for doneness to get that perfect bite. Pair your chicken and veggies with rice or quinoa. A side salad also works great. These add freshness and balance to your meal. For garnishes, fresh parsley gives a bright pop. Try a squeeze of lemon for extra zing. A drizzle of balsamic glaze can add depth. Each of these will enhance your dish beautifully. {{image_2}} You can spice things up by adding cayenne pepper. This will give your dish a nice kick. If you prefer herbs, try thyme or rosemary. These herbs add great flavor and smell. For a low-carb version, swap the zucchini with cauliflower. This keeps the meal light and tasty. If you need gluten-free options, rest assured this recipe is naturally gluten-free. Just check your spices to ensure they are safe. You can make this dish ahead of time and refrigerate it. Just keep it in an airtight container. If you want to freeze leftovers, place them in freezer-safe bags. When you’re ready, thaw them in the fridge overnight. To keep your leftovers fresh, use airtight containers. Glass or plastic containers work well. You can stack them easily in your fridge. Store your dish for up to four days. This way, you can enjoy your meal again without losing taste. For reheating, the oven is best. Preheat it to 350°F (175°C). Place the chicken and veggies in a baking dish. Heat for about 15-20 minutes. This method keeps the flavors strong and the chicken juicy. You can also use a microwave if you are short on time. Just cover the dish to keep moisture in. To freeze the dish, let it cool completely first. Then, place it in freezer bags or containers. Squeeze out as much air as possible. This helps to prevent freezer burn. Your meal will stay fresh for up to three months. When ready to eat, thaw it in the fridge overnight. Reheat it using the oven or microwave for a tasty meal. How long can I store leftovers? You can store leftovers in the fridge for up to four days. Use an airtight container to keep them fresh. If you want to keep them longer, freeze them. Can I use chicken breasts instead of thighs? Yes, you can use chicken breasts. They will cook faster than thighs, so check them early. What should I serve with sheet pan smoky paprika chicken? This dish pairs well with rice, quinoa, or a fresh salad. You can also add some crusty bread to soak up the juices. What is the internal temperature for cooked chicken? The safe internal temperature for cooked chicken is 165°F (74°C). Use a meat thermometer for the best results. Can I cook this recipe on a grill instead? Yes, you can grill the chicken and veggies! Just ensure you use a grill basket for the veggies. Cook them until tender and slightly charred. What can I use instead of smoked paprika? If you don’t have smoked paprika, use regular paprika with a dash of cayenne for a kick. Are there alternatives for olive oil? You can use avocado oil or vegetable oil in this recipe. Both will work well for roasting. This recipe covers everything you need for sheet pan smoky paprika chicken. You learned about the main and extra ingredients, helpful tools, and step-by-step instructions. I shared tips for perfect chicken and veggie swaps. You also found variations that suit different diets and meal prep ideas for leftovers. With these insights, you can create a tasty dish with ease. Enjoy cooking, and make it your own!

Sheet Pan Smoky Paprika Chicken Veggies Delight

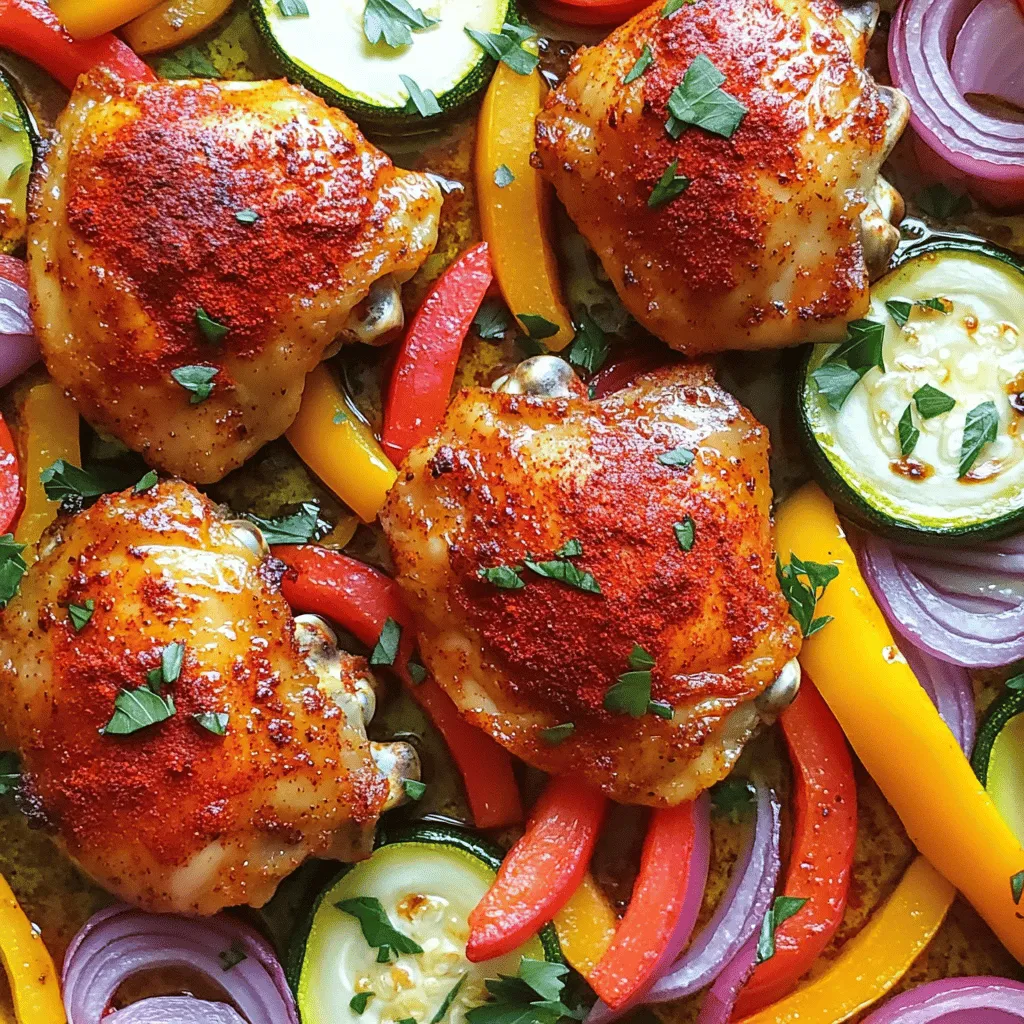
Looking for a simple, one-pan meal that bursts with flavor? You’ve come to the right place! My Sheet Pan Smoky

- 1 lb boneless, skinless chicken thighs - 1/4 cup low-sodium soy sauce - 2 tablespoons honey or maple syrup - 2 tablespoons rice vinegar - 1 tablespoon sesame oil - 2 cloves garlic, minced - 1 teaspoon fresh ginger, grated - Salt and pepper to taste For the teriyaki chicken, I love using boneless, skinless chicken thighs. They stay juicy and tender after cooking. The marinade is what really brings this dish to life. A mix of soy sauce, honey or maple syrup, rice vinegar, sesame oil, garlic, and ginger creates a sweet and savory flavor. This marinade coats the chicken and makes it super tasty. - 2 cups broccoli florets - 1 bell pepper (red or yellow), sliced into strips - 1 medium carrot, sliced thinly - 1 cup snap peas When it comes to veggies, I like to keep it colorful and fresh. Broccoli florets are great for crunch. You can use either red or yellow bell pepper for sweetness. Thinly sliced carrots add a nice bite, and snap peas bring a lovely snap. Tossing these together makes a colorful and healthy plate. - 1 tablespoon sesame seeds - 2 green onions, sliced Garnishing is key to a great dish. I sprinkle sesame seeds on top to add crunch and flavor. Sliced green onions not only look nice but also give a fresh taste. These small touches elevate the meal and make it more appealing. 1. First, preheat your oven to 425°F (220°C). This helps cook the chicken and veggies evenly. 2. Next, line a large baking sheet with parchment paper to prevent sticking. 3. In a bowl, whisk together the marinade ingredients. Combine low-sodium soy sauce, honey or maple syrup, rice vinegar, sesame oil, minced garlic, grated ginger, salt, and pepper. Mix until smooth. 1. Place the boneless, skinless chicken thighs in a zip-top bag or shallow dish. 2. Pour half of the marinade over the chicken. 3. Seal the bag or cover the dish. Let the chicken marinate for at least 15 minutes. For best flavor, let it marinate up to 2 hours in the fridge. 1. While the chicken marinates, prepare the veggies. In a large bowl, toss broccoli florets, sliced bell pepper, thinly sliced carrots, and snap peas with the remaining marinade. 2. Spread the marinated veggies evenly on one side of the prepared baking sheet. 3. Remove the chicken from the marinade and place it on the other side of the baking sheet. Discard the marinade used for the chicken. Now, you’re ready to bake! This simple process brings out great flavors and makes dinner easy. To cook evenly, cut chicken and veggies into similar sizes. This helps them cook at the same rate. For tender-crisp veggies, avoid overcooking. Aim for bright colors and a slight crunch. Cook chicken for 20 to 25 minutes at 425°F (220°C). Use a meat thermometer to check doneness. The chicken should reach 165°F (75°C) inside. Preheating the oven is key for great results. It helps the chicken and veggies cook properly. You can add spices like black pepper or crushed red pepper for a kick. If you want more flavor, try adding sesame seeds or green onions to the marinade. Adjust sweetness by adding more honey or maple syrup. For saltiness, use less soy sauce or choose a low-sodium version. {{image_2}} You can switch up the chicken in this recipe. Try using chicken breasts or drumsticks if you prefer. For seafood lovers, shrimp works great too. If you want a plant-based option, use tofu. Press the tofu to remove excess water, then cube it. Marinate and bake just like you would the chicken. Seasonal veggies add freshness to your dish. In spring, use asparagus or snap peas for a crisp texture. Summer is ideal for zucchini or bell peppers. In fall, try butternut squash or Brussels sprouts. Winter is great for hearty veggies like carrots and parsnips. Look for local or organic produce to boost flavor and support farmers. If you're gluten-free, swap regular soy sauce for a gluten-free version. Tamari works well here. For those cutting carbs, try using cauliflower rice instead of regular rice. It’s a great way to enjoy your meal while staying on track with your diet. You can also add some extra spices to enhance the flavors without extra carbs. Store your leftovers in an airtight container. This keeps them fresh and safe. You can refrigerate the teriyaki chicken and veggies for up to four days. Make sure the dish cools down before sealing it. To freeze, place the dish in a freezer-safe container. This is great for meal prep. You can store it for up to three months. When ready to eat, thaw it overnight in the fridge for best results. Reheat your teriyaki chicken and veggies in the oven or microwave. If using the oven, set it to 350°F (175°C). Heat for about 15-20 minutes. This helps keep the chicken juicy and the veggies crisp. If you microwave, use a microwave-safe dish and cover it. Heat in short intervals, stirring in between. This keeps the flavors intact and prevents sogginess. To make teriyaki sauce, combine these ingredients: - 1/4 cup low-sodium soy sauce - 2 tablespoons honey or maple syrup - 2 tablespoons rice vinegar - 1 tablespoon sesame oil - 2 cloves garlic, minced - 1 teaspoon fresh ginger, grated Mix these well in a bowl. You can adjust the sweetness or salt to taste. This simple recipe makes a flavorful sauce for your teriyaki chicken and veggies. Yes, you can use frozen vegetables. They are quick and easy. Just remember to thaw them first. Frozen veggies may cook faster than fresh ones. Keep an eye on them while baking. Fresh vegetables give a better crunch, but frozen ones work great in a pinch. Serve your teriyaki chicken and veggies with: - Steamed jasmine rice - Quinoa - Noodles These sides soak up the delicious sauce. You can also add a simple salad for a fresh touch. Enjoy your meal! This blog post covered how to make a tasty teriyaki chicken meal. You learned about fresh ingredients and step-by-step cooking methods. I shared tips for cooking and storage that can help you enjoy every bite. Remember, you can swap ingredients based on what you like or need. With simple adjustments, you can make this dish fit your diet. Explore, experiment, and find your favorite flavors. Cooking should be fun and satisfying, so enjoy your time in the kitchen!

Teriyaki Chicken Veggie Sheet Pan Flavorful Dinner Dish

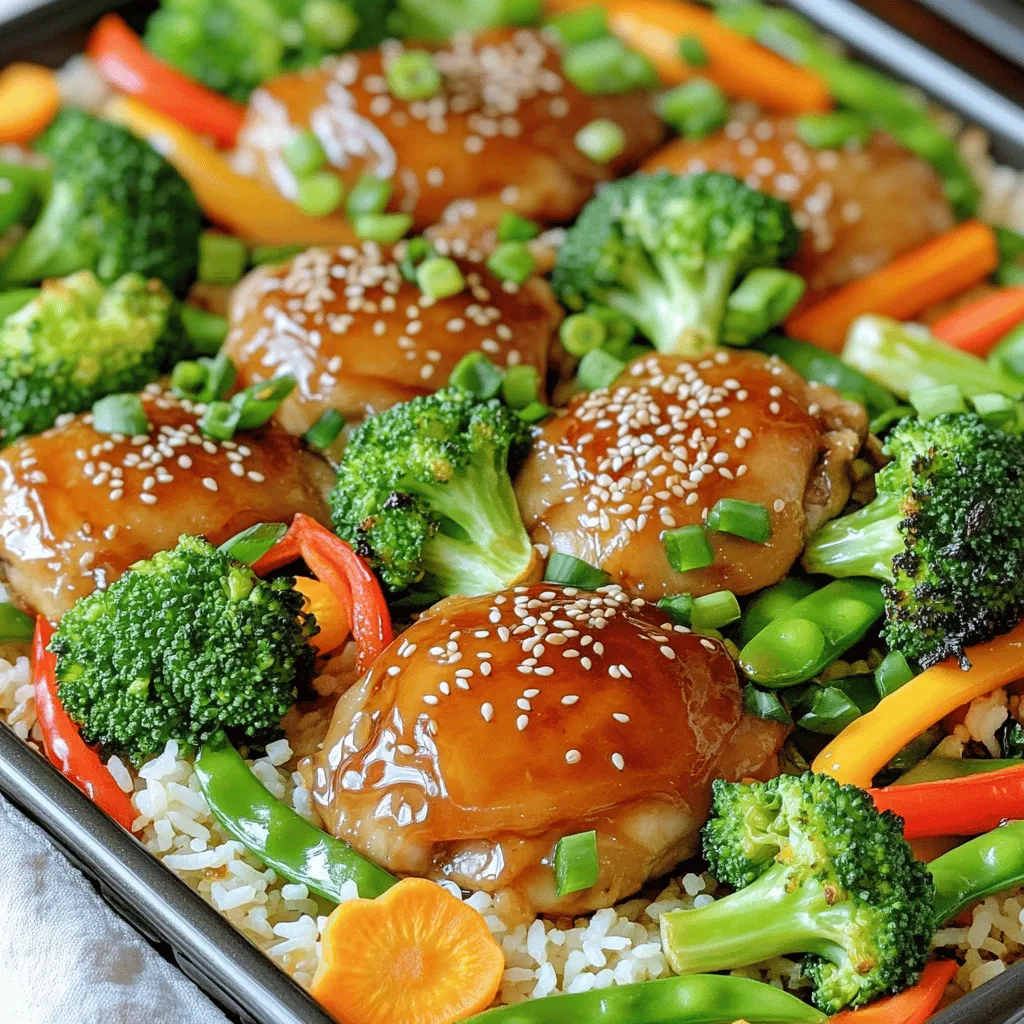
If you crave a quick, tasty meal, try this Teriyaki Chicken Veggie Sheet Pan dish! It’s easy to make, packed

To make S’mores Fudge Bars, start with these key ingredients: - 1 cup graham cracker crumbs - 1/2 cup unsweetened cocoa powder - 1/2 cup sugar - 1/4 teaspoon salt - 1/2 cup (1 stick) unsalted butter, melted - 1 can (14 oz) sweetened condensed milk - 1 cup semi-sweet chocolate chips - 1 cup mini marshmallows - 1/2 cup chopped chocolate (dark or milk, for topping) - Extra graham cracker crumbs for topping These ingredients create a rich, gooey, and sweet treat. The graham cracker crumbs form a delicious base. The chocolate chips and sweetened condensed milk blend to give that fudge texture. You can get creative with toppings! Here are some ideas: - Add crushed nuts for crunch. - Use white chocolate chips for a different flavor. - Swap mini marshmallows for larger ones, if you prefer. - Drizzle caramel sauce on top for extra sweetness. These options allow you to customize each bar. Feel free to experiment with flavors and textures. Each S’mores Fudge Bar has about: - Calories: 200 - Fat: 10g - Carbohydrates: 28g - Protein: 2g This treat is indulgent, so enjoy it in moderation. The mix of chocolate, sugar, and marshmallows makes it a delightful dessert. To start, preheat your oven to 350°F (175°C). This step is key for getting the crust just right. Line an 8x8-inch baking pan with parchment paper. Leave some paper hanging over the edges. This helps you lift the bars out later. In a large bowl, mix together the graham cracker crumbs, cocoa powder, sugar, and salt. This mix gives your crust a rich flavor. Next, drizzle in the melted butter. Stir until everything is combined and crumbly. Now, press the graham cracker mixture firmly into the bottom of your pan. Make sure it’s even all around. Bake this crust in the oven for 10 minutes. When it’s done, take it out and let it cool slightly. While the crust cools, it's time to make the fudge layer. Grab a medium saucepan and set it over medium heat. Combine the sweetened condensed milk and semi-sweet chocolate chips in the pan. Stir this mixture constantly. You want the chocolate to melt completely and become smooth. Once it’s ready, pour the chocolate fudge layer over the cooled crust. Spread it evenly with a spatula. Now comes the fun part! Sprinkle the mini marshmallows evenly over the fudge layer. Then, add the chopped chocolate on top. This will create a lovely topping. Return the pan to the oven for another 10 minutes. Bake until the marshmallows are golden and puffy. When it’s done, take it out and let it cool completely in the pan on a wire rack. After it cools, use the parchment paper to lift the bars out. Cut them into squares. For a special touch, sprinkle extra graham cracker crumbs on top before you serve. Enjoy your tasty S’mores Fudge Bars! To get a smooth fudge texture, use good quality chocolate. I recommend semi-sweet chocolate chips. When you heat the sweetened condensed milk, stir slowly. This helps the chocolate melt evenly. If the fudge seems too thick, add a tiny bit of milk. This will keep it creamy and rich. Store any leftover S'mores fudge bars in an airtight container. Keep them in the fridge. They will stay fresh for about five days. If you want to keep them longer, freeze the bars. Wrap each piece in plastic wrap and then place them in a freezer bag. They can last for up to three months. For a fun way to serve, cut the bars into squares. Place them on a rustic wooden board. You can add mini marshmallows on top for a cute look. Drizzle some chocolate sauce over them for extra sweetness. This makes every bite feel special and inviting. {{image_2}} To make gluten-free S’mores fudge bars, swap the regular graham crackers for gluten-free ones. Many brands offer tasty options. You can also check that your cocoa powder and chocolate chips are gluten-free. With these changes, you can enjoy the same great taste without gluten. If you want to change the flavor, try adding peanut butter. Just stir in half a cup of creamy peanut butter into the fudge layer. This adds a rich taste that pairs well with chocolate. For a mint twist, mix in a few drops of mint extract. This gives a refreshing flavor that makes the bars feel special. You can make no-bake S’mores fudge bars for a quick treat. Simply skip the baking steps. Mix the graham cracker crumbs, cocoa powder, sugar, and melted butter. Press this mixture into your pan. Next, heat the sweetened condensed milk and chocolate chips until smooth. Pour this over the crust and top with marshmallows and chocolate. Chill in the fridge for a few hours until set. This method is fast and easy, perfect for warm days! To keep your S’mores Fudge Bars fresh, place them in an airtight container. Use parchment paper to separate layers if you stack them. This helps avoid sticking. Store them in a cool, dry place. If you want them to last longer, refrigerate them. They can stay fresh for about five to seven days at room temperature. In the fridge, they can last up to two weeks. Freezing is a great option if you want to save some bars for later. Cut the bars into squares first. Wrap each square in plastic wrap. Then, place them in a freezer-safe bag or container. Make sure to remove as much air as possible. These bars can last up to three months in the freezer. When you’re ready to enjoy, let them thaw in the fridge overnight. If you prefer warm fudge bars, reheating is simple. Place a bar on a microwave-safe plate. Heat it for about 10 to 15 seconds. Check if it's warm enough; if not, heat for a few more seconds. Avoid overheating, as this can make the fudge too gooey. Enjoy them warm for a cozy treat. Yes, you can use any type of chocolate you love. Dark chocolate gives a rich taste. Milk chocolate adds sweetness. You can even mix them for a fun twist! Just keep the total amount the same. This way, your S’mores Fudge Bars still taste great. These bars last about a week when stored right. Keep them in an airtight container. They stay fresh at room temperature. If it's hot, store them in the fridge. They may last a bit longer if frozen. Just remember to wrap them well to avoid freezer burn. Yes, you can make these bars ahead of time. They are great for parties or snacks. Make them up to two days in advance. Just store them in an airtight container. If you freeze them, they keep for about three months. This makes them a perfect treat to have on hand! S’mores fudge bars are a tasty treat you can easily make at home. We covered the main ingredients, step-by-step instructions, and tips for perfecting your bars. You learned about fun variations, storage tips, and answered common questions. Enjoy these fudge bars as a sweet dessert. Get creative with toppings and flavors. You can impress friends and family with this simple recipe. Make these fudge bars, and you're sure to please everyone!

S’mores Fudge Bars Simple and Satisfying Treat

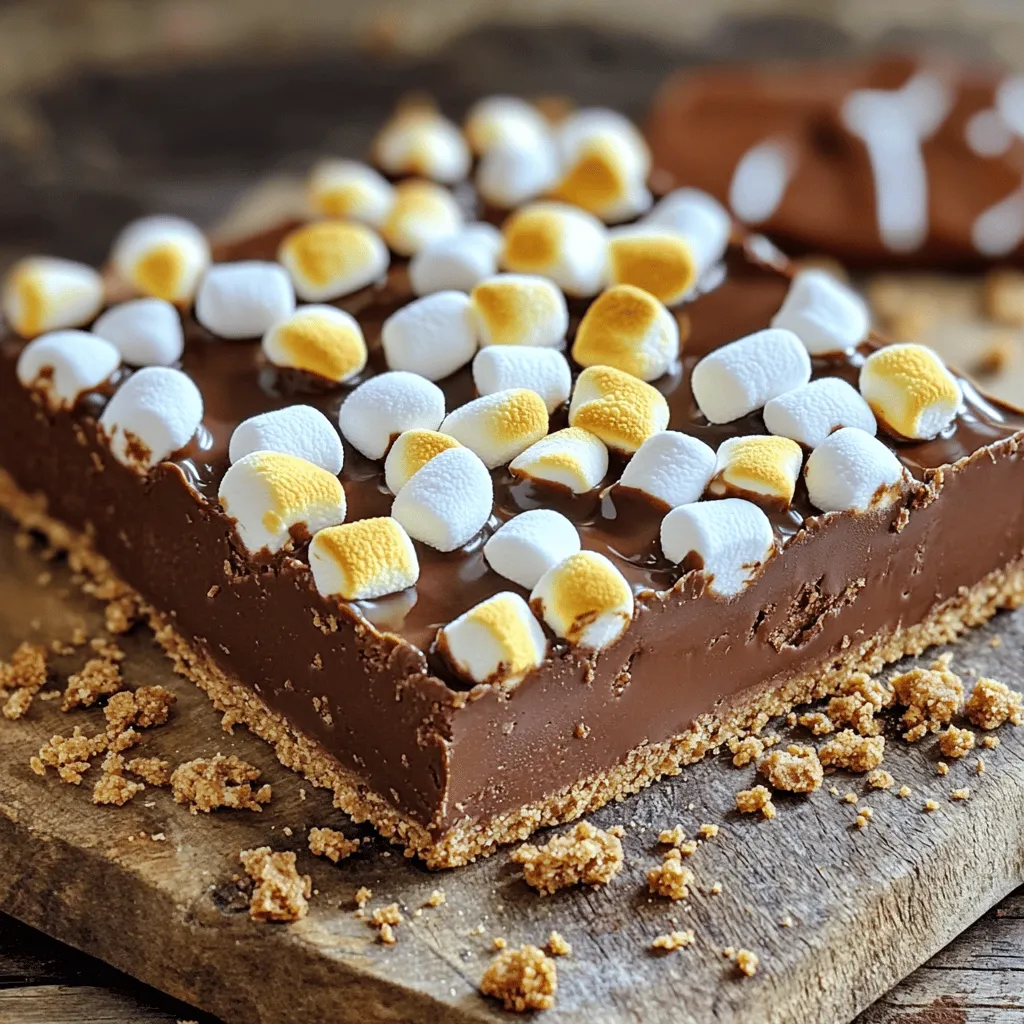
If you love the taste of s’mores, you’re in for a treat! S’mores Fudge Bars are simple, sweet, and packed

For the Cajun Shrimp Rice Skillet, gather these essential items: - 1 lb large shrimp, peeled and deveined - 1 cup long-grain rice - 2 cups low-sodium chicken broth - 1 medium onion, diced - 1 bell pepper, diced (red or green) - 2 cloves garlic, minced - 1 tablespoon Cajun seasoning - 1 teaspoon smoked paprika - 1 cup cherry tomatoes, halved - 1 cup corn kernels (fresh or frozen) - 2 tablespoons olive oil - Salt and pepper to taste - Fresh parsley, chopped (for garnish) Each ingredient plays a key role in the flavors of this dish. The shrimp bring protein, while the rice absorbs the broth and spices. Onions and bell peppers add sweetness and crunch. Garlic enhances the flavor, and Cajun seasoning packs a punch. Smoked paprika adds depth, while cherry tomatoes and corn provide freshness. Don't forget olive oil for cooking and seasoning with salt and pepper for balance. Fresh parsley at the end brightens the dish. First, heat two tablespoons of olive oil in a large skillet over medium-high heat. Add one medium onion and one diced bell pepper. Sauté these for 3-4 minutes until they soften. Once they soften, add two cloves of minced garlic. Cook this for another minute until it smells good. Then, stir in one tablespoon of Cajun seasoning and one teaspoon of smoked paprika. Toast the spices for about 30 seconds. This step wakes up the flavors. Next, add one cup of long-grain rice to the skillet. Stir well to coat the rice with the oil and spices. Cook it for one more minute. Now, pour in two cups of low-sodium chicken broth. Bring this mixture to a boil. After it boils, reduce the heat to low. Cover the skillet and let it simmer for about 15 minutes. This allows the rice to absorb all the tasty flavors. After 15 minutes, it's time to mix in one cup of halved cherry tomatoes and one cup of corn. Nestle one pound of large shrimp on top of the rice. Cover the skillet again and cook for another 5-7 minutes. The shrimp should turn opaque and look pink when done. To check if the shrimp are cooked, cut one open. It should be white inside and firm. Enjoy your colorful, tasty Cajun Shrimp Rice Skillet! - For the best shrimp flavor, use Cajun seasoning. A blend of spices adds depth. - Fluffy rice needs the right water. Use a 2:1 ratio of broth to rice. - Let the dish rest before serving. This helps the flavors meld together. - Do not overcook shrimp. They cook quickly and become rubbery if left too long. - Allow enough time for simmering. This lets the rice absorb all the flavors. - Taste your dish before serving. Adjust the seasoning to suit your palate. {{image_2}} You can easily change the proteins in this dish. Try chicken or sausage instead of shrimp. They add different flavors and textures. You can also switch the rice. Brown rice or jasmine rice works well. Each type gives a unique taste and feel. For spice lovers, consider adding more heat. A dash of cayenne or chili powder can kick it up. You can also play with flavors. Try adding cumin or coriander for a twist. These swaps let you make this dish your own. This skillet pairs well with sides. A simple green salad adds freshness. You can also serve it with crusty bread to soak up flavors. For sauces, try a squeeze of lemon or a drizzle of hot sauce. These can brighten the dish and add zing. Garnishes can enhance the meal. Fresh parsley adds color and flavor. You might also sprinkle some green onions on top. These little touches make your plate pop. To keep your Cajun shrimp rice skillet fresh, store leftovers in an airtight container. Place the cooled dish in the fridge right away. Try to eat it within three days for the best taste. If you want to freeze it, make sure it’s in a freezer-safe container. This way, it will stay good for up to three months. When you're ready to eat frozen leftovers, thaw them in the fridge overnight. Then, reheat on the stove or microwave until hot. In the fridge, your Cajun shrimp rice skillet lasts about three days. Look out for any strange smells or colors. If the shrimp looks dull or slimy, it's time to toss it. Always trust your senses. If it doesn’t smell or look right, don’t eat it. This way, you can enjoy your meal safely! Shrimp turn pink and opaque when cooked. They should curl into a C shape. Watch closely to avoid overcooking. Overcooked shrimp can become tough and rubbery. For best results, cook them for about 5-7 minutes in the skillet. Yes, you can prepare this dish ahead. Cook it as directed and let it cool. Store it in an airtight container in the fridge. When ready to eat, reheat it on the stove or in the microwave until warm. This makes for a quick meal later on. You can try Italian seasoning for a different flavor. Taco seasoning also works well for a fun twist. For more heat, use chili powder or paprika. Feel free to mix and match spices to suit your taste! Yes, this recipe is gluten-free! The ingredients used, like shrimp, rice, and vegetables, do not contain gluten. Always check labels on packaged items, like broth, to ensure they are gluten-free. Absolutely! Adding more vegetables boosts flavor and nutrition. Consider bell peppers, zucchini, or spinach. Just make sure to chop them small so they cook evenly. This dish is flexible, so get creative! This blog post covered how to make a delicious Cajun shrimp rice skillet. We discussed the ingredients, cooking steps, and tips for perfecting the dish. You learned about storing leftovers and alternatives for proteins or spices. In conclusion, cooking is fun and rewarding. With these steps, you can create a tasty meal. Enjoy experimenting and making this dish your own!

Cajun Shrimp Rice Skillet Quick and Tasty Dinner

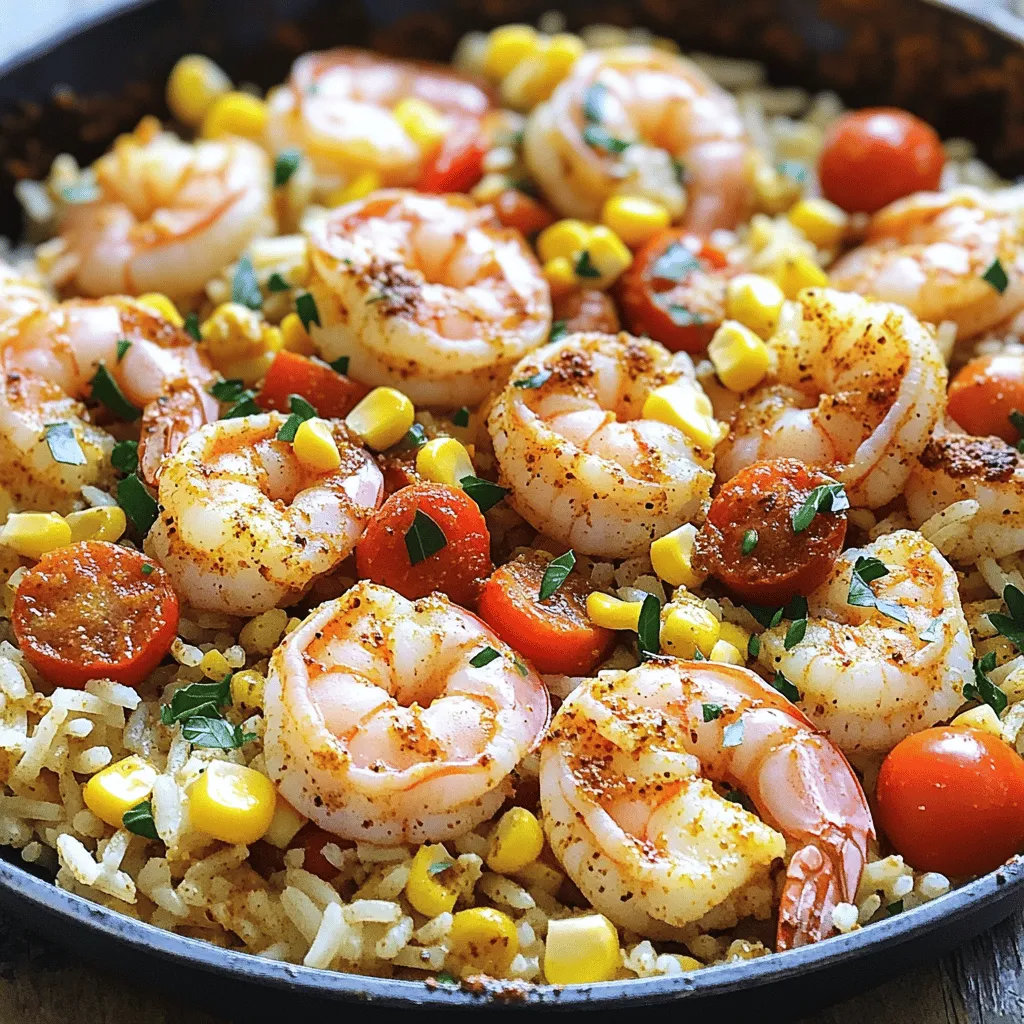
Looking for a quick and tasty dinner that packs a punch? This Cajun Shrimp Rice Skillet is your answer! With

- 1 ½ cups all-purpose flour - 1 teaspoon baking soda - ½ teaspoon baking powder - ½ teaspoon salt - 1 teaspoon ground cinnamon - ½ teaspoon ground nutmeg - ½ teaspoon ground ginger These dry ingredients form the base of your Pumpkin Streusel Bread. The all-purpose flour gives the bread its structure. Baking soda and baking powder help it rise. The spices add warmth and flavor, creating that cozy, holiday vibe. - 1 cup canned pumpkin puree - ½ cup granulated sugar - ½ cup packed brown sugar - ½ cup vegetable oil - 2 large eggs - 1 teaspoon vanilla extract The wet ingredients bring moisture and sweetness. Canned pumpkin puree creates a rich, smooth texture. Both sugars add sweetness and a hint of caramel flavor. Oil keeps the bread soft, while eggs help it rise and bind together. Vanilla adds a lovely aroma. - ½ cup chopped walnuts or pecans Adding nuts can enhance the texture. They provide a nice crunch. If you love nuts, fold them into the batter for a delightful surprise in every slice. - ½ cup all-purpose flour - ¼ cup brown sugar - ½ teaspoon ground cinnamon - ¼ cup unsalted butter, cold and cubed - ¼ cup rolled oats The streusel topping is what makes this bread special. Its crumbly texture contrasts with the soft bread. The combination of flour, brown sugar, and cinnamon gives it a sweet, spiced flavor. Cold butter is key to achieving that perfect crumb. Oats add a hearty touch. - Preheat your oven to 350°F (175°C). - Grease a 9x5-inch loaf pan or line it with parchment paper. - In a medium bowl, mix together 1 ½ cups of all-purpose flour, 1 teaspoon of baking soda, ½ teaspoon of baking powder, ½ teaspoon of salt, 1 teaspoon of ground cinnamon, ½ teaspoon of ground nutmeg, and ½ teaspoon of ground ginger. Set this aside for later. - In a large bowl, combine 1 cup of canned pumpkin puree, ½ cup of granulated sugar, ½ cup of packed brown sugar, ½ cup of vegetable oil, 2 large eggs, and 1 teaspoon of vanilla extract. - Mix these ingredients until the mixture is smooth and well combined. - Gradually fold the dry ingredients into the wet ingredients. Stir until just combined. - Be careful not to overmix; this keeps the bread light. If you like, fold in ½ cup of chopped walnuts or pecans for added texture and flavor. - Pour the batter into the prepared loaf pan. Spread it evenly. - To make the streusel topping, mix ½ cup of all-purpose flour, ¼ cup of brown sugar, ½ teaspoon of ground cinnamon, and ¼ cup of cold, cubed unsalted butter in a medium bowl. - Use a fork or pastry cutter to mix until the mixture looks like coarse crumbs. Stir in ¼ cup of rolled oats. - Sprinkle the streusel topping evenly over the batter. - Bake in the preheated oven for 55 to 60 minutes. Check if a toothpick comes out clean from the center. If the top browns too fast, cover it loosely with aluminum foil. - Allow the bread to cool in the pan for about 10 minutes. - Carefully remove it from the pan and let it cool completely on a wire rack. - Ensure proper measurements: Use a kitchen scale for accuracy. This helps get the right texture. - Avoid overmixing batter: Stir gently until just combined. This keeps your bread light and fluffy. - Achieving the perfect streusel texture: Mix cold butter with flour and sugar until crumbly. This creates a nice texture on top. - Suggestions for variations in streusel ingredients: Try adding chopped nuts or spices for extra flavor. You can use almonds or pecans for a crunch. - Best ways to serve Pumpkin Streusel Bread: Slice the bread warm and spread with butter or cream cheese. Dust with powdered sugar for a pretty touch. - Pairing options for a delicious experience: Enjoy this bread with coffee or tea. It also pairs well with a scoop of vanilla ice cream. {{image_2}} You can make Pumpkin Streusel Bread even more fun by adding extras. Chocolate chips give a sweet twist. Dried fruits like cranberries or raisins add chewiness. You can also add spices, like cardamom or cloves, for a warm taste. Each of these changes brings new flavor to your bread. Get creative! If you need a gluten-free version, it’s simple! You can use gluten-free flour blends instead of all-purpose flour. Look for a mix that contains xanthan gum for the best results. This swap keeps the bread light and fluffy. It’s a great way for everyone to enjoy this treat. Want to make this bread a bit healthier? You can lower the sugar. Try using only ¼ cup of granulated sugar and ¼ cup of brown sugar. Another option is to replace oil with unsweetened applesauce. This swap keeps the bread moist without extra fat. These small changes make a big difference without losing flavor. To store Pumpkin Streusel Bread at room temperature, wrap it tightly in plastic wrap. This keeps the bread soft and fresh. Place it in a cool, dry area. It can last for about 2-3 days this way. If you want it to last longer, consider refrigerating it. The cold air helps keep it fresh. For long-term storage, freezing is best. First, let the bread cool completely. Wrap it well in plastic wrap and then foil. This keeps out air and moisture. You can freeze it for up to three months. When you are ready to eat, thaw it in the fridge overnight. To reheat, slice the bread and warm it in the oven. Set your oven to 350°F (175°C) and heat for about 10-15 minutes. This makes it warm and tasty again. You can also microwave slices for about 20-30 seconds. Pumpkin Streusel Bread stays fresh for about 2-3 days at room temperature. In the fridge, it can last about a week. If frozen, it is best enjoyed within three months. Always check for signs of spoilage before eating, like mold or an off smell. Pumpkin puree is pure pumpkin. It has no added sugar or spices. Pumpkin pie filling, however, has added sugar, spices, and sometimes preservatives. When making Pumpkin Streusel Bread, always use pumpkin puree. This gives the bread the right flavor and texture. Yes, you can use fresh pumpkin. Start by peeling, chopping, and cooking the pumpkin until soft. Then, mash it to make puree. You will need about 2 cups of fresh pumpkin. Drain excess water to avoid soggy bread. The taste will be fresh and vibrant. To check if your bread is done, insert a toothpick into the center. If it comes out clean, the bread is ready. If it has batter on it, bake for a few more minutes. Keep an eye on the top. If it browns too fast, cover it loosely with foil. Yes! You can turn this bread into muffins. Just pour the batter into a muffin tin. Fill each cup about two-thirds full. Bake at the same temperature for about 20-25 minutes. Check with a toothpick to see if they are done. If you want to skip nuts, try using seeds like pumpkin or sunflower seeds. You could also add chocolate chips for sweetness. Dried fruits like raisins or cranberries make a tasty addition too. Choose what you like for a fun twist! This blog post covered everything you need to make Pumpkin Streusel Bread. We explored the ingredients, from dry and wet to optional add-ins. You learned step-by-step how to prepare, combine, and bake, plus some handy tips along the way. Consider trying flavor variations or healthier swaps for an extra twist. Proper storage extends its life, so remember those tips. Enjoy this warm, tasty treat with family or friends. With these insights, you’ll bake with confidence and delight every time.

Pumpkin Streusel Bread Irresistible Holiday Treat

If you’re looking for a sweet holiday treat that will warm your heart, Pumpkin Streusel Bread is it! The soft,

- 2 cups steel-cut oats - 6 cups water - 1/2 cup maple syrup - 1/2 cup brown sugar, packed - 1 teaspoon vanilla extract - 1 teaspoon cinnamon - Pinch of salt - 1/4 cup chopped pecans or walnuts - Fresh berries - Sliced bananas The main ingredients for this oatmeal are simple yet rich. Steel-cut oats give it a hearty texture. You will need six cups of water to cook them. Maple syrup adds sweetness, while brown sugar boosts the flavor. The additional flavors really make this dish shine. Vanilla extract adds warmth and depth. A teaspoon of cinnamon gives a lovely spice. Don’t forget a pinch of salt to bring all the flavors together. For toppings, you can get creative! Chopped pecans or walnuts add crunch. Fresh berries or sliced bananas make it fresh and colorful. You can mix and match these options to make your bowl unique. Enjoy experimenting with these ingredients. Start by lightly greasing the inside of your slow cooker. You can use cooking spray or butter. This step helps prevent the oatmeal from sticking. Next, set the slow cooker to low heat. This ensures a gentle cook for the oats, making them creamy and tender. In the slow cooker, mix together the steel-cut oats and water. Then, add the maple syrup and brown sugar. The syrup and sugar give the oats a sweet taste. Next, stir in the vanilla extract, cinnamon, and a pinch of salt. Make sure everything is well mixed. This helps the flavors blend evenly throughout the oatmeal. Cover the slow cooker and let it cook on low heat for 6 to 8 hours. This long cook time is key for soft oats. Stir the mixture every so often, if you can. This helps to break up clumps and evenly distribute the flavors. About 30 minutes before serving, you can add the chopped nuts, if you want. They add a nice crunch to your bowl of oatmeal. Once cooked, give the oatmeal a final stir before serving. Cooking time is key to great oatmeal. If you cook it long enough, the oats will be soft and creamy. I recommend cooking for 6 to 8 hours on low heat. This allows the flavors to blend well. Stir occasionally to keep everything from clumping together. A good stir helps mix the ingredients and keeps the oats from sticking to the bottom. To boost the flavor, I suggest adding spices like nutmeg or ginger. These spices add warmth and depth. You can also try almond extract for a unique twist. If you want to change the sweetness, consider using honey or agave syrup. Both will bring a different taste while still being sweet. Presentation matters! Serve your oatmeal in cozy, rustic bowls. Drizzle a little maple syrup on top to make it look even better. A sprinkle of cinnamon adds warmth and color. Fresh berries or banana slices not only taste great but also make the dish pop with color. For drinks, a warm cup of tea or coffee pairs perfectly with this sweet bowl of goodness. {{image_2}} You can change the fruit in your oatmeal for fun flavors. Dried fruits like raisins, cranberries, or apricots add sweetness and texture. When using dried fruit, add them in during cooking. This lets them soak up the flavors. You can also swap in fresh fruits. Berries, bananas, or peaches work well. Add them right before serving. This keeps them fresh and bright. Nuts add great crunch to oatmeal. Try different nuts like almonds, walnuts, or pecans. Each nut brings a unique flavor. Add them about 30 minutes before serving. This way, they stay crunchy. If you want a different texture, seeds are great too. Chia seeds or pumpkin seeds can replace nuts. They are healthy options packed with nutrients. For a fun twist, add cocoa powder to make chocolate oatmeal. Just mix in a few tablespoons when you add the oats. You can also try peanut butter. It gives a creamy texture and rich taste. Using flavored syrups is another option. Vanilla or hazelnut syrup can enhance the dish. Just stir in a bit to add a new layer of flavor. Store leftover oatmeal in airtight containers. Glass or plastic containers work well. Make sure you let the oatmeal cool first. Properly stored, your oatmeal lasts for up to five days in the fridge. Always check for any signs of spoilage before eating. To reheat oatmeal, use the microwave or a stovetop. If using the microwave, place the oatmeal in a bowl and add a splash of water or milk. Heat in short intervals, stirring in between. On the stovetop, warm it in a small pot over low heat, stirring frequently. Add a bit of water or milk to restore creaminess. You can freeze leftover oatmeal for later use. Scoop portions into freezer-safe bags or containers. Press out any extra air before sealing. This keeps it fresh. To thaw, place it in the fridge overnight. Reheat in the microwave or stovetop, adding a splash of water or milk to make it creamy again. Yes, you can use rolled oats. However, the cooking time will change. Rolled oats cook faster, usually in about 4 to 5 hours on low. Steel-cut oats take longer, about 6 to 8 hours, to become soft. This difference affects the texture too. Steel-cut oats stay chewy, while rolled oats become creamier. If you don’t have maple syrup, you can use honey or agave nectar. These sweeteners work well but may change the flavor a bit. If you choose honey, use a little less than the recipe calls for. Honey is sweeter than maple syrup, so adjust the amount accordingly. You can keep leftovers in the fridge for about 5 days. Store them in airtight containers. Look for any signs of spoilage, like an off smell or mold. If it smells bad or looks strange, it’s best to throw it away. Always trust your senses when it comes to food safety. In this post, we explored the ingredients and steps to make perfect slow-cooked oatmeal. We covered main ingredients like steel-cut oats and flavorful add-ins such as vanilla and cinnamon. You learned useful tips for consistency and flavor enhancement, plus creative variations and serving ideas. To wrap up, making oatmeal in a slow cooker is simple and rewarding. With a few tweaks, you can make it your own. Enjoy experimenting and find your favorite combo!

Slow Cooker Maple Brown Sugar Oatmeal Delight

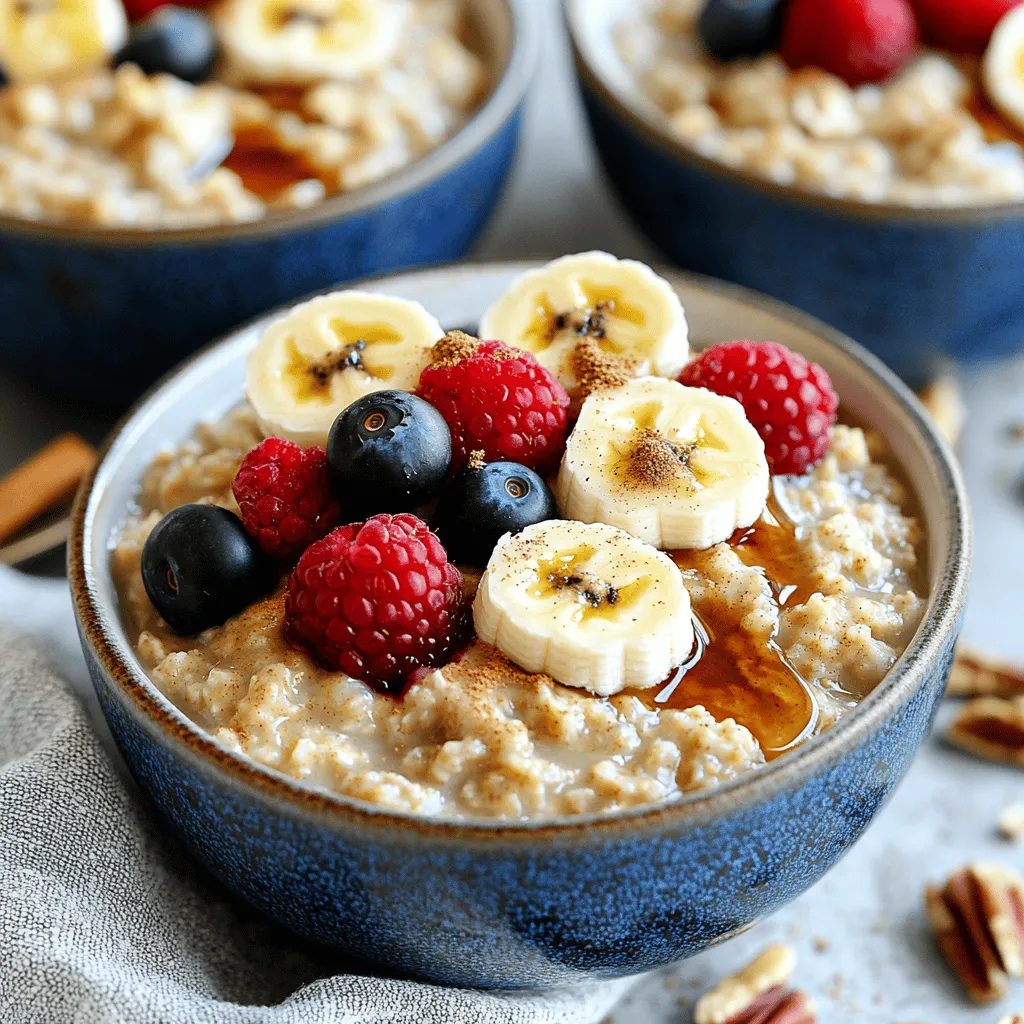
Are you ready to wake up to a warm bowl of comfort? My Slow Cooker Maple Brown Sugar Oatmeal Delight

Older posts
Newer posts
← Previous Page1 … Page22 Page23 Page24 … Page84 Next →

dsad

© 2026 juliesdish • Built with GeneratePress

Our Policies

  • Copyright Policy
  • Cookie Policy
  • GDPR Policy
  • Privacy Policy
  • Disclaimer
  • Terms Of Use

More Information

  • Home
  • About
  • Contact
  • Appetizers
  • Dessert
  • Dinner
  • Drinks
©2026, juliesdish About Back To Top