Skip to content
DisclaimerTerms Of UseGDPR PolicyCookie Policy

juliesdish

  • Home
  • Drinks
  • Appetizers
  • Dinner
  • Dessert
  • About
  • Contact
  • Privacy Policy
DisclaimerTerms Of UseGDPR PolicyCookie Policy

NO-ING-IMG

- 2 lbs chicken wings - 2 tablespoons olive oil - 1/4 cup honey - 2 tablespoons soy sauce - 1 tablespoon sriracha (adjust to taste) - 1 teaspoon garlic powder - Sesame seeds - Chopped green onions - Lime wedges To make Air Fryer Sweet & Spicy Chicken Wings, you need simple yet bold ingredients. First, grab the chicken wings. They are the star of the dish. The olive oil helps the wings crisp up nicely. Honey adds sweetness and helps with caramelization. Next, we have seasonings. Soy sauce gives a savory punch. Sriracha adds heat, but you can adjust the amount to your taste. Garlic powder brings in that rich, savory flavor. Each ingredient plays a key role in the overall taste. Finally, consider garnish options. Sesame seeds add crunch and a nutty flavor. Chopped green onions brighten the dish with color and freshness. Lime wedges bring a zesty kick that pairs well with the wings. These ingredients combine to create a delicious snack or meal that everyone will love! First, you need to dry the chicken wings. Use paper towels to pat them dry. This step is key for crispiness. Next, combine the marinade ingredients in a large bowl. You’ll need olive oil, honey, soy sauce, sriracha, garlic powder, onion powder, smoked paprika, salt, and pepper. Mix these well until they blend into a smooth sauce. Now, toss the wings in the marinade. Make sure every wing gets coated. This adds flavor and helps with tenderness. Let the wings sit in the marinade for 30 minutes. This time allows the flavors to soak in, making each bite delicious. Preheat your air fryer to 400°F (200°C). This step ensures the wings cook evenly and get crispy. Arrange the marinated wings in a single layer in the air fryer basket. Avoid overlapping to allow hot air to circulate. Cook the wings for 25-30 minutes. Flip them halfway through for even cooking. You want them golden brown and crispy. Once done, toss the wings in any leftover marinade for extra flavor. Serve them hot, and enjoy the sweet and spicy goodness! To get crispy wings, you must dry them well. Use paper towels to pat the wings dry. Moisture can prevent them from crisping up nicely in the air fryer. Set your air fryer to 400°F (200°C). This high temperature makes the skin crispy and golden. Cook the wings in a single layer. This helps them cook evenly. Avoid stacking the wings for the best results. Want more heat? You can easily modify the spice levels with sriracha. Just add more if you like it hot. If you prefer a milder flavor, use less. You can also add other spices for extra flavor. Try a pinch of cayenne or some black pepper. A touch of smoked paprika adds depth, too. When serving, arrange the wings on a large platter. Garnish with sesame seeds and chopped green onions. This makes your dish look appealing. Pair your wings with great sides. Serve them with celery sticks and a cool ranch dip. A fresh salad or crispy fries also goes well. Enjoy your meal! {{image_2}} You can change the taste of these wings easily. Try using different sauces. For a barbecue twist, swap honey for your favorite BBQ sauce. You can also replace sriracha with teriyaki sauce for a sweeter flavor. If you like it hot, add more sriracha. You can also mix in cayenne pepper or crushed red pepper flakes. This gives your wings a nice kick. Just remember to taste as you go! Air frying gives wings a crispy texture, but you can bake them too. Baking takes longer, about 40-45 minutes, but it works well. Just set your oven to 400°F (200°C) and follow the same marinating steps. Grilling is another option. It adds a smoky flavor. Preheat your grill and cook the wings for 20-25 minutes. Flip them often to avoid burning. Both baking and grilling offer tasty alternatives to air frying. Want gluten-free wings? Use gluten-free soy sauce or tamari. These options keep the flavor while making the dish safe for gluten-sensitive eaters. For a low-sugar twist, try using sugar-free honey or a sugar substitute. This keeps the sweet taste without the extra sugar. Always check labels to ensure your choices fit your needs. To keep your wings fresh, refrigerate them right away. Place the wings in an airtight container. This keeps them from drying out or absorbing odors from other foods. If you want to stack them, use parchment paper between layers. This prevents sticking and makes it easier to grab what you need later. When reheating wings, aim for the air fryer or oven. Both methods help keep the wings crispy. Preheat your air fryer to 375°F (190°C). Heat the wings for about 5-7 minutes. If using an oven, set it to 350°F (175°C) and bake for 10-15 minutes. This keeps the outside crunchy and the inside juicy. To freeze cooked wings, let them cool completely first. This stops ice crystals from forming. Place the wings in a freezer-safe bag or container. Remove as much air as possible to avoid freezer burn. For thawing, place the wings in the fridge overnight. This keeps them safe and tasty for your next meal. Air frying chicken wings takes about 25 to 30 minutes. Set your air fryer to 400°F (200°C). This high heat helps the wings get crispy and golden. Flip the wings halfway through cooking. This ensures even cooking and crispiness on both sides. Yes, you can use frozen chicken wings in the air fryer. Just add extra cooking time. Cook them for about 35 to 40 minutes at 400°F (200°C). It’s best to arrange them in a single layer. This allows hot air to circulate around each wing. No need to thaw them first! A great sauce for sweet and spicy wings is a mix of honey and sriracha. You can also use store-bought sauces like sweet chili sauce or buffalo sauce. If you want to make your own, combine honey, soy sauce, and sriracha. This gives a perfect blend of sweet and heat. Adjust the sriracha to match your spice level! To make great chicken wings, we covered key ingredients, preparation, and cooking tips. Start with fresh wings and a tasty marinade. Use techniques for crispiness and adjust flavors to suit your taste. Remember to store leftovers properly and reheat them effectively. Enjoy experimenting with different sauces and cooking methods. You can create your perfect wing experience, whether for a party or a cozy night in. Have fun perfecting your recipe and sharing it with others!

Air Fryer Sweet & Spicy Chicken Wings Delight

Get ready to indulge in the ultimate snack with my Air Fryer Sweet & Spicy Chicken Wings Delight! Perfectly crispy

- Pre-made pizza dough - Olive oil - 2 large onions - 8 ounces button mushrooms - 2 cloves garlic - 1 teaspoon fresh thyme leaves - 1 teaspoon balsamic vinegar - 1 ½ cups shredded mozzarella cheese - ¼ cup grated Parmesan cheese - Salt and pepper - Fresh basil For this pizza, you need a mix of fresh and tasty ingredients. Start with pre-made pizza dough for ease. This saves time and lets you focus on flavor. Use two large onions; they bring sweetness when caramelized. Choose 8 ounces of button mushrooms for a mild taste. You’ll also need two cloves of garlic, which add a nice kick. Fresh thyme leaves give an earthy note, while balsamic vinegar adds depth. Cheese is key in this dish. Use 1 ½ cups of shredded mozzarella for that gooey texture. Add ¼ cup of grated Parmesan for extra flavor. Don't forget salt and pepper to season it all. Finish with fresh basil, which brightens the pizza. These ingredients work together to create a pizza that is both simple and tasty. You can mix and match them easily to suit your taste. To caramelize the onions, start by heating 1 tablespoon of olive oil in a large skillet over medium heat. This is the key to getting that sweet flavor. Add 2 large, thinly sliced onions to the pan. Sprinkle a pinch of salt over the onions. This salt helps to draw out moisture and boost flavor. Cook the onions for about 20-25 minutes. Stir them occasionally. You want them to turn a deep golden brown. This deep color means they are nicely caramelized. Next, grab a separate skillet for the mushrooms. Add the remaining tablespoon of olive oil over medium heat. Once the oil is hot, add 8 ounces of sliced button mushrooms. Cook these for about 5-7 minutes. You will see them turn golden and release moisture. To add flavor, stir in 2 cloves of minced garlic, 1 teaspoon of fresh thyme leaves, and 1 teaspoon of balsamic vinegar. Cook this mixture for another 2 minutes. Season with salt and pepper to taste. Now it’s time to prepare the dough. Preheat your oven to 475°F (245°C) based on your pizza dough's instructions. Roll out the pre-made pizza dough on a floured surface. Make it as thick or thin as you like. Transfer the dough to a pizza stone or baking tray. Spread the caramelized onions evenly over the dough. Then layer the mushroom mixture on top. Sprinkle 1 ½ cups of shredded mozzarella cheese evenly over everything. Add ¼ cup of grated Parmesan cheese for extra flavor. Place the pizza in your preheated oven. Bake for 12-15 minutes. You want the cheese to be bubbling and the crust to be a nice golden brown. Once done, take the pizza out and let it cool for a couple of minutes. Garnish with fresh basil leaves before slicing. Enjoy your delicious pizza! To get the best flavor from your onions, take your time. Use medium heat and stir them often. This helps them cook evenly. If you rush, they might burn. It takes about 20-25 minutes for them to turn a nice golden brown. A pinch of salt helps too. It draws out moisture and adds flavor. If you smell burnt onions, turn down the heat right away. When picking cheese, mozzarella is a must. It melts well and has a mild taste. Parmesan adds a nice saltiness. You can mix both for great depth. If you want, you can use homemade cheese or store-bought. Both work fine, but fresh cheese often tastes better. You can make this pizza your own! Try adding spinach, artichokes, or olives for extra flavor. If you want it meat-free, just stick with the mushrooms and onions. For a vegan option, use plant-based cheese. There are many tasty choices out there today. Don't be afraid to experiment! {{image_2}} You can switch up the sauce for your pizza. Try using pesto instead of tomato sauce. This adds a fresh flavor. You can also make a white sauce. A blend of cream and garlic gives a nice touch. Want some heat? Add chili flakes to your sauce. This brings a spicy kick that warms your taste buds. Using seasonal mushrooms can enhance your pizza. Shiitake, portobello, or oyster mushrooms add rich flavors. You can also add seasonal veggies. In the fall, add spinach or kale. In summer, try cherry tomatoes or zucchini. These ingredients keep your pizza fresh and exciting. If you need gluten-free options, you can choose different pizza bases. Cauliflower crust is a popular choice. It is light and full of flavor. You can also use a chickpea flour base for a unique taste. Both options make the pizza gluten-free while still being tasty. To keep your pizza fresh, follow these simple steps: - First, let the pizza cool to room temperature. - Wrap it in plastic wrap or aluminum foil. - Place it in an airtight container. - Store the container in the fridge for up to three days. For long-term storage, freeze your leftovers: - Slice the pizza into pieces. - Wrap each slice in plastic wrap. - Place the wrapped slices in a freezer-safe bag. - Store in the freezer for up to two months. When it's time to enjoy your pizza again, reheating matters: - For the best texture, use an oven. Preheat it to 350°F (175°C). - Place the pizza on a baking sheet. - Heat for about 10 minutes, until hot and crispy. You can also use a microwave, but it may affect the texture: - Place a slice on a microwave-safe plate. - Heat for about 30 seconds to 1 minute. - If you can, place a cup of water in the microwave. This helps keep the crust less soggy. Choose your method based on how you like your pizza! You can use either homemade or store-bought pizza dough. If you want to make your own, mix flour, water, yeast, and salt. Knead it for a few minutes. Let it rise for about an hour. This gives you fresh dough with great flavor. Store-bought options save time. Many brands offer good quality. Just make sure to check the label for any preservatives. Yes, you can prepare caramelized onions ahead of time. Cook them as directed and let them cool. Store them in an airtight container in the fridge. They last for about three days. When you're ready, simply reheat them in a pan. This saves time on pizza night. This pizza pairs well with fresh salads. Try a simple green salad with a light vinaigrette. Roasted vegetables also make a great side. If you want something hearty, serve a bowl of soup. Tomato or mushroom soup complements the pizza's flavors nicely. This blog post covered how to make a delicious pizza with sweet caramelized onions and rich mushrooms. You learned about each ingredient, how to cook the onions, and the best ways to assemble and bake your pizza. Remember, you can customize your pizza with various toppings and sauces. Don’t forget to store leftovers properly and reheat them so they taste great. Enjoy experimenting with this fun recipe!

Caramelized Onion Mushroom Pizza Simple and Tasty Dish

Are you ready to create a delicious Caramelized Onion Mushroom Pizza? This simple and tasty dish will impress your friends

- 4 cups ripe tomatoes, chopped (fresh or canned) - 1 medium onion, diced - 1 red bell pepper, chopped - 4 cloves garlic, minced - Salt and pepper to taste - 1 tablespoon brown sugar - 1 teaspoon dried oregano - 1 teaspoon dried thyme These main ingredients form the base of our soup. Ripe tomatoes give it a fresh taste. Onions and bell peppers add sweetness and depth. Garlic brings a warm flavor that everyone loves. Brown sugar helps balance the acidity of the tomatoes. Oregano and thyme add a nice herbal touch. Salt and pepper season the soup perfectly. - 4 cups vegetable broth - ½ cup heavy cream or coconut cream (for a vegan option) - 1 cup fresh basil leaves, roughly chopped - Olive oil for drizzling The vegetable broth makes the soup rich and savory. Heavy cream adds a creamy texture, while coconut cream is a great vegan choice. Fresh basil gives a burst of flavor. A drizzle of olive oil on top makes it look fancy and tastes amazing. - Cheese or croutons for garnish - Other herbs or spices to enhance flavor You can add cheese for a rich topping. Croutons add a nice crunch. Feel free to use other herbs like parsley or spices like red pepper flakes for a kick. These optional add-ins let you customize your soup to suit your taste. Start by chopping your vegetables and herbs. Dice one medium onion and chop four cups of ripe tomatoes. You can use fresh or canned tomatoes. Next, mince four cloves of garlic and chop one red bell pepper. This colorful mix boosts the soup's flavor. Measure and organize your ingredients. You will need four cups of vegetable broth, one tablespoon of brown sugar, and one teaspoon each of dried oregano and thyme. Gather salt, pepper, and one cup of fresh basil leaves. It helps to have everything ready before you start cooking. Combine all the ingredients in the slow cooker. Add the chopped tomatoes, onion, garlic, red bell pepper, and vegetable broth. Then, stir in the brown sugar, oregano, thyme, salt, and pepper. Mix everything well to ensure even cooking. Set your slow cooker to low for six to eight hours or high for four to five hours. Cook until the vegetables become tender and the flavors blend nicely. The long cooking time helps create that rich, comforting taste. Once the soup is done cooking, use an immersion blender to puree it until smooth. If you don’t have one, carefully transfer the soup to a traditional blender in batches. This step gives your soup a creamy texture. Next, stir in the fresh basil leaves and half a cup of heavy cream or coconut cream for a vegan option. Allow the soup to simmer on low for an additional 30 minutes. This enhances the flavors even more. Taste your soup and adjust the seasoning if needed. Add more salt or pepper to fit your taste. To make your soup shine, add extra herbs. Fresh thyme or parsley can add a bright touch. You can also mix in a pinch of red pepper flakes for warmth. Start with small amounts, then taste as you go. Always adjust the salt and pepper to your liking. This simple step makes a big difference. Using a slow cooker is easy. Fill it with your ingredients, set the time, and walk away. Keeping the lid on during cooking helps trap heat and moisture. This makes the flavors blend well. Avoid opening the lid too often. Each time you do, it adds extra cooking time. For a cozy meal, serve your soup with crusty bread. Grilled cheese sandwiches pair great too. For a pretty finish, drizzle olive oil on top. Add a few fresh basil leaves for color. This makes your dish look as good as it tastes. Enjoy your bowl of comfort! {{image_2}} You can easily make this soup vegan. Just swap heavy cream for coconut cream. This change adds a nice, creamy texture. You can also use plant-based milk, like almond or oat milk. These options keep the soup rich and tasty without dairy. Want to kick up the taste? Add some red pepper flakes for heat. This gives the soup a zesty kick. You can also squeeze in some lemon juice or lime juice. The citrus brightens the flavors and makes it more vibrant. You can choose how thick your soup is. Blend it until smooth, or leave some chunks for texture. If you like toppings, try adding grated cheese or crunchy nuts. These extras make each bowl even better. After you make the soup, let it cool. Pour the leftovers into a container. Seal it tightly and place it in the fridge. This soup will stay fresh for about 3 to 4 days. When you want to enjoy it again, simply reheat it on the stove or in the microwave. Stir well to mix everything back together. If you have extra soup, freezing is a great option. Use a freezer-safe container or a sturdy zip-top bag. Leave some space at the top for expansion. You can freeze it for up to 3 months. When you are ready to eat it, take it out of the freezer. Let it thaw in the fridge overnight for best results. You can reheat your soup in two ways: the microwave or on the stovetop. For the microwave, pour the soup into a bowl. Heat it in short bursts, stirring in between. For the stovetop, place the soup in a pot. Heat it over medium heat, stirring often. To keep the soup creamy, add a splash of cream or coconut cream while reheating. This helps retain that rich texture we love! Yes, you can use canned tomatoes. They are a great choice. Here are some benefits: - Convenience: Canned tomatoes are easy and quick to use. - Availability: You can find them all year round. - Flavor: They often taste sweet and rich. However, there are differences in flavor and texture. Fresh tomatoes taste bright and vibrant. Canned tomatoes may be softer and have a deeper flavor. Choose based on what you like. You can store this soup in the fridge for about 3-4 days. Make sure to keep it in an airtight container. Here are signs of spoilage: - Smell: If it has a sour or off smell, discard it. - Appearance: Look for any mold or unusual colors. - Taste: If it tastes strange, do not eat it. Yes, you can easily customize this soup. Here are some fun suggestions: - Add-ins: Try adding spinach or carrots for more veggies. - Proteins: You can include cooked beans or chicken for added protein. - Spices: Add a pinch of red pepper flakes for heat or more herbs for flavor. Feel free to play with the ingredients to suit your taste! This blog post covered how to make delicious soup using simple ingredients. You learned about main and additional ingredients, as well as optional add-ins for more flavor. I provided step-by-step instructions, tips for enhancing flavors, and different variations to try. Don’t forget about storage options for your leftovers, and feel free to customize the recipe! With these tips and guidelines, you can create a tasty soup that fits your taste and style. Happy cooking!

Slow Cooker Tomato Basil Soup Flavorful Comfort Dish

Looking for a heartwarming dish to make you feel at home? This Slow Cooker Tomato Basil Soup is the perfect

To make the best Pumpkin Cream Cold Brew, gather these key items: - 2 cups cold brew coffee - 1/2 cup heavy cream - 1/4 cup pumpkin puree - 2 tablespoons maple syrup - 1 teaspoon vanilla extract - 1/2 teaspoon pumpkin pie spice These simple ingredients create a rich and creamy drink. Each one plays an important role. The cold brew brings a smooth coffee base. The pumpkin puree adds that cozy fall flavor. Heavy cream makes the drink nice and rich. Maple syrup sweetens it just right. Vanilla extract gives a warm touch. Finally, pumpkin pie spice adds a hint of warmth. While the drink is great on its own, you can enhance it with these extras: - Whipped cream (for topping) - Ground cinnamon (for garnish) Topping with whipped cream makes it feel special. A sprinkle of ground cinnamon adds color and flavor. You can even mix in chocolate shavings or caramel sauce for a twist. Each serving of Pumpkin Cream Cold Brew has about: - Calories: 320 - Fat: 24g - Carbohydrates: 23g - Sugar: 18g - Protein: 2g This drink is a treat, so enjoy it in moderation. You can adjust the recipe to fit your taste or dietary needs. For example, use light cream or less syrup to cut down on calories. To start, gather your ingredients. You need heavy cream, pumpkin puree, maple syrup, vanilla extract, and pumpkin pie spice. In a mixing bowl, add: - 1/2 cup heavy cream - 1/4 cup pumpkin puree - 2 tablespoons maple syrup - 1 teaspoon vanilla extract - 1/2 teaspoon pumpkin pie spice Whisk them together until you have a smooth, creamy mix. This will be the heart of your drink, adding that rich pumpkin flavor. Now, let’s put it all together. Take two tall glasses and fill them with ice cubes. Pour 1 cup of cold brew coffee into each glass. This gives your drink a nice chill. Slowly layer the pumpkin cream mixture on top of the cold brew. If needed, you can use a spoon to help with the layering. For a stunning look, try to pour the cream gently. This creates beautiful layers. If you want to add a special touch, top your drink with whipped cream. Then, sprinkle some ground cinnamon on top. It adds flavor and looks great. You can stir gently before sipping or leave it layered for a nice presentation. Enjoy your drink! To make great cold brew, start with coarsely ground coffee. Use a 1:4 ratio of coffee to water. Mix well and let it steep for 12 to 24 hours in the fridge. Strain it using a fine mesh or coffee filter to remove the grounds. This method gives you a smooth and rich flavor. The longer it steeps, the bolder the taste. You can change the sweetness and spice in your drink. If you like it sweeter, add more maple syrup. Start with one tablespoon and taste as you go. For spice, add more pumpkin pie spice or cinnamon. Just a pinch can make a big difference. Taste your pumpkin cream as you mix it to find your perfect balance. If you have extra pumpkin cream, store it in the fridge. Use an airtight container to keep it fresh. It lasts for about three days. When you are ready to use it again, just give it a quick whisk to bring it back to life. This way, you can enjoy your favorite drink all week! {{image_2}} If you want a dairy-free version of the pumpkin cream, try using coconut cream instead of heavy cream. Coconut cream is rich and creamy. It adds a subtle coconut flavor that pairs well with pumpkin. You can also use almond milk or oat milk. These options are lighter but still tasty. Add some fun to your drink by using flavored syrups. Vanilla or caramel syrup can enhance the sweetness and flavor. You can mix in a tablespoon of syrup when making the pumpkin cream. This gives your drink a unique twist. Feel free to experiment with different flavors like hazelnut or chocolate. Each flavor adds a new layer of taste. Pumpkin Cream Cold Brew stands out among other fall drinks. It is cold and refreshing, unlike hot coffee drinks. Many people love pumpkin spice lattes, which are warm and sweet. However, the cold brew offers a smoother taste with less acidity. It is perfect for those who enjoy cold beverages in cooler weather. The pumpkin cream adds a rich and creamy texture that many seasonal drinks lack. Cold brew coffee is smooth and less bitter. It uses cold water and time, not heat. This method brings out sweet notes in the coffee. Traditional brewing uses hot water, which can add bitterness. If you want a rich, tasty drink, cold brew is the way to go. I like to use coarsely ground coffee beans. Look for beans that are bold and rich. Medium roast beans work well too. They give you a balanced flavor. Some great options are: - Colombian - Brazilian - Ethiopian These beans will enhance your Pumpkin Cream Cold Brew. A French press is simple for cold brew. Start with coarsely ground coffee. Use a ratio of 1 cup of coffee to 4 cups of cold water. Mix them in the French press. Let it steep for 12 to 24 hours in the fridge. When done, press down the filter to separate the grounds. Pour the cold brew into a glass filled with ice. Now you are ready for the delicious pumpkin cream. This method gives you a rich, smooth coffee that pairs perfectly with pumpkin flavors. Yes, you can use store-bought cold brew coffee. It saves time and effort. Just make sure it is strong and fresh. This way, you can focus on the pumpkin cream part of the drink. Homemade pumpkin cream lasts about three days in the fridge. Store it in an airtight container. Give it a good stir before using it again, as it may separate over time. Yes, pumpkin puree is key for flavor and texture. It gives the drink a rich taste. Without it, the drink won't have that warm, cozy pumpkin flavor we love. You can enjoy pumpkin spice in many ways. Try adding it to pancakes, oatmeal, or muffins. You can also make pumpkin spice lattes or use it in baked goods. The options are endless! Making a Pumpkin Cream Cold Brew is simple and fun. You need essential ingredients, like pumpkin puree and cold brew coffee. Follow our step-by-step guide to prepare a tasty drink. Use my tips to perfect your method and explore fun variations. This drink suits all tastes, whether you prefer dairy-free options or flavored syrups. Enjoy every sip, and impress others with your skills. You can savor this seasonal delight any time!

Pumpkin Cream Cold Brew Delicious Fall Favorite Drink

Fall is here, and it’s time to indulge in a seasonal treat: Pumpkin Cream Cold Brew! This drink combines rich

- 1 pound gnocchi (store-bought or homemade) - 2 cups broccoli florets - 1 cup cherry tomatoes, halved - 1 red bell pepper, diced - 1 zucchini, sliced - 4 cloves garlic, minced - 3 tablespoons olive oil - 1/2 cup grated Parmesan cheese - 1 teaspoon Italian seasoning - Salt and pepper to taste - Fresh parsley for garnish Gnocchi serves as the star of this dish. These soft dumplings blend perfectly with the veggies. You can use store-bought gnocchi, which saves time, or make your own for a personal touch. Broccoli florets add color and crunch. They also provide vitamins A and C. Cherry tomatoes bring sweetness and juiciness, balancing the flavors. Red bell pepper adds a crisp texture and a pop of color. Zucchini is mild and absorbs flavors well. Garlic gives an aromatic punch that brings everything together. Olive oil is key for roasting, enhancing the taste and texture. Finally, Parmesan cheese melts beautifully, adding a rich, savory finish. If you can't find gnocchi, try using pasta or even quinoa. For veggies, feel free to swap broccoli with green beans or asparagus. You can replace cherry tomatoes with diced bell peppers or even corn. If you're out of garlic, shallots can work as a mild alternative. For a dairy-free version, use nutritional yeast instead of Parmesan. Extra virgin olive oil can be switched with avocado oil for a different flavor. Before you start, gather all your ingredients. You will need: - 1 pound gnocchi - 2 cups broccoli florets - 1 cup cherry tomatoes, halved - 1 red bell pepper, diced - 1 zucchini, sliced - 4 cloves garlic, minced - 3 tablespoons olive oil - 1/2 cup grated Parmesan cheese - 1 teaspoon Italian seasoning - Salt and pepper to taste - Fresh parsley for garnish Make sure your oven is ready. Preheat it to 425°F (220°C). This step is key for crisping the gnocchi. 1. Take a large sheet pan and place all the veggies and gnocchi on it. 2. In a small bowl, mix the minced garlic, olive oil, Italian seasoning, salt, and pepper. 3. Drizzle this mix over the gnocchi and veggies. 4. Toss everything gently. Make sure all the pieces are well-coated. 5. Spread the mix in a single layer on the pan. This helps it cook evenly. 6. Bake for 20-25 minutes. Stir halfway through to ensure even roasting. 7. When done, sprinkle the grated Parmesan cheese on top. 8. Return the pan to the oven for 5 more minutes. This melts the cheese. 9. Once finished, let it cool for a couple of minutes. 10. Garnish with fresh parsley before serving. One mistake is overcrowding the pan. This can lead to soggy veggies. Always spread them out. Another issue is not stirring halfway. This step is important for even cooking. Lastly, don’t skip the cooling time. Letting it sit for a few minutes enhances the flavors. To get the best roast, you need high heat. Preheat your oven to 425°F (220°C). This heat helps the gnocchi turn crispy and the veggies to caramelize. Spread the gnocchi and veggies in a single layer on the sheet pan. Don't overcrowd them; this ensures even cooking. Stir halfway through to promote browning. Keep an eye on them for the last few minutes to avoid burning. For extra flavor, consider adding spices. You can use red pepper flakes for heat. A sprinkle of smoked paprika adds a nice depth. Fresh herbs like thyme or rosemary work well, too. Don't forget about lemon juice! A squeeze before serving brightens the dish. Just mix your chosen spices with the olive oil and garlic before tossing. Serve the dish warm, garnished with fresh parsley. It works well as a main dish or a side. Pair it with grilled chicken or fish for a complete meal. You can also enjoy it with a light salad for balance. Leftovers taste great in a wrap or on top of greens. This dish is versatile and fun to serve! {{image_2}} You can switch up the veggies in this dish. Try using asparagus, green beans, or bell peppers. Cauliflower or carrots also work well. Each veggie brings its own flavor and texture. Don’t be afraid to mix and match. You can even use frozen veggies if you’re short on time. Just remember to adjust the cooking time. Parmesan cheese adds a great flavor, but you can try others. Asiago or Pecorino Romano work nicely too. For a creamier texture, use mozzarella or fontina. If you want something sharper, try aged cheddar. Each cheese brings a unique touch to the dish. Feel free to experiment! This recipe is easy to adjust for different diets. For a vegan option, swap out the cheese for nutritional yeast. You can also use a plant-based gnocchi. If you're gluten-free, look for gluten-free gnocchi. Adjust the olive oil to fit your calorie needs. This dish can cater to many dietary preferences. Enjoy making it your own! After cooking, let your gnocchi and veggies cool down. Place them in an airtight container. You can keep it in the fridge for up to three days. If you want to enjoy it later, storing it properly is key. To reheat, use the oven or microwave. For the oven, set it to 350°F (175°C). Spread the gnocchi and veggies on a baking tray. Heat for about 10-15 minutes until warm. If using a microwave, place them in a safe dish. Heat in short bursts, stirring often, until hot. You can freeze gnocchi and veggies for up to three months. Just place them in a freezer-safe bag or container. Try to remove as much air as possible to avoid freezer burn. When you want to eat it, thaw overnight in the fridge. Reheat as mentioned above for the best results. Yes, you can use frozen gnocchi. Just add them directly to the pan without thawing. They will cook well in the oven. The cooking time may be a bit longer, so check them for doneness. The veggies are done when they are tender and slightly browned. You can poke them with a fork to check. Look for a nice golden color on the edges. Stir halfway through cooking to help them roast evenly. This dish pairs well with a fresh salad or crusty bread. You could also serve it alongside grilled chicken or fish. A drizzle of balsamic glaze adds nice flavor too. Enjoy it hot and fresh! You’ve learned about all the ingredients, steps, tips, and variations for this dish. Remember to use key seasonings to boost flavor. Avoid common mistakes to get excellent results. You can creatively modify this recipe to fit your needs. Store leftovers safely and know how to reheat them. This meal is simple and will impress anyone you serve. Get cooking and enjoy tasty sheet pan garlic parmesan gnocchi and veggies!

Sheet Pan Garlic Parmesan Gnocchi & Veggies Delight

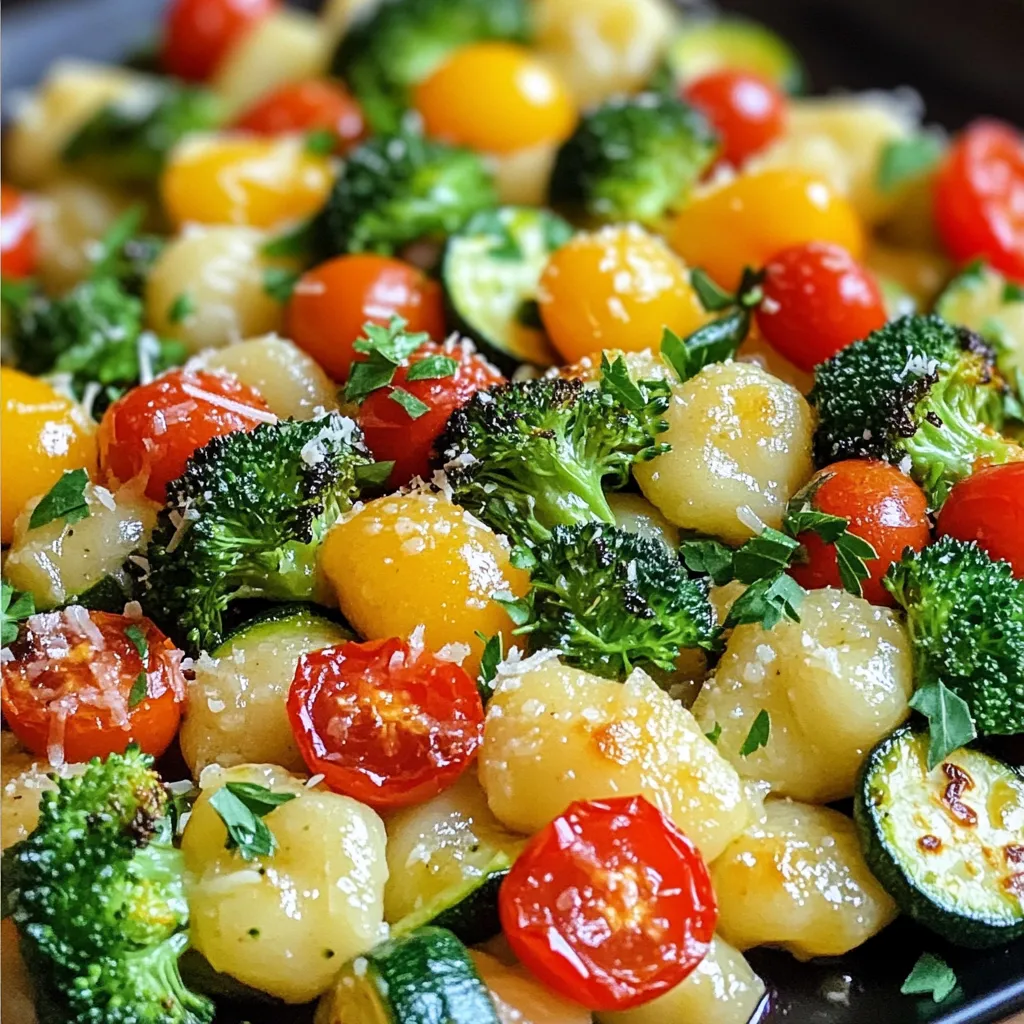
Welcome to my kitchen! Today, I’m sharing a simple and tasty recipe: Sheet Pan Garlic Parmesan Gnocchi & Veggies Delight.

To make these tasty apple cider glazed donuts, you need a few key ingredients. Here’s the list: - 2 cups all-purpose flour - 1 cup apple cider - 1/2 cup granulated sugar - 1/4 cup brown sugar, packed - 1 teaspoon baking powder - 1/2 teaspoon baking soda - 1 teaspoon ground cinnamon - 1/2 teaspoon ground nutmeg - 1/2 teaspoon salt - 1/4 cup unsalted butter, melted - 2 large eggs - 1 teaspoon vanilla extract - 1 cup powdered sugar - 2 tablespoons milk (or apple cider for an extra twist) Each ingredient plays a role. The flour gives structure. The apple cider adds flavor and moisture. Both sugars sweeten the donuts. Baking powder and baking soda help them rise. Cinnamon and nutmeg give a warm, cozy taste. Salt balances the flavors. Butter adds richness, while eggs provide moisture and help bind. Lastly, vanilla extract enhances the taste, and powdered sugar makes the glaze sweet and smooth. With this list, you’re ready to create a delightful treat. Enjoy the process and the delicious smell that fills your kitchen! First, you need to preheat your oven to 350°F (175°C). This helps the donuts cook evenly. While the oven heats, grease a donut pan with cooking spray. This step keeps the donuts from sticking and makes them easy to remove later. Now, grab a medium saucepan. Pour in 1 cup of apple cider. Heat it over medium heat until it reduces by half. This should take about 15 to 20 minutes. Stir it occasionally and keep an eye on it. After it reduces, let it cool slightly before using. In a large mixing bowl, add the dry ingredients. Combine 2 cups of all-purpose flour, 1/2 cup of granulated sugar, and 1/4 cup of packed brown sugar. Then, add 1 teaspoon of baking powder, 1/2 teaspoon of baking soda, 1 teaspoon of ground cinnamon, 1/2 teaspoon of ground nutmeg, and 1/2 teaspoon of salt. Whisk these together well to mix. In another bowl, melt 1/4 cup of unsalted butter. Let it cool a bit. Add 2 large eggs, the reduced apple cider, and 1 teaspoon of vanilla extract. Whisk these ingredients until smooth and well combined. Now, pour the wet mixture into the dry ingredients. Mix gently until they just combine. Be careful not to overmix, or your donuts may turn out dense. Next, transfer the batter into a piping bag or a zip-top bag with the corner snipped. Fill each donut mold halfway with the batter. Place the filled donut pan in the oven and bake for 10 to 12 minutes. Check for doneness by inserting a toothpick. If it comes out clean, the donuts are ready. Remove them from the oven and let them cool in the pan for about 5 minutes. After that, transfer them to a wire rack to cool completely. While the donuts cool, prepare the glaze. In a small bowl, combine 1 cup of powdered sugar with 2 tablespoons of milk or more apple cider. Mix until smooth. Once the donuts are cool, dip them into the glaze. Make sure they are well coated. Place the glazed donuts back on the wire rack to set. Enjoy your delicious treats! To make soft donuts, avoid overmixing the batter. Mix just until you see no dry flour. This keeps the donuts light and airy. After baking, let the donuts cool in the pan for five minutes. Then, transfer them to a wire rack to cool completely. This helps prevent soggy bottoms. You can spice up your donuts with warm flavors. Add a pinch of nutmeg or a dash of vanilla extract. These small changes create a deeper taste profile. For the glaze, try using apple cider instead of milk. This adds a sweet touch and keeps the apple flavor strong. For a beautiful display, arrange donuts on a colorful platter. Sprinkle a little cinnamon on top for extra flair. You can also add chopped nuts for crunch. Drizzling extra glaze over the donuts makes them look even more tempting. {{image_2}} To make apple cider cinnamon sugar donuts, change the glaze. Instead of the sweet glaze, mix sugar and cinnamon. Use about 1/2 cup of granulated sugar and 1 tablespoon of cinnamon. After baking, toss each donut in the sugar mix. This gives them a crunchy, sweet finish. You can also add a dash of nutmeg for extra flavor. If you want vegan apple cider donuts, you can easily swap out eggs and butter. For eggs, use 1/4 cup of applesauce per egg. For butter, use 1/4 cup of coconut oil or vegan butter. This keeps the texture moist and tasty. You should still follow the same baking steps for the best results. For gluten-free apple cider donuts, use gluten-free flour blends. Look for blends that have xanthan gum for better texture. You can use almond flour or rice flour too, but they will change the taste. Follow the same mixing and baking steps to get delicious results. Always check that your other ingredients are also gluten-free. To keep your apple cider glazed donuts fresh, use an airtight container. Place parchment paper between layers to avoid sticking. Store them at room temperature for up to three days. If you want to keep them longer, consider refrigerating them. Just make sure to seal them well to prevent drying out. Freezing these donuts is simple. Wrap each donut in plastic wrap. Then, place them in a freezer bag. Be sure to remove as much air as possible. They will stay fresh for about three months. To reheat, simply take a donut out and let it thaw at room temperature. You can warm it in the microwave for about 10-15 seconds if you want that fresh-baked taste. These delicious donuts last for about three days at room temperature. If you store them in the fridge, they can last up to a week. Freezing extends their life to around three months. Always check for signs of spoilage before eating. Keeping them stored properly helps maintain their great flavor and texture. To make apple cider, start with fresh apples. Choose a mix of sweet and tart apples for flavor. Wash and chop the apples without peeling. Place them in a large pot and add water until covered. Simmer for about an hour. Mash the apples to release the juice. Strain the mixture through a cheesecloth or fine sieve. This gives you fresh, delicious cider. Yes, you can use store-bought apple cider. It saves time and still tastes great in these donuts. Look for unfiltered cider for the best flavor. Avoid clear apple juice, as it lacks the rich taste of cider. Dense donuts can happen for a few reasons. First, check if you overmixed the batter. Mix just until combined. Second, ensure your baking powder and baking soda are fresh. Old leavening agents can fail to rise. Lastly, be careful with flour measurement. Too much flour leads to a thick batter. You can make these donuts in advance! Bake them and let them cool completely. Store them in an airtight container at room temperature. They stay fresh for about three days. For longer storage, freeze them after cooling. When ready to eat, thaw and glaze as needed. We explored the essential ingredients and step-by-step instructions to create delicious apple cider donuts. We discussed tips for the perfect texture, flavor, and fun variations for different diets. You learned how to store and freeze these treats for later enjoyment. With these techniques and ideas, you can make delightful donuts at home. Enjoy the process, experiment, and share these treats with friends and family. Happy baking!

Apple Cider Glazed Donuts Easy and Delicious Treat

Craving a warm, sweet treat? Look no further than these easy and delicious Apple Cider Glazed Donuts! With just a

- 1 medium butternut squash, peeled and diced - 2 medium apples, cored and diced (preferably Granny Smith) - 1 medium onion, chopped - 2 cloves garlic, minced - 4 cups vegetable broth To make this soup, you need some key ingredients. Butternut squash gives the soup its creamy base. I like to use Granny Smith apples for their tartness, which balances the sweetness of the squash. The onion and garlic add depth, while vegetable broth brings everything together. - 1/2 cup coconut cream - Fresh thyme or chives for garnish Adding coconut cream gives your soup a nice, creamy texture. If you want to elevate the dish, add fresh thyme or chives on top. They add a burst of flavor and a pop of color. - 1 teaspoon ground ginger - 1 teaspoon ground cinnamon - Salt and pepper to taste Seasoning is crucial for flavor. Ground ginger and cinnamon add warmth and a hint of spice. Don’t forget to adjust salt and pepper to your liking. Taste as you go to find that perfect balance. First, peel the butternut squash. Cut it in half and scoop out the seeds. Next, slice it into smaller pieces. Dice these pieces into small cubes, about one inch in size. This helps them cook evenly. Now, take the apples. I prefer Granny Smith for their tartness. Core and dice them into similar sizes as the squash. This keeps the flavors balanced. Finally, chop the onion. Aim for small pieces so they cook quickly. Mince the garlic cloves until they are fine. This will add great flavor to our soup. In a large pot, heat the olive oil over medium heat. Add the chopped onion and minced garlic first. Sauté these for about five minutes. You want the onion to turn soft and clear. Next, add the diced butternut squash and apples. Stir them often for five to seven minutes. This step helps them soften and mix with the flavors. Now, sprinkle in the ground ginger and cinnamon. Mixing these spices in coats the squash and apples well. They will add warmth and sweetness to the soup. Pour in the vegetable broth next. Bring the mixture to a boil, then reduce the heat to low. Let it simmer uncovered for 20 to 25 minutes. The squash should be tender when done. Once the soup is ready, take an immersion blender. Blend the soup directly in the pot until it is smooth. If you don’t have one, you can transfer it to a blender in batches. If you're using coconut cream, stir it in now. This adds a rich, creamy texture. Season the soup with salt and pepper to taste. Heat it over low until it's warm. Serve the soup hot. Garnish it with fresh thyme or chives for a lovely touch. Enjoy the comforting flavors! Choosing the right apple variety is key. I recommend using Granny Smith apples. They are tart and balance the sweetness of butternut squash. You can try Honeycrisp for a sweeter taste. Adjust your seasonings as you go. Taste the soup while cooking. You may want to add more salt or pepper to enhance the flavors. If you want a creamy soup but don't like coconut cream, try plain yogurt or sour cream. These options add a nice tang. To achieve the perfect texture, blend the soup until smooth. If it's too thick, add more broth or water. You want it to be silky, not chunky. For this soup, a large pot is essential. A sturdy wooden spoon helps mix everything well. I highly recommend using an immersion blender. It lets you blend the soup right in the pot. This saves time and fewer dishes to clean. An immersion blender also gives you control over the soup’s texture. {{image_2}} For those following a vegan diet, you can easily adjust this soup. Simply replace the vegetable broth with a homemade or store-bought vegan broth. The coconut cream adds richness, but you can skip it or use another plant-based cream if you prefer. If you need a gluten-free option, this recipe is naturally gluten-free. Just ensure your vegetable broth is labeled gluten-free. This soup is a great choice for everyone, regardless of dietary needs. You can play with spices to enhance the flavor. Adding nutmeg or cardamom can give the soup a warm twist. These spices blend well with the squash and apples, enriching the taste. Incorporating other vegetables makes this soup even better. Try adding diced carrots or sweet potatoes. They add sweetness and nutrition, creating a heartier soup. Pair this soup with a fresh salad or crusty bread for a complete meal. The soup is warm and filling, excellent for cozy dinners. For garnishes, fresh thyme or chives add a pop of color and flavor. You can also sprinkle some roasted pumpkin seeds on top for crunch! Store your butternut squash apple soup in an airtight container. This keeps it fresh. The soup lasts up to five days in the fridge. Before serving, give it a good stir and heat it up on the stove or in the microwave. You can freeze butternut squash apple soup for longer storage. Pour the cooled soup into freezer-safe bags or containers. Make sure to leave some space at the top, as the soup expands when frozen. It stays good for about three months. To reheat, thaw it in the fridge overnight. Heat it gently on the stove until warm. Stir occasionally for even warmth. Prep your ingredients in advance for easy cooking. Peel and dice the butternut squash and apples a day ahead. Chop the onion and mince the garlic early too. Store all in the fridge. You can also batch cook this soup. Make a large pot and freeze it in portions. This way, you have a comforting meal ready whenever you need one. Yes, you can use other squashes. Good options are acorn squash or pumpkin. Both give a nice flavor and texture. Just peel and dice them like butternut squash. To add heat, use a pinch of cayenne pepper or red pepper flakes. You can also add some diced jalapeños for a fresh kick. Start with a small amount and taste as you go. Absolutely! This soup is great for meal prep. Store it in an airtight container in the fridge for up to 5 days. Reheat in a pot over low heat, stirring often to prevent sticking. You can also freeze it for up to three months. Just thaw it in the fridge before reheating. This blog post covered how to make delicious butternut squash apple soup. We explored the main ingredients, the steps for cooking, and ways to enhance flavor. I shared tips for making it creamy and how to adapt the recipe to fit your diet. You can store it easily and even meal prep for busy days. Enjoy this comforting soup, and feel free to experiment with flavors. Your perfect bowl is just a recipe away!

Butternut Squash Apple Soup Comforting and Delicious

If you’re searching for a warm, tasty dish that combines sweetness and comfort, you’re in the right place! Butternut Squash

- 2 large chicken breasts, cut into strips - 1 tablespoon olive oil - 1 teaspoon garlic powder - 1 teaspoon paprika - Salt and pepper to taste - 4 large whole wheat tortillas - 1 cup romaine lettuce, chopped - ½ cup Caesar dressing - ½ cup grated Parmesan cheese - ¼ cup cherry tomatoes, halved - Optional: croutons for garnish When I gather my ingredients for Air Fryer Chicken Caesar Wraps, I feel excited. First, I choose two large chicken breasts. I cut them into strips for easy cooking and eating. Next, I drizzle one tablespoon of olive oil over the chicken. This oil adds flavor and helps the spices stick. Then, I sprinkle in garlic powder, paprika, salt, and pepper. The garlic powder gives a savory taste. Paprika adds a nice color and warmth. Salt and pepper balance the flavors. I mix everything well to coat the chicken evenly. For the wraps, I grab four whole wheat tortillas. They are healthier and sturdy. I also chop one cup of romaine lettuce, which adds crunch. Next, I measure out half a cup of Caesar dressing. This creamy dressing brings everything together. I also prepare half a cup of grated Parmesan cheese for a cheesy touch. Finally, I halve a quarter cup of cherry tomatoes for freshness. If I want some extra crunch, I keep croutons on hand for garnish. These ingredients make the perfect combination for a satisfying meal. Each element adds its own special flavor. I can't wait to bring them all together! First, preheat your air fryer to 400°F (200°C) for about 5 minutes. This step is key to ensuring your chicken cooks evenly and gets that nice, crisp finish. In a bowl, mix 2 large chicken breasts cut into strips with 1 tablespoon of olive oil. Add 1 teaspoon of garlic powder, 1 teaspoon of paprika, and salt and pepper to taste. Make sure to coat the chicken well so every piece is flavored. Next, place the seasoned chicken strips in the air fryer basket in a single layer. Cook for 12-15 minutes. Remember to shake the basket halfway through cooking. This helps to brown the chicken evenly and keeps it juicy. While the chicken cooks, prepare the lettuce mixture. In another bowl, toss 1 cup of chopped romaine lettuce with ½ cup of Caesar dressing, ½ cup of grated Parmesan cheese, and ¼ cup of halved cherry tomatoes. Once the chicken is done, let it cool for a couple of minutes. Lay out 4 large whole wheat tortillas and divide the lettuce mixture among them. Top each tortilla with the cooked chicken strips. If you love cheese, add more Parmesan before rolling the wraps tightly. If you want a crispy finish, you can return the wraps to the air fryer for an extra 2-3 minutes. This step is optional but adds a nice crunch. Slice the wraps in half and serve, adding croutons on top if you like a little extra texture in your meal. Enjoy! To get that golden brown finish on your chicken, start by preheating your air fryer. Set it to 400°F (200°C) for about five minutes. This step helps the chicken cook evenly. When mixing the chicken with olive oil, garlic powder, paprika, salt, and pepper, ensure every strip is coated well. Place the chicken in a single layer in the air fryer basket. Avoid crowding the strips, as this can lead to uneven cooking. Cook for 12 to 15 minutes, shaking the basket halfway for even browning. To check if your chicken is fully cooked, use a meat thermometer. The internal temperature should reach 165°F (75°C). You can also cut a piece open. The meat should be white with no pink inside. Rolling your wraps tightly is key to keeping everything inside. Start by laying out the whole wheat tortillas. Place the lettuce mixture in the center, followed by the chicken strips. Be careful not to overfill; this can make rolling hard. Tuck in the sides of the tortilla as you roll. This helps keep the filling secure. If you want to avoid soggy wraps, make sure to drain any excess dressing from the lettuce mixture. This way, your wraps stay crisp and fresh. For the perfect side dish, consider serving some crunchy carrot sticks or a light salad. They complement the rich flavors of the wraps well. Dips can also enhance your meal. A simple ranch or extra Caesar dressing can be great choices. As for beverages, I recommend a light sparkling water with lemon or a crisp white wine. These drinks balance the savory taste of your wraps and add a refreshing touch. {{image_2}} You can switch up the protein in these wraps easily. Try turkey strips for a lighter option. Shrimp adds a fun twist, giving a seafood flair. If you prefer a plant-based choice, tofu works great too. Just press the tofu to remove excess water. Season it like the chicken, and cook it in the air fryer until crispy. This way, everyone can enjoy their favorite protein. While Caesar dressing is classic, feel free to explore other dressings. A ranch or blue cheese dressing can change the flavor profile. You might also enjoy a zesty vinaigrette for a fresh taste. Mixing in different cheese types can enhance the dish. Feta adds a tangy kick, while mozzarella gives a creamy texture. Experimenting with dressings keeps your wraps exciting and new. You can make these wraps even healthier by adding more veggies. Try mixing in bell peppers, cucumbers, or spinach. These colorful additions boost vitamins and fiber. You can also add grains like quinoa or brown rice for extra texture and nutrients. If you're looking for low-calorie options, use less dressing or switch to a yogurt-based dressing. For a high-protein boost, add beans or extra chicken. These tweaks help you enjoy a tasty meal while meeting your nutritional goals. To store your Air Fryer Chicken Caesar Wraps properly, let them cool first. Wrap each one tightly in plastic wrap or foil. This keeps them from drying out. The best containers for preservation are airtight ones. Use glass or plastic containers that seal well. This helps keep the wraps fresh for longer. You can store them in the fridge for up to three days. The best way to reheat wraps is in the air fryer. It keeps them crispy and warm. Preheat your air fryer to 350°F (175°C). Place the wraps in for about 5 minutes. If you use a microwave, be aware it can make them soggy. Heat them on a plate for 30 seconds. Check if they are warm enough. If not, add another 15 seconds. To maintain texture and flavor, always cover wraps with a damp paper towel in the microwave. This helps keep them moist. Yes, you can prep these wraps in advance. Cook the chicken and let it cool. Store it in an airtight container in the fridge. You can also mix the lettuce, dressing, cheese, and tomatoes ahead of time. Keep the wraps separate until you’re ready to eat. This way, the tortillas stay fresh. Just assemble the wraps before serving for the best taste. The chicken is ready when it reaches an internal temperature of 165°F (75°C). Use a meat thermometer to check. Also, look for golden brown color and clear juices when you cut into it. If the juices are pink, it needs more time. These signs help ensure your chicken is both safe and tasty. Yes, you can use regular tortillas if you prefer. Whole wheat tortillas add fiber and a nutty taste. However, any type of tortilla works well. Just keep in mind the flavor and texture may change slightly. Choose what you enjoy most for your wraps. These wraps pair well with many side dishes. Consider a light salad or some fresh fruit. You could also serve chips or a crunchy veggie platter. For a heartier meal, add soup or a grain salad. These sides balance the flavors and make your meal complete. These Air Fryer Chicken Caesar Wraps combine juicy chicken, fresh veggies, and tasty dressing. You learned how to prepare the chicken and assemble wraps with whole wheat tortillas. I shared tips to ensure they turn out great every time. Experiment with different proteins and dressings for more fun. In the end, these wraps are simple, delicious, and healthy. Enjoy them for lunch, dinner, or a quick snack!

Air Fryer Chicken Caesar Wraps Flavorful and Easy Meal

Looking for a quick and tasty meal? Air Fryer Chicken Caesar Wraps are perfect for you! With juicy chicken, crisp

- 1 lb chicken breast, diced - 1 bell pepper, diced - 1 medium onion, chopped - 2 cloves garlic, minced - 1 tablespoon ginger, minced I love using chicken breast for this dish. It cooks quickly and stays juicy. The bell pepper adds sweet crunch, while the onion gives depth. Garlic and ginger bring a lovely aroma that makes your kitchen smell amazing. - 3 tablespoons soy sauce - 2 tablespoons rice vinegar - 1 tablespoon sesame oil Soy sauce is the base of the flavor here. It adds saltiness and umami. Rice vinegar gives a nice tang, balancing the dish. Sesame oil adds a nutty richness that completes the taste. - 1/4 cup unsalted roasted peanuts - 3 green onions, chopped - 2-3 dried red chilies (adjust to taste) Roasted peanuts add crunch and a bit of richness. Green onions provide freshness and color. Dried red chilies let you control the heat, so you can make it as spicy as you like! To start, you need to marinate the chicken. In a bowl, combine the diced chicken with soy sauce and cornstarch. Mix it well, so every piece is coated. Let the chicken sit for at least 15 minutes. This step makes the chicken tender and tasty. Next, heat vegetable oil in a large skillet or wok over medium-high heat. Once the oil is hot, add the marinated chicken. Stir-fry it for about 5 to 7 minutes. You want it to turn golden brown and be cooked all the way through. Once done, remove the chicken and set it aside. Now, it's time for the veggies. In the same skillet, add more vegetable oil if needed. Sauté the diced bell pepper and chopped onion for 3 to 4 minutes. They should start to soften. Then, add minced garlic, ginger, and dried red chilies. Stir-fry for another minute until you can smell the great aroma. Return the cooked chicken to the skillet. Pour in the rest of the soy sauce, rice vinegar, and sesame oil. Mix everything well and let it cook for another 2 to 3 minutes. This helps the flavors blend perfectly. Season with salt and pepper to taste. Finally, stir in the roasted peanuts and chopped green onions. Remove from heat. This step-by-step guide makes it easy to create a flavorful and quick meal. Enjoy your Spicy Kung Pao Chicken Bowls! To get the right heat in your dish, use dried red chilies. You can add 2-3 chilies for a nice kick. If you want it milder, use fewer chilies. For extra spice, add more. Marinating the chicken is key. Combine the chicken with soy sauce and cornstarch. Let it sit for at least 15 minutes. This step makes the chicken tender and flavorful. Using a wok is better than a skillet. A wok heats up faster and cooks food evenly. This helps the chicken get crispy and the veggies stay crunchy. High-heat cooking is crucial. It seals in the juices and makes the flavors pop. Stir-fry the chicken quickly for a delicious outcome. Serve your Kung Pao chicken over fluffy jasmine rice. This rice complements the spicy sauce well. For a beautiful look, garnish with chopped green onions and sprinkle sesame seeds on top. This adds color and extra taste to your meal. {{image_2}} If you want a vegetarian version, try tofu or tempeh. Tofu absorbs flavors well. Use firm tofu for good texture. Cut it into cubes and marinate just like chicken. Tempeh offers a nutty taste. You can slice tempeh thinly and sauté it. Both options give you a tasty meal without meat. Add more crunch and flavor with veggies. Snap peas or carrots work great. They add color and nutrients. Just chop them and toss them in while cooking. You can also change nuts or seeds. Instead of peanuts, try cashews or sunflower seeds. This adds different textures and tastes. Not everyone likes it hot. For a mild dish, use fewer dried red chilies. You can skip them altogether if you want. To make it spicier, add more chilies or even chili paste. Taste as you go to find your perfect heat level. This way, you can enjoy the dish just how you like it. To store leftovers, let them cool first. Place the Spicy Kung Pao Chicken in an airtight container. This keeps it fresh for up to three days in the fridge. Make sure to label the container with the date. This helps you know when to use it. You can freeze this dish for future meals. Allow the Kung Pao Chicken to cool completely. Transfer it to a freezer-safe container. Seal it tightly to avoid freezer burn. It will stay good for about three months. When you’re ready to eat, thaw it in the fridge overnight. To reheat without losing flavor, use a skillet. Heat it on medium-low and add a splash of water or broth. This keeps the chicken moist. Stir occasionally until heated through. You can also use the microwave. Cover the bowl with a damp paper towel to keep it from drying out. Enjoy your flavorful meal! To reduce the spice in your dish, here are some simple tips: - Use fewer dried red chilies. Start with one or two. - Remove the seeds from the chilies before adding them. - Add a bit more sugar or honey to balance the heat. - Include extra vegetables like bell peppers or onions. They help mellow the spice. These steps will keep your dish tasty but less fiery. You can still enjoy the flavors without the burn. Yes, you can prep this dish ahead of time! Here’s how: - Marinate the chicken in soy sauce and cornstarch a few hours in advance. - Chop your vegetables and store them in the fridge for a quick cook later. - You can even cook the chicken and veggies a day before. Just reheat them before serving. This makes busy days easier while still enjoying a great meal. These sides will enhance your meal: - Steamed jasmine rice is a classic choice. - Simple stir-fried veggies add color and crunch. - A cool cucumber salad can balance the spice. - Egg rolls or spring rolls make a fun addition. These sides complement the flavors and make your meal complete. This guide covered how to make Spicy Kung Pao Chicken Bowls. We explored main ingredients like chicken and vegetables, along with key sauces and garnishes. I shared step-by-step instructions and tips to enhance flavors and presentation. You can also explore variations for diets and spice preferences. Remember, storing this dish well keeps it fresh for later. Enjoy your cooking journey and feel free to experiment with these flavors!

Spicy Kung Pao Chicken Bowls Flavorful and Quick Meal

Craving a quick and tasty meal? My Spicy Kung Pao Chicken Bowls fit the bill! This dish is packed with

- 1 pound boneless, skinless chicken breasts - 1 can (15 oz) black beans, drained and rinsed - 1 can (15 oz) corn, drained - 1 can (14.5 oz) diced tomatoes with green chilies - 1 onion, diced - 3 cloves garlic, minced - 4 cups chicken broth - 1 tablespoon chili powder - 1 teaspoon cumin - 1 teaspoon paprika - Salt and pepper to taste - Juice of 1 lime I love using boneless, skinless chicken breasts for this soup. They are easy to shred. Black beans add protein and fiber, while corn brings sweetness. Diced tomatoes with green chilies give a nice kick. The onion and garlic add depth to the flavor. Chicken broth ties everything together and keeps it moist. - 1 cup tortilla strips (store-bought or homemade) - 1 avocado, diced (for topping) - Fresh cilantro, chopped (for garnish) - Shredded cheese (optional, for topping) - Lime juice Toppings make this soup special. Diced avocado adds creaminess. Fresh cilantro gives a pop of flavor. Tortilla strips add crunch. Shredded cheese melts beautifully on top. A squeeze of lime juice brightens every bite. You can mix and match these toppings to suit your taste. 1. Start with your slow cooker. Place 1 pound of boneless, skinless chicken breasts at the bottom. 2. Season the chicken with salt, pepper, 1 tablespoon of chili powder, 1 teaspoon of cumin, and 1 teaspoon of paprika. This mix adds great flavor to the chicken. 3. Next, add 1 diced onion, 3 minced cloves of garlic, 1 can of black beans (drained and rinsed), 1 can of corn (drained), and 1 can of diced tomatoes with green chilies on top. Spread these ingredients evenly over the chicken. 4. Now, pour 4 cups of chicken broth over everything. Make sure all the ingredients are covered. Stir gently to mix without disturbing the chicken too much. 1. Cover the slow cooker with its lid. Set it to cook on low for 6-7 hours or on high for 3-4 hours. 2. Check the chicken for doneness. It should be fully cooked and tender. You can use a meat thermometer to ensure it reaches 165°F. 1. Once the chicken is cooked, take it out of the slow cooker. Use two forks to shred the chicken into bite-sized pieces. 2. Return the shredded chicken to the soup and stir in the juice of 1 lime. This adds a nice zing. 3. To serve, ladle the soup into bowls. Top each bowl with tortilla strips, diced avocado, chopped cilantro, and shredded cheese if you like. Enjoy your tasty meal! To make your soup pop, consider adding spices like oregano and cayenne. These can bring warmth and depth. Fresh lime juice adds a bright touch. You can also toss in a handful of fresh cilantro to boost the taste. Cooking techniques matter too. Sautéing the onion and garlic before adding them to the slow cooker can deepen their flavor. This step takes just a few minutes and makes a big difference. For a great soup texture, balance is key. Use enough broth to cover the ingredients, but not too much. If you prefer a creamier soup, add some blended beans. This thickens the soup while keeping it healthy. Aim for a good ratio of chicken to beans and veggies. I suggest about 1 pound of chicken to 2 cans of beans. This ratio ensures every bite is tasty and filling. Cleaning your slow cooker is easy. After cooking, let it cool and then soak it in warm, soapy water. Use a soft sponge to avoid scratches. For tough spots, a baking soda paste works wonders. Common slow cooker mistakes can ruin your meal. Don’t lift the lid too often while cooking. This lets heat escape and can change cooking times. Always follow the recommended cooking times for best results. {{image_2}} You can change the protein in this soup. Use turkey, beef, or tofu. Each choice gives a new taste. You can swap out black beans too. Try pinto, kidney, or white beans. If you want more veggies, add bell peppers, zucchini, or carrots. These swaps will keep the soup fresh and fun. For those with gluten issues, use gluten-free broth and tortilla strips. This keeps the soup safe for everyone. If you want a vegan option, skip the chicken and broth. Use vegetable broth and add more beans or lentils for protein. You still get a hearty meal without meat. Pair this soup with rice or a simple salad. It adds a nice crunch and fills you up. You can also serve it with cornbread for a sweet side. For a twist, put the soup in a bread bowl. This makes for a fun and tasty meal. Store any soup leftovers in the fridge. Use airtight containers to keep it fresh. It is best to cool the soup to room temperature before sealing. Portion out the soup into smaller containers for easy access. This way, you can enjoy it whenever you want. To freeze the soup, let it cool completely first. Pour it into freezer-safe bags or containers. Leave some space at the top for expansion. Label each bag or container with the date. When you want to eat it, thaw the soup overnight in the fridge. Reheat it on the stove or in the microwave until hot. This soup lasts about 3 to 4 days in the fridge. For the best taste, eat it within this time. Check for any off smells or changes in texture before eating. If frozen, it can last up to 3 months. Always keep an eye on the quality to ensure a tasty meal. Can I make this recipe in advance? Yes, you can make this soup a day ahead. Just cook it in the slow cooker and let it cool. Store it in the fridge. When ready to serve, heat it on the stove or in the microwave. The flavors will blend even more overnight. How do I make it spicier? To add heat, try these tips: - Use more chili powder. - Add chopped jalapeños or hot sauce. - Serve with spicy salsa on top. Adjust spice levels to your taste. What kind of slow cooker is best? A 6-quart slow cooker works great for this soup. It gives enough space for all ingredients. Brands like Crock-Pot and Instant Pot are popular choices. Do I need a specific size slow cooker for this recipe? Not really! A 4-quart slow cooker can work too. Just make sure it can hold all the ingredients. You may need to adjust cooking time slightly. Can I use frozen chicken? Yes, frozen chicken is fine to use. Just add an hour to the cooking time. Make sure it cooks all the way through for safety. What can I use instead of black beans? You can swap black beans with pinto beans or kidney beans. Chickpeas also work well if you want something different. Just rinse them well before adding to the soup. This blog post covers making a tasty slow cooker soup. We discussed key ingredients like chicken, beans, and spices. I offered step-by-step instructions, enhancing flavor tips, and storage advice. Don’t shy away from experimenting with toppings or ingredient swaps. Feel free to adjust the recipe to fit your needs and preferences. Remember, cooking is fun! With practice, you’ll perfect your soup-making skills. Enjoy the process and the tasty results.

Slow Cooker Chicken Tortilla Soup Tasty and Easy Meal

Want a meal that’s both tasty and super easy? Look no further than Slow Cooker Chicken Tortilla Soup! This dish

Older posts
Newer posts
← Previous Page1 … Page12 Page13 Page14 … Page84 Next →

dsad

© 2026 juliesdish • Built with GeneratePress

Our Policies

  • Copyright Policy
  • Cookie Policy
  • GDPR Policy
  • Privacy Policy
  • Disclaimer
  • Terms Of Use

More Information

  • Home
  • About
  • Contact
  • Appetizers
  • Dessert
  • Dinner
  • Drinks
©2026, juliesdish About Back To Top