Go Back
- Peanut Butter Options I love using creamy peanut butter for these bars. It blends well and makes the bars smooth. You can also use crunchy peanut butter if you want some texture. Just keep in mind, it may change the final feel of the bars a bit. - Sweeteners: Honey vs. Maple Syrup For sweetness, I often choose honey. It adds a nice flavor and helps bind the bars. Maple syrup works too and gives a unique taste. If you're vegan, maple syrup is the better choice. Both will sweeten and hold the mixture together well. - Additional Ingredients for Consensus The oats give the bars a hearty bite. I use rolled oats, as they add a great texture. Protein powder boosts the nutrition, making these bars a perfect snack. Chia seeds add fiber and healthy fats. A pinch of sea salt enhances the flavors. You can also add dark chocolate chips on top for a sweet finish if you like! {{ingredient_image_1}} Combining Peanut Butter and Sweetener First, grab a large mixing bowl. Add 1 cup of creamy peanut butter. Then, add 1/2 cup of honey or maple syrup. Use a spatula to mix them until smooth. This step is key for a nice texture. Incorporating Dry Ingredients Next, add the dry ingredients. Measure and include 2 cups of rolled oats. Then, toss in 1/2 cup of protein powder and 1/4 cup of chia seeds. Don't forget the 1/2 teaspoon of vanilla extract and a pinch of sea salt. Stir well to combine all the ingredients. You want a dough-like mix that holds together well. Lining the Baking Dish Now, take an 8x8-inch baking dish. Line the bottom with parchment paper. Leave some paper hanging over the sides. This will help you lift the bars out later. Spreading and Pressing the Mixture Pour the peanut butter mixture into the lined dish. Use a spatula to spread it evenly. Press it down firmly to create a smooth surface. This helps the bars hold their shape when you cut them. Melting and Drizzling Chocolate If you want to add a chocolate layer, take 1/2 cup of dark chocolate chips. Melt them in a microwave-safe bowl. Heat in 30-second bursts, stirring after each. Once melted, drizzle or spread the chocolate over the pressed mixture. Alternative Toppings for Variability You can also get creative with toppings. Consider adding chopped nuts, coconut flakes, or dried fruit. These extras can give your bars a fun twist. To get the best texture for your no bake peanut butter bars, follow these tips: - Use creamy peanut butter: It blends well with other ingredients. - Check the oat texture: Rolled oats should not be too coarse. - Add liquid slowly: Mix honey or maple syrup gradually. Common mistakes can ruin your bars. Here are a few to avoid: - Overmixing: Too much mixing can make the bars dry. - Not pressing firmly: If you don’t press the mixture well, it may crumble. - Skipping the fridge: Letting them sit out too long can make them soft. These peanut butter bars taste great with many pairings. Here are the best options: - Serve with fresh fruit: Bananas and apples pair well. - Enjoy with yogurt: A scoop of yogurt adds creaminess. Get creative with your serving ideas: - Cut into fun shapes: Use cookie cutters for fun designs. - Dip in chocolate: Coat bars in melted chocolate for a treat. Pro Tips Use Natural Peanut Butter: For a healthier option, choose natural peanut butter without added sugars or oils. It enhances flavor and maintains the bars' texture. Chill for Best Results: Allow the bars to chill for at least 2 hours. This helps them set properly, making them easier to cut and enhancing their taste. Experiment with Mix-Ins: Feel free to add nuts, dried fruits, or seeds for added texture and flavor. Customize your bars to suit your taste preferences. Storage Tips: Store the bars in an airtight container in the fridge for freshness. They can also be frozen for longer shelf life, making them a great grab-and-go snack. {{image_2}} You can have fun with flavor in these no bake peanut butter bars. Here are a couple of ideas: - Adding Nuts or Dried Fruits: You can mix in nuts like almonds or walnuts. Chopped dried fruits like cranberries or apricots are great too. They add a nice crunch and sweetness. Try about 1/2 cup of your favorite nuts or fruits. Just fold them into the mixture before pressing it into the dish. - Different Protein Powder Options: If you want to change the taste, swap protein powders. Use chocolate for a richer flavor or vanilla for a lighter touch. Each type adds its unique taste. Just make sure to keep the same amount: 1/2 cup. Dietary needs can vary, so here are some easy swaps: - Gluten-Free Versions: To keep your bars gluten-free, use certified gluten-free oats. This ensures that no gluten gets into your bars. The rest of the recipe is already gluten-free, so you’re good to go. - Vegan Adaptations: To make these bars vegan, use maple syrup instead of honey. All other ingredients are plant-based. If you skip the chocolate topping, make sure to use dairy-free chocolate chips. This way, everyone can enjoy a tasty treat! To keep your no bake peanut butter bars fresh, use an airtight container. This helps prevent moisture and keeps the bars tasty. Storing them in a cool, dry place is also key. If you want to store them for a longer time, consider freezing. For freezing, wrap each bar in plastic wrap. This adds a layer of protection against freezer burn. Place the wrapped bars in a freezer-safe bag or container for extra security. They will stay fresh for up to three months in the freezer. No bake peanut butter bars last about a week in the fridge. Make sure to keep them in an airtight container for best results. They remain soft and chewy when stored correctly. If you freeze the bars, they last longer. Frozen bars can be enjoyed for about three months. Simply thaw them in the fridge overnight before you eat them. Enjoying them cold gives a refreshing twist! No bake peanut butter bars last about one week in the fridge. Store them in an airtight container. If you freeze them, they can stay good for up to three months. Just thaw them in the fridge before you eat. Yes, you can use natural peanut butter. It may make the bars a bit softer. If you do, choose one without added sugar or oils. This keeps the bars healthier and maintains a good taste. You can use ground oats or nut flour if you don’t have protein powder. You can also use a plant-based protein like hemp or pea protein. Just remember, this might change the texture a bit. Yes, they can be healthy! They have whole ingredients like oats and chia seeds. They give you energy and fiber. Just watch your portion size since they are also high in calories. Absolutely! You can make these bars a few days in advance. They save well in the fridge. This makes them great for meal prep or snacks throughout the week. No bake peanut butter bars are simple and fun to make. We covered ingredients, step-by-step instructions, and tips for success. You learned how to create tasty variations and the best storage methods. Feel free to experiment with flavors or toppings that fit your likes. Whether it's for a snack or dessert, these bars offer flexibility and joy. Enjoy making them and sharing them with friends!

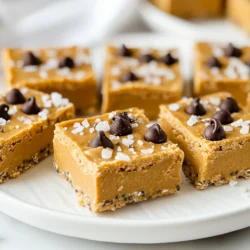
No Bake Peanut Butter Bars

Delicious and easy-to-make no bake bars made with peanut butter, oats, and optional chocolate topping.
Prep Time 15 minutes
Total Time 2 hours
Course Dessert
Cuisine American
Servings 12
Calories 200 kcal

Ingredients
  

  • 1 cup creamy peanut butter
  • 1/2 cup honey or maple syrup
  • 2 cups rolled oats
  • 1/2 cup protein powder (vanilla or chocolate)
  • 1/4 cup chia seeds
  • 1/2 teaspoon vanilla extract
  • 1/2 cup dark chocolate chips (optional for topping)
  • a pinch sea salt

Instructions
 

  • In a large mixing bowl, combine the creamy peanut butter and honey (or maple syrup) until smooth and well blended.
  • Add in the rolled oats, protein powder, chia seeds, vanilla extract, and a pinch of sea salt. Stir until all ingredients are fully mixed and a dough-like consistency forms.
  • Line a square baking dish (approximately 8x8 inches) with parchment paper, leaving some overhang for easy removal.
  • Spread the peanut butter mixture evenly into the prepared dish, using a spatula to press it down firmly and create an even surface.
  • If desired, melt the dark chocolate chips in a microwave-safe bowl in 30-second intervals, stirring in between until smooth. Drizzle the melted chocolate over the pressed mixture or spread it evenly with a spatula.
  • Refrigerate the bars for at least 1-2 hours until firm. Once set, lift the bars out of the dish using the parchment paper edges and place on a cutting board. Cut into squares or rectangles based on your preferred serving size.
  • Store leftover bars in an airtight container in the refrigerator for up to a week or freeze for longer storage.

Notes

Store leftovers in an airtight container in the refrigerator for up to a week.
Keyword bars, healthy, no bake, peanut butter, snack