Go Back
- 8 oz cream cheese, softened - 1/2 cup powdered sugar - 1 teaspoon vanilla extract - 1 cup heavy whipping cream - 1 cup fresh blueberries (plus a few for garnish) - 1/2 cup graham cracker crumbs - 2 tablespoons melted butter - 1 tablespoon lemon juice - Pinch of salt - Mixing bowls - Electric mixer - Serving jars When I create No-Bake Blueberry Cheesecake Jars, I always gather my ingredients first. This way, I stay organized and focused. The main ingredients are key for that creamy texture and sweet flavor. The cream cheese gives the cheesecake its rich base. I like to use softened cream cheese because it blends easily and smoothly. The powdered sugar adds a sweet touch, and the vanilla extract enhances the flavor. Heavy whipping cream is crucial for lightness. When whipped, it creates airy peaks. Now, let’s talk about the blueberries. They not only add flavor but also a beautiful pop of color. I always choose fresh blueberries for the best taste. If you want to add some zing, lemon juice works wonders. Just a tablespoon brightens everything up! For the crust, I combine graham cracker crumbs with melted butter and a pinch of salt. This mixture brings a nice crunch to each bite. Finally, you’ll need your electric mixer and some mixing bowls to make everything easy. The serving jars are fun! They let you show off your layers and make for easy serving. Now, you’re all set to start making this delicious treat! To start, grab a large mixing bowl. Beat the softened cream cheese until it is smooth. Use an electric mixer for best results. This step is key for a creamy texture. Next, add the powdered sugar and the vanilla extract. Mix well until everything combines and is creamy. This mixture forms the base of your cheesecake. In a separate bowl, pour in the heavy cream. Use a mixer to whip it until stiff peaks form. Stiff peaks mean the cream will hold its shape well. This lightens the cheesecake mixture. Now, gently fold the whipped cream into the cream cheese mixture. Use a spatula to combine them. Be careful not to deflate the whipped cream. This folding technique helps keep your cheesecake light and fluffy. Now comes the fun part: assembling the jars! In another bowl, mix the graham cracker crumbs with melted butter, lemon juice, and a pinch of salt. This mix will be your crust. Layer 1-2 tablespoons of the graham cracker mix at the bottom of each jar. Then, add a layer of the cheesecake filling on top. Follow this with a tablespoon of fresh blueberries. Repeat these layers until the jars are full. Finish with a layer of cheesecake filling. Top each jar with a few fresh blueberries for a beautiful finish. Cover the jars and refrigerate for at least four hours. For best results, chill them overnight. Enjoy your no-bake blueberry cheesecake jars! To get a smooth cheesecake, start with soft cream cheese. Let it sit out for about 30 minutes. This makes it easier to beat. Use an electric mixer for best results. Mix until there are no lumps. When whipping the cream, chill your bowl and beaters. Cold tools help the cream whip faster. Beat until stiff peaks form. This means the cream holds its shape well. Then, gently fold the whipped cream into the cream cheese mix. This keeps it light and fluffy. Want to add more flavor? Try mixing in some lemon zest or a splash of almond extract. You can also swap in different fruits like raspberries or strawberries. Adjust the sweetness by adding more or less powdered sugar. Taste the mixture as you go. This way, you can find the perfect balance for your palate. Garnish your jars with fresh blueberries on top. They look pretty and add a burst of flavor. You might also sprinkle some crushed graham crackers for extra crunch. For alternative toppings, consider using whipped cream or a drizzle of honey. You can even add a sprig of mint for a fresh touch. The goal is to make your jars look as great as they taste! {{image_2}} You can switch up the fruit in this dessert. Other berries like strawberries, raspberries, or blackberries work great. Each berry adds its own flavor and color. You can also use seasonal fruits, like peaches in summer or apples in fall. This keeps the dessert fresh and fun. While graham crackers are classic, you can try other cookies. Chocolate cookies give a rich flavor. Vanilla wafers add a light touch. If you need gluten-free options, use gluten-free graham crackers or crushed nuts. Both options create a tasty base. If you want a vegan version, use plant-based cream cheese. Coconut cream is great for whipping. For a low-sugar option, replace the powdered sugar with a sugar substitute. This way, you can still enjoy the sweet taste without the extra sugar. To keep your No-Bake Blueberry Cheesecake Jars fresh, store them in the fridge. Use lids or plastic wrap to cover each jar. This helps keep the flavors intact and prevents drying out. These jars last up to five days in the fridge. You can freeze No-Bake Blueberry Cheesecake Jars, but there are some tips. First, let them chill in the fridge for a few hours. Then, cover them tightly with lids or plastic wrap. They can last up to three months in the freezer. When you're ready to enjoy them, thaw the jars in the fridge overnight. Avoid thawing them at room temperature. This keeps the texture smooth and creamy. Enjoy your sweet treat later! Yes, you can use frozen blueberries for this recipe. Just remember to thaw them first. Drain any extra juice before adding them to the jars. This keeps the layers from getting too soggy. Frozen blueberries still taste great and save time! Chill the jars for at least 4 hours. If you have time, chill them overnight. This helps the layers set well. The longer they sit, the better the flavors blend together. You want a nice, firm cheesecake texture. Absolutely! You can prepare these jars a day or two in advance. Just store them in the fridge until you're ready to serve. This way, you can impress guests without last-minute stress. Plus, the flavors will have more time to develop! This blog post shared how to make delicious no-bake blueberry cheesecake jars. We covered the key ingredients like cream cheese, whipped cream, and blueberries. You learned step-by-step instructions for mixing and layering the jars. Tips showed you how to enhance flavors and adjust textures. Variations allow you to customize with fruits or dietary changes. Remember to follow storage guidelines for optimal freshness. Enjoy making these treats! They are perfect for any occasion and simple to prepare at home.

No-Bake Blueberry Cheesecake Jars

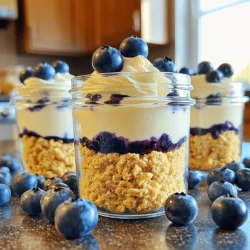
Indulge in the delightful flavors of No-Bake Blueberry Cheesecake Jars with this easy recipe! Perfect for a sweet treat without the hassle of baking, these jars are layered with creamy cheesecake filling, fresh blueberries, and crunchy graham cracker crumbs. Ideal for any occasion, this dessert will impress your friends and family. Click through to explore this mouthwatering recipe and whip up these delicious jars today!

Ingredients
  

8 oz cream cheese, softened

1/2 cup powdered sugar

1 teaspoon vanilla extract

1 cup heavy whipping cream

1 cup fresh blueberries (plus a few for garnish)

1/2 cup graham cracker crumbs

2 tablespoons melted butter

1 tablespoon lemon juice

Pinch of salt

Instructions
 

In a large mixing bowl, beat the softened cream cheese until smooth using an electric mixer.

    Gradually add the powdered sugar and vanilla extract, mixing until combined and creamy.

      In a separate bowl, whip the heavy cream until stiff peaks form. Carefully fold the whipped cream into the cream cheese mixture until fully incorporated.

        In another bowl, combine the graham cracker crumbs, melted butter, lemon juice, and a pinch of salt. Mix until crumbly.

          In serving jars, layer 1-2 tablespoons of the graham cracker mixture at the bottom.

            Add a layer of the cheesecake filling on top of the crumbs, followed by a tablespoon of fresh blueberries.

              Repeat the layers until the jars are filled, finishing with a layer of the cheesecake filling on top.

                Garnish with a few fresh blueberries on top of each jar.

                  Cover with lids or plastic wrap and refrigerate for at least 4 hours, or overnight for best results.

                    Prep Time: 20 minutes | Total Time: 4 hours (+ Chill time) | Servings: 4-6 jars