Skip to content
DisclaimerTerms Of UseGDPR PolicyCookie Policy

juliesdish

  • Home
  • Drinks
  • Appetizers
  • Dinner
  • Dessert
  • About
  • Contact
  • Privacy Policy
DisclaimerTerms Of UseGDPR PolicyCookie Policy

NO-ING-IMG

For these tasty bites, gather these main ingredients: - 1 cup rolled oats - 1/2 cup unsweetened shredded coconut - 1/2 cup almond butter (or peanut butter) - 1/4 cup honey (or maple syrup for vegan option) - 1/4 teaspoon vanilla extract - 1/4 teaspoon sea salt These ingredients work together to give you a satisfying and healthy snack. The rolled oats provide fiber and energy, while the almond butter adds protein and healthy fats. Coconut gives a nice chew and natural sweetness. Honey or maple syrup binds everything and adds a touch of sweetness. You can make these bites even more fun by adding optional ingredients: - 1/4 cup dark chocolate chips (optional) - Extra shredded coconut for rolling The chocolate chips bring a rich flavor. If you love coconut, roll the bites in extra shredded coconut for a tropical twist. You can also try adding nuts, seeds, or dried fruit to fit your taste! These energy bites are not just tasty; they are also nutritious. Here’s what each main ingredient offers: - Rolled oats: Great source of fiber, helps keep you full. - Shredded coconut: Provides healthy fats and adds texture. - Almond butter/peanut butter: Packed with protein and nutrients. - Honey/maple syrup: Natural sweeteners that give energy. These ingredients combine to create a snack that fuels your day. Plus, they are easy to make! You can find the full recipe here. To start, gather all your ingredients. This makes the process smooth and easy. You need: - 1 cup rolled oats - 1/2 cup unsweetened shredded coconut - 1/2 cup almond butter (or peanut butter) - 1/4 cup honey (or maple syrup for vegan option) - 1/4 cup dark chocolate chips (optional) - 1/4 teaspoon vanilla extract - 1/4 teaspoon sea salt - Extra shredded coconut for rolling Next, measure each item carefully. Fresh ingredients work best for flavor and texture. Now, grab a medium mixing bowl. Add the rolled oats and shredded coconut. Stir them well. This ensures even distribution. In another bowl, mix the almond butter, honey, vanilla extract, and sea salt. Blend until creamy. Once smooth, pour this mix over the oats and coconut. Stir everything together until you see no dry spots. If you like chocolate, add the dark chocolate chips now. This step brings a sweet and rich taste to each bite. Now it’s time to form your bites. Use your hands to roll small balls. Aim for about 1 inch in diameter. If your hands stick, wet them slightly with water. This helps the mixture roll easily. Once rolled, coat each ball in extra shredded coconut. This adds a nice texture. Place the bites on a baking sheet lined with parchment paper. Refrigerate them for at least 30 minutes. This helps them firm up. After they are firm, store the energy bites in an airtight container. They last in the fridge for up to a week. You can also freeze them for longer. Enjoy your tasty snacks anytime! For the complete recipe, check out the Full Recipe. To get the right texture for your energy bites, focus on the mix. Make sure to use rolled oats, as they provide a nice chew. The almond butter or peanut butter should be creamy. This helps bind everything together. Adjust the amount of honey if the mix feels too dry. If it’s too wet, add a bit more oats or shredded coconut. Rolling the bites with slightly damp hands also helps shape them easily. Store your energy bites in an airtight container. This keeps them fresh and tasty. You can keep them in the fridge for up to a week. For longer storage, freeze them in a single layer on parchment paper. Once frozen, transfer them to a freezer bag. They will last for about three months in the freezer. Just remember to label the bag with the date! One common mistake is not measuring ingredients correctly. Too much liquid can make the bites too sticky, while too little can make them dry. Another mistake is not chilling them long enough. If you skip the fridge time, they might fall apart. Lastly, forget about the chocolate chips at your own risk! They add a nice touch. Follow these tips, and you’ll have perfect No-Bake Coconut Energy Bites. For the full recipe, check the instructions above. {{image_2}} You can easily switch up the flavor of your energy bites. Try adding spices like cinnamon or nutmeg for warmth. You can also mix in extracts such as almond or coconut for a more tropical taste. If you want a chocolate twist, add cocoa powder or more chocolate chips. Each tweak brings a new flavor and fun! Feel free to swap ingredients based on your taste or what you have. If you don’t have almond butter, peanut butter works well too. For a vegan option, use maple syrup instead of honey. You can also replace dark chocolate chips with dried fruit or seeds for added texture and sweetness. These swaps keep the bites tasty and healthy. These energy bites fit many diets. They are naturally gluten-free, thanks to oats. If you want a nut-free version, use sunflower seed butter. This makes them safe for kids with nut allergies. You can also adjust the sweetener to fit your health goals. With these ideas, everyone can enjoy these nutritious snacks from the [Full Recipe]. To keep your no-bake coconut energy bites fresh, store them in an airtight container. This method helps to lock in moisture and flavor. Place the container in your fridge. They should stay good for about a week. If you notice any changes in smell or texture, it's best to discard them. Want to save some for later? Freezing is a great option! After you form the energy bites, place them on a baking sheet. Make sure they are not touching each other. Freeze them for about an hour. Once they are solid, transfer them to a freezer-safe bag or container. They can last up to three months in the freezer. When you're ready to eat, just thaw them in the fridge overnight. Always check your energy bites before eating. Look for any signs of spoilage. If they smell off or have an unusual texture, throw them out. Keep in mind that ingredients like almond butter and honey can spoil if not stored properly. Stick to these safety tips to enjoy your snacks worry-free. For the full recipe, check out the section above! No-Bake Coconut Energy Bites last up to one week in the fridge. After that, they may lose flavor and freshness. To store them, place the bites in an airtight container. For longer storage, freeze them. They can stay good for up to three months in the freezer. Just let them thaw before enjoying. Yes, you can use different nut butters. Almond butter is great, but peanut butter works well too. Cashew or sunflower seed butter can also be used for a twist. Each nut butter adds its own flavor and texture. Just choose one that you love for a tasty bite. Yes, these energy bites are gluten-free. The main ingredient, rolled oats, can be gluten-free if labeled so. Always check the label to ensure that no gluten is present. This makes them a safe snack for those with gluten allergies or sensitivities. To transport No-Bake Coconut Energy Bites, use a small container with a lid. Make sure it is airtight to keep them fresh. You can also use a resealable plastic bag. Just place a paper towel inside to absorb any moisture. This helps keep them from getting soggy while you’re on the go. For a quick snack, pack a few in your lunch or backpack! No-bake coconut energy bites are easy to make and tasty. We covered the main ingredients, preparation steps, and tips for perfect bites. You learned about flavor variations, storage methods, and how to customize them for your diet. Remember to store them well for the best taste. Enjoy these bites as a quick snack or a healthy treat. With a few simple steps, you can create a fun and nutritious snack anytime. Embrace the process and get creative with your own twist.

No-Bake Coconut Energy Bites Easy and Nutritious Snack

Looking for a quick and nutritious snack? I’ve got the perfect solution: No-Bake Coconut Energy Bites! These tasty bites are

To make a tasty beef stroganoff, gather these main ingredients: - 1 lb (450g) beef sirloin, thinly sliced - 1 medium onion, finely chopped - 2 garlic cloves, minced - 8 oz (225g) mushrooms, sliced - 1 tablespoon olive oil - 1 tablespoon butter - 2 cups beef broth - 1 tablespoon Worcestershire sauce - 1 teaspoon Dijon mustard - 1 cup sour cream - Salt and pepper to taste - 12 oz (340g) egg noodles These ingredients create the rich, creamy sauce that makes this dish special. The beef sirloin gives a tender bite, while the mushrooms add a nice earthiness. If you want to add more taste, consider these optional ingredients: - A splash of red wine for depth - Fresh thyme or rosemary for a herby touch - A pinch of nutmeg for warmth - Green onions for a mild, oniony flavor Adding any of these can boost the flavor profile. I love using fresh herbs to elevate my dish. To finish your dish, use these garnishes: - Fresh parsley, chopped - A dollop of sour cream on top - Cracked black pepper for a bit of spice Garnishes not only make the dish look nice, but they also add fresh flavors. For the full recipe, visit the provided link. First, cook the egg noodles. Follow the package instructions carefully. Use a large pot of boiling water. Add a pinch of salt for flavor. Cook the noodles until they are al dente. This usually takes about 8-10 minutes. Drain the noodles and set them aside. Next, heat olive oil in a large skillet. Set the heat to medium-high. Add the thinly sliced beef to the skillet. Cook it until it turns brown, about 5 minutes. Remove the beef from the skillet. Let it rest on a plate while you prepare the other ingredients. Now, it’s time for the onions and mushrooms. In the same skillet, add butter. Once it melts, add the chopped onion and minced garlic. Sauté them until the onion becomes clear, about 3 minutes. Then, add the sliced mushrooms. Cook them until they turn golden brown, about 5 minutes. Return the beef to the skillet. Pour in the beef broth, Worcestershire sauce, and Dijon mustard. Stir everything together well. Let the mixture simmer for about 5-7 minutes. This helps the sauce thicken slightly. Lower the heat and add the sour cream. Stir until it’s fully mixed in. Taste the sauce and add salt and pepper as needed. Serve the beef stroganoff over the cooked egg noodles. Garnish with fresh parsley for a nice touch. Enjoy this flavorful home-cooked meal! For the full recipe, check the Full Recipe section. When picking beef for stroganoff, choose tender cuts. I like beef sirloin. It cooks quickly and stays juicy. Flank steak is another good option. Just slice it thinly against the grain. This helps keep the meat tender. Cook the beef over high heat for just a few minutes. This browns the meat well. Avoid overcooking, as it will become tough. Remove the beef from the pan before adding other ingredients. This keeps it juicy and flavorful. To boost the sauce, use good beef broth. A splash of Worcestershire sauce adds depth. I also like to add Dijon mustard for a slight zing. Mix in sour cream at the end for creaminess. Taste and adjust with salt and pepper. Serve stroganoff over egg noodles for a classic touch. You can also use rice or mashed potatoes. Top with fresh parsley for color and taste. Pair it with a side salad for a complete meal. Enjoy every bite of this comforting dish! {{image_2}} Mushrooms add a rich flavor, but some may not enjoy them. You can easily skip mushrooms. Instead, use more onions for flavor. You can also add bell peppers. They bring a nice crunch and sweetness. This version still tastes great and keeps the creamy sauce. If you love chicken, try chicken stroganoff. Use boneless chicken breasts instead of beef. Cook them just like the beef. The sauce will still be creamy and delicious. You can follow the same steps in the full recipe. Serve it over rice or noodles for a hearty meal. Many people need gluten-free meals. You can make stroganoff gluten-free by changing the noodles. Use gluten-free egg noodles or rice. Check the Worcestershire sauce for gluten. Some brands are gluten-free. This way, everyone can enjoy this tasty dish without worry. After enjoying your beef stroganoff, store leftovers in an airtight container. Let it cool to room temperature first. Place the container in the fridge. This keeps your meal fresh for up to three days. Be sure to label it with the date. When ready to eat, reheat beef stroganoff on the stove. Use low heat to avoid burning. Stir gently while warming. This helps keep the meat tender and the sauce creamy. If the sauce is too thick, add a splash of beef broth or water. Stir well and serve it warm. You can freeze beef stroganoff for longer storage. Use a freezer-safe container or bag. Make sure to leave space for expansion. It can last up to three months in the freezer. To thaw, place it in the fridge overnight before reheating. This keeps the flavors intact. Enjoy this comforting dish anytime! You can serve Classic Beef Stroganoff with several delicious sides. I recommend egg noodles, as they soak up the sauce well. You can also serve it with rice or mashed potatoes. For a fresh touch, add a side salad with greens and a light dressing. Steamed vegetables like green beans or broccoli also pair nicely. Yes, you can. To make Classic Beef Stroganoff ahead of time, prepare the dish and let it cool. Store it in an airtight container in the fridge for up to three days. When you are ready to eat, reheat it on the stove over low heat. Add a splash of broth or water if the sauce is too thick. To make a lighter version of Classic Beef Stroganoff, use lean beef like sirloin or tenderloin. You can swap sour cream for Greek yogurt for fewer calories and added protein. Use whole grain noodles for more fiber. You can even add more veggies, like spinach or bell peppers, to boost nutrition without adding many calories. Beef Stroganoff comes from Russia. It dates back to the 19th century. The dish is named after the Stroganov family, who were wealthy merchants. It became popular in many countries, with different versions emerging. Today, it remains a favorite comfort food in many homes. You can find the Full Recipe for Classic Beef Stroganoff above this section. It includes easy steps to create a rich and creamy dish. Enjoy this meal with your family and friends! Classic Beef Stroganoff combines simple ingredients with easy steps. You learn to make tender beef and creamy sauce. I shared tips for great taste and smarter storage. Plus, I offered fun variations for everyone. In the end, this dish is perfect for families and gatherings. With a few tweaks, you can adapt it to your tastes. Enjoy making Beef Stroganoff and impress your friends and family!

Classic Beef Stroganoff Flavorful Home-Cooked Meal

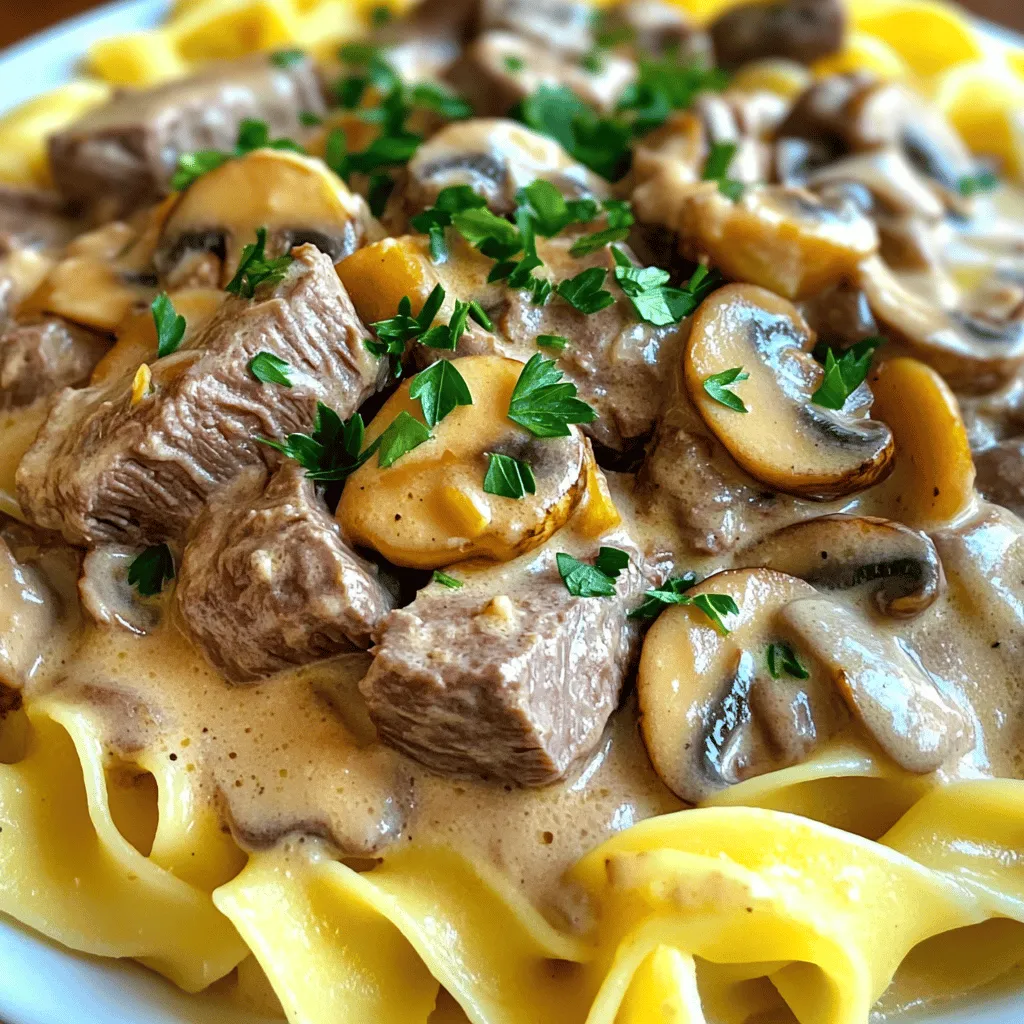
Are you ready to whip up a warm and tasty dish? Classic Beef Stroganoff is a simple and flavorful home-cooked

- 1 lb ground beef or ground turkey - 1 medium onion, finely chopped - 2 cloves garlic, minced - 1 bell pepper, diced - 1 can (15 oz) black beans, drained and rinsed - 1 can (15 oz) corn, drained - 1 cup diced tomatoes, fresh or canned I love using ground beef for that classic taste, but ground turkey works great too. The onion and bell pepper add sweetness and crunch. Don’t forget the garlic; it gives a nice kick. Black beans and corn bring in fiber and color, making the dish both tasty and vibrant. - 1 packet taco seasoning - Salt and pepper to taste The taco seasoning is key here. It adds all those bold flavors we love in tacos. A pinch of salt and pepper will enhance all the other tastes. You can adjust these to fit your taste buds. - 1 cup shredded cheddar cheese - Fresh cilantro or green onions for garnish (optional) Cheddar cheese makes this dish extra cheesy and creamy. If you want a fresh touch, add cilantro or green onions. They brighten up the dish and add a nice pop! For the full recipe, check out [Full Recipe]. - Heating the olive oil: Start by grabbing a large skillet. Pour in 2 tablespoons of olive oil. Heat it over medium heat. You want the oil to shimmer, not smoke. This takes about a minute. - Sautéing the onions and garlic: Next, add 1 finely chopped onion to the oil. Let it cook for about 3-4 minutes. The onion should turn clear. Then, add 2 minced garlic cloves. Stir them in for another 2-3 minutes. You'll love the smell! - Browning the ground beef or turkey: Now, turn the heat up to medium-high. Add 1 pound of ground beef or turkey to the skillet. Break it apart with a spoon. Cook it until it’s brown, about 5-6 minutes. Make sure to stir often so it cooks evenly. - Adding the diced bell pepper: After the meat is browned, toss in 1 diced bell pepper. Any color works! Stir it in and let it cook for another 3 minutes until the pepper softens. - Mixing in taco seasoning and canned goods: Time to add flavor! Stir in 1 packet of taco seasoning. Then, add 1 can of drained black beans, 1 can of drained corn, and 1 cup of diced tomatoes. Mix everything well. - Simmering the mixture: Let the mixture simmer for about 5 minutes. This helps the flavors blend together nicely. - Melting cheese on top: Lower the heat now. Sprinkle 1 cup of shredded cheddar cheese evenly over the top. Cover the skillet with a lid. Wait for 2-3 minutes. The cheese will melt perfectly. - Adding seasonings to taste: Finally, season with salt and pepper to taste. Stir gently to mix everything together. Your Easy Cheesy Taco Skillet is ready to enjoy! For the full recipe, check out the complete instructions above. - Choosing the right meat: Use ground beef for a rich taste. Ground turkey offers a lighter option. Both work well in this dish. Choose what fits your diet best. - How to avoid sogginess: Drain canned goods like black beans and corn well. This keeps the skillet from getting watery. You want a nice, thick texture, not a soup. - Best practices for sautéing: Heat the olive oil well before adding onions. This helps to caramelize them and add depth to the flavor. Stir often for even cooking. - Tips for cheese melting: Cover the skillet after adding cheese. This traps heat and helps the cheese melt evenly. Use a mix of cheeses for a richer taste. - Adding spices for extra heat: If you like spice, add chili powder or cayenne pepper. Start with a little, then taste and add more if needed. This gives your dish a nice kick. - Suggestions for additional toppings: Top with fresh cilantro or green onions for brightness. You can also add avocado or sour cream for creaminess. These extras make every bite special. For a full recipe, check the Easy Cheesy Taco Skillet. Enjoy cooking! {{image_2}} If you want a meat-free dish, use plant-based meat or beans. Both options taste great and keep the meal hearty. For those who avoid dairy, try dairy-free cheese. Many brands offer excellent alternatives that melt nicely. Add southwestern spices for an extra kick. Try cumin, paprika, or chili powder to enhance the taste. You can also mix in jalapeños for a spicy twist. Fresh herbs like cilantro or parsley can brighten the dish. This cheesy taco skillet pairs well with rice or tortilla chips. Both options add a nice crunch and balance the flavors. You can also use it as a filling for wraps or tacos. Just scoop the mixture into your favorite tortilla for a quick meal. For the full recipe, check the earlier section. To keep your Easy Cheesy Taco Skillet fresh, let it cool first. Transfer it to an airtight container. This helps prevent moisture loss and keeps flavors intact. Store it in the fridge for up to three days. If you won’t eat it within that time, consider freezing it. For longer storage, freezing works well. Portion the skillet into smaller containers. Make sure to leave some space at the top, as food expands when frozen. It will stay good for about three months. When you're ready to enjoy it again, thaw it in the fridge overnight. Reheat it on the stove or in the microwave until it’s hot. Pre-cooking some ingredients makes meal prep easy. You can brown the meat and chop the veggies ahead of time. Store them separately in the fridge. This cuts down your cooking time on busy nights. If you have leftovers, think about repurposing them. Use the taco mix in burritos, on nachos, or even in a salad. This keeps meals fun and fresh! Yes, you can make this dish ahead of time. Cook the Easy Cheesy Taco Skillet, then cool it down. Store it in an airtight container in the fridge for up to three days. When you're ready to eat, just reheat it on the stovetop or microwave until warm. This dish pairs well with several sides. Try serving it with: - Rice or quinoa for a hearty option - Tortilla chips for a crunchy bite - A fresh side salad for a light touch - Sour cream and salsa for extra flavor These sides add variety and make your meal more exciting. To lower the fat and calories, consider these tips: - Swap ground beef for ground turkey or chicken. - Use low-fat cheese or reduce the amount of cheese. - Add more vegetables like zucchini or spinach. - Choose low-sodium canned goods to cut back on salt. These changes keep the taste while making it lighter. Absolutely! To create a meat-free version, you can: - Use plant-based ground meat instead of beef. - Increase the amount of black beans or add lentils. - Use extra veggies like mushrooms or bell peppers. These options keep it delicious and filling. If you don't have taco seasoning, here are some good substitutes: - Mix chili powder, cumin, and paprika for a spicy kick. - Use garlic powder, onion powder, and oregano for flavor. - Add cayenne pepper for heat, if desired. These alternatives let you customize the flavor as you like. For the complete dish, check the Full Recipe. This Easy Cheesy Taco Skillet blends simple ingredients and flavors for a tasty meal. You can use ground beef or turkey, fresh veggies, and canned goods. Sauté the ingredients, mix in seasonings, and top with cheese. Explore variations, tips, and storage advice to enjoy this dish now and later. Cooking can be fun and creative. So, have fun with your taco skillet and make it your own!

Easy Cheesy Taco Skillet Quick and Flavorful Meal

Are you in the mood for a quick and tasty meal? Look no further than my Easy Cheesy Taco Skillet!

- 1 pound asparagus, trimmed - 3 tablespoons olive oil - 2 cloves garlic, minced - Zest and juice of 1 lemon - 1 teaspoon sea salt - ½ teaspoon black pepper - ¼ teaspoon red pepper flakes (optional) - 2 tablespoons grated Parmesan cheese (optional) - Fresh parsley, chopped for garnish Lemon garlic roasted asparagus is simple and tasty. You need fresh asparagus, bright lemon, and fragrant garlic to make this dish shine. The olive oil adds richness, while salt and pepper boost flavor. Red pepper flakes give a little heat if you want it spicy. For a bit of extra flavor, you can sprinkle grated Parmesan cheese on top. Fresh parsley adds a beautiful pop of color. Use these ingredients, and you will have a lovely side dish ready in no time. - Additional seasoning options (e.g., herbs or spices) - Different cheese types for garnishing Feel free to get creative! You can add herbs like thyme or rosemary for a fresh twist. Try other cheese types like feta or goat cheese for a unique taste. Each change will bring its own charm to this dish, making it fun to try new things. For the full recipe, you can easily find all the steps to create this delightful dish. - Preheat oven to 400°F (200°C). - Prepare a baking sheet with parchment paper. This step makes cleanup easy. - In a large bowl, combine the trimmed asparagus, olive oil, minced garlic, lemon zest, lemon juice, salt, black pepper, and red pepper flakes (if using). - Toss the asparagus with the mixture until evenly coated. This helps every piece soak up the flavor. - Spread the asparagus in a single layer on the prepared baking sheet. Make sure they are not crowded. - Roast in the preheated oven for 15-20 minutes. Check halfway through and toss for even cooking. - If you like, sprinkle grated Parmesan cheese over the asparagus during the last 5 minutes of roasting. - Once done, remove from the oven and garnish with freshly chopped parsley. Serve warm for the best taste. For the full recipe, check the details provided above. To get the best asparagus, start by trimming the ends. The tough ends can ruin a dish. You can snap the stalks where they break naturally. This saves time and effort. Aim for asparagus that is bright green and firm. For tenderness, roast the asparagus at 400°F (200°C). This high heat helps caramelize the natural sugars. Roast for 15 to 20 minutes. Toss halfway through to cook evenly. You want the asparagus to be tender yet still crisp. If you want to switch things up, try different seasonings. Herbs like thyme or rosemary can add a nice touch. You can also use lemon pepper for an extra zing. If you crave more garlic flavor, consider adding garlic powder. You can also roast some garlic cloves alongside the asparagus. This gives a sweet, mellow garlic taste. To make your dish look great, arrange the roasted asparagus on a platter. Drizzle some lemon juice over the top. This adds shine and flavor. Serve with lemon wedges on the side. They look pretty and provide extra zest. Pair this dish with proteins like grilled chicken or fish. They complement the flavors well. For a special touch, serve it alongside quinoa or a fresh salad. This adds color and makes your meal feel festive. {{image_2}} You can make simple changes to this dish. Use less olive oil for a lower fat option. Try just one tablespoon for a lighter taste. You can also skip the Parmesan cheese or use a low-fat version. Nutritional yeast is a great cheese substitute for a tasty, dairy-free option. Seasonal vegetables can add flair to your dish. In spring, add peas or radishes for color and taste. In fall, try carrots or Brussels sprouts to mix in. You can change the flavors with herbs too. In summer, add fresh basil or mint. In winter, consider rosemary for a warm taste. Pair this roasted asparagus with proteins like chicken or fish. It complements a grilled salmon fillet perfectly. You can serve it at many occasions. It’s great for a weeknight dinner or a fancy potluck. Arrange it on a platter and drizzle with extra lemon juice for a wow effect. For the full recipe, check out the details above. To keep your lemon garlic roasted asparagus fresh, put it in the fridge. Use an airtight container for best results. Make sure the asparagus is cool before you seal it. This helps keep moisture in and prevents sogginess. When you want to enjoy leftovers, heat them gently. The best method is to use the oven. Preheat it to 350°F (175°C). Place the asparagus on a baking sheet and warm for about 10 minutes. This keeps the texture crispy. Avoid using a microwave, as it can make the asparagus mushy. You can freeze lemon garlic roasted asparagus, but it’s best fresh. If you need to freeze it, start by cooling the leftovers completely. Then, place them in a freezer-safe bag. Squeeze out excess air before sealing. To thaw, move it to the fridge overnight. Reheat in the oven for a better texture. How long does roasted asparagus last in the fridge? Roasted asparagus lasts about three to five days in the fridge. Store it in an airtight container. This keeps it fresh and tasty. Can I use frozen asparagus for this recipe? Yes, you can use frozen asparagus. However, it may not be as crisp. Thaw it first and drain any water. Then, follow the same steps in the recipe. Can I prepare the asparagus ahead of time? You can prep the asparagus a few hours early. Trim and season it, then cover it and keep it in the fridge. This saves time before cooking. What are the best ways to enjoy leftover asparagus? Leftover asparagus is great in salads, soups, or omelets. You can also reheat it in a pan or the microwave. Just avoid overcooking it again to keep the taste. What are the health benefits of asparagus? Asparagus is rich in vitamins A, C, E, and K. It also has fiber and antioxidants. Eating asparagus can help with digestion and support heart health. Is lemon garlic roasted asparagus a low-carb dish? Yes, lemon garlic roasted asparagus is low in carbs. It is a perfect side for low-carb diets. Enjoy it alongside your favorite proteins for a balanced meal. Roasted asparagus is a simple and tasty dish. We covered key ingredients, preparation, and cooking steps. You learned tips for great flavor and how to present it well. Explore the many variations to fit your taste. Whether serving at dinner or a potluck, this dish shines. Follow storage and reheating tips for the best experience. Enjoy your cooking and the delicious results!

Lemon Garlic Roasted Asparagus Flavorful and Simple Dish

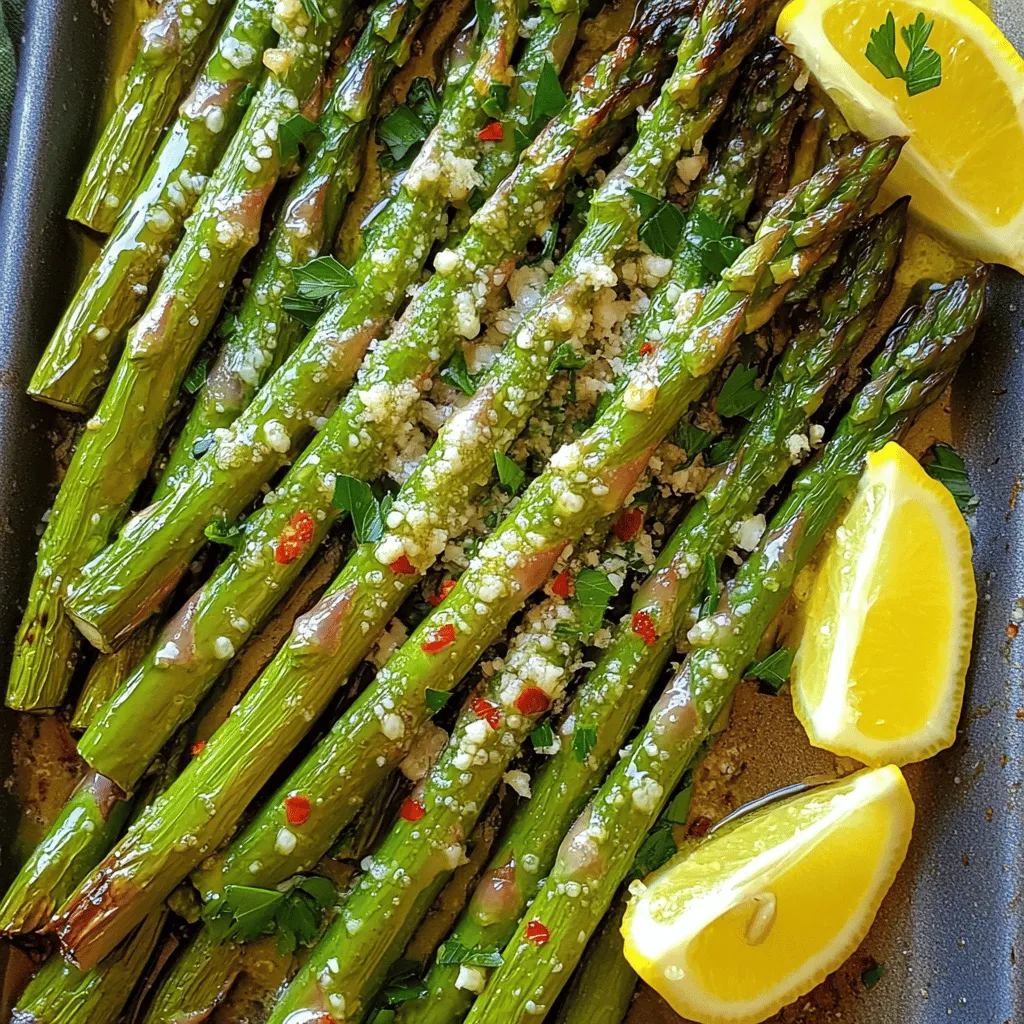
Looking for a quick and tasty side dish? Lemon Garlic Roasted Asparagus is your answer! This simple recipe requires just

- 1 cup Arborio rice - 1 cup mixed mushrooms (such as cremini, shiitake, and button), finely chopped - 1/2 cup heavy cream - 4 cups vegetable broth - 1 small onion, finely chopped - 2 cloves garlic, minced - 1/2 cup grated Parmesan cheese - 2 tablespoons olive oil - 2 tablespoons butter - Salt and pepper to taste - Fresh parsley, chopped (for garnish) When you make creamy mushroom risotto, the right ingredients matter. Arborio rice gives the risotto its creamy texture. This rice holds starch, making the dish rich and smooth. Mixed mushrooms add depth. You can use cremini, shiitake, and button mushrooms for a lovely flavor mix. You must keep vegetable broth warm. This helps the rice cook evenly. Onions and garlic add a nice base flavor. Finely chop them so they blend well. Heavy cream makes the risotto velvety. Parmesan cheese adds a salty touch. For seasoning, use olive oil and butter. These fats help sauté your onions and mushrooms. Salt and pepper enhance all the flavors. Lastly, fresh parsley brightens the dish and makes it look nice. For the full recipe, check out the Mushroom Dream Risotto. It’s a great way to explore this dish in detail! Keep the vegetable broth warm throughout the cooking process. Use a small saucepan on low heat. This step is key for the risotto. Warm broth helps the rice cook evenly. Using vegetable broth adds a rich flavor. It makes the dish vegetarian-friendly and tasty. In a large skillet or pot, heat olive oil and butter. Use medium heat to avoid burning. Add chopped onions and sauté until they turn clear. This takes about three to four minutes. Next, stir in minced garlic and chopped mushrooms. Cook for five to seven minutes. Your goal is to soften and brown the mushrooms. This step builds the foundation of flavor for your risotto. Now, add Arborio rice to your skillet. Mix it well with the mushrooms. Turn up the heat to medium-high. Stir for about two minutes. This helps the rice grains absorb the flavors. After that, gradually pour in a ladle of warm broth. Stir continuously until most of the liquid is absorbed. This gradual addition is vital for perfect risotto. Repeat this process for about 18 to 20 minutes. The rice should be creamy and slightly firm when done. Keep an eye on the cooking time. Stirring is important for that creamy texture. Use a wooden spoon to mix gently. When the rice is almost done, it should look thick and shiny. This texture is what you want for a perfect risotto. Once the rice is cooked, lower the heat. Stir in heavy cream and grated Parmesan cheese. Add the remaining butter, salt, and pepper. Mix until everything is blended and creamy. Taste the risotto and adjust the seasoning if needed. Let it sit for a minute before serving. This helps the flavors meld together. For a beautiful finish, garnish with chopped parsley. You can find the full recipe in this article. For creamy mushroom risotto, I love using mixed mushrooms. Here are my favorites: - Cremini: They have a rich, earthy taste. - Shiitake: They add a nice umami flavor. - Button: These are mild and tender. Mushrooms bring depth to the dish. Their flavors blend well with the creamy rice. The right mushrooms can turn a simple dish into a gourmet experience. Stirring is key when making risotto. It helps release the starch from the rice. This starch gives the risotto its creamy texture. I often stir for about 18-20 minutes while adding broth. Temperature control matters too. Keep the heat medium when cooking. If it's too high, the rice may cook unevenly. If it's too low, the cooking process slows down. You need the right balance for the best results. Presentation makes a difference. I like to serve risotto in shallow bowls. This allows the creamy rice to shine. Garnish with chopped fresh parsley and a sprinkle of cheese. It adds color and flavor. For side dishes, think light salads or roasted veggies. They balance the richness of the risotto. You can also pair it with grilled chicken or fish for protein. Discover more about this recipe in the Full Recipe section. {{image_2}} You can boost the risotto's taste easily. Adding fresh herbs like thyme or rosemary gives it a bright flavor. Try adding spices, too, like nutmeg or smoked paprika. These spices add warmth and depth. You can also mix in vegetables. Peas, asparagus, or spinach add color and nutrition. Just sauté them briefly before adding the rice. Want to make your risotto heartier? Adding protein works great! Cooked chicken or shrimp adds a nice touch. Just toss them in during the last few minutes of cooking. For a vegetarian option, try adding chickpeas or lentils. They bring protein and a satisfying texture. Tofu can also work well; just cube it and add it in. Need a gluten-free version? Use gluten-free broth and check your rice. Arborio rice is naturally gluten-free, so you're in luck! For a vegan risotto, swap heavy cream with coconut milk or cashew cream. You can also use nutritional yeast instead of Parmesan cheese. These swaps keep your risotto creamy and tasty. Check out the Full Recipe for more tips! To keep your creamy mushroom risotto fresh, follow these tips: - Refrigeration methods: Allow the risotto to cool completely before storing. Place it in the fridge within two hours of cooking. - Best containers for storage: Use airtight containers to prevent moisture loss. Glass or plastic containers work great. To reheat your risotto without losing creaminess, do this: - How to reheat risotto without losing creaminess: Add a splash of broth or cream while reheating. Stir slowly over low heat for best results. - Using broth vs. water while reheating: Broth adds flavor. Water can make it bland. Always choose broth to revive the dish. You can freeze risotto, but it may change texture. Here’s how: - Is freezing risotto recommended?: Yes, but it may lose some creaminess. Only freeze if you plan to eat it later. - Steps to freeze and thaw effectively: Cool the risotto, then scoop it into freezer bags. Lay them flat to save space. To thaw, place it in the fridge overnight. Reheat with broth. For the full recipe, check out the Mushroom Dream Risotto . Making creamy mushroom risotto takes about 30 minutes. This includes 10 minutes for prep. You will need about 20 minutes for cooking. During cooking, you will stir the rice often. This helps make it creamy. Yes, you can prep risotto ahead. Cook the base with onions, garlic, and mushrooms. Then, cool it and store it in the fridge. When ready to serve, heat it on the stove. Add warm broth slowly while stirring. This keeps it creamy and fresh. Arborio rice is short and round. This rice has a high starch content. It absorbs liquid well and gives risotto its creamy texture. Regular rice does not have the same starch. It cooks differently and won't yield the same creamy result. For the best risotto, always use Arborio rice. Check out the full recipe for more details. We explored the key ingredients, cooking techniques, and tips for making creamy mushroom risotto. Each step, from preparing the broth to achieving the perfect texture, is crucial for your dish. Remember, the right mushrooms and constant stirring make a big difference. Try variations to suit your taste, and store leftovers properly to keep them fresh. With these insights, you can create a risotto that impresses everyone. Enjoy your cooking journey and make this dish your own!

Creamy Mushroom Risotto Simple and Flavorful Dish

If you’re craving a dish that warms your soul, look no further than creamy mushroom risotto. This simple yet flavorful

- 1 lb ground beef - 1/2 lb ground pork - 1/2 cup breadcrumbs - 1/4 cup grated Parmesan cheese - 1/4 cup fresh parsley, chopped - 2 cloves garlic, minced - 1/2 teaspoon onion powder - 1 teaspoon Italian seasoning - Salt and pepper to taste - 1 jar (24 oz) marinara sauce - 4 sub rolls - 1 cup mozzarella cheese, shredded - Olive oil for greasing The main proteins in this recipe are ground beef and ground pork. Using both gives you a rich flavor and nice texture. Next, breadcrumbs help bind the meat together and add a bit of crunch. Parmesan cheese adds a salty bite that enhances the overall taste. Garlic brings depth, while Italian seasoning gives the meatballs a classic Italian flavor. Don't forget to season with salt and pepper to bring all the flavors together. - Fresh herbs and spices - Different cheese varieties - Alternative bread options For extra flavor, consider adding fresh herbs like basil or oregano. You can also try different cheese types, such as provolone or cheddar. If you want to switch it up, use garlic bread or ciabatta rolls instead of standard sub rolls for a fun twist. - Mixing bowl and baking sheet - Saucepan for heating sauce - Oven for baking subs To make these subs, you need a few simple tools. A mixing bowl is essential for combining the ingredients. A baking sheet will hold the meatballs as they cook. You’ll also need a saucepan to heat the marinara sauce. Finally, your oven will be key for baking the meatball subs to perfection. You can find the full recipe [here](#). To make meatballs, you need to mix the ingredients well. In a big bowl, combine: - 1 lb ground beef - 1/2 lb ground pork - 1/2 cup breadcrumbs - 1/4 cup grated Parmesan cheese - 1/4 cup fresh parsley, chopped - 2 cloves garlic, minced - 1/2 teaspoon onion powder - 1 teaspoon Italian seasoning - Salt and pepper to taste Use your hands to mix everything. Be gentle. You want the meat to stay tender. After mixing, roll the mixture into small meatballs. Aim for 1 to 1.5 inches in size. Place them on a baking sheet. Next, preheat your oven to 375°F (190°C). This step is key. A hot oven helps the meatballs cook evenly. Bake the meatballs for 20 to 25 minutes. They should turn golden brown and be fully cooked. While the meatballs bake, prepare the sub rolls. Cut them in half lengthwise, but don’t cut all the way. Place them on a lined baking sheet. Once the meatballs are done, heat a jar of marinara sauce in a pan. Add the meatballs to the sauce. Let them simmer for 5 to 10 minutes. This step adds great flavor. Now, it’s time to fill the subs. Spoon 3 to 4 meatballs, along with some sauce, into each roll. Top each sub with shredded mozzarella cheese. You can use about 1 cup total for all the subs. Finally, place the assembled subs back in the oven for 5 to 7 minutes. You want the cheese to melt and bubble. After that, they are ready to enjoy! To make great meatballs, avoid overworking the meat mixture. When you mix, do it gently. If you press too hard, the meatballs can turn tough. This will help keep them juicy. Browning your meatballs adds flavor. You can sear them in a hot pan with a bit of oil before baking. This step gives a nice crust and deep taste. Remember, a good crust means more flavor in your subs. When it comes to cheese, mozzarella is the best choice for melting. It gets all stretchy and gooey. You can also mix in provolone for a twist. Both work well in your meatball subs. Bake your assembled subs for about 5-7 minutes. This time allows the cheese to melt perfectly without burning. Keep an eye on them to catch that golden-brown color. Presentation matters! Serve your meatball subs on a wooden board. Garnish with fresh parsley for a pop of color. This makes them look fancy and appetizing. Pair your subs with a side salad or some crispy chips. A cold drink like soda or iced tea complements the meal well. Enjoy your tasty creation and share it with friends! For the full recipe, check out the Full Recipe. {{image_2}} You can switch up the meatballs to suit your taste. Turkey and chicken meatballs are great for a lighter meal. They have a nice flavor and are lower in fat. If you want a plant-based option, try vegetarian meatballs made from lentils or beans. They add a unique twist. For flavor, you can mix in some herbs. Try adding basil or oregano for a fresh taste. You can also use different spices like cumin for a kick. Experiment with cheese, too! Mixing in feta or cheddar can change the whole vibe of your subs. You don’t have to stick with marinara sauce. You can make your own at home or grab a jar from the store. Homemade sauce tastes fresh and lets you control the flavor. If you're short on time, a good store-bought sauce works just fine. Other sauce choices can really jazz up your meatball sub. Alfredo sauce gives a creamy touch, while pesto adds a herby flavor. You can even try barbecue sauce for a smoky taste. The options are endless! The bread you choose makes a big difference. Classic sub rolls are soft and hold the meatballs well. You can use hoagie rolls or baguettes for a crunchier bite. If you need gluten-free options, look for gluten-free sub rolls at your local store. You can also use lettuce wraps for a low-carb choice. Just be sure to layer your meatballs carefully so everything stays together. For the full recipe, check out the Easy Meatball Subs section above! To keep your meatball subs fresh, wrap them in foil or plastic wrap. This practice helps keep moisture in and prevents them from drying out. You can store them in the fridge for up to three days. If you want to enjoy them later, freezing is a great option. You can freeze your assembled subs for quick meals later. Just wrap each sub tightly in plastic wrap and then in aluminum foil. This double layer protects them from freezer burn. They can last in the freezer for up to three months. When you're ready to eat, simply thaw them in the fridge overnight. When reheating, you have a couple of choices. The microwave heats fast but can make the bread soggy. Instead, try using an oven for the best results. Preheat the oven to 350°F (175°C) and place the subs on a baking sheet. Heat for about 10-15 minutes. To keep the bread crispy, cover the subs loosely with foil for the first half of the reheating time. This method allows the cheese to melt while keeping the bread nice and crunchy. Now you're ready to enjoy your meatball subs anytime! For more details, check the Full Recipe. Yes, you can prepare meatballs in advance. Form the meatballs and place them on a tray. Cover them with plastic wrap and store them in the fridge for up to 24 hours. This keeps them fresh and ready to cook. If you want to store them longer, freeze them. Just freeze them on a tray first, then transfer to a bag. They can last up to three months in the freezer. When you're ready to cook, bake them straight from frozen. This saves time on busy days. If you want a change from marinara sauce, try some fun options. You can use Alfredo sauce for a creamy twist. Pesto also works great for a fresh, herby flavor. BBQ sauce adds a smoky taste that kids love. For a spicy kick, try sriracha mixed with tomato sauce. These options keep things interesting and tasty. Making a gluten-free meatball sub is easy. Use gluten-free breadcrumbs instead of regular ones for the meatballs. Make sure to check the labels on sauces and rolls. Look for gluten-free sub rolls at your local store. There are many tasty brands available now. This way, everyone can enjoy a delicious meatball sub! To boost the flavor, use fresh herbs like basil or oregano. You can mix in chopped onions or bell peppers for a crunch. Try adding red pepper flakes for some heat. For toppings, consider sliced olives or banana peppers. A sprinkle of Parmesan cheese on top adds a nice touch. These small changes make a big difference in taste. You can also check [Full Recipe] for more ideas! In this article, I shared how to make easy meatball subs. We covered main ingredients like ground beef and pork, along with optional add-ins. You learned about tools and step-by-step instructions, from preparing to baking the meatballs. Tips on cooking and serving will help you create the perfect dish. Remember, there are many variations and storage methods. Now, with these pointers, you can enjoy delicious meatball subs any time. Get creative and enjoy your cooking!

Easy Meatball Subs Simple and Flavorful Recipe

If you crave a quick and tasty meal, you’re in the right spot! This Easy Meatball Subs recipe brings together

- 4 chicken thighs, skin-on - 2 cups baby potatoes, halved - 1 red onion, sliced into wedges - 1 bell pepper (any color), sliced - 1 cup broccoli florets - 1 cup BBQ sauce (your choice) - 2 tablespoons olive oil - 1 teaspoon garlic powder - 1 teaspoon smoked paprika - Salt and pepper to taste - Fresh cilantro, for garnish The ingredients here create a great mix of flavors. The chicken thighs give a juicy and rich taste. Baby potatoes add a nice bite, while the onion and bell pepper bring sweetness. Broccoli adds color and crunch. For seasoning, BBQ sauce is key. It adds a smoky and sweet touch that works well with the chicken. Olive oil helps to roast the veggies perfectly. Garlic powder and smoked paprika give depth to the dish. Use salt and pepper to enhance all the flavors. I love to finish with fresh cilantro. It adds a bright taste and makes the dish look great. You can find the full recipe to make this dish at home. 1. Preheat your oven to 425°F (220°C). This will help cook everything evenly. 2. Line a large sheet pan with parchment paper. It makes cleanup a breeze. 3. In a big bowl, add baby potatoes, red onion, bell pepper, and broccoli. 4. Drizzle with olive oil. Add garlic powder, smoked paprika, salt, and pepper. 5. Toss the veggies until they are all coated in the oil and seasonings. 6. Spread the seasoned veggies evenly on the sheet pan. Leave enough room for the chicken. 1. Pat the chicken thighs dry with paper towels. This helps the skin get crispy. 2. Season both sides of the chicken with salt and pepper. This adds great flavor. 3. Place the chicken thighs on the sheet pan next to the veggies. Skin side should be up. 4. Brush BBQ sauce over the chicken thighs. Save some sauce for later. 1. Place the sheet pan in the preheated oven. Bake for 25-30 minutes. 2. Check the chicken’s internal temperature; it should reach 165°F (75°C). 3. In the last 5 minutes, brush more BBQ sauce on the chicken. This gives it a nice glaze. 4. Once done, take it out of the oven. Let it rest for a few minutes. 5. Garnish with fresh cilantro before serving. For the full recipe, check the details above. To get crispy skin on your BBQ chicken, start by drying the chicken thighs well. Patting them dry helps the skin crisp up nicely. Season with salt and pepper before applying any sauce. Bake at 425°F for about 25-30 minutes. For chicken thighs, this time works best. Always check the internal temperature. You want it to reach 165°F. When choosing veggies for your sheet pan meal, go for sturdy ones like baby potatoes, bell peppers, and broccoli. They hold up well when roasting. Cut them into even sizes to ensure they cook at the same rate. For tender and crispy veggies, toss them in olive oil and seasonings. Spread them out on the pan without crowding. This way, they roast instead of steam. For a beautiful presentation, use a large platter. Arrange the BBQ chicken and roasted veggies nicely. Drizzle the remaining BBQ sauce over the top. A sprinkle of fresh cilantro adds color and flavor. Serve with sides like rice, corn, or a fresh salad for a complete meal. Enjoy your delicious creation! Check out the Full Recipe for more details. {{image_2}} You can change up the proteins in this dish. Try chicken breasts or drumsticks instead of thighs. Both work well and cook nicely. If you want something different, you can use pork or tofu. These swaps keep it exciting. For veggies, think about the season. Use zucchini in summer or root veggies in winter. You can also mix in green beans or asparagus for a fresh touch. The key is to choose vegetables that you enjoy and that roast well. BBQ sauce is where the magic happens! You can pick a sauce that fits your mood. Go spicy for a kick or sweet for a classic taste. Tangy sauces can also add a fun twist. You can even mix sauces to create your own unique flavor blend. Adding herbs and spices will elevate your dish. Consider using fresh rosemary or thyme to add a nice aroma. A sprinkle of cayenne pepper can bring in some heat. Don't be shy to play around with flavors! Try adding garlic or onion powder for an extra zing. The options are endless, and it’s all about what you love. For a complete guide, check out the Full Recipe for more ideas. To store leftover BBQ chicken and vegetables, let them cool first. Place the chicken and veggies in airtight containers. This keeps them fresh for up to four days in the fridge. If you want to enjoy them later, you can freeze them. Just make sure to wrap them tightly in foil or use freezer bags. They will stay good for about three months in the freezer. For reheating, you can use the oven or microwave. If you use the oven, set it to 350°F (175°C). Heat for about 15-20 minutes until warm. If you use the microwave, place the chicken and veggies on a microwave-safe plate. Heat in short bursts of 1-2 minutes, checking often. Preparing in advance can save time on busy weeknights. You can chop the vegetables and season them ahead. Store them in the fridge for up to two days. This way, you can just pop everything on the sheet pan when you're ready to cook. For freezing options, you can assemble the chicken and veggies on a sheet pan. Cover it well and place it in the freezer. When you’re ready to cook, just take it out and bake it straight from frozen. This makes dinner quick and easy, even on the busiest nights. For full details, check the Full Recipe. You can check if chicken is cooked by using a meat thermometer. The internal temperature should reach 165°F (75°C). If you do not have a thermometer, cut into the thickest part of the chicken. The meat should be white, with no pink. If it is still pink, cook it longer until done. Yes, you can use skinless chicken thighs. They will still be tasty but may not get as crispy. If you prefer a crispy texture, consider broiling the chicken for a few minutes at the end of cooking. Sheet pan BBQ chicken goes well with many sides. Here are some great options: - Corn on the cob - Coleslaw - Baked beans - Rice or quinoa - A simple green salad You can store leftover sheet pan BBQ chicken in the fridge for up to four days. Keep it in an airtight container. If you want to keep it longer, freeze it for up to three months. Make sure to let it cool before freezing. Reheat in the oven or microwave. For the full recipe, check out the detailed instructions above! This blog post guided you through a simple BBQ chicken and vegetable recipe. We covered ingredients, step-by-step instructions, and helpful tips for success. Remember to choose your favorite BBQ sauce and adjust seasonings to your taste. You can mix in different proteins and veggies for variety. Storing leftovers properly will help you enjoy these tasty meals later. Now, it's time to gather your ingredients and try this easy recipe. You’ll impress your family with a delicious dinner. Enjoy your cooking adventure!

Sheet Pan BBQ Chicken Fast and Flavorful Dinner

Looking for a quick, tasty dinner? I’ve got you covered with my Sheet Pan BBQ Chicken recipe. It combines juicy

- Salmon fillets (4, skin-on or off) - Soy sauce (1/4 cup, low sodium recommended) - Honey (1/4 cup) - Rice vinegar (2 tablespoons) - Sesame oil (2 tablespoons) - Garlic (2 cloves, minced) - Fresh ginger (1 teaspoon, grated) - Cornstarch (1 tablespoon) - Water (2 tablespoons) - Sesame seeds (1 teaspoon for garnish) - Green onions (2, sliced) - Steamed rice or quinoa - Steamed vegetables (e.g., broccoli or snap peas) When making Sweet and Savory Teriyaki Salmon, the ingredients truly shine. What are the main ingredients? The main ingredients are salmon fillets, soy sauce, and honey. Salmon is rich in omega-3 fatty acids. Soy sauce gives that salty umami kick. Honey adds that perfect sweet touch. Together, they create a flavor that dances on your taste buds. What are the additional ingredients? The additional ingredients include rice vinegar, sesame oil, and garlic. Rice vinegar adds a tangy note. Sesame oil gives a nutty depth to the sauce. Garlic brings a hint of warmth and aroma. What garnishes and serving suggestions should I use? For garnishes, use fresh ginger, cornstarch, and sesame seeds. Green onions add a fresh crunch. Serve the salmon over a bed of steamed rice or quinoa. Add steamed vegetables, like broccoli or snap peas, for a complete meal. This dish not only tastes great but looks stunning too. The vibrant colors and glossy sauce make it a feast for the eyes. You’ll love how easy it is to whip up this flavorful delight. For the full details on how to create this dish, check the Full Recipe. To make the teriyaki sauce, grab a medium bowl. Whisk together these ingredients: - 1/4 cup soy sauce - 1/4 cup honey - 2 tablespoons rice vinegar - 2 tablespoons sesame oil - 2 minced garlic cloves - 1 teaspoon grated fresh ginger This mix gives your salmon a sweet and savory flavor. I love how the honey balances the saltiness from the soy sauce. In a small bowl, mix together: - 1 tablespoon cornstarch - 2 tablespoons water Stir until smooth. Once that’s done, add this mix to your teriyaki sauce. This step makes the sauce thicker and stickier, which is perfect for coating the salmon. Heat a non-stick skillet over medium heat. Place the salmon fillets in the pan, skin-side down if you prefer. Sear them for about 5 minutes. This gives the salmon a nice crust. Next, carefully flip the salmon. Pour the teriyaki sauce over the top. Cook for another 4-5 minutes. Basting the salmon with the sauce will add more flavor. You will know it's done when the salmon flakes easily with a fork. Remove the salmon from the skillet and let it rest for a few minutes. Drizzle any leftover sauce over the salmon as you plate them. Enjoy your sweet and savory teriyaki salmon! For the full recipe, check out the details in the recipe section. To sear salmon well, use a hot pan. Heat your skillet over medium heat. Add a bit of oil to help prevent sticking. Place the salmon skin-side down if you have skin. Cook for about 5 minutes without moving it. This gives a nice brown color. Basting is key for flavor. After flipping the salmon, pour the teriyaki sauce over it. Use a spoon to scoop the sauce and drizzle it over the fillets. This adds more taste and keeps the salmon moist. You can add extra spices to make it your own. Try garlic powder or smoked paprika. Fresh herbs like cilantro or basil also work well. If you want it sweeter, add more honey. For a saltier taste, a bit more soy sauce does the trick. Taste as you go to find what you like best. Serve your teriyaki salmon over rice or quinoa. This not only fills you up but also looks great. Arrange the salmon nicely on the plate. Garnish with sesame seeds and sliced green onions. This adds a pop of color and makes the dish look fancy. The full recipe gives you all the steps to make this meal shine! {{image_2}} You can switch up the protein in this dish. Chicken or tofu works great with teriyaki sauce. Both will soak up the flavors well. Just adjust cooking times. Chicken needs longer to cook through, while tofu just needs to warm up. For sweeteners, honey is popular, but you can try maple syrup or agave nectar. Each option adds its own unique taste. You can also play with the amount to match your preference. Want to give your teriyaki sauce a twist? Adding fruit juices can change the whole vibe. Orange juice adds a bright note, while pineapple juice brings a sweet and tangy flavor. You can also infuse the sauce with other flavors. A bit of chili adds heat, and hoisin sauce adds depth. Mix and match to find your favorite flavor combinations. You have options when it comes to cooking styles. Grilling gives a smoky taste and nice char. Pan-searing allows for a crispy edge. Both methods are easy and quick. If you want a healthier option, try baking. Preheat your oven to 375°F. Place the salmon on a baking sheet and pour the sauce over it. Bake for about 15-20 minutes. This method keeps the salmon moist and flavorful. Enjoy this dish with steamed rice and veggies for a complete meal. For the full recipe, check out Sweet and Savory Teriyaki Salmon. To keep your teriyaki salmon fresh, store it right away. Place the salmon in an airtight container. Make sure it cools to room temperature first. It stays good in the fridge for up to three days. If you want to keep it longer, freezing is a great option. For best results, use freezer-safe bags or containers. This helps prevent freezer burn and keeps the flavor intact. When reheating salmon, you want to keep it moist. The best way is to use an oven. Preheat it to 300°F. Place the salmon on a baking sheet and cover it with foil. Heat for about 10 minutes. This method keeps it flaky and flavorful. If you use a microwave, be careful. Heat it in short bursts at medium power. This helps avoid overcooking. Check it often to keep the texture nice. Freezing teriyaki salmon is simple. First, let it cool completely. Then, wrap each piece tightly in plastic wrap. Place the wrapped salmon in a freezer bag. Squeeze out as much air as possible to avoid freezer burn. You can freeze it for up to three months. When you're ready to eat, take it out and thaw it in the fridge overnight. This keeps the taste close to fresh. Yes, teriyaki salmon is quite healthy. Salmon is rich in omega-3 fatty acids, which help heart health. It also has protein for muscle strength. Teriyaki sauce, made from soy sauce and honey, adds flavor without too many calories. Using low-sodium soy sauce keeps the dish heart-friendly. Yes, you can marinate the salmon overnight. Marinating helps deepen the flavor and keeps the fish moist. The sauce seeps into the salmon, making it tastier. Just make sure to keep it in the fridge. You can serve teriyaki salmon with many delicious sides. Steamed rice or quinoa pairs well. Steamed vegetables like broccoli or snap peas add color and nutrients. You can also add a simple salad for a fresh touch. To check if salmon is cooked, look for a few signs. The fish should be opaque and flake easily with a fork. A good rule is to cook it for 4–6 minutes per half-inch of thickness. Using a food thermometer, aim for 145°F (63°C) for safe eating. This blog post shared a simple yet tasty teriyaki salmon recipe. We discussed ingredients, step-by-step cooking methods, and helpful tips. I encouraged variations, like using different proteins and cooking styles. Storing and reheating leftovers were also covered for your convenience. Remember, making delicious teriyaki salmon is easy and fun. Enjoy experimenting with flavors and garnishes. Happy cooking!

Sweet and Savory Teriyaki Salmon Flavorful Delight

Are you ready to elevate your dinner with a dish that’s both sweet and savory? My Sweet and Savory Teriyaki

To make easy chicken gyros, you need some key items: - 500g chicken breast, thinly sliced - 2 tablespoons olive oil - 1 tablespoon lemon juice - 1 teaspoon garlic powder - 1 teaspoon onion powder - 1 teaspoon dried oregano - Salt and pepper to taste These ingredients bring flavor and zest to your gyros. The chicken breast serves as the main protein source, while olive oil and lemon juice add moisture and tang. Garlic and onion powders enhance the taste, and oregano gives a hint of earthiness. Don’t forget to season with salt and pepper for balance. For the refreshing tzatziki sauce, gather these simple ingredients: - 1 cup Greek yogurt - 1 cucumber, grated - 1 tablespoon fresh dill, chopped - Lemon juice This sauce is a must. Greek yogurt forms the base, giving it creaminess. The grated cucumber adds crunch, while fresh dill offers a burst of flavor. A squeeze of lemon juice brightens the sauce, making it perfect for your gyros. For serving, you’ll need: - 4 pita breads - Fresh veggies: tomatoes, red onion, lettuce, sliced Pita bread wraps around the filling, making it easy to hold. Fresh veggies add color and crunch. Using ripe tomatoes, crisp lettuce, and sharp red onions elevates your meal. These components make your chicken gyros not just tasty but also beautiful on the plate. For the full recipe, check out the details mentioned above. Enjoy your cooking! First, you need to mix the marinade. In a bowl, combine these ingredients: - 2 tablespoons olive oil - 1 tablespoon lemon juice - 1 teaspoon garlic powder - 1 teaspoon onion powder - 1 teaspoon dried oregano - Salt and pepper to taste Stir it well until the mixture is smooth. Next, add the thinly sliced chicken breast. Make sure each piece gets coated in the marinade. Cover the bowl with plastic wrap and let it sit in the fridge for 30 minutes. This helps the chicken soak up all the great flavors. While the chicken is marinating, we can whip up the tzatziki sauce. In a separate bowl, mix: - 1 cup Greek yogurt - 1 cucumber, grated - 1 tablespoon fresh dill, chopped - A pinch of salt - A squeeze of lemon juice Stir until everything is well combined. This sauce adds a creamy touch to your gyros. It’s cool, fresh, and full of flavor! After marinating, it’s time to cook the chicken. Heat a non-stick skillet or grill pan over medium-high heat. Cook the chicken for about 5-7 minutes. You want it to be fully cooked and slightly golden brown. Make sure to turn the pieces occasionally. This way, they cook evenly and get that nice color. Now comes the fun part—putting it all together! Warm the pita breads in a dry skillet for about 1 minute on each side. This makes them soft and easy to fold. To assemble, lay a warm pita flat. Spread a generous amount of tzatziki sauce on it. Then, add the cooked chicken on top. Don’t forget to add your fresh veggies like lettuce, tomatoes, and red onion. Finally, fold the pita in half and enjoy! For a complete guide, check out the Full Recipe. To save time when marinating chicken, use thin slices. Thin pieces soak up the flavor fast. You can also marinate the chicken overnight. This makes it even tastier. If you’re in a rush, try marinating for just 15 minutes. It still adds great flavor. To make tzatziki sauce thicker, start with good yogurt. Greek yogurt has the right texture. Grate the cucumber and squeeze out excess water. This helps keep the sauce from being runny. You can also add a bit of sour cream for extra creaminess. If you want more flavor, mix in some minced garlic or lemon zest. You can serve gyros in many fun ways. For a crowd, consider a gyro bar. Set out pita, chicken, tzatziki, and fresh veggies. Let everyone build their own! For something different, try using lettuce wraps instead of pita. You can also add unique toppings like feta cheese or olives. Mix and match for tasty variations! {{image_2}} You can switch the chicken for beef or lamb. Both meats bring rich flavors. If you want a lighter choice, try tofu or tempeh for a vegetarian dish. These options add unique tastes and textures to your gyros. You can also use chickpeas for a hearty, plant-based meal. If you need a gluten-free meal, skip the pita bread. Instead, use lettuce wraps. They hold all the tasty fillings well. You can also find gluten-free pita in stores. This way, everyone can enjoy gyros without worry. Spice blends can change your gyros’ taste. Try adding paprika for smoky notes. Cumin gives a warm and earthy flavor. You can also mix in chili powder for some heat. Experimenting with spices lets you find what you love best. Each blend makes your gyros special, and you can have fun with it! For the complete recipe, check out the Full Recipe section. To keep your chicken gyros fresh, store leftovers in an airtight container. Place the chicken and veggies separately from the pita and sauce. This prevents sogginess. Store everything in the fridge. They will last for up to three days. Make sure to cool the chicken before placing it in the fridge. When you reheat the chicken, aim to keep it juicy. You can use the microwave, but cover it with a damp paper towel. This helps retain moisture. Heat it for 30 seconds, then check. If it's not hot enough, keep heating in 15-second bursts. Another option is to use a skillet. Heat it on low with a splash of water. Cover it with a lid to steam the chicken gently. Tzatziki can stay fresh in the fridge for about four days. Store it in a sealed container to avoid contamination. If you notice any off smell or change in texture, it's best to toss it. You can also freeze tzatziki, but it may change in texture. To thaw, place it in the fridge overnight before using. Yes, you can prepare gyros in advance. This saves time for busy days. Here's how: - Marinate the chicken: You can marinate the chicken the night before. Store it in the fridge. - Make the tzatziki sauce: Prepare the sauce ahead of time. It tastes better after chilling for a few hours. - Chop veggies: Slice your tomatoes, onions, and lettuce ahead. Store them in airtight containers. - Warm pita bread: When you're ready to eat, just warm the pita. This keeps it soft. If you need a substitute for Greek yogurt, here are some options: - Sour cream: This will give you a similar creamy texture. - Plain yogurt: Regular yogurt works too but is thinner. - Cottage cheese: Blend it to make it smooth. - Dairy-free options: Look for coconut yogurt or almond yogurt for a vegan choice. Knowing when chicken is fully cooked is key. Here are some signs: - Color: The chicken should be white and not pink. - Juices: When you cut it, the juices should run clear. - Temperature: Use a meat thermometer. The internal temp should reach 165°F (75°C). These tips will help you enjoy your Easy Chicken Gyros, made from the Full Recipe, without any worries! In this post, we explored making delicious gyros. We covered the main ingredients, from chicken to tzatziki sauce. You learned step-by-step instructions for marinating, cooking, and assembling gyros. We also shared tips for tasty variations and how to store your leftovers. Remember, cooking is all about fun and creativity. Enjoy trying new flavors and adapting recipes. You can impress your friends and family with simple skills. Happy cooking!

Easy Chicken Gyros Flavorful and Quick Meal Prep

Looking for a quick, tasty meal that impresses? Let me introduce you to Easy Chicken Gyros! This flavorful dish brings

- 2 cups cooked chicken, shredded - 4 cups broccoli florets, steamed - 1 cup cooked quinoa (or rice) - 1½ cups shredded sharp cheddar cheese - ½ cup cream cheese, softened - 1 teaspoon garlic powder - 1 teaspoon onion powder - ½ teaspoon paprika - Salt and pepper to taste - ¼ cup breadcrumbs (optional for crunch) - Chicken broth (1 cup) Gathering the right ingredients is key to making the best Cheesy Chicken Broccoli Bake. You will need cooked chicken for protein. Shredded chicken works great because it mixes easily. Broccoli adds a nice color and crunch. Quinoa or rice serves as a filling base. Cheddar cheese is the star here, giving that gooey, cheesy goodness. Cream cheese adds smoothness and flavor. For seasonings, garlic and onion powders bring out the best taste. Paprika adds a hint of warmth. Salt and pepper round out the flavors. If you want a little crunch, consider adding breadcrumbs on top. Using chicken broth in your sauce keeps the dish moist. All these ingredients help create a meal that is both easy and flavorful. For the full recipe, check the section above. - Preheat the oven to 375°F (190°C). - Prepare and steam the broccoli florets until bright green and tender. First, you need to set your oven. The right temperature will help your dish cook evenly. Next, steam your broccoli. This keeps it bright and fresh. You want it soft but not mushy. - Combine shredded chicken, steamed broccoli, cooked quinoa, and half of the cheddar cheese. In a big bowl, mix the shredded chicken with the steamed broccoli. Add the cooked quinoa and half of the cheddar cheese. This mix is the heart of your dish. Make sure it's well combined for even flavors. - Prepare the cream cheese mixture with chicken broth and seasonings. Now, let’s make the sauce. In a different bowl, mix cream cheese with chicken broth. Add garlic powder, onion powder, paprika, salt, and pepper. Stir it well until it's smooth. This sauce will add richness and flavor. - Mix and transfer to baking dish. - Top with remaining cheddar cheese and breadcrumbs. - Bake for 25-30 minutes. Pour the sauce over the chicken and broccoli mix. Stir it all together. Then, transfer everything into a greased baking dish. Spread it out evenly. Top with the rest of the cheddar cheese and if you like, sprinkle breadcrumbs for a little crunch. Bake in the oven for 25 to 30 minutes. You want it bubbly and golden brown. Enjoy your cheesy chicken broccoli bake! For the complete recipe, check out the [Full Recipe]. To make this dish lighter, you can substitute cream cheese with low-fat options. This swap cuts calories while still keeping the creaminess. Another great idea is to use brown rice or cauliflower rice instead of regular rice. Both choices add fiber and nutrients, making this meal even better for you. You can boost the flavor of your Cheesy Chicken Broccoli Bake by experimenting with different types of cheese. Try mozzarella for a milder taste or gouda for a smoky twist. If you like a little heat, add cayenne pepper or hot sauce. A small amount can transform the dish into a spicy delight. When it's time to serve, pair your bake with a fresh salad. The crunch and brightness of the salad balance the richness of the dish. You can also serve it with whole-grain bread. This adds fiber and makes the meal more filling. For the complete recipe, check the link to the Full Recipe. {{image_2}} You can easily make this dish vegetarian. Just replace the chicken with chickpeas or tofu. Both options add protein and flavor. Use vegetable broth instead of chicken broth to keep it plant-based. This swap gives you a rich taste without meat. For a gluten-free version, use gluten-free breadcrumbs or skip them altogether. This dish still tastes great without the extra crunch. You can also replace quinoa with gluten-free grains like rice or millet. These grains work well and keep the dish light. If you love creaminess, try adding a layer of sour cream or Greek yogurt. This twist gives the dish an extra rich flavor. The tanginess from the yogurt pairs well with the cheese. It makes your Cheesy Chicken Broccoli Bake even more delightful. For more ideas, check out the Full Recipe. Store any leftovers in an airtight container. They stay fresh in the fridge for up to 3 days. This keeps the flavors intact and prevents spoilage. To freeze Cheesy Chicken Broccoli Bake, let it cool completely. Then, cover it tightly with plastic wrap and foil. This method protects it from freezer burn. You can freeze it for up to 3 months. To thaw, move it to the fridge overnight. For quick thawing, place it in a warm water bath. The best way to reheat your dish is in the oven. Preheat it to 350°F (175°C). Place the Cheesy Chicken Broccoli Bake in a baking dish. Cover it with foil to keep it moist. Heat for about 20-25 minutes or until hot. You can also use the microwave. Heat it in short bursts, stirring in between, until warm. This helps retain its cheesy goodness. For the full recipe, click here: [Full Recipe]. It takes about 15 minutes to prep and 30 minutes to cook. So, you will spend a total of 45 minutes to serve this tasty dish. This quick time makes it easy for busy days or family gatherings. Yes, you can prepare it a day before. Just mix all the ingredients and put them in the fridge. When you are ready, bake it as usual. This saves time and lets the flavors blend well. You can swap chicken for chickpeas, tofu, or cooked turkey. If you like fish, cooked salmon works too. These options still give you protein and keep the dish tasty. Absolutely! You can portion this dish into containers. It stores well in the fridge for up to three days. Just reheat each portion as needed. This makes it a great choice for easy lunches or dinners. For the full recipe, check out the details above. In this blog post, we covered the ingredients, instructions, and tips for making Cheesy Chicken Broccoli Bake. You learned about the key ingredients like chicken, broccoli, and cheese. I also shared how to customize the dish with health-conscious options and variations. Remember, this recipe is not just easy; it’s fun to make. Enjoy trying different flavors or swapping ingredients. You can’t go wrong with this dish! Now, get cooking and enjoy a tasty meal with those you love.

Cheesy Chicken Broccoli Bake Easy and Flavorful Dish

Are you ready for a meal that’s both easy and delicious? This Cheesy Chicken Broccoli Bake combines tender chicken, fresh

Older posts
Newer posts
← Previous Page1 … Page81 Page82 Page83 Page84 Next →

dsad

© 2026 juliesdish • Built with GeneratePress

Our Policies

  • Copyright Policy
  • Cookie Policy
  • GDPR Policy
  • Privacy Policy
  • Disclaimer
  • Terms Of Use

More Information

  • Home
  • About
  • Contact
  • Appetizers
  • Dessert
  • Dinner
  • Drinks
©2026, juliesdish About Back To Top