Skip to content
DisclaimerTerms Of UseGDPR PolicyCookie Policy

juliesdish

  • Home
  • Drinks
  • Appetizers
  • Dinner
  • Dessert
  • About
  • Contact
  • Privacy Policy
DisclaimerTerms Of UseGDPR PolicyCookie Policy

NO-ING-IMG

Peach Cobbler Pancakes need simple and fresh ingredients. Here’s what you will need: - 1 cup all-purpose flour - 1 tablespoon baking powder - 1 tablespoon sugar - 1/2 teaspoon salt - 1 cup buttermilk - 1 large egg - 1 tablespoon vanilla extract - 2 tablespoons melted butter - 1 cup fresh peaches, peeled and diced - 1 teaspoon ground cinnamon - 1/4 cup brown sugar (for topping) - Whipped cream (for serving) These ingredients come together to create a fluffy pancake that tastes like peach cobbler. The fresh peaches add a sweet burst, while the cinnamon gives warmth. The brown sugar on top melts slightly as you cook, creating a sweet crust. Make sure to use ripe peaches for the best flavor. They should be soft to the touch and fragrant. If you prefer, you can substitute with canned peaches, but fresh is always best. To find the full recipe, check out the recipe section above. Happy cooking! To start, gather your ingredients. First, we need to combine the dry ingredients. In a mixing bowl, whisk together: - 1 cup all-purpose flour - 1 tablespoon baking powder - 1 tablespoon sugar - 1/2 teaspoon salt This mix gives our pancakes a fluffy base. Next, in another bowl, mix the wet ingredients. Beat together: - 1 cup buttermilk - 1 large egg - 1 tablespoon vanilla extract - 2 tablespoons melted butter Once mixed, pour the wet ingredients into the dry mix. Stir gently until just combined. It’s okay to have a few lumps; this helps keep the pancakes light. Finally, fold in: - 1 cup fresh peaches, peeled and diced - 1 teaspoon ground cinnamon This adds flavor and makes the batter smell amazing. Now, heat a non-stick skillet or griddle over medium heat. Lightly grease it with butter or cooking spray. Pour about 1/4 cup of batter onto the skillet for each pancake. Cook for about 2-3 minutes. Look for bubbles forming on the surface; this shows they are ready to flip. When it’s time to flip, do it with confidence. A quick, smooth motion keeps the pancake from breaking. Cook for an additional 1-2 minutes until golden brown. To add a sweet touch, sprinkle brown sugar on top of pancakes after flipping. This creates a nice caramelized finish. Serving your peach cobbler pancakes is where you can really shine. Place them on a warm plate for a nice touch. For extra flair, top with: - Whipped cream - Additional peach slices - A sprinkle of cinnamon This not only makes them look great but also adds more flavor. Enjoy your delicious breakfast treat that feels like dessert! - Overmixing the batter: This is a common error. When you mix too much, your pancakes can turn out tough. Just mix until the dry ingredients blend with the wet ones. A few lumps are perfectly fine. - Cooking at the wrong temperature: If your skillet is too hot, the outside burns before the inside cooks. Medium heat works best for even cooking. - Achieving fluffiness: For fluffy pancakes, use buttermilk. It adds moisture and lightness. Also, make sure to let the batter rest for a few minutes before cooking. This step helps the pancakes rise better. - Using fresh ingredients: Fresh peaches make a big difference. They add natural sweetness and flavor. Always choose ripe, firm peaches for the best result. - Adding spices: Ground cinnamon is a must for a warm flavor boost. You can also try nutmeg or cardamom for a unique twist. A pinch can elevate the taste. - Experimenting with sweetness: If you like your pancakes sweeter, adjust the brown sugar topping. You can also drizzle maple syrup or honey for added sweetness. Be creative and find your perfect balance! For the complete recipe, check out the Full Recipe. {{image_2}} You can easily adapt this recipe to fit your needs. - Gluten-free alternatives: Substitute all-purpose flour with a gluten-free blend. Look for blend options that contain xanthan gum to help with texture. - Dairy-free options: Use almond milk or oat milk instead of buttermilk. You can also try coconut yogurt for a creamy touch. Feel free to mix up the flavors! - Different fruits: Try using blueberries, strawberries, or even bananas. Each fruit brings its own unique taste. - Nut and grain options: You can add chopped nuts like pecans or walnuts for crunch. For more fiber, mix in oats or quinoa flakes. Explore other cultures with your pancakes! - Adding spices from different cuisines: Consider adding cardamom for a Middle Eastern flair or nutmeg for a warm, cozy taste. Cinnamon is always a classic choice too. - Regional pancake variations: Try making these pancakes with a Southern twist by adding a hint of cornmeal. For a French touch, serve with a drizzle of maple syrup and a dusting of powdered sugar. You can find the Full Recipe for these delightful Peach Cobbler Pancakes and unleash your creativity! To keep your peach cobbler pancakes fresh, store them in the fridge. Place them in an airtight container. They can last about 3 to 4 days this way. If you want to save them longer, you can freeze the pancakes. Just stack them with parchment paper in between each one. Then, place them in a freezer bag. They will stay good for up to 2 months in the freezer. When it comes to reheating, you want your pancakes to stay fluffy. The best method is to use a skillet. Heat it on low and add a little butter. Place the pancakes in the skillet for about 1-2 minutes on each side. If you need to use a microwave, set it to medium power. Heat for 20-30 seconds at a time until warm. This helps keep the texture nice. These pancakes are best enjoyed fresh, but they can last a while. In the fridge, they last about 3-4 days. In the freezer, they can last up to 2 months. Check for signs they are no longer good. If they smell sour or have a slimy texture, it’s best to toss them out. Always trust your senses when it comes to food safety. Peach cobbler pancakes are a sweet breakfast dish. They combine fluffy pancakes with sweet, juicy peaches. The pancakes have a warm, cinnamon flavor that reminds you of peach cobbler. You can top them with whipped cream and brown sugar for extra sweetness. Each bite feels like a cozy hug on a plate! Yes, you can! Prepare the pancake batter the night before. Store it in the fridge, covered. When you are ready to cook, just give the batter a quick stir. You can also cook the pancakes in advance. Store them in the fridge or freezer. To reheat, use a toaster or microwave. This way, you can enjoy them any time! If your peaches are hard, you can ripen them quickly. Place the peaches in a paper bag. Close the bag loosely and leave it at room temperature. The ethylene gas will help them ripen faster. Check them daily. Once soft, they are ready to use in your pancakes! For the full recipe, check out [Peach Cobbler Pancakes](#). Enjoy making this tasty dish! In this post, we explored how to make peach cobbler pancakes from scratch. We listed all the ingredients, provided step-by-step instructions, and shared tips for perfect pancakes. You learned common mistakes to avoid, variations to try, and how to store leftovers. Enjoy these pancakes fresh or experiment with flavors. Remember, cooking is about fun and creativity. With these tips, you can impress anyone. Enjoy making and sharing these delicious pancakes with family and friends.

Peach Cobbler Pancakes Irresistible Breakfast Treat

Wake up to a delicious twist on breakfast with Peach Cobbler Pancakes! Imagine fluffy pancakes bursting with sweet, juicy peaches

- Grated Zucchini - All-Purpose Flour - Baking Powder and Baking Soda - Seasonings: Salt, Garlic Powder, Onion Powder - Sharp Cheddar Cheese - Buttermilk and Egg - Unsalted Butter Measuring ingredients right is key to great biscuits. Use the following tips for best results: - Cup and Teaspoon Conversions: - 1 cup = 16 tablespoons - 1 tablespoon = 3 teaspoons - Tips for Accurate Measurements: - Spoon flour into the cup, then level it off. - Use a liquid measuring cup for buttermilk and egg. - For grated zucchini, squeeze out excess moisture before measuring. These simple steps help ensure your zucchini cheddar biscuits turn out perfect every time. The measurements in the full recipe guide you through each step to make delicious, fluffy biscuits. 1. Preheating the Oven Start by preheating your oven to 400°F (200°C). This ensures a nice, even bake. 2. Preparing the Baking Sheet Line your baking sheet with parchment paper. This keeps the biscuits from sticking and helps with cleanup. 1. Combining Flour and Seasonings In a large bowl, mix together the flour, baking powder, baking soda, salt, garlic powder, and onion powder. Whisk these ingredients well to combine. 2. Incorporating Zucchini and Cheese Next, add the grated zucchini and shredded cheddar cheese to the dry mix. Stir until the zucchini is well coated with flour. This helps distribute the flavor evenly. 1. Whisking Buttermilk, Egg, and Butter In a separate bowl, whisk together the buttermilk, egg, and melted butter. Make sure these ingredients are combined well so the biscuits come out moist. 2. Combining Wet and Dry Mixtures Pour the wet ingredients into the bowl with the dry mix. Stir gently until just combined. Do not overmix; it’s okay to have a few lumps. 1. Portioning and Spacing on Baking Sheet Using a spoon or ice cream scoop, drop the biscuit dough onto the prepared baking sheet. Make sure to space them a couple of inches apart for even baking. 2. Baking Time and Temperature Bake the biscuits for 15-20 minutes. They should turn golden brown. A toothpick inserted into the center should come out clean. Enjoy your warm Zucchini Cheddar Biscuits! For the full recipe, check out the details above. To make perfect Zucchini Cheddar Biscuits, avoid overmixing the dough. Overmixing makes the biscuits tough. You want them light and fluffy. Just mix until the dry and wet ingredients combine. It’s okay if you see a few lumps. Using buttermilk helps adjust the dough’s consistency. If you don't have buttermilk, mix regular milk with a tablespoon of lemon juice. This will give you a nice tang that enhances the flavor. The right amount of moisture keeps the biscuits tender. To boost the flavor, I suggest adding fresh herbs like chives or parsley. These herbs add a bright taste and a lovely color. You can also try spices like paprika or cumin for a unique twist. For cheese, sharp cheddar works great, but feel free to experiment. Crumbled feta or pepper jack can add a different taste. Each cheese will give your biscuits a new character. These biscuits shine when served warm. Pair them with herbed butter or a creamy dip. They work well as a side for soups or salads. For a beautiful presentation, sprinkle fresh herbs on top before serving. You can stack them on a plate for a fun look. Serve them at brunch or as a snack, and watch everyone enjoy! {{image_2}} You can easily change a few ingredients to fit your needs. - Gluten-Free Options: Use gluten-free flour instead of all-purpose flour. This will keep the texture light and fluffy. - Dairy-Free Alternatives: Substitute buttermilk with almond milk or coconut milk. You can also use dairy-free cheese for a tasty twist. Adding spices or veggies can make these biscuits even more fun. - Adding Spices or Other Vegetables: Try adding black pepper, paprika, or even fresh herbs like thyme or basil. You can also mix in carrots or corn for added flavor. - Unique Cheese Choices: Swap sharp cheddar for feta, mozzarella, or pepper jack cheese. Each cheese adds a new layer of taste. You can serve these biscuits in different ways for fun. - Mini Biscuits vs. Regular Size: Make mini biscuits for snacks or parties. Just reduce the baking time to 10-12 minutes. - Zucchini Cheddar Biscuit Sandwich Ideas: Use the biscuits as sandwich bread. Fill them with egg, bacon, or avocado for a hearty meal. For the full recipe, check out the Zesty Zucchini Cheddar Biscuits. To keep your zucchini cheddar biscuits fresh, you have two main options. - Short-term Storage in the Refrigerator: Place the cooled biscuits in an airtight container. They will stay good for about 3 days. If you want to keep them longer, consider freezing. - Long-term Freezing Instructions: Wrap each biscuit in plastic wrap or foil. Then, place them in a freezer bag. They will last up to 3 months. When you're ready to eat them, just thaw them in the fridge overnight. To enjoy your biscuits again, you need to reheat them properly. - Best Methods for Reheating Biscuits: Preheat your oven to 350°F (175°C). Place the biscuits on a baking sheet. Heat them for about 10 minutes. You can also use a microwave. Heat them for 15-20 seconds. - Maintaining Texture and Flavor: If you use the oven, you keep the biscuits crispy. The microwave can make them soft. For best results, wrap them in a damp paper towel before microwaving. This keeps them moist. Enjoy your tasty zucchini cheddar biscuits, knowing they can be easily stored and reheated! For the full recipe, check out the details earlier in this article. To make Zucchini Cheddar Biscuits, follow these steps: 1. Preheat your oven to 400°F (200°C). Line a baking sheet with parchment paper. 2. In a large bowl, mix together flour, baking powder, baking soda, salt, garlic powder, and onion powder. 3. Add grated zucchini and shredded cheddar cheese to the dry mix. Stir until coated. 4. In another bowl, whisk buttermilk, egg, and melted butter until combined. 5. Pour the wet mix into the dry ingredients. Stir gently until just combined. 6. Drop biscuit dough onto the prepared baking sheet, leaving space between each. 7. Bake for 15-20 minutes until golden brown. Check with a toothpick to ensure it’s cooked through. 8. Let them cool slightly before serving. This simple process leads to warm, cheesy biscuits. For the complete recipe, check the Full Recipe. Yes, you can use frozen zucchini. First, thaw the zucchini completely. Drain any excess water. Squeeze the zucchini in a clean cloth to remove moisture. This step is key to prevent soggy biscuits. Zucchini Cheddar Biscuits offer some health benefits: - Zucchini adds fiber and vitamins. - Cheddar cheese provides protein and calcium. - Using whole wheat flour can boost nutrition. However, they do contain butter and cheese, so enjoy in moderation. When stored properly, biscuits last: - In the fridge: 3-4 days in an airtight container. - In the freezer: Up to 3 months in a freezer bag. Always let them cool completely before storing. These biscuits shine at any meal. - Serve warm with butter or herbs. - Pair with soups or salads. - Great for brunch or as a snack. Their cheesy flavor and tender texture make them a hit! Zucchini cheddar biscuits are simple and fun to make. We covered key ingredients, measurement tips, and step-by-step instructions. Remember to mix dry and wet ingredients well but avoid overmixing for the best texture. Experiment with flavors and serving styles to suit your taste. Store leftovers properly for later enjoyment. With this knowledge, you can create tasty biscuits that are sure to impress. Enjoy your baking adventure!

Zucchini Cheddar Biscuits Flavorful and Easy Recipe

If you’re looking for a simple and tasty snack, you’ve found it! Zucchini Cheddar Biscuits are the perfect blend of

To make this dish, you need some fresh and simple ingredients. Here’s what you will need: - 1 pound large shrimp, peeled and deveined - 4 cloves garlic, minced - Zest and juice of 2 lemons - 3 tablespoons olive oil - 1 teaspoon red pepper flakes (adjust to taste) - Salt and pepper to taste These ingredients create a perfect blend of zesty and savory flavors. The shrimp will soak up the bright taste of lemon and garlic. You can enhance your dish with a few tasty garnishes: - 1 tablespoon fresh parsley, chopped (for garnish) - Lemon wedges (for serving) These garnishes add color and a fresh touch. They also boost the lemon flavor when served. Having the right tools makes cooking easier. Here’s what you will need: - A mixing bowl - A large skillet - A spatula or tongs - A knife and cutting board These tools help you prepare and cook the dish smoothly. With this setup, you will create a delightful meal. For the full recipe, just check the details above. To make the marinade, you start by gathering the shrimp and garlic. In a bowl, mix the shrimp, minced garlic, lemon zest, lemon juice, olive oil, red pepper flakes, salt, and pepper. Toss everything well. This step coats the shrimp in flavor. Let the mixture sit for 15 to 20 minutes. This helps the shrimp absorb all the tasty goodness. Next, heat a large skillet on medium-high heat. Once the skillet is hot, add the marinated shrimp in one layer. Cook for 2 to 3 minutes. You will see the shrimp turn pink. Flip them over and cook for another 2 minutes. The shrimp should be fully cooked and opaque. Be careful not to overcook them; this can make them tough. Once the shrimp is done, remove the skillet from the heat. Transfer the shrimp to a serving dish. For a nice touch, garnish with fresh parsley. Serve with lemon wedges on the side. This adds an extra zesty kick. For the full recipe, you can refer back to the ingredients and instructions provided earlier. Enjoy your meal! To cook shrimp just right, keep it simple. Use fresh shrimp for the best taste. Heat your skillet to medium-high. Add the shrimp in one layer. Cook for 2-3 minutes on one side. Watch for the color change; they should turn pink. Flip them over and cook for another 2 minutes. Shrimp cooks fast, so don’t walk away. Overcooked shrimp can get tough and chewy. Lemon and garlic are the stars here. For a deeper flavor, use fresh garlic. You can also add herbs like thyme or basil for more depth. If you like heat, increase the red pepper flakes. A splash of white wine during cooking can add a nice touch. Always taste as you go, and adjust to your liking. This dish is very flexible. You can swap shrimp for chicken or tofu if you prefer. Try adding veggies like bell peppers or zucchini for a colorful twist. Want a fun twist? Try adding a teaspoon of honey for a sweet touch. Use your favorite herbs to make this dish reflect your taste. Always feel free to experiment with flavors. Check out the Full Recipe for more ideas! {{image_2}} You can easily spice up your dish. Add more red pepper flakes for heat. If you like it very spicy, try diced jalapeños. They add a great kick. Mix them in when you marinate the shrimp. This zesty shrimp dish will set your taste buds on fire! Turn your zesty shrimp into a pasta dish. Cook your favorite pasta, like spaghetti or fettuccine. After cooking, toss the pasta with the shrimp. Use the leftover sauce from the shrimp for extra flavor. Top it with fresh parsley and lemon zest. This makes a complete meal that is full of flavor! Make grilled skewers for a fun twist. Thread the marinated shrimp onto skewers. You can add bell peppers or onions for extra veggies. Grill on medium heat for about 2-3 minutes per side. This method gives your shrimp a nice smoky flavor. Serve with lemon wedges for that zesty finish. For more details on how to make these variations, check out the Full Recipe. You should store your Zesty Lemon Garlic Shrimp in the fridge. Place the shrimp in an airtight container. They will stay fresh for up to 2 days. Make sure to cool them completely before sealing. This helps keep the shrimp tasty and safe. If you want to save some shrimp for later, freezing works well. First, cool your shrimp completely. Then, place them in a freezer-safe bag or container. Squeeze out as much air as you can. This helps prevent freezer burn. Your shrimp can last up to 3 months in the freezer. Reheat the shrimp carefully to keep them juicy. You can use a skillet over low heat. Add a splash of olive oil or water to help them heat evenly. Stir gently, and cook for about 2-3 minutes. Avoid high heat to prevent overcooking. You can also use a microwave. Heat in 30-second bursts until warm. Enjoy your meal! For the full recipe, check out Zesty Lemon Garlic Shrimp. You can marinate the shrimp for 15 to 20 minutes. This time lets the flavors mix well. If you marinate too long, the shrimp may get mushy. So, stick to the time for the best taste. You can serve this dish with many sides. Here are some great options: - Rice or quinoa for a filling base - Fresh salad for a crunchy bite - Garlic bread for a tasty treat - Pasta for a hearty meal Feel free to mix and match based on your taste! Yes, you can use frozen shrimp. Just remember to thaw them first. Place them in the fridge overnight or run them under cold water. Once thawed, you can follow the recipe as usual. Frozen shrimp works well and is often just as tasty! In this post, we explored how to make zesty lemon garlic shrimp. We covered the main ingredients, tools, and step-by-step cooking instructions. You learned tips for perfect shrimp and ways to customize the dish. We even discussed storage and answered common questions. Now, you can enjoy this simple yet tasty meal. Cooking shrimp can be fun and easy. With every bite, you can impress yourself and your guests. Happy cooking!

Zesty Lemon Garlic Shrimp Flavorful and Easy Dish

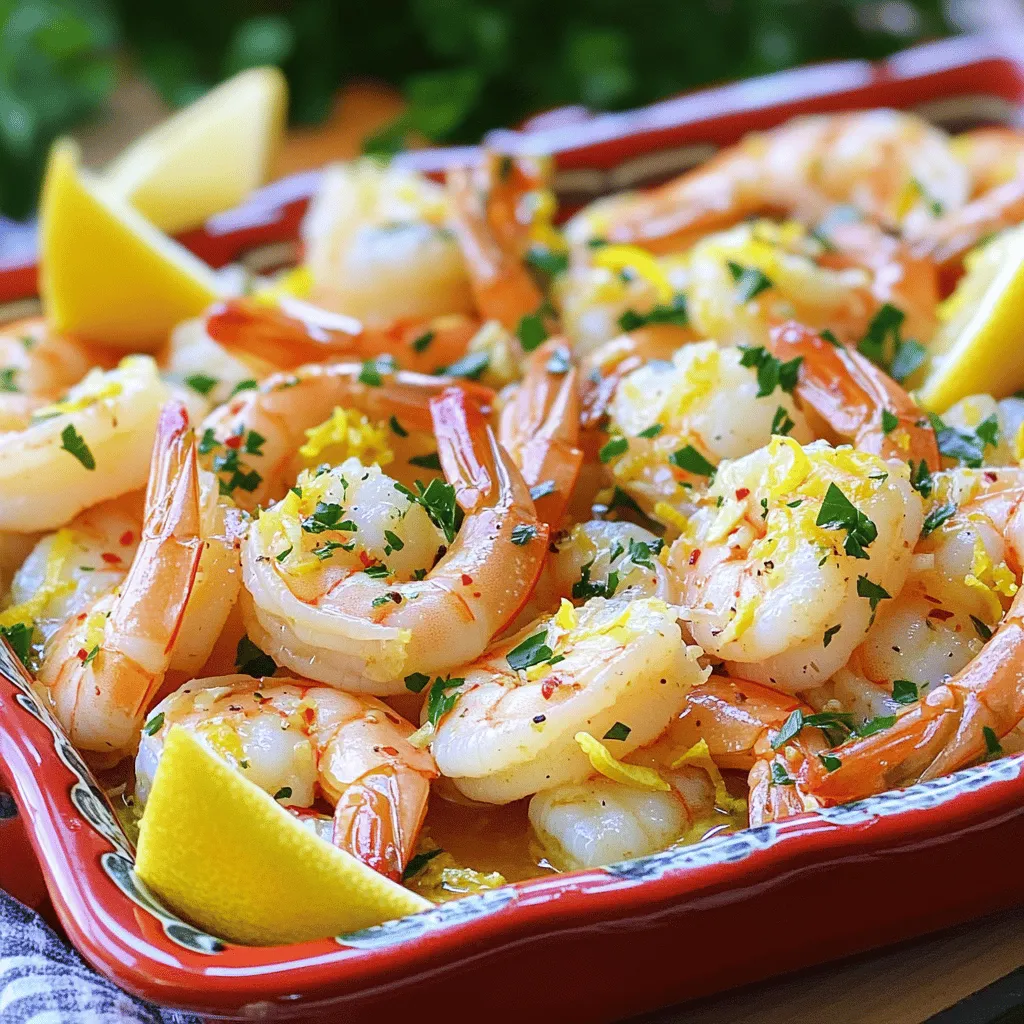
Are you ready to elevate your dinner game? This Zesty Lemon Garlic Shrimp dish is not just easy, it’s bursting

- 6 cups Romaine lettuce, chopped - 1 cup cherry tomatoes, halved - 1 cup cooked turkey bacon, crumbled - 1/2 cup red onion, thinly sliced - 1/2 cup crumbled blue cheese (or feta) - 1/4 cup fresh basil leaves, chopped - 1 avocado, diced - Dressing components: 1 ripe avocado, 1/4 cup Greek yogurt, 2 tablespoons lemon juice, 1 tablespoon olive oil, salt, and pepper Serving Size & Adjustments This salad serves four people. You can adjust the amounts based on how many you are serving. If you want more servings, just double the ingredients. Tips for Measuring Ingredients - Use a dry measuring cup for solid items like lettuce and bacon. - Use a liquid measuring cup for liquids like olive oil. - Always pack leafy greens gently into the cup for accurate measurement. Measuring correctly helps you create a balanced salad. Enjoy the freshness of each ingredient in your Classic BLT Salad. For the full recipe, check out the Crunchy BLT Salad with a Twist. Ingredients for the dressing - 1 ripe avocado - 1/4 cup Greek yogurt - 2 tablespoons lemon juice - 1 tablespoon olive oil - Salt and pepper to taste To begin, gather your ingredients. Cut the avocado in half and remove the pit. Scoop the flesh into a blender. Add Greek yogurt, lemon juice, and olive oil. Blend until smooth. If the dressing is too thick, add a little water to reach your desired consistency. Taste and season with salt and pepper. To cook the turkey bacon, heat a skillet over medium heat. Place the strips in the skillet. Cook for about 5-7 minutes, turning occasionally. Look for a golden color and a crispy texture. Once done, remove the bacon and let it cool. Crumble it into bite-sized pieces. Start by layering the chopped Romaine lettuce in a large salad bowl. Next, add halved cherry tomatoes and thinly sliced red onion on top. Then, sprinkle the crumbled turkey bacon and diced avocado. For a flavorful twist, add crumbled blue cheese or feta. Finish with chopped basil leaves. Just before serving, drizzle the creamy avocado dressing over the salad. Toss gently to mix the flavors. Enjoy your fresh and vibrant Classic BLT Salad! To boost the taste of your BLT salad, consider adding these spices: - Cracked black pepper - Smoked paprika - Garlic powder You can also serve with fresh lemon wedges. The citrus adds a bright kick. A sprinkle of extra cheese enhances the creamy texture too. Make your salad pop by plating it in clear bowls. Layer the ingredients for a colorful look. Arrange the lettuce at the bottom and pile on the toppings. For garnishing, add extra basil leaves on top. A drizzle of dressing adds shine and draws the eye. You can also sprinkle sesame seeds for extra texture. One mistake is overdressing your salad. Too much dressing can make it soggy and heavy. Aim for a light drizzle, then toss gently. Another mistake is choosing toppings that clash. Avoid strong flavors that overwhelm the salad. Stick to compatible toppings like cheese and fresh herbs for the best taste. For the full recipe, check the details above! {{image_2}} For a vegetarian option, swap turkey bacon for crispy chickpeas or tempeh bacon. Both add crunch and flavor. If you want a vegan salad, use the same alternatives and replace the Greek yogurt with a vegan yogurt. This keeps the creamy texture without dairy. For a gluten-free option, ensure your bacon substitute is gluten-free. Many brands offer gluten-free bacon or you can choose roasted nuts for added crunch. In summer, add fresh corn, diced cucumbers, or bell peppers to enhance the salad's crunch. These veggies shine with the fresh flavors of the season. In fall, consider roasted butternut squash or sweet potatoes for warmth and sweetness. These ingredients add a heartier feel to your salad. You can switch up the dressing, too. A light vinaigrette made with olive oil, vinegar, and mustard can brighten the salad. Add fresh herbs like dill or parsley for extra flavor. If you prefer a yogurt-based dressing, mix Greek yogurt with herbs and lemon juice for a tangy twist. Feel free to experiment with spices. A pinch of smoked paprika or garlic powder can elevate the dressing and make it unique. Check out the Full Recipe for more flavor ideas! To keep your Classic BLT Salad fresh, store it in an airtight container. This helps prevent the lettuce from wilting. Always refrigerate leftovers right after serving. The salad stays fresh for up to three days. However, the longer it sits, the soggier it may get. Freezing this salad is not ideal. While some ingredients can freeze, others cannot. The turkey bacon can be frozen after cooking. However, lettuce, tomatoes, and avocado do not freeze well. If you freeze the bacon, thaw it in the fridge overnight before reheating. To heat up your turkey bacon, use a skillet over medium heat. This method ensures it stays crispy. After refrigeration, assemble the salad just before serving. Toss the salad gently to mix everything. Add the dressing last to keep it fresh and crunchy. Enjoy your salad at its best! A Classic BLT Salad combines fresh ingredients for a tasty dish. It features: - Romaine lettuce, chopped - Cherry tomatoes, halved - Cooked turkey bacon, crumbled - Red onion, thinly sliced - Blue cheese, crumbled (or feta if you prefer) - Fresh basil leaves, chopped - Diced avocado You mix these ingredients for a vibrant salad. The flavors blend well, creating a fresh, crunchy dish. The turkey bacon adds a savory touch, while the cheese gives it a creamy bite. This salad is a fun twist on the classic BLT sandwich. Yes, you can prep some parts in advance. Here are my tips: - Chop the lettuce and store it in a sealed bag or container. - Halve the cherry tomatoes and slice the onion ahead of time. - Cook the turkey bacon and crumble it, then store it in the fridge. - Dice the avocado just before serving to keep it fresh. Assembling the salad right before serving keeps it crisp and vibrant. If you want alternatives, consider these options: - Regular bacon for a classic taste. - Tofurky or tempeh bacon for a vegetarian option. - Grilled chicken or shrimp for extra protein. These swaps work well, depending on your dietary needs. To lighten up the Classic BLT Salad: - Use less bacon or swap it for turkey bacon. - Substitute blue cheese with a low-fat cheese. - Use Greek yogurt in place of dressing for fewer calories. These tips help you enjoy a fresh salad with fewer calories while keeping the flavor intact. This blog post covered the key ingredients and steps for a Classic BLT Salad. You learned how to prepare the creamy avocado dressing, cook turkey bacon, and assemble the salad beautifully. We also explored tips to enhance flavor, common mistakes, and dietary substitutions for various needs. You can make this salad your own by trying different ingredients and flavors. With some practice, you’ll be able to create an amazing dish everyone will enjoy. Enjoy your time in the kitchen!

Classic BLT Salad Fresh and Flavorful Recipe Guide

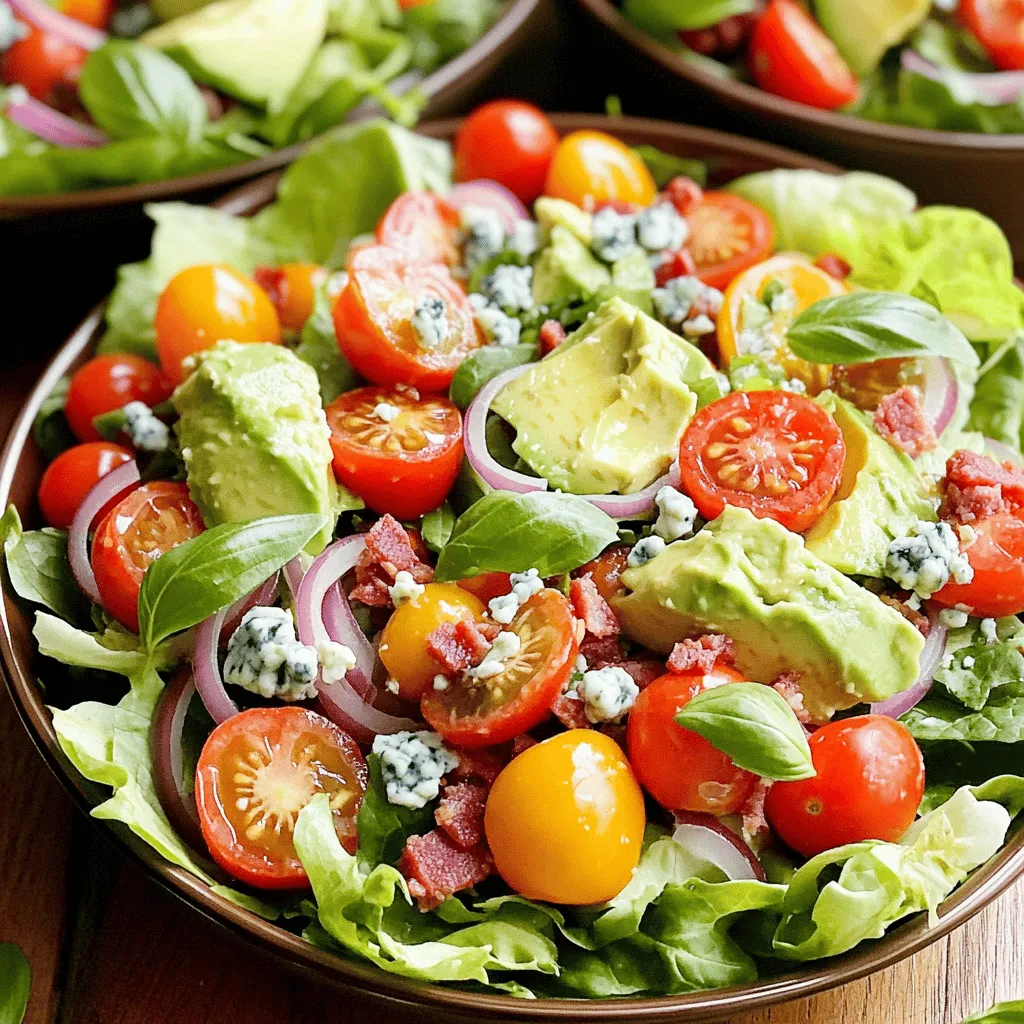
Looking for a fresh and tasty salad that packs a punch? My Classic BLT Salad is just what you need!

To make these Easy Sausage Breakfast Burritos, you will need: - 4 large eggs - 1 cup cooked breakfast sausage, crumbled - 1/2 cup bell pepper, diced (any color) - 1/4 cup onion, diced - 1/2 cup shredded cheddar cheese - 4 large flour tortillas - 2 tablespoons milk - 1 tablespoon olive oil - Salt and pepper to taste - 1/4 cup salsa (optional, for serving) - Fresh cilantro, chopped (for garnish, optional) You can easily swap some ingredients if needed. Here are a few ideas: - Use turkey or chicken sausage instead of pork sausage for a leaner option. - Substitute egg whites for whole eggs if you want fewer calories. - Try spinach or zucchini instead of bell peppers for a different veggie. - Use any cheese you like, such as pepper jack for extra flavor. - Whole wheat tortillas can replace regular flour tortillas if you prefer. To make these burritos, you'll want to have the following tools ready: - A medium mixing bowl for whisking eggs - A large skillet for cooking - A spatula for stirring and serving - A cutting board and knife for chopping veggies - A measuring cup for measuring ingredients - Aluminum foil or parchment paper (optional, for wrapping burritos) These ingredients and tools will help you create a tasty and simple meal. Enjoy the process and experiment with different flavors! Don't forget to check the Full Recipe for detailed cooking instructions. To make these Easy Sausage Breakfast Burritos, gather your ingredients first. Start by whisking the eggs and milk in a bowl. Add salt and pepper to taste. Next, heat the olive oil in a large skillet over medium heat. Once hot, add the diced onion and bell pepper. Cook them for 3-4 minutes until they are soft. Now, add the crumbled breakfast sausage to the skillet. Stir it in and heat for another 2-3 minutes. Push the sausage and veggies to one side of the skillet. Pour the whisked eggs into the empty side. Stir gently to scramble the eggs for about 3-4 minutes. When the eggs are cooked, mix them with the sausage and veggies. Add the shredded cheddar cheese and stir until it melts. Remove the skillet from heat. Warm the flour tortillas in another pan or microwave for about 15 seconds each. This will help them bend easily. Spoon the sausage mixture onto each tortilla’s center. Fold in the sides, then roll it tightly from the bottom. If you like, place the burritos seam side down in the skillet for 1-2 minutes to toast them. To make great scrambled eggs, focus on low heat. High heat can make them tough. Stir gently and frequently. This will keep them soft and fluffy. Remember, they will continue to cook a bit after you take them off the heat. So, remove them just before you think they’re done. Warming tortillas is key to a good burrito. If you use a microwave, wrap them in a damp paper towel. This adds moisture and keeps them soft. In a skillet, heat them for about 15 seconds on each side over medium heat. This makes them warm and flexible. Use this method to avoid tearing when you fill them. For the full recipe, check out the earlier sections. Enjoy your cooking! Meal prep makes mornings easier. You can save time and stress. Here are some tips: - Cook sausage and veggies ahead: You can cook the sausage and veggies the night before. Store them in the fridge. This way, you only need to add eggs in the morning. - Whisk eggs in advance: Mix the eggs and milk the night before. Keep them in a sealed bowl in the fridge. This saves time and keeps things easy. - Wrap and store burritos: If you make extra burritos, wrap them tightly in foil or plastic wrap. This keeps them fresh for later. These burritos are very flexible! You can change them to suit your tastes. Here are some ideas: - Add more veggies: Try spinach, mushrooms, or zucchini for extra flavor and nutrition. - Change the cheese: Swap cheddar for pepper jack or feta. Each cheese adds its own twist. - Spice it up: Add jalapeños or a dash of hot sauce to bring heat. If you love spice, go for it! - Try different meats: Use bacon or ham instead of sausage. You can even go meatless with beans or tofu. Even simple recipes can have hiccups. Here are mistakes to watch for: - Overcooking eggs: Keep an eye on your eggs! Cook them just until they are set. Overcooked eggs can become dry. - Too much filling: Stuffing too much into the tortilla makes it hard to roll. Use just enough filling for a neat wrap. - Not warming tortillas: Cold tortillas can break. Warm them for a few seconds to make them soft and bendable. - Skipping seasoning: Always season your eggs and veggies. A little salt and pepper make a big difference in flavor. With these tips, you’ll master making Easy Sausage Breakfast Burritos. Check out the Full Recipe for more details! {{image_2}} You can make a great vegetarian version of the sausage breakfast burrito. Just swap out the sausage for a meat-free option. Use plant-based sausage or skip the meat entirely. Add more veggies like spinach or mushrooms for extra flavor. This variation keeps it tasty and fun. If you like some heat, try a spicy southwest burrito. Add diced jalapeños or a dash of hot sauce to the egg mixture. You could also mix in black beans and corn for a heartier filling. Topping with avocado adds creaminess and balances the spice. Enjoy this bold twist! For a low-carb version, use lettuce wraps instead of tortillas. Fill them with the sausage, eggs, and cheese. You can also use cauliflower tortillas if you prefer. This way, you keep the taste without the carbs. It’s a great option for those watching their carb intake. For the full recipe, make sure to check out the complete guide! To keep your leftover burritos fresh, wrap them tightly in plastic wrap or foil. Place them in an airtight container. This helps prevent moisture loss and keeps them tasty. Store the wrapped burritos in the fridge for up to three days. Make sure to label the container with the date. This way, you know when they were made. When you're ready to enjoy your leftover burritos, you have a few great options. For the best taste, reheat them in a skillet. Heat the skillet over medium-low heat. Place the burrito seam side down in the pan. Cook for about 2-3 minutes on each side. This warms the filling and gives the outside a nice crisp. You can also use a microwave. Wrap the burrito in a damp paper towel and heat for 30-60 seconds. Check if it's hot throughout before eating. If you want to save burritos for later, freezing is a good choice. Let the burritos cool completely first. Then, wrap each one in plastic wrap, followed by aluminum foil. This helps keep them from freezer burn. Place the wrapped burritos in a freezer bag. They will stay fresh for up to three months. To reheat, simply thaw them in the fridge overnight and then use the reheating instructions above. Enjoy your Easy Sausage Breakfast Burritos whenever you like! Yes, you can make these burritos ahead of time. Prepare the filling by cooking the sausage, eggs, and veggies. Once cooked, let the mixture cool. Next, fill the tortillas and wrap them tightly. You can store these in the fridge for up to three days. For best taste, reheat them in a skillet or microwave before serving. Breakfast burritos pair well with many sides. Here are some tasty options: - Fresh fruit salad - Sliced avocado - Hash browns or home fries - A simple green salad - Yogurt with granola These sides add great flavor and balance to your meal. Making healthier burritos is easy! Here are some tips: - Use whole wheat tortillas instead of regular ones. - Swap regular sausage for turkey or veggie sausage. - Add more veggies, like spinach or mushrooms, for extra nutrients. - Use low-fat cheese or reduce the cheese amount. - Serve with salsa instead of sour cream. These changes keep the taste while boosting health benefits. For the complete recipe, check out the Full Recipe. You learned how to make Easy Sausage Breakfast Burritos. We covered the ingredients, tools, and step-by-step cooking instructions. I gave tips for perfect eggs and tortilla warming. You also discovered how to customize your burritos and avoid common mistakes. Remember, meal prep helps save time. Store leftovers carefully and reheat them well. With these tricks, you can enjoy great burritos anytime. Try different variations to keep meals fun! Happy cooking!

Easy Sausage Breakfast Burritos Simple and Tasty Meal

Start your day right with Easy Sausage Breakfast Burritos—simple, tasty, and full of flavor! I’ll show you how to whip

- 2 ripe avocados - 1 cup cherry tomatoes, halved - 1 cup fresh mozzarella balls, halved - 1/4 cup fresh basil leaves, chopped - 2 tablespoons balsamic glaze - 1 tablespoon olive oil - Salt and pepper to taste Each ingredient plays a big role in this dish. The avocados are creamy and smooth. They serve as the perfect bowl for the filling. Cherry tomatoes add a sweet and juicy burst. Fresh mozzarella gives a delightful chewiness. Basil brings an aromatic note that brightens the dish. Balsamic glaze adds a touch of sweetness and tang. Olive oil enriches the flavor and helps bind everything. - Calories per serving: About 400 calories. - Macronutrients breakdown: - Protein: 10g - Carbohydrates: 22g - Fat: 35g - Health benefits of key ingredients: - Avocados: Rich in healthy fats, great for heart health. - Tomatoes: Packed with vitamins and antioxidants. - Mozzarella: Source of protein and calcium. - Basil: Contains anti-inflammatory properties and vitamins. This dish is not just tasty; it also offers health benefits. Each bite brings flavor and nutrition. You can enjoy it as a light meal or a side dish. For the full recipe, check out the Caprese Stuffed Avocados section! To prepare the avocados, start by cutting them in half lengthwise. Make sure to be gentle as you don't want to bruise the fruit. Once cut, remove the pit with a spoon. If you want more filling space, scoop out a bit of the flesh. This step is key for a tasty bite. Next, you’ll mix the Caprese filling. In a bowl, add the halved cherry tomatoes, mozzarella balls, and chopped basil. These ingredients work well together. Now, drizzle the olive oil and balsamic glaze over the mix. Season everything with salt and pepper. Use a spoon to gently toss the mixture. You want every piece coated well. For a beautiful presentation, place the stuffed avocados on a plate. Allow the filling to overflow slightly for a fresh look. This makes the dish more inviting. As a final touch, drizzle extra balsamic glaze on top. This adds flavor and makes it look gourmet. You can also add some fresh basil leaves on top for color. If you want to be extra fancy, sprinkle some pine nuts or crushed red pepper for added crunch and heat. Enjoy your Caprese stuffed avocados right away for the best taste! For the complete recipe, check out the Full Recipe. To enjoy the best Caprese stuffed avocados, pick ripe avocados. A ripe avocado feels slightly soft when you gently squeeze it. Look for a dark green or black skin, which usually means it’s ready to eat. Avoid avocados with large dark spots or cracks, as these can indicate overripeness. To keep your cut avocado from browning, sprinkle some lemon juice over the flesh. The acidity slows down the browning process. You can also store it in an airtight container. Cover the surface with plastic wrap, pressing it down to remove any air. Adding fresh herbs can elevate your dish. Consider using oregano or thyme for a twist. A pinch of red pepper flakes can add a little heat. These small changes can make a big difference in taste. If you want to switch up the balsamic glaze, try using a drizzle of honey or a citrus vinaigrette. These options can give your Caprese stuffed avocados a fresh spin. You can also use pesto for a herby flavor that pairs well with the other ingredients. For the full recipe of Caprese stuffed avocados, check out the section above. {{image_2}} You can swap fresh mozzarella with burrata for a creamier taste. Goat cheese also works well for a tangy kick. If you want a dairy-free option, try using vegan mozzarella. Add some diced avocado for extra creaminess and flavor. For a fun twist, use grilled peaches or figs instead of tomatoes. They add a sweet touch to the dish. Caprese Stuffed Avocados can shine as a salad. Simply slice the stuffed avocados into wedges and serve over mixed greens. Drizzle more balsamic glaze on top for added flavor. You can also add grilled chicken or shrimp. This makes it a full meal. A sprinkle of pine nuts or walnuts can add crunch and richness. For a hearty dish, serve the stuffed avocados on toast or with crackers. Each bite bursts with flavor and freshness. When you have leftover Caprese stuffed avocados, store them right away. Place them in an airtight container. This helps keep them fresh and prevents browning. If you need to, add a little lemon juice on top. This adds flavor and helps stop browning too. You can keep them in the fridge for up to two days. You can get creative with leftovers. Try making a salad with the filling. Just chop up the avocado and mix it in. You can also add some cooked chicken for protein. If you have leftover mozzarella or tomatoes, keep them in the fridge. Store them in separate containers to keep them fresh. Enjoy your delicious Caprese stuffed avocados in new ways! To make Caprese stuffed avocados, start with ripe avocados. Cut them in half and take out the pit. You can scoop some flesh out for more filling space. In a bowl, mix halved cherry tomatoes, mozzarella balls, and chopped basil. Drizzle olive oil and balsamic glaze over the mix. Add salt and pepper to taste. Toss gently until everything blends well. Spoon the filling into each avocado half, letting it overflow a bit for looks. Drizzle more balsamic glaze on top for extra flavor. Serve right away for the best taste. For the full recipe, check the complete instructions above. Yes, you can prepare Caprese stuffed avocados ahead of time, but keep a few tips in mind. It’s best to fill avocados just before serving. If you prep too early, the avocado may brown. To avoid this, cover the stuffed avocados with plastic wrap. This helps keep air out. You can also chill them for a short time to serve cold. Prepare the filling in advance, but wait to assemble until you're ready to eat. Caprese stuffed avocados pair well with many dishes. You can serve them alongside a crisp green salad. They also go great with grilled chicken or fish for a full meal. Consider adding some crusty bread or a light pasta dish. These options balance the creamy avocado and fresh salad vibe of the dish. Enjoy with a glass of white wine for a refreshing treat. The Caprese Stuffed Avocados make a tasty and healthy meal. We covered easy steps to prepare them, plus tips on choosing the best avocados. You can mix and match ingredients to suit your taste. Store leftovers properly to enjoy this dish later. Simple yet flavorful, these stuffed avocados impress at any meal. Enjoy exploring new flavors and creating your perfect dish. Dive into this healthy recipe and make it part of your meals!

Caprese Stuffed Avocados Fresh and Flavorful Delight

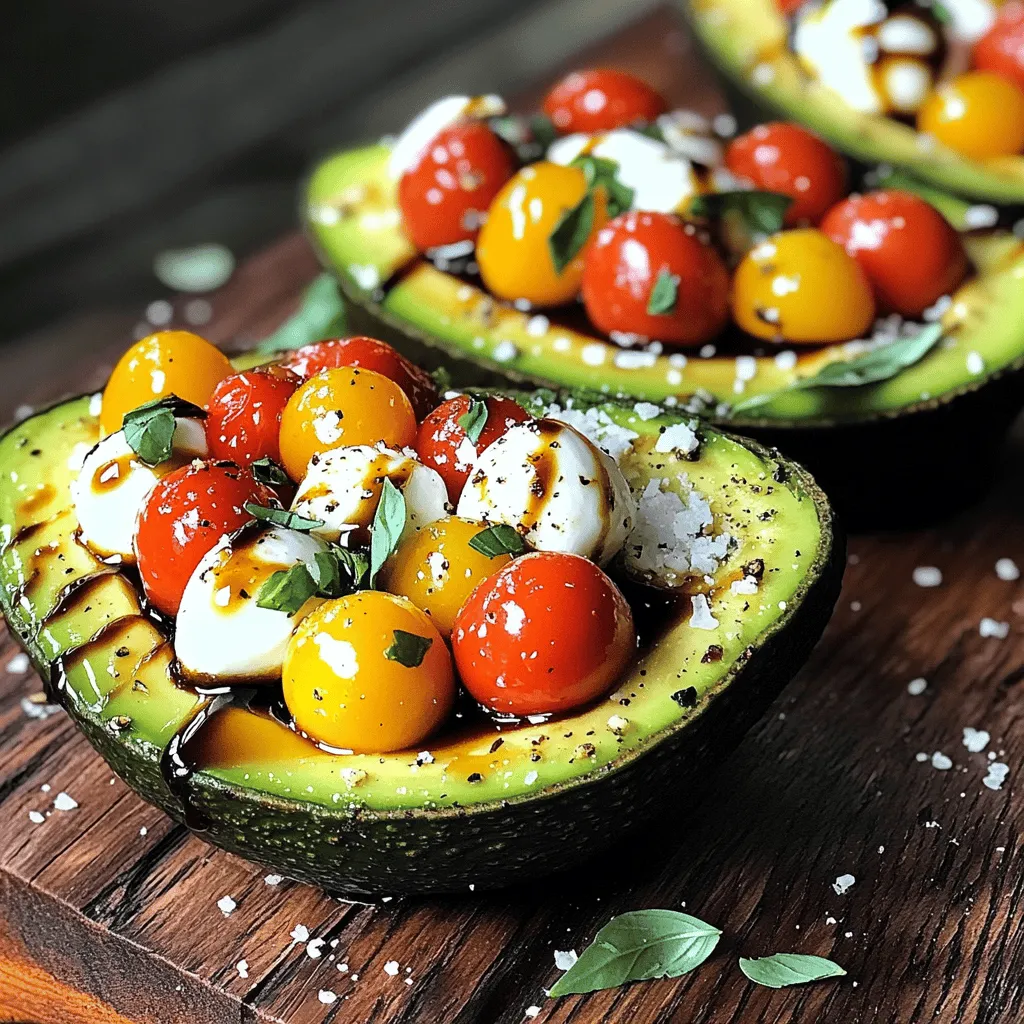
Are you ready to elevate your snack game? Caprese Stuffed Avocados bring fresh flavors and nutrition together in a fun

- 4 bone-in, skin-on chicken thighs - 4 cloves of garlic, minced - 2 tablespoons fresh rosemary, chopped - 2 tablespoons fresh thyme, chopped - 1 lemon (zested and juiced) - 3 tablespoons olive oil - Salt and black pepper to taste - 1 teaspoon paprika - ½ cup chicken broth When I prepare Baked Garlic Herb Chicken, I always use bone-in, skin-on thighs. They stay juicy and add great flavor. Fresh garlic and herbs like rosemary and thyme are key to this dish. They bring a bright taste and aroma. The lemon zest and juice add a nice tang. Olive oil helps the skin crisp up beautifully. Don't forget to season with salt, pepper, and a bit of paprika. The chicken broth keeps the chicken moist as it bakes. - Fresh parsley for garnish - Lemon wedges for serving I love to garnish my chicken with fresh parsley. It adds a lovely color and taste. Lemon wedges are great too. They give a fresh squeeze right before you eat. This makes every bite even better! If you want to learn more, check out the Full Recipe for all the steps and details. To make a tasty marinade, start by mixing together the minced garlic, chopped herbs, lemon zest, and lemon juice in a bowl. Add the olive oil, salt, pepper, and paprika. Stir everything until it blends well. This marinade gives your chicken a burst of flavor. Next, take your chicken thighs and dry them with paper towels. This step is key for crispy skin. Coat the chicken well with the marinade in a bowl or ziplock bag. Let it marinate for at least 30 minutes. For the best taste, marinate for 2 hours in the fridge. Heat some olive oil in an oven-safe skillet over medium-high heat. Once the oil is hot, carefully place the chicken thighs skin-side down in the skillet. Sear them for about 5 to 7 minutes. You want the skin to turn golden brown and get crispy. After searing, flip the chicken thighs over. Pour in the chicken broth and transfer the skillet to your preheated oven at 400°F. Bake the chicken for 25 to 30 minutes. Make sure the internal temperature reaches 165°F. This ensures the chicken is juicy and tender. You can find the full recipe at the beginning of this article. To get that perfect crispy skin, start by drying the chicken thighs. Pat them with paper towels. This step is key. Moisture on the skin will steam the chicken, not crisp it. Next, sear the chicken at the right heat. Use medium-high heat for the skillet. This helps the skin get golden brown. If the heat is too low, you won’t achieve that crunch. Marinating adds great flavor. For the best taste, let the chicken marinate for at least 30 minutes. If you have more time, try for 2 hours in the fridge. The longer, the better! If you have extra marinade, store it in the fridge. Use it within a day or two. Never reuse marinade that touched raw chicken. To ensure your chicken is safe to eat, check its internal temperature. Use a meat thermometer. It should read 165°F (75°C). If it isn’t cooked through, return it to the oven. Cook for an additional 5-10 minutes. Check again until it reaches the right temperature. This way, you get a juicy, safe meal every time. {{image_2}} You can change the herbs to fit your taste. If you want a milder flavor, use basil instead of rosemary. Oregano adds a nice touch too! Try mixing different herbs for fun. You can even use dried herbs if fresh ones are not available. Just remember, dried herbs are stronger, so use less. Want some heat? Add chili flakes or cayenne pepper to the marinade. This will give your chicken a spicy kick. You can also try smoked paprika for a deeper flavor. Feel free to adjust the spice level to match your taste. You can cook this chicken in other ways too! If you have a slow cooker, that works great. Just add all the ingredients and let it cook on low for six hours. If you like grilling, cook the chicken on a medium grill. This will give it a nice smoky taste. No matter how you cook it, the chicken will still be juicy and full of flavor! Store leftover chicken in an airtight container. Cool the chicken to room temperature before sealing. Keep it in the fridge for up to three days. For best taste, eat it within two days. If you have lots of leftovers, divide them into smaller portions. This makes it easy to grab when you're hungry. When reheating chicken, keep it moist. Preheat the oven to 350°F (175°C). Place the chicken in an oven-safe dish and cover it with foil. Heat for about 15-20 minutes. You can also use the microwave. Place the chicken on a microwave-safe plate. Heat in short bursts, about 1-2 minutes, checking often. Add a splash of chicken broth to keep it juicy. If you want to freeze baked chicken, wrap it tightly in plastic wrap or foil. Place it in a freezer bag to avoid freezer burn. It can last up to three months in the freezer. To thaw, move it to the fridge overnight. You can also use the microwave on the defrost setting. Always heat it to an internal temperature of 165°F (75°C) before eating. Yes, you can use boneless chicken thighs! They cook faster than bone-in thighs. Reduce the baking time to about 20-25 minutes. Always check the internal temperature. It should reach 165°F (75°C) for safe eating. Boneless thighs will still hold great flavor, but they may not be as juicy as bone-in thighs. Many sides work well with Baked Garlic Herb Chicken. Here are some tasty options: - Roasted vegetables, like carrots and broccoli - Creamy mashed potatoes - Fresh green salad with a light vinaigrette - Quinoa or rice pilaf for a grain option - Garlic bread for a nice touch These sides will enhance your meal and balance the rich flavors of the chicken. To get the best flavor in your marinade, focus on these tips: - Use fresh herbs for a bright taste. - Let the chicken marinate longer; 2 hours is best. - Add a splash of vinegar for extra tang. - Zest the lemon for a bright, citrus note. - Don’t skip the salt; it enhances all flavors. These steps will help you create a rich, flavorful chicken that stands out. Looking for the detailed recipe of Baked Garlic Herb Chicken? Check the above sections for all ingredients and instructions! In this blog post, we explored how to make Baked Garlic Herb Chicken. We covered the main ingredients you need, like chicken thighs, garlic, and fresh herbs. You learned the steps to prepare, marinate, sear, and bake the chicken for tasty results. I shared tips for crispy skin and variations to try. Lastly, I provided storage and reheating advice. Enjoying this dish can be easy and rewarding. Try making it your own with different herbs and spices. You'll impress everyone with your cooking!

Baked Garlic Herb Chicken Juicy and Flavorful Dish

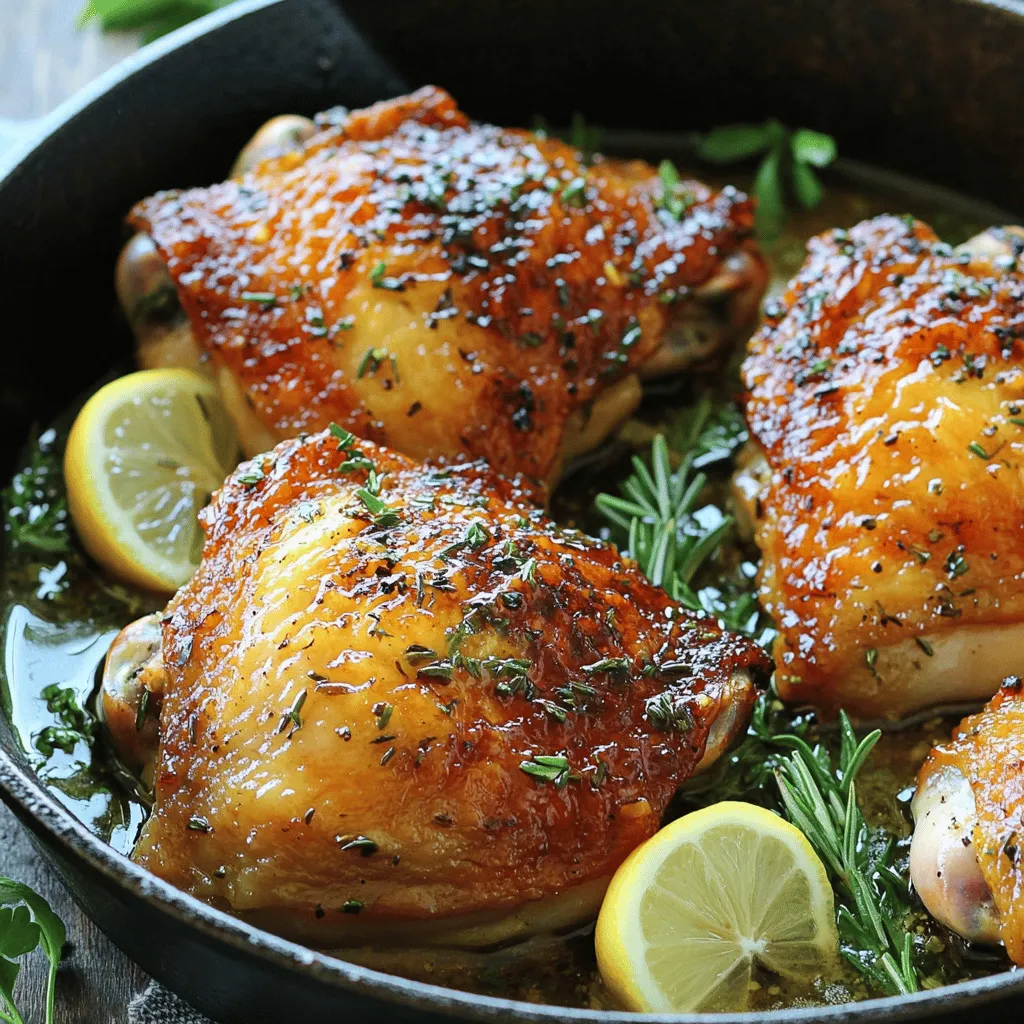
Are you ready to wow your family with a dish that’s juicy and packed with flavor? Baked Garlic Herb Chicken

To make the best strawberry cheesecake ice cream, you need some key ingredients. Here's what you will need: - 2 cups fresh strawberries, hulled and sliced - 1 tablespoon sugar - 1 teaspoon lemon juice - 1 cup cream cheese, softened - 1 cup heavy cream - 3/4 cup sweetened condensed milk - 1 teaspoon vanilla extract - 1/2 cup graham cracker crumbs These ingredients come together to create a creamy, rich ice cream with a lovely strawberry flavor. The cream cheese adds that signature cheesecake taste, while the strawberries bring freshness. You can make your ice cream even more special with some fun toppings: - Fresh strawberries, for garnish - A sprinkle of graham cracker crumbs - Whipped cream, if you want extra creaminess - Mint leaves, for a pop of color These toppings not only look great but also add extra flavor and texture. Here’s what you can expect in terms of nutrition for each serving: - Calories: Approximately 300 - Total Fat: 18g - Saturated Fat: 10g - Sugar: 20g - Protein: 4g This ice cream is a treat, so enjoy it in moderation! If you want to lighten it up, consider serving smaller portions. For more details, check the Full Recipe. First, gather your ingredients. You need fresh strawberries, sugar, lemon juice, cream cheese, heavy cream, sweetened condensed milk, vanilla extract, and graham cracker crumbs. Preparing these items makes the process smooth. Start by hulling and slicing the strawberries. This step is key for flavor and texture. Mix the sliced strawberries with sugar and lemon juice in a bowl. Let them sit for about ten minutes. This helps the juices come out. Now, let’s make the ice cream mixture. In a blender, puree the strawberries until smooth. If you want chunks, save some slices for later. In another bowl, beat the softened cream cheese until it’s creamy. Slowly mix in the heavy cream, sweetened condensed milk, and vanilla extract. Make sure everything is smooth and well combined. Then, gently fold in the pureed strawberries. If you saved some slices, add them now. Finally, mix in the graham cracker crumbs. This adds that classic cheesecake flavor. Pour the mixture into an airtight container. Freeze it for at least four to six hours. This helps it set well. When you’re ready to serve, let the ice cream sit for a few minutes at room temperature. This makes scooping easier. Serve it in chilled bowls. Top with a fresh strawberry and a sprinkle of graham cracker crumbs for a lovely finish. For the full recipe, check out the details above. To get that smooth, creamy texture in your strawberry cheesecake ice cream, use cold ingredients. Start with cold cream cheese and heavy cream. Mixing them well is key. Beat the cream cheese until it’s fluffy. Then, add heavy cream slowly while mixing. This helps create air pockets for creaminess. Don't rush this step; it makes a big difference. One mistake many make is not chilling the mixture. Always chill your mix before freezing it. This keeps the ice cream from becoming icy and hard. Another mistake is over-mixing the strawberries. You want chunks for texture. Lastly, don’t skip the graham cracker crumbs. They add that classic cheesecake flavor we love. A quality ice cream maker is your best friend. It helps churn the mixture, creating that smooth texture. If you don’t have one, a large bowl and a whisk work too. You will also need a blender for the strawberries. Use an airtight container for freezing, which keeps the ice cream fresh. These tools make the process easier and more fun! {{image_2}} You can change up the fruit in your cheesecake ice cream. Try using peaches or blueberries. Both fruits add a new twist. You can even mix different fruits together for fun flavors. Just remember to adjust the sugar based on the fruit's sweetness. To make this ice cream dairy-free, swap cream cheese and heavy cream. Use vegan cream cheese and coconut cream instead. This keeps it creamy and rich while being dairy-free. Also, check labels for sweetened condensed milk. You can find plant-based options that work well. Don't stop at strawberry! You can play with flavors. How about adding chocolate or peanut butter? Or mix in mint for a refreshing taste. You can also add spices like cinnamon or nutmeg to make it unique. The options are endless, so let your taste buds guide you! For the full recipe, check out the details above. Storing your homemade strawberry cheesecake ice cream is simple. Use an airtight container to keep it fresh. Make sure the container is clean and dry before adding the ice cream. This helps prevent ice crystals from forming. Press a piece of plastic wrap directly on the surface of the ice cream. This extra layer protects it from air. When stored correctly in the freezer, your strawberry cheesecake ice cream can last about two weeks. After this time, the ice cream may lose its best taste and texture. For the best flavor, try to eat it within a week. You want to enjoy it at its peak! Sometimes homemade ice cream can get too hard. If this happens, don’t worry! Just take it out of the freezer. Let it sit at room temperature for about 5 to 10 minutes. This helps soften it. If it’s still too hard, use a sturdy ice cream scoop. Warm the scoop in warm water for easier serving. Enjoy your creamy scoop of strawberry cheesecake ice cream right away! Yes, you can use frozen strawberries. Just thaw them first. Drain any excess liquid. This helps keep the ice cream from being too watery. Frozen strawberries work well, but fresh ones taste best. They give a vibrant flavor and a lovely texture. You can use coconut cream as a tasty substitute. It gives a rich texture and flavor. You might also try a blend of milk and butter. Mix 3/4 cup of milk with 1/4 cup of melted butter. This mix works well in many recipes. To make a non-dairy version, swap the cream cheese and heavy cream for non-dairy options. Use cashew cream or vegan cream cheese. For the heavy cream, use coconut milk or almond milk. Follow the same steps in the Full Recipe for great results. In this article, I shared how to make strawberry cheesecake ice cream from scratch. We covered the key ingredients, step-by-step instructions, and useful tips and tricks. I also explored tasty variations and storage tips to keep your ice cream fresh. Making this treat is fun and rewarding. With the right steps, you can enjoy smooth, creamy ice cream. Don't forget to experiment with flavors and toppings. Happy making!

Strawberry Cheesecake Ice Cream Creamy Homemade Delight

Craving something sweet and creamy? Let me show you how to make Strawberry Cheesecake Ice Cream that will delight your

- 4 bone-in chicken thighs, skin-on - 1/4 cup honey - 1/4 cup Dijon mustard - 2 tablespoons whole grain mustard - 2 tablespoons apple cider vinegar - 3 cloves garlic, minced - 1 teaspoon paprika - Salt and pepper to taste - Olive oil for cooking The main ingredients for honey mustard chicken thighs create a perfect balance of sweet and tangy. The chicken thighs give you juicy meat with crisp skin. Honey adds a natural sweetness, while Dijon mustard brings in a nice kick. Whole grain mustard adds texture and depth. Apple cider vinegar gives a bright note that cuts through the richness. Garlic and paprika round out the flavor, making it all pop. - Fresh thyme leaves for garnish Adding fresh thyme is optional but can elevate the dish. Thyme brings a fresh, herbal note that pairs beautifully with the honey mustard sauce. It also adds a lovely touch of color. If you have some on hand, I highly recommend using it for garnish. For the full recipe, check out the details above. First, preheat your oven to 400°F (200°C). This step gets your oven ready for cooking. While it heats, pat the chicken thighs dry with paper towels. Dry skin helps it get crispy. Next, sprinkle salt and pepper on both sides of the chicken. This adds great flavor. Now, let's make the honey mustard sauce. In a mixing bowl, whisk together the following ingredients: - 1/4 cup honey - 1/4 cup Dijon mustard - 2 tablespoons whole grain mustard - 2 tablespoons apple cider vinegar - 3 cloves garlic, minced - 1 teaspoon paprika - Salt and pepper to taste Whisk until everything is combined. This sauce brings a sweet and tangy kick to the chicken. Next, grab an oven-safe skillet. Heat a tablespoon of olive oil over medium-high heat. Once hot, add the chicken thighs skin-side down. Sear them for about 5-7 minutes. You want the skin to be golden brown and crispy. After that, flip the chicken over. Pour the honey mustard mixture over the chicken. Make sure to coat it well. Transfer the skillet to the oven and roast for 25-30 minutes. The chicken should reach an internal temperature of 165°F (75°C) when done. Once cooked, remove it from the oven and let it rest for 5 minutes before serving. You can find the full recipe here. To get crispy skin on your chicken thighs, start by drying them well. Use paper towels to pat the skin dry. This helps remove moisture that can make the skin soggy. Next, use a heavy skillet that can hold heat well. Cast iron pans work great for this. Sear the chicken thighs skin-side down for 5 to 7 minutes. You want the skin to be golden brown and crisp before flipping them. To boost the flavor of your honey mustard glaze, consider adding herbs or spices. Fresh thyme or rosemary adds a nice touch. You can also sprinkle in some cayenne pepper for heat. For deeper flavor, marinate the chicken for a few hours or overnight. This extra time allows the flavors to soak in, making each bite even tastier. When it comes to sides, roasted vegetables or a fresh salad pair well with honey mustard chicken. Creamy mashed potatoes also make a great match. For a beautiful presentation, place the chicken on a platter and drizzle extra sauce over the top. Adding fresh thyme leaves as a garnish makes it look even nicer. For the full recipe, check out the details above. {{image_2}} You can switch up the chicken thighs for other proteins like pork or tofu. Both work great with the honey mustard sauce. If you want a lighter dish, try using skinless chicken breasts. They cook faster and stay juicy when cooked properly. For sweetener options, you can use maple syrup or agave nectar. These give a nice twist to the flavor. If you want a sugar-free choice, try a sugar substitute that fits your diet. You still get that sweet taste without the added sugar. You can cook honey mustard chicken thighs in different ways. Grilling adds a smoky flavor that many people love. Just marinate the chicken first, then grill until cooked through. Baking is another easy method. You get crispy skin and tender meat. Follow the same steps from the Full Recipe, and you will have a delicious meal. Slow cookers are great for busy days. Just add the chicken and sauce, set it, and forget it. In a few hours, you will have tender chicken with rich flavors. To give your honey mustard chicken an Asian flavor, add soy sauce or ginger. These ingredients will change the taste and make it unique. You can even toss in some sesame seeds for crunch. If you want a Mediterranean spin, use olive oil, oregano, and lemon juice. This twist brings fresh, bright tastes to the dish. Serve it with a side of couscous or a salad for a full meal. Store your honey mustard chicken thighs in the fridge to keep them fresh. First, let the chicken cool down. Then, place it in an airtight container. This helps lock in flavor and moisture. I suggest using a glass or plastic container with a tight lid. You can also wrap the chicken tightly in foil or plastic wrap if you prefer. If you want to save chicken for later, freezing is a great option. First, let the chicken cool completely. Then, wrap each thigh in plastic wrap. Place the wrapped thighs in a freezer-safe bag. Make sure to remove as much air as you can. This prevents freezer burn. To reheat, take the chicken out of the freezer and let it thaw in the fridge overnight. You can then reheat it in the oven at 350°F (175°C) until warmed through. In the fridge, honey mustard chicken lasts about 3-4 days. If you freeze it, the chicken can last up to 3 months. Always check for any off smells or changes in texture before eating. Keeping track of storage dates helps you enjoy your leftovers at their best. To cook chicken thighs safely, reach an internal temperature of 165°F (75°C). For bone-in thighs, I recommend roasting them in the oven at 400°F (200°C) for about 25-30 minutes. This ensures they cook evenly and remain juicy. Always check the thickest part of the meat, near the bone, to confirm the right temperature. Yes, you can prepare honey mustard chicken thighs ahead of time! For meal prep, season the chicken and coat it with the honey mustard sauce. Store it in the fridge for up to 24 hours before cooking. When ready, simply bake it according to the recipe. Reheating is easy; just warm it in the oven until hot throughout. Honey mustard chicken thighs can be a healthy choice. They provide protein and essential nutrients. The chicken offers protein while the honey adds natural sweetness. However, consider portion sizes, as honey adds sugar. Using less honey or substituting it with a sugar alternative can make it lighter. Enjoy it with veggies for a balanced meal! Honey mustard chicken thighs are easy to make and taste great. You need simple ingredients and clear steps. We talked about the best ways to make, serve, and store this dish. Remember, you can add your twist with flavors and cooking methods. Enjoy this dish for a special meal or a quick weeknight dinner. With the tips shared, you'll get more flavor and crunch. Try it out, and I hope it becomes a family favorite!

Honey Mustard Chicken Thighs Flavorful and Easy Recipe

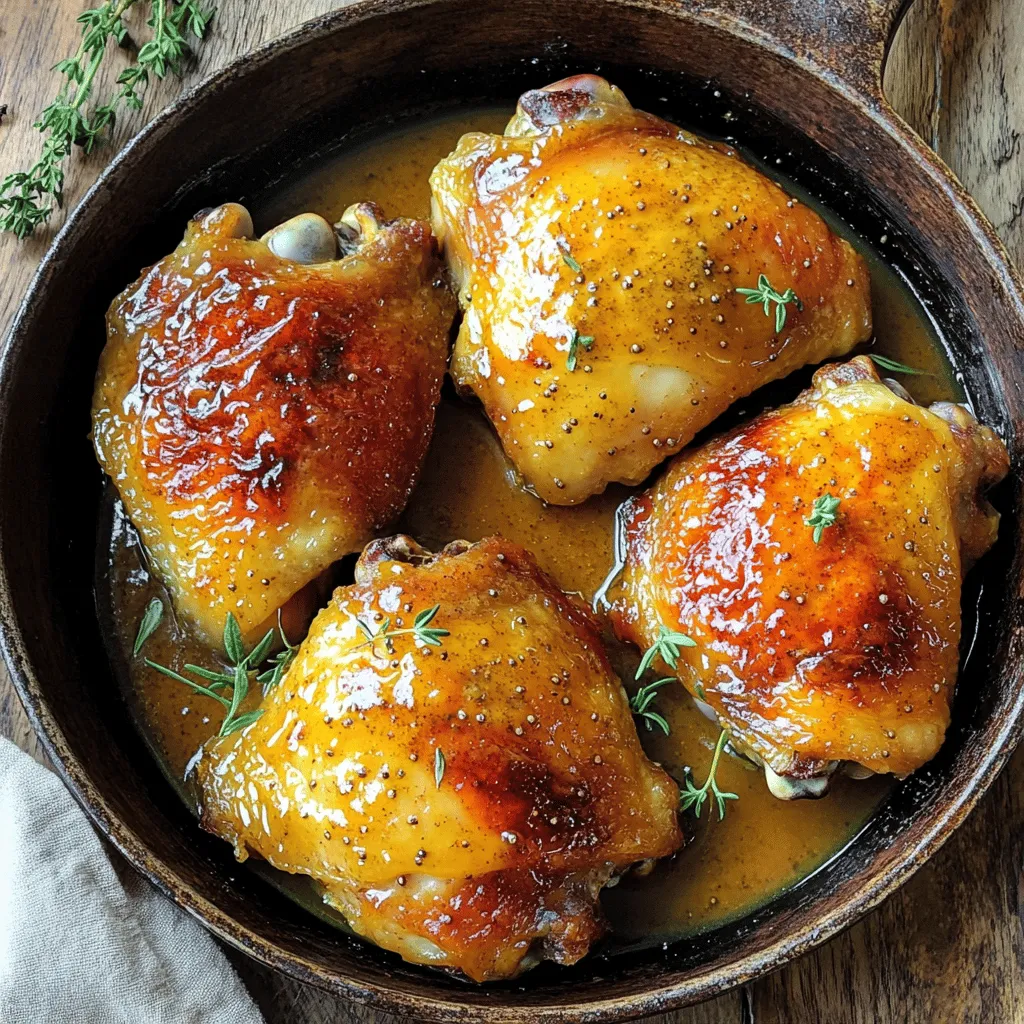
Get ready to elevate your dinner game with Honey Mustard Chicken Thighs! This recipe is all about bold flavors and

To make a vibrant Easy Veggie Stir Fry, gather your ingredients. Here’s what you need: - 1 cup broccoli florets - 1 cup bell peppers (red, yellow, green), sliced - 1 cup snap peas - 1 medium carrot, julienned - 1 small zucchini, sliced - 3 cloves garlic, minced - 2 tablespoons ginger, grated - 3 tablespoons soy sauce (or tamari for gluten-free) - 1 tablespoon sesame oil - 2 tablespoons vegetable oil - Sesame seeds for garnish - Fresh cilantro for garnish These ingredients create a colorful and tasty dish. You can mix and match vegetables based on what you have. Fresh veggies not only taste great, but they also bring nutrients. Cooking with seasonal produce improves flavor and supports local farmers. If you want to explore variations or add protein, feel free. You can throw in tofu or shrimp for a heartier meal. Try the Full Recipe for detailed steps, and enjoy your cooking journey! - First, wash all your vegetables. Rinse them well under cool water. - Now, slice the bell peppers into thin strips. Cut the zucchini into rounds. - Julienne the carrot into thin sticks. Trim the snap peas and broccoli florets. - Next, peel the garlic and ginger. Mince the garlic and grate the ginger. - Heat your vegetable oil in a large wok or skillet over medium-high heat. - Once the oil is hot, add the minced garlic and grated ginger. Sauté for about 30 seconds. This step brings out their flavors. - Add the broccoli florets and carrots first. Cook for about 2-3 minutes while stirring. - Next, toss in the sliced bell peppers and zucchini. Stir for another 2-3 minutes until they soften. - Finally, add the snap peas. Pour in the soy sauce and sesame oil. Stir everything together. Cook for about 2 more minutes. - Remove your stir fry from heat. - Garnish with sesame seeds and fresh cilantro for a nice touch. - Serve immediately for the best flavor and texture. For the complete recipe, refer to the [Full Recipe]. - To keep your veggies crispy, cook them fast. High heat works best. - Start with harder veggies like broccoli and carrots. Add softer ones later. - Adjust cooking time based on size. Smaller pieces cook faster than bigger ones. - Try making your own sauce. Mix soy sauce with honey and lime juice for zest. - Add crushed red pepper for heat or sesame seeds for crunch. - Fresh herbs like basil or mint can brighten the dish. - Pair your stir fry with rice or noodles for a filling meal. - For a colorful plate, arrange veggies in a rainbow pattern. - Drizzle a little extra sauce on top before serving for extra flavor. For the full recipe, check out the Colorful Crunchy Veggie Stir Fry! {{image_2}} You can use many types of vegetables for your stir fry. Some great options include: - Cauliflower - Green beans - Mushrooms - Asparagus - Bok choy - Spinach Think about the seasons. In spring, you might find fresh peas. In summer, zucchini shines. In fall, add squash or pumpkin. Winter calls for root veggies like carrots and beets. Each season brings new flavors. Adding protein makes your stir fry heartier. Tofu is a great choice. It soaks up flavors well. Tempeh is another option; it has a nutty taste. If you prefer meat, try chicken or beef. Thinly slice the meat for quick cooking. Shrimp also works well, cooking in just a few minutes. Cook the protein first, then add veggies for a balanced dish. Do you need gluten-free options? Use tamari instead of soy sauce. It has a similar taste without gluten. For vegan choices, stick with tofu or tempeh. You can also add lentils or chickpeas for protein. They keep the dish filling and tasty. Other alternatives include quinoa or brown rice, both packed with nutrients. This stir fry is flexible. You can change it up based on what you have. For the full recipe, check out the details above. After you make the veggie stir fry, let it cool down. Place it in an airtight container. This keeps the flavors fresh. You can store it in the fridge for 3-4 days. If you want to keep it longer, consider freezing. To freeze your stir fry, use freezer-safe containers. Make sure to leave some space for the food to expand. You can freeze it for up to 3 months. When you're ready to eat, take it out and reheat. You can use a microwave or a skillet. Heat it until it’s hot all the way through. Check for signs of spoilage before eating. If it smells bad or has a slimy texture, throw it away. Always wash your hands before cooking or handling food. This helps prevent germs. Keep raw and cooked foods separate to avoid cross-contamination. For more details, check the Full Recipe. How do I make an Easy Veggie Stir Fry? To make an Easy Veggie Stir Fry, gather your veggies. You’ll need broccoli, bell peppers, snap peas, carrots, and zucchini. Start by heating oil in a large pan. Add garlic and ginger, cooking until fragrant. Then, add your veggies in stages, starting with the broccoli and carrots. After a few minutes, add the bell peppers and zucchini. Finally, add snap peas, soy sauce, and sesame oil. Stir well and serve hot. For more details, check the Full Recipe. Can I use frozen vegetables for this recipe? Yes, you can use frozen vegetables. They save time and are often just as tasty. Just make sure to thaw them first. This helps avoid excess water in your stir fry. What are some common substitutions for soy sauce? You can use tamari for a gluten-free option. Other choices include coconut aminos or liquid aminos. These provide a similar salty flavor without gluten. What are the nutritional benefits of this dish? This dish is packed with vitamins and minerals. Broccoli is rich in fiber and vitamin C. Bell peppers provide antioxidants, while snap peas add protein. Overall, it’s a low-calorie meal that fuels your body. Can this recipe be made low-calorie? Yes, this recipe is already low in calories. You can cut down on oil and use less soy sauce. Adding more veggies also helps keep it light. What kitchen tools are best for stir-frying? A large wok or skillet works best for stir-frying. A spatula helps with tossing the veggies. A sharp knife and cutting board are also essential for prep. Do I need a wok? While a wok is great, it’s not necessary. A large skillet can work just as well. The key is to have enough space to stir your veggies freely. This stir fry is a simple, tasty way to enjoy fresh veggies. We covered the key ingredients, preparation steps, and cooking methods. I shared tips for enhancing flavor and suggested serving options to make your dish shine. You can also explore variations and storage ideas for leftovers. Remember, cooking should be fun and flexible. Feel free to experiment with your favorite veggies and proteins. Enjoy your stir fry adventure, and make it your own!

Easy Veggie Stir Fry Quick and Healthy Meal Idea

Are you looking for a quick and healthy meal that bursts with flavor? My Easy Veggie Stir Fry is perfect

Older posts
Newer posts
← Previous Page1 … Page77 Page78 Page79 … Page84 Next →

dsad

© 2026 juliesdish • Built with GeneratePress

Our Policies

  • Copyright Policy
  • Cookie Policy
  • GDPR Policy
  • Privacy Policy
  • Disclaimer
  • Terms Of Use

More Information

  • Home
  • About
  • Contact
  • Appetizers
  • Dessert
  • Dinner
  • Drinks
©2026, juliesdish About Back To Top