Skip to content
DisclaimerTerms Of UseGDPR PolicyCookie Policy

juliesdish

  • Home
  • Drinks
  • Appetizers
  • Dinner
  • Dessert
  • About
  • Contact
  • Privacy Policy
DisclaimerTerms Of UseGDPR PolicyCookie Policy

NO-ING-IMG

- 1 cup quinoa, rinsed - 2 cups vegetable broth or water - 1 cup cherry tomatoes, halved - 1 cucumber, diced - 1 bell pepper (any color), diced - 1/4 red onion, finely chopped - 1/4 cup fresh parsley, chopped - 1/4 cup fresh mint, chopped Quinoa is the star of this salad. It brings a nutty flavor and a fluffy texture. I always rinse it first to remove any bitter taste. Fresh herbs like parsley and mint add zest. They make each bite fresh and bright. Cherry tomatoes and cucumbers add crunch and sweetness. Bell peppers bring color and flavor. Red onion gives a slight bite that balances the dish. - 1/4 cup feta cheese, crumbled (optional) - Alternative dressings Feta cheese is a great addition if you love a creamy touch. It adds a rich flavor that pairs well with the herbs. If you want to switch up the dressing, try tahini or yogurt. These options can change the taste while keeping it fresh. - 3 tablespoons olive oil - Juice of 1 large lemon - Zest of 1 lemon - Salt and pepper to taste Olive oil is my go-to for dressings. It adds smoothness and flavor. Fresh lemon juice and zest bring brightness. They make the salad taste lively. Salt and pepper help to enhance all the flavors. Just a pinch can make a big difference. For the full recipe, check out the [Full Recipe]. To start, rinse the quinoa under cold water. This removes any bitter taste. Next, in a medium saucepan, bring 2 cups of vegetable broth or water to a boil. Once it boils, add the rinsed quinoa. Reduce the heat to low and cover the pot. Let it simmer for about 15 minutes. The quinoa will absorb the liquid and become fluffy. After cooking, remove it from heat and let it cool. While the quinoa cools, chop your vegetables. You will need cherry tomatoes, cucumber, bell pepper, and red onion. Cut the cherry tomatoes in half. Dice the cucumber and bell pepper into small pieces. For the red onion, chop it finely. Once chopped, place all the veggies in a large mixing bowl. This bowl will hold your salad. Now it’s time to add flavor! Toss in the chopped parsley and mint into the bowl with the veggies. If you like cheese, sprinkle in some crumbled feta cheese. In a separate small bowl, whisk together 3 tablespoons of olive oil, the juice of 1 lemon, and the lemon zest. Add salt and pepper to taste. Pour this dressing over the salad and mix gently. Make sure everything is coated well. Your Lemon Herb Quinoa Salad is almost ready! To get that perfect fluffy texture, rinse your quinoa well in cold water. This removes any bitter taste. After cooking, let it sit covered for five minutes. Then, fluff it with a fork to separate the grains. For cooling, spread the quinoa on a large plate. This helps it cool faster. You can also cover it with a clean towel to keep it warm if needed. To boost the flavor, try adding garlic powder or smoked paprika. These spices add a nice kick. You can also mix in some chopped olives or sun-dried tomatoes for extra taste. If you have dietary needs, swap the feta for avocado for creaminess. You can use a balsamic vinaigrette instead of the lemon dressing if you prefer a sweeter flavor. For a beautiful presentation, serve the salad in a large bowl. Garnish it with more herbs and lemon wedges for color. This makes it look fresh and inviting. Pair this salad with grilled chicken or fish for a complete meal. It also works great as a side dish for barbecues or picnics. Enjoy this fresh and flavorful salad for lunch or dinner. You can find the full recipe [here](#). {{image_2}} You can swap quinoa for other grains. Brown rice or farro work well. These grains add a different taste and texture. Both are gluten-free options. They are perfect for those with gluten allergies. You can also try millet or amaranth. These grains are nutritious and easy to find. Using seasonal vegetables makes this salad even better. In spring, add asparagus or peas. In summer, try corn or zucchini. Fall brings butternut squash, while winter can use roasted carrots. Fresh herbs also change with the seasons. Basil or dill can replace parsley or mint in summer. If you follow a vegan or vegetarian diet, this salad fits well. Simply skip the feta cheese. Add more veggies or nuts for protein. For low-carb options, reduce the quinoa. You can replace it with cauliflower rice. This keeps the dish light and healthy. To keep your Lemon Herb Quinoa Salad fresh, use an airtight container. Glass or plastic containers work well. Make sure to seal the lid tightly. If you want to freeze it, place the salad in a freezer-safe bag. Squeeze out any air before sealing. This helps prevent freezer burn. For the best taste, eat the salad within 3 to 5 days. Store it in the fridge for freshness. If you see any signs of spoilage, such as an off smell or slimy texture, throw it away. Always trust your senses; they guide you well in the kitchen. You can enjoy this salad cold or warm. If you choose to reheat, do so gently. Warm it in a pan over low heat. Add a splash of olive oil to keep it moist. If you prefer it cold, serve it straight from the fridge. The flavors stay bright and zesty that way. For the full recipe, visit the recipe section above. To cook quinoa, rinse it first. Rinsing removes the bitter coating. You can boil it in water or broth for added flavor. Use a two-to-one ratio of liquid to quinoa. Bring the liquid to a boil, then lower the heat and cover it. Simmer for about 15 minutes until the quinoa is fluffy. Common mistakes include not rinsing the quinoa or using too much water. Both can lead to a mushy texture. Also, don't forget to fluff the quinoa after it cooks. This step makes it light and airy. Yes, you can make this salad in advance. It works great for meal prep. Just prepare the salad, but keep the dressing separate until you serve it. This helps keep the salad fresh and crunchy. For best storage, use an airtight container. It will last in the fridge for up to three days. If you want to keep it longer, you can freeze the quinoa. Just thaw it in the fridge before serving. You can easily customize this salad to fit your taste. Add your favorite veggies like carrots, spinach, or bell peppers. You can also try different herbs, like basil or cilantro. For more flavor, consider adding nuts or seeds. Toasted pine nuts or sunflower seeds add a nice crunch. If you want a protein boost, you can add chickpeas or grilled chicken. Experiment with these options to find your perfect mix! For the full recipe, check the section above. In this post, we covered how to make a Lemon Herb Quinoa Salad. We explored the main ingredients, optional additions, and seasonings that bring flavor to the dish. You learned step-by-step instructions, including cooking quinoa and preparing vegetables. We also shared tips for perfecting your salad and variations for different diets. Finally, we looked at how to store leftovers and addressed common FAQs. Enjoy making this tasty salad and feel free to get creative with your ingredients!

Lemon Herb Quinoa Salad Fresh and Flavorful Meal

Looking for a fresh and tasty meal? My Lemon Herb Quinoa Salad is just what you need! It’s packed with

- 2 cups carrots, peeled and sliced - 2 cups bell peppers (red, yellow, and green), diced - 2 cups zucchini, sliced - 1 red onion, chopped - 4 cloves garlic, minced - 3 tablespoons olive oil - 1 teaspoon dried thyme - 1 teaspoon dried rosemary - 1 teaspoon paprika - Salt and pepper to taste - Fresh parsley, chopped (for garnish) Garlic herb roasted vegetables shine with bright flavors. Each veggie brings its own taste. - Carrots: Sweet and earthy, they add a nice crunch. - Bell Peppers: Colorful and juicy, they bring a mild sweetness. - Zucchini: Soft and tender when cooked, it has a mild flavor. - Red Onion: Sweet and slightly sharp, it adds depth. For herbs and spices, thyme and rosemary work well together. Paprika adds a hint of smokiness. You can mix and match these flavors to suit your taste. Try adding oregano or basil for a different twist. This dish is not just pretty; it’s also healthy and packed with nutrients. You can find the full recipe to make this easy and flavorful dish. Prepping the Vegetables First, wash your vegetables. Peel and slice 2 cups of carrots. Dice 2 cups of bell peppers in red, yellow, and green. Slice 2 cups of zucchini and chop 1 red onion. Keep all these veggies ready in a large bowl. Making the Garlic Herb Mixture In a small bowl, mix 4 cloves of minced garlic with 3 tablespoons of olive oil. Add 1 teaspoon each of dried thyme, dried rosemary, and paprika. Season this blend with salt and pepper to your taste. This mixture adds great flavor. Combining and Coating the Vegetables Pour the garlic herb mixture over your prepared vegetables. Toss them well to coat every piece evenly. This step ensures that all the veggies soak in that tasty flavor. Oven Temperature Settings Preheat your oven to 425°F (220°C). This high heat helps the veggies caramelize and get tender. Arranging the Vegetables on the Baking Sheet Line a baking sheet with parchment paper. Spread the coated vegetables evenly in a single layer. Avoid overcrowding to allow even cooking. Roasting Time and Tips Roast the veggies for about 25-30 minutes. Stir them halfway through to ensure even roasting. Look for a nice golden color and a tender texture when they are done. How to Serve the Roasted Vegetables Once roasted, let them cool for a few minutes. Transfer them to a serving dish for a beautiful presentation. Garnishing Options Sprinkle fresh parsley on top for a pop of color. This garnish also adds a fresh taste. Suggested Pairings or Side Dishes Serve these roasted veggies with grilled chicken or fish. They also pair well with rice or quinoa for a hearty meal. For more details, check the Full Recipe. - Achieving Optimal Crispiness To get crispy veggies, choose a hot oven. I like to preheat to 425°F. This high heat helps the vegetables caramelize. Spread them out in a single layer on the baking sheet. Crowding them makes them steam instead of roast. - How to Avoid Soggy Vegetables Use fresh, dry vegetables. If they are wet, they will steam and turn soggy. Pat them dry with a towel before roasting. Also, don’t skip the oil. It helps crisp up the edges. - Importance of Cutting Vegetables Evenly Uniform cuts ensure even cooking. Try to cut all vegetables into similar sizes. This way, they cook at the same rate. For example, slice carrots and zucchini about the same thickness. - Adding Additional Vegetables Feel free to mix in your favorite vegetables. Broccoli, asparagus, or sweet potatoes all work well. Just make sure they roast at a similar time as your main veggies. - Including Protein Options Want to make it a full meal? Add protein like chicken or tofu. Cube them up and toss them with the veggies. You’ll have a tasty, balanced dish. - Adjusting Flavor with Different Herbs Switch up the herbs to change the flavor. Try basil or oregano for a different taste. Fresh herbs can also add a nice touch at the end. - Overcrowding the Baking Sheet This is a big mistake. If you pile vegetables on top of each other, they won’t roast. Instead, they’ll steam and become mushy. Always leave space between each piece. - Not Preheating the Oven Properly I can’t stress this enough. Preheating is key to good roasting. If your oven isn’t hot enough, your vegetables won’t cook right. - Incorrect Seasoning Ratios Balance is crucial in seasoning. Too much salt can ruin the dish. Start with a little and adjust as you go. Taste the mixture before adding more. {{image_2}} Using seasonal vegetables keeps your dish fresh and tasty. In spring, try asparagus and peas. In summer, add eggplant and tomatoes. Autumn calls for squash and Brussels sprouts. In winter, root veggies like parsnips and turnips shine. Adjust your recipe based on what is in season. This makes your meal vibrant and full of flavor. For holiday meals, roasted vegetables can add color and taste to your table. You can use a mix of festive colors like red and orange bell peppers. Add seasonal herbs like sage or thyme to enhance the dish. These small tweaks can turn a simple side into a showstopper for your gatherings. You can easily change the flavor of your roasted vegetables. For a richer taste, try different oils. Avocado oil adds a subtle flavor. Grapeseed oil offers a light, nutty taste. Each oil can change the dish's profile while keeping it healthy. Adding vinegar can also boost the flavor. Balsamic vinegar gives a sweet tang, while apple cider vinegar adds brightness. Experiment with these options to find what you love. Cheese can be a great topping. Parmesan brings a salty kick, while feta offers a creamy texture. You can even sprinkle some goat cheese on top. These toppings can elevate your vegetables and make them even more delicious. For a Mediterranean twist, add olives and sun-dried tomatoes. Toss in some capers for a briny punch. You can also mix in fresh basil or oregano. These additions create a vibrant dish that transports you to sunny shores. For an Asian-inspired version, use sesame oil instead of olive oil. Add soy sauce for a savory depth. Toss in some sliced mushrooms and bok choy for a fresh crunch. These flavors create a unique take on roasted veggies that is both exciting and comforting. Explore these variations to make your garlic herb roasted vegetables even more delightful. Each option gives you a chance to get creative in the kitchen. For a full guide on how to make these, check out the Full Recipe. To keep your Garlic Herb Roasted Vegetables fresh, follow these tips: - Best Practices for Refrigeration: Allow the vegetables to cool completely. Place them in an airtight container. Store in the fridge for up to three days. This helps maintain their flavor and texture. - Freezing Suggestions for Long-Term Storage: If you want to keep them longer, freeze the leftovers. Spread the cooled vegetables on a baking sheet. Freeze for a few hours until firm, then transfer to a freezer-safe bag. They will last up to three months in the freezer. Proper reheating can bring back the veggies' taste and texture: - Best Methods for Reheating Roasted Vegetables: Use your oven or a skillet. For the oven, preheat to 375°F (190°C). Spread veggies on a baking sheet and reheat for about 10-15 minutes. In a skillet, heat over medium-low heat. Stir often until warmed through. - Tips for Maintaining Texture and Flavor: Avoid using the microwave if possible. It can make the vegetables soggy. Add a dash of olive oil when reheating to boost flavor. Knowing how long your leftovers last is important: - Expected Storage Times in the Fridge: When stored properly, Garlic Herb Roasted Vegetables last about three days in the fridge. - Signs of Spoilage to Look Out For: Check for off-smells or slimy textures. If the colors look dull or faded, it’s best to toss them. Always trust your senses when it comes to food safety. Yes, you can use many types of vegetables. Some great options include: - Broccoli - Cauliflower - Sweet potatoes - Asparagus - Brussels sprouts These vegetables add different flavors and textures. You can also mix and match. Just ensure they roast well at the same temperature. If you have seasonal vegetables, use those for freshness. They often taste better and are more nutritious. Making this dish vegan is easy! Simply replace the olive oil with a vegan-friendly oil. You can use: - Avocado oil - Coconut oil Both options work well. Ensure your herbs and spices are vegan too. This recipe already is plant-based, so enjoy without any animal products. This dish pairs well with many main courses. Try serving it with: - Grilled chicken or fish - Quinoa or rice - Pasta dishes For special occasions, serve it alongside roasted meats or at a potluck. The colors and flavors will impress any guest. This guide walks you through making delicious Garlic Herb Roasted Vegetables. You learned the best ingredients, preparation steps, and roasting tips. I shared how to avoid common mistakes and create your own variations. Remember to store leftovers properly and reheat them for the best taste. Roasting vegetables brings out their flavor and adds joy to meals. Try new combinations to keep it exciting. Enjoy the crunch, color, and taste in every bite!

Garlic Herb Roasted Vegetables Easy and Flavorful Dish

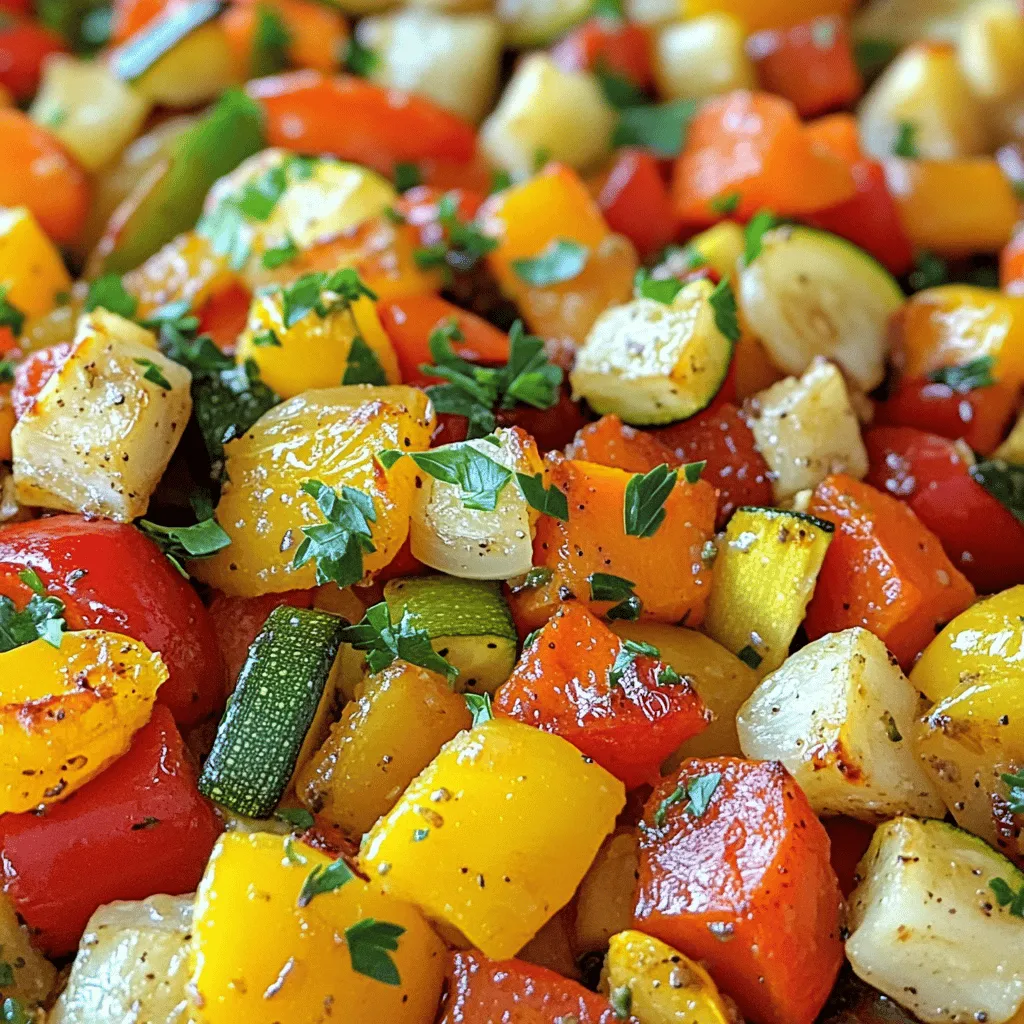
Are you looking for a simple, tasty way to enjoy your veggies? Garlic Herb Roasted Vegetables are the answer! This

To make this easy broccoli cheddar soup, gather these simple items: - 4 cups broccoli florets - 1 cup grated sharp cheddar cheese - 1 medium onion, diced - 2 cloves garlic, minced - 4 cups vegetable broth - 1 cup heavy cream - 2 tablespoons olive oil - Salt and pepper to taste - 1 teaspoon paprika (optional) - Croutons for garnish (optional) Using fresh ingredients is key for great flavor. Look for bright green broccoli florets. The cheddar cheese should be sharp for a rich taste. Fresh garlic and onion add a nice depth. Choose high-quality vegetable broth for a strong base. Heavy cream makes the soup creamy, so opt for full-fat for the best results. If possible, buy organic products for better nutrients and taste. If you have dairy allergies, you can use plant-based cheese and coconut cream instead of heavy cream. For a gluten-free option, check that your vegetable broth is gluten-free. You can also use olive oil for cooking instead of butter if you have a dairy sensitivity. If you dislike broccoli, try this recipe with cauliflower or carrots for a different flavor. First, gather your ingredients. This soup is easy to make. You will need broccoli, cheese, onion, garlic, broth, cream, and olive oil. 1. In a large pot over medium heat, add the olive oil. 2. Once hot, sauté the diced onion for 3-4 minutes until soft. 3. Add the minced garlic and cook for 1 more minute. 4. Now, add the broccoli florets and vegetable broth to the pot. 5. Bring it to a boil, then lower the heat. 6. Let it simmer for 10-15 minutes. The broccoli should be tender. 1. Use an immersion blender to puree the soup until smooth. 2. If you do not have an immersion blender, pour the soup in batches into a standard blender. 3. Return the pureed soup to low heat. 4. Stir in the heavy cream and heat it through. Do not boil. 5. Slowly add the grated cheddar cheese, stirring until it melts. 6. Finally, season with salt, pepper, and paprika if you like. This simple process gives you a rich, creamy soup full of flavor. For the full recipe, click here. To boost the taste of your soup, try these ideas: - Use fresh herbs like thyme or parsley. - Add a splash of lemon juice for brightness. - Stir in a teaspoon of Dijon mustard for depth. These small changes can make a big difference. You can also try different seasonings. You might enjoy adding a pinch of cayenne for heat. If your soup is too thick, add more vegetable broth. Slowly stir it in until you reach your desired texture. If you prefer a thicker soup, let it simmer longer. This helps it reduce and become creamier. You can also blend in some cooked potatoes. They add creaminess without changing the flavor much. Avoid these errors to make the best soup: - Don’t cook the broccoli too long; it can turn mushy. - Be careful not to boil the soup after adding cheese. This can cause it to clump. - Always taste before you season. You may not need much salt or pepper. Learning these tips can help you make a perfect bowl every time. For the full recipe, check out the details above. {{image_2}} You can add many healthy items to your broccoli cheddar soup. Spinach is one great option. It adds extra vitamins and a nice color. Kale is another good choice. It brings a hearty texture and boosts fiber. If you want more protein, add cooked chicken or beans. They make the soup more filling too. For a nutty flavor, toss in some sunflower seeds or chopped nuts. These add crunch and help with nutrition. While sharp cheddar is classic, you have choices! Gruyère cheese melts beautifully and gives a rich taste. Monterey Jack cheese offers a mild flavor and creamy texture. For a tangy twist, try feta or goat cheese. Mix different cheeses for a unique blend. Just remember to adjust the amount of cheese based on the flavor you want. Want to spice things up? Add red pepper flakes for heat. You can also use jalapeños if you like it hot. For a smoky flavor, include a bit of smoked paprika or chipotle powder. You can even stir in some curry powder for an unexpected kick! If you prefer herbal notes, fresh thyme or rosemary can add a lovely depth. Don't hesitate to experiment and find your perfect twist! After enjoying your soup, let it cool down. Pour the leftovers into an airtight container. This keeps out air and moisture, which can spoil the soup. Store it in the fridge for up to three days. If you want it to last longer, consider freezing. To freeze, let the soup cool completely. Then, transfer it to freezer-safe bags or containers. Leave some space at the top, as soup expands when frozen. Label the bags with the date. Your soup can stay fresh for up to three months in the freezer. When you’re ready to enjoy the soup again, take it out of the fridge or freezer. For fridge leftovers, heat it in a pot over medium heat. Stir often until it warms through. If frozen, let it thaw in the fridge overnight, then heat as usual. You can also use a microwave, but stir every minute for even heating. Enjoy your creamy broccoli cheddar bliss! For the full recipe, check out the link. Broccoli cheddar soup stays fresh for about 3 to 5 days in the fridge. Store it in an airtight container. If you see any signs of spoilage, toss it out. To keep it fresh, heat only what you need. This way, the rest stays safe and tasty. Yes, you can use frozen broccoli. It is a great time-saver. Just add it directly to the pot with the broth. Frozen broccoli cooks quickly and will still taste good in the soup. It may change the texture a bit, but it will still be creamy and delicious. Yes, broccoli cheddar soup can be gluten-free. Just make sure the broth you use is gluten-free. Most vegetable broths are naturally gluten-free, but always check the label. The other ingredients, like cheese and cream, are also gluten-free. Enjoy your soup without worry! For the full recipe, visit the recipe section above. This article covered all aspects of making delicious Broccoli Cheddar Soup. We looked at key ingredients and how to choose the best ones. You learned about cooking steps, tips to boost flavor, and how to avoid common mistakes. Variations and storage options are also important to keep your soup fresh. Cooking can be fun and easy, especially with this soup. Enjoy your meals and feel free to get creative with flavors!

Easy Broccoli Cheddar Soup Quick and Comforting Recipe

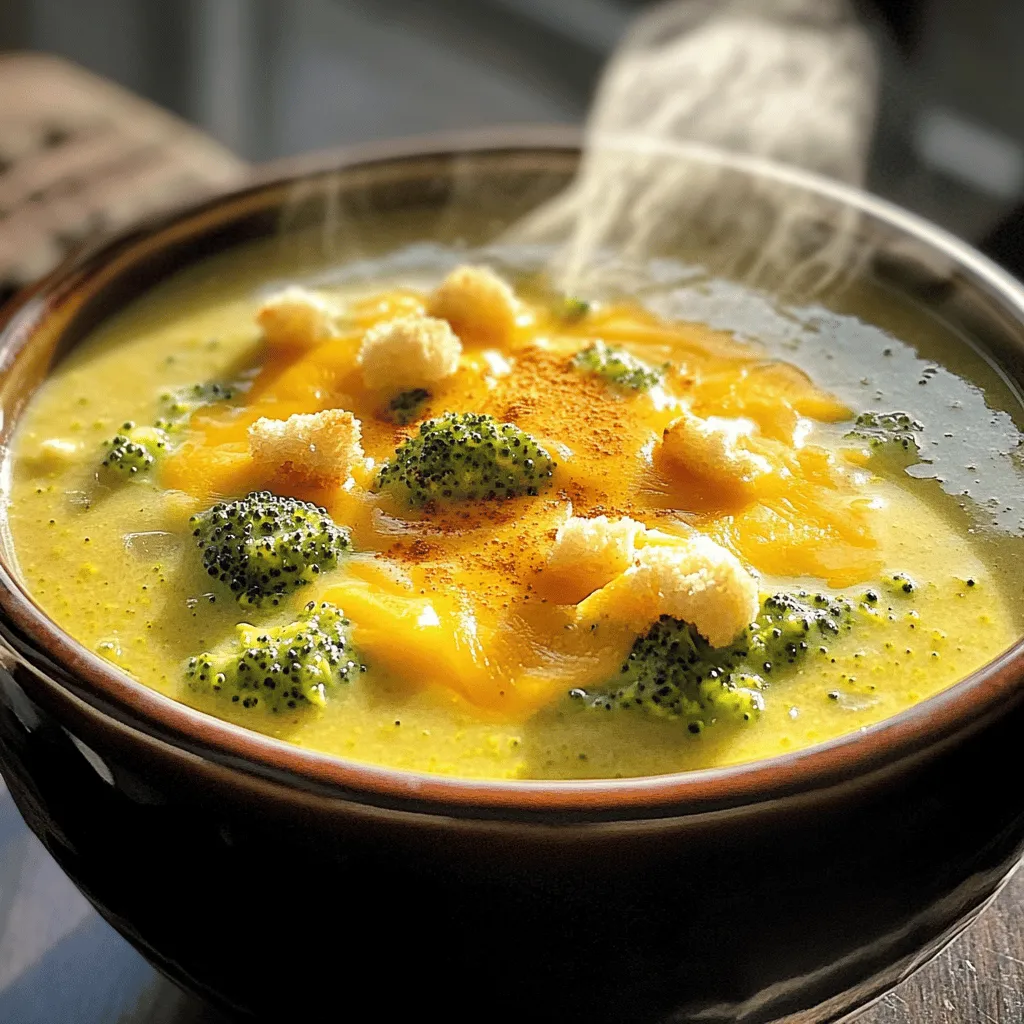
Craving a warm bowl of soup that’s quick and easy to make? You’re in the right place! This Easy Broccoli

- 2 chicken breasts, sliced into thin strips - 1/4 cup soy sauce (low sodium) - 2 tablespoons honey - 1 tablespoon rice vinegar - 1 teaspoon sesame oil - 1 tablespoon ginger, minced - 2 cloves garlic, minced - 1 cup jasmine rice - 2 cups water or chicken broth - 1 cup broccoli florets - 1 bell pepper, sliced (red or yellow) - 1 carrot, julienned - 2 green onions, sliced for garnish - Sesame seeds for garnish The heart of a teriyaki chicken bowl is the chicken and sauce. Thin chicken strips soak in a mix of soy sauce, honey, and ginger. This rich marinade gives the chicken its sweet and savory flavor. Don't forget the vegetables! Broccoli, bell peppers, and carrots not only add color but also bring crunch. They balance the tenderness of the chicken. The jasmine rice acts as a fluffy base, soaking up all the tasty sauce. - Types of sesame seeds: You can use white or black sesame seeds. Both add a nice crunch. - Alternatives for soy sauce: Try tamari for a gluten-free option. Coconut aminos also work well for a lighter taste. - Additional garnishes: Fresh cilantro or sliced radishes can enhance flavor and look. Mixing in these optional ingredients can make your dish even more special. They allow you to customize your bowls based on what you like or what you have at home. - Essential kitchen tools: You need a cutting board, knife, and mixing bowl for prep. - Recommended cookware: A large skillet works best for cooking the chicken and veggies. - Measuring utensils: Use measuring cups and spoons for accuracy when adding ingredients. Having the right tools makes cooking easier and more fun. You can focus on making each part of the dish shine. For the best results, measure carefully and keep your workspace tidy. For the complete cooking process, check out the Full Recipe, and get ready to enjoy a delicious teriyaki chicken bowl! To make the marinade, mix soy sauce, honey, rice vinegar, sesame oil, minced ginger, and minced garlic in a bowl. Whisk it well until smooth. Then, add the sliced chicken and coat it evenly. Let the chicken marinate for at least 30 minutes. If you have time, marinate it for up to 2 hours in the fridge. This makes the chicken more flavorful. For the best jasmine rice, rinse it under cold water until the water runs clear. This step removes extra starch and helps the rice stay fluffy. In a medium saucepan, bring 2 cups of water or chicken broth to a boil. Add the rinsed rice and reduce the heat to low. Cover the pot and let it simmer for about 15-18 minutes. The liquid should absorb fully. After cooking, let the rice sit covered for 5 extra minutes to finish steaming. Use a large skillet for sautéing vegetables. Start by adding a splash of water or a little oil over medium heat. Add broccoli florets, sliced bell pepper, and julienned carrot. Sauté these for about 4-5 minutes. You want them tender but still bright and fresh. Once done, take them out and set aside. In the same skillet, add the marinated chicken and the marinade. Cook over medium-high heat. Stir occasionally until the chicken is fully cooked and slightly caramelized, about 6-8 minutes. To ensure it's done, check that the chicken reaches an internal temperature of 165°F (75°C). This step is crucial for safety. Now, fluff the cooked rice and divide it into serving bowls. Layer the sautéed vegetables and the teriyaki chicken on top. For extra flavor and a nice look, sprinkle sliced green onions and sesame seeds on each bowl. This adds color and crunch. You can serve the bowls with a slice of lime for an extra zesty kick. Enjoy your meal! To achieve caramelization, cook the chicken in a hot skillet. This helps the sugars in the marinade brown nicely. Stir the chicken only occasionally. This allows it to develop a good sear. If the flavors seem off, tweak the marinade. Add more honey for sweetness or soy sauce for saltiness. A splash of rice vinegar can bring balance. Always taste as you go to find the right mix. Use bright, contrasting bowls for serving. White or black bowls work well to show off the colorful food. You can also add a slice of lime on the side for a zesty touch. For garnishing, sprinkle sliced green onions and sesame seeds on top. This adds color and texture to your dish. A few cilantro leaves can also enhance visual appeal. Meal prepping helps save time. You can marinate the chicken a day before. Cook the rice in bulk and store it in the fridge. Just reheat it when ready to serve. Using leftover ingredients is smart. If you have extra veggies from another meal, add them to your teriyaki bowl. This reduces waste and adds variety to your dish. {{image_2}} If you want gluten-free teriyaki chicken bowls, use coconut aminos instead of soy sauce. This swap gives a similar taste without gluten. You can also use tamari, which is a gluten-free soy sauce. For a vegan option, replace the chicken with tofu or chickpeas. Make sure to marinate them just like the chicken. Both options will still taste great! You can enhance your teriyaki chicken bowls in many ways. Try adding pineapple chunks for a sweet twist. In some parts of Japan, they use local vegetables like daikon or shiso. You can also swap jasmine rice for sushi rice or brown rice. These changes can give your dish a unique flavor and texture. Adding spices or herbs can elevate your dish. Try sprinkling sesame seeds or crushed red pepper for a kick. Fresh herbs like cilantro or basil add freshness. You can also drizzle sesame oil or chili sauce on top for extra flavor. These small changes can make a big impact on your teriyaki chicken bowls. For the full recipe, check out Savory Teriyaki Chicken Bowls. To keep your teriyaki chicken bowls fresh, store them in airtight containers. This helps prevent odors from mixing. You should refrigerate them within two hours of cooking. Properly stored, they last for about three to four days in the fridge. If you used cooked chicken, its shelf life is similar. Vegetables like broccoli and bell peppers are best used within this time frame to stay fresh. When you’re ready to enjoy your leftovers, heat them gently. You can use a microwave or a stovetop. If using a microwave, place the bowl on medium heat for two to three minutes. Stir halfway through to ensure even heating. On the stovetop, use low heat and stir often. This helps keep the chicken juicy and the vegetables crisp. Adding a splash of water can help maintain moisture. You can freeze the cooked teriyaki chicken bowls. However, it's best to freeze the chicken and rice separately from the vegetables. Cooked rice can be frozen for up to six months. When freezing, make sure to use freezer-safe bags or containers. To thaw, place the frozen items in the fridge overnight. For quicker results, you can use the microwave on the defrost setting. This ensures they heat evenly without losing flavor or texture. Teriyaki chicken bowls combine simple, fresh ingredients. Key components include: - Chicken breasts, sliced into thin strips - Low-sodium soy sauce - Honey for sweetness - Rice vinegar for tang - Sesame oil for richness - Ginger and garlic, minced for flavor - Jasmine rice as the base - Fresh vegetables like broccoli, bell peppers, and carrots These ingredients come together to create a balanced meal with protein, carbs, and veggies. Yes, you can meal prep teriyaki bowls. Here are some tips: - Marinate the chicken the night before. - Cook the rice and store it in the fridge. - Sauté the vegetables just before serving to keep them crisp. - Assemble the bowls in advance but keep the sauce separate until serving. This way, you save time and enjoy fresh flavors. To reduce saltiness in teriyaki chicken, try these methods: - Use low-sodium soy sauce for less salt. - Dilute the marinade with water or broth. - Add more honey or sugar to balance the flavors. - Increase the amount of vegetables to dilute the sauce. These changes help you enjoy the dish without too much salt. Many sides complement teriyaki chicken bowls. Consider: - Steamed edamame for a protein boost - Cucumber salad for crunch - Miso soup for warmth - Pickled vegetables for tang These sides enhance the meal and add variety to your plate. For detailed instructions, check out the Savory Teriyaki Chicken Bowls recipe. It offers step-by-step guidance to help you create this delicious dish. You now have all the tools to create tasty teriyaki chicken bowls. We covered main and optional ingredients, and essential tools. I shared simple steps for marinating chicken and cooking rice and veggies. With these tips and tricks, you can present your dish beautifully and save time. Consider dietary needs and try variations for different tastes. Store leftovers properly and reheat them to keep flavors bright. Enjoy making and sharing delicious teriyaki bowls with friends and family. Dive into cooking with confidence!

Teriyaki Chicken Bowls Flavorful Meal for Everyone

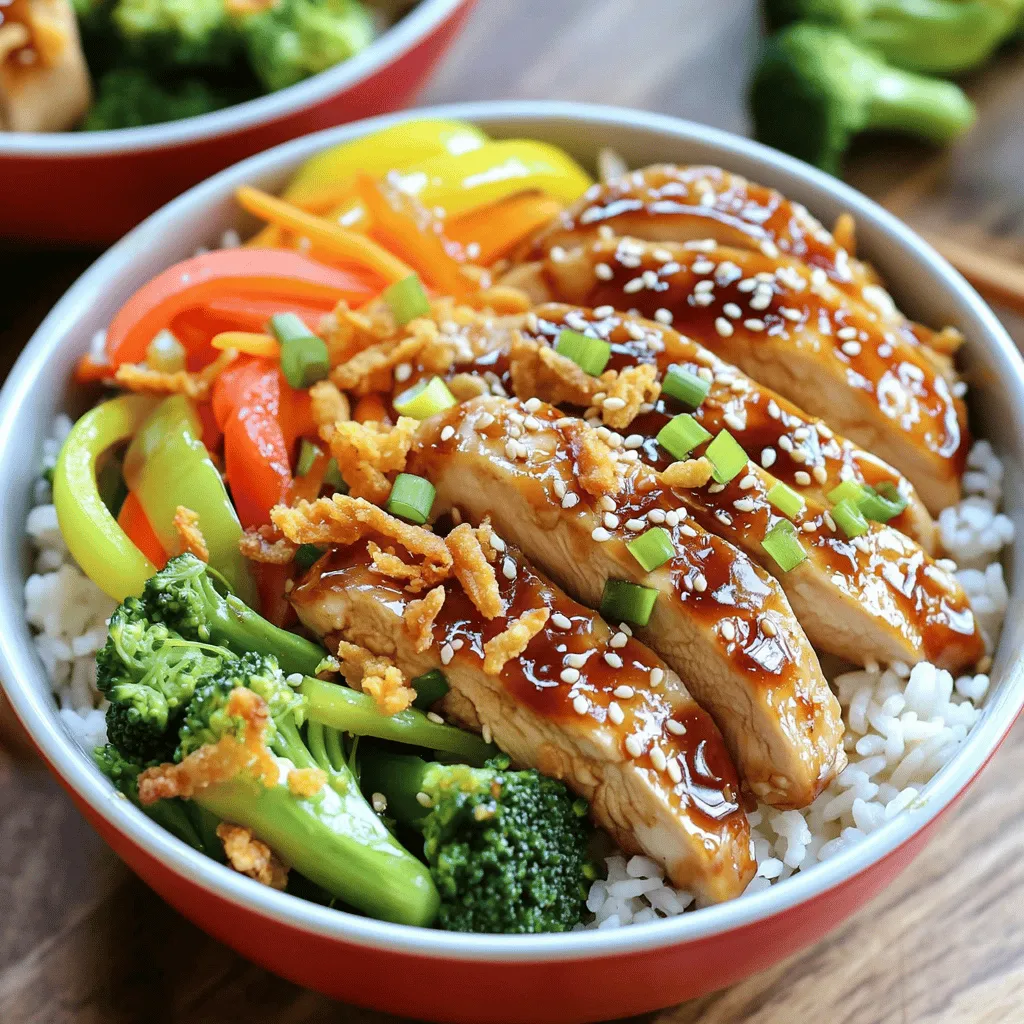
Are you craving a meal that’s full of flavor and easy to make? Teriyaki chicken bowls are a perfect choice!

- 4 large eggs - 1 ripe avocado - 1 tablespoon Greek yogurt - 1 tablespoon Dijon mustard - 1 teaspoon lemon juice - 1 tablespoon fresh dill, chopped - 1 green onion, finely sliced - Salt and pepper to taste Gather these fresh ingredients to make a creamy avocado egg salad that is both tasty and healthy. The ripe avocado brings a smooth texture, while the eggs add protein. Greek yogurt gives it a nice creaminess. Dijon mustard adds a hint of zing, and lemon juice brightens the flavors. Fresh dill and green onion give it a burst of freshness. When you choose your avocado, look for one that is slightly soft but not mushy. This will ensure your salad has the best flavor and texture. The eggs should be large and fresh for the best results. This recipe is a perfect way to enjoy a nutritious meal. You can serve it on bread, in a lettuce cup, or even on its own. If you want the full details on how to make this delicious dish, check out the Full Recipe. Start by boiling the eggs. Place them in a saucepan and cover them with cold water. Bring the water to a gentle boil over medium heat. Once it starts boiling, cover the pot and take it off the heat. Let it rest for 12 to 14 minutes. This method helps the eggs cook evenly and stay tender. After the resting time, transfer the eggs to a bowl filled with ice water. This step cools the eggs quickly and makes them easier to peel. Let them sit in the ice water for about 5 to 10 minutes. Once cooled, peel the eggs and chop them into small pieces. Now, let’s prepare the avocado. Take your ripe avocado and cut it in half. Remove the pit and scoop the flesh into a mixing bowl. Use a fork to mash the avocado until it’s smooth. You want a creamy base for your salad. Next, add one tablespoon of Greek yogurt and one tablespoon of Dijon mustard to the mashed avocado. Squeeze in one teaspoon of lemon juice for brightness. Add chopped dill, salt, and pepper. Mix everything well until combined. This mixture should be rich and flavorful. Now it’s time to bring it all together. Gently fold the chopped eggs into the avocado mixture. Be careful not to mash the eggs too much. You want to keep some texture. Then, add finely sliced green onion for a fresh crunch. Finally, taste the mixture. Adjust the seasoning with more salt and pepper if needed. This is your chance to make it perfect. You can now enjoy your creamy avocado egg salad, or check the Full Recipe for more tips. To get the best texture for your avocado egg salad, think about how you mash the avocado. I like to mash it until smooth, but you can leave it a bit chunky if you prefer. This gives your salad a nice bite. Also, use ripe avocados. They mash easily and blend well with eggs. Make sure your eggs are cool before you chop them. This helps keep their shape and mix better. Herbs and spices can really boost the flavor. I suggest adding fresh dill, as it pairs well with both avocado and eggs. You can also try parsley or cilantro for a different taste. For extra creaminess, consider mixing in some more Greek yogurt or even a splash of sour cream. You can also try a bit of garlic powder for a nice kick. Serving your egg salad on toasted whole grain bread is a great choice. It adds crunch and flavor. If you want something lighter, use lettuce cups instead. They make a fresh and fun wrap. Garnish your dish with extra dill or sliced green onions. This adds color and a fresh touch to your meal. For the full recipe, check out the Creamy Avocado Egg Salad. {{image_2}} To make a lighter version of avocado egg salad, consider using Greek yogurt instead of some avocado. Greek yogurt adds creaminess and protein without the extra fat. You can also swap out Dijon mustard for a milder option. Try using a whole grain mustard for a nice twist. Spice can elevate your avocado egg salad. Adding a sprinkle of paprika brings warmth. If you like heat, cayenne pepper is a great choice. Fresh herbs can also change the flavor. Try basil, cilantro, or parsley to give your salad a fresh touch. If you're looking for vegan-friendly options, replace eggs with chickpeas. Mash them up to mimic the texture. For a gluten-free version, serve the salad in lettuce cups instead of bread. This keeps it light and crunchy while still being delicious. To keep your avocado egg salad fresh, store it in the fridge. Use an airtight container to seal in the flavor. I find that glass containers work best. They keep the salad fresh and let you see what’s inside. This salad lasts about three days in the fridge. After that, the eggs and avocado may spoil. Look for signs like a sour smell or brown color. If you see these, it’s best to toss it out. Don’t waste any leftovers! You can use the salad as a spread on sandwiches. It also tastes great in a wrap or with crackers. Try adding it to a salad for extra flavor. You can find more ideas in the Full Recipe section. Yes, you can make avocado egg salad ahead of time. I suggest storing it in the fridge for up to two days. Keep it in an airtight container. This will help keep it fresh. If you make it too early, the avocado may brown. To prevent this, add a bit more lemon juice. This helps to keep the color bright. To pick a ripe avocado, look for a few signs. First, check the skin. It should be dark green or nearly black. Next, gently squeeze the avocado. If it feels slightly soft but not mushy, it is ripe. Also, check the stem. If it comes off easily and is green underneath, the avocado is ripe. If it’s brown, the avocado is overripe. Avocado egg salad pairs well with many dishes. You can serve it on toasted bread for a sandwich. It also works great in lettuce cups for a fresh bite. Pair it with fresh veggies like carrots or cucumber sticks. You can also enjoy it with whole grain crackers for a crunchy side. Each of these options adds a nice touch to your meal. Want more ideas? Check out the Full Recipe for tasty serving suggestions. This blog covered a tasty avocado egg salad recipe. You learned the needed ingredients and how to prep each part. We also shared tips for great texture and flavor. You have options for different diets and how to store leftovers. In closing, this salad is simple, fresh, and versatile. I hope you enjoy making it!

Avocado Egg Salad Nutritious and Tasty Recipe

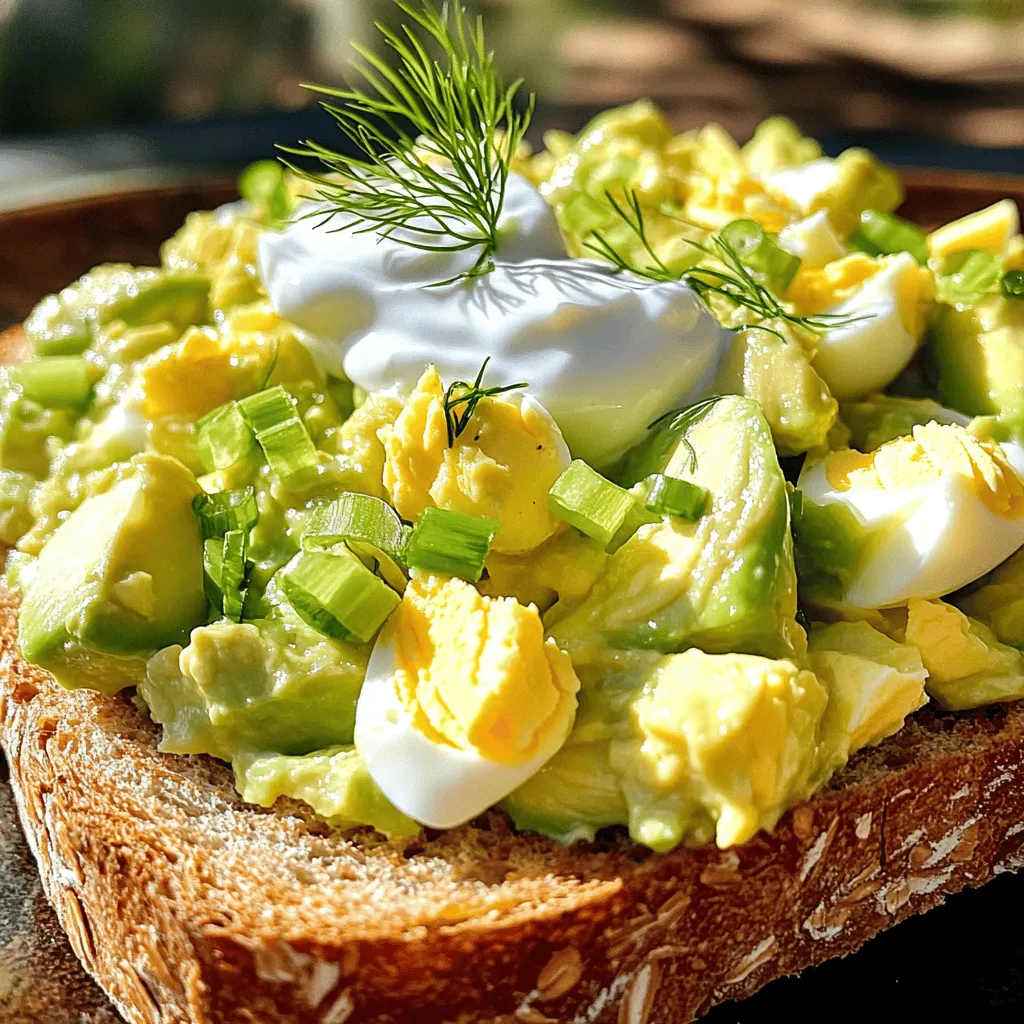
Looking for a delicious and healthy meal? My Avocado Egg Salad recipe is perfect for you! Packed with creamy avocado

- 2 lbs chicken wings - 1/2 cup honey - 1/4 cup soy sauce (low sodium preferred) - 4 cloves garlic, minced - 1 tablespoon freshly grated ginger - 1-2 teaspoons sriracha (adjust for spice preference) - 1 tablespoon rice vinegar - 1 teaspoon sesame oil - 1/2 teaspoon black pepper - 2 green onions, sliced (for garnish) - Sesame seeds (for garnish, optional) Each ingredient plays a vital role in making these wings taste amazing. The chicken wings give a great base, while honey adds sweetness. Soy sauce brings umami, and garlic adds depth. Ginger gives a fresh bite, and sriracha adds heat. Rice vinegar balances the sweetness, and sesame oil gives a nutty finish. If you find yourself short on honey, you can use maple syrup or agave syrup. Both provide a nice sweetness. For soy sauce, try coconut aminos for a soy-free option. If you want less salt, look for low-sodium soy sauce. To change the heat level, add more or less sriracha. You can swap it with chili paste or hot sauce, too. Using fresh garlic makes a big difference. Fresh garlic gives a strong, bold flavor that dried garlic cannot match. Fresh ginger also stands out. It has a bright, zesty taste that enhances the wings. If fresh ingredients are not available, use garlic powder and ground ginger as substitutes. Just remember, the flavors will be milder. For the full recipe, check out the steps to create these delicious wings and impress your friends! First, you want to dry the wings. Drying them with paper towels helps them get crispy when cooked. If they are wet, they won’t crisp up well. After drying, place the wings in a large bowl. Next, preheat your oven to 400°F (200°C). This temperature helps the wings cook evenly and develop a nice golden color. Now, let’s mix the marinade. In a separate bowl, whisk together honey, soy sauce, minced garlic, grated ginger, sriracha, rice vinegar, sesame oil, and black pepper. This mixing technique ensures even flavor on each wing. Marinating the wings is key! Pour the marinade over the chicken wings and toss until they are well coated. Let them sit for at least 30 minutes at room temperature. For more flavor, you can marinate them in the fridge for up to 2 hours. When it’s time to bake, line a baking sheet with foil. Place a wire rack on top of the sheet. This setup allows air to circulate around the wings for even cooking. Arrange the marinated wings in a single layer on the rack. Monitor the doneness as they bake for 30-35 minutes. Flip the wings halfway through for even browning. They should be golden and crispy when done. For extra flavor, brush the remaining marinade over the wings in the last 5 minutes of baking. To get crispy wings, start by patting them dry. This step removes moisture and helps them crisp up in the oven. You can bake or fry the wings. Baking is easier and less messy, but frying gives a deep crunch. Both methods work, but I prefer baking for a healthier option. Want more heat? Add chili flakes to your marinade. This will kick up the spice level. You can also infuse flavors during marination. Let the wings soak up the marinade for at least 30 minutes. For the best taste, marinate them for up to 2 hours in the fridge. Pair your spicy honey garlic wings with dipping sauces like ranch or blue cheese. These cool sauces balance the heat. For sides, try celery sticks or a fresh salad. They add crunch and freshness to your meal. Check out the Full Recipe for more ideas on serving! {{image_2}} You can easily change the taste of your spicy honey garlic wings. One fun idea is to make citrus-infused wings. Just add orange or lemon juice to the marinade. This brightens the flavor and adds a zesty kick. You can also try Asian-inspired versions. Use different sauces like hoisin or teriyaki. These will give your wings a sweet and savory twist. A dash of sesame oil can also enhance the flavor. You have options when it comes to cooking. Grilling your wings gives them a smoky taste. You can marinate them and throw them on the grill for about 20 minutes. Just flip them halfway through. Oven baking is another great choice. It keeps the wings crispy and juicy. Follow the [Full Recipe] for oven instructions. If you want a hands-off approach, try a slow cooker. Just place the marinated wings inside and cook for 4-6 hours on low. This method keeps the meat tender and flavorful. Making diet-friendly wings is simple. For gluten-free wings, swap out the soy sauce for tamari. This keeps the flavor while making the dish safe for gluten-free diets. Looking for low-calorie alternatives? You can use less honey and add more garlic. This way, you keep the flavor while cutting calories. Another tip is to bake instead of fry, which helps reduce fat. After enjoying your spicy honey garlic wings, let them cool at room temperature. This prevents steam from building up, which can make the wings soggy. Use an airtight container to store them. Glass or plastic containers work well. Place a paper towel in the container to absorb moisture. This helps keep the wings crispy. In the fridge, your wings will last for 3 to 4 days. For the best taste, reheat your wings in the oven. Preheat the oven to 350°F (175°C). Arrange the wings on a baking sheet. Bake for about 10 to 15 minutes. This method helps regain their crispy texture. If you're in a hurry, you can use the microwave. Place the wings on a microwave-safe plate. Cover them with a damp paper towel. Heat for 1 to 2 minutes. Check if they are hot enough before serving. To freeze cooked wings, let them cool completely first. Place them in a freezer-safe bag or container. Remove as much air as possible to prevent freezer burn. You can freeze them for up to 3 months. When you're ready to eat, thaw them overnight in the fridge. Reheat in the oven as mentioned before for the best results. Enjoy your spicy honey garlic wings later without losing flavor! For the full recipe, check the section above. Yes, you can make these wings ahead of time. To prepare them, follow these steps: - Marinate the wings: Coat the wings in the marinade and let them sit in the fridge. This can last up to 2 hours for great flavor. - Store properly: If you want to keep them longer, store the marinated wings in an airtight container. They can last in the fridge for about a day. - Cook when ready: When you're ready to eat, simply bake them. This keeps the wings fresh and tasty. Several sauces work well with spicy honey garlic wings. Here are some popular choices: - Ranch dressing: Its coolness balances the spice. - Blue cheese dressing: A classic option for wing lovers. - Buffalo sauce: For those who want extra heat. - Barbecue sauce: Adds a sweet and smoky flavor. You can easily adjust the spice level in this recipe. Here’s how: - Sriracha: Start with 1 teaspoon. Add more if you like it hotter. - Chili flakes: Sprinkle in some chili flakes for extra heat. - Pepper: Use more black pepper in the marinade. Adjusting these ingredients lets you customize your wings to your taste. Yes, you can use frozen chicken wings. Here’s how to handle them: - Thaw: Always thaw chicken wings before cooking. You can do this in the fridge overnight or use a quick method by placing them in cold water for an hour. - Adjust cooking time: If using thawed wings, follow the cooking instructions in the Full Recipe. The wings should bake until crispy and golden. In this guide, we explored key ingredients for tasty chicken wings, including marinades and garnishes. We discussed how to prepare, bake, and serve them for maximum flavor and crispiness. I shared tips on ingredient substitutes, variations, and proper storage. Remember, experimenting with flavors can make these wings your own. Whether you prefer Asian-inspired or citrus-infused, there’s a wing recipe for everyone. Now, it's your turn to try these tips and enjoy delicious wings with family and friends.

Spicy Honey Garlic Wings Bold and Flavorful Recipe

Are you ready to take your chicken wing game to a whole new level? This Spicy Honey Garlic Wings recipe

To make Mango Coconut Chia Pudding, you need simple and fresh ingredients. Here’s the list: - 1 cup coconut milk - 1/2 cup almond milk - 1/4 cup chia seeds - 2 tablespoons maple syrup or honey - 1 ripe mango, diced - 1 teaspoon vanilla extract - Pinch of salt - Toppings: toasted shredded coconut and fresh mint leaves Each ingredient plays a key role. Coconut milk gives a rich, creamy base. Almond milk adds a light touch and nutty flavor. Chia seeds are the star here. They soak up liquid and create that pudding texture we love. Maple syrup or honey sweetens the dish naturally. Fresh mango adds brightness and tropical taste. Vanilla extract enhances all the flavors. A pinch of salt balances the sweetness perfectly. When you choose your mango, look for one that is ripe. It should feel slightly soft when you press it. This ensures it’s sweet and juicy. For toppings, toasted shredded coconut adds crunch. Fresh mint leaves bring a refreshing note. This recipe is easy to prepare and perfect for any meal of the day. For the full recipe, check the instructions later on! 1. Mixing the liquid ingredients Start by taking a mixing bowl. Pour in 1 cup of coconut milk and 1/2 cup of almond milk. Add 2 tablespoons of maple syrup or honey and 1 teaspoon of vanilla extract. Sprinkle in a pinch of salt. Whisk these ingredients together until they are smooth. This blend gives your pudding a creamy base. 2. Incorporating chia seeds Next, you need to add the 1/4 cup of chia seeds. Slowly add them into the liquid mix while stirring. This step is important to prevent clumps from forming. Keep stirring until the chia seeds are evenly distributed. 3. Setting the pudding in the refrigerator Once mixed, cover the bowl with plastic wrap or transfer the mix into a jar with a lid. Place it in the refrigerator. Let it chill for at least 4 hours or overnight. This waiting time lets the chia seeds swell and thicken the pudding, creating that perfect texture. 1. Dividing pudding into bowls After chilling, take the pudding out of the fridge. Stir it gently to break up any clumps. Now, divide the pudding evenly into serving bowls or cups. 2. Adding toppings Top each bowl with diced mango and a sprinkle of toasted shredded coconut. These toppings add flavor and texture. You can also add fresh mint leaves on top for a touch of color and freshness. 1. Enhancing visual appeal To make your pudding look even more inviting, try layering the pudding with diced mango. This creates a lovely contrast of colors. You can also use clear cups so that the layers show beautifully. 2. Creative serving ideas Serve your pudding with a side of granola or yogurt. This adds crunch and creaminess. You can also make it a smoothie bowl by blending the pudding with extra fruit and serving it in a bowl. For the full recipe, refer to the Full Recipe section. Enjoy making this bright and tasty treat! Chilling time is key for great chia pudding. This allows the chia seeds to soak up the liquid and swell. Always chill it for at least four hours. If you want a smoother texture, let it sit overnight. Stirring also plays a big role. When you add chia seeds, stir them in slowly. This helps avoid clumping. If you notice clumps after chilling, give it another stir to break them up. This will give you that creamy texture you want. Using fresh mango adds a bright taste. It gives your pudding a burst of sweetness. On the other hand, frozen mango works too. Just thaw it before using. Both options can be delicious. For sweeteners, maple syrup is a great choice. If you want something different, try honey or agave. Each sweetener brings its own flavor. You can adjust the sweetness to your liking. One mistake is letting chia seeds clump together. This happens if you don’t stir them well when mixing. Always stir them in gradually. Another mistake is not chilling the pudding enough. If it's too warm, the seeds won’t thicken properly. Over-chilling can also be a problem. If you leave it too long, it may become too thick. Aim for that perfect balance for the best taste and texture. For the full recipe, refer to the earlier sections. {{image_2}} You can change up the flavor of your mango coconut chia pudding with different fruits. Pineapple adds a tropical twist, while berries bring a burst of color and taste. Just chop any fruit you like and mix it in. You can also use different nut milks. Cashew milk makes it creamy, while oat milk gives a nice flavor. This recipe is vegan-friendly. Simply use maple syrup instead of honey, and you’re set. Chia seeds are naturally gluten-free, making this dish safe for those with gluten issues. You can enjoy it without worry. You can serve your pudding in many ways. Try layering it with granola for a crunchy texture. You can also add yogurt for creaminess. If you want something new, transform it into a smoothie bowl. Just blend the pudding with a bit of extra almond milk until smooth. Pour it in a bowl and top with fruits and nuts. For the full recipe, check out the details above. To keep your mango coconut chia pudding fresh, use an airtight container. Glass jars work well. They help you see the pudding and keep it safe. Plastic containers are also fine as long as they seal well. Store the pudding in the fridge. It needs to stay cold to keep its texture. Make sure the lid is tight to prevent any smells from other foods. You can store chia pudding in the fridge for up to five days. After that, it may lose flavor and texture. Look for signs of spoilage before you eat it. If you see mold or an off smell, throw it away. If the pudding separates, a good stir can help. Yes, you can freeze chia pudding! To freeze it, place it in a freezer-safe container. Leave some space at the top for expansion. When you're ready to eat, take it out and put it in the fridge overnight to thaw. Stir it well before you enjoy it again. The texture may change a bit, but it will still taste good. For the best results, try to eat the frozen pudding within three months. For the full recipe, check out the details above. To make this tasty treat, follow these easy steps: 1. Combine 1 cup coconut milk, 1/2 cup almond milk, 2 tablespoons maple syrup, 1 teaspoon vanilla extract, and a pinch of salt in a bowl. 2. Whisk the mixture until it blends well. 3. Gradually stir in 1/4 cup chia seeds to avoid clumps. 4. Cover the bowl or transfer it to a jar. 5. Refrigerate for at least 4 hours or overnight to let it thicken. 6. Stir the pudding to mix. 7. Serve in bowls, topping with diced 1 ripe mango and toasted shredded coconut. 8. Add fresh mint leaves for extra color. For the complete recipe, check out the [Full Recipe]. Chia seeds are tiny but mighty! Here are some key health benefits: - They are high in fiber, which helps digestion. - They offer a great source of protein for energy. - They contain omega-3 fatty acids, good for heart health. - They are rich in antioxidants, which help fight free radicals. - They provide essential minerals like calcium, magnesium, and phosphorus. Adding chia seeds to your diet can really boost your health! Yes, you can make this chia pudding ahead of time! Here are some tips: - Prepare the pudding at least 4 hours before serving, or overnight for best results. - Store it in an airtight container in the fridge. - It can last for up to 5 days in the fridge. - Stir before serving to keep it creamy. This makes it perfect for meal prep! Enjoy the ease of a quick, healthy snack or breakfast. Mango Coconut Chia Pudding is a tasty and nutritious treat. We covered the key ingredients like coconut milk, chia seeds, and ripe mango. You learned how to prepare, serve, and present it. Plus, I shared tips for texture and flavor. With endless variations and smart storage tips, you're set for success. Remember, the right chilling time and stirring keep your pudding smooth. Enjoy making and sharing this delicious dessert!

Mango Coconut Chia Pudding Fresh and Easy Recipe

Craving a refreshing dessert that’s both easy and delicious? Dive into my Mango Coconut Chia Pudding recipe! It’s creamy, fruity,

To make this easy Greek tzatziki dip, gather these ingredients: - 1 cup Greek yogurt - ½ cucumber, finely grated - 2 cloves garlic, minced - 1 tablespoon fresh lemon juice - 1 tablespoon fresh dill, chopped (or mint for a twist) - Salt and pepper to taste - 1 tablespoon olive oil (optional for richness) These simple ingredients work together to create a fresh and creamy dip. Each one adds its own unique flavor and texture. If you don’t have all the ingredients, here are some swaps you can try: - Use sour cream instead of Greek yogurt for a tangy taste. - Swap the cucumber for shredded zucchini if you want. - Garlic powder can replace fresh garlic in a pinch. - Fresh parsley can stand in for dill or mint for a different flavor. These substitutions keep the tzatziki flavorful while catering to what you have on hand. This tzatziki dip has several healthy ingredients: - Greek yogurt: High in protein and good for gut health. - Cucumber: Low in calories and hydrating. - Garlic: May boost your immune system and has anti-inflammatory properties. - Lemon juice: Packed with vitamin C, it helps your skin and immune system. - Dill (or mint): Can aid digestion and adds fresh flavor. These ingredients not only taste great but also provide health benefits. Enjoy this dip while nourishing your body! For the full recipe, check out the instructions above. To make the best tzatziki, start with the cucumber. Grate it finely using a box grater. Then, wrap the grated cucumber in a clean kitchen towel. Twist the towel tightly. This step removes excess moisture. A dry cucumber helps keep your dip thick and creamy. Next, take a mixing bowl. Add 1 cup of Greek yogurt. To that, mix in the squeezed cucumber, 2 minced garlic cloves, and 1 tablespoon of fresh lemon juice. It’s important to get all the flavors in. Now, chop your herb. You can use 1 tablespoon of fresh dill, or mint if you like a twist. Add this to the bowl. Season everything with salt and pepper to taste. If you want richness, pour in 1 tablespoon of olive oil. Finally, stir all the ingredients well. Make sure everything is mixed evenly. Cover the bowl with plastic wrap. Place it in the fridge for 30 minutes. This time helps the flavors blend together. The key to a great tzatziki is the cucumber handling. Always squeeze out the moisture. If your cucumber is too wet, the dip will be runny. Mixing the yogurt and cucumber well is also key. It creates a smooth texture. If you want it creamier, use full-fat Greek yogurt. You can even blend it for a minute if you prefer a silky dip. If you need to make more or less tzatziki, adjust the ingredients. For 2 servings, use half the amounts. For 8 servings, double everything. Remember that the key ratios stay the same. Keep the yogurt as the base and adjust the cucumber, garlic, and lemon juice accordingly. This way, you can serve the right amount for your guests. For the full recipe, check out the full recipe section. To make your tzatziki pop, use fresh ingredients. Fresh dill or mint gives it a bright taste. You can also try adding a pinch of cumin for warmth. Adjust the garlic to your liking; more garlic means a stronger flavor. For a zesty touch, add more lemon juice. Don't skip the salt; it brings out all the other flavors. Many people forget to squeeze out excess cucumber juice. This mistake makes the dip runny. Always use plain Greek yogurt for the best taste and texture. Avoid using regular yogurt; it can be too thin. Taste your tzatziki before serving. You may need to add more salt or lemon juice to balance the flavors. Serve tzatziki with warm pita bread for a classic combo. It also pairs well with fresh veggie sticks like carrots and celery. Try it as a dip for grilled meats like chicken or lamb. Tzatziki can be a great topping for gyros or falafel. For a twist, use it as a spread on sandwiches. Enjoy your tzatziki with these tasty options! {{image_2}} You can make tzatziki without dairy. Use coconut yogurt or almond yogurt. Both are creamy and tasty. They work well with the other flavors. Just follow the same steps in the full recipe. You will not miss the milk! You can change tzatziki by adding new herbs or spices. Try fresh mint for a bright twist. Chives add a mild onion taste. A pinch of smoked paprika brings warmth. You can also use oregano or parsley. Each herb gives tzatziki a unique flavor. Mix and match to find your favorite! Tzatziki is great with many foods. Serve it with pita bread or veggie sticks. It also pairs well with grilled meats. You can use it as a spread in wraps or sandwiches. For a fun twist, try it with fish tacos. Tzatziki adds a cool, creamy touch to any dish. The options are endless! To keep your tzatziki dip fresh, store it in an airtight container. This will prevent it from absorbing other smells in your fridge. If you have leftovers, make sure to cover it well. I like to use plastic wrap or a tight lid. Tzatziki dip lasts about 3 to 5 days in the fridge. To ensure it stays fresh, avoid using a dirty spoon. Always use a clean utensil each time you serve it. If you notice any changes in smell or color, it’s best to toss it. You can freeze tzatziki, but it may change texture. Freezing makes the yogurt watery when thawed. If you decide to freeze it, use a freezer-safe container. It can last up to 2 months. When ready to eat, thaw it in the fridge overnight. Stir it well before serving. For the best taste, I recommend enjoying it fresh. You can find the Full Recipe for a delicious tzatziki dip above. Tzatziki is a cool and creamy sauce from Greece. It is made with yogurt, cucumber, garlic, and herbs. You can serve tzatziki as a dip or sauce. It pairs well with pita bread, veggies, or grilled meats. This dip is fresh and perfect for summer meals. You can find tzatziki at many Greek restaurants, often served with gyros or souvlaki. It adds a refreshing flavor to any dish. Yes, you can make tzatziki ahead of time. It tastes even better after sitting in the fridge. Making it early lets the flavors mix well. I recommend making it a few hours before your meal. This way, you save time and enjoy the dip cold. Just keep it covered in the fridge until you are ready to serve. Tzatziki can last about 3 to 5 days in the fridge. Make sure to store it in an airtight container. If you notice any changes in smell or texture, it's best to toss it out. Always use clean utensils to scoop the dip. This keeps it fresh and safe to eat. Enjoy your tzatziki with your favorite dishes or as a snack. You can find the full recipe for easy Greek tzatziki dip above. In this post, we explored how to make a tasty Greek tzatziki dip. We covered important ingredients, their health benefits, and easy substitutions. I shared clear steps to prepare the dip and tips for better texture. You learned how to enhance flavor and avoid common mistakes. We also discussed cool serving ideas and how to store tzatziki for freshness. Think of tzatziki as a versatile dip for snacks or meals. Enjoy making it your own!

Easy Greek Tzatziki Dip Simple and Flavorful Recipe

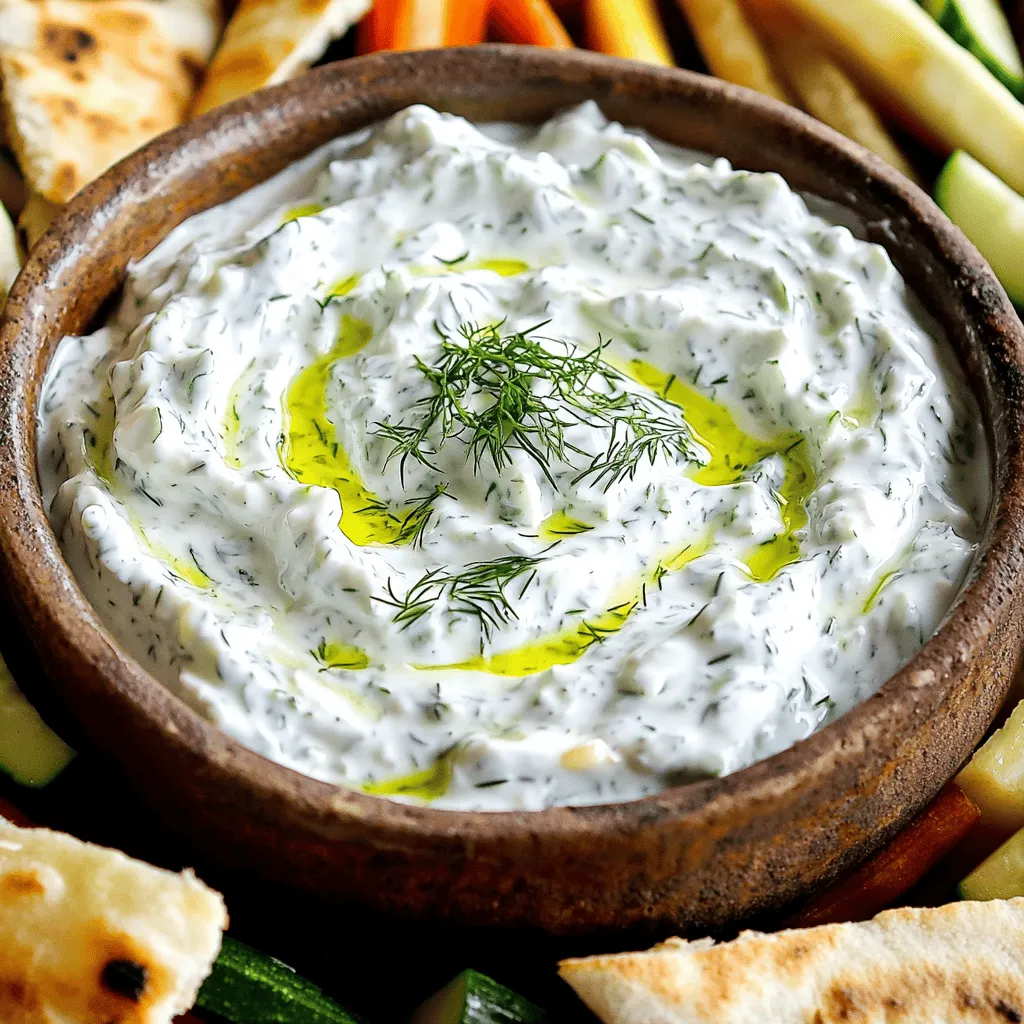
If you crave a cool, creamy dip bursting with flavor, you’re in the right place! My easy Greek tzatziki dip

To make crispy coconut shrimp, gather these key ingredients: - 1 pound large shrimp, peeled and deveined - 1 cup all-purpose flour - 2 large eggs - 1 cup shredded coconut (preferably sweetened) - 1 cup Panko breadcrumbs - 1 teaspoon garlic powder - 1 teaspoon paprika - Salt and pepper to taste - Oil for frying These ingredients give your shrimp that perfect crunch and flavor. For shrimp, I suggest using wild-caught shrimp. Brands like SeaPak and Gorton’s offer good quality. When it comes to coatings, I prefer using Sweetened Shredded Coconut from Baker's or Bob's Red Mill. Their Panko breadcrumbs are always light and crisp, making your shrimp even better. To take your crispy coconut shrimp to the next level, consider adding: - A squeeze of lime juice - A dash of cayenne pepper for heat - Fresh herbs like cilantro or parsley These extra ingredients add depth and freshness, making the dish even tastier. For the full recipe, check out the detailed steps to create this yummy dish. Start by setting up your breading station. You need three shallow dishes. In the first dish, add 1 cup of all-purpose flour. In the second dish, beat 2 large eggs. In the third dish, mix 1 cup of shredded coconut with 1 cup of Panko breadcrumbs. Add 1 teaspoon each of garlic powder and paprika. Don't forget to season with salt and pepper to taste. This setup makes it easy to coat the shrimp. Now, it’s time to coat the shrimp. First, pat 1 pound of large shrimp dry with paper towels. This step helps the coating stick better. Take each shrimp and dredge it in the flour. Shake off any extra flour. Next, dip the shrimp in the beaten eggs. Let any excess drip back into the dish. Finally, coat the shrimp in the coconut-Panko mix. Press gently to make sure the coating sticks well. For frying, heat about 1 inch of oil in a large skillet. Aim for medium-high heat. You want the oil to shimmer, which means it is hot enough. This usually takes about 350°F or 175°C. Carefully add the shrimp in batches. Do not overcrowd the pan. Fry each batch for about 2 to 3 minutes. You want them golden brown and crispy. Once done, use a slotted spoon to transfer the shrimp to a paper towel-lined plate. This step helps drain any excess oil. Let them cool slightly before you serve. For the full recipe, check the earlier section. For crispy coconut shrimp, the key is moisture control. Start by patting the shrimp dry with paper towels. Removing moisture helps the coating stick better. Use Panko breadcrumbs instead of regular breadcrumbs. Panko adds a light, airy crunch. Fry in oil that is hot, about 350°F. If the oil is too cool, the shrimp will absorb too much oil and turn soggy. One common mistake is overcrowding the pan while frying. This lowers the oil temperature, leading to greasy shrimp. Always fry in small batches. Another mistake is not pressing the coating onto the shrimp. Be sure to press the coconut-Panko mix firmly. This will ensure the coating stays on during frying. Seasoning is key for great flavor. Before breading, sprinkle the shrimp with salt and pepper. This simple step enhances the taste. You can also add a pinch of cayenne or chili powder to the coconut-Panko mixture for a kick. For an extra burst of flavor, try adding some lime zest to the mix. This pairs well with the shrimp and coconut. For the full recipe, check out Crispy Coconut Shrimp. {{image_2}} You can add unique flavors to your coconut shrimp. Try using lime zest for a citrusy twist. You can also mix in some curry powder for a taste of the tropics. Adding some chopped fresh herbs like cilantro or basil can brighten the dish. You can even use spicy breadcrumbs for extra heat. These changes keep the recipe fresh and exciting. Frying brings a wonderful crunch, but baking is a healthier choice. To bake, preheat your oven to 400°F (200°C). Place the coated shrimp on a baking sheet. Spray them lightly with oil for a golden finish. Bake for about 15-20 minutes, flipping halfway through. This method cuts down on oil and still gives a nice crunch. Coconut shrimp is versatile. You can give it an international flair. For a Caribbean twist, add mango chutney on the side. If you want an Asian flavor, serve it with a sweet soy sauce. You can also try using coconut milk for a marinade. This will add moisture and flavor. Each twist brings new life to this classic dish, making it fun to explore. Store leftover coconut shrimp in an airtight container. Let the shrimp cool first. Place a paper towel inside to absorb moisture. This keeps them crispy for a while. You can keep them in the fridge for up to two days. To reheat coconut shrimp, use the oven for best results. Preheat your oven to 375°F (190°C). Place the shrimp on a baking sheet in a single layer. Bake for about 10-12 minutes. This method restores their crunch. You can also use an air fryer if you want quick heat. Set it to 350°F (175°C) for 5-7 minutes. You can freeze coconut shrimp if you want to save them. First, let them cool completely. Lay them out on a baking sheet in a single layer. Freeze until firm, then transfer to a freezer bag. Remove as much air as possible. They will last up to three months in the freezer. When ready to eat, bake or fry them from frozen. This keeps them tasty and crunchy. Check out the Full Recipe for more tips! The best shrimp for coconut shrimp is large shrimp. I recommend using peeled and deveined shrimp. This makes prep easy and quick. Fresh shrimp works great, but frozen shrimp saves time. Just thaw them properly before cooking. The size matters because larger shrimp hold up better during frying. You want a good bite with each piece. Yes, you can prepare coconut shrimp ahead. I suggest breading the shrimp and storing them in the fridge. Cover them well with plastic wrap. This keeps them fresh for a few hours. If you want to store them longer, freeze the breaded shrimp. You can fry them straight from the freezer when ready. Just add a few extra minutes to the cooking time. Crispy coconut shrimp tastes great with many sauces. Sweet chili sauce is a favorite for its balance of heat and sweetness. You can also try a tangy mango sauce for a tropical twist. A simple mix of ketchup and horseradish adds a nice kick, too. For a creamy option, use a coconut yogurt dip. Each sauce brings out the shrimp's flavor in a unique way. In this blog post, we explored how to craft crispy coconut shrimp. We covered the main ingredients, including recommended brands for shrimp and coatings. The step-by-step instructions ensure perfect frying. I shared tips for extra crispiness and common mistakes to avoid. You can also try different flavors and storage tips for leftovers. Crispy coconut shrimp is a tasty dish with many variations. Go ahead and experiment, and you’ll impress everyone at your next meal! Enjoy your cooking adventure!

Crispy Coconut Shrimp Irresistible Flavor and Crunch

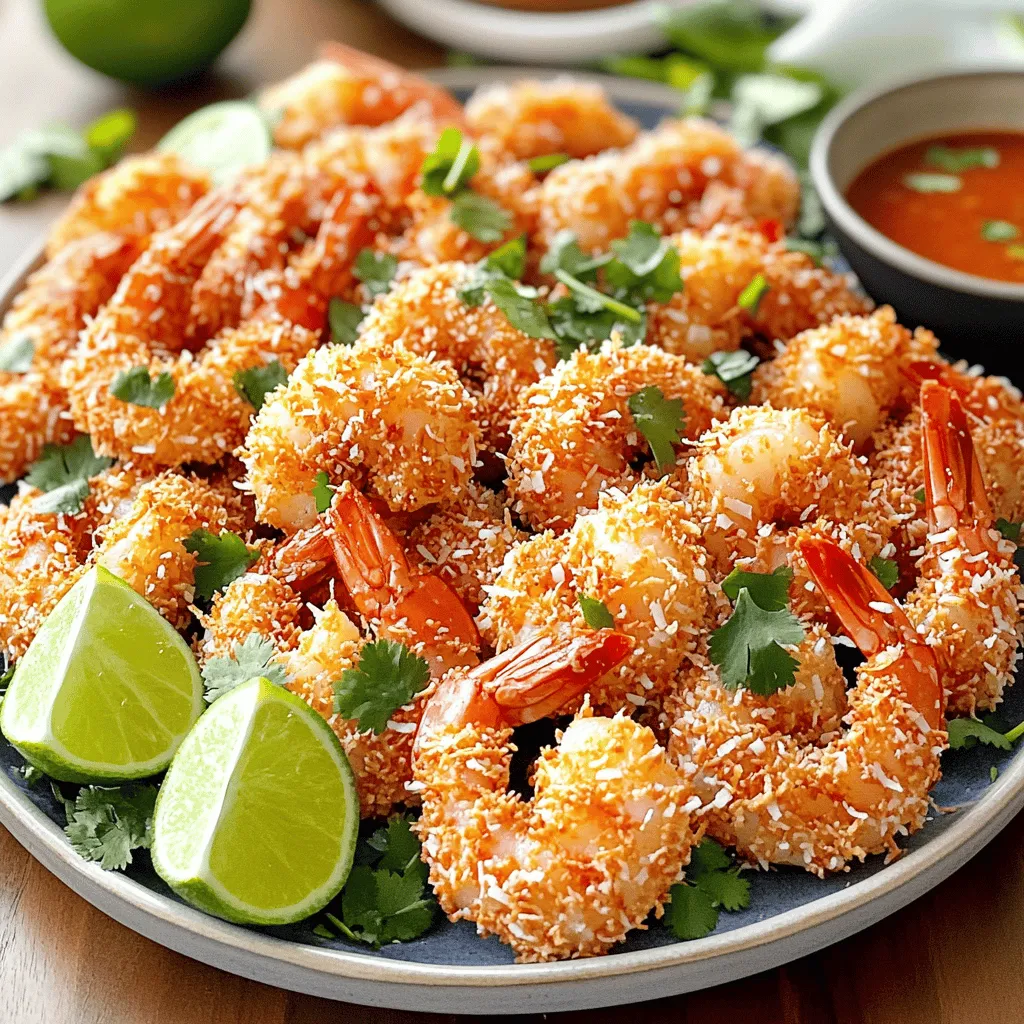
Are you ready to indulge in a delightful treat? Crispy Coconut Shrimp packs a punch of flavor and crunch that’s

To make a healthy quinoa breakfast bowl, gather these essential ingredients: - 1 cup cooked quinoa - 1 cup almond milk (or any plant-based milk) - 1 banana, sliced - 1/2 cup blueberries (fresh or frozen) - 1/4 cup Greek yogurt (or plant-based yogurt for vegan option) - 1 tablespoon chia seeds - 1 tablespoon honey or maple syrup (optional) - 1 teaspoon vanilla extract - 1 tablespoon almond butter (optional) - A pinch of cinnamon These ingredients work together to create a tasty and filling meal. Each ingredient in the quinoa breakfast bowl brings its own health perks: - Quinoa is high in protein and fiber. It helps keep you full longer. - Almond milk is low in calories and packed with vitamins. It’s great for dairy-free diets. - Bananas add natural sweetness and potassium. They boost your energy for the day. - Blueberries are rich in antioxidants. They help fight inflammation and improve brain health. - Greek yogurt provides protein and probiotics. This helps with digestion and gut health. - Chia seeds are a source of omega-3 fatty acids. They support heart health and keep you satisfied. - Honey or maple syrup adds a touch of sweetness. Use it if you like a sweeter bowl. - Vanilla extract enhances flavor with natural sweetness. It makes the bowl smell amazing. - Almond butter adds healthy fats and creaminess. It can make your bowl even more satisfying. - Cinnamon is a warming spice. It helps regulate blood sugar levels and adds flavor. Want to boost your bowl even more? Try these optional add-ins: - Nuts like walnuts or almonds for crunch and healthy fats. - Seeds such as pumpkin or sunflower seeds for extra protein. - Dried fruits like raisins or cranberries for natural sweetness. - Nut butter variations like peanut or cashew butter for more flavor. - Fresh herbs like mint for a refreshing twist. Feel free to mix and match these options to suit your taste! For the full recipe, check out the Quinoa Sunrise Bowl. To make quinoa, rinse it under cold water first. This helps remove any bitter taste. In a pot, use two cups of water for every one cup of quinoa. Bring the water to a boil. Add the rinsed quinoa, then reduce the heat. Cover the pot and let it simmer for about 15 minutes. When it's done, let it sit for five minutes. Fluff it with a fork, and it's ready for your breakfast bowl. Now, let’s make the Quinoa Sunrise Bowl. Start with one cup of cooked quinoa. In a medium saucepan, combine the cooked quinoa and one cup of almond milk. Heat it over medium-low, stirring often. Once warm, stir in one teaspoon of vanilla extract and a pinch of cinnamon. Mix well and take it off the heat. Next, transfer the quinoa mixture into bowls. Top it with sliced banana and half a cup of blueberries. Add a dollop of Greek yogurt on top. Sprinkle one tablespoon of chia seeds across the bowl. Drizzle some honey or maple syrup if you like it sweeter. For creaminess, swirl in one tablespoon of almond butter. For a beautiful presentation, use a colorful bowl. This adds life to your dish. Garnish it with a sprig of mint or a few extra berries. These small touches make the meal more inviting. Enjoy your healthy start to the day with this vibrant breakfast! For the full recipe, check out the Quinoa Sunrise Bowl section above. To cook quinoa well, rinse it first. This removes bitter saponins. Use a 2:1 ratio of water to quinoa. Bring water to a boil, then add the quinoa. Reduce heat and cover. Cook for about 15 minutes. Let it sit off the heat for 5 minutes. Fluff with a fork for best texture. You can change your quinoa bowl based on flavors you love. Add nuts for crunch or seeds for protein. Try different fruits like strawberries or peaches. You can swap almond milk for coconut milk for a tropical feel. For a protein boost, add nuts, seeds, or protein powder. Spice it up with nutmeg or ginger if you like a kick. Cook a big batch of quinoa on the weekend. Store it in the fridge for up to five days. You can easily grab it in the morning. Heat a portion with your favorite milk. Top it with fruits and nuts for a quick meal. This method saves time and helps you eat healthy. You can find the full recipe in the article. {{image_2}} You can make your quinoa bowl fun with different fruits. Here are some tasty ideas: - Strawberries: Slice fresh strawberries for a sweet touch. - Apples: Dice apples and sprinkle with cinnamon for crunch. - Peaches: Add fresh or grilled peaches for a juicy flavor. - Mango: Use diced mango for a tropical twist. Mix and match your favorite fruits to keep things exciting! For a dairy-free or vegan option, swap Greek yogurt for plant-based yogurt. Almond milk is great, but you can also try: - Coconut milk: This adds a rich and creamy texture. - Oat milk: A smooth and mild flavor that blends well. You can top with maple syrup instead of honey if you want it vegan. These choices make your bowl healthy and delightful! If you prefer savory flavors, try these ideas to spice up your bowl: - Avocado and Tomato: Mash avocado and mix with diced tomatoes. - Spinach and Feta: Sauté spinach and crumble feta cheese on top. - Eggs: Add a poached or fried egg for protein. These savory options give you energy and keep you full longer. Enjoy creating your unique quinoa breakfast bowl! Store leftover quinoa breakfast bowls in an airtight container. Make sure to cool them first. This helps keep the dish fresh. Place the container in the fridge. It can last for about three days. If you keep it longer, the taste may change. When you are ready to eat, reheating is simple. Use a microwave for quick warming. Place the bowl in the microwave and cover it with a damp paper towel. This helps to keep the moisture in. Heat for one to two minutes. Stir halfway through to warm evenly. If you prefer, you can use a stovetop. Just add a splash of almond milk and warm over low heat. You can also freeze quinoa breakfast bowls for later. Portion them into individual containers. Let them cool before sealing. Label the containers with the date. They can stay fresh for up to three months. To enjoy, thaw in the fridge overnight. Then, reheat using the tips above. Enjoy a healthy breakfast any day! Quinoa is a superfood packed with nutrients. It is high in protein, which helps build muscles. It also has fiber, aiding digestion and keeping you full. Quinoa contains vitamins and minerals like magnesium, iron, and B vitamins. These nutrients support heart health and boost energy. Plus, quinoa is gluten-free, making it safe for those with gluten allergies. Eating quinoa can help you feel great all day. Yes, you can! Making a quinoa breakfast bowl in advance saves time. Cooked quinoa stays fresh in the fridge for about five days. Just store it in an airtight container. You can also prepare toppings like fruits and yogurt ahead. In the morning, simply warm the quinoa and add your toppings. This way, you enjoy a healthy breakfast with little effort. Both quinoa and oats are healthy choices. Quinoa offers more protein and fiber, which helps keep you full. Oats are great too, as they are high in beta-glucan, a type of fiber that supports heart health. The best choice depends on your taste and needs. You can even mix both for a fun breakfast twist. Try it out and see what works for you! You now have all the tools to make a tasty quinoa breakfast bowl. We explored key ingredients with their health benefits and discussed tasty add-ins. I shared how to cook quinoa and prepare a colorful sunrise bowl. Keep in mind tips for customizing flavors and storing leftovers. Quinoa is a nutritious choice that rivals oats for breakfast. Try different fruit combinations and vegan options to keep it exciting. Enjoy experimenting with this healthy meal that fits your taste!

Healthy Quinoa Breakfast Bowl for Energizing Mornings

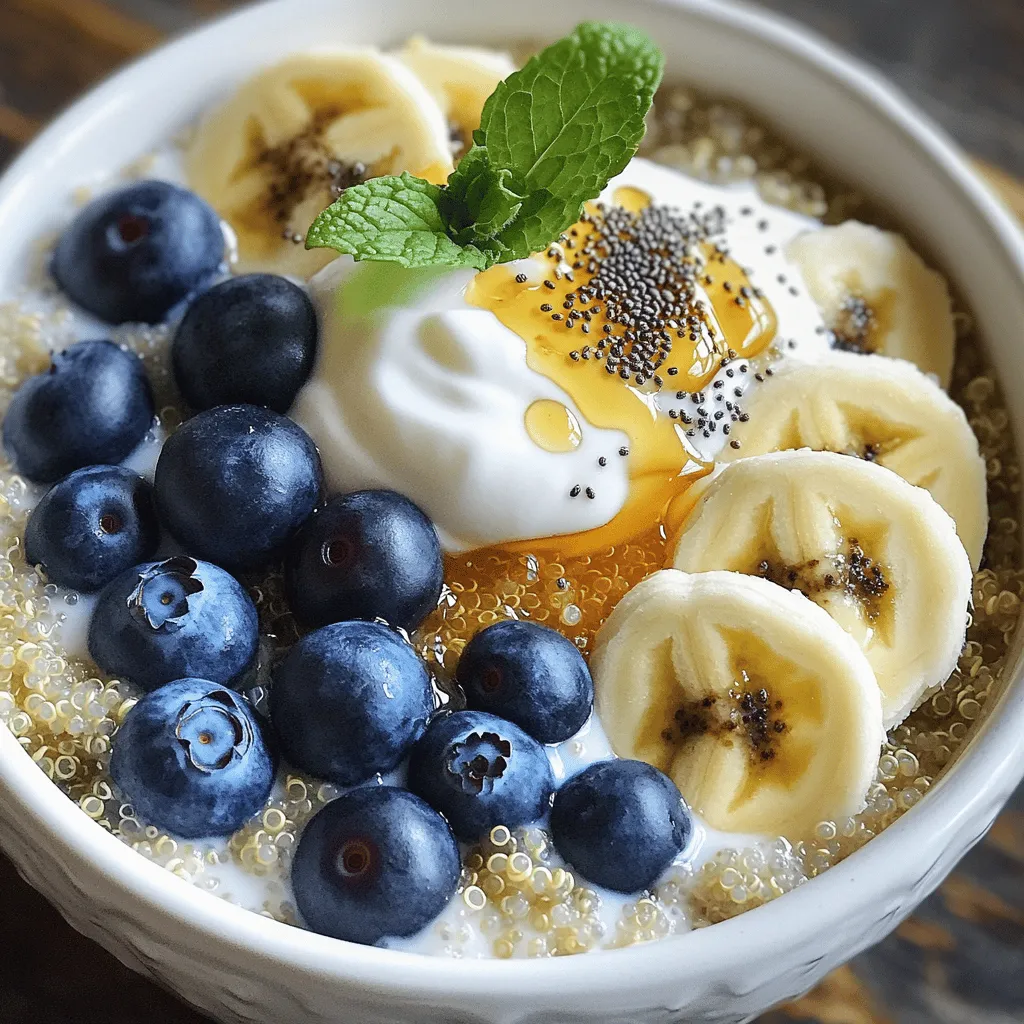
Are you looking for a breakfast that fuels your mornings? The Healthy Quinoa Breakfast Bowl is your answer! Packed with

Older posts
Newer posts
← Previous Page1 … Page60 Page61 Page62 … Page84 Next →

dsad

© 2026 juliesdish • Built with GeneratePress

Our Policies

  • Copyright Policy
  • Cookie Policy
  • GDPR Policy
  • Privacy Policy
  • Disclaimer
  • Terms Of Use

More Information

  • Home
  • About
  • Contact
  • Appetizers
  • Dessert
  • Dinner
  • Drinks
©2026, juliesdish About Back To Top