Skip to content
DisclaimerTerms Of UseGDPR PolicyCookie Policy

juliesdish

  • Home
  • Drinks
  • Appetizers
  • Dinner
  • Dessert
  • About
  • Contact
  • Privacy Policy
DisclaimerTerms Of UseGDPR PolicyCookie Policy

NO-ING-IMG

To make a delicious Apple Cinnamon Oatmeal Bake, you need a few simple ingredients. Here’s what you will gather: - 2 cups rolled oats - 2 cups almond milk (or milk of your choice) - 2 medium apples, peeled, cored, and diced - 1/2 cup brown sugar (or maple syrup for a healthier option) - 1 teaspoon ground cinnamon - 1/2 teaspoon nutmeg - 2 tablespoons coconut oil, melted - 1 teaspoon vanilla extract - 1/2 cup chopped walnuts or pecans (optional) - 1/4 teaspoon salt - 1 egg (or flax egg for a vegan option) These ingredients create a hearty and flavorful dish. Rolled oats form the base, giving it texture. Apples add sweetness and moisture. Cinnamon and nutmeg give warm spice notes. Coconut oil helps bind the mix and adds a rich flavor. Feel free to add nuts for crunch or use maple syrup instead of sugar. This recipe is flexible and perfect for your taste! If you want the full recipe, check out the Apple Cinnamon Oatmeal Bake 🥣 for precise measurements and instructions. - Preheat the oven to 375°F (190°C). - Grease the baking dish with coconut oil. - Combine all ingredients in a mixing bowl. Start by preheating your oven. This step is key to getting that nice golden top. Greasing your baking dish with coconut oil helps the bake not stick. Then, grab a big mixing bowl. Add the rolled oats, almond milk, diced apples, brown sugar, ground cinnamon, nutmeg, melted coconut oil, vanilla extract, and salt. Mix well until everything is combined. If you want extra crunch, toss in some chopped walnuts or pecans. Lastly, whisk your egg or flax egg separately, then add it to the bowl. - Pour mixture into the prepared baking dish. - Spread evenly with a spatula. - Bake until golden and set. Next, pour your oatmeal mix into the greased dish. Use a spatula to spread it out evenly. This helps it bake uniformly. Place it in the preheated oven. Bake for 30 to 35 minutes. You want the top to turn golden and the oatmeal to set. - Cool for 10 minutes before slicing. - Presentation tips for serving. Once it’s done baking, take it out of the oven. Let it cool for 10 minutes before slicing. Cooling helps it firm up. For serving, you can drizzle some maple syrup on top and sprinkle a bit more cinnamon. Add a few apple slices or a dollop of yogurt for a nice touch. Enjoy your warm Apple Cinnamon Oatmeal Bake! - Healthier sweeteners: You can swap brown sugar for maple syrup. This change makes the dish healthier and adds a nice flavor. - Dairy-free options: Instead of almond milk, you can use coconut milk or oat milk. These choices work well and keep it creamy. - Nut alternatives: If you have nut allergies, try sunflower seeds or pumpkin seeds. They add crunch without the nuts. - Ensuring even baking: Make sure to spread the oatmeal mixture evenly in the dish. This helps it cook uniformly. - Testing for doneness: Insert a toothpick in the center. If it comes out clean, your bake is good to go. - Tips for a perfect texture: Let the bake cool for a bit after taking it out. This helps it firm up nicely. - How to elevate presentation: Serve warm and drizzle with maple syrup. Add a sprinkle of cinnamon and a few apple slices on top. - Pairing with toppings: Greek yogurt or a scoop of ice cream can add a creamy touch. You can also use fresh berries for extra color and flavor. {{image_2}} You can change up the flavor by adding other fruits. Bananas and berries work well. You can also try spices like ginger or cloves for a warm kick. These small changes can make your bake unique and fun. To make this dish vegan, simply swap the egg for a flax egg. Mix one tablespoon of ground flaxseed with three tablespoons of water. Let it sit to thicken. For gluten-free options, use certified gluten-free oats. This way, everyone can enjoy this tasty treat. You can turn this oatmeal bake into a quick snack. Just cut it into smaller squares. You can grab a piece on the go! If you want a breakfast option, serve it warm with yogurt or fruit on top. These adjustments make it perfect for any time of day. To store leftovers, let the Apple Cinnamon Oatmeal Bake cool first. Then, cut it into squares. Place the squares in an airtight container. This keeps the dish fresh and tasty. Store it in the fridge for up to five days. The best temperature for the fridge is 40°F (4°C) or lower. You can also freeze portions for later. Cut the baked oatmeal into squares and wrap each piece in plastic wrap. Then place the wrapped pieces in a freezer bag. Be sure to remove as much air as possible. They will stay good for up to three months. To thaw, move a square to the fridge overnight. For reheating, you can use the microwave or bake it until warm. In the fridge, the Apple Cinnamon Oatmeal Bake lasts about five days. If you notice any mold or strange smells, it’s best to throw it away. A good rule is to trust your nose and eyes. If it doesn’t look or smell right, don’t eat it. To make this dish gluten-free, swap rolled oats for certified gluten-free oats. These oats are processed in a way that prevents gluten contamination. Always check the packaging to ensure they are gluten-free. You can use steel-cut oats, but the texture will change. Steel-cut oats need more cooking time. Soak them overnight in liquid before mixing them into the recipe. This will help them soften during baking. To reheat, place the leftovers in the microwave. Heat them for about 30 seconds to 1 minute. You can also warm them in the oven at 350°F (175°C) for about 10-15 minutes. Add a splash of almond milk to keep them moist. Yes! You can prepare it a day ahead. Mix the ingredients and store them in the fridge overnight. In the morning, pour the mixture into the baking dish and bake it fresh. This saves time and makes breakfast easy. To lower the sugar, reduce the brown sugar to 1/4 cup. You can also use ripe bananas or applesauce as natural sweeteners. These options keep the flavor without adding too much sugar. For a full recipe, check the link. This recipe combines rolled oats, fresh apples, and warm spices for a delicious dish. You can enjoy it for breakfast or as a snack. Don't forget the tips on storage and flavor variations to customize your experience. Experiment with different fruits or sweeteners to make it your own. With these steps, you'll create a healthy, satisfying meal that everyone will love. Now it's your turn to try it out!

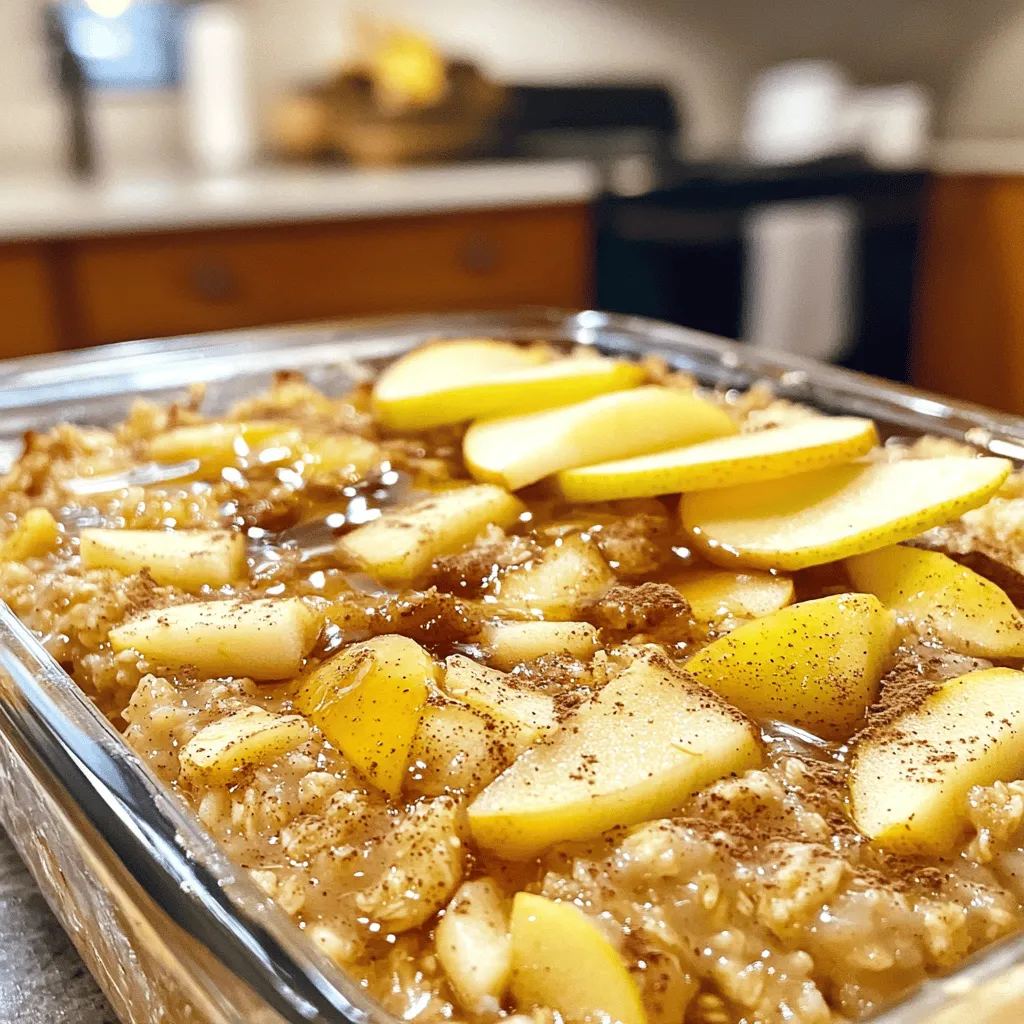
Apple Cinnamon Oatmeal Bake Simple and Tasty Recipe

Looking for a warm, comforting dish that’s also healthy? My Apple Cinnamon Oatmeal Bake is perfect for breakfast or a

- 2 large red bell peppers - 1 can (15 oz) chickpeas, drained and rinsed - 1/4 cup tahini - 3 tablespoons olive oil - 2 tablespoons fresh lemon juice - 2 cloves garlic, minced - 1/2 teaspoon ground cumin - Salt and pepper to taste - 1-2 tablespoons water (as needed) - Fresh parsley for garnish - Pita bread or vegetable sticks for serving Making roasted red pepper hummus is easy and fun. Each ingredient plays a key role in flavor and texture. The red bell peppers give this dip its sweet and smoky taste. Roasting them changes their texture and adds depth to the flavor. Chickpeas, or garbanzo beans, are the base and provide creaminess. Tahini adds a nutty flavor that pairs well with the peppers. Olive oil adds richness and smoothness, while lemon juice brings balance with its fresh acidity. Garlic gives a nice kick, and cumin adds warmth. Salt and pepper enhance all the flavors. Finally, the parsley offers a fresh touch. This mix not only tastes great but also packs a nutritional punch. Each serving is full of protein and healthy fats. For a full recipe, check out the detailed steps above. First, we need to preheat the oven to 425°F (220°C). This high heat helps char the peppers. Next, place the whole red bell peppers on a baking sheet. Roast them for about 25 to 30 minutes. Turn the peppers often. Look for a charred and blistered skin. This adds great flavor. After roasting, remove the peppers from the oven. Place them in a bowl and cover it tightly with plastic wrap. Let them sweat for about 10 minutes. This step makes peeling easier. Once they cool, peel the skin off the peppers. Remove the seeds and chop the peppers into chunks. Now, it’s time to blend! In a food processor, combine the roasted red peppers, chickpeas, tahini, olive oil, lemon juice, minced garlic, and ground cumin. Blend until the mix is smooth. If it’s too thick, add 1-2 tablespoons of water to get the right consistency. Taste your hummus and adjust the seasoning. Add salt and pepper, then blend again until well mixed. Transfer the hummus to a serving bowl. Drizzle a bit of olive oil on top. Garnish with chopped parsley for a pop of color. For serving, pair it with pita bread or fresh vegetable sticks. These crunchy items are perfect for dipping. If you have leftovers, store the hummus in an airtight container in the fridge. It stays fresh for several days. For the full recipe, check out the details above for all the steps and tips! Choosing the best peppers is key. Look for firm, bright red bell peppers. They should feel heavy and have smooth skin. Avoid any that are soft or have blemishes. You can roast peppers in different ways. The oven method is great, but grilling adds a smoky flavor. If you prefer, you can use a stovetop. Just place the peppers over an open flame, turning them often. Common mistakes to avoid include not preheating your oven, which can lead to uneven roasting. Also, don’t rush the sweating process after roasting. This step helps the skin come off easily. To make your hummus even tastier, try adding spices. Smoked paprika or cayenne can add warmth. You can also use ground coriander for a fresh twist. Fresh herbs, like parsley or cilantro, can boost flavor. Adding them right before serving keeps their taste bright. Balancing acidity is also important. A little lemon juice brightens up the hummus. Start with two tablespoons and adjust to your taste. For the full recipe, make sure to check out the details above. Enjoy crafting your perfect roasted red pepper hummus! {{image_2}} You can easily switch up the flavor of your roasted red pepper hummus. Here are some fun ideas: - Spicy roasted red pepper hummus: Add some chopped jalapeños or a pinch of cayenne pepper. This will give your dip a nice kick. - Adding herbs like basil or dill: Fresh herbs can brighten up the flavors. Toss in some chopped basil or dill to make it more refreshing. - Incorporating nuts or seeds for texture: Blend in some toasted pine nuts or sunflower seeds. They add crunch and extra flavor. Not every ingredient works for everyone. Here are some swaps you can make: - Alternatives for tahini: If you don’t have tahini, try using sunflower seed butter or Greek yogurt. Both add creaminess without losing taste. - Vegan substitutions: If you want a vegan dip, stick to the original recipe. All the ingredients are plant-based. - Adjusting for dietary preferences (gluten-free, etc.): Use gluten-free pita or veggie sticks for dipping. This way, everyone can enjoy it without worry. Explore these variations and substitutions to find what you love best. You can also check the Full Recipe for more guidance. Store your homemade roasted red pepper hummus in an airtight container. It keeps well in the fridge for up to five days. To prevent it from drying out, drizzle a bit of olive oil on top before sealing. If you want to store it longer, freezing works great. To freeze, transfer the hummus to a freezer-safe container. Leave some space at the top for expansion. It can last for about three months in the freezer. When you’re ready to eat it, thaw it overnight in the fridge. When reheating, add a little water or olive oil to revive its creamy texture. Blend it well to mix in the added liquid. When buying roasted red pepper hummus, look for trusted brands like Sabra or Tribe. Check the ingredients for quality. A shorter list means fewer additives. To choose the best option, look for hummus with real roasted peppers listed first on the label. Pay attention to the expiration date. If it’s near, skip it. Most store-bought hummus lasts about a week after opening. Always check for any off smell or changes in texture before eating. How long does homemade hummus last? Homemade hummus can last about 4 to 7 days in the fridge. Always store it in an airtight container. If you notice any change in smell or color, it’s best to toss it. Can I use canned roasted red peppers? Yes, you can use canned roasted red peppers. They save time and still taste great. Just drain and rinse them before adding to your hummus. What’s the best way to serve hummus for gatherings? Serve hummus in a bowl with a drizzle of olive oil on top. Add fresh parsley for color. Pair it with pita bread or vegetable sticks for a fun dip. What is tahini, and can I make it at home? Tahini is a paste made from ground sesame seeds. You can make it at home by blending toasted sesame seeds with a bit of oil. This gives it a smooth texture. How do I make hummus smoother? To make hummus smoother, blend it longer and add a bit of water. Use a food processor for the best results. Scrape down the sides to ensure even mixing. What are the health benefits of chickpeas? Chickpeas are rich in protein and fiber. They help you feel full longer and support digestion. Plus, they are packed with vitamins and minerals, making them a healthy choice. You can easily make roasted red pepper hummus with the right ingredients and steps. We covered the essential ingredients, the preparation and blending process, and tasty serving ideas. I shared tips to perfect your roasting and ways to enhance flavors. Don’t hesitate to try variations or substitutions that suit your taste. Enjoy your homemade hummus fresh, and remember to store leftovers properly. This delicious dip can brighten any meal or gathering. Happy cooking!

Roasted Red Pepper Hummus Flavorful and Healthy Dip

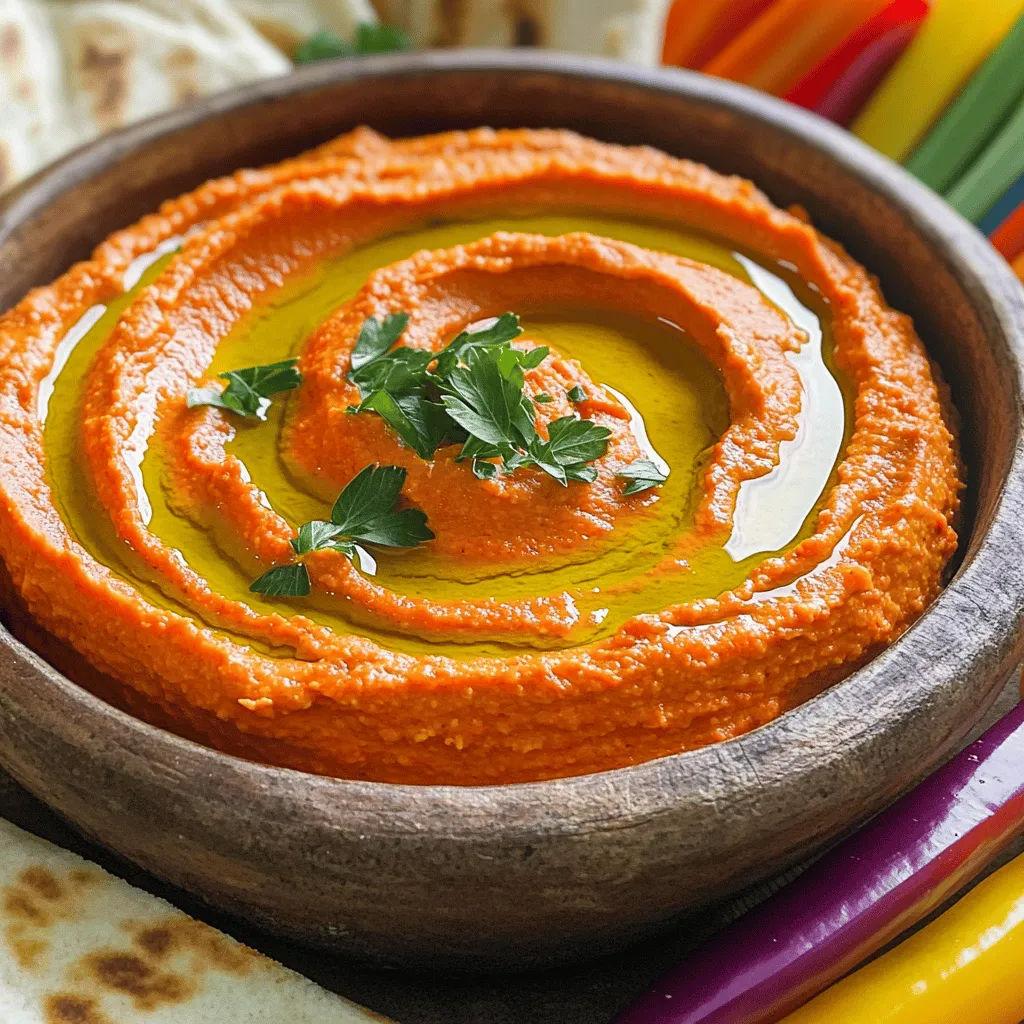
Are you ready to dive into a dip that’s both delicious and healthy? Roasted red pepper hummus packs a flavorful

- 1 pound ground chicken - 1 tablespoon sesame oil - 2 cloves garlic, minced - 1 inch ginger, grated - 1 red bell pepper, diced - 1 cup carrots, julienned - 2 green onions, chopped - 1/4 cup soy sauce (low-sodium) - 1 tablespoon rice vinegar - 1 tablespoon hoisin sauce - 1 teaspoon chili garlic sauce (optional, for heat) - 1 head of Butter lettuce (or Romaine), leaves separated These ingredients create a simple yet tasty dish. Ground chicken gives protein and flavor. Sesame oil adds a nutty taste. Garlic and ginger bring warmth and depth. The veggies add crunch. Red bell pepper gives sweetness, while carrots offer a fresh bite. Green onions add bright flavor. The sauce mix of soy sauce, rice vinegar, hoisin sauce, and chili garlic sauce brings it all together. When choosing lettuce, I prefer Butter lettuce. Its soft leaves hold the filling well. Romaine is a great choice too. Both options make a fun wrap. For the full recipe, check out the details above. Enjoy making these easy chicken lettuce wraps! - Gather and prep all ingredients - Separate lettuce leaves First, gather all your ingredients. You will need ground chicken, sesame oil, garlic, ginger, red bell pepper, carrots, green onions, soy sauce, rice vinegar, hoisin sauce, and optional chili garlic sauce. This will make cooking much smoother. Next, separate the leaves of the butter lettuce. Choose the largest leaves for easy wrapping. Rinse them gently under cold water and pat them dry with a clean towel. Set these aside for later. - Heat oil and sauté garlic and ginger - Cook ground chicken until browned Now, heat the sesame oil in a large skillet over medium heat. Once hot, add the minced garlic and grated ginger. Sauté them for about 30 seconds. You want these to become fragrant, not browned. Then, add the ground chicken to the skillet. Cook it until it turns brown and no longer pink. This should take around 5 to 7 minutes. Make sure to break up the chicken as it cooks for even browning. - Mix in vegetables and sauce - Spoon into lettuce leaves and garnish After the chicken is cooked, stir in the diced red bell pepper and julienned carrots. Cook for another 3 to 4 minutes until the vegetables soften. In a small bowl, mix the soy sauce, rice vinegar, hoisin sauce, and optional chili garlic sauce. Pour this sauce over the chicken and vegetable mix. Stir until everything is well-coated. Remove the skillet from heat and fold in the chopped green onions. To serve, spoon the chicken mixture into your prepared lettuce leaves. Top each wrap with chopped cilantro for a fresh finish. For the full recipe, check the details above. Enjoy your Easy Chicken Lettuce Wraps! To get started, let's prep garlic and ginger right. For garlic, you should peel the cloves first. Then, chop them finely. This way, they blend well in the dish. For ginger, peel it using a spoon. Then, grate it with a box grater or microplane. This makes it easier to mix into the chicken. When it comes to diced vegetables, size matters! Aim for small, even pieces. For the red bell pepper, cut it into tiny cubes. The carrots should be julienned for a nice crunch. The green onions can be chopped thinly. Uniform sizes help everything cook evenly. Now, let's talk about cooking chicken. Start by heating your skillet to medium. Add sesame oil and wait until it shimmers. Then, add the ground chicken. Stir it often to brown nicely. This will give it great flavor. Don’t rush this step, as browning adds depth. For the vegetables, keep them crunchy! After adding the bell pepper and carrots, stir for just a few minutes. You want them to soften slightly but still have a bite. This contrast in texture makes the wraps exciting to eat. When it comes to serving, you can add rice or noodles on the side. This turns your wraps into a meal. If you want a lighter dish, keep it just as wraps. To make your meal more colorful, garnish with chopped cilantro. You can also drizzle some extra hoisin sauce on top for flair. This adds a nice touch and makes the dish pop! For the full recipe, check out the detailed instructions here. {{image_2}} You can easily adapt this recipe to fit your needs. For a gluten-free option, use tamari instead of soy sauce. This small swap keeps the flavor while making it safe for those avoiding gluten. If you want a low-carb dish, try using ground turkey instead of chicken. Turkey has a similar taste and works well in this wrap. Feel free to mix things up with different proteins. Ground turkey or even tofu can be great alternatives. They absorb flavors nicely. You can also play with spices and sauces. Add more chili garlic sauce for heat or try a splash of sriracha for a kick. This flexibility lets you create a dish that fits your taste. While Butter lettuce works great, you can use other greens. Romaine, for instance, adds a nice crunch. You can also experiment with collard greens or even cabbage for a unique twist. These options not only change the flavor but also add different textures to your wraps. Enjoy being creative with your wraps! For a full recipe, check out [Full Recipe]. After you make your Easy Chicken Lettuce Wraps, store the chicken mixture in an airtight container. This keeps it fresh and safe. Let it cool before sealing to avoid moisture buildup. For the lettuce, keep the leaves in a separate container. Wrap them in a damp paper towel to retain some moisture, then place them in a sealed bag. When it's time to enjoy your leftovers, use the stove or microwave. For the stove, heat on low until warm. This keeps the chicken juicy. If using the microwave, heat in short bursts to prevent drying out. To keep the lettuce crisp, don’t reheat it. Serve fresh leaves with the warm chicken mixture. These wraps can last in the fridge for about three days. After that, they may lose flavor or texture. Signs that your wraps have gone bad include a sour smell or discoloration. If you notice these changes, it’s best to toss them out. Enjoy your wraps fresh for the best taste! You can prep the chicken filling a day before. Cook the chicken and veggies. Store them in an airtight container in the fridge. When you are ready to eat, just spoon the filling into the lettuce leaves. This keeps the wraps fresh and crunchy. Yes, you can freeze the chicken filling. Let it cool completely before placing it in a freezer-safe bag. Remove as much air as possible. The filling can last for up to three months in the freezer. When you’re ready to use it, thaw it in the fridge overnight. These wraps pair well with many sides. Consider serving them with steamed rice or quinoa for a heartier meal. You can also add a side of fresh fruit, like mango or pineapple, to balance the flavors. The heat level depends on your taste. The chili garlic sauce adds a nice kick. If you prefer less heat, you can leave it out. You could also add more ingredients like honey or extra veggies to tone it down. Adjusting the heat makes it fun and personal! Easy Chicken Lettuce Wraps are simple and fun. You learned about key ingredients, like ground chicken and lettuce options. I shared easy steps for cooking and assembly. Keeping veggies crunchy adds great taste. For variations, consider dietary needs or different proteins. Always store leftovers well to enjoy later. These wraps can be a meal or a snack. Making them your own is part of the fun. Dive into this tasty dish and enjoy!

Easy Chicken Lettuce Wraps Flavorful and Quick Dish

Are you craving a quick and tasty meal that packs a punch? Try my Easy Chicken Lettuce Wraps! These wraps

- 1 cup all-purpose flour - 1/2 cup powdered sugar - 1/2 cup unsalted butter, softened - 1/2 cup granulated sugar - 2 large eggs - 1/2 cup fresh lemon juice (about 3 lemons) - Zest of 2 lemons - 1 cup fresh raspberries (or frozen, thawed) - 1/4 teaspoon salt - 1 teaspoon baking powder To create the best raspberry lemon bars, you need simple ingredients. The base starts with flour, butter, and sugar. This mix gives a nice, crumbly texture. Using powdered sugar helps create a sweet crust. For the filling, fresh lemons bring bright flavors. Lemon juice and zest add a punch of tanginess. Eggs help bind the filling together, making it smooth. Raspberries are the star of this recipe. You can use fresh or frozen. If using frozen, just let them thaw. Salt and baking powder balance the flavors and aid in rising. Each ingredient plays a key role in making these bars taste great. - 8x8 inch baking dish - Mixing bowls - Whisk - Measuring cups and spoons - Parchment paper (optional) These tools make baking easier. An 8x8 inch dish is perfect for these bars. Mixing bowls help you combine your ingredients well. A whisk is great for beating eggs and mixing batter. Measuring cups and spoons ensure you get the right amounts. Parchment paper helps with easy cleanup. With the right tools, you can focus on creating these delicious treats. You can find the full recipe above to guide you through the process. - Preheat the oven to 350°F (175°C). - Grease or line an 8x8 inch baking dish with parchment paper. - In a medium bowl, combine 1/2 cup of softened butter, 1/2 cup of granulated sugar, and 1/2 cup of powdered sugar. - Mix until creamy and smooth. - Add 1 cup of all-purpose flour and 1/4 teaspoon of salt. Stir until just combined. - Press the mixture evenly into the bottom of the baking dish. - In another bowl, whisk together 2 large eggs, 1/2 cup of granulated sugar, 1/2 cup of fresh lemon juice, the zest of 2 lemons, and 1 teaspoon of baking powder. - Gently fold in 1 cup of fresh raspberries. Be careful not to mash them. - Once the crust is slightly golden, pour the lemon-raspberry filling over it. - Bake for 25-30 minutes until the filling is set and edges puff slightly. - Allow the bars to cool in the pan for 1 hour. - Refrigerate for at least 2 hours before slicing into squares. - For a lovely touch, dust with powdered sugar before serving. For the full recipe, check out the detailed steps above. Enjoy your delicious raspberry lemon bars! To create the ideal raspberry lemon bars, you must balance sweet and tangy. Here are some tips: - Use fresh raspberries. They give a bright flavor. - Fresh lemon juice adds a zesty kick. Bottled juice can taste flat. - When mixing, start with less sugar. You can always add more if needed. This way, your bars will have a perfect taste that pops. Serving is as important as baking. Here is how to present your bars: - Chill the bars before serving. They cut better and taste fresh. - Place them on a pretty plate. A white plate makes colors stand out. - Garnish with fresh raspberries and a mint sprig. This adds color and flair. These small touches make your dessert look special. Baking can be tricky. Avoid these common mistakes: - Make sure the crust is firm. Bake it until it’s lightly golden before adding the filling. This gives the bars a good base. - Do not rush the filling. Ensure it is set before removing from the oven. A runny filling can ruin the whole dish. By following these tips, you will have perfect raspberry lemon bars every time. For the full recipe, check above. {{image_2}} You can switch raspberries for other fruits. Strawberries add sweetness, while blueberries bring a mild flavor. Both options taste great in lemon bars. For a fun twist, try a mixed berry version. You can use any combination of your favorite berries. This change gives the bars a colorful look and a new taste. Want to make your lemon bars special? Adding herbs like mint or basil gives a fresh taste. Just chop the herbs finely and mix them in the lemon filling. You can also play with flavored extracts like vanilla or almond. These small changes can create a unique flavor profile. Experimenting can lead to a new favorite! If you need a gluten-free option, almond flour works well. Substitute it for regular flour in the crust. It gives a slightly nutty flavor and a nice texture. For those looking to make vegan versions, replace eggs with flax eggs. Mix one tablespoon of flaxseed meal with two and a half tablespoons of water, then let it sit. This simple swap keeps the bars moist and tasty. To keep your raspberry lemon bars fresh, store them in the fridge. Place them in an airtight container. If you don’t have one, use plastic wrap. This helps to keep the bars moist. I suggest separating layers with parchment paper. This prevents them from sticking together. For added freshness, dust the bars with powdered sugar just before serving. This keeps the sugar from melting into the bars. If you want to freeze your raspberry lemon bars, here’s how. First, let them cool completely. Next, cut the bars into squares. Wrap each square tightly in plastic wrap. Then, place them in a freezer-safe container. This protects them from freezer burn. To thaw, take out the bars and let them sit in the fridge overnight. You can also leave them at room temperature for a few hours. Raspberry lemon bars can last in the fridge for about one week. To check for freshness, look for any discoloration or an off smell. If they feel dry or hard, it’s best to toss them. Enjoy these treats while they’re fresh for the best flavor and texture! You can tell when the bars are done by checking a few signs. First, look for a slight puffiness around the edges. The center should be set but still a bit jiggly. You can also insert a toothpick. If it comes out clean or with just a few crumbs, the bars are ready. Bake them for about 25-30 minutes. Keep an eye on them to avoid overbaking. You can use bottled lemon juice, but fresh is best. Fresh juice has a bright taste that makes these bars shine. Bottled lemon juice can be more tart or flat, which might change the flavor. If you must use bottled, choose one that says “100% juice” for better taste. Fresh lemons also give you zest, which adds more flavor. To cut the bars neatly, chill them well after baking. Let them cool for about an hour, then refrigerate for at least 2 hours. Use a sharp knife to slice. For clean cuts, dip the knife in warm water and wipe it dry between cuts. This helps prevent sticking and gives you nice, even squares. Yes, you can make these lemon bars ahead of time. They stay fresh for about a week in the fridge. This makes them perfect for events or gatherings. Just bake them, cool, and refrigerate. Dust with powdered sugar before serving for a nice touch. You can easily impress your guests with these tasty treats! Check the Full Recipe for more details on making them. Raspberry lemon bars are a fun, tasty treat. We covered ingredients, tools, and steps to make them. You learned tips for balance and how to avoid common mistakes. Variations like berries and dietary adjustments add new flavors. Follow the storage tips to keep them fresh. With these insights, you can enjoy these bars anytime. Happy baking!

Raspberry Lemon Bars Easy and Refreshing Recipe

Are you craving a sweet treat that’s both tangy and refreshing? My easy Raspberry Lemon Bars are just what you

- 2 cups fusilli pasta - 1 cup sun-dried tomatoes, chopped - 1 cup cherry tomatoes, halved - 1/2 cup black olives, sliced - 1/2 cup feta cheese, crumbled - 1/4 cup fresh basil, chopped - 1/4 cup olive oil - 2 tablespoons balsamic vinegar - 1 teaspoon garlic powder - Salt and pepper to taste When you start this Sun-Dried Tomato Pasta Salad, the main ingredients shine bright. Fusilli pasta twists hold the dressing well, making each bite tasty. Sun-dried tomatoes bring a rich, tangy flavor. Cherry tomatoes add a fresh burst of sweetness. Next, the additional ingredients help balance the dish. Black olives give a salty bite. Feta cheese adds creaminess and a slight tang. Fresh basil introduces a light, herbal note. For the dressing, you’ll use olive oil for richness. Balsamic vinegar adds a lovely zing. Garlic powder enhances the overall flavor. Finally, season with salt and pepper to taste. This mix creates a salad packed with flavor and texture. For the full recipe, check the details above. Enjoy creating this delightful dish! - Bring salted water to a boil. This adds flavor to the pasta. - Cook fusilli according to package instructions. Aim for al dente. - Drain the pasta and let it cool. You want it to be room temperature. - In a large bowl, combine sun-dried tomatoes, cherry tomatoes, and olives. Their flavors blend well. - Next, add feta cheese and fresh basil. This gives the salad a nice creamy touch. - In a small bowl, whisk together olive oil, balsamic vinegar, garlic powder, salt, and pepper. Mix until smooth. - Pour the dressing over the salad and toss gently. This helps coat everything evenly. You can find the full recipe to make this dish delicious and fresh. Enjoy every bite! - Use sun-dried tomatoes packed in olive oil. This adds depth and richness. - Allow the salad to sit for flavor melding. Let it rest for at least 15 minutes. Letting the salad sit helps the flavors blend. You will taste the difference. The sun-dried tomatoes, olives, and feta all come together in a magical way. - Ensure pasta is al dente for ideal texture. This keeps the pasta firm and chewy. - Adjust salt and pepper to personal preference. Taste as you go for the best result. Cooking pasta just right is key. If it is too soft, the salad loses its crunch. - Serve chilled or at room temperature. This makes it refreshing, especially on warm days. - Perfect as a side dish or main course. You can pair it with grilled meats or serve it alone. This salad shines in any setting. It is colorful and full of flavor. For the full recipe, check out the details above! {{image_2}} You can switch up the pasta shape for fun. Try penne, rotini, or even whole wheat pasta. Each type brings a new twist to the dish. If you want a creamier texture, use mozzarella instead of feta cheese. Mozzarella adds a nice stretch and mild flavor that pairs well with sun-dried tomatoes. To boost nutrition, add fresh spinach or arugula. These greens give extra vitamins and a nice crunch. You can also toss in grilled chicken or chickpeas for protein. Both options make this salad heartier and more filling. If you want a zesty kick, try lemon vinaigrette instead of balsamic. The bright flavor of lemon enhances the salad. You can also mix in different herbs and spices. Consider using oregano, thyme, or even a pinch of chili flakes for heat. Experimenting with flavors keeps the dish exciting! For more delicious ideas, check out the Full Recipe for Sun-Dried Tomato Pasta Salad. To keep your Sun-Dried Tomato Pasta Salad fresh, store it in an airtight container in the refrigerator. This method helps lock in the flavors. It’s best to eat it within 3-4 days for optimal taste and texture. You can freeze this salad, but know that the texture may change. When you’re ready to enjoy it again, thaw it in the refrigerator before serving. This gentle method helps maintain its flavors. Before serving leftovers, refresh the salad with a drizzle of olive oil. This small step can bring back the vibrant taste and make it feel freshly made again. Enjoy it as a side dish or a light meal! For the full recipe, check out the instructions above. Yes, it's perfect for meal prep and tastes better the next day. The flavors blend, making each bite more delicious. I often make a big batch so I can enjoy it throughout the week. Just store it in the fridge in an airtight container. Consider adding grilled vegetables, nuts, or proteins like chicken or tuna. You can mix in roasted peppers for some heat or chickpeas for extra fiber. Feel free to get creative! Each of these options adds a unique twist to the salad. This recipe is already vegetarian-friendly. Just make sure that the cheese comes from a vegetarian source. You can also swap feta for a plant-based cheese to keep it vegan. The salad remains fresh and tasty either way. While you can use fresh tomatoes, the sun-dried variety enhances flavor significantly. Sun-dried tomatoes bring a deeper, richer taste that brightens the whole dish. For the best results, stick with the sun-dried ones when you can. This salad combines fresh flavors and easy steps for a perfect dish. You learned about the key ingredients, from fusilli pasta to sun-dried tomatoes and feta cheese. We also covered tips for enhancing taste and storage options. My final thought is that this salad is versatile. You can adjust it to fit your taste and needs. So, enjoy making this delightful dish at home and share it with others!

Sun-Dried Tomato Pasta Salad Flavorful and Fresh Dish

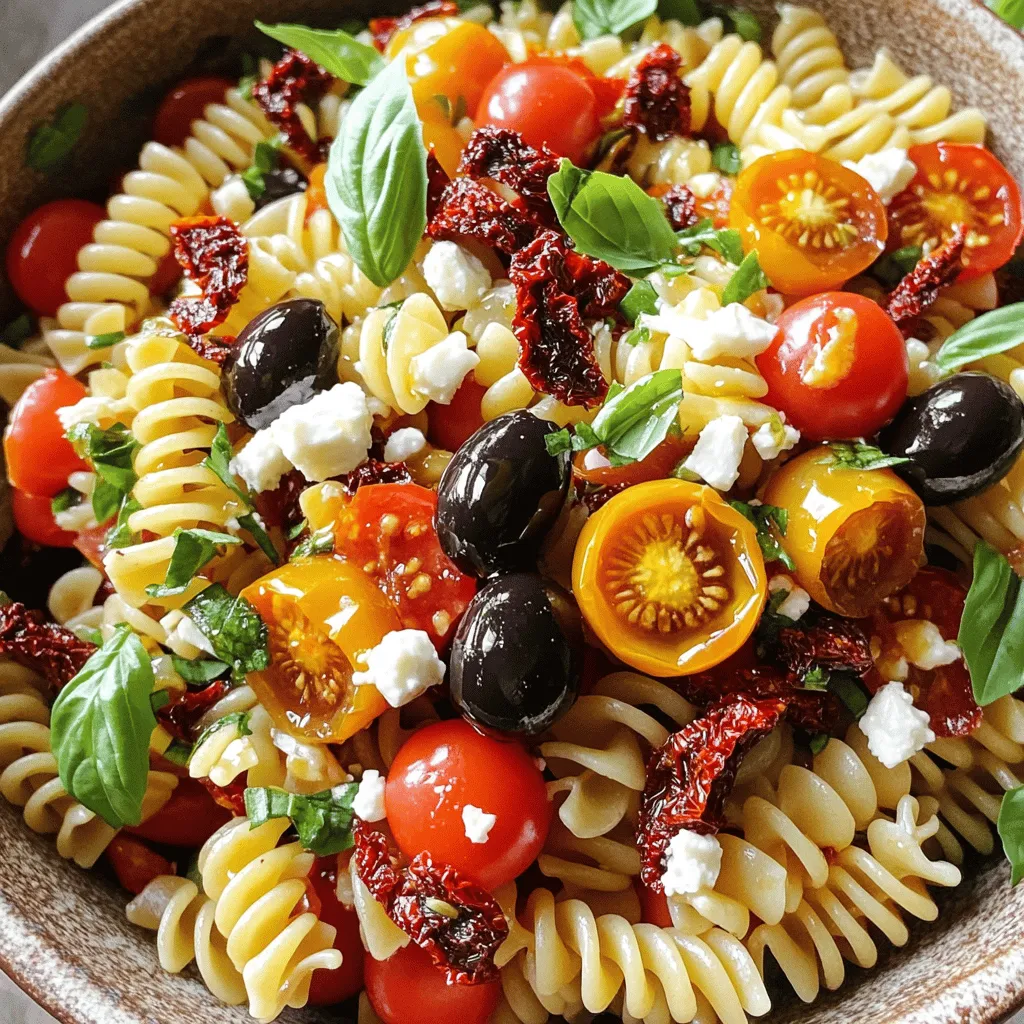
Looking for a fresh and flavorful meal? You’ve found it! This Sun-Dried Tomato Pasta Salad is easy to make and

- 1 cup graham cracker crumbs - 1/2 cup unsalted butter, melted - 1/4 cup brown sugar - 1 teaspoon ground ginger - 1 teaspoon ground cinnamon - 1/4 teaspoon ground cloves - 1/4 teaspoon salt - 2 (8 oz) packages cream cheese, softened - 1 cup granulated sugar - 2 large eggs - 1 teaspoon vanilla extract - 1/2 cup sour cream - 1/4 cup molasses You can swap graham cracker crumbs for cookie crumbs if you want a different taste. Try using vanilla wafers or digestive biscuits. If you're looking for a vegan option, use vegan cream cheese. Brands like Tofutti or Kite Hill work well. For a low-sugar option, consider using a sugar substitute like erythritol or stevia. These can help keep the sweetness without the calories. Remember, always check the conversion ratios when using substitutes to get the right flavor and texture. {{ingredient_image_1}} First, line an 8x8 inch baking pan with parchment paper. Make sure to leave some overhang. This helps you lift the bars out easily later. Next, preheat the oven to 325°F (160°C). This temperature is perfect for baking the cheesecake bars. In a medium bowl, mix together the graham cracker crumbs, melted butter, brown sugar, ginger, cinnamon, cloves, and salt. Stir well until combined. This mixture should be crumbly but hold together when pressed. Now, press it firmly into the bottom of the prepared baking pan. This creates a solid crust layer. Bake in the oven for 10 minutes. Once done, remove it and let it cool slightly. In a large mixing bowl, combine the softened cream cheese and granulated sugar. Use an electric mixer to beat them together for about 2-3 minutes. The mixture should be smooth and creamy. Next, add the eggs one at a time. Mix well after each addition. Then, add the vanilla extract, sour cream, and molasses. Mix until everything is just combined. Finally, pour this creamy filling over the cooled crust. Spread it evenly using a spatula. Bake in the preheated oven for 30-35 minutes. The edges should be set, but the center can have a slight jiggle. This means it's not overcooked. Once baked, remove the pan from the oven. Allow it to cool at room temperature for about an hour. After that, refrigerate for at least 3 hours. This helps the bars set completely. Once chilled, lift the cheesecake out of the pan using the parchment paper overhang. Cut into bars to serve. To prevent cracks in your cheesecake bars, ensure your cream cheese is at room temperature. Cold cream cheese can lead to lumps and cracks. Mix slowly when adding eggs. Overmixing can also cause cracks. Check for doneness by looking for a slight jiggle in the center. The edges should be set, but the middle should still move a bit. This means it will firm up as it cools. Top your bars with whipped cream for a rich treat. A sprinkle of ground cinnamon or nutmeg adds a nice touch. You can also pair these bars with coffee for a warm drink option. Mint adds a fresh flavor that works well too. Serve your gingerbread cheesecake bars on a colorful platter. You can garnish with a dollop of whipped cream and a sprinkle of cinnamon. For a festive look, add a small sprig of mint. This simple touch makes your dessert stand out at gatherings. Pro Tips Chill Thoroughly: Make sure to refrigerate the cheesecake bars for at least 3 hours to allow for proper setting and flavor development. Use Room Temperature Ingredients: Ensure your cream cheese and eggs are at room temperature for a smoother batter and better incorporation. Prevent Cracking: To minimize cracks, avoid overbaking and let the bars cool gradually at room temperature before chilling in the fridge. Experiment with Toppings: Feel free to get creative with toppings like caramel sauce, chocolate drizzle, or crushed gingersnaps for added flavor and texture. {{image_2}} You can spice up your gingerbread cheesecake bars in fun ways. Adding chocolate gives a rich twist. Melt dark or milk chocolate and swirl it into the cheesecake mix. This adds a nice depth of flavor. Another great option is caramel. Drizzle caramel sauce on top before serving. This sweet touch balances the warm spices. Citrus zest infusions are another fun choice. Lemon or orange zest brightens the flavor. Just a teaspoon mixed into the cream cheese makes a big difference. It adds a fresh taste that complements the spices well. If you need gluten-free options, swap out the graham cracker crumbs. You can use almond flour or crushed gluten-free cookies instead. This keeps the crust tasty and safe for those with gluten sensitivities. For a lighter version, choose low-fat cream cheese and sour cream. You can also cut down on sugar. Use a sugar substitute like stevia for a sweet taste without the extra calories. This way, you can enjoy the bars without the guilt. Holiday flavors can make these bars even more special. Try adding pumpkin spice to the filling. Just mix in a tablespoon of pumpkin puree and a bit of pumpkin spice. This gives a cozy, festive vibe. In summer, you can top your bars with fresh fruit. Berries like strawberries or blueberries work great. They add a burst of color and flavor. Just slice the fruit and arrange it on top before serving. To keep your Gingerbread Cheesecake Bars fresh, use an airtight container. This prevents moisture loss and keeps them tasty. If you have leftovers, let the bars cool completely first. Then, place them in the container and layer with parchment paper between bars to avoid sticking. You can refrigerate the bars for up to a week. For longer storage, freeze them. Wrap each bar tightly in plastic wrap. Then, place them in a freezer-safe bag or container. This way, they can last for up to three months in the freezer. For the best flavor, enjoy these bars within the first few days. After that, they remain good for up to a week in the fridge. Check for any signs of spoilage. If the bars smell off or have an unusual texture, it’s best to throw them away. When frozen, the bars maintain great quality for about three months. Just remember to thaw them in the fridge before serving. This keeps the texture nice and creamy. Enjoy your holiday treat all season long! Yes, you can make these bars ahead of time. They store well in the fridge. After they cool, cover them tightly with plastic wrap or foil. They will stay fresh for about five days. If you want to keep them longer, freeze the bars. Just wrap them in plastic and then in foil. They can last up to three months in the freezer. When you are ready to eat them, thaw them overnight in the fridge. To check if your bars are done baking, look for a few signs. The edges should be set, while the center has a slight jiggle. If the center is too firm, it can turn dry. You can also insert a toothpick in the center. If it comes out clean or with just a few crumbs, they are ready. Remember, the bars will continue to cook slightly after you take them out of the oven. For clean cuts, use a sharp knife. Wipe the knife with a damp cloth between cuts. This helps keep the edges neat. You can also chill the bars before cutting. Cold bars are firmer and easier to slice. For a nice presentation, cut them into even squares. Serve them on a pretty platter to impress your guests. A sprinkle of cinnamon or a dollop of whipped cream can add a festive touch. You learned about making delicious gingerbread cheesecake bars, from ingredients to storage. I shared tips for perfect texture and serving ideas to impress guests. With various flavor combinations and dietary modifications, there’s a version for everyone. Remember to store them properly to enjoy your tasty treats longer. Have fun baking and customizing these bars for any season or celebration!

Gingerbread Cheesecake Bars Irresistible Holiday Treat

Get ready to delight your taste buds this holiday season with my Gingerbread Cheesecake Bars! These bars blend the classic

To make a tasty Veggie Loaded Egg Roll in a Bowl, you need some key ingredients: - 1 tablespoon sesame oil - 2 cups coleslaw mix (shredded cabbage and carrots) - 1 red bell pepper, diced - 1 cup snap peas, trimmed and sliced - 1 cup mushrooms, sliced - 1/2 cup green onions, sliced - 3 cloves garlic, minced - 1 tablespoon fresh ginger, grated - 1/4 cup reduced-sodium soy sauce - 1 tablespoon rice vinegar - 1 teaspoon Sriracha (adjust to taste) These items create a crunchy and flavorful base for your dish. The sesame oil adds a nice nutty taste. The coleslaw mix gives you a fresh crunch. The bell pepper and snap peas add color and sweetness. If you want to switch things up, try these optional ingredients: - 2 large eggs, lightly beaten (optional) - Sesame seeds for garnish Adding eggs makes the dish more filling. The sesame seeds add a nice touch on top. Feel free to mix in other veggies you like, such as carrots or zucchini. You only need a few tools to make this dish: - Large skillet or wok - Cutting board - Knife - Small bowl for sauce mixing - Spatula Using a large skillet or wok helps cook the veggies evenly. A cutting board and knife make chopping easy. A small bowl is great for mixing your sauce without a mess. Get ready to enjoy a quick and tasty meal! {{ingredient_image_1}} Start by heating 1 tablespoon of sesame oil in a large skillet over medium-high heat. Once hot, add 3 minced garlic cloves and 1 tablespoon of grated ginger. Sauté these for about 30 seconds to bring out their scent. Next, toss in 2 cups of coleslaw mix, 1 diced red bell pepper, 1 cup of trimmed snap peas, and 1 cup of sliced mushrooms. Stir-fry these veggies for 5 to 7 minutes. You want them tender but still crisp. In a small bowl, mix 1/4 cup of reduced-sodium soy sauce, 1 tablespoon of rice vinegar, and 1 teaspoon of Sriracha. Pour this sauce over the veggies in the skillet and toss everything well. If you want to add eggs, push the veggies to one side. Pour in 2 lightly beaten eggs and scramble them until fully cooked. Then mix the eggs back into the veggies. Finally, remove the skillet from heat and stir in 1/2 cup of sliced green onions. Serve this mix hot and top it with sesame seeds. To get the best veggies, cut them into even sizes. This helps them cook at the same rate. Stir frequently to avoid burning. You want that nice crunch, so don’t overcook! Using a large skillet or wok helps. It gives veggies room to fry well. If you find them getting too soft, turn down the heat. If you decide to add eggs, do this after the veggies are cooked but before serving. Scramble the eggs in the same skillet for extra flavor. This way, they soak up the sauce and spices. If you prefer a vegetarian version, feel free to skip the eggs. The dish will still taste great without them! You can make your egg roll bowl your own. Start by adding different veggies. Try zucchini, broccoli, or even edamame. You can change the protein too. Use chicken, shrimp, or tofu for a boost. If you like spice, add more Sriracha or some red pepper flakes. You can also top it with avocado for creaminess. Stir-frying is quick and fun! Heat your skillet or wok well before adding oil. Use high heat to keep the veggies crisp. Cut all your ingredients before cooking. This way, you can add them quickly. Stir often to cook evenly. Don’t overcrowd the pan; this will steam your veggies instead of frying them. To add more flavor, try these tips. Use garlic powder or onion powder for depth. A splash of lime juice can brighten flavors. You can also sprinkle some five-spice powder for a warm taste. Fresh herbs like cilantro or basil can add freshness. Lastly, a drizzle of sesame oil at the end adds richness. Pro Tips Prep Your Veggies Ahead: Chop and prepare all your vegetables beforehand to make the cooking process smoother and faster. Customize Your Sauce: Adjust the Sriracha level based on your spice preference, or add additional sauces like hoisin for a different flavor profile. Use Fresh Ingredients: Opt for fresh vegetables and herbs for the best flavor and nutrition. Frozen vegetables can become mushy when cooked. Serve with Toppings: Enhance your dish with toppings like crushed peanuts, cilantro, or lime wedges for added texture and flavor. {{image_2}} To make this dish vegetarian, skip the eggs. You can add more veggies like zucchini or carrots for extra flavor. For a vegan option, use tofu or tempeh. Scramble the tofu in the pan instead of eggs. It gets great flavor from the soy sauce and spices. For a gluten-free dish, use tamari instead of soy sauce. Tamari gives the same taste without gluten. You can also swap the rice vinegar for apple cider vinegar if needed. Always check the labels on sauces to ensure they are gluten-free. To make this low-carb, skip the coleslaw mix and use spiralized zucchini. This adds great texture without many carbs. You can also cut down on the snap peas and mushrooms for fewer carbs. Use more leafy greens like spinach or kale instead. These options keep your meal light and healthy. To keep your Veggie Loaded Egg Roll in a Bowl fresh, store it in an airtight container. Let it cool to room temperature first. Do not leave it out for more than two hours. You can store it in the fridge for up to three days. Make sure to separate any toppings, like sesame seeds, to keep them crisp. When you’re ready to eat leftovers, reheat them in a skillet. Add a splash of water for moisture and heat over medium. Stir often until warm. You can also microwave it in a bowl. Cover it with a microwave-safe lid. Heat for 1-2 minutes, stirring halfway through. If you want to freeze your dish, do it right after cooking. Let it cool completely, then place it in a freezer-safe bag. Remove as much air as you can. It can last for up to three months. To thaw, put it in the fridge overnight. Reheat it in a skillet for the best texture. Yes, you can make this dish ahead of time. Cook the veggies and sauce, then store them in the fridge. Keep the eggs separate if you use them. When you’re ready to eat, just reheat the mix in a pan. You can use coconut aminos as a great soy sauce swap. It has a sweet taste and is lower in sodium. Another option is tamari, which is gluten-free. To ramp up the heat, add more Sriracha. You can also sprinkle in some crushed red pepper flakes. For extra spice, try adding chili oil or fresh chopped jalapeños. Yes! Veggie Loaded Egg Roll in a Bowl is perfect for meal prep. Cook a large batch and divide it into containers. It will keep well in the fridge for several days. This dish is packed with veggies like cabbage, bell peppers, and snap peas. These provide fiber, vitamins, and minerals. Eggs add protein, which is great for muscle health. Plus, using less oil makes it a lighter option. This article covered making a Veggie Loaded Egg Roll in a Bowl. You learned about essential ingredients and some tasty variations. We also explored helpful cooking tips and storage methods. Creating this dish is fun, healthy, and easy. With the right ingredients and prep, you can enjoy a colorful meal. Feel free to customize it to fit your taste. Try it out and enjoy your cooking adventure!

Veggie Loaded Egg Roll in a Bowl Tasty Quick Meal

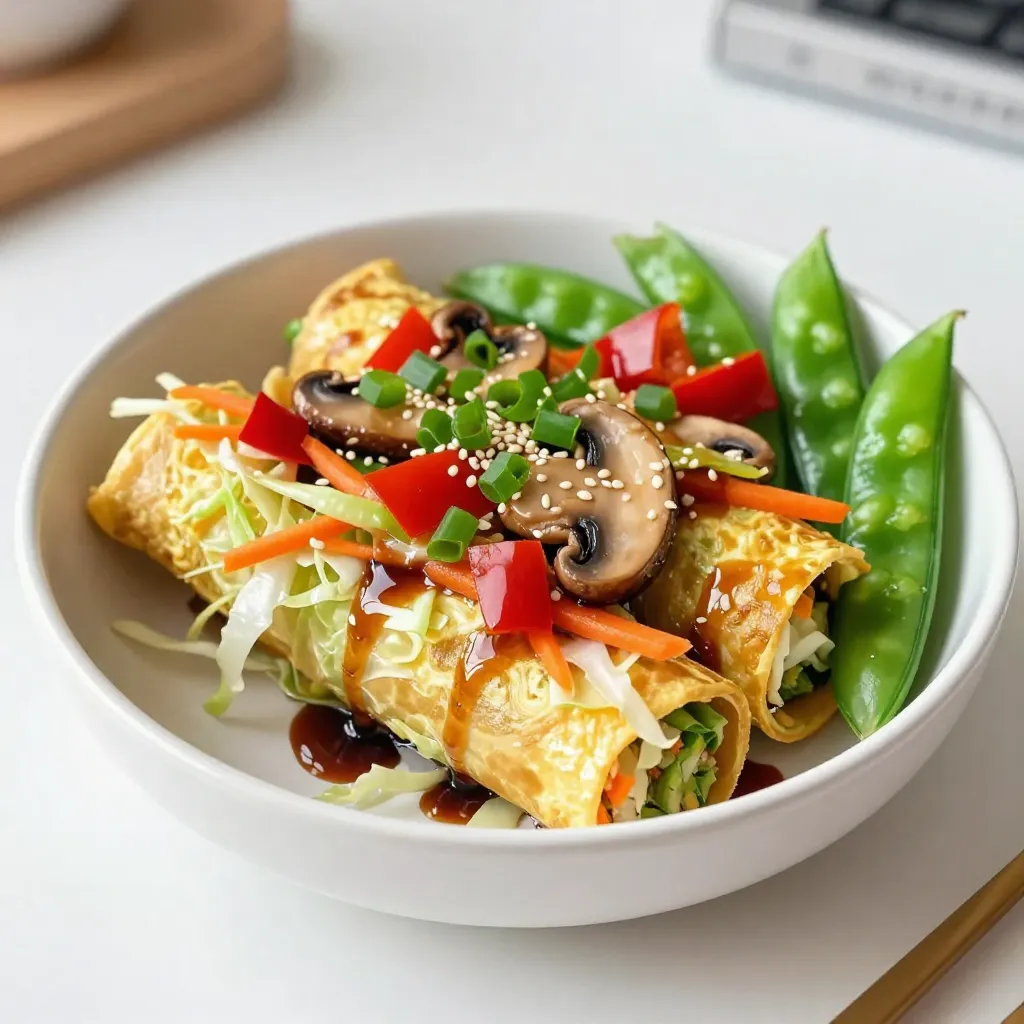
Looking for a quick meal that’s both tasty and packed with veggies? The Veggie Loaded Egg Roll in a Bowl

To make tasty Tzatziki Chicken Skewers, you need a few key items: - 1 lb chicken breast, cut into 1-inch cubes - 2 tablespoons olive oil - 2 teaspoons dried oregano - 1 teaspoon garlic powder - Salt and pepper to taste These ingredients create a juicy chicken base. The chicken breast is lean and cooks well. The olive oil adds moisture and flavor. Oregano and garlic powder give the chicken a lovely taste. The marinade is important for flavor. You mix olive oil, oregano, garlic powder, salt, and pepper. This blend brings out the chicken's natural taste. Letting the chicken marinate for at least 30 minutes is key. It allows the flavors to soak in and makes the chicken more tender. The tzatziki sauce makes this dish shine. You will need: - 1 cucumber, shredded - 1 cup Greek yogurt - 2 tablespoons lemon juice - 1 tablespoon fresh dill, chopped - 1 clove garlic, minced - Salt to taste The cucumber adds a cool crunch. Greek yogurt gives the sauce its creamy texture. The lemon juice adds a zesty kick, while dill and garlic enhance the flavor. Together, they create a fresh and tangy dip. Serve the sauce with the skewers for the best taste. For the full recipe, check out the details above. Start by mixing olive oil, oregano, garlic powder, salt, and pepper in a bowl. This mix is your marinade. Cut the chicken breast into 1-inch cubes. Add the chicken to the marinade. Make sure each piece is well coated. Cover the bowl and let it sit in the fridge for at least 30 minutes. This step makes the chicken juicy and flavorful. While the chicken marinates, it’s time to make the tzatziki sauce. In a separate bowl, mix shredded cucumber and Greek yogurt. Add lemon juice, chopped dill, and minced garlic. Stir well to combine. Season with salt to taste. This sauce is cool and refreshing. It pairs perfectly with the warm chicken skewers. Set it aside while you grill. Preheat your grill or grill pan over medium-high heat. Take the marinated chicken pieces and thread them onto skewers. Leave some space between each piece for even cooking. Grill the skewers for about 5 to 7 minutes on each side. Cook until the chicken is no longer pink inside. You want a nice char on the outside. Once done, let them rest for a couple of minutes. Serve warm with the tzatziki sauce, pita bread, and fresh veggies. Enjoy your tasty creation! For the complete recipe, check the Full Recipe. Marinating chicken is key for flavor. Use a mix of olive oil, oregano, and garlic. This blend adds depth. Make sure to coat each piece well. I recommend marinating for at least 30 minutes. If you have more time, let it sit for a few hours. The longer it marinates, the better it tastes. Always place the chicken in the fridge while marinating. This keeps it safe and fresh. Grilling skewers can be easy with the right steps. First, preheat your grill to medium-high heat. This helps cook the chicken evenly. Thread the marinated chicken onto skewers. Leave space between each piece for air flow. Grill for about 5-7 minutes on each side. Look for a nice char and ensure it reaches 165°F inside. Let the skewers rest for a few minutes after grilling. This makes them juicy and tender. Tzatziki sauce is your secret weapon. Start with Greek yogurt, cucumber, and garlic. Mix in lemon juice for brightness. Taste as you go! If you want it stronger, add more garlic. For a bit of heat, a pinch of red pepper flakes works great. If you prefer a creamier texture, mix in more yogurt. Remember, this sauce should complement your chicken. So, adjust it to fit your taste. You can find the full recipe for Tzatziki Chicken Skewers to explore more flavors. {{image_2}} You can use many meats for skewers. Chicken is great, but beef, lamb, and pork also work well. For beef, try sirloin or tenderloin. For lamb, use leg or shoulder cuts. Pork tenderloin is juicy and easy to grill. Each meat brings a unique flavor to your skewers. If you want a vegetarian dish, consider using tofu or tempeh. These proteins soak up flavors well. You can also use mushrooms or zucchini for a tasty twist. Just cut them into bite-sized pieces. Marinate them the same way you would chicken for great flavor. You can change up the tzatziki sauce to fit your taste. For a spicy kick, add some cayenne or red pepper flakes. If you love herbs, try mint or parsley. For a tangy twist, mix in some feta cheese. You can even swap the cucumber for roasted red peppers for a different flavor. For the full recipe, check the earlier section. Store leftover chicken skewers in an airtight container. Keep them in the fridge for up to three days. If you want them to last longer, freeze them. They can stay frozen for two to three months. When ready to eat, just thaw them overnight in the fridge. To keep tzatziki sauce fresh, place it in a sealed container. Store it in the fridge for about four days. Avoid freezing tzatziki, as it may change texture. If you see excess water, simply drain it before serving. When reheating chicken skewers, use an oven for the best taste. Preheat it to 350°F. Place the skewers on a baking sheet. Heat for about 10-15 minutes until warm. You can also use a microwave, but it may make the chicken less crispy. Always serve your skewers with fresh tzatziki sauce for a delicious meal. For the full recipe, check the earlier sections. Yes, you can use other types of yogurt. I recommend using plain yogurt for a similar taste. Greek yogurt works best due to its thick texture. You can also try non-dairy yogurts if you prefer. Just ensure they are plain and unsweetened. This keeps the tzatziki fresh and tangy. You can marinate the chicken for at least 30 minutes. However, for more flavor, I suggest marinating it for up to 2 hours. If you have time, marinating overnight is great too. Just store it in the fridge to keep it fresh. This extra time lets the chicken soak up all the tasty spices. Serve the skewers with warm pita bread and fresh veggies. I love adding sliced cucumbers and tomatoes for a crunchy bite. You can also serve them with a side salad for extra freshness. Don't forget the tzatziki sauce; it adds a cool, creamy touch. For a fun twist, try serving them on a platter for sharing. Check out the Full Recipe for more ideas! Tzatziki chicken skewers are a tasty and fun dish. We covered the key ingredients, from the chicken to the tzatziki sauce. You learned how to marinate, prepare, and grill your skewers for the best taste. We shared tips for perfecting each step and explored tasty variations to try. Finally, we discussed how to store leftovers and keep them fresh. Enjoy making these skewers at home, and experiment with your flavors! You will impress your family and friends with this easy meal.

Tzatziki Chicken Skewers Savory and Simple Recipe

Looking for a quick and tasty meal? Tzatziki Chicken Skewers are your go-to dish! This simple recipe combines juicy chicken

To make No-Bake Cookie Dough Bites, you need simple and tasty ingredients. Here’s what you’ll need: - 1 cup almond flour - 1/2 cup creamy almond butter (or peanut butter) - 1/4 cup maple syrup - 1 teaspoon vanilla extract - 1/4 teaspoon salt - 1/2 cup mini chocolate chips - 2 tablespoons chia seeds (optional for added crunch) Each ingredient plays a key role. Almond flour gives a nice base. Almond butter adds creaminess. Maple syrup brings sweetness. Vanilla enhances flavor. Salt balances all the tastes. Chocolate chips add joy in every bite. You can jazz up your bites with some fun extras. Here are a few ideas: - Dried fruits like cranberries or raisins - Nuts such as chopped walnuts or pecans - Coconut flakes for a tropical twist - Protein powder for a health boost Adding these can change the style and taste. Mix and match to find your favorite combo! If you have allergies or dietary needs, you can swap ingredients easily. Instead of almond flour, use oat flour or coconut flour. If you want a nut-free option, try sunflower seed butter. For a vegan version, ensure your chocolate chips are dairy-free. These swaps keep the treats safe and delicious for everyone. To start, gather your ingredients. You will need almond flour, almond butter, maple syrup, vanilla extract, salt, mini chocolate chips, and chia seeds if you want some crunch. In a large bowl, mix the almond flour and almond butter first. Then, add the maple syrup, vanilla extract, and salt. Stir well until everything blends into a smooth dough. It should feel soft and slightly sticky. Now, fold in the mini chocolate chips and chia seeds. Make sure they spread evenly throughout the dough. Once your dough is ready, it's time to shape it. Take small portions of the mixture. Use your hands to roll them into balls, about one inch in size. Place these balls on a baking sheet lined with parchment paper. This step is fun and lets you see how many bites you can make. Aim for uniform balls for even chilling later. After shaping, it's chill time! Place the baking sheet in the fridge for at least 30 minutes. This helps the bites firm up and makes them easier to eat. Once chilled, enjoy them right away or store any extras in an airtight container. They will stay fresh in the fridge for about a week. These no-bake cookie dough bites are a tasty snack anytime. For the full recipe, check the previous section. When making no-bake cookie dough bites, avoid using dry almond flour. It can make your bites crumbly. Use fresh, creamy almond butter. If it's too thick, your bites won't hold together well. Don't skip the chilling step. If you skip it, your bites may fall apart when you eat them. Lastly, don't overmix the dough. Mixing too much can make the bites dense. You can change these cookie dough bites easily. Swap almond butter for peanut butter or sun butter for a nut-free option. Add different mix-ins like dried fruit, nuts, or even protein powder. Want a flavor boost? Try adding cocoa powder or spices like cinnamon. You can also roll them in crushed nuts or coconut for added texture. To make the process smooth, gather a few handy tools. A large mixing bowl helps you combine all ingredients. A spatula is great for scraping down the sides. Use a cookie scoop for even-sized bites. This keeps them uniform and makes rolling easier. Finally, have parchment paper ready for your baking sheet. It prevents sticking and makes cleanup a breeze. For the full recipe, check out the detailed instructions above. {{image_2}} You can mix up the flavors in your no-bake cookie dough bites. Try adding different nut butters, like cashew or sunflower seed butter. Each nut butter gives a unique taste. You can also swap in different sweeteners, like honey or agave syrup, for a new twist. For a fun chocolate flavor, add cocoa powder to the mix. You could even use white chocolate chips or butterscotch chips instead of mini chocolate chips. If you have allergies or follow a special diet, you can still enjoy these bites. For a nut-free option, use sunflower seed butter instead of almond butter. You can replace almond flour with oat flour or coconut flour. Always check for gluten-free versions of these flours if needed. If you want to avoid added sugars, try using mashed bananas or unsweetened applesauce in place of maple syrup. Make your cookie dough bites festive for any holiday. During autumn, add pumpkin spice or chopped nuts for a fall feel. For winter holidays, mix in crushed peppermint or cinnamon. You can even roll the bites in crushed candy canes for a fun touch. In summer, add dried fruits like cranberries or apricots for a fresh twist. Each season brings a chance to create something special. After you make your no-bake cookie dough bites, let them cool. Place them in an airtight container. This keeps them fresh and tasty. You can store these bites in the fridge for up to a week. If you have leftovers, this method works great. Just make sure the lid is on tight to avoid drying out. If you want to keep your cookie dough bites for longer, freezing is a smart choice. To freeze, place the bites on a baking sheet first. Make sure they are not touching. Freeze them for about an hour. After they are firm, transfer them to a freezer bag. Label the bag with the date. These bites can last for up to three months in the freezer. When you want to eat them, just take out a few and let them thaw in the fridge. Fresh no-bake cookie dough bites taste amazing. They are soft and creamy right after chilling. However, stored bites still taste good. They may be a bit firmer but still delicious. You can eat them cold or let them sit at room temperature for a bit. Both ways are enjoyable. For the best taste, try to eat them within a week of making them. For the full recipe, visit the link provided. Yes, you can make these bites vegan! Simply swap almond butter for a nut-free option, like sunflower seed butter. Use maple syrup, which is plant-based, and ensure your chocolate chips are dairy-free. If you need a substitute for almond flour, try oat flour or coconut flour. Both options work well. Just note that coconut flour absorbs more moisture, so you may need to adjust the liquid in your recipe. These cookie dough bites can last up to a week in the fridge. Store them in an airtight container to keep them fresh. If you want to save them longer, freeze them! To add protein, mix in protein powder or some nut butter. You can also add chia seeds or hemp seeds for extra nutrition. This makes your snack not just tasty but also filling! For the Full Recipe, check out the complete details to make these delicious bites. You now have all the tools to make delicious No-Bake Cookie Dough Bites. From essential ingredients to step-by-step instructions, I've shared tips to avoid mistakes and customize your treats. Knowing how to store them properly ensures they stay fresh and tasty. These bites are fun to make and perfect for sharing. So grab your tools, get creative with flavors, and enjoy a sweet treat anytime!

No-Bake Cookie Dough Bites Quick and Tasty Treats

Craving something sweet but short on time? No-bake cookie dough bites are your answer! These quick and tasty treats will

- 4 medium-sized sweet potatoes - 1 can black beans, drained and rinsed - 1 cup corn kernels (fresh or frozen) - 1 red bell pepper, diced - 1 teaspoon cumin - 1 teaspoon smoked paprika - 1 avocado, diced - 1/4 cup cilantro, chopped - Juice of 1 lime - Salt and pepper to taste - 1/2 cup Greek yogurt or sour cream for topping - Optional: Sliced jalapeños for heat You can add more flavors to your stuffed sweet potatoes. Try adding cheese for creaminess. A sprinkle of feta or a handful of shredded cheddar works well. If you want a bit of spice, use sliced jalapeños. They add a nice kick to the dish. You could also toss in some cooked quinoa for extra protein and texture. Always choose fresh ingredients. Fresh sweet potatoes should feel firm and have smooth skin. Check for any soft spots or blemishes. For the best taste, use ripe avocados. They should yield slightly when you press them. Select canned beans that have no added sugar or preservatives. When possible, use organic corn and peppers. Fresh or frozen corn is a great option. Quality ingredients make your stuffed sweet potatoes shine. For the full recipe, refer to the above list. First, preheat your oven to 425°F (220°C). Rinse and scrub the sweet potatoes well. This step is key to remove dirt. Next, pierce each sweet potato several times with a fork. This helps steam escape while baking. Place the sweet potatoes on a baking sheet. Bake them for about 45 to 60 minutes. They are done when a knife goes in easily. While the sweet potatoes bake, prepare the stuffing. In a large bowl, mix the black beans, corn, and diced red bell pepper. Add in the cumin and smoked paprika for flavor. Squeeze in the juice of one lime. This brightens the dish. Season with salt and pepper to taste. Mix everything well. Toss in half of the chopped cilantro for a fresh touch. When the sweet potatoes are tender, take them out of the oven. Let them cool for a few minutes. Cut each sweet potato in half lengthwise. Use a fork to fluff the insides gently. This creates space for the stuffing. Spoon the bean and corn mixture into each half. Fill them generously. Top each one with diced avocado and a scoop of Greek yogurt or sour cream. Finish with a sprinkle of the remaining cilantro. If you like heat, add sliced jalapeños. Your stuffed sweet potatoes are ready to enjoy! You can find the Full Recipe for more details. To bake sweet potatoes just right, choose medium-sized ones. They cook evenly and are easier to handle. Always scrub them clean to remove dirt. This helps the skin stay nice and tasty. Pierce each potato several times with a fork. This lets steam escape and prevents them from bursting. Bake them at 425°F (220°C) for 45-60 minutes. Check them with a knife; if it slides in easily, they are done. When it comes to flavor, get creative! Add spices like cayenne for heat or chili powder for depth. You can also mix in garlic powder for extra taste. Fresh herbs like basil or parsley can make your dish pop. For a zesty kick, try lime or lemon juice. A sprinkle of cheese on top can melt beautifully. Don’t be shy about experimenting with toppings to find your favorite combo! Using the right tools makes cooking easier. A sharp knife helps cut the sweet potatoes smoothly. Use a fork to fluff the insides without making a mess. A baking sheet is great for roasting them. If you have a mixing bowl, it’s perfect for combining your stuffing. Don’t forget measuring cups for accuracy! For a fun twist, a spiralizer can create veggie noodles to mix in. You can check out the Full Recipe for more tips! {{image_2}} You can get creative with vegetarian options for your stuffed sweet potatoes. Here are some ideas: - Chickpeas and Spinach: Mix chickpeas with sautéed spinach and garlic. - Quinoa and Feta: Combine cooked quinoa with crumbled feta and cherry tomatoes. - Mushrooms and Swiss Cheese: Sauté mushrooms with onions, then top with Swiss cheese. These combinations add flavor and texture to your meal. If you want to add meat, consider these non-vegetarian fillings: - Ground Turkey or Chicken: Sauté with taco seasoning for a zesty kick. - Shredded BBQ Chicken: Use cooked chicken mixed with your favorite BBQ sauce. - Bacon and Cheese: Fry up some bacon, crumble it, and mix with cheddar cheese. These options make your stuffed sweet potatoes heartier and more filling. For gluten-free and vegan choices, try these alternatives: - Lentils and Vegetables: Cook lentils with diced veggies like zucchini and carrots. - Cauliflower Rice: Use riced cauliflower mixed with spices and herbs. - Nut and Seed Mix: Blend nuts and seeds for a crunchy, protein-rich filling. These variations keep your meal healthy and accessible for all diets. After you enjoy your stuffed sweet potatoes, store any leftovers in the fridge. Place them in an airtight container. Be sure to do this within two hours of cooking. Leftovers can last about 3 to 5 days in the fridge. If you want to keep them fresh longer, consider freezing them. To reheat stuffed sweet potatoes, use the oven for the best results. Preheat your oven to 350°F (175°C). Place the stuffed sweet potatoes on a baking sheet. Cover them with foil to keep them moist. Heat for about 15 to 20 minutes, or until warm. You can also use a microwave, but this may make the potatoes softer. Yes, you can freeze stuffed sweet potatoes! Wrap each one tightly in plastic wrap. Then, place them in a freezer-safe bag or container. They can last up to 3 months in the freezer. When ready to eat, thaw them in the fridge overnight and reheat as mentioned above. This method keeps the flavors intact. You can change the filling to suit your taste. Some options include: - Cooked quinoa for added protein - Shredded chicken or turkey for a meat option - Spinach or kale for extra greens - Feta or goat cheese for a creamy touch Mix and match these ingredients to create your own unique flavor. Yes, you can prepare stuffed sweet potatoes ahead of time. Bake the sweet potatoes and prepare the filling. Store them separately in the fridge. When you're ready to eat, just stuff the potatoes and bake them again until warm. This makes meal prep easy and quick. Stuffed sweet potatoes pair well with many sides. Here are a few ideas: - A simple green salad for freshness - Grilled vegetables for added flavor - Rice or quinoa for extra carbs You can also serve them with salsa or hot sauce for a kick. Sweet potatoes are done when they are soft. You can check by poking them with a fork or knife. If it goes in easily, they are ready. The skin may also look a bit wrinkled. This means they are sweet and tender, perfect for stuffing. Stuffed sweet potatoes are versatile and tasty. We covered the ingredients, from main staples to optional flavors. I shared detailed steps for preparing, baking, and enhancing these dishes. Tips ensured perfect results, and I provided variations for everyone, including gluten-free options. You can also store and reheat leftovers with ease. Now, you are ready to create your own stuffed sweet potatoes. Enjoy the mix of flavors and textures. They are sure to please at any meal.

Stuffed Sweet Potatoes Flavorful and Healthy Recipe

Are you ready to enjoy a meal that’s both tasty and good for you? Stuffed sweet potatoes are the perfect

Older posts
Newer posts
← Previous Page1 … Page59 Page60 Page61 … Page84 Next →

dsad

© 2026 juliesdish • Built with GeneratePress

Our Policies

  • Copyright Policy
  • Cookie Policy
  • GDPR Policy
  • Privacy Policy
  • Disclaimer
  • Terms Of Use

More Information

  • Home
  • About
  • Contact
  • Appetizers
  • Dessert
  • Dinner
  • Drinks
©2026, juliesdish About Back To Top