Skip to content
DisclaimerTerms Of UseGDPR PolicyCookie Policy

juliesdish

  • Home
  • Drinks
  • Appetizers
  • Dinner
  • Dessert
  • About
  • Contact
  • Privacy Policy
DisclaimerTerms Of UseGDPR PolicyCookie Policy

NO-ING-IMG

For the perfect pumpkin spice candied almonds, you need a few key ingredients. Here’s the detailed list: - Raw Almonds: 2 cups. These nuts provide a great crunch and flavor. - Granulated Sugar: 1 cup. This will sweeten the almonds and help create a candy coating. - Pumpkin Spice Mix: 1 tablespoon. You can use a mix or make your own with cinnamon, nutmeg, ginger, and cloves. - Other Essential Ingredients: - Water: 1/2 cup. This helps dissolve the sugar for the syrup. - Salt: 1/2 teaspoon. A little salt enhances the sweet flavor. - Vanilla Extract: 1 teaspoon. This adds a lovely flavor depth. - Vegetable Oil: 1 tablespoon. This prevents sticking and helps with coating. These ingredients create a delightful snack that's perfect for fall. If you want to try making these tasty treats, check out the Full Recipe. Preheating the Oven Start by preheating your oven to 350°F (175°C). This step is key for getting that perfect crunch. While the oven heats, line a baking sheet with parchment paper. This will help the almonds not stick. Making the Pumpkin Spice Syrup In a large saucepan, mix the granulated sugar and water. Heat this over medium heat. Stir it until the sugar fully dissolves. Then, add the pumpkin spice mix, salt, and vanilla extract. Stir well to mix all the flavors together. Coating the Almonds Next, add the raw almonds to the saucepan. Stir them gently to coat them in the syrup. Keep cooking for about 5-7 minutes. Stir constantly until you see the syrup thickening and starting to crystallize on the almonds. This is where the magic happens! When it looks good, remove the pan from heat. Stir in the vegetable oil to help keep the almonds from sticking. Baking Instructions Now, pour the coated almonds onto the prepared baking sheet. Spread them out evenly with a spatula. Bake in the preheated oven for 10-15 minutes. Remember to stir them once halfway through baking. You'll know they're done when they turn golden and smell amazing. Cooling Process and Tips Once baked, let the almonds cool completely on the baking sheet. They will become crispy as they cool. If you notice any clumps, break them apart gently. Store the cooled almonds in an airtight container to keep them fresh. For the full recipe, check out [Full Recipe]. Ensuring Even Coating To coat the almonds evenly, stir them well in the syrup. Use a large spoon to mix. Make sure every almond gets a good layer of syrup. This helps the spices stick nicely. Avoiding Clumping To avoid clumping, spread the almonds on the baking sheet quickly. Use a spatula to separate them. If they stick together, they won’t bake evenly. Stir them once halfway through baking to break up any clumps. Best Practices for Storage Store your pumpkin spice candied almonds in an airtight container. This keeps them fresh and crunchy. A glass jar or a sealed plastic bag works well. Keep them in a cool, dry place away from heat. How to Maintain Crispiness To keep the almonds crispy, do not store them in the fridge. The moisture can make them soggy. If they lose crunch, you can bake them briefly at 350°F. Just a few minutes will bring back that delightful crunch. {{image_2}} You can change the flavors of your pumpkin spice candied almonds by using different spices. Try adding nutmeg or allspice for a new twist. If you like heat, a pinch of cayenne works great. You can even skip pumpkin spice and use your favorite cinnamon blend. The key is to keep it fun and tasty. You can also mix in extra ingredients for more flavor. Consider adding a splash of maple syrup for a sweet touch. You might want to toss in some dried cranberries or chocolate chips after baking. These add color and taste, making your almonds even better. These almonds are great for many occasions. Serve them as a snack during game nights or movie marathons. They are perfect for fall gatherings and holiday parties. You can even pack them in bags as gifts. They look cute and taste amazing. You can also use these almonds in different recipes. Try adding them to salad for some crunch. They can top off oatmeal or yogurt for breakfast. You can create a unique trail mix by mixing them with dried fruits and other nuts. The options are endless, so get creative! Almonds are packed with nutrients. A 1-ounce serving gives you about 6 grams of protein and 3.5 grams of fiber. They are high in vitamin E, magnesium, and healthy fats. These nutrients help keep your heart healthy and support your brain. Eating almonds can lower cholesterol levels and reduce the risk of heart disease. Pumpkin spice, made from warm spices, brings extra health perks. Cinnamon helps control blood sugar levels, while nutmeg can aid digestion. Ginger has anti-inflammatory properties, and cloves may improve oral health. Together, these spices elevate the flavor and add nutrition to your candied almonds. A serving of pumpkin spice candied almonds is about 1 ounce. This gives you a good snack without overdoing it. Each serving has around 150 calories. Keep in mind the sugar content. The recipe uses 1 cup of sugar for 2 cups of almonds. This results in about 24 grams of sugar per serving. While this adds sweetness, it is wise to enjoy these almonds in moderation. How to Make Pumpkin Spice Candied Almonds Vegan? You can easily make this recipe vegan. Just swap the granulated sugar for coconut sugar or another vegan-friendly sweetener. Make sure your pumpkin spice mix does not contain any animal products. The rest of the recipe stays the same! Can I Use Other Nuts Instead of Almonds? Yes, you can! Cashews, pecans, or walnuts work well too. Each nut will give a unique flavor and texture. Just keep an eye on cooking times, as different nuts can cook at different rates. Where to Buy Pre-made Pumpkin Spice Candied Almonds? You can find pre-made versions at many stores. Check your local grocery store or specialty shops. Online retailers also offer various options. Just make sure to read the labels for ingredients. How Long Will They Last in Storage? When stored in an airtight container, these almonds can last for about two weeks. Keep them in a cool, dry place. If you want them to last longer, you can freeze them for up to three months. What to Do if the Almonds Aren't Crisp? If your almonds aren’t crisp, they may need more baking time. Make sure to bake them until golden brown. Let them cool completely on the pan, as they will crisp up as they cool. Best Practices for Even Flavored Almonds To ensure even flavor, stir the almonds well while cooking. Coat them fully with the syrup. Stir them again while baking to help with even cooking and flavor distribution. You now know how to make tasty pumpkin spice candied almonds. We discussed the key ingredients, step-by-step instructions, and helpful tips. You can use variations to customize your recipe and serve these nuts in fun ways. Remember, proper storage keeps them crispy for longer. Enjoy trying out different flavors and sharing them with friends. Getting it right takes practice, so don’t worry if it’s not perfect at first. Happy snacking!

Pumpkin Spice Candied Almonds Tasty Fall Delight

Are you ready to savor the taste of fall? Pumpkin Spice Candied Almonds are the perfect snack to celebrate the

- 2 cups pecan halves - 1/2 cup pure maple syrup - 1/4 cup brown sugar - 1/2 teaspoon ground cinnamon - 1/4 teaspoon salt - 1/4 teaspoon vanilla extract - 1 tablespoon unsalted butter Pecans are not just tasty; they offer health perks. They are rich in healthy fats, fiber, and protein. These nuts help lower cholesterol and support heart health. Pecans also provide vitamins like E and B. This makes them good for your skin and overall wellness. Pure maple syrup has its own benefits. It contains antioxidants that fight free radicals. Maple syrup can also help with digestion due to its prebiotic properties. It has a lower glycemic index than sugar, making it a better choice for energy. When choosing pecans, look for ones that are plump and shiny. Avoid any that look dull or have dark spots. Fresh pecans should smell sweet and nutty. For maple syrup, always buy pure syrup. Check the label to avoid imitation syrup, which has added sugars and flavors. Pure maple syrup has a rich taste and real health benefits. First, I preheat my oven to 350°F (175°C). This is the perfect temperature for roasting. Next, I line a baking sheet with parchment paper. This step keeps the pecans from sticking. My next step is to make the maple glaze. I grab a medium saucepan and place it on medium heat. I add the maple syrup, brown sugar, salt, cinnamon, and butter. I stir this mixture for about 2-3 minutes. I keep stirring until it bubbles and the sugar melts. Once it’s ready, I take the saucepan off the heat. Then, I mix in the vanilla extract. This adds a lovely depth to the flavor. Now, it’s time to coat the pecans. I add the pecan halves directly to the saucepan. I stir them well to coat each nut with the maple mixture. I want to make sure every pecan gets that sweet glaze. A tip here: use a spatula to help mix. This tool makes it easy to cover each pecan evenly. Next, I spread the coated pecans on the baking sheet. I make sure they are in a single layer. This helps them bake evenly. I place the sheet in the preheated oven. I set a timer for 15-20 minutes. Halfway through, I stir the pecans. This ensures that they caramelize evenly and do not burn. I keep an eye on them as they bake. Once they turn golden brown and smell amazing, I take them out. I let the pecans cool on the baking sheet. As they cool, the glaze hardens. After they cool, I break apart any clusters. These maple glazed pecans are now ready to enjoy! For the full recipe, check the earlier section. To avoid burning your pecans, keep a close watch on them. Set a timer for 15 minutes, but check them after 10 minutes. The key is to stir halfway through baking. This helps them cook evenly, so no side gets too dark. Want to spice things up? Try adding a pinch of nutmeg or ginger. These spices give a warm flavor that pairs well with maple. For a fun twist, you can add a splash of almond extract instead of vanilla. Garnish your pecans with a sprinkle of sea salt or even some chopped herbs for a fresh touch. Serve your maple glazed pecans in a bright bowl to make them pop. You can also place them on a pretty platter with dried fruit. They are great snacks on their own or as toppings for salads and desserts. Pair them with cheese or yogurt for a tasty combo! {{image_2}} You can spice up your maple glazed pecans easily. Try adding nutmeg or cayenne for a kick. Nutmeg gives warmth, while cayenne adds heat. You can also change the sweetness. Use honey or agave syrup instead of maple syrup. This gives a different flavor and sweetness level. For a fun twist, add sea salt or parmesan cheese. The salt enhances the sweetness of the maple. Parmesan adds a nice, rich flavor. You can even mix in crispy bacon for a sweet and savory treat. This combo works well for snacks or toppings. If you want a vegan option, substitute butter with coconut oil. This keeps the rich taste while staying plant-based. Make sure all ingredients are vegan. This way, everyone can enjoy maple glazed pecans. You can find many plant-based options easily in stores. For the full recipe, check out the detailed instructions and tips to perfect your snack! Store your maple glazed pecans in an airtight container. Glass jars or plastic containers work well. Make sure the lid is tight to keep air out. Place the container in a cool, dark place like a pantry or cupboard. Avoid heat and sunlight, which can spoil their taste. At room temperature, these pecans stay fresh for about two weeks. If you want to keep them longer, consider freezing them. In the freezer, they can last up to six months. Just be sure to use a freezer-safe container to prevent freezer burn. To bring back the crunchiness after storage, use the oven. Preheat your oven to 350°F (175°C). Spread the pecans on a baking sheet. Heat them for about 5-10 minutes. Watch them closely to avoid burning. You can also use a stovetop pan over low heat. Stir them gently in the pan until warm and crispy again. Enjoy your delicious snack! Maple glazed pecans are sweet, crunchy nuts coated in a maple syrup mixture. They have a rich flavor from the maple and a hint of cinnamon. This snack is easy to make and perfect for any occasion. To make maple glazed pecans, start by mixing maple syrup, brown sugar, cinnamon, salt, and butter in a saucepan. Heat it until it bubbles and the sugar dissolves. Stir in pecans to coat them well. Spread them on a baking sheet and bake at 350°F for 15-20 minutes. Keep an eye on them to avoid burning. Yes, you can make maple glazed pecans ahead of time. After baking, let them cool completely. Store them in an airtight container at room temperature. They stay fresh for about one week. For longer storage, you can freeze them. You can find maple glazed pecans at local grocery stores or specialty food shops. Online retailers also offer them, often in bulk. Look for brands that use pure maple syrup for the best flavor. Maple glazed pecans have some health benefits. Pecans are rich in healthy fats and provide fiber. Maple syrup has some antioxidants. However, they are still a treat due to added sugar. Enjoy them in moderation as part of a balanced diet. Maple glazed pecans are easy to make and delicious. We covered the ingredients, giving you tips for quality. You learned health benefits of pecans and maple syrup. Our step-by-step guide ensures perfect results every time. Experiment with flavors and try variations for fun spins. Remember to store them well to keep them fresh. Enjoyed alone or added to dishes, they’re a great snack. Keep these tips in mind to make your pecans irresistible!

Maple Glazed Pecans Simple Sweet Snack Recipe

If you’re looking for a quick and delicious snack, you’ve come to the right place. This Maple Glazed Pecans recipe

To make cinnamon sugar candied pecans, gather these simple ingredients: - 2 cups pecan halves - 1 cup granulated sugar - 1 teaspoon ground cinnamon - 1/4 teaspoon salt - 1/4 cup unsalted butter - 1/2 teaspoon vanilla extract - 1/4 cup water Choosing the right pecans matters. I recommend fresh, whole pecan halves. Look for ones that are plump and free from dark spots. This ensures a richer flavor. Fresh nuts have a nice crunch and a sweet taste that shines through. You can find these at local markets or specialty stores. Buy them raw or toasted, depending on your preference. If you have dietary restrictions, there are options. You can use coconut sugar instead of granulated sugar. It adds a nice caramel flavor. For a dairy-free option, swap out unsalted butter for coconut oil. This change keeps the texture similar and still makes them tasty. If you're looking to cut down on sugar, try using a sugar substitute that measures like sugar. Just make sure it’s safe for baking. To make cinnamon sugar candied pecans, start by gathering your ingredients. You need 2 cups of pecan halves, 1 cup of granulated sugar, 1 teaspoon of ground cinnamon, 1/4 teaspoon of salt, 1/4 cup of unsalted butter, 1/2 teaspoon of vanilla extract, and 1/4 cup of water. 1. Preheat your oven to 350°F (175°C). Line a baking sheet with parchment paper. 2. In a medium saucepan, mix the sugar, cinnamon, and salt well. 3. Add the butter, water, and vanilla to the pan. Heat over medium heat. Stir constantly until it starts to boil. 4. Once it boils, let it simmer for about 1-2 minutes without stirring. This will thicken the mixture. 5. Add the pecan halves to the pan. Stir until they are fully coated. 6. Spread the pecans in a single layer on your baking sheet. 7. Bake for 10-15 minutes. Stir once or twice to ensure even caramelization. 8. Remove from the oven and let them cool completely. They will harden as they cool. 9. Once cooled, break apart any clusters and enjoy your delicious candied pecans! The key to perfect candied pecans is the cooking time. If you bake them too long, they can burn. If you don’t bake them long enough, they won’t crisp up. Stir the pecans halfway through baking. This helps them brown evenly. Another tip is to watch for color changes. When they turn a golden brown, they are ready. Keep an eye on your pecans as they bake. Set a timer for 10 minutes, but check them after 8 minutes. If they look golden, they are close to done. If you smell a nutty aroma, it’s time to check. Burnt pecans have a bitter taste, so stay alert! For the best results, remember to cool them on the baking sheet. They will harden as they cool. Enjoy your snack! For the full recipe, check out the earlier section. To get that perfect crunch in your candied pecans, watch the baking time. Bake them for about 10-15 minutes, but check often. Stir them at least once during baking. This helps them cook evenly and stay crunchy. Let them cool completely on the baking sheet. They harden as they cool, giving that delightful crunch. One common mistake is not stirring the sugar mixture enough. You want it to boil and thicken, but keep stirring until it reaches that stage. Another error is not watching the pecans while they bake. They can burn quickly. Lastly, don’t skip the cooling step. If you do, your pecans may not get that nice crunch. For added flavor, sprinkle some sea salt over the pecans after baking. It balances the sweetness. You can also mix in a pinch of nutmeg or ginger with the cinnamon for a warm twist. For a beautiful presentation, serve your candied pecans in a clear jar or on a colorful plate. This makes them look as good as they taste. For the full recipe, check out the details above! {{image_2}} You can play with flavors in your candied pecans. Instead of just cinnamon, try nutmeg or allspice. These spices add warmth and depth. You can also use cardamom for a floral twist. Just mix a teaspoon into your sugar blend. Pecans are great, but other nuts work too! Almonds, walnuts, or cashews can be fun. Each nut has its own taste and crunch. Just follow the same recipe, but switch the nuts. Each choice will give you a new snack experience. Mixing sweet and savory makes for a fun treat. Try adding a pinch of cayenne pepper for heat. This spicy kick pairs well with the sweet sugar. You can also sprinkle in some sea salt after baking. This contrast makes every bite exciting! To keep your cinnamon sugar candied pecans fresh, store them in an airtight container. Glass jars work great for this. You can also use plastic bags, but make sure they seal well. Always let them cool completely before storing. This step stops moisture from forming, which can make them soft. Keep them in a cool, dry place away from sunlight. When stored correctly, candied pecans can last up to two weeks. They stay crunchy and tasty for a good while. If you want them to last longer, consider freezing them. In the freezer, they can stay fresh for up to three months. Just remember to thaw them at room temperature before enjoying. If your pecans lose their crunch, don’t worry! You can easily fix this. Preheat your oven to 350°F (175°C). Spread the pecans on a baking sheet in a single layer. Bake them for about 5-7 minutes. Keep an eye on them to avoid burning. Once they cool, they should be crispy again. Enjoy your snack! You can prepare these pecans a few days ahead. Just follow the full recipe. Once you cool them, store them in an airtight container. Keep them in a cool, dry place. They stay fresh for about a week. If you want longer storage, consider refrigerating them. Just make sure they're sealed well to avoid moisture. Yes, you can use raw pecans. However, roasted pecans add more flavor and depth. If you choose raw, roast them first for about 8-10 minutes in the oven. This step brings out their natural oils and gives a nice crunch. Roasting elevates the taste and texture of your candied pecans. You can find cinnamon sugar candied pecans on various online stores. Check popular sites like Amazon or specialty food shops. Local grocery stores may also have them. If you prefer homemade, try the full recipe for a fresh snack treat. Making them yourself allows full control over flavor and sweetness. Candied pecans are versatile! You can snack on them straight from the jar. They make a great topping for salads, yogurt, or oatmeal. Use them in baking for cookies or cakes. You can even sprinkle them on ice cream. Their sweet crunch adds a delightful touch to many dishes. Cinnamon sugar candied pecans are a tasty, easy treat. We covered the best ingredients, cooking steps, and storage tips. Known for their crunch, they are perfect for snacks or toppings. You can try different spices or nuts for variety. Avoid common mistakes to achieve the best results. With these tips, you can make delicious pecans that impress. Enjoy your cooking adventure and savor every bite!

Cinnamon Sugar Candied Pecans Irresistible Snack Treat

Are you ready to indulge in a snack that’s both sweet and crunchy? Cinnamon Sugar Candied Pecans are the perfect

- 2 cups semi-sweet chocolate chips - 1 cup creamy peanut butter - 1 can (14 oz) sweetened condensed milk - 1 teaspoon vanilla extract - ½ cup powdered sugar - A pinch of sea salt Alternatives for chocolate chips If you want a different taste, you can use dark chocolate chips or milk chocolate. Both will give you a sweet treat, but the flavor will change slightly. Options for nut butter replacements You can swap creamy peanut butter for almond or cashew butter. These will give your fudge a new flavor and texture. How to make it dairy-free To make this fudge dairy-free, use dairy-free chocolate chips and coconut milk instead of sweetened condensed milk. This keeps the taste creamy without any dairy. - Step 1: Prepare the Baking Dish Line an 8x8 inch square baking dish with parchment paper. Leave some overhang for easy removal later. Set the dish aside. - Step 2: Melt the Chocolate In a medium saucepan over low heat, combine 2 cups of semi-sweet chocolate chips with 1 can of sweetened condensed milk. Stir continuously until the mixture is smooth and fully melted. Remove from heat. - Step 3: Add Peanut Butter and Flavor Stir in 1 cup of creamy peanut butter and 1 teaspoon of vanilla extract into the melted chocolate mixture. Mix until well combined. Make sure there are no lumps of peanut butter. - Step 4: Incorporate Powdered Sugar Sift ½ cup of powdered sugar into the chocolate-peanut butter mixture to avoid lumps. Gently fold it in until fully incorporated. This gives the fudge a rich, smooth texture. - Step 5: Season and Combine Add a pinch of sea salt. Mix again for a well-balanced sweet flavor. - Step 6: Transfer to Baking Dish Pour the fudge mixture into the prepared baking dish. Use a spatula to smooth the top and create an even layer. - Step 7: Chill and Slice Place the fudge in the refrigerator for at least 2 hours to set. It should firm up nicely. Once set, use the parchment paper to lift the fudge out of the dish. Cut into squares as large or small as you prefer. For the full recipe, refer to the earlier section. To make the best chocolate peanut butter fudge, avoid common mistakes. First, always melt your chocolate slowly. High heat can burn it and ruin your fudge. Use low heat and stir often to keep it smooth. Next, pay attention to the texture. The right fudge should be creamy and not too soft. If your fudge is too soft after chilling, it likely needs more powdered sugar. This helps firm it up. When serving fudge, presentation matters. Use a nice platter or a decorative box. Garnish with crushed peanuts on top. A drizzle of melted chocolate adds flair, too. For pairing ideas, enjoy your fudge with a glass of cold milk or coffee. The rich flavors work well together. You can even serve it with fresh fruit for a tasty contrast. For the complete instructions, check out the Full Recipe. {{image_2}} You can change the taste of your fudge in fun ways. Adding nuts or chocolate chunks gives it more texture and flavor. I love using chopped walnuts or pecans. They add a nice crunch that pairs well with the creamy fudge. You can also sprinkle in some mini chocolate chips. They melt slightly and create little pockets of rich chocolate. If you're feeling adventurous, try swapping out peanut butter for other nut butters. Almond butter or cashew butter works great too. Each nut butter brings its own unique taste. You might find that a mix of nut butters is your new favorite. If you're on a keto diet, you can still enjoy this fudge. Use sugar-free chocolate chips and a low-carb nut butter. This way, you can satisfy your sweet tooth without the carbs. Just make sure the sweeteners you choose fit your diet. For a vegan option, replace the sweetened condensed milk with coconut cream. You can also use dairy-free chocolate chips. This makes it easy to enjoy the creamy fudge while sticking to a vegan diet. It's just as rich and tasty, and your friends won't even notice the difference! You can find the full recipe at the beginning of the article to get started on your fudge journey! To keep your fudge fresh, store it in an airtight container. This will help retain its rich, creamy texture. You can keep it at room temperature for up to a week. If you live in a warm area, the fridge is a better option. It will last about two weeks in the fridge. Just make sure to wrap it well to avoid drying out. You can freeze chocolate peanut butter fudge for long-term storage. Cut it into squares and place them in a single layer in a freezer-safe container. Add wax paper between layers to prevent sticking. The fudge can stay frozen for up to three months. When you're ready to enjoy it, take out only what you need. Let it thaw in the fridge for a few hours. For the best taste, avoid thawing it at room temperature. This keeps the texture smooth and creamy. How long does chocolate peanut butter fudge last? Chocolate peanut butter fudge lasts about two weeks at room temperature. Keep it in an airtight container. In the fridge, it can last up to a month. For best taste, eat it fresh! Can I use crunchy peanut butter instead of creamy? Yes, you can use crunchy peanut butter. It adds fun texture and a nutty bite. Just make sure it mixes well with the chocolate for a smooth fudge. How do I know when the fudge is fully set? The fudge is set when it feels firm to the touch. It should not stick to your fingers. If it’s still soft, give it more time in the fridge. What to do if fudge doesn’t set properly? If your fudge doesn't set, it may need more time in the fridge. If it’s still soft after a few hours, you can reheat it gently and add more powdered sugar, then cool it again. How to fix a grainy texture? A grainy texture often comes from not melting the chocolate enough. To fix this, briefly heat the fudge mixture over low heat. Stir until smooth, then cool again. Caloric content and nutrition breakdown per serving Each square of fudge has around 150 calories. It includes fat, carbs, and some protein from the peanut butter. For a richer view, check nutrition labels for exact details. Allergens and dietary considerations This fudge contains peanuts and dairy. If you have allergies, look for nut-free or dairy-free options. Always check ingredient labels before cooking. This blog post showed you how to make tasty chocolate peanut butter fudge. You learned about key ingredients, how to swap them, and step-by-step instructions. I also shared tips to avoid mistakes and offered serving ideas. You can even find variations for different diets and how to store or freeze your fudge. In short, making fudge is fun and easy. With practice, you'll impress everyone with your delicious treats. Enjoy sharing your creations!

Chocolate Peanut Butter Fudge Rich and Creamy Treat

Are you ready to treat yourself to something truly delicious? This Chocolate Peanut Butter Fudge is rich, creamy, and super

- Chicken Breast Preparation You need four boneless, skinless chicken breasts. This cut cooks evenly and stays juicy. Always choose fresh chicken for the best flavor. - Marinade Components The marinade brings the flavor. You will use: - 2 lemons (zest and juice) - 1/4 cup olive oil - 4 cloves garlic, minced - 1 teaspoon honey - Salt and pepper to taste The lemon juice adds tang, while the zest gives a bright aroma. Olive oil keeps the chicken moist. Garlic adds depth, and honey balances the acid. - Fresh Herb Importance Fresh basil is key. It makes the dish vibrant and fragrant. Use 1/4 cup, chopped. Fresh herbs have more flavor than dried ones. They brighten the chicken and enhance the overall taste. Choosing the right ingredients makes a big difference in your Lemon Basil Grilled Chicken. {{ingredient_image_1}} To make the marinade, gather all your ingredients first. You need lemon zest, lemon juice, olive oil, chopped basil, minced garlic, honey, salt, and pepper. In a mixing bowl, whisk these together. Aim for a smooth blend where all the flavors mix well. For marination, place your chicken breasts in a resealable bag or a shallow dish. Pour the marinade over the chicken. Make sure each piece gets a good coat. Seal the bag or cover the dish. Marinate it in the fridge for at least 30 minutes, or up to 4 hours. Longer marination gives you more flavor. Before grilling, preheat your grill to medium-high heat. This step helps cook the chicken evenly. Lightly oil the grill grates to prevent sticking. Use a paper towel dipped in oil for this task. When the grill is hot, remove the chicken from the marinade. Discard any leftover marinade. Place the chicken on the grill. Cook each side for about 6-7 minutes. You want the chicken to reach an internal temperature of 165°F. Look for nice grill marks for that perfect finish. After grilling, let the chicken rest for 5 minutes. This allows the juices to redistribute, making the chicken moist. For serving, slice the chicken and arrange it on a plate. You can add extra fresh basil and lemon slices for a lovely touch. This not only enhances the look but also adds flavor. Minimum and Maximum Marination Times For great flavor, marinate your chicken for at least 30 minutes. If you have more time, you can marinate up to 4 hours. Longer marinating makes the chicken tastier. Enhancing Marinade Flavor To boost the flavor, add more lemon zest or fresh herbs. A pinch of red pepper flakes can add a nice kick. Don't skimp on the garlic; it brings out a lovely depth. Safety Tips for Marinating Always marinate chicken in the fridge, not on the counter. This keeps it safe from bacteria. Use a clean container or a resealable bag to avoid cross-contamination. How to Check for Doneness To ensure your chicken is cooked, use a meat thermometer. The chicken should reach 165°F (75°C) in the thickest part. If you don’t have a thermometer, cut into the chicken. It should be white and juices should run clear. Adjusting Grill Temperature Keep your grill on medium-high heat for perfect grilling. If the chicken cooks too fast, lower the heat slightly. This allows it to cook evenly without burning. Avoiding Dry Chicken To keep your chicken juicy, let it rest after grilling. This helps the juices redistribute. Avoid overcooking; it can lead to dry meat. Keep an eye on the time while grilling. Complementary Side Dishes Serve your Lemon Basil Grilled Chicken with fresh salads or roasted veggies. Quinoa or rice can also be great. These sides balance the flavors and add texture. Best Wines to Pair A crisp white wine like Sauvignon Blanc works well with this dish. Its acidity complements the lemon and basil. If you prefer red, a light Pinot Noir is a good choice. Serving with Sauces You can drizzle a light lemon vinaigrette or a basil pesto over the chicken. These sauces add an extra layer of flavor and make the dish pop. Pro Tips Marinate Longer for Flavor: For a deeper flavor profile, marinate the chicken for the full 4 hours instead of just 30 minutes. This allows the chicken to absorb more of the marinade's flavors. Use a Meat Thermometer: To ensure perfectly cooked chicken, use a meat thermometer to check that the internal temperature reaches 165°F (75°C). This prevents overcooking and keeps the chicken juicy. Rest the Chicken: Always let the grilled chicken rest for at least 5 minutes after cooking. This helps the juices redistribute, making the chicken more tender and flavorful. Experiment with Herbs: Feel free to mix in other herbs like thyme or oregano along with basil for a unique flavor twist. Fresh herbs can elevate the dish even further. {{image_2}} You can cook Lemon Basil Grilled Chicken in different ways. Here are some options: - Baking Lemon Basil Chicken: Preheat your oven to 375°F (190°C). Place the marinated chicken on a baking tray. Bake for 25-30 minutes. Check that it reaches 165°F (75°C). This method keeps the chicken juicy. - Sautéing vs. Grilling: Sautéing is great for a quick meal. Heat a pan over medium-high heat. Add some olive oil, then cook the chicken for about 6-7 minutes per side. You won’t get grill marks, but it will taste great. - Using a Slow Cooker: For a hands-off meal, use a slow cooker. Place the marinated chicken inside and cook on low for 4-6 hours. The chicken will fall apart and soak up all the flavors. You can change the flavors of this dish in fun ways: - Adding Spices or Heat: Want some heat? Add red pepper flakes or hot sauce to the marinade. It gives a nice kick. - Herb Substitutions: If you don't have basil, try parsley or cilantro. These herbs bring their own special taste. - Citrus Variations: Switch lemons for limes or oranges for a fresh twist. Each fruit adds a new flavor profile to your chicken. This recipe can fit various diets: - Gluten-Free Options: All ingredients in this dish are gluten-free. Enjoy it safely! - Low-Carb Variations: This dish is naturally low in carbs. Pair it with veggies for a healthy meal. - Dairy-Free Suggestions: The recipe is already dairy-free. Use coconut oil instead of olive oil for a new flavor twist. - Best Practices for Refrigeration After grilling, let the chicken cool for a few minutes. Place it in an airtight container. Store it in the fridge. It will stay fresh for three to four days. - Freezing Tips and Timeframes If you want to keep it longer, freeze the chicken. Wrap it tightly in plastic wrap. Then, put it in a freezer bag. It can last up to three months in the freezer. - Reheating Guidelines When ready to eat, thaw it in the fridge overnight. Reheat in the oven or microwave. Make sure it reaches 165°F (75°C) to be safe. - How Long Marinade Lasts in the Fridge The marinade can stay fresh in the fridge for about three days. Keep it in a clean jar with a tight lid. - Disposing Tips for Leftover Marinade Do not reuse marinade after chicken has been in it. Throw it away to avoid germs. - Using Marinade as a Sauce If you want to use marinade for sauce, heat it before serving. Boil it for a few minutes to kill any bacteria. This way, you can enjoy a tasty sauce with your chicken. How does marinating affect chicken flavor? Marinating adds depth to chicken flavor. The acid in lemon breaks down proteins. This process makes the meat tender and juicy. The herbs and garlic infuse their taste into the meat. Your chicken will be packed with fresh, bright flavors after marinating. Can I use other meats with this marinade? Yes! This marinade works well with pork and fish. You can try it on shrimp too. Each meat will absorb the flavors differently. Adjust cooking times for each type of meat for best results. What can I serve with Lemon Basil Grilled Chicken? You can serve this chicken with a fresh salad or grilled vegetables. It also goes great with rice or quinoa. For a fun twist, try it in a wrap or sandwich. What is the best grill temperature for chicken? The best grill temperature is medium-high. Aim for about 375°F to 450°F. This heat gives you nice grill marks and juicy meat. How do I know if my chicken is fully cooked? Use a meat thermometer to check doneness. Chicken should reach 165°F (75°C) at the thickest part. Cut into the chicken to check for any pink areas. If it’s all white and juices run clear, it’s ready. Can I make this recipe in advance? Yes, you can marinate the chicken ahead of time. Marinate it for up to 4 hours in the fridge. Cook it fresh when you are ready to eat. You can also grill the chicken and store it in the fridge for later. What can I substitute for fresh basil? You can use dried basil if fresh is not available. Use about one teaspoon of dried basil for every tablespoon of fresh. Other herbs like parsley or oregano can work too. How do I store fresh herbs? Store fresh herbs in the fridge. Place them in a damp paper towel and bag. This keeps them fresh longer. You can also place stems in water like a bouquet. Can I use bottled lemon juice instead of fresh? Bottled lemon juice is okay but fresh is best. Fresh lemon juice gives a brighter flavor. If using bottled juice, make sure it’s pure lemon juice without additives. This blog post covered all you need for perfect Lemon Basil Grilled Chicken. We explored key ingredients like chicken breast, marinade components, and the fresh herbs that make the dish shine. The step-by-step guide showed easy prep, grilling techniques, and creative serving tips. Remember, marinating adds depth to flavors, and switching up cooking methods can keep meals exciting. With the right storage tips, you can enjoy your chicken longer. Experiment with variations to discover your favorites. Enjoy cooking and sharing this delicious dish.

Lemon Basil Grilled Chicken Flavorful and Simple Recipe

Are you ready to elevate your dinner game? This Lemon Basil Grilled Chicken recipe gives you a burst of fresh

- 2 cups cooked chicken breast, shredded - 1 cup plain Greek yogurt - 1 tablespoon Dijon mustard - 1 tablespoon honey - 1 celery stalk, finely chopped - 1 small red onion, finely diced - 1/2 cup diced cucumber - 1/4 cup green olives, pitted and chopped - 1 tablespoon fresh dill, chopped (or 1 teaspoon dried dill) - Salt and pepper to taste - 4 large whole wheat tortillas - Lettuce leaves (romaine or butter lettuce) for wrapping - Cherry tomatoes, halved for garnish This Greek Yogurt Chicken Salad is a simple yet tasty meal that you can enjoy any day. First, I love using shredded chicken. You can use leftover chicken or even rotisserie chicken to save time. Next, plain Greek yogurt acts as a creamy base. It keeps the salad light and adds protein. I also mix in some Dijon mustard and honey. The mustard gives a nice tang, while the honey adds sweetness. For crunch and flavor, I chop celery, red onion, cucumber, and green olives. These veggies bring freshness and texture to the salad. Finally, I add dill, salt, and pepper for seasoning. To serve, I use large whole wheat tortillas. They wrap up the salad perfectly. I add lettuce leaves for extra crunch and freshness. Lastly, I like to garnish with halved cherry tomatoes for a pop of color. This meal is quick to make and full of flavor. Perfect for lunch or a light dinner! {{ingredient_image_1}} - In a medium bowl, combine 1 cup of Greek yogurt, 1 tablespoon of Dijon mustard, and 1 tablespoon of honey. - Stir until the mixture is smooth and well blended. - Next, add 2 cups of shredded chicken, 1 finely chopped celery stalk, 1 small diced red onion, 1/2 cup of diced cucumber, and 1/4 cup of chopped green olives. - Gently fold these ingredients together. Make sure the chicken gets well coated in the yogurt mix. - Now, stir in 1 tablespoon of fresh dill, and add salt and pepper to taste. - Taste the mixture and adjust the seasoning if needed. It should be fresh and flavorful. - Take a large tortilla and lay it on a clean surface. - Place a few lettuce leaves down the center of the tortilla. - Spoon a generous amount of the chicken salad over the lettuce. Spread it evenly but do not overload it. - Carefully fold in the sides of the tortilla and roll it up from the bottom to the top. - Repeat this process for the remaining tortillas and filling. - Once done, slice each wrap in half diagonally. Enjoy your meal! - Use rotisserie chicken for convenience. It saves time and tastes great. - Poach chicken breasts for maximum flavor. This method keeps the meat juicy and tender. - Store the chicken salad in an airtight container in the fridge. This keeps it fresh for up to three days. - To keep wraps fresh, wrap them tightly in plastic wrap. This helps prevent them from drying out. - To avoid tearing the tortilla, warm it slightly in the microwave. This makes it more pliable. - For even distribution of filling, spoon the chicken salad down the center of the tortilla. This helps with rolling and keeps it neat. Pro Tips Use Leftover Chicken: Utilize leftover roasted or grilled chicken to save time and enhance flavor. Customize Your Veggies: Feel free to add or substitute any vegetables you enjoy, such as bell peppers or carrots, for added crunch. Chill Before Serving: Let the chicken salad sit in the refrigerator for about 30 minutes before serving to allow the flavors to meld. Wrap It Up: If you're making these wraps ahead of time, wrap them tightly in plastic wrap to keep them fresh and prevent sogginess. {{image_2}} You can easily switch up the protein in this recipe. Try using turkey or tofu instead of chicken. Both options give a different taste and texture. For a sweet touch, add fruits like grapes or diced apples. They bring a nice contrast to the creamy yogurt. Mixing in some dried cranberries also adds a fun pop of flavor. If you want to make this dish gluten-free, use lettuce wraps instead of tortillas. Romaine or butter lettuce works great and adds a fresh crunch. For those who prefer vegan meals, swap Greek yogurt for plant-based yogurt. You can also use chickpeas or lentils in place of chicken for protein. Changing up your herbs can make a big difference. Try using fresh parsley or cilantro instead of dill. Each herb gives a unique flavor to the dish. You can also use different vegetables. Carrots or bell peppers add color and crunch. They will change the taste but keep the salad fresh and interesting. The chicken salad mixture stays fresh for up to three days in the fridge. Store it in an airtight container. If you wrap the chicken salad in tortillas, they may get soggy quickly. Keep the chicken salad mixture separate from the tortillas for the best texture. You can freeze chicken salad wraps, but the texture may change. Wrap them tightly in plastic wrap before placing them in a freezer bag. To defrost, place the wraps in the fridge overnight. For reheating, unwrap and microwave for 30 seconds to a minute. Use glass or BPA-free plastic containers for storage. These containers keep the chicken salad fresh longer. To avoid sogginess, store lettuce leaves separately from the chicken salad. This method helps maintain crispness and flavor in your wraps. You can use several options if you need a substitute for Greek yogurt. Here are a few: - Sour cream: This has a similar texture and tangy taste. - Cottage cheese: Blend it first for a smoother texture. - Dairy-free yogurt: Options like almond or coconut yogurt work well. - Mashed avocado: This adds creaminess and healthy fats. These choices can help fit different diets or preferences. If you love heat, there are easy ways to spice up your chicken salad. Here are some ideas: - Add hot sauce: A few drops can really boost the flavor. - Chili powder: Mix in a small amount for a warm kick. - Jalapeños: Chop them finely and fold them into the salad. - Pepper jack cheese: Shred some and add for extra heat. These tips will help you customize the spice level just right. Yes, using leftover chicken is a great idea! Here’s how you can do it: - Rotisserie chicken: This is quick and adds good flavor. - Grilled chicken: Shredded pieces from your last meal work well. - Poached chicken: If you have some on hand, it’s a great choice. Using leftover chicken makes this recipe even easier and cuts down on waste. You learned how to make a tasty chicken wrap with simple ingredients. We discussed the best chicken options, tips for prepping, and storing your wraps. Remember, you can mix in new flavors or vegetables to keep it fresh. Feel free to adapt the recipe for your needs, whether you want something spicy or vegan. Enjoy your wraps with friends or family. They are easy, fun, and full of flavor!

Greek Yogurt Chicken Salad Wraps Simple and Tasty Meal

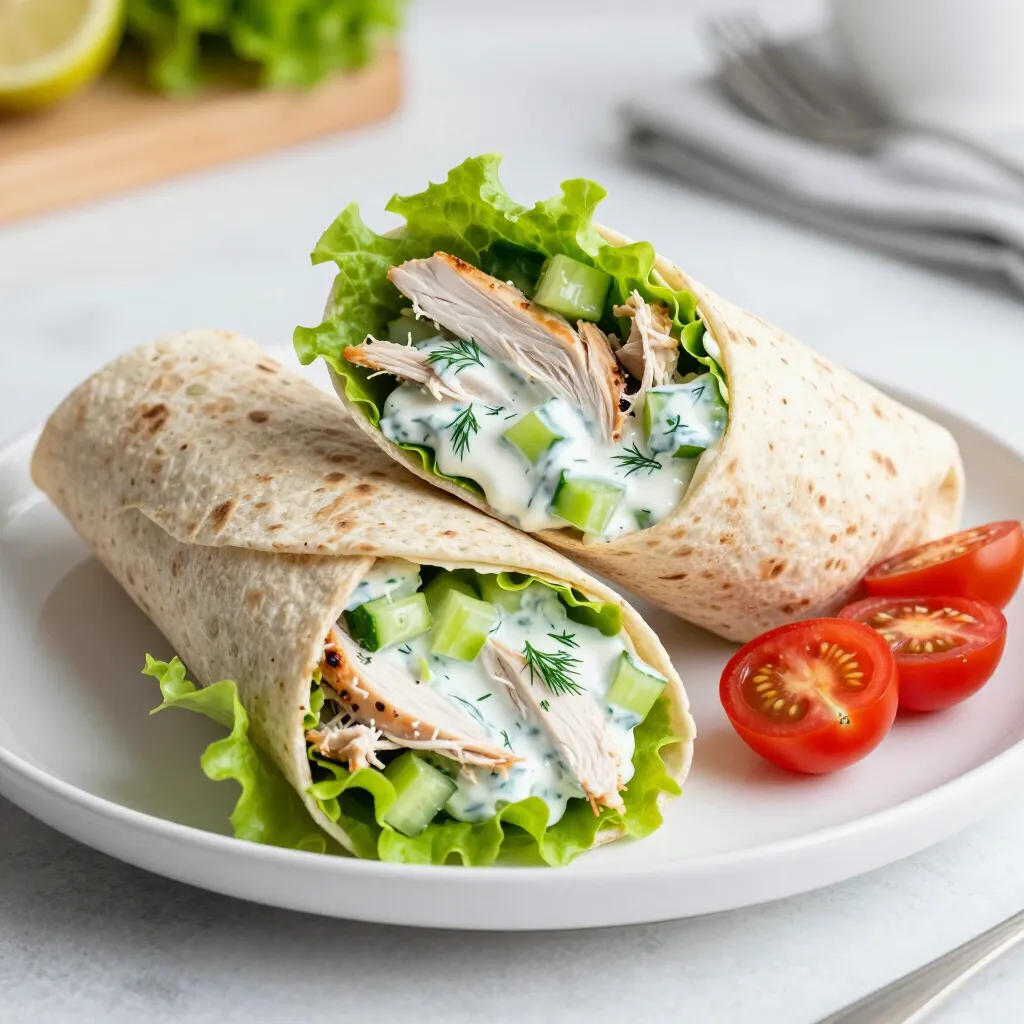
Looking for a quick and healthy meal that’s full of flavor? Try these Greek Yogurt Chicken Salad Wraps! Packed with

For my savory Instant Pot mac and cheese, you need these ingredients: - 8 oz elbow macaroni - 4 cups vegetable broth - 1 cup frozen spinach, thawed and drained - 1 cup canned artichoke hearts, chopped - 1 cup sharp cheddar cheese, shredded - 1 cup cream cheese, softened - 1 teaspoon garlic powder - 1 teaspoon onion powder - ½ teaspoon black pepper - Salt to taste - ½ cup grated Parmesan cheese for topping These simple ingredients create a creamy and delicious dish. The elbow macaroni serves as the base, while the vegetable broth adds depth. Frozen spinach and canned artichoke hearts give it a fresh twist. Sharp cheddar cheese and cream cheese bring that rich creaminess we love. Garlic and onion powders add flavor, and black pepper gives a little kick. Finally, we finish with a sprinkle of Parmesan for an extra touch. For the full recipe, check out the detailed steps. This dish is perfect for quick meals, and you can customize it to fit your taste! To start, set your Instant Pot to Sauté mode. This mode helps cook the pasta well. Add the elbow macaroni and vegetable broth to the pot. Stir the mixture to combine everything. This step is key for even cooking. Next, close the lid of the Instant Pot. Make sure to turn the valve to Sealing. Cook the pasta on high pressure for 5 minutes. When the timer goes off, quickly release the pressure by turning the valve to Venting. This makes the pasta soft and ready for the next step. Now, open the lid and add the thawed spinach and chopped artichoke hearts. Then, mix in the sharp cheddar cheese and cream cheese. Sprinkle in the garlic powder, onion powder, and black pepper. Stir well until the cheese melts into a creamy sauce. Taste your dish and add salt if needed. Ladle the mac and cheese into bowls. Top with grated Parmesan cheese for a burst of flavor. For a fun touch, serve with fresh parsley or a dash of paprika. This makes your dish look great! For the full recipe, check out the Creamy Spinach & Artichoke Instant Pot Mac and Cheese. To get the best creamy texture, use good cheese. I like sharp cheddar and cream cheese. They melt well and blend nicely. Stir the cheeses in when the pasta is hot. This helps them melt faster. If you want it creamier, add more cream cheese. You can also mix in a splash of milk for a smoother sauce. If you have some mac and cheese left, store it in an airtight container. Let it cool down first. It stays fresh in the fridge for about three days. For longer storage, you can freeze it. Just make sure to use a freezer-safe container. When reheating, add a little milk to keep it creamy. To make your dish look nice, use fresh herbs. Parsley and basil add color and flavor. Just chop them up and sprinkle on top. A dash of paprika adds a nice touch too. It gives a pop of color and a bit of spice. Serve in bowls or a big dish for sharing. This makes it look even more inviting. {{image_2}} Adding protein to your Instant Pot mac and cheese makes it heartier. You can use cooked chicken, turkey, or ham. Shrimp or bacon also work well. Just make sure to add pre-cooked meats. This way, you can heat them through while mixing with the cheese. If you prefer plant-based options, try tofu or chickpeas. These add protein without meat. Simply fold them in after cooking the pasta. Cheese choice can change the flavor. Sharp cheddar is great, but feel free to experiment. You can use Gruyère, mozzarella, or Monterey Jack for different tastes. Mixing cheeses adds depth. For a tangy twist, try goat cheese or feta. If you want a smoother texture, consider using cream cheese or Velveeta. Remember to adjust the amount based on your cheese preference. Vegetables can add color and nutrition to your dish. If you don’t have spinach or artichokes, use broccoli or peas. Cauliflower can also be a good substitute and adds creaminess. You can even use bell peppers or zucchini for a fresh taste. Just chop them into small pieces so they cook evenly. Add them after the pasta is done to keep them tender. For the full recipe, check out the Creamy Spinach & Artichoke Instant Pot Mac and Cheese. To keep your Instant Pot mac and cheese fresh, store it in an airtight container. Let it cool down to room temperature first. Then, cover it tightly. This helps keep it creamy and tasty. You can store it in the fridge for up to three days. Make sure to label your container with the date. This way, you won’t forget when you made it. You can freeze mac and cheese if you want to keep it longer. First, let it cool completely. Then, scoop the mac and cheese into freezer-safe bags or containers. Try to remove as much air as possible. Label each bag with the date. You can freeze it for up to three months. When you want to eat it, just thaw in the fridge overnight. Reheating is easy! For the best results, use the stove. Add a splash of milk to keep it creamy. Heat on low and stir often. If you use a microwave, place the mac and cheese in a bowl. Add a little milk and cover it. Heat it in short bursts, stirring in between. This keeps it from drying out. Enjoy your creamy mac and cheese again! You can store Instant Pot mac and cheese for about three to five days. Keep it in an airtight container in the fridge. If you're not sure when you'll eat it, freeze it! Just remember to let it cool before you freeze it. Yes, you can make it without cream cheese. If you skip it, your dish may not be as creamy. You could add more cheddar cheese or use a creamy vegan cheese. Both options work well for a tasty meal. Absolutely! You can change ingredients based on your diet. For a gluten-free option, use gluten-free pasta. If you're vegan, swap regular cheese for plant-based cheese. You can also skip the spinach or artichokes if you prefer a simpler taste. The Full Recipe gives you a solid base to get creative! In this post, we explored a tasty Instant Pot mac and cheese recipe. We covered the ingredients you'll need, like elbow macaroni and sharp cheddar cheese. Then, we provided clear steps to cook and make it creamy. I shared tips to perfect your dish and store leftovers. Lastly, we discussed options for variations and answered common questions. Enjoy this quick and easy meal any time. You can customize it for your taste and needs!

Savory Instant Pot Mac and Cheese Fast and Easy Dish

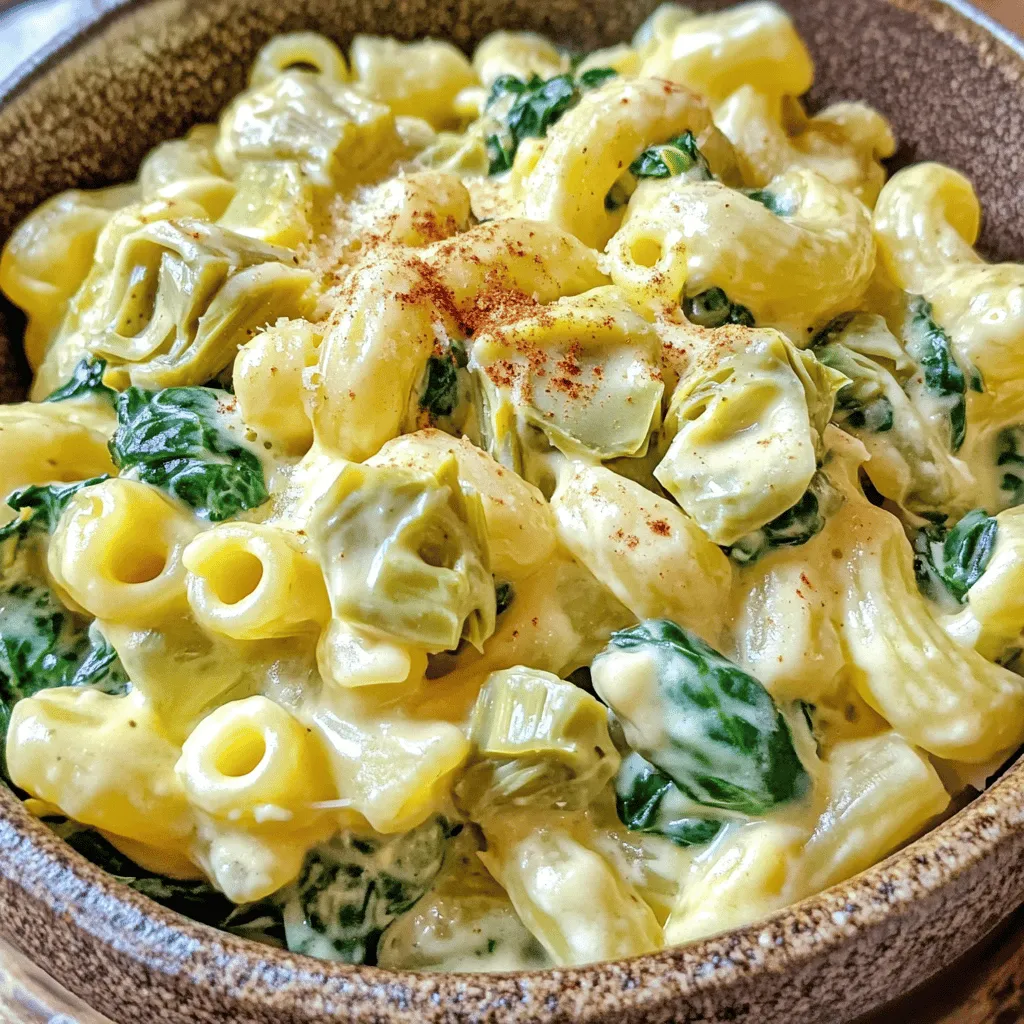
Are you ready to whip up a cheesy delight in minutes? My Savory Instant Pot Mac and Cheese is fast,

Making Instant Pot creamy tomato basil soup is quick and easy. This recipe gives you a rich, smooth soup bursting with flavor. It takes about 30 minutes from start to finish. You will serve 4 to 6 people with this dish. To make this tasty soup, you will need these key ingredients: - 2 tablespoons olive oil - 1 medium onion, chopped - 2 cloves garlic, minced - 1 can (28 oz) crushed tomatoes - 1 cup vegetable broth - 1 teaspoon dried oregano - 1 teaspoon sugar (optional) - Salt and pepper to taste - 1 cup heavy cream (or coconut cream) - 1/4 cup fresh basil leaves, chopped - Grated Parmesan cheese (for garnish) These ingredients come together to create a warm and comforting dish. The olive oil adds richness, while the onion and garlic bring depth. You can play around with some ingredients for fun. Here are a few ideas: - Use fresh tomatoes if you prefer. About 2 pounds will work well. - If you want a spicier soup, add a pinch of red pepper flakes. - Swap heavy cream for coconut cream for a dairy-free twist. - Add a splash of balsamic vinegar for a tangy flavor. These options let you customize the soup to your taste. Enjoy experimenting! If you want the full recipe, check out the recipe section. Start by turning on your Instant Pot to 'Sauté' mode. Add 2 tablespoons of olive oil and let it heat. Once the oil is hot, toss in 1 medium chopped onion. Sauté for about 3-4 minutes until the onion looks clear. This step builds a great base for our soup. Next, add 2 minced garlic cloves. Sauté for another minute until you smell that wonderful garlic aroma. Now, it’s time to add the main ingredients. Pour in 1 can of crushed tomatoes (28 oz) and 1 cup of vegetable broth. Stir in 1 teaspoon of dried oregano to give the soup flavor. If you like, add 1 teaspoon of sugar to cut the acidity of the tomatoes. Season with salt and pepper to taste. Close the lid and seal the vent. Cook on high pressure for 10 minutes. Once done, release the pressure by turning the valve to venting. Open the lid carefully. Use an immersion blender to make the soup smooth. If you don’t have one, pour the soup in batches into a regular blender. After blending, return the soup to the pot if needed. Stir in 1 cup of heavy cream (or coconut cream for a dairy-free option) and 1/4 cup of chopped fresh basil leaves. Set the Instant Pot to 'Sauté' again just for a couple of minutes to warm it through. Taste and adjust the seasoning if needed. Now, you’re ready to serve. Garnish with grated Parmesan cheese for a nice touch. You can find the Full Recipe for more details. To make your soup shine, focus on the base. Start with good olive oil. Use it to sauté your onions and garlic until they are soft. This step adds depth. You can also add a pinch of sugar to balance the acidity. This small tweak can change the whole taste. Both fresh and canned tomatoes work well in this recipe. Fresh tomatoes add a nice taste in summer. If you use fresh tomatoes, aim for ripe ones. For canned, look for quality brands. They are often sweeter and save time. Just remember to crush them well before adding. This soup has simple swaps for different diets. For a dairy-free option, replace heavy cream with coconut cream. It adds a rich flavor without dairy. If you're gluten-free, check your broth. Some brands add gluten. Always read labels to keep your dish safe and tasty. For the full recipe, visit the section above. {{image_2}} To make this soup dairy-free, swap out heavy cream for coconut cream. Coconut cream adds a rich texture and a hint of sweetness. You can also use almond milk or cashew cream for a lighter option. These alternatives keep the soup creamy without dairy. Want to boost flavor? Add sautéed mushrooms or roasted red peppers. These ingredients add depth and create a more complex taste. You can also fold in some cooked quinoa or lentils for added protein. A splash of balsamic vinegar brightens the soup's flavor too. If you like heat, add red pepper flakes or diced jalapeños. Start with a small amount, then taste as you go. This way, you can control the spice level. For a smoky flavor, try adding smoked paprika. Adjusting the spices can make this soup perfect for your taste. After you enjoy your Instant Pot creamy tomato basil soup, let it cool. Pour the soup into airtight containers. This helps keep it fresh. Store the soup in the fridge. It lasts up to 5 days. If you want to keep it longer, freezing is a great option. When you're ready to eat your soup again, simply take it out of the fridge. Pour the soup into a pot over medium heat. Stir it often so it heats evenly. You can also use the microwave. Heat it in a bowl for about 2-3 minutes. Stir halfway through to avoid hot spots. To freeze the soup, make sure it is completely cool. Use freezer-safe containers or bags. Leave some space at the top for expansion. Label the containers with the date. The soup can freeze well for up to 3 months. When you're ready to eat, thaw it overnight in the fridge. Reheat it as mentioned before. Enjoy your delicious soup anytime! For the full recipe, check the [Full Recipe]. Homemade tomato basil soup lasts about 4 to 5 days in the fridge. Store it in an airtight container to keep it fresh. If you want to save it longer, freeze the soup. It will stay good for up to 3 months in the freezer. Just remember to let it cool before you freeze it. Yes, you can use fresh tomatoes! You will need about 2 pounds of fresh tomatoes. Start by roasting or boiling them to remove the skins. After that, chop them and add them to the pot. Fresh tomatoes add a bright taste but may require a bit more cooking time. Adjust your liquid, so the soup doesn’t get too thick. Absolutely! Making this soup ahead of time is a great idea. You can cook it and store it in the fridge for later. Just reheat it on the stove or in the microwave. If you freeze it, let it thaw in the fridge overnight before reheating. This soup tastes even better the next day as the flavors blend. For the full recipe, check out the [Full Recipe]. In this blog post, we covered the full recipe and essential ingredients for tomato basil soup. You learned how to prepare aromatics, cook, and blend the soup. We shared tips for perfecting flavor and adjusting spice levels. Variations for dietary needs and storage tips were also included. Making this soup is simple, and you can get creative with ingredients. Enjoy your homemade soup, knowing it will taste great and suit your needs. Happy cooking!

Instant Pot Creamy Tomato Basil Soup Delight

If you crave a warm, comforting bowl of soup, you’ll love my Instant Pot Creamy Tomato Basil Soup. This easy

Here’s what you need for a tasty Instant Pot Chicken Noodle Soup: - 1 lb boneless, skinless chicken breasts - 1 tablespoon olive oil - 1 medium onion, diced - 3 cloves garlic, minced - 3 carrots, sliced - 2 stalks celery, sliced - 6 cups chicken broth - 1 teaspoon dried thyme - 1 teaspoon dried rosemary - 1 bay leaf - Salt and black pepper to taste - 8 oz egg noodles - Fresh parsley for garnish These simple ingredients come together to create a warm, comforting bowl of soup. The chicken provides protein, while the veggies add color and nutrients. The herbs give it a great flavor boost. If you want more details, check out the Full Recipe. You can adjust the ingredients to fit your taste. Want more veggies? Add some peas or corn. Prefer a creamier soup? You can stir in a splash of cream at the end. Make sure to gather everything before you start cooking. It makes the process smooth and fun! First, we want to sauté the aromatics. To do this, I turn on my Instant Pot and select the “Sauté” function. I pour in one tablespoon of olive oil and let it heat up. Once hot, I add one medium onion, diced. I let it cook for about 3-4 minutes until it’s soft and clear. Then, I add three cloves of minced garlic for another minute. This makes the kitchen smell amazing! Next, I incorporate the chicken and vegetables. I place one pound of boneless, skinless chicken breasts into the pot. Then, I add three sliced carrots and two sliced stalks of celery. After that, I pour in six cups of chicken broth. I also add one teaspoon each of dried thyme and dried rosemary, along with one bay leaf. Finally, I sprinkle in salt and black pepper to taste. I stir it gently to mix everything together. Now, it’s time to cook in the Instant Pot. I secure the lid tightly and make sure the valve is set to “Sealing.” I select the “Manual” or “Pressure Cook” function and set the timer for 10 minutes. The Instant Pot will build pressure and start cooking the soup. Once the timer goes off, I let the pressure release naturally for about 5 minutes. After that, I carefully switch the valve to “Venting” to let out any remaining steam. I open the lid and use tongs to remove the chicken breasts. I shred the chicken using two forks. It should fall apart easily! Then, I return the shredded chicken to the pot. Now, I add 8 ounces of egg noodles to the soup. I select the “Sauté” function again and let it cook for about 5-6 minutes. I keep an eye on it until the noodles are tender. Finally, I taste the soup and adjust the seasoning if needed. Before serving, I remove the bay leaf. Now you’re ready to enjoy a warm bowl of delicious Instant Pot chicken noodle soup! For the full recipe, check the section above. Adjusting Seasoning for Taste Taste is key in a good soup. After cooking, always taste the broth. You may need to add more salt or pepper. If it feels flat, try adding a splash of lemon juice or vinegar. These ingredients brighten the flavor. Fresh herbs can also enhance the taste. Add parsley or thyme just before serving for a fresh kick. Cooking Time Tips The Instant Pot cooks fast, but timing is crucial. For tender chicken, cook for 10 minutes. If you like your noodles softer, add them early in the cooking. If you prefer them firmer, wait until after shredding the chicken. This way, they won’t overcook. Understanding Pressure Cooking Pressure cooking saves time and enhances flavors. The Instant Pot builds steam, which cooks food quickly. Always ensure the valve is set to "Sealing" before starting. This keeps the steam inside, leading to perfectly cooked meals. Maintaining Your Instant Pot Keep your Instant Pot in good shape. Clean the sealing ring after each use. This helps avoid any lingering smells. Regularly check the vent for blockages. A clean pot means better cooking each time. Use gentle soap and warm water for cleaning. This helps maintain the pot's function and longevity. {{image_2}} You can switch up the veggies in your soup. Try adding: - Peas - Corn - Bell peppers These add color and flavor. You can also use kale or spinach for a fresh touch. Just add these greens near the end of cooking. This keeps them bright and crunchy. For protein, chicken is great, but you can swap it out. Use turkey or even shredded rotisserie chicken. If you're feeling adventurous, try chickpeas for a veggie twist. They give you protein and a nice texture. If you need gluten-free noodles, look for rice noodles or gluten-free pasta. They work well in this soup. Just check the cooking time on the package. You might need to adjust it a little. For a low-sodium option, find broth labeled "low-sodium." You can also make your own broth from scratch. This way, you control the salt. Fresh herbs can add flavor without the extra sodium. Try thyme, rosemary, or even dill for a fresh taste. Explore these variations to make the soup your own! Check out the Full Recipe for specific details. To keep your Instant Pot Chicken Noodle Soup fresh, store it right. Use a clean container. Make sure it is airtight. This will help prevent any bad smells or taste. Place the soup in the fridge. It will stay good for about three to four days. If you want it to last longer, consider freezing it. - Allow the soup to cool down to room temperature. - Transfer to an airtight container. - Label the container with the date. - Store in the fridge for up to four days. - Let the soup cool completely. - Use freezer-safe containers or bags. - Remove as much air as possible. - Label with the date and type of soup. - Freeze for up to three months. Reheating your chicken noodle soup is easy and quick. You want to keep it safe and tasty. Here are some methods that work well. - Stovetop: Pour the soup into a pot. Heat over medium heat, stirring often. - Microwave: Use a microwave-safe bowl. Cover loosely and heat for 1-2 minutes, stirring halfway. - Stir the soup while reheating to avoid hot spots. - Add a splash of broth or water if it is too thick. - Taste and adjust seasoning after reheating. Enjoy your soup, whether fresh or reheated! For the full recipe, check out the Cozy Instant Pot Chicken Noodle Soup . How do I thicken my chicken noodle soup? To thicken your soup, you can add a cornstarch slurry. Mix 1 tablespoon of cornstarch with 2 tablespoons of cold water. Stir it into the hot soup and let it cook for a few more minutes. This method works great and keeps your soup smooth and tasty. Can I use frozen chicken in this recipe? Yes, you can use frozen chicken. Just add a few extra minutes to the cooking time. The Instant Pot will cook the frozen chicken safely. This saves time and is super convenient for busy days. How long does chicken noodle soup last in the fridge? Your chicken noodle soup can last about 3 to 4 days in the fridge. Make sure to store it in an airtight container. This helps keep it fresh and safe to eat later. What happens if I forget to seal the Instant Pot? If you forget to seal the Instant Pot, the pressure won't build up. This means your soup won't cook properly. Always check the valve to ensure it is set to "Sealing" before you start cooking. Can I double this recipe? Yes, you can double the recipe! Just make sure not to fill the pot past the maximum fill line. Doubling the ingredients can give you more soup for meal prep or sharing with friends. What can I do if my soup is too salty? If your soup is too salty, add more water or broth to balance the flavor. You can also add diced potatoes or a little sugar to help cut the saltiness. This can make your soup taste just right. You now have all the steps to make a tasty Instant Pot chicken noodle soup. We covered the key ingredients, how to prepare and cook, plus helpful tips. Remember, you can tweak the recipe for your taste. Adding different vegetables or proteins can make it your own. Store leftover soup properly for the best flavor when you reheat. Enjoy this easy meal that warms the soul and brings comfort. Cooking can be fun, and this recipe is a great way to start.

Instant Pot Chicken Noodle Soup Quick and Simple Recipe

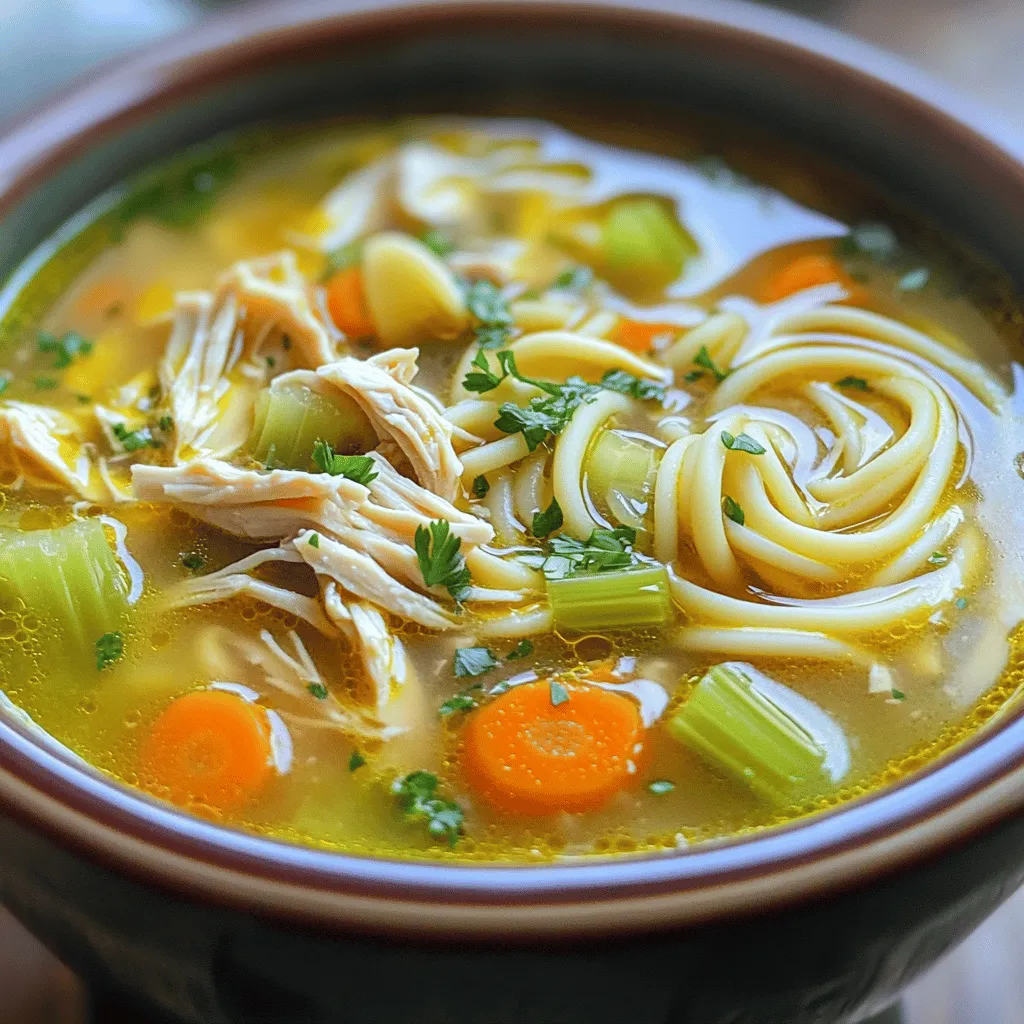
Craving a warm, comforting bowl of soup? This Instant Pot Chicken Noodle Soup is quick and simple to make! In

- 2 lbs beef chuck, cut into 1-inch cubes - 2 tablespoons olive oil - 1 large onion, chopped - 3 cloves garlic, minced - 4 medium carrots, sliced - 3 medium potatoes, peeled and diced - 1 cup green peas (frozen is fine) - 4 cups beef broth - 2 tablespoons tomato paste - 2 teaspoons dried thyme - 1 teaspoon smoked paprika - Salt and pepper to taste - Fresh parsley for garnish The key to a great beef stew is using the right ingredients. I choose beef chuck for its rich flavor and tenderness. It cooks well in the Instant Pot, giving you that melt-in-your-mouth goodness. The olive oil helps to brown the beef, adding depth to the stew. Onions and garlic are my go-to aromatics. They create a base of flavor that makes the stew sing. Carrots and potatoes bring sweetness and heartiness. I love adding peas for a pop of color and extra nutrients. - You can use brisket or round cuts of beef. They also work well and bring unique flavors. - Feel free to swap in other veggies like parsnips or turnips. - For a low-sodium option, use low-sodium beef broth. It keeps the dish tasty while reducing salt. Using fresh vegetables usually gives better flavor and texture. However, frozen veggies can save time and work just as well. If you use frozen peas, add them at the end to keep them bright and tender. When using frozen carrots or potatoes, they may need a bit more cooking time. Just adjust the pressure cooking time if you want them softer. - Cubing beef and vegetable cutting Cut your beef chuck into 1-inch cubes. This size ensures even cooking. Next, chop your onion and mince the garlic. Slice the carrots and dice the potatoes. Having all your ingredients ready makes cooking easier. - Sautéing tips for better browning Set your Instant Pot to Sauté mode. Add the olive oil and let it heat up. Season the beef cubes with salt and pepper before adding them. Brown the beef well, about 5-7 minutes. This step adds flavor to your stew. After browning, take the beef out and set it aside. - How to set the Instant Pot correctly After sautéing, add the onion and garlic to the pot. Cook for 2-3 minutes until the onion is soft. Then, add carrots, potatoes, thyme, and smoked paprika. Stir everything together. - Pressure cooking settings explained Next, deglaze the pot by stirring in the tomato paste. Pour in the beef broth and scrape the bottom. This prevents burning. Return the browned beef to the pot. Seal the lid and set the Instant Pot to Manual mode for 35 minutes. Ensure the pressure valve is set to Sealing. - Adding ingredients at the right time When the cooking time is up, let the pressure release naturally for 10 minutes. Then switch the valve to Venting to release any leftover pressure. After that, stir in the green peas. - Tips for achieving the perfect consistency If you want a thicker stew, blend a small portion and mix it back in. This trick gives your stew a nice, hearty texture. Ladle the stew into bowls and garnish with fresh parsley for a pop of color. For the complete recipe, check out the Full Recipe section. To make your beef stew great, start with browning the meat well. This step adds deep flavor. Use a hot pot and add olive oil before the beef. Don’t crowd the pot; it will not brown nicely. Let it cook for about 5-7 minutes on each side. If you want more taste, herbs are your friend. Add thyme and smoked paprika to bring out rich notes. Fresh herbs can also add a bright flavor. Toss in some parsley before serving for a fresh touch. Sometimes, your stew may turn out too thin. To fix this, you can blend a small part of the stew. This thickens it while keeping all the flavors. If you find your stew too salty, add diced potatoes. They soak up the saltiness. Cook them for a bit until tender, then remove them before serving. Want to save time? Prep your ingredients the night before. Chop your veggies and cube the beef ahead of time. Store them in the fridge to keep them fresh. After cooking, if your stew is too hot, cool it quickly. Place the pot in a sink filled with ice water for fast cooling. This trick helps keep your stew safe to eat later. For the full recipe, check out the entire guide to make this dish your own! {{image_2}} You can change the taste of your stew easily. Try adding red wine or beer. These drinks bring a deep richness. They also add a nice depth to the flavor. Just replace a cup of beef broth with wine or beer. You can also try exotic spices like cumin. Cumin adds a warm, earthy taste. A little goes a long way, so start small. Need a gluten-free option? Use gluten-free beef broth. This simple swap keeps your stew safe for all diets. You can also make a vegan version. Replace beef with mushrooms or lentils. Use vegetable broth instead of beef broth. This gives you a hearty, filling dish without meat. Adding seasonal veggies can change your stew. In summer, use zucchini or bell peppers. These fresh vegetables brighten up the dish. In winter, stick to root veggies like parsnips or turnips. They add warmth and comfort. Don't forget to pair your stew with fresh herbs. Parsley or thyme can really lift the flavors. Enjoy experimenting with what you have! For the complete recipe, check out the Full Recipe. To keep your beef stew fresh, use airtight containers. Glass or plastic containers work well. Let the stew cool down to room temperature first. This helps prevent moisture build-up inside the container. Store leftovers in the fridge for up to three days. When reheating stew, the stove is best. Pour the stew into a pot and heat it on medium. Stir often to ensure even heating. You can also use a microwave. Place the stew in a microwave-safe bowl. Heat in short bursts, stirring in between. Make sure it reaches 165°F to stay safe. To freeze beef stew, let it cool completely. Then, transfer it to freezer-safe containers or bags. Remove as much air as possible to prevent freezer burn. Label the containers with the date. When ready to eat, thaw the stew overnight in the fridge. Reheat it on the stove or microwave before serving. For the full recipe, check out the details above. Cooking beef stew in the Instant Pot takes about one hour. You need 20 minutes for prep and 35 minutes for cooking. After cooking, let the pressure release naturally for 10 minutes. This method speeds up the process while keeping the meat tender. Yes, you can use different cuts of beef. Options like brisket, round, or even sirloin work well. Choose cuts that have some fat for better flavor and tenderness. Chuck is ideal, but don't hesitate to experiment with your favorite cuts. Preparing beef stew without browning the meat is possible, but it may affect flavor. Browning adds depth and richness. If you skip this step, your stew might taste less complex. I highly recommend browning for the best results. Beef stew pairs well with many sides. Consider serving it with crusty bread or rice for a filling meal. Mashed potatoes bring a creamy texture that complements the stew. A simple green salad adds freshness and crunch. The beef is tender when it breaks apart easily with a fork. It should not feel tough or chewy. After cooking, check a piece to ensure it’s soft. Properly cooked beef should melt in your mouth, creating a comforting stew experience. This blog post covered how to make a delicious beef stew. We discussed the key ingredients, cooking steps, and tips for perfect results. Now, you have options for ingredient substitutions and flavor variations. I shared storage tips to keep your stew fresh and even answered common questions. Beef stew is versatile and can suit many tastes. Enjoy experimenting with flavors while making this classic dish. With practice, you’ll master the art of stew-making!

Hearty Instant Pot Beef Stew Simple and Delicious Meal

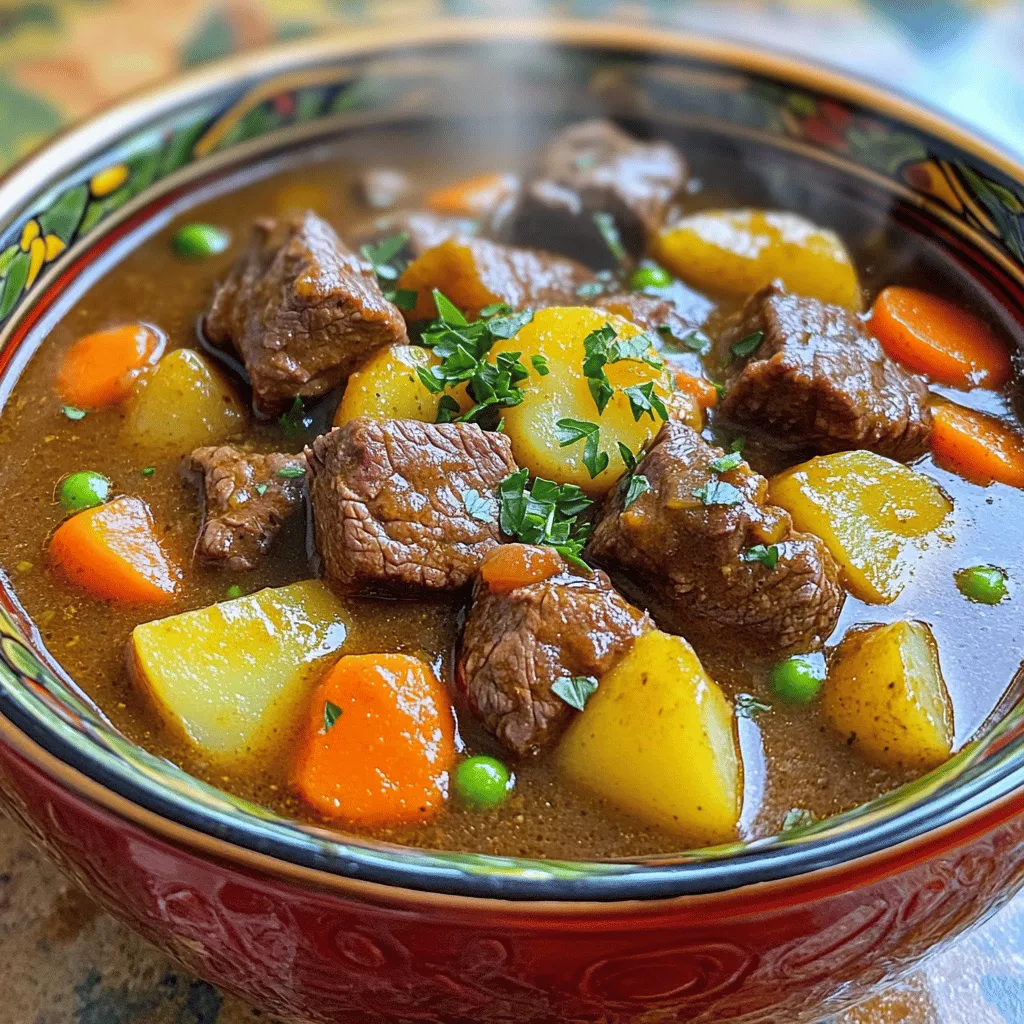
Welcome to your new favorite recipe! My Hearty Instant Pot Beef Stew is simple, quick, and packed with flavor. This

Older posts
Newer posts
← Previous Page1 … Page49 Page50 Page51 … Page84 Next →

dsad

© 2026 juliesdish • Built with GeneratePress

Our Policies

  • Copyright Policy
  • Cookie Policy
  • GDPR Policy
  • Privacy Policy
  • Disclaimer
  • Terms Of Use

More Information

  • Home
  • About
  • Contact
  • Appetizers
  • Dessert
  • Dinner
  • Drinks
©2026, juliesdish About Back To Top