Skip to content
DisclaimerTerms Of UseGDPR PolicyCookie Policy

juliesdish

  • Home
  • Drinks
  • Appetizers
  • Dinner
  • Dessert
  • About
  • Contact
  • Privacy Policy
DisclaimerTerms Of UseGDPR PolicyCookie Policy

NO-ING-IMG

- 3 cups shredded sweetened coconut - 1 cup sweetened condensed milk - 1 teaspoon vanilla extract - 1/4 teaspoon salt - 2 large egg whites - 1/4 cup granulated sugar - 1 cup dark chocolate chips (for dipping) - Sea salt flakes (for garnish) These main ingredients create the tasty base for your macaroons. Shredded sweetened coconut gives that wonderful chewy texture. The sweetened condensed milk adds sweetness and binds everything together. A dash of vanilla and salt enhances the flavors. The egg whites provide lift and lightness, while the granulated sugar helps achieve a crisp exterior. Finally, the dark chocolate chips transform these treats into an indulgent delight. - Alternative chocolates for dipping - Flavor extracts (e.g., almond) If you want to play with flavors, consider using different chocolates for dipping. You can try milk or white chocolate, which will change the taste. Adding flavor extracts, like almond, can give your macaroons a unique twist. - Mixing bowls - Baking sheet - Parchment paper - Microwave-safe bowl You will need a few kitchen tools to make this recipe smooth. Mixing bowls help combine the ingredients well. A baking sheet lined with parchment paper keeps the macaroons from sticking. A microwave-safe bowl is perfect for melting the chocolate. With these tools, you will be ready to create delicious chocolate-dipped coconut macaroons. If you're curious about the full recipe, check it out for more details! - Preheat the oven to 325°F (160°C). - Prepare the baking sheet with parchment paper. Start by heating your oven. This helps the macaroons bake evenly. Lining the baking sheet with parchment paper makes cleanup easy and keeps the macaroons from sticking. - Combine coconut, condensed milk, vanilla, and salt. - Whisk egg whites and incorporate with sugar. In a large bowl, mix the shredded coconut with sweetened condensed milk, vanilla, and a bit of salt. This mixture will give your macaroons a sweet and rich flavor. In another bowl, whisk the egg whites until they form soft peaks. Then, slowly add granulated sugar. Keep whisking until the mixture is glossy and forms stiff peaks. This step is key for making your macaroons light and airy. - Shape macaroons and space them on the baking sheet. - Bake for 20-25 minutes until golden. Next, scoop the coconut mixture. Use a tablespoon to form small mounds and space them about 2 inches apart. This helps them bake evenly. Bake the macaroons in your preheated oven for 20 to 25 minutes. Look for a golden color on the edges. Once done, let them cool on the baking sheet. - Melt chocolate for dipping. - Dip each macaroon and place back on parchment. While the macaroons cool, melt the chocolate chips in a microwave-safe bowl. Heat in 30-second intervals, stirring each time until smooth. Once the macaroons are cool, dip the bottoms into the melted chocolate. Allow the excess chocolate to drip off and place them back on the parchment paper. If you want, sprinkle a little sea salt on top before the chocolate sets. For the full recipe, check the details provided. To make light macaroons, you must fold gently. Start by mixing the coconut with the condensed milk. When you add the egg whites, use a spatula. Lift and turn the mixture carefully. This keeps air in the egg whites. Egg whites should reach soft peaks before you add sugar. Soft peaks look like little waves. Whisk until they are glossy and stiff. This helps the macaroons rise and stay light. For even baking, space the macaroons well on the sheet. Keep them about 2 inches apart. This allows heat to circulate. Rotate the baking sheet halfway through baking. This helps them bake evenly. Let the macaroons cool completely on the baking sheet. This keeps them from falling apart when you move them. Cooling also helps the texture stay perfect. When melting chocolate, use a microwave-safe bowl. Heat in 30-second bursts. Stir between each burst to keep it smooth. This prevents hot spots that can burn the chocolate. Avoid getting water in your chocolate. Even a drop can cause it to seize. If your chocolate does seize, you may need to start over. Remember, smooth chocolate makes for perfect dipping. For the full recipe, check the earlier section. {{image_2}} You can play with flavors in your macaroons. Adding nuts like almonds or macadamia brings a nice crunch. These nuts add rich taste and texture. You can also enhance the coconut flavor by adding a little coconut extract. This makes each bite even more delightful. The chocolate you choose can change the whole treat. Try using white chocolate or milk chocolate for a different twist. Each type brings its own taste and sweetness. You can even add flavors to the chocolate, like peppermint or orange zest. This will make your macaroons special and unique. If you need gluten-free options, simply use gluten-free ingredients. Most of what you need is naturally gluten-free. For those who prefer vegan treats, swap egg whites with aquafaba, the liquid from canned chickpeas. This works great and keeps your macaroons fluffy. Making these small changes lets everyone enjoy this delicious treat. To keep your chocolate-dipped macaroons fresh, store them in an airtight container at room temperature. This helps maintain their texture and flavor. If you want them to last a bit longer, you can refrigerate them. Just be sure to let them come back to room temperature before serving for the best taste. For longer shelf life, freezing macaroons is a great option. Place them in a single layer on a baking sheet and freeze until solid. Once frozen, transfer them to a freezer-safe bag or container. When you’re ready to enjoy, thaw them in the fridge overnight or at room temperature for a few hours. This keeps them moist and tasty. Chocolate-dipped macaroons can last about one week at room temperature. If stored in the fridge, they can stay fresh for up to two weeks. In the freezer, they can last for about three months. Just remember, the sooner you eat them, the better they will taste! Yes, you can make Chocolate Dipped Coconut Macaroons ahead of time. To do this, follow these tips: - Bake and cool: Prepare the macaroons and let them cool completely. - Store properly: Place them in an airtight container. Keep them at room temperature for up to three days. - Freeze for longer: For longer storage, freeze the macaroons. Use a freezer-safe container or bag. They can last up to three months in the freezer. - Chocolate dipping: You can dip them in chocolate right before serving. This keeps the chocolate fresh and tasty. To check if the macaroons are done baking, look for these signs: - Color: The edges should turn a nice golden brown. This shows they are baked well. - Texture: The tops should feel firm to touch. They should not be soft or gooey. - Time: Bake for 20-25 minutes. Check them after 20 minutes to avoid overbaking. Yes, you can use unsweetened coconut in this recipe. However, there are some effects to consider: - Flavor: Unsweetened coconut has a more natural, less sweet taste. This can make your macaroons less sweet overall. - Sweetness: You may want to add extra sugar if you prefer a sweeter treat. Adjust the sweetened condensed milk to balance the flavors. - Texture: Unsweetened coconut may affect the texture slightly, but the macaroons will still turn out great. In this post, we explored how to make delicious chocolate-dipped coconut macaroons. We detailed the main and optional ingredients, tools you’ll need, and provided clear steps for perfect macaroons. You learned tips for texture, baking, and chocolate melting, plus variations to make these treats your own. Now, you have the knowledge to whip up tasty treats at home. Enjoy your sweet creation!

Chocolate Dipped Coconut Macaroons Irresistible Treat

Craving a sweet, chewy treat that’s easy to make? Look no further than chocolate-dipped coconut macaroons! With just a few

To make a tasty Cranberry Pecan Chicken Salad, gather these ingredients: - 2 cups cooked chicken, shredded or diced - 1 cup celery, diced - 1/2 cup dried cranberries - 1/2 cup pecans, roughly chopped - 1/2 cup Greek yogurt (or mayonnaise) - 1 tablespoon Dijon mustard - 1 tablespoon apple cider vinegar - 1 teaspoon honey - 1/4 teaspoon garlic powder - Salt and pepper to taste - Mixed greens for serving Using fresh ingredients makes a big difference. Fresh celery adds a nice crunch. It gives your salad a crisp texture. Dried cranberries bring sweetness and chewiness. They balance well with the nuts and chicken. Pecans add a rich flavor and a bit of crunch. You can swap dried cranberries for fresh if you prefer. Just remember, fresh cranberries are tart, so adjust sweetness as needed. Fresh herbs like parsley or chives also brighten the dish. This salad is not just tasty; it's also healthy! Each serving offers: - Protein from chicken and yogurt - Healthy fats from pecans - Fiber from celery and cranberries - Vitamins from mixed greens This dish is perfect for a light lunch or dinner. It is filling and nutritious without being heavy. For the full recipe, check the earlier section to get started! To make Cranberry Pecan Chicken Salad, gather your ingredients. You need cooked chicken, celery, cranberries, and pecans. The dressing uses Greek yogurt, Dijon mustard, apple cider vinegar, honey, garlic powder, salt, and pepper. This dish takes about 15 minutes to prep and 30 minutes to chill. 1. Start by shredding or dicing your cooked chicken. You can use leftovers or rotisserie chicken for ease. 2. Chop the celery into small pieces. This adds a nice crunch to the salad. 3. In a large bowl, mix the chicken, celery, dried cranberries, and chopped pecans. 4. In a small bowl, whisk the Greek yogurt, Dijon mustard, apple cider vinegar, honey, garlic powder, salt, and pepper. Make sure it’s smooth and well-blended. 5. Pour the dressing over the chicken mixture. Gently toss to coat everything evenly. 6. Taste the salad. Adjust the salt, pepper, or honey to your liking. 7. Cover the bowl and refrigerate for at least 30 minutes. This helps the flavors blend. 8. Serve the salad on mixed greens, in a sandwich, or in a wrap for a tasty meal. When mixing, take your time. Gently toss to keep the ingredients intact. If you want more texture, add more pecans or cranberries. For a creamier salad, increase the Greek yogurt. You can also mix in fresh herbs for added flavor. Feel free to explore your preferences! To make the best cranberry pecan chicken salad, focus on texture and flavor. Start with good-quality cooked chicken. Shred or dice it well for even mixing. Use fresh celery for a nice crunch. The dried cranberries add sweetness, while pecans bring a rich, nutty taste. For the dressing, blend Greek yogurt and Dijon mustard. This mix gives your salad a creamy yet tangy kick. Don’t forget to let it chill before serving. This helps the flavors blend together beautifully. You can easily change ingredients to fit different diets. If you want a lighter option, replace Greek yogurt with a vegan mayo. For nut allergies, try sunflower seeds instead of pecans. If you prefer a bit of spice, add jalapeños or hot sauce. You can also swap out chicken for canned tuna or chickpeas for a vegetarian twist. Each change can give your salad a new taste while keeping it fresh. Serve your chicken salad on a bed of mixed greens. This adds color and freshness. You can also use it in a sandwich or wrap for a quick lunch. Pair it with a light soup for a full meal. A glass of iced tea or lemonade would complement it nicely. You can also add sliced apples or pears for extra crunch. This salad is versatile, and you can enjoy it in many ways. For the full recipe, check the section above. {{image_2}} You can swap chicken for other proteins. Try turkey for a tasty twist. Canned tuna works well too. For a vegetarian option, use chickpeas or tofu. Each choice brings a new flavor to the salad. Add fresh herbs for more taste. Chopped parsley or dill adds freshness. A squeeze of lemon juice gives a nice zing. You can also sprinkle in some feta cheese for a salty bite. Each of these options makes the salad pop. Change ingredients based on the season. In spring, add fresh peas for crunch. In summer, try diced bell peppers for sweetness. Autumn calls for diced apples, while winter can use roasted sweet potatoes. These swaps keep the salad fresh and exciting throughout the year. For the full recipe, check out the Cranberry Pecan Chicken Salad. To keep your cranberry pecan chicken salad fresh, store it in an airtight container. This helps prevent any air from spoiling the flavors. Make sure to refrigerate it within two hours of serving. If you plan to eat it later, do not add greens until just before you serve. When stored correctly, this chicken salad lasts for about three to four days in the fridge. If you want to freeze it, I recommend storing the chicken salad without the dressing. This keeps the texture nice. You can freeze it for about one month. Just remember to thaw it in the fridge before serving. Leftovers can sometimes lose their charm. To freshen them up, stir in a bit of Greek yogurt or a dash of vinegar. This adds moisture and brightness. Serve it on fresh greens to give it a new life. You can also add more cranberries or nuts for a tasty twist. For the full recipe, refer to the earlier section. If you don't have Greek yogurt, use mayonnaise as a substitute. It adds creaminess. You can also try sour cream for a tangy twist. Both options will keep your salad tasty and rich. Greek yogurt is lower in fat than mayonnaise. So, if you want a lighter dish, stick with it. Yes, this chicken salad works well for meal prep. You can make it ahead and store it in the fridge. It stays fresh for up to three days. Just make sure to keep it in an airtight container. The flavors will meld together over time, making it even better. I recommend serving this salad cold. Warm chicken salad might change the texture. The crispness of the celery and pecans shines best when chilled. If you prefer it warm, heat the chicken first and mix it in. Just know it will taste different than the original recipe. Try the full recipe for the best results! This article covered everything you need to know about making the perfect salad. We explored the key ingredients, the preparation steps, and tips for getting it just right. You learned how to make substitutions based on your needs and how to store any leftovers. Now you're ready to take your salad skills to the next level. Use fresh ingredients, try new flavors, and enjoy the process. A great salad is not just a meal; it’s a creative adventure. Happy cooking!

Cranberry Pecan Chicken Salad Fresh and Flavorful Dish

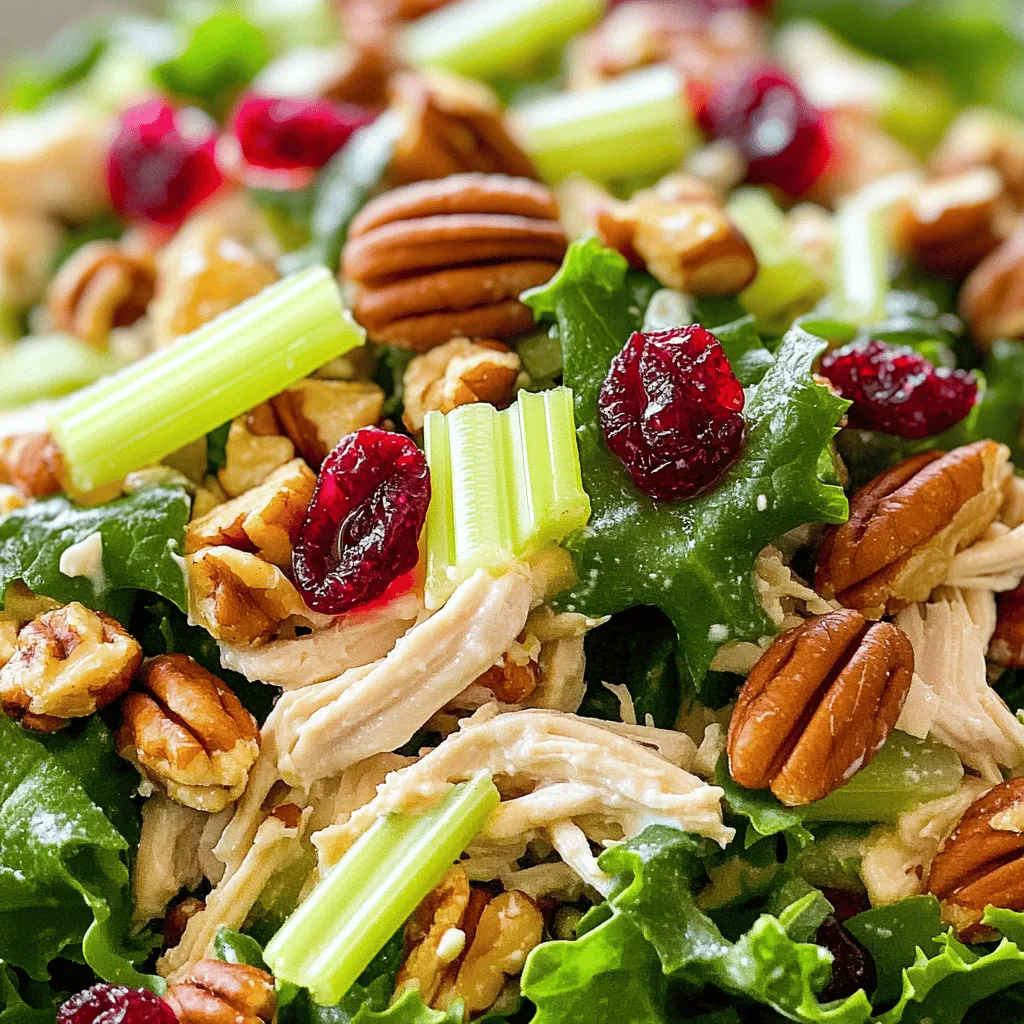
Looking for a quick and tasty meal? My Cranberry Pecan Chicken Salad is fresh and full of flavor. It combines

To make the delicious Caramel Apple Monkey Bread, you will need the following ingredients: - 2 cans of refrigerated biscuit dough - 1 cup brown sugar - 1/2 cup granulated sugar - 1 teaspoon ground cinnamon - 1/4 cup unsalted butter, melted - 2 large apples, peeled and diced (Granny Smith or Honeycrisp work great) - 1/2 cup pecan pieces (optional) - 1 cup caramel sauce (store-bought or homemade) - Powdered sugar for dusting (optional) You can switch up the apples if you like. Try using Fuji or Gala for a sweeter taste. If you want a nut-free version, skip the pecans altogether. You can also use almond or cashew pieces if you prefer. For a fun twist, add chocolate chips or dried fruit to the mix! These simple ingredients come together to create a sweet treat that is full of flavor. The mix of cinnamon, apples, and caramel makes every bite special. For the full recipe, check out the instructions above. First, preheat your oven to 350°F (175°C). This step is key for a perfectly baked monkey bread. Next, grab your bundt pan and spray it with non-stick spray. This will help the bread release easily later. In a medium bowl, mix together 1/2 cup of granulated sugar and 1 teaspoon of ground cinnamon. This sweet blend will coat the biscuit pieces. Now, open the cans of biscuit dough and cut each biscuit into quarters. This makes them bite-sized and easy to layer. Roll each piece of dough in the cinnamon sugar mixture until they are fully coated. Set them aside for later use. Now it's time to layer! Start by placing half of the coated biscuit pieces in the bottom of your greased bundt pan. Next, take half of the apple-pecan mixture and sprinkle it over the biscuit layer. If you like nuts, this is where you can use the pecan pieces. Add another layer of the remaining biscuit pieces on top. Follow it with the rest of the apple-pecan mixture. This creates a delicious mix of flavors throughout the monkey bread. Drizzle the melted butter evenly over the top of the biscuit and apple layers. This step adds richness and flavor. After that, sprinkle any leftover cinnamon sugar over the entire pan. Now, pour the caramel sauce evenly over the top. This allows it to drizzle between the layers, enhancing the sweetness. Bake your monkey bread in the preheated oven for 30-35 minutes. Check for doneness by looking for a golden brown color. Once it’s ready, let the monkey bread cool in the pan for about 10 minutes. Then, carefully invert it onto a serving plate. If you want, dust it with powdered sugar before serving. For the full recipe, check out the details and enjoy this delightful homemade treat! To get a golden brown finish, preheat your oven to 350°F (175°C). Grease your bundt pan well. This helps the bread come out easily. Layer the biscuit dough evenly to ensure it cooks through. Common pitfalls include undercooking or overcooking. To avoid these, set a timer for 30 minutes. Check for doneness by inserting a toothpick into the center. If it comes out clean, your bread is ready. If it’s still wet, give it a few more minutes. For serving, carefully invert the monkey bread onto a plate. This will show off the caramel and apple layers. You can cut it into pieces or pull it apart for a fun, casual look. To add some flair, dust the top with powdered sugar. This creates a lovely contrast with the caramel. You can also drizzle some extra caramel sauce over the top. It makes the dish look even more appetizing. Enjoy serving this sweet treat at gatherings or family dinners! {{image_2}} You can play with flavors in your Caramel Apple Monkey Bread. Try using pears instead of apples. Pears add a sweet, juicy twist. Berries are another fun option. They bring a burst of color and tartness. Mix berries like raspberries or blueberries for a fruity flair. You could even combine fruits for a unique taste. Think apples and berries together! The key is to choose fruits that hold their shape when baked. If you need a gluten-free version, use gluten-free biscuit dough. Many brands offer tasty options that work well. For a vegan twist, swap the butter for coconut oil. You can also use a plant-based caramel sauce. These changes keep the flavors while making it suitable for your diet. Always check labels to ensure all ingredients fit your needs. This monkey bread is great on its own, but you can elevate it. Serve it warm with a scoop of vanilla ice cream. The hot bread and cold ice cream create a delightful mix. Another fun idea is to add whipped cream on top. You can sprinkle some cinnamon or nuts for extra crunch. For a more indulgent treat, drizzle extra caramel sauce over each slice. Each of these ideas makes your Caramel Apple Monkey Bread even more special. Want the full recipe? Check out the Full Recipe section. After enjoying Caramel Apple Monkey Bread, store leftovers in an airtight container. This helps keep the bread moist. Place it in the fridge for the best results. To reheat, simply pop it in the microwave for about 15-20 seconds. If you prefer, you can warm it in the oven at 350°F for about 10 minutes. This brings back the gooey caramel and soft texture. Caramel Apple Monkey Bread stays fresh in the fridge for up to three days. After that, it may start to lose its flavor and texture. Always check for any signs of spoilage before eating. If it smells off or feels dry, it’s best to toss it. You can freeze Caramel Apple Monkey Bread for up to two months. To do this, let it cool completely. Wrap it tightly in plastic wrap and then in aluminum foil. This prevents freezer burn. To thaw, move it to the fridge overnight. Then, reheat it in the oven or microwave before serving. Enjoy the sweet flavors that taste just as fresh as when you first made it! For the complete recipe, check out the Full Recipe section. What can I substitute for biscuit dough? You can use crescent roll dough if you want a different taste. Some people like to use homemade dough for a fresh touch. Just make sure it’s easy to pull apart. Can I make this recipe ahead of time? Yes, you can! Prepare the dough and apple layers the night before. Just cover it well and place it in the fridge. Bake it fresh in the morning for a warm treat. Why did my monkey bread not rise properly? If your monkey bread did not rise, it could be due to the dough being old or expired. Make sure to check the date on the biscuit cans. Also, ensure your oven is preheated correctly. This helps the dough rise well. What can I do if my apples turned mushy? If your apples turned mushy, they may have been overcooked. Try choosing firmer apples like Granny Smith. You can also add them later in the bake to keep their crunch. Is Caramel Apple Monkey Bread a suitable dessert for gatherings? Absolutely! Caramel apple monkey bread is a fun dessert for any gathering. It’s easy to share and looks beautiful on a table. Everyone loves pulling apart the sweet, sticky pieces. Caramel Apple Monkey Bread is a fun treat that brings joy to any table. We covered everything from ingredients and preparation to baking tips and variations. Remember, you can swap fruits or try different diets. Store leftovers the right way to enjoy them later. This dish is great for gatherings, and you can prepare it ahead if needed. Follow these steps, and your dessert will impress everyone. Enjoy making this sweet delight!

Caramel Apple Monkey Bread Delightful Homemade Treat

Are you ready to create the perfect blend of sweet and gooey? In this blog post, I’ll guide you through

- Tofu: Selecting the Right Firmness - For this recipe, use firm tofu. Firm tofu holds its shape and crisps well when cooked. Avoid soft or silken tofu as they can break apart easily during cooking. - Sweet and Spicy Components: Honey and Sriracha - The star ingredients are honey and Sriracha sauce. Honey adds sweetness, while Sriracha brings the heat. Together, they create a perfect balance of flavors. Adjust the amount of Sriracha based on your spice preference. - Optional Garnishes: Green Onions and Sesame Seeds - Garnishing with sliced green onions adds a fresh crunch. Sesame seeds add a nutty flavor and a nice visual touch. Both are optional but enhance the dish's look and taste. For the full recipe, you can refer to the detailed instructions above. This dish is easy to make and packed with flavor! How to Press and Cube Tofu Start by pressing your tofu. This step removes extra water and helps it crisp up. Wrap the tofu block in a clean kitchen towel. Place a heavy object on top for about 20 minutes. This helps squeeze out moisture. After pressing, cut the tofu into 1-inch cubes. Ensuring Proper Drying Techniques Once cubed, ensure the tofu is dry. You can pat the cubes with a paper towel. This helps the cornstarch stick better. The drier the tofu, the crispier it becomes when cooked. Whisking Together Key Ingredients In a bowl, combine honey, Sriracha, soy sauce, and rice vinegar. Whisk them together until smooth. This glaze gives your tofu a sweet and spicy kick. You can adjust the amounts to suit your taste. Tips for Adjusting Sweetness and Heat If you want it sweeter, add a bit more honey. For extra heat, increase the Sriracha. Tasting as you mix helps you find the perfect balance. Remember, a little goes a long way with Sriracha. Best Practices for Frying Tofu Heat vegetable oil in a non-stick skillet over medium-high heat. Add the cornstarch-coated tofu cubes in a single layer. Fry in batches if needed. This prevents overcrowding, which makes the tofu soggy. Ensuring Even Cooking and Crispiness Cook the tofu for about 5-7 minutes on each side. Look for a golden-brown color. This indicates it's crispy. After frying, remove the tofu from the skillet and set it aside. You will add it back later to coat with the glaze. By following these steps, you can create a tasty Honey Sriracha Glazed Tofu that is easy to make at home. For the full recipe, check out the details provided earlier. Achieving Optimal Crispiness Tofu can be tricky. Press it well to remove moisture. Use a clean towel and a heavy object on top for 20 minutes. Cube the tofu into one-inch pieces. Coat each piece with cornstarch. This helps create that nice crunch when frying. Common Mistakes to Avoid Don’t skip pressing the tofu. It will turn out soggy. Also, avoid overcrowding the pan. Cook in batches to ensure even frying. Lastly, don’t rush the frying process. Let the tofu get golden before flipping. Balancing Sweetness with Spice The honey gives a sweet touch, while Sriracha adds heat. If you find the glaze too sweet, add more Sriracha. If it’s too spicy, mix in a bit more honey. Taste as you go to find your ideal balance. Suggestions for Heat Management For less heat, reduce the Sriracha. You can also mix in some soy sauce. It adds depth without spiciness. If you want more kick, consider adding chili flakes or fresh peppers. Plating Your Honey Sriracha Glazed Tofu Serve the tofu over jasmine rice. This makes for a beautiful base. Drizzle extra glaze on top for shine. Arrange the tofu pieces neatly for an appealing look. Best Garnishing Techniques Use sliced green onions for a pop of color. Sprinkle sesame seeds for a nice crunch. These simple touches make your dish look professional. It’s all about the details! For the full recipe, check out the Honey Sriracha Glazed Tofu. {{image_2}} For a vegan twist, you can easily substitute honey with agave syrup. Agave has a similar sweetness but is plant-based. This switch keeps the dish fully vegan without losing that rich flavor. You can also try other glaze combinations. For instance, mix maple syrup with Sriracha for a unique taste. This gives you a new flavor while keeping the spirit of the dish. Adding seasonal veggies boosts both nutrition and color. Try pairing your tofu with bell peppers, broccoli, or snap peas. These veggies not only taste great but also add crunch. You can also stir-fry them with the tofu for a quick and colorful meal. This method helps the veggies absorb some of the glaze, enhancing their flavor. If you need a gluten-free option, pick the right soy sauce. Look for tamari, which is a gluten-free soy sauce. This choice ensures you keep all the flavor without any gluten. When it comes to coating the tofu, cornstarch works well. You can also use rice flour for a crispy texture. Both options are great for frying and will make your tofu shine. You can find the full recipe for Honey Sriracha Glazed Tofu to experience these variations yourself! To keep your Honey Sriracha Glazed Tofu fresh, store it in an airtight container. Make sure it cools down before sealing it up. This helps prevent excess moisture, which can lead to sogginess. - Best Practices for Refrigeration: Place the tofu in the fridge within two hours of cooking. This keeps harmful bacteria away. Layer the tofu with parchment paper if you have extra sauce. This keeps it from getting too wet. - Shelf Life and Signs of Spoilage: When stored correctly, your leftovers can last up to three days in the fridge. Check for any strange smells or changes in texture. If it looks slimy or discolored, it’s best to toss it. Reheating is key to enjoying your leftovers. You want to keep the tofu crispy while warming it up. - Ways to Retain Crispiness: The stovetop is your best friend here. Heat a non-stick skillet over medium heat. Add a splash of oil and place the tofu in the skillet. Cook for a few minutes on each side until it’s hot and crispy again. - Microwave vs. Stovetop Heating: The microwave is quick but can make your tofu soggy. If you must use it, place a paper towel under the tofu. This can help absorb moisture. However, I recommend the stovetop for the best texture. Yes, you can make Honey Sriracha Glazed Tofu in advance. Meal prep helps save time. To do this, follow these steps: - Make the glaze and store it in a jar. - Press and cube the tofu, then store it in an airtight container. - Fry the tofu fresh for the best crispiness. - You can store the cooked tofu and glaze separately in the fridge for up to three days. When ready to eat, simply reheat the tofu and toss it with the glaze. This keeps the tofu crispy and flavorful. If you want to switch the tofu, there are great options. Here are some alternate protein sources: - Tempeh: It has a nutty flavor and works well. - Seitan: This wheat-based protein has a meaty texture. - Chickpeas: Roasted chickpeas add crunch and protein. - Cauliflower: Use cauliflower florets for a veggie twist. Feel free to try these in the recipe. Just remember to adjust cooking times as needed. The spiciness of Honey Sriracha Glazed Tofu depends on the Sriracha used. Sriracha has a mild to moderate heat level. If you prefer less spice, try these tips: - Use less Sriracha in the glaze. - Add more honey to balance the heat. - Mix in some ketchup for a sweeter taste. You can always taste the glaze before adding it to the tofu. This way, you can adjust the spice level to your liking. Enjoy your cooking! In this article, we explored making Honey Sriracha Glazed Tofu. We covered the right tofu firmness, glazed texture, and cooking methods. We also shared tips on adjusting flavors and presented ideas for variations. By following these steps, you can create a tasty dish. Enjoy your cooking journey and feel free to experiment with flavors and ingredients. This dish is flexible and fun, so make it your own!

Honey Sriracha Glazed Tofu Flavorful and Easy Recipe

If you’re craving a dish that combines sweet and spicy flavors, you’re in for a treat! This Honey Sriracha Glazed

To make the cinnamon streusel coffee cake muffins, you need: - 2 cups all-purpose flour - 1 cup granulated sugar - 1/2 cup unsalted butter, softened - 1 cup sour cream - 2 large eggs - 1 teaspoon vanilla extract - 1 teaspoon baking powder - 1 teaspoon baking soda - 1/2 teaspoon salt - 1 tablespoon ground cinnamon - 1/2 cup brown sugar - 1 cup chopped walnuts or pecans (optional) - All-purpose flour: This gives structure to the muffins. It helps them rise and hold their shape. - Granulated sugar: It sweetens the muffins and helps them brown. - Unsalted butter: Adds moisture and flavor. Softening it helps mix well. - Sour cream: This keeps the muffins moist and adds a nice tang. - Eggs: They bind the ingredients and add richness. - Vanilla extract: This boosts the flavor and adds warmth. - Baking powder: It helps the muffins rise and become fluffy. - Baking soda: Works with baking powder for an extra lift. - Salt: Balances the sweetness and enhances the other flavors. - Ground cinnamon: This gives the muffins their signature spice and aroma. - Brown sugar: Adds depth and a slight caramel flavor to the streusel. - Chopped nuts: They add crunch and flavor, but they are optional. If you have dietary needs, here are some swaps: - Gluten-free flour: Use a 1:1 gluten-free flour blend instead of all-purpose flour. - Non-dairy butter: Swap the unsalted butter for a plant-based option. - Greek yogurt: You can use Greek yogurt instead of sour cream for a tangy taste. - Flax eggs: Mix 1 tablespoon of ground flaxseed with 3 tablespoons of water to replace each egg. - Maple syrup: For a natural sweetener, you can use maple syrup in place of granulated sugar. Using these tips, you can enjoy these muffins no matter your diet! Check out the Full Recipe for more details. To start, preheat your oven to 350°F (175°C). This warms the oven for even baking. Next, prepare your muffin tin. You can line it with paper liners or grease it with non-stick spray. This step helps the muffins come out easily after baking. In a large bowl, cream together the softened butter and granulated sugar. Mix until it is fluffy. Then, add the eggs one at a time. Make sure to mix well after each egg. Now, stir in the vanilla extract. In another bowl, whisk together the flour, baking powder, baking soda, ground cinnamon, and salt. Gradually add this dry mixture to the butter mixture. Alternate this with the sour cream. Start and end with the flour mixture. Mix until just combined. This keeps the muffins light and fluffy. In a small bowl, mix the brown sugar, ground cinnamon, and chopped nuts if you are using them. This mixture will create a sweet, crunchy topping. It adds great texture and flavor to your muffins. Spoon about half of the batter into the prepared muffin cups. Next, sprinkle a generous layer of streusel topping over this batter. Then, add the remaining batter on top, filling the cups about 2/3 full. Top with more streusel for extra crunch. Bake in the preheated oven for 18-22 minutes. To check if they are done, insert a toothpick into the center. If it comes out clean, your muffins are ready. Allow them to cool in the pan for about 5 minutes before transferring them to a wire rack. This cooling time helps the muffins set. Enjoy your delightful cinnamon streusel coffee cake muffins! For the full recipe, refer to the beginning of this article. To get the best texture, use room-temperature ingredients. This helps the batter mix well. Cream the butter and sugar until light and fluffy. This step adds air to the batter, making the muffins rise nicely. Don’t overmix once you add the flour; just mix until there are no flour spots. This keeps the muffins tender and fluffy. For even baking, fill your muffin cups evenly. Aim to fill them about two-thirds full. Use an ice cream scoop for uniformity. Place your muffin tin on the center rack of the oven. This spot allows for the best air flow. Rotate the muffin tin halfway through baking to ensure all muffins bake evenly. One common mistake is not measuring flour correctly. Too much flour makes muffins dry. Always spoon the flour into your measuring cup and level it off with a knife. Another mistake is skipping the streusel topping. This adds a sweet crunch that enhances the muffins. Lastly, don’t open the oven door too early. This can cause the muffins to sink. Follow these tips to bake perfect cinnamon streusel coffee cake muffins every time! {{image_2}} If you want to skip the nuts, you can. Simply leave out the chopped walnuts or pecans from the recipe. This makes the muffins safe for those with nut allergies. The muffins will still be soft and tasty. You can add extra cinnamon for flavor or use seeds like sunflower seeds for crunch. You can easily change the flavors in these muffins. Try adding chocolate chips for a sweet twist. Just mix in a cup of semi-sweet chocolate chips to the batter before spooning it into the muffin tins. You can also add fruit, like blueberries or diced apples, for a fresh taste. Use about a cup of fruit to keep the balance just right. If you need gluten-free muffins, swap the all-purpose flour with a gluten-free blend. Make sure the blend includes xanthan gum for the best texture. You can use the same amount of the gluten-free flour as the regular flour in the recipe. This way, you can enjoy the same delicious muffins without gluten. For the full recipe, click here: [Full Recipe]. To keep your muffins fresh, store them in an airtight container. This prevents moisture loss. You can line the container with paper towels. Place the muffins in a single layer. This helps avoid squishing. Keep them at room temperature for up to three days. For longer storage, consider freezing. To freeze muffins, wrap each one in plastic wrap. Then, place them in a freezer bag. Remove as much air as possible. This protects them from freezer burn. They can last for up to three months. When ready to eat, take one out and let it thaw at room temperature. For a warm treat, pop it in the microwave for 15-20 seconds. Cinnamon streusel coffee cake muffins taste best fresh. When stored properly, they stay good for about three days. After that, they may dry out. If you want to keep them longer, freeze them. Always check for signs of spoilage, such as mold or an off smell. Enjoy your muffins at their best with the right storage. Don't forget to check the full recipe for more details! Yes, you can use plain yogurt in place of sour cream. Yogurt provides a similar tangy taste and moisture. It may change the texture slightly, but the muffins will still be delicious. To lower the sugar, you can reduce the granulated sugar by 25% or more. Use natural sweeteners like honey or maple syrup. You can also add spices like nutmeg or vanilla to enhance sweetness without adding sugar. You can use applesauce, mashed bananas, or flaxseed meal as egg substitutes. For each egg, use 1/4 cup of applesauce or mashed banana. Mix 1 tablespoon of flaxseed meal with 2.5 tablespoons of water for one egg. Yes, these muffins are great for meal prep. They store well in the fridge for about five days. You can also freeze them for up to three months. Just reheat them in the microwave or oven when ready to eat. To enhance the coffee cake flavor, add more cinnamon or a splash of almond extract. You can also mix in a bit of instant coffee granules into the batter for a richer taste. Topping with a glaze or icing adds a nice touch too. For the complete recipe, check out the full recipe section above. Cinnamon streusel coffee cake muffins are a treat you will love. They are soft, sweet, and full of flavor. The warm cinnamon hits your taste buds just right. The streusel topping adds a nice crunch. You can make them for breakfast or snack time. Each muffin is a perfect bite of joy. The full recipe is easy to follow and will guide you step by step. If you want to explore more delicious recipes, check out these links: - Classic Blueberry Muffins - Lemon Poppy Seed Muffins - Pumpkin Spice Muffins You can easily print the recipe for your kitchen. Just click the print option and follow along while you bake. Enjoy your baking and the delightful smell of cinnamon filling your home! This blog post covered how to make great muffins from scratch. You learned about key ingredients and their roles. You also found tips for perfect texture and common mistakes to avoid. We explored delicious variations and safe storage methods. Making muffins can be fun and rewarding. With practice, you'll create tasty treats for any occasion. Enjoy baking and experimenting with flavors that excite you!

Cinnamon Streusel Coffee Cake Muffins Delightful Treat

If you love the warm, cozy taste of cinnamon coffee cake, you’re in for a treat! Today, I’ll show you

To make Thai peanut ramen, you need these key ingredients: - 200g ramen noodles - 1 cup vegetable broth - 1/2 cup creamy peanut butter - 3 tablespoons soy sauce - 2 tablespoons lime juice - 1 tablespoon brown sugar - 1 tablespoon sesame oil - 1 teaspoon fresh grated ginger - 1 garlic clove, minced - 1 cup baby spinach - 1 carrot, julienned - 1 bell pepper, thinly sliced (any color) - 1/4 cup chopped green onions - Crushed peanuts and lime wedges for garnish You can swap some ingredients for dietary needs. If you need a gluten-free option, use gluten-free ramen or rice noodles. For a nut-free dish, try sunflower seed butter instead of peanut butter. If you want a low-sodium version, use low-sodium soy sauce. Also, you can replace vegetable broth with water if you want a lighter taste. Using fresh ingredients makes a big difference in flavor. Fresh veggies add crunch and color, making the dish appealing. Fresh garlic and ginger enhance the sauce with bright flavors. Always choose ripe limes for the best juice. Fresh ingredients not only taste better but also give a healthy touch to your meal. When you use good-quality items, you create a dish that shines with flavor. For the full recipe, refer to the list above. First, let’s cook the ramen noodles. Boil water in a pot. Add the noodles and cook them based on the package instructions. Usually, it takes about 3 to 5 minutes. Once they are soft, drain them and set them aside. This step is crucial, as the noodles will soak up the flavors later. Next, we need to make the peanut sauce. Grab a medium saucepan and place it on medium heat. Pour in the vegetable broth. Then, add the creamy peanut butter, soy sauce, lime juice, brown sugar, sesame oil, grated ginger, and minced garlic. Stir well until the sauce is smooth and warm. This sauce is the heart of the dish, giving it that rich and nutty flavor. Now, it’s time to mix everything. Add the julienned carrot and sliced bell pepper into the saucepan. Cook for about 3 to 4 minutes. You want the veggies to be tender but still crisp. Then, stir in the baby spinach and cooked ramen noodles. Mix gently until the spinach wilts. Serve the dish in bowls. Don’t forget to top each bowl with chopped green onions, crushed peanuts, and a lime wedge. This adds a fresh and zesty touch. For the full recipe, check out the details above. Enjoy your tasty Thai peanut ramen! When cooking ramen, follow these tips for the best results: - Use plenty of water. This helps the noodles cook evenly. - Add noodles once the water boils. This keeps them from sticking. - Stir gently at first, then let them cook without stirring. - Taste the noodles a minute before the time is up. They should be firm but tender. This way, you’ll have perfect ramen every time. To make your peanut sauce pop, try these tips: - Use fresh lime juice instead of bottled. Fresh juice tastes brighter. - Add a pinch of salt to enhance the flavors. - If you like spice, add chili paste or sriracha. This gives the sauce a nice kick. - Mix in some coconut milk for creaminess and depth. These small changes will elevate your sauce to a new level. Serving your Thai peanut ramen well makes it even more inviting. Here are a few ideas: - Use a wide, shallow bowl to show off the colors. - Top the dish with sliced green onions and crushed peanuts. - Add lime wedges on the side for a fresh touch. - Arrange the veggies nicely on top. This makes the dish look more appealing. With these tips, your ramen will be as beautiful as it is tasty. For the full recipe, check out the complete guide. {{image_2}} You can easily make this dish vegetarian or vegan. Use vegetable broth and creamy peanut butter as your base. Instead of chicken or shrimp, add tofu for protein. Tofu absorbs the flavors well and gives a nice texture. You can also add more veggies like mushrooms or zucchini. These additions make the dish colorful and healthy. If you want to add protein, there are great choices. Chicken is a classic option. Cook it in a pan until it’s golden brown. Then slice it and toss it into the ramen. Shrimp is another tasty option. Just cook them until pink and tender. If you prefer plant-based protein, use firm tofu. Press it, cube it, and sauté until crispy. Each protein adds a different taste and texture to your ramen. For those who love spice, add chili flakes or hot sauce. Start with a little, then taste before adding more. You can also use sriracha or sambal oelek for a kick. For a fresh touch, add sliced jalapeños or Thai bird chilies. These spicy options will wake up your dish and make it even more exciting. Once you finish your meal, let the Thai peanut ramen cool down. Use an airtight container to store the leftovers. This will keep the noodles and sauce fresh. Place it in the fridge if you plan to eat it within a few days. It is best to eat it within three days for the best taste. To reheat your ramen, add a splash of water to the noodles. Put it in a pot over low heat. Stir gently until heated through. This keeps the noodles from drying out. You can also use the microwave. Just cover your bowl and heat for one minute. Stir and heat again if needed. You can freeze Thai peanut ramen if you want to save it for later. However, the texture may change when you thaw it. The noodles might become softer. To freeze, place it in a freezer-safe container. Leave some space at the top for expansion. When ready to eat, thaw it in the fridge overnight. Reheat as explained before. Enjoy your flavorful meal anytime! For the full recipe, check out the details above. Thai Peanut Ramen is a tasty, quick meal. It combines ramen noodles with a creamy peanut sauce. This dish bursts with flavor from fresh vegetables and spices. You can whip it up in just 20 minutes. The sauce is made with peanut butter, soy sauce, and lime juice. It's rich, savory, and has a hint of sweetness. This meal is perfect for busy weeknights when you crave something comforting. Yes, you can use different noodles if you like. Soba or udon noodles work well in this dish. Rice noodles are also a great choice for a gluten-free option. Just make sure to cook them according to the package directions. Each type of noodle brings its own taste and texture. Experimenting can lead to new favorites. To make Thai Peanut Ramen gluten-free, use gluten-free soy sauce. This will keep the flavor while avoiding gluten. Also, pick gluten-free noodles, like rice noodles or gluten-free ramen. Check labels for any hidden gluten in sauces or ingredients. With these swaps, you can enjoy this dish without worry. This blog post covers making delicious Thai Peanut Ramen. We explored ingredients, including healthy swaps and the need for fresh produce. Then, we provided step-by-step instructions for cooking the noodles and making the sauce. I shared tips for better cooking and fun presentation ideas. Variations allow for dietary choices, including vegan and spicy options. Lastly, proper storage and reheating tips ensure your meal stays tasty. Embrace these ideas. Dive into cooking and enjoy your flavorful bowl of ramen!

Thai Peanut Ramen Flavorful and Easy Weeknight Meal

Are you craving a quick, tasty meal that bursts with flavor? Look no further than Thai Peanut Ramen! This dish

To make buttermilk blueberry pancakes, you need a few key ingredients. These are: - 1 cup all-purpose flour - 1 tablespoon sugar - 1 teaspoon baking powder - 1/2 teaspoon baking soda - 1/4 teaspoon salt - 1 cup buttermilk - 1 large egg - 2 tablespoons unsalted butter, melted - 1 cup fresh blueberries (or frozen, thawed) - Additional butter for cooking These ingredients work together to create fluffy, soft pancakes. The buttermilk gives them a unique taste and texture. Getting the measurements right is vital for perfect pancakes. Use a dry measuring cup for flour and sugar. For liquids like buttermilk, a liquid measuring cup is best. When you measure flour, spoon it into the cup and level it off. This method avoids packing the flour too tightly. You can add fun flavors to your pancakes. Consider these options: - 1 teaspoon vanilla extract for sweetness - 1 teaspoon cinnamon for warmth - Lemon zest for a fresh kick These optional ingredients can take your pancakes from good to great. Feel free to experiment and find your favorite mix! You can find the full recipe to try these additions. To make buttermilk blueberry pancakes, gather your ingredients first. You need: - 1 cup all-purpose flour - 1 tablespoon sugar - 1 teaspoon baking powder - 1/2 teaspoon baking soda - 1/4 teaspoon salt - 1 cup buttermilk - 1 large egg - 2 tablespoons unsalted butter, melted - 1 cup fresh blueberries - Additional butter for cooking Start by whisking the dry ingredients. Mix the flour, sugar, baking powder, baking soda, and salt in a big bowl. In another bowl, combine the buttermilk, egg, and melted butter. Whisk until it's smooth. Next, pour the wet mix into the dry mix. Stir gently until just combined. A few lumps are okay. Finally, fold in the blueberries. Now, heat a non-stick skillet over medium heat. Add a little butter to coat the pan. Pour about 1/4 cup of batter for each pancake. Cook until bubbles form on top and the edges seem set, about 2-3 minutes. It’s important not to rush this step. When it’s time to flip, do it gently. Cook for another 2-3 minutes until golden brown. When flipping, use a wide spatula. This helps keep the pancake intact. If the pancake sticks, wait a little longer before flipping. To serve, stack the pancakes high on a plate. Drizzle with maple syrup, and add more blueberries on top. A sprinkle of powdered sugar adds a nice touch. Enjoy your fluffy buttermilk blueberry pancakes! For more details, check the Full Recipe. To make your pancakes fluffy, start with fresh baking powder. Check the date on the package. Use buttermilk instead of regular milk. This adds moisture and tang. Mix the dry and wet ingredients separately. Combine them gently. Overmixing makes pancakes tough. It’s okay to have lumps in the batter. The more air you keep in the mix, the better your pancakes will rise. One common mistake is not letting the batter rest. Allow it to sit for 5-10 minutes. This helps the gluten relax. Another mistake is cooking on high heat. Medium heat cooks pancakes evenly. If the skillet is too hot, the outside burns while the inside stays raw. Lastly, avoid using old or stale blueberries. Fresh or properly thawed frozen berries give the best taste. To boost the flavor of your pancakes, add a dash of vanilla extract. A pinch of cinnamon also works wonders. You can even mix in citrus zest, like lemon or orange. For a fun twist, try adding chocolate chips along with the blueberries. Serve with maple syrup or honey for sweetness. Presentation matters too; stack them high and sprinkle with extra berries for a gorgeous look. For the complete recipe, refer to the Full Recipe section. {{image_2}} You can make gluten-free pancakes easily. Use gluten-free flour instead of all-purpose flour. Look for a blend that works well for baking. Often, these blends include rice flour, tapioca starch, and xanthan gum. Adjust the liquid if the batter seems too thick. This will help you achieve that fluffy texture. You can add fun flavors to your pancakes. For a warm touch, mix in a teaspoon of cinnamon. If you love citrus, add the zest of one lemon to the batter. This brightens the taste and adds freshness. You can also try vanilla extract or nutmeg for a unique twist. Each option brings a new taste to the classic blueberry pancake. Toppings can change your pancake game. Try classic maple syrup for sweetness. Fresh fruit, like sliced bananas or strawberries, adds color and flavor. For a crunch, sprinkle nuts like pecans or walnuts on top. You can also drizzle yogurt or whipped cream for a creamy finish. The options are endless, so get creative! This way, each breakfast can be a new delight. To keep your leftover pancakes fresh, you should store them properly. Allow the pancakes to cool completely. Place them in a single layer on a plate or tray. Cover them with plastic wrap or foil. You can also use an airtight container. This method helps keep them moist and tasty. Store them in the fridge for up to three days. Freezing pancakes is easy and smart. Place cooled pancakes in a single layer on a baking sheet. Make sure they do not touch each other. Freeze them for about one hour. Then, stack them with parchment paper in between each pancake. Place the stack in a freezer-safe bag or container. Label the bag with the date. They will stay good for up to two months. To reheat pancakes, you have a few options. For quick reheating, use the microwave. Place a pancake on a microwave-safe plate. Heat it for about 20-30 seconds. For best texture, use a skillet. Heat the skillet over medium heat and add a little butter. Cook each pancake for 1-2 minutes on each side until warm. Enjoy your fluffy buttermilk blueberry pancakes just like fresh! For the complete recipe, check out the Full Recipe section. Yes, you can use frozen blueberries in your pancakes. Just make sure to thaw them first. This helps avoid extra moisture in the batter. Frozen blueberries may bleed a bit, turning your pancakes a lovely purple hue. That color makes them even more fun! If you don’t have buttermilk, you can make your own. Combine 1 cup of milk with 1 tablespoon of vinegar or lemon juice. Let it sit for about 5 minutes. This creates a similar tangy flavor. You can also use plain yogurt or sour cream mixed with water. To make pancakes without eggs, use a mashed banana or unsweetened applesauce. Use about 1/4 cup of either for each egg you replace. This keeps the pancakes moist and adds natural sweetness. You can also use flaxseed mixed with water as an egg substitute. You can tell the pancakes are done when bubbles form on the surface. The edges should look set and dry. Flip them over and cook until golden brown, about 2-3 minutes more. A toothpick inserted in the center should come out clean. Enjoy your fluffy buttermilk blueberry pancakes! For the full recipe, check out the details above. You learned how to make buttermilk blueberry pancakes from scratch. We covered essential ingredients, helpful steps, and tips for a perfect meal. You can modify recipes with gluten-free options or bold flavors like cinnamon. Storing and reheating leftover pancakes keeps them tasty for later. With these insights, you can enjoy delicious pancakes anytime. Embrace the fun of cooking and share these tips with others!

Buttermilk Blueberry Pancakes Fluffy and Delicious Treat

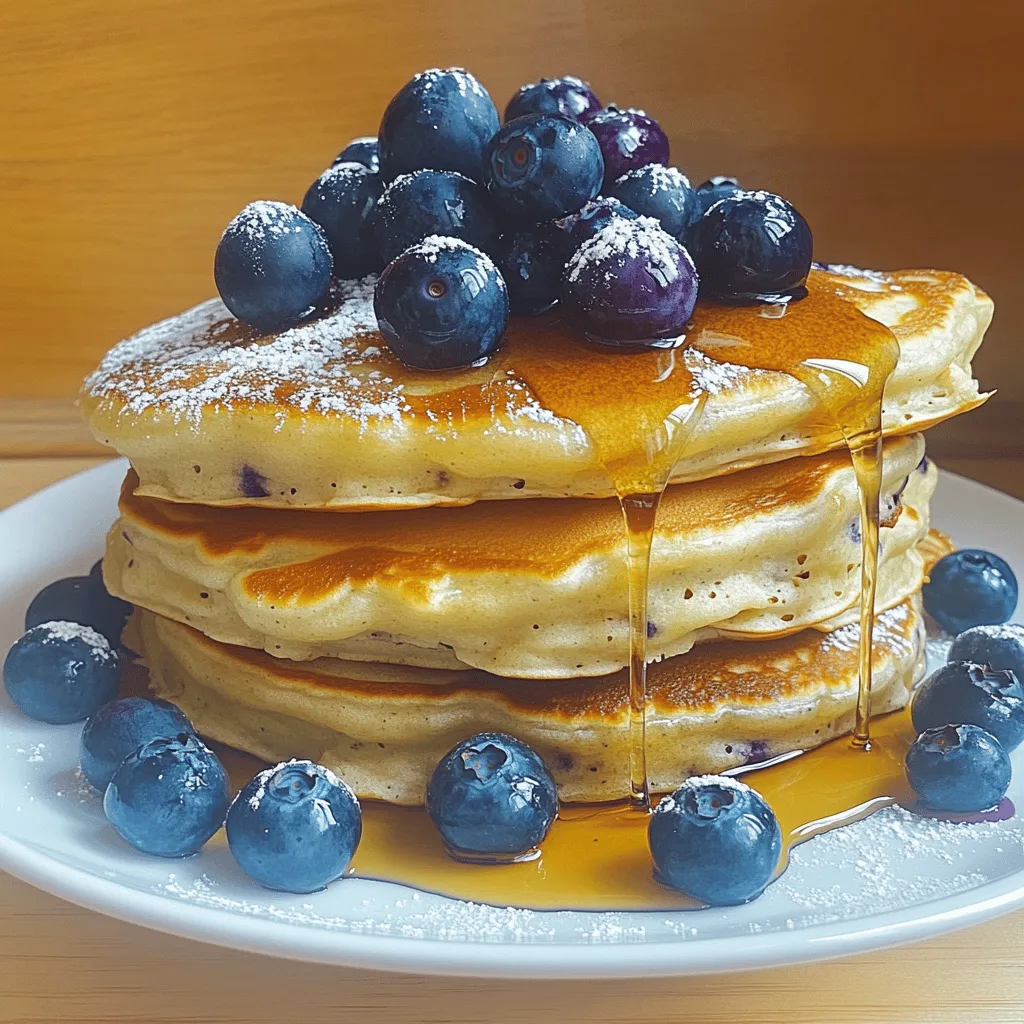
Get ready to elevate your breakfast game with my Buttermilk Blueberry Pancakes! These pancakes are fluffy, delicious, and perfect for

To make Pineapple Teriyaki Meatballs, you need a few simple ingredients. Here is what you will need: - 1 pound ground chicken or turkey - 1/2 cup breadcrumbs (gluten-free if needed) - 1/4 cup finely chopped green onions - 1/4 cup crushed pineapple, drained - 1 teaspoon garlic powder - 1 teaspoon ginger powder - 1 egg, beaten - Salt and pepper to taste For the teriyaki sauce, gather these items: - 1/2 cup low-sodium soy sauce - 1/4 cup honey (maple syrup works for vegan) - 2 tablespoons rice vinegar - 1 tablespoon cornstarch mixed with 2 tablespoons cold water - 1/2 cup diced pineapple (fresh or canned) - 1 tablespoon sesame seeds (for garnish) You will need some basic kitchen tools to prepare these meatballs. Here’s what you should have: - Mixing bowl - Baking sheet - Parchment paper (for easy cleanup) - Small saucepan - Measuring cups and spoons - Spoon or spatula for mixing Do you need to make some swaps? Here are some easy substitutes: - Use ground beef or pork instead of chicken or turkey. - Swap breadcrumbs with oats or crushed rice crackers. - Use scallions if you can’t find green onions. - Try using coconut aminos instead of soy sauce for a soy-free option. - Maple syrup can replace honey for a vegan choice. These swaps can help you make tasty meatballs no matter what you have on hand. For the full recipe, check the complete guide. To start, gather all your ingredients. You need one pound of ground chicken or turkey. Add half a cup of breadcrumbs, and look for gluten-free if you need it. Next, chop up a quarter cup of green onions. Drain and crush a quarter cup of pineapple. In a large bowl, combine these ingredients. Add one teaspoon of garlic powder and one teaspoon of ginger powder. Crack one egg and beat it before adding it to the mix. Season with salt and pepper to your taste. Now, mix everything well until combined. First, preheat your oven to 400°F (200°C). While the oven warms up, shape your mixture into small meatballs. Aim for about one inch in diameter. Place them on a lined baking sheet, spaced apart. Bake the meatballs for 15 to 20 minutes. They should be golden brown and cooked through. Keep an eye on them to avoid burning. While your meatballs bake, it’s time for the teriyaki sauce. In a small saucepan, combine half a cup of low-sodium soy sauce and a quarter cup of honey. You can use maple syrup if you want a vegan option. Add two tablespoons of rice vinegar and half a cup of diced pineapple. Heat this over medium until it simmers. In a separate bowl, mix one tablespoon of cornstarch with two tablespoons of cold water. Pour this mixture into your sauce and stir well. Cook for another two to three minutes until it thickens. Once your meatballs are done, coat them with the teriyaki sauce. For a complete guide, check the Full Recipe. To make the best meatballs, start with fresh ingredients. Use ground chicken or turkey. The choice of meat affects the taste and texture. Mix the ingredients well, but don’t overwork them. This keeps the meatballs tender. Shape them into even balls, about one inch wide. Use wet hands to prevent sticking. Bake them until golden brown for a nice texture. These meatballs shine on their own, but pair them with rice or quinoa. A side of steamed veggies adds color and nutrition. You can also serve them as appetizers with toothpicks. Drizzle extra teriyaki sauce on top for more flavor. Garnish with sesame seeds for crunch. Offer fresh pineapple pieces to add a fruity touch. To boost the flavor, try adding fresh herbs. Chopped cilantro or basil work well. You can also include chopped bell peppers for extra sweetness. If you like spice, add a dash of red pepper flakes to the sauce. For a smoky taste, use smoked soy sauce. This will give your dish a unique twist. For the full recipe, check out the complete guide. {{image_2}} You can swap ground chicken or turkey for other proteins. Try ground beef or pork for a richer taste. If you prefer lighter options, use ground chicken breast. For a leaner choice, ground turkey is great too. Each protein brings its own flavor, so feel free to experiment! To make this dish vegan, you can use lentils or chickpeas as your base. Just mash them up and mix with breadcrumbs and spices. Tofu also works well. Crumble firm tofu and blend it with flavorings. Use flaxseed meal mixed with water instead of an egg to bind the mixture. Serve your meatballs over rice or noodles for a filling meal. You can also add them to a fresh salad for a lighter option. Another fun way is to use them in sliders, served in small buns with extra teriyaki sauce. Don’t forget to garnish with fresh herbs or sesame seeds for that extra pop! For the full recipe, check out the Pineapple Teriyaki Meatballs section above. Once you finish your meal, let the meatballs cool. Then, place them in an airtight container. Store them in the fridge for up to three days. If you want to enjoy them later, this works well. Just remember to keep the teriyaki sauce separate. This keeps the meatballs from getting soggy. To reheat, you have a few choices. You can use the microwave or the oven. For the microwave, place the meatballs in a bowl with a splash of water. Heat for one to two minutes. If you prefer the oven, preheat it to 350°F (175°C). Place the meatballs on a baking sheet and heat for about ten minutes. Either way, ensure they are hot all the way through. Freezing is a great option for longer storage. Place cooled meatballs in a single layer on a baking sheet. Freeze them for about an hour. Once they are firm, transfer them to a freezer-safe bag. You can keep them frozen for up to three months. When you're ready to eat, thaw them in the fridge overnight before reheating. This method keeps your meatballs tasty and fresh. For the full recipe, check out the recipe section. You can enjoy Pineapple Teriyaki Meatballs with many sides. Rice is a classic choice. It soaks up the tasty sauce. You can also serve them with steamed veggies. Broccoli or snap peas work well. A fresh salad adds crunch and color, too. Try a simple cucumber salad for a refreshing touch. Noodles are another good option. They can be tossed in the teriyaki sauce for flavor. Yes, you can make Pineapple Teriyaki Meatballs ahead of time. Prepare the meatballs and bake them. Let them cool, then store in the fridge. You can keep them for up to three days. To heat, just warm them in the oven. If you want to freeze them, do so before baking. Freeze the raw meatballs on a tray first. Once frozen, place them in a bag. They last for about two months in the freezer. Making a gluten-free version is easy! Use gluten-free breadcrumbs in the meatball mix. Check your soy sauce, too. Look for a gluten-free soy sauce or tamari. This way, you keep the great flavor without gluten. You can also use coconut aminos as a soy sauce substitute. This makes the dish suitable for gluten-free diets without losing its tasty essence. Pineapple Teriyaki Meatballs are easy and fun to make. We covered key ingredients, simple steps, and tools needed. You learned tips to create perfect meatballs and tasty variations. I shared storage methods and answered common questions to help you enjoy this dish. Now, get creative and put your twist on these meatballs. Experiment with flavors and share them with family and friends. Enjoy cooking!

Pineapple Teriyaki Meatballs Delightful and Easy Recipe

Get ready to enjoy a burst of flavor with my Pineapple Teriyaki Meatballs! This simple recipe merges sweet and savory

To make this hearty soup, you will need the following key ingredients: - 1 lb ground beef (or ground turkey for a lean option) - 1 medium onion, diced - 2 cloves garlic, minced - 3 medium potatoes, diced - 4 cups beef broth - 1 cup carrots, diced - 1 cup celery, diced - 1 teaspoon Italian seasoning - 1 tablespoon Worcestershire sauce - Salt and pepper to taste - 1 cup cheddar cheese, shredded - 1 tablespoon olive oil - 1/2 cup heavy cream (optional for creaminess) - Fresh parsley for garnish These ingredients work together to create a warm, filling meal. The ground beef adds protein, while the veggies give texture and flavor. The broth brings everything together, making it a true comfort food. While the base recipe is delicious, you can add extra flavors with these optional ingredients: - Crispy bacon bits for a smoky touch - Hot sauce for heat - Bell peppers for sweetness and crunch - Fresh herbs like thyme or dill for freshness Feel free to mix and match! These extras can elevate your soup and make it your own. Here’s a breakdown of the nutritional benefits of the main ingredients: - Ground beef: Rich in protein and iron, helps build muscles. - Onions: Packed with vitamins and antioxidants, great for heart health. - Garlic: Boosts the immune system and adds flavor. - Potatoes: A good source of carbs and fiber, keeps you full. - Carrots and celery: High in vitamins and add crunch. - Cheddar cheese: Provides calcium and makes the soup creamy. - Heavy cream: Adds richness but can be left out for a lighter meal. Using these ingredients, you can enjoy a nutritious meal that fills you up and warms your heart. If you want the full recipe, check it out! To make One-Pot Cheeseburger Soup, start by gathering your ingredients: - 1 lb ground beef (or ground turkey for a lean option) - 1 medium onion, diced - 2 cloves garlic, minced - 3 medium potatoes, diced - 4 cups beef broth - 1 cup carrots, diced - 1 cup celery, diced - 1 teaspoon Italian seasoning - 1 tablespoon Worcestershire sauce - Salt and pepper to taste - 1 cup cheddar cheese, shredded - 1 tablespoon olive oil - 1/2 cup heavy cream (optional for creaminess) - Fresh parsley for garnish Cooking steps: 1. In a large pot, heat the olive oil over medium heat. Add the diced onion and minced garlic. Sauté until the onion turns translucent, about 3-4 minutes. 2. Next, add the ground beef (or turkey) to the pot. Cook until it browns, breaking it up with a spoon as it cooks. This takes around 5-7 minutes. Drain any excess fat if needed. 3. Stir in the diced potatoes, carrots, and celery, mixing well with the meat and onions. 4. Pour in the beef broth. Add Italian seasoning, Worcestershire sauce, salt, and pepper. Bring this mixture to a boil. Once boiling, reduce the heat and let it simmer for about 20 minutes, until the potatoes and carrots are tender. 5. If you want a creamier soup, stir in the heavy cream. Then add the shredded cheddar cheese. Stir until the cheese melts and everything combines well. 6. Taste your soup and adjust the seasoning if needed. 7. Serve hot. Garnish with fresh parsley on top for a pop of color. - Use fresh ingredients: Fresh veggies and herbs make a big difference in taste. - Don’t rush: Allow the soup to simmer fully for the best flavors to develop. - Adjust to taste: Always taste your soup before serving. Add more salt or pepper if needed. - Cheese choice: Use high-quality cheddar for the best melt and flavor. This simple and quick process makes the One-Pot Cheeseburger Soup a great choice for busy days. You can find the full recipe linked for more details. To make your soup creamier, add heavy cream when you finish cooking. This adds a rich flavor and smooth texture. You can also use cream cheese for a different taste. Blend it smooth before adding it to the pot. If you want a lighter option, use half-and-half. It still gives a creamy feel without too many calories. Reheating this soup is easy and quick. Use a pot over medium heat for best results. Stir often to keep it smooth. You can also use a microwave for quick reheating. Just cover the bowl to avoid spills. Heat in short bursts, stirring in between. This keeps the soup from getting too hot or thick. You can easily customize this recipe for various diets. If you're vegetarian, use plant-based ground meat or lentils. Swap beef broth for vegetable broth to keep it veggie-friendly. For a low-carb option, replace potatoes with cauliflower. This makes the soup lighter but still filling. For lactose-free needs, try dairy-free cheese and coconut milk. These swaps keep the flavor while fitting your diet. For the full recipe, check out the details above. {{image_2}} You can easily adapt this recipe to make it vegetarian. Instead of beef, use plant-based ground meat. You can also add beans for protein and fiber. Mushrooms give a nice, meaty texture, too. Use vegetable broth instead of beef broth for the soup base. This will keep the flavors rich without using meat. You can follow the full recipe, making these easy swaps. If you like heat, add some spice! You can mix in jalapeños or chili powder to the pot. Hot sauce is another great choice; stir it in when you add the cheese. Pepper jack cheese is an excellent substitute for cheddar. It adds creaminess and a nice kick. Adjust the spice level to suit your taste. This twist will give your soup an exciting flavor boost. For a low-carb version, skip the potatoes. Use cauliflower instead; it gives a similar texture. You can also add zucchini or spinach for more veggies. Use a low-carb broth and keep the cheese for flavor. Heavy cream is still a great option here, adding richness without the carbs. This way, you get all the deliciousness without the extra carbs. Enjoy this healthy take on cheeseburger soup! After enjoying your delicious one-pot cheeseburger soup, store leftovers quickly. Let the soup cool down to room temperature. Pour it into an airtight container. This helps keep the soup fresh. Store it in the fridge for up to three days. When you're ready to eat, just reheat it on the stove or in the microwave. Freezing is a great way to keep your soup for longer. To freeze, let the soup cool completely. Then, transfer it into freezer-safe containers or bags. Leave some space at the top, as the soup will expand when frozen. Label the containers with the date. You can freeze it for up to three months. When you are ready to enjoy it, thaw in the fridge overnight. Reheat on the stove for best results. The shelf life of cheeseburger soup is key to safe eating. In the fridge, it lasts about three days. If you freeze it, aim to eat it within three months for best taste. Always check for signs of spoilage. If the soup smells off or looks strange, it’s best to throw it away. Remember, food safety is important! Enjoy your one-pot meal safely and deliciously. For the complete recipe, refer to the [Full Recipe]. The prep time for One-Pot Cheeseburger Soup is about 10 minutes. Cooking it takes around 25 minutes. So, you can have a warm, tasty meal ready in about 35 minutes. This quick timeline makes it easy to fit into a busy day. Yes, you can make this soup in advance. It stores well in the fridge for up to three days. Just cool it down before you put it in a container. When you want to serve it, heat it on the stove or in the microwave. If you like, you can add a bit of milk or cream to help it stay creamy. I love serving One-Pot Cheeseburger Soup with crusty bread or soft rolls. A side salad also pairs well for a complete meal. For extra flavor, top the soup with chopped pickles or a dollop of sour cream. You can also sprinkle some extra cheese on top before serving. These small touches make the soup even more delicious. For the full recipe, check out the original source. In this blog post, we explored how to make delicious One-Pot Cheeseburger Soup. We covered essential and optional ingredients that add flavor. I shared cooking methods and helpful tips for creamy soup results. You can also find fun variations, like vegetarian and spicy options. Lastly, we discussed how to store leftovers and answered common questions. Enjoy your cooking, and remember that this easy soup can fit many tastes and diets. Happy cooking!

One-Pot Cheeseburger Soup Tasty and Hearty Meal

Welcome to your new favorite comfort food: One-Pot Cheeseburger Soup! Picture a rich, creamy blend of beef, cheese, and veggies

- 2 pounds chicken wings - 1 ripe mango, peeled and diced - 2 habanero peppers, deseeded and minced (adjust according to taste) - 1/4 cup honey - 2 tablespoons soy sauce - 1 tablespoon lime juice - 2 cloves garlic, minced - 1 teaspoon ginger, grated - Salt and pepper to taste - 1 tablespoon olive oil To make Mango Habanero Wings, you need fresh ingredients. Start with chicken wings. They are the star of this dish. You want about 2 pounds, perfect for sharing. Next, grab a ripe mango. The fruit should be sweet and juicy. Peel and dice it. This will give your sauce a tropical twist. Now, for some heat, use habanero peppers. I like to use two, but you can adjust this. Deseed and mince them. This step is key for flavor. To sweeten the sauce, use 1/4 cup of honey. It balances the heat well. Then, add 2 tablespoons of soy sauce and 1 tablespoon of lime juice for depth. Don’t forget the garlic. You need 2 cloves, minced, and 1 teaspoon of grated ginger. These add a nice kick to your wings. Finally, season with salt and pepper. A drizzle of olive oil helps the wings marinate. Mixing all these ingredients creates a vibrant and spicy sauce. It’s easy to get excited about these Mango Habanero Wings! {{ingredient_image_1}} To start, you need to marinate the wings. In a big bowl, mix the chicken wings with olive oil, salt, and pepper. Make sure the wings get coated well. This step is key for flavor. Let the wings sit for at least 30 minutes. If you can, marinate them overnight. This extra time adds more taste. Next, let’s make the sauce. In a blender, combine the diced mango, minced habanero peppers, honey, soy sauce, lime juice, garlic, and ginger. Blend until smooth. Check the flavor. If you want more sweetness, add more mango. For more heat, toss in extra habanero. This sauce is the star of your dish! Now, preheat your oven to 425°F (220°C). Line a baking sheet with aluminum foil. Place a wire rack on top. This helps the wings cook evenly. Arrange the marinated wings on the rack in one layer. Bake them for about 35-40 minutes. Turn them halfway through for crispiness. In the last 5 minutes of baking, take the wings out. Brush them with the mango habanero sauce. Put them back in the oven for 5 more minutes. This caramelizes the glaze and adds a nice finish. Once done, let them rest for a few minutes. Serve hot, with extra sauce on the side for dipping. For a beautiful presentation, arrange the wings on a platter. Drizzle with more sauce and garnish with fresh cilantro and lime wedges. Enjoy your spicy and flavorful mango habanero wings! Importance of Marination Marinating chicken wings is key to flavor and crispiness. When you coat the wings in olive oil, salt, and pepper, they absorb those flavors. Try marinating for at least 30 minutes, or longer if you can. This time allows the wings to soak up every bit of goodness. The longer, the better! Utilizing a Wire Rack Using a wire rack helps air circulate around the wings. This technique prevents sogginess. Place the wings on the rack over a baking sheet. This setup lets the fat drip away and keeps the wings from steaming. Bake them until they are golden and crispy, which usually takes about 35 to 40 minutes. Adjusting Spiciness with Habanero Habanero peppers pack a punch! You can control the heat by adjusting the number of peppers. For a milder version, use just one. If you love spice, add more. Remember to deseed the peppers for a milder kick. Always taste your sauce before using it to ensure it suits your taste. Options for Sweetness and Flavor Enhancements If you like your wings sweeter, add more mango or honey to the sauce. You can also include a splash of orange juice for a fruity twist. Experiment with different flavors that excite your palate! Adding a bit of lime zest can brighten the sauce, making it even more refreshing. Pro Tips Adjust Heat Level: If you prefer a milder flavor, reduce the number of habanero peppers or replace them with a less spicy pepper like jalapeño. Marination Time: For the best flavor, marinate the wings overnight in the refrigerator, allowing the spices to penetrate the meat thoroughly. Crispy Texture: Baking on a wire rack helps circulate heat around the wings, ensuring they become crispy on all sides. Serving Suggestion: Serve with a side of cooling ranch or blue cheese dressing to balance the heat of the wings. {{image_2}} Air Fryer Instructions You can make these wings in an air fryer for a quicker meal. Start by marinating the wings as usual. Set your air fryer to 375°F (190°C) and arrange the wings in a single layer. Cook for about 25 minutes, turning halfway through. This method gives you crispy wings with less oil. Grill Option for Outdoor Cooking Grilling the wings adds a smoky flavor. After marinating, preheat your grill to medium-high heat. Place the wings directly on the grill and cook for 15-20 minutes, flipping them often. Brush on the mango habanero sauce in the last few minutes for a tasty glaze. Substituting Fruits for Different Flavors You can swap mango with other fruits like pineapple or peach. Each fruit brings its own unique taste and sweetness. If you choose a sweeter fruit, you may want to cut back on honey to balance the flavors. Gluten-free Options for Soy Sauce If you need a gluten-free option, use tamari sauce instead of regular soy sauce. It has a similar taste and works well in this recipe. This small change keeps your wings tasty and safe for those with gluten sensitivities. To store leftover mango habanero wings, follow these tips: - Refrigeration Tips and Timeframe: Place your wings in an airtight container. They will stay fresh for about 3 to 4 days in the fridge. Make sure they cool down first to keep them crispy. - Freezing Instructions for Long-term Storage: For long-term storage, put the wings in a freezer-safe bag. Remove as much air as possible. You can freeze them for up to 3 months. When you’re ready to eat, let them thaw in the fridge overnight. Reheating wings can be tricky. Here are some great methods to keep them crispy: - Best Methods to Maintain Crispiness: The oven is best for reheating. Preheat it to 350°F (175°C). Place the wings on a baking sheet lined with foil. Bake for about 10 to 15 minutes until warm and crispy. - Stovetop vs. Microwave: You can use the stovetop too. Heat a pan on medium and add a little oil. Cook the wings for a few minutes on each side. Avoid the microwave if you want to keep the wings crispy. Microwaving makes them soggy and less tasty. To make your wings spicier, you can adjust the habanero quantity. Start with two habanero peppers. If you want more heat, add one or two more. Make sure to taste as you go. You can also use additional spicy ingredients. Consider adding cayenne pepper or a dash of hot sauce. These will enhance the spice without changing the flavor too much. Yes, you can use frozen wings. However, it’s best to thaw them first. You can thaw wings overnight in the fridge or use a microwave. Cooking times will change slightly. Frozen wings might need an extra 5-10 minutes in the oven. Always check for doneness to ensure they are cooked through. Great sides include coleslaw, rice, or corn on the cob. These complement the wings nicely. For beverage pairing, try a cold beer or a sweet mango soda. These drinks balance the spicy flavor of the wings well. You now have all the steps to make delicious Mango Habanero Chicken Wings. From marinating the wings to preparing the sauce, each detail matters. You can customize the flavor to suit your taste. Try different cooking methods like air frying or grilling for variety. Remember, leftover wings can be stored and reheated easily. Enjoy experimenting with this fun recipe! Dive into this cooking adventure and impress yourself and others with your skills.

Mango Habanero Wings Spicy and Flavorful Recipe

Get ready to spice up your dinner with my Mango Habanero Wings! This flavorful recipe combines juicy chicken wings with

Older posts
Newer posts
← Previous Page1 … Page43 Page44 Page45 … Page84 Next →

dsad

© 2026 juliesdish • Built with GeneratePress

Our Policies

  • Copyright Policy
  • Cookie Policy
  • GDPR Policy
  • Privacy Policy
  • Disclaimer
  • Terms Of Use

More Information

  • Home
  • About
  • Contact
  • Appetizers
  • Dessert
  • Dinner
  • Drinks
©2026, juliesdish About Back To Top