Skip to content
DisclaimerTerms Of UseGDPR PolicyCookie Policy

juliesdish

  • Home
  • Drinks
  • Appetizers
  • Dinner
  • Dessert
  • About
  • Contact
  • Privacy Policy
DisclaimerTerms Of UseGDPR PolicyCookie Policy

NO-ING-IMG

For a vibrant Tropical Peach Mango Salsa, you need these key ingredients: - 2 ripe peaches, diced - 1 ripe mango, diced - 1/2 red bell pepper, finely chopped - 1/4 red onion, finely chopped - 1 jalapeño, deseeded and minced (optional for spice) - 1/4 cup fresh cilantro, chopped - Juice of 1 lime - Salt and pepper to taste These ingredients bring a bright and sweet flavor to your dish. The peaches and mangoes provide a juicy base. The red bell pepper adds crunch, while the onion gives it a nice bite. If you like heat, the jalapeño is a great touch. Fresh cilantro and lime juice brighten the flavors even more. You can enhance your salsa with these optional ingredients: - 1/2 teaspoon garlic powder - 1 teaspoon honey for sweetness - A pinch of cumin for warmth Adding garlic powder gives a savory note. Honey can balance the tartness of the lime. Cumin adds depth and pairs well with the fruits. To make your salsa pop, consider these garnishes: - Extra lime wedges - Slices of fresh avocado - Additional cilantro leaves These garnishes not only look great but also add more flavor. Lime wedges let people add their own zing. Avocado adds creaminess, making the dish more filling. Extra cilantro can appeal to those who love its fresh taste. Start by gathering all your fresh ingredients. You need two ripe peaches and one ripe mango. Dice both fruits into small, even pieces. Next, take half a red bell pepper and chop it finely. Then, finely chop a quarter of a red onion. If you like heat, deseed and mince one jalapeño. Lastly, chop a quarter cup of fresh cilantro. This mix will create a bright, colorful salsa. In a large mixing bowl, add the diced peaches and mango. Then, mix in the red bell pepper, red onion, and jalapeño. Next, sprinkle in the chopped cilantro for added freshness. Squeeze the juice of one lime over the mixture. The lime juice adds a zesty kick. Stir all the ingredients gently but thoroughly. You want everything to blend well. Finally, season the salsa with salt and pepper to suit your taste. Let your salsa sit for at least 15 minutes. This helps the flavors meld together beautifully. Serve it chilled or at room temperature. It pairs well with grilled fish or chicken. You can also enjoy it with tortilla chips. For a fun touch, try plating it in a colorful bowl. This salsa is best eaten fresh but can last a day in the fridge. Choose ripe peaches and mangoes for the best taste. Look for peaches that are slightly soft. They should have a sweet smell. For mangoes, pick ones that yield slightly to gentle pressure. A ripe mango will also have a fruity aroma. Freshly picked fruits will make your salsa shine. Store your salsa in an airtight container. It keeps the flavors fresh and vibrant. Place the container in the fridge. Fresh salsa tastes best within two days. If you have leftovers, add lime juice to keep it fresh longer. This helps slow down browning. You can change the flavors to suit your taste. Add diced avocado for creaminess. Swap the red onion for green onion for a milder taste. If you like heat, add more jalapeño or include serrano peppers. You can also mix in diced pineapple or kiwi for a tropical twist. {{image_2}} You can spice up your salsa easily. Adding jalapeño gives it a nice kick. If you want more heat, try a serrano pepper. For a smoky flavor, add some chipotle powder. Taste as you go, so you find the right heat for you. You can swap fruits to create new flavors. Try using pineapple for a tropical twist. Or, mix in diced kiwi for a tart taste. You can even use strawberries for a sweet touch. Be creative and use fruits that you enjoy. To make a low-calorie salsa, focus on fresh veggies. Use more red bell pepper and less fruit. You can also add cucumber for crunch with fewer calories. This keeps your salsa fresh and light without losing flavor. Tropical peach mango salsa adds a fresh taste to many meals. I love serving it with grilled chicken or fish. The sweet and tangy flavors complement the savory meats well. You can also use it as a topping for tacos or burritos. It brings a fruity twist to your favorite dishes. For a lighter option, serve it with tortilla chips. The crunchy texture pairs perfectly with the salsa. This salsa isn’t just for dipping! You can mix it into salads for a burst of flavor. Try adding it to a bowl of rice or quinoa. It makes a colorful and tasty addition. You can also use it in wraps or sandwiches to brighten up your lunch. If you love breakfast, spoon it over scrambled eggs or an omelet. The salsa adds a tropical vibe to your morning meal. Making your salsa look good is easy! Use a clear bowl to show off the bright colors. You can also serve it in a halved pineapple or coconut for a fun twist. Garnish with extra cilantro or lime wedges for a pop of color. Make sure to serve the salsa chilled for the best taste. The fresh look will make your dish even more tempting. Tropical Peach Mango Salsa lasts about 2 to 3 days in the fridge. Keep it in an airtight container. The flavors stay fresh for a short time. After a few days, the fruit may get mushy. If you notice changes in texture or smell, it’s best to toss it. Yes, you can make Tropical Peach Mango Salsa ahead of time. I suggest making it the day before you plan to serve it. This allows the flavors to mix well. Just remember to store it in the fridge. It tastes great when chilled. Tropical Peach Mango Salsa pairs well with many dishes. Here are some ideas: - Grilled chicken or fish - Tacos or burritos - Tortilla chips for dipping - Salads for a fresh touch - Rice or quinoa bowls These pairings bring out the fresh flavors of the salsa. Enjoy experimenting with your favorite dishes! Tropical Peach Mango Salsa is refreshing and easy to make. We covered key ingredients, from main fruits to optional flavors and garnishes. Step-by-step, you learned how to prepare and combine these ingredients. Tips on storage and customization give you ideas for making it your own. Variations let you add spice or swap fruits while serving suggestions show how to pair it perfectly with dishes. Enjoy this vibrant salsa for any occasion, and don't hesitate to experiment; your taste buds will thank you.

Tropical Peach Mango Salsa Fresh and Flavorful Dish

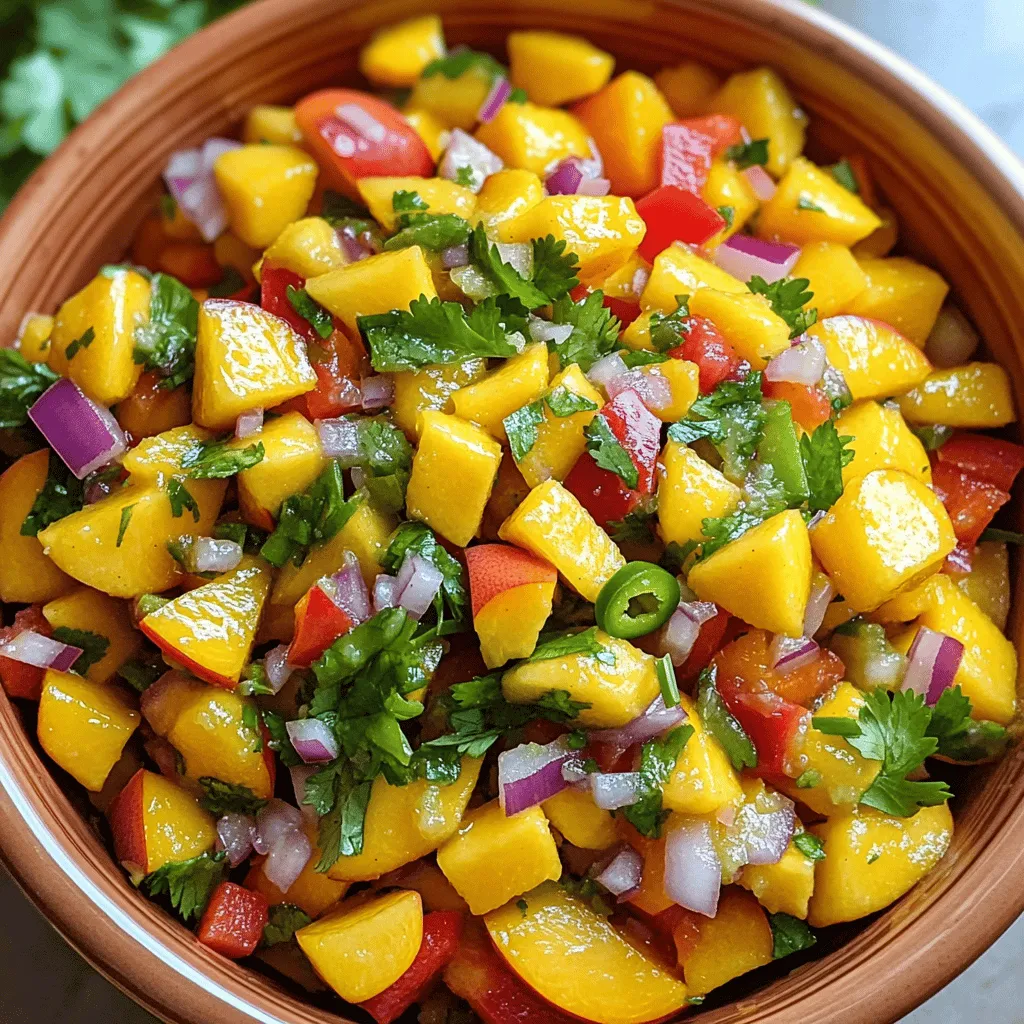
If you’re looking for a burst of flavor, my Tropical Peach Mango Salsa is a must-try! Fresh, fruity, and oh-so-delicious,

- 2 cups rolled oats: These oats form the base for your granola. They provide fiber and a chewy texture. - 1 cup pecans, chopped: Pecans add a rich, nutty flavor and a satisfying crunch. - 1/2 cup pumpkin seeds: These seeds are high in protein and healthy fats. They also add crunch and flavor. - 1/2 cup dried cranberries: Cranberries bring a sweet, tart taste and chewy texture. They balance the nutty flavors. - 1/2 cup maple syrup: This syrup adds natural sweetness. It helps bind the granola together. - 1/2 cup canned pumpkin puree: Pumpkin adds moisture and flavor. It also boosts the health benefits. - 1/4 cup coconut oil, melted: Coconut oil helps with binding. It gives a light coconut taste. - 2 teaspoons pumpkin pie spice: This spice mix gives your granola its warm, cozy flavor profile. - 1/2 teaspoon vanilla extract: Vanilla adds depth and richness to the flavor. - 1/4 teaspoon salt: Salt enhances all the flavors in your granola. - Chopped nuts: You can swap pecans for walnuts or almonds. - Other dried fruits: Try raisins or chopped dates for a different sweetness. - Coconut flakes: Add unsweetened coconut for extra texture. - Chocolate chips: Mix in dark chocolate chips after baking for a sweet treat. 1. Preheat your oven to 350°F (175°C). This ensures even baking. 2. Line a baking sheet with parchment paper. This helps with easy cleanup. 3. Mix dry ingredients. In a large bowl, combine: - 2 cups rolled oats - 1 cup chopped pecans - 1/2 cup pumpkin seeds - 1/2 cup dried cranberries Stir these together to get a good mix. This will add texture. 4. Combine wet ingredients in a separate bowl. Whisk together: - 1/2 cup maple syrup - 1/2 cup canned pumpkin puree - 1/4 cup melted coconut oil - 2 teaspoons pumpkin pie spice - 1/2 teaspoon vanilla extract - 1/4 teaspoon salt Make sure everything blends well. This mix adds flavor. 5. Pour the wet mix over the dry ingredients. Stir until all the dry ingredients get coated. This ensures every bite is tasty. 6. Spread the granola on the lined baking sheet. Use a spatula to press it down gently. This helps it stick together. 1. Bake the granola for 25-30 minutes. Stir it halfway through baking. This helps it bake evenly. 2. Watch closely while it bakes. It should turn golden brown. Keep an eye on it to avoid burning. 3. Remove from the oven and let it cool completely on the baking sheet. It will become crunchy as it cools. Don’t rush this step! Now you have a crunchy and flavorful pumpkin spice granola ready to enjoy! To get that perfect crunch in your pumpkin spice granola, follow these tips: - Use fresh ingredients: Fresh oats and nuts add more flavor and crunch. - Don’t skip the pressing: After mixing, press the granola down on the baking sheet. It helps form clusters. - Monitor the bake time: Check the granola halfway. Stir gently to avoid burning. - Cool completely: Let it cool on the sheet. It will harden as it cools. For tools, you need: - A large mixing bowl for combining ingredients. - A whisk for mixing the wet ingredients. - A baking sheet lined with parchment paper for easy cleanup. - A spatula for pressing and stirring. Want to amp up the flavor? Here are some ideas: - Add nuts: Almonds or walnuts can boost both taste and crunch. - Mix in seeds: Chia or sunflower seeds add texture and nutrients. - Try dried fruits: Raisins or apricots offer sweetness and chewiness. These extras also bring nutritional benefits: - Nuts: They are great sources of healthy fats and protein. - Seeds: They can add fiber and essential minerals. - Dried fruits: They provide vitamins and antioxidants. Feel free to get creative! Your granola can be as unique as you want. {{image_2}} You can change the spice mix to fit your taste. Try using apple pie spice instead of pumpkin pie spice. This mix has cinnamon, nutmeg, and allspice for a warm flavor. You could also add some ground ginger for a unique twist. Think about using seasonal ingredients. In the fall, add chopped apples or pears for a fruity crunch. In the winter, try dried figs or even some chocolate chips. These swaps keep your granola exciting and new. Making this granola gluten-free is easy. Just use gluten-free oats instead of regular rolled oats. This way, everyone can enjoy it without worry. If you want to make it vegan, swap the honey for maple syrup. The recipe already uses maple syrup, so you’re all set! You can also replace coconut oil with a plant-based butter. This keeps the granola tasty and friendly for all diets. To keep your pumpkin spice granola fresh, store it in an airtight container. This helps keep moisture out and preserves crunchiness. I like using glass jars or plastic bins with tight lids. You can also use resealable bags, but make sure to press out the air before sealing. Keep your granola in a cool, dry place. Avoid direct sunlight, as it can make the oils go bad. When stored properly, your granola can last for about two weeks. After that, it may start to lose its crunch. Signs that your granola has gone bad include a stale smell or an off taste. If you see any mold, toss it out right away. Always trust your senses—if it looks or smells strange, it's better to be safe! How to make pumpkin spice granola without nuts? You can skip the nuts in this recipe. Just use more seeds or dried fruit. Sunflower seeds or extra pumpkin seeds work well. You can even add more oats to keep the texture nice. This will still give you a crunchy and tasty granola. Can you use honey instead of maple syrup? Yes, honey can replace maple syrup. It adds sweetness and helps bind the granola. Just keep in mind, honey is sweeter than maple syrup. You might want to use a bit less. Adjust to your taste and enjoy your granola! Top brands available in stores You can find many brands of pumpkin spice granola at stores. Popular ones include Nature Valley, Bear Naked, and Cascadian Farm. Check your local grocery store for these brands. They often offer tasty options. Recommendations for purchasing online If you prefer online shopping, websites like Amazon and Thrive Market have great choices. You can read reviews and find different brands. Look for organic or gluten-free options if you prefer those. Overview of calories, carbs, and protein content per serving Each serving of pumpkin spice granola has about 200 calories. It contains 30 grams of carbs and 5 grams of protein. This makes it a filling snack or breakfast option. Health benefits of pumpkin and spices used Pumpkin is high in fiber and vitamins. It can help your digestion and keep you full longer. The spices in this granola, like cinnamon and nutmeg, have health benefits too. They can help with inflammation and add flavor without extra calories. Enjoying this granola can be tasty and good for you! In this blog post, we've explored how to make delicious pumpkin spice granola. I shared the key ingredients and simple steps for preparation and baking. You learned tips for achieving the perfect crunch, along with ways to customize flavors and accommodate diets. Proper storage keeps your granola fresh longer. Remember, this tasty snack not only delights your taste buds but also provides various health benefits. Enjoy experimenting with different flavors and techniques to make this recipe your own. Happy cooking!

Pumpkin Spice Granola Crunchy and Flavorful Recipe

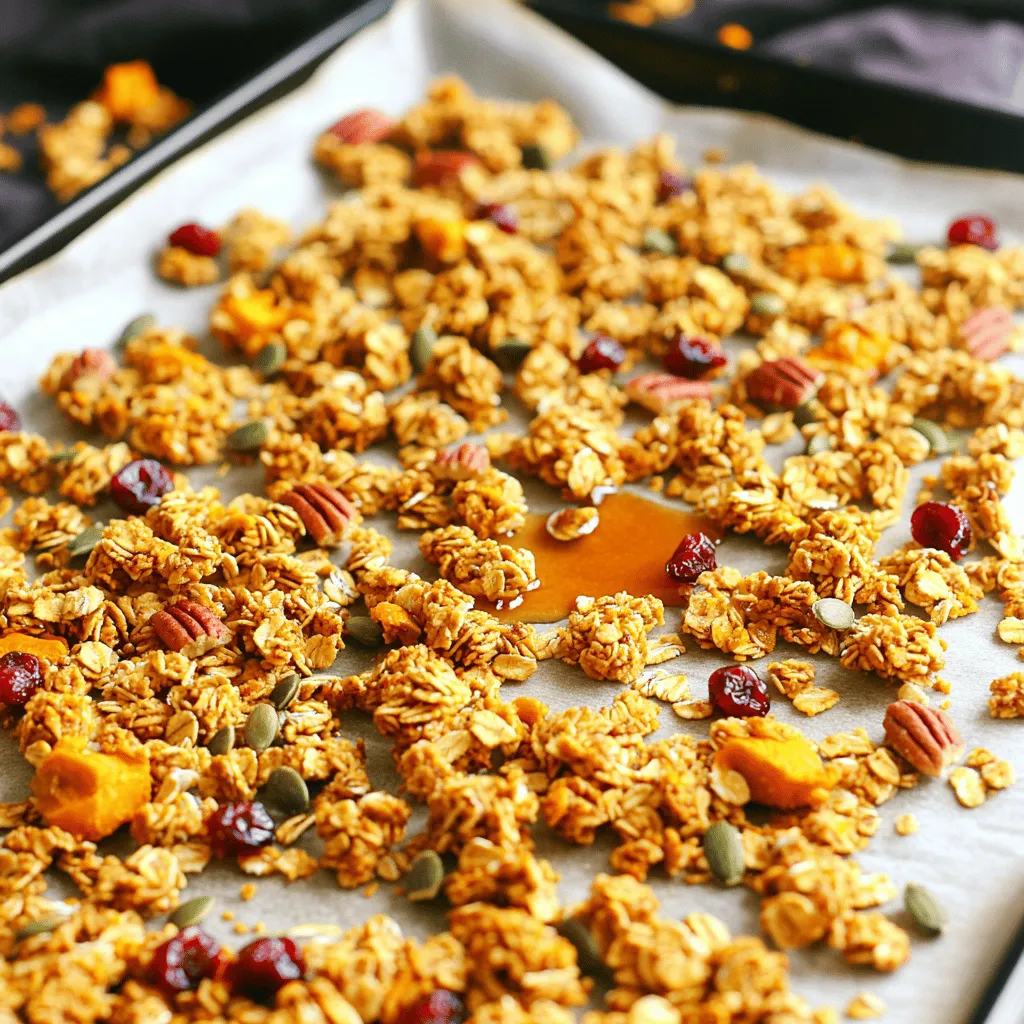
Get ready to enjoy a bowl of the season’s best treat! This Pumpkin Spice Granola recipe is bursting with flavor

- 1 cup unsalted butter, softened - 1 cup granulated sugar - 1 cup brown sugar, packed - 3 large eggs - 1 tablespoon vanilla extract - 3 cups all-purpose flour - 1 teaspoon baking soda - 1/2 teaspoon salt - 1/4 cup rainbow sprinkles (plus extra for topping) - 1 cup white chocolate chips These ingredients create a fun and sweet cookie. The butter makes the cookies soft. The sugars add sweetness and a slight crunch. Eggs help bind everything together. Flour gives the cookies body. Baking soda helps them rise. Salt enhances all the flavors. The rainbow sprinkles add color and fun. White chocolate chips bring a creamy sweetness. You can switch things up with these options: - Dark chocolate chips instead of white chocolate - Nuts like walnuts or pecans for crunch - Different sprinkles like chocolate or holiday-themed These changes can make your cookies unique. Try adding flavors like almond or lemon extract for a twist. You can also use gluten-free flour for a different texture. To make your cookies even better, consider these ideas: - Serve with a glass of cold milk - Pair with ice cream for a sundae twist - Create cookie sandwiches with frosting in between These ideas can turn your cookies into a fun dessert. They can impress guests at a party or make a simple snack special. Don’t forget to enjoy your sweet creations! First, gather your ingredients. You need: - 1 cup unsalted butter, softened - 1 cup granulated sugar - 1 cup brown sugar, packed - 3 large eggs - 1 tablespoon vanilla extract - 3 cups all-purpose flour - 1 teaspoon baking soda - 1/2 teaspoon salt - 1/4 cup rainbow sprinkles (plus extra for topping) - 1 cup white chocolate chips Start by preheating your oven to 350°F (175°C). Line a baking sheet with parchment paper. In a large bowl, cream the softened butter, granulated sugar, and brown sugar. Mix until the mixture is light and fluffy. This takes about 2-3 minutes. Next, add the eggs one at a time. Make sure to mix well after each egg. Then, stir in the vanilla extract. In a separate bowl, whisk the flour, baking soda, and salt. Gradually add this dry mix to the wet mixture. Mix until just combined. Finally, fold in the rainbow sprinkles and white chocolate chips. Make sure they spread evenly throughout the dough. Using a cookie scoop or spoon, drop heaping tablespoons of dough onto your prepared baking sheet. Leave about 2 inches between each cookie. This will help them spread nicely. Top each cookie dough ball with a few extra rainbow sprinkles for a festive look. Bake in your preheated oven for 10-12 minutes. The edges should turn golden brown, while the centers stay soft. Keep an eye on them to avoid overbaking. Once done, remove the baking sheet from the oven. Let the cookies cool on the sheet for about 5 minutes. This helps them firm up a bit. After that, transfer the cookies to a wire rack to cool completely. These cookies are best enjoyed fresh but can be stored for later. Serve them at a party or just enjoy them at home! To get the best cookie texture, cream the butter and sugars well. Mix for 2-3 minutes until light and fluffy. This helps create a soft center. Use room temperature butter; it blends better. Be careful not to overmix the dough after adding flour. This keeps the cookies tender. Bake just until the edges turn golden brown. The centers should stay soft. One big mistake is using cold butter. Cold butter doesn’t cream well. This leads to dense cookies. Another mistake is overbaking. Keep an eye on your cookies as they bake. They will continue to cook on the sheet after you take them out. Also, don’t skip the sprinkles on top. They add fun and color! Store your cookies in an airtight container. This keeps them soft and fresh. You can add a slice of bread to help retain moisture. If you want to keep them longer, freeze them. Wrap each cookie in plastic wrap and place them in a freezer bag. They can last up to three months. Just thaw them at room temperature when you want to enjoy them! {{image_2}} You can make gluten-free Funfetti cookies using a simple swap. Just replace all-purpose flour with a gluten-free blend. Look for a mix that works well for baking. I like to use a blend with xanthan gum. This keeps the cookies chewy and yummy. The rest of the recipe stays the same. You can still enjoy the fun colors and flavors! To create vegan Funfetti cookies, you need to adjust a few ingredients. Use vegan butter instead of regular butter. You can replace eggs with flaxseed meal or applesauce. For each egg, mix 1 tablespoon of flaxseed meal with 2.5 tablespoons of water and let it sit for a few minutes. This gives you a great egg substitute. You can still add your favorite sprinkles and white chocolate chips, but make sure they are vegan-friendly! Mixing things up is always fun! You can add nuts like walnuts or pecans for crunch. Try adding dried fruit like cranberries or cherries for a chewy taste. You could even swap out white chocolate chips for dark chocolate or peanut butter chips. The options are endless! Just remember to keep the total amount of mix-ins around 1.5 cups. This way, your cookies stay soft and packed with flavor! To keep your Funfetti Birthday Cake Cookies fresh, store them in an airtight container. Make sure the cookies are completely cool before you pack them. If you have extra sprinkles on top, be careful. They can stick together. Layer parchment paper between the cookies if you stack them. This keeps them from sticking and helps maintain their shape. You can freeze these cookies for later enjoyment. First, let them cool completely. Next, place them in a single layer on a baking sheet and freeze for about an hour. After they are firm, transfer the cookies to a freezer bag. Remove any air from the bag before sealing. You can also freeze the dough. Scoop the dough onto a sheet and freeze it. Then, you can bake the cookies fresh when you want them! When stored properly, Funfetti Birthday Cake Cookies can last up to one week at room temperature. They will stay fresh in the fridge for about two weeks. If frozen, they can last for up to three months. However, I bet they won’t last that long! Funfetti Birthday Cake Cookies stand out for their bright colors and fun taste. They mix classic cookie flavors with the joy of birthday cake. The addition of rainbow sprinkles and white chocolate chips brings a festive touch. Each bite feels like a celebration, making them perfect for any occasion. The soft and chewy texture adds to their charm. These cookies are a treat that everyone loves, young and old alike. Yes, you can use different types of sprinkles. While rainbow sprinkles are traditional, you can try chocolate, pastel, or themed sprinkles. Use your favorite colors to match any event. Just keep in mind that some sprinkles might melt more than others. This can change the look of your cookies. Experimenting with sprinkles can lead to fun and unique results. To prevent cookies from spreading too much, follow a few simple steps. First, make sure your butter is softened but not melted. Too much warmth can cause spreading. Next, chill the dough for about 30 minutes before baking. This helps the cookies hold their shape. Also, be sure to use enough flour in your recipe. If the dough feels too wet, add a little more flour. Finally, give each cookie enough space on the baking sheet. This allows for even baking and helps them keep their shape. In this blog post, we covered how to make Funfetti Birthday Cake Cookies. We discussed the key ingredients and shared useful tips for baking and storing. You learned how to achieve that perfect cookie texture and avoid common mistakes. We also explored fun variations, including gluten-free and vegan options. Remember, these cookies bring joy and celebration. With proper storage, they will stay fresh and tasty. Enjoy making these delicious treats for any occasion!

Funfetti Birthday Cake Cookies Sweet and Colorful Treat

Looking to add a pop of color to your dessert table? Funfetti Birthday Cake Cookies are the answer! These sweet,

- 2 cups apple cider - 2 cups all-purpose flour - 1 cup granulated sugar - 1/2 cup unsalted butter, softened - 3 large eggs - 1 tablespoon baking powder - 1 teaspoon baking soda - 1 teaspoon ground cinnamon - 1/2 teaspoon ground nutmeg - 1/2 teaspoon salt - 1 teaspoon vanilla extract - 1/2 cup powdered sugar (for glaze) - Water or apple cider for the glaze Gathering the right ingredients is key for any recipe. For this apple cider donut cake, the first essential ingredient is, of course, apple cider. It gives the cake a sweet and tangy flavor. You will need two cups for this cake. Next, all-purpose flour is a must. It helps the cake rise and hold its shape. You will need two cups of this too. Granulated sugar adds sweetness and helps the cake brown nicely. You need one cup. Softened unsalted butter gives the cake a rich taste. Half a cup is just right. Now, let's move on to the additional ingredients that bring out the flavor. You will need three large eggs. They help bind everything together. One tablespoon of baking powder and one teaspoon of baking soda help the cake rise. For the warm and cozy taste, use one teaspoon of ground cinnamon and half a teaspoon of ground nutmeg. These spices add depth and warmth. Don't forget half a teaspoon of salt to balance the sweetness and enhance the flavors. Finally, add one teaspoon of vanilla extract for a lovely aroma. For the glaze, we keep it simple. You need half a cup of powdered sugar. Mix it with water or more apple cider until smooth. This will give the cake a sweet finish that will make it shine. With these ingredients, you are all set to create a delightful apple cider donut cake. Enjoy the process and the delicious results! 1. Preheat your oven to 350°F (175°C). This is important for even baking. 2. Grease a 9x13-inch baking pan or a bundt pan. This helps the cake release easily. 3. In a saucepan, bring 2 cups of apple cider to a boil over medium heat. 4. Reduce it to a simmer. Let it cook down for about 10-15 minutes. You want it to reduce to about 1 cup. This step adds deep flavor. 1. In a large bowl, cream together 1/2 cup of softened butter and 1 cup of granulated sugar. Mix until light and fluffy. 2. Beat in 3 large eggs, one at a time. Then add 1 teaspoon of vanilla extract. 3. Pour in the cooled apple cider. Stir until everything is combined. 1. In another bowl, whisk together 2 cups of all-purpose flour, 1 tablespoon baking powder, 1 teaspoon baking soda, 1 teaspoon ground cinnamon, 1/2 teaspoon ground nutmeg, and 1/2 teaspoon salt. 2. Gradually add the dry mix to the wet mixture. Stir until just combined; do not overmix. 1. Pour the batter into the prepared pan. Smooth the top with a spatula. 2. Bake in the preheated oven for 30-35 minutes. 3. Check for doneness by inserting a toothpick in the center. It should come out clean. 1. While the cake bakes, mix 1/2 cup of powdered sugar with 2 tablespoons of water or apple cider. 2. Stir until smooth and set it aside. 1. Once baked, let the cake cool in the pan for about 10 minutes. 2. Carefully transfer it to a wire rack. 3. Drizzle the glaze over the warm cake and let it set for a few minutes. 4. Slice and enjoy your delicious cake warm! To avoid overmixing the batter, mix just until you see no dry flour. Overmixing can make the cake tough. Use a gentle folding method with a spatula for best results. For greasing the pan, use unsalted butter or baking spray. Make sure to coat the pan well, especially the corners. This helps the cake release easily after baking. You can add more spices like ginger or cloves to boost flavor. A pinch of allspice or nutmeg gives extra warmth. Using fresh apple cider makes a big difference. It adds a rich, tart taste. If you use store-bought cider, look for a brand with no added sugar or flavor. For plating, place the cake on a nice serving platter. You can cut it into squares or wedges. Garnish with seasonal toppings like chopped apples or a sprinkle of cinnamon. You can also add a dollop of whipped cream for a fun touch. {{image_2}} You can make this cake even better with a few fun tweaks. First, try adding chocolate chips. They mix well with the sweet apple flavor. You can also toss in some nuts for a nice crunch. Pecans or walnuts work best. Another idea is to add spices like allspice. This spice brings a warm taste that pairs well with cinnamon and nutmeg. These small changes make your cake unique each time you bake. If you need a gluten-free cake, don’t worry! You can switch all-purpose flour for gluten-free flour blends. These blends work well in most recipes. Just make sure you check the package for the right amount. This way, everyone can enjoy your delicious cake! Want to make cupcakes or mini cakes? It’s simple! Just pour the batter into cupcake liners or mini cake pans. Bake them for about 18-20 minutes. Keep an eye on them! Use a toothpick to check if they are done. Let them cool and glaze as you would the larger cake. These mini treats are perfect for sharing or for a fun snack! To keep your apple cider donut cake fresh, store it at room temperature. Wrap the cake in plastic wrap or place it in an airtight container. This helps keep it moist. It should last for about three days this way. If you want it to last longer, refrigeration is a good option. Place the cake in the fridge, but remember to wrap it well to avoid drying out. You can freeze your apple cider donut cake for up to three months. To do this, let the cake cool completely. Then, wrap the entire cake tightly in plastic wrap. Next, place it in a freezer-safe bag or container. When you are ready to enjoy it, thaw the cake in the fridge overnight. This way, it stays moist and tasty. To reheat your cake, the best method is to use the oven. Preheat your oven to 300°F (150°C). Place the cake on a baking sheet and cover it with foil. Heat it for about 10 to 15 minutes. This method warms the cake without making it dry. You can also use the microwave, but be careful. Heat it for short bursts of about 10 seconds to avoid drying it out. Enjoy your warm cake! You can use apple juice as a great substitute for apple cider. It has a similar flavor, though it may be a bit sweeter. You can also try using pear juice, which adds a unique twist. If you want a different flavor, consider using a mix of water and a splash of vinegar for tang. To enhance moisture, use fresh apple cider. Reducing the cider helps concentrate flavors and adds richness. You can also add a bit of sour cream or yogurt to the batter. This adds moisture and gives a nice texture. Be careful not to overmix; this can make the cake dry. Yes, you can make the cake ahead of time! Bake it, cool it, and wrap it tightly in plastic wrap. Store it at room temperature for up to two days. For longer storage, place it in the fridge for up to a week. You can also freeze the cake for up to three months. Serve the cake warm for the best taste. Drizzle the glaze over the top for a sweet finish. Pair it with a scoop of vanilla ice cream or a dollop of whipped cream. Add a sprinkle of cinnamon on top for extra flavor. It’s perfect for fall gatherings or cozy family meals. If stored properly, the cake lasts about two days at room temperature. In the fridge, it stays fresh for about a week. If you freeze it, it can last up to three months. Just make sure to wrap it well to prevent freezer burn. Always check for freshness before serving. Apple cider donut cake combines simplicity and flavor. We covered key ingredients and steps for preparation. Remember to adjust flavors and experiment with variations. You can create mini cakes or go gluten-free. Proper storage keeps your cake fresh and tasty. Enjoy serving this warm treat, satisfying friends or family at any gathering. Don’t hesitate to adapt the recipe to make it your own. Happy baking!

Apple Cider Donut Cake Flavorful and Easy Recipe

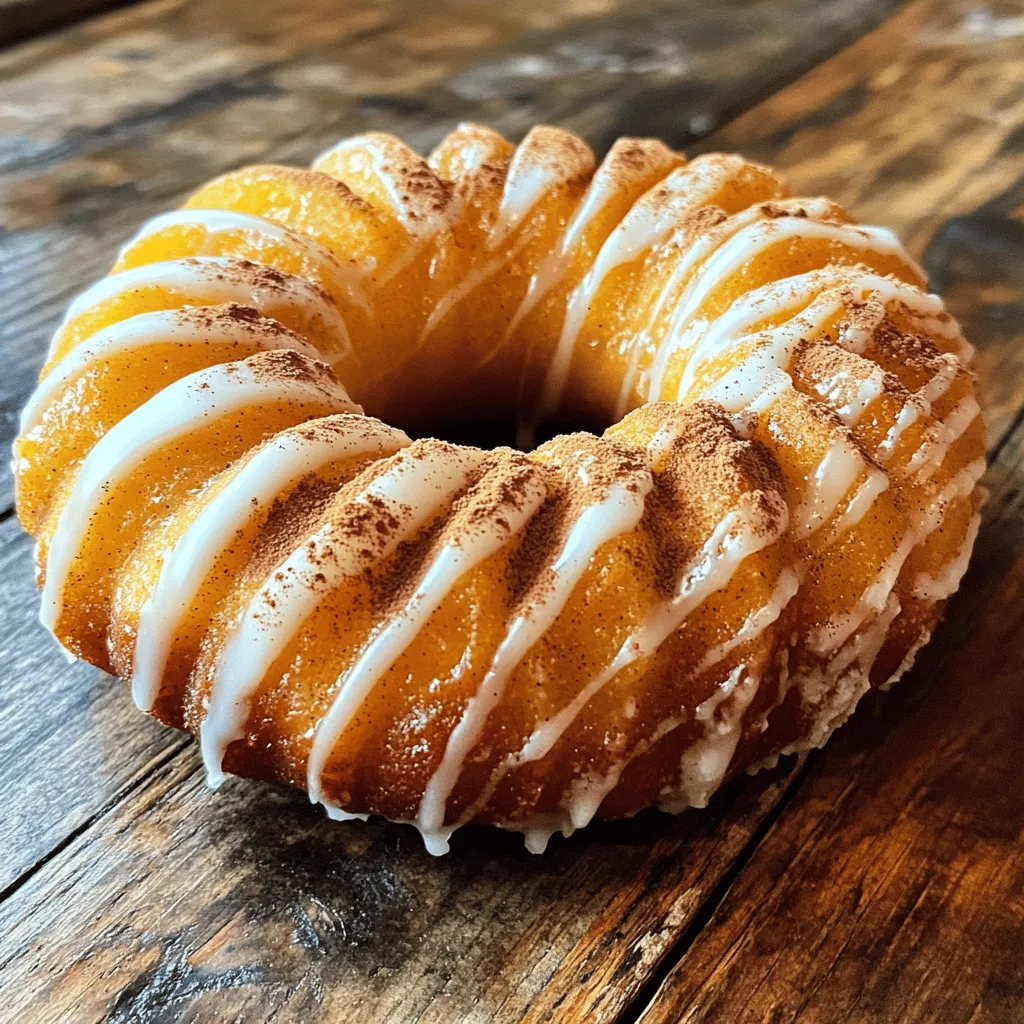
If you love apples and sweet treats, you will adore this Apple Cider Donut Cake! It’s full of warm spices

- 4 tablespoons all-purpose flour - 1 tablespoon granulated sugar - 1/2 teaspoon baking powder - 1/4 teaspoon ground cinnamon - 1/4 cup milk - 2 tablespoons vegetable oil - 1/2 teaspoon vanilla extract - 1 tablespoon brown sugar - 1 teaspoon butter, melted - 1/2 teaspoon ground cinnamon (for the swirl) - Optional: Cream cheese frosting for topping Use a standard tablespoon and cup for measuring. If you need a gluten-free option, swap the all-purpose flour for almond flour or a gluten-free blend. For lower sugar, reduce the granulated sugar to 2 teaspoons. You can also use unsweetened almond milk or oat milk instead of regular milk. This will keep the cake moist and tasty. You need a microwave-safe mug for baking. A small bowl helps mix the cinnamon swirl. A fork or toothpick is good for creating that marble effect. That's all! Simple tools make this recipe quick and fun. To make your cinnamon roll mug cake, start by gathering your ingredients. You need: - 4 tablespoons all-purpose flour - 1 tablespoon granulated sugar - 1/2 teaspoon baking powder - 1/4 teaspoon ground cinnamon - 1/4 cup milk - 2 tablespoons vegetable oil - 1/2 teaspoon vanilla extract - 1 tablespoon brown sugar - 1 teaspoon butter, melted - 1/2 teaspoon ground cinnamon (for the swirl) - Optional: Cream cheese frosting 1. Take a microwave-safe mug. Add the flour, sugar, baking powder, and 1/4 teaspoon of cinnamon. Mix them well. Make sure there are no lumps in the dry mix. 2. Next, pour in the milk, vegetable oil, and vanilla extract. Stir until the batter is smooth. Scrape the bottom and sides of the mug to mix well. 3. In a small bowl, mix the brown sugar, melted butter, and the remaining 1/2 teaspoon of cinnamon. This will be your swirl mixture. 4. Pour half of the cake batter into the mug. Then, spoon the cinnamon swirl mixture over it. Finally, add the rest of the batter on top. 5. With a fork or toothpick, gently swirl the cinnamon mixture into the batter. Try to create a marble effect without over-mixing. 6. Microwave the mug on high for 1 minute. If it’s not cooked through, heat in 10-second intervals until done. It should take about 1 to 1.5 minutes. 7. After cooking, let it cool for a minute. If you like, add cream cheese frosting on top. Microwave power varies. If your mug cake is not cooked after 1 minute, keep checking every 10 seconds. Start with less time to avoid overcooking. A well-cooked cake should rise and look firm. If it looks wet, give it more time. If your mug cake is too dry, you may have cooked it too long. Next time, try a shorter cooking time. If it’s too wet, your batter might be too thick. Add a tiny splash of milk to help balance it. For a denser cake, mix well but avoid over-mixing. If it spills over, use a larger mug next time. To get the best texture, use the right mug. A wide mug helps the cake cook evenly. Mix the dry ingredients well to avoid lumps. When adding wet ingredients, stir gently. This keeps the batter light and fluffy. Avoid over-mixing after adding the cinnamon swirl. A few swirls will give you that nice marble look without making it dense. You can boost the flavor with a hint of nutmeg or cardamom. These spices add warmth and depth. For a richer taste, use whole milk instead of low-fat. If you love sweetness, add a bit more brown sugar to the swirl. Top with cream cheese frosting for a classic cinnamon roll flavor. You can also sprinkle chopped nuts for an extra crunch. Serve your mug cake with a scoop of vanilla ice cream for a warm treat. Drizzle some caramel sauce on top for added sweetness. If you use cream cheese frosting, a sprinkle of cinnamon can make it look fancy. You can enjoy it straight from the mug, or transfer it to a plate for a more elegant touch. Don't forget a cup of coffee to go with your cake! {{image_2}} You can change the taste of your cinnamon roll mug cake easily. Try adding pumpkin spice for a warm fall flavor. Just mix in a teaspoon of pumpkin spice with the dry ingredients. For an apple cinnamon twist, add diced apples to your batter. This adds a nice fruity texture and taste. You can also swap out the ground cinnamon for nutmeg for a different spice note. I know that some people have dietary needs. You can make this mug cake gluten-free. Use gluten-free flour instead of all-purpose flour. For a dairy-free version, swap milk with almond or oat milk. This keeps the flavor but makes it safe for those with allergies. Always check your labels to ensure the substitutions fit your needs. Toppings can make or break your mug cake. A drizzle of cream cheese frosting adds a sweet finish. If you want crunch, sprinkle some chopped nuts on top. Walnuts or pecans work great. Fresh fruits like berries or banana slices can add a fresh touch. You can mix and match these toppings to find your favorite combination. It’s all about making it your own! If you have leftover cinnamon roll mug cake, let it cool first. Cover it with plastic wrap or put it in a small airtight container. This keeps it fresh. Store it in the fridge for up to two days. To reheat, take the mug cake out of the fridge. Place it in the microwave for about 10 to 15 seconds. Check if it's warm enough. If not, heat it in short bursts. Be careful not to overheat, as it can dry out. You can freeze the mug cake too. Just let it cool completely. Wrap it tightly in plastic wrap. Then, place it in a freezer bag. It can last up to a month in the freezer. To eat, thaw it in the fridge overnight. Reheat it in the microwave for a fresh taste. A Cinnamon Roll Mug Cake tastes best fresh. If you have leftovers, cover them. Store the mug cake in the fridge for up to two days. Reheat in the microwave for a few seconds to enjoy again. Yes, you can use any microwave-safe mug. Just make sure it's big enough. A standard mug works well, but avoid small cups. They may overflow during cooking. Mug cakes are popular! You can make chocolate mug cake, brownie in a mug, or even pizza. Just follow simple steps, and you'll have a fun treat in minutes. Yes, there are many videos online. Search for Cinnamon Roll Mug Cake on your favorite video platform. Watching a video can help you see each step in action. In this article, we explored the key ingredients, tools, and step-by-step instructions for making a delicious Cinnamon Roll Mug Cake. I shared tips for perfect texture and flavor, plus fun variations to try. Remember, success is all about patience and practice! With the right storage and reheating methods, you can enjoy this treat anytime. Experiment with toppings and flavors to make it your own. Get ready to impress yourself and others with this quick and easy dessert.

Cinnamon Roll Mug Cake Easy and Quick Dessert Recipe

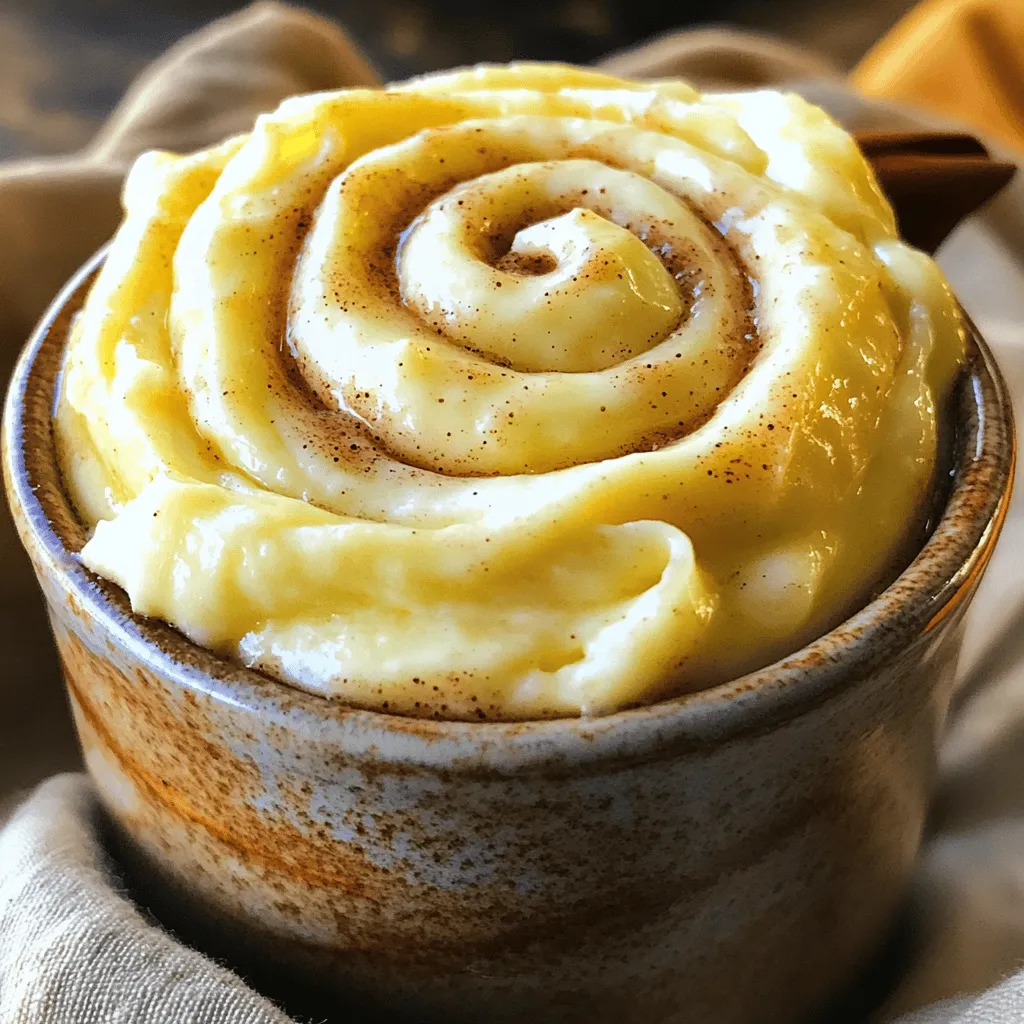
Are you craving something sweet but short on time? Look no further! This Cinnamon Roll Mug Cake is your answer.

To make delicious taco stuffed zucchini boats, you will need the following ingredients: - 4 medium zucchinis - 1 pound ground turkey or chicken - 1 small onion, finely chopped - 2 cloves garlic, minced - 1 cup black beans, drained and rinsed - 1 cup corn (fresh, frozen, or canned) - 1 cup diced tomatoes (canned or fresh) - 1 tablespoon taco seasoning - 1 teaspoon cumin - Salt and pepper to taste - 1 cup shredded cheese (cheddar or Mexican blend) - Fresh cilantro, chopped (for garnish) - Sour cream or Greek yogurt (for serving, optional) These ingredients create a flavorful and healthy meal. The zucchini acts as a perfect vessel for the filling. Ground turkey or chicken provides lean protein. Black beans and corn add texture and nutrients. Diced tomatoes bring moisture and flavor. Taco seasoning and cumin enhance the taste, making each bite enjoyable. Feel free to adjust the ingredients to suit your taste. Add more cheese for a richer flavor or toss in some diced peppers for extra crunch. This recipe is versatile and fun to customize! 1. Preheat your oven to 375°F (190°C). 2. Cut the zucchinis in half lengthwise. Scoop out the center with a spoon. This creates a boat shape. Save the scooped-out flesh for later. 3. In a large skillet over medium heat, sauté the chopped onion and minced garlic. Cook until the onion turns translucent, about 3-4 minutes. 4. Add the ground turkey or chicken to the skillet. Cook until browned, breaking it apart with a spatula. Drain any excess fat if needed. 5. Mix in the reserved zucchini flesh, black beans, corn, diced tomatoes, taco seasoning, cumin, salt, and pepper. Stir well and cook for about 5-7 minutes until heated through. 1. Place the zucchini boats in a baking dish, cut side up. 2. Fill each zucchini boat with the taco filling. Pack it in generously. 3. Sprinkle the shredded cheese evenly over the top of each stuffed zucchini boat. 1. Cover the baking dish with foil. Bake in the preheated oven for 15 minutes. 2. Remove the foil and bake for another 10 minutes. The cheese should be melted and bubbly. 3. Take the dish out of the oven and let it cool for a few minutes. 4. Garnish with fresh cilantro before serving. You can add a dollop of sour cream or Greek yogurt if you like. To keep your zucchini boats from being watery, start by salting them. After you scoop out the filling, sprinkle salt inside and let them sit for about 10 minutes. This draws out extra moisture. Pat them dry before filling. For perfect cheese melting, use shredded cheese. Grate it fresh for the best results. Cover the dish with foil during the first part of baking. This helps the cheese melt evenly without burning. For a vegetarian option, swap the meat for beans and quinoa. Use 1 cup of cooked quinoa and 1 cup of black beans. This adds protein and fiber while keeping the dish hearty. If you like spice, add diced jalapeños to the meat mixture. You can also sprinkle some on top of the cheese before baking. This gives your dish a nice kick. Pair your taco stuffed zucchini boats with a fresh salad. A side of corn or rice also works well. You can serve them with tortilla chips for extra crunch. Get creative with toppings! Try avocado slices, chopped tomatoes, or a squeeze of lime. You can also drizzle some hot sauce over the top for added flavor. {{image_2}} To keep your taco stuffed zucchini boats fresh, follow these tips: - Refrigeration: Place your leftover zucchini boats in an airtight container. They can stay good for up to 3 days in the fridge. - Freezing: If you want to freeze them, wrap each boat in plastic wrap, then place in a freezer-safe bag. They will be great for up to 3 months. When reheating your zucchini boats, you want them to taste fresh: - Recommended methods: The best way is to use an oven. Preheat it to 350°F (175°C). Place the zucchini boats on a baking sheet and heat for about 15-20 minutes. - Avoiding sogginess: To prevent sogginess, do not cover them tightly with foil. This allows steam to escape and keeps the texture nice. - Calories per serving: About 350 calories. - Key nutrients provided by the recipe: - Protein: Ground turkey or chicken offers lean protein. - Fiber: Zucchini and black beans provide healthy fiber. - Vitamins: Corn and tomatoes add vitamins A and C. - Calcium: Cheese gives you a good source of calcium. Using zucchini as a base is smart. It is low in calories and high in water. This helps you feel full without extra calories. Zucchini also adds fiber, which is good for digestion. Lean protein from turkey or chicken is another plus. It helps build muscles and keeps you satisfied. This protein choice is lower in fat than beef. It helps you enjoy a hearty meal without extra calories. Can I use other ground meats? Yes, you can. Ground beef or pork works well too. Just remember that different meats may change the flavor and fat content. How long can I store the filled zucchini boats? You can store them in the fridge for up to three days. Make sure to keep them in an airtight container to keep them fresh. Can I make this recipe ahead of time? Absolutely! You can prepare the filling a day in advance. Just stuff the zucchini boats right before baking. What can I substitute for taco seasoning? You can mix your own spices. Use chili powder, garlic powder, cumin, and paprika for a tasty blend. How to adjust spice levels To make it milder, skip the taco seasoning. For heat, add chopped jalapeños or hot sauce to the filling. Recommendations for gluten-free options This recipe is naturally gluten-free. Just make sure to check your taco seasoning and any canned ingredients for gluten-free labels. This blog post guides you through making delicious stuffed zucchini boats. We covered the key ingredients, clear step-by-step instructions, and handy tips for perfect results. You learned how to store leftovers and the dish's nutritional benefits. Remember, experimenting with flavors makes cooking fun. Feel free to try different fillings or toppings. Enjoy your cooking journey!

Taco Stuffed Zucchini Boats Flavorful and Nutritious Meal

Looking for a healthy twist on taco night? Taco Stuffed Zucchini Boats are your answer! Packed with savory ground turkey,

- 1 cup cream cheese, softened - 1/2 cup powdered sugar - 1 tablespoon lemon juice - Zest of 1 lemon - 1/2 teaspoon vanilla extract The main ingredients give this dip its creamy texture and bright flavor. Cream cheese forms the base, making it rich and smooth. Powdered sugar adds sweetness, balancing the tartness of the lemon. The lemon juice and zest bring a fresh, zesty taste. Finally, vanilla extract rounds out the flavors, giving it warmth. - 1 cup blueberry pie filling - 1/2 cup whipped cream The blueberry pie filling adds color and sweetness. It creates a beautiful layer in the dip. Whipped cream lightens the mixture, making it airy and fluffy. This combination enhances the overall flavor and texture, making each bite delightful. - Fresh blueberries - Lemon slices - Graham crackers or fruit slices for dipping To serve, I love using fresh blueberries and lemon slices for garnish. They add pops of color and a burst of flavor. Pair this dip with graham crackers or fruit slices for dipping. This makes it fun and interactive for guests. You can also set out a colorful platter to make it more festive! First, grab a bowl and your softened cream cheese. Use an electric mixer to beat it until smooth. This step makes sure there are no lumps. Next, slowly add the powdered sugar. Keep mixing until it is fluffy and well blended. This gives the dip its sweet taste. Now, it’s time to add some flavor. Squeeze in the lemon juice and add the zest from the lemon. The zest adds a bright taste. Don’t forget the vanilla extract for extra depth. Mix until the flavors come together. Then, gently fold in the whipped cream. This makes the dip light and airy. To assemble your dip, grab a nice serving dish. Start by layering half of the cheesecake mix at the bottom. Next, spoon the blueberry pie filling on top. This adds a beautiful color and sweetness. Now, add the rest of the cheesecake mixture, smoothing it out. If you want, swirl in a bit more blueberry filling on top for a pretty look. Cover and chill the dip in the fridge for at least 30 minutes. This lets all the flavors blend together. When you are ready to serve, garnish with fresh blueberries and lemon slices for a pop of color. To make your dip smooth, start with softened cream cheese. Cold cream cheese clumps up and won’t mix well. Let it sit at room temperature for 30 minutes before using. This step is key for a creamy texture. When you fold in the whipped cream, do it gently. Use a spatula and scoop from the bottom up. This keeps the air in the whipped cream, making your dip light and fluffy. If you stir too hard, you’ll lose that nice texture. For a bright flavor, add extra lemon zest. It lifts the taste and brings out the lemon's freshness. Just a teaspoon more can make a big difference. You can also swirl in some blueberry filling on top. This not only tastes great but looks pretty too. A beautiful dip makes the party more fun! Get creative with your serving dish. Use a colorful platter to show off the dip. You can layer it in a clear bowl to show the blueberry and cheesecake layers. For dipping, offer a mix of graham crackers and fresh fruit slices. Apples, strawberries, or even bananas work well. This variety makes it exciting and appealing for any occasion. {{image_2}} You can easily change the taste of your dip. Try adding fresh strawberries or raspberries for a fruity twist. The sweet and tart notes mix well with the creamy base. You can also use flavored extracts like almond or coconut for a unique flavor. Just swap out the vanilla extract for something new. If you need a dairy-free option, use a cream cheese substitute made from nuts. Look for brands made from cashews or almonds. They work well and still taste great! For gluten-free dipping, choose gluten-free graham crackers or fruit slices. Apples or pears add a nice crunch and flavor. Make your dip festive for holidays. Add crushed peppermint for winter or colorful sprinkles for birthdays. This dip can be fun for any event! For parties, serve it in a big bowl with lots of colorful fruit slices around it. This makes a great display and is easy for guests to grab their favorite dipper. To keep your Lemon Blueberry Cheesecake Dip fresh, store it in the refrigerator. Use an airtight container to prevent air from drying it out. Glass containers work well because they do not hold odors. You can also use plastic containers with a tight lid. Avoid using aluminum foil or plastic wrap directly on the dip, as it may stick and ruin the texture. Can you freeze Lemon Blueberry Cheesecake Dip? Yes, you can freeze this dip for later enjoyment! However, freezing may change the texture slightly. To freeze, scoop the dip into a freezer-safe container. Leave space at the top for expansion. Seal it tightly, and label it with the date. How to thaw properly without compromising texture? Place the frozen dip in the fridge overnight to thaw slowly. This method helps maintain its creamy texture. Avoid microwaving the dip, as it may become too soft and watery. Once thawed, give it a gentle stir before serving. Enjoy your delicious dip even after freezing! Yes, you can prepare this dip ahead of time! To make it easy, mix the cream cheese, sugar, lemon juice, zest, and vanilla first. Store this mixture in the fridge for up to a day. Just before serving, fold in the whipped cream. This keeps it airy and light. Layer with blueberry filling right before serving to keep the flavors fresh. If you need a cream cheese alternative, there are a few options. You can use Greek yogurt for a tangy flavor that is also healthy. Another choice is vegan cream cheese, which works well for dairy-free diets. Silken tofu is also a great option; it blends smoothly for a creamy texture. This dip stays fresh in the fridge for about three days. Store it in an airtight container to keep it from drying out. If you notice any changes in texture or smell, it's best to discard it. Enjoy it within this timeframe for the best taste! This blog post covers how to make a delicious Lemon Blueberry Cheesecake Dip. We discussed the main and additional ingredients, like cream cheese and blueberry pie filling. I provided easy, step-by-step instructions for preparing, adding flavor, and assembling your dip. You also learned tips for the best texture and fun variations for different tastes. Lastly, we talked about storage and common questions. Enjoy your tasty dip at any gathering, and remember, it’s all about fun and creativity in the kitchen!

Lemon Blueberry Cheesecake Dip Delightful and Creamy

Are you ready to dive into a delightfully creamy treat? My Lemon Blueberry Cheesecake Dip is perfect for any gathering

To create these bites, gather these key items: - 8 ounces cream cheese, softened - 1/2 cup powdered sugar - 1 teaspoon vanilla extract - 1/2 cup sour cream - 1 cup graham cracker crumbs - 1 cup semi-sweet chocolate chips - 1 tablespoon coconut oil (or any neutral oil) These ingredients blend to form a creamy, sweet filling. The graham cracker crumbs add texture and flavor. The chocolate coating makes everything even more delicious. You can customize your bites with these extras: - Flavor extracts (like almond or lemon) - Different sweeteners (like honey or maple syrup) - Various toppings (like nuts or sprinkles) Feel free to mix and match these options. They let you create bites that fit your taste. Having the right tools makes cooking easier: - Medium mixing bowl - Electric mixer - Baking sheet - Parchment paper - Small cookie scoop or your hands - Microwave-safe bowl for melting chocolate - Fork for dipping These tools help you prepare and serve your cheesecake bites with ease. Enjoy the process and the tasty results! To start, you need to combine a few ingredients. In a medium bowl, mix 8 ounces of softened cream cheese, 1/2 cup of powdered sugar, and 1 teaspoon of vanilla extract. Use an electric mixer to beat these together. Mix until it is smooth and creamy. Then, add 1/2 cup of sour cream. Blend it well with the cream cheese mix. After that, fold in 1 cup of graham cracker crumbs. Make sure everything is blended well. This mixture should be thick and creamy, perfect for cheesecake bites. Next, you will form the cheesecake bites. First, line a baking sheet with parchment paper. This helps to prevent sticking. Use a small cookie scoop or your hands to shape the mixture into balls. Each ball should be about 1 inch wide. Place these on the lined baking sheet. Once you have formed all the bites, freeze them for about 30 minutes. They need to be firm before the next step. While the cheesecake bites freeze, it’s time to melt the chocolate. In a microwave-safe bowl, combine 1 cup of semi-sweet chocolate chips and 1 tablespoon of coconut oil. The oil helps the chocolate melt smoothly. Microwave this mix in 30-second intervals. Stir in between each interval until it is fully melted and smooth. After the cheesecake bites are firm, take them out of the freezer. Dip each bite into the melted chocolate using a fork. Make sure they are fully coated. Let any excess chocolate drip off. Then, place the chocolate-covered bites back on the baking sheet. If you like, sprinkle a tiny pinch of sea salt on top for extra flavor. Finally, refrigerate the bites for at least 15 minutes. This will help the chocolate set. Enjoy your delicious treats! To get that perfect texture, use softened cream cheese. It helps the mixture blend smoothly. Beat the cream cheese with powdered sugar and vanilla until creamy. This step is key. Add the sour cream next and mix again. Gradually fold in the graham cracker crumbs. This gives your bites a great base. When forming the bites, ensure they are compact. This helps them hold their shape. Avoid overmixing the cream cheese. This can make your bites too soft. Also, do not skip the freezing step. Freezing the bites ensures they hold together when you dip them in chocolate. Use a fork to dip each bite fully. If they are not firm, the chocolate won't coat well. Lastly, remember to let excess chocolate drip off. This keeps the bites from being too messy. For a beautiful display, use a nice platter. Arrange the bites neatly in rows. If you sprinkle sea salt on top, it adds a nice touch. You can also use colorful cupcake liners. This makes serving easy and fun. Consider adding fresh fruit or mint leaves around the bites. It makes the whole plate look appealing. Enjoy sharing these treats with friends and family! {{image_2}} You can easily switch up the flavor of your cheesecake bites. To make strawberry or raspberry bites, simply mix in some fruit puree. Use about 1/4 cup of fresh or frozen fruit. Blend it well before adding to the cream cheese mixture. This step gives your bites a fruity twist. You can also add a bit of zest for extra flavor. While semi-sweet chocolate is a classic choice, feel free to explore other coatings. White chocolate adds a sweet touch, while dark chocolate gives a rich flavor. For a fun twist, try mixing different chocolates. Melt each type separately and dip half of the bites in one, and the other half in another. This creates a beautiful and tasty treat. Toppings can take your cheesecake bites to the next level. After dipping in chocolate, you can sprinkle on crushed nuts, colorful sprinkles, or even cookie crumbs. This adds texture and flavor. Try using crushed Oreos for a classic contrast. Or, go for chopped pistachios for a nutty flavor. Just make sure to add toppings while the chocolate is still warm, so they stick well. Store your chocolate-covered cheesecake bites in an airtight container. This keeps them fresh and tasty. Layer them with parchment paper to avoid sticking. Place the container in the fridge. This way, they stay cool and creamy. You can freeze the cheesecake bites if you have extras. First, let them firm up in the fridge. Then, place them in a single layer on a baking sheet. Freeze them for about an hour, until they are hard. After that, move them to a freezer-safe bag. Be sure to remove as much air as possible. They freeze well and stay delicious. If stored in the fridge, these bites last about 5 days. In the freezer, they can last up to 3 months. However, for the best taste, enjoy them within the first month. Always check for any signs of freezer burn when you're ready to eat. To make chocolate-covered cheesecake bites, follow these steps: 1. Mix the filling: In a bowl, blend softened cream cheese, powdered sugar, and vanilla until creamy. 2. Add sour cream: Mix in sour cream until combined. Then, fold in graham cracker crumbs. 3. Shape the bites: Scoop out the mixture and form it into 1-inch balls. Place them on a lined baking sheet. 4. Freeze: Chill the balls in the freezer for 30 minutes to make them firm. 5. Melt the chocolate: Heat chocolate chips with coconut oil in the microwave until smooth. 6. Dip the bites: Coat each frozen cheesecake ball in melted chocolate. Let excess chocolate drip off. 7. Garnish: Place the bites back on the sheet and add a pinch of sea salt if you like. 8. Chill again: Refrigerate for 15 minutes until the chocolate hardens. This method gives you rich and creamy bites covered in smooth chocolate. Yes, you can use different cheeses! Cream cheese is the classic choice, but you can try: - Mascarpone: It’s creamier and adds a rich flavor. - Ricotta: It gives a lighter texture but may need more sweetening. - Neufchâtel: A lower-fat alternative to cream cheese, with a similar taste. Each cheese brings its unique flavor and texture. Just adjust the sugar to balance sweetness. You can find chocolate-covered cheesecake bites at: - Local bakeries: Many offer gourmet treats. - Dessert shops: Look for specialty stores that focus on sweets. - Online retailers: Websites like Etsy or gourmet food sites may have unique options. - Grocery stores: Check the frozen dessert aisle or the bakery section. If you want them fresh, making them at home is the best way. You can customize flavors and toppings to your liking! You’ve learned how to make tasty chocolate-covered cheesecake bites. Start with the right ingredients and tools. Follow the steps to prepare, shape, and coat your bites. Use tips to get the best texture and impress with your presentation. You can customize flavors and coatings too! These sweet treats are easy to store or freeze for later. Enjoy making them for yourself or to share. Now it’s your turn to create this delightful dessert!

Chocolate Covered Cheesecake Bites Irresistible Treat

Indulging in chocolate-covered cheesecake bites is a treat you won’t forget. These little delights mix creamy cheesecake with rich chocolate

- 4 large bell peppers (any color) - 2 cups cooked chicken, shredded - 1 cup marinara sauce - 1 cup ricotta cheese - 1 cup shredded mozzarella cheese - ½ cup grated Parmesan cheese - 1 teaspoon garlic powder - 1 teaspoon Italian seasoning - Salt and pepper to taste The main ingredients are simple yet full of flavor. The bell peppers serve as the vessel for our tasty filling. I love using different colors, like red, yellow, or green. They add a nice pop to the dish. Cooked chicken gives a hearty base, while marinara sauce adds moisture and zest. Ricotta cheese helps bind everything together, and mozzarella brings that melty goodness. Parmesan cheese adds a sharp touch, while garlic powder and Italian seasoning boost the flavor. Don't forget to season with salt and pepper to taste! - Fresh basil leaves for garnish (optional) - Chopped onions or garlic for added flavor - Spinach or kale for extra veggies - Cooked sausage for a meatier filling Feel free to get creative! Fresh basil leaves make a beautiful garnish. You can add chopped onions or garlic for more depth. If you want more veggies, spinach or kale work great. Want a heartier stuffed pepper? Try adding cooked sausage to the mix. The beauty of this recipe is its flexibility. - Baking dish - Mixing bowl - Sharp knife - Cutting board - Measuring cups and spoons You’ll need a few basic tools to make this dish. A baking dish holds the stuffed peppers as they bake. A mixing bowl is perfect for combining all the filling ingredients. A sharp knife and cutting board make cutting the peppers easy. Measuring cups and spoons help ensure the right amounts of each ingredient. Having these tools ready will make your cooking experience smooth and enjoyable! 1. Preheat your oven to 375°F (190°C). 2. Grab 4 large bell peppers. Cut off the tops and take out the seeds. 3. Stand the peppers upright in a baking dish for easy stuffing. 4. In a big bowl, mix together the shredded chicken and marinara sauce. 5. Add the ricotta cheese, half of the mozzarella, and grated Parmesan cheese. 6. Sprinkle in garlic powder, Italian seasoning, salt, and pepper. 7. Stir well until everything is nicely blended. 1. Stuff each bell pepper with the chicken mix. Press down gently to pack it in. 2. Top each pepper with the rest of the mozzarella cheese. 3. Pour a bit of water into the bottom of the baking dish. This keeps the peppers moist. 4. Cover the dish with foil and bake for 25 minutes. 5. After 25 minutes, take off the foil. Bake for another 10 to 15 minutes. 6. Look for bubbly and golden cheese as a sign they are done. 7. Once baked, take them out and let cool for a few minutes. - Choose firm bell peppers to hold the filling well. - Press the filling in tightly to avoid empty spaces. - Use a mix of cheeses for extra flavor. - Let the dish rest before serving to help flavors meld. - Garnish with fresh basil for a pop of color and taste. The total cooking time for Chicken Parmesan stuffed peppers is 50 minutes. This includes 15 minutes for prep and 35 minutes for baking. It's quick enough for a weeknight meal but tasty enough for a special dinner. This recipe serves four people. Each person gets one stuffed pepper. You can serve these peppers with a simple green salad or garlic bread. This adds a nice touch and balances the meal. For drinks, a light red wine pairs well with the flavors. Each stuffed pepper packs a punch of nutrition. Here’s a quick look: - Calories: About 350 per pepper - Protein: Approximately 30 grams - Carbohydrates: Roughly 20 grams - Fat: Around 15 grams These peppers provide a good source of protein from chicken and cheese. They also offer vitamins from the bell peppers, making them a healthy choice for dinner. {{image_2}} To keep your peppers crisp, start by removing the seeds and membranes. This helps reduce moisture. Bake them upright in a dish to let steam escape. Pour a little water in the bottom of the dish. This adds moisture without making the peppers soggy. You can also pat the insides of the peppers dry with paper towels before stuffing. For a deeper flavor, use fresh garlic instead of garlic powder. You could also add some crushed red pepper for a kick. Mixing in fresh herbs like parsley or thyme can brighten the dish. A splash of balsamic vinegar in the chicken mixture adds a tangy twist. Feel free to play with spices; it’s all about what you like! If you need a lighter meal, swap ricotta for cottage cheese. For a gluten-free option, use gluten-free breadcrumbs instead of regular ones. You can also make it dairy-free by using vegan cheese. If you're vegetarian, replace chicken with black beans or lentils. Always adjust seasoning to match different ingredients. You can easily make these stuffed peppers vegetarian. Instead of chicken, use cooked quinoa or lentils. Add extra veggies like spinach, mushrooms, or zucchini. Mix them with marinara sauce and ricotta cheese. This keeps the dish hearty and flavorful. You can also add your favorite spices for extra taste. For those who love spice, add some heat to your chicken mixture. Use diced jalapeños or crushed red pepper flakes. You can replace regular marinara with a spicy marinara sauce. This gives your stuffed peppers a nice kick. Top with pepper jack cheese for an extra burst of flavor. Cheese plays a big role in the taste of stuffed peppers. You can mix and match your favorite cheeses. Try using gouda or cheddar instead of mozzarella. A blend of cheeses adds depth to the dish. Adding cream cheese can also make the filling creamier and richer. If you need a ricotta cheese substitute, try cottage cheese. It has a similar texture. You can also use cream cheese mixed with a bit of milk for a smooth blend. For a dairy-free option, try silken tofu. Just blend it until smooth. Each choice gives a tasty twist to your dish. To store leftovers, let the peppers cool first. Then, cover them tightly with plastic wrap or foil. You can also place them in an airtight container. Store them in the fridge for up to three days. For longer storage, freeze them in a freezer-safe container for up to three months. Yes, you can make Chicken Parmesan stuffed peppers ahead of time. Prepare them up to the baking step. Cover the dish and store it in the fridge. Bake them when you are ready to eat. You can also freeze them before baking for a quick meal later. Just thaw and bake as needed. We explored how to make delicious Chicken Parmesan Stuffed Peppers. You learned about the main and optional ingredients, along with tools you need. I shared clear steps for preparation and cooking, with tips for perfect results. We discussed cooking time and serving sizes, nutritional facts, and ways to avoid soggy peppers. You discovered tasty variations and answers to common questions. Now, you can confidently create this dish, ensuring great taste every time. Enjoy your cooking!

Chicken Parmesan Stuffed Peppers Flavorful Easy Recipe

Are you ready to transform dinner with a fun twist on a classic dish? Chicken Parmesan Stuffed Peppers are an

To make this delicious galette, you will need the following ingredients: - 2 cups all-purpose flour - 1/2 teaspoon salt - 1 tablespoon sugar - 1/2 cup unsalted butter, chilled and diced - 6-8 tablespoons ice water - 3 medium apples (Granny Smith or Honeycrisp), peeled, cored, and sliced thin - 1/3 cup brown sugar - 1 teaspoon cinnamon - 1 tablespoon lemon juice - 1/4 teaspoon nutmeg - 1/2 cup homemade or store-bought salted caramel sauce - 1 egg, beaten (for egg wash) - Sea salt, for sprinkling You can swap some ingredients if needed: - Use whole wheat flour instead of all-purpose flour for a nutty flavor. - Coconut oil makes a great alternative to butter for a dairy-free option. - Honey or maple syrup can replace the brown sugar for a different sweet taste. - Any tart apple works if you can't find Granny Smith or Honeycrisp. For this recipe, gather these tools: - Large mixing bowl for the dough - Pastry cutter or your hands for mixing butter into flour - Rolling pin to roll out the dough - Parchment paper to line the baking sheet - Baking sheet for the galette - Sharp knife for slicing apples - Measuring cups and spoons for accuracy These tools will help you create a perfect salted caramel apple galette. Enjoy the process and get ready for a tasty dessert! Start by gathering your ingredients. You will need: - 2 cups all-purpose flour - 1/2 teaspoon salt - 1 tablespoon sugar - 1/2 cup unsalted butter, chilled and diced - 6-8 tablespoons ice water In a large bowl, whisk the flour, salt, and sugar. Add the diced butter. Use your fingers or a pastry cutter to mix until it looks like coarse crumbs. Slowly add ice water, one tablespoon at a time. Mix until the dough sticks together. Form it into a disk and wrap it in plastic wrap. Chill in the fridge for at least 30 minutes. This makes the crust flaky and tender. Now, let’s prepare the apple filling. You will need: - 3 medium apples (Granny Smith or Honeycrisp), peeled, cored, and sliced thin - 1/3 cup brown sugar - 1 teaspoon cinnamon - 1 tablespoon lemon juice - 1/4 teaspoon nutmeg In a separate bowl, combine the sliced apples, brown sugar, cinnamon, lemon juice, and nutmeg. Toss everything together until the apples are well-coated. Set this aside while you roll out the dough. This mix adds sweetness and spice to the galette. First, preheat your oven to 400°F (200°C). On a floured surface, roll out the chilled dough into a large circle, about 12 inches wide. Then, transfer it to a parchment-lined baking sheet. Next, arrange the apple filling in the center of the dough. Leave a 2-inch border around the edges. Drizzle half of the salted caramel sauce over the apples. Gently fold the edges of the dough up over the apples. Pleat it to create a rustic look. Brush the folded dough with the beaten egg. Drizzle the remaining salted caramel sauce over the filling. Finally, sprinkle sea salt on top. Bake for 25-30 minutes, or until the crust is golden and the apples are soft. The smell will be amazing! Enjoy the sweet and salty flavors as they come together in this delicious dessert. To make the best pie crust, start with cold ingredients. Use chilled butter and ice water. This keeps the dough flaky. Mix the flour, salt, and sugar first. Then, cut in the butter until it looks like crumbs. Add the ice water slowly. Stop when the dough holds together. Chill the dough in the fridge for at least 30 minutes. This helps it relax and makes rolling easier. For a great flavor, choose the right apples. I love using Granny Smith or Honeycrisp apples. Granny Smith adds a nice tartness. Honeycrisp offers a sweet crunch. You can also mix different apples for more depth. Just make sure the apples are firm and fresh. This ensures a tasty filling that holds its shape. The caramel sauce should be smooth and rich. If you make it at home, watch the heat closely. Use a heavy saucepan and stir often. Cook until the sugar melts and turns golden. Add cream slowly to avoid splattering. If it’s too thick, add a bit of water. If it’s too thin, cook it longer. Aim for a pourable sauce that coats the back of a spoon. This is perfect for drizzling over your galette. {{image_2}} You can make your salted caramel apple galette even more special. Try adding different spices. Here are some fun ideas: - Ginger: Add 1/2 teaspoon of ground ginger for warmth. - Cloves: A pinch of ground cloves adds depth. - Cardamom: Use 1/4 teaspoon of ground cardamom for a unique twist. - Nuts: Chopped pecans or walnuts can add crunch and flavor. Feel free to mix in other fruits, too. Pears pair well with apples. They add sweetness and softness. You can also use dried fruits like cranberries or raisins for extra texture. You can easily make this recipe gluten-free. Just swap the all-purpose flour for a gluten-free blend. Look for one that works well in baking. For a vegan version, replace the butter with coconut oil or vegan butter. Use a plant-based milk for the egg wash. You can skip the egg wash and still have a great crust. Just brush the edges with a bit of water. Serving your galette right can make it even better. Here are some great ideas: - Ice Cream: Vanilla ice cream is a classic choice. It pairs well with warm galette. - Whipped Cream: A dollop of fresh whipped cream adds a light touch. - Cheese: A slice of sharp cheddar can balance the sweetness. - Coffee or Tea: A warm drink can enhance the flavors. Feel free to experiment with these ideas to find your favorite pairing! To store leftover galette, let it cool completely. Then, wrap it tightly in plastic wrap or foil. You can also place it in an airtight container. This keeps the galette fresh and prevents it from drying out. It is best to store it in the fridge. The cold helps the flavors stay strong. When you are ready to eat the galette again, preheat your oven to 350°F (175°C). Place the galette on a baking sheet. Cover it loosely with foil to keep it from browning too much. Heat it for about 10 to 15 minutes. This method warms it gently and helps maintain that perfect crust. You can also warm slices in the microwave for about 30 seconds. However, the crust may become soft this way. If stored properly, your salted caramel apple galette can last up to 3 days in the fridge. After that, it may lose its flavor and texture. For best taste, enjoy it within the first couple of days. If you want to keep it longer, consider freezing it. Wrap it well and store it in the freezer for up to 2 months. Just remember to thaw it in the fridge before reheating. Yes, you can make the dough ahead of time. After mixing, wrap it in plastic. Store it in the fridge for up to three days. If you want to keep it longer, freeze it for up to three months. Just let it thaw in the fridge before rolling it out. This helps save time on a busy day. When using homemade caramel, let it cool slightly before drizzling. This keeps it from running off the apples. Use a whisk to mix in a pinch of sea salt for flavor. If your caramel hardens, gently warm it in the microwave. This makes it easy to pour over the apples. Your galette is done when the crust turns golden brown. Check the apples too; they should be tender. The edges should be slightly crispy. If you see bubbling from the caramel, that’s a good sign! Let it cool a bit, and then enjoy this tasty treat. In this article, we explored the delicious salted caramel apple galette. We covered ingredients, step-by-step instructions, and helpful tips. You learned about substitutions and tools needed for success. We also discussed variations to suit your taste. Finally, storage tips helped you keep leftovers fresh. Remember, a good galette takes time, but it's worth it. Enjoy making this dessert and let your creativity shine!

Salted Caramel Apple Galette Irresistible Dessert Recipe

Are you ready to impress your family and friends with a delightful dessert? This Salted Caramel Apple Galette combines the

Older posts
Newer posts
← Previous Page1 … Page40 Page41 Page42 … Page84 Next →

dsad

© 2026 juliesdish • Built with GeneratePress

Our Policies

  • Copyright Policy
  • Cookie Policy
  • GDPR Policy
  • Privacy Policy
  • Disclaimer
  • Terms Of Use

More Information

  • Home
  • About
  • Contact
  • Appetizers
  • Dessert
  • Dinner
  • Drinks
©2026, juliesdish About Back To Top