Skip to content
DisclaimerTerms Of UseGDPR PolicyCookie Policy

juliesdish

  • Home
  • Drinks
  • Appetizers
  • Dinner
  • Dessert
  • About
  • Contact
  • Privacy Policy
DisclaimerTerms Of UseGDPR PolicyCookie Policy

NO-ING-IMG

- 1 ½ cups chocolate cookie crumbs - ½ cup unsalted butter, melted - 16 oz cream cheese, softened - 1 cup creamy peanut butter - 1 cup powdered sugar - 1 teaspoon vanilla extract - 2 cups whipped topping (like Cool Whip) - ½ cup chocolate ganache (for topping) - Chopped peanuts and chocolate shavings (for garnish) You can use any brand of chocolate cookies for the crust. A mix of graham crackers and cocoa powder works too. If you're out of unsalted butter, you can use salted butter. Just skip any extra salt in the crust. For the cream cheese, use full-fat for the best taste. A low-fat version might not be as creamy. You can swap creamy peanut butter for crunchy if you like some texture. If you want a sugar-free option, look for powdered sugar made from erythritol or stevia. Make sure your cream cheese is soft. This helps it mix smoothly. Cold cream cheese will make lumps in your filling. When choosing whipped topping, go for a brand with no artificial flavors. This will keep your cheesecake tasting fresh. For the chocolate ganache, you can make it by melting chocolate with heavy cream. Use high-quality chocolate for a rich flavor. Lastly, garnish with fresh peanuts and chocolate shavings just before serving. This adds a nice touch to your dessert! {{ingredient_image_1}} First, I preheat the oven to 350°F (175°C). In a bowl, I mix the chocolate cookie crumbs with melted butter. I want the crumbs to be fully coated. Then, I press this mixture into the bottom of a 9-inch springform pan. I make sure it is firm and even. Next, I bake it for 10 minutes. After that, I take it out and let it cool. Now, I focus on the filling. I start by beating the softened cream cheese and peanut butter together in a large bowl. I mix until it is smooth and creamy. Then, I slowly add the powdered sugar and vanilla extract. I continue mixing until everything is well blended. Next, I gently fold in the whipped topping. I do this carefully to keep the mixture light. Once mixed, I pour this filling over the cooled crust. I use a spatula to smooth the top. After filling the crust, I cover the springform pan. I place it in the refrigerator for at least 4 hours or ideally overnight. This helps the cheesecake set perfectly. Once it is set, I carefully remove it from the pan. I pour chocolate ganache over the top, letting it drip down the sides. Finally, I garnish with chopped peanuts and chocolate shavings. To serve, I slice the cheesecake into wedges and enjoy it chilled. When making your cheesecake, avoid overmixing the filling. Overmixing can add air, which causes cracks. Make sure your cream cheese is at room temperature. Cold cream cheese can lead to lumps in your filling. Also, remember to cool your crust completely before adding the filling. If the crust is warm, it can melt the filling. For a creamy texture, beat the cream cheese and peanut butter well. Mix until smooth. When you add the powdered sugar, do it slowly. This helps blend it evenly. Gently fold in the whipped topping. This keeps the mixture light and fluffy. Chill the cheesecake for at least four hours. Overnight chilling gives the best results. To make your cheesecake look stunning, drizzle chocolate ganache over the top. Let it run down the sides for a nice touch. Use a sharp knife to slice clean pieces. You can garnish with chopped peanuts and chocolate shavings. A sprinkle of sea salt can add a nice contrast to the sweet flavors. Pro Tips Use Room Temperature Ingredients: Ensure that your cream cheese and peanut butter are at room temperature before mixing. This helps achieve a smoother, creamier filling without lumps. Chill Overnight: For the best flavor and texture, allow the cheesecake to chill overnight. This helps the flavors meld together and gives the cheesecake a firmer structure. Garnish Just Before Serving: Add the chocolate ganache and garnishes like chopped peanuts and chocolate shavings just before serving to keep them fresh and visually appealing. Experiment with Flavors: Feel free to customize your cheesecake by adding ingredients like crushed Oreos, caramel sauce, or different types of chocolate to the filling or topping for a unique twist. {{image_2}} You can make a no-bake version of the peanut butter chocolate cheesecake. To do this, skip the baking step for the crust. Simply mix the chocolate cookie crumbs with melted butter. Then, press the mixture into your pan. Next, prepare the filling as usual and pour it over the crust. Chill it in the fridge for at least 4 hours. This method keeps things simple and quick! To create a vegan version, swap the cream cheese for a dairy-free cream cheese. Use coconut whipped cream instead of regular whipped topping. You can also replace the butter with coconut oil. This will give you a rich and creamy texture without any animal products. Make sure to check the chocolate you use is dairy-free as well. Garnishing can change your cheesecake’s look and taste. Instead of chocolate ganache, try a caramel sauce. This adds a sweet twist. You can also use fresh fruit like strawberries or raspberries for a tart flavor. Chopped nuts like almonds or walnuts add crunch. For a fun touch, sprinkle sea salt on top. This balance of sweet and salty makes each bite exciting! To keep your cheesecake fresh, store it in the fridge. Place it in an airtight container. If you use the springform pan, cover it tightly with plastic wrap. This helps prevent it from drying out. Leftover cheesecake can last up to five days in the fridge. You can freeze your cheesecake for longer storage. First, let it cool completely in the fridge. Then, wrap each slice tightly in plastic wrap. Place the wrapped slices in a freezer bag. Remove as much air as possible. You can freeze it for up to three months. To thaw your cheesecake, move it from the freezer to the fridge. Let it sit for about six hours or overnight. This way, it thaws slowly and keeps its texture. If you need it quicker, leave it at room temperature for an hour. Do not microwave it, as this can ruin the creamy texture. Enjoy your cheesecake chilled! Yes, you can use other nut butters. Almond butter or cashew butter work well. Each nut butter adds a unique flavor. Just remember that the texture may change slightly. This cheesecake stays fresh for about five days in the fridge. Make sure to cover it well. Use plastic wrap or an airtight container to keep it tasty. Yes, you can use a regular pie dish or cake pan. Just ensure you line the bottom with parchment paper. This helps in removing the cheesecake later. You can use heavy cream instead of whipped topping. Just whip it until soft peaks form. You can also try Greek yogurt for a tangy twist. This article covered how to make a delicious peanut butter chocolate cheesecake. We reviewed key ingredients, step-by-step instructions, and tips to avoid common mistakes. I shared variations to try, along with storage and serving advice. Mastering this recipe brings joy and tasty rewards. Now you can impress friends and family with ease. Enjoy creating your cheesecake masterpiece!

Peanut Butter Chocolate Cheesecake Creamy Delight Recipe

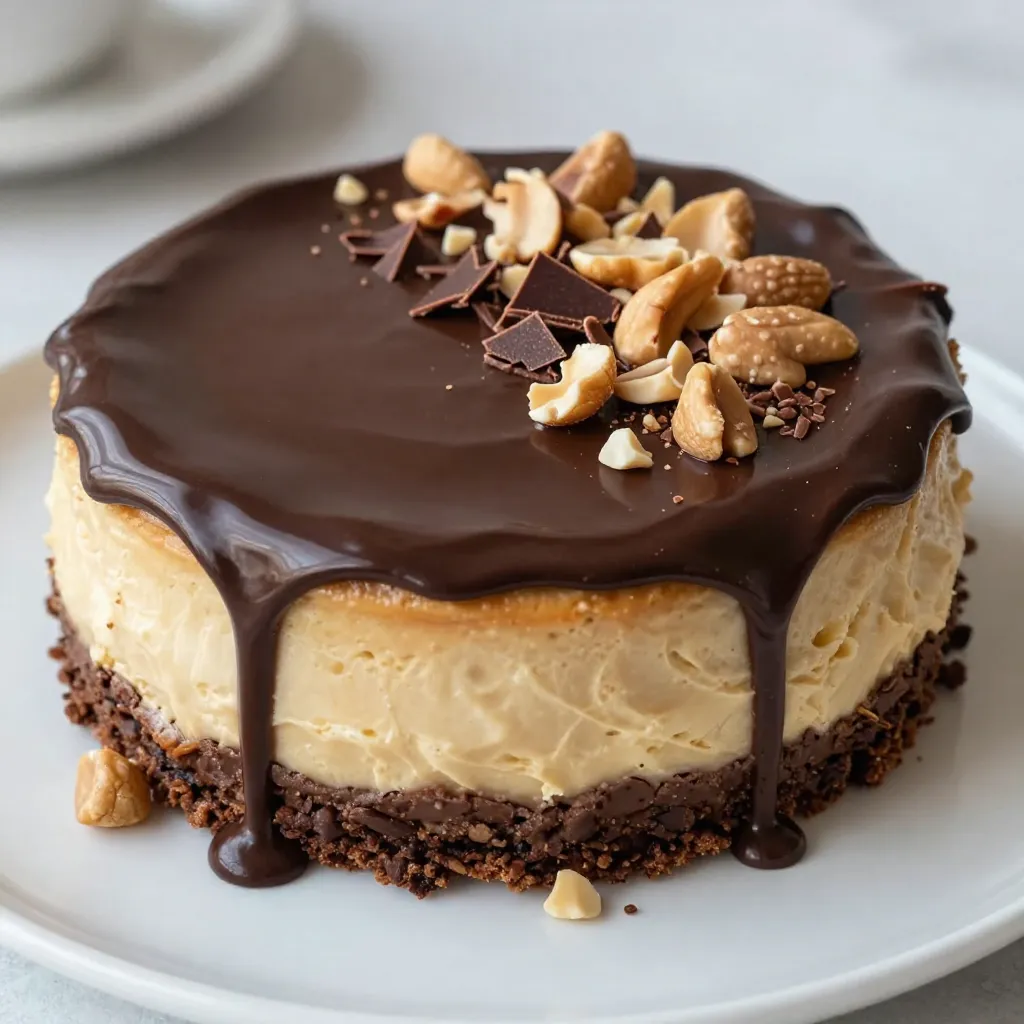
Get ready to indulge in a creamy delight! This Peanut Butter Chocolate Cheesecake will sweep you off your feet. With

- 1 cup rolled oats - 2 cups almond milk (or any milk of choice) - 1/2 cup creamy peanut butter - 1 ripe banana, mashed - 2 tablespoons chia seeds - 1 tablespoon honey or maple syrup (optional) - 1/2 teaspoon vanilla extract - A pinch of salt - Sliced bananas and chopped nuts for topping To make your peanut butter overnight oats, gather these simple ingredients. The oats form the base and give us that hearty feel. Almond milk adds creaminess, but you can use any milk you like. Creamy peanut butter creates a rich flavor and texture. A ripe banana brings sweetness and moisture. Chia seeds add fiber and help thicken the mix. You can also include honey or maple syrup if you want added sweetness. Vanilla extract enhances the flavor, while a pinch of salt balances everything out. For fun toppings, use sliced bananas and chopped nuts. They add crunch and taste. Feel free to swap ingredients or add your favorites. You can try different fruits or nut butters to make this recipe your own! 1. In a large mixing bowl, add the rolled oats. 2. Pour in 2 cups of almond milk. You can use any milk you like. 3. Add 1/2 cup of creamy peanut butter. 4. Mash 1 ripe banana and mix it in. 5. Toss in 2 tablespoons of chia seeds. 6. If you want sweetness, add 1 tablespoon of honey or maple syrup. 7. Add 1/2 teaspoon of vanilla extract and a pinch of salt. 8. Whisk the mixture well until everything blends smoothly. Next, divide the mixture into 4 jars or containers. Make sure each jar has a lid. Seal them tightly to keep freshness. Refrigerate the jars overnight. If you can't wait, let them sit for at least 4 to 6 hours. The oats will soak up the milk and thicken nicely. In the morning, grab a jar and give the oats a good stir. They might be thick, so you can add a splash of milk to make them creamier. For a tasty touch, top them with sliced bananas and chopped nuts. This adds crunch and flavor. Enjoy your peanut butter overnight oats! To make your peanut butter overnight oats, start by mixing all the ingredients in a big bowl. This includes rolled oats, almond milk, creamy peanut butter, mashed banana, chia seeds, and a bit of honey. You can prepare these oats ahead of time, which is great for busy mornings. After mixing, divide the oats into four jars. Seal them well and place them in the fridge. They can last up to five days, so you can enjoy them all week! To make your oats even more delicious, try adding sliced bananas or chopped nuts on top. These toppings not only add flavor but also great texture. For a stronger peanut butter taste, mix in an extra spoonful of peanut butter before you store it. You can also sprinkle in some cocoa powder or cinnamon for a fun twist. These small changes can really enhance your breakfast! {{image_2}} You can mix in many fruits to your overnight oats. Berries, like strawberries and blueberries, add bright colors and sweet flavors. Apples give a nice crunch and taste great with peanut butter. Bananas are classic, but don’t stop there! Try peaches or mango for a tropical twist. Adding fruits not only makes your oats taste better, but they also add nutrients. Fruits are rich in vitamins and fiber. This keeps you full longer and helps with digestion. The natural sweetness from fruits can also reduce the need for added sugar. You can boost your oats with nuts and seeds. Almonds, walnuts, and pecans give a nice crunch. They add healthy fats and protein. Seeds like sunflower or pumpkin seeds offer a different texture and taste. To add these, simply sprinkle them on top or mix them in. This way, you get a mix of soft oats and crunchy bits. It makes your breakfast exciting and fun to eat. Plus, these additions make your meal more filling and nutritious! To keep your peanut butter overnight oats fresh, use tight-sealing containers. Proper sealing stops air from getting in. This keeps the oats moist and tasty. I recommend glass jars or BPA-free plastic containers. They are easy to clean and safe for food. Make sure each jar has a lid that fits well. This way, your oats stay great for days. You can freeze your overnight oats if you want to save some for later. To freeze, first, divide the oats into single-serving containers. Leave a little space at the top for expansion. This helps avoid spills. Seal them tightly and place them in the freezer. When you are ready to eat, take out a container. Let it thaw in the fridge overnight. If you need it faster, you can thaw it in the microwave. Use a low setting to heat it gently. Stir the oats well before eating. If they seem too thick, add a splash of milk. Enjoy your tasty oats any time! Overnight oats can last in the fridge for about five days. This makes them great for meal prep. Store them in airtight containers to keep them fresh. If you see any signs of spoilage, like an off smell or strange texture, it's best to toss them. Yes, you can use other nut butters like almond or cashew. Each nut butter adds a different flavor. Almond butter gives a milder taste, while cashew butter is creamier. Feel free to experiment and find your favorite! Yes, overnight oats can be gluten-free if you use gluten-free oats. Some regular oats may have traces of gluten from processing. Check labels carefully to ensure they are certified gluten-free. You can also try quinoa flakes or buckwheat for a gluten-free option. Overnight oats are easy to make and customize. You can mix your favorite ingredients and store them for busy mornings. We covered measurements, preparation steps, and tips for boosting flavor. You learned about mixing in fruits and nuts for extra nutrition. Remember to seal your containers tightly and know how to freeze oats. With these tips, you can enjoy delicious and healthy breakfasts all week. Try different flavors and make this your go-to meal prep, since it’s fun and simple!

Peanut Butter Overnight Oats Simple and Tasty Meal

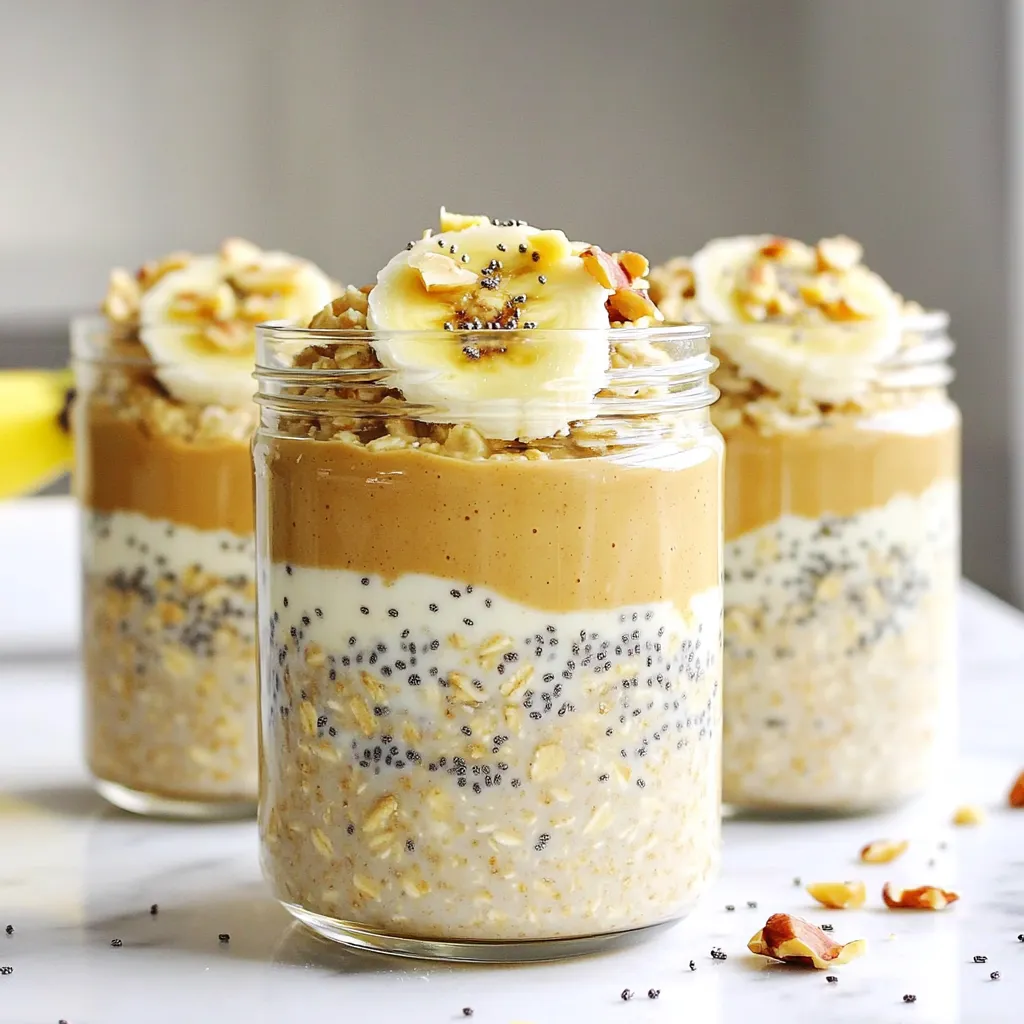
Start your day with a mouthwatering twist. Peanut butter overnight oats are simple to make and deliciously satisfying. You’ll only

- 8 oz (about 225g) pasta (penne or rigatoni) - 1 cup fresh spinach, chopped - 1 cup canned artichoke hearts, drained and chopped - 1 cup cream cheese, softened - 1 cup shredded mozzarella cheese - 1/2 cup grated Parmesan cheese - 1/2 cup sour cream - 2 cloves garlic, minced - 1/4 teaspoon red pepper flakes (optional for spice) - Salt and pepper to taste - 2 tablespoons olive oil - Fresh parsley for garnish For the best flavor, I recommend using Philadelphia cream cheese. It melts well and gives a smooth texture. For mozzarella, I prefer Galbani or BelGioioso. Their cheeses are rich and creamy. For Parmesan, look for Grana Padano for a nice nutty taste. If you need alternatives, you can use gluten-free pasta for a healthier option. For a lighter dish, swap sour cream with Greek yogurt. If you're vegan, try cashew cream instead of cream cheese. Use nutritional yeast to replace the cheese flavors. Start by boiling a large pot of water. Add a good amount of salt. This helps flavor the pasta. Once the water is bubbling, toss in 8 ounces of your choice, like penne or rigatoni. Cook according to the package until it's al dente. This means it should be firm but cooked through. Save half a cup of pasta water before draining. Drain the pasta and set it aside. This step makes sure your pasta stays perfect. Heat 2 tablespoons of olive oil in a large skillet over medium heat. Add 2 cloves of minced garlic and sauté for around 1 minute. You want the garlic to smell great but not brown. Brown garlic can taste bitter, so keep an eye on it. Lower the heat and add 1 cup of softened cream cheese to the skillet with garlic. Stir it well until the cream cheese melts and blends with the garlic. This creamy base sets the tone for your dip. Next, gradually add in 1 cup of shredded mozzarella and 1/2 cup of grated Parmesan cheese. Keep stirring as they melt into a smooth sauce. This step is key for a creamy texture. If it feels too thick, you can add a splash of the reserved pasta water. Now, fold in 1 cup of chopped fresh spinach and 1 cup of drained, chopped artichoke hearts. Mix well and let it cook for about 3 to 4 minutes. You want the spinach to wilt but still be bright green. This adds freshness and flavor. Stir in 1/2 cup of sour cream next. This adds creaminess and tang. Then, slowly mix in the reserved pasta water until you get the sauce you like. Taste it and add red pepper flakes, salt, and pepper as you prefer. Adjust these until it tastes just right. Finally, add the cooked pasta to the skillet. Toss everything together until the pasta is coated in the creamy spinach artichoke mix. Make sure every piece of pasta gets that yummy sauce. Serve it warm, and you can garnish with fresh parsley or extra cheese for a nice touch. One common mistake is overcooking the pasta. You want it al dente, which means firm to the bite. Overcooked pasta becomes mushy and loses its texture. Always check the package for cooking time and taste it a minute before it's done. Another pitfall is adding the cheese too quickly. When you mix in the mozzarella and Parmesan, do it gradually. This helps create a smooth, creamy sauce. If you rush, the cheese might clump together. Garnishing enhances your dish's look and taste. I love adding fresh parsley on top. It adds a pop of color and a fresh flavor. You can also sprinkle extra cheese for richness. For sides, consider a simple green salad. It offers a nice contrast to the creamy pasta. You could also serve garlic bread for a comforting touch. Store leftovers in an airtight container. This keeps them fresh for up to three days. To reheat, add a splash of water or milk. This helps bring back the creaminess. Heat gently on the stove or in the microwave. Avoid high heat to keep the pasta from drying out. {{image_2}} To make this dish lighter, swap some ingredients. Use low-fat cream cheese and Greek yogurt instead of sour cream. Choose whole grain pasta for more fiber. You can also cut the cheese amounts by half without losing flavor. Want more taste? Add cooked chicken or shrimp for protein. Sauté mushrooms along with the garlic for depth. You could also mix in sun-dried tomatoes for a tangy twist. A touch of lemon juice brightens this dish, too. Making this recipe vegan is easy. Substitute cream cheese with cashew cream or a vegan cream cheese. Use nutritional yeast for a cheesy flavor without dairy. Choose plant-based pasta, and ensure artichokes are canned in water, not oil. This keeps your dish creamy and delicious without animal products. Each serving of Spinach Artichoke Dip Pasta has about 500 calories. It contains 25 grams of fat, mostly from cheese and cream. You’ll also find around 15 grams of protein, which helps keep you full. This dish offers a good amount of carbs, mainly from the pasta, making it a hearty meal. Spinach is a superfood. It is rich in iron and vitamins A and C. Iron helps your blood carry oxygen. Artichokes are high in fiber, which aids digestion. They also contain antioxidants that support overall health. Whole grain pasta gives you energy and keeps your heart happy. It has more nutrients than regular pasta. A serving size is about one cup of pasta. Pair it with a salad for balance. This dish is best enjoyed fresh but can also be great as leftovers. If you have some, try adding grilled chicken or shrimp for extra protein. Adjust portion sizes based on your daily needs. Yes, you can use frozen spinach. Just thaw it first. Squeeze out the extra water before adding it to the dish. Frozen spinach is easy and saves time. It also has a good taste. Just make sure to chop it finely. You can make this dish ahead of time. Cook the pasta and mix it with the dip. Store it in the fridge for up to two days. When you're ready to eat, reheat it on low heat. Add a splash of water if it looks too thick. Stir well to combine everything. You can use other cheeses, too. Cream cheese is key, but you could try cheddar or gouda for a twist. Feta cheese can add a nice tangy flavor. Mix and match to find your favorite blend. Just remember to keep the texture creamy. To make this dish gluten-free, choose gluten-free pasta. Many brands offer great options now. Also, check the labels on your cheeses and sour cream. Most are gluten-free, but it’s good to confirm. Enjoy this creamy goodness without worry. If you want more heat, add more red pepper flakes. You could also mix in some chopped jalapeños. For a smoky flavor, try adding paprika or chili powder. Experiment with spices to find your perfect kick! This blog post covered all you need to know to make a tasty spinach and artichoke pasta. We talked about choosing the right ingredients, cooking tips, and some fun variations. You can make it healthier, spicier, or even vegan-friendly. Remember to avoid common mistakes, like overcooking the pasta, to get the best results. Enjoy your cooking adventure, and make this dish your own! Your kitchen will fill with great smells and flavors. Happy cooking!

Spinach Artichoke Dip Pasta Flavorful Comfort Dish

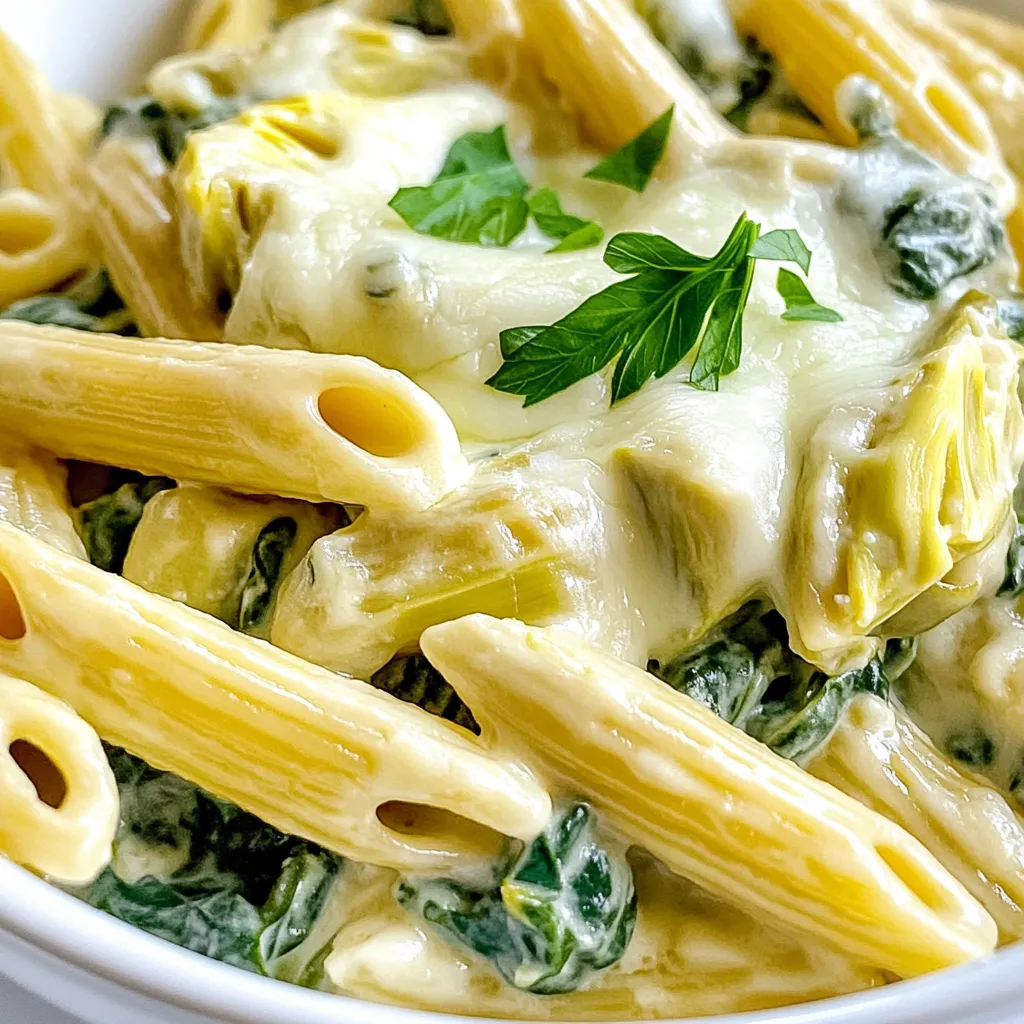
Craving a warm, cheesy hug in a bowl? Look no further! Our Spinach Artichoke Dip Pasta combines the creamy goodness

- 2 medium zucchini, cut into sticks - 1 cup breadcrumbs (preferably Panko for extra crunch) - 1/2 cup grated Parmesan cheese - 1 teaspoon garlic powder - 1 teaspoon onion powder - 1/2 teaspoon paprika - Salt and pepper to taste - 1 large egg - 1 tablespoon olive oil For this recipe, I use two medium zucchinis. Cutting them into sticks makes them fryable. I like to use one cup of Panko breadcrumbs. This gives the fries a nice crunch. For the cheese, half a cup of grated Parmesan adds rich flavor. I add one teaspoon each of garlic powder and onion powder. They give a savory kick. A half teaspoon of paprika adds a touch of warmth. Finally, I season with salt and pepper to taste. I need one large egg for binding and one tablespoon of olive oil for crispiness. You can change the flavors by using different spices. Try adding Italian seasoning for a herby touch. For a spicy kick, use cayenne pepper or chili powder. You can also try using different cheeses. Cheddar or mozzarella can add a new twist. If you want a fruity flavor, add lemon zest to the breading. These options let you make the fries your own, adding extra flavor and fun! Start by washing your zucchini under cool water. Dry them well with a towel. Cut each zucchini into sticks, about the size of your finger. This helps them cook evenly. The more uniform the size, the better they will bake. Place the sticks on a plate to get ready for coating. Grab two bowls. In the first bowl, mix the breadcrumbs, Parmesan cheese, garlic powder, onion powder, paprika, salt, and pepper. Stir until all the dry ingredients blend well. In the second bowl, beat the egg with a fork until it is smooth. Dip each zucchini stick into the egg. Let any extra egg drip off. Then, coat the stick in the breadcrumb mix. Press gently to make sure the crumbs stick well. Place each coated stick on a baking sheet lined with parchment paper. They should not touch each other. Preheat your oven to 425°F (220°C). This high heat helps them become crispy. Drizzle olive oil over the zucchini fries before baking. This adds flavor and helps them brown. Bake them for 20 to 25 minutes. Flip them halfway through for even cooking. Look for a golden brown color to know they are done. Let them cool for a few minutes before serving. Enjoy your crispy Parmesan zucchini fries! To get the best crunch, use Panko breadcrumbs. They have a light and airy texture. Also, make sure to coat the zucchini fries well. A thin layer of egg helps the crumbs stick better. Drizzle olive oil on top before baking. It adds flavor and helps them crisp up. Flip the fries halfway through cooking to ensure even browning. Start by cutting the zucchini into even sticks. This helps them cook at the same rate. Set up your bowls with egg and breadcrumb mixtures next to each other. Dip each stick in the egg, and let the excess drip off. Then, roll it in the breadcrumb mix. Press the crumbs on firmly so they stick well. Serve the crispy zucchini fries right from the oven. They taste best hot and crunchy. You can put them in a cone-shaped holder for fun. Pair them with marinara sauce or garlic aioli for dipping. This adds a nice touch and makes eating them even better! {{image_2}} You can enjoy crispy zucchini fries without gluten. Use gluten-free breadcrumbs instead of regular ones. Many brands offer tasty alternatives. You can also use ground almonds or crushed cornflakes. Both options work well for a crunchy coating. Just ensure they are labeled gluten-free for safety. If you want to switch things up, try different coatings. You can use crushed tortilla chips for a fun twist. They add a nice crunch and flavor. Another option is to use finely grated cheese, like cheddar or mozzarella. For a lighter version, you can skip the breadcrumbs and use just the egg and cheese. To make your zucchini fries more exciting, add extra spices to the mix. Consider adding cayenne for heat or Italian herbs for a fresh taste. You can also try lemon zest for a bright flavor. Mixing in some grated parmesan with the breadcrumbs boosts the cheesy taste. Feel free to be creative and make these fries your own! To store your leftover crispy zucchini fries, let them cool first. Place them in an airtight container. Keep them in the fridge for up to three days. This way, they stay fresh and tasty. If you want to keep them longer, consider freezing them. When you're ready to enjoy your leftovers, heat your oven to 400°F (200°C). Place the fries in a single layer on a baking sheet. Bake for about 10-15 minutes until they are hot and crispy again. This method helps bring back their crunch. Avoid using the microwave as it can make them soggy. You can freeze the zucchini fries before or after cooking. To freeze before cooking, coat the sticks and place them on a baking sheet. Freeze them until solid, then transfer to a freezer bag. They can last for up to three months. When you’re ready to cook, bake them straight from the freezer. No need to thaw! If freezing after cooking, let them cool completely first. Then follow the same steps for storage. Yes, you can use other vegetables. Carrots, eggplant, or sweet potatoes work well. Cut them into sticks just like zucchini. Adjust the baking time based on the vegetable. Thicker veggies may need more time to cook. To avoid soggy fries, make sure to coat them well. Use Panko breadcrumbs for extra crunch. Drizzle olive oil on top for crispiness. Also, space them out on the baking sheet. This allows hot air to circulate around them. Flip the fries halfway through baking for even crispness. For dipping, marinara sauce pairs nicely with zucchini fries. Garlic aioli adds a creamy touch. Ranch dressing is another great choice. You can even try spicy ketchup for a kick. Choose a sauce that you love for the best experience! This guide covered all you need for perfect zucchini sticks. I shared ingredients, measurements, and options to make them tasty. You learned how to prep, coat, and bake the sticks for crispiness. Also, I gave tips for serving and storing leftovers. Experiment with variations for more fun. Enjoy your zucchini sticks as a great snack! They are simple, tasty, and healthy. You now have the tools for success in the kitchen.

Crispy Parmesan Zucchini Fries Easy and Flavorful Snack

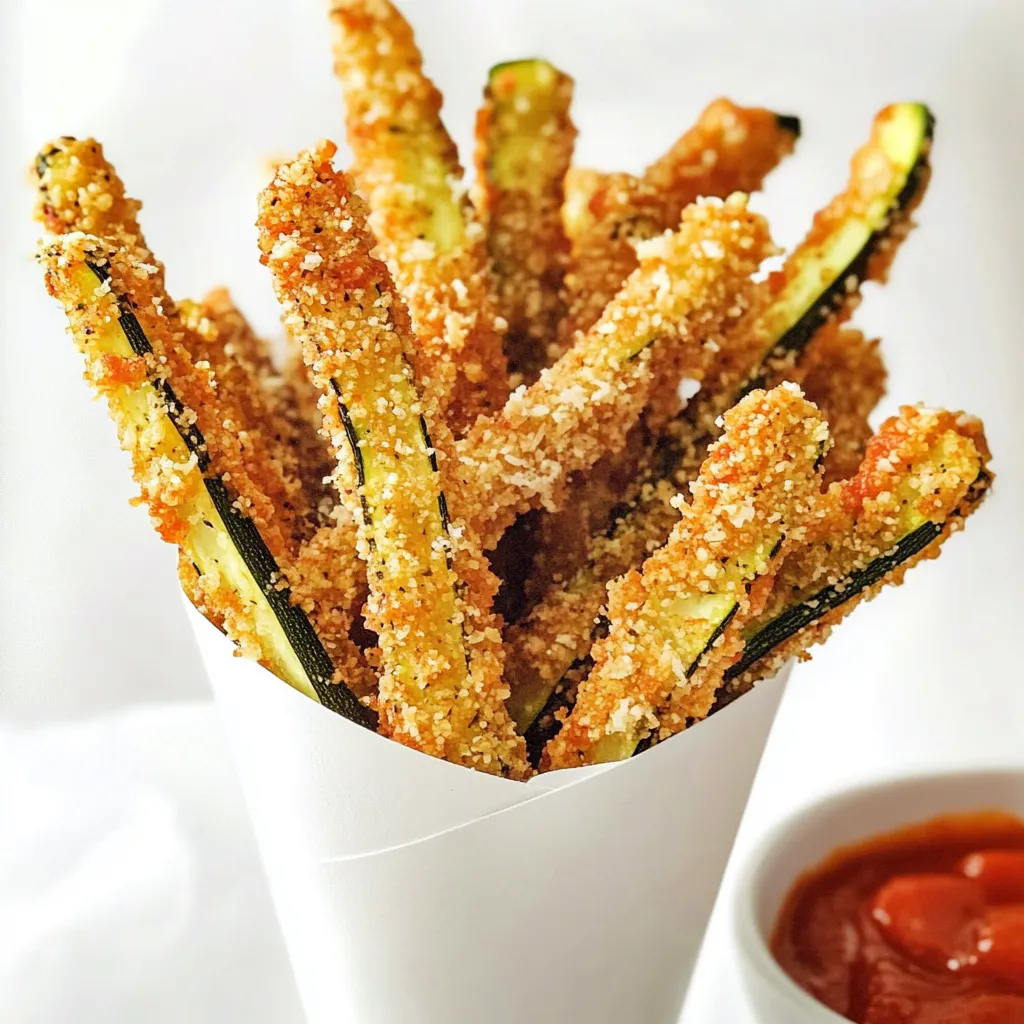
Looking for a tasty snack that’s easy to make? Try my Crispy Parmesan Zucchini Fries! These fries are simple, packed

For this tasty dish, you need: - 1 pound sirloin steak, cut into 1-inch cubes - 4 tablespoons unsalted butter - 4 cloves garlic, minced - 1 tablespoon fresh rosemary, chopped - 1 tablespoon fresh parsley, chopped - Salt and pepper to taste - 1 tablespoon olive oil - Lemon wedges for serving The sirloin steak gives a rich flavor. Cut it into cubes for easy cooking. The butter adds creaminess, while garlic brings a strong taste. Fresh herbs like rosemary and parsley make it aromatic. Seasoning is key to making the steak bites stand out. Salt and pepper add a basic flavor. Fresh rosemary and parsley elevate the dish. They add color and taste, making every bite fresh. Once cooked, serve your steak bites hot. Add lemon wedges on the side. A squeeze of lemon juice brightens the flavors. You can pair these bites with rice, potatoes, or a fresh salad for a complete meal. Enjoy the easy prep and rich taste! Start by cutting your sirloin steak into 1-inch cubes. This size helps it cook evenly. Next, sprinkle the cubed steak with salt and pepper. Make sure to coat every piece well. This step adds flavor and enhances the dish. Heat a large skillet over medium-high heat. Add olive oil to the pan. Wait until the oil shimmers. This means it's hot enough to sear the steak. Place the steak cubes in the skillet in a single layer. Don't stir them just yet. Let them sear for about 2-3 minutes. This creates a nice crust. After that, flip the steak bites. Cook for another 2 minutes for medium-rare. Adjust the time if you want them more done. Remove the steak from the pan and set it aside. In the same skillet, lower the heat to medium. Add the unsalted butter and minced garlic. Stir for about 30 seconds. You want the garlic to smell great but not brown. This step makes the sauce rich and tasty. Now, return the cooked steak bites to the skillet. Toss them to coat them in the garlic butter sauce. Sprinkle chopped rosemary and parsley over the steak. Mix well for another minute. This adds freshness and color. Serve the steak bites hot with lemon wedges on the side. A squeeze of lemon adds a bright touch. Enjoy your savory garlic butter steak bites! To get that great crust, use a hot skillet. Heat the olive oil until it shimmers. Place the steak bites in a single layer. Do not crowd the pan. Let them cook for 2-3 minutes. This time helps the meat brown nicely. Flip the bites to sear the other side. Adjust your cooking time for more doneness. A perfect sear locks in flavor. For this recipe, olive oil works best. It has a high smoke point. This means it can handle heat well. Other good options are avocado oil and grapeseed oil. Both oils can give a nice flavor. Avoid oils with low smoke points, like butter. You will add butter later for flavor. Want to boost the taste? Try adding different herbs. Thyme or oregano can add depth. You can also use garlic powder if you're short on fresh garlic. Swap sirloin with ribeye for a richer taste. For a kick, add a pinch of red pepper flakes. Fresh lemon juice brightens the dish, too. {{image_2}} You can use many cuts of steak for garlic butter steak bites. Sirloin works great, but you can also try ribeye for more fat and flavor. Filet mignon gives a tender bite, while flank steak is leaner and still tasty. Just remember, each cut cooks a bit different. Adjust your cooking time as needed. Herbs and spices add fun to your dish. Try thyme or oregano instead of rosemary. You can even add a pinch of red pepper flakes for some heat. Fresh basil can also change the flavor for a fresh twist. Mix and match to find what you love best. You can make this meal even better with veggies. Add bell peppers or onions to the skillet while cooking the steak. Zucchini or asparagus can roast alongside it for color and taste. Serve with a fresh salad or mashed potatoes for a full meal. These extras make the dish more colorful and healthy. To keep your garlic butter steak bites fresh, place them in an airtight container. Let the steak cool to room temperature first. Store the container in the fridge for up to three days. Make sure to label it with the date, so you know when to eat it. When you are ready to eat the leftovers, the best way to reheat them is on the stove. Add a splash of water or broth to a skillet over medium heat. Gently heat the steak bites for about five minutes. Stir them often to ensure they warm evenly. This method keeps the steak juicy and the garlic butter flavorful. You can also freeze the steak bites if you want to save them for later. Place the cooled steak in a freezer-safe bag or container. Remove as much air as possible to prevent freezer burn. They will stay good for up to three months. When you are ready to eat them, thaw the steak in the fridge overnight. Then, reheat them using the stovetop method for the best taste. Yes, you can use different cuts of steak. Tender cuts like ribeye or filet mignon work well. These cuts give a rich flavor and stay juicy. You can also try flank steak or skirt steak for a different taste. Just remember, cooking time may vary based on the cut. To add spice, you can include red pepper flakes or cayenne pepper. Mix these spices with salt and pepper before seasoning the steak. You could also use spicy sauces, like sriracha, in the garlic butter. Just start with a little and add more to taste. Garlic butter steak bites pair well with many sides. Try mashed potatoes or creamy polenta for a filling dish. Fresh salads add a nice crunch. Roasted vegetables also make a great complement. Don't forget some crusty bread to soak up that tasty garlic butter! This recipe is best fresh, but you can prep some parts ahead. Season and cut the steak a few hours before cooking. You can also make the garlic butter in advance. Just store it in the fridge until ready to use. Reheat it gently when you're ready to cook the steak. In this post, we explored how to make garlic butter steak bites. We covered the main ingredients, seasonings, and serving tips. I shared step-by-step instructions for preparing and cooking the steak. Tips included achieving the perfect sear and choosing the best oils. We also discussed variations like different cuts of steak and adding veggies. Finally, I offered storage ideas to help keep leftovers fresh. These steak bites are quick and sure to impress. Enjoy experimenting and making this dish your own!

Garlic Butter Steak Bites Savory and Simple Recipe

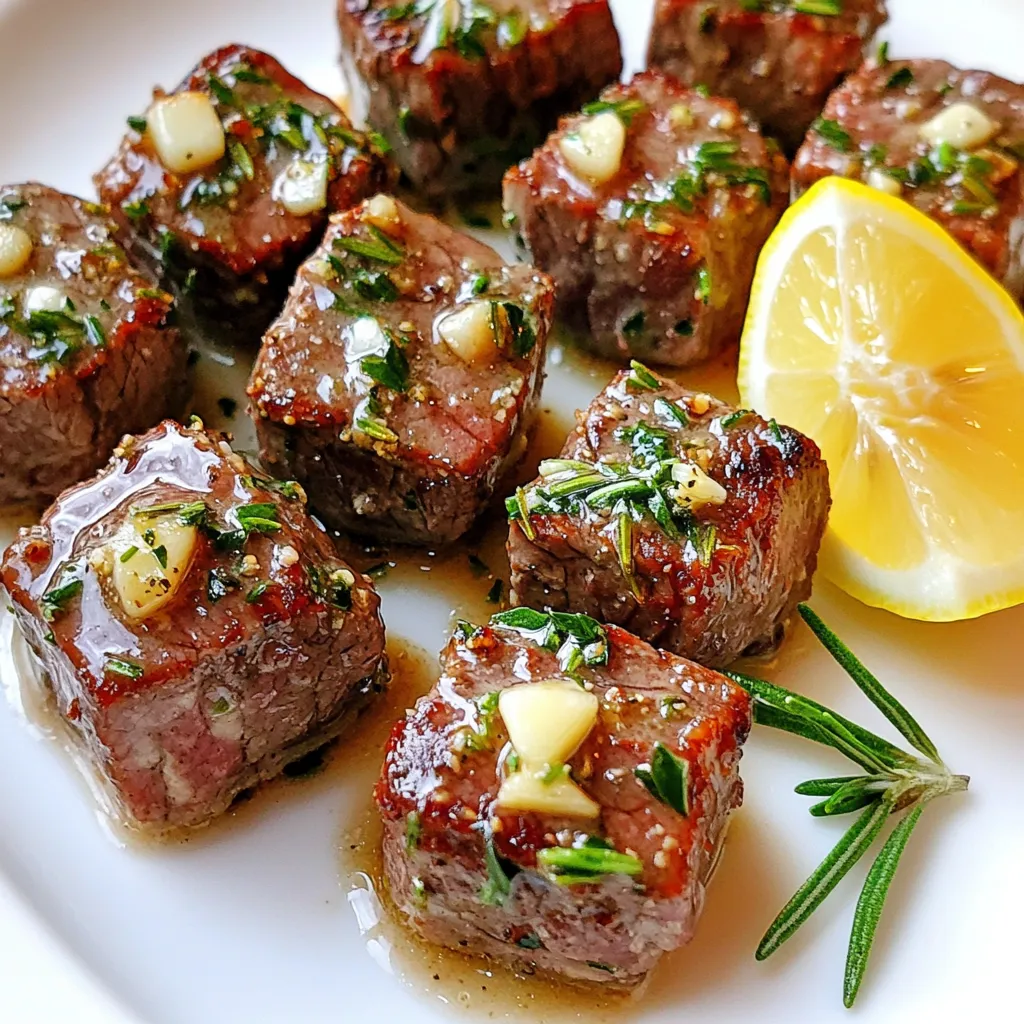
If you’re craving a quick and tasty meal, you’ve come to the right spot! Garlic Butter Steak Bites are super

To make Buffalo Cauliflower Bites, gather these key ingredients: - 1 medium cauliflower, cut into bite-sized florets - 3/4 cup all-purpose flour - 1/2 cup water - 1 teaspoon garlic powder - 1 teaspoon onion powder - 1/2 teaspoon smoked paprika - 1/2 teaspoon salt - 1/4 teaspoon black pepper - 1 cup buffalo sauce (store-bought or homemade) - 2 tablespoons unsalted butter, melted - Fresh celery sticks and ranch dressing for serving These ingredients come together to create a crispy and flavorful snack. The flour and water mix forms a batter that coats the cauliflower. The spices add depth to the flavor, while the buffalo sauce gives it that classic kick. If you find yourself missing an ingredient, here are some easy swaps: - Cauliflower: Use broccoli for a different taste. - All-purpose flour: Try almond flour or chickpea flour for a gluten-free option. - Buffalo sauce: Use sriracha or hot sauce for a different heat level. - Unsalted butter: Substitute with olive oil or vegan butter for dairy-free bites. These alternatives still keep your bites tasty and enjoyable. Don’t hesitate to mix and match! When picking cauliflower, look for these signs of freshness: - Color: Choose white florets with no brown spots. - Leaves: Fresh leaves should be green and crisp. - Feel: The head should feel firm and heavy for its size. Avoid any heads that feel soft or have dark patches. Fresh cauliflower leads to the best Buffalo Cauliflower Bites! Start by washing the cauliflower well. Remove the leaves and stem. Cut it into bite-sized florets. Make sure each piece is similar in size. This helps them cook evenly. In a large bowl, mix 3/4 cup of flour and 1/2 cup of water. Add 1 teaspoon of garlic powder, 1 teaspoon of onion powder, 1/2 teaspoon of smoked paprika, 1/2 teaspoon of salt, and 1/4 teaspoon of black pepper. Whisk until the batter is smooth. You want it to coat the cauliflower well. Preheat your oven to 450°F (232°C). Line a baking sheet with parchment paper. Dip each cauliflower floret into the batter. Make sure it’s coated all around. Place them on the baking sheet in a single layer. Bake for 20 minutes. Look for a lightly golden color and crisp texture. While the cauliflower bakes, mix 1 cup of buffalo sauce with 2 tablespoons of melted butter in a bowl. Once the cauliflower is done, take it out of the oven. Toss the florets in the buffalo sauce mixture. Make sure they are well coated. Return them to the baking sheet and bake for another 10 to 15 minutes. This step adds extra crispiness. After baking, let them cool before serving. To get your cauliflower bites super crispy, follow these steps: - Use a good amount of flour in the batter. This helps form a crust. - Make sure the cauliflower is coated evenly. This helps with crispness. - Bake on parchment paper. This prevents sticking and promotes browning. - Avoid crowding the baking sheet. Give each floret space to crisp up. Want to add more flavor? Try these ideas: - Mix in cayenne pepper for extra heat. Just a pinch will do! - Add some chipotle powder for a smoky kick. - Experiment with different spices like cumin or Italian herbs. - For a tangy twist, squeeze fresh lime juice over the bites before serving. Serve your buffalo cauliflower bites with these sides: - Fresh celery sticks add a nice crunch. - Pair with ranch dressing for cooling contrast. - Add a side salad to balance flavors and textures. - Serve with quinoa or rice for a heartier meal. {{image_2}} You can easily make Buffalo Cauliflower Bites vegan. Instead of butter, use a plant-based alternative like coconut oil or vegan margarine. Choose a dairy-free buffalo sauce for a perfect match. Many brands offer this option. You can also make your own sauce using hot sauce and a splash of vinegar. This way, you can enjoy the heat without any dairy. Want to switch things up? Try different flavors! For an Asian twist, use soy sauce and ginger instead of buffalo sauce. Toss the cauliflower bites in a mix of sesame oil and Sriracha after baking. For a BBQ flavor, coat the bites in your favorite barbecue sauce. This will give them a sweet and smoky taste. Feel free to experiment with spices like cumin, curry, or even lemon zest for a fresh kick. If you need a gluten-free option, swap out the all-purpose flour. Use almond flour or a gluten-free flour blend instead. These options will still give you that crispy texture. Always check labels to ensure there are no hidden gluten ingredients in your sauces. Enjoy your Buffalo Cauliflower Bites without worry! To keep your buffalo cauliflower bites fresh, place them in an airtight container. Make sure they cool down first. Store them in the fridge for up to three days. This way, they remain tasty for your next snack. When you want to enjoy your leftovers, use the oven for reheating. Preheat it to 350°F (175°C). Spread the cauliflower bites on a baking sheet. Heat them for about 10-15 minutes. This method helps keep them crispy. You can also use an air fryer. Set it to 350°F (175°C) and cook for about 5-7 minutes. If you want to store them longer, freezing is a great option. First, let the bites cool completely. Then, place them in a single layer on a baking sheet and freeze for 1-2 hours. After that, transfer them to a freezer-safe bag or container. They can last for about 2 months. When you're ready to eat, thaw them in the fridge overnight before reheating. Yes, you can make Buffalo Cauliflower Bites in the air fryer! Preheat the air fryer to 375°F (190°C). Prepare the cauliflower as usual by dipping it in the batter. Place the coated florets in the air fryer basket in a single layer. Cook for about 12-15 minutes, shaking halfway through. This method gives you a nice crispy texture without much oil. To make the cauliflower bites spicier, add more buffalo sauce. You can mix in some cayenne pepper or hot sauce into the batter. For an extra kick, try adding diced jalapeños to the batter. Adjust the heat to your taste, and feel free to experiment! Buffalo Cauliflower Bites go well with a few tasty dipping sauces. Ranch dressing is a classic choice. You can also try blue cheese dressing for a stronger flavor. For a fresh twist, serve them with a yogurt-based sauce or a spicy aioli. Each dip adds a new layer of flavor to your bites! In this post, we explored how to make Buffalo Cauliflower Bites. I discussed the essential ingredients, tips for prepping, and how to bake them for that perfect crisp. You learned about variations, like vegan and gluten-free options, and how to store and reheat leftovers. Buffalo Cauliflower Bites offer a tasty, healthy snack. With these tips, you can create your own delicious bites at home. Enjoy experimenting with flavors and serving ideas!

Buffalo Cauliflower Bites Crispy and Flavorful Snack

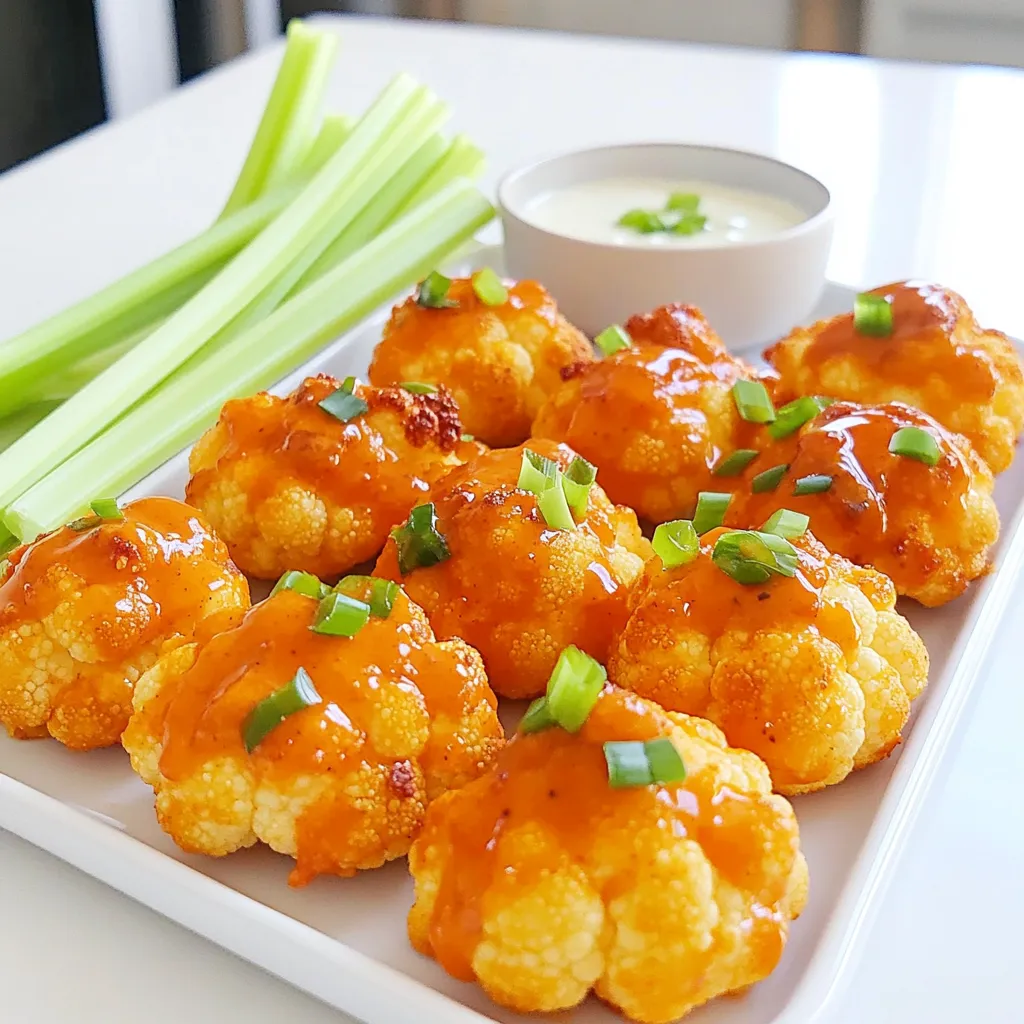
Looking for a tasty snack that packs a punch? Buffalo Cauliflower Bites are your answer! Crispy on the outside and

- 1 cup quinoa, rinsed - 2 cups vegetable broth (or water) - 1 cup cherry tomatoes, halved - 1 cucumber, diced - 1 bell pepper (red or yellow), diced - 1/4 cup red onion, finely chopped - 1/4 cup fresh parsley, chopped - 1/4 cup fresh mint, chopped - 1/4 cup feta cheese, crumbled (optional) - Juice of 1 lemon - 3 tablespoons olive oil - Salt and pepper to taste To make this lemon herb quinoa salad, gather these fresh ingredients. Start with one cup of quinoa. Rinse it well to remove any bitterness. For cooking, use two cups of vegetable broth or water. This adds flavor to the quinoa. You will need a cup of cherry tomatoes. Halve them for a juicy bite. A diced cucumber adds a nice crunch. Choose a bell pepper, either red or yellow, for color and sweetness. Chop a quarter cup of red onion finely. This gives a sharp taste that balances the salad. Fresh herbs are key. Use a quarter cup each of chopped parsley and mint. They bring bright flavors. If you like cheese, add a quarter cup of feta. It adds creaminess and a salty kick. You will also need the juice of one lemon and three tablespoons of olive oil. These dress the salad and enhance the taste. Finally, season with salt and pepper to suit your taste. - Calories per serving: Approximately 220 - Macronutrient breakdown: - Carbs: 33g - Fats: 9g - Protein: 7g This salad is not just tasty; it is also healthy. Each serving has around 220 calories. You get a good mix of carbs, healthy fats, and protein. It is a well-rounded meal! - Quinoa is a complete protein. It has all nine essential amino acids. This makes it a great choice for plant-based diets. - Fresh herbs like parsley and mint add flavor and nutrients. They are full of vitamins and antioxidants. - Olive oil is a healthy fat. It can help lower bad cholesterol. Lemon juice adds vitamin C and brightens the salad. Using these ingredients not only makes a delicious salad but also packs it with health benefits. Enjoy the freshness and feel good about what you eat! First, you need to cook the quinoa. In a medium pot, combine 1 cup of rinsed quinoa with 2 cups of vegetable broth or water. Bring this mixture to a boil over medium-high heat. Once it boils, reduce the heat to low. Cover the pot and let it simmer for about 15 minutes. You will know it is done when the quinoa is fluffy and the liquid is absorbed. After cooking, remove it from heat and let it cool down. To cool it faster, spread it on a large plate. This helps the quinoa cool evenly. Next, prepare your veggies. For the onion and bell pepper, chop them into small pieces. Aim for a uniform size. This helps with even cooking and nice bites. Halve the cherry tomatoes carefully. Use a sharp knife for a clean cut. For the cucumber, dice it into small cubes. This adds crunch and freshness to the salad. Finally, chop the fresh parsley and mint. These herbs give your salad a vibrant flavor. Now, it’s time to mix everything. In a large bowl, add your cooked quinoa along with the chopped vegetables. Squeeze the juice of one lemon over the top. Drizzle in 3 tablespoons of olive oil. Season it with salt and pepper to taste. Use a gentle hand to toss the salad. This ensures everything mixes without breaking the veggies. If you like, fold in crumbled feta cheese. Allow the salad to sit for 10 to 15 minutes before serving. This lets the flavors blend together nicely. Enjoy your fresh and colorful Lemon Herb Quinoa Salad! To achieve fluffy quinoa, start by rinsing it well. Rinsing removes the bitter coating called saponin. Use two cups of vegetable broth or water for every cup of quinoa. This gives the grains great flavor. Bring the liquid to a boil, then lower the heat and cover it. Let it simmer for about 15 minutes until the liquid is absorbed. Fluff the quinoa with a fork after it cools. This step keeps it light and airy. For seasoning, taste as you go. Start with salt and pepper. A little lemon juice adds brightness. If you want more flavor, add fresh herbs like parsley or mint. The herbs make a big difference! You can prepare this salad in advance. Cook the quinoa and chop the veggies ahead of time. Store each in separate containers in the fridge. This keeps the veggies crisp. The salad stays fresh for about 3 days. Just mix everything together before serving. Letting the salad sit for a bit helps the flavors blend. If you make it ahead, give it about 10-15 minutes to sit after mixing. This way, every bite is full of flavor! Serving this salad can be fun! Use a large bowl to show off the colors. You can also use clear glass dishes. This way, guests can see the layers of quinoa and veggies. For garnishing, try adding more herbs on top. Fresh mint or parsley looks pretty and adds flavor. You can also add slices of cucumber or cherry tomatoes on top for extra color. This makes the salad not just tasty, but also beautiful! {{image_2}} You can make this salad even better with some tasty add-ins. Chickpeas are a great choice. They add protein and fiber. If you want meat, grilled chicken works well too. It brings a savory flavor that pairs nicely with the fresh herbs. You can also change up the veggies. Zucchini adds a nice crunch. Carrots give a touch of sweetness. Feel free to mix and match based on your taste! To boost the flavor, try adding spices. Cumin adds a warm, earthy taste. Paprika gives a hint of smokiness. Both spices can take this salad to the next level. Don't forget about vinegars! You could try balsamic or apple cider vinegar. Each one gives a unique twist to the overall taste. So, get creative and find what you love! This salad can fit many diets. It’s naturally gluten-free because quinoa is a gluten-free grain. If you need a vegan option, just skip the feta cheese. You can still enjoy a fresh and tasty salad without it. Making these small changes can help you enjoy the Lemon Herb Quinoa Salad your way! To store leftovers, place the quinoa salad in an airtight container. Make sure to seal it well. This helps keep it fresh and prevents it from absorbing odors. You can enjoy the salad for about 3 to 5 days in the fridge. Always check for any signs of spoilage before eating. You can freeze the salad, but some ingredients may change in texture. To freeze, put the salad in a freezer-safe container. Leave some space at the top to allow for expansion. When you want to eat it, take it out and thaw it in the fridge overnight. After thawing, give it a good stir. Fresh herbs may need to be replaced for the best flavor. The best way to reheat quinoa salad is to use the microwave. Put it in a microwave-safe bowl and cover it loosely. Heat it in short bursts of 30 seconds, stirring in between. This helps keep the texture nice. You can also enjoy it cold. If you prefer warm, just add a bit of olive oil to enhance the flavor again. You can store quinoa salad in the fridge for about three to five days. Make sure to keep it in an airtight container. This helps to lock in flavor and keep it fresh. Always check for any signs of spoilage before eating. Yes, you can use other grains if you like. Farro, brown rice, or even barley work great. Each grain gives a different taste and texture. Choose what you enjoy or have on hand. Just remember to adjust cooking times for the grain you pick. If you want a dairy-free option, you can use avocado or tofu. Both add creaminess to the salad. You can also try using nutritional yeast for a cheesy flavor without the dairy. Crumbled goat cheese is another great choice if you still want cheese. To add some heat, try adding chopped jalapeños or red pepper flakes. Another option is to mix in a splash of hot sauce. If you want a different flavor, consider using spicy mustard or horseradish. These ingredients can give your salad a nice kick! This blog post covered a tasty quinoa salad. We explored the ingredients, health benefits, and step-by-step instructions. I shared tips for making and storing the salad, plus fun variations. In conclusion, this quinoa salad is simple and versatile. You can customize it to fit your taste and dietary needs. Enjoy experimenting with flavors and make it your own!

Lemon Herb Quinoa Salad Fresh and Flavorful Dish

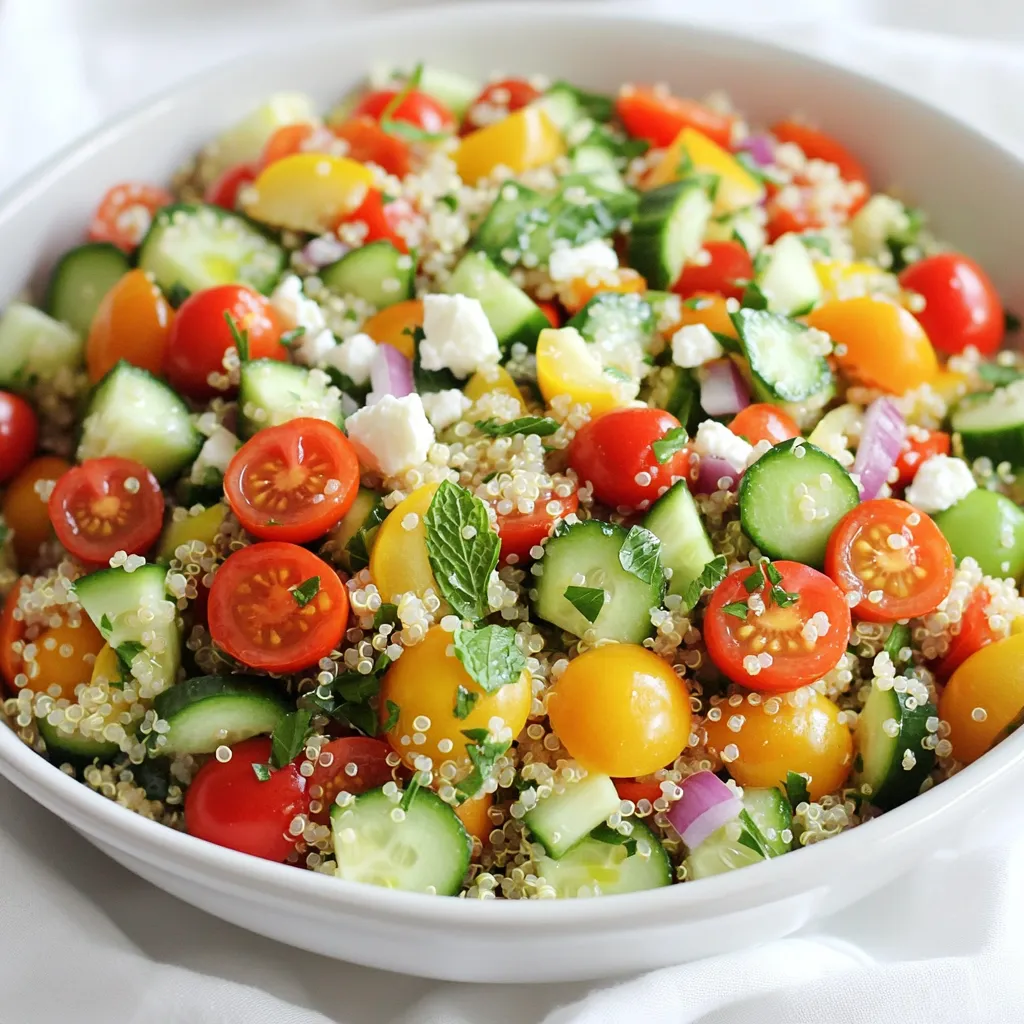
Looking for a fresh dish that bursts with flavor? This Lemon Herb Quinoa Salad is perfect for you! Packed with

To make One Pot Creamy Cajun Pasta, gather these items: - 12 oz penne pasta - 1 tablespoon olive oil - 1 small onion, diced - 3 cloves garlic, minced - 1 bell pepper (red or green), chopped - 1 tablespoon Cajun seasoning - 1 teaspoon smoked paprika - 1/2 teaspoon cayenne pepper (adjust for heat preference) - 4 cups vegetable broth - 1 cup heavy cream (or coconut cream for a lighter option) - 1 cup cherry tomatoes, halved - 1 cup frozen peas - Salt and pepper to taste - Fresh parsley, chopped (for garnish) You can add or swap these ingredients to fit your taste: - Chicken or shrimp for protein - Spinach or kale for greens - Mushrooms for earthiness - Different types of cheese for creaminess These tools will help you make this dish easy and fun: - Large pot for cooking - Wooden spoon for stirring - Knife and cutting board for prep - Measuring cups and spoons for accuracy To make One Pot Creamy Cajun Pasta, start by heating olive oil in a large pot over medium heat. Add diced onion and cook until it turns soft, about 3 to 4 minutes. Next, stir in minced garlic and chopped bell pepper. Cook these for another 2 minutes. This will give your dish a strong base flavor. Now, sprinkle in the Cajun seasoning, smoked paprika, and cayenne pepper. Mix well and let it cook for one more minute. The spices will fill your kitchen with a warm smell. Next, add uncooked penne pasta and pour in the vegetable broth. Stir everything together, making sure the pasta is well coated. Bring the pot to a boil, then lower the heat to a gentle simmer. Cook uncovered for about 10 to 12 minutes, stirring often. This helps the pasta absorb all the flavors while cooking. Once the pasta is al dente, stir in heavy cream and halved cherry tomatoes. Then, add frozen peas. Bring it back to a gentle simmer and cook for 2 to 3 more minutes. You want the sauce to become creamy and the peas to heat through. Finally, adjust the taste with salt and pepper. Turn off the heat, and let it cool for a few moments before serving. To ensure your pasta has the right texture, follow these steps: - Use a large pot with enough water to let the pasta move freely. - Stir the pasta during cooking to prevent sticking. - Check the pasta at the 10-minute mark; it should be firm but not hard. - If you prefer softer pasta, cook for an extra minute. To get a creamy sauce, here are some tips: - Add heavy cream gradually while stirring to create a smooth blend. - If the sauce is too thick, add a little more vegetable broth or water. - For a lighter option, use coconut cream; it adds a unique flavor. - Make sure to simmer the sauce gently; high heat can break the cream and make it grainy. These steps will help you create a rich, creamy sauce that perfectly coats your pasta. Enjoy your cooking! To boost the flavor of your One Pot Creamy Cajun Pasta, use fresh herbs. Fresh parsley adds color and taste. You can also add a squeeze of lemon juice. This adds brightness and balances the creaminess. Another tip is to let the pasta sit for a few minutes after cooking. This helps the flavors meld together. To keep your pasta from sticking, stir it often while cooking. Use enough liquid, as the pasta needs space to move. I recommend using a large pot. This gives the pasta room to cook evenly. Adding a splash of olive oil to the water can also help. Just a little goes a long way. One common mistake is overcooking the pasta. Check it a minute or two before the time on the package. You want it al dente, which means firm to the bite. Another mistake is not seasoning well. Be sure to taste before serving. Adjust the salt and pepper as needed. Lastly, don’t skip the Cajun seasoning. It gives the dish its signature kick! {{image_2}} You can easily make this dish vegetarian. Just skip the meat. Use vegetable broth for a rich base. For a vegan option, swap heavy cream with coconut cream. It gives a nice taste and keeps it creamy. You can add more veggies for extra flavor. Try using mushrooms or zucchini to enhance the dish. A sprinkle of nutritional yeast can add a cheesy taste, too. If you want more protein, add chicken or shrimp. For chicken, cut it into bite-sized pieces. Sauté it in the pot before adding the onions. Cook until it turns golden. If you prefer shrimp, toss it in after the pasta is almost cooked. Shrimp cooks fast, so don't add it too early. Both options add a nice heartiness to the dish. Feel free to switch up the veggies. You can use broccoli, spinach, or carrots. Just make sure to add them at the right time. Broccoli should go in early to cook well. Spinach can go in later, just until it wilts. Carrots should be diced small so they cook quickly. Mixing different vegetables keeps the dish colorful and packed with nutrients. To keep your One Pot Creamy Cajun Pasta fresh, start by letting it cool. Transfer the pasta to an airtight container. This helps prevent moisture loss. Store it in the fridge for up to three days. If you plan to eat it later, don’t add any extra toppings yet. When you're ready to enjoy your leftovers, take them out of the fridge. Add a splash of vegetable broth or cream to the pasta. This helps bring back the creamy texture. Heat it in a pot over medium heat, stirring gently. You can also use a microwave. Heat it for about one to two minutes. Stir halfway through for even warming. If you want to save some pasta for later, freezing works well. Place the cooled pasta in a freezer-safe container. Make sure to leave some space at the top. The sauce can expand. You can freeze it for up to three months. When you're ready to eat it, thaw it overnight in the fridge. Reheat it as described above for the best results. Yes, you can use other pasta shapes. Bowtie or fusilli work great too. Just watch the cooking time. You want your pasta to be al dente. Check the package for guidance on cooking times. Coconut cream is a good swap for heavy cream. It adds a nice flavor. You can also use half-and-half or whole milk for a lighter touch. Just know the sauce will be less thick. To boost the heat, add more cayenne pepper. You can also use spicy sausage or hot sauce. Start with a little, then taste as you go. Adjusting spice levels is key to your taste. Yes, you can make it ahead. Cook the pasta and creamy sauce, then store it. Keep it in the fridge for up to three days. When ready, just reheat on the stove over low heat. Add a splash of broth to loosen it up. This blog covered the main ingredients and cooking steps for a tasty pasta dish. You learned how to customize it with optional ingredients and the right tools. We provided tips for perfect texture and creamy sauce. Plus, we shared variations, storage tips, and FAQs to help you succeed. Embrace your kitchen skills and enjoy personalizing your meals. Each attempt is a chance to cook better and savor delicious flavors. Happy cooking!

One Pot Creamy Cajun Pasta Simple Flavor Explosion

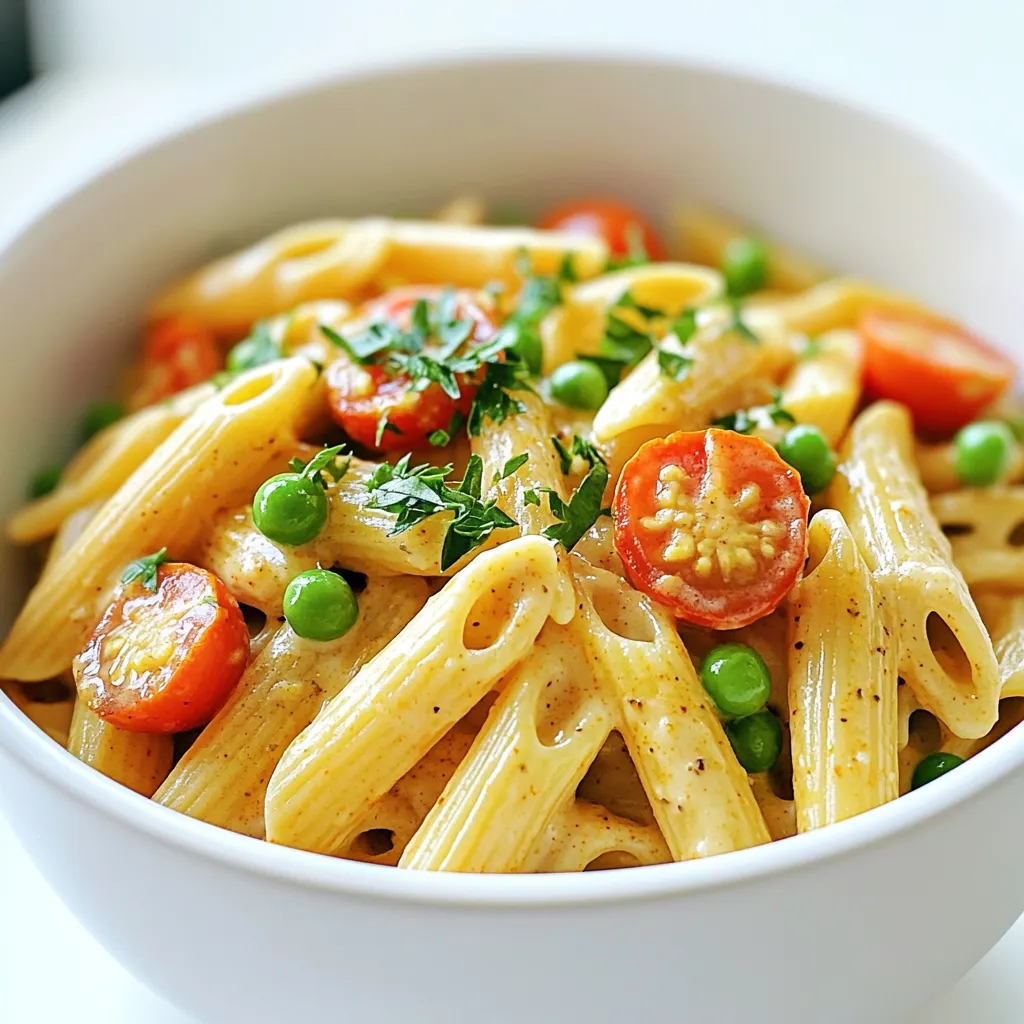
Ready to spice up dinner time? My One Pot Creamy Cajun Pasta delivers a simple flavor explosion that’s quick and

To make crispy air fryer shrimp tacos, gather these key ingredients: - 1 pound shrimp, peeled and deveined - 1 cup panko breadcrumbs - 1 teaspoon smoked paprika - 1 teaspoon garlic powder - 1 teaspoon onion powder - ½ teaspoon cayenne pepper (adjust for spice level) - 1 teaspoon salt - 1 teaspoon black pepper - 1 tablespoon olive oil - 8 small corn tortillas - 1 cup shredded green cabbage - ½ cup diced mango - ¼ cup fresh cilantro, chopped - 1 lime, cut into wedges - Sour cream or avocado for topping (optional) To get the best flavor from your shrimp, start by rinsing them under cold water. Pat them dry with paper towels. This step removes excess moisture. Next, toss the shrimp in olive oil. This helps the breadcrumbs stick. You can mix in some spices at this stage for extra flavor. Make sure to use fresh shrimp if you can. If you use frozen shrimp, thaw them first. This ensures even cooking. For a fun twist, try marinating the shrimp in lime juice for 15 minutes before cooking. This adds brightness and zest to each bite. Toppings make your tacos more exciting! I suggest using shredded cabbage for crunch. Diced mango gives sweetness and color. Fresh cilantro adds a burst of flavor. You can also add sour cream or avocado for creaminess. If you love heat, add a slice of jalapeño. On the side, serve lime wedges for squeezing over the tacos. A simple salad or chips and salsa pairs nicely too. Enjoy mixing and matching your favorite toppings! Start by preheating your air fryer to 400°F (200°C) for about 5 minutes. This step is key to getting your shrimp crispy. Ensure it reaches the right temperature before adding the shrimp. A hot air fryer cooks evenly and fast. In a bowl, mix 1 cup of panko breadcrumbs with 1 teaspoon each of smoked paprika, garlic powder, onion powder, salt, and black pepper. For a kick, add ½ teaspoon of cayenne pepper. In another bowl, toss 1 pound of peeled and deveined shrimp with 1 tablespoon of olive oil. Make sure all the shrimp are coated with oil. Next, take each shrimp and dredge it in the breadcrumb mix. Press gently to help the crumbs stick. This coating gives the shrimp a crunchy texture when cooked. Place the coated shrimp in the air fryer basket. Lay them in a single layer so they cook evenly. Avoid overlapping the shrimp; this helps them crisp up nicely. You may need to cook in batches if you have a lot of shrimp. Air fry the shrimp for 8 to 10 minutes. Shake the basket halfway through cooking to ensure even browning. Once they turn golden brown, they are ready. Enjoy your crispy shrimp in tacos with fresh toppings. To get your shrimp crispy, the right coating is key. Use panko breadcrumbs for extra crunch. Make sure to dredge each shrimp fully in the breadcrumb mix. Press down gently. This helps the crumbs stick. Air frying at 400°F gives a nice golden color. Shake the basket halfway through cooking for even crispiness. If you like heat, add more cayenne pepper. Start with half a teaspoon if you're unsure. You can always add more later. For a milder flavor, skip the cayenne. You can also use a sweet spice like paprika. This adds flavor without the heat. Always taste as you go. Preheating the air fryer is important. Set it to 400°F for about 5 minutes. This helps the shrimp cook quickly. Cook for 8-10 minutes until golden. Don't overcrowd the basket. If needed, cook in batches. Each shrimp needs space to crisp up properly. Enjoy the crunchy texture in every bite! {{image_2}} You can swap shrimp for other proteins. Try chicken or tofu for a twist. Both options work well with the same spices. Chicken needs to cook longer, while tofu may need less time. Adjust the cooking time as needed. For gluten-free tacos, use gluten-free breadcrumbs. Corn tortillas are naturally gluten-free. If you're vegan, replace shrimp with chickpeas or tempeh. Use plant-based toppings like avocado or cashew cream. These changes keep the dish tasty and fitting for different diets. Marinades can boost flavor in your tacos. Before breading, marinate shrimp in lime juice and garlic for 30 minutes. Try adding herbs like cilantro or parsley to the breadcrumb mix. For a spicy kick, mix in some hot sauce or chili powder. These simple tweaks make your tacos even more exciting! To store leftover shrimp tacos, let them cool first. Place them in an airtight container. Try to keep the shrimp and toppings separate. This helps maintain their texture. You can store them in the fridge for up to two days. When you’re ready to eat, reheat the shrimp tacos in the air fryer. Set the air fryer to 350°F (175°C). Heat them for about 5 minutes. This keeps the shrimp crispy. You can also use a skillet over medium heat. Just flip them gently to avoid breaking. If you want to freeze the shrimp, do it before frying. Coat the shrimp in breadcrumbs, then place them on a baking sheet. Freeze them for about an hour. Once frozen, transfer them to a freezer bag. They can last up to three months. When ready to cook, air fry them straight from the freezer. Adjust the time to about 12-15 minutes. Yes, you can use frozen shrimp. Just make sure to thaw them first. Place the shrimp in cold water for about 15 minutes. Drain and pat them dry before cooking. Thawed shrimp will coat better in breadcrumbs and cook evenly. The best temperature for shrimp is 400°F (200°C). This high heat helps the shrimp cook quickly and get crispy. Preheating the air fryer for about 5 minutes before adding the shrimp makes a big difference. To avoid soggy tacos, use warm, not hot, tortillas. Heat them in a skillet for about 30 seconds. Also, use a layer of shredded cabbage. It helps absorb moisture from the shrimp and toppings. Serve the tacos right away for the best texture. Great side dishes for shrimp tacos include: - Mexican street corn - Black beans - Rice with lime and cilantro - Fresh salsa or guacamole - A light salad with avocado and lime dressing These sides complement the flavors of the tacos and add variety to your meal. Yes, you can bake the shrimp! Preheat your oven to 425°F (220°C). Spread the coated shrimp on a baking sheet. Bake for about 12-15 minutes or until crispy. Keep an eye on them so they don’t overcook. Baking will give you a different texture but can still be yummy. In this blog post, we covered how to make tasty shrimp tacos. We explored main ingredients, shrimp prep tips, and suggested toppings. You learned the step-by-step instructions for air frying shrimp to a perfect crisp. We also shared helpful tips for spice levels and air fryer settings. Finally, we discussed variations, storage, and answered common questions. With these tips, you can create delicious shrimp tacos that fit your needs. Enjoy playing with flavors and sharing your tacos with friends!

Air Fryer Shrimp Tacos Flavorful and Quick Meal

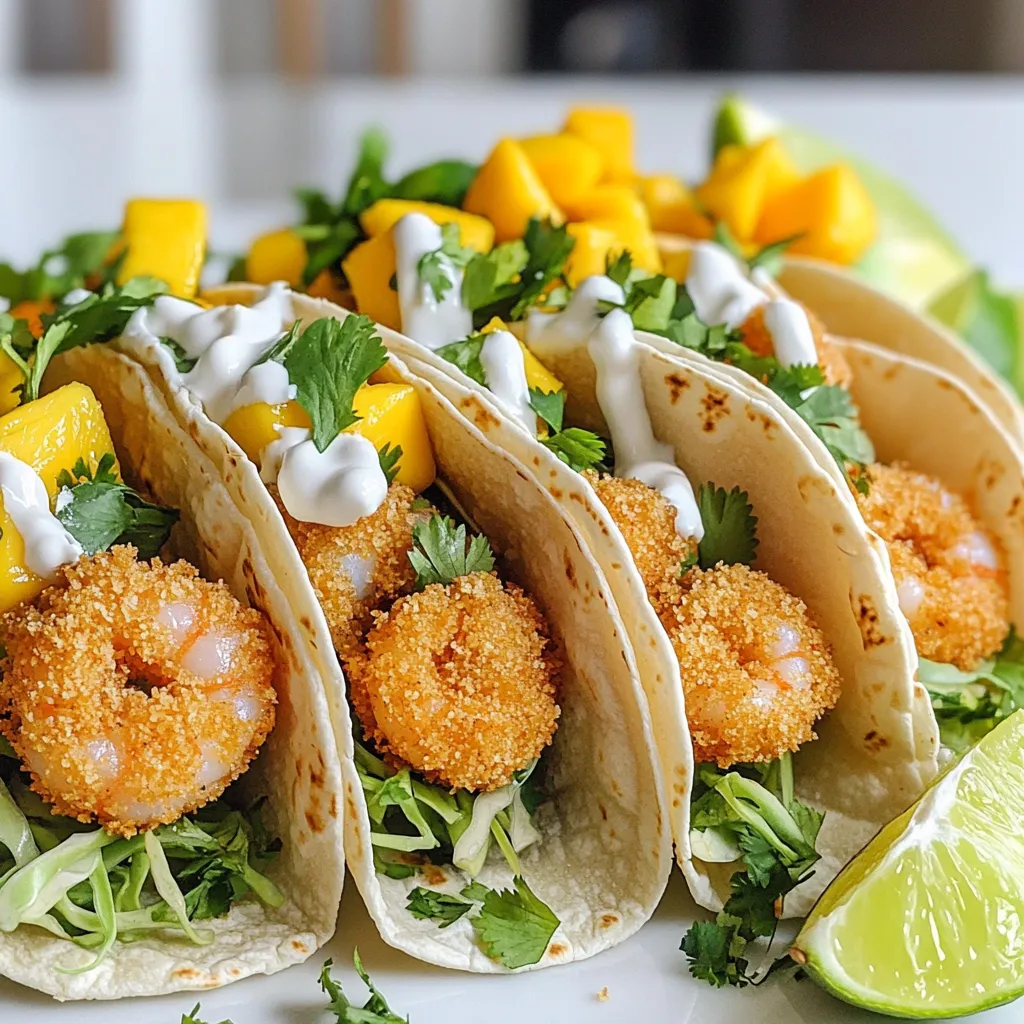
Are you craving a quick, delicious meal? Air Fryer Shrimp Tacos are the answer! With juicy shrimp and tasty toppings,

- 1 cup coconut milk - 1/4 cup chia seeds - 2 tablespoons honey or maple syrup - 1 ripe mango, diced - 1/2 teaspoon vanilla extract (optional) - A pinch of salt The base of this pudding starts with coconut milk. I love using canned coconut milk for its creamy texture. It gives the pudding a rich flavor. Next, we add chia seeds. They soak up the liquid and create a nice, thick consistency. For sweetness, I often choose between honey and maple syrup. Both work well, so pick your favorite. You can adjust the amount based on how sweet you want it. Fresh ripe mango adds a fruity touch. It’s perfect for this tropical treat. If you want to enhance the flavor, consider adding vanilla extract and a pinch of salt. The salt brings out the sweetness, while vanilla adds depth. - Toasted coconut flakes - Fresh mint leaves For a fun finish, I like to top my pudding with toasted coconut flakes. They add a crunchy texture that contrasts beautifully with the creamy pudding. Fresh mint leaves also make a nice garnish. They add a pop of color and a refreshing flavor. You can mix and match these garnishes to create your own unique look. Enjoy your Mango Coconut Chia Pudding! - Mixing the base mixture Start by taking a mixing bowl. Pour in 1 cup of coconut milk. Add in 1/4 cup of chia seeds along with 2 tablespoons of honey or maple syrup. You can also include 1/2 teaspoon of vanilla extract for extra flavor. Finally, sprinkle in a pinch of salt. Whisk everything well until it's fully combined. - Allowing the chia seeds to bloom After mixing, let the bowl sit for about 5 minutes. This allows the chia seeds to absorb the liquid. Give it another whisk to keep the seeds from clumping. This step is key for achieving a smooth pudding. - Importance of refrigeration for thickening Cover the bowl with plastic wrap, or transfer the mixture to a mason jar with a lid. Refrigeration helps the chia seeds expand and thicken the pudding. This is crucial for the right texture. - Recommended chilling time Chill the pudding for at least 4 hours or overnight. The longer you chill, the thicker your pudding will become. Trust me, patience pays off here! - How to serve the pudding with toppings Once your pudding is set, give it a gentle stir. If it's too thick, add a bit more coconut milk. Spoon the pudding into serving bowls. Top it with diced mango and sprinkle some toasted coconut flakes on top. For a colorful touch, add a mint leaf. Your guests will love the look and taste! To get the best texture, you want your chia pudding to be thick but smooth. Start by whisking the coconut milk and chia seeds well. This helps blend them together. After five minutes, whisk again. This step stops the seeds from clumping. If your pudding is too thick after chilling, stir in a bit more coconut milk until it feels just right. Sweetness is key to making this pudding shine. I love using honey or maple syrup. Start with two tablespoons, then taste. If you want it sweeter, add more. Remember, ripe mangoes are sweet too! Adjust based on your taste and fruit ripeness. Visual appeal makes a dish even better. Layer the pudding and diced mango in clear cups. This shows off the beautiful colors. Top it with toasted coconut flakes for crunch. A fresh mint leaf adds a pop of green. You can also serve it in mason jars for a fun twist! {{image_2}} You can change up the fruit in your mango coconut chia pudding. Try adding berries or sliced bananas for a new taste. Each fruit brings its unique flavor. Fresh strawberries or blueberries pair well with coconut. They add sweetness and color. You can also use different milk types. Almond milk gives a nutty flavor. Soy milk is a good choice too. Both options keep it creamy and tasty. If you want to try a different sweetener, agave syrup works great. It has a mild taste and mixes well. You can also use stevia for a low-calorie option. Adjust the amount to fit your taste. Both choices keep your pudding sweet without adding too many calories. For a twist, add cocoa powder or coffee to your pudding. Cocoa powder adds rich chocolate flavor. Mix it in with the base for a dessert-like treat. If you love coffee, try adding a small amount to the mix. It gives a nice kick to the pudding. Both options create a fun new dessert that surprises your taste buds. To store leftovers of mango coconut chia pudding, use a clean container. I recommend a mason jar or a sealed plastic container. These keep the pudding fresh and tasty. Make sure to keep the lid on tight. This helps avoid any weird smells from the fridge. In the refrigerator, the pudding lasts about five days. This makes it great for meal prep. Just remember to check for any changes in smell or texture before eating. If it looks or smells off, it’s best to toss it. You can freeze chia pudding, but it may change a bit. To freeze, pour the pudding into a freezer-safe container. Leave some space at the top for expansion. When you want to eat it, thaw it in the fridge overnight. Stir it well before serving. If the texture seems off, add a splash of coconut milk to bring back creaminess. Chia pudding needs at least 4 hours to set. This is when the chia seeds absorb liquid and swell. For best results, chill the mixture overnight. It will be thick and creamy. Yes, you can use different types of milk. Almond milk and soy milk work well too. Just keep in mind that coconut milk gives a rich and creamy texture. Yes, this recipe is vegan-friendly. Use maple syrup instead of honey for a sweet touch. All other ingredients are plant-based. You can adjust sweetness easily. Start with the recommended amount of honey or maple syrup. Taste, then add more if needed. You can also use other sweeteners like agave syrup. This pudding is nutritious. It is high in fiber, healthy fats, and protein. Chia seeds provide omega-3 fatty acids. Coconut milk adds vitamins and minerals. Each serving is a delicious and healthy option. This blog post showed you how to make mango coconut chia pudding. We covered key ingredients like coconut milk, chia seeds, and ripe mango. You learned steps for mixing, refrigeration, and serving. Tips helped you perfect the texture and sweetness. Variations let you play with flavors and substitute ingredients. Lastly, we discussed proper storage and answered common questions. I hope this guide inspires you to create delicious chia pudding at home. Enjoy your tasty, healthy treat!

Mango Coconut Chia Pudding Delightful and Nutritious

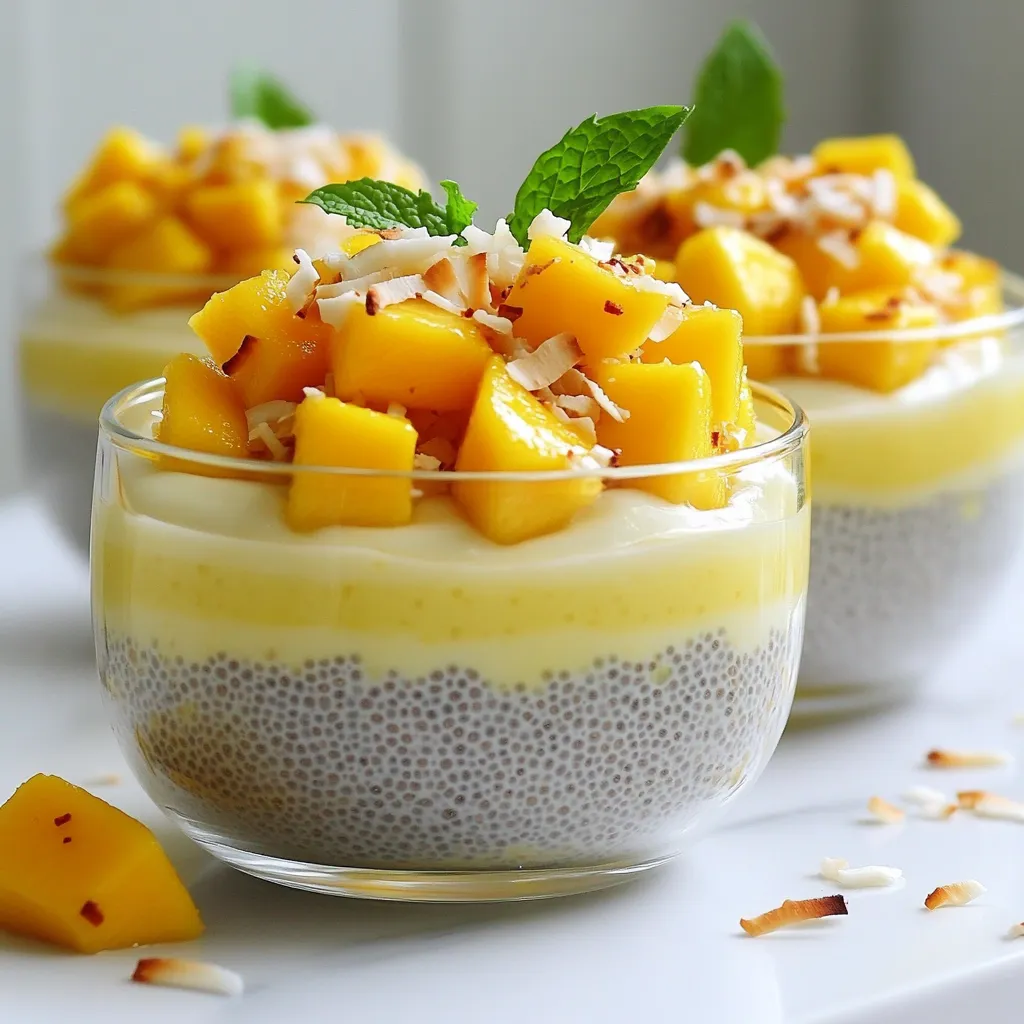
Are you ready to treat yourself to a delicious and healthy dessert? My Mango Coconut Chia Pudding is the perfect

Older posts
Newer posts
← Previous Page1 Page2 Page3 Page4 … Page84 Next →

dsad

© 2026 juliesdish • Built with GeneratePress

Our Policies

  • Copyright Policy
  • Cookie Policy
  • GDPR Policy
  • Privacy Policy
  • Disclaimer
  • Terms Of Use

More Information

  • Home
  • About
  • Contact
  • Appetizers
  • Dessert
  • Dinner
  • Drinks
©2026, juliesdish About Back To Top