Skip to content
DisclaimerTerms Of UseGDPR PolicyCookie Policy

juliesdish

  • Home
  • Drinks
  • Appetizers
  • Dinner
  • Dessert
  • About
  • Contact
  • Privacy Policy
DisclaimerTerms Of UseGDPR PolicyCookie Policy

NO-ING-IMG

- 2 cups all-purpose flour - 1 cup granulated sugar - ½ cup brown sugar, packed - 2 teaspoons baking powder - ½ teaspoon baking soda - ½ teaspoon salt - ½ cup unsalted butter, softened - 2 large eggs - 1 teaspoon vanilla extract - 1 cup sour cream - 1 tablespoon ground cinnamon - 1 cup chopped walnuts or pecans (optional) To make this cake, you need simple and common ingredients. They come together to create a sweet and rich flavor. The mix of butter, sugar, and eggs gives a soft texture. The sour cream adds extra moisture and tang. The brown sugar and cinnamon create a delicious swirl. - Chopped walnuts or pecans - Extra ground cinnamon for topping - A drizzle of caramel sauce Adding nuts gives a nice crunch. More cinnamon enhances that warm spice taste. A caramel drizzle on top adds a sweet finish. Feel free to get creative! - Use coconut oil instead of butter for a dairy-free option. - Swap sour cream with Greek yogurt for a lighter twist. - For gluten-free, substitute with a gluten-free flour blend. These swaps help if you have allergies or dietary needs. Always remember to check your ingredient labels, as some may contain hidden allergens. Making these small changes can still lead to a great coffee cake! Start by preheating your oven to 350°F (175°C). Grease and flour a 9x13 inch baking pan. This helps your cake come out easily. Gather your ingredients to keep things neat and fun. You will need flour, sugars, baking powder, baking soda, salt, butter, eggs, vanilla, sour cream, and cinnamon. If you want some crunch, add chopped nuts. In a large bowl, combine the flour, granulated sugar, baking powder, baking soda, and salt. Mix these dry ingredients well until they are blended. In a different bowl, cream the softened butter and brown sugar together. Beat them until they are light and fluffy. Then, add the eggs one at a time. Mix well after each egg. Stir in the vanilla extract next. Gradually add the sour cream and mix until the batter is smooth. Now, pour the wet mixture into the dry ingredients. Stir gently until just combined. Be careful not to overmix! In a small bowl, mix the ground cinnamon and optional chopped nuts. This will be your swirl mix. Pour half of the batter into your prepared pan, spreading it evenly. Next, sprinkle half of the cinnamon-nut mix over this layer. Pour the rest of the batter on top and spread it out. Then, sprinkle the remaining cinnamon-nut mix over the top. Use a knife or toothpick to gently swirl the layers together. You want a pretty marbled look, but don’t mix it too much. Bake the cake for 35-40 minutes. To check if it's done, insert a toothpick in the center. If it comes out clean, it's ready! Let the cake cool in the pan for about 10 minutes before moving it to a wire rack to cool completely. Enjoy the sweet aroma that fills your kitchen! To get that perfect swirl, use a knife or toothpick. Gently drag it through the batter. This creates a nice marbled look. Be careful not to mix it too much. You want to see the layers. A light touch is key here. It’s all about balance. One big mistake is overmixing the batter. This can make the cake tough. Mix just until the dry ingredients blend in. Also, don’t skip preheating the oven. A hot oven helps the cake rise. Lastly, make sure to measure your ingredients well. Accurate measurements lead to great results. To keep your coffee cake moist, use sour cream. It adds richness and moisture. Also, don’t bake it too long. Check for doneness with a toothpick at 35 minutes. If it comes out clean, it’s done. Storing the cake properly also helps. Cover it to lock in moisture. {{image_2}} To make a gluten-free version, swap all-purpose flour with a gluten-free flour blend. Look for one that works well for baking. The texture might change a bit, but it will still taste great. Always check labels to ensure other ingredients are also gluten-free. For a dairy-free cake, replace the butter with coconut oil or a dairy-free margarine. Use dairy-free yogurt or sour cream in place of regular sour cream. These swaps keep the cake moist and tasty. You can add your favorite fruits or chocolate chips to this coffee cake. Blueberries or raspberries work well for a fruity twist. If you love chocolate, fold in some chocolate chips. They add a rich flavor that pairs nicely with the cinnamon. You can also mix in some citrus zest for a refreshing hint. These variations let you personalize the coffee cake to your taste. Enjoy trying out different flavors and textures! After you bake your coffee cake, let it cool. Then, wrap it tightly in plastic wrap or foil. You can also place it in an airtight container. Store it at room temperature. It will stay fresh for about three days. If you want to keep it longer, consider freezing it. To freeze your coffee cake, first let it cool completely. Then, cut it into slices for easy serving. Wrap each slice in plastic wrap. Place the wrapped slices in a freezer bag. Press out as much air as you can before sealing. This helps prevent freezer burn. Your cake can last up to three months in the freezer. To reheat your coffee cake, take a slice out of the fridge or freezer. If it's frozen, let it thaw in the fridge overnight. Preheat your oven to 350°F (175°C). Place the slice on a baking sheet. Heat it for about 10 minutes or until warm. You can also use a microwave. Heat it for about 15-20 seconds. Enjoy your cake warm for the best flavor! Yes, you can use whole wheat flour. It adds a nutty flavor. However, it may change the cake's texture. Use a mix of whole wheat and all-purpose flour for best results. Check the cake at about 35 minutes. Insert a toothpick in the center. If it comes out clean, the cake is done. If it has batter on it, bake a bit longer. Yes, you can! Make the cake a day in advance. Just store it in an airtight container. It stays moist and tasty overnight. Serve it warm or at room temperature. Slice it into squares. Pair it with coffee or tea for a delightful treat. Adding a drizzle of icing makes it extra special! In this post, we explored how to make delicious Brown Sugar Cinnamon Swirl Coffee Cake. We covered the key ingredients, preparation steps, and helpful tips. You learned how to avoid common mistakes and create various flavors. Remember, storing the cake properly keeps it fresh. Enjoy experimenting with substitutions and variations to make this cake your own. A warm slice pairs perfectly with coffee. Happy baking!

Brown Sugar Cinnamon Swirl Coffee Cake Delight

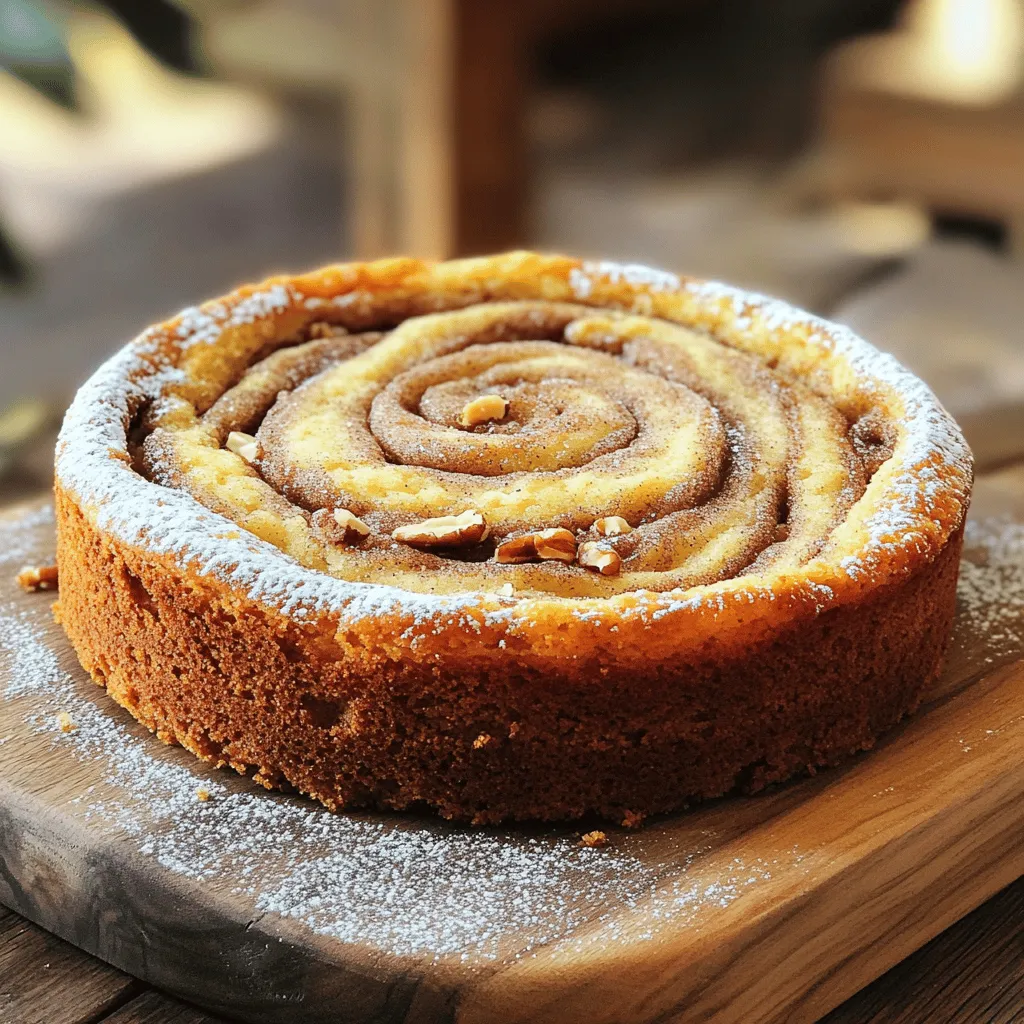
Are you ready to whip up a treat that smells as good as it tastes? Dive into the world of

- 1 cup rolled oats - 1/2 cup natural peanut butter (or any nut butter) - 1/4 cup honey or maple syrup - 1/4 cup dark chocolate chips (or cacao nibs) - 1/4 cup ground flaxseed - 1/2 teaspoon vanilla extract - Pinch of salt - Optional: 1/4 cup chopped nuts (almonds, walnuts, or pecans) Using these simple ingredients, you create a tasty treat. Each item plays a key role. The rolled oats provide fiber and texture. Peanut butter adds protein and healthy fats. Honey or maple syrup gives sweetness. Dark chocolate chips bring a rich taste. Ground flaxseed offers omega-3s and helps bind the mix. Vanilla extract enhances the flavors. A pinch of salt balances the sweetness. If you like, add chopped nuts for crunch. - Calories per serving: About 100 calories - Macronutrient breakdown: - Protein: 3 grams - Fats: 5 grams - Carbs: 10 grams - Health benefits of main ingredients: - Rolled oats help with digestion and keep you full. - Peanut butter supports heart health and muscle growth. - Honey or maple syrup boosts energy quickly. - Dark chocolate is rich in antioxidants. - Flaxseed improves heart health and digestion. This snack is not just tasty; it’s also good for you! Each bite packs nutrients. It’s a great choice for energy on busy days. - Mixing dry ingredients: Start by taking a large bowl. Add 1 cup of rolled oats, 1/4 cup of ground flaxseed, and a pinch of salt. Stir these dry ingredients well. This step helps blend the flavors and nutrients together. - Preparing wet ingredients: Next, grab another bowl. Mix 1/2 cup of natural peanut butter, 1/4 cup of honey (or maple syrup), and 1/2 teaspoon of vanilla extract. Stir until everything is smooth. This mixture adds sweetness and moisture to your bites. - Incorporating wet and dry mixes: Pour your wet mixture into the bowl with dry ingredients. Use a spatula or spoon to stir them together. Make sure everything is fully combined. You want a thick dough-like consistency. - Adding chocolate and nuts: Now it’s time to add in 1/4 cup of dark chocolate chips and the optional 1/4 cup of chopped nuts. Mix these into your dough until they are evenly distributed. The chocolate and nuts add texture and flavor. - Shaping the energy bites: Take small amounts of the mixture and roll them into balls about 1 inch in diameter. Place them on a parchment-lined tray. This step can be messy but is fun. - Setting the bites in the fridge: Once you shape all the bites, put the tray in the fridge. Let them chill for at least 30 minutes. This helps them firm up and makes them easy to eat. Enjoy them cold for a refreshing snack! To ensure the right texture, aim for a sticky yet firm mix. If it feels too dry, add a splash of water or more nut butter. If your mix is too wet, add a bit more oats or flaxseed. Adjust to fit your taste. Some like it sweeter, so feel free to add more honey or syrup. You can prepare a batch ahead of time. These energy bites are great for busy days. Just roll them into balls and store in the fridge. For longer storage, freeze them in a single layer on a tray. Once frozen, transfer them to an airtight container. They last well in the freezer for up to three months. You can easily change up the ingredients for dietary needs. Use almond butter or sunflower seed butter if you need nut-free options. To add some zing, mix in a bit of cinnamon or shredded coconut. Dried fruits like cranberries or raisins also make fantastic add-ins for extra flavor. {{image_2}} You can easily make these energy bites fit your diet. For vegan options, swap honey for maple syrup. Use any nut butter you like, such as almond or cashew. If you need nut-free options, replace the nut butter with sunflower seed butter. This keeps the bites safe for anyone with nut allergies. Want to add some extra taste? You can sprinkle in spices like cinnamon or nutmeg. Just a pinch can make a big difference. You might also try adding extracts, like almond or peppermint. These flavors can make your bites even more fun. Dried fruits like raisins or cranberries work well too. Seeds like chia or pumpkin can add crunch and nutrients. When it comes to chocolate, you have choices. Dark chocolate gives a rich flavor and less sugar. Milk chocolate is sweeter and creamy. If you want to cut sugar, cacao powder is a great choice. You can mix it into the oats for that chocolate taste without the extra sugar. Store your chocolate peanut butter energy bites in an airtight container. This keeps them fresh and prevents them from drying out. Use a glass or plastic container with a tight lid. I find that glass works best because it does not absorb smells. Keep the container in the fridge. This helps the bites stay firm and tasty. They love the cool temperature! These energy bites last up to a week in the fridge. After that, they may lose their flavor and texture. Look for signs of spoilage. If the bites smell off or feel too soft, it is time to toss them. For travel, pack your energy bites in small containers or bags. You can use reusable snack bags for a green option. Portion out a few bites for a quick snack. This way, you can enjoy a healthy treat anytime, anywhere! These energy bites stay fresh in the fridge for up to a week. Store them in an airtight container. If you freeze them, they can last for about three months. Just let them thaw before enjoying! Yes, you can make these bites nut-free! Substitute peanut butter with sunflower seed butter or soy nut butter. Both options give similar flavors and textures without nuts. They are tasty and safe for those with nut allergies. You can use agave syrup or brown rice syrup as a substitute for honey or maple syrup. Both options will still provide sweetness and help bind the ingredients. You can also try using mashed bananas for a natural sweetener. Absolutely! These energy bites are a great snack for kids. They are easy to grab and packed with nutrients. Kids love the taste of chocolate and peanut butter. Plus, they can help you make them! Yes, adding protein powder is a fantastic idea! Just mix in about 1/4 cup of your favorite protein powder when combining the dry ingredients. This boosts the protein content and makes the bites even more filling. These chocolate peanut butter energy bites are easy to make and full of flavor. You learned about the key ingredients, how to prep them, and tips for the perfect texture. Whether you want to customize for dietary needs or make some ahead of time, these bites fit your needs. With careful storage, they can last long and make great snacks. Enjoy creating your own tasty versions while keeping it healthy and simple!

Chocolate Peanut Butter Energy Bites Healthy Snack Idea

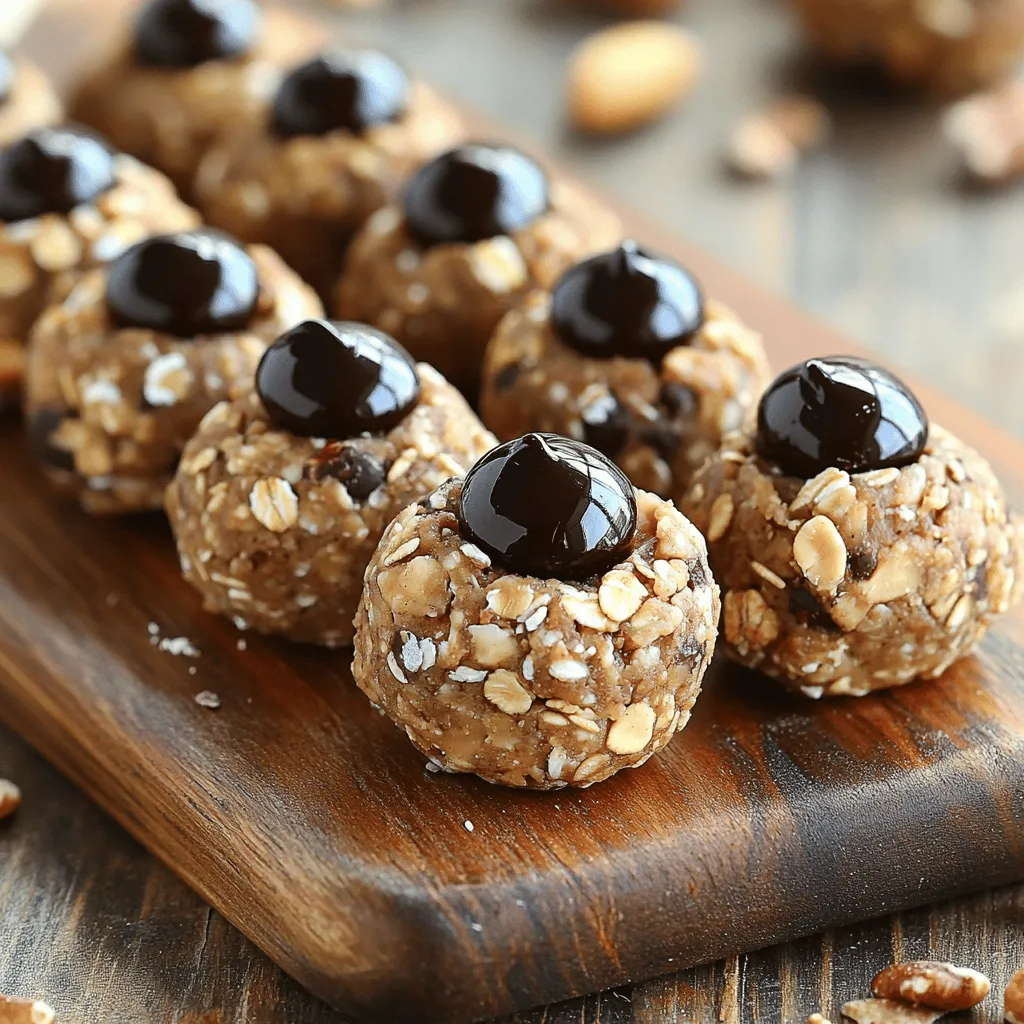
Are you craving a quick snack that fuels your day? Look no further! Chocolate Peanut Butter Energy Bites are packed

- 4 boneless, skinless chicken thighs - 1 lb baby potatoes, halved - 3 tablespoons olive oil - Zest and juice of 2 lemons - 4 cloves garlic, minced - 1 teaspoon dried oregano - 1 teaspoon dried thyme - 1 teaspoon paprika - Salt and pepper to taste - Fresh parsley, chopped When I create this dish, I focus on fresh, simple ingredients. The chicken thighs give you rich flavor and stay juicy. Baby potatoes are perfect because they roast well. Olive oil adds the right amount of fat for cooking. For seasoning, lemons are key. They add brightness and zest. Garlic gives depth, while oregano and thyme add warmth. Paprika gives a subtle smokiness. I always use salt and pepper to enhance all the flavors. Garnishing with fresh parsley adds a pop of color. It also adds a fresh taste. This dish is not just tasty; it looks great on the plate too! - Preheat the oven to 425°F (220°C). - In a large bowl, mix 3 tablespoons of olive oil, the zest and juice of 2 lemons, 4 minced garlic cloves, 1 teaspoon of dried oregano, 1 teaspoon of dried thyme, 1 teaspoon of paprika, and salt and pepper. This creates a bright and tasty marinade. - Add 4 boneless, skinless chicken thighs to the marinade. Make sure each piece is well coated. Let the chicken sit in the marinade for at least 15 minutes. This helps the flavors soak in. - While the chicken marinates, prepare 1 pound of baby potatoes. Cut them in half and place them on a large sheet pan. Drizzle with olive oil, and season with salt, pepper, and a sprinkle of oregano. Toss them well to coat. - Now, arrange the marinated chicken thighs on the sheet pan with the potatoes. Spread them out for even cooking. - Bake everything in the preheated oven for 25 to 30 minutes. Check that the chicken reaches an internal temperature of 165°F (75°C) and that the potatoes look golden and crispy. - For extra crispiness, you can broil the dish for 2 to 3 minutes at the end. Keep an eye on it to prevent burning! - Once done, take the sheet pan out of the oven. Let it rest for 5 minutes. This helps the juices settle. - Before serving, garnish with chopped fresh parsley for color and flavor. Enjoy your delicious meal! To get the best flavor from your chicken, marinate it well. Mix the olive oil, lemon zest, lemon juice, garlic, oregano, thyme, paprika, salt, and pepper in a bowl. Let the chicken soak in this mix for at least 15 minutes. If you have more time, let it marinate for an hour or even overnight. This adds depth and helps the chicken absorb all those tasty herbs. If you want to change the spice level, feel free to adjust the paprika. You can use smoked paprika for a deeper flavor or leave it out for a milder taste. You can also add more garlic if you love that strong taste. Just remember, a little goes a long way! Getting that crispy skin on your chicken and golden potatoes is key. After baking, broil the dish for 2-3 minutes. This helps crisp everything up without drying it out. Keep a close eye on it while broiling. Things can go from crispy to burnt quickly! For cooking times, bake the chicken and potatoes for 25-30 minutes. The chicken should reach 165°F inside. The potatoes should be tender and golden. If they need more time, keep checking every few minutes. You want them perfectly crispy, but not overdone. {{image_2}} You can easily swap the chicken in this recipe. Try using pork or tofu instead. Pork chops or tenderloin work well. For a plant-based option, use firm tofu. Just be sure to press the tofu first to remove excess water. This helps it soak up the flavors better. Adjust cooking times accordingly. Pork may need a bit more time, while tofu cooks faster. Feel free to add your favorite veggies to this dish. Carrots, bell peppers, or broccoli all work great. Just cut them into similar sizes as the potatoes. This helps everything cook evenly. Toss them in the same olive oil and seasoning mix. This way, they soak up all the delicious flavors. It creates a colorful and tasty meal. You can change the herbs and spices for a new taste. Try using rosemary or basil instead of oregano and thyme. Each herb adds its own unique flavor. You could also add a pinch of cayenne for some heat. Experimenting with flavors keeps this dish exciting. Don't be afraid to mix and match! To store leftovers, let the dish cool down first. Then, place the chicken and potatoes in an airtight container. You can keep them in the fridge for up to three days. Make sure to separate the chicken from the potatoes if you want to keep them crispy. If you notice any moisture, use a paper towel to absorb it before sealing the container. The best way to reheat your chicken and potatoes is in the oven. Preheat the oven to 350°F (175°C). Place the chicken and potatoes on a baking sheet. Heat for about 15-20 minutes or until they are warm. You can also use a microwave, but this may make the potatoes soft. If you use the microwave, cover the dish with a lid or microwave-safe wrap to keep moisture in. If you want to freeze your leftovers, divide the chicken and potatoes into meal-sized portions. Use freezer-safe bags or containers. Be sure to remove as much air as possible before sealing. You can freeze them for up to three months. When you are ready to eat, thaw in the fridge overnight, then reheat as mentioned above. You can serve this dish with many sides. I love a fresh green salad with a light vinaigrette. The crisp veggies balance the rich flavors of the chicken. You can also pair it with steamed broccoli or green beans. These add nice color and nutrients to your plate. For something warm, try garlic bread or a simple rice pilaf. Each of these sides complements the chicken and potatoes well. Yes, you can prepare this dish ahead of time! You can marinate the chicken in the morning and store it in the fridge. Just remember to let it sit for at least 15 minutes before cooking. For the potatoes, you can cut them and toss them in oil and seasoning too. Keep them in a sealed container until you're ready to bake. This way, you save time when you are ready to cook. The best oven temperature for this dish is 425°F (220°C). This high heat cooks the chicken quickly and makes the potatoes crispy. It allows the flavors to meld together nicely. Just make sure to check the chicken reaches an internal temperature of 165°F (75°C). This ensures it is safe to eat and delicious! This dish combines simple ingredients like chicken, baby potatoes, and fresh herbs. We covered how to prepare and bake them for a tasty meal. You learned tips to add flavor and get crispy results. Also, I shared ideas for swaps and storage. Cooking should be fun and easy. Try these steps, and enjoy a delicious, homemade feast!

Savory Sheet-Pan Lemon Herb Chicken & Potatoes Recipe

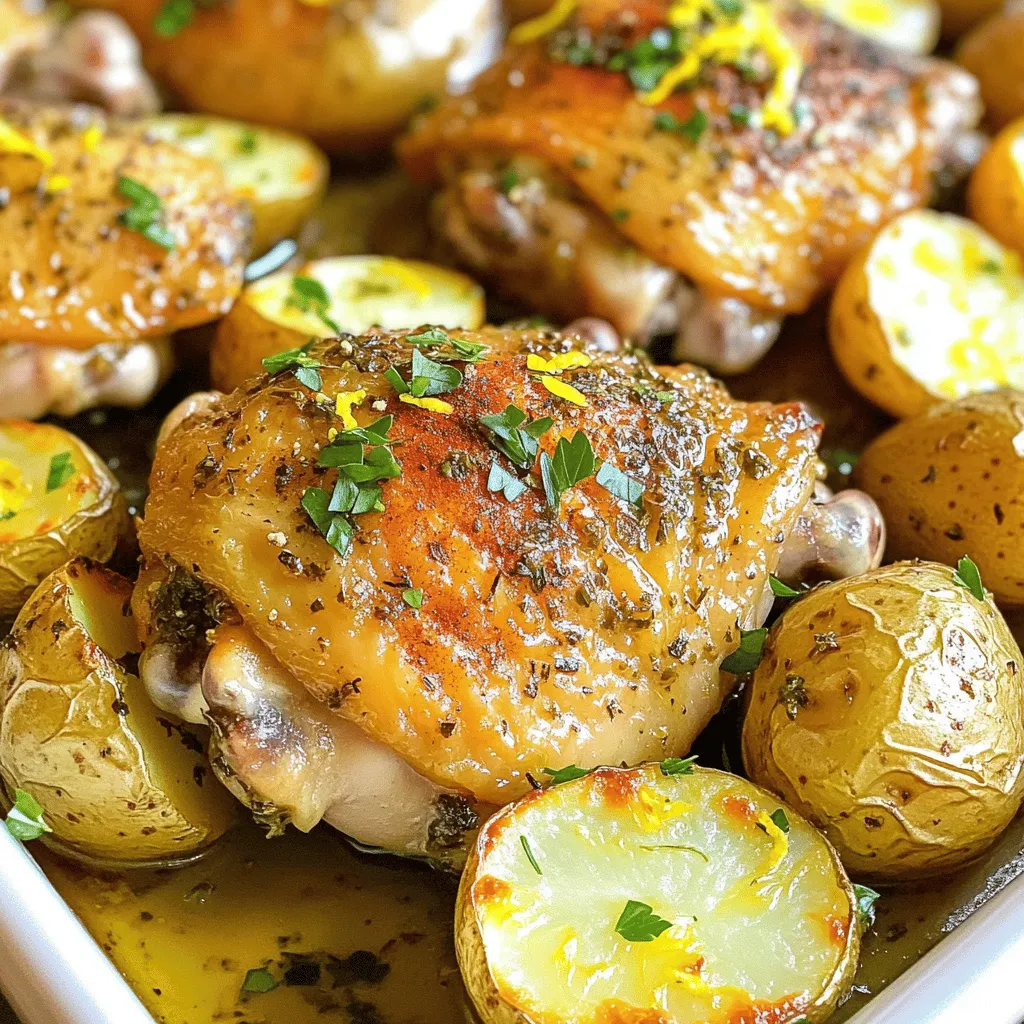
Get ready to enjoy a delicious dinner with my Savory Sheet-Pan Lemon Herb Chicken & Potatoes recipe! This simple, one-pan

To make No-Bake Biscoff Cheesecake Cookie Cups, gather these simple items: - 12 Biscoff cookies, crushed - 3 tablespoons unsalted butter, melted - 8 oz cream cheese, softened - ½ cup powdered sugar - 1 teaspoon vanilla extract - ½ cup whipped cream - ¼ cup Biscoff spread, melted (for drizzling) - Extra Biscoff cookies, crushed (for topping) These ingredients combine to create a rich and creamy treat. You can add fun toppings to make your cookie cups even better. Here are some ideas: - A dollop of whipped cream on top - A sprinkle of cinnamon for warmth - Shaved chocolate for extra sweetness Feel free to get creative! Not all ingredients are set in stone. Here are some swaps you can try: - Use gluten-free cookies if you need a gluten-free option. - Swap cream cheese for Greek yogurt for a lighter version. - Try using whipped coconut cream instead of regular whipped cream for a dairy-free treat. These swaps keep the flavor while meeting dietary needs. To make the crust, start by crushing 12 Biscoff cookies. You can use a food processor or place them in a zip bag and crush them with a rolling pin. The goal is to have fine crumbs. Next, mix the crushed cookies with 3 tablespoons of melted unsalted butter. Combine them well in a medium bowl. This mixture should be moist but not too wet. Now, take your serving cups and divide the cookie mixture evenly among them. Press the crumbs down firmly in each cup to form a solid base. This crust will hold everything together and give a nice crunch. In another bowl, beat 8 ounces of softened cream cheese with ½ cup of powdered sugar and 1 teaspoon of vanilla extract. Use an electric mixer for a smooth and creamy texture. It should blend well without lumps. Once the cream cheese mixture is smooth, gently fold in ½ cup of whipped cream. This step is important for a light and airy filling. Use a spatula and mix carefully. You want to keep the fluffiness of the whipped cream. Now it’s time to assemble. Spoon the cheesecake filling over the cookie crusts in each cup. Use a spatula to smooth the tops, making them look nice. After that, drizzle ¼ cup of melted Biscoff spread on top of each cheesecake layer. This adds a delicious layer of flavor. For the finishing touch, sprinkle some crushed Biscoff cookies on top of the drizzle. They give a nice crunch and look great. Finally, place the cups in the fridge for at least 2 hours. This helps the cheesecake set properly. Enjoy your delicious no-bake Biscoff cheesecake cookie cups! To get a smooth cheesecake, start with soft cream cheese. I recommend leaving it out for about 30 minutes before you mix. Mix it with powdered sugar and vanilla until it’s creamy. Then, gently fold in the whipped cream. This adds air and keeps the texture light. If you mix too hard, it can get dense. These cookie cups need to chill for at least 2 hours. This helps them set. After chilling, keep them in the fridge. They stay fresh for up to 3 days. When you serve, use a fun platter. A scoop of whipped cream on top makes it look fancy. Drizzle leftover Biscoff spread around the cups for a pretty touch. One big mistake is not crushing the cookies finely enough. If the pieces are too big, the crust won’t hold. Make sure to press the crust firmly into the cups. Another mistake is skipping the chill time. Without it, the cheesecake won't set well. Finally, don’t skip the whipped cream. It makes the filling light and fluffy, which is key for a great cheesecake. {{image_2}} You can change the flavor of the filling to suit your taste. For a chocolate twist, add cocoa powder or melted chocolate to the cream cheese mix. You could also mix in peanut butter for a nutty flavor. If you love fruit, try adding pureed strawberries or raspberries. Each choice brings a new taste adventure. If you want to switch the cookie base, there are many choices. You can use graham crackers for a classic feel. Oreos work great for a chocolatey base. For a nutty taste, try crushed almond cookies. Each cookie adds a unique flavor and texture to the cheesecake cups. To make these cookie cups gluten-free, use gluten-free cookies. Many brands offer great options. For a vegan version, swap cream cheese for a plant-based alternative. Use coconut cream instead of whipped cream for a rich texture. Adjust the sweetener to suit your needs, and you can enjoy this treat without gluten or dairy! To keep your cookie cups fresh, place them in an airtight container. Use layers of parchment paper between the cups to avoid sticking. Store them in the fridge for best results. This method keeps the cheesecake creamy and the crust crunchy. You can freeze the cookie cups if you want to save some for later. Place them in a freezer-safe container. Make sure to cover them well to prevent freezer burn. When ready to enjoy, thaw them in the fridge for several hours before serving. These cookie cups last about 3 to 5 days in the fridge. If frozen, they can last up to 2 months. Always check for any signs of spoilage before eating. Enjoy your tasty treats while they are fresh! The cheesecake needs at least 2 hours in the fridge. This time lets it firm up. You can leave it longer if you want a firmer texture. Just make sure to cover the cups to keep them fresh. Yes, you can make these cookie cups a day ahead. Just store them in the fridge. They stay tasty and fresh, making them perfect for parties or gatherings. If you can't find Biscoff cookies, try graham crackers or digestive biscuits. They both offer a different flavor but still work well. You can also use chocolate cookies for a sweeter twist. Yes, you can make a vegan version! Use vegan cream cheese and plant-based whipped cream. Replace Biscoff spread with a vegan chocolate or nut spread. The cookie base can stay the same with vegan cookies. This blog post covered all you need for delicious cheesecake cookie cups. We explored ingredients, with options for toppings and swaps. I shared simple steps to prepare the crust and filling. We discussed tips for perfect texture and serving ideas. The section on variations helps you tailor this treat to your taste or needs. Now that you know how to store and freeze them, you'll keep these cups fresh longer. Enjoy every bite!

No-Bake Biscoff Cheesecake Cookie Cups Delight

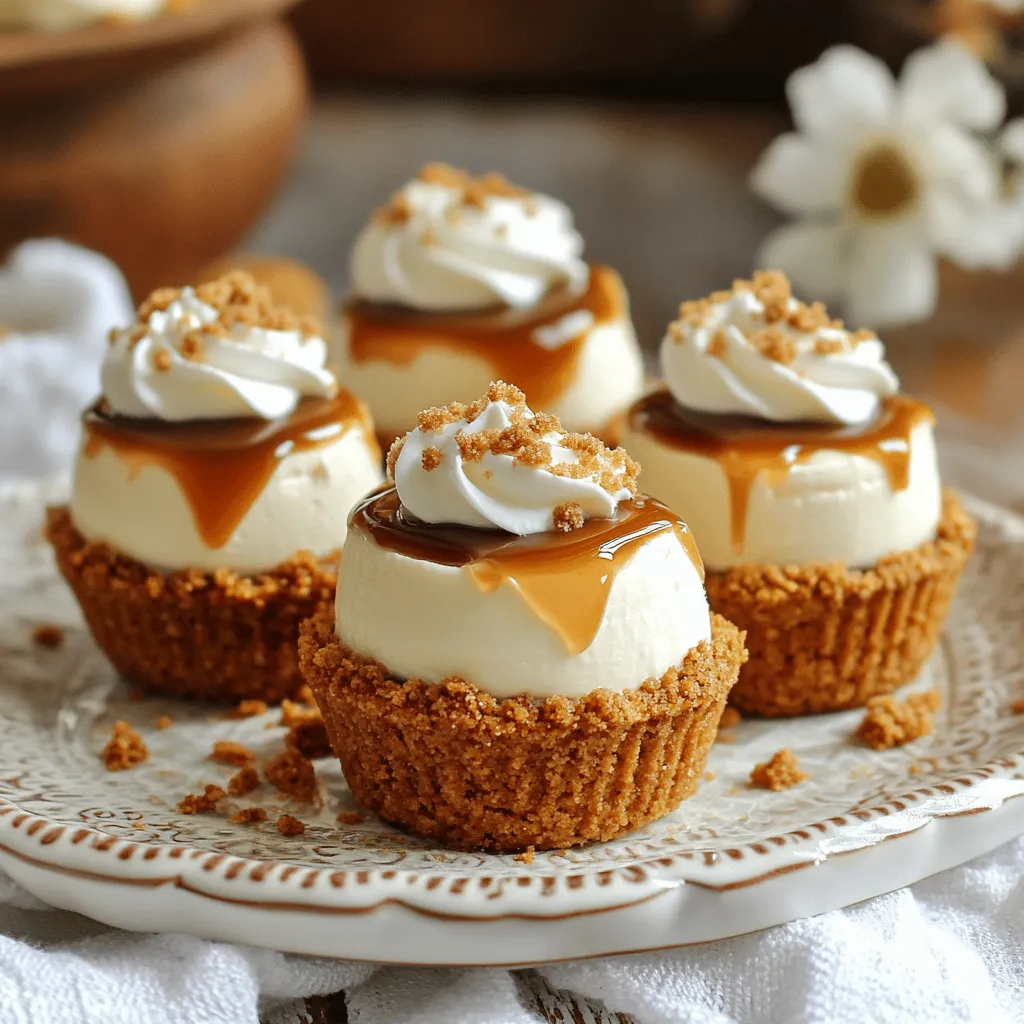
Are you ready for a sweet treat that’s simple and satisfying? No-Bake Biscoff Cheesecake Cookie Cups are your answer! These

- 8 oz (225g) linguine or spaghetti - 1 lb (450g) large shrimp, peeled and deveined - 1 cup sun-dried tomatoes, chopped (in oil) - 3 cloves garlic, minced - 1 small onion, finely chopped - 1 teaspoon dried oregano - 1 teaspoon dried basil - 1 tablespoon olive oil - Salt and pepper to taste - Fresh parsley, chopped (for garnish) - Grated Parmesan cheese (optional, for serving) In this recipe, I use linguine or spaghetti as the base. Both types soak up the flavors well. Large shrimp add protein and a nice bite, while sun-dried tomatoes bring a sweet, tangy taste. Garlic and onion form the aromatics. They add warmth and depth to the dish. Dried oregano and basil give it a classic Italian flavor. I use olive oil for cooking, along with salt and pepper for seasoning. For garnishes, fresh parsley adds a pop of color and brightness. Grated Parmesan cheese is optional but highly recommended. It adds creaminess and richness that enhances every bite. - Sautéing Onion and Garlic: Start by heating olive oil in a large pot over medium heat. Add the finely chopped onion and minced garlic. Cook until the onion turns soft, about 3 to 4 minutes. The smell will be amazing! - Cooking Shrimp: Next, push the onion and garlic to the side. Add the large shrimp to the pot. Season them with salt and pepper. Cook each side for about 2 to 3 minutes. The shrimp should turn pink and opaque. Once done, remove the shrimp from the pot and set them aside. - Adding Sun-Dried Tomatoes and Broth: In the same pot, toss in the chopped sun-dried tomatoes and the broth. - Incorporating Cherry Tomatoes and Seasonings: Add the halved cherry tomatoes, dried oregano, and dried basil. Stir well and bring the mixture to a gentle boil. - Adding Linguine or Spaghetti: Now, it’s time to add the linguine or spaghetti. Make sure it's fully submerged in the broth. - Monitoring Pasta Doneness: Reduce the heat to low and cover the pot. Let it simmer for about 10 to 12 minutes. Stir occasionally until the pasta is al dente and most of the liquid is absorbed. - Returning Shrimp to the Pot: Once the pasta is cooked, take the pot off the heat. Add the cooked shrimp back into the pot. Gently toss everything to combine. - Adjusting Seasoning and Texture: Taste the pasta and adjust with more salt and pepper if needed. If it seems dry, add a splash of broth or olive oil. - Garnishing and Presentation: Spoon the pasta into bowls and garnish with fresh parsley. - Accompaniments for Serving: If you like, serve with grated Parmesan cheese on top for extra flavor. Enjoy your meal! - Ideal Cooking Time for Shrimp: Cook shrimp for about 2-3 minutes on each side. They should turn pink and opaque when done. - Signs of Overcooked Shrimp: Overcooked shrimp become rubbery and tough. They lose their bright color and become grayish. - Using Homemade Broth vs. Store-Bought: Homemade broth has a richer flavor than store-bought. It adds depth to your dish. Use store-bought broth if you're short on time, but choose a low-sodium option for better control over salt. - Additional Seasoning Ideas: Consider adding crushed red pepper for heat. Fresh herbs like basil or thyme can also bring more flavor. - Suggestions for Adding Creamy Texture: For creaminess, stir in a bit of cream or cream cheese at the end. You can also use a splash of pasta water to help with texture. - Avoiding Dry Pasta: Keep an eye on the pasta as it cooks. If it seems dry, add more broth or a touch of olive oil. Stir often to prevent sticking. {{image_2}} You can swap shrimp for chicken or tofu. - Chicken: Use diced chicken breast. Cook it like shrimp. Sauté until it turns white. - Tofu: Use firm tofu, cut into cubes. Sauté it until golden brown. This keeps it crispy. You can choose various pasta types for this dish. - Gluten-Free Pasta: Look for gluten-free options like brown rice or quinoa pasta. They work well in this recipe. - Whole Wheat Options: Whole wheat pasta adds fiber and a nutty flavor. It’s a healthy choice. Adding more flavors makes this dish even better. - Incorporating Spinach or Kale: Toss in fresh spinach or kale while cooking. This adds color and nutrients. - Adding Cheese Variations: Try mozzarella, feta, or goat cheese. They melt well and enhance the taste. - Proper Containers for Leftovers: Use airtight containers to keep your pasta fresh. Glass or plastic containers work well. They help prevent moisture loss and keep flavors intact. - How Long It Lasts in the Fridge: Store your One-Pot Sun-Dried Tomato Shrimp Pasta in the fridge for up to three days. After that, the quality may drop. - Best Practices for Freezing Pasta Dishes: To freeze your pasta, let it cool first. Then, place it in freezer-safe bags or containers. Remove as much air as possible to avoid freezer burn. - Thawing and Reheating Tips: Thaw in the fridge overnight before reheating. You can also microwave it on low. This keeps the shrimp tender and the pasta moist. - Methods for Even Heating: Use a skillet or microwave to reheat. In a skillet, add a splash of broth or water and heat gently. This helps to warm it through without drying it out. - Keeping Pasta Moist: Add a bit of olive oil or broth when reheating. This will help restore moisture and flavor, making your pasta just as good as when it was fresh. It takes about 30 minutes to make this dish. You will need 10 minutes to prep. Cooking takes around 20 minutes. Yes, you can make it ahead of time. Store the pasta in an airtight container. It stays fresh in the fridge for up to three days. Reheat it on the stove or microwave. Add a splash of broth to keep it moist. You can use fresh tomatoes if you prefer. Cherry tomatoes work well, too. They will give a different taste but still taste great. You can also try roasted red peppers for a unique twist. This recipe is perfect for meal prep. Make a big batch and portion it out. It keeps well in the fridge and is easy to reheat. Use separate containers for shrimp and pasta to keep them fresh longer. This blog post has covered how to make One-Pot Sun-Dried Tomato Shrimp Pasta. We explored the key ingredients, from shrimp to aromatics. I shared step-by-step instructions to ensure your dish turns out great. You learned helpful tips for cooking shrimp and adding creamy texture. We also explored variations, storage tips, and frequently asked questions. With these insights, you can make a delicious pasta meal with ease. Enjoy your cooking adventures!

One-Pot Sun-Dried Tomato Shrimp Pasta Delight

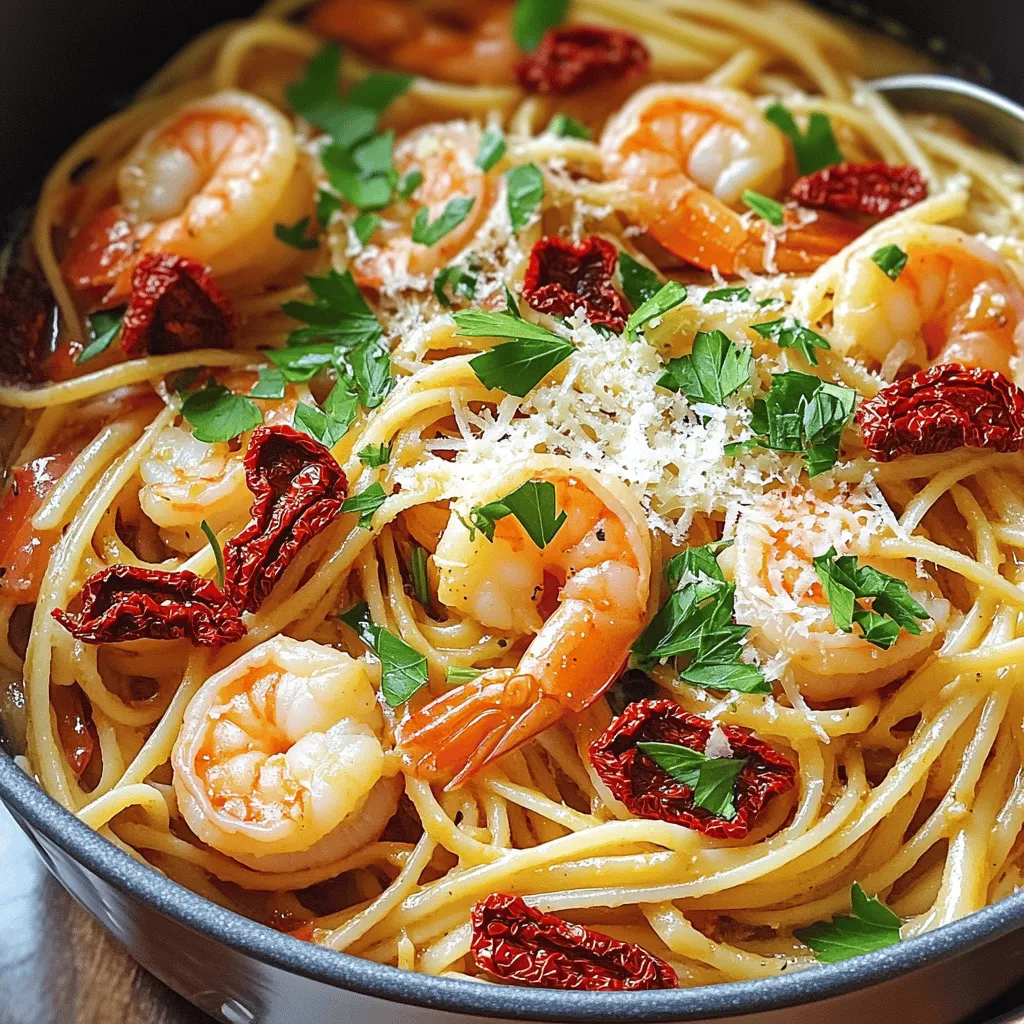
Welcome to a dinner idea that’s quick, easy, and bursting with flavor! My One-Pot Sun-Dried Tomato Shrimp Pasta combines juicy

- 1 ½ cups all-purpose flour - 1 cup canned pumpkin puree - ½ cup granulated sugar - ½ cup brown sugar - ⅓ cup vegetable oil - 2 large eggs - 1 teaspoon vanilla extract - 1 teaspoon baking powder - ½ teaspoon baking soda - ½ teaspoon salt - 1 teaspoon ground cinnamon - ½ teaspoon ground nutmeg - ¼ teaspoon ground ginger - ½ cup rolled oats - ½ cup all-purpose flour - ⅓ cup brown sugar - 1 teaspoon ground cinnamon - ¼ cup unsalted butter, melted - ½ cup chopped pecans or walnuts (optional) The cake uses simple ingredients. Canned pumpkin puree gives it moisture and flavor. Granulated and brown sugars add sweetness and depth. The spices bring warmth and a lovely aroma to the cake. The streusel topping adds a crunchy layer. Rolled oats and flour create a nice texture. Brown sugar and cinnamon give it sweetness and spice. The melted butter binds it all together. If you like, add chopped nuts for extra crunch. Gather these ingredients before you start. It makes baking smooth and fun. Plus, you will enjoy the process of creating this lovely treat! 1. Preheat your oven to 350°F (175°C). Grease a 9-inch round cake pan or a 9x9-inch square dish with butter or cooking spray. 2. In a large bowl, mix the canned pumpkin puree, granulated sugar, brown sugar, vegetable oil, eggs, and vanilla extract. Whisk until smooth and well combined. 3. In another bowl, sift together the flour, baking powder, baking soda, salt, cinnamon, nutmeg, and ginger. Gradually blend this dry mixture into the wet mixture. Stir until just combined, but don’t overmix. 1. In a medium bowl, combine rolled oats, flour, brown sugar, and cinnamon. 2. Drizzle the melted butter over this mix. Use a fork to combine until it becomes crumbly. 3. If you like, add in chopped nuts for extra crunch. This step is optional but highly recommended. 1. Pour the cake batter into the prepared pan. Spread it evenly with a spatula. 2. Evenly sprinkle the streusel topping over the cake batter. Make sure to cover it well. 3. Bake in the oven for 30-35 minutes. Use a toothpick to check for doneness; it should come out clean. 4. Once baked, let the coffee cake cool in the pan for about 10 minutes. Then transfer it to a wire rack to cool completely before serving. - Use room temperature ingredients. This helps the cake mix evenly and rise well. - Check for doneness with a toothpick. Insert it in the center; it should come out clean. - Rotate the cake halfway through baking. This ensures it cooks evenly on all sides. - Dust the cake with powdered sugar. This adds a nice touch and looks elegant. - Enjoy it with a cup of coffee or a dollop of whipped cream. It makes each bite even better. - You can swap granulated sugar with coconut sugar for a different flavor. - Try honey or maple syrup instead of brown sugar for a unique taste. - Use canola oil or melted coconut oil in place of vegetable oil. - For a dairy-free option, you can replace eggs with flaxseed meal mixed with water. {{image_2}} You can make this pumpkin streusel coffee cake even more exciting. One great way is to add chocolate chips. They melt into the cake and create a rich taste. You can also try adding dried cranberries. They add a nice tartness that balances the sweet pumpkin. Another idea is to enhance the spices. You can mix in clove or allspice. These spices bring warmth and depth to the cake. They make each bite feel cozy and comforting. If you need gluten-free options, you can use almond flour or oat flour. These flours work well and keep the cake moist. Make sure to add a bit more baking powder for rise. For vegan adaptations, you can replace eggs with flax eggs. Just mix one tablespoon of ground flaxseed with three tablespoons of water. Let it sit for a few minutes. To replace dairy, use almond milk or coconut cream. These swaps keep the flavors rich without using animal products. You can add more fall flavors by mixing in chopped apple or pear. They add moisture and sweetness. You can also sprinkle some cinnamon on the fruit for extra flavor. Another fun way to change this cake is to play with nut toppings. You could use chopped walnuts, pecans, or even hazelnuts. Each nut gives a different crunch and taste, making the cake unique. To keep your pumpkin streusel coffee cake fresh, wrap it tightly in plastic wrap. Place it in an airtight container or a resealable plastic bag. This prevents air from drying it out. If you prefer, you can also use aluminum foil. For best results, store it in the fridge. At room temperature, this coffee cake stays fresh for about two days. If stored in the fridge, it can last for about a week. Always check for signs of spoilage. Look for mold, an off smell, or a dry texture. If you see any of these, it's best to toss it. To reheat your coffee cake, use a microwave or an oven. In the microwave, warm a slice for about 15-20 seconds. This keeps it moist. If using the oven, preheat it to 350°F. Place the cake on a baking sheet and cover it with foil. Heat for about 10-15 minutes. This method helps restore its original texture. Enjoy your warm, delicious slice! You can use mashed sweet potato, butternut squash, or applesauce. Each option gives a unique flavor. Sweet potato adds sweetness and creaminess. Butternut squash has a mild taste. Applesauce keeps it moist but changes the flavor. All options work well in this recipe. Yes, you can make this coffee cake ahead. Bake it and let it cool completely. Wrap it in plastic wrap. Store it in the fridge for up to three days. You can also freeze it for up to three months. Just thaw it overnight in the fridge before serving. To check for doneness, use a toothpick. Insert it into the center of the cake. If it comes out clean, the cake is done. If there’s wet batter, bake it for a few more minutes. The edges should pull away from the pan, too. Yes, you can make this recipe gluten-free. Use a gluten-free flour blend that measures cup-for-cup. Almond flour or coconut flour can also work, but you need to adjust the liquids. Add more moisture if using coconut flour, as it absorbs more liquid. This coffee cake recipe is simple and packed with flavors. We covered the ingredients, steps, and variations to help you make it perfect each time. Remember to check for doneness and try different toppings to find your favorite. Enjoy serving it warm to friends or family. With these tips, you're ready to bake a delicious treat. Happy baking!

Pumpkin Streusel Coffee Cake Irresistible Autumn Treat

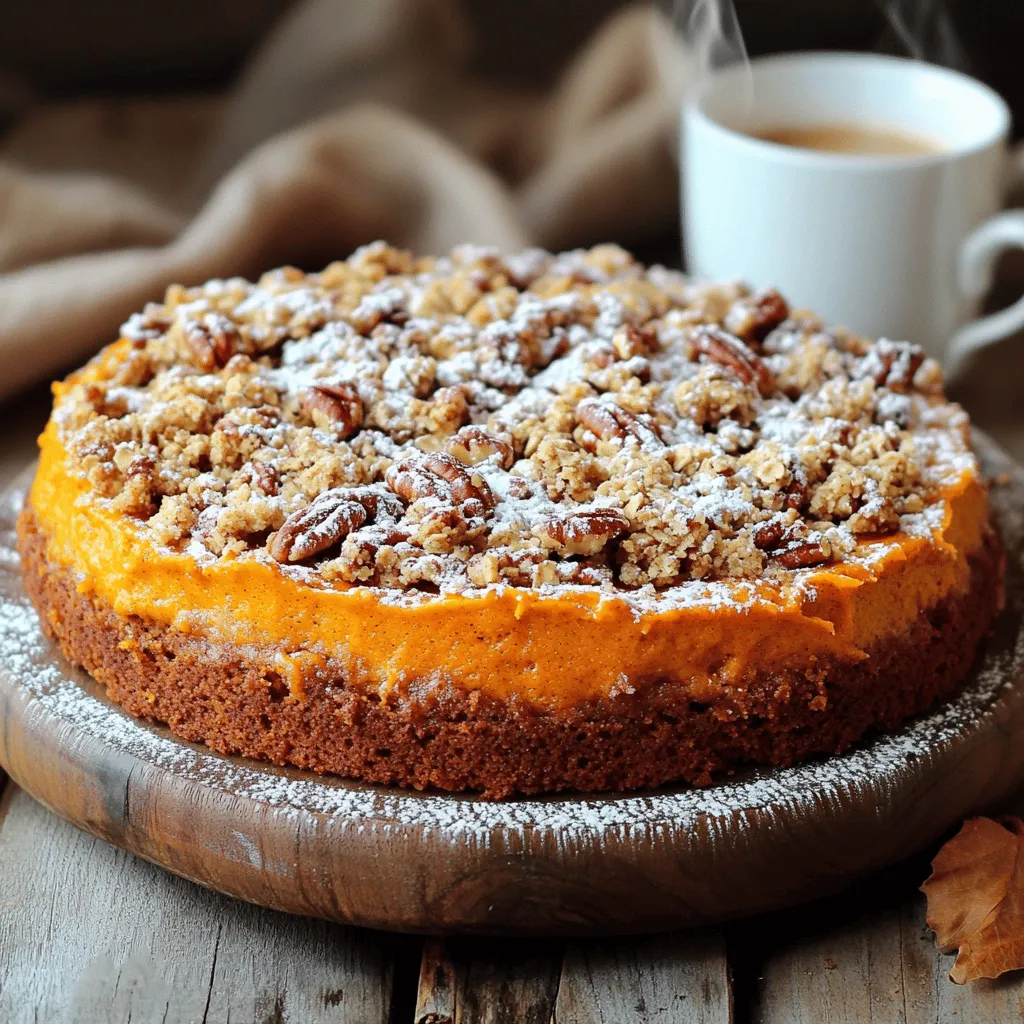
If you’re craving the cozy flavors of fall, look no further than this Pumpkin Streusel Coffee Cake. Moist and spiced

- 4 bone-in chicken thighs, skin removed - 2 cups fresh mushrooms, sliced (such as cremini or button) - 1 medium onion, finely chopped - 3 garlic cloves, minced - 1 cup low-sodium chicken broth - 1 tablespoon soy sauce (or tamari for gluten-free) - 1 tablespoon olive oil I love using bone-in chicken thighs. They stay juicy and tender during cooking. The fresh mushrooms add a rich flavor. You can choose cremini or button mushrooms for this dish. Onions and garlic are must-haves. They boost the dish's taste and aroma. - 1 teaspoon dried thyme - 1 teaspoon dried rosemary - Salt and pepper to taste - Fresh parsley, chopped (for garnish) Thyme and rosemary give your chicken an earthy taste. Don’t be shy with salt and pepper; they enhance the flavors. For garnish, fresh parsley offers a pop of color and freshness. It makes the dish look even better. First, I dry the chicken thighs with paper towels. This step helps the seasoning stick well. Next, I season both sides with salt and pepper. This simple step adds a lot of flavor. After that, I sauté the aromatics. In a skillet, I heat olive oil over medium heat. Then, I add the chopped onion and minced garlic. I cook them for about 3-4 minutes. They should become soft and fragrant. This is where the magic begins! Next, I stir in the sliced mushrooms. I let them cook for about 5 minutes. They start to release their moisture, adding depth to the dish. Now, it's time to layer the ingredients in the slow cooker. I transfer the onion and mushroom mixture to the bottom. Then, I place the seasoned chicken thighs right on top. This layering ensures even cooking and flavor. Next, I mix the liquid. In a bowl, I combine chicken broth, soy sauce, thyme, and rosemary. After mixing well, I pour this mixture over the chicken and mushrooms. This creates a lovely sauce that will keep the chicken moist. For cooking time, I have two options: low and high settings. If I choose low, I cook for 6-7 hours. If I go high, it takes about 3-4 hours. I prefer the low setting for a more tender result. To check for doneness, I use a meat thermometer. The chicken should reach 165°F (75°C). This ensures the chicken is cooked through and safe to eat. To keep your chicken juicy, start with skinless, bone-in thighs. These cuts hold moisture well. Season both sides with salt and pepper. This adds flavor and helps keep the meat moist. Sautéing is key for flavor. Heat olive oil in a skillet. Add onion and garlic first; cook until soft. This step builds a great base for your dish. Then, add the mushrooms. They should cook until they release their moisture. This enhances their taste and makes the dish richer. To thicken your sauce, use a cornstarch slurry. Mix 1 tablespoon of cornstarch with 2 tablespoons of water. Stir it into the sauce during the last 15 minutes of cooking. This gives the sauce a nice, thick texture. If you don’t have cornstarch, try a flour slurry. Mix equal parts flour and water, then stir it in. You can also let the sauce simmer uncovered for a bit to reduce it. This method concentrates the flavors without adding extra ingredients. Pair your mushroom chicken with rice or mashed potatoes. These sides soak up the tasty sauce. For a fresh touch, try steamed green beans or a crisp salad. They add color and balance to your meal. For presentation, use a large platter. Arrange the chicken and mushrooms neatly. Drizzle the sauce over the top, and sprinkle with chopped parsley. This adds a pop of color and makes the dish look inviting. {{image_2}} You can easily change the recipe to fit your needs. For a gluten-free option, use tamari instead of soy sauce. This keeps the taste rich without gluten. If you're looking for a vegan or vegetarian dish, swap chicken thighs for firm tofu or tempeh. You can also use vegetable broth instead of chicken broth to keep the flavor deep and satisfying. Adding different herbs and spices can elevate your dish. Try adding basil or oregano for a fresh twist. You can also use smoked paprika for a hint of smokiness. For mushrooms, experiment with shiitake or portobello. These types add a meaty texture and a bold flavor. Mixing different mushrooms can create a rich and layered taste. If you want to speed things up, try making this dish in an Instant Pot. Cook on high pressure for about 15 minutes. Let the pressure release naturally for best results. You can also make this on the stovetop. Just brown the chicken in a pan first, then add the mushrooms and broth. Simmer on low heat until the chicken is tender. These methods will give you delicious results in less time. To keep your leftovers fresh, place them in an airtight container. Make sure to let the chicken cool to room temperature first. Store the container in the fridge. Your mushroom chicken will stay tasty for up to four days. Check for any off smells or changes in texture before eating. For longer storage, freeze your mushroom chicken. First, portion it into freezer-safe bags or containers. Squeeze out excess air to prevent freezer burn. This dish can last up to three months in the freezer. When ready to eat, thaw it overnight in the fridge. To enjoy your dish again, reheating is key. The oven is best for keeping texture and flavor. Preheat it to 350°F and heat for about 20 minutes. Cover the dish with foil to prevent drying out. If you're in a hurry, use the microwave. Heat it in short bursts, stirring in between. This keeps it warm but can make it slightly less juicy. Yes, you can use boneless chicken thighs. They cook faster than bone-in thighs. Just reduce the cooking time by about one hour. Check for doneness to ensure they are cooked through. To keep the chicken moist, avoid overcooking it. Use a meat thermometer to check for an internal temperature of 165°F. The slow cooker method helps retain moisture, as the environment is humid. Also, consider using chicken thighs instead of breasts, as they have more fat and flavor. If you lack a slow cooker, you can use a Dutch oven or a heavy pot. Brown the chicken and sauté the veggies in the pot. Then, add the broth and cover it. Cook on low heat on the stove for about 1.5 to 2 hours. Make sure to check the chicken for doneness. Absolutely! You can add carrots, bell peppers, or green beans. Just chop them into bite-sized pieces. Add them to the slow cooker with the chicken for added flavor and nutrition. To add heat, include red pepper flakes or diced jalapeños. Stir them in with the onion and garlic. Adjust the amount based on your heat preference for a kick. This dish pairs well with rice, mashed potatoes, or pasta. You can also serve it with a fresh salad or steamed veggies for a balanced meal. Yes, you can prepare the ingredients the night before. Store them in the fridge. Simply place them in the slow cooker in the morning and let it cook during the day. Store any leftovers in an airtight container in the fridge. They can last for up to four days. Make sure to cool them down before sealing the container. Yes, you can freeze it! Place cooled leftovers in a freezer-safe container. It can last for up to three months. Thaw it overnight in the fridge before reheating. To reheat, use the microwave or stovetop. If using the stovetop, add a splash of broth to keep it moist. Heat until warmed through. This blog post covered everything you need for making mushroom chicken in a slow cooker. We explored key ingredients like chicken thighs, mushrooms, and seasonings. I shared step-by-step instructions for preparation and cooking, plus tips for success. We also discussed variations and how to store your dish properly. Remember, this recipe is adaptable and easy. Enjoy the warmth and flavor of this dish with friends and family. Happy cooking!

Slow Cooker Mushroom Chicken Thighs Flavorful Delight

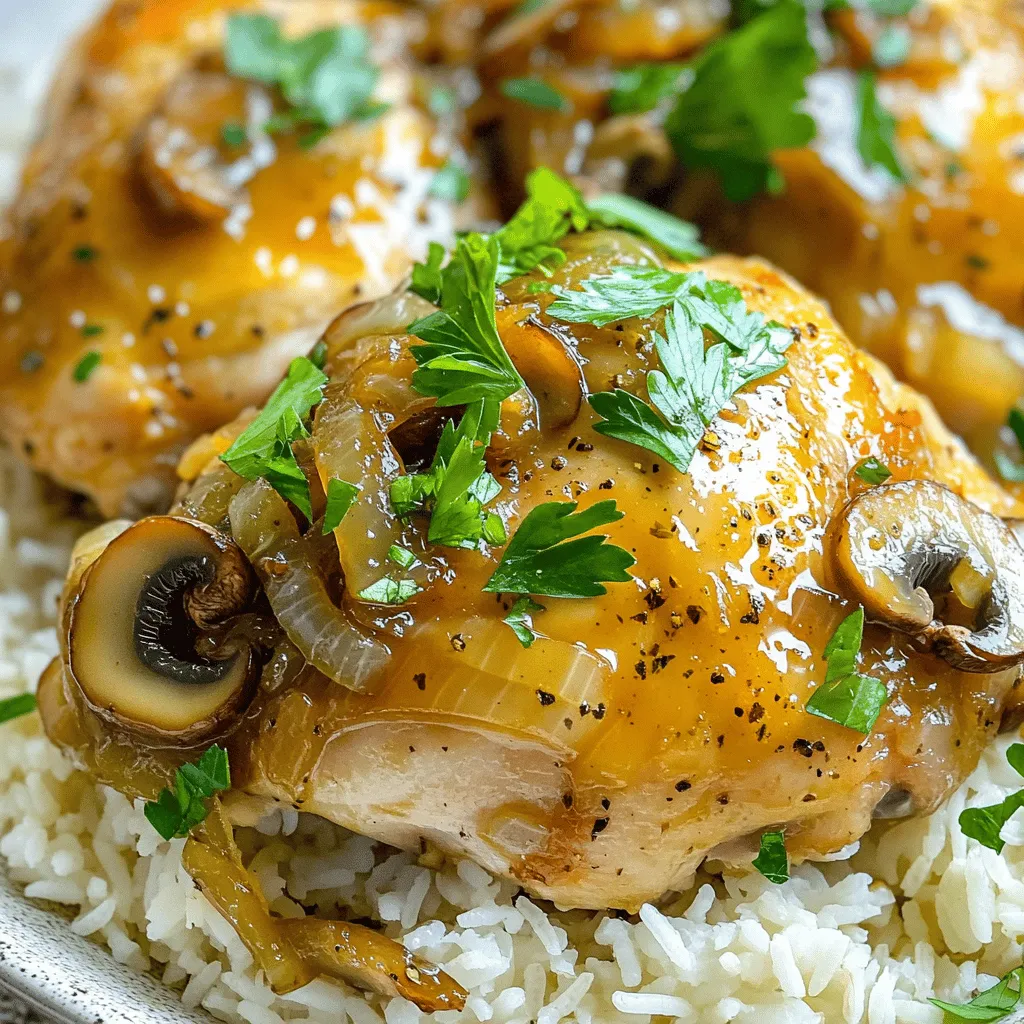
Get ready to enjoy a warm and tasty meal with my Slow Cooker Mushroom Chicken Thighs! This dish combines tender

- 1 pound large shrimp, peeled and deveined - 1 tablespoon Cajun seasoning - 2 tablespoons olive oil - 1 tablespoon lemon juice - 1/2 teaspoon garlic powder - 1/2 teaspoon onion powder - 1/4 teaspoon paprika - 1/4 teaspoon black pepper - 1/2 cup breadcrumbs (panko for extra crispiness) - Fresh parsley, chopped (for garnish) - Lemon wedges (for serving) Gathering the right ingredients is key to making great crispy Cajun shrimp. Start with the shrimp. I prefer large shrimp, as they hold up well in the air fryer and have a nice bite. You want them peeled and deveined for easy cooking. Cajun seasoning brings bold flavor to this dish. It adds heat and depth, making the shrimp pop. Olive oil helps the seasoning stick and keeps the shrimp moist. Lemon juice brightens the flavors and adds a nice zing. For the extra crunch, I recommend using panko breadcrumbs. They create a delightful, crispy layer when cooked. Garlic powder and onion powder boost the flavor without overpowering the dish. Paprika adds a hint of smokiness, while black pepper gives it a little kick. Don't forget fresh parsley! It adds a pop of color and freshness when you serve the shrimp. Lemon wedges on the side are perfect for squeezing over the shrimp right before you eat. Enjoy the bold flavors and crispy texture in every bite! - In a mixing bowl, combine: - 1 tablespoon Cajun seasoning - 1/2 teaspoon garlic powder - 1/2 teaspoon onion powder - 1/4 teaspoon paprika - 1/4 teaspoon black pepper Mix these well to blend the flavors. Then, add the shrimp. Pour in: - 2 tablespoons olive oil - 1 tablespoon lemon juice Toss the shrimp until they are evenly coated with the seasoning. This step ensures that every bite bursts with flavor. Now that the shrimp are ready, sprinkle: - 1/2 cup breadcrumbs (panko for extra crispiness) Gently toss the shrimp again. The goal is to coat each one well. This helps to achieve that perfect crispy texture when cooked. Preheat your air fryer to 400°F (200°C). This usually takes about 5 minutes. Once it’s hot, arrange the shrimp in a single layer in the basket. Avoid overcrowding to keep them crispy. Cook the shrimp for 8-10 minutes. Halfway through, shake the basket to ensure even cooking. Look for a golden color and crispiness. Once done, remove the shrimp and place them on a serving plate. To get the best crispiness, you must place the shrimp in a single layer in the air fryer. This allows hot air to circulate all around each shrimp. If you pile them on top of one another, they won’t cook evenly. Using panko breadcrumbs is key for extra crunch. They are lighter and crispier than regular breadcrumbs. This makes a big difference in texture. You can easily make the Cajun seasoning milder. Just reduce the amount you use. You might try one teaspoon instead of one tablespoon. For more heat, add extra spices like cayenne pepper. Start with a pinch, and taste before adding more. This way, you control the spice to suit your taste. Serve your crispy Cajun shrimp with sides like rice or coleslaw. These pair well and balance the dish. You can also offer dips like ranch or garlic sauce. They add a nice touch and enhance the flavors. Don’t forget the lemon wedges; they add freshness and zest! {{image_2}} You can cook Cajun shrimp in many ways. The air fryer gives a great crispy texture, but you can also bake or fry them. Oven-baking option for Cajun shrimp: - Preheat your oven to 425°F (220°C). - Place the shrimp on a baking sheet lined with parchment. - Bake for 12-15 minutes. Flip halfway for even cooking. Stove-top frying for alternative texture: - Heat oil in a skillet over medium heat. - Add the shrimp and cook for 3-4 minutes on each side. - This will give you a nice, golden crust. You can change the flavor of your shrimp to suit your taste. Adding herbs like thyme or oregano: - Mix in fresh or dried herbs with your spices. - These herbs add depth and aroma to the dish. Experimenting with different seasoning blends: - Try curry powder or chili powder for a twist. - You can also use lemon pepper for a zesty kick. Cajun shrimp can fit many dietary needs. Gluten-free alternatives for breadcrumbs: - Use crushed cornflakes or almond flour instead of regular breadcrumbs. - These options provide crunch without gluten. Low-fat options by reducing oil: - Cut back on olive oil to lower fat content. - You can also use a spray oil for even less fat. To keep your crispy Cajun shrimp fresh, you should refrigerate them soon. Place the shrimp in an airtight container. Make sure the lid seals tightly to keep moisture out. This way, they stay crispy for a longer time. You can store them in the fridge for up to three days. When you want to enjoy leftovers, the air fryer is the best choice. Preheat your air fryer to 350°F (175°C). Place the shrimp in a single layer and heat them for about 5 minutes. This helps keep them crispy. Avoid the microwave, as it makes the shrimp soggy. If you want to freeze shrimp, you can do this before or after cooking. For uncooked shrimp, place them in a freezer-safe bag. Remove as much air as possible and seal it tight. For cooked shrimp, let them cool first. Then, use a similar bag for freezing. They can last up to three months in the freezer. For thawing, move the shrimp to the fridge overnight. If you need them faster, place the bag in cold water for about 30 minutes. This method helps keep the shrimp juicy. You cook shrimp in an air fryer for 8 to 10 minutes. Keep the temperature at 400°F (200°C). Check on them halfway through and shake the basket. This helps them cook evenly and get crispy. Yes, you can use frozen shrimp. Just make sure to thaw them first. Run them under cold water for a few minutes. Pat them dry before seasoning. This helps the spices stick better. Cajun shrimp pairs well with many dipping sauces. Here are a few great options: - Remoulade sauce: It adds a nice tang. - Garlic butter sauce: This brings a rich flavor. - Spicy mayo: It gives a nice kick. - Lemon aioli: This adds freshness and creaminess. These sauces enhance the shrimp’s flavor and make it even more delicious. Shrimp are fully cooked when they turn pink and opaque. They should curl into a "C" shape. If they stay straight, they might be overcooked. Use a food thermometer if you want to check. The safe internal temperature is 120°F (49°C). This blog post covers how to make crispy Cajun shrimp in an air fryer. We discussed the key ingredients, step-by-step instructions, and tips for the best results. You learned about different cooking methods and flavor variations to try. Proper storage and reheating techniques ensure you enjoy your shrimp later. Remember, you can tailor the spice levels to your taste and even explore gluten-free options. Enjoy your cooking adventure and the tasty shrimp you'll create!

Crispy Cajun Shrimp Air Fryer Flavorful Dish Recipe

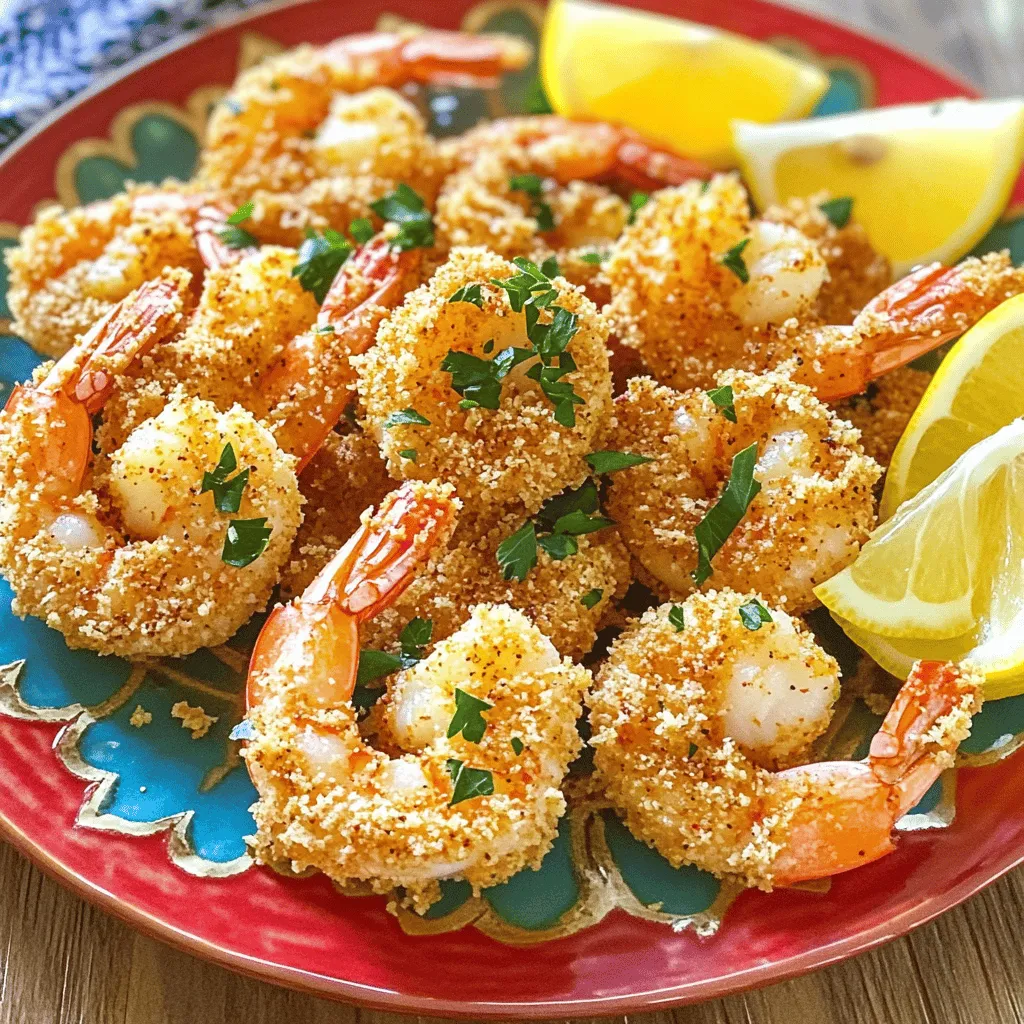
Are you ready to spice up your dinner? This Crispy Cajun Shrimp recipe made in an air fryer is both

- 8 oz pasta (fettuccine or penne) - 4 cups vegetable broth - 1 cup heavy cream - 1 cup freshly grated Parmesan cheese - 4 cloves garlic, minced - 1 cup cherry tomatoes, halved - Fresh basil leaves for garnish For this dish, I like to use fettuccine or penne. These pasta types hold the sauce well. Fresh garlic adds a strong flavor. Cherry tomatoes give a sweet touch. Basil is perfect for a fresh taste. - 4 cups vegetable broth - 1 cup heavy cream - 1 cup Parmesan cheese You need vegetable broth to cook your pasta. Heavy cream makes the sauce rich and creamy. Freshly grated Parmesan cheese is key for that cheesy flavor. - 1 teaspoon onion powder - 1 teaspoon Italian seasoning - Salt and pepper to taste Onion powder adds depth to the dish. Italian seasoning brings a mix of herbs that enhance the flavor. Don’t forget to add salt and pepper to taste. These bring all the ingredients together. Start by heating olive oil in a large pot over medium heat. Once the oil is warm, add the minced garlic. Sauté the garlic for about 1-2 minutes. You want the garlic fragrant but not browned. This step builds a strong flavor base for your dish. Next, pour in the vegetable broth. Bring it to a boil. Once boiling, add your choice of pasta, either fettuccine or penne. Cook according to the package instructions, which is about 8-10 minutes. Stir occasionally to prevent sticking. Check for al dente texture before draining. Once the pasta is cooked, reduce the heat. Stir in the heavy cream and mix well. This adds richness. Gradually add the grated Parmesan cheese, stirring constantly until it melts and becomes creamy. Now, sprinkle in onion powder and Italian seasoning. Season with salt and pepper to taste. Fold in the halved cherry tomatoes and cook for 2-3 minutes. This warms the tomatoes and adds color. Let the dish sit for a minute to thicken before serving. Garnish with fresh basil leaves for a lovely finish. - Temperature Control and Timing: Keep the heat low after adding the cream. This helps the sauce stay creamy. If the heat is too high, the cream can separate. - Importance of Stirring: Stir the sauce often. This helps it mix well with the pasta. It also keeps the cheese from clumping. - Checking for Al Dente Texture: Taste a piece of pasta a minute before the time is up. It should be firm but not hard. This is al dente. - How to Avoid Overcooking: Follow the package instructions closely. Stir the pasta every few minutes. This helps it cook evenly. - Adding Other Vegetables: Toss in some spinach or bell peppers for color and taste. They add nutrition and make the dish pop. - Optional Protein Add-ins (Chicken, Shrimp): Grilled chicken or shrimp makes the dish more filling. Cook them separately and add them at the end. {{image_2}} For a vegetarian or vegan twist, you can swap out dairy ingredients. Use coconut cream or cashew cream instead of heavy cream. Nutritional yeast makes a great cheese flavor substitute. For vegan cheese, look for brands that melt well. These options keep the dish rich and creamy without dairy. Adding herbs and spices boosts flavor. Fresh basil pairs well with garlic. Try adding a pinch of red pepper flakes for heat. You can also mix in dried oregano or thyme for extra taste. For cheese, you have choices. If you want a sharper flavor, try Pecorino Romano or Asiago. If you like something mild, mozzarella works well. Each cheese brings a unique taste, so feel free to experiment. Pair your pasta with side salads for freshness. A simple green salad with vinaigrette complements the dish nicely. Garlic bread also makes a great side. You can adjust serving sizes by adding more pasta or sauce. This dish easily scales up for larger families. Just remember to keep the same pasta-to-sauce ratio for the best results. To keep your creamy garlic parmesan pasta fresh, follow these steps: - Cool Down: Let the pasta cool to room temperature. - Use Airtight Containers: Store in glass or plastic containers with tight lids. - Refrigerate Promptly: Place in the fridge within two hours of cooking. This will help maintain flavor and texture. When you reheat, you want it creamy and delicious. Here’s how: - Use Low Heat: Reheat on the stove over low heat to avoid burning. - Add a Splash of Cream: This helps keep the sauce smooth. - Stir Often: Stirring prevents sticking and helps heat evenly. Avoid using high heat or a microwave, as this can make it dry. Yes, you can freeze this dish! Here’s how: - Cool Completely: Let it cool down before freezing. - Use Freezer-Safe Containers: Choose containers that are safe for the freezer. - Label and Date: Always label with the date to track freshness. To thaw, move it to the fridge overnight. Reheat gently on the stove with a bit of cream for best results. Yes, you can use other types of pasta. If you prefer gluten-free, choose brown rice pasta or chickpea pasta. Whole wheat pasta is also a great choice for more fiber. Just make sure to adjust the cooking time based on the type of pasta you use. To make this dish lighter, you can swap heavy cream with half-and-half or a light cream. Use less cheese or opt for a reduced-fat version. You might also add more vegetables like spinach or zucchini to bulk it up without adding too many calories. You can add protein to make it heartier. Cooked chicken, shrimp, or even beans can work well. You can also toss in more veggies like broccoli, peas, or bell peppers for added nutrients and texture. In this post, we explored making creamy garlic parmesan pasta. We discussed essential ingredients like pasta, fresh garlic, and basil. We also covered pantry staples like vegetable broth and heavy cream. The cooking steps included heating oil, boiling pasta, and creating a rich sauce. For the best results, remember to control temperature and timing. Feel free to customize with extra veggies or protein. This dish is not just tasty; it is easy to store and reheat. Enjoy your creamy pasta adventures!

Creamy Garlic Parmesan Pasta One Pot Delight

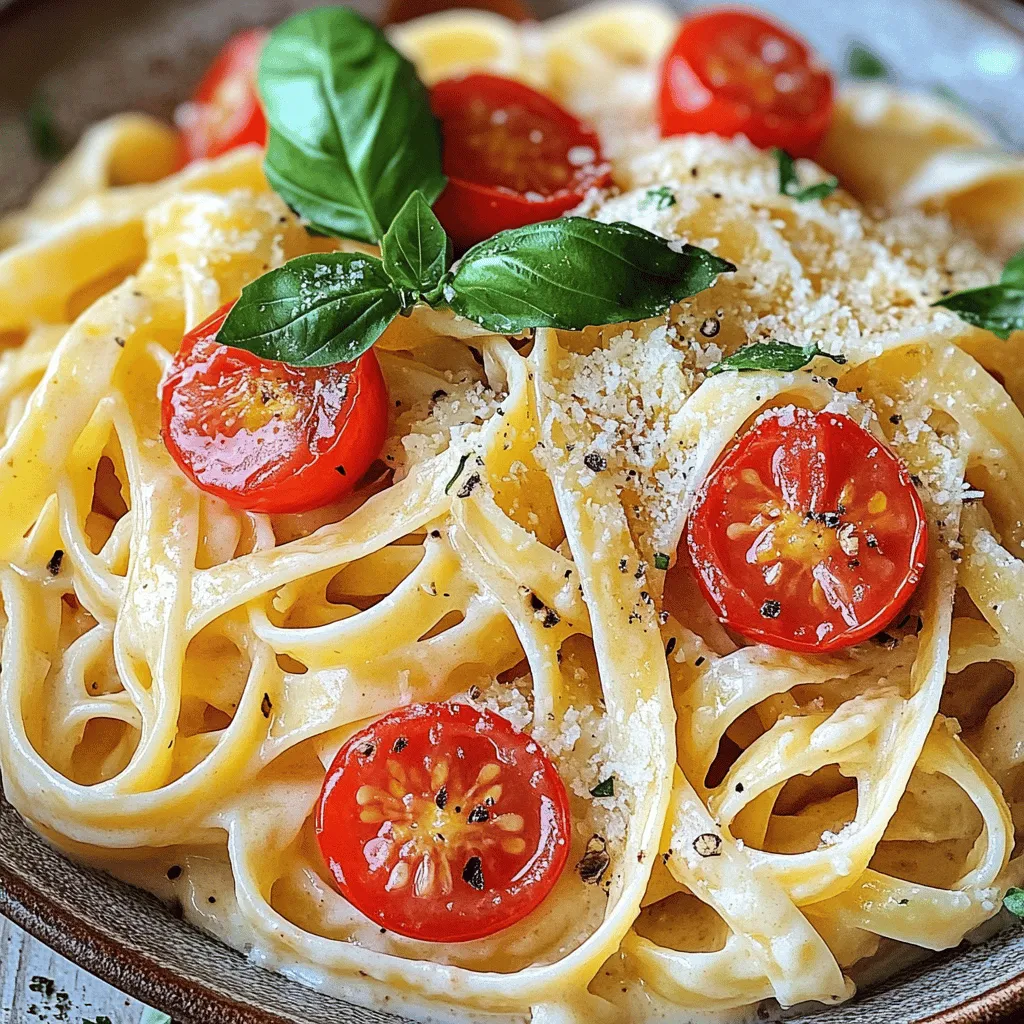
Are you ready to whip up a creamy, dreamy pasta dish without the fuss? My Creamy Garlic Parmesan Pasta One

- 1 ½ cups graham cracker crumbs - ½ cup unsalted butter, melted - ⅓ cup brown sugar - 1 can (15 oz) pumpkin puree - ½ cup maple syrup - ⅓ cup granulated sugar - 2 large eggs - 1 teaspoon vanilla extract - 1 teaspoon ground cinnamon - ½ teaspoon ground nutmeg - ½ teaspoon ground ginger - ¼ teaspoon salt - 1 cup chopped pecans These bars start with a buttery graham cracker crust. The crust is easy to make and adds a nice crunch. You mix graham cracker crumbs, melted butter, and brown sugar. This creates a sweet and crumbly base. Next, the filling is a blend of pumpkin puree and maple syrup. This gives the bars a rich flavor. The eggs help set the filling, while the spices add warmth and depth. Ground cinnamon, nutmeg, and ginger make each bite comforting. The chopped pecans add a special crunch and nutty taste. For a lovely finish, you can add powdered sugar on top. A dollop of whipped cream makes these bars even better. A sprinkle of cinnamon also looks nice and adds flavor. These small touches make your dessert shine. First, gather your crust ingredients. You need graham cracker crumbs, melted butter, and brown sugar. In a mixing bowl, combine these three. Stir them well until it looks like wet sand. This means your crust mix is ready. Next, take your 9x9 inch baking pan. Grease it or line it with parchment paper. This helps with easy removal later. Now, press the graham cracker mix firmly into the bottom of the pan. Make sure it’s even. Bake this crust at 350°F (175°C) for about 10 minutes. When done, take it out and let it cool slightly. Now let’s make the pumpkin filling. In a large bowl, add pumpkin puree, maple syrup, granulated sugar, and eggs. Don’t forget the vanilla extract. Whisk these wet ingredients together until smooth. Next, add your spices: cinnamon, nutmeg, ginger, and salt. Mix them in well. This gives your filling a warm flavor. Finally, fold in the chopped pecans. This adds a nice crunch to your filling. You’re almost there! Pour the pumpkin filling over your pre-baked crust. Spread it evenly with a spatula. Bake the bars for 30 to 35 minutes. To check if they’re done, insert a toothpick in the center. If it comes out clean, your bars are ready. Let them cool completely in the pan. After that, refrigerate them for at least an hour. This helps firm them up for easy slicing. Enjoy your delicious Maple Pecan Pumpkin Pie Bars! Ensuring a Firm Filling To get a firm filling, you need to bake it just right. Check the filling after 30 minutes. It should not jiggle when you gently shake the pan. If a toothpick comes out clean, it's done. Let the bars cool completely before slicing. This helps the filling firm up even more. Achieving a Crisp Crust A crisp crust is key to great pie bars. Start with fresh graham cracker crumbs. Mix them well with melted butter and brown sugar. Press the mixture firmly into the pan. Pre-bake the crust for 10 minutes to set it. This step prevents a soggy base. Garnishing Ideas To make your bars look stunning, dust them with powdered sugar. Add a dollop of whipped cream on top. A sprinkle of cinnamon adds warmth and flavor. You can also add some chopped pecans for a nice crunch. Serving Suggestions Serve the bars on a pretty platter. Cut them into squares or rectangles for easy sharing. They make a great treat for fall gatherings or holiday meals. Pair them with warm drinks like cider or coffee for a cozy vibe. {{image_2}} You can change the flavor of your Maple Pecan Pumpkin Pie Bars by adding spices. Try including allspice or cloves for a warm kick. A pinch of cardamom can also add depth. Each spice brings its own charm, enhancing the overall taste. Feel free to mix and match. Experimenting with spices can make each batch unique. If you want to reduce sugar, consider using honey or agave syrup. Both add sweetness while keeping the flavor rich. You can also use coconut sugar for a deeper caramel note. Adjust the amount based on your taste preference. Remember to check the sweetness of your filling before baking. To make these bars vegan, swap the eggs for flax eggs. Mix one tablespoon of ground flaxseed with three tablespoons of water. Let it sit for five minutes until it thickens. Use coconut oil instead of butter for the crust. These swaps keep the bars tasty while fitting a vegan diet. To make these bars gluten-free, use gluten-free graham cracker crumbs. Many brands offer these options. Ensure other ingredients, like baking powder or sugar, are gluten-free. This way, everyone can enjoy the bars without worry. Adjust baking time if needed, as gluten-free ingredients may change texture slightly. Refrigeration Tips You can store these bars in the fridge. Place them in an airtight container. They stay fresh for up to a week. If you want to keep them longer, refrigerate them right after they cool. This helps them stay firm and tasty. Freezing Instructions To freeze, wrap each bar in plastic wrap. Then, place the wrapped bars in a freezer-safe bag. They can last up to three months in the freezer. When you are ready to enjoy, thaw them in the fridge overnight. This keeps the flavors rich and fresh. Methods for Refreshing the Bars To reheat, preheat your oven to 350°F (175°C). Place the bars on a baking sheet. Heat them for about 10 minutes. This warms them up and makes them taste fresh again. You can also use the microwave. Just heat them for about 15-20 seconds. Maintaining Texture If you want to keep the texture, avoid overheating. Too much heat can make them dry. Always check after a short time to find the right warmth. Enjoy your bars warm or cool; either way, they taste great! You can use crushed cookies, like digestive biscuits or vanilla wafers. You might also try crushed oats for a healthier option. Each choice brings a unique flavor. Experiment to find what you like best! Yes, these bars are great for making ahead. You can prepare them a day or two before your event. Just store them in the fridge until you are ready to serve. This helps the flavors meld together nicely. The filling is set when a toothpick comes out clean from the center. It should not jiggle too much when you shake the pan. This usually takes about 30 to 35 minutes of baking. - Additional Common Questions and Answers - Can I use fresh pumpkin instead of canned? Yes, but make sure to cook and puree it first. - What if I don't have pecans? You can use walnuts or leave them out entirely. - Can I add chocolate chips? Yes, chocolate chips add a fun twist to the bars! You now have all the tools to make delicious pumpkin bars. Remember the key points: pick fresh ingredients, prep the crust well, and bake it right. Use the tips to get perfect texture and great taste. You can play with flavors and make it your own with swaps. Storing and reheating keep your bars fresh, so follow those tips too. Enjoy your baking journey and share these treats with friends and family. Happy baking!

Maple Pecan Pumpkin Pie Bars Tasty Fall Treats

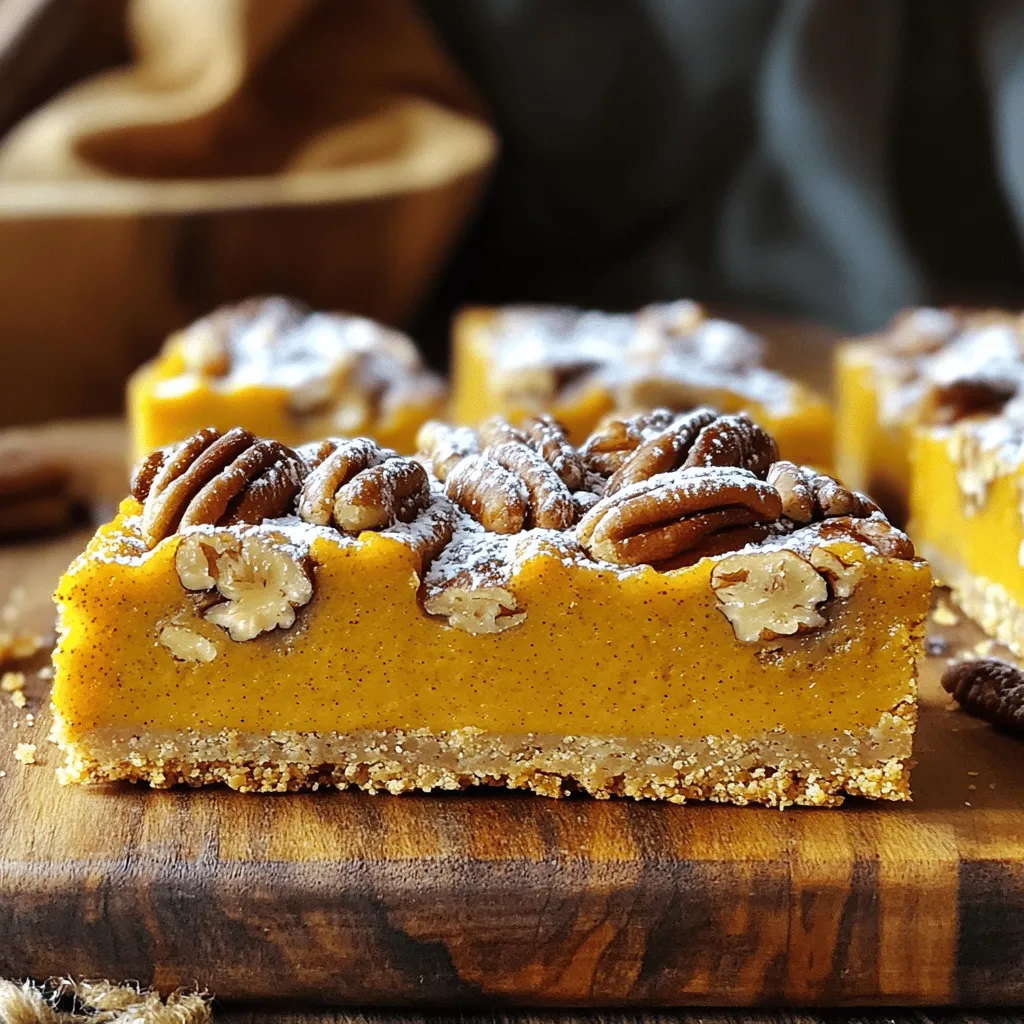
If you’re looking for a cozy fall treat, you’ve found it! Maple Pecan Pumpkin Pie Bars bring together warm spices,

Older posts
Newer posts
← Previous Page1 … Page24 Page25 Page26 … Page84 Next →

dsad

© 2026 juliesdish • Built with GeneratePress

Our Policies

  • Copyright Policy
  • Cookie Policy
  • GDPR Policy
  • Privacy Policy
  • Disclaimer
  • Terms Of Use

More Information

  • Home
  • About
  • Contact
  • Appetizers
  • Dessert
  • Dinner
  • Drinks
©2026, juliesdish About Back To Top