Skip to content
DisclaimerTerms Of UseGDPR PolicyCookie Policy

juliesdish

  • Home
  • Drinks
  • Appetizers
  • Dinner
  • Dessert
  • About
  • Contact
  • Privacy Policy
DisclaimerTerms Of UseGDPR PolicyCookie Policy

NO-ING-IMG

To make flavorful Sheet Pan Sweet Potato Black Bean Quesadillas, gather these key ingredients: - 2 large sweet potatoes, peeled and diced - 1 can black beans, rinsed and drained - 1 red bell pepper, diced - 1 small red onion, diced - 1 teaspoon cumin - 1 teaspoon smoked paprika - ½ teaspoon chili powder - Salt and pepper to taste - 6 large flour tortillas - 1 cup shredded cheese (cheddar or a blend) - 2 tablespoons olive oil - Fresh cilantro, chopped (for garnish) - Sour cream or Greek yogurt (for serving) Each ingredient plays a big role in creating the taste you’ll love. Sweet potatoes bring a natural sweetness and a creamy texture. Black beans add protein and a hearty feel. The red bell pepper gives a nice crunch, while the red onion adds a mild bite. Spices like cumin, smoked paprika, and chili powder create warmth and depth. The tortillas hold everything together, and the cheese melts to create a gooey, delicious filling. Olive oil helps in roasting the veggies to perfection. Finally, fresh cilantro and a dollop of sour cream or Greek yogurt add a fresh finish to your meal. These ingredients combine to make a filling dish that is both healthy and satisfying. Feel free to explore additional toppings or sides to make it your own! First, preheat your oven to 425°F (220°C). This step is key for a nice crisp. Next, line a large baking sheet with parchment paper. This helps with easy cleanup and prevents sticking. In a big mixing bowl, combine these ingredients: - 2 large sweet potatoes, peeled and diced - 1 can black beans, rinsed and drained - 1 red bell pepper, diced - 1 small red onion, diced - 1 teaspoon cumin - 1 teaspoon smoked paprika - ½ teaspoon chili powder - Salt and pepper to taste - 2 tablespoons olive oil Toss everything until the sweet potatoes and veggies are well coated. This mix packs in lots of flavor! Spread the veggie mixture evenly on your baking sheet. The even spread helps them roast well. Place it in the oven for about 25-30 minutes. Stir halfway through to ensure even cooking. You want the sweet potatoes to be tender and lightly browned. Once the filling cools slightly, it's time to assemble. Grab a tortilla and lay it flat. Sprinkle half of it with the roasted veggie mix. Then, add a generous amount of shredded cheese on top. Fold the tortilla in half, creating a semi-circle. Make sure the filling is inside. Repeat this with the remaining tortillas and filling. It’s a fun and simple way to build your quesadillas! Place the folded quesadillas on a new baking sheet. Lightly brush or spray the tops with olive oil. This helps with crispiness. Bake them in the oven for 10-12 minutes. Flip them halfway through for even browning. You want them golden brown and crispy. When they are done, take them out and let them rest for a few minutes. Cut each quesadilla into wedges. For a nice touch, arrange the wedges on a platter. Sprinkle with fresh cilantro for color. Serve with small bowls of sour cream or Greek yogurt for dipping. This adds a creamy, tangy flavor that pairs well! - Ensuring even cooking: Spread the veggie mixture in a single layer. This helps the sweet potatoes cook nicely. Stir halfway through to mix the flavors and heat evenly. Keep an eye on them to avoid burning. - Achieving the perfect crispy quesadilla: Brush both sides of the folded quesadillas with olive oil. This gives them a nice golden color. Bake until they are crispy, flipping them halfway through for even browning. - Suggestions for spice adjustments: If you like heat, add more chili powder or some diced jalapeños. For a warm flavor, increase the cumin. Taste the veggie mix before filling the tortillas to get your perfect spice level. - Additional toppings for more flavor: Top the quesadillas with fresh avocado, pico de gallo, or a squeeze of lime. You can also add a sprinkle of feta cheese for a tangy kick. Try serving with salsa or guacamole for extra taste. {{image_2}} You can easily change things up in this recipe. - Alternative vegetables: Instead of sweet potatoes, try zucchini or butternut squash. They add a nice texture and flavor. You can also use spinach or kale for a green boost. Each choice brings its own taste. - Different beans or proteins: If you want to swap black beans, consider pinto beans or chickpeas. For a protein punch, add cooked chicken or turkey. This keeps it filling and adds variety. Making this dish fit your diet is simple. - Vegetarian and vegan options: This recipe is already vegetarian. To make it vegan, use dairy-free cheese. You can also skip the cheese for a lighter option. - Gluten-free tortilla suggestions: For gluten-free quesadillas, choose corn tortillas or gluten-free flour tortillas. They hold up well and taste great. Just make sure to check the labels for gluten. To store leftovers, let the quesadillas cool to room temperature. Then, place them in an airtight container. You can also wrap them in plastic wrap or foil. This keeps them fresh and prevents drying out. The cooked quesadillas last about 3 to 4 days in the fridge. For freezing, I recommend wrapping each quesadilla in plastic wrap. Then, place them in a freezer bag. Squeeze out extra air to avoid freezer burn. They can stay good in the freezer for up to 2 months. When you are ready to eat, reheat them in the oven or a toaster oven. Bake at 350°F (175°C) for about 15-20 minutes until warm. You can also use a microwave for a quicker option, but the oven gives better crispness. To make these quesadillas, start by preheating your oven to 425°F (220°C). Line a large baking sheet with parchment paper. In a bowl, combine diced sweet potatoes, black beans, red bell pepper, red onion, spices, and olive oil. Toss until coated. Spread this mixture on the baking sheet and roast for 25-30 minutes until the sweet potatoes are soft. Let it cool slightly, then layer the roasted veggies and cheese on tortillas. Fold and bake them for another 10-12 minutes until golden. Yes! You can swap sweet potatoes for other veggies like zucchini or corn. Use different beans, like pinto or kidney beans, for a new taste. You can also add proteins like chicken or tofu. If you want more spice, add jalapeños or extra chili powder. This recipe is flexible to fit your cravings. These quesadillas pair well with many sides. Serve with fresh guacamole or salsa for a tasty dip. A simple salad with lime dressing complements the dish nicely. You can also add sour cream or Greek yogurt for creaminess. These sides elevate your meal and add variety. Leftovers can last 3-4 days in the fridge. Store them in an airtight container to keep them fresh. If you want to save them longer, freeze them for up to 2 months. To reheat, bake them in the oven or use a skillet for the best taste and texture. This blog post shared a simple way to make sheet pan sweet potato black bean quesadillas. You learned about the key ingredients like sweet potatoes, black beans, and tortillas. I covered how to roast the filling, assemble, and bake the quesadillas for crispiness. Remember, you can customize the recipe with your favorite veggies or proteins. Enjoy leftovers by storing or freezing them properly. With these tips, you can make delicious quesadillas any time. Happy cooking!

Flavorful Sheet Pan Sweet Potato Black Bean Quesadillas

Get ready to enjoy a tasty twist on classic quesadillas! My Sheet Pan Sweet Potato Black Bean Quesadillas are not

For these skewers, you need 1 pound of large shrimp. Make sure they are peeled and deveined. Fresh shrimp works best, but you can also use frozen shrimp. Just thaw them before cooking. The garlic butter marinade gives the shrimp a rich flavor. Here’s what you need: - 4 tablespoons unsalted butter (melted) - 4 cloves garlic (minced) - 1 tablespoon fresh parsley (chopped) - 1 teaspoon lemon juice Mix these ingredients in a bowl. The melted butter and garlic create a lovely base. The parsley and lemon juice add freshness. To make the shrimp even tastier, include these seasonings: - 1 teaspoon paprika for a hint of smokiness - ½ teaspoon salt to bring out all the flavors - ¼ teaspoon black pepper for a little kick After cooking, you can garnish with extra parsley. This adds color and a fresh taste to the dish. To start, you need skewers. If you use wooden skewers, soak them in water for 30 minutes. This step stops them from burning in the air fryer. Metal skewers do not need soaking. They are ready to use right away. Next, it’s time to marinate the shrimp. In a bowl, mix together: - 4 tablespoons unsalted butter, melted - 4 cloves garlic, minced - 1 tablespoon fresh parsley, chopped - 1 teaspoon lemon juice - 1 teaspoon paprika - ½ teaspoon salt - ¼ teaspoon black pepper Stir well to combine. Once mixed, add the shrimp. Toss them until they are fully coated in the marinade. Let the shrimp sit for 15-20 minutes. This waiting time helps the flavors blend into the shrimp. Now, it’s time to cook. First, preheat your air fryer to 400°F (200°C) for about 5 minutes. While it heats up, thread the marinated shrimp onto the skewers. Leave a little space between each shrimp. This space helps them cook evenly. When the air fryer is ready, place the skewers in the basket. Make sure they do not touch each other. Cook the shrimp for 6-8 minutes. Flip the skewers halfway through cooking. The shrimp should turn pink and opaque when done. Once cooked, take them out and drizzle any leftover garlic butter marinade over the top. You can also sprinkle some extra parsley for a nice touch. Enjoy your delicious air fryer garlic butter shrimp skewers! When picking shrimp, go for large, fresh shrimp. Look for shrimp that are firm and have a slight ocean scent. Avoid shrimp that smell strong or have a slimy texture. Fresh shrimp will taste best in your skewers. If you can't find fresh shrimp, frozen shrimp works too. Just thaw them well before cooking. To cook shrimp evenly, leave space between them on the skewers. This airflow helps them cook nicely. If they touch, they may not cook right. Flip the skewers halfway through the cooking time. This lets both sides get that perfect pink color. To make your shrimp sing with flavor, let them marinate long enough. Fifteen to twenty minutes is great. Use fresh garlic for a strong taste. You can also add a dash of lemon zest for extra brightness. If you like heat, sprinkle some red pepper flakes in the marinade. This will give your skewers a spicy kick. {{image_2}} You can easily add vegetables to your shrimp skewers. Bell peppers, zucchini, and cherry tomatoes work great. Just cut them into similar sizes as the shrimp. This way, they cook evenly. Toss the veggies in the garlic butter marinade too. It adds more flavor and color to your dish. Plus, it makes it healthier! If you want to change the flavor, try different marinades. A citrus marinade with orange or lime juice gives a fresh twist. You could also use soy sauce and ginger for an Asian flair. Combine these ingredients with melted butter for a rich taste. Feel free to mix and match until you find your favorite! For those who love heat, make spicy garlic butter shrimp skewers. Add red pepper flakes or cayenne pepper to the marinade. Start with a small amount, then taste it. You can always add more heat later. This gives a nice kick that pairs well with the garlic butter. Enjoy the spicy flavor that makes your taste buds dance! You can store leftover shrimp skewers in a sealed container. Make sure they cool down first. Place them in the fridge for up to three days. If they are not covered, they may dry out. To keep them fresh, use airtight containers. Reheat shrimp skewers in the air fryer for the best results. Set the air fryer to 350°F (175°C). Cook for 3-5 minutes. This warms them up without making them tough. You can also use a microwave, but they may lose some flavor. You can freeze shrimp skewers for later use. Wrap each skewer in plastic wrap. Then place them in a freezer bag. They can last for up to two months in the freezer. When ready to use, thaw them in the fridge overnight before reheating. Yes, you can use frozen shrimp. Just remember to thaw them first. Place the shrimp in cold water for about 15-20 minutes. This step helps them cook evenly. Shrimp are done when they turn pink and opaque. They should also curl up slightly. If you want to be exact, use a meat thermometer. The internal temperature should reach 120°F. Garlic butter shrimp skewers pair well with many sides. Here are some ideas: - Rice - Quinoa - Steamed vegetables - Salad - Garlic bread These options will enhance your meal and add variety. This blog post covered how to make shrimp skewers. You learned about the key ingredients, from the shrimp to the garlic butter marinade. I shared step-by-step instructions for preparing, marinating, and cooking in an air fryer. You also discovered tips for choosing the best shrimp and ensuring they cook evenly. Whether you add veggies or explore spicy flavors, these shrimp skewers will impress. Proper storage and reheating tips ensure your leftovers stay tasty. Now you're ready to make delicious shrimp skewers at home! Enjoy your cooking!

Air Fryer Garlic Butter Shrimp Skewers Simple Recipe

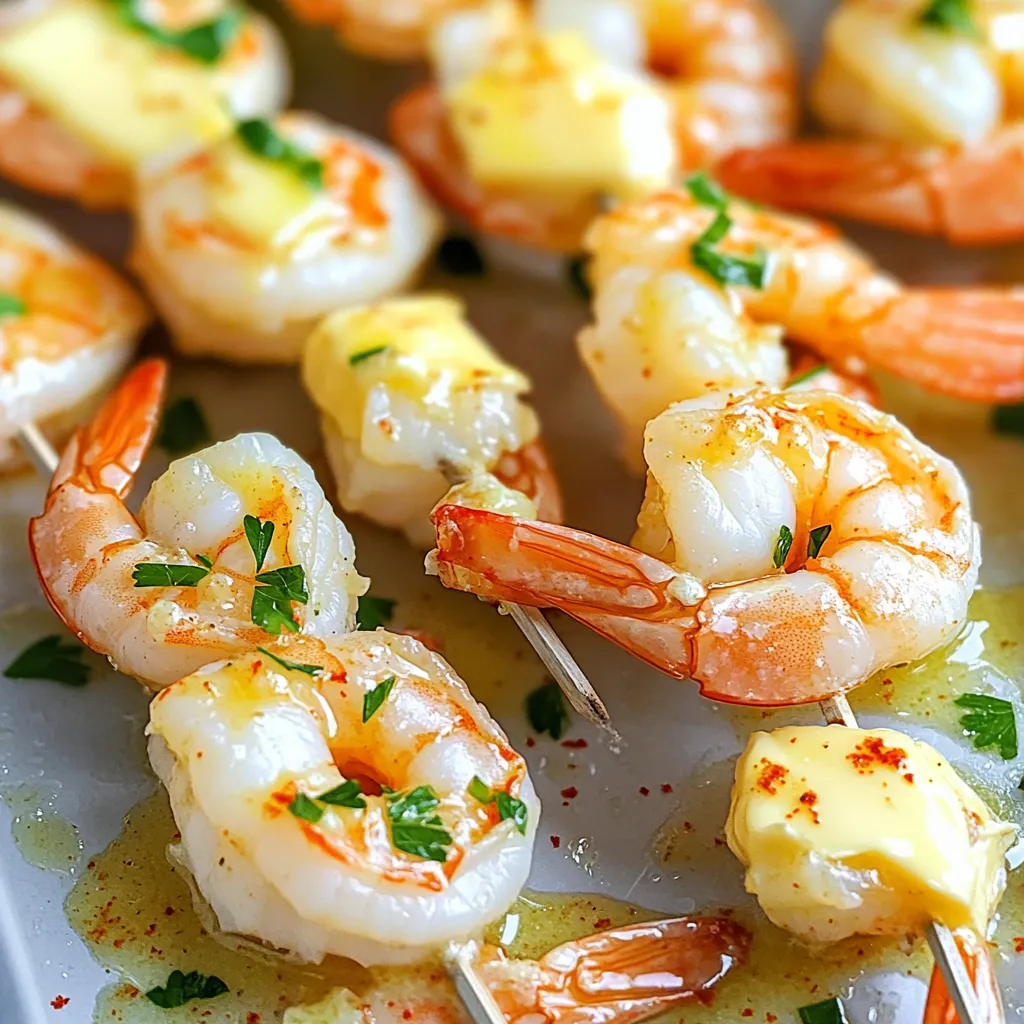
Looking for a quick and tasty dish? You’ll love these Air Fryer Garlic Butter Shrimp Skewers! This simple recipe brings

- 1 cup creamy peanut butter - 1/2 cup honey or maple syrup - 2 cups rolled oats - 1 cup dark chocolate chips - 1/2 teaspoon vanilla extract - A pinch of salt These main ingredients create a rich and tasty treat. The creamy peanut butter adds smoothness. Honey or maple syrup gives sweetness. Rolled oats provide texture and fiber. Dark chocolate chips bring a deep chocolate flavor. Vanilla extract enhances all the flavors. Salt balances the sweetness, making each bite perfect. - Crushed nuts - Cocoa powder You can personalize your truffles with these add-ins. Crushed nuts add crunch and flavor. They can be almonds, walnuts, or pecans. Cocoa powder gives a rich chocolate flavor. You can roll the truffles in either for a fun finish. These options let you make the truffles your own. First, grab a large mixing bowl. Add 1 cup of creamy peanut butter. Next, pour in 1/2 cup of honey or maple syrup. Use a spatula to mix these until smooth. Now, add 2 cups of rolled oats. Don’t forget 1/2 teaspoon of vanilla extract and a pinch of salt. Mix it all well until every part blends together. Cover the bowl with plastic wrap. Place it in the fridge for about 30 minutes. Chilling helps the mixture firm up. This makes it easier to handle when you roll it into balls. Once chilled, take the mixture out. Use a tablespoon to scoop some mixture. Roll it between your hands into a ball. Aim for bite-sized pieces. Repeat this step until you finish the mixture. Now, let’s prepare the chocolate coating. Take 1 cup of dark chocolate chips and melt them in a microwave-safe bowl. Heat in 30-second bursts, stirring in between, until smooth. Dip each truffle ball into the melted chocolate. Make sure it’s fully coated. Use a fork to lift it out, letting any extra chocolate drip off. Place the truffles on a parchment-lined baking sheet. If you like, sprinkle crushed nuts or cocoa powder on top. Then, chill the tray in the fridge for about 30 minutes. This will let the chocolate set perfectly. To make your truffles smooth, start with creamy peanut butter. Mix it with honey or maple syrup in a large bowl. Stir until you see no lumps. Then add rolled oats, vanilla, and salt. Make sure to blend everything well. This will give you a nice, thick mixture. If you want to chill your mixture faster, use a shallow dish. Spread the mixture out evenly in the dish. It will cool quicker than in a deep bowl. You can also place it in the freezer for about 10 to 15 minutes. Just keep an eye on it, so it doesn’t freeze solid. When melting chocolate, use a microwave-safe bowl. Heat in 30-second bursts. Stir after each time. This helps avoid clumps and keeps it smooth. If you see some chocolate still in chunks, just keep stirring. It will melt completely without overheating. {{image_2}} You can change the taste of your truffles easily. Try adding flavored extracts to the mix. A few drops of almond or coconut extract can bring a new twist. You can also add spices for warmth. A sprinkle of cinnamon or nutmeg gives a cozy flavor. These small changes make your truffles unique and fun. If you want vegan truffles, it’s simple. Just swap honey for maple syrup. Use dark chocolate that is dairy-free for the coating. For gluten-free options, make sure the oats are certified gluten-free. This way, everyone can enjoy the treats without worry. Coating can change the look and taste of your truffles. Instead of dark chocolate, try white chocolate or milk chocolate. Melt these chocolates just like you would with dark chocolate. You can also roll the truffles in different toppings. Crushed nuts, sprinkles, or cocoa powder add fun textures. These choices let you customize each truffle to your liking. You can keep your no-bake chocolate peanut butter truffles in the fridge. They stay fresh for up to one week. Make sure to store them in an airtight container. This keeps them from drying out and losing flavor. If you want to save some for later, freezing is a great option. Place the truffles in a single layer on a baking sheet. Freeze them for about one hour. After that, transfer them to a freezer-safe container. They can last up to three months in the freezer. Just remember to separate layers with parchment paper. These truffles shine as a quick snack or dessert. Serve them chilled for the best taste. You can also pair them with fresh fruit or a scoop of ice cream. For extra flair, sprinkle some crushed nuts or cocoa powder on top before serving. Enjoy the rich flavors and creamy texture! No-bake chocolate peanut butter truffles last about one week in the fridge. Store them in an airtight container. If you freeze them, they can last up to three months. Just thaw them in the fridge before eating. Yes, you can use natural peanut butter. It will give the truffles a nice, creamy texture. Just make sure it is smooth and not too oily. If you use natural peanut butter, you may adjust the amount of honey to taste. To make these truffles dairy-free, use dairy-free dark chocolate chips. Look for brands that are labeled as dairy-free. This way, you can enjoy the rich flavor without any dairy. You can substitute honey with maple syrup. Maple syrup adds a nice flavor and keeps the truffles sweet. You can also use agave syrup if you want a vegan option. Yes, adding protein powder is a great idea! It boosts the nutrition of your truffles. Just add a scoop when mixing the dry ingredients. Adjust the other ingredients as needed to keep the right texture. You just learned how to make no-bake chocolate peanut butter truffles. We explored key ingredients, easy steps, and helpful tips. You can adjust flavors or adapt the recipe for diet needs. Remember, these truffles store well and make a delightful treat. Enjoy trying different coatings and add-ins to make them your own. With these steps, you have everything you need to create a tasty snack everyone will love. Happy truffling!

No Bake Chocolate Peanut Butter Truffles Delight

Do you crave a sweet treat that’s quick and easy? These No Bake Chocolate Peanut Butter Truffles are your answer!

- 1 lb chicken breast, cut into bite-sized pieces - 2 cups cooked jasmine rice - 1 cup broccoli florets - 1 carrot, julienned - 3 tablespoons sesame oil - 4 cloves garlic, minced - 2 tablespoons soy sauce - 2 tablespoons honey - 1 tablespoon rice vinegar - 1 tablespoon sesame seeds - 2 green onions, sliced - Salt and pepper to taste The main ingredients in this recipe are simple yet flavorful. You will need chicken breast as the star protein. This chicken cooks well and absorbs flavors easily. Jasmine rice serves as the base for the bowl. It is fragrant and complements the dish perfectly. The vegetables add color and crunch. Broccoli and carrots provide great texture and nutrients. For the marinade, sesame oil plays a big role. It gives the chicken a rich, nutty taste. Garlic brings a fresh, bold flavor. Soy sauce adds depth, while honey balances it with sweetness. Rice vinegar adds a touch of tanginess. Finally, garnishes like sesame seeds and green onions enhance the dish’s look and taste. A sprinkle of salt and pepper rounds it out for perfect seasoning. First, combine the chicken pieces with the marinade. In a bowl, mix 1 tablespoon of sesame oil, minced garlic, soy sauce, honey, rice vinegar, salt, and pepper. Make sure the chicken is well coated. Let it sit for at least 15 minutes. This time helps the flavors soak in. You can marinate it longer if you want a stronger taste. While the chicken is marinating, it's time to cook the vegetables. Steam the broccoli florets and julienned carrot for about 4-5 minutes. They should be slightly tender but still bright in color. This method keeps them crisp and tasty. If you want to add more veggies, bell peppers or snap peas work well too. Next, heat the remaining sesame oil in a large skillet over medium-high heat. Once the oil is hot, add the marinated chicken pieces. Cook them for about 6-8 minutes until they turn golden brown. Remember to stir occasionally. This ensures even cooking. Check that the chicken is cooked through before removing it from heat. Now, let’s put the bowls together. Start by dividing the cooked jasmine rice among serving bowls. Top each bowl with the cooked chicken, steamed broccoli, and carrot. For extra flavor, drizzle any leftover marinade from the skillet over the top. This step makes the dish even more delicious. To finish, sprinkle sesame seeds and sliced green onions on top of each bowl. This adds a nice crunch and fresh flavor. Serve your bowls warm, and don’t forget to offer extra soy sauce on the side for those who like a little more kick. Enjoy your meal! To get the best flavor from your sesame garlic chicken, marinating is key. I suggest marinating the chicken for at least 15 minutes. This allows the flavors to soak in. Use 1 tablespoon of sesame oil, minced garlic, soy sauce, honey, rice vinegar, salt, and pepper. You can tweak the spices to your taste. If you like it sweeter, add more honey. For a kick, try adding chili flakes. Jasmine rice is perfect for this dish. Rinse it under cold water until the water runs clear. This removes excess starch and helps keep the rice fluffy. You can cook it on the stovetop or in an Instant Pot. For stovetop, use 1 cup of rice to 1.5 cups of water. Bring to a boil, then simmer for about 15 minutes. In an Instant Pot, use the same ratio but cook on high pressure for 4 minutes. Let it sit for 10 minutes before releasing the pressure. Timing is crucial for making tasty chicken rice bowls. Start by marinating the chicken while you prepare the veggies. Steam the broccoli and carrots until they are bright and slightly tender, about 4-5 minutes. This keeps them crispy and colorful. Cook the chicken next. It should take about 6-8 minutes to get it golden brown and fully cooked. This way, all your ingredients will be ready at the same time, making meal prep easy and efficient. {{image_2}} You can swap chicken for tofu or shrimp. Tofu gives a nice texture and absorbs flavors well. Use firm tofu for best results. Press it to remove excess water before cooking. Cook tofu in the same way as chicken. For shrimp, cook until they turn pink. This takes about 3-4 minutes. Both options add variety to your meal. Feel free to use other veggies in your rice bowls. Bell peppers, snap peas, and zucchini work great. You can also use seasonal veggies for freshness. In summer, try fresh corn or cherry tomatoes. In fall, consider sweet potatoes. These changes keep the dish exciting and delicious. To add a kick, sprinkle chili flakes on top. This gives your rice bowls some heat. You can also try different sauces. Instead of soy sauce, use teriyaki or hoisin for a unique twist. Experimenting with flavors keeps your meals fun and fresh. To keep your sesame garlic chicken rice bowls fresh, store them in airtight containers. This helps prevent moisture loss and keeps flavors strong. Make sure to let the dish cool down first. Once cooled, divide the bowls into single servings. This way, you can easily grab a bowl when you're hungry. Store the leftovers in the fridge. They should stay fresh for about three days. When reheating your chicken rice bowls, use the microwave for quick results. Place a bowl in the microwave and cover it with a damp paper towel. This helps keep the chicken moist. Heat for 1-2 minutes, checking to see if it warms evenly. You can also use a skillet on low heat. Stir often to avoid sogginess. Add a splash of water if needed to keep things moist. Yes, you can freeze the rice bowls! To freeze, place the cooled bowls in freezer-safe containers. Be sure to leave some space at the top for expansion. They can last up to three months in the freezer. To reheat, move them to the fridge overnight to thaw. Then, follow the reheating instructions above. This method keeps your meal tasty and helps you save time on busy days. You can marinate chicken for at least 15 minutes. This time allows the flavors to soak in well. For even richer taste, you can marinate it for up to 2 hours. Just remember, longer marinating adds more depth. Yes, you can! Meal prep is great for busy days. You can marinate the chicken and cook it earlier. Store the chicken and veggies in separate containers. When you are ready, reheat them and serve over fresh rice. These rice bowls pair well with many sides. Consider serving with: - Steamed edamame - Asian-style slaw - Cucumber salad - Pickled vegetables These add color and crunch to your meal. Yes, this recipe can be gluten-free. Use gluten-free soy sauce, often called tamari. Check labels to ensure all ingredients are gluten-free. You can also use coconut aminos as a tasty alternative. This recipe for Sesame Garlic Chicken Rice Bowls shows how easy tasty meals can be. You learned how to marinate chicken, cook vegetables, and layer bowls. I shared tips for flavor and timing to make cooking simple. You can try different proteins and veggies for variety. Storing leftovers is easy with my guidelines. Now, you can enjoy delicious meals at home. Start cooking today and enhance your kitchen skills!

Savory Sesame Garlic Chicken Rice Bowls Recipe

Looking for a quick, tasty meal? My Savory Sesame Garlic Chicken Rice Bowls are a winner! This easy recipe combines

- 2 cups all-purpose flour - 1 teaspoon baking powder - 1 teaspoon baking soda - 1 teaspoon ground cinnamon - ½ teaspoon ground nutmeg - ¼ teaspoon ground ginger - ½ teaspoon salt - 1 cup granulated sugar - ½ cup unsalted butter, softened - 1 cup pumpkin puree - 2 large eggs - 1 teaspoon vanilla extract - ½ cup chopped walnuts or pecans (optional) - ½ cup brown sugar, packed - ¼ cup all-purpose flour - 1 teaspoon ground cinnamon - ¼ cup unsalted butter, melted - ¼ cup rolled oats When I make Pumpkin Streusel Coffee Cake, I love gathering my ingredients first. This helps me stay organized. The dry ingredients are key for texture. I use all-purpose flour, baking powder, and baking soda to give it lift. The spices—cinnamon, nutmeg, and ginger—add warmth and flavor. Salt enhances all the flavors. Next, I focus on the wet ingredients. Granulated sugar and softened butter create a sweet, creamy base. The pumpkin puree gives moisture and a beautiful color. Eggs bind everything together, while vanilla extract adds a nice aroma. If you like a nutty crunch, toss in some chopped walnuts or pecans. Lastly, I prepare the streusel topping. It’s so easy! I mix brown sugar, flour, and cinnamon for sweetness and spice. Melted butter brings it all together, and rolled oats add a hearty crunch. This topping makes the cake extra special. Now you have all the ingredients ready! Let’s move on to making this cake. - Preheat your oven to 350°F (175°C). - Grease a 9x13 inch baking pan. Use butter or cooking spray. - In a large bowl, whisk together the dry ingredients. Combine the flour, baking powder, baking soda, spices, and salt. - In another bowl, cream the butter and sugar. Mix until it feels light and fluffy. - Add the pumpkin puree into the butter and sugar mix. Next, mix in the eggs one at a time. Stir in the vanilla extract until smooth. - Gradually add the dry mix to the wet mix. Stir until the batter is just combined. If you want nuts, fold them in now. - Pour the batter into the greased pan. Smooth the top with a spatula. - For the streusel topping, mix the brown sugar, flour, cinnamon, melted butter, and oats in a separate bowl. Mix until crumbly. - Sprinkle the streusel topping over the batter in the pan. - Bake for 30 to 35 minutes. Check for doneness by inserting a toothpick into the center. It should come out clean. To get the right consistency, mix the flour, baking powder, and spices well. Make sure your butter is softened. This helps it blend smoothly with sugar. If your batter feels too thick, add a splash of milk for moisture. To check if your cake is done, insert a toothpick in the center. If it comes out clean, your cake is ready. If not, bake a few more minutes. Keep an eye on it! Dusting the cooled cake with powdered sugar adds a lovely touch. Use a fine sieve to sprinkle it evenly. This makes your cake look professional and inviting. For serving, slice the cake and place it on a decorative stand. Pair it with a hot cup of coffee. The flavors blend perfectly. Your guests will love the warm, cozy vibe! To boost the flavor, consider adding extra spices. Cloves or allspice can add warmth. Just a pinch can make a big difference. Using different nuts can also change the taste. Try pecans for a softer crunch or almonds for a firmer bite. Each type of nut adds its unique flavor and texture to the cake. {{image_2}} You can easily change the flavor of your pumpkin streusel coffee cake. One fun way is by adding chocolate chips. Just fold in about a cup of semi-sweet chocolate chips into the batter. This adds sweetness and a rich flavor. You can also use different types of squash, like butternut or acorn squash. They can give a different taste and texture while keeping that lovely fall feel. If you need gluten-free options, replace the all-purpose flour with a gluten-free blend. Many brands work well in baking. For those who want vegan options, you can substitute eggs with flaxseed meal. Mix one tablespoon of flaxseed meal with three tablespoons of water. Let it sit until it thickens. You can also use coconut oil or vegan butter instead of regular butter. This keeps your coffee cake moist and tasty without dairy. To make your coffee cake festive, consider adding seasonal spices. Cinnamon, nutmeg, and cloves work wonders. You can also decorate with cranberries or pecans on top for a holiday touch. Another idea is to serve it with a warm spiced cider. This turns your coffee cake into a cozy treat for any fall gathering. You can even slice it into fun shapes for Halloween! To keep your Pumpkin Streusel Coffee Cake fresh, store it at room temperature. Use an airtight container to protect it from air and moisture. If you have leftover cake, cover it with plastic wrap or foil. This helps maintain its softness for up to three days. If you want to save some for later, freezing is a great option. First, let the cake cool completely. Then, wrap it tightly in plastic wrap and aluminum foil. This prevents freezer burn. You can freeze the cake for up to three months. When you're ready to enjoy it, take the cake out of the freezer. Place it in the fridge overnight to thaw. For quicker thawing, leave it at room temperature for about two hours. After thawing, you can serve it as is, or warm it slightly in the oven for a cozy treat. At room temperature, the cake lasts about three days. If you store it in the fridge, it can last up to a week. Always check for signs of spoilage. If the cake smells off or you see mold, it’s best to discard it. Keeping an eye on your cake ensures you enjoy it at its best! You can tell your coffee cake is done when a toothpick comes out clean. The top should be golden brown and spring back when lightly touched. If it jiggles, it needs more time. I recommend checking at the 30-minute mark. Every oven is a bit different, so stay alert! Yes, you can make this coffee cake ahead of time. Bake it, then let it cool completely. Wrap it in plastic wrap or foil. Store it at room temperature for up to three days. For longer storage, freeze it for up to three months. Thaw it in the fridge overnight before serving. This coffee cake pairs well with many drinks. I suggest fresh coffee or hot tea. A scoop of vanilla ice cream can add a nice touch. You could also serve it with whipped cream for extra creaminess. Enjoy it with loved ones for a cozy fall treat! This article covered the ingredients and steps for making a delicious Pumpkin Streusel Coffee Cake. You learned about dry and wet ingredients, how to mix and bake the cake, and storage tips. We also explored flavor variations and presentation ideas. With some practice, you can make this cake perfect. It’s a great treat for any occasion, so enjoy baking and sharing it! Always feel free to experiment with your own twists to make it unique. Happy baking!

Pumpkin Streusel Coffee Cake Irresistible Fall Treat

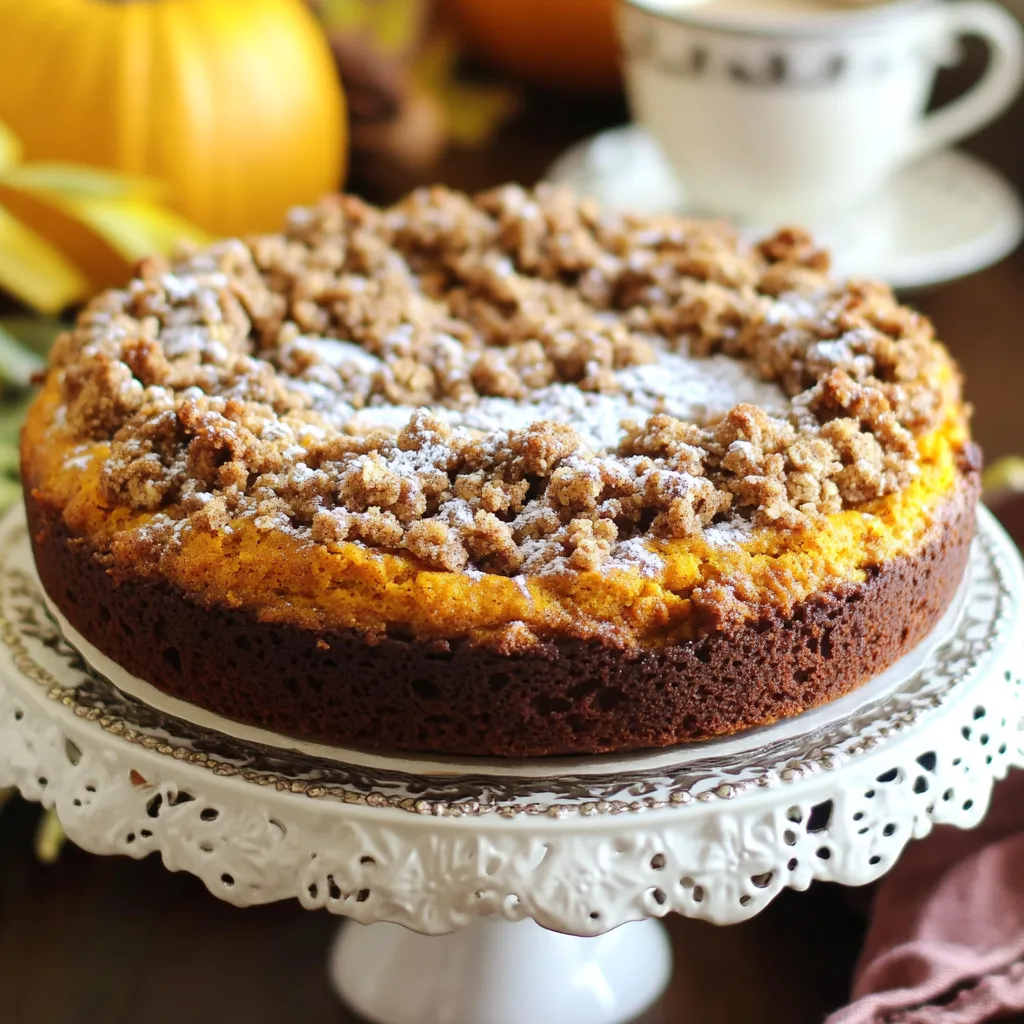
Fall is the perfect time for cozy flavors, and nothing says autumn like Pumpkin Streusel Coffee Cake. With its warm

- 200g of fresh egg noodles or instant noodles - 2 tablespoons spicy chili crisp (store-bought or homemade) - 1 tablespoon soy sauce - 1 teaspoon sesame oil - 1 garlic clove, minced - 1 green onion, finely sliced - Fresh cilantro for garnish (optional) - 1 tablespoon sesame seeds - Lime wedges The main ingredients make this dish shine. Fresh egg noodles or instant noodles are key. They create a base that soaks up all that spicy goodness. The spicy chili crisp adds heat and flavor. Use two tablespoons for a perfect kick. Soy sauce brings depth while sesame oil adds a rich, nutty finish. Aromatics like minced garlic are a must. They bring a warm, inviting scent. Green onions add crunch and freshness. Fresh cilantro brightens the dish and makes it look pretty. If you want to elevate your bowl, consider sesame seeds. They add a nice crunch. A lime wedge on the side is also great. Just a squeeze will brighten every bite. This simple list has everything you need to create a flavor explosion right in your kitchen! 1. Boil water: Bring a pot of water to a rolling boil. 2. Prepare noodles: Add 200g of fresh egg noodles or instant noodles to the boiling water. Cook them based on the package instructions. Fresh noodles cook quickly, usually in just a couple of minutes. 3. Drain and set aside: Once cooked, drain the noodles in a colander and set them aside for later. 1. Mix the sauce: In a small bowl, combine 2 tablespoons of spicy chili crisp, 1 tablespoon of soy sauce, and 1 teaspoon of sesame oil. 2. Stir well: Mix everything together until it forms a smooth sauce. Set this bowl aside as well. 1. Heat the oil: In a large pan or skillet, add 1 tablespoon of vegetable oil and heat it over medium heat. 2. Sauté garlic: Add 1 minced garlic clove to the oil. Sauté for about 30 seconds until it smells fragrant. Watch closely to avoid burning the garlic. 1. Add noodles: Transfer the drained noodles into the pan with the sautéed garlic. 2. Toss with sauce: Pour the chili crisp sauce over the noodles. Toss everything together until the noodles are well coated. 1. Stir in garnishes: Add in the sliced green onion and, if you like, 1 tablespoon of sesame seeds. 2. Plate and serve: Serve the noodles hot. For a nice touch, you can garnish with fresh cilantro and extra chili crisp. Enjoy! To get the best noodle texture, cook your noodles just until tender. Fresh egg noodles take only a couple of minutes in boiling water. If you use instant noodles, follow the package instructions. Drain them and set aside right away. When sautéing garlic, heat your oil over medium heat. Add the minced garlic and sauté for about 30 seconds. Watch closely to avoid burning. This step brings out the garlic's best flavor. Adjusting the seasoning can make a big difference. Start with the soy sauce and chili crisp mix. Taste it, then add more soy sauce or chili crisp to fit your taste. If you want more heat, add an extra spoon of chili crisp. It can really pump up the flavor! To make your dish look great, serve the noodles in deep bowls. Top with extra chili crisp for a colorful pop. A sprinkle of sesame seeds adds a nice crunch. For a fresh touch, add a lime wedge on the side. This can brighten the flavors and make the dish more appealing! {{image_2}} You can boost your Minute Spicy Chili Crisp Noodles with protein. Here are some tasty options: - Tofu: Use firm or extra-firm tofu. Cut it into cubes and pan-fry until golden. Add it to the noodles for a great texture. - Chicken: Thinly slice chicken breast. Sauté it in the pan before adding garlic. Cook it until no longer pink, then mix it with the noodles. - Shrimp: Peel and devein shrimp. Cook them in the pan until they turn pink. They add a nice seafood flavor to your dish. Veggies add color and nutrition to your noodles. Here are some good choices: - Bell Peppers: Slice them thinly and add them to the pan with garlic. They bring sweetness and crunch. - Broccoli: Cut into small florets. Steam or stir-fry them before mixing with the noodles. - Carrots: Shred or slice them thinly. They add a bit of sweetness and bright color. When adding veggies, cook them in the pan for a few minutes to soften. This step helps blend the flavors well with the noodles. You can control the heat of your dish to suit your taste. For a mild version, use less chili crisp. Start with 1 tablespoon and taste before adding more. If you like it spicy, stick with 2 tablespoons or more. To adjust heat levels, consider adding a splash of vinegar or a pinch of sugar. Both can balance the spice and enhance the overall flavor. Enjoy your noodle dish just the way you like it! To keep your Minute Spicy Chili Crisp Noodles fresh, store them properly. First, let the noodles cool down to room temperature. Then, place them in an airtight container. This helps keep moisture out, which can spoil the noodles. - Use glass or plastic containers with tight lids. - Label the container with the date. This way, you can enjoy your noodles later without worry. Aim to eat them within 2-3 days for the best taste. When it's time to enjoy your leftovers, reheating is key. There are a few great methods to choose from. 1. Stovetop Method: Heat a pan over medium heat. Add a splash of water or oil. Place the noodles in the pan and stir until warm. This keeps the noodles from drying out. 2. Microwave Method: Place the noodles in a microwave-safe bowl. Add a little water to help steam them. Cover with a lid or microwave-safe wrap. Heat in 30-second intervals, stirring in between. No matter which method you use, keep an eye on the noodles. You want them warm but not overcooked. Enjoy your meal just as much the second time around! Fresh egg noodles take about 2-3 minutes in boiling water. Instant noodles cook faster, usually in just 1-2 minutes. Always check the package for exact times. Yes, you can! Making your own spicy chili crisp is easy. Just mix fried garlic, crushed red pepper, and oil. For a recipe, check out my favorite homemade chili crisp link [here](#). You can find spicy chili crisp at many Asian grocery stores. Online, options include Amazon and specialty food sites. Look for brands known for bold flavors. These noodles go great with a side salad or steamed veggies. You can also add grilled chicken, shrimp, or tofu for extra protein. A lime wedge brightens the dish. You can make a fun and tasty dish with spicy chili crisp noodles. We covered the key ingredients, like fresh noodles and flavorful sauces. The steps showed how to cook and mix everything together. I shared tips for great timing and flavor. Don't forget the options for proteins and veggies to make it your own. Use these ideas to enjoy or share this dish. Cook, taste, and have fun!

Minute Spicy Chili Crisp Noodles Easy Flavor Explosion

Are you ready for a flavor explosion? Minute Spicy Chili Crisp Noodles pack a punch that’ll ignite your taste buds

Here is the full list of ingredients for One-Pan Creamy Garlic Butter Shrimp Orzo: - 1 pound large shrimp, peeled and deveined - 1 cup orzo pasta - 3 tablespoons unsalted butter - 4 cloves garlic, minced - 2 cups vegetable broth - 1 cup heavy cream - 1 cup cherry tomatoes, halved - 1/2 cup grated Parmesan cheese - 1 teaspoon dried oregano - Salt and pepper, to taste - Fresh parsley, chopped (for garnish) - Lemon wedges (for serving) Each of these ingredients plays a key role in the dish's flavor and texture. The shrimp brings a sweet and briny taste, while the orzo adds a nice bite. Butter and garlic create a rich base, making every bite creamy and savory. The heavy cream adds a lovely thickness. Cherry tomatoes give a burst of freshness. Finally, Parmesan and oregano enhance the overall flavor profile. Don't forget to have salt and pepper handy to adjust the seasoning to your liking. Fresh parsley is perfect for garnish, adding color and a hint of herbiness. Lemon wedges serve as a bright finish, balancing the dish's richness. Enjoy gathering these ingredients, as they set the stage for a delightful meal! First, melt the butter in a large skillet over medium heat. You want it to be hot but not burning. Next, add the minced garlic and sauté it for about 30 seconds. This step makes your kitchen smell amazing! Then, toss in the shrimp. Cook them for 2 to 3 minutes until they turn pink. Pink means they are ready! Once cooked, set the shrimp aside on a plate. In the same pan, add the orzo pasta. Toast it lightly for about 1 minute. This step adds a nice nutty flavor to the orzo. After toasting, pour in the vegetable broth. Bring it to a simmer. Cook the orzo for around 8 minutes. Stir it occasionally until it is al dente. Al dente means it should still have a bit of a bite. When the orzo is ready, lower the heat. Add the heavy cream, cherry tomatoes, and dried oregano. Stir everything well to combine. Then, mix in the cooked shrimp and grated Parmesan cheese. This will make the dish rich and creamy! Cook it for an additional 2 to 3 minutes until the sauce thickens slightly. Finally, season with salt and pepper to taste. Garnish with chopped parsley before serving. Enjoy your meal! - Cooking shrimp to the right doneness: Shrimp cook fast. Sauté them for 2-3 minutes until they turn pink. Overcooking makes them rubbery. Watch them closely! - Ensuring creamy consistency of sauce: For a rich sauce, add heavy cream slowly. Stir well to blend. It should be smooth and thick. If it’s too thick, add a bit more broth. - Timing for adding ingredients: Add the shrimp back at the end. This keeps them tender. Mix in the cheese right before serving. This ensures it melts perfectly into the sauce. - Alternatives for heavy cream: You can use half-and-half for a lighter option. Coconut milk adds a twist and is dairy-free. Greek yogurt can also work for creaminess. - Different types of pasta to use: If you don’t have orzo, try small shells or ditalini. They cook well and soak up the sauce nicely. - Varieties of shrimp and seasoning options: Fresh shrimp are best, but frozen works too. For seasoning, try Old Bay or Cajun spice for a kick. Experiment to find your favorite flavor! {{image_2}} You can make this dish even better with some fun add-ins. Try adding spinach or kale for a boost of greens. They add great color and nutrients. You can also toss in other vegetables like bell peppers or zucchini. These veggies bring crunch and sweetness. For more flavor, add spices or fresh herbs. A pinch of red pepper flakes gives heat. Fresh basil or cilantro adds a nice touch too. If you need dietary changes, this recipe is flexible. For a gluten-free option, swap orzo with rice or quinoa. They cook well and keep the dish hearty. If you want a dairy-free meal, use coconut cream instead of heavy cream. Nutritional yeast can replace Parmesan cheese for a cheesy taste. Low-carb lovers can skip the pasta. Use spiralized zucchini or cauliflower rice instead for a lighter meal. To keep your creamy garlic butter shrimp orzo fresh, store it in an airtight container. Place it in the refrigerator within two hours of cooking. It can last for 3-4 days. If you want to keep it longer, consider freezing. In that case, let it cool completely before placing it in a freezer-safe bag or container. This way, it can last for up to three months. When reheating, the best method is to use the stovetop. Add a splash of broth or cream to keep it moist. Cook over low heat, stirring gently. This helps maintain the creamy texture. You can also use a microwave. Heat in short intervals, stirring in between. This will heat it evenly and prevent drying out. Enjoy your meal just as delicious as the first time! Can I use frozen shrimp? Yes, you can use frozen shrimp. Just thaw them first. Pat them dry before cooking. This helps them cook evenly and taste better. How long can the dish be stored? You can store leftovers in the fridge for 3 days. Use an airtight container to keep it fresh. Reheat gently on the stove or in the microwave. What can I serve with creamy garlic butter shrimp orzo? This dish pairs well with a simple green salad or garlic bread. You can also serve it with lemon wedges for extra zest. How do I know when shrimp are fully cooked? Shrimp are ready when they turn pink and opaque. They should curl slightly and have an internal temperature of 120°F. What can I substitute for orzo if I don't have it? If you don’t have orzo, use rice or small pasta like ditalini. Quinoa is a great gluten-free option too. How can I make the dish spicier? To add heat, mix in red pepper flakes or diced jalapeños. You can also use spicy seasoning blends for extra flavor. This recipe for creamy garlic butter shrimp orzo is simple and delicious. You’ve learned about the key ingredients, step-by-step instructions, and helpful tips to make it perfect. Don’t hesitate to try different variations, substitute ingredients, or get creative with add-ins. You can also store leftovers easily for later meals. Enjoy making this dish and impressing others with your cooking skills! You have many options to customize it just for you. Happy cooking!

One-Pan Creamy Garlic Butter Shrimp Orzo Delight

Craving a simple yet delicious meal? Let me introduce you to One-Pan Creamy Garlic Butter Shrimp Orzo Delight! This dish

- 4 cups all-purpose flour - 1 packet (2 ¼ teaspoons) active dry yeast - 1 cup whole milk, warmed - 1/3 cup granulated sugar - 1/4 cup unsalted butter, melted - 2 large eggs - 1 teaspoon salt - 1 tablespoon ground cinnamon - 1/2 cup brown sugar, packed - 1/4 cup unsalted butter, softened - 1/2 cup maple syrup - 1 cup powdered sugar (for icing) - 2 tablespoons milk (for icing) - Alternatives for all-purpose flour: You can use whole wheat flour or a gluten-free blend. Just ensure the gluten-free mix has xanthan gum for better texture. - Vegan options for butter and milk: Use coconut oil instead of butter and almond or oat milk for dairy-free needs. - Sweetener alternatives: You can replace granulated sugar with coconut sugar or agave syrup for a healthier option. Activating the yeast mixture Start by warming your milk. It should feel warm, not hot. In a small bowl, mix the warm milk with sugar. Then, sprinkle the yeast over the milk. Let it sit for about five minutes. The yeast should get frothy and bubbly. This shows it is alive and ready to work its magic. Mixing and kneading the dough In a large bowl, whisk together three cups of flour, salt, and cinnamon. This blend adds flavor and structure. Next, add your frothy yeast mixture, melted butter, and eggs. Stir them until well combined. Gradually add the last cup of flour. Knead the dough on a floured surface for five to seven minutes. You want it to be smooth and elastic. This step is key for soft rolls. Shaping the dough into a rectangle Once your dough rises, roll it out on a floured surface. Aim for a rectangle about 16 by 24 inches. Use a rolling pin for even thickness. This shape helps with even filling and rolling. Spreading butter and adding the filling Spread the softened butter over the entire surface of the dough. This butter will make each bite rich. In a bowl, mix brown sugar and cinnamon. Sprinkle this mixture evenly over the butter. Drizzle maple syrup on top for that sweet flavor. Cutting the dough and preparing for the second rise Starting from one long edge, roll the dough tightly into a log. Pinch the edge to seal. Cut the log into 12 equal pieces. Place these rolls in a greased baking dish. Cover them and let them rise for another 30 to 45 minutes. This second rise makes the rolls fluffy. Baking and achieving golden brown color Preheat your oven to 350°F (175°C). Bake the rolls for 25 to 30 minutes. They should turn golden brown on top. This color means they are ready to eat. Enjoy the warm smell filling your kitchen! To get those soft, fluffy rolls, you need a warm rising spot. Yeast loves warmth. It helps the dough rise well. Use a warm oven or a sunny spot in your home. This small step makes a big difference. Kneading is key for great texture. I recommend kneading the dough for about 5-7 minutes. It should feel smooth and elastic. Don’t rush this part. Proper kneading helps the rolls rise and get fluffy. For smooth icing, whisk the powdered sugar and milk well. This mix should be creamy and lump-free. You want it to drizzle easily over your rolls. Take your time to get it right. Timing for icing is important. Apply the icing while the rolls are warm. This way, it melts slightly and seeps into the rolls. It makes every bite taste even better! One common mistake is over-proofing the dough. This can make the rolls too airy and collapse. Keep an eye on the time and check the dough. It should double in size, not overflow. Another mistake is underbaking the rolls. If they are gooey in the center, they need more time. Aim for a nice golden brown color. This shows they are baked perfectly. {{image_2}} You can make these rolls even more exciting. Try adding chocolate chips. They melt and make each bite rich. You can also mix in chopped nuts. Walnuts or pecans add a nice crunch. Another fun twist is to use flavored extracts. You can swap vanilla for maple. Almond extract also adds a nice touch. Need a gluten-free option? Use a gluten-free flour blend. Make sure it has xanthan gum for structure. For a dairy-free version, swap whole milk with almond or oat milk. You can use dairy-free butter too. These swaps keep the rolls soft and fluffy. Want to dress up your rolls? You can sprinkle nuts or fruits on top. Chopped apples or pecans look pretty and taste great. For unique icing flavors, add spices or citrus zest. Try orange zest for a fresh twist. Each choice makes your rolls special and tasty! To keep your rolls fresh, place them in an airtight container. You can refrigerate them for up to four days. If you want to store them longer, consider freezing. Here’s how: - Wrap each roll in plastic wrap. - Place the wrapped rolls in a freezer-safe bag. - They can stay frozen for up to three months. This method keeps them moist and tasty for later enjoyment. When you want to enjoy your rolls again, reheating is key. Here are some simple steps: - Preheat your oven to 350°F (175°C). - Place the rolls on a baking sheet and cover with foil. - Heat for about 10-15 minutes. This method keeps the rolls soft and warm. You can also use the microwave: - Place a roll on a microwave-safe plate. - Cover it with a damp paper towel. - Heat for 10-15 seconds. This helps avoid drying out your rolls. Enjoy that fresh, bakery taste! Bakery-style maple cinnamon rolls stay fresh for about 2 to 3 days at room temperature. After that, they may dry out. To keep them soft, store them in an airtight container. You can also wrap them in plastic wrap. If you want them to last longer, freeze them. They can stay good in the freezer for up to 3 months. Yes, you can make these rolls ahead of time. You can prepare the dough the night before. After kneading, place the dough in the fridge. Let it rise overnight. In the morning, you can roll, fill, and bake them. This way, you have fresh rolls without much morning prep time. The best way to store cinnamon rolls is at room temperature in an airtight container. This keeps them soft and moist. If you want to keep them for longer, you can freeze them. Wrap each roll well in plastic wrap and place them in a freezer bag. Yes, you can use instant yeast instead of active dry yeast. Instant yeast works faster, so you can skip the proofing step. Just mix it directly with the dry ingredients. This saves you time and still gives you soft and sweet rolls. To tell when the rolls are done baking, look for a golden brown color on top. You can also tap the bottom of a roll. If it sounds hollow, it’s done. The internal temperature should reach about 190°F (88°C) for perfect rolls. Making maple cinnamon rolls is simple and fun. You’ve learned about key ingredients, step-by-step instructions, and tips for success. Remember to experiment with flavors and ensure proper baking techniques. Store your leftover rolls correctly to keep them fresh. With these insights, you can create delicious rolls that impress everyone. Enjoy baking and share your tasty results!

Bakery-Style Maple Cinnamon Rolls Soft and Sweet Treat

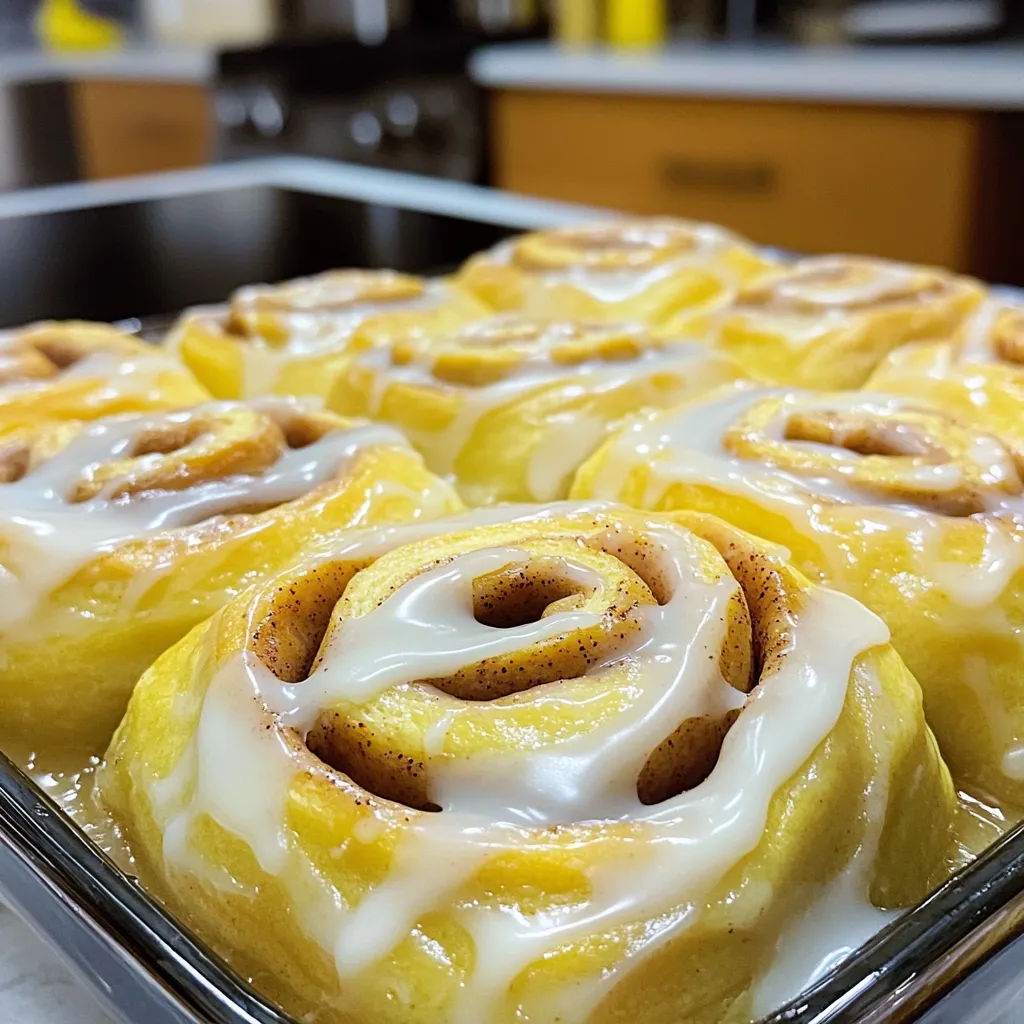
If you’re craving a warm, soft, and sweet treat, bakery-style maple cinnamon rolls are the answer! I’ll guide you through

- 2 cups rolled oats - 1 cup pumpkin puree - 1/2 cup nut butter (such as almond or peanut) The base of these bars is rolled oats. They give a hearty texture. Oats are great for energy. Next, we add pumpkin puree. This gives a nice flavor and moisture. Nut butter adds richness and healthy fats. You can choose almond or peanut butter. Both work well in this recipe. - 1/4 cup honey or maple syrup For sweetness, I use honey or maple syrup. Both options add a nice touch. Honey gives a warm flavor. Maple syrup adds a hint of caramel. Either choice makes the bars taste great. - 1 teaspoon pumpkin pie spice - 1/2 teaspoon cinnamon - 1/4 teaspoon salt Spices bring the fall flavor. I use pumpkin pie spice for that classic taste. Ground cinnamon adds warmth. A little salt balances the sweetness. Together, they make these bars a true fall treat. - Preheat your oven to 350°F (180°C). - Line an 8x8 inch baking dish with parchment paper. Leave some overhang for easy removal. - In a large bowl, mix 2 cups of rolled oats, 1/2 cup chopped nuts, 1/2 cup dried cranberries, and 1/4 cup pumpkin seeds. Add 1 teaspoon pumpkin pie spice, 1/2 teaspoon cinnamon, and 1/4 teaspoon salt. Stir to combine. - In another bowl, whisk together 1 cup pumpkin puree, 1/2 cup nut butter, 1/4 cup honey or maple syrup, and 1 teaspoon vanilla extract until smooth. - Pour the wet ingredients into the dry mix. Stir until everything is coated well. - Transfer the mixture to your prepared baking dish. Press it down firmly using a spatula or your hands. It must be tightly packed to avoid crumbling. - Bake for 20-25 minutes until the edges are golden brown. - After baking, cool in the dish for 10 minutes. Use the parchment overhang to lift it out. Let it cool completely on a wire rack before cutting into bars. To make your pumpkin spice granola bars great, mix well. This helps all the oats and nuts blend. When adding the wet mix, ensure every piece is coated. This gives a uniform taste. After mixing, press the mixture firmly into the baking dish. A tight pack keeps the bars from crumbling. For a lovely display, stack the granola bars on a platter. Drizzle some nut butter on top for extra flavor. You can also sprinkle pumpkin seeds for a nice touch. These bars pair well with warm apple cider or a cup of herbal tea. They make a cozy snack on chilly fall days. Store your granola bars in an airtight container. This keeps them fresh and chewy. You can also wrap each bar in parchment paper for easy grab-and-go. They will stay fresh for about a week at room temperature. If you want them to last longer, store them in the fridge for up to two weeks. {{image_2}} If you want a nut-free version, you can swap out the nut butter. Sunflower seed butter works great. It gives the bars a nice flavor without nuts. You can also use soy nut butter for a similar taste. Just make sure to check for allergies. You can easily change the flavor of your granola bars. Adding chocolate chips creates a sweet twist. Dark chocolate or milk chocolate both work well. You can also mix in different spices. Try ginger or allspice for a new taste. These simple changes can make your bars unique. When it comes to dried fruits, you have options. You can use raisins or cranberries based on your taste. Dried cherries or apricots also add a nice touch. Just chop them up to mix well. Any dried fruit can make your bars even tastier. - Calories per serving: Each bar has about 150 calories. - Key nutrients: These bars are rich in fiber, healthy fats, and protein. - Benefits of oats and pumpkin: Oats provide fiber, which aids digestion. Pumpkin is high in vitamins A and C, which boost immunity. - Importance of nuts and seeds: Nuts add protein and healthy fats. Pumpkin seeds are great for magnesium and zinc. - Gluten-free options: Use certified gluten-free oats for a safe snack. - Vegan-friendly adaptations: Swap honey for maple syrup to keep it vegan. To keep your granola bars fresh, store them in an airtight container. Place parchment paper between layers to prevent sticking. Keep them in a cool, dry place. If you want them to last longer, you can refrigerate them. This helps maintain their texture and flavor. Yes, you can freeze these bars! Wrap each one in plastic wrap and place them in a freezer bag. This keeps them fresh for up to three months. When you want to enjoy one, just take it out and let it thaw at room temperature. For quicker thawing, you can microwave it for a few seconds. To achieve a chewy texture, use a little less oats. You can also add more nut butter or pumpkin puree. These ingredients help bind the bars better. Press the mixture firmly into the dish before baking. This ensures they hold together well. You learned how to make delicious pumpkin spice granola bars. We covered main ingredients like oats and pumpkin puree, sweeteners like honey, and spices for flavor. I shared step-by-step instructions for mixing and baking. You also picked up tips on serving ideas and storage methods. Finally, I highlighted dietary options for everyone. Enjoy making your bars! They are easy to customize and fun to share. Let your kitchen creativity shine!

Pumpkin Spice Granola Bars Tasty Fall Snack Idea

Looking for a tasty fall snack that’s easy to make? Try my Pumpkin Spice Granola Bars! These bars blend warm

- 12 large jalapeño peppers - 8 ounces cream cheese, softened - 1 cup shredded sharp cheddar cheese - 1/2 cup breadcrumbs (preferably panko for extra crunch) - 1 teaspoon garlic powder - 1 teaspoon onion powder - Salt and pepper to taste - 1 tablespoon chopped fresh cilantro (optional for garnish) To make air fryer cheddar jalapeño poppers, gather these ingredients. The fresh jalapeños give a spicy kick. Cream cheese and cheddar blend for a rich filling. Breadcrumbs add crunch and texture. For flavor, garlic and onion powders work wonders. Don't forget salt and pepper to enhance taste. You can add cilantro for a fresh touch at the end. These ingredients come together to create a tasty treat. You can customize them, making them your own. With this list, you are ready to impress your friends and family. First, you need to preheat the air fryer. Set it to 375°F (190°C). This step helps cook the poppers evenly. While it's heating, let's prepare the jalapeños. Take 12 large jalapeño peppers and slice them in half lengthwise. Be careful to remove the seeds and membranes inside. This step reduces the heat and makes them more enjoyable. If you want to avoid hot pepper oils on your hands, wear gloves. Now, it's time to make the cheese mixture. In a mixing bowl, combine 8 ounces of softened cream cheese, 1 cup of shredded sharp cheddar cheese, 1 teaspoon of garlic powder, 1 teaspoon of onion powder, and a pinch of salt and pepper. Mix everything until smooth and creamy. Next, fill each jalapeño half with the cheese mixture. Use a spoon or a piping bag for a neat job. Make sure to fill them generously. This is where the flavor really starts to shine! For the cooking process, place the filled jalapeños in the air fryer basket in a single layer. Avoid overlapping to ensure they cook evenly. You might need to do this in batches. Air fry the poppers for 10-12 minutes. Check them often. You want them tender and the tops golden brown and crispy. Once done, carefully remove them from the air fryer. Let them cool for a few minutes before serving. Enjoy your flavorful air fryer cheddar jalapeño poppers! - Choosing the right jalapeños: Pick large, firm jalapeños for the best results. Look for bright green ones without blemishes. They should feel heavy for their size, indicating freshness. - Using gloves for preparation: Always wear gloves when handling jalapeños. This prevents the spicy oils from burning your skin. If you touch your face or eyes, you may feel a sting. - Achieving the perfect crunch: Use panko breadcrumbs for a crispier topping. They help create a delightful crunch when air-fried. Make sure to coat the jalapeños evenly with breadcrumbs for the best texture. - Pairing with dips: Serve your poppers with creamy dips like ranch or sour cream. These cool dips balance the heat from the jalapeños. You can also try salsa or guacamole for extra flavor. - Ideal complementing dishes: Jalapeño poppers go well with grilled meats or tacos. They make a great appetizer at parties. You can also enjoy them with a refreshing salad for a light meal. {{image_2}} You can easily change up these poppers for more fun. Adding bacon gives them a great taste. Just cook the bacon until crispy, then chop it up. Mix it into your cheese filling. You will love the smoky flavor. Want to spice things up? You can add more peppers! Try using serrano or habanero for extra heat. Just chop them finely and mix them in. This will make your poppers fiery and exciting. If you need a gluten-free option, switch the breadcrumbs. You can use crushed cornflakes or ground almonds. Both give a nice crunch without gluten. For those who want a vegan version, try using vegan cream cheese. You can also use a firm vegan cheese that melts. This way, everyone can enjoy these tasty treats! After you enjoy your jalapeño poppers, let them cool. This helps to keep them fresh. Place them in an airtight container. Store them in the fridge for up to three days. Reheating is easy! Just pop them back in the air fryer at 350°F (175°C) for about 5 minutes. This warms them up and keeps them crispy. Want to save some poppers for later? Freezing is a great option. First, let the poppers cool completely. Then, place them on a baking sheet in a single layer. Freeze them for a few hours until solid. Once frozen, transfer them to a freezer bag. They can last up to three months in the freezer. When you’re ready to eat them, no need to thaw! Just air fry the frozen poppers at 375°F (190°C) for about 12-15 minutes. Check to see if they are heated through and crispy. Enjoy your poppers anytime! Yes, you can use other cheeses. Cream cheese is great for texture. You might try pepper jack for extra spice. Mozzarella gives a nice stretch. Feel free to mix cheeses for fun flavors! Air fryer jalapeño poppers last about three to four days in the fridge. Store them in an airtight container. Reheat in the air fryer for a few minutes to keep them crispy. Serve jalapeño poppers with dips like ranch or salsa. They pair well with guacamole too. For a meal, try them with tacos or nachos. They make a great party snack! You now know how to make tasty air fryer jalapeño poppers. Start with fresh ingredients like jalapeños, cream cheese, and sharp cheddar. Follow simple steps to prepare, fill, and cook them. Remember the tips for crunch and great flavor. You can even try variations to match your taste or diet. Storing and reheating leftovers is easy too. Enjoy this fun snack at your next gathering or meal. I hope you feel inspired to create these poppers and impress your guests!

Air Fryer Cheddar Jalapeño Poppers Easy and Flavorful

Are you ready to spice up your snacking game? My Air Fryer Cheddar Jalapeño Poppers are about to become your

Older posts
Newer posts
← Previous Page1 … Page13 Page14 Page15 … Page84 Next →

dsad

© 2026 juliesdish • Built with GeneratePress

Our Policies

  • Copyright Policy
  • Cookie Policy
  • GDPR Policy
  • Privacy Policy
  • Disclaimer
  • Terms Of Use

More Information

  • Home
  • About
  • Contact
  • Appetizers
  • Dessert
  • Dinner
  • Drinks
©2026, juliesdish About Back To Top