Skip to content
DisclaimerTerms Of UseGDPR PolicyCookie Policy

juliesdish

  • Home
  • Drinks
  • Appetizers
  • Dinner
  • Dessert
  • About
  • Contact
  • Privacy Policy
DisclaimerTerms Of UseGDPR PolicyCookie Policy

NO-ING-IMG

- 1 cup cottage cheese - 1/2 cup plain Greek yogurt - 1 tablespoon ranch seasoning mix Cottage cheese is the star of this dip. It gives a creamy texture and adds protein. I suggest using full-fat cottage cheese for a richer flavor. Next, plain Greek yogurt adds a nice tang. It also keeps the dip light and fresh. Finally, the ranch seasoning mix brings in the bold flavors we all love. You can use store-bought or make your own for a personal touch. - 1/4 cup diced cucumber - 1/4 cup bell pepper, finely chopped (any color) - 1/4 cup cherry tomatoes, quartered - 2 green onions, chopped - 1 tablespoon fresh parsley, chopped The veggie add-ins make this dip colorful and crunchy. Diced cucumber adds a refreshing crunch. Bell peppers, in any color, give sweetness and color. Cherry tomatoes add juicy bites. Green onions bring a mild onion flavor. Lastly, fresh parsley adds a pop of green and freshness. Feel free to mix and match based on your favorites! - 1 teaspoon lemon juice - Salt and pepper to taste You can add lemon juice for a tangy twist. Start with a teaspoon and adjust to your taste. Salt and pepper are key for bringing out all the flavors. Always taste your dip before serving. This way, you can find the perfect balance! - In a medium mixing bowl, combine 1 cup of cottage cheese and 1/2 cup of plain Greek yogurt. Use a fork or whisk to mix them until smooth and creamy. This step is key for a great base. - Next, add 1 tablespoon of ranch seasoning mix. Stir well to blend it in completely. This adds a burst of flavor that makes the dip special. - Now, fold in the vegetables. Add 1/4 cup of diced cucumber, 1/4 cup of finely chopped bell pepper, 1/4 cup of quartered cherry tomatoes, 2 chopped green onions, and 1 tablespoon of fresh parsley. Gently mix until the veggies are evenly spread throughout the dip. - For a tangy kick, add 1 teaspoon of lemon juice, along with salt and pepper to taste. Give it a good stir to bring all the flavors together. - Cover the bowl and refrigerate the dip for at least 30 minutes. This chilling time helps the flavors meld and creates a creamier texture. - Before serving, stir the dip well. Taste it and adjust the salt and pepper as needed. - For a fun presentation, serve the dip in a colorful bowl. Surround it with an array of veggie sticks like carrots, celery, and bell peppers. You can also add pita chips for a nice crunch. This makes for a vibrant and healthy snack platter! Choosing the right cottage cheese is key. I prefer using small curd cottage cheese for a creamy texture. It blends well and gives a smooth finish. If you can, try to find a brand that uses simple ingredients. They taste better! You can use homemade or store-bought ranch seasoning. I enjoy making my own because I control the flavors. Just mix garlic powder, onion powder, dill, and a pinch of salt. If you’re short on time, store-bought works too. Just check for quality ingredients. To ensure creaminess, proper mixing is crucial. Use a fork or whisk to blend the cottage cheese and Greek yogurt. Whisk until smooth, which brings a lovely texture. Avoid over-mixing once you add the veggies. You want them to stay crunchy! Chilling the dip is also important. Let it sit in the fridge for at least 30 minutes. This time allows the flavors to blend beautifully. The longer you chill it, the better it tastes! Want to add more flavor? Consider adding fresh herbs like dill or chives. They brighten the dip and give it a fresh taste. You can also mix in a dash of paprika for some warmth. Adjusting the seasoning to your taste is key. Start with a little salt and pepper, then taste. If you like it zestier, add more lemon juice. Personalizing the dip makes it truly yours! {{image_2}} You can twist the classic flavor of this dip in fun ways. For a spicy kick, add diced jalapeños. They bring heat and a fresh taste. If you want a more herbal flavor, mix in fresh dill or thyme. These herbs add depth and aroma, making the dip even more delightful. While veggie sticks are great, you can explore other dippers too. Try pairing the dip with crunchy crackers, warm pita chips, or salty pretzels. Each option adds a new texture and flavor to your snack. You can even set up a dip bar with various dippers for a fun party. If you're looking for vegan options, you can swap cottage cheese for silken tofu. Blend it until smooth for a creamy base. Use dairy-free yogurt instead of Greek yogurt. For those watching fat intake, choose low-fat cottage cheese and yogurt. This way, you can enjoy the dip without missing out on taste. You can store Veggie Ranch Cottage Cheese Dip in the fridge for up to four days. To keep it fresh, use an airtight container. This helps prevent the dip from absorbing odors from other foods. You can freeze this dip, but the texture may change. If you freeze it, use a freezer-safe container. When you want to use it, thaw it in the fridge overnight. After thawing, stir it well before serving. Before serving, give the dip a good stir to mix everything up. If it seems dry, add a splash of Greek yogurt or lemon juice. Check for any signs of spoilage, like an off smell or mold. If you see or smell anything strange, it’s best to throw it away. To make ranch seasoning, you need simple ingredients. Combine these in a bowl: - 1 tablespoon dried parsley - 1 teaspoon dried dill - 1 teaspoon garlic powder - 1 teaspoon onion powder - 1/2 teaspoon salt - 1/2 teaspoon black pepper - 1/2 teaspoon paprika Mix these well. You can store it in a jar for later use. This mix adds a fresh taste to your Veggie Ranch Cottage Cheese Dip. Yes, you can use low-fat cottage cheese. This choice makes the dip lighter. However, the texture may change. Low-fat versions can be thinner. If you want a creamier dip, stick to regular cottage cheese. It blends better with yogurt and veggies. Serving this dip can be fun! Use a colorful bowl to hold the dip. Surround it with fresh veggie sticks like: - Carrots - Celery - Bell peppers You can also add pita chips for crunch. This makes a great snack platter for parties. Your guests will love the vibrant colors and fresh taste! This blog post shared a simple and tasty Veggie Ranch Cottage Cheese Dip. You learned about key ingredients like cottage cheese, Greek yogurt, and ranch seasoning. We covered preparation steps and shared tips for the best dip texture. I highlighted enjoyable variations and storage tips so you can keep your dip fresh. Now you can impress friends with a creamy, flavorful dip. Enjoy experimenting with different ingredients to make it your own. Happy dipping!

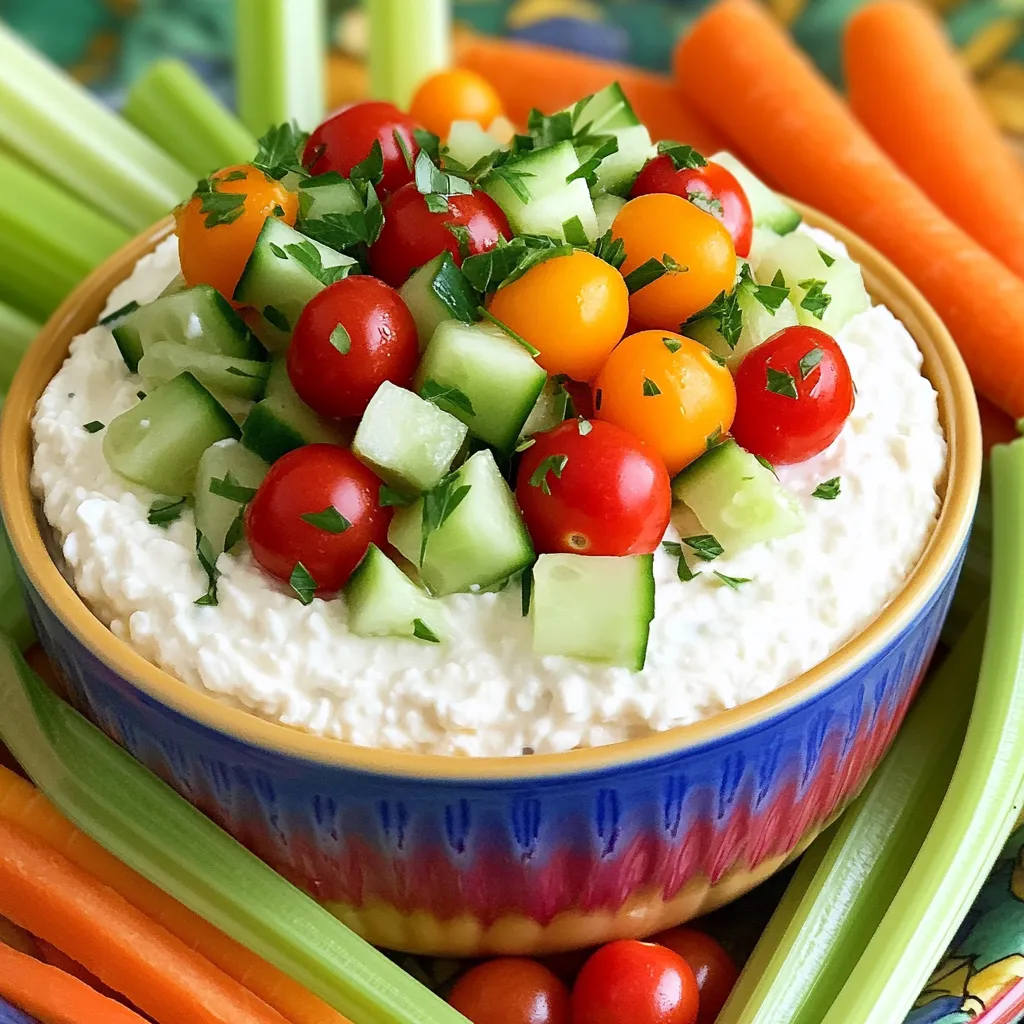
Veggie Ranch Cottage Cheese Dip Delightful and Creamy

Are you looking for a fresh and tasty snack? Whip up my Veggie Ranch Cottage Cheese Dip! Packed with creamy

- 1 cup unsalted butter - 1 cup granulated sugar - 1 cup brown sugar - 4 large eggs - 8 oz cream cheese - 1/2 cup granulated sugar - 1 large egg - 1/2 cup caramel sauce To make these caramel swirl cheesecake brownies, gather these key ingredients. Using unsalted butter gives you control over the salt. The mix of granulated and brown sugar makes the brownies rich and sweet. Eggs help bind everything and add moisture. For the cheesecake layer, you need cream cheese. It gives that smooth, creamy texture. Adding sugar and another egg helps it blend well and adds sweetness. Finally, don’t forget the caramel sauce. It’s what makes the swirl! You can use store-bought for ease or make your own for a fun twist. These ingredients come together to create a treat that looks great and tastes amazing. - Preheat your oven to 350°F (175°C). - Grease a 9x13 inch baking pan or line it with parchment paper. - In a large bowl, combine 1 cup melted unsalted butter, 1 cup granulated sugar, and 1 cup packed brown sugar. - Mix until well combined. - Beat in 4 large eggs, one at a time. - Add 1 teaspoon of vanilla extract and mix again. - In a separate bowl, whisk together 1 cup all-purpose flour, 1/2 cup cocoa powder, 1/2 teaspoon baking powder, and 1/4 teaspoon salt. - Gradually fold this dry mix into the wet ingredients until just combined. - In another bowl, beat 8 oz softened cream cheese until smooth. - Add 1/2 cup granulated sugar, 1 large egg, and 1 teaspoon of vanilla extract. - Mix until creamy and well blended. - Pour half of the brownie batter into the prepared pan and spread it evenly. - Spoon dollops of the cheesecake mixture over the brownie layer. - Use a spatula to spread the cheesecake gently. - Drizzle 1/2 cup caramel sauce over the cheesecake layer. - With a knife or skewer, swirl the caramel into the cheesecake for a marbled look. - Pour the remaining brownie batter on top and smooth it out with a spatula. - Set your timer for 30-35 minutes. - Check for doneness by inserting a toothpick in the middle. It should come out with a few moist crumbs, not wet batter. - Avoiding overmixing: Mix the brownie batter just until the dry ingredients blend in. This keeps your brownies soft and chewy. If you mix too much, they can turn out tough. - Checking baking time: Start checking your brownies at 30 minutes. Insert a toothpick in the center. It should come out with a few moist crumbs, not wet batter. This shows they are just right. - Techniques for swirling caramel: After drizzling the caramel, use a knife or skewer to gently swirl it through the cheesecake layer. Don’t overdo it; a little swirl creates a beautiful marbled effect. - Tips for cheesecake consistency: Make sure your cream cheese is soft. Blend it well with sugar and egg until smooth. This ensures a creamy cheesecake layer that pairs well with the brownies. - How to present brownies: Cut the brownies into squares and place them on a decorative platter. Drizzle extra caramel sauce on top for a lovely touch. A sprinkle of sea salt adds contrast and enhances the flavors. - Pairing with ice cream or coffee: These brownies taste great with vanilla ice cream or a cup of coffee. The rich chocolate and caramel flavors blend well with creamy or bitter notes. {{image_2}} You can make these brownies even better! Here are a few simple ideas: - Adding Nuts or Chocolate Chips: Chop up some walnuts or pecans. Mix them into the brownie batter before baking. You can also add chocolate chips for extra sweetness. - Using Flavored Caramel or Sauces: Try different caramel flavors like sea salt or butterscotch. You can even use chocolate sauce instead of caramel for a twist. Want to make these brownies gluten-free? No problem! Substitute all-purpose flour with almond flour or coconut flour. Just remember to adjust the amount. You might need less of these flours. If you want a vegan version, you can easily swap out some ingredients: - Egg Alternatives: Use flaxseed meal or chia seeds mixed with water. This works well as a binding agent. - Cream Cheese Substitutes: Try using blended silken tofu or cashew cream. These options give a creamy texture without dairy. These variations let you customize your brownies for any taste or diet! To keep your brownies fresh, store them in an airtight container. This helps prevent them from drying out. Place a piece of parchment paper between layers to avoid sticking. You can refrigerate them for up to one week. You can freeze brownies to enjoy later. First, let them cool completely. Then, wrap them tightly in plastic wrap. Place the wrapped brownies in a freezer-safe bag or container. They can last up to three months in the freezer. When ready to eat, thaw them in the fridge overnight. Brownies stay fresh for about one week in the fridge. If they start to dry out or develop a strange smell, they are no longer good to eat. Check for mold or changes in color. If you see any, it's best to discard them. Yes, you can use homemade caramel sauce. To make it, heat 1 cup of granulated sugar in a saucepan. Stir it gently as it melts. Once it turns a golden color, remove it from heat. Add 1/2 cup of heavy cream slowly and mix. Be careful, as it will bubble. Let it cool before using it in your brownies. If you don’t have cream cheese, you can use Greek yogurt or ricotta cheese. Both will give a creamy texture. Use the same amount, about 8 oz. Mix it with sugar and an egg, just like in the recipe. This will still create a tasty cheesecake layer. To check if the brownies are done, look for a few important cues. The edges should be firm, but the center may look soft. Insert a toothpick into the center. If it comes out with a few moist crumbs, they are ready. If it has wet batter on it, bake for a few more minutes. In this blog post, we explored how to make delicious brownie cheesecake with caramel swirl. We covered key ingredients like butter, sugar, cream cheese, and caramel sauce. You learned step-by-step instructions, tips for perfect texture, and serving ideas. Remember, the right mix and bake time makes a big difference. Feel free to explore variations like adding nuts or making it gluten-free. Enjoy your sweet creation and share it with friends. You’ll impress everyone with these tasty brownies!

Caramel Swirl Cheesecake Brownies Irresistible Treat

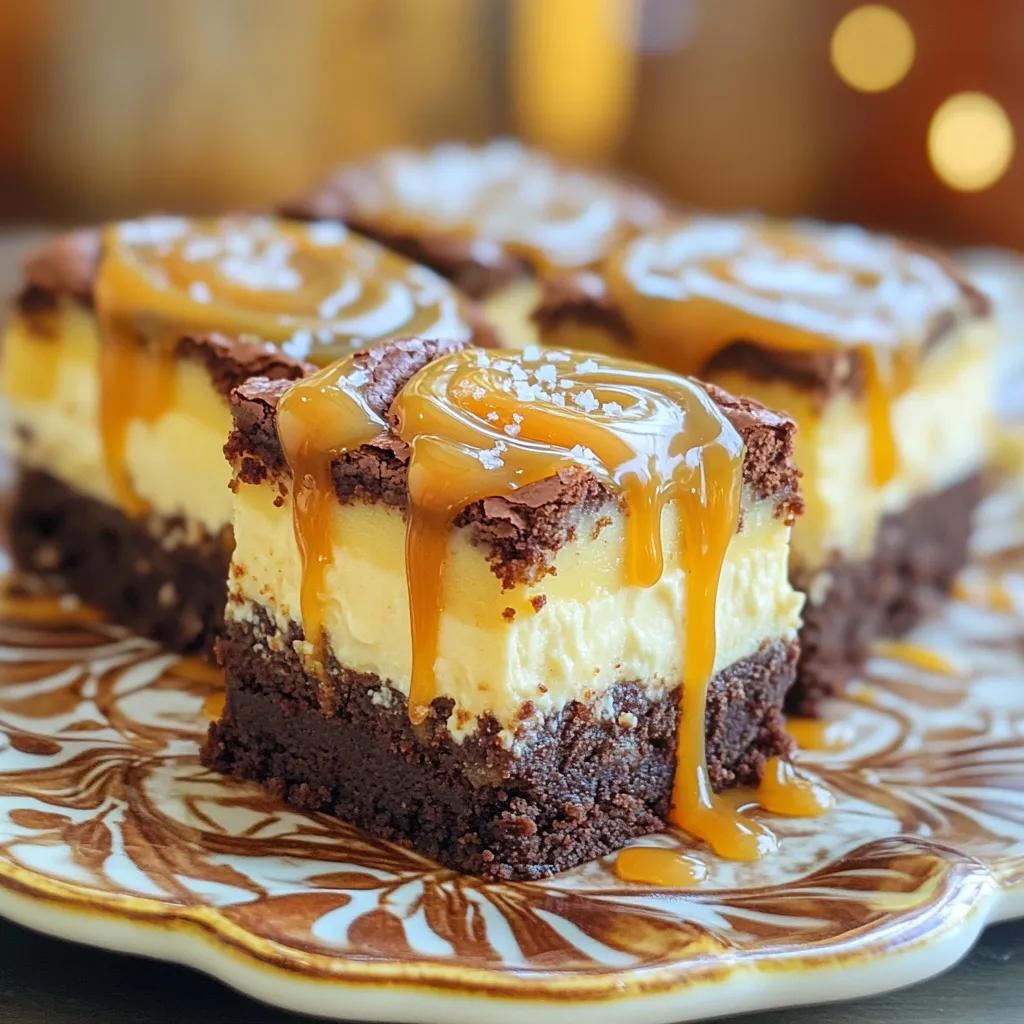
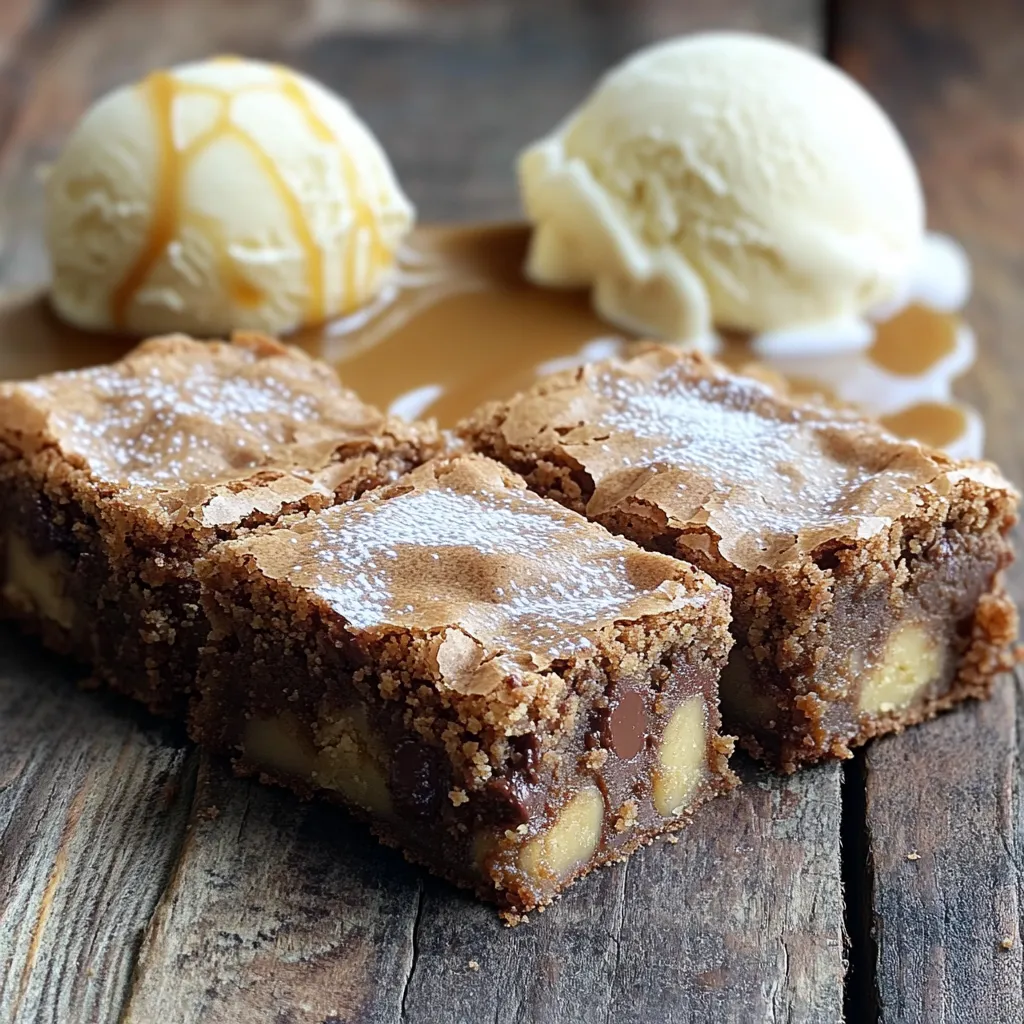
Get ready to indulge in a dessert that combines creamy cheesecake and rich brownie goodness: Caramel Swirl Cheesecake Brownies! This

- 1 medium zucchini, sliced into half-moons - 1 bell pepper (red or yellow), chopped - 1 cup cherry tomatoes, halved - 1 medium red onion, sliced - 1 cup carrots, sliced into thin rounds - 3 tablespoons olive oil - 2 teaspoons dried oregano - 1 teaspoon dried thyme - 1 teaspoon garlic powder - Salt and freshly ground black pepper, to taste - Fresh parsley, chopped Using fresh veggies makes this dish bright and tasty. Zucchini adds a nice crunch. Bell peppers bring sweetness, while cherry tomatoes burst with flavor. Red onions give a slight bite, and carrots add a natural sweetness. For herbs, olive oil helps the flavors blend. Dried oregano and thyme bring depth. Garlic powder adds a warm touch. Don’t forget salt and pepper to enhance all the tastes. Fresh parsley on top makes the dish look great and adds a fresh flavor. You can use these ingredients to create a colorful and healthy meal. Keep these in mind for your next cooking adventure! Set your oven to 425°F (220°C). This high heat helps the veggies roast well. Using parchment paper on your sheet pan makes cleanup easy. You won’t have to scrub stuck bits later. Grab a large bowl and add the chopped zucchini, bell pepper, cherry tomatoes, red onion, and sliced carrots. These colorful veggies make the dish pop. Drizzle 3 tablespoons of olive oil over the veggies. Then, add 2 teaspoons of dried oregano, 1 teaspoon of dried thyme, and 1 teaspoon of garlic powder. Don’t forget to season with salt and freshly ground black pepper. Toss everything well. You want each piece coated in oil and spices for the best flavor. Spread the veggie mix evenly on the sheet pan. Make sure they lie flat in one layer. This helps them roast evenly. Place the pan in your hot oven. Roast for 25-30 minutes. Stir the veggies halfway through to ensure they cook well on all sides. You’ll know they are done when they are tender and have a nice caramelized look. After roasting, let them cool slightly before tasting. Adjust the seasoning if needed and garnish with fresh parsley for a bright finish. To get those veggies just right, even cooking is key. Cut all veggies into similar sizes. This helps them cook at the same time. I like to slice zucchini into half-moons and chop bell peppers into bite-sized pieces. For the best results, spread the veggies evenly on the sheet pan. Leave some space between them. If they are too close, they will steam instead of roast. This can make them soggy. You can customize the flavors to match your taste. Try adding a pinch of red pepper flakes for heat or a drizzle of honey for sweetness. Mix in fresh herbs like basil or rosemary for a fresh kick. Remember to taste your mix before roasting. Adjust the salt and pepper to your liking. This small step can make a big difference in flavor. How you serve the roasted veggies matters too. You can place them in a big bowl for a family-style meal. Or, serve them directly on the sheet pan for a rustic look. For a final touch, drizzle some extra olive oil on top. A sprinkle of fresh herbs adds color and flavor. This simple step makes your dish look fancy and inviting. {{image_2}} You can change the veggies based on what you have. Try seasonal options for more flavor. In spring, use asparagus or peas. In fall, add butternut squash. You can swap bell peppers for eggplant. If you love broccoli, toss it in too. The key is to pick colorful veggies for a beautiful dish. Want to boost the taste? Add cheese or nuts to your mix. Feta or goat cheese gives a creamy kick. Walnuts or almonds add a nice crunch. Fresh herbs can also make a big difference. Instead of dried oregano, try fresh basil or rosemary. These herbs can brighten up the flavors. This veggie medley works as a main dish or a side. It pairs well with grains like quinoa or rice. For proteins, serve it with grilled chicken or fish. You can even make a veggie bowl with hummus. The options are endless, and it all depends on your taste. Store your leftover Herb Roasted Veggie Medley in an airtight container. This keeps moisture in and helps the veggies last longer. Allow the veggies to cool before sealing. They can stay fresh for about 3 to 5 days in the fridge. You can reheat the veggies in the oven or microwave. For the oven, preheat to 350°F (175°C). Spread the veggies on a baking sheet and heat for about 10-15 minutes. This method keeps them crispy. If you use the microwave, place them in a microwave-safe dish. Heat for 2-3 minutes. Stir halfway to ensure even warming. If you want to freeze the medley, first let it cool completely. Use freezer-safe containers or bags. Remove as much air as possible to prevent freezer burn. The veggies can last up to 3 months in the freezer. When ready to eat, thaw in the fridge overnight before reheating. Yes, you can use frozen vegetables. Frozen veggies save time and last longer. They are often picked at peak ripeness, which keeps their taste. However, they can release extra water when cooked. This might make your dish less crisp. If you choose frozen, roast them at a higher temperature. This helps remove excess moisture. Fresh vegetables taste better and have more texture. So, if you can, go for fresh! Leftovers from this dish last about three to four days in the fridge. Store them in an airtight container for the best freshness. If you notice any off smells or changes in color, throw them out. You can also freeze leftovers for about three months. Just make sure to cool them completely before freezing. This will help keep their flavor and texture. This veggie medley pairs well with many dishes. Serve it with grilled chicken or fish for a healthy meal. It also goes great with quinoa or brown rice for a filling option. Try adding it to pasta dishes or in wraps for lunch. You can even mix it into an omelet for breakfast. The possibilities are endless! In this blog post, we explored a vibrant veggie medley made with fresh ingredients. You learned about simple steps to roast vegetables perfectly, ensuring great flavor and texture. We discussed tips for customization and presentation, making your dish stand out. Remember, you can mix and match seasonal veggies and spices to fit your taste. Proper storage keeps leftovers fresh for next time. This easy recipe adds color and health to any meal, proving that cooking can be fun and rewarding. Enjoy your delicious creations!

Herb Roasted Veggie Medley Sheet Pan Delight

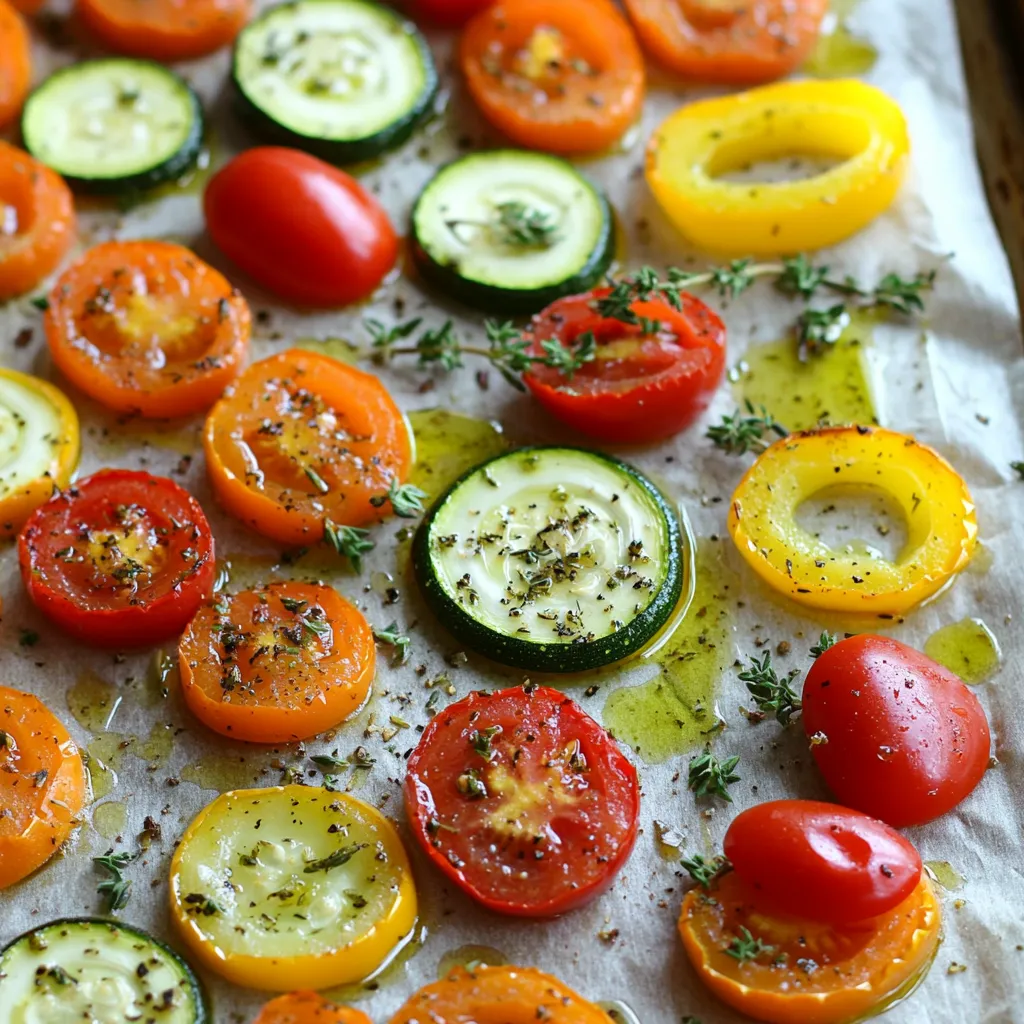
Looking for a simple yet flavorful dish? My Herb Roasted Veggie Medley Sheet Pan Delight is just what you need!

- 1 lb chicken thighs, boneless and skinless - 1/2 cup sweet chili sauce - 2 tablespoons soy sauce - 1 tablespoon sesame oil - 1 teaspoon garlic powder - 1 teaspoon ginger powder - 1/2 teaspoon black pepper - 1 tablespoon cornstarch - 2 green onions, finely chopped (for garnish) - Sesame seeds (for garnish) If you don’t have chicken thighs, you can use chicken breasts. They will cook a bit quicker, so check them early. For a vegan option, try tofu instead of chicken. Ensure to press the tofu to remove extra moisture. If sweet chili sauce is not on hand, mix honey with sriracha for a sweet and spicy sauce. You can also use tamari instead of soy sauce for a gluten-free option. To add more flavor, consider garnishing with fresh cilantro or lime wedges. These can brighten the dish and give it a fresh taste. You can also add chopped peanuts for a crunchy texture. To make Air Fryer Sweet Chili Chicken, you start by making the marinade. In a large bowl, mix together: - 1/2 cup sweet chili sauce - 2 tablespoons soy sauce - 1 tablespoon sesame oil - 1 teaspoon garlic powder - 1 teaspoon ginger powder - 1/2 teaspoon black pepper Stir these until they blend well. Next, cut 1 pound of boneless, skinless chicken thighs into bite-sized pieces. Add the chicken to the marinade. Stir until every piece is coated. Cover the bowl and let it sit in the fridge for at least 30 minutes. This step makes the chicken tasty. After marinating, take the chicken out. Sprinkle 1 tablespoon of cornstarch over the chicken. Toss it again so the cornstarch coats the chicken evenly. This helps it get crispy in the air fryer. Now, preheat your air fryer to 400°F (200°C). Once it is hot, place the chicken in the basket. Make sure to spread it in a single layer. Do not overcrowd it. If needed, cook in batches. Air fry the chicken for 12 to 15 minutes. Halfway through, shake the basket to help it cook evenly. The chicken should turn golden brown. Use a meat thermometer to check that it reaches 165°F (74°C) inside. When done, take the chicken out and let it rest for a few minutes. This helps keep it juicy. Finally, garnish with chopped green onions and sesame seeds before serving. - Marinating Time: 30 minutes - Cooking Temperature: 400°F (200°C) - Cooking Time: 12-15 minutes - Internal Temperature: 165°F (74°C) To get the best flavor from your chicken, marinate for at least 30 minutes. If you have more time, marinating for 1 to 2 hours works even better. Make sure to coat the chicken well in the marinade. Use a zip-top bag if you want to save space in your fridge. This also helps the chicken soak up the flavors more. Always marinate in the fridge to keep the chicken safe. To make your chicken super crispy, use cornstarch. The cornstarch gives a great crunch. Coat the chicken well before air frying. Also, do not overcrowd the air fryer. Cook in batches if needed. This helps air circulate and ensures crispiness. Shake the basket halfway through cooking. This action helps the chicken brown evenly. If your chicken is not crispy, check a few things. First, ensure you used enough cornstarch. Second, check your air fryer temperature. It should be set to 400°F (200°C). If the chicken is too soggy, it may be marinated too long. Try marinating for just 30 minutes. Lastly, check if you are cooking in a single layer. You can boost flavor by adding more garlic or ginger. A splash of lime juice can brighten the dish. Try serving it with rice or noodles. Fresh veggies like bell peppers work well too. For a crunchy touch, add nuts or seeds. You can also pair it with a cool dipping sauce like ranch or yogurt for balance. {{image_2}} Want to kick up the heat? Use a spicy sweet chili sauce. You can also add red pepper flakes to the marinade. This change gives your chicken a nice kick. If you love heat, try adding hot sauce too. Just a few drops can turn up the flavor. You can swap chicken thighs for chicken breasts. Chicken breasts are leaner but just as tasty. Cut them into small pieces for even cooking. If you want a plant-based option, try tofu. Use firm or extra-firm tofu. Press it to remove excess water, then cut it into cubes. Marinate just like you would with chicken. If you don’t have an air fryer, you can use your oven. Preheat your oven to 425°F (220°C). Spread the marinated chicken on a baking sheet. Bake for 20-25 minutes, flipping halfway. The result is still crispy and delicious. The air fryer cooks faster, but the oven works great too. You can store leftover air fryer sweet chili chicken in the fridge. Place it in an airtight container. It will last for about 3 to 4 days. Make sure it cools down before sealing it. This keeps the chicken fresh and tasty. If you want to keep your sweet chili chicken longer, freezing is a great option. Place the cooled chicken in a freezer-safe bag. Remove as much air as possible before sealing. It can last up to 2 to 3 months in the freezer. When you’re ready to eat, just thaw it in the fridge overnight. To reheat your chicken, the air fryer works best. Preheat it to 350°F (175°C). Air fry the chicken for about 5 to 7 minutes. This keeps it crispy and flavorful. You can also use the microwave for a quick reheat. Just be careful, as it may become soggy. Enjoy your meal! To make the chicken less spicy, reduce the sweet chili sauce. You can use half a cup of sauce instead of three-quarters. Another option is to add a bit of honey to balance the heat. Honey gives sweetness without more spice. You can also serve the chicken with a creamy dip to cool it down. Try sour cream or yogurt-based sauces for a good match. Yes, you can use skin-on chicken thighs. They will add more flavor and richness. However, the skin may not get as crispy in the air fryer. If you like crispy skin, remove the skin before cooking. Skin-on thighs will take a little longer to cook. Check the internal temperature to ensure it reaches 165°F (74°C). Sweet chili chicken goes great with many sides. Some good choices include: - Steamed rice - Fried rice - Stir-fried vegetables - Asian slaw - Quinoa salad - Noodles Each of these sides balances the sweet and spicy flavors. You can mix and match based on what you love. You’ve learned about the key ingredients and their swaps. We covered step-by-step cooking tips and how to get great results every time. I shared tricks to make your dish crispy and flavorful. You also discovered tasty variations and smart storage tips. As you cook, keep these ideas in mind. They can help you create a delicious meal. Enjoy your cooking journey and try out new flavors!

Air Fryer Sweet Chili Chicken Easy and Tasty Recipe

Craving a quick, tasty meal? This Air Fryer Sweet Chili Chicken recipe will satisfy your hunger! With its crispy exterior

- 1 cup cream cheese, softened - 1/2 cup unsalted butter, softened - 1 1/2 cups granulated sugar - 3 large eggs - 1 cup canned pumpkin puree - 2 teaspoons vanilla extract - 2 cups all-purpose flour - 1 teaspoon baking powder - 1/2 teaspoon baking soda - 1/2 teaspoon salt - 1 teaspoon ground cinnamon - 1/2 teaspoon ground nutmeg - 1/4 teaspoon ground ginger This cake shines with its main ingredients. Cream cheese and butter give it a rich base. The pumpkin puree adds moisture and flavor. The eggs help bind it all together. Granulated sugar sweetens the mix, creating a delightful taste. Spices like cinnamon and nutmeg bring warmth and depth to every bite. - Powdered sugar for dusting - Whipped cream for topping - Tiny pumpkin decorations for a festive look Garnishing your cake makes it even more special. A dusting of powdered sugar looks nice. A dollop of whipped cream adds creaminess. Tiny pumpkin decorations can give it a fun touch for fall. - Cream cheese: Use mascarpone for a lighter taste. - Unsalted butter: Coconut oil works as a dairy-free option. - Granulated sugar: Try brown sugar for a hint of caramel flavor. - Pumpkin puree: Substitute with butternut squash for a different twist. If you need to swap ingredients, many options work well. Mascarpone can replace cream cheese for a soft texture. Coconut oil helps if you avoid dairy. Brown sugar adds a deep flavor. Butternut squash can give a fresh take on the pumpkin taste. Start by gathering all your ingredients. You will need: - 1 cup cream cheese, softened - 1/2 cup unsalted butter, softened - 1 1/2 cups granulated sugar - 3 large eggs - 1 cup canned pumpkin puree - 2 teaspoons vanilla extract - 2 cups all-purpose flour - 1 teaspoon baking powder - 1/2 teaspoon baking soda - 1/2 teaspoon salt - 1 teaspoon ground cinnamon - 1/2 teaspoon ground nutmeg - 1/4 teaspoon ground ginger Make sure your cream cheese and butter are soft. This helps them blend well. Grease and flour a 9x5-inch loaf pan. This step prevents sticking. In a large bowl, use an electric mixer to beat the cream cheese and butter. Mix until it is creamy and smooth. Gradually add the granulated sugar. Keep mixing until the mixture is light and fluffy. Add the eggs one by one. Mix well after each egg. Then stir in the pumpkin puree and vanilla extract. In a separate bowl, whisk the dry ingredients. Combine the flour, baking powder, baking soda, salt, cinnamon, nutmeg, and ginger. Gradually add the dry mix to the wet mix. Use low speed to mix until just combined. Be careful not to overmix, or your cake may be dense. Pour the batter into your prepared loaf pan. Smooth the top with a spatula. Place the pan in your preheated oven at 350°F (175°C). Bake for 60 to 70 minutes. Check if it’s done by inserting a toothpick in the center. If it comes out clean, your cake is ready. After baking, remove the pan from the oven. Let the cake cool in the pan for about 10 minutes. Then, transfer it to a wire rack to cool completely. Enjoy the warm, inviting scent of pumpkin and spices as it cools. To get a soft and moist cake, use room temperature cream cheese and butter. This helps them blend well. Mix until creamy, but be careful not to overmix the batter. This keeps the cake light. Make sure you add the eggs slowly, one at a time, and mix well after each egg. This builds a nice structure. One big mistake is overmixing the batter. This can make the cake tough. Another mistake is not measuring ingredients properly. Use a scale or measuring cups for accuracy. Also, avoid opening the oven door too soon. This can cause the cake to sink. Lastly, remember to let the cake cool in the pan for a short time before moving it. You will need a few key tools for this recipe. A good electric mixer is essential for mixing the batter. Have a 9x5-inch loaf pan ready, and grease it well. A whisk is handy for mixing the dry ingredients. Use a spatula to smooth the batter in the pan. Don't forget a toothpick to test if the cake is done. These tools will help you make the best pumpkin cream cheese pound cake! {{image_2}} You can play with flavors in this cake. For fall, try adding a little maple syrup. In winter, mix in some orange zest for a bright taste. For spring, use lemon zest and fresh herbs. Each season brings new options! To make this cake gluten-free, swap all-purpose flour for a gluten-free blend. Make sure the blend has a good mix of starches and flours. This keeps the texture nice and moist. Add a bit of xanthan gum if your blend needs it. Mix-ins add fun to your cake! Try adding chopped walnuts or pecans for crunch. For a sweet twist, fold in chocolate chips. Both options make the cake richer and more exciting. Just be sure to adjust baking time slightly if you add a lot. To keep your leftover pumpkin cream cheese pound cake fresh, wrap it tightly in plastic wrap. You can also place it in an airtight container. This helps keep it moist and tasty. Store the cake at room temperature for up to three days. If you want to keep it longer, consider freezing it. Freezing your pound cake is simple. First, let it cool completely. Then, wrap the cake in plastic wrap. After that, place it in a freezer-safe bag or container. This method prevents freezer burn. You can freeze the cake for up to three months. When you want to enjoy it, just take it out and let it thaw in the fridge. To reheat your pumpkin cream cheese pound cake, slice it into pieces. Place the slices in the microwave for about 10-15 seconds. Keep an eye on them to avoid overheating. You can also warm them in the oven at 350°F for about 5-10 minutes. This makes the cake soft and warm, just like fresh-baked! Yes, you can make this pound cake ahead of time. I suggest baking it a day or two before you plan to serve it. Once it cools, wrap it tightly in plastic wrap. This keeps it moist and fresh. You can also store it in the fridge for up to a week. To slice pound cake, use a sharp, serrated knife. Make sure the cake is fully cooled. Start at one end and cut straight down. Avoid using a sawing motion, as this can cause the cake to crumble. Cutting slowly gives you clean slices and keeps the shape. You can check if the pound cake is done by inserting a toothpick into the center. If it comes out clean, the cake is ready. If there is wet batter on the toothpick, it needs more time. You can also gently press the top; if it springs back, it's done. You now have all you need to make a delicious Pumpkin Cream Cheese Pound Cake. We covered the main ingredients and tasty variations. I shared step-by-step instructions for making the cake, along with tips for perfect results. Storing and reheating your cake can help it last longer. Remember, you can make this recipe your own with fun mix-ins. Enjoy baking and sharing this treat with others!

Pumpkin Cream Cheese Pound Cake Delightful and Simple

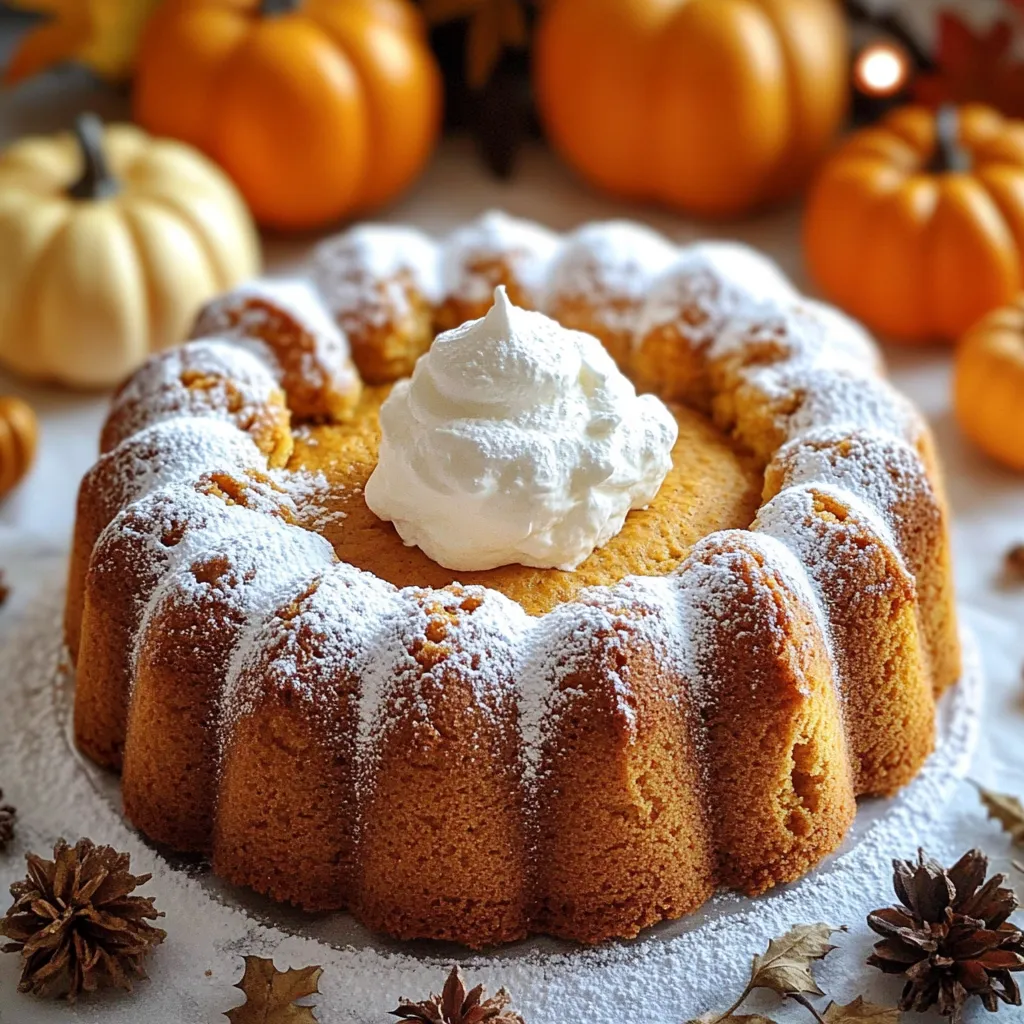
Are you ready to fall in love with fall flavors? This Pumpkin Cream Cheese Pound Cake is a delicious treat

To make this tasty slow cooker chicken enchilada soup, gather these ingredients: - 1 pound boneless, skinless chicken breasts - 1 can (10 oz) red enchilada sauce - 1 can (15 oz) black beans, rinsed and drained - 1 can (15 oz) corn kernels, drained - 1 can (14.5 oz) diced tomatoes with green chilies - 1 medium onion, diced - 2 cloves garlic, minced - 1 teaspoon ground cumin - 1 teaspoon chili powder - 1 teaspoon smoked paprika - 4 cups chicken broth - Salt and pepper to taste - 1 cup shredded cheese (cheddar or Mexican blend) - Fresh cilantro for garnish - Avocado slices for serving Using fresh ingredients can elevate your soup's flavor. Fresh onions and garlic add a bright taste. You can also use fresh tomatoes for a lighter feel. However, canned ingredients save time. Canned black beans and corn are quick and easy. They still provide great flavor and texture. Choose what fits your schedule and taste best. I suggest using boneless, skinless chicken breasts for this soup. They cook evenly and shred easily. Thighs can also work well. They add extra flavor and moisture. If you prefer dark meat, feel free to switch to thighs. Just adjust your cooking time if needed. Start with your slow cooker. Place 1 pound of boneless, skinless chicken breasts at the bottom. Pour 1 can of red enchilada sauce over the chicken. This sauce adds rich flavor to the dish. Next, add 1 can of black beans, rinsed and drained. Then, include 1 can of corn kernels, drained as well. Toss in 1 can of diced tomatoes with green chilies. This adds a nice kick. Now, add 1 diced medium onion and 2 cloves of minced garlic. These will give your soup a strong base. Sprinkle in 1 teaspoon of ground cumin, 1 teaspoon of chili powder, and 1 teaspoon of smoked paprika for depth. Finally, pour in 4 cups of chicken broth. Season with salt and pepper to taste. Stir gently to mix everything well. Ensure the chicken is mostly covered by the liquid. Cover your slow cooker and set it to low for 6-8 hours. If you are short on time, you can set it to high for 4 hours. During this time, the chicken will cook and become tender. You will smell the delicious spices as it cooks. Make sure not to lift the lid too often; this keeps the heat in and helps the chicken cook evenly. When the cooking time is up, carefully take out the chicken breasts. Use two forks to shred the chicken into bite-sized pieces. This makes it easier to eat. Return the shredded chicken back to the soup and mix well. Taste your soup and adjust the seasoning if needed. Serve your soup hot. Top each bowl with 1 cup of shredded cheese, fresh cilantro, and avocado slices. These toppings add freshness and creaminess to the dish. Enjoy your tasty slow cooker chicken enchilada soup! To get tender chicken, use boneless, skinless chicken breasts. They cook well in a slow cooker. Always make sure the chicken is fully submerged in the broth and sauce. This keeps it moist and flavorful. Cook on low heat for 6-8 hours or on high for 4 hours. When done, shred the chicken gently with two forks. This helps it blend well in the soup. You can boost the flavor of your soup easily. Add fresh lime juice right before serving. It brightens the taste and adds a nice zing. You might also try adding chopped jalapeños if you like heat. For a smokier flavor, use smoked cheese instead of regular cheese. This adds depth and richness to each bowl. Don’t forget to taste and adjust the spices. Everyone has a different taste, so make it your own! Toppings can elevate your soup to the next level. I love adding shredded cheese on top. Cheddar or a Mexican blend works great. Fresh cilantro adds a pop of color and freshness. Avocado slices are also a must. They bring creaminess and balance the spices. You can even add sour cream for extra richness! Feel free to mix and match your toppings to find your favorite. {{image_2}} To make a vegetarian version of this soup, swap the chicken for more beans or vegetables. Use 2 cans of black beans or 1 can each of black beans and kidney beans. Add chopped bell peppers, zucchini, or mushrooms for extra flavor. You can also use vegetable broth instead of chicken broth for a full plant-based taste. If you like it spicy, add diced jalapeños or a splash of hot sauce. For a milder soup, skip the chili powder or use less. Remember, you can always add more spice later when serving. This way, everyone can enjoy it at their favorite heat level. You can use turkey instead of chicken for a lighter twist. Shredded rotisserie chicken is also a great option if you're short on time. For a unique touch, try adding cooked chorizo for a spicy kick. Just remember to adjust cooking times if using pre-cooked meats. To store your soup, let it cool first. Then, pour the soup into an airtight container. Make sure to cover it tightly. You can keep the soup in the fridge for up to four days. If you want to save it longer, freezing is a great option. For freezing, use freezer-safe bags or containers. Leave some space at the top for expansion. Label the bags with the date. The soup can stay in the freezer for up to three months. When you’re ready to eat, just thaw it in the fridge overnight. To reheat, place the soup in a pot over medium heat. Stir it often until it warms up. You can also use the microwave. Heat it in a microwave-safe bowl. Stir every minute until it is hot throughout. Enjoy your delicious soup again! Yes, you can use frozen chicken. Just add it to the slow cooker with the sauce. Cook it on high for about 5-6 hours or low for 7-8 hours. The chicken will become tender and easy to shred. I often use frozen chicken for a quick meal. It saves time and is still tasty. If you do not have enchilada sauce, try salsa or taco sauce. You can also make your own with tomatoes, chili powder, and spices. This gives you control over the flavor. Experiment with different sauces to find what you like best. Each option adds a unique taste to the soup. To thicken the soup, you can add more beans or corn. You can also mix in a bit of cornstarch with water and stir it in. Another method is to let the soup cook longer with the lid off. This allows steam to escape and thickens the soup naturally. In this post, we explored every detail for making a standout soup. We discussed the best ingredients to use, highlighting fresh versus canned options and ideal chicken cuts. The step-by-step guide provided clear directions for preparing, cooking, shredding, and serving. Tips ensured you get tender chicken and tasty toppings. Variations let you customize the dish, offering vegetarian and spice options. Lastly, we covered how to store, freeze, and reheat leftovers. Try these methods next time you cook, and you'll impress everyone with your soup skills!

Tasty Slow Cooker Chicken Enchilada Soup Recipe

If you’re craving a warm and filling meal, this Tasty Slow Cooker Chicken Enchilada Soup is for you! With tender

- 8 oz rice noodles - 1 lb shrimp, peeled and deveined - 3 tablespoons sesame oil - 3 cloves garlic, minced - 2 tablespoons soy sauce - 1 tablespoon honey or maple syrup - 1 tablespoon rice vinegar - 1 teaspoon red pepper flakes (optional) - 2 green onions, sliced - 1 tablespoon sesame seeds - Salt - Pepper In this recipe, I focus on simplicity and flavor. The rice noodles form the base, offering a chewy texture. Fresh shrimp adds protein and a sweet taste. Sesame oil gives the dish a rich, nutty flavor. Garlic provides a wonderful aroma that makes your kitchen smell amazing. The soy sauce adds saltiness and depth. For additional flavor, I use honey or maple syrup. This adds a hint of sweetness. Rice vinegar brightens the dish with a tangy note. Optional red pepper flakes can give you a little heat. Green onions add freshness and color, while sesame seeds provide a nice crunch. Don’t forget the salt and pepper. These basic seasonings make your dish pop. Each ingredient works together to create a quick and easy meal that feels special. You can mix and match ingredients as you like. The key is to keep it simple while enjoying great flavors. Boil a pot of water. Add 8 oz of rice noodles to the boiling water. Cook them for about 4-5 minutes, following the package instructions. Once cooked, drain the noodles and set them aside. In a small bowl, whisk together 2 tablespoons of soy sauce, 1 tablespoon of honey or maple syrup, 1 tablespoon of rice vinegar, and 1 teaspoon of red pepper flakes if you like it spicy. Set this sauce aside for later. Heat 3 tablespoons of sesame oil in a large skillet over medium heat. Add 3 cloves of minced garlic to the skillet. Cook the garlic for about 30 seconds, until it smells great. Be careful not to burn the garlic. Now, add 1 pound of peeled and deveined shrimp to the skillet. Season the shrimp with salt and pepper. Cook the shrimp for 2-3 minutes. They should turn pink and opaque. Flip them halfway through to cook evenly. Next, add the cooked rice noodles to the skillet with the shrimp. Pour the sauce you prepared over the noodles and shrimp. Toss everything together until the noodles are well coated and heated through, about 2 minutes. Remove the skillet from heat. Stir in 2 sliced green onions and 1 tablespoon of sesame seeds. Portion the noodles and shrimp into bowls. You can add extra green onions and sesame seeds on top for a nice touch if you’d like. To cook shrimp just right, avoid overcooking them. Overcooked shrimp turn tough and chewy. Cook them until they turn pink and opaque. This usually takes 2-3 minutes. Look for a bright color change; that’s your cue! If you see them start curling up tightly, they are done. To boost flavor, think about adding spices. You can try ginger, lime zest, or even a dash of chili powder. Balancing sweetness and saltiness is key. The honey or maple syrup adds sweetness, while soy sauce brings salt. Adjust to your taste. If you want it sweeter, add more honey. If it needs more salt, add a splash of soy sauce. For rice noodles, soak them in hot water for about 4-5 minutes. This helps them cook evenly. After soaking, drain them well to prevent clumping. Rinse with cool water if needed. This helps keep them separate and prevents sticking. Toss them lightly with a bit of sesame oil to keep them from clumping together in the skillet. {{image_2}} You can swap shrimp for chicken or tofu. Chicken thighs work well for a juicy bite. Just cut it into small pieces, season, and cook in the same way as the shrimp. For a plant-based option, tofu is great. Press it to remove water, then cut it into cubes. Cook it until golden and crispy for added texture. You can also add vegetables like mushrooms or zucchini to keep it fresh and vibrant. If you need a gluten-free meal, use gluten-free rice noodles. These noodles are easy to find and cook just like regular noodles. You can also replace soy sauce with tamari. Tamari has a rich flavor and is perfect for gluten-free cooking. This way, you can enjoy your meal without worry. Feel free to get creative with vegetables. Bell peppers add sweetness, while broccoli gives a nice crunch. You can also try snap peas or carrots for color and taste. Consider adding sauces like sriracha for heat or hoisin for sweetness. Garnish with fresh cilantro or crushed nuts for extra flavor and crunch. The options are endless, so have fun experimenting! To store leftovers, let the shrimp noodles cool down first. Place them in an airtight container. Make sure to cover the container well. They will stay fresh in the fridge for up to three days. If you notice any strong odors, it's best to toss them out. When you're ready to eat, you can reheat your shrimp noodles easily. The best way is to use a skillet. Heat a bit of sesame oil over medium heat. Add the leftovers and stir gently. This helps keep the shrimp tender and the noodles warm. You can also microwave them. Just cover the bowl with a damp paper towel. Heat in short bursts, stirring in between, until warmed through. Yes, you can freeze this dish! To freeze, let the noodles cool completely. Then, portion them into freezer-safe bags or containers. Squeeze out as much air as possible to prevent freezer burn. You can store them for up to two months. When you’re ready to eat, thaw them in the fridge overnight. Reheat as mentioned above for the best taste. This dish takes about 20 minutes to make. You need 10 minutes for prep and 10 minutes for cooking. It’s quick and perfect for busy days. Yes, you can use frozen shrimp. Just thaw them first. Place them in cold water for 15-20 minutes. Fresh shrimp taste great, but frozen works well too. You can use olive oil or avocado oil instead of sesame oil. Olive oil has a light flavor, while avocado oil is mild and buttery. Both can work in this dish. The recipe is not spicy by default. If you like heat, add red pepper flakes. Start with a small amount and adjust to your taste. It’s easy to make it spicier! Yes! To make it vegetarian, replace shrimp with tofu or mushrooms. For vegan, use maple syrup instead of honey. These swaps keep the flavor while making it plant-based. This blog post shared a tasty recipe for Minute Garlic Sesame Shrimp Noodles. You learned about key ingredients like shrimp and rice noodles. I guided you through easy cooking steps. Plus, I gave tips for perfect shrimp and noodle texture. Remember, you can customize this dish with different proteins and vegetables. You can adjust flavors to suit your taste. Cooking can be fun and rewarding. Enjoy your shrimp noodles!

Minute Garlic Sesame Shrimp Noodles Quick and Easy Meal

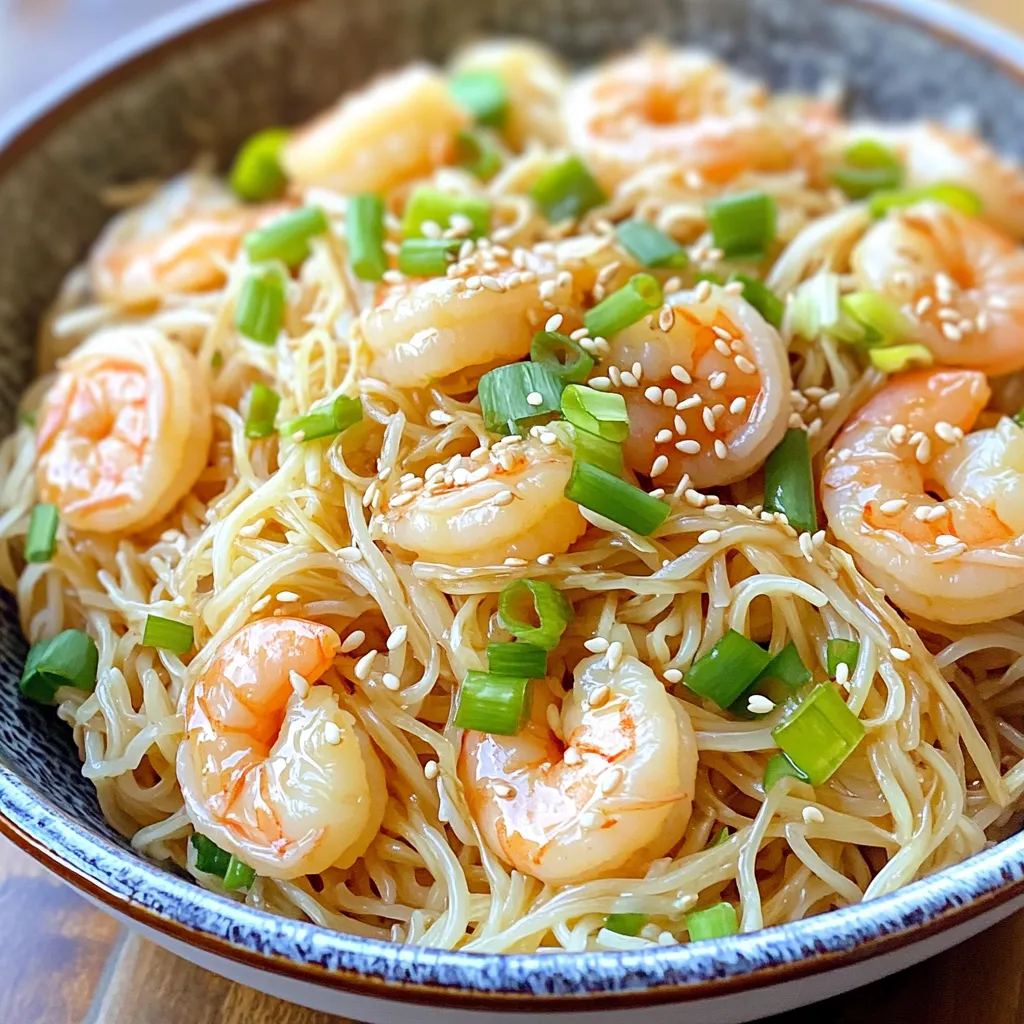
Looking for a quick and tasty meal? Try my Minute Garlic Sesame Shrimp Noodles! This dish comes together in just

To make these delicious blondies, you need a few key items. Here are the main ingredients: - 1 cup unsalted butter, melted - 2 cups packed brown sugar - 2 large eggs - 2 teaspoons vanilla extract - 2 cups all-purpose flour - 1 teaspoon baking powder - ½ teaspoon salt - 1 cup chocolate chips (semi-sweet or milk chocolate) These ingredients create a rich and sweet base for your blondies. The brown sugar gives them a lovely caramel flavor. The butter adds moisture and helps with texture. The eggs bind everything together. You can customize your blondies with fun add-ins. Here are some great options: - ½ cup chopped walnuts (optional) - Dried fruits like cranberries or cherries - Different types of chocolate chips, like dark or white chocolate - A sprinkle of sea salt for a sweet and salty touch These additions can change the flavor and texture. They let you make the recipe your own. If you want a crunch, walnuts work well. For sweetness, try adding dried fruit. If you have dietary needs, you can still enjoy blondies. Here are some simple substitutions: - Use coconut oil instead of butter for a dairy-free option. - Swap all-purpose flour for gluten-free flour to make them gluten-free. - Replace eggs with flax eggs (1 tablespoon flaxseed meal + 2.5 tablespoons water) for a vegan option. These swaps help you enjoy blondies, no matter your diet. Make sure to follow the same measurements when substituting. This will help keep the texture right. Start by preheating your oven to 350°F (175°C). This step warms up your oven so the blondies bake evenly. Next, grab a 9x13-inch baking pan. Grease it well with butter or oil. Then, line the bottom with parchment paper. Leave some paper hanging over the edges. This will help you lift the blondies out later. In a large mixing bowl, pour in the melted butter. Add 2 cups of packed brown sugar. Use a whisk to mix them until smooth. This creates a rich base for your blondies. Next, crack in the two large eggs. Beat them in one at a time. Make sure to mix well after each egg. Finally, stir in 2 teaspoons of vanilla extract. This adds a nice flavor. In another bowl, measure out 2 cups of all-purpose flour. Add 1 teaspoon of baking powder and ½ teaspoon of salt. Whisk these dry ingredients together. This helps to combine them and prevent lumps. Gradually add the dry mix to the wet mix. Fold them together gently until just combined. It’s okay if the batter has some lumps. Next, fold in 1 cup of chocolate chips. If you like, add ½ cup of chopped walnuts too. Pour your batter into the prepared pan, spreading it evenly. Bake for 25-30 minutes. Check if they are done by inserting a toothpick in the center. If it comes out with moist crumbs, they are ready! Let them cool for about 10 minutes before lifting them out. Enjoy your blondies! To get the best texture in your blondies, follow a few simple steps. First, use melted butter. It helps blend the sugar well. Second, mix the wet and dry ingredients just until mixed. Overmixing can make them tough. You want a soft, chewy bite. Lastly, line your pan with parchment paper. This makes it easy to lift the blondies out later. For chewy blondies, brown sugar is key. It adds moisture and sweetness. Use packed brown sugar to get the right amount. Also, don’t bake them too long. A toothpick should come out with a few moist crumbs. This keeps them soft in the center. Adding an extra egg yolk can also help create that chewy texture you want. To store your blondies, keep them in an airtight container. They can last up to a week at room temperature. If you want to save them longer, freeze them. Wrap each piece well in plastic wrap, then put them in a freezer bag. To reheat, just microwave for a few seconds. Enjoy them warm for a delightful treat! {{image_2}} To make nut-free blondies, simply leave out the walnuts. You can still enjoy the rich taste of brown sugar. If you want some crunch, try adding oats instead. Oats add a nice texture without nuts. You can also add more chocolate chips if you like. You can make your blondies even more fun with add-ins. Dried fruits like cranberries or apricots work great. They add a chewy sweet burst in every bite. You might also add spices like cinnamon or nutmeg for warmth. Just mix them in with the chocolate chips before baking. This makes each blondie unique. To make gluten-free blondies, swap all-purpose flour for a gluten-free blend. Many blends work well, but make sure it includes xanthan gum. This helps the blondies hold together. You can also try almond flour for a nutty flavor. Remember to check labels for hidden gluten in other ingredients. To keep your brown sugar blondies fresh, store them in an airtight container. Line the bottom with parchment paper. This helps with easy removal and prevents sticking. Place a piece of wax paper between layers if you stack them. Keep the container in a cool, dry spot. Avoid areas with heat or sunlight. This keeps them soft and delicious. When stored properly, blondies last about a week at room temperature. They may stay fresh for up to two weeks in the fridge. The cold air helps them last longer. If you notice any changes in texture or smell, it’s best to toss them. Trust your senses on this! Freezing blondies is a great way to enjoy them later. Start by cutting them into squares. Wrap each piece tightly in plastic wrap. Then, place the wrapped blondies in a freezer bag. Be sure to label the bag with the date. They can last up to three months in the freezer. To enjoy, simply thaw them at room temperature. You can also warm them briefly in the microwave for that fresh-baked taste! Yes, you can use alternatives like coconut sugar or maple sugar. These can add a unique flavor. However, they may change the texture slightly. Stick with light brown sugar for the best results. Dark brown sugar works too, but it gives a stronger taste. To cut blondies, first cool them completely. Use a sharp knife for clean cuts. For best results, line the pan with parchment paper. This makes lifting the blondies out easy. Cut them into squares or rectangles, depending on your preference. Check your blondies after 25 minutes. The edges should be golden brown. Insert a toothpick in the center. It should come out with some moist crumbs, but not wet batter. If there’s wet batter, bake a few more minutes. You now have all the tools to make delicious brown sugar blondies. We covered key ingredients, such as optional add-ins and substitutions for diets. I shared easy steps to bake and tips for that perfect chewy bite. You also learned storage tips to keep your blondies fresh. Experiment and find your favorite flavors. Enjoy baking these tasty treats at home!

Brown Sugar Blondies Simple & Sweet Treat Recipe

Are you ready to bake something delicious? Brown Sugar Blondies are simple, sweet, and perfect for any occasion! In this

- 1 cup graham cracker crumbs - 1/4 cup unsweetened shredded coconut - 1/2 teaspoon ground cinnamon - 1/4 cup melted coconut oil - 2 medium apples, diced - 1/2 cup caramel sauce - 1 tablespoon lemon juice - 1/4 cup chopped walnuts (optional) - Whipped cream, for serving (optional) For this yummy treat, we need a mix of sweet and crunchy items. The graham cracker crumbs give us a nice base. The shredded coconut adds a tropical taste, while cinnamon brings warmth. Next, we have coconut oil. It helps bind everything together. The diced apples bring a fresh crunch, and the caramel sauce adds that sweet, gooey layer. A splash of lemon juice keeps the apples bright and tasty. If you want some extra crunch, chopped walnuts work great on top. Whipped cream is optional but makes everything feel even more special. - Alternatives for graham cracker crumbs: Use crushed cookies like vanilla wafers or digestive biscuits. - Vegan options for caramel sauce: Look for plant-based caramel or make your own using coconut milk and brown sugar. - Replacement ideas for coconut oil: You can swap coconut oil with unsalted butter or any neutral oil like canola. These swaps can help if you have allergies or diet preferences. Feel free to mix and match based on what you have at home. To start, grab a mixing bowl. Add 1 cup of graham cracker crumbs, 1/4 cup of unsweetened shredded coconut, and 1/2 teaspoon of ground cinnamon. Mix these dry ingredients well. Next, pour in 1/4 cup of melted coconut oil. Stir until the crumbs appear like wet sand. This mix will form a tasty crust. Now, line a baking tray with parchment paper. This step helps with easy removal later. Take about 1 tablespoon of the crumb mixture and press it into the bottom of each mini muffin cup or silicone mold. Make sure it forms a solid crust. For the filling, dice 2 medium apples. Toss them in a bowl with 1 tablespoon of lemon juice and half of the caramel sauce. This keeps the apples fresh and tasty. Spoon this mixture into each crust until it's full. Drizzle the remaining caramel sauce on top. If you like, sprinkle 1/4 cup of chopped walnuts over each one for extra crunch. Place the tray in the refrigerator for at least 30 minutes to set. This helps the bites hold their shape. For easy removal, gently wiggle the molds after chilling. Use a small knife to help if needed. Serve them cold, adding a dollop of whipped cream on top if you want a little extra sweetness. - Ensuring crust consistency: Mix the graham cracker crumbs, coconut, and cinnamon well. The mixture should feel like wet sand. This ensures a firm crust. If it feels too dry, add a bit more melted coconut oil. - Choosing the right apple varieties: Use crisp apples like Granny Smith or Honeycrisp. These apples add a nice crunch and balance the sweetness. Sweet apples like Fuji can work, too, but might change the flavor. - Adjusting sweetness with extra caramel: If you love sweet treats, drizzle more caramel on top. This can make each bite even more indulgent. Just remember, too much can make it messy. - Experimenting with different toppings: Try adding chocolate chips or crushed nuts. You can also use different types of caramel, like salted caramel, for a fun twist. Get creative and find what you love most! - Keeping bites fresh in the refrigerator: Place any leftover bites in an airtight container. They will stay fresh for about three days. This makes it easy to enjoy them later. - Freezing options for longer storage: You can freeze these bites for up to a month. Just wrap them in plastic wrap and place them in a freezer bag. Thaw them in the fridge when you are ready to eat. {{image_2}} You can change the taste of your no-bake caramel apple pie bites easily. Adding spices can bring a warm twist. Try mixing in a bit of nutmeg or ginger. These spices add depth and a cozy flavor that complements the apples. You can also use flavored caramel sauces. For example, a salted caramel sauce can give a sweet and salty balance. Experimenting with different flavors keeps the bites exciting! These bites can fit many diets with a few tweaks. To make them gluten-free, swap graham cracker crumbs for gluten-free options. Almond flour or gluten-free cookies work well here. For a dairy-free treat, use coconut cream instead of whipped cream. You can find dairy-free caramel sauces in stores too. These changes let everyone enjoy this sweet treat. Serving your no-bake bites can be fun and creative. You can place them in mini dessert cups for a classy touch. This makes them easy to grab and eat. Another great idea is to incorporate them into a dessert platter. Mix them with other treats like fruit or cookies. This adds variety to your table and makes it more inviting. No-Bake Caramel Apple Pie Bites are best stored in the fridge. If you keep them at room temperature, they may soften. They can last up to two hours unrefrigerated. Always keep them in a cool place away from direct sunlight. To keep your bites fresh, place them in an airtight container. This helps prevent air from drying them out. If you layer them, add parchment paper between layers. They will stay good in the fridge for about three days. If you want to enjoy them later, you can freeze these bites. Wrap each bite tightly in plastic wrap. Then place them in a freezer bag. They can last up to three months in the freezer. To enjoy, thaw them overnight in the fridge. Yes, you can make these bites a day ahead. Just keep them in the fridge. For storage, place them in an airtight container. This keeps them fresh and tasty. If you want a nut-free option, you can skip the walnuts. Try using sunflower seeds or pumpkin seeds for a crunch. These alternatives also add flavor without nuts. They need about 30 minutes to set in the fridge. This time helps the bites hold their shape. You can leave them longer if you want them firmer. We covered how to make tasty No-Bake Caramel Apple Pie Bites. You learned the main ingredients, step-by-step instructions, and useful tips for customizing this treat. Always remember to choose the right apples and keep the crust firm. These bites are great to share or enjoy alone. You can also experiment with flavors and storage methods. I hope you feel ready to try making these bites yourself. Enjoy the deliciousness!

No-Bake Caramel Apple Pie Bites Simple and Sweet Treat

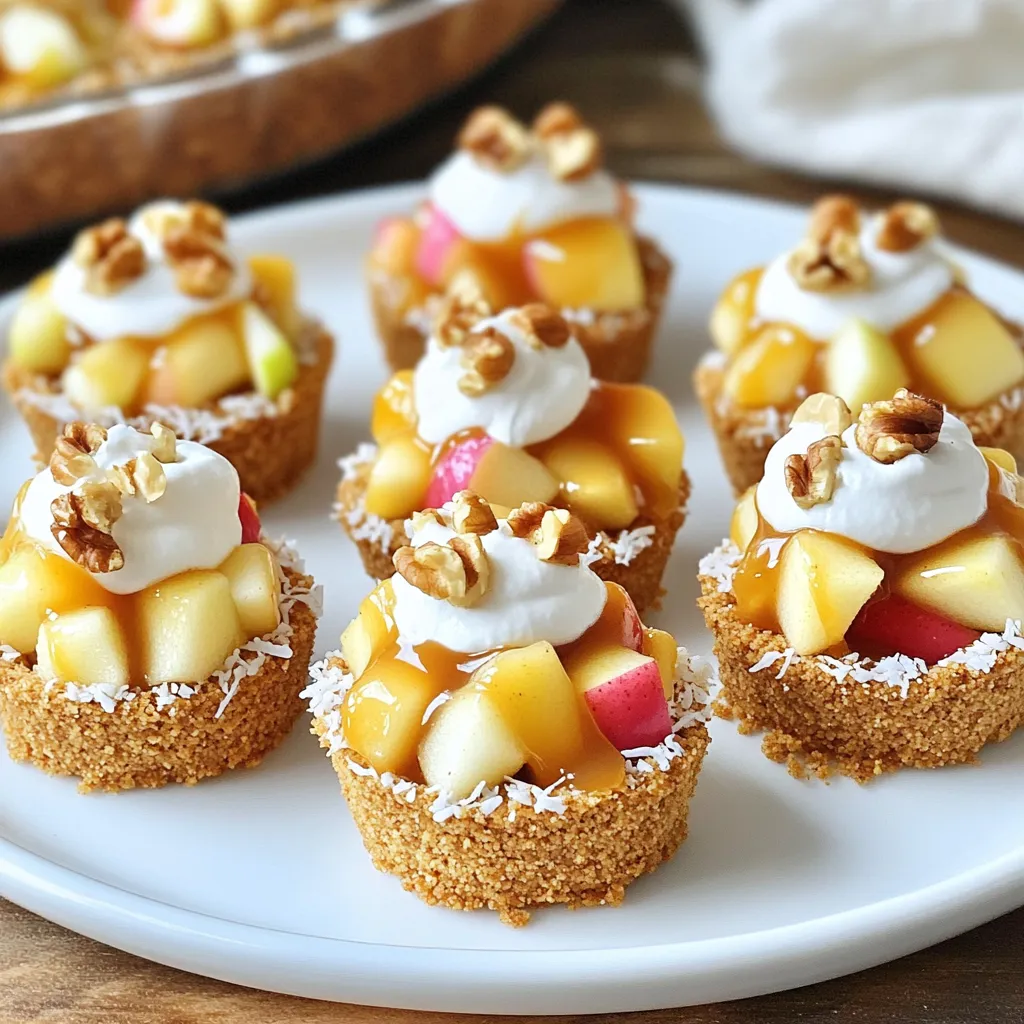
Craving a sweet treat that’s quick and easy? You’ve found it! My No-Bake Caramel Apple Pie Bites blend creamy caramel

To make these tasty cups, you need: - 1 can (8 oz) refrigerated cinnamon roll dough - 1 medium apple, peeled, cored, and chopped - 1/4 cup brown sugar - 1 teaspoon ground cinnamon - 1 tablespoon butter, melted - 1/4 cup caramel sauce - 1/2 teaspoon vanilla extract - Pinch of salt These ingredients create a warm, sweet treat that everyone loves. The cinnamon roll dough forms the base, while the apple mixture adds flavor and texture. A drizzle of caramel sauce makes it even better. You can enhance your cups with some optional items: - 1/2 cup chopped pecans - A sprinkle of sea salt for added flavor Pecans give a nice crunch to the sweet softness of the apple filling. If you love textures, add them in! If you don’t have some ingredients, here are easy swaps: - Use any apple variety you like, such as Granny Smith or Fuji. - Swap brown sugar for white sugar if needed. - Instead of butter, you can use coconut oil for a dairy-free option. These substitutions keep your recipe flexible. You can still enjoy the deliciousness of these cups with what you have on hand. Start by preheating your oven to 350°F (175°C). This step is key for even baking. While the oven warms up, take a muffin tin and lightly grease it. You can use cooking spray or butter to make sure they don't stick. Open your can of cinnamon roll dough. Carefully separate each roll. Use your fingers to flatten each roll into a small disk. Now, press each disk into the bottom and up the sides of a muffin cup. You want to form a little cup that will hold the filling. In a mixing bowl, combine the chopped apple, brown sugar, ground cinnamon, melted butter, vanilla extract, and a pinch of salt. Mix everything well until the apples are fully coated in the sweet mixture. This will add great flavor to your cups. Now it’s time to fill the cups! Spoon the apple mixture into each cinnamon roll cup, pressing gently to pack it in. Drizzle caramel sauce over the top of the apple filling in each cup. If you like, sprinkle chopped pecans on top for some crunch. Bake them in the oven for 15-20 minutes, until golden brown. Let them cool for about 5 minutes before removing. Drizzle more caramel sauce on top before serving for that extra sweetness. Enjoy! To make sure your caramel apple cinnamon roll cups bake evenly, use a light hand. Press the dough into the muffin tin gently, so the cups hold their shape. Bake them at 350°F for 15-20 minutes. Check for a golden color on top. If they look too brown, take them out! Remember, the centers should feel firm but soft. Choose a sweet apple for the best taste, like Honeycrisp or Fuji. Peel and chop them into small pieces. This helps them cook well and mix with the sugar and cinnamon. Toss the apples with brown sugar and cinnamon for extra flavor. Let them sit for a few minutes to soak up the spices. This makes each bite juicy and tasty! For a perfect drizzle, warm the caramel sauce slightly. This makes it easier to pour. Use a spoon or squeeze bottle for control. Start from the center and spiral outwards for a lovely look. If you want extra caramel goodness, drizzle more on top right before serving. This will make your cups even more inviting! {{image_2}} You can switch up the filling in these cups for fun. Try using pears instead of apples. They add a soft, sweet taste. You can also use mixed berries like blueberries or raspberries. They give a nice tartness. If you like citrus, chop some oranges or mix in some lemon zest. Each fruit brings its own flavor twist to the cup. If you need gluten-free options, look for gluten-free cinnamon roll dough. Many brands offer this choice now. For dairy-free needs, use a plant-based butter. There are great dairy-free caramel sauces too. Check labels to be sure they fit your needs. These swaps keep the recipe tasty for everyone. Toppings can really make these cups shine! Try adding whipped cream on top for a creamy touch. A sprinkle of sea salt gives a nice contrast to the sweet caramel. You can also use chocolate drizzle. It pairs well with the apple and caramel. For a crunchy bite, add crushed graham crackers or oats. These options let you personalize each batch to your taste. Once your Caramel Apple Cinnamon Roll Cups cool, you can store them for later. Place them in an airtight container. They stay fresh for about 2-3 days in the fridge. If you want to keep them longer, consider freezing. To reheat, you can use the microwave or the oven. For the microwave, place a cup on a plate. Heat it for about 15-20 seconds. This warms it without making it soggy. If you prefer the oven, set it to 350°F (175°C). Bake for about 5-10 minutes. This keeps the texture nice and crisp. Freezing is a great option if you have extra cups. Wrap each cup tightly in plastic wrap. Then, place them in a freezer-safe bag or container. They can last up to 2 months in the freezer. When you're ready to enjoy, thaw them in the fridge overnight. Reheat them as mentioned before for the best taste. Yes, you can use homemade cinnamon roll dough. Fresh dough adds a special touch. Just make sure it’s rolled out to similar size as store-bought dough. This will help form the cups easily. You can prepare the apple filling in advance. Store it in the fridge until you’re ready to bake. You can also form the cups and keep them in the fridge. Just bake them when you want to enjoy them. You can try whipped cream or chocolate sauce. Fresh berries or nuts can also work well. Use your favorite toppings to make it your own. These cups are great for both! They have sweet flavors and a fun shape. Enjoy them for breakfast, brunch, or dessert. They fit any occasion. Look for a golden brown color on the cinnamon roll cups. You can also insert a toothpick. If it comes out clean, they are ready. Allow them to cool slightly before serving. These caramel apple cinnamon roll cups are fun and easy to make. We explored the key ingredients, step-by-step instructions, and helpful tips. You can customize them with different fruits and toppings, making them your own. Storing leftovers and reheating them keeps their taste fresh. Whether for breakfast or dessert, these cups are a hit. Enjoy your cooking adventure and relish every bite!

Caramel Apple Cinnamon Roll Cups Irresistible Delight

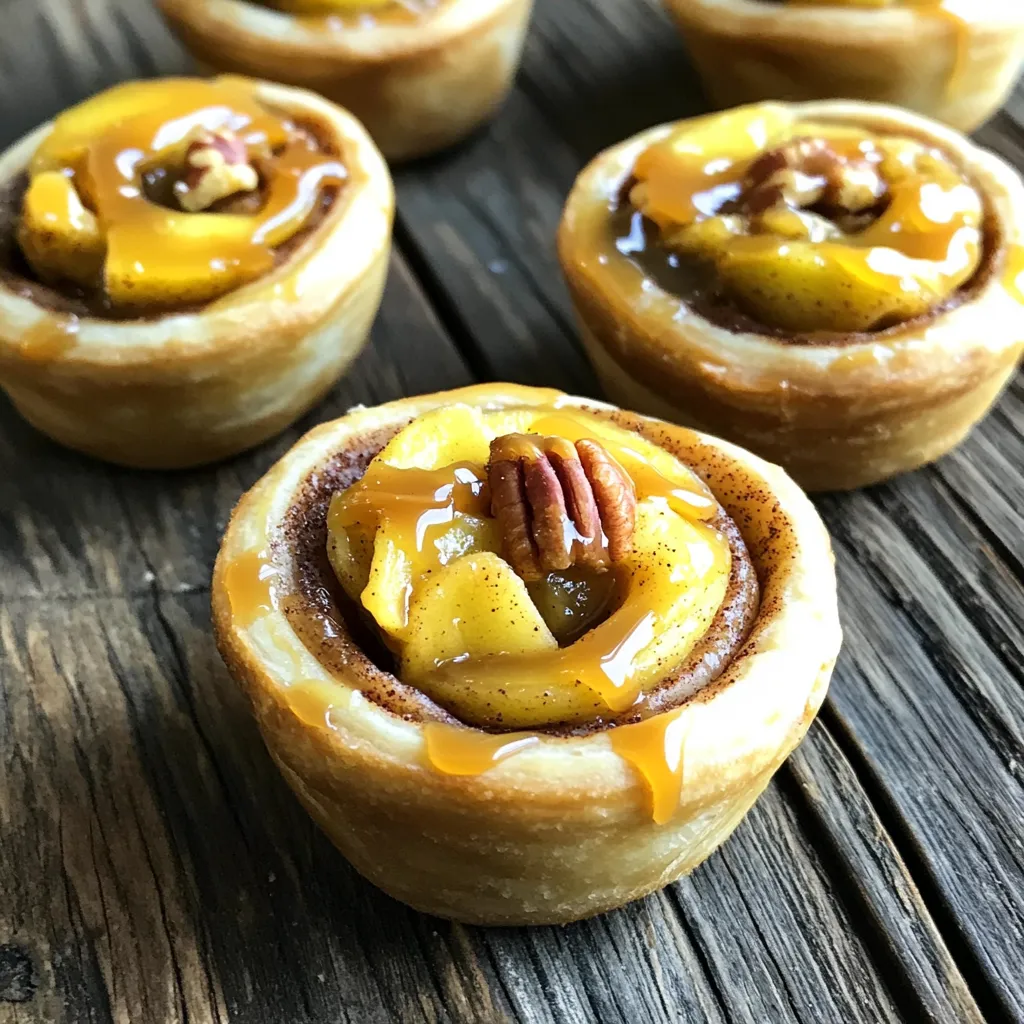
Get ready for a sweet treat! Today, I’m sharing my recipe for Caramel Apple Cinnamon Roll Cups—a delightful twist on

Older posts
Newer posts
← Previous Page1 … Page11 Page12 Page13 … Page84 Next →

dsad

© 2026 juliesdish • Built with GeneratePress

Our Policies

  • Copyright Policy
  • Cookie Policy
  • GDPR Policy
  • Privacy Policy
  • Disclaimer
  • Terms Of Use

More Information

  • Home
  • About
  • Contact
  • Appetizers
  • Dessert
  • Dinner
  • Drinks
©2026, juliesdish About Back To Top