Instant Pot Lemon Garlic Quinoa Flavorful and Easy Dish

WANT TO SAVE THIS RECIPE?

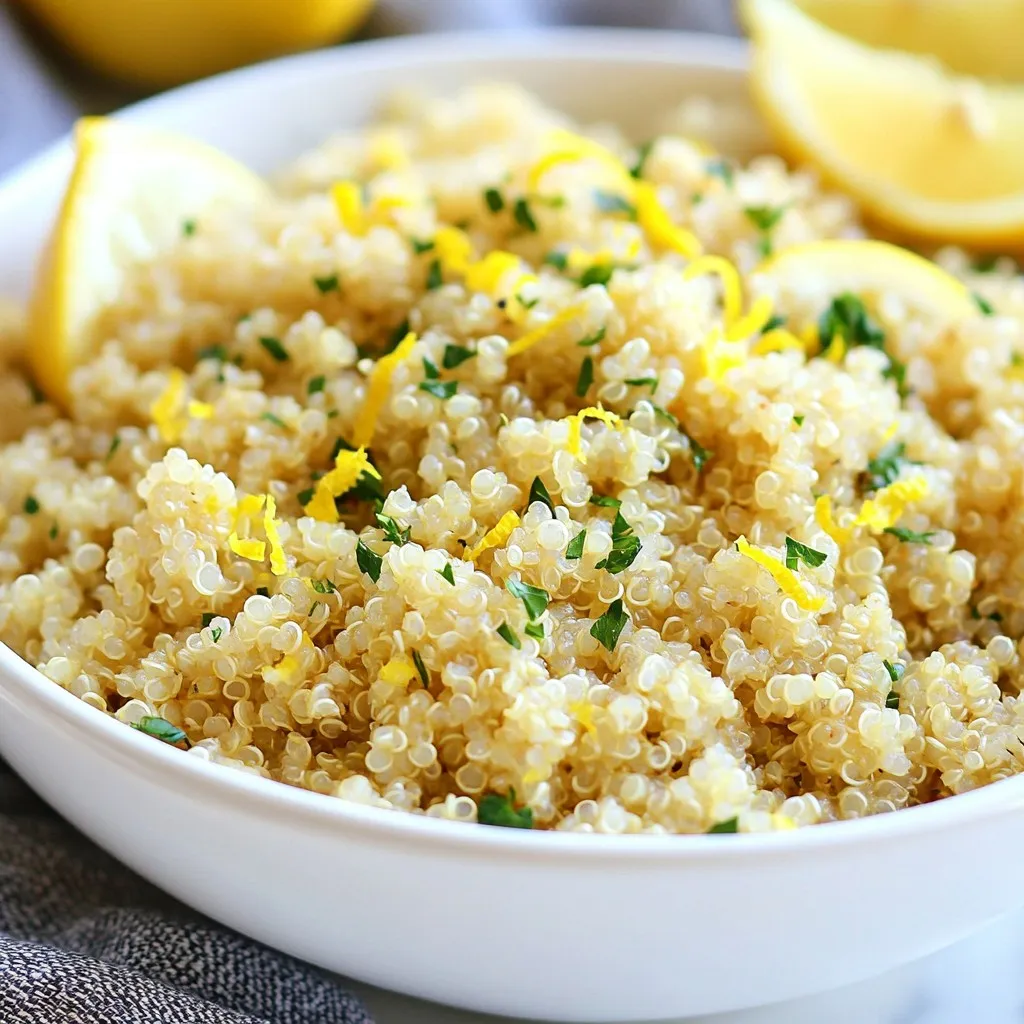
Looking for a quick, tasty dish that’s both healthy and easy to make? You’ve found it! My Instant Pot Lemon Garlic Quinoa is packed with flavor and comes together in no time. With just a handful of ingredients like quinoa, garlic, and lemon, this dish will become a new favorite. Whether you want a side dish or a hearty meal, I’ll guide you step-by-step to create this delicious dish that everyone will love!

Why I Love This Recipe

  1. Bright and Zesty Flavor: The combination of lemon and garlic creates a refreshing and vibrant taste that elevates the quinoa.
  2. Quick and Easy: This recipe comes together in just 20 minutes, making it perfect for busy weeknight dinners.
  3. Healthy and Nutritious: Quinoa is a great source of protein and fiber, making this dish both filling and nutritious.
  4. Versatile Side Dish: It pairs well with a variety of main dishes, from grilled vegetables to roasted meats, making it a great addition to any meal.

Ingredients

Main Ingredients

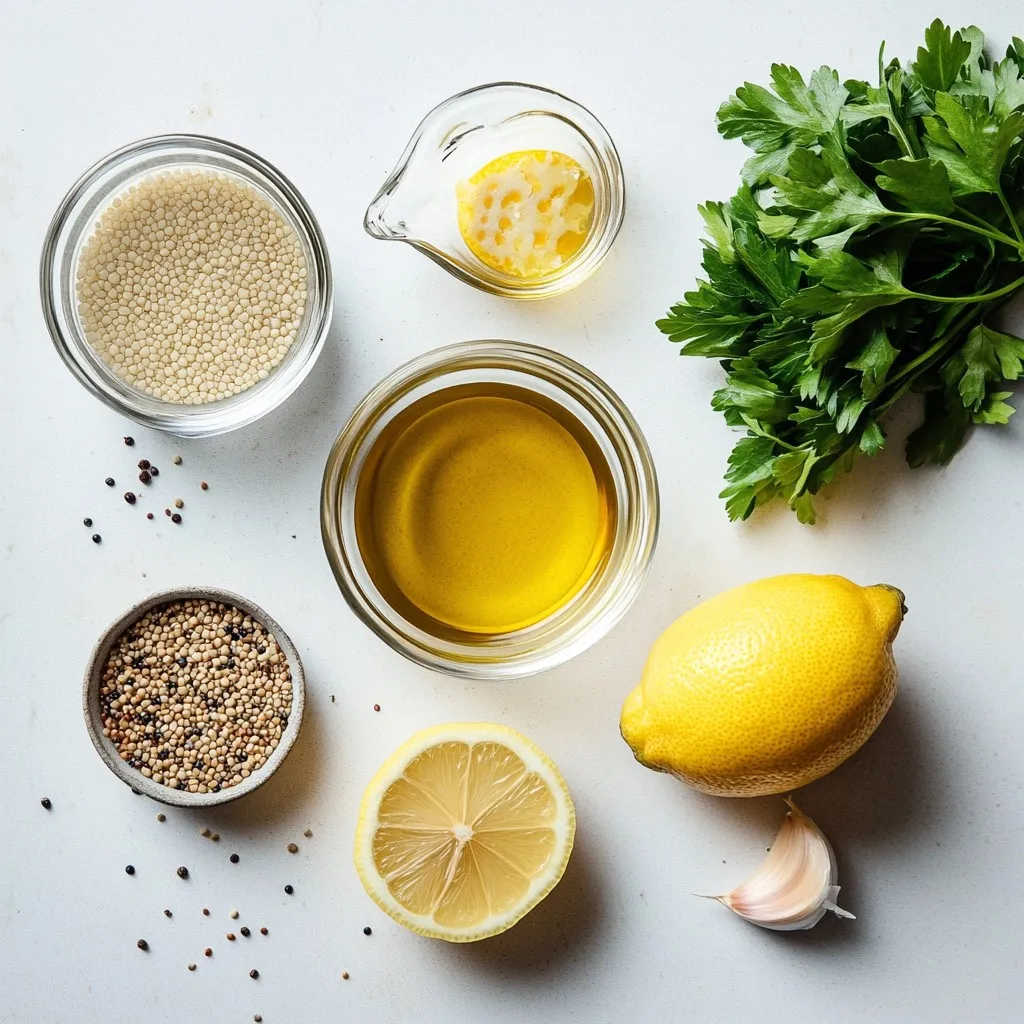
– 1 cup quinoa, rinsed

– 2 cups vegetable broth

– 2 tablespoons olive oil

– 3 cloves garlic, minced

Flavor Enhancers

– Zest of 1 lemon

– 2 tablespoons lemon juice

– 1 teaspoon dried oregano

– 1 teaspoon salt (or to taste)

– 1/2 teaspoon black pepper

Optional Garnishes

– Fresh parsley, chopped for garnish

– Additional lemon wedges

The main ingredients for this dish create a base that shines with flavor. Quinoa is a great choice. It is healthy and full of protein. Rinsing the quinoa is key. This step removes any bitter taste. The vegetable broth adds depth, making each bite rich and savory.

I use olive oil to sauté the garlic. This brings out its aroma and flavor. Garlic is a star in this dish. Minced garlic adds a punch that pairs well with lemon.

Now, let’s talk about the flavor enhancers. Adding lemon zest makes the dish bright. Zest brings out the fresh taste of lemon without the sourness. The lemon juice adds a tang that brightens the flavors. Dried oregano gives an herbal note. The salt and black pepper round out the taste. Adjust these to suit your taste buds.

For garnishes, fresh parsley adds color and a hint of freshness. You can also serve lemon wedges on the side. They make for a great pop of flavor when squeezed over the dish.

With these simple ingredients, you can create a delicious and easy meal. The balance of flavors in this Instant Pot Lemon Garlic Quinoa makes it a standout dish.

Step-by-Step Instructions

Sautéing the Garlic

– Turn on the Instant Pot and select ‘Sauté’ mode.

– Add 2 tablespoons of olive oil and 3 cloves of minced garlic. Sauté for 1-2 minutes. You want the garlic fragrant, but be careful not to burn it.

Preparing the Quinoa

– Add 1 cup of rinsed quinoa to the pot. Stir it with the garlic and oil. Sauté for another minute to slightly toast the quinoa. This step adds a nice flavor.

Combining Ingredients

– Pour in 2 cups of vegetable broth. Add the zest of 1 lemon, 2 tablespoons of lemon juice, 1 teaspoon of dried oregano, 1 teaspoon of salt, and 1/2 teaspoon of black pepper. Stir everything well to combine.

Cooking the Quinoa

– Close the lid of the Instant Pot. Make sure the valve is set to ‘Sealing’.

– Select ‘Pressure Cook’ and set the timer for 1 minute at high pressure.

Release and Fluff

– After the cooking time is up, let it sit for a natural pressure release for 10 minutes.

– Carefully switch the valve to ‘Venting’. Remove the lid and fluff the quinoa with a fork.

Final Touch

– Garnish with freshly chopped parsley. Serve it warm. Enjoy the bright flavors!

Tips & Tricks

Perfecting the Quinoa Texture

– Rinse quinoa thoroughly to remove bitterness. This step is key for a clean taste.

– Adjust water or broth for desired consistency. Use less for firmer quinoa, more for softer.

Timing Tips

– Ensure quick cooking by using high-quality quinoa. Look for brands that are pre-rinsed.

– Letting the pressure release naturally enhances flavor. This helps keep the quinoa fluffy and moist.

Ingredient Substitutions

– Use chicken broth instead of vegetable for extra flavor. The richness adds depth to the dish.

– Replace garlic with garlic powder if in a hurry. It saves time but still adds a nice taste.

Pro Tips

  1. Rinse the Quinoa: Always rinse quinoa thoroughly under cold water to remove its natural coating, called saponin, which can make it taste bitter.
  2. Enhance Flavor: For extra flavor, consider using homemade vegetable broth or adding a bay leaf during cooking and removing it before serving.
  3. Adjusting Consistency: If you prefer a creamier quinoa, increase the broth by 1/4 cup; for drier quinoa, reduce the liquid slightly.
  4. Meal Prep Friendly: This quinoa can be made in advance and stored in the fridge for up to a week, making it a great option for meal prep.

Variations

Adding Vegetables

You can easily boost the nutrition of your quinoa dish. Adding spinach or cherry tomatoes gives it a fresh taste. These bright veggies not only look good but also pack vitamins. You can also mix in roasted bell peppers for a sweet twist. Their flavor complements the lemon and garlic well.

Protein Boost

Want to make your meal heartier? Add cooked chickpeas or shredded chicken to your quinoa. This turns your dish into a complete meal. If you want a crunch, toss in nuts like almonds or walnuts. This adds protein and texture to your dish.

Flavor Infusions

Feel free to play with flavors! You can try different herbs like basil or thyme. These add depth and new tastes. If you’re in the mood for a twist, use lime juice instead of lemon. This gives a unique citrus kick that can brighten your dish.

Storage Info

Refrigeration

Store any leftovers in an airtight container in the fridge. This helps keep the quinoa fresh. It is best consumed within 3-4 days. After that, it may lose its flavor and texture.

Freezing

You can freeze the quinoa in portions for up to 2 months. This makes meal prep easy! To thaw, place it in the fridge overnight. If you need it fast, use the microwave for a quick defrost.

Reheating

Reheat the quinoa in a microwave or on the stovetop. I suggest adding a splash of broth. This keeps the quinoa moist and tasty. Enjoy it warm for the best flavor!

FAQs

How do I prevent quinoa from being mushy?

To keep quinoa from being mushy, rinse it well before cooking. Rinsing removes bitter saponins. Use the right water-to-quinoa ratio. For this recipe, use 2 cups of broth for 1 cup of quinoa. This gives you fluffy, tender grains.

Can I make this recipe ahead of time?

Yes, you can make this quinoa dish ahead of time. Cook it, then cool it down. Store it in the fridge for a few days. When you need it, just reheat it in the microwave or stovetop. This makes meal prep easy!

Is quinoa gluten-free?

Yes, quinoa is gluten-free. It is a great choice for those with gluten sensitivities. You can enjoy it in salads, bowls, or as a side. Quinoa is also packed with protein and fiber.

How can I make this dish more flavorful?

To boost the flavor, add more garlic or lemon juice. You can also increase the spices like oregano. If you like heat, add some red pepper flakes. Tasting as you go helps you find your perfect flavor balance.

This blog post covered how to make a tasty quinoa dish. We explored the key ingredients, like quinoa and broth, and discussed enhancing flavors with lemon and herbs. You learned step-by-step instructions and tips for perfect texture and timing. Variations allow you to mix in veggies or protein for extra nutrition. Finally, we provided storage tips for leftovers to ensure freshness.

With these insights, you can create a flavorful and healthy meal that you’ll enjoy. Now, get cooking and savor every bit

- 1 cup quinoa, rinsed - 2 cups vegetable broth - 2 tablespoons olive oil - 3 cloves garlic, minced - Zest of 1 lemon - 2 tablespoons lemon juice - 1 teaspoon dried oregano - 1 teaspoon salt (or to taste) - 1/2 teaspoon black pepper - Fresh parsley, chopped for garnish - Additional lemon wedges The main ingredients for this dish create a base that shines with flavor. Quinoa is a great choice. It is healthy and full of protein. Rinsing the quinoa is key. This step removes any bitter taste. The vegetable broth adds depth, making each bite rich and savory. I use olive oil to sauté the garlic. This brings out its aroma and flavor. Garlic is a star in this dish. Minced garlic adds a punch that pairs well with lemon. Now, let’s talk about the flavor enhancers. Adding lemon zest makes the dish bright. Zest brings out the fresh taste of lemon without the sourness. The lemon juice adds a tang that brightens the flavors. Dried oregano gives an herbal note. The salt and black pepper round out the taste. Adjust these to suit your taste buds. For garnishes, fresh parsley adds color and a hint of freshness. You can also serve lemon wedges on the side. They make for a great pop of flavor when squeezed over the dish. With these simple ingredients, you can create a delicious and easy meal. The balance of flavors in this Instant Pot Lemon Garlic Quinoa makes it a standout dish. {{ingredient_image_1}} - Turn on the Instant Pot and select 'Sauté' mode. - Add 2 tablespoons of olive oil and 3 cloves of minced garlic. Sauté for 1-2 minutes. You want the garlic fragrant, but be careful not to burn it. - Add 1 cup of rinsed quinoa to the pot. Stir it with the garlic and oil. Sauté for another minute to slightly toast the quinoa. This step adds a nice flavor. - Pour in 2 cups of vegetable broth. Add the zest of 1 lemon, 2 tablespoons of lemon juice, 1 teaspoon of dried oregano, 1 teaspoon of salt, and 1/2 teaspoon of black pepper. Stir everything well to combine. - Close the lid of the Instant Pot. Make sure the valve is set to 'Sealing'. - Select 'Pressure Cook' and set the timer for 1 minute at high pressure. - After the cooking time is up, let it sit for a natural pressure release for 10 minutes. - Carefully switch the valve to 'Venting'. Remove the lid and fluff the quinoa with a fork. - Garnish with freshly chopped parsley. Serve it warm. Enjoy the bright flavors! - Rinse quinoa thoroughly to remove bitterness. This step is key for a clean taste. - Adjust water or broth for desired consistency. Use less for firmer quinoa, more for softer. - Ensure quick cooking by using high-quality quinoa. Look for brands that are pre-rinsed. - Letting the pressure release naturally enhances flavor. This helps keep the quinoa fluffy and moist. - Use chicken broth instead of vegetable for extra flavor. The richness adds depth to the dish. - Replace garlic with garlic powder if in a hurry. It saves time but still adds a nice taste. Pro Tips Rinse the Quinoa: Always rinse quinoa thoroughly under cold water to remove its natural coating, called saponin, which can make it taste bitter. Enhance Flavor: For extra flavor, consider using homemade vegetable broth or adding a bay leaf during cooking and removing it before serving. Adjusting Consistency: If you prefer a creamier quinoa, increase the broth by 1/4 cup; for drier quinoa, reduce the liquid slightly. Meal Prep Friendly: This quinoa can be made in advance and stored in the fridge for up to a week, making it a great option for meal prep. {{image_2}} You can easily boost the nutrition of your quinoa dish. Adding spinach or cherry tomatoes gives it a fresh taste. These bright veggies not only look good but also pack vitamins. You can also mix in roasted bell peppers for a sweet twist. Their flavor complements the lemon and garlic well. Want to make your meal heartier? Add cooked chickpeas or shredded chicken to your quinoa. This turns your dish into a complete meal. If you want a crunch, toss in nuts like almonds or walnuts. This adds protein and texture to your dish. Feel free to play with flavors! You can try different herbs like basil or thyme. These add depth and new tastes. If you're in the mood for a twist, use lime juice instead of lemon. This gives a unique citrus kick that can brighten your dish. Store any leftovers in an airtight container in the fridge. This helps keep the quinoa fresh. It is best consumed within 3-4 days. After that, it may lose its flavor and texture. You can freeze the quinoa in portions for up to 2 months. This makes meal prep easy! To thaw, place it in the fridge overnight. If you need it fast, use the microwave for a quick defrost. Reheat the quinoa in a microwave or on the stovetop. I suggest adding a splash of broth. This keeps the quinoa moist and tasty. Enjoy it warm for the best flavor! To keep quinoa from being mushy, rinse it well before cooking. Rinsing removes bitter saponins. Use the right water-to-quinoa ratio. For this recipe, use 2 cups of broth for 1 cup of quinoa. This gives you fluffy, tender grains. Yes, you can make this quinoa dish ahead of time. Cook it, then cool it down. Store it in the fridge for a few days. When you need it, just reheat it in the microwave or stovetop. This makes meal prep easy! Yes, quinoa is gluten-free. It is a great choice for those with gluten sensitivities. You can enjoy it in salads, bowls, or as a side. Quinoa is also packed with protein and fiber. To boost the flavor, add more garlic or lemon juice. You can also increase the spices like oregano. If you like heat, add some red pepper flakes. Tasting as you go helps you find your perfect flavor balance. This blog post covered how to make a tasty quinoa dish. We explored the key ingredients, like quinoa and broth, and discussed enhancing flavors with lemon and herbs. You learned step-by-step instructions and tips for perfect texture and timing. Variations allow you to mix in veggies or protein for extra nutrition. Finally, we provided storage tips for leftovers to ensure freshness. With these insights, you can create a flavorful and healthy meal that you’ll enjoy. Now, get cooking and savor every bite!

Zesty Instant Pot Lemon Garlic Quinoa

A flavorful and easy-to-make quinoa dish with lemon and garlic, perfect for a healthy meal.
Prep Time 10 minutes
Cook Time 10 minutes
Total Time 20 minutes
Course Main Course
Cuisine Mediterranean
Servings 4
Calories 200 kcal

Ingredients
  

  • 1 cup quinoa, rinsed
  • 2 cups vegetable broth
  • 2 tablespoons olive oil
  • 3 cloves garlic, minced
  • 1 lemon zest of
  • 2 tablespoons lemon juice
  • 1 teaspoon dried oregano
  • 1 teaspoon salt (or to taste)
  • 0.5 teaspoon black pepper
  • to taste fresh parsley, chopped (for garnish)

Instructions
 

  • Turn on the Instant Pot and click the 'Sauté' mode. Add olive oil and minced garlic, sautéing for about 1-2 minutes until fragrant, being careful not to burn it.
  • Add the rinsed quinoa to the pot, stirring to combine with the garlic and oil. Sauté for another minute to slightly toast it.
  • Pour in the vegetable broth, lemon zest, lemon juice, dried oregano, salt, and black pepper. Stir everything together to ensure an even distribution.
  • Close the lid of the Instant Pot, ensuring the valve is set to 'Sealing'. Select the 'Pressure Cook' or 'Manual' setting, and set the timer for 1 minute on high pressure.
  • Once the cooking time is complete, allow for a natural pressure release for 10 minutes. Afterward, carefully switch the valve to 'Venting' to release any remaining pressure.
  • Remove the lid and fluff the quinoa with a fork. Check seasoning and adjust if necessary.
  • Sprinkle freshly chopped parsley over the quinoa before serving for a pop of color and flavor.

Notes

Serve the quinoa in a large bowl or individual plates, garnished with additional lemon zest and parsley for a vibrant look. A lemon wedge on the side adds a nice touch!
Keyword garlic, Instant Pot, lemon, quinoa, vegetarian

WANT TO SAVE THIS RECIPE?

Leave a Comment

Recipe Rating