Instant Pot Chicken Noodle Soup Quick and Simple Recipe
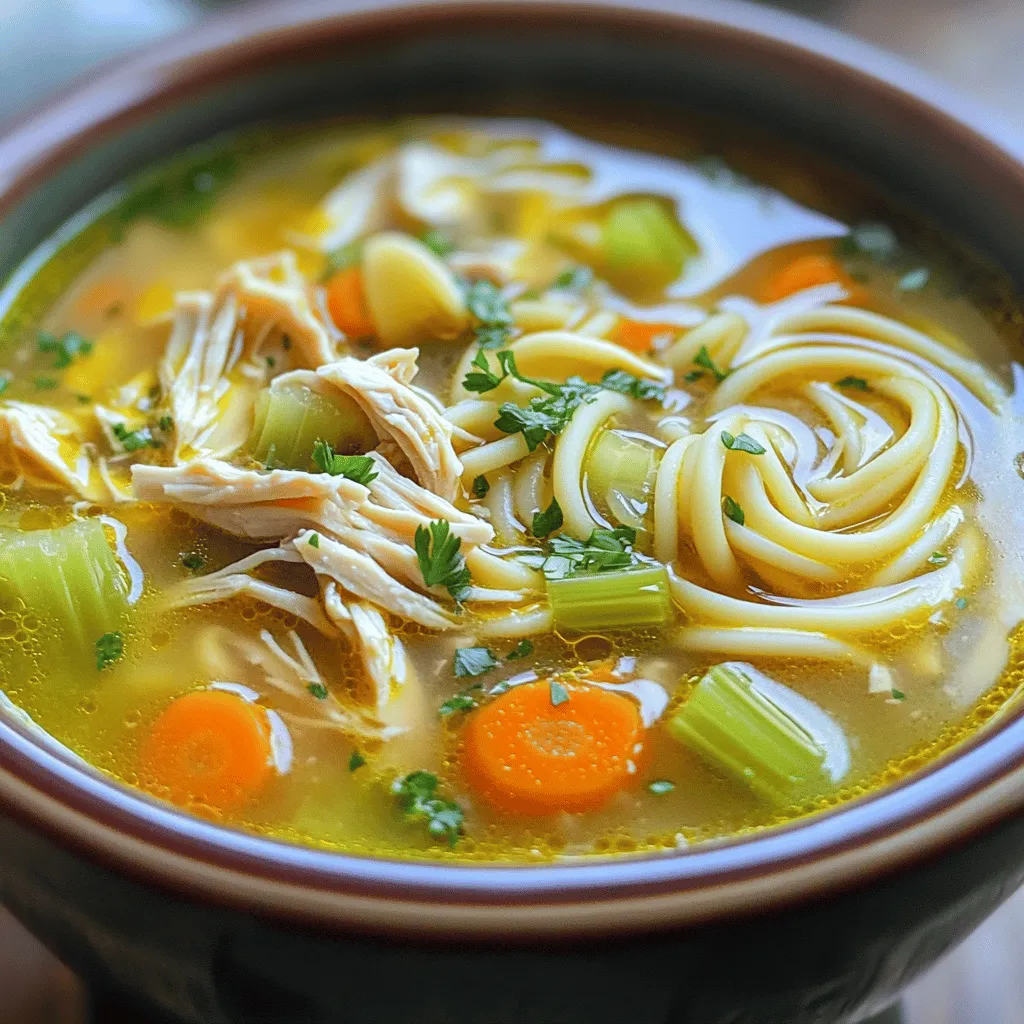
Craving a warm, comforting bowl of soup? This Instant Pot Chicken Noodle Soup is quick and simple to make! In

Craving a warm, comforting bowl of soup? This Instant Pot Chicken Noodle Soup is quick and simple to make! In
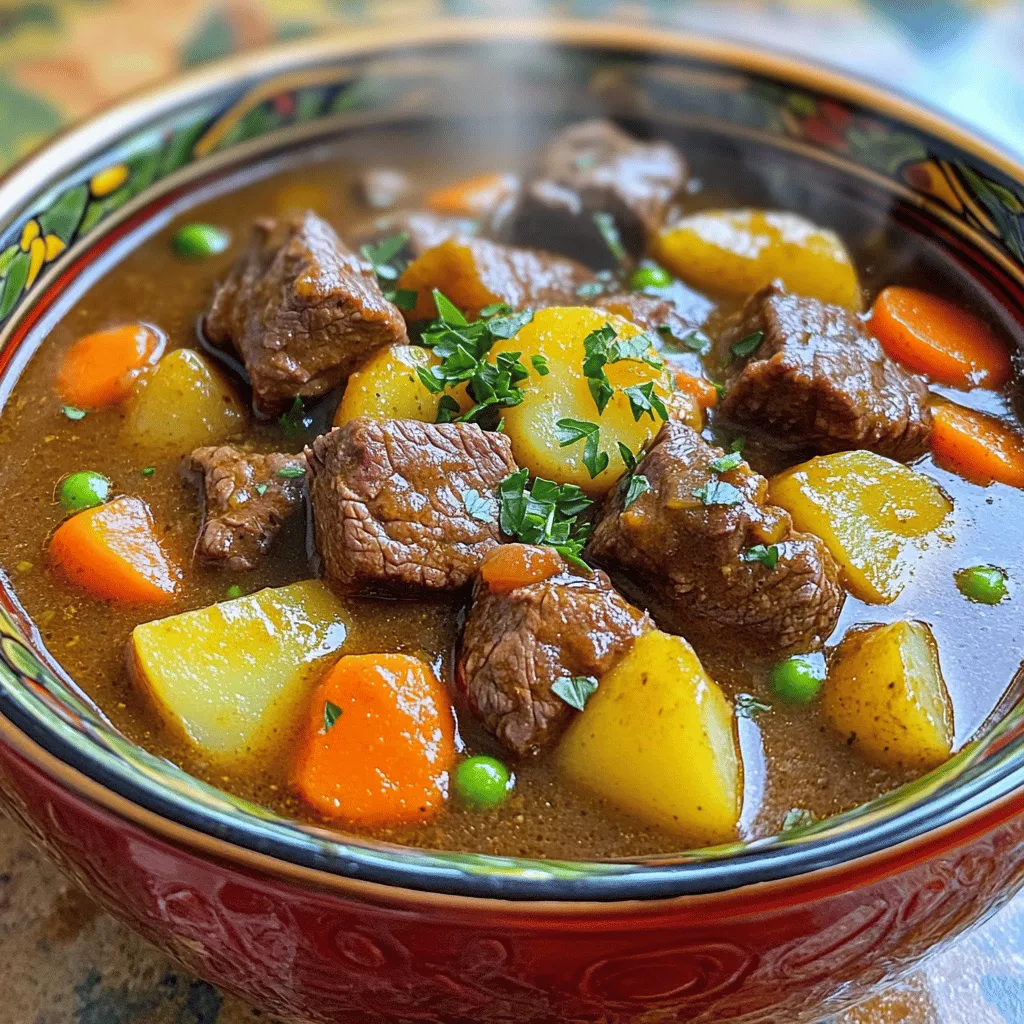
Welcome to your new favorite recipe! My Hearty Instant Pot Beef Stew is simple, quick, and packed with flavor. This
. Check out video demonstrations for tips and tricks to perfect your fries. These resources will help you create the best air fryer sweet potato fries! You now have all the tools to make tasty sweet potato fries. We covered the ingredients, cooking steps, and tips to achieve that perfect crisp. Remember to experiment with flavors and seasonings to make it your own. Storage and reheating methods will help keep your fries delicious. By following these insights, you can enjoy a healthy snack any time. Happy cooking!](https://juliesdish.com/wp-content/uploads/2025/07/98d92564-9f27-42bc-8778-681823de061e.webp)
Craving a tasty treat that’s also good for you? Try my Air Fryer Sweet Potato Fries! They’re crispy, flavorful, and
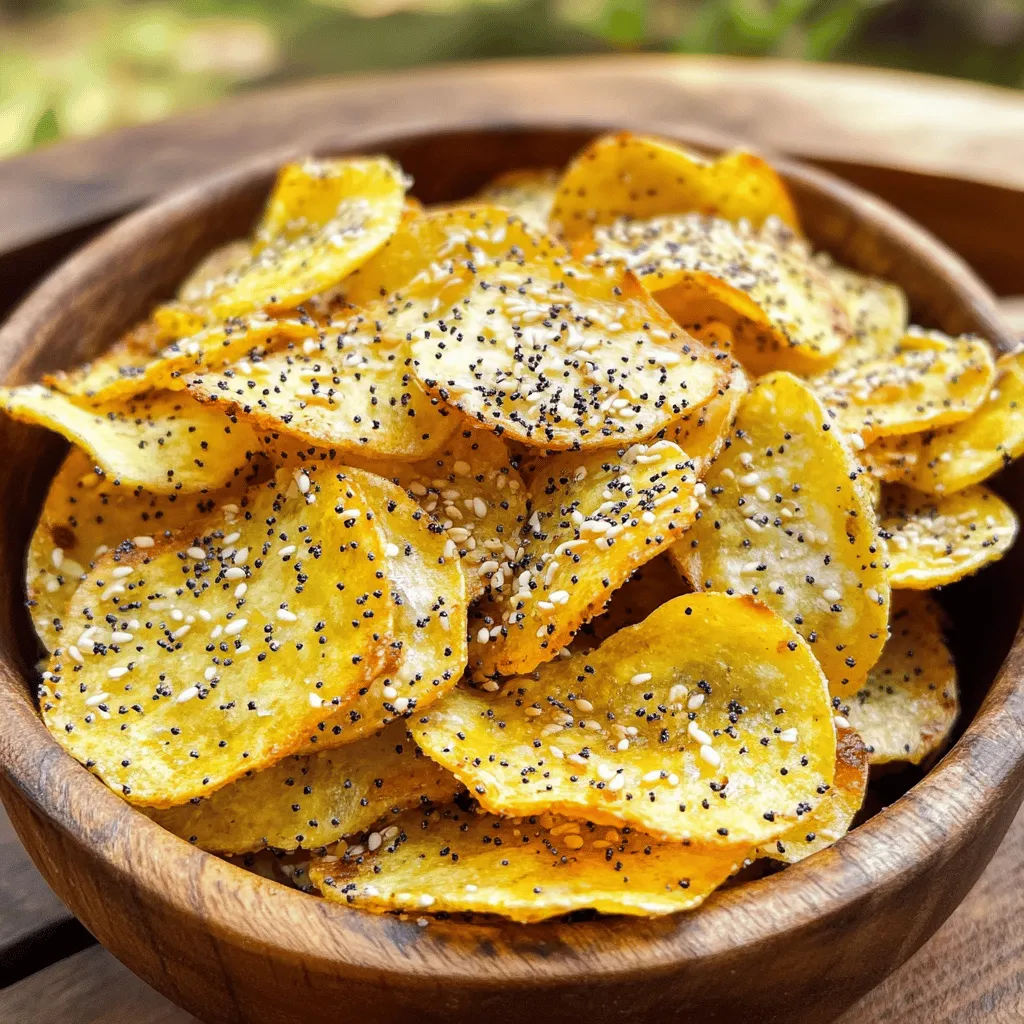
Craving a snack that’s crunchy and full of flavor? These crispy air fryer everything bagel chips are your answer! You
![- Cauliflower - Olive oil - Honey - Sriracha sauce - Soy sauce (or tamari) - Garlic powder - Smoked paprika - Salt and pepper - Chopped green onions - Sesame seeds When making Air Fryer Honey Sriracha Cauliflower, the right ingredients matter. First, you need a medium head of cauliflower. Cut it into bite-sized florets for even cooking. Next, gather three tablespoons of olive oil. This helps the cauliflower get crispy. For sweetness, use three tablespoons of honey. Honey pairs well with Sriracha, which adds heat. You will need two tablespoons of Sriracha sauce for that spicy kick. The additional ingredients enhance the flavor. Soy sauce or tamari adds depth. Garlic powder and smoked paprika bring warmth. Don't forget to season with salt and pepper to taste. Finally, garnishing makes the dish pop. Chopped green onions add freshness. Sesame seeds provide crunch. For the full recipe, check the instructions to create this bold flavor dish! First, gather your ingredients. In a large bowl, combine the olive oil, honey, Sriracha sauce, soy sauce, garlic powder, smoked paprika, salt, and pepper. Use a whisk to mix them well. A good marinade is key. It helps the cauliflower soak up all the tasty flavors. Now, add the cauliflower florets to the bowl. Toss them gently in the marinade until they are all coated. This step is important! Let the florets sit for about 15 to 20 minutes. This time allows them to absorb the flavors fully. Before you cook, preheat your air fryer to 375°F (190°C) for about 5 minutes. Once it's ready, place the marinated cauliflower florets in the air fryer basket. Make sure not to overcrowd them; this helps them cook evenly. You may need to do this in batches. Cook the cauliflower for 12 to 15 minutes. Remember to shake the basket halfway through. This will help them get golden brown and crispy. Enjoy your Air Fryer Honey Sriracha Cauliflower! For the full recipe, check [Full Recipe]. To get that crunchy texture, you should set your air fryer to 375°F (190°C). This temperature cooks the cauliflower just right. Make sure not to overcrowd the basket. If you pile in too many florets, they will steam instead of crisp. Cook them in batches if needed. This way, every piece gets that perfect crunch. You can make this dish even better by adding your favorite spices or herbs. A pinch of cayenne can boost the heat. Or try adding Italian herbs for a twist. If you want more sweetness, add a bit more honey. To increase the heat, just add extra Sriracha. Taste the sauce before you marinate your cauliflower to find your best balance. This Honey Sriracha Cauliflower is a great appetizer, snack, or side dish. Pair it with a creamy dip like ranch or Greek yogurt. The coolness of the dip balances the heat perfectly. For a beautiful presentation, serve it on a nice platter. Garnish with chopped green onions and sesame seeds for extra color. This makes the dish look as good as it tastes. Check out the Full Recipe for more details! {{image_2}} You can switch up the sauce for your Air Fryer Honey Sriracha Cauliflower. Try using a sweet chili sauce for a milder taste. You might enjoy a garlic soy sauce for more depth. If you want a vegan option, maple syrup works great instead of honey. It adds sweetness without animal products. If you need gluten-free options, use tamari instead of soy sauce. This keeps the dish safe for those with gluten issues. For low-carb diets, you can skip the honey or use a sugar substitute. This keeps the flavor fresh without the carbs. You can make this dish without an air fryer. Oven roasting is a great option. Just preheat the oven to 425°F (220°C). Spread the marinated cauliflower on a baking sheet and roast for about 20-25 minutes. Stir halfway for even cooking. Stovetop sautéing is another method. Heat a pan with a bit of olive oil. Add the marinated cauliflower and cook for 10-15 minutes. Stir often until the florets are tender and golden. For all these methods, the key is to get that crispy texture. Use the [Full Recipe] for more details on preparation. To store your leftover Air Fryer Honey Sriracha Cauliflower, place it in an airtight container. This helps keep moisture in while preventing other smells from mixing in. You can store it in the fridge for about 3 to 4 days. If you want to keep it fresh longer, think about freezing it. You can reheat the cauliflower in the air fryer or microwave. The air fryer is best for crispiness. To do this, set it to 350°F (175°C) and reheat for about 5 to 7 minutes. Shake the basket halfway through to ensure even heating. The microwave is quicker but may make it soft. If you use the microwave, heat in short bursts. To freeze the cauliflower, let it cool first. Then, spread it out on a baking sheet to freeze. Once frozen, transfer it to a freezer bag or container. This way, you avoid clumping. You can store it for up to 3 months. When you want to eat it, thaw it overnight in the fridge. To reheat, use the air fryer for the best texture. Yes, you can use frozen cauliflower. When using frozen cauliflower, thaw it first. Drain any excess water. You may need to cook it a bit longer. Keep an eye on the texture so it gets crispy. Honey Sriracha Cauliflower makes a great side dish. You can serve it with grilled chicken or fish. It also pairs well with fried rice or quinoa. For a lighter option, try it with a fresh salad. To add more heat, increase the Sriracha sauce. You can also add red pepper flakes. Another option is to use a spicier chili sauce. Taste as you go to find your perfect level of heat. Yes, this recipe is great for meal prep. You can make a large batch and store it. Just refrigerate it in an airtight container. It lasts about 3-4 days. Reheat it in the air fryer to keep it crispy. Absolutely! Doubling the recipe is easy. Just make sure your air fryer can fit all the cauliflower. You may need to cook it in batches. Adjust the cooking time if needed, checking for doneness. This blog post covered how to make Honey Sriracha Cauliflower from start to finish. We discussed the main and additional ingredients, plus tips for marinating and cooking. You learned about variations and how to store leftovers while keeping them tasty. Remember, you can adjust flavors and experiment with cooking methods. Enjoy your crispy, flavorful dish! Follow the steps, and don’t be afraid to try your own twist! Happy cooking!](https://juliesdish.com/wp-content/uploads/2025/07/de29001b-160a-4cd4-ab1b-d1e7a333e0a6.webp)
Are you ready to spice up your dinner with a delicious twist? This Air Fryer Honey Sriracha Cauliflower dish packs
![- 2 pounds chicken wings - 2 tablespoons olive oil - ½ cup grated Parmesan cheese - 1 teaspoon garlic powder - 1 teaspoon onion powder - 1 teaspoon smoked paprika - Salt and pepper to taste - 2 tablespoons fresh parsley, chopped - 2 tablespoons butter, melted Gathering the right ingredients is key for success in this recipe. First, you need chicken wings. I prefer fresh wings, but frozen can work too. You will also need olive oil, which helps with crispiness. Parmesan cheese adds a rich flavor. Next, for the seasoning, garlic powder and onion powder bring depth. Smoked paprika adds a nice touch. Don't forget salt and pepper to make it all pop. Finally, fresh parsley gives a bright finish. Melted butter helps to mix everything together. You can find the full recipe [Full Recipe] for more details on how to bring these flavors together. First, preheat your air fryer to 400°F (200°C). This step takes about 5 minutes. While the air fryer heats, grab a large mixing bowl. Add the chicken wings, olive oil, garlic powder, onion powder, smoked paprika, salt, and pepper. Mix these ingredients well. You want to coat every wing evenly. This blend makes the wings tasty and helps them crisp up nicely. Next, place the seasoned wings in the air fryer basket. Make sure they are in a single layer. This helps them cook evenly. If you have many wings, you might need to do this in batches. Air fry the wings for 25 to 30 minutes. Flip them halfway through cooking. This flip is key for even crispiness. You want them golden brown and crunchy. While the wings cook, it's time to mix the garlic Parmesan sauce. In a separate bowl, combine the melted butter, grated Parmesan cheese, and chopped parsley. Once the wings are done, transfer them to the bowl with your sauce. Toss them well to coat each wing. This step adds a rich flavor that makes the wings irresistible. Serve them right away and enjoy! For the full recipe, check out the earlier section. To get the best crispiness, cook the wings in a single layer. This allows hot air to circulate evenly. If you stack them, they won't cook right. You may need to do this in batches. If they aren't crispy enough, add a few more minutes to the cooking time. Just watch them closely to avoid burning. Feel free to change the seasonings to fit your taste. You can add cayenne for heat or lemon zest for brightness. For dipping sauces, try ranch or blue cheese. These pair well with garlic Parmesan flavors and enhance the dish. For a great look, serve the wings with fresh veggies like carrots and celery. This adds color and crunch. Use a large platter or a rustic wooden board to show off your wings. It makes them look extra tasty and inviting. For the full recipe, check out the detailed instructions and enjoy these delicious wings! {{image_2}} You can spice up your wings in many ways. For a kick, try spicy garlic Parmesan wings. Just add cayenne pepper or hot sauce to the mix. This will give your wings a nice heat without losing their garlic and cheese charm. If you want a fresh twist, consider herb-infused options. Mix in dried basil or oregano to the garlic Parmesan sauce. This adds depth and a garden flavor to every bite. While air frying is great, you can also bake your wings in the oven. Preheat your oven to 425°F (220°C). Spread the wings on a baking sheet. Bake for about 40-45 minutes until crispy. Grilling is another fun option, especially in summer. Toss your seasoned wings on the grill for a smoky taste. Just be sure to keep an eye on them, so they don’t burn. If you need gluten-free wings, use gluten-free soy sauce instead of regular. This keeps the flavor while making them safe for those with gluten issues. For a lower-fat adaptation, you can skip the butter in the garlic Parmesan sauce. Use a light olive oil spray instead. This reduces calories but keeps your wings tasty. Try these variations to match your needs and preferences! For the full recipe, check out the detailed instructions above. To keep your leftover wings fresh, store them in the fridge. Place the wings in a shallow container. Make sure to cover it tightly with a lid or plastic wrap. This helps keep the wings from drying out. They can last for up to three days in the fridge. For best results, try to eat them within two days. The best containers for storage are glass or BPA-free plastic. These materials do not absorb odors. They also help maintain flavor and texture. When you want to enjoy your wings again, reheating them is easy. The best method is to use the air fryer again. Preheat your air fryer to 350°F (175°C). Place the wings in a single layer. Heat them for about 5 to 7 minutes. This keeps them crispy. To avoid sogginess, do not use the microwave. Microwaves make wings soft and chewy. If you must use a microwave, place a paper towel under the wings. This helps absorb moisture. You can freeze both uncooked and cooked wings. For uncooked wings, season them and place them in a freezer bag. Remove all air from the bag. This keeps them fresh for up to six months. For cooked wings, allow them to cool completely before freezing. Place them in an airtight container. They can last for up to three months in the freezer. When you are ready to cook frozen wings, thaw them in the fridge overnight. This way, they stay safe and are ready to cook the next day. How long to air fry chicken wings? You should air fry chicken wings for about 25 to 30 minutes. Flip them halfway through to ensure even cooking. This gives them that crispy texture we all love. Can I use frozen wings for this recipe? Yes, you can use frozen wings. Just add a few extra minutes to the cooking time. Make sure they are not stuck together when you place them in the air fryer. Are air fryer wings healthier? Air fryer wings are generally healthier than deep-fried wings. You use less oil, which cuts down on calories and fat. This way, you can enjoy crispy wings without the guilt. Comparison with deep-fried wings Deep-fried wings soak up a lot of oil. This adds extra calories and fat. Air frying keeps the wings crispy but cuts down on unhealthy fats. Eating air fryer wings is a smarter choice. What can I use instead of Parmesan cheese? If you don't have Parmesan, try using Pecorino Romano or nutritional yeast. Both options give a nice cheesy flavor without losing the taste you want. Alternatives for olive oil in the recipe You can swap olive oil for avocado oil or melted coconut oil. Both work well and help to crisp the wings just like olive oil. This guide covered how to make delicious air-fried chicken wings. You learned about the key ingredients, step-by-step prep, and cooking tips. We explored flavor variations and storage methods, ensuring you enjoy these wings anytime. Remember, achieving crispiness matters, so follow the tips closely. With these techniques, you can create tasty wings that impress. Enjoy your cooking journey and have fun mixing flavors. Your snack time will never be the same!](https://juliesdish.com/wp-content/uploads/2025/07/3681883e-ad12-447f-b17b-1b761b2571f7.webp)
Get ready for a flavor explosion with my crispy Air Fryer Garlic Parmesan Wings! These juicy wings are perfect for
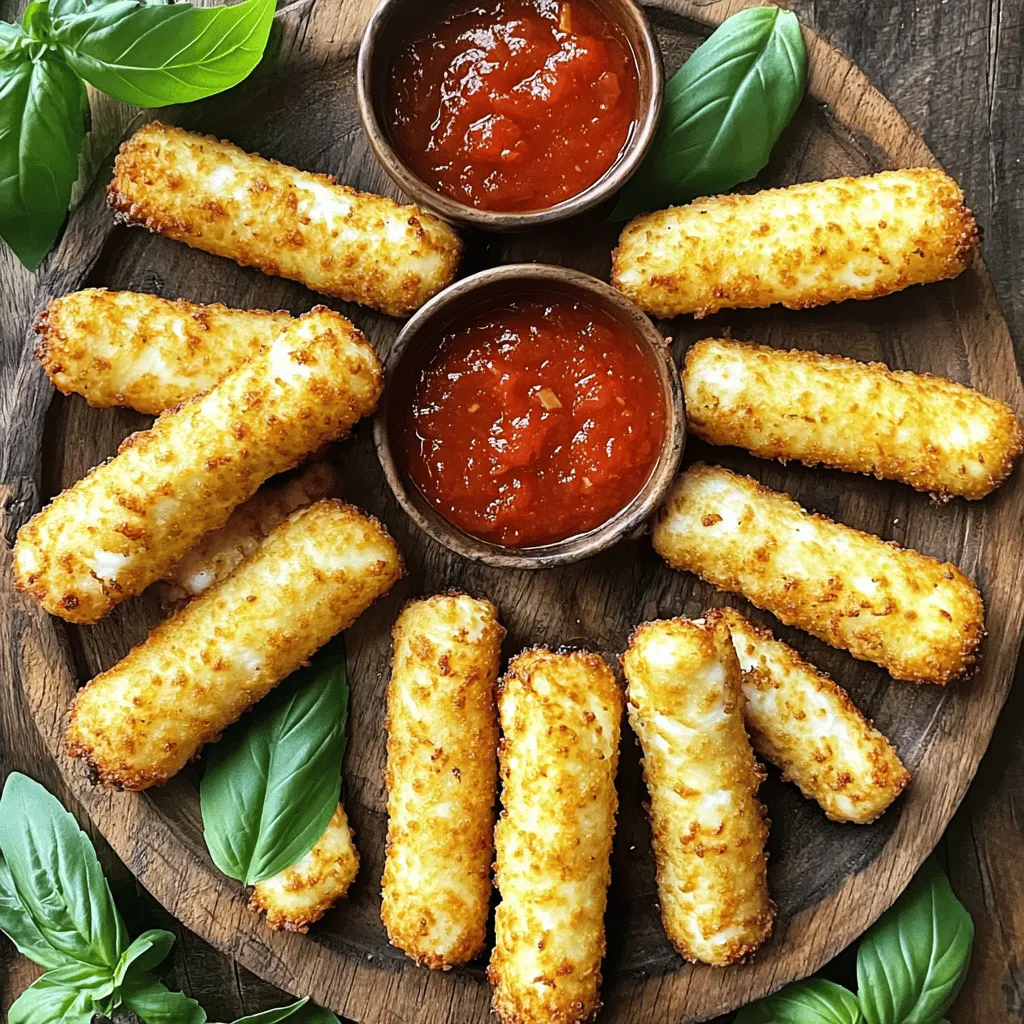
Air Fryer mozzarella sticks are the ultimate crunchy snack you’ll love. They’re simple to make and turn out golden and
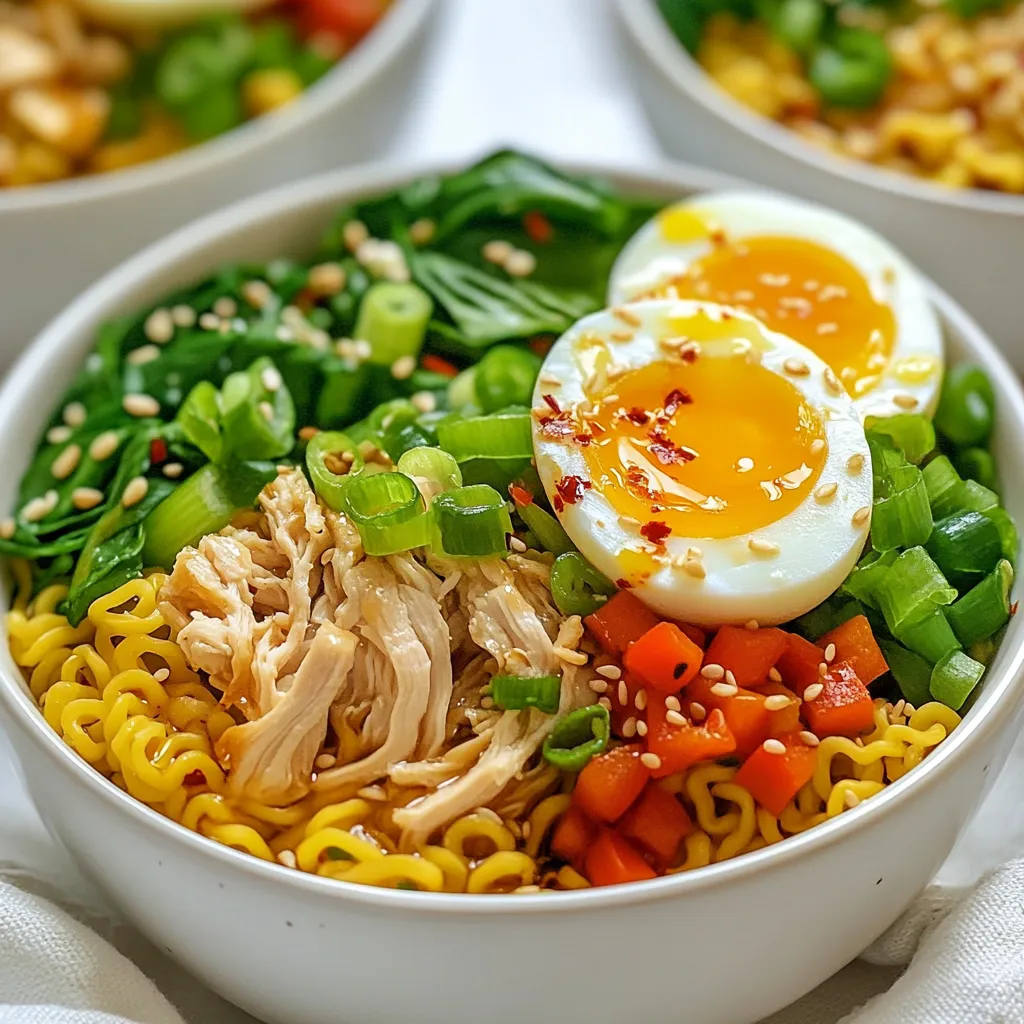
If you love quick meals that pack flavor, you’ll want to try the TikTok ramen hack. This simple guide transforms
![To make the easy pumpkin roll cake, you will need: - 3/4 cup all-purpose flour - 1 teaspoon baking powder - 1/2 teaspoon baking soda - 1/2 teaspoon ground cinnamon - 1/4 teaspoon ground nutmeg - 1/4 teaspoon ground ginger - 1/4 teaspoon salt - 3 large eggs - 1 cup granulated sugar - 1 cup canned pumpkin puree - 1 teaspoon vanilla extract - Powdered sugar for dusting For the filling: - 8 oz cream cheese, softened - 1/4 cup unsalted butter, softened - 1 cup powdered sugar - 1 teaspoon vanilla extract Here’s a quick guide for measuring your ingredients: - 3/4 cup all-purpose flour = 95 grams - 1 teaspoon baking powder = 5 grams - 1/2 teaspoon baking soda = 2 grams - 1/2 teaspoon ground cinnamon = 1.5 grams - 1/4 teaspoon ground nutmeg = 0.5 grams - 1/4 teaspoon ground ginger = 0.5 grams - 1/4 teaspoon salt = 1.5 grams - 3 large eggs = 150 grams (about 50 grams each) - 1 cup granulated sugar = 200 grams - 1 cup canned pumpkin puree = 240 grams - 1 teaspoon vanilla extract = 5 ml - 8 oz cream cheese = 226 grams - 1/4 cup unsalted butter = 57 grams - 1 cup powdered sugar = 120 grams If you need to substitute, here are some ideas: - Use whole wheat flour for a healthier option. - Applesauce can replace some or all of the eggs. - Maple syrup can substitute for granulated sugar for natural sweetness. - If you're dairy-free, try a non-dairy cream cheese for the filling. - You can use pumpkin pie spice instead of individual spices for convenience. Check out the Full Recipe for details on making your pumpkin roll cake. First, preheat your oven to 375°F (190°C). Grab a 15x10-inch jelly roll pan. Line it with parchment paper and lightly grease it. This helps the cake come out easily after baking. In a medium bowl, sift together the dry ingredients. This includes flour, baking powder, baking soda, cinnamon, nutmeg, ginger, and salt. In a larger bowl, beat the eggs and granulated sugar together for about 3-4 minutes. The mix should look pale and fluffy. Next, mix in the pumpkin puree and vanilla extract until combined. Now, slowly add the dry mix to the pumpkin mixture. Stir gently until just combined. Pour the batter into the prepared pan. Spread it evenly using a spatula. Bake for 13-15 minutes. The cake should spring back when touched. Once baked, dust the hot cake with powdered sugar. Place a clean kitchen towel on top and flip the cake onto the towel. Gently peel away the parchment paper. Start rolling the cake from one edge of the towel. Keep it tight and let it cool completely in this rolled shape. These steps will help you create a perfect pumpkin roll cake. For the complete recipe, check out the Full Recipe. To get the right cake texture, focus on mixing. When you beat the eggs and sugar, do it well. This adds air and helps the cake rise. The batter should be smooth and slightly thick. Don't overmix once you add the dry ingredients. Stir until just combined to keep it light and fluffy. One common mistake is not preheating the oven. Always set the oven to 375°F before you start. Another error is letting the cake cool too long in the pan. Roll it right after baking for the best shape. Lastly, don't skip the powdered sugar dusting. It keeps the cake from sticking to the towel. Using the right tools makes this recipe easier. Here’s what you need: - A 15x10-inch jelly roll pan - Parchment paper to line the pan - An electric mixer for beating the eggs and filling - A clean kitchen towel for rolling - A sifter for the dry ingredients These tools help you create a perfect pumpkin roll. Don't forget to check the [Full Recipe] for more details! {{image_2}} You can easily switch up the flavor of your pumpkin roll cake. Adding spices can bring new life to this recipe. Try these options: - Cocoa Powder: For a chocolate twist, mix in 1/4 cup of cocoa powder. - Ginger: Increase the ginger to 1/2 teaspoon for a spicier kick. - Nutmeg: Up the nutmeg to 1/2 teaspoon for a warm flavor boost. These small tweaks can make a big difference. You can also add nuts like walnuts or pecans for extra crunch. Just chop them finely and blend them into the batter. If you need to adjust the recipe for dietary needs, there are simple swaps. Here are some ideas: - Gluten-Free: Use a gluten-free flour blend instead of all-purpose flour. This keeps the cake moist. - Vegan: Substitute the eggs with 1/4 cup of unsweetened applesauce for each egg. Use vegan cream cheese for the filling. These options let anyone enjoy the delicious pumpkin roll cake. Presentation matters when serving your pumpkin roll cake. Here are some fun ways to make it pop: - Dust with Powdered Sugar: A light dusting of powdered sugar adds a touch of elegance. - Add Whipped Cream: Serve slices with a dollop of whipped cream for a treat. - Garnish with Nuts: Sprinkle chopped nuts on top for a crunchy finish. These simple ideas can turn your cake into a show-stopping dessert. Check out the Full Recipe for more details. To store leftover pumpkin roll cake, wrap it tightly in plastic wrap. This keeps the cake moist and fresh. You can also place it in an airtight container. Make sure the cake cools completely before wrapping or storing. This helps prevent any sogginess. If you want to freeze the pumpkin roll cake, wrap it in plastic wrap first. Then add a layer of aluminum foil for extra protection. You can freeze it for up to three months. When ready to eat, thaw it in the fridge overnight. This method helps maintain its flavor and texture. The pumpkin roll cake stays fresh in the fridge for about 5 days. Always check for any signs of spoilage before eating. If it looks or smells off, it's best to throw it away. To enjoy it at its best, serve it chilled. For more detailed cooking methods, check the Full Recipe. Yes, you can make the pumpkin roll cake ahead of time. This cake keeps well in the fridge for a few days. Just wrap it tightly in plastic wrap to keep it fresh. For best results, fill the cake a day before serving. This allows the flavors to meld together and makes it even tastier. If you need a cream cheese substitute, use mascarpone cheese or Greek yogurt. Both options give a smooth texture. For a dairy-free choice, try coconut cream. Whip it until fluffy for a light filling. Just remember to adjust the sweetness if needed. To check if the cake is fully baked, gently press the center. It should spring back when done. You can also use a toothpick. Insert it into the cake; if it comes out clean, your cake is ready. Keep an eye on it as it bakes to avoid overcooking. You learned about making a pumpkin roll cake from ingredient lists to storage tips. I shared how to mix and bake the cake while avoiding common mistakes. You can even add your favorite flavors or make it vegan. Remember, practice makes perfect. With these steps, you’ll create a delicious cake. Enjoy sharing it with friends and family. Whether for a feast or a snack, this cake will be a hit!](https://juliesdish.com/wp-content/uploads/2025/07/fe64c80d-4ceb-4f63-85a8-023edf94a42b.webp)
If you’re craving a delicious fall treat, you’ve found the right recipe! This Easy Pumpkin Roll Cake offers a simple
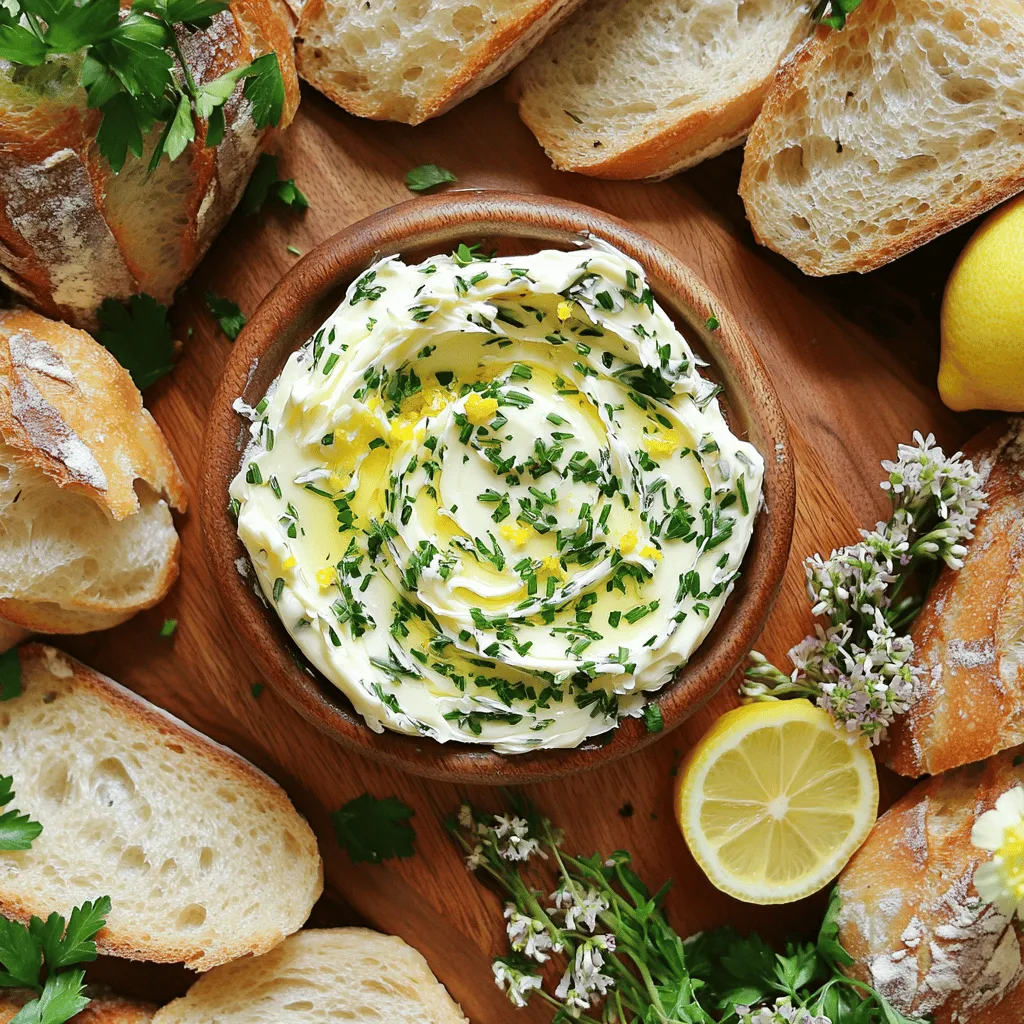
Looking to impress your guests at your next gathering? The Garlic Herb Butter Board is a delightful party spread that
