![- Young edamame pods - Olive oil - Garlic cloves The main ingredients are simple but pack a punch. Young edamame pods are fresh and green. They are the star of this dish. Olive oil helps to sauté and adds richness. Garlic cloves bring a strong, savory flavor that makes this snack pop. - Red pepper flakes - Soy sauce - Sesame oil Seasonings are where the magic happens. Red pepper flakes add heat and depth. You can adjust the amount based on your taste. Soy sauce gives a salty and umami boost. Sesame oil adds a nutty flavor that brings everything together. - Lime juice - Sea salt - Sesame seeds - Sliced green onions For garnish, lime juice adds freshness and tang. A sprinkle of sea salt enhances all the flavors. Sesame seeds give a nice crunch and visual appeal. Sliced green onions add color and a mild onion taste. You can mix and match these add-ins to make the dish your own. For the complete recipe, check out the Full Recipe section. - Boiling the edamame: First, boil a pot of salted water. The salt adds flavor. Once the water is boiling, add 2 cups of young edamame pods. Cook them for about 5-6 minutes. They should be tender but still firm. - Draining and setting aside: After cooking, drain the edamame in a colander. Let them sit for a moment to dry. This step keeps them from becoming soggy later. - Heating the olive oil: In a large skillet, pour in 3 tablespoons of olive oil. Heat it over medium heat. Don't let it smoke; you want it hot enough to cook the garlic. - Adding garlic and red pepper flakes: Now, add 4 minced garlic cloves and 1 teaspoon of red pepper flakes. Sauté this for 1-2 minutes. You want the garlic to smell amazing, but don’t let it burn. - Stirring in edamame: Next, add the cooked edamame pods to the skillet. Stir well so every pod gets coated in the garlic mixture. - Adding soy sauce and sesame oil: Pour in 2 tablespoons of soy sauce and 1 tablespoon of sesame oil. Toss everything together. This adds rich flavor to your dish. - Final seasoning adjustments: Let the mix cook for another 2-3 minutes. This is when the flavors blend. Before serving, sprinkle with sea salt. If you like, add 1 teaspoon of sesame seeds. Toss it one last time. Now, your spicy garlic edamame is ready to enjoy. This simple snack is packed with flavor and perfect for sharing! For the full recipe, check out the complete guide. Choose fresh edamame pods for the best taste. Look for bright green pods without brown spots. Firmness is key; they should feel plump and not shriveled. If you can find them, fresh edamame often tastes better than frozen. However, frozen edamame is convenient and still tasty. It’s usually picked at peak freshness and quick-frozen. Adjust spice levels to fit your taste. Start with one teaspoon of red pepper flakes. You can always add more if you want more heat. Timing is crucial when sautéing garlic. Cook it just until fragrant, about one to two minutes. If the garlic burns, it will taste bitter and ruin your dish. Pair your spicy garlic edamame with cold drinks. A crisp beer or a light white wine works well. For a fun twist, serve it with a side of dipping sauces. Presentation matters too! Use a nice bowl and sprinkle some sesame seeds on top. Add sliced green onions for a pop of color. This makes your dish look inviting. Enjoy it as a snack or a side dish. For the full recipe, check out the complete guide above. {{image_2}} You can make spicy garlic edamame even better with a few easy tweaks. Adding ginger gives your dish a nice zing. Grate fresh ginger and toss it in when cooking the garlic. It adds warmth and depth. You might also try different sauces. Teriyaki sauce can bring a sweet twist. Just replace half the soy sauce with teriyaki for a fun change. Want to make this snack fit your diet? It's simple! To make it gluten-free, swap regular soy sauce for tamari sauce. Many brands offer delicious gluten-free options. If you're looking for vegan alternatives, this recipe is already vegan. Just ensure your sauces are vegan-friendly. This way, everyone can enjoy the dish! Looking for a different way to cook edamame? You can oven-roast them. Toss the pods in olive oil and seasoning. Spread them on a baking sheet, then roast at 425°F for about 20 minutes. This method gives a nice crunch. You can also try air frying. It cooks them fast and keeps them crispy. Set your air fryer to 400°F and cook for about 8-10 minutes. It's a healthy and fun option! For the full recipe, check out the Spicy Garlic Edamame section above. To store leftover spicy garlic edamame, let it cool first. Place it in an airtight container. This keeps it fresh and tasty. You can store it in the fridge for up to three days. After three days, the flavor and texture may change. If you want to save edamame for later, freezing is a great option. Place the cooled edamame in a freezer bag. Remove as much air as you can to prevent freezer burn. This way, it stays good for about three months. When you are ready to use it, take out the amount you need. To defrost, place it in the fridge overnight or microwave it for a few minutes. To reheat, use a skillet over medium heat. This keeps the flavor bright and the texture firm. You can add a splash of olive oil to help. Avoid microwaving for too long, as it can make the edamame soggy. Just heat until warm, and enjoy your delicious snack again! Edamame are young soybeans picked before they fully mature. They are bright green and often served in the pod. - Nutritional benefits: Edamame is packed with protein, fiber, and vitamins. They are low in calories and high in antioxidants. One cup of edamame gives you about 17 grams of protein and 8 grams of fiber. This makes them a great snack for health-conscious eaters. - Common uses in cooking: You can eat edamame as a snack or add them to salads, stir-fries, or grain bowls. They also work well in sushi rolls and as a topping for ramen. Edamame adds color and nutrients to many dishes. Yes, you can use frozen edamame. It is a great time-saver and still tasty. - Cooking time adjustments: If using frozen edamame, add a few extra minutes to the cooking time. Boil them for about 7-8 minutes, or until they are heated through. - Tips for using frozen products: Always check the package for cooking instructions. You can steam frozen edamame too. Just follow the directions and enjoy the same delicious flavor. The spice level can vary based on your taste. You control how spicy it gets. - Customizing spice levels: For mild heat, use less red pepper flakes. If you love spice, add more! You can also use fresh chili peppers for an extra kick. - Recommendations for spice enthusiasts: If you love heat, try adding a dash of hot sauce or chili oil. Mix in some chopped jalapeños for a fresh, spicy twist. Enjoy experimenting with the flavors! For the full recipe, check out [Full Recipe]. In this post, we explored how to make spicy garlic edamame. We covered the main ingredients, seasonings, and garnishes that elevate this dish. You learned the steps to prepare edamame, cook the garlic mixture, and combine everything for a tasty finale. I shared tips for quality edamame and variations for different diets. Remember, even small tweaks can change the flavor. Enjoy your spicy garlic edamame, and feel free to adjust ingredients to suit your taste!](https://juliesdish.com/wp-content/uploads/2025/07/8d6d822d-52e5-41dc-a2ac-6974b3a762e1.webp)
Spicy Garlic Edamame Flavorful and Simple Snack
Looking for a tasty, healthy snack that packs a punch? Try my Spicy Garlic Edamame! This simple recipe blends young

Looking for a tasty, healthy snack that packs a punch? Try my Spicy Garlic Edamame! This simple recipe blends young

Are you ready for a flavor explosion? My Jalapeño Popper Chicken Casserole packs all the spicy, creamy goodness you crave.
![To make these spicy Korean chicken wings burst with flavor, you need key ingredients: - 2 lbs chicken wings - 1/4 cup gochujang (Korean chili paste) - 2 tablespoons soy sauce - 2 tablespoons honey - 1 tablespoon sesame oil - 2 cloves garlic, minced - 1 tablespoon ginger, grated - 1 teaspoon black pepper - 1 tablespoon rice vinegar - 1 tablespoon sesame seeds - 2 green onions, sliced These ingredients work together to create a sweet and spicy flavor. Gochujang brings heat, while honey adds sweetness. If you can't find gochujang, you can use sriracha or red pepper flakes. They won't taste the same, but they can add some heat. For honey, maple syrup works well too. If you're out of sesame oil, you can use olive oil, but it will change the flavor a bit. When buying chicken wings, look for wings that are pink and firm. Avoid any that appear gray or slimy. Fresh wings should also smell clean, not strong or sour. If you can, buy from a trusted butcher or market. Fresh wings make all the difference in your dish. For the full recipe, visit the [Full Recipe]. Gather your ingredients first. You need chicken wings, gochujang, soy sauce, honey, sesame oil, garlic, ginger, black pepper, rice vinegar, sesame seeds, and green onions. 1. Prep the Wings: Rinse the chicken wings in cold water. Dry them with paper towels. This step helps the wings get crispy. 2. Make the Marinade: In a big bowl, mix gochujang, soy sauce, honey, sesame oil, minced garlic, grated ginger, black pepper, and rice vinegar. Stir until it is smooth. 3. Marinate the Chicken: Toss the wings in the marinade until they are coated well. Cover the bowl with plastic wrap. Chill in the fridge for at least one hour. Overnight is better for flavor. 4. Preheat the Oven: Heat your oven to 400°F (200°C). Line a baking sheet with foil. Place a wire rack on top. This keeps the wings crispy while they cook. 5. Bake the Wings: Lay the wings in a single layer on the rack. Bake for 40-45 minutes. Flip them halfway through for even cooking. 6. Garnish and Serve: When done, take them out of the oven. Sprinkle sesame seeds and sliced green onions on top. Serve them hot for the best taste. For the full recipe, check the details above. Look for golden-brown wings. They should be crispy on the outside. Use a meat thermometer to check if they reach 165°F (75°C) for safe eating. Enjoy the spicy aroma as they bake! To get the best flavor, use fresh gochujang. This chili paste gives wings their signature kick. Mix it well with soy sauce, honey, and sesame oil for a tasty marinade. Don't skip the ginger and garlic; they add depth. Marinate your wings overnight for a stronger flavor. One common mistake is not drying the wings. Wet wings won’t become crispy. Another mistake is overcrowding the baking sheet. Give wings space so they cook evenly. Lastly, don’t rush the marinating process. Allowing time helps the flavors soak in. To make wings crispy, start by preheating your oven to 400°F (200°C). Use a wire rack over your baking sheet. This allows hot air to circulate around the wings. Bake them for 40-45 minutes, flipping halfway through. You’ll know they're done when they look golden brown. For extra crunch, broil for the last 2-3 minutes. Enjoy your crispy, spicy wings! {{image_2}} You can play with the marinade for your spicy Korean chicken wings. Here are some fun ideas: - Sweet and Spicy: Add more honey and a dash of chili flakes. - Garlic Lover’s: Increase the garlic to four cloves for a bold taste. - Citrus Twist: Mix in some orange juice or lime juice for a fresh zing. - Soy-Free Option: Use coconut aminos instead of soy sauce for a lighter option. Experimenting with these flavors can make each batch unique. You can cook your wings in different ways. Here are three popular methods: - Baking: This is my go-to method. It keeps the wings crispy and easy. Just set your oven to 400°F (200°C) and bake for 40-45 minutes. - Frying: For a crunchy exterior, deep-fry the wings in hot oil. Cook them for about 8-10 minutes until golden brown. - Grilling: If you love smoky flavors, grill your wings on medium heat. Cook them for about 15-20 minutes, turning often. Each method gives a different taste and texture, so try them all! Serve your spicy Korean chicken wings with tasty sides. Here are some great ideas: - Pickled Vegetables: The crunch and tanginess balance the heat well. - Rice: A bowl of white or fried rice helps soak up the sauce. - Dipping Sauces: Try a creamy garlic dip or a cool cucumber sauce. - Salad: A fresh green salad gives a nice crunch and lightens the meal. These sides not only complement the wings but also make your meal more exciting! For the full recipe, check the section above. After enjoying your spicy Korean chicken wings, you might have some left. To keep them fresh, let the wings cool down first. Place them in an airtight container. This keeps air out and helps them stay tasty. Store the container in your fridge. They will last about three days. If you want to eat them later, freezing is a great option. When you are ready to eat the leftover wings, reheating is key. The oven is your best friend here. Preheat your oven to 375°F (190°C). Place the wings on a baking sheet. Bake them for about 10-15 minutes. This helps them get crispy again. You can also use an air fryer for this. Set it to 360°F (182°C) and cook for about 8-10 minutes. Both methods keep the wings crunchy and delicious. If you want to save wings for a longer time, freezing works well. First, make sure the wings are fully cooled. Wrap them tightly in plastic wrap or foil. Then, place them in a freezer bag. Squeeze out as much air as possible before sealing. This helps prevent freezer burn. You can freeze them for up to three months. When you are ready to eat, thaw them in the fridge overnight before reheating. For best flavor, try to eat them sooner rather than later. Enjoy your wings! Gochujang is a thick, spicy Korean chili paste. It has a sweet and savory flavor. You can find gochujang in most Asian markets. It is also available in the international section of many grocery stores. Look for it in jars or tubes. If you can't find it locally, you can buy it online. Yes, you can use chicken drumsticks. Drumsticks will still taste great with the marinade. They may take longer to cook than wings. Adjust the cooking time to ensure they are fully cooked. Always check that the internal temperature reaches 165°F (75°C). Many great places serve spicy Korean chicken wings. Check local Korean BBQ spots or wings joints. You can often find them in cities with diverse food scenes. Some popular chains also offer a version of spicy wings. Look for places with good reviews online. They often share their twist on this classic dish. Spicy Korean chicken wings offer a tasty treat full of flavor and fun. We explored key ingredients, cooking methods, and tips for the perfect dish. Remember to choose fresh wings and be mindful of cooking techniques. With many variations and serving options, you can customize your wings to fit any occasion. Proper storage ensures you enjoy leftovers without losing taste. Dive into making your perfect batch, and enjoy the satisfaction of cooking this delightful dish. Your kitchen adventure awaits!](https://juliesdish.com/wp-content/uploads/2025/07/021a5752-6690-4f76-bb0b-28e95620df38.webp)
Are you craving a burst of flavor that will make your taste buds dance? My spicy Korean chicken wings recipe

Start your day with a burst of flavor! Cherry Almond Overnight Oats is a tasty and nutritious dish that packs
![- 1 pound boneless, skinless chicken breast - Fresh herbs: parsley, thyme, rosemary - Garlic and seasoning essentials: salt, pepper, and lemon juice To make garlic herb chicken kabobs, start with fresh and high-quality ingredients. The chicken breast is the star here. Boneless and skinless pieces work best. They cook evenly and stay tender. Fresh herbs like parsley, thyme, and rosemary add great flavor. Always use fresh herbs if you can; they make a big difference. Garlic is key in this recipe. It gives a strong and tasty punch. Use four cloves of minced garlic for the best flavor. Lastly, don't forget salt and pepper. They enhance all the other flavors. A splash of lemon juice brightens everything up. - Red bell pepper chunks - Yellow bell pepper chunks - Red onion wedges Now, let’s talk about the vegetables. Red and yellow bell peppers add color, crunch, and sweetness. Cut them into bite-sized chunks. Red onion wedges provide a nice contrast in flavor. They caramelize beautifully on the grill. You can mix and match your veggies. Feel free to toss in zucchini or cherry tomatoes. They work well and add more flavor. Just think about how they will grill together. - Additional vegetables (zucchini, cherry tomatoes) - Marinade variations Looking to change things up? You can create different marinades. Try adding spices like paprika or cumin for a smoky flavor. Just remember, the marinade needs to complement the chicken and veggies. You can also play with the ratios of garlic and herbs to find your perfect taste. For a twist, add some additional veggies to your skewers. Zucchini slices grill up nice, and cherry tomatoes burst with flavor. This adds variety and can make your kabobs even more colorful and fun. For the full recipe and detailed instructions, check out the [Full Recipe]. To start, I prepare the marinade. I mix minced garlic, chopped herbs, and olive oil in a bowl. This blend brings a bright, fresh flavor to the chicken. I add lemon juice, salt, and pepper to enhance the taste. Then, I coat the chicken cubes in the marinade. I cover the bowl and let it sit in the fridge. A good marinating time is at least 30 minutes, but I often let it marinate for up to two hours. This longer time makes the chicken even tastier. Next, I prepare the skewers. If I use wooden skewers, I soak them in water for about 30 minutes. Soaking helps prevent burning on the grill. If I prefer metal skewers, I skip this step. Metal skewers are great because they hold heat well and are easy to reuse. Now, I assemble the kabobs. I take a skewer and start adding the marinated chicken. I like to alternate chicken pieces with colorful chunks of bell peppers and onion wedges. This not only adds flavor but also makes the kabobs look great. I ensure an even distribution of chicken and veggies. This way, every bite has a mix of flavors. It’s time to grill! I preheat my grill to medium-high heat. This temperature is perfect for cooking chicken. I also lightly oil the grill grates to stop sticking. I place the kabobs on the grill and cook them for 10 to 15 minutes. I turn them often to achieve nice grill marks. I check the chicken's internal temperature; it should reach 165°F (75°C) to be safe. Once cooked, I remove the kabobs from the grill. I let them rest for a couple of minutes before serving. This resting time helps keep the chicken juicy. I love to sprinkle fresh herbs on top for added flavor. These kabobs pair well with rice, a fresh salad, or grilled veggies. Enjoying them hot makes the meal even better! For the full recipe, check out [Full Recipe]. To cook chicken kabobs just right, you need to know the internal temperature rule. Always aim for an internal temperature of 165°F (75°C) for safe eating. Using a meat thermometer helps you avoid undercooking or overcooking. To keep the chicken juicy, marinate it well. I suggest marinating for at least 30 minutes. However, letting it soak for up to 2 hours gives even better flavor. This makes the chicken tender and packed with taste. Want to spice things up? You can add cumin or paprika for a smoky kick. If you like a thicker marinade, try adding a spoon of Greek yogurt. This gives the chicken a creamy texture and holds onto the flavors better. When serving kabobs, consider creative plating. You can arrange them on a large platter with fresh herbs. This adds color and makes it look fancy. Dipping sauces also enhance the meal. Try a tangy yogurt sauce or a zesty chimichurri. These options pair well with the garlic herb chicken kabobs. Remember, a good presentation can make your meal more enjoyable. For the full recipe, check out the Garlic Herb Chicken Kabobs section above. {{image_2}} You can change up the protein in garlic herb chicken kabobs. Try using tofu, shrimp, or beef. For tofu, press it to remove extra water. Cut it into cubes and marinate just like chicken. Shrimp cooks fast, so marinate for only 15 minutes. Beef needs a longer marination time of about two hours. - Tofu: Press and cube before marinating. - Shrimp: Marinate for 15 minutes. - Beef: Use a two-hour marination for flavor. If you want a veggie twist, use vegetables and plant-based proteins on your skewers. You can use zucchini, mushrooms, cherry tomatoes, and bell peppers. Mix these with a tasty marinade. A great marinade can include olive oil, lemon juice, and your favorite herbs. This keeps the veggies juicy and bright. - Skewering Ideas: Zucchini, mushrooms, and cherry tomatoes. - Marinade: Olive oil, lemon juice, and herbs. You can change the flavor of your kabobs easily. Use different herbs and spices to keep things exciting. Basil, oregano, or even cumin can add a new taste. You can also try using flavored oils or infused vinegar. These can enhance the dish with a burst of flavor. - Herb Ideas: Basil, oregano, or cumin. - Flavored Oils: Try garlic-infused or chili oil. Experiment with these variations to find your favorite. For the full recipe, check out the Garlic Herb Chicken Kabobs section above. To keep your garlic herb chicken kabobs fresh, store them in a sealed container. Refrigerate the kabobs within two hours after cooking. This helps prevent bacteria growth. They will last up to three days in the fridge. When you are ready to eat, reheat them in the oven or microwave. For the best texture, use the oven at 350°F (175°C) for 10 minutes. This method keeps the chicken juicy while warming it through. You can freeze both uncooked and cooked kabobs. For uncooked kabobs, place them in a freezer bag and remove excess air. They can stay in the freezer for up to three months. When ready to cook, thaw them in the fridge overnight. For cooked kabobs, let them cool before freezing. Reheat from frozen or thaw first. If you thaw, warm them in the oven for a tender bite. Meal prep can make your life easier. Start by marinating the chicken and chopping the veggies ahead of time. Store them in separate containers in the fridge. You can also assemble kabob stacks in advance. Just thread the chicken and vegetables onto the skewers. Keep them covered in the fridge until it’s time to grill. This way, you have an easy meal ready to go! I recommend marinating chicken kabobs for at least 30 minutes. This time helps the flavors soak in. For even better taste, you can marinate them for up to 2 hours. Longer marination boosts the garlic and herb flavors. Grill chicken kabobs at medium-high heat, around 400°F (200°C). This temperature cooks the chicken evenly. It also gives a nice char on the outside. Always check if the chicken reaches 165°F (75°C) inside. Yes, you can make kabobs without skewers! You can grill the marinated chicken and veggies on a grill pan. Alternatively, you can use a baking sheet in the oven. Just spread the pieces out for even cooking. Many sides work well with garlic herb chicken kabobs. You can try garlic rice or a fresh salad. Grilled vegetables or corn on the cob also make great choices. These sides enhance the kabobs and add color to your plate. To prevent sticking, oil the grill grates before cooking. You can also oil the kabobs lightly. Make sure the grill is hot enough before placing the kabobs on it. This helps create a nice sear and keeps them from sticking. For more ideas, check the Full Recipe. In this guide, we covered how to make tasty chicken kabobs. We talked about the right ingredients, like fresh herbs and colorful veggies. The step-by-step instructions helped you marinate, assemble, and grill the kabobs perfectly. With tips on flavor and storage, you learned how to keep them tasty. Now, you can enjoy delicious kabobs anytime. Experiment with flavors and have fun grilling!](https://juliesdish.com/wp-content/uploads/2025/07/b8ac7529-cc9c-4636-8b52-e2ad5c90943d.webp)
If you’re looking for a quick, delicious meal, you’re in the right place! Garlic Herb Chicken Kabobs are a tasty
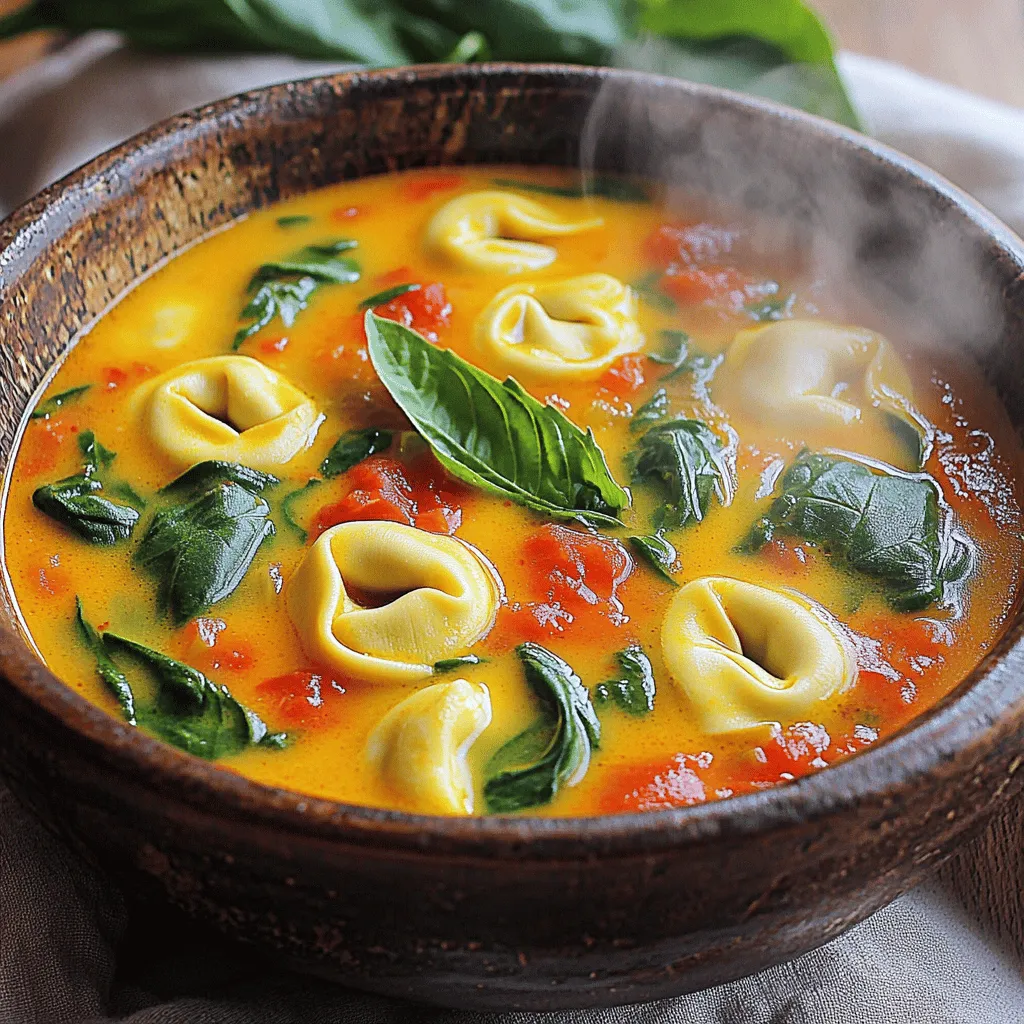
Are you ready to enjoy a warm bowl of comfort? In Creamy Tomato Basil Tortellini Soup: Simple and Savory, I’ll
. To keep your Caprese stuffed avocado fresh, store it in an airtight container. If you have leftovers, cover them tightly. This helps prevent air from turning the avocado brown. You can also add some lemon juice on top. The acidity slows down browning. Your stuffed avocados will last about two days in the fridge. After that, the taste and texture may change. If you notice any browning, it’s still safe to eat, but it may not look as nice. Always check for any off smells before eating. Reheating stuffed avocados is not the best option. The texture of the avocado can change, becoming mushy. If you must, use a microwave for a short time. Heat it in 10-second bursts to avoid overcooking. Enjoy it cold for the best taste! For a detailed look at how to make this dish, check out the Full Recipe. Yes, you can prepare the filling ahead of time. Make the Caprese mixture and store it in the fridge. However, I recommend waiting to stuff the avocados until you are ready to serve. This keeps them fresh. If you do stuff them early, the avocados may brown quickly. If you want a different flavor, try using burrata cheese. It has a creamy texture that works well. You can also use feta or goat cheese for a tangy twist. These options bring their own unique taste to the dish. To make a low-carb version, skip the mozzarella and use more cherry tomatoes. You could also add olives or nuts for added crunch. These changes keep the dish light and fresh while still being delicious. To stop your avocados from browning, sprinkle lemon or lime juice on the flesh. This adds flavor and keeps them looking nice. You can also cover the stuffed avocados tightly with plastic wrap before serving. This helps keep air out and slows down browning. This post covered all you need to know about Caprese stuffed avocados. We looked at the key ingredients, easy steps to prepare them, and tips for the best results. You can mix things up with various flavors or ways to serve. Proper storage helps keep leftovers fresh. Remember, you can even make these ahead of time. Dive into these tasty avocados, and enjoy the fresh flavors and healthy benefits they offer!](https://juliesdish.com/wp-content/uploads/2025/07/23f65fa4-528b-4e63-b44e-9b99bbd51c98.webp)
Treat yourself to a fresh and flavorful delight with my Caprese Stuffed Avocado recipe! This dish combines creamy avocado with
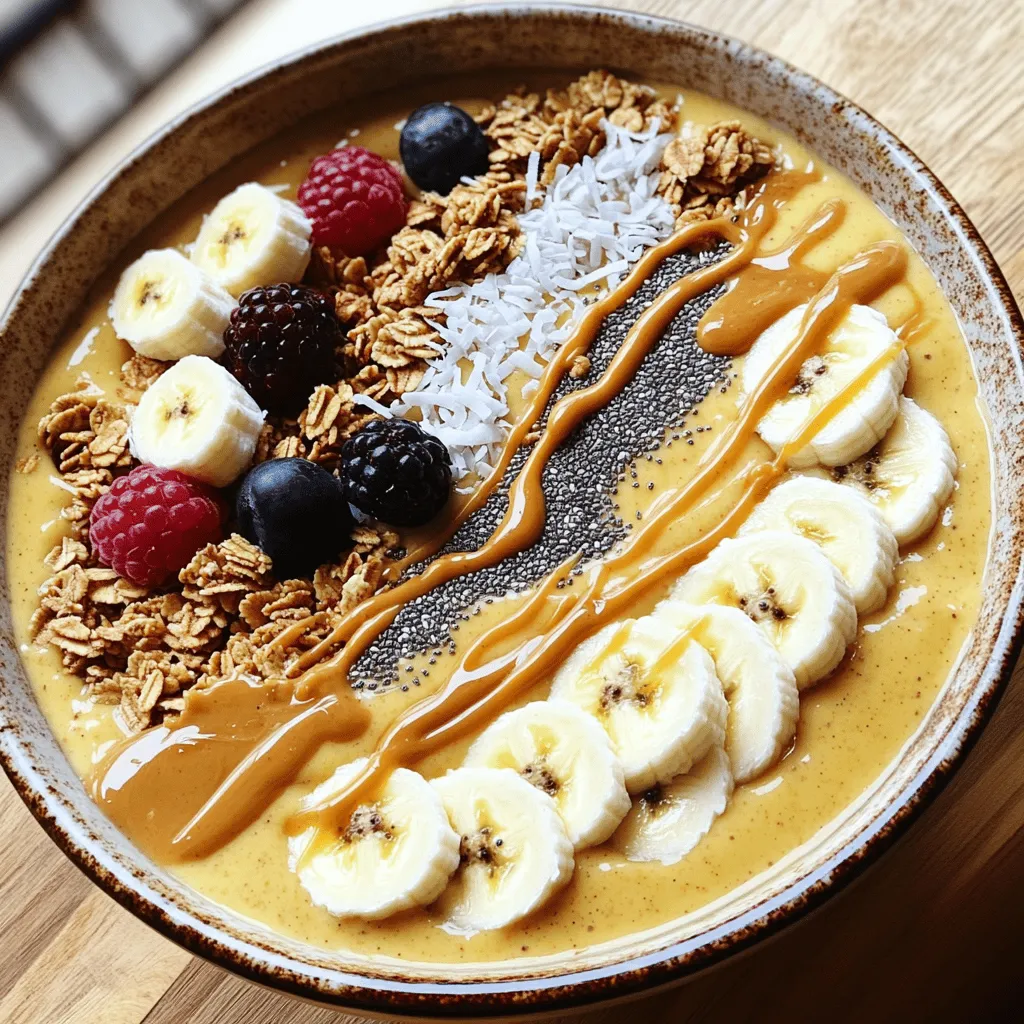
If you crave a tasty and healthy treat, the Peanut Butter Banana Smoothie Bowl is for you! This yummy bowl

If you’re looking for a breakfast that’s both simple and tasty, oatmeal raisin breakfast cookies are the perfect choice! Packed
. To get the best flavor, balance the honey and Sriracha. The honey adds sweetness, while Sriracha brings heat. You can adjust the heat level by adding more or less Sriracha. For a deeper taste, add a splash of lime juice to the glaze. This adds a bright note that pairs well with salmon. Using fresh ginger and garlic boosts the flavor. Always use fresh ingredients for the best results. One big mistake is overcooking the salmon. Salmon cooks fast, so watch it closely. If you cook it too long, it becomes dry. Another mistake is not seasoning the salmon well. A sprinkle of salt and pepper enhances the taste. Avoid using high heat when cooking the salmon. High heat can burn the glaze before the fish cooks through. Lastly, don’t skip the basting step. Basting keeps the salmon moist and flavorful. A large non-stick skillet works best for this dish. It helps to achieve a nice sear on the salmon. A whisk is needed to mix the glaze well. Use a meat thermometer to check doneness. It should read 145°F for perfect salmon. A spatula helps to flip the salmon gently without breaking it. Lastly, have a serving platter ready to present your dish beautifully. For a complete guide, check the Full Recipe. {{image_2}} You can make your Honey Sriracha glazed salmon even better by adding vegetables. I love using broccoli, bell peppers, and snap peas. These veggies bring color and crunch to the dish. - Broccoli: Steam or sauté until bright green. - Bell Peppers: Slice them thin for quick cooking. - Snap Peas: Add them for a sweet flavor. Cook the veggies in the same skillet after the salmon. This way, they soak up the tasty glaze. Toss them in right before serving for a fresh bite. If Sriracha is not your thing, no problem. You can try other hot sauces like sambal oelek or chili garlic sauce. These options give a different flavor and heat level. - Sambal Oelek: It has a chunky texture and is less sweet. - Chili Garlic Sauce: This sauce adds a nice garlicky kick. Feel free to adjust the amount of these sauces. It’s all about finding your perfect heat. When serving your Honey Sriracha glazed salmon, side dishes make a big difference. Here are my favorites: - Jasmine Rice: The sweetness pairs well with the salmon. - Quinoa: A nutty option that adds protein. - Roasted Asparagus: The earthy flavor balances the glaze. These sides not only taste great but also create a colorful plate. Enjoy mixing and matching to find your best combo. For the full recipe, be sure to check out the instructions above! To keep your honey Sriracha glazed salmon fresh, place it in an airtight container. Make sure the salmon cools down to room temperature first. Store it in the fridge for up to three days. If you want to enjoy it later, you can also freeze it. When you're ready to eat leftovers, reheating is simple. Preheat your oven to 350°F. Place the salmon on a baking sheet. Cover it with foil to prevent drying out. Heat for about 10-15 minutes until warmed through. You can also use a microwave, but it may affect the texture. For freezing, wrap each salmon fillet tightly in plastic wrap. Then, place them in a freezer-safe bag. Squeeze out any air before sealing. Frozen salmon can last for up to three months. When you're ready to cook it, thaw overnight in the fridge before reheating. Enjoy your honey Sriracha glazed salmon later with ease! For more details, check the Full Recipe. If you want a milder sauce, try using chili garlic sauce. It adds flavor without too much heat. You can also mix hot sauce with honey for sweetness. Another option is to use red pepper flakes mixed in soy sauce. This gives a nice kick but keeps it manageable. Yes, you can use frozen salmon. Just thaw it completely before cooking. Place the salmon in the fridge overnight to thaw it safely. If you're short on time, you can run cold water over the sealed package to speed up the process. Make sure to pat it dry before seasoning. To cut the spice, reduce the amount of Sriracha. Start with just one tablespoon and taste the glaze. You can also add more honey. This balances the heat with sweetness. Another idea is to add a bit of plain yogurt or sour cream as a topping. It cools down the dish nicely. For the full recipe, check out the earlier section. In this blog post, we explored making Honey Sriracha Glazed Salmon. You learned about key ingredients, preparation steps, and tips for the best flavor. We also discussed cooking variations, storage, and common questions. Enjoy this tasty dish with its sweet and spicy kick. With practice, you’ll perfect it. Try new sides or veggies to make it your own. I hope you feel inspired to cook this easy and delicious meal.](https://juliesdish.com/wp-content/uploads/2025/07/9cf26ea1-a632-4e42-b975-dc8ca2e58979.webp)
Are you ready to wow your taste buds? This Honey Sriracha Glazed Salmon recipe is not only delicious, but it’s
