
Buttermilk Blueberry Pancakes Fluffy and Delicious Treat
Get ready to elevate your breakfast game with my Buttermilk Blueberry Pancakes! These pancakes are fluffy, delicious, and perfect for

Get ready to elevate your breakfast game with my Buttermilk Blueberry Pancakes! These pancakes are fluffy, delicious, and perfect for

Get ready to enjoy a burst of flavor with my Pineapple Teriyaki Meatballs! This simple recipe merges sweet and savory
![To make this hearty soup, you will need the following key ingredients: - 1 lb ground beef (or ground turkey for a lean option) - 1 medium onion, diced - 2 cloves garlic, minced - 3 medium potatoes, diced - 4 cups beef broth - 1 cup carrots, diced - 1 cup celery, diced - 1 teaspoon Italian seasoning - 1 tablespoon Worcestershire sauce - Salt and pepper to taste - 1 cup cheddar cheese, shredded - 1 tablespoon olive oil - 1/2 cup heavy cream (optional for creaminess) - Fresh parsley for garnish These ingredients work together to create a warm, filling meal. The ground beef adds protein, while the veggies give texture and flavor. The broth brings everything together, making it a true comfort food. While the base recipe is delicious, you can add extra flavors with these optional ingredients: - Crispy bacon bits for a smoky touch - Hot sauce for heat - Bell peppers for sweetness and crunch - Fresh herbs like thyme or dill for freshness Feel free to mix and match! These extras can elevate your soup and make it your own. Here’s a breakdown of the nutritional benefits of the main ingredients: - Ground beef: Rich in protein and iron, helps build muscles. - Onions: Packed with vitamins and antioxidants, great for heart health. - Garlic: Boosts the immune system and adds flavor. - Potatoes: A good source of carbs and fiber, keeps you full. - Carrots and celery: High in vitamins and add crunch. - Cheddar cheese: Provides calcium and makes the soup creamy. - Heavy cream: Adds richness but can be left out for a lighter meal. Using these ingredients, you can enjoy a nutritious meal that fills you up and warms your heart. If you want the full recipe, check it out! To make One-Pot Cheeseburger Soup, start by gathering your ingredients: - 1 lb ground beef (or ground turkey for a lean option) - 1 medium onion, diced - 2 cloves garlic, minced - 3 medium potatoes, diced - 4 cups beef broth - 1 cup carrots, diced - 1 cup celery, diced - 1 teaspoon Italian seasoning - 1 tablespoon Worcestershire sauce - Salt and pepper to taste - 1 cup cheddar cheese, shredded - 1 tablespoon olive oil - 1/2 cup heavy cream (optional for creaminess) - Fresh parsley for garnish Cooking steps: 1. In a large pot, heat the olive oil over medium heat. Add the diced onion and minced garlic. Sauté until the onion turns translucent, about 3-4 minutes. 2. Next, add the ground beef (or turkey) to the pot. Cook until it browns, breaking it up with a spoon as it cooks. This takes around 5-7 minutes. Drain any excess fat if needed. 3. Stir in the diced potatoes, carrots, and celery, mixing well with the meat and onions. 4. Pour in the beef broth. Add Italian seasoning, Worcestershire sauce, salt, and pepper. Bring this mixture to a boil. Once boiling, reduce the heat and let it simmer for about 20 minutes, until the potatoes and carrots are tender. 5. If you want a creamier soup, stir in the heavy cream. Then add the shredded cheddar cheese. Stir until the cheese melts and everything combines well. 6. Taste your soup and adjust the seasoning if needed. 7. Serve hot. Garnish with fresh parsley on top for a pop of color. - Use fresh ingredients: Fresh veggies and herbs make a big difference in taste. - Don’t rush: Allow the soup to simmer fully for the best flavors to develop. - Adjust to taste: Always taste your soup before serving. Add more salt or pepper if needed. - Cheese choice: Use high-quality cheddar for the best melt and flavor. This simple and quick process makes the One-Pot Cheeseburger Soup a great choice for busy days. You can find the full recipe linked for more details. To make your soup creamier, add heavy cream when you finish cooking. This adds a rich flavor and smooth texture. You can also use cream cheese for a different taste. Blend it smooth before adding it to the pot. If you want a lighter option, use half-and-half. It still gives a creamy feel without too many calories. Reheating this soup is easy and quick. Use a pot over medium heat for best results. Stir often to keep it smooth. You can also use a microwave for quick reheating. Just cover the bowl to avoid spills. Heat in short bursts, stirring in between. This keeps the soup from getting too hot or thick. You can easily customize this recipe for various diets. If you're vegetarian, use plant-based ground meat or lentils. Swap beef broth for vegetable broth to keep it veggie-friendly. For a low-carb option, replace potatoes with cauliflower. This makes the soup lighter but still filling. For lactose-free needs, try dairy-free cheese and coconut milk. These swaps keep the flavor while fitting your diet. For the full recipe, check out the details above. {{image_2}} You can easily adapt this recipe to make it vegetarian. Instead of beef, use plant-based ground meat. You can also add beans for protein and fiber. Mushrooms give a nice, meaty texture, too. Use vegetable broth instead of beef broth for the soup base. This will keep the flavors rich without using meat. You can follow the full recipe, making these easy swaps. If you like heat, add some spice! You can mix in jalapeños or chili powder to the pot. Hot sauce is another great choice; stir it in when you add the cheese. Pepper jack cheese is an excellent substitute for cheddar. It adds creaminess and a nice kick. Adjust the spice level to suit your taste. This twist will give your soup an exciting flavor boost. For a low-carb version, skip the potatoes. Use cauliflower instead; it gives a similar texture. You can also add zucchini or spinach for more veggies. Use a low-carb broth and keep the cheese for flavor. Heavy cream is still a great option here, adding richness without the carbs. This way, you get all the deliciousness without the extra carbs. Enjoy this healthy take on cheeseburger soup! After enjoying your delicious one-pot cheeseburger soup, store leftovers quickly. Let the soup cool down to room temperature. Pour it into an airtight container. This helps keep the soup fresh. Store it in the fridge for up to three days. When you're ready to eat, just reheat it on the stove or in the microwave. Freezing is a great way to keep your soup for longer. To freeze, let the soup cool completely. Then, transfer it into freezer-safe containers or bags. Leave some space at the top, as the soup will expand when frozen. Label the containers with the date. You can freeze it for up to three months. When you are ready to enjoy it, thaw in the fridge overnight. Reheat on the stove for best results. The shelf life of cheeseburger soup is key to safe eating. In the fridge, it lasts about three days. If you freeze it, aim to eat it within three months for best taste. Always check for signs of spoilage. If the soup smells off or looks strange, it’s best to throw it away. Remember, food safety is important! Enjoy your one-pot meal safely and deliciously. For the complete recipe, refer to the [Full Recipe]. The prep time for One-Pot Cheeseburger Soup is about 10 minutes. Cooking it takes around 25 minutes. So, you can have a warm, tasty meal ready in about 35 minutes. This quick timeline makes it easy to fit into a busy day. Yes, you can make this soup in advance. It stores well in the fridge for up to three days. Just cool it down before you put it in a container. When you want to serve it, heat it on the stove or in the microwave. If you like, you can add a bit of milk or cream to help it stay creamy. I love serving One-Pot Cheeseburger Soup with crusty bread or soft rolls. A side salad also pairs well for a complete meal. For extra flavor, top the soup with chopped pickles or a dollop of sour cream. You can also sprinkle some extra cheese on top before serving. These small touches make the soup even more delicious. For the full recipe, check out the original source. In this blog post, we explored how to make delicious One-Pot Cheeseburger Soup. We covered essential and optional ingredients that add flavor. I shared cooking methods and helpful tips for creamy soup results. You can also find fun variations, like vegetarian and spicy options. Lastly, we discussed how to store leftovers and answered common questions. Enjoy your cooking, and remember that this easy soup can fit many tastes and diets. Happy cooking!](https://juliesdish.com/wp-content/uploads/2025/07/8f18fd92-c2f0-48b2-87e4-72a55ef99d21.webp)
Welcome to your new favorite comfort food: One-Pot Cheeseburger Soup! Picture a rich, creamy blend of beef, cheese, and veggies

Get ready to spice up your dinner with my Mango Habanero Wings! This flavorful recipe combines juicy chicken wings with

Looking for a quick, delicious dinner idea? You’ve found it! This Creamy Roasted Red Pepper Pasta is the perfect combination
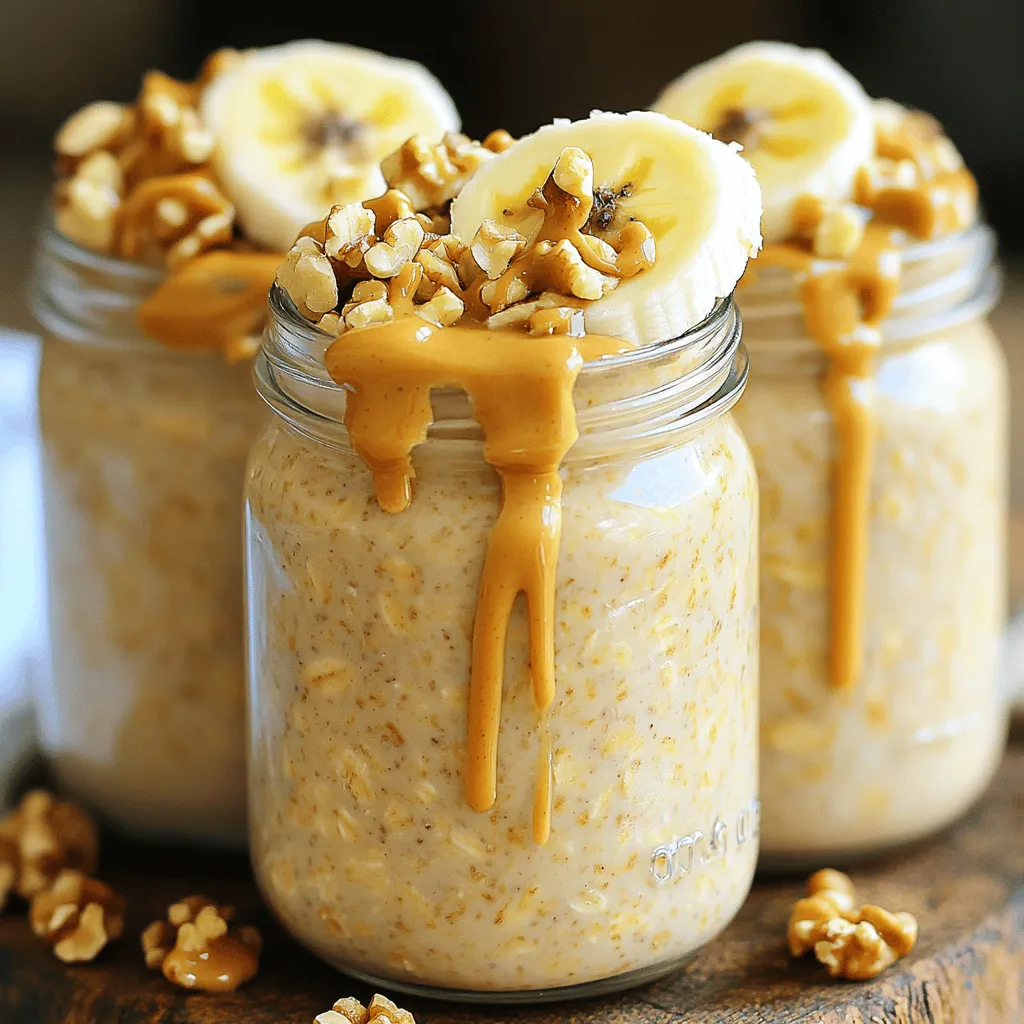
Are you ready to transform your breakfast game? Banana Nut Overnight Oats are a quick and tasty way to fuel

Looking for a crunchy snack that packs a punch? You’ll love these Sriracha Honey Roasted Chickpeas! They’re spicy, sweet, and

Looking for a quick and tasty dinner idea? Try my creamy roasted red pepper pasta! It’s easy to make and

Craving a cool drink on a hot summer day? Look no further than Strawberry Basil Lemonade! This tasty blend of

Get ready to whip up a treat that brings a splash of joy to your kitchen! This easy Cranberry Orange
