Skip to content
DisclaimerTerms Of UseGDPR PolicyCookie Policy

juliesdish

  • Home
  • Drinks
  • Appetizers
  • Dinner
  • Dessert
  • About
  • Contact
  • Privacy Policy
DisclaimerTerms Of UseGDPR PolicyCookie Policy

NO-ING-IMG

- 2 cups cooked chicken, shredded - 1 cup black beans, drained and rinsed - 1 cup corn kernels (fresh, frozen, or canned) - 1 cup diced bell peppers (red and green) - Spices: cumin, chili powder, garlic powder - 8 flour tortillas (8 inches each) - 2 cups shredded cheese (cheddar and Monterey Jack blend) - 2 cups enchilada sauce (store-bought or homemade) - Fresh cilantro and sour cream for garnish In this recipe, the main ingredients create a hearty and flavorful filling. Shredded chicken gives protein and richness. Black beans add fiber, and corn brings sweetness. Diced bell peppers add crunch and color. For spices, cumin offers warmth, while chili powder adds a nice kick. Garlic powder enhances all the flavors. The flour tortillas are perfect for wrapping the filling tightly. The cheese blend melts beautifully and provides a creamy texture. Enchilada sauce adds moisture and tang. Lastly, fresh cilantro and sour cream are great for garnishing. You can find the full recipe for Cheesy Fiesta Chicken Enchiladas [Full Recipe]. - Preheat your oven to 350°F (175°C). - In a large bowl, mix the shredded chicken with black beans, corn, and bell peppers. This mix gives the enchiladas a hearty flavor. - Spread a thin layer of enchilada sauce on the bottom of your baking dish. This stops the tortillas from sticking. - Take a tortilla and fill it with about 1/3 cup of the chicken mixture. Add a sprinkle of cheese on top of the filling, then roll the tortilla tightly. Place it seam-side down in the prepared baking dish. Repeat this for all the tortillas. - Cover the baking dish with foil and bake for 20 minutes. This helps the enchiladas cook evenly. - After 20 minutes, remove the foil. Bake for an additional 10-15 minutes until the cheese is bubbly and slightly golden. This step makes the cheese melt perfectly. - Once done, take the dish out and let it cool for a few minutes. Garnish with fresh cilantro before serving. Enjoy your cheesy fiesta chicken enchiladas! You can find the full recipe in the article. - Use homemade enchilada sauce for enhanced flavor. This sauce adds depth to your dish. - Ensure tortillas are warm for easy rolling. Warm tortillas bend without tearing. - Offer sour cream and fresh cilantro on the side. These toppings enhance the taste. - Pair with Mexican rice or refried beans. Both add heartiness to your meal. - Overfilling tortillas can lead to breakage. Use about 1/3 cup of filling per tortilla. - Not covering with foil during initial baking can dry out your enchiladas. Keep them moist! For a full guide to making these enchiladas, check the Full Recipe. {{image_2}} You can easily change the main filling. Replace chicken with shredded beef for a heartier dish. For a vegetarian twist, sauté bell peppers, zucchini, or mushrooms. These swaps keep your meal fresh and exciting. Cheese choices also matter. Try pepper jack for a spicy kick, or use a blend of mozzarella and cheddar. Each mix brings unique flavors to your enchiladas. Do you like heat? Add sliced jalapeños inside the enchiladas or on top. They add a nice crunch and spice. If you prefer mild flavors, choose a gentle enchilada sauce. This way, everyone can enjoy the meal without burning tongues. Serving enchiladas can be fun! Pair them with guacamole for creaminess. Pico de gallo adds freshness and zest. You can also turn your enchiladas into a casserole. Layer the ingredients in a baking dish instead of rolling them. This style is great for feeding a crowd. For the full recipe, check out the Cheesy Fiesta Chicken Enchiladas. Store leftover chicken and cheese enchiladas in an airtight container. They will stay fresh in the fridge for up to 3 days. Make sure to let them cool down before sealing the container. This helps keep the texture and flavor intact. You can freeze either assembled or baked enchiladas. Just wrap them tightly in plastic wrap and then foil. This method prevents freezer burn. When you want to enjoy them again, thaw them in the fridge overnight before reheating. For the best taste, reheat enchiladas in the oven. Preheat it to 350°F (175°C). Place the enchiladas in a baking dish, cover with foil, and heat for about 20 minutes. If you prefer a quicker method, use the microwave. Just heat them for 1-2 minutes until hot. Enjoy your delicious meal! For the full recipe, check out the Cheesy Fiesta Chicken Enchiladas. To make homemade enchilada sauce, you need a few simple ingredients. Start with these: - 2 tablespoons olive oil - 2 tablespoons flour - 2 tablespoons chili powder - 1 teaspoon cumin - 1 cup chicken or vegetable broth - 1 can (15 oz) tomato sauce - Salt to taste 1. In a saucepan, heat the olive oil over medium heat. 2. Add flour and stir for a minute. 3. Mix in chili powder and cumin. Stir for another minute. 4. Gradually add the broth, mixing well to avoid lumps. 5. Stir in the tomato sauce and salt. 6. Simmer for 10 minutes until thickened. This sauce is perfect for your Chicken and Cheese Enchiladas. You can also use store-bought sauce if you are short on time. Yes, you can prepare Chicken and Cheese Enchiladas ahead of time. Here’s how: 1. Assemble the enchiladas as per the recipe. 2. Place them in a baking dish. 3. Cover tightly with plastic wrap or foil. 4. Freeze them for up to two months. When you are ready to bake, just remove them from the freezer. Let them thaw in the fridge overnight. Then, bake as usual. This way, you save time on busy days. A few side dishes pair nicely with Chicken and Cheese Enchiladas. Here are my top picks: - Mexican rice - Refried beans - Black bean salad - Guacamole - Corn salad These sides add color and flavor to your meal. They also enhance the experience of enjoying your enchiladas. Try them out for a complete dinner! You can make delicious chicken and cheese enchiladas with easy steps. Start with cooked chicken, beans, and corn. Add cheese and sauce for amazing flavor. Remember to warm your tortillas for easy rolling and use foil while baking. For a twist, try different meats or spice levels. Store leftovers easily for future meals. Happy cooking! Enjoy your tasty creation and impress your family with this simple recipe.

Savory Chicken and Cheese Enchiladas Easy Recipe

Craving a warm, cheesy meal? Try my easy Chicken and Cheese Enchiladas! This hearty dish mixes shredded chicken with black

To make the best Crockpot Chicken Taco Soup, gather these key ingredients: - 1 lb boneless, skinless chicken breasts - 1 can (15 oz) black beans, drained and rinsed - 1 can (15 oz) kidney beans, drained and rinsed - 1 can (15 oz) corn, drained - 1 can (14 oz) diced tomatoes, undrained - 1 can (10 oz) diced tomatoes with green chilies - 1 packet taco seasoning - 1 medium onion, diced - 1 bell pepper (any color), diced - 2 cloves garlic, minced - 4 cups chicken broth - 1 tablespoon lime juice - Salt and pepper to taste These ingredients create a rich and hearty flavor in the soup. The chicken adds protein, while the beans boost fiber. The tomatoes and corn bring sweetness, making it a delight. Adding toppings can elevate your soup experience. Here are some tasty options: - Sour cream - Shredded cheese - Diced avocado - Fresh cilantro These toppings add creaminess, crunch, and freshness. They also let you customize each bowl to your liking. Having some cooking staples on hand can help you make this dish easier: - Olive oil for sautéing (if you want to enhance the flavor) - A good-quality chicken broth for depth - Fresh limes for that zesty kick These staples help you create a more flavorful base. They are also great to have for other recipes. You can find the full recipe for this delightful dish in the provided link. Cooking on Low vs. High You can cook this soup on low or high. Cooking on low takes about 6-8 hours. This method makes the chicken very tender. Cooking on high takes 3-4 hours. It also cooks the chicken well, but it may not be as tender. Choose the method that fits your day best. Shredding Chicken Tips Once the chicken is cooked, take it out using tongs. Place it on a cutting board. Use two forks to shred the chicken. Hold one fork steady and pull the chicken with the other fork. This way, it shreds easily. Make sure to shred it well so it blends into the soup. Adding Lime Juice and Seasoning After shredding the chicken, return it to the soup. Stir in the lime juice for a fresh taste. Taste the soup and add salt and pepper as needed. This step brings all the flavors together. Suggested Garnishes When serving, add your choice of toppings. Sour cream adds creaminess. Shredded cheese gives a nice flavor. Diced avocado adds richness. Fresh cilantro brings a burst of color and taste. Feel free to mix and match your garnishes for a fun twist. For the full recipe, check the previous section. Cooking this soup in a crockpot is simple. You can set it on low for 6-8 hours or high for 3-4 hours. I love the low setting for a deep flavor. Just let it simmer slowly! Always check the chicken. It should shred easily when done. Use a meat thermometer to ensure the chicken reaches 165°F. If you want a quicker meal, go for high heat. Taco seasoning is key! It brings out the best in your soup. I always use a packet for ease, but you can make your own too. Just mix chili powder, cumin, garlic powder, and onion powder. This seasoning adds warmth and spice. Don’t skip it! You can also adjust the amount based on your taste. If you like it hot, add more or try spicy varieties. Avoid overcooking the chicken. It can become dry and tough. Make sure to shred it as soon as it’s done. Another mistake is not using enough liquid. The soup needs enough broth to stay hearty. If it looks thick, add more chicken broth or water. Finally, don’t forget to taste! Adjust with lime juice, salt, and pepper before serving. These small steps make a big difference in flavor. For the full recipe, check out the section above! {{image_2}} You can swap out chicken for other proteins. Try turkey for a leaner option. Ground beef can work well too. If you want to make it vegetarian, use beans or lentils. Tofu is another great choice. It absorbs flavors and adds protein. Feel free to add more spices or vegetables. Toss in some diced zucchini or bell peppers for extra crunch. You can also use corn, carrots, or even sweet potatoes. Add cumin or smoked paprika for a deeper flavor. A pinch of chili powder can give it a nice kick. Serve your soup with tasty sides. Cornbread pairs well and adds sweetness. Tortilla chips can give a nice crunch. You can also offer fresh avocado slices or lime wedges. Fresh cilantro adds a bright touch too. Don't forget the sour cream or shredded cheese to finish off your bowl. For more details on making this dish, check the Full Recipe. After cooking your Crockpot Chicken Taco Soup, let it cool. Store it in an airtight container. It will last up to three days in the fridge. Always check for any signs of spoilage before eating. You can freeze this soup for later meals. Use freezer-safe containers or bags. Make sure to leave space for expansion. It will keep well for about three months. Thaw it overnight in the fridge before reheating. To reheat, pour the soup into a pot. Heat it on the stove over medium heat. Stir often to avoid burning. You can also use a microwave. Heat in short intervals, stirring in between. Make sure it is hot all the way through before serving. For added flavor, top with fresh garnishes like sour cream or avocado. For the full recipe, check the full recipe section. To make your soup spicy, add some chopped jalapeños. You can also use hot taco seasoning. Another option is to sprinkle in cayenne pepper. Adjust the heat to fit your taste. Yes, you can use frozen chicken. Just place it in the crockpot without thawing. The cooking time may increase by about an hour. Ensure the chicken reaches 165°F for safety. Your soup will last about 3-4 days in the fridge. Store it in an airtight container. Make sure it cools down before sealing. Always check for signs of spoilage before eating. Great sides for this soup include tortilla chips or a side salad. You can also serve rice or cornbread. These help balance the soup's rich flavors. Yes, you can prepare the soup a day ahead. Store the ingredients in the fridge. Just cook it the next day as normal. This makes for a quick meal on busy days. For the full recipe, check the earlier section. Crockpot Chicken Taco Soup is simple and fun to make. We covered key ingredients and tips for rich flavors. You learned about optional toppings and how to enhance your soup. I shared how to store and reheat your soup safely. Remember to experiment with proteins and spices for new twists. Now, you can enjoy this comforting dish any day. Dive in and make it your own!

Crockpot Chicken Taco Soup Hearty and Flavorful Dish

Welcome to the world of comfort food with my Crockpot Chicken Taco Soup! This dish is hearty, full of flavor,

- 1 large head of cauliflower, cut into florets - 1 cup all-purpose flour - 1/2 cup cornstarch - 1/2 teaspoon garlic powder - 1/2 teaspoon onion powder - 1/2 teaspoon salt - 1/4 teaspoon black pepper - 1 cup water (adjust as necessary) - Oil for frying (vegetable or canola) For the sticky sauce: - 1/4 cup soy sauce - 1/4 cup honey or maple syrup (for a vegan option) - 2 tablespoons sesame oil - 2 tablespoons rice vinegar - 1 tablespoon sriracha (optional, for heat) - 1 tablespoon freshly grated ginger - 2 cloves garlic, minced - 1 tablespoon sesame seeds - Chopped green onions, for garnish You can swap honey for maple syrup to make this dish vegan. If you need gluten-free options, try using almond flour or rice flour instead of all-purpose flour. Pair your sticky sesame cauliflower with steamed rice or a fresh salad. For a pop of color, add chopped green onions and sesame seeds on top. You can even drizzle some extra sauce for added flavor and fun presentation. To start, gather your dry ingredients. You will need: - 1 cup all-purpose flour - 1/2 cup cornstarch - 1/2 teaspoon garlic powder - 1/2 teaspoon onion powder - 1/2 teaspoon salt - 1/4 teaspoon black pepper Mix these dry ingredients in a large bowl. After that, add water slowly. You want a smooth batter. It should have a pouring consistency but not be too runny. Adjust the water as needed. Next, prepare your cauliflower. Cut a large head into florets. Dip each floret into the batter. Make sure to coat them well. This helps create a nice crunch when frying. Heat oil in a deep pan over medium-high heat. Fry the cauliflower in batches. Cook them for about 4-5 minutes until they turn golden brown. Remove the fried florets and place them on paper towels to soak up excess oil. This step is key for crunchiness. For the sticky sauce, combine these ingredients in a saucepan: - 1/4 cup soy sauce - 1/4 cup honey or maple syrup - 2 tablespoons sesame oil - 2 tablespoons rice vinegar - 1 tablespoon sriracha (optional) - 1 tablespoon freshly grated ginger - 2 cloves garlic, minced Heat the mixture over medium heat. Stir constantly for about 4-5 minutes until the sauce thickens slightly. This sauce adds flavor and stickiness to the dish. Now, it’s time to bring everything together. Add the fried cauliflower to the saucepan with the sticky sauce. Toss them gently to coat every floret. Cook for an extra minute to let the sauce stick. For a beautiful presentation, arrange the sticky sesame cauliflower on a serving platter. You can sprinkle sesame seeds on top and add chopped green onions for color. This dish looks as good as it tastes. Serve it warm and enjoy this flavorful treat! For the full recipe, refer back to the beginning. To get the best texture, fry the cauliflower at 350°F (175°C). This temperature ensures a crispy outside and tender inside. If your oil is too cool, the cauliflower will soak up oil and become soggy. To avoid this, fry in small batches. It helps the oil stay hot. You can make this dish your own by adding spices. Try chili powder or cayenne for some heat. If you like it sweeter, adjust the honey or maple syrup to your taste. A little extra ginger can give it a nice kick, too. For frying, use a deep pan or wok. These shapes help keep the oil hot and even. A slotted spoon is great for lifting the cauliflower out of the oil. Use a mixing bowl with a spout for easy batter dipping. This setup makes coating a breeze. For the sticky sauce, a saucepan works best for even heating. For the full recipe, check the detailed instructions above. {{image_2}} You can change the taste of your sticky sesame cauliflower easily. Adjust the sauce ingredients to explore new flavors. For a sweeter dish, add more honey or maple syrup. If you want a spicy kick, increase the sriracha or add chili flakes. You can also include a splash of orange juice for a citrusy twist. Adding vegetables or proteins can transform this dish. Try tossing in some snap peas, bell peppers, or broccoli. For added protein, consider including tofu or tempeh. These additions give the dish more texture and flavor. Oven-baking is a great method for a healthier option. To bake, preheat your oven to 425°F (220°C). Place the coated cauliflower on a baking sheet lined with parchment paper. Bake for about 25 minutes, flipping halfway through for even crispiness. Air frying also gives you a crunchy result while using less oil. Set your air fryer to 400°F (200°C). Cook the cauliflower in batches for about 15 minutes, shaking the basket halfway through. This method keeps the cauliflower crispy without frying. Making this dish gluten-free is simple. Use gluten-free flour instead of all-purpose flour. Many options are available like almond flour or chickpea flour, which work well in the batter. If you're adjusting for keto or low-sugar diets, use a sugar-free sweetener in place of honey. Erythritol or stevia are great choices. This keeps the dish low in carbohydrates while still being tasty. You can find the full recipe to try these variations at home. After you enjoy your sticky sesame cauliflower, store any leftovers in a good container. I recommend using an airtight glass or plastic container. This keeps the flavors fresh and prevents drying out. You can store it in the fridge for about 3 days. If you want it to last longer, consider freezing it. To reheat and keep the crispness, use an oven or an air fryer. Preheat your oven to 350°F (175°C). Place the cauliflower on a baking sheet and heat for about 10 minutes. This helps it regain its crunch. When using the microwave, the cauliflower may get soggy. Avoid that by using a paper towel to absorb extra moisture. If you want to freeze sticky sesame cauliflower, follow these steps. First, let it cool completely. Then, place the cauliflower in a freezer-safe bag. Make sure to remove as much air as possible. When you’re ready to eat, thaw it in the fridge overnight. For best results, reheat in the oven or air fryer to keep the texture and taste intact. To make Sticky Sesame Cauliflower, it takes about 15 minutes to prep. Cooking adds another 15 minutes. So, the total time is around 30 minutes. This quick dish is great for busy days. You can prepare this dish ahead of time. Fry the cauliflower and store it in the fridge for about two days. When ready to serve, heat it and add the sauce. This keeps the flavors fresh and tasty. Sticky Sesame Cauliflower pairs well with rice or quinoa. You can also serve it with a crisp salad. For protein, try tofu or grilled chicken. These sides make a complete meal. Yes, Sticky Sesame Cauliflower can be vegan. Use maple syrup instead of honey for the sauce. Check your soy sauce for vegan options. This way, everyone can enjoy this tasty dish. For a gluten-free option, substitute the flour with a gluten-free blend. To sum it up, we covered how to make Sticky Sesame Cauliflower. We talked about key ingredients, tasty substitutions, and side dish ideas. I shared step-by-step instructions to ensure a crispy and flavorful dish. You learned tips for better texture and flavor, plus some fun variations. Remember, storing leftovers right is key, and reheating can keep them crispy. Experiment with this recipe in your kitchen. It's a delightful way to enjoy a classic dish while making it your own. Enjoy the journey of flavors and textures!

Sticky Sesame Cauliflower Flavorful and Crunchy Treat

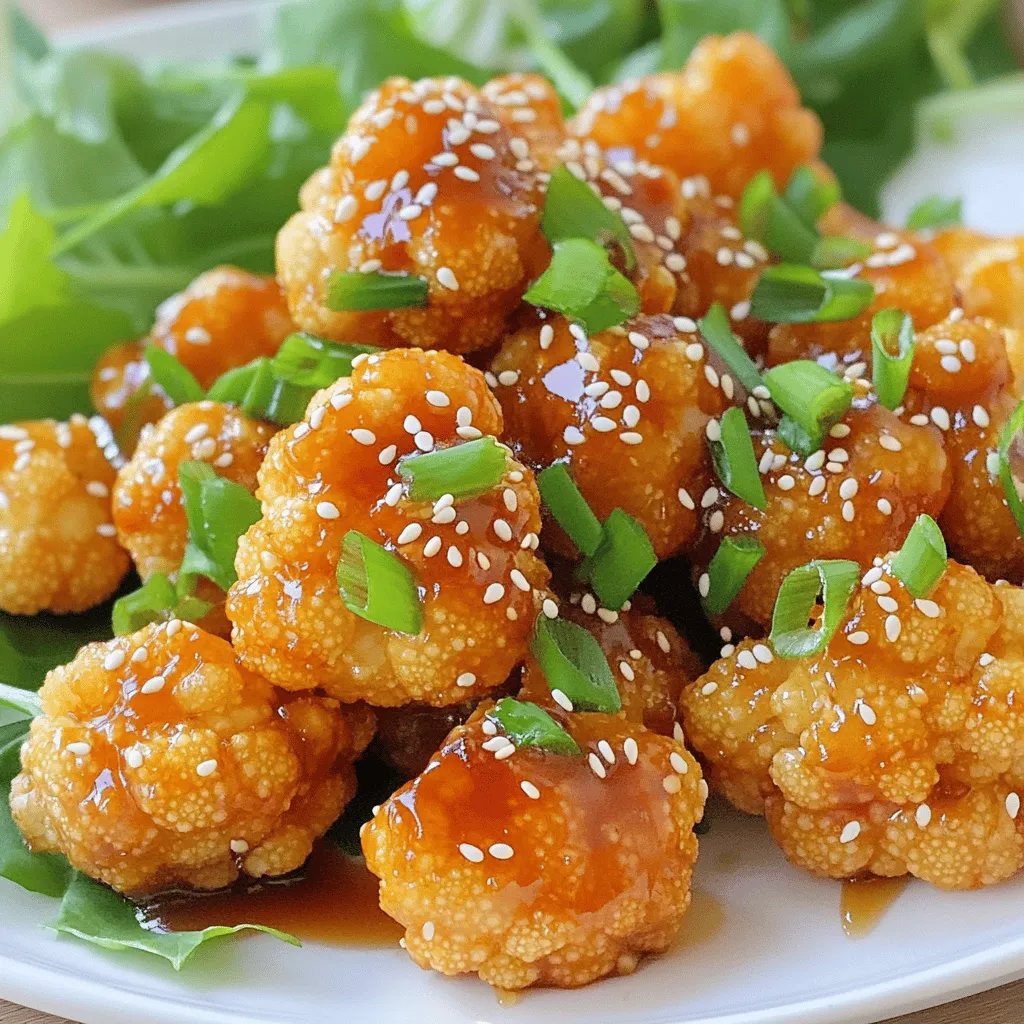
Are you ready to make a crunchy and tasty treat that everyone loves? Sticky Sesame Cauliflower is your perfect answer!

- 1 ½ cups all-purpose flour - 1 cup granulated sugar - ½ cup unsalted butter, softened - 2 large eggs - 1 teaspoon vanilla extract - 1 teaspoon baking powder - ½ teaspoon baking soda - ¼ teaspoon salt - ½ cup whole milk - ½ cup rainbow sprinkles (plus extra for topping) - Optional: 1 cup cream cheese frosting (store-bought or homemade) Gathering the right ingredients is key for perfect Funfetti cupcakes. First, use all-purpose flour. It gives the cupcakes a soft texture. Granulated sugar adds sweetness. The unsalted butter is essential for a rich flavor. Make sure it's softened. This helps it mix well with the sugar. You need two large eggs for moisture and binding. A teaspoon of vanilla extract gives a nice aroma. Baking powder and baking soda help the cupcakes rise. A pinch of salt balances the sweetness. Whole milk keeps the batter smooth and creamy. Rainbow sprinkles are the star of this recipe. Fold half a cup into your batter. Save a bit for decoration later. If you love frosting, consider using cream cheese frosting. It adds a tangy taste that pairs well with sweet cupcakes. - Cupcake pan and liners - Mixing bowls - Electric mixer or whisk - Measuring cups and spoons To make these cupcakes, you will need some tools. A cupcake pan helps shape your treats. Cupcake liners keep them neat and easy to serve. Mixing bowls are essential for combining ingredients. An electric mixer speeds up blending. You can also use a whisk if you prefer. Measuring cups and spoons ensure you use the right amounts. Having these tools ready makes the process smooth and fun. - Use room temperature ingredients for better mixing - Opt for high-quality vanilla extract for enhanced flavor Using room temperature ingredients makes mixing easier. Cold butter or eggs can lead to clumps in your batter. High-quality vanilla extract improves the taste of your cupcakes. It makes a big difference in flavor. Always choose the best ingredients you can find. They make your cupcakes shine! First, preheat your oven to 350°F (175°C). This step is crucial for baking. While the oven heats, take your cupcake pan. Line it with cupcake liners. This keeps the cupcakes from sticking. Now, grab a large mixing bowl. Beat the softened butter and granulated sugar together. Mix them until they look creamy and light, which takes about 3-4 minutes. Next, add the eggs one at a time. Mix well after each egg. Stir in the vanilla extract for that lovely flavor. In another bowl, whisk together the flour, baking powder, baking soda, and salt. This makes sure your dry ingredients are well mixed. Gradually add this dry mix to the wet ingredients. Alternate with the milk, starting and ending with the flour. Mix until just combined; do not over-mix! It's time for the fun part! Gently fold in the rainbow sprinkles. This adds color and joy to your batter. Now, divide the batter evenly into the cupcake liners. Fill each liner about 2/3 full. Bake your cupcakes in the preheated oven for 18-20 minutes. Check for doneness by inserting a toothpick. If it comes out clean, they are ready! After baking, let them cool in the pan for 5 minutes. Then, transfer them to a wire rack to cool completely. Once cool, you can frost them with cream cheese frosting and add extra sprinkles on top. For the complete recipe, check the Full Recipe section. Enjoy your delightful Funfetti cupcakes! To make light and fluffy Funfetti cupcakes, avoid over-mixing. When you mix the batter, do it just until combined. This keeps air in the batter and helps your cupcakes rise nicely. For the perfect dome on your cupcakes, fill each liner two-thirds full. This will allow room for the cupcakes to rise without spilling over. You want that nice rounded top for a great look. Cream cheese frosting pairs well with these cupcakes. If you want to make it from scratch, beat softened cream cheese and butter until smooth. Add powdered sugar and vanilla extract to taste. For decoration, use extra rainbow sprinkles on top. You can also pipe the frosting in fun shapes. This adds color and makes your cupcakes pop. One common mistake is overfilling the cupcake liners. If you fill them too much, the batter will spill over while baking. Stick to the two-thirds rule for best results. Another mistake is not checking your oven temperature. An oven that is too hot can burn your cupcakes. Use an oven thermometer to ensure it’s accurate. This simple step can save your batch. {{image_2}} You can mix up the flavors of your Funfetti cupcakes. The classic choice is vanilla. It gives a light and sweet taste. But chocolate is another great option. Chocolate cupcakes can add a rich depth to your treat. You can also get creative with mix-ins. Try adding nuts for a crunch. Chopped walnuts or pecans work well. Dried fruit can also be a fun addition. Consider raisins or chopped apricots to add a chewy texture. Your Funfetti cupcakes can shine with fun decorations. Use colorful frosting to match any theme. Pipe swirls of bright icing for a festive look. You can even create rainbow patterns. Use a toothpick to swirl different colors together. For themed occasions, consider adding small decorations. Edible glitter can give a magical touch. Seasonal toppers, like mini pumpkins for fall, can also work. You can even use candles for birthdays. Let your creativity flow! You can easily adapt this recipe to fit different diets. For gluten-free cupcakes, swap regular flour for a gluten-free blend. Make sure the blend has a good structure. If you need dairy-free options, use coconut milk in place of whole milk. You can also replace butter with vegan butter. For a vegan Funfetti cupcake, use flax eggs instead of regular eggs. Mix one tablespoon of flaxseed meal with three tablespoons of water for each egg. These adaptations keep the joy of Funfetti cupcakes alive for everyone! For the full recipe, check out the section above. To keep your homemade Funfetti cupcakes fresh, use airtight containers. This helps prevent them from drying out. Store them at room temperature for the best taste. If you live in a hot area, refrigerate them. Just remember, refrigeration can change the texture slightly. If you want to save cupcakes for later, freezing works well. Wrap each cupcake in plastic wrap. Place them in a freezer bag or container. Be sure to remove as much air as possible. To thaw, leave them at room temperature for about an hour. You can also use the microwave for a quick thaw, but be careful not to overheat them. Cupcakes stay fresh at room temperature for about 3 to 4 days. Look for signs of spoilage. If they smell off or have mold, toss them out. If they feel hard or dry, they might not taste as good. Enjoy them while they’re fresh for the best flavor! Homemade Funfetti cupcakes last about 2-3 days at room temperature. They stay fresh longer in the fridge, up to a week. Store them in an airtight container to keep them moist. If you want to enjoy them later, freeze the cupcakes for up to three months. Yes, you can use many types of sprinkles! If you want a fun twist, try chocolate sprinkles or edible glitter. Each sprinkle type adds a different look and taste. Some sprinkles might melt during baking, so use thicker ones for better results. To frost cupcakes like a pro, start with cooled cupcakes. Use a piping bag fitted with a star tip for a fancy design. You can also use a spatula to spread frosting smoothly. Add extra sprinkles on top for a colorful touch. Making Funfetti cupcakes is fun and easy. You learned the key ingredients, essential tools, and tips for great results. I shared step-by-step instructions to create light, fluffy cupcakes. Plus, you picked up variations for flavor and decoration. Remember to store them properly for freshness. Enjoy baking and sharing these colorful treats! Your creations will surely brighten anyone's day.

Homemade Funfetti Cupcakes Delightful and Colorful Treat

Get ready to indulge in a burst of color and flavor with my Homemade Funfetti Cupcakes! These delightful treats are

- 1 lb (450g) boneless chicken thighs - 3 tablespoons olive oil - 2 teaspoons dried oregano - 1 teaspoon garlic powder - 1 teaspoon smoked paprika - Salt and black pepper to taste - 4 whole wheat pitas or flatbreads - 1 cup tzatziki sauce (store-bought or homemade) - 1 cup diced tomatoes - 1 cup sliced cucumbers - 1/2 small red onion, thinly sliced - Fresh parsley for garnish The main ingredients for easy chicken gyros are simple yet full of flavor. I love using boneless chicken thighs because they stay juicy and tender. The marinade, made with olive oil, oregano, garlic powder, and smoked paprika, adds a kick. You can adjust the salt and pepper to your taste. For the perfect gyro, grab some whole wheat pitas. They hold all the goodness inside. Fresh vegetables bring crunch and brightness. Diced tomatoes, sliced cucumbers, and red onion give color and taste. Finally, a generous scoop of tzatziki sauce pulls it all together. This sauce cools the spices and adds creaminess. You can buy tzatziki or make your own. Either way, it’s a must for gyros. - Grill pan or skillet - Mixing bowl, knife, and cutting board To make these gyros, you will need a few simple tools. A grill pan or skillet cooks the chicken perfectly. If you don’t have a grill pan, a regular skillet works too. A mixing bowl helps you combine the marinade. You will also need a knife and cutting board for slicing the chicken and fresh veggies. These tools make the cooking process smooth and easy. For the full recipe, you can refer to the sections that follow. Enjoy the process of making these delightful chicken gyros! In a large bowl, combine olive oil, dried oregano, garlic powder, smoked paprika, salt, and black pepper. Stir well to mix all the spices. This mixture will give your chicken a rich flavor. Take the boneless chicken thighs and coat them in the marinade. Make sure every piece is covered. Let the chicken rest for at least 30 minutes. If you have more time, refrigerate it for up to 2 hours. This will enhance the flavor even more. Preheat a grill pan or skillet over medium-high heat. Once hot, add the marinated chicken thighs. Grill for 6-7 minutes on each side. Check the internal temperature; it should reach 165°F (75°C). You want nice grill marks and fully cooked chicken. After cooking, remove the chicken from the heat and let it rest for a few minutes. Slice the chicken into thin strips. Warm the whole wheat pitas on the grill for about 1-2 minutes. Then, layer the grilled chicken, tzatziki sauce, diced tomatoes, sliced cucumbers, and red onion in each pita. Garnish with fresh parsley. Wrap the pita around the fillings like a sandwich. Enjoy your easy chicken gyros! For the complete recipe, check out the Full Recipe. To make your chicken gyros shine, focus on the marinade. The basic mix gives great flavor, but you can add more spices to elevate your dish. Try adding: - Cumin for a warm, earthy taste. - Cinnamon for a hint of sweetness. - Lemon zest for freshness. These additions will make your chicken more exciting and tasty. Let the chicken marinate longer for deeper flavor, ideally two hours or more. You can cook chicken gyros in different ways. Each method brings a unique taste. Besides grilling, you can try: - Oven: Preheat to 400°F (200°C). Place chicken on a baking sheet for about 20 minutes. - Air fryer: Set it to 375°F (190°C) and cook for 15-20 minutes, flipping halfway. Both options will give you juicy chicken with a nice crust. Pair your gyros with tasty sides and drinks. Here are some ideas: - Sides: Greek salad, roasted potatoes, or a fresh tabbouleh. - Drinks: Try a light beer, lemonade, or sparkling water with mint. These pairings will balance your meal, making it more enjoyable. For the full recipe, check out the earlier sections! {{image_2}} You can change up this recipe by using different proteins. Lamb is a classic choice for gyros. It has a rich flavor that pairs well with the spices. Beef is another option. It gives a hearty taste. For a plant-based option, use tofu. Press it first to remove extra water. Then marinate it just like the chicken. This helps the tofu soak up flavors. Each protein brings its own twist to the dish. While tzatziki is a must for many, you can swap it for other sauces. Try hummus for a creamy touch. It adds a nice texture and flavor. You could also use garlic sauce or tahini. These options can give your gyros a unique spin. Experiment with different spreads to find what you like best. If you need gluten-free options, use lettuce wraps instead of pitas. This keeps all the flavors intact while being gluten-free. For low-carb diets, you can skip the pita and load up on veggies. Use extra cucumbers and tomatoes for crunch. These adjustments make the dish fit your needs without losing taste. For the full recipe, check out the detailed instructions above. To store your chicken gyros, first, let them cool. Then, place the gyros in a sealed container. You can keep them in the fridge for up to three days. If you store the chicken and veggies separately, they will last longer. Keep the tzatziki sauce in a different container. This will help maintain the freshness of each ingredient. When it's time to enjoy your leftovers, reheat carefully. The best way is to use a skillet. Heat it on medium for a few minutes. Add the chicken strips and warm them for about three minutes. This method keeps the chicken juicy and tasty. You can also wrap the gyros in foil and warm them in the oven at 350°F (175°C) for about 10 minutes. This way, they won't dry out. To freeze your gyros, start by cooling them completely. Wrap each gyro tightly in plastic wrap. Then, place them in a freezer bag. You can freeze them for up to three months. When you're ready to eat, thaw them in the fridge overnight. Reheat as described above for the best results. This way, you always have a quick meal ready! For the full recipe, check out the complete guide on making these Easy Chicken Gyros. To make tzatziki, you need simple ingredients. Here’s how: - Ingredients: - 1 cup plain Greek yogurt - 1 medium cucumber, grated and drained - 2 cloves garlic, minced - 1 tablespoon olive oil - 1 tablespoon fresh lemon juice - Salt and pepper to taste - Fresh dill or mint (optional) 1. Start by grating the cucumber. Squeeze it to drain excess water. 2. In a bowl, mix the yogurt, cucumber, garlic, olive oil, and lemon juice. 3. Add salt and pepper to taste. Stir well. 4. If you like herbs, add fresh dill or mint for extra flavor. 5. Chill for at least 30 minutes before serving. Yes, you can prepare the chicken in advance. Here’s how: - Marinate the chicken thighs for 30 minutes or more. - For best results, marinate for up to 2 hours in the fridge. - Once marinated, store the chicken in an airtight container. - Cook the chicken within 24 hours for the best flavor. The best pita for gyros is soft and fluffy. Here are some options: - Whole wheat pita is a healthy choice. - Traditional Greek pita adds authentic flavor. - Look for pita bread that is fresh and pliable. - You can find these at most grocery stores or bakeries. The right spices make your chicken gyros special. Here are my top picks: - Dried oregano gives a great Mediterranean taste. - Garlic powder adds depth and aroma. - Smoked paprika brings a nice smoky flavor. - You can also try cumin or coriander for a unique twist. A chicken gyro is a tasty meal option. Here are some estimates: - One chicken gyro has about 400-500 calories. - This includes the chicken, pita, and toppings. - Adding more veggies can lower the calorie count. - Always check the specific ingredients you use for exact numbers. For a full recipe, check the [Full Recipe]. This blog post covers how to make delicious chicken gyros. We explored main ingredients, tools, and cooking steps. I shared tips for marinades and cooking techniques to help you succeed. You can also try variations or adjust for diets. Storing leftovers and reheating tips were included for easy meals later. Making gyros at home can be quick and fun. Enjoy experimenting with flavors and making them your own. Happy cooking!

Easy Chicken Gyros Simple and Flavorful Delight

Are you craving a meal that’s both easy to make and packed with flavor? Look no further! In this post,

- 2 large eggplants, sliced into ½-inch rounds - 2 cups marinara sauce - 2 cups ricotta cheese - 2 cups shredded mozzarella cheese - 1 cup grated Parmesan cheese - 1 cup all-purpose flour - 3 large eggs, beaten - 1 cup breadcrumbs (preferably Italian seasoned) - 1 teaspoon dried oregano - 1 teaspoon garlic powder - 1 teaspoon salt - ½ teaspoon black pepper - Fresh basil leaves for garnish Eggplant is the star of this dish. Look for firm, smooth skin. It should feel heavy for its size. This means it is fresh and full of moisture. You don’t want spongy or wrinkled eggplants. These will not taste good in your casserole. - 1 tablespoon olive oil (for frying) - 1 teaspoon red pepper flakes (for heat) - ½ cup fresh mozzarella (for creaminess) - 1 tablespoon balsamic vinegar (for depth) Adding olive oil gives a nice flavor. Red pepper flakes can spice things up. Fresh mozzarella brings a creamy touch. Balsamic vinegar can add a rich layer. When choosing eggplants, check for these signs of quality: - Color: Look for a deep, rich purple color. - Skin: The skin should be shiny and smooth. - Weight: Heavier eggplants often have more moisture. - Stem: A fresh green stem indicates freshness. Avoid eggplants with brown spots or blemishes. These signs mean the eggplant is not fresh. Always select the best ingredients for a great Eggplant Parmesan Casserole. You can find the full recipe above for easy reference! Start by washing the eggplants. Slice them into ½-inch rounds. Sprinkle salt on each slice. Let them sit for about 30 minutes. This step pulls out moisture and bitterness. Rinse the eggplant slices under cold water. Pat them dry with paper towels to remove excess moisture. Now, they are ready for frying. Next, set up your breading station. Grab three bowls. Put all-purpose flour in the first bowl. In the second bowl, beat the eggs until smooth. In the third bowl, mix the breadcrumbs with garlic powder, oregano, salt, and black pepper. This mix adds a nice flavor. Dip each eggplant slice into the flour first. Then, coat it with the beaten eggs. Finally, roll it in the breadcrumb mix. Set each breaded slice aside on a plate. Now, it's time to layer the casserole. Preheat your oven to 375°F (190°C). In a 9x13-inch casserole dish, spread a layer of marinara sauce on the bottom. Place half of the fried eggplant slices over the sauce. Now, spread half of the ricotta cheese on top. Sprinkle a third of the mozzarella cheese and half of the Parmesan cheese over the ricotta. Repeat this with the rest of the eggplant, sauce, and cheeses. Top with the remaining mozzarella and Parmesan. Cover the dish with aluminum foil. Bake for 25 minutes. Remove the foil and bake for another 20 minutes until bubbly and golden. Let it cool for 10 minutes before slicing. The Full Recipe is a perfect guide for this delicious dish! To get that perfect crunch, you need to salt the eggplant first. Salt draws out moisture and bitterness. After 30 minutes, rinse and dry the slices well. This step is key to a crispy texture. Then, bread the eggplant slices carefully. Coat them in flour, then egg, and finally breadcrumbs. This process helps create layers that crisp up nicely when fried. When baking your casserole, start by preheating your oven to 375°F (190°C). Cover the dish with aluminum foil during the first half of baking. This keeps the moisture in and helps the cheese melt evenly. After 25 minutes, remove the foil. This allows the cheese to brown and bubble nicely for the last 20 minutes. Keep an eye on it to prevent over-browning. Serve your Eggplant Parmesan Casserole with a side salad or garlic bread. This adds freshness and crunch to the meal. For garnishing, sprinkle fresh basil leaves on top just before serving. You can also drizzle extra marinara sauce over the slices. This gives a vibrant look and adds flavor. Enjoy the rich layers of cheese and eggplant with every bite! {{image_2}} Eggplant Parmesan Casserole can easily fit vegetarian diets. Simply skip the meat and enjoy the rich flavors of eggplant. For vegan options, use plant-based ricotta and mozzarella. You can also replace eggs with a flaxseed mixture. Mix 1 tablespoon of ground flaxseed with 2.5 tablespoons of water. Let it sit until thickened. This works great for breading. If you are gluten-free, no worries! Substitute all-purpose flour with almond flour or a gluten-free blend. You can also use gluten-free breadcrumbs. Many brands offer tasty options that work well in this recipe. Check the label to ensure they are certified gluten-free. Cheese is key in this dish. While ricotta, mozzarella, and Parmesan are classic, you can mix it up. Try goat cheese for a tangy flavor or fontina for creaminess. If you love a bit of spice, add pepper jack cheese. This gives a fun twist to your casserole. Each cheese brings its own unique taste, so feel free to experiment! For the full recipe, check the details above. To keep your Eggplant Parmesan Casserole fresh, let it cool completely. Transfer it to an airtight container. If you have a lot, you can also wrap it tightly in plastic wrap. Store it in the fridge for up to three days. Make sure to label the container with the date. This helps you remember when you made it. When you’re ready to enjoy leftovers, preheat your oven to 350°F (175°C). Place the casserole in an oven-safe dish. Cover it with foil to keep moisture in. Heat for about 20 to 25 minutes, or until it’s hot throughout. You can also microwave individual portions. Cover them to avoid splatters and heat in short bursts. For long-term storage, you can freeze the casserole. Cut it into portions and wrap each piece tightly in plastic wrap. Then, place the pieces in a freezer-safe bag or container. This helps prevent freezer burn. You can freeze it for up to three months. When you’re ready to eat, thaw it in the fridge overnight before reheating. Enjoy a delicious meal anytime! Eggplant Parmesan Casserole lasts about 3 to 5 days in the fridge. Store it in an airtight container. This keeps it fresh and safe to eat. If you want it to last longer, consider freezing it. Yes, you can make Eggplant Parmesan Casserole ahead of time. You can prepare it a day in advance. Just assemble the layers, cover it, and keep it in the fridge. Bake it just before serving. This can save you time on busy days. Eggplant Parmesan Casserole pairs well with many side dishes. Here are some ideas: - Garlic bread - A fresh green salad - Roasted vegetables - Pasta with marinara sauce These sides add variety and flavor to your meal. Enjoy! For the full recipe, check out the earlier section. Eggplant Parmesan casserole is a tasty dish packed with flavor. We explored essential ingredients, preparation steps, and great tips for the best texture. Variations ensure everyone can enjoy this meal. Remember to store leftovers well to keep them fresh. With these insights, you can create a delicious casserole that delights your family and friends. Enjoy making this dish and share it with those you love!

Eggplant Parmesan Casserole Flavorful and Easy Recipe

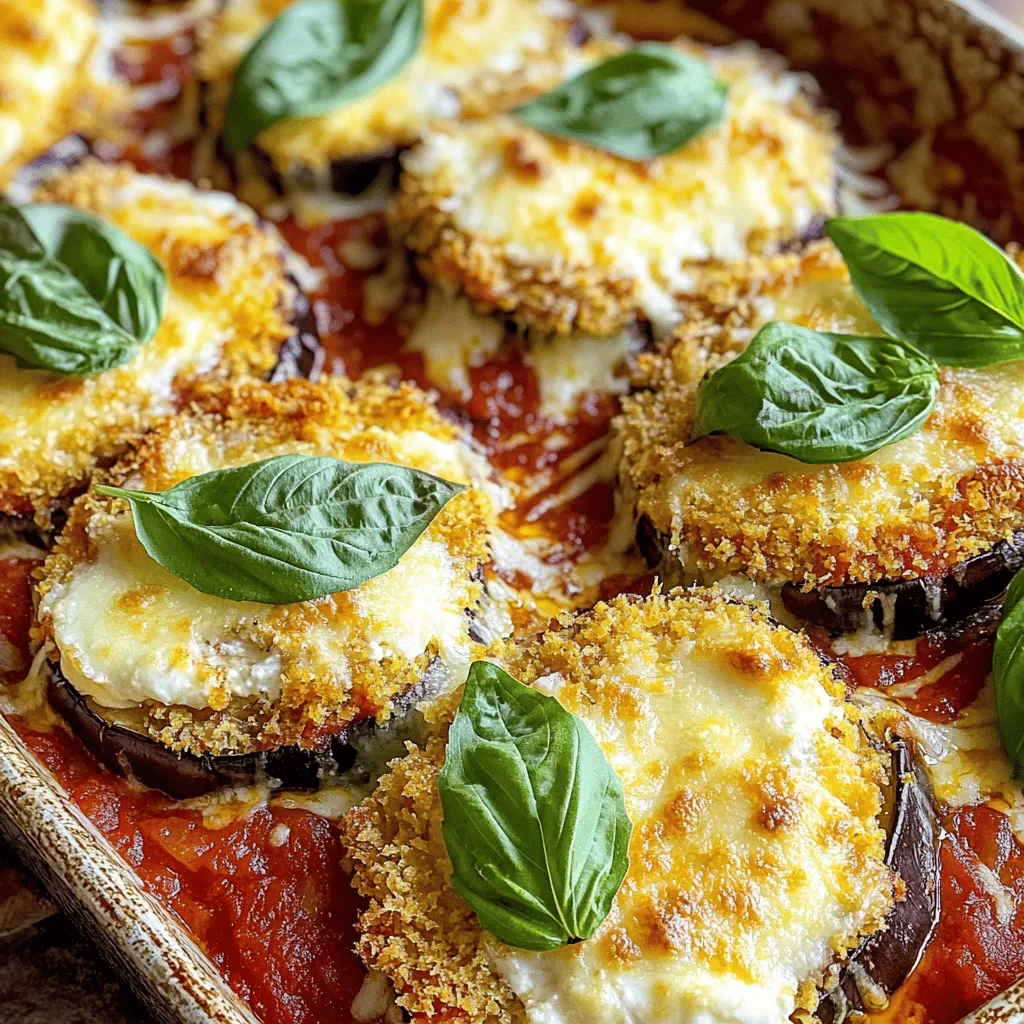
If you’re looking for a tasty and easy dish to impress your family, try my Eggplant Parmesan Casserole. This recipe

- 16 oz cream cheese, softened - 3/4 cup granulated sugar - 1 teaspoon vanilla extract - 2 large eggs - 1/4 cup sour cream - 1 cup all-purpose flour - 1/4 teaspoon baking powder - 1/4 teaspoon baking soda - 1/2 teaspoon cinnamon - 1/4 teaspoon salt - 1/2 cup unsalted butter, melted - 1/2 cup brown sugar, packed - 1 tablespoon ground cinnamon - 1/4 cup granulated sugar (for finishing) To create these churro cheesecake bars, you need some basic ingredients. For the cheesecake layer, use cream cheese and granulated sugar. Adding vanilla extract gives it a nice flavor. Don't forget the eggs and sour cream, which make the filling creamy. For the churro crust and topping, you will need all-purpose flour and some baking powder and soda. The cinnamon adds that classic churro taste. Salt helps balance the sweetness. Melt the butter and mix it with brown sugar for a rich flavor. Finally, cinnamon and granulated sugar create a sweet topping. You can find the full recipe for these delightful bars in the earlier section. Enjoy gathering your ingredients! - Preheat your oven to 350°F (175°C). - Line an 8x8-inch baking pan with parchment paper. - In a mixing bowl, combine: - 1 cup all-purpose flour - 1/4 teaspoon baking powder - 1/4 teaspoon baking soda - 1/2 teaspoon cinnamon - 1/4 teaspoon salt - In another bowl, mix melted butter and brown sugar until smooth. - Gradually add the dry mix into the wet mix. Stir until a dough forms. - Press 2/3 of the churro dough into the bottom of the pan. - Bake for 10-12 minutes until slightly golden. - While it bakes, prepare the cheesecake filling. - For the filling, beat: - 16 oz cream cheese, softened - 3/4 cup granulated sugar - 1 teaspoon vanilla extract - Add 2 large eggs one at a time, mixing well after each. - Stir in 1/4 cup sour cream until smooth. - Pour the cheesecake filling over the baked crust. - Crumble the remaining churro dough over the filling. - Bake for 25-30 minutes until set with light cracks on top. - Let the bars cool completely in the pan. - Refrigerate for at least 2 hours to set. - Use the parchment to lift the bars out. - Slice into squares and enjoy! For the full recipe with ingredients, check [Full Recipe]. To make a smooth cheesecake layer, start with softened cream cheese. This helps it mix easily. After adding eggs, mix gently. This avoids too much air and keeps the texture creamy. When making the churro crust, don’t overmix the dough. Overmixing can lead to a tough crust. Look for a slightly golden color when baking. This shows you have the right texture. You can add optional toppings like whipped cream for extra fun. Pairing the bars with ice cream creates a delicious dessert combo. It adds a creamy touch that many love. For the full recipe, check out the earlier section. {{image_2}} You can make your churro cheesecake bars even better. Here are some ideas: - Add chocolate chips to the cheesecake layer. This adds richness and a fun texture. - Top with fresh fruits like strawberries or raspberries. The fruit adds a nice tartness. You can change the recipe to fit your diet. Consider these options: - Use almond or coconut flour for a gluten-free option. This keeps the flavor while making it safe for gluten-free diets. - For a vegan version, try plant-based cream cheese and flax eggs instead of regular eggs. You can find many great substitutes. Get creative with how you serve your churro cheesecake bars. Here are two fun ideas: - Make mini churro cheesecake bars for bite-sized treats. This is great for parties. - Try churro cheesecake bites. Just cut smaller pieces for a fun twist. For the complete recipe, check the Full Recipe section. You should store your churro cheesecake bars in an airtight container. Keep them in the refrigerator. They stay fresh for up to 5 days. This way, you can enjoy a sweet treat later! If you want to save some for later, wrap the bars in plastic wrap. Then wrap them again in foil. This helps keep them fresh. You can freeze them for up to 3 months. Just label them so you remember what’s inside! When you're ready to eat them, thaw the bars overnight in the refrigerator. This keeps them from getting soggy. If you want a warm dessert, reheat them in the oven. This adds a nice touch to the flavors. You’ll love the warm, creamy cheesecake mixed with the churro crust! Churro Cheesecake Bars are a sweet treat that blends two favorites: churros and cheesecake. They have a crispy churro crust and a creamy cheesecake filling. The top gets a sprinkle of cinnamon sugar, just like a churro. This dessert is fun to make and even more fun to eat! The total time to make these bars is 1 hour and 30 minutes. This includes baking time and cooling time. You can enjoy them fresh from the oven or chilled after some time in the fridge. Yes, you can make these bars a day before you plan to serve them. Just store them in the fridge. This makes them great for parties or special family dinners. These bars are best served chilled. You can add a dollop of whipped cream or a scoop of ice cream on the side. This adds a nice touch and makes them even more delightful! The cheesecake is done when it shows light cracks on the top and feels firm in the center. This ensures that the texture is just right. Follow the baking time in the Full Recipe for best results. Churro cheesecake bars blend sweet and creamy flavors perfectly. You learned how to make a churro crust and a rich cheesecake layer. With simple tips, you can enhance the taste and texture. Try options like chocolate chips or fresh fruit for extra flavor. Store leftovers correctly or freeze for later. This dessert is a crowd-pleaser. Follow these steps and impress your friends and family. Enjoy every bite of your delicious creation!

Churro Cheesecake Bars Delightful Dessert Recipe

If you’re craving a dessert that combines the best of two worlds—churros and cheesecake—look no further! These Churro Cheesecake Bars

To make Easy Greek Lemon Chicken, you will need: - 4 boneless, skinless chicken breasts - 1/4 cup olive oil - 3 tablespoons fresh lemon juice - Zest of 1 lemon - 3 cloves garlic, minced - 1 tablespoon dried oregano - 1 teaspoon salt - 1/2 teaspoon black pepper - 1/4 teaspoon red pepper flakes (optional) - Fresh parsley, chopped (for garnish) - Lemon slices (for garnish) These ingredients create a bright and zesty flavor that makes this dish special. If you don’t have an ingredient, you can swap it for something else. Here are some ideas: - Chicken breasts: Use thighs for more flavor and juiciness. - Olive oil: Any neutral oil, like canola or avocado oil, works well. - Lemon juice: You can use lime juice for a different citrus flavor. - Fresh garlic: Garlic powder can be used, but use less (1/2 teaspoon). - Dried oregano: Fresh oregano is better, about three times more than dried. - Red pepper flakes: Skip them if you want a milder dish. These swaps help you fit the recipe to what you have on hand. Using fresh ingredients often gives the best taste. Fresh herbs and spices can make your dish more vibrant. However, dried herbs work well too. They are convenient and last longer. For this recipe, using fresh lemon juice and garlic is best. They add a lively taste that dried versions can’t match. Remember, fresh herbs can shine when you add them at the end. They bring out the best in your Easy Greek Lemon Chicken. For the full recipe, check the details provided above. Enjoy cooking! Start by making the marinade. In a large bowl, add the olive oil, lemon juice, and lemon zest. Next, toss in the minced garlic, oregano, salt, black pepper, and red pepper flakes if you like some heat. Whisk all these together until they mix well. You want a smooth blend that coats the chicken nicely. This marinade is key for flavor. Now it's time to marinate the chicken. Take your chicken breasts and place them in the bowl with the marinade. Make sure each piece gets covered well. This step is important because it helps the chicken soak up all those vibrant flavors. Cover the bowl with plastic wrap and let it sit in the fridge. Aim for at least 30 minutes, but if you have time, let it marinate for up to 2 hours. The longer, the better! You can cook the chicken in two ways: grilling or using a skillet. If you choose to grill, preheat your grill to medium-high heat. Brush the grates lightly with oil to prevent sticking. Place the marinated chicken on the grill. Cook it for about 6-7 minutes on each side. Look for nice grill marks and ensure it reaches 165°F inside. If you prefer a skillet, heat a large skillet over medium-high heat. Add a little oil to the pan, and place the chicken in it. Cook for about 6-8 minutes on each side. Just like on the grill, check that it is fully cooked. Once done, let the chicken rest for 5 minutes before slicing. This helps keep it juicy! Want to see the full recipe? Check it out [here](#). A great marinade makes this dish shine. Use fresh lemon juice for bright flavor. I like to zest the lemon too. It adds a nice touch. Mix olive oil, lemon juice, garlic, oregano, salt, and pepper. Whisk well to blend all the flavors. Let the chicken soak in this mix for at least 30 minutes. For deeper flavor, marinate up to 2 hours. This step is key to a juicy and tasty chicken. To keep your chicken juicy, do not skip the resting step. After cooking, let it rest for about 5 minutes. This helps the juices stay inside the meat. Cooking it on medium-high heat also helps. Aim for an internal temperature of 165°F (75°C). This ensures it is safe to eat but not dry. If you use a grill, flip the chicken only once. This also helps keep it moist. When serving, garnishing makes a big difference. Fresh parsley adds color and flavor. Add some lemon slices on the side for a pop of brightness. Serve with a side of Greek salad or rice. This adds texture and complements the dish. You can also place the chicken on a colorful platter. This makes the meal look more inviting. For more ideas, check the Full Recipe. {{image_2}} Grilling veggies adds more color and taste. You can use bell peppers, zucchini, or red onions. Just cut them into thick slices. Toss them in olive oil and season with salt and pepper. Grill them for about 5 to 7 minutes until they are tender. They pair well with the lemon chicken. Adding these vegetables makes the meal more fun and healthy. If you want to switch proteins, fish works great too. Salmon or cod absorbs the lemon flavors well. Just follow the same marinade. Marinate fish for 15 to 30 minutes. Tofu is another good option for a plant-based dish. Use firm tofu, and press it to remove excess water. Cut it into cubes and marinate like chicken. Grill or pan-sear it until golden brown. You can make this dish your own by changing the spices. Try adding fresh herbs like thyme or dill for a new twist. You can mix in paprika or cumin for extra depth. Just a pinch can change the whole taste. Experiment with what you like best. The beauty of Easy Greek Lemon Chicken is that it is easy to customize. For more details on this dish, check the Full Recipe. After you enjoy your Easy Greek Lemon Chicken, store leftovers in an airtight container. This keeps the chicken fresh for up to three days in the fridge. Make sure it cools to room temperature before sealing. This helps prevent moisture buildup and sogginess. When ready to eat, reheating the chicken requires care to keep it moist. I suggest using a skillet over low heat. Add a splash of chicken broth or a bit of water to help with moisture. Cover the skillet to trap steam. Heat for about 5 to 10 minutes. Check that the chicken is warm throughout. Avoid using the microwave if you can, as it may dry out the meat. If you want to save the chicken for later, freezing is a great option. First, let the chicken cool completely. Wrap each piece tightly in plastic wrap. Then, place the wrapped chicken in a freezer-safe bag or container. It will stay good for up to three months in the freezer. When you're ready to eat, let it defrost overnight in the fridge. After that, you can reheat it using the tips above. You should marinate the chicken for at least 30 minutes. This time helps the chicken soak up all the tasty flavors. If you have more time, try marinating for up to 2 hours. This will make the chicken even more flavorful and juicy. Easy Greek Lemon Chicken pairs well with many sides. Here are some of my favorites: - Greek salad with cucumbers and tomatoes - Roasted or grilled vegetables like bell peppers and zucchini - Rice pilaf with herbs - Lemon or garlic mashed potatoes - Pita bread with tzatziki sauce These sides bring out the bright lemon flavor and add color to your plate. Yes, you can make this recipe in advance. You can prepare the marinade and marinate the chicken the day before. Just keep it in the fridge until you're ready to cook. You can also cook the chicken ahead of time. Store it in the fridge for up to three days. A quick reheat, and it’s ready to enjoy! For the full recipe, check out the detailed steps provided earlier. We covered the key steps to make Easy Greek Lemon Chicken. We looked at ingredients, cooking methods, and smart tips. You learned how to make the best marinade and keep chicken juicy. You can add fun twists with veggies and different proteins. Finally, I shared how to store leftovers for later. Enjoy cooking and creating tasty meals. It’s all about making it fun and easy!

Easy Greek Lemon Chicken Flavorful and Simple Dish

Ready for a dish that bursts with flavor and is truly simple to make? Easy Greek Lemon Chicken combines fresh

- 1 large round loaf of sourdough or Italian bread - 2 tablespoons unsalted butter, melted - 1 cup shredded mozzarella cheese - 1 cup shredded cheddar cheese - 1/2 cup grated Parmesan cheese - 3 cloves garlic, minced - 1 tablespoon fresh parsley, chopped - 1 teaspoon Italian seasoning - Salt and pepper to taste When making cheesy pull apart bread, fresh ingredients make a big difference. Choose a loaf that feels soft but firm. Look for a crust that is golden and not too hard. For cheese, go for blocks instead of pre-shredded. Fresh garlic adds a punch, so pick firm cloves. Herbs should be bright green and fragrant. Always check the expiration dates on your butter and cheese. Fresh ingredients will give your dish the best flavor. If you want to switch things up, you can try some easy substitutions. For the bread, you can use a round focaccia or ciabatta. Instead of mozzarella, you can use gouda or provolone cheese. If you don't have Parmesan, nutritional yeast can work as a dairy-free option. Fresh parsley can be swapped with basil or chives for a different taste. Use garlic powder if fresh garlic is not handy. These swaps can help you create a unique twist on this classic dish. Check the Full Recipe for more details on making it your own! Making cheesy pull apart bread is simple and fun. You will need to gather your ingredients and prepare your tools. A big bowl and a baking sheet will help. This snack is great for sharing and perfect for any gathering. First, set your oven to 350°F (175°C). Preheating helps cook the bread evenly. Take this time to prepare your ingredients. Next, grab your serrated knife. Carefully cut the loaf in a crisscross pattern. Make diamond shapes but don’t cut all the way through. This keeps the bread connected and ready for stuffing. In a small bowl, mix together the melted butter, minced garlic, chopped parsley, Italian seasoning, salt, and pepper. This garlic butter adds flavor to the bread. Stir until everything blends well. After mixing, gently open the cuts in the bread. Brush the garlic butter mixture into the gaps. Make sure to coat every cut. Now, fill these cuts with mozzarella, cheddar, and Parmesan cheeses. Distribute the cheese evenly for the best taste. Wrap your bread in aluminum foil and place it on a baking sheet. Bake it in the oven for 15-20 minutes. Unwrap the bread and bake for an extra 5-10 minutes until the cheese bubbles and the bread is golden. Once done, let it cool for a few minutes. This will make it easier to pull apart. Serve it warm, and enjoy sharing this tasty snack with friends! For the full recipe, check the earlier section. To make perfect cheesy pull apart bread, start with a good loaf. I recommend using sourdough or Italian bread. These types hold up well and give great flavor. Cut the bread in a crisscross pattern but don't cut through the bottom. This keeps the loaf intact while holding all the cheesy goodness. Make sure your butter mix is well-seasoned. The garlic, parsley, and Italian herbs add flavor. Brush the mix deep into the cuts for the best taste. This step lets the butter soak in and gives you a moist, flavorful bread. The key to a great cheese melt is using a mix of cheeses. I suggest mozzarella for stretch, cheddar for sharpness, and Parmesan for a savory kick. Mix them well before stuffing them into the bread. Bake the bread wrapped in foil at first. This traps steam and helps the cheese melt evenly. After 15-20 minutes, unwrap the bread and bake it longer. This browns the cheese and makes it bubbly and delicious. One common mistake is cutting the bread too deep. If you cut through the bottom, the bread falls apart. Another mistake is not using enough cheese. More cheese means more flavor and a gooey texture. Don't skip the resting time after baking. Letting the bread cool for a few minutes helps it set. This makes it easier to pull apart without making a mess. By following these tips, you’ll create a cheesy pull apart bread that everyone will love. For the full recipe, refer to the earlier section. {{image_2}} You can easily change the taste of your cheesy pull apart bread by adding herbs and spices. For a fresh touch, try adding basil or oregano. These herbs give a bright flavor that works well with cheese. You can also sprinkle in red pepper flakes for some heat. Just a pinch can make a big difference. Incorporating different cheeses can take this bread to the next level. You can swap out mozzarella for gouda or add pepper jack for a spicy kick. Mixing in some blue cheese creates a bold flavor that cheese lovers will enjoy. Each cheese melts differently, so experiment to find your favorite mix. Cheesy pull apart bread pairs well with many dishes. It’s great with a side of marinara sauce for dipping. You can also serve it with garlic oil or pesto for added flavor. This makes it a fun snack at parties or gatherings. For creative serving ideas, consider using the bread as a bowl. After baking, you can fill the center with a warm cheese dip. Guests can pull apart the bread and dip it into the cheesy goodness. Another idea is to serve it alongside a fresh salad for a balanced meal. For the full recipe and more tips, check out the [Full Recipe]. To store leftover cheesy pull apart bread, wrap it tightly in plastic wrap. This keeps the bread fresh and moist. You can also use aluminum foil if you prefer. Place it in an airtight container for extra protection. Store it at room temperature for up to two days. If you want it to last longer, consider freezing it. When you’re ready to enjoy the leftovers, reheating is key. Preheat your oven to 350°F (175°C). Unwrap the bread from its storage. Place it on a baking sheet. Bake for about 10 to 15 minutes. This helps the cheese melt and the bread warm up nicely. If you want a crispy crust, you can bake it uncovered. Freezing is a great way to save cheesy pull apart bread for later. Wrap the bread in plastic wrap, then in foil. This prevents freezer burn. You can freeze it for up to three months. When you’re ready to eat, thaw the bread in the fridge overnight. Then, reheat it in the oven for the best flavor and texture. This method keeps the bread and cheese delicious. For the full recipe, check out the recipe section. For cheesy pull apart bread, I recommend using a large round loaf of sourdough or Italian bread. These types have a nice crust and soft inside. Their shapes hold the cheese well and make it easy to pull apart. Yes, you can prepare this recipe ahead of time. You can cut the bread and mix the garlic butter. Store them separately in the fridge. When you’re ready to bake, just brush the bread and add the cheese. Bake it fresh for a warm snack. Yes, you can make cheesy pull apart bread gluten-free. Look for gluten-free bread that has a sturdy texture. Many stores offer gluten-free options, like gluten-free sourdough or Italian bread. When choosing gluten-free bread, consider the following tips: - Look for breads made with almond flour or oat flour. - Check for bread that claims to be gluten-free and has good reviews. - Make sure the bread has a good crust to hold the filling. You can customize your cheesy pull apart bread in many ways. Here are some ideas: - Add different cheeses like gouda or pepper jack for a kick. - Include cooked bacon or ham for extra flavor. - Mix in chopped herbs like basil or thyme for freshness. - Try different seasonings, like smoked paprika or chili flakes, for a twist. For a full recipe, check out the Cheesy Pull Apart Bread section. In this post, we explored how to make cheesy pull-apart bread from scratch. You learned about the key ingredients, cooking steps, and tips for choosing fresh items. We also shared ingredient swaps and variations to personalize your bread. Remember, the right bread and cheese really make a difference. Experiment with flavors and serving ideas to find your favorite. Don’t forget to store any leftovers properly. Now, go ahead and enjoy pulling apart delicious bites of cheesy goodness!

Cheesy Pull Apart Bread Savory and Easy Snack

Are you ready to wow your friends with a tasty snack? Cheesy pull apart bread is the perfect blend of

- 2 medium sweet potatoes, scrubbed and cut into wedges - 3 tablespoons olive oil - 1 teaspoon smoked paprika - 1 teaspoon garlic powder - 1/2 teaspoon cumin - 1/2 teaspoon cayenne pepper (adjust to taste) - Salt and pepper to taste - Fresh parsley, chopped (for garnish) When making roasted sweet potato wedges, choose firm sweet potatoes. Look for ones with smooth skin and no soft spots. The olive oil adds a rich flavor and helps the wedges crisp up nicely. Smoked paprika gives them a nice, smoky taste, while garlic powder adds depth. Cumin and cayenne give a warm kick to the dish. You can adjust the cayenne based on your heat preference. Don’t forget salt and pepper, which enhance all the flavors. Fresh parsley adds a pop of color and freshness when you serve the wedges. - Mixing bowl - Baking sheet - Parchment paper - Knife and cutting board You’ll want a sturdy knife for cutting the sweet potatoes. A cutting board protects your counter and gives you a stable surface. The mixing bowl is for combining the oil and spices. Using a baking sheet lined with parchment paper makes cleanup easy and helps the wedges crisp up without sticking. For the full experience, check out the Full Recipe. This will guide you through each step to achieve perfectly crispy and flavorful sweet potato wedges! - Preheat the oven to 425°F (220°C). - Prepare the baking sheet with parchment paper. - In a large bowl, mix olive oil and spices. - Toss sweet potato wedges in the spice mixture. - Arrange wedges on the baking sheet in a single layer. - Roast in the oven for 25-30 minutes. - Flip wedges halfway through cooking for even crispiness. - Before serving, garnish with fresh parsley. Roasting sweet potatoes is simple. The high heat makes them crispy. The spices give them a great flavor. You can find the full recipe above. Enjoy your snack! To get crispy sweet potato wedges, space is key. When you lay out the wedges, make sure they are not touching. This helps the hot air flow around them, making them crunchy. Also, line your baking sheet with parchment paper. This keeps the wedges from sticking and makes cleanup easy. Adjusting the spice mix can make a big difference. Feel free to add more cayenne if you like heat. You can also try using different spices. For instance, cinnamon adds a sweet touch, while Italian herbs like oregano give a nice twist. Experiment with flavors to find what you love best. Dipping sauces can elevate your wedges. Try pairing them with spicy aioli or creamy ranch. For gatherings, serve the wedges on a colorful platter. Add a small bowl of your favorite sauce in the center. This makes a fun and tasty snack for everyone. If you want to get creative, top the wedges with shredded cheese or fresh herbs for extra flavor. {{image_2}} You can change the flavor of your roasted sweet potato wedges easily. Try a sweet and spicy mix. Just add honey and chili powder to the recipe. This will give your wedges a nice kick. Another option is to use herbs. Rosemary or thyme can add a fresh taste. Just sprinkle them over the wedges before roasting. These herbs pair well with the natural sweetness of the potatoes. You can cook sweet potato wedges in different ways. The air fryer is a great choice for a quick meal. It cooks them fast and keeps them crispy. Just set the air fryer to a high temperature and check them often. Grilling is another method that adds a smoky flavor. Just toss the wedges on the grill for a charred taste. This method works best when you want a nice outdoor meal. If you follow a vegan diet, these wedges are perfect for you. They are naturally vegan and gluten-free. You can enjoy them without any worries. For those looking to cut carbs, you can swap sweet potatoes for other veggies. Try zucchini or cauliflower wedges. They roast well and can take on the same spices. This way, you’ll have a delicious low-carb snack. For the full recipe, check out the complete guide on making crispy roasted sweet potato wedges. To keep your roasted sweet potato wedges fresh, let them cool first. Place them in an airtight container. This helps keep out moisture, which can make them soggy. Use a glass or plastic container with a tight lid. If you have a lot of wedges, stack them in layers with parchment paper between. This helps them stay crispy. When you reheat your sweet potato wedges, you want them crispy again. The best way is to use the oven. Preheat it to 400°F (200°C). Spread the wedges out on a baking sheet. Bake for about 10-15 minutes. Flip them halfway through to get even heat. If you use a microwave, they may get soft. If you must use the microwave, try a lower power setting. Heat for a short time and check often. Yes, you can freeze sweet potato wedges! To freeze, let them cool completely. Place them in a single layer on a baking sheet. Freeze for a few hours until solid. Then, transfer them to a freezer bag. Squeeze out air before sealing. When you want to eat them, thaw in the fridge overnight. Reheat them in the oven for best results. This way, they’ll stay tasty and crispy. To make your roasted sweet potato wedges crispy, follow these tips: - Cut wedges evenly: This ensures they cook at the same rate. - Use enough oil: Coat the wedges lightly with olive oil. It helps them crisp up. - Don’t overcrowd the pan: Space them out on the baking sheet. This allows hot air to circulate. - Flip halfway: Turn the wedges halfway through roasting for an even crisp. These steps will keep your sweet potato wedges from getting soggy. Roasted sweet potato wedges pair well with many main dishes. Here are a few ideas: - Grilled chicken: The sweetness complements the savory flavor. - Burgers: They make a great side for any type of burger. - Tacos: Add a crunchy side to your favorite taco meal. - Fish: Roasted wedges balance nicely with grilled or baked fish. These options enhance the meal and make it more satisfying. Roasted sweet potato wedges can last in the fridge for about 3-5 days. Store them in an airtight container. If you freeze them, they can last up to 2 months. Make sure to cool them first before freezing. For best results, reheat in the oven to bring back the crispiness. Enjoy them as a tasty snack or side dish again! You can make delicious roasted sweet potato wedges easily. We covered ingredients, tools, and steps to get crispy wedges. I shared tips on seasoning and serving suggestions. You learned variations, storage info, and solutions to common questions. Experiment with flavors and methods to find your favorite. Enjoy making these tasty wedges for meals or gatherings! Keep these tips handy, and your sweet potato game will be on point.

Roasted Sweet Potato Wedges Crispy and Flavorful Snack

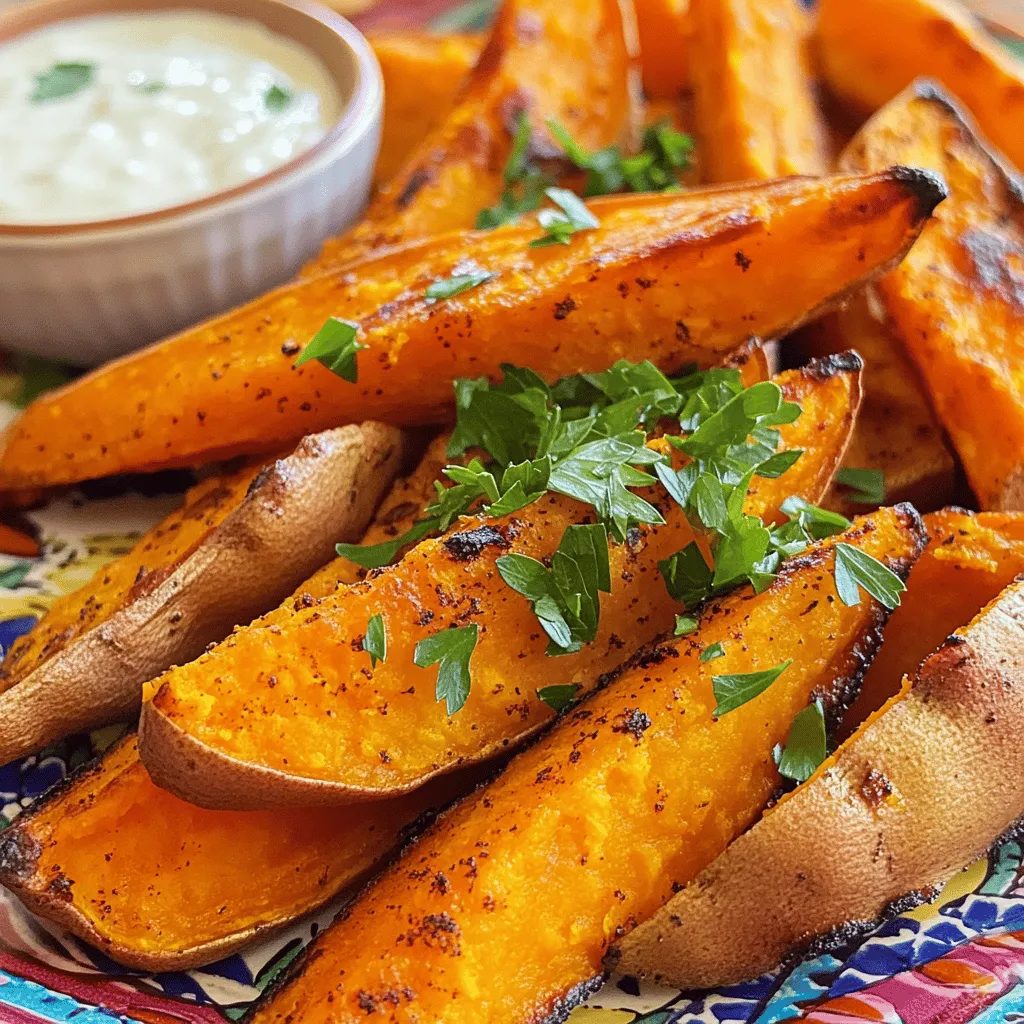
If you’re craving a snack packed with flavor and crunch, you’re in the right place. Roasted sweet potato wedges are

Older posts
Newer posts
← Previous Page1 … Page79 Page80 Page81 … Page84 Next →

dsad

© 2026 juliesdish • Built with GeneratePress

Our Policies

  • Copyright Policy
  • Cookie Policy
  • GDPR Policy
  • Privacy Policy
  • Disclaimer
  • Terms Of Use

More Information

  • Home
  • About
  • Contact
  • Appetizers
  • Dessert
  • Dinner
  • Drinks
©2026, juliesdish About Back To Top