Skip to content
DisclaimerTerms Of UseGDPR PolicyCookie Policy

juliesdish

  • Home
  • Drinks
  • Appetizers
  • Dinner
  • Dessert
  • About
  • Contact
  • Privacy Policy
DisclaimerTerms Of UseGDPR PolicyCookie Policy

NO-ING-IMG

- Fresh strawberries - Dark chocolate chips - Coconut oil - Optional toppings (crushed nuts, shredded coconut, sea salt) To make chocolate-covered strawberry bites, gather these simple ingredients. Start with fresh strawberries. Choose large, ripe strawberries for the best taste. Next, grab some dark chocolate chips. Dark chocolate adds rich flavor and pairs well with the sweet strawberries. You will also need coconut oil. This oil helps the chocolate melt smoothly. For a little extra flair, consider optional toppings. Crushed nuts like almonds or walnuts add crunch. Shredded coconut gives a tropical twist. A sprinkle of sea salt brings out the chocolate's sweetness. You can mix and match toppings based on your taste. These ingredients are easy to find. You can use them to create a lovely and delicious treat. Check out the Full Recipe for more details on how to prepare this delight. - Preparing the baking sheet: Start by lining a baking sheet with parchment paper. This helps keep the strawberries from sticking. Set it aside for later. - Melting the chocolate mixture: In a microwave-safe bowl, add 1 cup of dark chocolate chips and 1 tablespoon of coconut oil. Heat it in the microwave in 30-second intervals. Stir the mixture between each interval. This ensures the chocolate melts evenly. It will take about 1 to 1.5 minutes to get smooth chocolate. - Dipping the strawberries: Take each strawberry by the stem and dip it into the warm chocolate. Make sure to coat it well, letting any extra chocolate drip off. Place the dipped strawberries on the prepared baking sheet. - Adding toppings: While the chocolate is still warm, sprinkle your choice of toppings. Use crushed nuts or shredded coconut for extra flavor and texture. Get creative! - Setting the chocolate: Once all strawberries are coated, sprinkle a tiny bit of sea salt over them. This adds a nice contrast. Then, refrigerate the strawberries for about 15 to 30 minutes. This helps the chocolate harden and set. - Serving suggestions: Serve the chocolate-covered strawberry bites on a nice plate. You can arrange them in a fun pattern. These treats are perfect for parties or special moments. Enjoy the sweet and salty bite! For the complete recipe, refer to the [Full Recipe]. Avoiding clumps To melt chocolate well, use high-quality chocolate chips. These melt evenly and help avoid clumps. Heat them gently in short bursts. I suggest starting with 30 seconds in the microwave. Stir after each interval. This keeps the heat even and smooths out the chocolate. Using the right bowl Choose a microwave-safe bowl. Glass or ceramic works best. Avoid metal bowls, as they can heat unevenly. Also, make sure the bowl is dry. Any water can cause the chocolate to seize. Achieving an even coating Hold each strawberry by the stem to dip. This gives you control and keeps your hands clean. Dip it in the melted chocolate. Make sure to cover it completely. Twirl it gently to let excess chocolate drip off. Allowing chocolate to set After dipping, place the strawberries on parchment paper. This prevents sticking. For best results, chill them for about 15-30 minutes. This helps the chocolate harden and stay shiny. Creative serving ideas Serve chocolate-covered strawberries on a decorative plate. You can arrange them in a circle or a fancy shape. For extra flair, drizzle some melted white chocolate on top. This adds a beautiful touch. You can also serve them with a side of whipped cream for dipping. These ideas make the treats look special and inviting. For the full recipe, you can check the details above. {{image_2}} You can switch up the chocolate for your strawberry bites. Try using white chocolate or milk chocolate. These options give a sweet twist. You can even use flavored chocolate. Think of options like orange or mint. Each choice adds a new taste and fun to the bites. The seasons bring great chances to change your treats. For holidays, use fun coatings. You can add red and green sprinkles for Christmas. Or, use pastel colors for Easter. Pair strawberries with fruits or nuts as well. Sliced bananas or crushed pistachios can make great matches. It’s all about creativity! If you want a healthier treat, there are choices. Use sugar-free chocolate to cut down on sugar. There are tasty brands that make it easy. You can also add superfoods to your bites. Think chia seeds or flaxseeds. These add a boost of nutrition without losing flavor. Enjoy experimenting with these fun ideas! To keep your chocolate-covered strawberries fresh, store them in the fridge. Use a shallow container with a lid. Line the bottom with paper towels to absorb any moisture. Place the strawberries in a single layer. Avoid stacking them to prevent damage. Keep them away from strong-smelling foods. Strawberries soak up odors easily. The right temperature is key. Store them at around 35 to 40 degrees Fahrenheit. This keeps the chocolate firm and the strawberries juicy. Do not freeze them, as this will ruin their texture. Chocolate-covered strawberries last about 1 to 2 days in the fridge. After that, they may start to spoil. Look for signs like a mushy texture or mold. If the chocolate develops a white film, it’s called “bloom.” This happens when the chocolate cools too quickly. While it’s safe to eat, it doesn't look nice. Chocolate-covered strawberries make a lovely gift. For packaging, use a clear box or a decorative tin. Add some tissue paper for a pop of color. You can also tie a ribbon around it for a nice touch. For presentation, arrange the strawberries in a unique way. Use cupcake liners to separate each one. It adds charm to your gift. For special occasions, consider adding a small card with a sweet note. For the full recipe, visit the main section above. To make your chocolate coating smooth, add a bit of coconut oil. This helps thin the chocolate and makes it easier to dip. Heat the chocolate slowly in the microwave. Stir it often to avoid hot spots. If you add too much chocolate, it can clump. You can use frozen strawberries, but fresh ones are best. Frozen strawberries lose their water when they thaw. This can make them soggy. If you use frozen strawberries, let them thaw and dry well. Pat them down with a towel before dipping. If the chocolate hardens too fast, it might be too cool. Try warming it slightly in the microwave. Stir it well to keep it smooth. You can also add a teaspoon of coconut oil to slow the cooling. If you don't have time, just dip quickly and add toppings fast. You can buy pre-made chocolate-covered strawberry bites at many stores. Look for them in the candy or dessert section. Online stores also sell quality options. Always check reviews to find the best ones. For the freshest taste, I recommend making them yourself. You can find the full recipe online to try! In this post, we explored how to make chocolate-covered strawberries. We covered ingredients, easy steps, and helpful tips. You now know how to melt chocolate, dip strawberries, and add toppings. I shared ways to customize your treats and store them well. Creating these treats is fun and tasty. Enjoy experimenting with flavors and toppings. Use your new skills to impress friends or treat yourself! Happy dipping!

Chocolate Covered Strawberry Bites Delightful Treats

Indulge in the rich joy of Chocolate Covered Strawberry Bites, a treat that’s both fun to make and delicious to

- 8 ounces fettuccine pasta - 1 pound large shrimp, peeled and deveined - 2 tablespoons Cajun seasoning - 2 tablespoons olive oil - 1 medium red bell pepper, sliced - 1 medium yellow onion, sliced - 3 cloves garlic, minced - 1 cup cherry tomatoes, halved - 1 cup heavy cream (or coconut cream) - Salt and pepper to taste - 2 tablespoons fresh parsley, chopped - Juice of 1 lemon Each ingredient plays a key role in making the Spicy Cajun Shrimp Pasta shine. The fettuccine serves as a perfect base, holding the creamy sauce well. The shrimp brings a fresh taste, while the Cajun seasoning adds a bold kick. The red bell pepper and onion add sweetness and crunch. The garlic gives a lovely aroma, while the cherry tomatoes burst with flavor. The creamy sauce, made with heavy cream or coconut cream, ties everything together and makes this dish rich and indulgent. When you combine these ingredients, you create a dish that is not just quick to make but also packed with flavor. If you're looking for the full recipe, check the [Full Recipe]. Each bite offers a delightful mix of spices and freshness that you will love. First, boil a large pot of salted water. Add the fettuccine pasta. Cook it according to the package instructions until it is al dente. This usually takes around 8 to 10 minutes. Once done, drain the pasta and set it aside in a bowl. While the pasta cooks, grab a bowl and toss the shrimp with Cajun seasoning. Make sure every shrimp gets a nice coat. It adds a lot of flavor. Next, heat some olive oil in a large skillet over medium heat. Add the seasoned shrimp to the hot skillet. Sauté them for about 2 to 3 minutes on each side. They should turn pink and opaque when cooked. Now, it’s time to add some color and flavor. Push the cooked shrimp to one side of the skillet. In the same skillet, add sliced bell pepper and onion. Sauté these vegetables until they soften, which takes about 4 to 5 minutes. Then, add minced garlic and halved cherry tomatoes. Cook for another 1 to 2 minutes. Next, pour in the heavy cream or coconut cream. Bring it to a gentle simmer. Mix everything well. Finally, add the drained pasta to the skillet. Toss gently until the pasta is coated in the creamy sauce. Season with salt and pepper to taste. For a touch of freshness, stir in some chopped parsley and a squeeze of lemon juice. This dish is now ready to serve! Don't forget to check out the Full Recipe for precise details. How to avoid overcooking the shrimp To keep shrimp tender, cook them for just 2-3 minutes on each side. They'll turn pink and opaque when done. Overcooked shrimp become tough and rubbery. Keep an eye on them! Timing for adding vegetables Add your vegetables first. Sauté them until they soften, about 4-5 minutes. This gives them a nice texture. Then, push them aside to cook the shrimp. Best ways to garnish your pasta Garnish your pasta with fresh parsley for a pop of color. A sprinkle of lemon zest adds brightness. You can also add a wedge of lemon on the side for a nice touch. Plating techniques for a beautiful serve Use a large bowl for serving. Twirl the pasta into the center for height. Drizzle olive oil on top for shine. A beautiful serve makes every meal special. Adding extra spices for more heat If you love heat, add cayenne or crushed red pepper flakes. A little goes a long way. You can always start with a small amount and adjust to your taste. Using alternative proteins or veggies Try chicken or sausage if you want a change. For a veggie option, lentils or chickpeas make a great substitute. They add protein and flavor without shrimp. Check the Full Recipe for more ideas! {{image_2}} You can make Spicy Cajun Shrimp Pasta lighter. Swap heavy cream for coconut cream. This gives a creamy texture but cuts calories. You can also use Greek yogurt for a tangy twist. For pasta, choose gluten-free options, like brown rice or quinoa pasta. These substitutions keep the dish tasty and healthy. Shrimp isn’t the only option here. You can use chicken or sausage instead. Season them just like the shrimp for great flavor. If you want a vegetarian meal, lentils or chickpeas work well. They add protein and make this dish filling. Want to shake things up? You can add Asian spices like ginger or sesame oil. This gives a unique twist to the dish. Also, try different cheese options. Grate some Parmesan or sprinkle feta on top for added richness. These twists make your meal even more exciting. For the full recipe, check out the detailed instructions above. To keep your Spicy Cajun Shrimp Pasta fresh, store leftovers in an airtight container. Make sure it cools down before sealing. This helps prevent sogginess. It will stay good for up to three days in the fridge. When you reheat, use low heat on the stove or in the microwave. Add a splash of cream or water to keep it moist. Stir often to heat evenly. Yes, you can freeze Spicy Cajun Shrimp Pasta! To prepare, let it cool completely. Then, place it in a freezer-safe container or a zip-top bag. Remove as much air as possible before sealing. Label the bag with the date. It can last up to three months in the freezer. When ready to eat, thaw it overnight in the fridge. Reheat gently on the stove, adding a bit of cream for creaminess. Enjoy your meal anytime! Spicy Cajun Shrimp Pasta lasts about 3 to 4 days in the fridge. To keep it fresh, store it in an airtight container. Make sure it cools down before sealing. Always check for any off smells or changes in texture before eating. If you see mold or it smells bad, throw it away. Yes, you can prep some parts ahead of time. Cook the pasta and shrimp separately, then store them in the fridge. You can chop the vegetables and mix the sauce earlier too. Just reheat everything together when you are ready to eat. This saves time and keeps flavors fresh. This meal pairs well with many sides. You can serve a fresh salad with mixed greens and a light vinaigrette. Garlic bread is also a great choice to soak up the creamy sauce. For a veggie option, consider roasted asparagus or steamed broccoli. These sides add color and balance to your plate. This blog post covered how to make delicious Spicy Cajun Shrimp Pasta. We looked at key ingredients, cooking steps, and even tips for the best results. You can also explore flavorful variations to make the dish your own. Remember to store any leftovers correctly for freshness. With these steps, you'll impress anyone at your table. Enjoy making this tasty meal!

Spicy Cajun Shrimp Pasta Quick and Flavorful Meal

Ready for a burst of flavor? My Spicy Cajun Shrimp Pasta is quick, easy, and packed with zest. In just

- 1 pound Brussels sprouts, trimmed and halved - 3 tablespoons balsamic vinegar - 1 tablespoon honey or maple syrup - 2 tablespoons olive oil - Salt and pepper to taste - 1/4 cup pecans or walnuts, chopped - 1 tablespoon fresh thyme leaves (or 1 teaspoon dried thyme) - Optional: Grated Parmesan cheese for serving Brussels sprouts are the star here. They grow in tight clusters on tall stalks. Choose sprouts that are firm and bright green. Trim the base and slice them in half. This helps them cook evenly. Balsamic vinegar adds a sweet and tangy flavor. It pairs well with the sprouts. Honey or maple syrup gives a nice touch of sweetness to the glaze. Use pure honey or real maple syrup for the best taste. Olive oil helps the sprouts roast to perfection. It gives them a crispy texture and rich flavor. Salt and pepper enhance all the flavors and make the dish pop. Nuts bring crunch and depth. I often use pecans or walnuts. They toast beautifully and add a great texture. Fresh thyme adds an aromatic touch. You can use dried thyme if fresh isn’t available. For a creamy finish, sprinkle on some grated Parmesan cheese. It adds a savory layer to the dish. - You can swap honey for agave syrup or brown sugar for a similar sweetness. - Try almonds or hazelnuts instead of pecans or walnuts. - Use rosemary or oregano if you do not have thyme on hand. Experiment with these ingredients to make this dish your own. You can adjust flavors to match your taste. For the full recipe, check out the link above. - Prepping the Brussels sprouts Start by trimming the ends of the Brussels sprouts. Cut them in half. This helps them cook evenly. - Mixing ingredients for the glaze In a small saucepan, mix balsamic vinegar and honey (or maple syrup). Heat over medium heat until it simmers. Stir until it thickens a bit, about five minutes. - Roasting instructions and timing Preheat your oven to 425°F (220°C). Place the halved Brussels sprouts in a bowl. Drizzle with olive oil, salt, and pepper. Toss well to coat. Spread them cut side down on a baking sheet. Roast for 20-25 minutes. Toss halfway for even cooking. - Toasting nuts process While the sprouts roast, take a small skillet. Add chopped pecans or walnuts. Toast over medium heat for about 3-5 minutes. Stir often to avoid burning. - How to combine the elements Once the Brussels sprouts are golden and crispy, take them out of the oven. Drizzle the balsamic glaze over them. Toss well to coat evenly. - Serving suggestions Sprinkle the toasted nuts and fresh thyme over the sprouts. If you want, add some grated Parmesan cheese for extra flavor. Serve warm as a delightful side dish. For the full experience, check out the Full Recipe. To get Brussels sprouts nice and crispy, start with a hot oven. Set it to 425°F (220°C). This high heat helps them roast well. Spread the sprouts out evenly on the baking sheet. Space them apart so they can brown nicely. If they touch too much, they will steam instead of roast. Brussels sprouts love spices! Add a pinch of garlic powder or smoked paprika for warmth. These spices bring out their natural taste. For a thicker balsamic glaze, simmer the vinegar longer. This helps it reduce and thicken just right, giving a rich flavor. Plating is key to making your dish shine. Serve the Brussels sprouts on a white plate. This makes their color pop! For a special touch, sprinkle grated Parmesan cheese on top. It adds a savory finish. You can also add fresh herbs like thyme for a burst of color and taste. {{image_2}} You can easily change this recipe with seasonal vegetables. Think about adding carrots or sweet potatoes. These veggies add color and sweetness. They pair well with the balsamic glaze. You might also try adding roasted red peppers for a pop of flavor. Adjusting the flavor profile can create new tastes. For a spicy kick, add red pepper flakes. If you love garlic, toss in some minced cloves. Each season brings different flavors. Embrace what is fresh and local. This dish is simple to modify for different diets. To make it vegan, swap honey for maple syrup. This keeps the glaze sweet and tasty. You can also use gluten-free balsamic vinegar. If you need nut-free options, skip the nuts entirely. Use sunflower seeds for a similar crunch. They add texture without the allergens. Balsamic glazed Brussels sprouts go great with many main dishes. They pair well with roasted chicken or grilled fish. These sprouts can also balance a rich meal like beef. If you have leftovers, you can use them in salads. Chop them up and toss them with mixed greens. They add a nice flavor to your lunch. You can also mix them into a grain bowl for a hearty meal. For the full recipe, check out the detailed instructions to get started on this dish. To keep your Balsamic Glazed Brussels Sprouts fresh, use airtight containers. Place any leftover sprouts in the fridge within two hours of cooking. They can last for up to three days. If you want to freeze them, make sure they are completely cool first. Use freezer-safe bags or containers. They can last up to three months in the freezer. When reheating, the goal is to keep the sprouts crispy. The best method is to use an oven. Preheat the oven to 350°F (175°C). Spread the sprouts on a baking sheet and heat for about 10-15 minutes. This method helps maintain their texture. Avoid using a microwave, as this can make them soggy. If you must use a microwave, do so in short bursts and cover them loosely with a paper towel to help keep moisture in check. To cut Brussels sprouts, start by trimming the stem end. Remove any yellow leaves. Then, slice each sprout in half from top to bottom. This method helps them cook evenly. If you want smaller pieces, you can quarter them. Halving makes them easy to roast and helps them absorb the glaze better. Yes, you can make the balsamic glaze ahead of time. Just cook it as the recipe states and let it cool. Store the glaze in an airtight container in the fridge for up to a week. When you're ready to use it, gently reheat it in a saucepan over low heat. This brings back its flavorful taste. Leftover balsamic glazed Brussels sprouts will last for about 3 to 4 days in the fridge. Store them in an airtight container to keep them fresh. If you want to reheat them, use the oven or a skillet. This will help keep them crispy. Avoid microwaving, as it may make them soggy. In this post, we explored how to make delicious roasted Brussels sprouts with a sweet balsamic glaze. We covered the key ingredients, helpful tips, and various recipe variations. Keep these steps in mind for perfect results each time. Try new spices and toppings to make this dish your own. Remember, leftovers can be stored easily, so don’t hesitate to whip up a big batch. Enjoy your cooking adventure and impress your friends with this tasty side dish!

Balsamic Glazed Brussels Sprouts Flavorful Side Dish

Looking for a side dish that’s both tasty and easy to make? Try my Balsamic Glazed Brussels Sprouts! This dish

To make a delicious avocado toast with poached egg, you'll need some key ingredients. Here they are: - 2 slices of whole-grain bread - 1 ripe avocado - 2 large eggs - 1 tablespoon lemon juice - 1/4 teaspoon garlic powder - Salt and pepper to taste - 1 tablespoon olive oil - Red pepper flakes (optional, for garnish) - Fresh herbs (such as cilantro or chives, for garnish) Each ingredient plays an important role in creating a tasty dish. The whole-grain bread provides fiber and texture. The ripe avocado brings creaminess and healthy fats. Eggs are a great source of protein. The lemon juice adds brightness. Garlic powder gives a nice flavor kick, while salt and pepper enhance all the tastes. Olive oil adds richness, and red pepper flakes and herbs can boost the dish's appeal. For the full recipe, you can check out the detailed instructions. To start, you need to toast the bread slices. I like to use whole-grain bread for its nutty flavor. Place the slices in a toaster or on a pan over medium heat. Toast them until they are golden and crispy. This usually takes about 3 to 5 minutes. While the bread toasts, you can prepare the avocado mixture. Take a ripe avocado and cut it in half. Scoop the green flesh into a small bowl. Use a fork to mash the avocado until it's smooth but still a bit chunky. Mix in one tablespoon of lemon juice, 1/4 teaspoon of garlic powder, and add salt and pepper to taste. Stir well until everything is combined. Next, it's time to poach the eggs. Fill a medium saucepan with water and bring it to a gentle simmer over medium heat. Crack each egg into a small cup. This way, you can add them to the water easily. To poach the eggs, create a gentle whirlpool in the simmering water with a spoon. Carefully slide each egg into the water. Poach them for about 3 to 4 minutes for runny yolks. If you like firmer yolks, leave them in for an extra minute or two. Use a slotted spoon to take out the eggs, and let them drain on a paper towel. Now, it's time to put everything together. Once the toast is ready, spread the avocado mixture generously on each slice. Make sure to cover the bread well for maximum flavor. Place one poached egg on top of each slice of avocado toast. For an extra kick, drizzle a bit of olive oil over them. You can also sprinkle red pepper flakes and fresh herbs like cilantro or chives on top. This adds color and flavor to your dish. Enjoy your delicious avocado toast with poached egg! For the full recipe, check out the instructions above. Using fresh eggs is key for great poached eggs. Fresh eggs hold their shape better when cooked. Look for eggs with firm whites and bright yolks. Always check the date on the carton. To ensure even cooking, bring water to a gentle simmer. Boiling water can break the eggs apart. Create a whirlpool in the water using a spoon. This helps the egg whites wrap around the yolk. Cook each egg for about 3-4 minutes for a runny yolk. If you like firmer yolks, cook them a bit longer. Adding spices and herbs boosts the taste of your avocado toast. I love to sprinkle garlic powder into the avocado mix. It adds depth without overpowering the dish. You can also use salt and pepper to taste. When serving, drizzle olive oil over your toast. A touch of red pepper flakes adds a nice kick. Fresh herbs like cilantro or chives make it look pretty, too. For more ideas, check the Full Recipe for other tasty options. {{image_2}} You can change up your avocado toast with fun toppings. Try adding smoked salmon for a savory twist. It pairs nicely with the creamy avocado. Feta cheese also adds a salty bite. Just sprinkle some crumbled feta on top for a tasty contrast. If you want a different spread, consider hummus. It adds a rich, nutty flavor. Cream cheese is another great option. It makes your toast extra creamy. Both spreads work well with the avocado. Don’t hesitate to mix and match your favorites. For those who need gluten-free options, use gluten-free bread. Many brands offer great textures and flavors. You will still enjoy your toast without the gluten. If you're looking for vegan options, you can skip the eggs. Try using silken tofu instead. Just mash it up and add some seasoning. You can also use a store-bought vegan egg substitute. These options still give you that creamy texture. They make your toast just as delightful as the original recipe. Explore these variations to find your perfect avocado toast! Check the Full Recipe for a complete guide. To keep your avocado toast fresh, store its parts separately. Place the avocado mixture in an airtight container. This helps keep it from browning. Use a bit of lemon juice in the mix for extra protection. For the toast, wrap the bread in foil or plastic wrap. This keeps it from getting too dry. When it’s time to eat, reheat the toast. You can pop it back in the toaster to crisp it up. If you prefer, use a hot skillet for a few minutes. Just make sure it gets warm but stays crunchy. The ingredients in this recipe have different shelf lives. Whole-grain bread lasts about a week if stored properly. Keep it in a cool, dry place. The ripe avocado will stay fresh for 1-2 days once cut. Always check for brown spots to know if it’s good. To avoid browning, use lemon juice, as mentioned before. This keeps your fresh avocado looking bright and green. If you follow these tips, you can enjoy your avocado toast for days after making it. To make perfect poached eggs, start with fresh eggs. Fresh eggs hold their shape better. Bring a pot of water to a light simmer. Add a splash of vinegar to help the egg whites stay together. Crack each egg into a small bowl. Create a gentle whirlpool in the water with a spoon. Slowly slide the egg into the center of the whirlpool. This helps the whites wrap around the yolk. Cook for about 3 to 4 minutes for a runny yolk. If you prefer a firmer yolk, cook it a little longer. Use a slotted spoon to remove the eggs. Let them drain on a paper towel to remove excess water. Yes, you can make some components in advance. You can prepare the avocado mixture a few hours ahead. Just keep it in the fridge to stay fresh. To prevent browning, add a bit of lemon juice. Toast the bread just before serving for the best crunch. For poached eggs, it’s best to cook them fresh. However, you can poach them in advance and reheat them. To reheat, place them in warm water for a minute. This keeps them soft without cooking them more. Avocado toast is not only tasty but also healthy. It is rich in healthy fats, vitamins, and fiber. One slice of avocado toast has about 200 calories. Avocados provide potassium, which is great for heart health. Whole-grain bread adds fiber, which helps with digestion. Eggs are a great source of protein, keeping you full longer. Together, they make a balanced meal. You can enjoy this dish for breakfast, lunch, or a snack. It fits well into many diets, making it a versatile choice. This blog post covers a tasty avocado toast recipe. We explored the key ingredients and provided step-by-step instructions. I shared tips for poaching eggs and ways to enhance the flavor. You can try different toppings and make dietary swaps too. Proper storage and meal prep ideas help you enjoy this dish later. Avocado toast is both simple to make and delicious. Give it a try to enjoy a quick meal that’s good for you.

Avocado Toast with Poached Egg Flavorful Recipe Guide

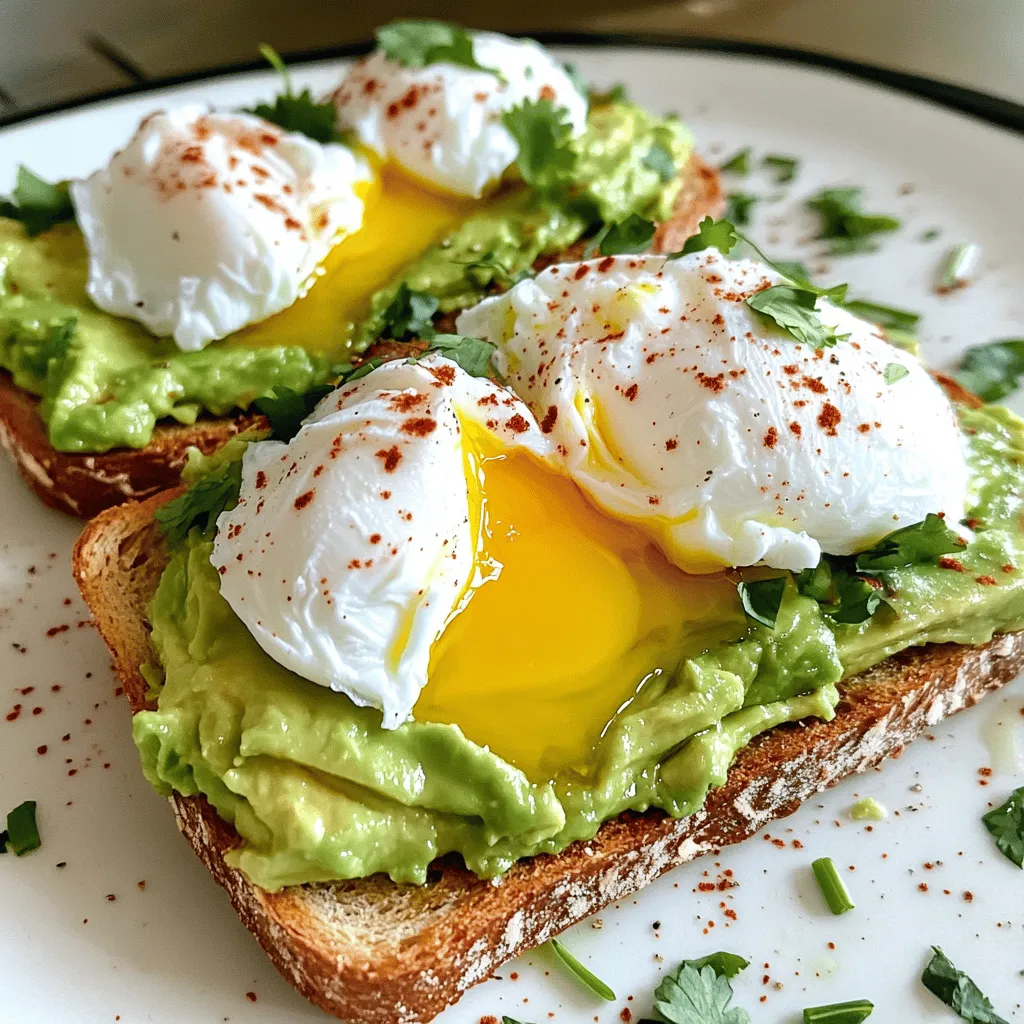
Avocado toast with poached egg is a delicious and healthy meal that you can make at home. This guide will

- 2 large sweet potatoes, peeled and diced - 1 cup quinoa, rinsed - 1 cup black beans, rinsed and drained - 1 red bell pepper, diced - 1 cup corn kernels (fresh or frozen) - 1 avocado, diced - 1/4 cup fresh cilantro, chopped Sweet potatoes are the star of this dish. Their natural sweetness shines when roasted until golden. Quinoa adds a nice texture and protein boost. Black beans bring fiber and a hearty feel. The red bell pepper and corn add bright colors and crunch. Finally, the creamy avocado ties it all together. - 1 tablespoon olive oil - 1 teaspoon smoked paprika - Salt and pepper to taste - Juice of 1 lime - 1 tablespoon honey or agave syrup - Optional: Feta cheese for topping Seasoning is key to a great salad. Olive oil helps the sweet potatoes roast perfectly. Smoked paprika gives a warm, rich flavor. Lime juice adds a zesty kick and balances the sweetness. Honey or agave syrup enhances the dressing. If you want a tangy finish, sprinkle some feta cheese on top. For the full recipe, check out the details in the article. Preheating the Oven First, you need to preheat your oven to 400°F (200°C). This helps the sweet potatoes roast perfectly. While the oven warms up, you can prepare the sweet potatoes. Tossing with Seasonings In a large bowl, take 2 diced sweet potatoes. Add 1 tablespoon of olive oil, 1 teaspoon of smoked paprika, salt, and pepper to taste. Mix everything well until the sweet potatoes are coated. This step brings out the natural sweetness in the potatoes and adds a nice flavor. Combining Ingredients While the sweet potatoes roast, it's time to cook the quinoa. In a medium saucepan, combine 1 cup of rinsed quinoa with 2 cups of vegetable broth. This adds flavor to the quinoa. Bring it to a boil, then lower the heat to a simmer. Cover the pot and let it cook for about 15 minutes. Fluffing and Finishing After 15 minutes, check if the liquid is absorbed. If it is, remove it from the heat. Use a fork to fluff the quinoa gently. This makes it light and fluffy, perfect for the salad. Combining All Ingredients Once the sweet potatoes are done roasting, combine them in a large bowl with the cooked quinoa, 1 cup of black beans, 1 diced red bell pepper, and 1 cup of corn. Mix them gently to keep everything intact. Adding Dressing and Seasoning In a small bowl, whisk together the juice of 1 lime and 1 tablespoon of honey or agave syrup. Pour this dressing over the salad mixture. Toss everything gently to coat. Finally, fold in 1 diced avocado and 1/4 cup of chopped cilantro. Adjust seasoning with salt and pepper as needed. If you like, sprinkle feta cheese on top. This step creates a colorful and tasty salad. For the full recipe, check the earlier sections! Achieving the Right Texture To get the best sweet potatoes, cut them into even pieces. Aim for about one inch. This helps them cook at the same rate. Toss them well with olive oil and spices. This ensures they roast evenly. Roast them until golden brown and tender. You want a nice caramelized edge. This adds a sweet flavor to your salad. Flavor Enhancements Smoked paprika adds a warm, smoky taste. You can also try cinnamon for warmth. A pinch of cayenne can add a kick. Don’t skip the salt and pepper. They enhance all the flavors in your dish. Avoiding Soggy Quinoa Rinse the quinoa before cooking. This removes bitter saponins. Cook it in vegetable broth instead of water. This gives it a richer taste. Use a 2:1 ratio of broth to quinoa. This helps you get fluffy grains. Using Broth for Added Flavor Using broth instead of water is key. It adds depth to the dish. You can use any broth you like. Vegetable broth works best for this salad. It complements the sweet potatoes and other veggies. Presentation Ideas Present your salad in a large, shallow bowl. This makes it look inviting. Garnish with extra cilantro and lime wedges. This adds color and makes it fresh. Pairing with Other Dishes This salad pairs well with grilled chicken or tofu. You can serve it alongside fish for a light meal. It also works great with a warm soup on a cool day. Enjoy the mix of flavors and textures! {{image_2}} You can add protein to your salad in many ways. Grilled chicken or tofu works well. The chicken adds a hearty touch, while tofu provides a great vegan option. Both soak up flavors nicely. You can also add nuts and seeds for crunch. Almonds, walnuts, or pumpkin seeds add texture and healthy fats. They make the salad more filling and tasty. Feel free to switch the veggies based on what's in season. For example, use butternut squash or zucchini in place of sweet potatoes. This keeps the salad fresh and exciting. You can also substitute ingredients based on your taste. If you don't like black beans, try chickpeas instead. This makes the dish your own. The dressing can change the whole flavor. A vegan cashew cream adds a rich, creamy touch without dairy. It pairs well with the sweet potatoes. You can also try tahini or yogurt dressings. Tahini gives a nutty flavor, while yogurt makes it light and zesty. Both options are delicious and unique. For the full recipe, check out the details above. To keep your roasted sweet potato salad fresh, store it in an airtight container. This helps lock in moisture and flavor. Place it in the fridge right after it cools down. The salad stays good for about 3 to 5 days. The main ingredients have different shelf lives: - Cooked sweet potatoes: 3 to 5 days - Quinoa: up to a week - Black beans: 3 to 5 days If you want to save some salad for later, freezing is a great option. First, let the salad cool completely. Then, pack it into a freezer-safe container or bag. Be sure to remove as much air as possible to avoid freezer burn. The salad can last up to 3 months in the freezer. When you're ready to eat it, thaw the salad in the fridge overnight. This keeps it safe and tasty. To reheat your salad, use the stove or microwave. If you use the stove, warm it gently in a pan over low heat. Stir often to prevent sticking. If you choose the microwave, heat it in short bursts. Stir in between to keep it even. Make sure to keep the texture and flavor intact. If it seems dry, add a splash of lime juice or olive oil to bring it back to life. Enjoy your vibrant and flavorful dish! Yes, you can make this salad ahead of time. It tastes great when chilled. To prepare, cook the sweet potatoes and quinoa first. Allow them to cool before mixing with other ingredients. Store the salad in an airtight container. Keep the avocado and dressing separate until serving. This way, the salad stays fresh and vibrant. If you need a substitute for quinoa, try bulgur or farro. Both are tasty and cook easily. You can also use rice, but adjust cooking times. Using different grains gives the salad a new twist. Feel free to mix and match based on your preference. To add spice, include jalapeños or red pepper flakes. If you want a smoky kick, try adding chipotle powder. For a fresh heat, mix in diced fresh chili peppers. These ingredients boost flavor and heat, making the salad exciting. Adjust the spice level to your taste. This blog post covered everything you need for a delicious roasted sweet potato salad. We talked about key ingredients, from sweet potatoes to black beans. I shared step-by-step cooking instructions and tips for perfect textures. You can also explore variations and storing tips to enjoy later. In the end, this salad is easy and fun to make. Don't hesitate to try new ingredients or dressings. Experimenting is part of the joy. Enjoy your time in the kitchen!

Roasted Sweet Potato Salad Vibrant and Flavorful Dish

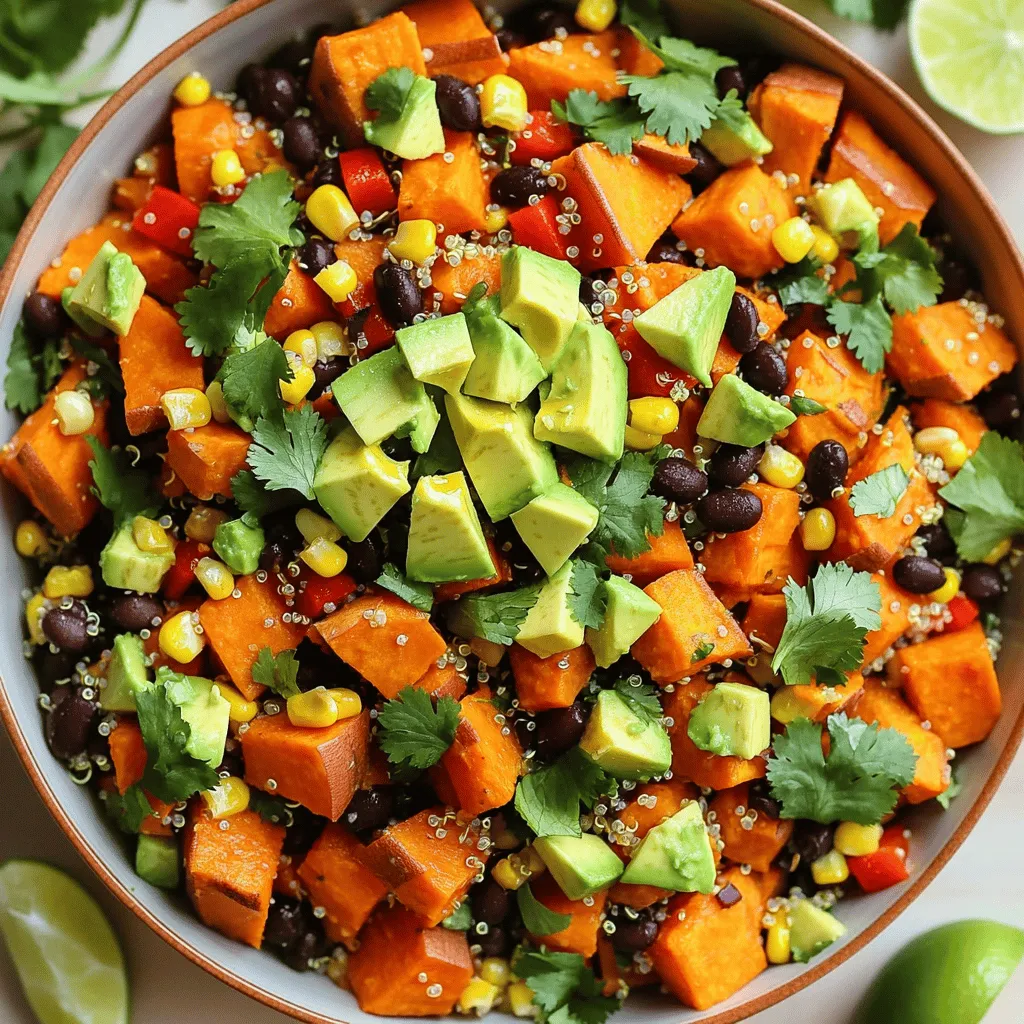
Welcome to the vibrant world of roasted sweet potato salad! This dish is not just colorful; it’s also packed with

To make these funfetti cake batter cookies, you need a few key items: - 1 stick (1/2 cup) unsalted butter, softened - 3/4 cup granulated sugar - 1/4 cup brown sugar, packed - 1 large egg - 1 teaspoon vanilla extract - 1 1/2 cups all-purpose flour - 1/2 teaspoon baking soda - 1/4 teaspoon salt - 1/2 cup cake mix (funfetti or vanilla flavored) - 1/2 cup rainbow sprinkles - 1/2 cup white chocolate chips (optional) These ingredients work together to create a soft, chewy cookie that bursts with flavor and color. While the main ingredients are essential, you might want to add a few optional ones: - White chocolate chips for extra sweetness - Nuts or other types of chocolate chips These options can enhance the cookie's taste and texture. If you need to swap out any ingredients, I have some great ideas: - Use coconut oil or margarine instead of butter. - Substitute brown sugar with coconut sugar for a different flavor. - Try almond or oat flour instead of all-purpose flour for a gluten-free option. - You can leave out the egg and use 1/4 cup unsweetened applesauce as a binder. These substitutions keep the cookie fun and tasty, even with your own twist! {{ingredient_image_1}} Start by preheating your oven to 350°F (175°C). This step is key. While it heats, line a baking sheet with parchment paper. This helps the cookies bake evenly and makes cleanup easy. Make sure you use a large baking sheet, so the cookies have room to spread. In a large mixing bowl, add 1 stick of softened unsalted butter, 3/4 cup of granulated sugar, and 1/4 cup of packed brown sugar. Use a mixer to cream these ingredients together until they are smooth and fluffy. This usually takes about 2-3 minutes. Next, crack in 1 large egg and pour in 1 teaspoon of vanilla extract. Mix until everything is well combined. This blend gives the cookies their rich flavor and soft texture. In another bowl, whisk together 1 1/2 cups of all-purpose flour, 1/2 teaspoon of baking soda, 1/4 teaspoon of salt, and 1/2 cup of cake mix. The cake mix is the secret to that funfetti flavor! Make sure the dry ingredients are evenly blended before adding them to your wet mixture. Gradually add the dry mix to the wet mix. Stir gently until just combined. Be careful not to overmix; this keeps the cookies tender. Fold in 1/2 cup of rainbow sprinkles and 1/2 cup of white chocolate chips, if you like. Now, scoop tablespoon-sized balls of dough and place them about 2 inches apart on your prepared baking sheet. Bake the cookies for 10-12 minutes. They should look slightly underbaked in the center but golden around the edges. Once they are out of the oven, let the cookies cool on the baking sheet for about 5 minutes. This helps them set up nicely. After that, transfer them to a wire rack to cool completely. Enjoy the sweet smell as they cool down! To make the best Funfetti Cake Batter Cookies, follow these tips: - Use softened butter: This helps create a fluffy texture. Let it sit out for about 30 minutes. - Don’t overmix: Mix just until the ingredients blend. Overmixing makes cookies tough. - Chill the dough: If you have time, chill the dough for 30 minutes. This helps the cookies keep their shape. - Watch the baking time: Bake until the edges are golden. The centers should look a bit underbaked. This keeps them soft. - Use fresh sprinkles: Fresh sprinkles add color and fun. Old sprinkles may lose their vibrancy. Avoid these common mistakes for better cookies: - Skipping the baking soda: This ingredient helps cookies rise. Don’t leave it out! - Using too much flour: Measure flour carefully. Too much makes cookies dry. - Not preheating the oven: Always preheat your oven. This ensures even baking. - Baking on a hot sheet: Make sure your baking sheet is cool. Hot sheets can spread the dough too much. - Ignoring the cooling time: Let cookies cool on the sheet. This helps them set properly. Serve these cookies in fun ways: - Colorful platter: Arrange cookies on a bright platter. It makes them look festive. - Extra sprinkles: Top each cookie with more sprinkles before serving. This adds a fun touch. - Dunk in milk: These cookies taste great with a glass of cold milk. It’s a classic combo! - Pair with ice cream: Sandwich some ice cream between two cookies for a delightful treat. - Gift in a jar: Layer cookies in a jar for a cute gift. It’s perfect for friends or family! Pro Tips Chill the Dough: For thicker cookies, chill the dough for at least 30 minutes before baking. This helps prevent spreading and results in a chewier texture. Use Fresh Ingredients: Ensure your baking soda and flour are fresh for the best rise and flavor. Stale ingredients can affect the outcome of your cookies. Experiment with Mix-Ins: Feel free to get creative! Try adding chopped nuts, different types of chocolate chips, or even flavored extracts to customize your cookies. Storage Tips: Store cookies in an airtight container at room temperature for up to a week. For longer freshness, consider freezing them and thawing as needed. {{image_2}} You can easily switch up the flavor of your Funfetti cake batter cookies. For chocolate lovers, swap the funfetti cake mix for chocolate cake mix. This change brings a rich, chocolaty taste. You can add chocolate chips for even more chocolatey goodness. If you prefer a bright flavor, try lemon cake mix. The cookies will be light and refreshing. A bit of lemon zest can also enhance the lemon flavor. Making these cookies gluten-free is simple. Use a gluten-free flour blend instead of all-purpose flour. Ensure your cake mix is also gluten-free. For a vegan version, replace the butter with coconut oil or vegan butter. Use flax eggs instead of a regular egg. Mix one tablespoon of flaxseed meal with three tablespoons of water and let it sit for five minutes. This will mimic the texture of an egg. Get creative with add-ins and mix-ins! Add chopped nuts like walnuts or pecans for a crunchy texture. If you love fruit, consider adding dried fruits like cranberries or cherries. You can also mix in different types of chocolate chips, like dark or milk chocolate. For a fun twist, try adding mini marshmallows. These mix-ins can change the cookie's taste and make them even more exciting. To keep your Funfetti cake batter cookies fresh, store them in an airtight container. This helps the cookies stay soft and moist. Make sure they are completely cool before placing them in the container. You can layer the cookies with parchment paper to avoid sticking. You can freeze the cookie dough before baking. Scoop out the dough and place it on a baking sheet. Freeze for about one hour. Once firm, transfer the dough balls to a freezer-safe bag. You can bake them straight from the freezer. Just add an extra minute or two to the baking time. When stored properly, these cookies last about one week at room temperature. If you freeze them, they can last up to three months. Just remember to label your containers or bags with the date. This way, you’ll know when to enjoy them! Yes, you can. Any flavor of cake mix works well. Chocolate or vanilla give great taste. Just remember, it changes the cookie flavor. Funfetti adds color and joy! These cookies last about one week when stored correctly. Keep them in an airtight container. They stay fresh and tasty that way. You can also freeze them for up to three months. If your dough feels too sticky, add a bit more flour. Start with one tablespoon at a time. Mix it well until the dough feels right. You want it soft but easy to handle. Absolutely! You can skip the sprinkles if you prefer. The cookies will still taste great. For a different twist, try adding nuts or chocolate chips instead. Funfetti cake batter cookies are fun and easy to make. You learned about the main ingredients and some optional tweaks. I showed you step-by-step how to mix, bake, and cool your cookies. There are tips to get the perfect batch and avoid common mistakes. You also saw tasty variations and how to store your cookies. Now you're ready to bake. Enjoy making these cookies your own!

Funfetti Cake Batter Cookies Delightful and Easy Treat

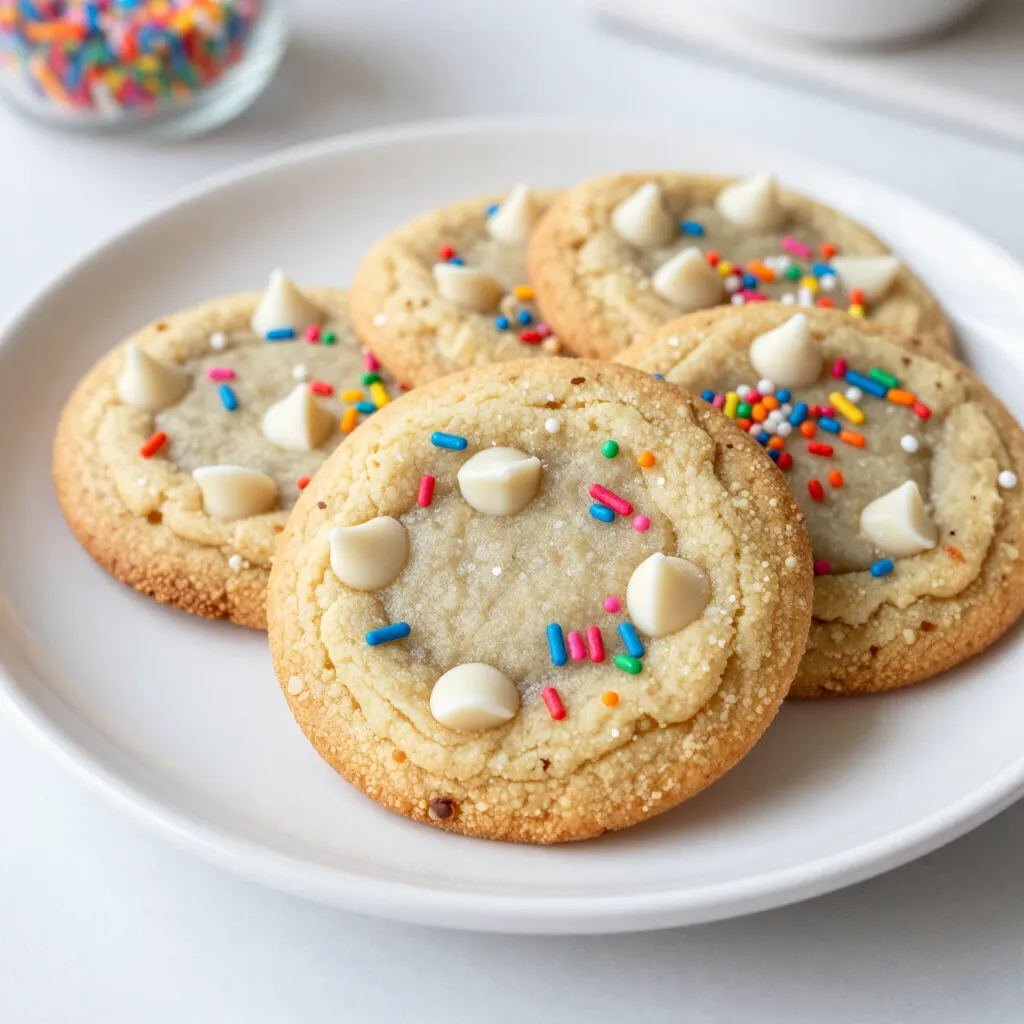
Are you ready to brighten your day with some Funfetti Cake Batter Cookies? These colorful, tasty treats are super easy

- 500g gnocchi - 2 tablespoons olive oil - 3 cloves garlic, minced - 1 can (400g) diced tomatoes - 1 cup heavy cream - 150g fresh spinach - 1 teaspoon dried basil - 1 teaspoon dried oregano - Salt and pepper to taste - Grated Parmesan cheese for serving - Additional herbs and spices - Substitute options for dietary restrictions - Large pot - Skillet - Cooking utensils Gather these ingredients to create a cozy meal. Each one plays a key role in the dish. Gnocchi serves as the comforting base. Olive oil adds richness, while garlic brings great flavor. Diced tomatoes create a tasty sauce, and heavy cream makes it creamy. Fresh spinach adds color and nutrients. Dried herbs like basil and oregano enhance the taste. Parmesan cheese gives a savory finish. Feel free to mix in other herbs or spices based on your taste. If you need substitutes, try gluten-free gnocchi or coconut cream for a dairy-free option. Also, make sure you have a large pot and a skillet ready. These tools help you cook and combine everything smoothly. Enjoy the process of making this delightful meal! {{ingredient_image_1}} Start by boiling water in a large pot. Add a pinch of salt to the water. This helps the gnocchi taste better. Once the water boils, add the gnocchi. Cook them according to the package instructions. Watch for the gnocchi to float. This usually takes about 2-3 minutes. When they float, they are ready. Drain the gnocchi and set them aside. In a large skillet, heat 2 tablespoons of olive oil over medium heat. Add 3 cloves of minced garlic. Sauté the garlic for 1-2 minutes until it smells good. Make sure not to burn the garlic; it can taste bitter. Next, pour in 1 can of diced tomatoes with their juices. Stir this mixture and let it simmer for 5 minutes. This helps the flavors mix well. Now it's time to add 1 cup of heavy cream, 1 teaspoon of dried basil, and 1 teaspoon of dried oregano. Cook this for another 3-5 minutes. You want the sauce to get warm and start to thicken. Add 150 grams of fresh spinach to the skillet. Cook until the spinach wilts, which takes about 2-3 minutes. Gently fold the cooked gnocchi into the creamy sauce. Stir them carefully to coat them well. Season the dish with salt and pepper to your taste. Remove the skillet from heat and let it sit for a minute. This helps the sauce stick to the gnocchi. Serve the dish hot. Top it with freshly grated Parmesan cheese for extra flavor! How to properly cook gnocchi To cook gnocchi, start with a large pot of water. Add a pinch of salt. Bring it to a rolling boil. Once boiling, add the gnocchi. Watch for them to float. This means they are done, usually in 2-3 minutes. Drain them quickly and set aside. This keeps them soft and fluffy. Preventing the sauce from curdling To keep your sauce smooth, don't let it boil. After adding the cream, lower the heat. Stir gently to mix well. Adding cream slowly helps too. Always use fresh cream for the best results. Serving suggestions for a beautiful plate For a lovely presentation, use deep bowls. Place the gnocchi in the center. Add extra spinach on top. This adds color and texture. A sprinkle of Parmesan cheese brightens the dish. Drizzle a little olive oil for shine and richness. Garnishes to enhance flavor and appearance Fresh herbs make a great garnish. Try basil or parsley for a pop of green. You can also use a few pine nuts for crunch. They add extra flavor and look nice on the plate. Using fresh vs. dried herbs Fresh herbs bring a brighter flavor. They are great for garnishing too. Dried herbs work well when cooking. They are easy to keep on hand. Use about one-third of the amount of dried herbs compared to fresh. Suggestions for additional ingredients You can add proteins like grilled chicken or shrimp. They make the dish heartier. For extra veggies, try mushrooms or bell peppers. They add color and taste. Feel free to mix and match based on your taste! Pro Tips Choose Fresh Gnocchi: For the best texture and flavor, opt for fresh gnocchi rather than frozen or dried. Fresh gnocchi will elevate the dish significantly. Balance the Cream: If you prefer a lighter sauce, substitute half of the heavy cream with vegetable or chicken broth to maintain creaminess while cutting down on calories. Season at Every Step: Taste and adjust the seasoning as you cook. Adding salt and pepper at different stages helps build layers of flavor. Experiment with Greens: Feel free to swap out spinach for other greens like kale or arugula. Each green brings a unique flavor and nutrition profile to the dish. {{image_2}} You can easily adjust this recipe to fit your diet. For gluten-free gnocchi, look for options made from rice or potato. Many stores sell these alternatives, so check the pasta aisle. If you need a dairy-free option, substitute heavy cream with coconut milk or nut cream. Both will still give you that creamy texture. Want to boost the protein? Add cooked chicken or shrimp. Simply toss them in when you add the gnocchi. This step is quick and adds a nice touch. You could also mix in other veggies like bell peppers or mushrooms. They will blend well with the creamy sauce. To give your dish an Italian flair, sprinkle in some fresh basil or use sun-dried tomatoes. These will enhance the classic flavors. For a spicy kick, add chili flakes while cooking. Just a pinch can make your meal exciting! To keep your Creamy Tomato Spinach Gnocchi fresh, store leftovers in the fridge. Place the gnocchi in an airtight container. This helps to prevent moisture loss and keeps the texture nice. Make sure to let the dish cool before sealing it. It can last for about 3 days in the fridge. Reheating is easy, but do it right to keep the flavors. The stovetop method is best. Heat a small amount of olive oil in a pan over low heat. Add the gnocchi and stir gently until warmed through. This method helps the texture stay creamy. If you use a microwave, cover the dish with a damp paper towel. Heat in short bursts, stirring in between. This keeps the sauce from drying out. You can freeze the gnocchi, but it’s best to freeze it uncooked. This way, it stays fresh and tasty when you’re ready to use it. Place the uncooked gnocchi on a baking sheet in a single layer. Once frozen, transfer them to a freezer bag. They can last for up to 3 months. When you’re ready to eat, thaw them overnight in the fridge before cooking. If you freeze cooked gnocchi, try to reheat it in the oven or stovetop for the best texture. You know the gnocchi is done when it floats to the top of the water. This usually takes about 2-3 minutes. Make sure to watch closely. If some do not float, give them a bit more time. Once they rise, drain them quickly to avoid overcooking. Yes, you can make parts of this dish ahead. Cook the gnocchi and sauce separately. Store them in airtight containers in the fridge. When ready to eat, heat the sauce and gnocchi together. This keeps flavors fresh and tasty. You can serve this dish with a side salad or garlic bread. A crisp green salad adds freshness. Garlic bread complements the creamy sauce well. You could also pair it with roasted vegetables for a colorful plate. Yes, Creamy Tomato Spinach Gnocchi is vegetarian. It contains no meat or fish. The main ingredients are plant-based, making it a great choice for vegetarians and even those who want a lighter meal. To spice it up, add red pepper flakes or a dash of cayenne pepper. You could also mix in some sautéed mushrooms or artichokes for added flavor. Fresh herbs like basil or parsley can brighten the dish, too. This blog shared the key steps to make a delicious Creamy Tomato Spinach Gnocchi. You learned about essential ingredients and how to cook them perfectly. I explored tips for serving and enhancing flavor. For the best results, don’t skip the details. Your dish can shine with fresh herbs and careful cooking. Enjoy your meal, and remember, you can always adjust flavors to suit your taste. Happy cooking!

Creamy Tomato Spinach Gnocchi Flavorful Dinner Idea

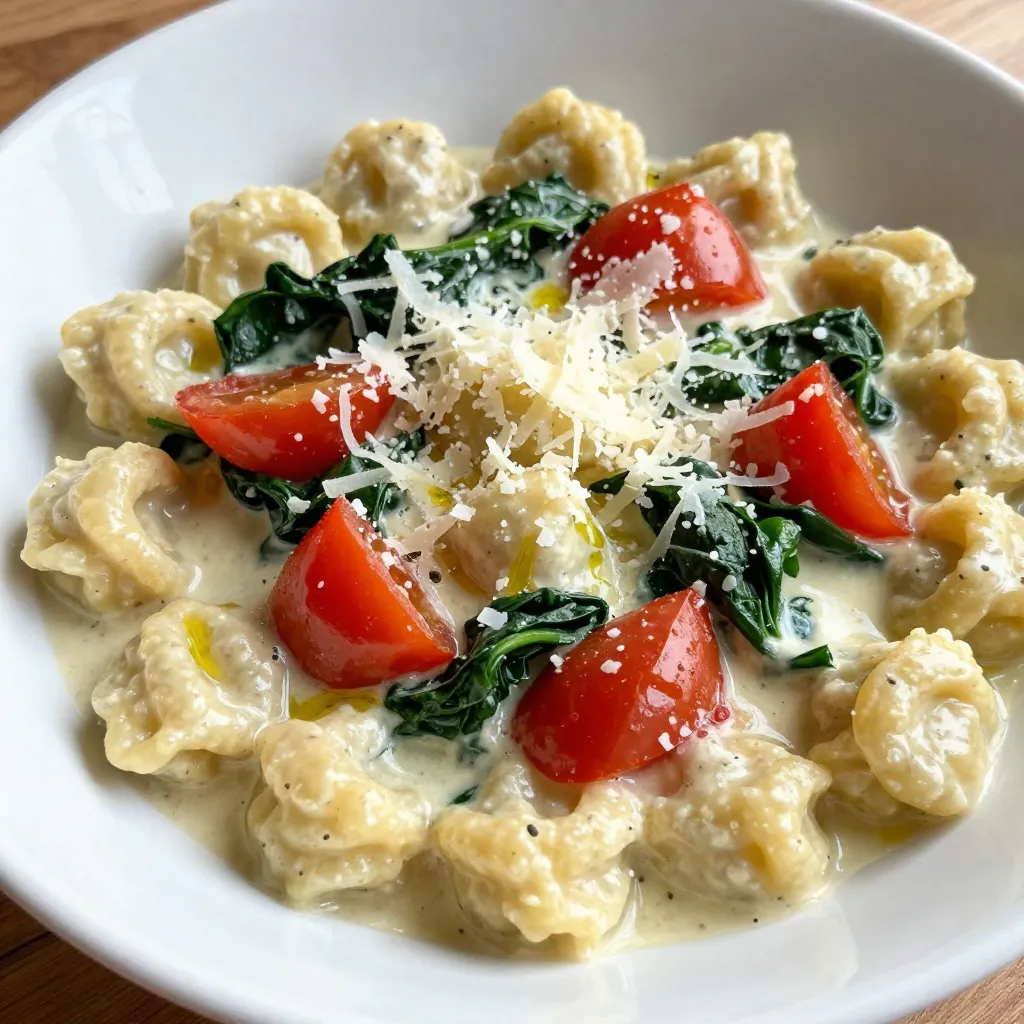
Looking for a quick, tasty dish that impresses? Creamy Tomato Spinach Gnocchi is your answer! This easy recipe blends tender

Cobb Salad is a colorful dish filled with fresh flavors. Here are the ingredients you will need: - 4 cups mixed salad greens (romaine, arugula, spinach) - 1 cup cooked chicken breast, diced - 4 slices of crispy turkey bacon, crumbled - 2 hard-boiled eggs, sliced - 1 ripe avocado, diced - 1 cup cherry tomatoes, halved - 1/2 cup crumbled blue cheese - 1/4 cup red onion, thinly sliced - 1/4 cup balsamic vinaigrette dressing - Salt and pepper to taste These ingredients create a tasty mix of textures and flavors. The greens provide a crisp base, while the chicken adds protein. Turkey bacon brings a smoky note, and hard-boiled eggs give a creamy touch. Ripe avocado adds richness, and cherry tomatoes burst with sweetness. Crumbled blue cheese offers a tangy kick, and red onion gives a sharp crunch. Lastly, the balsamic vinaigrette ties everything together. You can find the full recipe with step-by-step instructions to create this delightful salad. Enjoy making it! 1. Layering the greens: Start by placing 4 cups of mixed salad greens at the bottom of your bowl. I like to use a mix of romaine, arugula, and spinach. This gives your salad a crunchy base. 2. Adding proteins and toppings: Next, evenly distribute 1 cup of diced cooked chicken breast over the greens. Then, sprinkle 4 slices of crispy crumbled turkey bacon on top for added flavor. Arrange 2 sliced hard-boiled eggs around the salad for a nice look. After that, scatter 1 ripe diced avocado and 1 cup of halved cherry tomatoes. These ingredients not only add taste but also bring color. 3. Drizzling dressing and seasoning: Finish by sprinkling 1/2 cup of crumbled blue cheese and 1/4 cup of thinly sliced red onion over the top. Drizzle 1/4 cup of balsamic vinaigrette dressing all over the salad. Add salt and pepper to taste. For a final touch, gently toss the salad just before serving. This mixes the flavors while keeping it pretty. 1. Arranging ingredients for aesthetic appeal: When you arrange your salad, think about how it looks. Use colorful ingredients. This makes the salad more inviting. Place ingredients in a way that everyone can see each layer. 2. Importance of color and texture: A great salad has a mix of colors and textures. Bright tomatoes, creamy avocado, and crispy bacon all work well together. This not only makes your salad look good, but it also makes eating more fun. Aim for a balance of greens, yellows, reds, and blues to make your Cobb salad pop. For the full experience, check out the [Full Recipe]. To make a great Cobb salad, start with even layers. Place the greens at the bottom first. This helps the salad look nice and keeps it fresh. Next, add your proteins. Distribute the chicken evenly across the greens. This ensures every bite has chicken. To avoid soggy greens, dry the salad greens well. Use a salad spinner to remove extra water. If you wash them before use, let them sit for a bit. Pat them dry with a paper towel. This keeps your salad crisp and fresh. Want to switch up the dressing? Try a creamy ranch or a zesty vinaigrette. They add a new twist to the Cobb salad. You can also mix Greek yogurt with herbs for a lighter option. For spices, sprinkle some black pepper and a bit of garlic powder. Fresh herbs like parsley or chives can boost the flavor. They add brightness and a nice aroma. Don't shy away from experimenting! Use what you love to make the salad your own. For the full recipe, check out the details above. {{image_2}} You can change up your Cobb salad with fun swaps. If you want a different protein, try grilled shrimp or tofu. Grilled shrimp adds a sweet, smoky taste. Tofu gives a nice, plant-based option for any meal. For vegetables, bell peppers or cucumbers work great. Bell peppers add crunch and sweetness. Cucumbers bring a refreshing, crisp texture. Both swaps keep your salad exciting and new. If you need gluten-free options, focus on fresh ingredients. The salad's base is already gluten-free. Stick to proteins like chicken, shrimp, or tofu. Always check your dressing for gluten-containing ingredients. Most balsamic vinaigrettes are safe, but it's good to double-check. For vegan adaptations, skip the chicken and turkey bacon. Use grilled tofu or chickpeas for protein. You can also replace eggs with avocado for creaminess. Just make sure to use vegan cheese or skip it altogether. These changes keep your Cobb salad tasty while meeting dietary needs. For the full recipe, check out the Crispy Cobb Salad Delight 🥗🥚. To keep your Cobb salad fresh, store it in an airtight container. This method keeps the salad from wilting and losing flavor. You can also separate the proteins and dressing from the greens. This helps maintain the crunch of the salad. If stored properly, leftovers last for about three days in the fridge. If you want to enjoy your protein again, gently reheat it. Use the microwave or a pan on low heat. Avoid high heat, as it can dry out the chicken or bacon. You can also add leftover proteins to a soup or wrap for a new meal. Another idea is to mix leftover salad with cooked pasta for a hearty dish. Cobb Salad comes from America. It was created in the 1930s at the Brown Derby restaurant in Los Angeles. The chef, Bob Cobb, made it late one night for a friend. The salad had many tasty ingredients. It quickly became popular. Today, Cobb Salad is a classic dish enjoyed by many. It represents fresh, vibrant American cuisine. Yes, you can make Cobb Salad in advance! Here are some tips to keep it fresh: - Prep the ingredients: Chop and store greens, proteins, and toppings separately. - Avoid dressing early: Keep the dressing in a small container. Add it just before serving. - Layer wisely: Place heavier items at the bottom of your container. This helps prevent sogginess. - Use airtight containers: This keeps the ingredients fresh longer. If you don’t like blue cheese, you have options! Here are some tasty substitutes: - Feta cheese: It has a similar crumbly texture and salty flavor. - Goat cheese: Soft and creamy, goat cheese adds a nice tang. - Parmesan cheese: Grated parmesan gives a rich flavor without being too strong. - Nutritional yeast: A great vegan option that adds a cheesy taste. For the full recipe, check out the Crispy Cobb Salad Delight! This blog post covered how to create a delicious Cobb Salad. We discussed the key ingredients, helpful preparation methods, and tips for presentation. I shared simple ways to enhance flavor and explore variations for different diets. Lastly, we reviewed storage options and answered common questions. Cobb Salad is versatile and easy to make. Enjoy experimenting with flavors and ingredients. Fresh, tasty meals are just a few simple steps away.

Classic Cobb Salad Tasty and Fresh Recipe Guide

Welcome to my guide on the classic Cobb salad! This dish is as fresh as it is filling. Packed with

To make a healthy quinoa salad, gather these key ingredients: - 1 cup quinoa, rinsed - 2 cups vegetable broth (or water) - 1 cup cherry tomatoes, halved - 1 cup cucumber, diced - 1 cup black beans, rinsed and drained - ½ cup red bell pepper, diced - ½ cup corn (fresh or frozen, thawed) - ¼ cup red onion, finely chopped - ¼ cup fresh cilantro, chopped These ingredients create a vibrant and colorful salad. Quinoa adds protein and fiber. The beans boost the protein even more. Fresh veggies bring crunch and flavor. Feel free to customize your salad with these optional ingredients: - Avocado, diced - Feta cheese or goat cheese, crumbled - Jalapeños for heat - Chopped nuts or seeds for crunch These add-ins can make your salad even tastier. You can mix and match based on what you love. A good dressing ties the salad together. Here are the simple ingredients you need: - Juice of 1 lime - 3 tablespoons olive oil - 1 teaspoon cumin - Salt and pepper to taste This dressing is bright and zesty. It brings out the flavors of all the fresh ingredients. You can adjust the lime and spice to suit your taste. For the complete recipe, check out the Full Recipe. Enjoy making this healthy quinoa salad! Start by rinsing 1 cup of quinoa under cold water. This step helps to remove the bitter coating. In a medium pot, bring 2 cups of vegetable broth or water to a boil. Once it boils, add the rinsed quinoa. Lower the heat and cover the pot. Cook for about 15 minutes until the quinoa is fluffy and the liquid is gone. Take it off the heat and let it cool. While the quinoa cools, wash and chop your veggies. You will need: - 1 cup cherry tomatoes, halved - 1 cup cucumber, diced - 1 cup black beans, rinsed and drained - ½ cup red bell pepper, diced - ½ cup corn, fresh or frozen - ¼ cup red onion, finely chopped - ¼ cup fresh cilantro, chopped In a large bowl, mix all these fresh veggies together. This adds color and crunch to your salad. Once the quinoa is cool, add it to the bowl with the veggies. In a small bowl, whisk together: - Juice of 1 lime - 3 tablespoons olive oil - 1 teaspoon cumin - Salt and pepper to taste Pour this dressing over the salad mixture. Gently toss everything until well combined. Taste your salad and adjust the seasoning if needed. Let it sit for at least 15 minutes to help the flavors blend. Serve it fresh and enjoy the vibrant taste! You can find the Full Recipe for more details. To cook perfect quinoa, start by rinsing it well. This removes any bitter taste. Use a ratio of two cups of liquid for every one cup of quinoa. You can use vegetable broth or water for cooking. Bring the liquid to a boil, then add the rinsed quinoa. Cover the pot, lower the heat, and let it simmer for about 15 minutes. Once done, fluff it with a fork and let it cool. This method gives you fluffy quinoa every time. To make your quinoa salad pop, use fresh herbs like cilantro or parsley. You can also add spices like cumin or paprika for a warm flavor. A squeeze of lime juice brightens the taste. For a little crunch, toss in some nuts or seeds, like sunflower seeds or sliced almonds. Feel free to mix in different veggies, like avocados or bell peppers, to add color and texture. For serving, place the salad in a large bowl. Garnish it with lime wedges and extra herbs for a fresh look. You can also serve it in individual cups for a fun twist. This makes it easy for guests to enjoy. Pair the salad with grilled chicken, fish, or a hearty soup for a complete meal. For the full recipe, check out the vibrant quinoa fiesta salad. {{image_2}} This salad is already a great choice for vegetarians and vegans. It uses quinoa, beans, and fresh veggies. To make it even better, add more plant-based ingredients. Try adding avocado for creaminess. You can also toss in roasted sweet potatoes for a warm touch. Nuts or seeds add a nice crunch too. Think about using pumpkin seeds or walnuts. Want to boost the protein in your salad? You can add grilled chicken or shrimp if you eat meat. If you want more plant-based protein, try adding tofu or tempeh. These options will keep your salad filling. You can also mix in extra beans like chickpeas. They add flavor and texture. You can change the taste of your salad by adding different ingredients. For a Mediterranean flair, use olives and feta cheese. Drizzle it with a lemon-olive oil dressing. For an Asian twist, add sesame oil and soy sauce. Toss in some edamame and sliced green onions. You can also use fresh herbs like mint or basil for more flavor. For a full recipe that highlights these variations, check out the Vibrant Quinoa Fiesta Salad. To store your quinoa salad, first let it cool. Place it in an airtight container. This keeps it fresh and prevents odors from mixing. You can store it in the fridge for up to four days. When you want to eat it, check the smell and look for any changes. If it looks good, it’s good to go! Meal prepping quinoa salad is simple. Make a big batch using the Full Recipe. Divide the salad into smaller containers. This way, you can grab lunch or dinner quickly. Keep the dressing separate until you’re ready to eat. This keeps the salad fresh and crunchy. Quinoa salad lasts well in the fridge for four days. If you want to keep it longer, you can freeze it. Place it in freezer-safe bags or containers. Remove as much air as you can. You can freeze it for up to three months. When ready to eat, defrost it in the fridge overnight. Then enjoy your tasty, healthy meal! Yes, quinoa is gluten-free. It comes from a seed, not a grain. This makes it safe for those with gluten allergies or celiac disease. Quinoa is a great option for people looking for gluten-free foods. You can enjoy it without worry. Quinoa offers many health benefits. It is high in protein, containing all nine essential amino acids. This makes it a complete protein. It is also rich in fiber, which aids digestion. Quinoa is low in fat, making it heart-healthy. Additionally, it provides vitamins and minerals like magnesium and iron. Including quinoa in your diet can support overall health. Yes, you can make the salad ahead of time. It tastes even better after sitting in the fridge for a while. The flavors blend and become richer. Just store it in an airtight container. You can keep it in the fridge for up to three days. Before serving, give it a quick toss to freshen it up. Quinoa salad pairs well with many dishes. You can serve it alongside grilled chicken or fish for a balanced meal. It also complements soups and stews nicely. If you want a vegetarian option, try it with roasted veggies or hummus. Quinoa salad is versatile and can fit into many meal plans. For a fun twist, serve it as a filling for wraps or pita pockets. In this article, we explored how to create a healthy quinoa salad. We covered main ingredients, optional add-ins, and dressing ideas. I shared step-by-step instructions for cooking quinoa and preparing vegetables. You learned tips for perfect quinoa and fun serving ideas. Additionally, we discussed variations for different diets and storage tips to keep your salad fresh. Quinoa salad is versatile and nutritious. Enjoy making it your way!

Healthy Quinoa Salad Nutritious and Easy Recipe

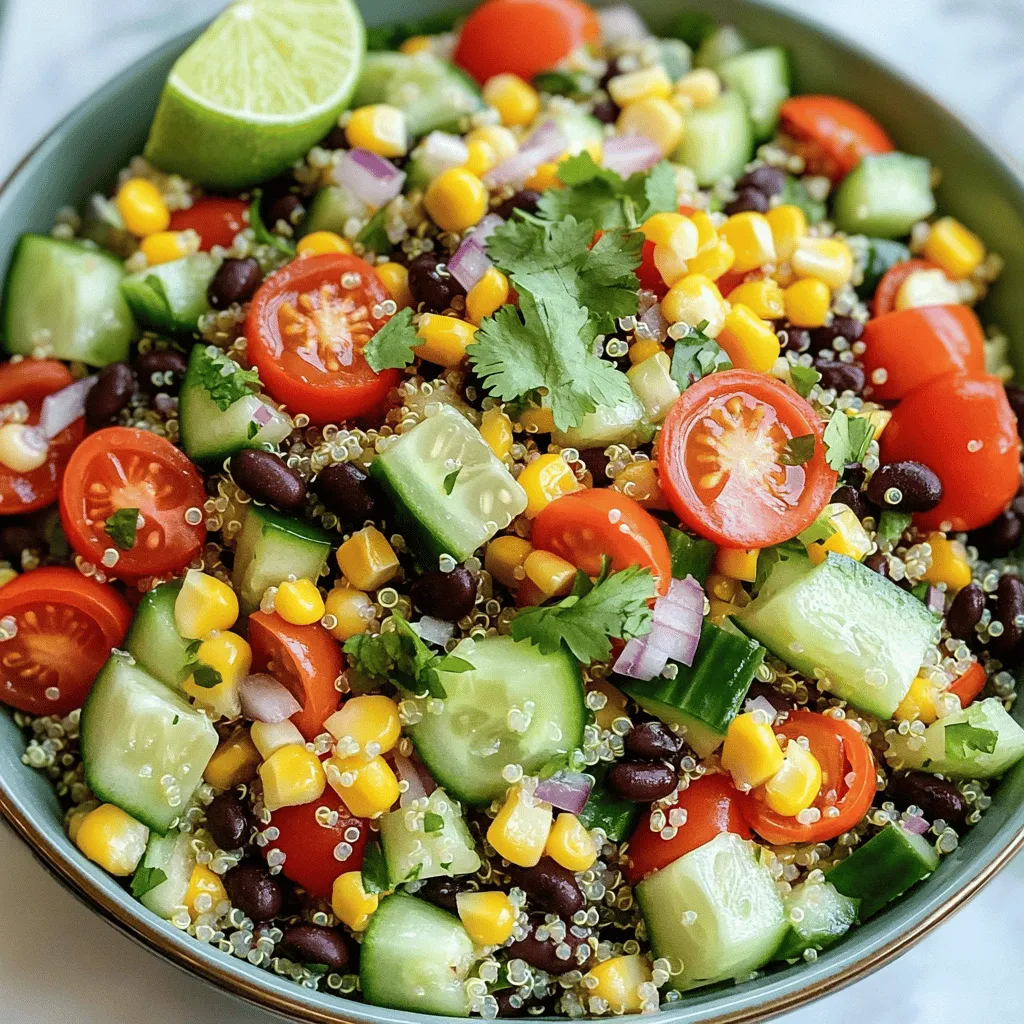
Looking for a simple and healthy recipe? You’ve found it! This Healthy Quinoa Salad is packed with nutrients and flavors.

- 2 boneless, skinless chicken breasts, sliced into thin strips - 1 tablespoon olive oil - 1 red bell pepper, sliced - 1 green bell pepper, sliced - 1 medium onion, sliced - 1 cup cooked brown rice or quinoa - 1 cup black beans, rinsed and drained - 1 cup corn kernels (fresh, frozen, or canned) - 1 avocado, diced You need the chicken for protein. It adds great flavor and keeps you full. The colorful bell peppers and onion bring crunch and sweetness. For your base, use brown rice or quinoa. Both add fiber and nutrients to your meal. - 1 teaspoon cumin - 1 teaspoon paprika - 1 teaspoon garlic powder - 1 teaspoon onion powder - Salt and pepper to taste - Fresh cilantro, chopped, for garnish - Lime wedges, for serving Spices are key to flavor. Cumin and paprika give warmth; garlic and onion powder add depth. You can adjust salt and pepper to fit your taste. Top your bowl with fresh cilantro for a burst of freshness. Lime wedges add a zesty kick, perfect for squeezing over your dish. Feel free to check the Full Recipe for more details! To start, we need to marinate the chicken. In a large bowl, mix the sliced chicken with olive oil, cumin, paprika, garlic powder, onion powder, salt, and pepper. Make sure the chicken gets coated well. Let it sit for about 10 minutes. This allows the flavors to soak in. Next, it’s time to cook the chicken. Heat a large skillet over medium-high heat. Add the marinated chicken strips. Cook them for about 5 to 7 minutes. Stir occasionally until the chicken turns golden brown and is fully cooked. This step is key to getting juicy chicken. Now, let’s add some color and crunch. Once the chicken is done, toss in the sliced bell peppers and onion. This adds flavor and texture to the dish. Cook for another 5 to 6 minutes. You want the veggies to be tender and fragrant, making the kitchen smell amazing. Now comes the fun part—assembling your fajita bowls! Start by adding a base of cooked brown rice or quinoa to each bowl. This gives you a nice foundation. Next, spoon the sautéed chicken and vegetable mixture over the rice. We can’t forget about the toppings! Add a scoop of warmed black beans and corn. For the final touch, garnish each bowl with diced avocado and chopped cilantro. A lime wedge on the side is perfect for squeezing over the top. Presentation matters, so arrange everything neatly. And there you have it! Your easy chicken fajita bowls are ready to serve. For the full recipe, check out the details above. Enjoy! How to Get Perfectly Cooked Chicken To cook chicken well, start with thin strips. Thin chicken cooks evenly and quickly. Use a hot skillet to sear the chicken. This brings out great flavors and gives a nice color. Cook for 5-7 minutes, or until the chicken is no longer pink. Always check the center to make sure it’s fully cooked. Achieving Tender Vegetables Tender vegetables need attention, too. After cooking the chicken, add sliced bell peppers and onions. Stir them in for a few minutes. This keeps them crisp and bright. Cook them for 5-6 minutes until they are soft but not mushy. Pairing Ideas These fajita bowls go well with many sides. Try serving them with tortilla chips or a fresh salad. You can also add a dollop of sour cream or Greek yogurt for creaminess. Additional Sauces and Dressings Drizzle on some salsa or hot sauce for extra flavor. A sprinkle of lime juice brightens up the dish. You can also mix in a cilantro-lime dressing for a fresh twist. Suggestions for Picky Eaters To please picky eaters, keep things simple. Serve the chicken and veggies on the side. Let kids build their own bowls. They can choose what to add or skip. Customization Options Customization is key! Swap ingredients based on what you have. Try using shredded chicken or beef. Add different veggies like zucchini or carrots. You can even change the base to noodles or lettuce for a fun twist. Check out the Full Recipe for more ideas! {{image_2}} You can swap chicken for beef or shrimp. Beef adds a rich, bold flavor. Use flank or skirt steak for the best results. Just slice it thin and season like the chicken. Shrimp cooks fast and has a light taste. It pairs well with the same spices. For vegetarian options, consider using tofu or tempeh. Both soak up flavor well. Cook them with the same spices and veggies. You can also try chickpeas for extra protein. You can choose between quinoa and rice as your base. Quinoa is a superfood packed with protein. It has a nutty taste that complements the other flavors. Rice is classic and filling. Brown rice adds fiber, while white rice is soft and fluffy. Think about nutritional needs when choosing your base. Quinoa has more protein and nutrients than rice. However, rice is great for quick energy. Both options work well for easy chicken fajita bowls. Adding heat can spice things up. You can mix in jalapeños or hot sauce for a kick. If you want a smoky flavor, try chipotle powder. It gives a nice depth to your dish. For unique ingredients, consider adding pineapple or mango. They bring a sweet touch that balances the spices. You can also try crumbled feta or cotija cheese for creaminess. These twists make your fajita bowls even more exciting. For the full recipe and more details, check out Easy Chicken Fajita Bowls! How long do Easy Chicken Fajita Bowls last? You can keep them in the fridge for up to three days. Make sure they cool down before you store them. This helps keep the flavors fresh. What are proper storage containers? Use airtight containers for best results. Glass or plastic containers work well. Label the containers with the date. This way, you won’t forget when you made them. Can you freeze the fajita mixture? Yes, you can freeze it for up to three months. Just let the chicken and veggies cool down first. Then, pack them in freezer-safe bags. Try to remove as much air as you can. What are reheating tips? When ready to eat, thaw the mixture overnight in the fridge. Reheat it in a skillet over medium heat. Stir until hot. This keeps the flavors intact. How can you prepare ahead of time? You can slice the chicken and veggies a day in advance. Store them in separate containers. This saves time on busy nights. What are the best ways to reheat? Use a microwave or skillet. If using a microwave, cover with a damp paper towel. This keeps the food moist. Stir halfway through for even heating. Enjoy your meals without stress! To make easy chicken fajita bowls, follow these steps: 1. Prepare Ingredients: Slice two chicken breasts, bell peppers, and onion. 2. Mix Seasonings: In a bowl, combine olive oil, cumin, paprika, garlic powder, onion powder, salt, and pepper. 3. Coat Chicken: Toss the chicken strips in the seasoning mix until coated. 4. Cook Chicken: Heat a skillet and cook the chicken for about 5-7 minutes until golden. 5. Add Veggies: Add bell peppers and onion. Stir and cook for 5-6 minutes. 6. Heat Beans and Corn: In another pan, warm the black beans and corn. 7. Assemble Bowls: Start with brown rice or quinoa, then add chicken, veggies, beans, and corn. 8. Garnish: Top with diced avocado, cilantro, and serve with lime wedges. This simple method gives you a tasty meal in just 30 minutes. You can find the full recipe above. Yes, you can use frozen chicken. Here are some tips: - Thaw First: Always thaw the chicken in the fridge overnight for best results. - Cooking Time: Frozen chicken may take longer to cook. Check for doneness at 165°F. - Season Well: Ensure that the seasoning coats well, as frozen chicken can hold extra water. If you don’t have black beans, here are some alternatives: - Pinto Beans: They have a similar taste and texture. - Chickpeas: These add a nice crunch and protein. - Kidney Beans: They offer a different flavor but work well. - Lentils: Use cooked lentils for a quick swap. Feel free to mix and match based on what you have! To make these fajita bowls healthier, consider these tips: - Lean Proteins: Use chicken thighs or turkey for lower fat. - Whole Grains: Choose quinoa or brown rice for added fiber. - Fresh Veggies: Load up on extra vegetables like zucchini or spinach. - Healthy Fats: Use avocado in moderation, or skip it if needed. You can enjoy a nutritious meal while keeping the flavor intact! To sum up, we explored how to create tasty chicken fajita bowls. We discussed key ingredients, from chicken and veggies to flavorful spices. You learned step-by-step how to prepare the chicken, sauté veggies, and assemble the bowl for a great look. We shared tips for perfect cooking, serving ideas, and how to make it kid-friendly. Lastly, we examined variations, storage, and helpful FAQs to guide your cooking. Now, you have everything you need to enjoy these delicious bowls any time!

Easy Chicken Fajita Bowls Flavorful and Quick Meal

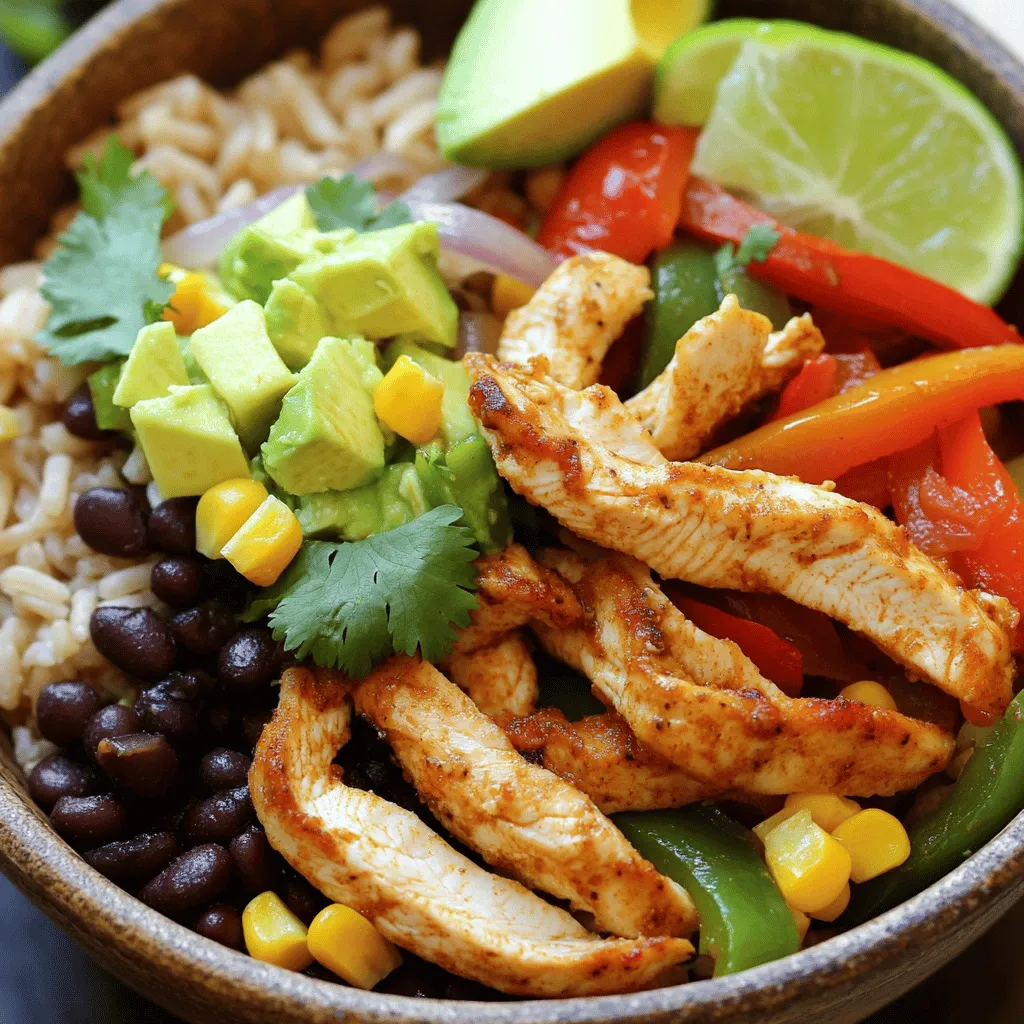
Looking for a quick and tasty meal? You’re in the right place with my Easy Chicken Fajita Bowls! These bowls

Older posts
Newer posts
← Previous Page1 … Page71 Page72 Page73 … Page84 Next →

dsad

© 2026 juliesdish • Built with GeneratePress

Our Policies

  • Copyright Policy
  • Cookie Policy
  • GDPR Policy
  • Privacy Policy
  • Disclaimer
  • Terms Of Use

More Information

  • Home
  • About
  • Contact
  • Appetizers
  • Dessert
  • Dinner
  • Drinks
©2026, juliesdish About Back To Top