Skip to content
DisclaimerTerms Of UseGDPR PolicyCookie Policy

juliesdish

  • Home
  • Drinks
  • Appetizers
  • Dinner
  • Dessert
  • About
  • Contact
  • Privacy Policy
DisclaimerTerms Of UseGDPR PolicyCookie Policy

NO-ING-IMG

To create a delicious Apple Pie Smoothie, you need these key ingredients: - 1 large apple (Fuji or Honeycrisp recommended) - 1/2 cup rolled oats - 1/2 cup Greek yogurt (or dairy-free alternative) - 1 cup unsweetened almond milk (or milk of choice) These ingredients give your smoothie a rich, creamy base. The apple adds a sweet, fruity taste. The rolled oats provide fiber and texture, while Greek yogurt adds creaminess and protein. Almond milk makes it smooth and easy to blend. For that classic apple pie flavor, you will want to add: - 1 teaspoon cinnamon - 1/2 teaspoon nutmeg - 1 tablespoon maple syrup (optional, for extra sweetness) - A pinch of salt Cinnamon and nutmeg create warmth and depth in your smoothie. Maple syrup adds sweetness, but you can skip it if you want to keep it lighter. A pinch of salt brings out all the flavors nicely. Want to make your smoothie even better? Here are some optional add-ins: - Ice cubes for a chilled smoothie - Additional toppings (e.g., cinnamon sprinkle, apple slices) Adding ice cubes gives your smoothie a refreshing chill. Toppings like a sprinkle of cinnamon or apple slices make it look great and taste even better. These simple touches can elevate your smoothie from good to amazing. For the full recipe, check out the detailed instructions. Enjoy blending! To start, you need to prep the apple. First, wash it thoroughly. This step ensures that your smoothie is clean and safe to drink. Next, core the apple to remove the seeds and the tough center. Finally, dice the apple into small pieces. This makes it easier for the blender to mix everything smoothly. You also need to measure out the oats, Greek yogurt, and almond milk. These ingredients are key to giving your smoothie the right texture and flavor. Now, it’s time to blend. Combine all your prepared ingredients in a blender. This includes the diced apple, rolled oats, Greek yogurt, and almond milk. Next, add in the spices. Sprinkle in the cinnamon and nutmeg for that classic apple pie flavor. If you like your smoothie a bit sweeter, you can add maple syrup too. Don’t forget a pinch of salt! This small touch enhances all the flavors. If you want a colder drink, toss in a few ice cubes before blending. Blend everything until it’s smooth and creamy. Stop the blender a few times to scrape down the sides. This helps mix all the ingredients well. After blending, taste the smoothie. If it needs more sweetness, add a bit more maple syrup. Just blend again briefly to mix it in. Once you’re happy with the taste, pour the smoothie into glasses. Enjoy this healthy treat that captures the warm flavors of apple pie! For the full recipe, check out the details above. To make your Apple Pie Smoothie just right, start with the right balance of ingredients. If you want a thicker smoothie, add more rolled oats or Greek yogurt. For a thinner mix, pour in a little more almond milk. Using frozen fruit can also give your drink a cool texture. Frozen apples work well and make your smoothie extra cold! Feel free to get creative with spices. You can try adding ginger or cardamom for a new twist. If you want to boost nutrition, mix in protein powder. This addition makes your smoothie filling and perfect for breakfast or a post-workout snack. When serving, choose tall glasses to show off your smoothie. A clear glass highlights the beautiful color. For garnishing, sprinkle a little cinnamon on top. You can also add thin apple slices or a dollop of whipped cream for an eye-catching finish. These small touches make your smoothie feel like a special treat! {{image_2}} You can make this smoothie nut-free. Simply swap Greek yogurt for coconut yogurt. This change gives your smoothie a creamy texture without nuts. For the milk, try oat milk or rice milk. Both are great choices for those with nut allergies. If you want a dairy-free version, use plant-based yogurt and milk. Almond milk works well, but you can also use soy or coconut milk. This way, you keep the same delicious apple pie flavor. The texture remains rich and smooth, just like the classic recipe. Want to mix things up? Add pumpkin puree for a fall twist. It pairs nicely with the spices in the smoothie. You can also try different seasonal fruits. Berries or peaches can add a fresh taste while keeping the smoothie healthy. Experiment with what’s in season to find your favorite combination. To keep your Apple Pie Smoothie fresh, use an airtight container. Glass jars work well and prevent leaks. You can also use BPA-free plastic containers. Store it in the fridge for up to two days. After this time, the smoothie may lose flavor and texture. You can make smoothies ahead of time. Blend your Apple Pie Smoothie and store it in the fridge. If you want to save it for later, freeze the leftover portions. Pour the smoothie into ice cube trays or freezer bags for easy storage. This way, you can enjoy it anytime. When you're ready to drink your frozen smoothie, thaw it properly. Place it in the fridge overnight for a slow thaw. If you're in a hurry, leave it at room temperature for about 30 minutes. For the best texture, re-blend it after thawing. This helps mix everything evenly and brings back its creamy goodness. To make your Apple Pie Smoothie vegan, you simply need to swap out a few ingredients. For yogurt, use a dairy-free option like coconut yogurt or almond yogurt. Replace regular milk with any plant-based milk you like, such as oat milk or soy milk. These changes keep the smoothie creamy and tasty without dairy. Yes, you can easily add protein to your smoothie! Consider using protein powder. Pea protein, hemp protein, or a plant-based blend works well. You can also add nut butters like almond or peanut butter for extra protein. Both options will give your smoothie a nice boost in nutrition without changing the flavor too much. Making an Apple Pie Smoothie is quick and easy. You only need about 10 minutes total. This includes prep time for cutting the apple and blending all the ingredients. It’s perfect for a busy morning or a quick snack! If you want to skip oats, there are good alternatives. You can try using quinoa flakes or ground flaxseed. Both options give your smoothie a nice texture. If you need a gluten-free option, make sure to choose certified gluten-free grains. They work great and are still healthy! In this post, we explored the delicious world of the Apple Pie Smoothie. We covered essential ingredients like apples, oats, and yogurt. We discussed spices and optional add-ins that enhance flavor. You learned how to prepare, blend, and store this smoothie. Plus, we looked at fun variations to keep things fresh. Try different ingredients to find your favorite mix. This smoothie is easy, tasty, and a healthy choice for any time. Enjoy your smoothie adventure!

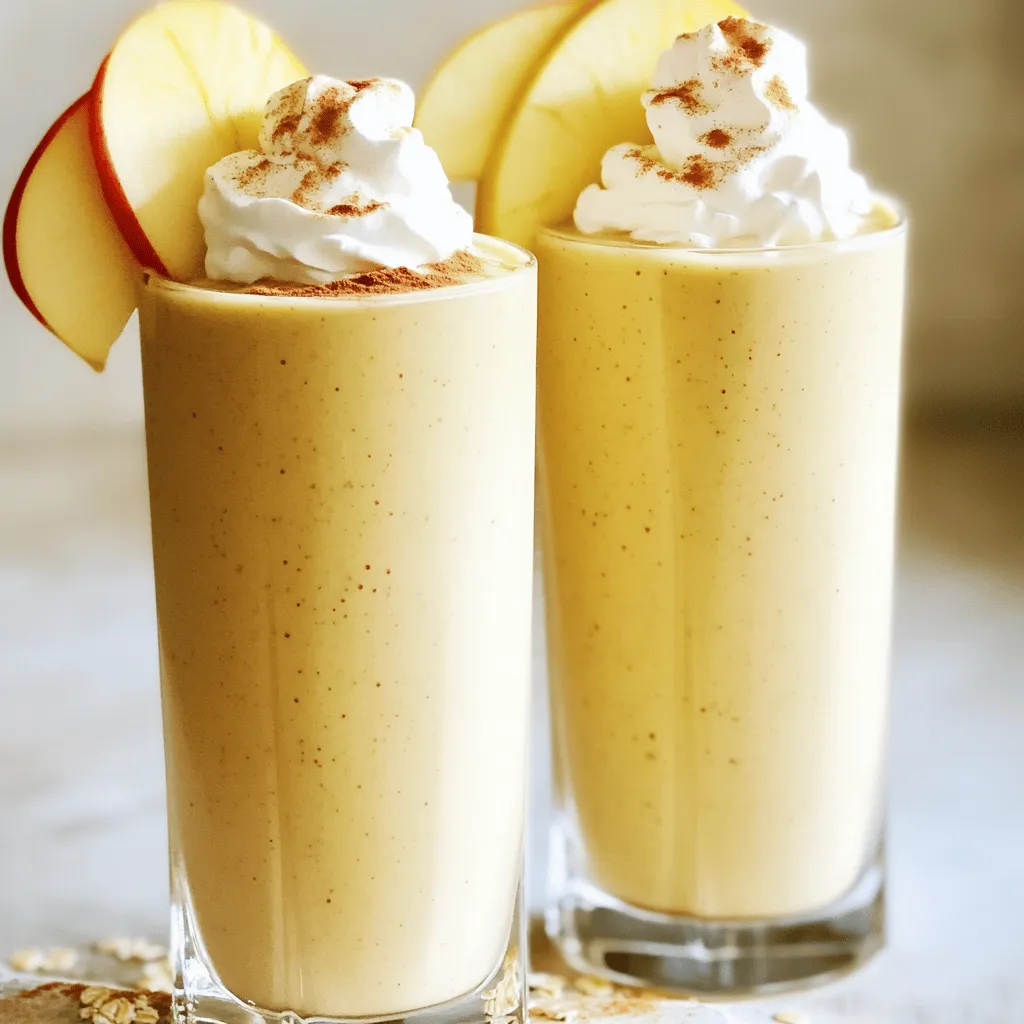
Apple Pie Smoothie Flavorful and Healthy Delight

Craving a tasty treat that’s also good for you? Look no further than the Apple Pie Smoothie! Packed with wholesome

Fresh ginger root is the star of this drink. It adds a spicy kick. Ginger helps with digestion and can ease sickness. Use about 1 inch of ginger. Peel it and grate it for the best flavor. Citrus fruits bring bright flavors and vitamins. I use 2 juicy oranges and 1 lemon. They are high in vitamin C. This vitamin boosts your immune system. Juice them right before using for the freshest taste. I add a tablespoon of honey for sweetness. You can swap it with maple syrup for a vegan option. Turmeric is also important. It has health benefits and adds a warm color. Use 1 teaspoon. A pinch of black pepper helps your body absorb turmeric better. Lastly, fresh mint leaves make a lovely garnish. For the full recipe, check out the complete details. First, grab your fresh ginger root. Peel and grate about one inch. Next, take a small saucepan and add one cup of water. Bring it to a simmer over medium heat. Once it’s simmering, add the grated ginger and one teaspoon of turmeric powder. Stir the mixture well. Let it simmer for about five to seven minutes. This helps the flavors blend together nicely. After that, remove the saucepan from the heat. Strain the mixture into a large bowl or pitcher. Discard the ginger pulp. Now, you have a fragrant ginger and turmeric infusion ready for the next step. Now, it’s time to bring in the bright flavors of citrus. Juice two fresh oranges and one lemon. Make sure to remove any seeds. Add the freshly squeezed juices to your ginger and turmeric infusion. Mix everything together well. This adds a refreshing zing to the drink. The citrus not only tastes great but also boosts your immune health. Next, it’s time to sweeten your drink. Stir in one tablespoon of honey or maple syrup until it fully dissolves. This adds a lovely sweetness that balances the tanginess of the citrus. Don’t forget to add a pinch of black pepper. This small addition helps your body absorb the benefits of turmeric. If you like your drink cold, chill it in the refrigerator for about 15 to 20 minutes. You can also serve it warm if you prefer. For a nice presentation, serve in clear glass cups and garnish with fresh mint leaves. Optionally, add a slice of orange on the rim for a fun touch. Enjoy your Ginger Citrus Immune Booster! Juicing citrus fruits is easy with a few simple steps. First, roll the oranges and lemons on the counter. This helps to break down the fibers. Next, cut them in half. Use a manual juicer or a reamer for best results. Strain the juice to remove seeds. Enjoy fresh juice for a bright flavor. It adds a zesty kick to your Ginger Citrus Immune Booster. Fresh mint adds a cool taste to your drink. Start by rinsing the mint leaves under cold water. Pat them dry gently. Tear the leaves with your hands to release oils. You can muddle them in the bottom of your glass before serving. This method makes the mint flavor pop. Garnish your drink with a few whole leaves for a lovely look. Honey is a great sweetener, but you have options. Maple syrup is vegan and adds a rich taste. Agave nectar is another choice, with a mild flavor. Coconut sugar has a unique caramel note. Each sweetener offers different health benefits. Choose what you like best! They all blend well in the Ginger Citrus Immune Booster. {{image_2}} You can make this drink even better by adding grapefruit or lime. Grapefruit adds a tangy kick. It also gives you vitamin C. Lime brings a zesty flavor that brightens your drink. Simply replace some of the oranges with these fruits. The balance is key, so taste as you mix. You’ll find a new favorite twist! Want to make this drink healthier? Add superfoods! Chia seeds can boost fiber and omega-3s. Just use one tablespoon and mix it in. You can also add spirulina for added vitamins. This green powder is packed with nutrients. Just be careful! A little goes a long way. Superfoods can turn your Ginger Citrus Immune Booster into a powerhouse drink. Do you like heat? Try adding jalapeño! It gives your drink a spicy kick. Just slice a small piece and add it to the ginger infusion. Let it simmer for a few minutes. This adds warmth and depth. Jalapeño also has health benefits, like boosting metabolism. It’s a fun way to make your immune booster unique. For the complete recipe, check out the Full Recipe section! Store any leftover Ginger Citrus Immune Booster in a clean, airtight container. This helps keep the drink fresh. Always use glass or BPA-free plastic. Avoid metal containers, as they can change the flavor. When stored correctly, your Ginger Citrus Immune Booster will last about 3 to 5 days in the refrigerator. The flavors may change slightly over time, but it will still be good to drink. You can freeze the Ginger Citrus Immune Booster for longer storage. Pour it into ice cube trays for easy use later. Once frozen, transfer the cubes to a zip-top bag. They’ll last for about 2 to 3 months in the freezer. Just thaw and enjoy when you need a health boost! Ginger is known for its strong anti-inflammatory properties. It helps reduce nausea and aids digestion. Citrus fruits, like oranges and lemons, are rich in vitamin C. This vitamin boosts your immune system and fights infections. Together, they create a powerhouse drink that supports your overall health. Yes, you can easily make this recipe vegan. Just use maple syrup instead of honey. This small swap keeps the drink sweet and plant-based. All other ingredients are already vegan-friendly. You can enjoy this immune booster without any animal products. You can change this recipe in many ways. Try adding more ginger for a spicier kick. If you like it sweeter, add more maple syrup. You can also mix in other juices, like grapefruit or lime, for a different flavor. Experimenting is fun and keeps the drink fresh. - What other ingredients can help boost immunity? Many other ingredients can help strengthen your immune system. Here are a few ideas: - Garlic adds flavor and has strong immune-boosting properties. - Honey is not just sweet; it also has antibacterial effects. - Spinach is full of vitamins and minerals that support health. - Berries are rich in antioxidants, making them great for your body. These ingredients can enhance your Ginger Citrus Immune Booster and make it even healthier. Check out the Full Recipe for more details! This recipe is a simple way to boost your health. You learned about fresh ginger, citrus fruits, and additional ingredients like honey and turmeric. Following the steps, you can create a tasty immune booster. Remember to use tips for juicing and flavoring to make your drink special. Storage info helps you keep leftovers fresh for later. Stay curious and try different variations to find what you love. With this knowledge, you can support your health in a fun way. Enjoy your tasty drink and its health benefits!

Ginger Citrus Immune Booster for Stronger Health

Feeling run down? Discover the powerful health benefits of the Ginger Citrus Immune Booster. Packed with fresh ginger, vitamin-rich oranges,

- 1 cup coconut water - 1 ripe banana, sliced - 1/2 cup Greek yogurt (or dairy-free alternative) - 1/2 cup fresh pineapple chunks - Zest and juice of 1 lime - 1 tablespoon honey or agave syrup (optional, for sweetness) - 1/4 teaspoon vanilla extract - Ice cubes (optional, for a chilled smoothie) When selecting ingredients, always choose fresh and ripe options. A ripe banana adds natural sweetness and creaminess. Fresh pineapple gives a bright flavor that mixes well with lime. The coconut water should be pure and free from added sugars. If using Greek yogurt, opt for plain and unsweetened for the best flavor balance. You can swap out the Greek yogurt for a dairy-free option like coconut yogurt or almond yogurt. This makes it friendly for those avoiding dairy. If you want a sweeter smoothie, consider adding more honey or agave syrup. You can also use a ripe mango instead of pineapple for a tropical twist. Adjust the sweetness to your taste. You can always add more honey after blending if needed. To make the Coconut Lime Coconut Water Smoothie, follow these steps closely: 1. Start by measuring your ingredients. You will need 1 cup of coconut water, 1 ripe banana, and 1/2 cup of Greek yogurt. 2. Slice the banana. This makes it easier to blend. Use a ripe banana for better sweetness. 3. Cut your pineapple. Use fresh pineapple chunks. They add a tropical taste. 4. Add ingredients to the blender. Place coconut water, banana slices, Greek yogurt, and pineapple chunks in the blender. 5. Zest and juice the lime. This adds a fresh zing. Make sure to add both the zest and juice to the blender. 6. Sweeten if needed. If you like it sweeter, add 1 tablespoon of honey or agave syrup. 7. Blend it all. Blend on high until smooth and creamy. For a chilled drink, toss in some ice cubes and blend again. 8. Taste your smoothie. Check the flavor and add more honey if you want it sweeter. Blend briefly to mix it in. Tip: For a perfect texture, blend until there are no lumps. A powerful blender helps to create a creamy finish. Once your smoothie is ready, it's time to serve! Here are some ideas: - Garnish it well. Top each glass with a slice of lime or a sprinkle of lime zest. This adds a nice touch. - Choose your glassware. Serve in tall glasses to show off the color. Clear glasses let the vibrant green shine! - Add a straw or spoon. This makes it easier and fun to drink. For the full recipe, check the earlier section! Enjoy your refreshing Coconut Lime Coconut Water Smoothie! To get your smoothie just right, think about thickness and smoothness. You can adjust it easily. If you want a thicker smoothie, add more banana or Greek yogurt. For a thinner texture, just add more coconut water. Ice can change your smoothie’s feel. If you like it cold, add ice cubes. Just blend them in with the other ingredients. If you prefer it without ice, you can skip it. Using frozen fruit also helps keep the drink cool without ice. Adding more flavors can make your smoothie special. Try fresh mint for a refreshing twist. A little ginger can add a nice zing too. Just remember to balance sweetness and acidity. You want the taste to be bright but not too sweet. If you use honey, add it carefully. Too much can make the smoothie too sweet. Always taste it before serving. This simple check can help you find the perfect flavor. For the full recipe, click here! {{image_2}} You can boost your Coconut Lime Coconut Water Smoothie with superfoods. Adding a handful of spinach gives it a green boost without altering the taste. Chia seeds are another great choice. They add fiber and healthy fats. Just a tablespoon will do. If you want a vegan option, use dairy-free yogurt. This keeps the smoothie creamy while staying plant-based. For a low-calorie version, skip the honey and enjoy the natural sweetness of fruit. Seasonal fruits can change the flavor of your smoothie. In summer, try using fresh mango instead of pineapple. It adds a tropical twist. In fall, you can swap in pears or apples for a cozy vibe. Use whatever is fresh and local. Some great combinations include peach and lime or kiwi and coconut. These swaps keep the smoothie exciting all year long. For the full recipe, click here. To keep your Coconut Lime Coconut Water Smoothie fresh, use a glass jar. Glass keeps flavors nice. Fill the jar to the top to limit air. Seal it tightly and place it in the fridge. This keeps it cold and tasty for up to 24 hours. If you want to save some for later, freezing is a great option. Pour your smoothie into ice cube trays. Once they freeze, pop the cubes into a freezer bag. This way, you can use them later in other smoothies or drinks. When you’re ready to enjoy a stored smoothie, take it out of the fridge. If it has separated, just give it a good shake. If it's too thick, add a splash of coconut water. Blend it again until smooth. To keep the texture nice, don’t let it sit out too long. Smoothies can get watery if left out. Always try to drink it fresh or re-blend it right away. This keeps it creamy and delicious. For the full recipe of this refreshing treat, check out the [Full Recipe]. Coconut water is a great drink for hydration. It has many electrolytes, like potassium and sodium. These help balance fluids in your body. Coconut water can help you recover after exercise. It is low in calories and has natural sugars. This makes it a healthier choice than many sports drinks. Many people enjoy its light and refreshing taste. Drinking coconut water can also aid digestion, thanks to its natural enzymes. Overall, it's a tasty way to stay hydrated and healthy. Yes, you can make this smoothie ahead of time. To keep it fresh, store it in a sealed container. It stays good in the fridge for up to 24 hours. If you want to keep it longer, try freezing individual servings. When you're ready to drink it, simply blend it again. This will make it smooth and creamy once more. Just remember, the flavors can change a bit over time, so it’s best fresh. If you want a sweeter smoothie, there are a few easy options. You can add more honey or agave syrup. Just start with a little and taste as you go. You can also use a ripe banana for natural sweetness. Other options include adding a medjool date or a splash of 100% fruit juice. These options keep the flavor rich without adding too many calories. Adjusting sweetness is simple and personal, so have fun experimenting! In this blog post, we explored how to create the perfect smoothie. We covered key ingredients, preparation steps, and serving ideas. Tips for texture and flavor helped you find your ideal blend. Variations gave you options to customize your drink, and storage advice ensures freshness. Remember, experimenting with fresh ingredients and techniques can lead to new favorites. Enjoy crafting smoothies that are not only tasty but also healthy. Each sip can fuel your day and brighten your mood!

Coconut Lime Coconut Water Smoothie Fresh Delight Recipe

Craving a refreshing drink that’s both tasty and healthy? You’re going to love my Coconut Lime Coconut Water Smoothie! With

To create the perfect White Chocolate Raspberry Frappe, gather these simple ingredients: - 1 cup milk (whole or almond milk) - 1/2 cup heavy cream - 1/3 cup white chocolate chips - 1 cup fresh raspberries (plus extra for garnish) - 1-2 tablespoons raspberry syrup (adjust for sweetness) - 1 tablespoon vanilla extract - 2 cups ice - Whipped cream (for topping) - Mint leaves (for garnish) Each ingredient plays a key role. The milk and cream give the frappe its rich, creamy base. The white chocolate chips add sweetness and depth. Fresh raspberries bring bright flavor and a pop of color. The raspberry syrup boosts the sweetness and enhances the berry taste. Make sure your ice is fresh for that perfect chill. Whipped cream on top is a must. It makes every sip a sweet delight. Finally, the mint leaves add a fresh touch. This recipe is a treat for both your eyes and taste buds. If you want to see the full method to make this delight, check the Full Recipe. - Combine white chocolate chips and 1/4 cup of milk in a saucepan. - Stir continuously until smooth. This creates a rich base for your frappe. Melted white chocolate adds a creamy, sweet flavor. Make sure you stir it well. Avoid burning the chocolate by keeping the heat low. Once smooth, remove it from the heat and let it cool slightly. - Add the remaining milk, heavy cream, melted white chocolate, fresh raspberries, raspberry syrup, vanilla extract, and ice to a blender. - Blend until smooth and frosty. Blend on high speed for about 30 seconds. This mix should be thick and creamy. If your blender struggles, stop and stir the mixture. Make sure it's well combined for the best taste. - Taste the mixture and add more syrup if needed for sweetness. - Pour into glasses and garnish with whipped cream. Taste is key here. If you want it sweeter, add more raspberry syrup. After blending, pour the frappe into tall glasses. Top each glass with whipped cream. For a fun touch, add fresh raspberries and mint leaves as a garnish. Enjoy your White Chocolate Raspberry Frappe! This treat is perfect for warm days or any time you want a sweet drink. Check out the [Full Recipe] for more details. - Use chilled ingredients for a frosty texture. - Blend in batches if your blender is small. To get the best texture, chill all your ingredients. Cold milk and cream make a big difference. If your blender struggles, blend small amounts at a time. This helps keep everything smooth. - Consider serving in clear glasses for visual appeal. - Add additional garnishes like chocolate shavings. Clear glasses let you show off the lovely colors. The red from raspberries and the white from chocolate look great together. You can also sprinkle chocolate shavings on top. It adds a nice touch and extra flavor. - Substitute regular milk with plant-based options. - Experiment with different syrups or fruit flavors. If you want a dairy-free drink, try almond or oat milk. These options taste great and keep the drink creamy. You can also change the syrup. Use strawberry or blueberry syrup for a new twist. The Full Recipe gives you the base, and you can make it your own! {{image_2}} You can change up the frappe's flavor with ease. Try adding strawberries or blueberries for a fruity twist. These berries add a fresh taste and pretty color. You could also use dark chocolate instead of white chocolate. Dark chocolate gives a richer flavor. This swap can create a nice contrast with the raspberry. If you want a lighter drink, consider healthy swaps. Use low-fat cream or non-dairy substitutes like almond or oat milk. These options keep the frappe creamy without extra fat. You can also sweeten it with honey or agave syrup. These natural sweeteners can enhance the flavor without refined sugar. Add fun seasonal flavors to your frappe for a special treat. In fall, add pumpkin spice to the mix. This gives a cozy vibe to your drink. During the holidays, infuse your frappe with peppermint syrup. The minty flavor adds a festive touch that many will enjoy. You can find the full recipe for the White Chocolate Raspberry Frappe and see how easy these variations can be! To keep your White Chocolate Raspberry Frappe fresh, store it in an airtight container in the fridge. This will help maintain its creamy texture and sweet flavor. Make sure to consume it within 24 hours for the best freshness. After that, the taste may change, and it might not be as delightful. If you want to save some for later, you can freeze your frappe. Pour it into a freezer-safe container, leaving some space for expansion. When you're ready to enjoy it, thaw it in the fridge for a few hours or overnight. Keep in mind that the texture may change after freezing. It might become a bit grainy. If that happens, a quick blend can help restore some creaminess. For the full recipe, check out the detailed steps earlier in the article! Yes, you can make this frappe dairy-free! Here are some easy swaps: - Use almond milk or oat milk instead of whole milk. - Replace heavy cream with coconut cream or a non-dairy whipping cream. - Ensure your white chocolate chips are dairy-free. Look for brands made without milk. These options keep the taste creamy and delicious! You should drink your frappe fresh for the best taste. If you have leftovers, store them in the fridge in a sealed container. Try to enjoy it within 24 hours. The longer it sits, the more the ice will melt. This changes the texture and taste. If you freeze it, the texture may change when thawed, but you can still enjoy it! Pair your frappe with tasty snacks! Here are some ideas: - A slice of chocolate cake for a sweet treat. - Fresh fruit, like strawberries or blueberries, for a light touch. - Cookies, like shortbread or biscotti, for a nice crunch. These pairings make your drink even more enjoyable! This blog post covered how to make a delicious White Chocolate Raspberry Frappe. We shared the ingredients, step-by-step instructions, and tips for perfection. I also included fun variations and storage info to keep your frappe fresh. Experimenting with flavors can make your frappe unique. Don’t shy away from trying new ingredients or serving ideas. Enjoy your tasty treat, and share it with friends or family!

White Chocolate Raspberry Frappe Deliciously Chilly Treat

Indulge in a delightful treat that blends creamy white chocolate with tangy raspberries! This White Chocolate Raspberry Frappe is not

To make the Lemon Basil Spritz, gather the following ingredients: - 1 cup fresh lemon juice (about 4-5 lemons) - 1/2 cup fresh basil leaves, packed - 3 tablespoons honey or agave syrup - 4 cups sparkling water - Ice cubes - Lemon slices and basil sprigs for garnish These ingredients create a fresh and bright drink. The lemon juice gives a tart flavor, while the basil adds a nice herbal touch. Honey or agave syrup sweetens the drink, making it refreshing. Sparkling water adds fizz, making each sip exciting. Using fresh, high-quality ingredients makes a big difference. The taste of fresh lemon juice is far better than bottled juice. Fresh basil leaves bring a strong aroma and flavor. This drink is not just tasty, but it looks lovely too. The lemon slices and basil sprigs make it pretty and inviting. For the full recipe, you can follow the steps outlined to enjoy this delightful summer drink! Start by taking fresh basil leaves and honey or agave syrup. In a small saucepan, combine these with one cup of water. Heat over medium heat until it simmers. Stir well until the sugar dissolves completely. Remove it from heat and let it steep for about ten to fifteen minutes. This step brings out the sweet and fragrant basil flavor. Next, use a fine mesh sieve to strain the infused liquid into a bowl or pitcher. This step is key to removing the basil leaves, leaving you with a smooth syrup. Discard the leaves and allow the syrup to cool completely. In a large pitcher, combine the cooled basil syrup with fresh lemon juice. Use about one cup of lemon juice, which is around four to five lemons. Stir the mixture well to combine. Now, slowly add four cups of sparkling water. Stir gently to mix everything without losing the fizz. To serve, fill glasses with ice cubes. Then, pour the Lemon Basil Spritz over the ice. This keeps the drink refreshingly cold. For the final touch, garnish each glass with lemon slices and a sprig of fresh basil. This not only looks good but adds extra flavor too. Enjoy your drink! To make the best Lemon Basil Spritz, start with fresh ingredients. Fresh lemon juice and basil give your drink a vibrant taste. The quality of your ingredients matters. If you want to enhance the sweetness, you can adjust it to your liking. Honey or agave syrup works well to sweeten your drink. Start with three tablespoons, then add more if you prefer it sweeter. Presentation can make your drink more appealing. Serve the spritz in clear glasses. This lets everyone see the beautiful yellow color. It adds to the excitement! You can also use colorful straws. They add a fun touch. A sprig of basil or a slice of lemon on the rim makes the drink look fancy. These little details can impress your guests and make every sip enjoyable. {{image_2}} You can add fruits to your Lemon Basil Spritz. Strawberries, raspberries, or even blueberries work great. Just muddle them gently in the glass before adding the drink. This makes your spritz colorful and tasty. Try different fruits to find your favorite mix. Want a grown-up version? Simply add vodka or gin. This gives a nice kick to your spritz. Use about 1 to 2 ounces of your chosen spirit per glass. Mix it in after you add the sparkling water. Enjoy a refreshing drink with an adult twist. If you love herbs, try using mint or rosemary instead of basil. Both add unique flavors. Muddle the herbs with the honey syrup for a fresh taste. You can mix and match herbs to create your own blend. This makes every spritz special. For the complete recipe, check out the Full Recipe section. To keep your basil syrup fresh, store it in an airtight container in the fridge. This helps preserve the bright flavors of the basil and lemon. You want to enjoy every sip! For the best taste, use the syrup within a week. After that, the flavor may fade. Always check for any signs of spoilage before using. You can reuse the basil syrup for other drinks or cocktails. It adds a fresh twist to lemonade or iced tea. Try mixing it with soda or sparkling wine for a fun treat! Yes, you can prepare the basil syrup in advance. Simply mix it with sparkling water right before serving. This way, the drink stays fresh and bubbly. You can use agave syrup, maple syrup, or sugar as alternatives to honey. Each option adds a different flavor but still keeps the drink sweet. While fresh lemon juice is best for flavor, you can use bottled juice if needed. Just keep in mind that fresh juice offers a brighter, more vibrant taste. In this blog post, we explored how to create a refreshing Lemon Basil Spritz. We covered the ingredients, step-by-step instructions, and tips to perfect your drink. You learned how to store leftover basil syrup and even some fun variations to try. Enjoy making this drink with fresh flavors and your creative twists! It’s a simple way to impress friends and family. So gather your ingredients and start mixing today!

Lemon Basil Spritz Refreshing Summer Drink Recipe

Looking for a cool drink to beat the summer heat? The Lemon Basil Spritz is your answer! This refreshing recipe

- 1 cup fresh strawberries, hulled and sliced - 10-12 fresh mint leaves - 2 tablespoons lime juice (freshly squeezed) Fresh strawberries are the star of this drink. They give a sweet and fruity flavor. I recommend using ripe strawberries for the best taste. Next, mint leaves add a refreshing note. They wake up your senses with every sip. Lastly, lime juice brings a tangy kick. It balances the sweetness of the strawberries. - 2 tablespoons honey or agave syrup (adjust to taste) You can choose between honey and agave syrup. Honey is thick and sweet, while agave syrup is lighter. Both options work well, so pick what you like! Taste your mocktail as you mix. You can always add more sweetener if you prefer a sweeter drink. - Mint sprigs - Sliced strawberries Garnishes make your drink pretty and fun! Add mint sprigs on top for a burst of color. Sliced strawberries also look nice. They show off the fresh ingredients and make your drink look inviting. These simple touches make your mocktail feel special. For the full recipe, check out the steps ahead! To start, you need to muddle your strawberries and mint. Take one cup of fresh strawberries and slice them. Place the slices in a mixing bowl or large glass. Add 10 to 12 fresh mint leaves to the bowl. Use the back of a spoon or a muddler to press down gently. This action helps release the juicy strawberry flavors and mint oils. Be careful not to mash them too hard. You want to break them up, not turn them into mush. Next, add two tablespoons of freshly squeezed lime juice to the muddled mix. This juice gives your drink a nice tartness. Then, add two tablespoons of honey or agave syrup. You can adjust the amount based on your taste. Stir the mixture well until the sweetener dissolves completely. This ensures that each sip is sweet and tasty. Now it's time to serve your mocktail! Fill two glasses halfway with ice cubes. This keeps the drink cool and refreshing. Strain the strawberry-mint mixture into the glasses, leaving some room at the top. Finally, top each glass with soda water or sparkling water. Stir gently to mix everything together. For a lovely finish, garnish with mint sprigs and a few slices of fresh strawberries on top. Enjoy your Strawberry Mojito Mocktail! For the full recipe, check out the details above. Using fresh ingredients makes a big difference. Fresh strawberries burst with flavor. They add sweetness and a bright color. Mint leaves bring a cool taste that pairs well. You can also try adding basil or cucumber for a twist. Basil adds an earthy note, while cucumber gives a refreshing crunch. Experiment to find your favorite mix. Ice levels matter for the right drink. Too much ice can dilute your flavors. Start with a handful of ice cubes in each glass. If it’s too strong, add more soda water. Balancing sweetness and tartness is key. If it’s too sweet, add more lime juice. Taste as you go to find your perfect blend. Creative glassware can make your drink pop. Use tall glasses or even mason jars for a fun look. Decorative garnishes are a must. Mint sprigs and sliced strawberries on top make it pretty. You can also add a lime wheel for color. These little touches make serving special. For the full recipe, check out the Strawberry Mojito Mocktail . {{image_2}} You can switch out strawberries for other berries. Try raspberries, blueberries, or blackberries. Each berry brings its own flavor. Raspberries add a tart touch. Blueberries offer a sweet taste. Blackberries give a rich, deep flavor. Just muddle the berries as you would with strawberries. The rest of the recipe stays the same. This keeps your drink fresh and exciting each time you make it. Want to add a tropical vibe? Mix in some pineapple or coconut flavors. You can use pineapple juice or fresh chunks. This gives your drink a bright, sunny taste. Coconut water can replace soda for a lighter feel. Simply muddle the mint and strawberries first, then add your tropical twist. It’s like a vacation in a glass! If you prefer less sweetness, try using natural fruit juices. Fresh orange or lemon juice can work well. You can also use stevia if you want a low-calorie option. Just remember, start with a little and taste as you go. This way, you can find the perfect balance for your drink. Each option gives you a chance to customize your mocktail for your taste. For the full recipe, check out the Strawberry Mojito Mocktail section. You can prepare the ingredients for your Strawberry Mojito Mocktail ahead of time. Start by slicing the strawberries and washing the mint leaves. You can store these in an airtight container in the fridge. This way, your mocktail will be quick to make when you're ready to serve. Just remember to keep the mint fresh to avoid wilting. If you have leftover mocktail mixture, store it in a covered pitcher in the fridge. It's best to keep the soda water separate until you are ready to drink. This keeps the fizz. When you are ready, pour the mixture over ice and top with soda water. Enjoy it fresh for the best taste! The fresh strawberries and mint will last about three days in the fridge. Lime juice stays good for about a week if stored in a sealed container. Soda water is best when used fresh but can last for a few weeks if unopened. Always check for signs of spoilage before using any ingredients. Yes, you can use frozen strawberries! They work well in this mocktail. Frozen strawberries can provide a nice chill. However, they might make the drink a bit thicker. To use them, let them thaw a bit before mixing. This helps release their juices. Fresh strawberries offer a brighter flavor. If you have both, try a mix for a fun twist. To make this mocktail less sweet, cut back on the honey or agave syrup. Start with one tablespoon instead of two. Taste it after mixing. If it still seems sweet, add more lime juice. Lime adds tartness, balancing the flavors. You can also use soda water with less sweetness. This way, you keep the refreshing taste without too much sugar. Yes, you can easily turn this mocktail into a cocktail! To do this, add rum. A light or white rum works best. Start with one to two ounces per glass. Mix it in after you combine the fruit and mint. This adds a fun kick and keeps the refreshing vibe. Enjoy your strawberry mojito with a twist! A mocktail is a non-alcoholic drink that mimics a cocktail. It uses similar ingredients but skips the alcohol. Mocktails are great for all ages and occasions. You can enjoy the flavors and fun without the buzz. They often include fresh fruits, herbs, and mixers. Strawberry mojito mocktail is a popular choice! You learned how to make a fresh and tasty mocktail using simple ingredients. By muddling strawberries, mint, and lime juice, you create a great base. Adjusting sweetness with honey or agave syrup can suit your taste. Don't forget about garnishes—they make a big difference! Try variations like the Berry Mojito Mocktail or a Tropical Twist. Store leftovers well and enjoy them later. Mocktails are a refreshing choice for everyone, with or without alcohol. Now, grab your ingredients and start mixing your perfect drink!

Strawberry Mojito Mocktail Refreshing Summer Drink

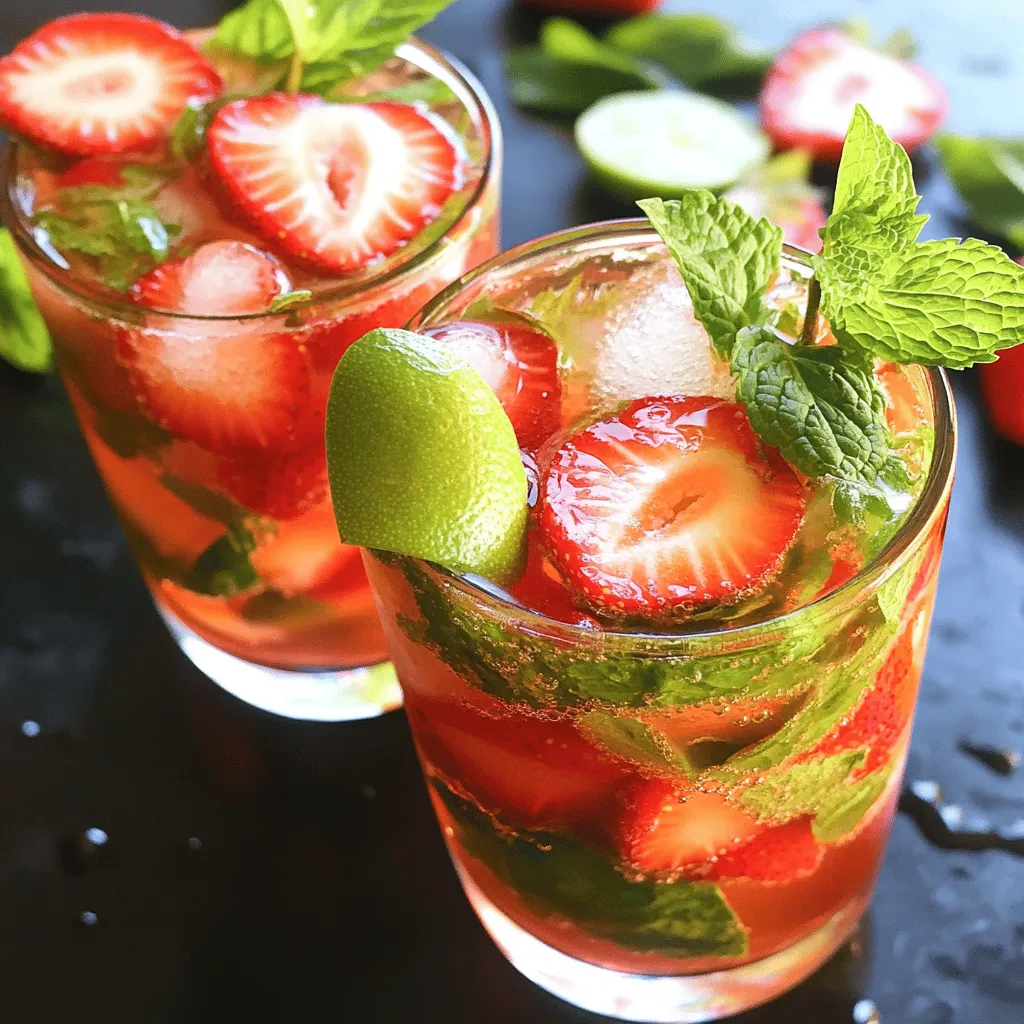
Looking for a drink that screams summer? Try my Strawberry Mojito Mocktail! It’s a fun, fruity treat packed with fresh

- 1 lb baby carrots - 3 tablespoons unsalted butter - 1/4 cup pure maple syrup - 1 teaspoon ground cinnamon - 1/4 teaspoon sea salt - 1 tablespoon fresh thyme leaves - Freshly ground black pepper - Additional thyme sprigs - Extra drizzle of maple syrup When you choose carrots, fresh is best. Baby carrots work well, but larger ones also shine. If using larger carrots, slice them into sticks or rounds. This helps them cook evenly. Frozen carrots are convenient, but fresh carrots give the best flavor and texture. Next, let’s talk about maple syrup. Always go for pure maple syrup. The taste is rich and deep. Avoid imitation syrup; it lacks the same quality. Pure maple syrup enhances the sweet glaze on your carrots. Trust me, it makes a big difference. For the thyme, fresh is ideal, but dried thyme works too. Use one teaspoon of dried if you can’t find fresh. And don’t skip the black pepper! It adds a nice kick to balance the sweetness. For the complete recipe, check out the Full Recipe. First, wash your baby carrots well. If you use larger carrots, peel them and cut into sticks or rounds. This helps them cook evenly. Next, take a large skillet and melt the butter over medium heat. The butter adds a rich flavor to the dish. Once the butter melts, add the carrots to the skillet. Sauté them for about five minutes until they soften slightly. This step starts to bring out their natural sweetness. Then, drizzle the maple syrup over the carrots. Sprinkle in the ground cinnamon and sea salt. Stir everything together to coat the carrots well. As the carrots cook, sprinkle in the fresh thyme leaves and season with black pepper. This adds a nice herb flavor. Cook for another minute until the carrots are tender and coated in a sticky glaze. Keep an eye on them to avoid overcooking. Then, remove the skillet from the heat. Let the carrots cool slightly before serving. Enjoy this sweet and savory side dish! For the full recipe, check the details above. To get that perfect glaze on your carrots, start by sautéing them gently. Use medium heat to avoid burning the butter. I recommend stirring often for even cooking. If you find the glaze too sweet, you can adjust it. Add a pinch of salt to balance the flavor. Using the right skillet makes a big difference. A large non-stick skillet works best for this recipe. It helps prevent sticking and makes cleanup easy. For utensils, grab a wooden spoon or spatula. They help stir the glaze without damaging your skillet. Check the doneness of your carrots often. You want them tender but not mushy. If you use larger carrots, they will need more time. Cut them into smaller pieces to cook evenly. Aim for about 15 to 20 minutes total cooking time for larger cuts. {{image_2}} To make your maple glazed carrots unique, try adding citrus zest. A bit of orange or lemon zest brightens the flavor. It adds a fresh kick that makes the dish pop. You can also use different herbs. Instead of thyme, try rosemary or dill for a new twist. Each herb brings its own taste, enhancing your dish. If you want to make this dish vegan, you can swap out the butter. Use coconut oil or vegan butter instead. These alternatives will still give you a rich flavor. For those watching their sugar intake, consider sugar substitutes. Stevia or monk fruit can replace maple syrup. Just adjust the amount to taste, as these sweeteners can be much sweeter. Maple glazed carrots pair wonderfully with many main dishes. They go great with roasted chicken or grilled fish. You can also add them to salads or grain bowls. Their sweet and savory taste complements greens or quinoa perfectly. This gives you a colorful and tasty meal that is sure to impress. For the full recipe, check out the detailed instructions. To store leftover maple glazed carrots, place them in an airtight container. Make sure the lid seals tightly. This keeps them fresh and safe to eat. You can store them in the fridge for up to four days. After that, they may lose flavor and texture. When reheating glazed carrots, the best methods are using the stove or microwave. For the stove, warm them in a skillet over low heat. Stir often to ensure even warming. If using the microwave, heat them in short bursts. Check them frequently to avoid overcooking. This keeps them tender and tasty. You can freeze cooked maple glazed carrots, but raw carrots do not freeze well. To freeze cooked carrots, let them cool first. Then, place them in a freezer-safe bag or container. They stay good for up to three months. When you want to eat them, thaw them in the fridge overnight. Reheat them gently on the stove or in the microwave. This helps maintain their flavor and texture. For best results, don’t refreeze them once thawed. What can I serve with maple glazed carrots? You can pair maple glazed carrots with many dishes. They go well with roasted chicken or grilled salmon. They also complement rice or quinoa nicely. Try them with a fresh salad for a bright touch. Can I make maple glazed carrots ahead of time? Yes, you can make them ahead. Simply cook the carrots, then let them cool. Store them in the fridge for up to three days. When ready to serve, reheat gently in a pan. Why are my carrots not getting tender? If your carrots are not tender, they might need more time. Cook them longer at medium heat. You can add a splash of water to help steam them. How do I fix overly sweet glazed carrots? If your carrots taste too sweet, add a pinch of salt. This helps balance the sweetness. You can also add a squeeze of lemon juice for a tart flavor. Nutritional benefits of maple glazed carrots Maple glazed carrots are rich in vitamins A and C. They provide fiber, which aids digestion. The maple syrup adds a natural sweetness without refined sugars. Are maple glazed carrots healthy? Yes, they are a healthy side dish. They use simple ingredients, and you control the sweetness. Enjoy them as part of a balanced meal. For the full recipe, check out the recipe section above. In this post, we covered how to make maple glazed carrots. We explored the main ingredients, the cooking process, and tips for perfecting your dish. I shared ways to vary the recipe and discussed how to store and reheat leftovers effectively. Maple glazed carrots are simple and delicious. With fresh ingredients, you can enjoy a tasty side. Experiment with flavors and make this dish your own. Enjoy your cooking!

Maple Glazed Carrots Savory and Simple Side Dish

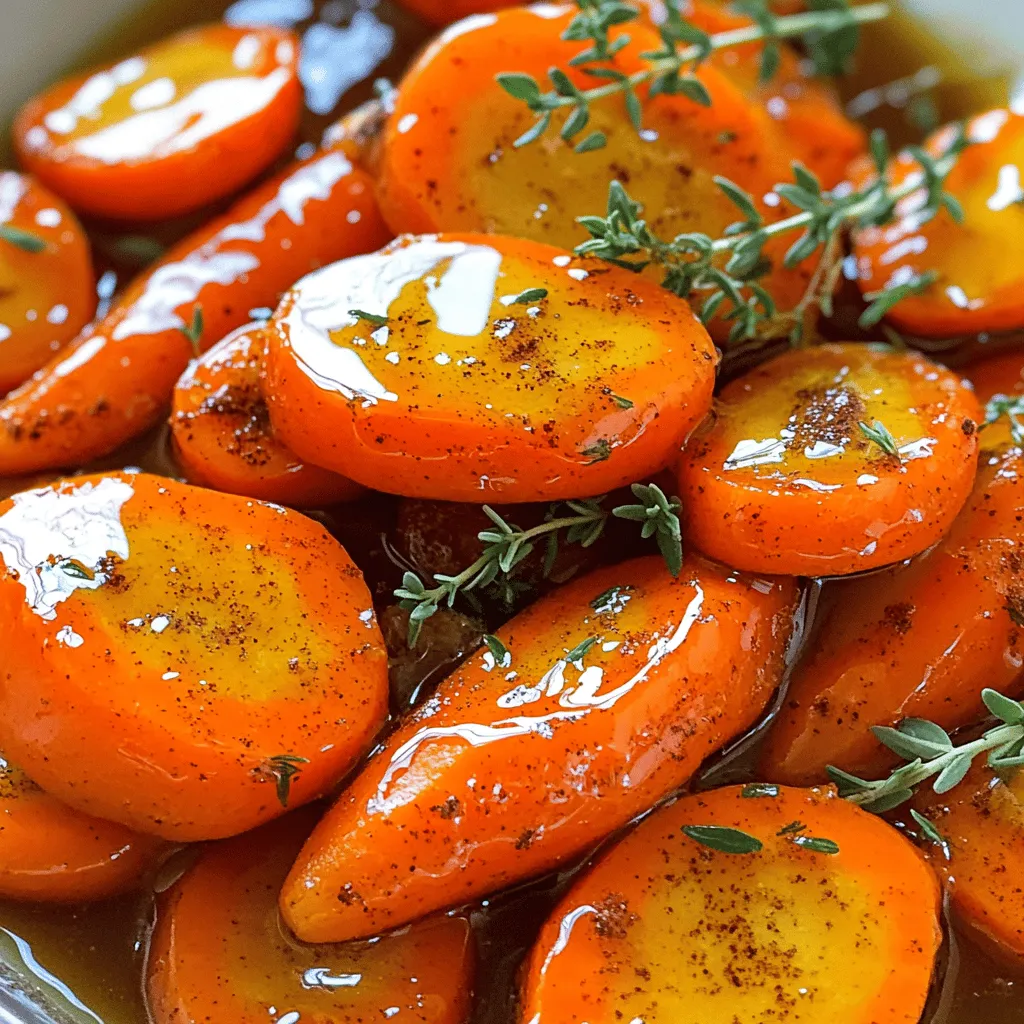
Looking for a simple yet tasty side dish? Maple glazed carrots are packed with flavor and so easy to make!

- 2 cups cooked brown rice - 1 lb boneless, skinless chicken breasts, diced - 1 tablespoon olive oil - 1 teaspoon cumin - 1 teaspoon paprika - 1 teaspoon chili powder - Salt and pepper to taste - 1 can black beans, drained and rinsed - 1 cup corn (frozen or canned) - 1 medium red bell pepper, diced - 1 small red onion, diced - 2 ripe avocados, sliced - 1/2 cup salsa (your choice) - Fresh cilantro, chopped, for garnish - Lime wedges, for serving You will find that these ingredients make a great base for chicken burrito bowls. The brown rice gives a nice, hearty feel. The chicken adds protein and flavor. The olive oil helps the seasonings stick well. Don't forget the spices! Cumin, paprika, and chili powder bring warmth and depth. Black beans add fiber and a creamy texture. For toppings, use fresh corn for sweetness. Diced bell pepper and onion add crunch. Ripe avocados bring creaminess and richness. Salsa adds zest, while cilantro gives freshness. A squeeze of lime brightens the dish. This mix of flavors and textures turns a simple meal into a feast. For the full recipe, you can check out the [Full Recipe]. Cook the brown rice according to the package instructions. I find brown rice adds a nice, nutty flavor. Make sure to set it aside once it’s done. In a bowl, toss the diced chicken with olive oil, cumin, paprika, chili powder, salt, and pepper. Mix well until the chicken is evenly coated. This step adds lots of flavor to your dish. Heat a large skillet over medium-high heat. Add the seasoned chicken and cook for about 5-7 minutes. Stir occasionally until the chicken is browned and fully cooked. Remove the chicken and set aside. In the same pan, add the diced red bell pepper and onion. Sauté for 3-4 minutes until they become soft. Then, add the black beans and corn. Cook for an additional 2 minutes until heated. In each serving bowl, start with a generous layer of brown rice. Next, add the sautéed vegetable mixture. Top it all with the cooked chicken. This creates a beautiful layer of flavors. Top the bowls with slices of avocado. Spoon salsa evenly over the top. Finally, sprinkle fresh cilantro for a pop of color. Serve with lime wedges on the side for an extra zing. You can find the Full Recipe for this delightful meal for quick reference. Enjoy making your Chicken Burrito Bowls! To cook chicken just right, watch the time closely. Overcooked chicken becomes dry and tough. Aim for 5-7 minutes in the skillet. Stir the chicken often to ensure even cooking. When the chicken is golden brown, it's ready to serve. You can boost the taste of your chicken burrito bowl with fun spices. Try adding garlic powder or onion powder for depth. Marinades can also bring great flavor. A simple mix of lime juice and olive oil works wonders. Don't hesitate to experiment with different spices to find your favorite mix! Make your burrito bowls pop with colors and layers. Start with a base of brown rice. Then, add the sautéed veggies and chicken. For a nice touch, layer the avocado slices on top. Drizzle salsa for a bright finish, and sprinkle fresh cilantro. Use colorful bowls for extra appeal. This makes your meal look as good as it tastes! {{image_2}} You can easily make this meal vegetarian. Swap the chicken for tofu or grilled vegetables. - Use firm tofu, diced and sautéed with spices. - Try zucchini, mushrooms, or eggplant for a hearty mix. - Add extra beans for protein, like pinto or kidney beans. Want fewer carbs? Use cauliflower rice instead of brown rice. - Grate cauliflower or buy pre-riced cauliflower. - Sauté it briefly to soften before adding toppings. - This option keeps your meal light but still filling. You can change the flavor with different beans, cheeses, or dressings. - Black beans work well, but try chickpeas for a twist. - Experiment with cheese: feta, pepper jack, or cheddar. - Dress your bowl with ranch, vinaigrette, or a spicy sauce. These variations keep the dish exciting and suit different diets. For the full recipe, check the recipe section above. To keep your chicken burrito bowls fresh, store them in an airtight container. Make sure to cool them down first. Leftovers can last in the fridge for up to three days. When you store them, separate the toppings like avocado and salsa to avoid sogginess. This way, each bite remains fresh and delicious. If you want to save your burrito bowls for later, freezing is a great option. First, freeze the chicken, rice, and veggies separately. This keeps their flavors and textures intact. You can use freezer bags or containers. Remember to label them with the date. They can stay good for up to three months in the freezer. When you're ready to eat, just thaw them in the fridge overnight. Reheating your chicken burrito bowls should keep them tasty. You can use the microwave or stovetop. If using a microwave, heat in short bursts, stirring in between. This helps prevent uneven heating. For the stovetop, warm them gently in a pan over low heat. Add a splash of water or broth to keep everything moist. Enjoy your meal just like the first time! Yes, you can use white rice or quinoa. White rice will be softer and lighter. Quinoa adds protein and a nutty flavor. Both options work well with the other ingredients. To spice it up, use hot spices like cayenne pepper. You can also add jalapeños to the chicken or as a topping. Chopped fresh chili peppers add heat and flavor. Great sides include a fresh salad or tortilla chips. A zesty corn salad adds crunch. You can also serve with guacamole for extra creaminess. You can find the full recipe instructions for Chicken Burrito Bowls in the earlier sections. In this blog post, we explored how to create delicious chicken burrito bowls. We covered the essential ingredients, from cooked brown rice to fresh toppings. I shared step-by-step instructions, tips for perfect chicken, and fun variations. Don't forget to try vegetarian or low-carb options to mix things up. Proper storage and reheating methods ensure you enjoy leftovers as much as the first meal. With these details, you can make a tasty bowl that fits your taste and preferences. Enjoy your cooking adventure and the flavorful rewards!

Chicken Burrito Bowls Delightful and Flavorful Meal

Are you craving a meal that’s both tasty and filling? Look no further than chicken burrito bowls! This delightful dish

To make Simple Hummus Veggie Wraps, you need the following ingredients: - 4 large whole wheat tortillas - 1 cup hummus (store-bought or homemade) - 1 cup spinach leaves - 1 medium cucumber, julienned - 1 large carrot, julienned - 1 red bell pepper, sliced - 1/2 avocado, sliced - 1/4 cup feta cheese, crumbled (optional) - Salt and pepper to taste - 1 tablespoon olive oil (for drizzling) These ingredients create a fresh and satisfying wrap that is perfect for lunch or a snack. You can add extra ingredients to boost taste. Consider these options: - Sliced olives for a briny touch - A sprinkle of chili flakes for heat - Fresh herbs like dill or parsley for freshness - Sun-dried tomatoes for a sweet, tangy flavor These optional ingredients can take your wraps to the next level. If you have dietary needs, you can swap some ingredients easily. Here are some ideas: - Use gluten-free tortillas if you avoid gluten. - Swap hummus for guacamole for a different flavor. - Try different greens like arugula or kale instead of spinach. - Replace feta with a dairy-free cheese for a vegan option. These substitutions can help you enjoy the wraps while meeting your dietary goals. For the full recipe, check out the details! 1. First, lay your whole wheat tortillas flat on a clean surface. 2. Spread a thick layer of hummus on each tortilla. Leave an inch around the edges. 3. Next, layer the spinach leaves over the hummus. Cover the whole surface. 4. Add the julienned cucumber, carrot, and sliced red bell pepper on top. 5. Place avocado slices evenly over the veggies. You can sprinkle feta cheese if you like. 6. Season with a pinch of salt and pepper to enhance the taste. 7. Drizzle a little olive oil over the fresh ingredients for richness. 8. Roll the tortilla tightly, starting from one end. Tuck in the filling as you go. 9. Cut each wrap in half diagonally to show off the colorful filling. 10. Serve right away or wrap in parchment for a quick meal later. - Use fresh tortillas for better texture. They should be soft yet strong. - A spatula works well for spreading hummus. It makes it even and easy. - Try to layer veggies evenly to avoid a messy wrap. - A sharp knife helps cut the wraps cleanly. - If you want, you can prep extra wraps for later. - Don’t overfill the wraps. Too much filling makes them hard to roll. - Avoid using soggy veggies. They can make the wrap fall apart. - Skip the salt if you use feta. It adds enough saltiness on its own. - Don’t forget to leave space at the edges when spreading hummus. - Always cut the wraps with a sharp knife for a neat look. For the full recipe, you can refer to the entire section earlier in the article. Start with a good base. Spread hummus evenly on each tortilla. Leave space at the edges. Layer spinach leaves next. They add crunch and color. Then, add your julienned cucumber, carrot, and red bell pepper. This order keeps the wrap balanced. Avoid overloading one side. It helps with rolling later. Look for bright colors and firm textures. Choose cucumbers without soft spots. Carrots should be crisp, not limp. For bell peppers, pick ones that feel heavy. They should have shiny skin. If you can, buy from local farmers' markets. Fresh veggies taste better and are more nutritious. Making hummus at home is simple. You need a few key ingredients. Start with chickpeas, tahini, lemon juice, and garlic. Blend until smooth. Add olive oil for richness. Adjust the flavor with salt. You can also add spices like cumin for kick. Homemade hummus is creamy and delicious. Use it in your wraps for a fresh twist. Check the Full Recipe for more details. {{image_2}} You can easily adapt these wraps for any diet. If you're vegan, skip the feta cheese. Use a plant-based hummus instead. For gluten-free options, switch to gluten-free tortillas. You can also make this wrap low-carb by using large lettuce leaves instead of tortillas. This way, you still enjoy the same great taste while fitting your needs. To add more depth to your Simple Hummus Veggie Wraps, consider spices and herbs. A sprinkle of smoked paprika gives a nice kick. You can add fresh herbs like cilantro or dill for a burst of flavor. If you like a little heat, try adding sliced jalapeños or a dash of hot sauce. You can also mix in some roasted garlic for extra richness. Wraps don't have to be limited to tortillas. You can try flatbreads, pita bread, or even rice paper for a fun twist. For a crunchy bite, use nori sheets, the same ones used for sushi. Another option is to make it a bowl meal. Layer the ingredients in a bowl instead of a wrap. This way, you can enjoy all the flavors while keeping it fresh and creative. For the complete recipe, check out the [Full Recipe]. To keep your Simple Hummus Veggie Wraps fresh, wrap them tightly. Use parchment paper or foil. Place them in a sealed container or a zip-top bag. This helps prevent air from getting in, which can make the wraps soggy. Store them in the fridge. They stay good for up to three days. Reheat the wraps in a skillet over medium heat. Cook for a few minutes on each side. This warms the wraps and makes them a bit crispy. You can also enjoy them cold. Serve with extra hummus or your favorite dip for added flavor. Fresh veggies in the wraps last about five days in the fridge. Hummus can stay good for about a week if stored well. Whole wheat tortillas last longer, about two weeks unopened. Check the dates on your products to be sure. Enjoy your wraps while the ingredients are fresh for the best taste. To make hummus from scratch, you need simple ingredients. Use: - 1 can of chickpeas (15 oz), drained - 1/4 cup tahini - 2 tablespoons lemon juice - 1 clove garlic, minced - 2 tablespoons olive oil - Salt to taste Blend these in a food processor until smooth. Add water if it’s too thick. You can adjust the flavors by adding more garlic or lemon juice. This fresh hummus pairs perfectly with your wraps. Veggie wraps are packed with nutrients. They provide: - Fiber from whole wheat tortillas and fresh veggies - Vitamins and minerals from spinach, carrots, and peppers - Healthy fats from avocado and olive oil These wraps offer a low-calorie meal option. They keep you full while giving your body energy. Eating a variety of veggies also helps boost your immune system. Yes, you can prepare wraps in advance! Here’s how: - Make the wraps, but don’t cut them yet. - Wrap each one tightly in plastic wrap or foil. - Store them in the fridge for up to three days. When you’re ready to eat, just cut them in half. This makes a quick and healthy lunch or snack. For the best taste, add avocado just before eating to keep it fresh. You can find the Full Recipe for more details. In this post, we explored how to make Simple Hummus Veggie Wraps. We covered the key ingredients, optional flavors, and substitutions. You learned the steps for making wraps and common mistakes to avoid. We shared tips for choosing fresh veggies and making homemade hummus. Additionally, we discussed ways to customize and store your wraps. These wraps are easy to make and healthy. You can adjust ingredients to fit your needs. Enjoy creating your wraps with fresh ingredients and flavors!

Simple Hummus Veggie Wraps Quick and Tasty Meal

Looking for a quick, tasty meal? You’ll love these Simple Hummus Veggie Wraps! Packed with fresh veggies and creamy hummus,

- 3 medium-sized apples (Granny Smith or Honeycrisp) - 1 cup caramel sauce (store-bought or homemade) - 1/2 cup semi-sweet chocolate chips - 1/2 cup mini marshmallows - 1/2 cup crushed graham crackers - 1/4 cup chopped nuts (pecans or walnuts) - 1 teaspoon cinnamon (optional) - Whipped cream for drizzling (optional) To make caramel apple nachos, you need simple ingredients. Start with apples. I love using Granny Smith or Honeycrisp for their crispness and tang. You will also need caramel sauce. You can buy it or make your own. Semi-sweet chocolate chips add a rich taste. Mini marshmallows bring a fun texture. Crushed graham crackers add crunch. Chopped nuts, like pecans or walnuts, give a nice finish. Cinnamon is optional but adds warmth. And don’t forget the whipped cream for drizzling! - Alternative fruits for different flavors - Varieties of caramel sauce to use or make Feel free to switch up the fruits. Pears or bananas work well too. You can also explore different caramel sauces. Some people love salted caramel for a sweet and salty mix. Others may choose chocolate caramel for an extra treat. - Microwave-safe bowl - Baking sheet or serving platter - Parchment paper You will need a few tools to prepare this dish. A microwave-safe bowl helps melt the caramel. A baking sheet or serving platter is perfect for arranging the nachos. Parchment paper makes cleanup easy and keeps the nachos from sticking. For the full recipe, refer to the instructions in the earlier section. Enjoy creating this delicious dessert! 1. First, wash the apples under cold water. This helps remove any dirt. 2. Next, core the apples. You want to take out the seeds and stem. 3. Now, slice the apples into thin wedges. Aim for even pieces for better layering. 1. Take your large platter and spread the apple slices in a circular pattern. 2. Drizzle caramel sauce over the apple slices. Make sure to cover them well. 1. Sprinkle semi-sweet chocolate chips evenly on top of the apples. 2. Add mini marshmallows for a sweet, fluffy touch. 3. Next, sprinkle crushed graham crackers. This will give a nice crunch. 4. Finish with chopped nuts for extra texture. If you like, add a sprinkle of cinnamon on top. For the full recipe, check out the details above. Enjoy making this fun dessert! To ensure a smooth caramel sauce, heat it slowly. If you use a microwave, check every 30 seconds. Stir well to avoid hot spots. If you make homemade caramel, keep it warm. Use a pot on low heat for easy pouring. Get creative when serving caramel apple nachos. Try using colorful plates or fun platters to catch the eye. Arrange the nachos in a circle to draw attention. You can also add seasonal decorations like leaves or small pumpkins for a festive touch. Consider adding fun flavors to your nachos. You can mix in sliced bananas or pears for a twist. Drizzle some peanut butter or white chocolate for extra sweetness. Pair with warm cider or a scoop of vanilla ice cream for a delightful experience. For a kick, add a pinch of sea salt on top. For the full recipe of caramel apple nachos, check out the recipe section above. {{image_2}} You can have fun with different fruits! Try using pears or bananas for a new twist. They add a nice sweetness and different texture. For fall, think of seasonal fruits. Slices of ripe figs or pomegranate seeds can make your nachos pop with color and flavor. Switching up the toppings can make your nachos stand out. White chocolate chips offer a creamy touch that pairs well with fruit. Peanut butter drizzles add a nutty flavor that many enjoy. You can also use different nuts, like almonds or hazelnuts, to bring in crunch. Sprinkles can add a festive look and a bit of fun. If you want a vegan version, you can find plant-based caramel. Many brands offer vegan options that taste great. For toppings, use dairy-free chocolate chips and nuts. If you need gluten-free nachos, swap graham crackers for gluten-free options. This way, everyone can enjoy this delicious treat! Check out the Full Recipe for more ideas. To store caramel apple nachos, place them in an airtight container. Cover the nachos with plastic wrap or a lid. This keeps them fresh in the fridge. They will last for about 1 to 2 days. The apples may soften over time, but they will still taste good. If your nachos get soggy, you can refresh them easily. Place them on a baking sheet and pop them in the oven at 350°F for about 5 minutes. This helps crisp them up again. If you need to reheat the caramel sauce, use the microwave. Heat it in short bursts of 15 seconds, stirring after each time. This ensures it warms evenly and stays smooth. You can prep some ingredients ahead. Wash and slice the apples a few hours before serving. Store them in lemon water to keep them fresh. You can also make the caramel sauce early. Just warm it before you assemble the nachos. Assemble everything just before serving for the best taste and look. For the complete process, check the Full Recipe. Yes, you can use many types of apples. The best apples for flavor and texture are Granny Smith or Honeycrisp. Granny Smith brings a tartness that pairs well with sweet toppings. Honeycrisp offers a sweet and juicy bite. You can also try Fuji or Gala apples for a sweeter taste. To make this recipe vegan, you can use dairy-free caramel sauce. Many stores sell vegan caramel. You can also make your own using coconut milk and maple syrup. For toppings, choose dairy-free chocolate chips and avoid whipped cream or use a vegan version. Get creative with toppings! Some fun ideas include: - Sliced bananas for extra sweetness - Coconut flakes for a tropical twist - Dried fruits like cranberries or raisins - Peanut butter for a nutty flavor - Colorful sprinkles for a festive look Yes, you can make this recipe gluten-free. Use gluten-free graham crackers or crushed nuts as a crunchy layer. Many brands offer gluten-free options at the store. Always check labels to ensure they meet your dietary needs. You can find the full recipe to make this delicious dessert and explore more ideas! Caramel apple nachos make a fun dessert for everyone. You start with apples, then layer on caramel and tasty toppings. I showed you how to prepare the apples and add different flavors. Remember to store leftovers well and consider variations. This recipe is easy to adjust for your taste. Enjoy making your perfect nachos anytime!

Caramel Apple Nachos Delightful Fall Dessert Recipe

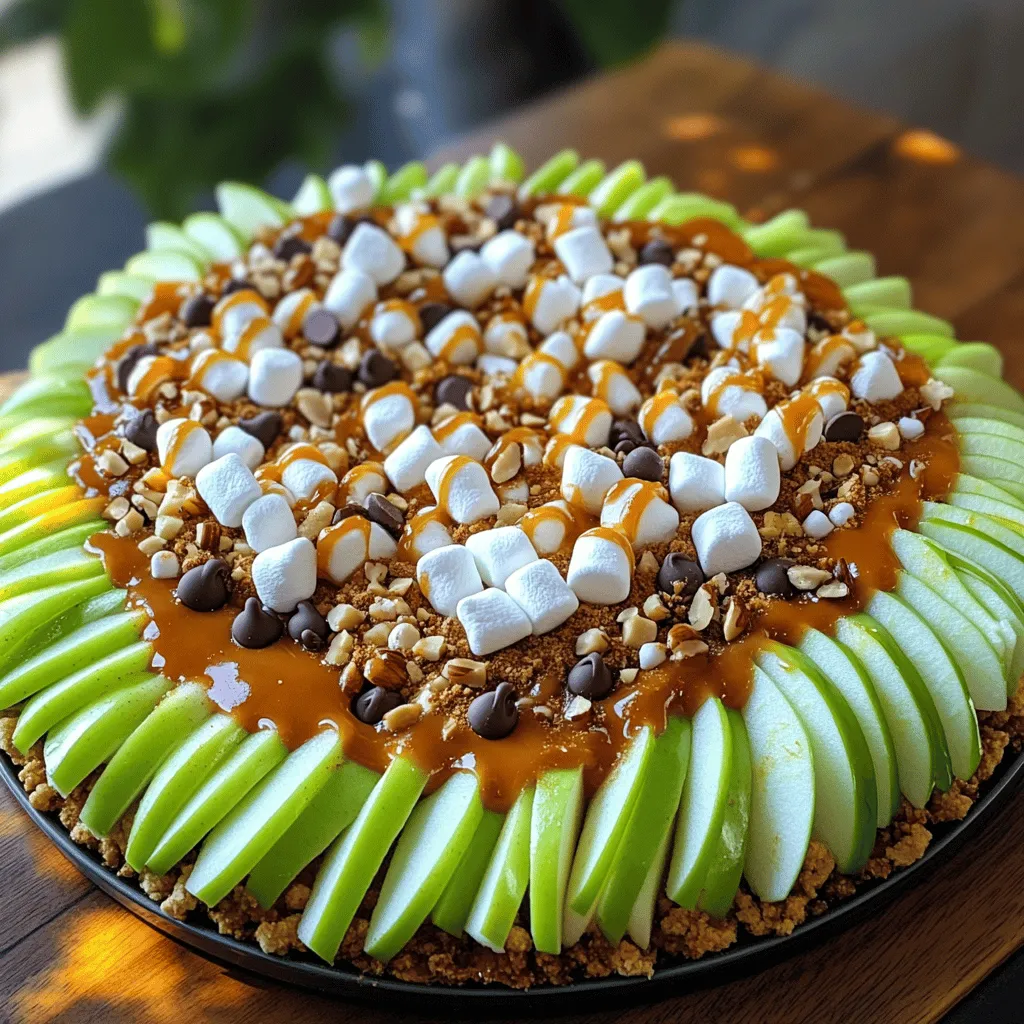
Are you ready to enjoy a sweet and crunchy treat this fall? Caramel Apple Nachos are the perfect dessert to

Older posts
Newer posts
← Previous Page1 … Page70 Page71 Page72 … Page84 Next →

dsad

© 2026 juliesdish • Built with GeneratePress

Our Policies

  • Copyright Policy
  • Cookie Policy
  • GDPR Policy
  • Privacy Policy
  • Disclaimer
  • Terms Of Use

More Information

  • Home
  • About
  • Contact
  • Appetizers
  • Dessert
  • Dinner
  • Drinks
©2026, juliesdish About Back To Top