Skip to content
DisclaimerTerms Of UseGDPR PolicyCookie Policy

juliesdish

  • Home
  • Drinks
  • Appetizers
  • Dinner
  • Dessert
  • About
  • Contact
  • Privacy Policy
DisclaimerTerms Of UseGDPR PolicyCookie Policy

NO-ING-IMG

To make tasty Chicken Souvlaki Skewers, you need a few key ingredients. Here’s what you’ll need: - 1 pound chicken breast, cut into 1-inch cubes - 1/4 cup olive oil - 3 tablespoons fresh lemon juice - 3 garlic cloves, minced - 1 tablespoon dried oregano - 1 teaspoon paprika - Salt and pepper to taste - 8 skewers (soaked in water for 30 minutes if wooden) These ingredients create a juicy and flavorful chicken that will impress everyone. The marinade is crucial for great flavor. Mixing olive oil, lemon juice, and spices brings out the best in the chicken. Here’s a breakdown: - Olive oil adds richness and helps the chicken stay moist. - Fresh lemon juice gives a bright taste that cuts through the richness. - Minced garlic adds a punch of flavor. - Dried oregano gives a classic Mediterranean touch. - Paprika adds a subtle smokiness and color. - Salt and pepper enhance all the flavors. Mix these ingredients well to coat the chicken evenly, ensuring each piece absorbs the marinade. Garnishes and sides can elevate your dish. Consider adding these: - Fresh parsley, chopped (for garnish) - Tzatziki sauce (for dipping) Chopped parsley adds a pop of color and freshness. Tzatziki sauce gives a creamy, cool dip that complements the skewers beautifully. For the full recipe, check out the Zesty Chicken Souvlaki Skewers . To make the marinade, gather your ingredients. You will need olive oil, fresh lemon juice, minced garlic, dried oregano, paprika, salt, and pepper. In a large bowl, whisk together these items until well mixed. The olive oil will add richness, while the lemon juice gives a nice brightness. The garlic and spices bring bold flavors. This marinade is key for juicy, tasty chicken. Next, you’ll want to marinate the chicken. Cut your chicken breast into 1-inch cubes for even cooking. Add these cubes to the marinade, ensuring each piece is well-coated. Cover the bowl and place it in the fridge. For the best taste, let the chicken marinate for at least one hour. If you have more time, letting it sit overnight will deepen the flavor. Now it’s time to skewer and grill. First, preheat your grill or grill pan over medium-high heat. Take your soaked skewers and thread the marinated chicken onto them. Pack the pieces snugly, but avoid crowding them. This helps them cook evenly. Grill the skewers for 10-12 minutes, turning them every few minutes. Use a meat thermometer to check that the chicken reaches 165°F (74°C). Once done, let the skewers rest for a few minutes before serving. They will be juicy and delicious! For a complete guide, check out the Full Recipe. Marinating chicken is key to great taste. Use a mix of olive oil, lemon juice, garlic, oregano, and spices. This mix not only adds flavor but also keeps the chicken juicy. I suggest marinating for at least one hour. If you have time, let it sit overnight. This makes the chicken even tastier. Grill marks make your chicken souvlaki look great. Start with a hot grill. Preheat it for about 10 minutes. Use a clean grill to avoid sticking. Place the skewers at a 45-degree angle. This helps create those nice lines. Flip the skewers every few minutes for even cooking. Keep an eye on the time. Grill the chicken for about 10-12 minutes. Serve your chicken souvlaki hot off the grill. Use fresh parsley to add color. Tzatziki sauce is a must for dipping. It adds a cool and creamy taste. You can also pair it with pita bread and a Greek salad. These sides make a full meal. For a fun twist, try serving it with grilled veggies. Enjoy your meal! For the complete recipe, check out the Full Recipe. {{image_2}} You can swap chicken for other proteins. Beef, pork, or lamb work well. Each meat brings its own flavor. For beef, choose tender cuts like sirloin. For pork, use shoulder or loin. Lamb adds a unique taste with its rich flavor. Make sure to adjust the marinade time based on the protein you use. If you want a veggie version, try using firm tofu or tempeh. Both soak up flavors nicely. You can also use veggies like bell peppers, zucchini, and mushrooms. Marinate them just like you would the chicken. For a vegan twist, skip the tzatziki and use a tahini sauce instead. Experimenting with different spices can spark new ideas. You might try a Mediterranean mix with cumin and coriander. For a spicy kick, add chili flakes or cayenne pepper. A sweet blend can include cinnamon and nutmeg. These different seasoning blends elevate the classic recipe. Check the [Full Recipe] to see how these tweaks can shine. To keep your chicken souvlaki skewers fresh, let them cool first. Place them in an airtight container. You can store them in the fridge for up to three days. If you want to keep them longer, freezing is a great option. When you're ready to enjoy your leftover skewers, preheat your oven to 350°F (175°C). Place the skewers on a baking sheet. Heat for about 10-15 minutes until they are warm throughout. You can also use a microwave. Heat on medium for 1-2 minutes, checking to avoid drying out the chicken. To freeze your chicken souvlaki skewers, wrap them tightly in plastic wrap or foil. Then, place them in a freezer-safe bag. They will stay good for up to three months. When you want to eat them, thaw in the fridge overnight. Then, reheat as directed for the best flavor. For the full recipe, check out the details above. To keep chicken juicy, marinate it well. Use a mix of olive oil and lemon juice. This blend helps lock in moisture. Cook it quickly over medium-high heat. Avoid overcooking to keep it tender. A meat thermometer helps too. Aim for an internal temperature of 165°F (74°C). Marinate chicken for at least one hour. For the best taste, marinate overnight. This time lets the flavors soak in deeply. Use a covered bowl in the fridge for best results. Remember, more time means more flavor! Yes, you can make Chicken Souvlaki Skewers without a grill. Use a grill pan on the stove instead. You can even bake them in the oven at 400°F (200°C). Just place the skewers on a baking sheet. Cook until they reach 165°F (74°C). Enjoy them just as much as grilled ones! For the full recipe, check out the complete guide. In this post, we explored how to make delicious chicken souvlaki skewers. We covered key ingredients, marinade tips, and grilling techniques. You learned about storage options and even ways to switch up the recipe. My final thoughts are to have fun with this dish. Souvlaki is versatile and easy to adapt. Try different flavors and proteins. Enjoy cooking and sharing your tasty creations!

Savory Chicken Souvlaki Skewers Easy and Tasty Treat

If you’re looking for a tasty and easy meal, these Chicken Souvlaki Skewers are for you! With just a few

- 2 medium sweet potatoes, peeled and diced - 1 can (400 ml) coconut milk - 1 can (400 g) chickpeas, drained and rinsed Sweet potatoes bring a sweet, earthy flavor. They also add a creamy texture. Coconut milk adds richness and a hint of sweetness. Chickpeas provide protein and a hearty bite. Together, they create a balanced and filling dish. - 2 tablespoons red curry paste - 2 cloves garlic, minced - 1 inch ginger, grated - 1 tablespoon lime juice Red curry paste gives the dish its spicy kick. Garlic adds a robust flavor, while ginger gives warmth. Lime juice brightens the curry and adds a zesty twist. These spices work together to create a rich, comforting flavor. - 1 large onion, chopped - 1 bell pepper, diced (any color) - 1 tablespoon olive oil Onion adds sweetness and depth. Bell pepper adds color and crunch. Olive oil helps sauté the vegetables, enhancing their flavors. Each ingredient plays a role in making this curry a delightful experience. You can find the full recipe to make this dish easily. 1. Start by peeling the sweet potatoes. Use a sharp peeler for best results. 2. Dice the sweet potatoes into small cubes. Aim for even sizes for even cooking. 3. Next, chop the onion until it is in small pieces. This adds great flavor. 4. Dice the bell pepper into small chunks. You can use any color you like. 1. In a large pot, heat the olive oil over medium heat. Wait for it to shimmer. 2. Add the chopped onion and sauté for about 5 minutes. Cook until it is soft and translucent. 3. Stir in the minced garlic and grated ginger. Cook for another minute until fragrant. 4. Add the red curry paste to the pot. Mix it well with the onions, garlic, and ginger. Cook for 2 more minutes while stirring. 5. Toss in the diced sweet potatoes and bell pepper. Stir to coat them with the spices. 6. Pour in the vegetable broth and coconut milk. Bring the mixture to a gentle simmer. 1. Cover the pot and let it simmer for about 15-20 minutes. Cook until the sweet potatoes are tender. 2. Stir in the chickpeas and lime juice. Cook for an additional 5 minutes to heat through. 3. Season with salt and pepper to taste. Adjust the seasoning to your liking. 4. Remove from heat and let it sit for a few minutes before serving. This easy method helps you create a warm and tasty Vegan Sweet Potato Curry. For the complete recipe, check the Full Recipe section. To achieve a creamy consistency in your curry, use full-fat coconut milk. This gives a rich texture and flavor. Stir it well into the pot to blend with the spices. For the best cooking times for sweet potatoes, cut them into small, even pieces. This helps them cook evenly and quickly. Simmer them for about 15 to 20 minutes until they're tender. When serving, place the curry in deep bowls. This makes it look inviting. Garnish with fresh cilantro for color. Serve with fluffy rice or warm naan for a hearty meal. You can also pair it with a simple side salad. A fresh cucumber salad offers a nice crunch and complements the curry well. Sweet potatoes are packed with vitamins A and C. They also provide fiber, which is good for digestion. Eating sweet potatoes can help you feel full longer. A vegan diet has many advantages. It can lower the risk of heart disease and improve overall health. Plus, it encourages eating a variety of fruits and veggies, which boosts your nutrient intake. {{image_2}} You can easily change the vegetables in this curry. Try adding carrots, peas, or zucchini. Each will bring a unique taste and texture. You can also swap chickpeas for lentils or black beans. These options add protein and fiber, making your dish even more filling. If you like heat, add more red curry paste. For a milder dish, use less. You can also add fresh herbs like basil or cilantro. These herbs can brighten the dish and add fresh notes. A squeeze of fresh lime juice can also enhance flavors. You can make this curry in different ways. The Instant Pot is quick and easy. It cooks the sweet potatoes perfectly in a short time. The stovetop method allows you to watch as it cooks and adjust flavors. A slow cooker is great for busy days. Just set it up in the morning, and dinner will be ready when you return. For the full recipe, follow the steps outlined above. Enjoy making your vegan sweet potato curry! You can store leftover vegan sweet potato curry in an airtight container. Make sure it cools down first. Place it in the fridge within two hours of cooking. This dish will last for about 3 to 5 days. When reheating, make sure it is heated all the way through. To freeze the curry, let it cool completely before packing. Use a freezer-safe container or bag. This way, you can store it for up to 3 months. When you're ready to eat, thaw it overnight in the fridge. Reheat it on the stove or in the microwave, stirring often. You can prepare this curry ahead of time for busy days. Cook a larger batch and divide it into portions. Store them in individual containers for quick meals. This makes it easy to grab and heat when you need something tasty and healthy. This way, you always have a comforting meal ready to enjoy! What to serve with Vegan Sweet Potato Curry? I love serving Vegan Sweet Potato Curry with fluffy rice or warm naan. Rice soaks up the rich sauce. Naan adds a nice touch of flavor. You can also add a fresh salad on the side for crunch. Can I make this curry gluten-free? Yes, this recipe is easily gluten-free! Just ensure you use gluten-free naan or rice. Most red curry pastes are gluten-free, but check the label to be sure. How to make it spicier? To add heat, try using extra red curry paste. You can also add sliced fresh chili peppers. If you like it really hot, sprinkle in some cayenne pepper to taste. Ways to add protein to the dish Chickpeas are great, but you can also add tofu or tempeh. Cook the tofu until golden before adding it to the curry. You could also mix in edamame or lentils for extra protein. Caloric content per serving Each serving of Vegan Sweet Potato Curry has about 300 calories. This can vary based on portion size and added ingredients. Key vitamins and minerals benefits Sweet potatoes are rich in vitamin A, great for your eyes and skin. Chickpeas provide protein and fiber, helping you feel full. Coconut milk adds healthy fats, which keep your heart happy. This blog post covers delicious vegan sweet potato curry. We discussed main ingredients like sweet potatoes, coconut milk, and chickpeas. I shared cooking steps and tips for a perfect dish. You can adjust the spices and customize it easily. Remember to store leftovers correctly to keep them fresh. Overall, this recipe is not just tasty but also packed with nutrients. Enjoy making this dish for yourself or friends!

Vegan Sweet Potato Curry Flavorful Comfort Dish

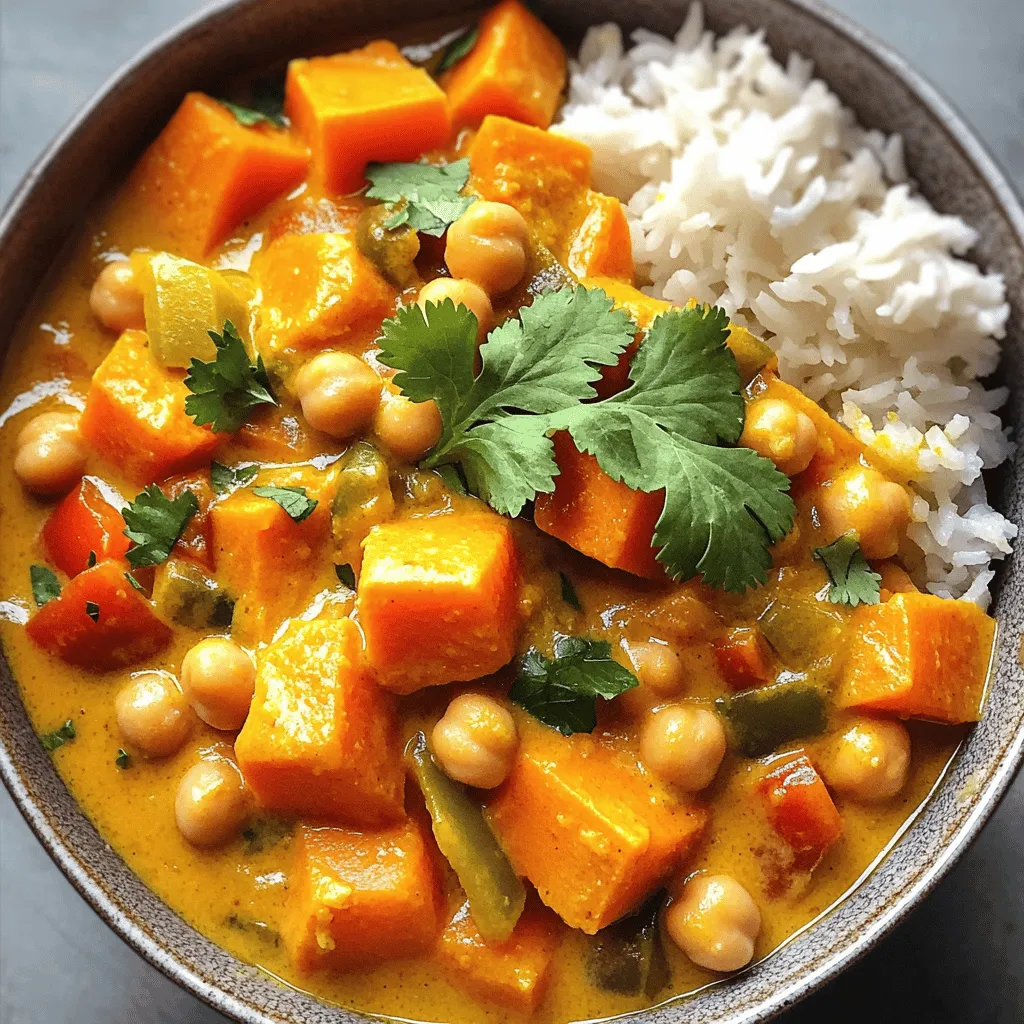
Looking for a warm, satisfying dish that’s easy to make? This Vegan Sweet Potato Curry is the answer! Packed with

- Chicken and Marinade Ingredients - 4 boneless, skinless chicken thighs - 1 tablespoon olive oil - 4 garlic cloves, minced - 1/4 cup honey - 1/4 cup soy sauce (low sodium) - 1 tablespoon apple cider vinegar - 1 teaspoon fresh ginger, grated - Salt and pepper to taste - Vegetables and Optional Sides - 1 cup broccoli florets - 1 cup bell pepper, sliced (red or yellow) - 1 cup jasmine rice (optional, for serving) - Garnishing Ingredients - Sesame seeds - Green onions for garnish These ingredients come together to create a dish that bursts with flavor. The honey adds sweetness, while garlic and ginger bring warmth. The chicken thighs stay juicy and tender. You can mix in your favorite veggies, too. Broccoli and bell peppers work great here. If you want to serve it with rice, jasmine rice is a perfect match. For the full recipe, check the details above. Enjoy the simple yet delicious flavors of this one-pan meal! To start, you need to create a tasty marinade. In a small bowl, combine these ingredients: - 1/4 cup honey - 1/4 cup low-sodium soy sauce - 1 tablespoon apple cider vinegar - 4 minced garlic cloves - 1 teaspoon grated fresh ginger Mix these well until the honey blends in. Set aside half of this marinade for later. Now, take 4 boneless, skinless chicken thighs and place them in a shallow dish or zip-lock bag. Pour the honey garlic marinade over the chicken, making sure to coat each piece. Let the chicken marinate for at least 30 minutes. If you have more time, letting it sit for up to 2 hours will make it even tastier. Next, it’s time to cook. Heat 1 tablespoon of olive oil in a large skillet over medium heat. When the oil is hot, take the chicken from the marinade, letting any extra drip off. Sear the chicken thighs for about 5 minutes on each side, until they turn a nice brown color. After browning, lower the heat to medium-low. Now, pour the reserved marinade over the chicken. Cover the skillet and let it cook for another 10 to 15 minutes. Use a meat thermometer to check if the chicken is done. It should reach an internal temperature of 165°F (75°C). In the last 5 minutes, add the vegetables. Use 1 cup of broccoli florets and 1 cup of sliced bell peppers. Toss them gently in the sauce, cover again, and let them steam until they are tender. If you want to serve this dish with rice, prepare 1 cup of jasmine rice according to the package instructions. While the chicken and veggies are cooking, you can do this. Once everything is ready, remove the skillet from heat. Allow the chicken to rest for a few minutes before slicing. Serve the chicken on rice, spooning the delicious sauce and vegetables over the top. For a nice touch, garnish with sesame seeds and sliced green onions. Enjoy your one-pan honey garlic chicken! For the complete recipe, refer to the Full Recipe section. Optimal Marinade Time For the best flavor, marinate the chicken for at least 30 minutes. If you have time, let it sit for up to 2 hours. This longer time helps the chicken soak up all that tasty honey garlic flavor. Using a Zip-Lock Bag for Effective Marinating Using a zip-lock bag makes marinating easy. It fits well in the fridge and saves space. Plus, it helps the marinade coat the chicken evenly. Just be sure to remove the air before sealing. How to Achieve Perfectly Tender Chicken To get tender chicken, avoid cooking it on high heat. Start by searing the chicken on medium heat until golden brown. This keeps the inside juicy. Use a meat thermometer to check for a safe internal temperature of 165°F. Tips for Cooking Vegetables Thoroughly Add your vegetables in the last 5 minutes of cooking. This way, they stay crisp and vibrant. Toss them in the sauce for extra flavor. Make sure to cover the skillet to steam them well. Pairings with Rice or Other Sides Serve your honey garlic chicken with jasmine rice for a complete meal. You can also try quinoa or whole grain rice. The grains soak up the sauce and balance the flavors. Presentation Ideas for the Dish For a nice look, slice the chicken before serving. Place it over the rice, then spoon the sauce and veggies on top. Sprinkle sesame seeds and green onions for a pop of color. This makes your dish not only delicious but also Instagram-worthy. For the full recipe, check out the One-Pan Honey Garlic Chicken section. {{image_2}} You can change the chicken to suit your taste. Try using turkey or tofu. Both options work well with the honey garlic sauce. For veggies, you have plenty of choices. Swap the broccoli for green beans or snap peas. Add carrots or zucchini for more color and flavor. You can even toss in mushrooms for a nice earthy taste. Want to spice things up? Add some red pepper flakes or a dash of sriracha. These will give your dish a nice kick. If you want to change the sauce, think about adding lime juice or hoisin sauce. These can add a fresh twist to the classic flavor. You could also try a splash of orange juice for a fruity note. You can serve this dish in different ways. Try making wraps with tortillas or lettuce. Just add the chicken and veggies, then roll it up. Another idea is to serve it as a stir-fry. Just toss everything in a hot pan with some cooked noodles. This way, you get a different texture and taste. Check the full recipe for more ideas on how to enjoy this meal! Refrigeration Guidelines Store any leftover one-pan honey garlic chicken in an airtight container. It will last about 3 to 4 days in the fridge. Make sure the chicken and veggies cool down before you seal them up. This keeps them fresh and tasty. Freezing Instructions If you want to save it for later, you can freeze the chicken. Place the cooled chicken and veggies in a freezer-safe bag or container. It stays good for about 2 to 3 months. When you’re ready to eat it, let it thaw in the fridge overnight. Best Practices for Reheating Chicken When reheating, the best way is to use the stove. Heat a skillet over medium heat. Add a splash of water or chicken broth to keep it moist. Stir the chicken and veggies until they are hot all the way through. You can also use a microwave, but be careful. Heat in short bursts to avoid drying it out. Ensuring Vegetables Retain Freshness To keep the veggies crisp, don’t overheat them. Just warm them until they are hot but still bright in color. If you reheat them too long, they can get mushy. This way, you enjoy the flavors and the crunch! What is the best type of chicken to use? I recommend using boneless, skinless chicken thighs. They stay juicy and tender. They soak up the honey garlic flavor very well. However, you can also use chicken breasts if you prefer a leaner option. Can I make this dish ahead of time? Yes, you can prepare the marinade and marinate the chicken a day before. This saves time on busy nights. Just store the marinated chicken in the fridge until you are ready to cook. How do I know when the chicken is fully cooked? The chicken is ready when it reaches an internal temperature of 165°F (75°C). Use a meat thermometer to check. The juices should run clear, not pink. Can I use different sweeteners instead of honey? Yes, you can use maple syrup or agave nectar. Both options work well and provide a similar sweetness. Adjust the amount to match your taste preference. How can I make this dish lower in sodium? Use low-sodium soy sauce to cut down on salt. You can also reduce the amount of soy sauce in the recipe. Adding fresh herbs can enhance the flavor without extra salt. How should leftovers be stored? Store leftovers in an airtight container. Place them in the fridge for up to three days. For longer storage, freeze them in a freezer-safe container for up to three months. Can this recipe be doubled for larger servings? Absolutely! You can double the ingredients easily. Just make sure your pan is big enough. Cook the chicken in batches if needed to ensure even cooking. This blog post covers all you need to make One-Pan Honey Garlic Chicken. We explored the ingredients, marinating tips, cooking steps, and serving suggestions. We also discussed variations and storage methods to help you customize and keep your dish fresh. In my view, this recipe is simple yet delicious. With just a few steps, you can create a meal that everyone will love. Use the tips provided to make it your own. Enjoy cooking!

One-Pan Honey Garlic Chicken Easy Weeknight Meal

Looking for a quick and tasty meal? One-Pan Honey Garlic Chicken is your answer! This easy weeknight dish combines juicy

- 2 large heads of broccoli, cut into florets - 3 tablespoons olive oil - 5 cloves garlic, minced - 1 lemon, zested and juiced - 1 teaspoon red pepper flakes (optional) - Salt and pepper to taste - 2 tablespoons grated Parmesan cheese (optional) - Fresh parsley, chopped for garnish When I prepare Lemon Garlic Roasted Broccoli, I love using fresh ingredients. Fresh broccoli gives the best texture and flavor. You can find it at your local grocery store or farmer's market. If you want alternatives to broccoli, try using cauliflower or Brussels sprouts. Both work well and taste great when roasted. If you need a replacement for olive oil, you can use avocado oil or melted butter. Each adds a unique flavor. If you don’t have garlic, shallots or garlic powder can work in a pinch. Just adjust the amount to your taste. You can find all these ingredients at local grocery stores. Look for fresh broccoli and lemons in the produce section. Specialty food shops may offer organic options. If you prefer online shopping, many grocery delivery services can bring everything right to your door. Check your favorite online grocery store for the best deals. For the full recipe, refer to the earlier section. Enjoy cooking! Preheating the oven First, heat your oven to 425°F (220°C). This high heat helps the broccoli get crispy. Preparing the broccoli florets Take 2 large heads of broccoli and cut them into small florets. Make sure they are all about the same size. This helps them cook evenly. Combining ingredients In a big bowl, mix the broccoli florets with 3 tablespoons of olive oil, 5 cloves of minced garlic, the zest and juice of 1 lemon, and salt and pepper to taste. You can add 1 teaspoon of red pepper flakes if you like heat. Toss well to coat every piece. Spreading on the baking sheet Next, line a baking sheet with parchment paper. Spread the broccoli mixture evenly on the sheet. Make sure not to crowd them. This helps them roast better. Roasting time and temperature Put the baking sheet in your preheated oven. Roast for 20-25 minutes. Stir the broccoli halfway through. You want them tender with crispy edges. Adding Parmesan cheese After roasting, take the broccoli out of the oven. Sprinkle 2 tablespoons of grated Parmesan cheese on top while it's hot. Let it melt for a minute. Garnishing with parsley Finally, move the broccoli to a serving platter. Garnish it with fresh chopped parsley for a pop of color. Enjoy your delicious Lemon Garlic Roasted Broccoli with any meal! For the full recipe, check the recipe card. To create the best lemon garlic roasted broccoli, focus on texture and flavor. - Achieving the right texture: Roast broccoli at 425°F (220°C). This high heat helps it become tender yet crispy. Aim for a bright green color with slightly charred edges. Stir the broccoli halfway through cooking to ensure even roasting. - Ensuring flavors are balanced: Use fresh garlic and lemon for a bright taste. The olive oil helps carry these flavors throughout the dish. Adjust salt and pepper to fit your taste. If you like heat, add red pepper flakes for a kick. Avoid these errors to ensure your broccoli shines. - Overcooking broccoli: Keep an eye on the time. Broccoli cooks quickly, and overcooking makes it mushy. Aim for 20-25 minutes in the oven. You want it tender but still firm. - Not using enough oil or seasoning: Broccoli needs enough olive oil to roast well. This oil helps the flavors stick and enhances the dish. Don’t skip the seasoning, as it brings out the best in the broccoli. Lemon is a star in this dish. - Benefits of lemon: Lemon adds brightness and freshness. The acidity cuts through the richness of the olive oil. It also enhances the flavor of the broccoli. - Tips for zesting and juicing: Use a Microplane to zest the lemon easily. This tool gives you fine zest without any pith. For juicing, roll the lemon on the counter to soften it. Then, cut it in half and squeeze out the juice. This method helps extract more juice. For the full recipe, check out the Lemon Garlic Roasted Broccoli recipe and enjoy a fresh and flavorful side! {{image_2}} You can make Lemon Garlic Roasted Broccoli even better with fun add-ins. - Incorporating other vegetables: Try adding carrots, bell peppers, or cauliflower. They roast well and add color. Mix them in with the broccoli for a veggie medley. - Adding protein options: Add chickpeas or cooked chicken for a heartier dish. Toss them in the pan with the broccoli before roasting. This makes for a filling meal. Boost the taste of your roasted broccoli with different herbs and spices. - Different herbs and spices: Add thyme, basil, or oregano for a new twist. You can also try smoked paprika for a hint of smokiness. Just sprinkle them on before roasting. - Cheese variations: Swap out Parmesan for feta or goat cheese. These cheeses add a creamy texture and tangy flavor. Try mixing them in right after roasting for the best melt. How you serve Lemon Garlic Roasted Broccoli can change the meal. - Pairing with main dishes: This broccoli pairs well with grilled chicken or fish. It also complements pasta dishes and grains like quinoa. - Creative serving ideas: Serve it in a wrap or on a bed of rice. You can also top it on a salad for a crunchy, bright addition. These ideas make your meal more exciting. Explore the [Full Recipe] for more tips and tricks to make this dish shine! To keep your roasted broccoli fresh, store it in an airtight container. Make sure the broccoli has cooled completely before sealing it. This helps prevent steam build-up, which can make it soggy. The roasted broccoli lasts for about 3 to 5 days in the fridge. Just reheat it gently before serving. If you want to freeze your roasted broccoli, let it cool first. Then, place it in a freezer-safe bag or container. Remove as much air as possible to prevent freezer burn. When you are ready to eat it, thaw it overnight in the fridge. To reheat, place it in the oven at 350°F (175°C) for about 10-15 minutes. This helps keep its texture nice and crisp. You can easily add roasted broccoli to your weekly meal plans. It goes well with grains like quinoa or rice. You can also toss it into pasta dishes for extra flavor. For a fun twist, serve the broccoli cold as a salad. Just mix it with some cherry tomatoes, olives, and a simple vinaigrette. This way, you enjoy the lemon garlic flavor in a new way. For the full recipe, check out the [Full Recipe]. To make Lemon Garlic Roasted Broccoli, start by preheating your oven to 425°F (220°C). Next, cut two large heads of broccoli into florets. In a big bowl, mix the broccoli with three tablespoons of olive oil, five minced garlic cloves, lemon zest, and lemon juice. You can also add red pepper flakes, salt, and pepper. Toss everything well. Spread the broccoli on a baking sheet lined with parchment paper. Roast in the oven for 20-25 minutes, stirring halfway through. When done, sprinkle optional Parmesan cheese over the broccoli and let it melt. Finally, garnish with fresh parsley for a lovely touch. You can find the full recipe with detailed steps in the [Full Recipe]. Yes, you can roast broccoli without olive oil. You can use vegetable broth or water instead. This method will work but may not give the same crispy texture. If you want a richer flavor, try using melted butter or coconut oil. Both options can make your broccoli tasty, but each will change the final taste. Lemon Garlic Roasted Broccoli is very healthy. Broccoli is full of vitamins C and K. It has fiber, which helps digestion. Garlic also has many health benefits. It can boost your immune system and lower blood pressure. The lemon adds vitamin C too. Overall, this dish is nutritious and supports a healthy diet. Yes, you can use frozen broccoli for this recipe. Frozen broccoli is often picked at its peak freshness, which is a plus. However, it may release more water during cooking. This can make the broccoli a bit soggier than fresh ones. If you choose frozen, roast it for a few extra minutes to get a crispy texture. This blog post explored how to make Lemon Garlic Roasted Broccoli. We covered essential ingredients, substitutes, and where to find them. I shared step-by-step prep and cooking instructions, plus tips to ensure perfect roasting. We also looked at variations, storage, and answered common questions. In summary, this recipe is not only easy to follow but also adaptable. Enjoy this healthy dish as part of your meals. Whether you’re a beginner or a pro in the kitchen, roasting broccoli can be simple and rewarding.

Lemon Garlic Roasted Broccoli Fresh and Flavorful Side

Looking for a fresh and tasty side dish? Lemon Garlic Roasted Broccoli is your answer! This simple recipe brings out

- 2 cans black beans, rinsed and drained - 1 tablespoon olive oil - Fresh vegetables for topping These main ingredients form the heart of my spicy black bean tacos. The black beans provide protein and fiber. Olive oil adds richness and helps cook the veggies. Fresh toppings bring color and crunch. - Selection of spices for added heat - Gluten-free tortilla options - Alternative toppings and garnishes You can spice up the tacos with jalapeños or chili powder. If you need gluten-free options, use corn tortillas. For toppings, consider avocado, salsa, or fresh cilantro. You can make these tacos your own with just a few tweaks. For the full recipe, check out the complete cooking instructions. To start, you need to chop some fresh ingredients. First, take one small onion and finely chop it. Next, mince two cloves of garlic. For some heat, chop one jalapeño pepper, removing the seeds for less spice. After this, rinse and drain two cans of black beans in a colander. In a large skillet, heat one tablespoon of olive oil over medium heat. Once hot, add the chopped onion. Sauté the onion for about five minutes, or until it turns soft and clear. Stir in the minced garlic and jalapeño. Cook for another one to two minutes until you smell their nice aroma. Now it's time to add flavor. Toss in the rinsed black beans along with one teaspoon of ground cumin, one teaspoon of smoked paprika, and one teaspoon of chili powder. Season with salt and pepper to taste. Mix everything well and let it cook for about five to seven minutes. This step warms the beans and lets the spices blend. While the bean mixture cooks, grab your tortillas. Heat eight small corn or flour tortillas in a separate pan over medium heat. Warm each side for about thirty seconds until they feel soft and flexible. Now, you can assemble the tacos! Place a generous scoop of the black bean mixture in each tortilla. Top with one cup of shredded cabbage or lettuce, some slices of avocado, and a sprinkle of fresh cilantro. For extra zing, serve with lime wedges on the side for squeezing on top. Enjoy your spicy black bean tacos! For the complete cooking instructions, check the Full Recipe. You can change the spice level of your tacos easily. If you want a milder version, skip the jalapeño or remove the seeds. You can also add some diced bell pepper for sweetness. For those who love heat, try adding crushed red pepper flakes or extra jalapeños. A dash of hot sauce on top can bring the fire, too. To make your tacos vegan, you’re already on the right track! The black beans are plant-based. Just ensure that any toppings are also vegan. For a gluten-free meal, choose corn tortillas. Check the labels to make sure they are certified gluten-free. You can also use lettuce wraps instead of tortillas for a fresh twist. Pair your tacos with tasty sides for a full meal. Some great options include: - Mexican rice - Refried beans - Grilled corn on the cob You can also serve fresh salsa or guacamole on the side. For drinks, a cold limeade or Mexican beer works great. You can even try a fruity mocktail for a fun twist. These sides and drinks will make your meal more enjoyable. For the complete cooking instructions, check the Full Recipe. {{image_2}} You can easily switch up the protein in your tacos. Adding shredded chicken or beef gives a nice twist. Just cook your meat with the same spices as the black beans. It will mix well and add flavor. If you prefer plant-based options, try tofu. Firm tofu works best. Cut it into small cubes. Sauté it until golden brown. Season it just like the beans. This will add great texture and taste. Dressings and sauces can take your tacos to the next level. A drizzle of chipotle sauce adds a smoky kick. You might also enjoy a fresh lime crema for a zesty touch. Making your own salsa or guacamole is easy. For salsa, chop fresh tomatoes, onions, and cilantro. Mix in lime juice and salt. For guacamole, mash ripe avocados and mix in lime juice and salt. Both add freshness and flavor to your tacos. Use seasonal vegetables for added crunch and flavor. In spring, add fresh radishes or asparagus. In summer, grilled corn or zucchini shines. In fall, roasted sweet potatoes or squash make a tasty addition. You can also adapt your tacos for holidays. For Cinco de Mayo, add festive toppings like pickled onions and queso fresco. For a cozy winter meal, serve with warm, spiced beans and a side of hot cocoa. With these variations, you can enjoy spicy black bean tacos all year round! For the full recipe, check out the detailed cooking instructions. To keep your leftover tacos fresh, store them in an airtight container. This method helps keep the flavors locked in and prevents them from drying out. You can place the tacos in the fridge for up to three days. If you separate the filling from the tortillas, they will last longer. The tortillas can get soggy if stored together too long. When it’s time to reheat your tacos, the best method is using a skillet. Heat the skillet over medium heat. Place the tacos in the pan for about 2-3 minutes on each side. This method helps keep the tortillas crispy. You can also microwave them for about 30-45 seconds, but be careful not to overdo it. This can make the tortillas tough. Always check the filling to make sure it's hot. If needed, add a splash of water to keep them moist while reheating. Yes, you can make the bean mixture ahead of time. Here’s how: - Cook the black bean mix as directed in the recipe. - Let it cool completely. - Store it in an airtight container in the fridge for up to three days. When you're ready to eat, just reheat it in a pan. This saves time on busy nights! You have many tasty options! Here are some ideas: - Rice or quinoa: These grains complement the tacos well. - Chips and salsa: A classic snack that pairs nicely with the meal. - Guacamole: Creamy avocado adds great flavor. - Fresh fruit: Watermelon or mango can be refreshing. - Cold drinks: Try a light beer, iced tea, or lemonade. Yes, these tacos are packed with nutrition. Here’s why: - High fiber: Black beans are rich in fiber, which helps digestion. - Low fat: The ingredients keep the fat content low. - Vitamins and minerals: Toppings like avocado and cabbage add vitamins. Overall, this dish supports a healthy diet while being delicious. For the complete cooking instructions and details, check out the Full Recipe. Spicy black bean tacos are easy to make and fun to enjoy. You learned about the main ingredients, step-by-step cooking, and how to customize your dish. We explored ways to adjust spice levels and make your tacos vegan or gluten-free. Plus, we discussed flavorful sides and variations to keep meals exciting. Remember, leftovers can also shine! With these tips, you'll whip up tacos for any occasion. Enjoy creating your own tasty twists and share your favorites with friends!

Spicy Black Bean Tacos Quick and Tasty Meal

If you’re looking for a quick, tasty meal that packs a punch, you’ve found it! Spicy black bean tacos are

- Coconut milk: This creamy base adds rich flavor. It makes the parfait smooth and tasty. Choose full-fat for a richer taste or light for fewer calories. - Chia seeds: These tiny seeds absorb liquid and swell. They create a fun, pudding-like texture. Plus, they pack a nutritional punch with fiber and omega-3s. - Maple syrup: This natural sweetener balances the flavors. You can adjust the amount based on your sweetness preference. Honey is also a great option. - Granola: For a crunchy layer, sprinkle granola on top. It adds texture and makes the parfait more filling. Use your favorite kind or try a homemade version for extra flavor. - Fresh berries: Layer in more berries for added sweetness and color. Strawberries, blueberries, and raspberries work well. They provide vitamins and antioxidants, making this treat even healthier. - Fresh mint leaves: These leaves add a pop of color and a refreshing taste. Place a few on top for a lovely presentation. - Additional fruits: Consider adding sliced bananas or kiwi. They enhance the flavor and make your parfait look stunning. Choose fruits that are in season for the best taste. This Berry Coconut Chia Parfait is easy to make and fun to enjoy. You can find the full recipe above to get started! To make the Berry Coconut Chia Parfait, you first need to combine the ingredients. In a medium bowl, add the coconut milk, chia seeds, maple syrup, and vanilla extract. Whisk these ingredients together until they blend well. This step is key to getting a smooth texture. Next, cover the bowl with plastic wrap. You need to refrigerate the mixture for at least two hours. If you can, let it sit overnight. This chilling time allows the chia seeds to absorb the liquid and thicken the mixture. Once your chia pudding is ready, it's time to layer the parfait. Start by preparing your serving glasses. You can use jars or any clear glass you have. This allows you to see those beautiful layers. Now, it's time to layer the parfait. Begin with a layer of chia pudding at the bottom of each glass. Next, add a layer of mixed berries. You can use strawberries, blueberries, and raspberries for a colorful mix. Repeat these layers until your glasses are full. If you like, you can top each parfait with a sprinkle of granola. This adds a nice crunch. Finally, garnish with fresh mint leaves for a touch of color and freshness. When serving your Berry Coconut Chia Parfait, think about the presentation. Clear glasses show off the vibrant layers, making it look appealing. As for portion sizes, you can adjust based on your needs. This recipe serves two to four, depending on how big your glasses are. A small glass is perfect for a snack, while a larger one works well for breakfast. Enjoy every bite of this tasty treat! For the full recipe, check out [Full Recipe]. To get the best chia texture, chilling time is key. I recommend letting the chia mix chill for at least two hours. If you can wait overnight, that's even better! This allows the seeds to soak up the liquid and become plump. For mixing, use a whisk or fork. Mix well to avoid clumps. Stir the seeds into the coconut milk gently. This way, they spread evenly. If you find clumps after chilling, just stir again before serving. You can adjust the sweetness to fit your taste. If you want it sweeter, add more maple syrup or honey. Start with a small amount and taste as you go. You can also skip the sweetener if you prefer a less sweet treat. Try flavor variations too! Add a pinch of cinnamon or a splash of almond extract for a twist. You can even blend in a ripe banana for extra creaminess. Presentation makes your parfait shine! Use clear glasses or jars to show off the layers. I love using mason jars for their rustic look. For garnishing, fresh mint leaves add color and a pop of flavor. You can also sprinkle some granola on top for extra crunch. Layering is fun too! Alternate between chia pudding and berries to make it visually appealing. Enjoy creating your Berry Coconut Chia Parfait! For the full recipe, check out the detailed steps above. {{image_2}} You can switch up the coconut milk for other options. Almond milk works well. It gives a nutty flavor and is low in calories. Oat milk is another great choice. It adds creaminess and a slight sweetness. Both options keep the parfait tasty and healthy. Mixing fruits can change the whole vibe of your parfait. For a tropical twist, add mango, pineapple, and banana. This combo feels like a vacation in a glass. You can also use seasonal berries. Strawberries, blueberries, or raspberries brighten up the dish. They add natural sweetness and beautiful colors. If you're vegan, this parfait is already a fit. Use maple syrup for sweetness. For gluten-free needs, skip the granola or choose gluten-free options. You can still enjoy this treat without worry. Adjusting the recipe makes it friendly for many diets. To keep your berry coconut chia parfait fresh, refrigerate it right away. Make sure to store it in an airtight container. This will help keep all the flavors in and the parfait from drying out. Glass jars or plastic containers work well. They keep the parfait safe and easy to grab when you want a snack. In the fridge, your parfait lasts about 3 to 5 days. This is a great option for meal prep! Always check for signs of spoilage. If you see any mold or a strange smell, it's best to toss it. Fresh berries will go bad faster, so eat those layers first. If you have extras, don’t worry! You can use the chia pudding in smoothies or as a topping for oatmeal. Mix it into yogurt for a quick breakfast. You can also use leftover berries in salads or desserts. Get creative and enjoy every bite! For the complete method, check the Full Recipe. You can use different types of milk in this recipe. Almond milk works well if you want a nutty taste. Soy milk is a great dairy-free option too. If you need a nut-free choice, try oat milk. It provides a creamy texture without nuts. Chia pudding can stay fresh in the fridge for about five days. It’s best to store it in an airtight container. This keeps it from drying out and helps it stay tasty. If you notice any strange smells or colors, throw it away. Yes, you can prepare this parfait in advance. A night before serving is ideal. Just layer the chia pudding and berries in your glasses. Cover them well and store in the fridge. This way, the flavors mix nicely and save you time in the morning. You can find the Full Recipe to guide you through the steps. The parfait recipe combines simple ingredients like coconut milk and chia seeds. You learned how to layer the mixture for a stunning presentation. I shared tips to enhance texture and flavor, plus ideas for customization. Remember, this recipe is flexible. Use your favorite fruits and milks. Store it properly to enjoy fresh flavors later. With these ideas, you can create delicious parfaits that suit your taste. Enjoy making your next parfait!

Berry Coconut Chia Parfait Healthy and Tasty Treat

Are you ready to dive into a delicious and healthy treat? The Berry Coconut Chia Parfait is not just easy

- 1 lb boneless, skinless chicken thighs - Fresh vegetables: broccoli, bell pepper, carrot - Honey and soy sauce blend The chicken thighs give this dish a juicy texture. They cook quickly and absorb flavors well. Fresh vegetables add color and crunch. I love using broccoli for its nutrients. Bell peppers offer sweetness, and carrots bring a nice pop of color. The honey and soy sauce blend creates that sweet and savory taste we crave. - Garlic and ginger - Cornstarch for thickening - Vegetable oil for cooking Garlic and ginger add a fragrant kick. They make the dish aromatic and lively. Cornstarch helps thicken the sauce, making it stick to the chicken and veggies. Vegetable oil is perfect for stir-frying. It has a high smoke point and won’t burn easily. - Chopped green onions - Sesame seeds - Salt and pepper to taste Chopped green onions give a fresh, sharp flavor. They also brighten the dish’s look. Sesame seeds add a nutty crunch. I like to sprinkle them on top for texture. Don't forget salt and pepper. They enhance all the flavors in the dish. You can find the full recipe for precise measurements and steps. To make Honey Garlic Chicken Stir Fry, you will follow a few simple steps. Each step builds on the last, ensuring your dish turns out tasty and colorful. - Start by slicing 1 lb of boneless, skinless chicken thighs into strips. Thin strips cook fast and stay juicy. - Next, mince 2 cloves of garlic and 1 tablespoon of fresh ginger. These add great flavor. - For the veggies, julienne 1 carrot and slice 1 bell pepper into strips. Use any color bell pepper you like. - Heat 1 tablespoon of vegetable oil in a large skillet or wok over medium-high heat. The oil helps cook the chicken evenly. - Once the oil is hot, add the chicken strips. Stir-fry them until they are browned and cooked through, about 5-7 minutes. Make sure they are not pink inside. - After the chicken is cooked, remove it from the skillet and set it aside. - In the same skillet, add the minced garlic and ginger. Sauté them for about 30 seconds until they smell great. - Next, toss in the broccoli, bell pepper, and carrot. Stir-fry the vegetables for about 3-4 minutes until they are tender-crisp. You want them to still have a bit of crunch. - Return the chicken to the skillet with the veggies. Pour your honey-garlic sauce over everything. Toss well until all the ingredients are coated and the sauce thickens. This takes about 2 minutes. - Finally, remove the stir fry from the heat and serve it hot. You can garnish it with chopped green onions and sesame seeds for a nice touch. You can find the full recipe for detailed measurements and tips. Enjoy your cooking adventure! - Best temperature for stir-frying: Use medium-high heat. This keeps the chicken juicy and the veggies crisp. - Ensuring even cooking of ingredients: Cut all ingredients into similar sizes. This helps them cook at the same rate. Stir frequently to avoid burning. - Modifying sweetness and spice levels: If you like it sweeter, add more honey. For heat, try adding red pepper flakes. - Alternatives for soy sauce: Use coconut aminos for a soy-free option. You can also use tamari for a gluten-free choice. - Plating suggestions for appealing visuals: Serve the stir fry on a large white plate. This makes the colors pop. Drizzle extra sauce on top for a shiny finish. - Complementing sides like rice or noodles: Serve with steamed jasmine rice or thin rice noodles. They soak up the sauce well and add texture. For more tips, check the full recipe! {{image_2}} You can change the protein in this dish. Tofu works great for a vegetarian option. Shrimp adds a nice touch too. Try a mix of both if you want. For veggies, you can swap broccoli for snap peas or green beans. Cauliflower or zucchini also taste good in this stir fry. Use what you have on hand! Want to kick up the flavor? Add red pepper flakes for a spicy twist. You can also squeeze in some lime or lemon juice. This adds a fresh taste and balances the sweetness of the honey. Try adding chopped herbs like cilantro or basil for extra flavor. These small changes can make a big difference! If you're looking for gluten-free options, use tamari instead of soy sauce. It has a similar taste without gluten. For those watching sugar, use less honey or a sugar substitute. You can still enjoy this dish while keeping it healthy. Don't hesitate to adjust the recipe to fit your needs! For the full recipe, check out the details above. Store your leftover honey garlic chicken stir fry in an airtight container. Make sure it cools down to room temperature before sealing. This step helps keep it fresh. Glass containers or BPA-free plastic ones work well. Label the container with the date to track freshness. You can freeze cooked stir fry for up to three months. Place it in a freezer-safe bag or container. Remove as much air as possible to prevent freezer burn. To thaw, move it to the fridge overnight. For reheating, warm it in a skillet over medium heat until hot. You can also microwave it, stirring halfway through. In the fridge, your stir fry lasts about three to four days. If it develops an off smell or changes color, discard it. Also, if you see any mold, throw it away right away. Keeping an eye on these signs ensures your meals stay safe and tasty. You can find the full recipe in the article above. Honey Garlic Chicken Stir Fry is a delightful dish. It combines tender chicken with vibrant vegetables. The sauce blends sweet honey with savory soy sauce. This creates a tasty, sticky glaze that coats everything. You get a nice balance of flavors. The garlic gives it a warm, rich taste. The fresh ginger adds a hint of spice. Altogether, it’s a dish that pleases everyone at the table. You can easily make a vegetarian version of this stir fry. Swap the chicken for firm tofu or tempeh. These options provide a great texture. Use the same marinade for flavor. You can add more veggies, like snap peas or mushrooms. For a vegan option, use maple syrup instead of honey. This keeps the dish sweet and satisfying. Yes, you can make this recipe ahead of time. Prep the chicken and chop the veggies the night before. Store them in airtight containers in the fridge. You can also mix the sauce in advance. Just keep it sealed until you're ready to cook. When you’re ready to eat, it will save you time. This makes dinner easy and quick. Serve your Honey Garlic Chicken Stir Fry with steamed rice or noodles. Both options soak up the sauce well. You can also add a side of fresh salad. A light cucumber salad pairs nicely with the dish. If you want something crunchy, try serving it with spring rolls. These sides complement the stir fry perfectly. You can easily adjust the spice level to your taste. If you like it mild, skip the spices. For some heat, add red pepper flakes to the sauce. You can also include sliced jalapeños in the stir fry. Start with a small amount and taste as you go. This way, you can find your perfect balance. This blog post covered how to make a tasty Honey Garlic Chicken Stir Fry. We explored the main ingredients, seasonings, and garnishes that make it special. You learned step-by-step cooking instructions and useful tips to enhance your dish. We also discussed variations for dietary needs and ingredients you can swap. With these insights, you can create a meal that suits your taste. Enjoy making this dish your own!

Honey Garlic Chicken Stir Fry Flavorful Family Meal

Are you ready to whip up a dish that will win over your family? Honey Garlic Chicken Stir Fry is

- 1 ½ cups all-purpose flour - ½ cup unsweetened cocoa powder - ½ cup powdered sugar - ½ cup unsalted butter, softened - 1 large egg yolk - 1 tablespoon cold water To create the perfect crust, you'll need a few basic ingredients. Start with all-purpose flour and unsweetened cocoa powder for that rich chocolate flavor. The powdered sugar adds sweetness and helps with texture. Soften the unsalted butter for easy mixing. Then, you’ll need an egg yolk to bind everything together. A tablespoon of cold water helps form the dough. - 1 cup granulated sugar - 6 tablespoons unsalted butter, cubed - ½ cup heavy cream - 1 teaspoon sea salt Next, let’s make the salted caramel filling. You’ll need granulated sugar, which you will melt down to create that deep amber color. The cubed unsalted butter adds creaminess. Heavy cream brings everything together, making it smooth. Don’t forget the sea salt, which gives that perfect sweet-salty balance. - 1 cup semi-sweet chocolate chips - ½ cup heavy cream For the chocolate ganache, grab semi-sweet chocolate chips. They melt beautifully and taste rich. Combine them with heavy cream, which helps create a silky texture. This ganache tops the tart and adds a layer of indulgence. Gather these ingredients, and you’re one step closer to a delightful experience! {{ingredient_image_1}} To make the crust, start by gathering your ingredients. You will need all-purpose flour, cocoa powder, powdered sugar, softened butter, an egg yolk, and cold water. In a mixing bowl, combine 1 ½ cups of flour, ½ cup of cocoa powder, and ½ cup of powdered sugar. Add ½ cup of softened butter and mix until it looks crumbly. Next, add one egg yolk and 1 tablespoon of cold water. Mix until the dough forms a ball. Press the dough evenly into a 9-inch tart pan. Make sure to cover the bottom and sides well. Use a fork to prick the bottom. This helps the crust bake evenly. Place the crust in the refrigerator for 30 minutes. Preheat your oven to 350°F (175°C). Bake the crust for 15 minutes. After baking, let it cool completely. Now it's time for the salted caramel. Gather these items: granulated sugar, cubed unsalted butter, heavy cream, and sea salt. In a medium saucepan, add 1 cup of granulated sugar over medium heat. Stir constantly until the sugar melts and turns a deep amber color. This part is crucial, so keep an eye on it. Slowly whisk in 6 tablespoons of cubed unsalted butter until it melts. Then, gradually add ½ cup of heavy cream while stirring. Be careful as it may splatter. Once mixed, stir in 1 teaspoon of sea salt. Remove from heat and let it cool slightly. Pour the warm caramel into the cooled crust, spreading it evenly. Place it back in the refrigerator for at least 1 hour to set. For the chocolate ganache, you will need semi-sweet chocolate chips and heavy cream. In a small saucepan, heat ½ cup of heavy cream over medium heat until it starts to simmer. Remove it from heat and add 1 cup of chocolate chips. Stir until the mixture is smooth and glossy. This will give your tart a rich flavor. Pour the ganache over the salted caramel layer. Spread it evenly with a spatula, ensuring every bit is covered. After assembling the tart, return it to the refrigerator. Chill it for at least 2 hours or until set completely. This step is very important for the best texture. When you’re ready to serve, slice the tart into pieces. You can add a sprinkle of extra sea salt on top for that perfect finishing touch. Enjoy your delicious creation! To get a great crust, you need to mix the dry ingredients well. Blend the flour, cocoa powder, and powdered sugar. Use softened butter and mix until it looks crumbly. Don’t forget the egg yolk and cold water. This makes the dough stick together. Press the dough into the tart pan firmly. It should be even and smooth. Pricking the bottom helps it bake well. Chill the crust before baking for a better texture. To avoid crystals in your caramel, use a clean pan. Melt the sugar slowly over medium heat. Stir it gently and watch for a deep amber color. When you add butter, do it slowly to keep the mixture smooth. Adding cream can cause splatter, so be careful. Stir well after adding salt; this keeps the texture smooth. Let the caramel cool a bit before pouring it into the crust. For a smooth ganache, heat the cream until it simmers, but don’t boil it. Remove it from heat before adding the chocolate chips. Stir gently until it’s shiny and smooth. If it’s too thick, add a little more warm cream. Working quickly, pour the ganache over the cooled caramel. Spread it evenly for a nice finish. Chilling the tart after will help everything set nicely. Pro Tips Chill the Dough: For a flakier crust, make sure to refrigerate the dough for at least 30 minutes before baking. This helps the butter firm up and prevents the crust from shrinking. Monitor Caramel Color: When making the salted caramel, watch closely as the sugar melts. It can go from perfect to burnt quickly, so stir constantly and remove from heat as soon as it reaches a deep amber color. Use Quality Chocolate: The flavor of the ganache relies heavily on the chocolate used. Opt for high-quality semi-sweet chocolate chips for the best results. Let It Set: After assembling the tart, allow it to chill in the refrigerator for at least 2 hours. This ensures the layers firm up properly, making it easier to slice and serve. {{image_2}} You can enhance your tart with nuts. Try adding crushed pecans or walnuts. These nuts add a nice crunch. You can mix them into the crust for extra texture. If you prefer a topping, sprinkle nuts on the ganache. This variation gives a rich, nutty flavor that pairs well with chocolate. You can switch up the chocolate in the ganache. Dark chocolate brings a bold flavor. It balances well with the sweet caramel. If you love milk chocolate, use that for a creamier taste. White chocolate can also work, giving a sweet touch. Each choice changes the tart's flavor profile, making it exciting. Toppings can elevate your dessert further. Sea salt enhances the sweet and salty combo. Fresh berries add a pop of color and flavor. You can also use whipped cream for a light touch. Drizzle with caramel sauce for extra sweetness. These choices allow you to customize your tart based on what you like. To store leftover tart, cover it with plastic wrap or foil. Place it in the fridge. The tart stays fresh for up to three days. Make sure to keep it sealed. This helps prevent it from drying out. If you want, you can place it in an airtight container. This is a great option for longer storage. If you have extra tart, you can freeze it! First, slice it into pieces. Wrap each slice in plastic wrap tightly. Then, place the wrapped slices in a freezer bag. Make sure to remove as much air as possible. The tart can stay in the freezer for up to two months. When you are ready to eat, let it thaw in the fridge overnight. For the best taste, serve the tart cold. Remove it from the fridge about 10 minutes before serving. This helps soften the flavors. You can also sprinkle extra sea salt on top for added flair. If you froze the tart, let it thaw completely before serving. This ensures a smooth, creamy texture. Enjoy each bite of chocolate salted caramel tart! Yes, you can make the tart a day before serving. This gives the flavors time to develop. Just store it in the fridge. Cover it with plastic wrap to keep it fresh. You can use coconut cream for a dairy-free option. Regular milk works too but won’t be as rich. If you choose milk, add a bit of butter to increase the fat content. The caramel is ready when it turns a deep amber color. Stir the sugar constantly to avoid burning. A candy thermometer can help, aiming for 350°F (175°C). This recipe is not gluten-free due to the all-purpose flour. To make it gluten-free, use a gluten-free flour blend. This will keep the crust light and tasty. This blog post covered all you need for a tasty tart. We talked about ingredients like the perfect crust, salted caramel, and smooth chocolate ganache. I shared tips to avoid common mistakes and showed fun variations you can try. Don’t forget the best ways to store any leftovers. With these steps, you can impress your friends and family with this dessert. Enjoy making and sharing your new favorite tart!

Chocolate Salted Caramel Tart Irresistible Delight

Indulging in a Chocolate Salted Caramel Tart is the ultimate way to treat yourself. With a crisp crust, sweet caramel,

For delicious chocolate chip zucchini muffins, you will need a few simple ingredients. Here’s the list: - 1 cup grated zucchini (about 1 medium zucchini) - 1 cup all-purpose flour - 1/2 cup whole wheat flour - 1/2 cup granulated sugar - 1/4 cup brown sugar, packed - 1/2 cup unsweetened applesauce - 2 large eggs - 1/3 cup vegetable oil - 1 teaspoon vanilla extract - 1 teaspoon baking soda - 1/2 teaspoon baking powder - 1/4 teaspoon salt - 1 teaspoon cinnamon - 1 cup semi-sweet chocolate chips These ingredients blend well to create moist muffins. Zucchini adds a nice texture while keeping the muffins light. The mix of sugars provides sweetness, and the applesauce helps to keep the muffins moist. Enjoy the rich flavors of chocolate chips that melt into each bite. {{ingredient_image_1}} - Preheat oven to 350°F (175°C). - Prepare muffin tin with liners or cooking spray. In a large bowl, combine: - 1 cup grated zucchini - 1/2 cup unsweetened applesauce - 2 large eggs - 1/3 cup vegetable oil - 1 teaspoon vanilla extract Whisk these ingredients together until they blend well. The zucchini adds moisture and flavor. In another bowl, mix together: - 1 cup all-purpose flour - 1/2 cup whole wheat flour - 1/2 cup granulated sugar - 1/4 cup brown sugar, packed - 1 teaspoon baking soda - 1/2 teaspoon baking powder - 1/4 teaspoon salt - 1 teaspoon cinnamon Stir until everything is well combined. This mix gives the muffins their structure and sweetness. Gently fold the dry ingredients into the wet mixture. Do not overmix; a few lumps are okay. This step keeps the muffins light and fluffy. Then, fold in: - 1 cup semi-sweet chocolate chips This adds a rich, chocolatey touch that makes these muffins irresistible. Scoop the batter into the prepared muffin tin. Fill each cup about two-thirds full. Bake in your preheated oven for 18-20 minutes. Check for doneness with a toothpick; it should come out clean. Once baked, remove the muffins from the oven. Let them cool in the pan for about 5 minutes. Then, transfer them to a wire rack. Cooling helps them set and makes them easier to handle. Enjoy these muffins warm, or store them for later! To get the best muffins, avoid overmixing your batter. When you mix too much, the muffins can turn out dense. It’s fine if some lumps remain. Just stir until the flour disappears. Checking for doneness is easy. Stick a toothpick in the center. If it comes out clean, your muffins are ready. To keep your muffins fresh, store them in an airtight container. This keeps moisture in but prevents them from getting soggy. You can also wrap them in plastic wrap for extra protection. If you want a warm muffin later, pop it in the microwave for 10-15 seconds. This brings back the soft texture. Serve your muffins warm with a light dusting of powdered sugar. This adds a lovely touch. You can also pair them with cream cheese spread. This creaminess balances the sweetness of the chocolate. Your guests will love it! Pro Tips Use Fresh Zucchini: For the best flavor and moisture, choose fresh, firm zucchini. Grating it just before using will ensure maximum freshness. Don’t Overmix: Mix the batter until just combined to keep the muffins tender. A few lumps are perfectly fine! Experiment with Add-Ins: Feel free to customize your muffins by adding nuts, dried fruit, or even a sprinkle of sea salt on top before baking for extra flavor. Storing Muffins: Store your muffins in an airtight container at room temperature for up to 3 days or freeze them for longer shelf life. Just reheat before serving! {{image_2}} - Use whole wheat flour instead of all-purpose flour. This swap adds fiber and nutrients. - Substitute oil with applesauce. It cuts fat while keeping muffins moist and sweet. - Add nuts like walnuts or pecans for crunch. Dried fruits like raisins or cranberries work well too. - Experiment with spices. Nutmeg or ginger can elevate the flavor profile. - For gluten-free muffins, use a gluten-free flour blend. This keeps the texture light and fluffy. - Replace eggs with flaxseed meal or chia seeds for vegan muffins. Use non-dairy milk instead of regular milk. Zucchini is a great food choice. It is low in calories and high in fiber. This helps keep you full without extra calories. One medium zucchini has about 33 calories. It also packs a punch with vitamins and minerals. You will find vitamin C, vitamin A, and potassium. These nutrients are important for your body’s health and energy. Using applesauce in recipes is smart. It helps cut back on sugar and fat. By using applesauce, you can reduce sugar by half. This keeps the muffins sweet without being too sugary. Applesauce adds moisture, making muffins soft and flavorful. It also gives a slight fruity taste that pairs well with chocolate. Adding zucchini to your baked goods is a game-changer. Zucchini enhances the texture of muffins. It makes them moist and fluffy. Plus, it boosts the nutritional value without changing the taste. You can enjoy delicious treats while sneaking in extra veggies. This is a great way to get kids to eat more healthy foods! Yes, you can use frozen zucchini. First, thaw it completely. After thawing, drain the excess water. This step is important. Too much moisture can make the muffins soggy. Once drained, you can add the zucchini just like fresh. You can check for doneness with a toothpick. Insert it into the center of a muffin. If it comes out clean, the muffins are done. You might also notice a nice golden color on top. They should bounce back slightly when you touch them. Absolutely! You can try nuts for a crunch. Chopped walnuts or pecans work well. Dried fruits like raisins or cranberries add sweetness. You could also use white chocolate chips for a fun twist. These muffins stay fresh for about four days at room temperature. If you want them to last longer, freeze them. Just wrap each muffin in plastic wrap. They can stay in the freezer for up to three months. When you want one, let it thaw at room temperature. In this post, we explored how to make delicious chocolate chip zucchini muffins. You learned about the ingredients, steps, tips, and variations. Zucchini adds moisture and nutrients while keeping the muffins light and tasty. Try these muffins for a healthy treat that everyone will love. Enjoy baking and sharing these yummy, nutritious goodies!

Chocolate Chip Zucchini Muffins Irresistible Recipe

If you’re looking for a tasty way to sneak more veggies into your diet, you’re in the right place! These

- 2 medium sweet potatoes, peeled and cubed - 1 tablespoon olive oil - 1 teaspoon smoked paprika - 1/2 teaspoon ground cumin - Salt and pepper to taste - 1 can (15 oz) chickpeas, drained and rinsed - 2 cups cooked quinoa - 1 avocado, sliced - 1 cup baby spinach - 1/4 cup tahini - 2 tablespoons lemon juice - 2 tablespoons water (to thin the tahini) - Sesame seeds for garnish Sweet potatoes and chickpeas are the stars of this bowl. Sweet potatoes give a sweet flavor and creamy texture. Chickpeas add protein and fiber, making the dish filling. Quinoa serves as a hearty base. It cooks quickly and has a nutty taste. Avocado adds creaminess and healthy fats. Baby spinach brings fresh crunch to each bite. For the tahini dressing, you mix tahini, lemon juice, and water. This dressing ties all the flavors together in a rich and zesty way. - Additional vegetables like bell peppers or carrots - Grains such as brown rice or farro - Toppings like nuts, seeds, or herbs You can customize your Buddha bowl with more veggies or grains. Try adding roasted bell peppers or crunchy carrots. These options boost flavor and nutrition. Add toppings like seeds or nuts for a nice crunch. Fresh herbs can also brighten up the meal. Sweet potatoes are rich in vitamins A and C. They support eye health and boost your immune system. Chickpeas are high in protein and fiber. They help keep you full and satisfied. Quinoa is a complete protein source. It contains all nine essential amino acids. Avocado is full of healthy fats that can lower bad cholesterol. Together, these ingredients make a balanced meal. For the complete recipe, check out the Full Recipe section. 1. Preheating the oven and preparing the baking sheet Start by setting your oven to 425°F (220°C). This high heat helps the sweet potatoes get crispy. Line a baking sheet with parchment paper for easy cleanup. 2. Tossing sweet potatoes with seasonings Peel and cube the sweet potatoes. In a mixing bowl, add the sweet potatoes. Pour in 1 tablespoon of olive oil. Sprinkle 1 teaspoon of smoked paprika and 1/2 teaspoon of ground cumin over the top. Add salt and pepper to taste. Toss everything until the sweet potatoes are well coated. 1. Timing and indicators for perfect texture Spread the seasoned sweet potatoes in a single layer on the baking sheet. Roast in the oven for 25-30 minutes. You want them to be tender and golden brown when done. 2. Flipping technique for even roasting Halfway through roasting, take the baking sheet out. Use a spatula to flip the sweet potatoes. This helps them cook evenly and get that nice brown color on all sides. 1. Layering quinoa and toppings In serving bowls, start with a base of cooked quinoa. Next, add the roasted sweet potatoes on top. Then, layer in the chickpeas, sliced avocado, and baby spinach. Arrange everything artfully for a colorful look. 2. Drizzling tahini dressing and garnishing To make the tahini dressing, mix 1/4 cup of tahini with 2 tablespoons of lemon juice and 2 tablespoons of water in a small bowl. Drizzle this dressing over the bowl. Finally, sprinkle sesame seeds on top for extra crunch. For the full recipe, check out the details above! To get the best roasted sweet potatoes, cut them into even cubes. Aim for about 1-inch pieces. This helps them cook evenly. Toss the cubes well with olive oil and spices. Use enough oil to coat them but not too much. Roast your sweet potatoes at 425°F (220°C) for 25 to 30 minutes. Flip them halfway through. This keeps them from sticking and helps them brown nicely. The perfect sweet potato is tender inside and crisp outside. Don't overcrowd the baking sheet; give them space to breathe. Common mistakes include not preheating the oven or using too little oil. Avoid cutting the sweet potatoes too small, as they can burn. Also, don’t skip flipping them during roasting. That way, they brown evenly and taste better. When serving your Buddha bowl, think about how to arrange the ingredients. Use deep bowls to create layers. Start with a base of quinoa, then add the roasted sweet potatoes. Place the chickpeas, avocado, and spinach on top. For color, mix dark greens, bright orange, and creamy avocado. This makes the dish pop. Add nuts or seeds for extra texture. A sprinkle of sesame seeds can bring a nice crunch. Drizzle the tahini dressing just before serving to keep it fresh and vibrant. For tahini dressing, start with the basic mix of tahini, lemon juice, and water. If you want it thicker, use less water. If you prefer a thinner dressing, add more water until you reach your desired texture. You can also add garlic or herbs for more flavor. Try mixing in a bit of maple syrup for sweetness or red pepper flakes for heat. Taste as you go to find the right balance that you enjoy most. This dressing not only enhances the bowl but adds a creamy richness that ties everything together. For the complete recipe, check out the [Full Recipe]. {{image_2}} You can add chicken, tofu, or fish to your Buddha bowl. For chicken, grill or bake it first. Cut it into bite-sized pieces. For tofu, press it to remove water. Then, cube it and bake until golden. If you choose fish, like salmon, cook it in a pan or oven until flaky. Cooking times will change based on the protein. Chicken usually needs 20-30 minutes at 375°F (190°C). Tofu may take about 25 minutes at the same temperature. Fish cooks faster, often in 15-20 minutes. Always check for doneness with a meat thermometer or fork. If you want to keep it vegetarian or vegan, swap out any animal products. Use a plant-based protein like tempeh or lentils instead of chicken. You can also use a vegan yogurt or cashew cream in place of tahini. For added protein, consider chickpeas, black beans, or edamame. They blend well with sweet potatoes and quinoa. This keeps your meal healthy and filling. Experiment with different seasonings for unique flavors. Try curry powder or chili flakes for some heat. You can also use fresh herbs like cilantro or parsley to brighten the dish. For dressings, explore options beyond tahini. A simple lemon vinaigrette works great. Combine olive oil, lemon juice, and a bit of honey or maple syrup for a sweet touch. You can even add a spicy sauce like sriracha if you like it hot. To keep your Roasted Sweet Potato Buddha Bowl fresh, store leftovers right away. Place your food in an airtight container. This keeps moisture in and air out. You can also use glass containers. They are safe and do not stain or hold odors. Make sure to refrigerate the bowl within two hours of cooking. This helps prevent any spoilage. When you want to enjoy your leftovers, reheating can be key. You can use a microwave or an oven for the best results. If you use a microwave, heat in short bursts. Stir between each burst to ensure even heating. For the oven, set it to 350°F (175°C). Place your bowl in the oven for about 10-15 minutes. This keeps your sweet potatoes and quinoa warm without making them mushy. If you want a crispy texture, consider reheating the sweet potatoes in a skillet for a few minutes. If you want to save time, you can freeze your Buddha Bowl. Assemble the bowl without the dressing and toppings. This keeps everything fresh. Use freezer-safe containers or bags. Make sure to remove as much air as possible. For best results, eat frozen bowls within three months. When you are ready to eat, thaw the bowl in the fridge overnight. Reheat it as mentioned before, and enjoy your quick meal! A Buddha Bowl is a meal served in a single bowl, filled with various ingredients. It often has grains, vegetables, proteins, and a dressing. The name comes from the idea that the bowl looks like a Buddha's belly. This dish has roots in many cultures and is popular for its balance of nutrition and flavor. Yes, you can make this dish ahead of time. Roast the sweet potatoes and cook the quinoa earlier in the week. Store them in sealed containers in the fridge. You can also prepare the tahini dressing in advance. Just give it a good shake before using. This makes meal prep easy and quick. If you do not have tahini, you can use peanut butter or sunflower seed butter. These alternatives provide a nutty flavor similar to tahini. Greek yogurt is another option for a creamy texture. Just keep in mind that each replacement will change the flavor a bit. This Roasted Sweet Potato Buddha Bowl is mostly gluten-free already. Use quinoa, which is gluten-free, as your base. Ensure that any tahini or other dressings are also gluten-free. Check labels on all packaged items to avoid gluten. This bowl is packed with nutrients. A serving has about 450 calories. It contains: - Sweet Potatoes: Rich in vitamin A and fiber. - Chickpeas: Good source of protein and iron. - Quinoa: Contains all nine essential amino acids. - Avocado: Healthy fats and potassium. - Spinach: Loaded with vitamins and minerals. These ingredients make the dish healthy and filling. For the full recipe, check out the [Full Recipe]. This article shared how to create a tasty Roasted Sweet Potato Buddha Bowl. You learned about the key ingredients like sweet potatoes, chickpeas, and quinoa. We explored tips for perfecting your roasting and assembling the bowl. There are also variations for meat eaters and vegans. Finally, I covered storage, reheating, and meal prep tips. Enjoy this healthy dish, knowing it’s simple and full of flavor. You can make it your own with different ingredients. Happy cooking!

Roasted Sweet Potato Buddha Bowl Healthy and Simple

Looking for a healthy and easy meal? You’ll love this Roasted Sweet Potato Buddha Bowl! It’s packed with sweet potatoes,

Older posts
Newer posts
← Previous Page1 … Page67 Page68 Page69 … Page84 Next →

dsad

© 2026 juliesdish • Built with GeneratePress

Our Policies

  • Copyright Policy
  • Cookie Policy
  • GDPR Policy
  • Privacy Policy
  • Disclaimer
  • Terms Of Use

More Information

  • Home
  • About
  • Contact
  • Appetizers
  • Dessert
  • Dinner
  • Drinks
©2026, juliesdish About Back To Top