Skip to content
DisclaimerTerms Of UseGDPR PolicyCookie Policy

juliesdish

  • Home
  • Drinks
  • Appetizers
  • Dinner
  • Dessert
  • About
  • Contact
  • Privacy Policy
DisclaimerTerms Of UseGDPR PolicyCookie Policy

NO-ING-IMG

Let’s gather all the tasty ingredients for chocolate dipped pretzel rods. Having everything ready makes cooking fun and easy. - 12 pretzel rods - 1 cup semi-sweet chocolate chips - 1 tablespoon coconut oil - 1/4 cup crushed nuts (almonds, pecans, or peanuts) - 1/4 cup colorful sprinkles - Sea salt (optional, for garnish) These ingredients create a delightful mix of sweet and salty. The pretzel rods give a nice crunch, while the chocolate adds a rich flavor. You can use different nuts or sprinkles to change things up. Each option brings a unique taste. Remember, you can find the Full Recipe for detailed steps to make this treat. Enjoy the process as you mix and match your favorite toppings! To start, you need to melt the chocolate. In a microwave-safe bowl, combine the chocolate chips and coconut oil. The coconut oil helps the chocolate stay smooth. Microwave this mix in 30-second bursts. Stir it after each interval. Keep microwaving until it is fully melted and smooth. This usually takes about 1 to 1.5 minutes. Next, get your baking sheet ready. Line it with parchment paper. This helps keep the pretzel rods from sticking. Make sure the parchment covers the whole sheet. Now, it's time to dip! Take one pretzel rod and hold it by one end. Dip the rod into the melted chocolate. Twist it to coat it well. Let any extra chocolate drip back into the bowl. Before the chocolate sets, roll or sprinkle the coated pretzel in crushed nuts or colorful sprinkles. Repeat this for all the pretzel rods. After dipping, place the chocolate-covered pretzel rods on the lined baking sheet. If you want, you can sprinkle a little sea salt on top for a nice touch. Now, chill them in the fridge for 15 to 20 minutes. This will help the chocolate set completely. For the full recipe, check out the earlier section. Using coconut oil makes a big difference. It helps the chocolate melt smoothly. This oil also keeps the chocolate shiny. Without it, your chocolate may seize up or become thick. Add one tablespoon of coconut oil for every cup of chocolate chips. This simple step gives you a nice, even coat. To evenly coat your pretzel rods, dip slowly. Hold the rod by one end. Swirl it gently in the chocolate. Let any extra chocolate drip back into the bowl. Then, roll it in your chosen toppings right away. If you wait, the chocolate can harden, and the toppings won't stick well. You can change up the toppings as you like. Try crushed cookies, toffee bits, or coconut flakes. You can also use different chocolates. White, dark, or milk chocolate all work great. For a fun twist, drizzle caramel or peanut butter on top. Get creative and have fun with your flavors! For more ideas, check out the Full Recipe for Chocolate Dipped Pretzel Rods. {{image_2}} You can use many types of chocolate for dipping. Milk chocolate gives a sweet taste. White chocolate adds a creamy flavor. Dark chocolate offers a rich and bold kick. Each type gives a unique twist to your pretzel rods. Try mixing them for fun! You can even create a colorful layer with the white chocolate. Adding extra flavors makes your pretzel rods stand out. A drizzle of caramel gives a nice touch of sweetness. Peanut butter adds a salty and nutty flavor that many love. You can get creative! Consider mixing melted chocolate with these flavors for a fun dip. It’s all about what you enjoy. You can make your pretzel rods match the seasons. For holidays, use festive colors like red and green for Christmas. Pastel colors work well for Easter. You can even sprinkle edible glitter for a special touch! These themes make your treats eye-catching for parties. Get inspired by the season and have fun decorating! To keep your freshly made chocolate dipped pretzel rods tasty, store them in an airtight container. Avoid stacking them to prevent smudging. Place a layer of parchment paper between each layer if needed. Keep the container in a cool spot, away from heat. This helps maintain their crunch and flavor. If you want to save some for later, you can freeze them. First, let the rods cool completely. Wrap each rod in plastic wrap to avoid freezer burn. Then, place them in a freezer-safe bag or container. Be sure to remove as much air as possible. They can last up to three months in the freezer. When you’re ready to eat them, thaw them in the fridge for a few hours. In an airtight container at room temperature, chocolate dipped pretzel rods stay fresh for about a week. If you store them in the fridge, they may last a little longer. However, make sure to check for any signs of moisture or spoilage. Always trust your senses; if they smell or look off, it’s best to toss them. To make chocolate-dipped pretzel rods, follow these simple steps: 1. Melt the Chocolate: Combine chocolate chips and coconut oil in a bowl. Microwave it until smooth, stirring often. 2. Prepare the Pretzel Rods: Line a baking sheet with parchment paper to avoid sticking. 3. Dip the Pretzels: Hold a pretzel rod and dip it into the melted chocolate, twisting to cover it. 4. Add Toppings: Roll or sprinkle the chocolate-coated pretzel with crushed nuts or colorful sprinkles before the chocolate sets. 5. Set the Chocolate: Place the pretzel rods on the baking sheet. Chill them in the fridge for about 15-20 minutes. 6. Serve: Enjoy your pretzel rods right away or store them in an airtight container for up to a week. Yes, you can use various types of chocolate for your pretzel rods. Here are some options: - Milk Chocolate: This gives a sweet and creamy taste. - White Chocolate: It adds a rich, sweet flavor and looks great. - Dark Chocolate: This option is less sweet and has a deep flavor. - Flavored Chocolates: Try mint or orange-flavored chocolate for a twist. Each type will change the taste, so pick what you love! You can find pre-made chocolate-dipped pretzel rods at many places. Here are some recommendations: - Local Bakeries: Many bakeries make their own versions. - Gourmet Stores: Look for specialty shops that focus on treats. - Online Retailers: Websites like Amazon or Etsy often have unique options. - Candy Stores: They usually stock a variety of chocolate-dipped pretzels. These options offer great flavors without the effort of making them at home. Making chocolate-dipped pretzel rods is fun and easy. You need just a few ingredients like chocolate chips, pretzel rods, and toppings. Melt the chocolate, dip the pretzels, and add your favorite toppings. Don’t forget to chill them to set. With these tips and tricks, you can create tasty treats for any occasion. Experiment with flavors and toppings to make them your own. Enjoy your sweet and salty snack!

Chocolate Dipped Pretzel Rods Delightful Crunchy Treat

Wow, are you ready to treat yourself? Chocolate dipped pretzel rods are a simple and fun snack. They blend sweet

- 1 lb small cremini or button mushrooms - 4 tablespoons olive oil - 4 cloves garlic, minced - Fresh herbs (thyme, rosemary, parsley) - Lemon zest and seasoning When choosing mushrooms, look for firm ones. They should feel smooth and not slimy. A good mushroom has a nice, rich color. Avoid ones with dark spots or wrinkles. If you can, go for organic mushrooms. They often taste better and are better for you. Organic farms use fewer chemicals, which is good for our planet. You need a baking sheet to roast the mushrooms. A good-sized mixing bowl helps mix all the ingredients together. Make sure you have parchment paper to line the baking sheet. This will make cleanup easy. You don’t want to scrub stuck-on bits after cooking! First, preheat your oven to 400°F (200°C). This temperature gives the mushrooms a nice roast. While the oven heats, clean your mushrooms. Use a damp cloth to wipe them. This keeps them fresh and ready for cooking. To coat the mushrooms well, use a large mixing bowl. Add the cleaned mushrooms, olive oil, minced garlic, thyme, rosemary, parsley, lemon zest, salt, and pepper. Toss everything together. Make sure each mushroom is covered. This helps the flavors mix well. If you see clumps, break them apart. An even coat makes a big difference in taste. Spread the mushrooms on a baking sheet in a single layer. This is key for even cooking. If they pile up, they won’t roast well. Place them in the oven and roast for 20-25 minutes. Remember to stir them halfway through. This helps them brown all over. When they are done, they should be tender and golden brown. Enjoy your garlic herb roasted mushrooms! For the full recipe, check the earlier section. Timing is key. Preheat your oven to 400°F (200°C). This high heat helps mushrooms brown nicely. Roast them for about 20 to 25 minutes. Stir halfway through to make sure they cook evenly. To check for doneness, look for a golden color. The mushrooms should be tender but not mushy. If they look dry, they may need a little more oil. You want them juicy and bursting with flavor. To boost flavor, try adding spices. A pinch of smoked paprika or red pepper flakes adds a nice kick. You can also use different oils. Instead of olive oil, try avocado oil for a unique taste. Experiment with other herbs too. Basil or oregano can add a fresh twist. Mixing flavors can create a new favorite. Serve these mushrooms warm for the best taste. Place them on a large platter for sharing. For a fancy touch, use small ramekins. Garnish with extra parsley for color. A squeeze of lemon juice brightens the dish. This adds freshness and balances the rich flavors. Enjoy the beauty of your creation! For the full recipe, check out the detailed steps above. {{image_2}} You can use many types of mushrooms for this dish. Portobello mushrooms are large and meaty. They add a nice texture. Shiitake mushrooms have a rich, earthy flavor. They can make the dish taste even better. Oyster mushrooms are delicate and have a mild taste. You can mix and match these mushrooms for a fun twist on the classic recipe. Feel free to change up the herbs. If you want a different flavor, try basil or dill. You can also use sage or tarragon for a unique taste. Fresh herbs work best, but dried herbs are fine too. Just remember to use less dried herbs, as they are stronger in flavor. This dish is easy to make vegan or gluten-free. Use vegetable broth instead of chicken broth for added flavor. For a gluten-free option, check that your oil and seasonings are gluten-free. You can also add nuts or seeds for extra crunch and protein. This way, anyone can enjoy the garlic herb roasted mushrooms! For the full recipe, check out the complete details above. Store leftover garlic herb roasted mushrooms in an airtight container. Keep them in the fridge for up to three days. This helps maintain their flavor and texture. If you notice any moisture, use a paper towel to absorb it. This will keep your mushrooms fresh longer. For freezing, let the mushrooms cool completely. Spread them on a baking sheet in a single layer. Freeze them for about one hour until firm. Then, transfer the mushrooms to a freezer-safe bag or container. They can last up to three months in the freezer. This method keeps them from sticking together. To reheat, you have two good options: the oven or the microwave. For the oven, preheat to 350°F (175°C). Spread the mushrooms on a baking sheet and heat for about 10 minutes. This keeps them crispy. For the microwave, place them in a microwave-safe dish. Heat for 30 seconds, then check. If they need more time, add 15-second intervals until warm. The oven gives better texture, but the microwave is quick! Enjoy these tips, and feel free to explore the [Full Recipe] for more details! Yes, you can use other herbs! Rosemary, thyme, and parsley work great together. If you want a twist, try basil or oregano. Dill gives a fresh taste while sage adds warmth. Feel free to mix and match based on your taste! Garlic roasted mushrooms can last up to 5 days in the fridge. Store them in an airtight container to keep them fresh. Always check for any signs of spoilage before using leftovers. Yes, you can prep garlic herb roasted mushrooms ahead of time! Clean and coat the mushrooms, then store them in the fridge for up to 24 hours. When ready to cook, just pop them in the oven. They reheat well, too. You can warm them in the oven or microwave. These mushrooms pair well with many dishes! Serve them as a side with grilled chicken or steak. They also complement pasta dishes nicely. For a vegetarian option, try them with quinoa or a fresh salad. They add a burst of flavor to any meal! For the full recipe of garlic herb roasted mushrooms, check out the detailed instructions above! To make garlic herb roasted mushrooms, you need just a few ingredients. Here’s a quick look at the key steps. - 1 lb small cremini or button mushrooms, cleaned - 4 tablespoons olive oil - 4 cloves garlic, minced - 1 teaspoon fresh thyme leaves, chopped - 1 teaspoon fresh rosemary, chopped - 1 teaspoon fresh parsley, chopped - Salt and black pepper to taste - Zest of 1 lemon 1. Preheat the Oven: Start by heating your oven to 400°F (200°C). This step is crucial for even roasting. 2. Mix Ingredients: In a bowl, mix the cleaned mushrooms with olive oil and garlic. Add the herbs, lemon zest, salt, and pepper. Toss everything well to coat the mushrooms. 3. Prepare the Baking Sheet: Line a baking sheet with parchment paper. This makes cleanup easy and helps the mushrooms roast evenly. 4. Roast the Mushrooms: Spread the mushrooms out on the baking sheet in a single layer. Roast them for 20-25 minutes. Stir halfway to ensure they cook evenly. 5. Check for Doneness: The mushrooms should be tender and golden brown when they are ready. If they need more flavor, taste and adjust the seasoning. You can find the full recipe in the earlier sections. Enjoy your flavorful side dish! In this article, we explored how to make delicious Garlic Herb Roasted Mushrooms. You learned about the ingredients, fresh mushroom selection, and needed equipment. I shared step-by-step instructions, tips for perfect roasting, and flavor variations. We also covered storage tips and answered common questions. Now you can enjoy tasty, roasted mushrooms anytime. The tips and tricks you learned will help you create a great dish. Get cooking and enjoy!

Garlic Herb Roasted Mushrooms Flavorful Side Dish

Looking for a side dish that packs a punch? Garlic Herb Roasted Mushrooms are bursting with flavor and easy to

To make Cheesy Baked Ziti, you need a few simple items. Each ingredient plays a key role. Here’s what you will need: - 12 oz ziti pasta - 2 cups marinara sauce - 1 cup ricotta cheese - 2 cups shredded mozzarella cheese - 1 cup grated Parmesan cheese - 1 large egg - 1 teaspoon dried Italian herbs (oregano, basil, thyme) - Salt and pepper to taste - Fresh basil leaves for garnish The ziti pasta is the base. It holds the sauce and cheese well. Marinara sauce adds flavor and moisture. Ricotta cheese gives a creamy layer. The shredded mozzarella melts nicely, while Parmesan adds a salty bite. The egg helps to bind the cheese mixture. Dried Italian herbs enhance the taste. Salt and pepper bring out the flavors of the dish. Finally, fresh basil makes a lovely garnish. This blend of ingredients creates a rich and comforting meal. For the full recipe, check out the detailed instructions. First, you need to cook the ziti pasta. Boil a big pot of salted water. Add the ziti and cook it until al dente. This means it should be firm but not hard. Follow the package instructions for the right time. After cooking, drain the pasta in a colander and set it aside. Next, grab a mixing bowl. In it, combine the ricotta cheese, half of the mozzarella, and half of the Parmesan. Then, add one large egg to the bowl. Toss in dried Italian herbs, salt, and pepper. Mix everything well until it's creamy and smooth. Now, it’s time to build your dish! Start by spreading a layer of marinara sauce at the bottom of a large baking dish. Layer half of the cooked ziti over the sauce. Then, add half of the cheese mixture on top and another layer of marinara sauce. Repeat this with the rest of the ziti, the remaining cheese mixture, and finally, the last of the marinara sauce. Cover the baking dish with aluminum foil. Bake it in a preheated oven at 375°F (190°C) for 20 minutes. After that, take off the foil. This helps the cheese brown nicely. Bake for another 15 to 20 minutes until the cheese is bubbly and golden brown. Let it cool for about five minutes. Garnish with fresh basil leaves before serving. Enjoy your cheesy baked ziti! Check out the Full Recipe for more details. Ovens can vary in heat. Check the bake time closely. I suggest starting with 20 minutes covered. Then, remove the foil and bake for another 15-20 minutes. Watch for the cheese to bubble and turn golden. If your oven runs hot, cut back on the time. If it runs cool, add a few more minutes. This way, your ziti will cook just right. Want to mix up the flavors? Try different cheeses! Instead of ricotta, you could use cottage cheese for a lighter taste. Swap mozzarella for provolone for a more robust flavor. You can even add goat cheese for a tangy twist. Each cheese brings its own charm to the dish. Experiment until you find your favorite combo! Pair your cheesy baked ziti with simple sides. A fresh green salad works great to balance the rich flavors. Garlic bread adds a nice crunch and is perfect for dipping. For a splash of color, consider adding some cherry tomatoes on top. Serve it all on a big plate for a cozy family meal. Enjoy every bite! {{image_2}} You can make Cheesy Baked Ziti a veggie delight. Adding vegetables like spinach or mushrooms boosts flavor and nutrition. Spinach adds a mild taste and bright color. Mushrooms bring an earthy depth. Just sauté them before mixing into the cheese filling. You can also use zucchini or bell peppers for variety. If you love meat, try a meat lover's twist. Incorporating ground beef or sausage makes the dish heartier. Brown the meat first to add rich flavor. Mix it with the marinara sauce before layering. This option is perfect for those who want extra protein in their meal. For those avoiding gluten, there are great pasta options. You can use gluten-free ziti or penne. They cook just like regular pasta and taste great too. Be sure to check the package for cooking instructions. This way, everyone can enjoy Cheesy Baked Ziti without worry. For the full recipe, visit the [Full Recipe]. To keep cheesy baked ziti fresh, store it in an airtight container. Make sure to cool the dish to room temperature first. Place the container in the fridge. It will last for about 3-5 days. If you want to keep it longer, consider freezing it. To reheat, use the oven for best results. Preheat the oven to 350°F (175°C). Cover the dish with foil to keep it moist. Heat for about 20-25 minutes. Check if it's warm throughout before serving. You can also use the microwave, but it may dry out. Heat in short bursts and stir in between. For freezing, wrap the dish tightly in plastic wrap. Then, place it in a freezer-safe bag. It can stay frozen for up to 3 months. When ready to eat, thaw in the fridge overnight. Reheat in the oven as mentioned above. This keeps the texture nice and cheesy. For the full recipe, check back on the ingredients list. Yes, you can make Cheesy Baked Ziti ahead of time. Prepare the dish up to the baking step. Cover it and store it in the fridge for up to two days. When ready to bake, let it sit out for about 30 minutes. Then, bake as normal. This makes weeknight dinners easy! You will know the cheese is melted when it looks bubbly and golden brown. After baking, the edges should be crisp, and the center hot. Try to resist peeking too soon! Let it rest for five minutes before serving, which helps the cheese set slightly. Yes, you can use other pasta types. Penne, shells, or fusilli work well too. Just cook them until al dente, just like ziti. This way, they hold their shape and soak up the sauce nicely. Feel free to get creative with your favorite pasta! This recipe serves six people. Each serving has about 450 calories, with 20 grams of protein and 25 grams of fat. It also has around 45 grams of carbs. These numbers can change based on your cheese and sauce choices. Always check labels for exact values. Yes, this recipe can be easily doubled. Just use a larger baking dish and increase the cooking time a bit. Check the center to make sure it is hot. You can also make two smaller dishes if you want to freeze one for later. Perfect for big family gatherings! You learned how to make cheesy baked ziti from start to finish. We covered all the ingredients, from pasta to cheese, and went through each step clearly. You can add variations for different tastes, including vegetarian and gluten-free options. Remember to store leftovers well and use the right methods to reheat. Cheesy baked ziti is a tasty dish that suits many occasions. Enjoy making this easy and delicious meal with your personal touch!

Cheesy Baked Ziti Comforting Family Dinner Idea

If you’re looking for a warm, cheesy dish that brings everyone together, you’ve found it! Cheesy baked ziti is the

- 1 cup rolled oats - 2 cups almond milk - 1/4 cup maple syrup - 1/2 cup Greek yogurt These are the key ingredients for maple pecan overnight oats. The rolled oats provide a hearty base. Almond milk adds creaminess. Maple syrup gives natural sweetness. Greek yogurt brings a nice tang and extra protein. - Dairy-free alternatives - Fresh fruit toppings - Additional sweeteners You can customize your oats with optional ingredients. Use a dairy-free yogurt if you want. Fresh fruit like bananas or berries adds great flavor and color. You could add more sweeteners too if you like it sweeter. - Serving sizes and conversions This recipe serves about 2-4 people. If you want more, simply double the ingredients. For smaller servings, cut the amounts in half. Measuring cups work well for accuracy. You can also use a kitchen scale if you prefer. For the full recipe, check out the detailed instructions. To make maple pecan overnight oats, start by mixing the base ingredients. In a bowl, combine: - 1 cup rolled oats - 2 cups almond milk (or any milk of choice) - 1/4 cup maple syrup - 1/2 cup Greek yogurt (or a dairy-free alternative) - 1/2 teaspoon vanilla extract - 1/2 teaspoon cinnamon - 1/4 teaspoon salt Stir well until everything is mixed together. This step is key, as it makes sure the oats soak up all the flavors. Next, fold in the pecans. Use 1/2 cup of roughly chopped pecans. This adds a nice crunch and rich taste to your oats. Once mixed, it’s time to store the oats. Divide the mixture into mason jars or airtight containers. Make sure to seal each jar tightly. This keeps the oats fresh. Place the jars in the refrigerator. Let them sit overnight, or for at least six hours. This soaking time is important. It softens the oats and melds the flavors. In the morning, take out your jars. Give the oats a good stir and check the sweetness. If you want more sweetness, add a bit more maple syrup. For toppings, I recommend fresh fruit. Bananas or berries work great. You can also add extra chopped pecans for more crunch. These final touches make your overnight oats not just tasty, but also beautiful to serve. Enjoy your delicious maple pecan overnight oats! For the full recipe, feel free to check the details above. To make the best overnight oats, you need the right mix of ingredients. The oats should absorb the liquid without being too runny. Start with a ratio of 1 part oats to 2 parts liquid. This will give you a creamy texture. Balancing flavors is key. Maple syrup adds sweetness, while pecans give a nice crunch. You can adjust the sweetness based on your taste. If you like it sweeter, add more maple syrup. If you want a nutty taste, add more pecans. One common mistake is using too little liquid. This will make your oats dry and hard. Always measure your liquid accurately. Another mistake is skipping the chill time. The oats need to soak to soften. If you don’t chill them long enough, your oats will be tough. Aim for at least 6 hours in the fridge. You can make your overnight oats even better! Try adding spices like nutmeg or ginger. These spices can brighten the flavor. Adding protein is another great idea. You could mix in some chia seeds or protein powder. This will help you feel full longer. You can also top your oats with fresh fruit like bananas or berries for extra nutrition. For the full recipe, refer to the earlier section on ingredients and instructions. {{image_2}} You can easily switch up the flavor of your maple pecan overnight oats. Here are two fun ideas: - Chocolate chip maple pecan: Add a handful of mini chocolate chips to your oats. The sweet and rich flavor pairs well with maple and pecans. - Tropical coconut pecan: Stir in some shredded coconut and use coconut milk instead of almond milk. This gives your oats a light and fruity taste. Making your oats fit your diet is simple. Here are some tips for common dietary needs: - Gluten-free options: Use certified gluten-free rolled oats. This ensures your oats are safe and delicious for those avoiding gluten. - Vegan substitutions: Replace Greek yogurt with a dairy-free yogurt. Almond milk is already vegan, so you’re halfway there! You can match your toppings to the season, making your oats feel fresh and fun: - Berry compote for summer: Top your oats with a warm berry compote. It adds a burst of flavor and color. - Pumpkin spice for fall: Mix in pumpkin puree and sprinkle pumpkin spice on top. This cozy flavor is perfect as the weather cools down. Try these variations to keep your maple pecan overnight oats exciting. For the full recipe, check out the details above! To keep your maple pecan overnight oats fresh, store them in airtight containers. This helps lock in flavor and moisture. The oats will stay good in the fridge for up to five days. If you want to enjoy them later, make sure to check for any signs of spoilage. If you prefer warm oats, you can easily reheat them. Simply transfer the oats to a microwave-safe bowl. Heat them in short bursts, stirring in between, until warm. Some people love their oats cold, which is great too! Just add your favorite toppings and dig in. You can freeze maple pecan overnight oats if you want to prepare them in advance. Just pour the mixture into freezer-safe containers. However, be cautious about texture changes when thawing. The oats might become a bit mushy. To enjoy, let them thaw in the fridge overnight before serving. Overnight oats can last up to five days in the fridge. Store them in airtight containers. Always check for any signs of spoilage before eating. I find they taste best within the first three days. Yes, you can make these oats vegan. Use almond milk and a dairy-free yogurt. Maple syrup already works for vegan diets. This way, you keep the creamy texture and sweet taste without dairy. You can use quick oats, but they will change the texture. Quick oats absorb liquid faster and can be mushy. Rolled oats give a better chew and hold their shape well. I recommend sticking with rolled oats for the best results. Yes, you can double the recipe. Just keep the same ratios for each ingredient. Use larger containers if needed. This way, you can meal prep for the week ahead and enjoy tasty oats every day. If you need a substitute for Greek yogurt, try coconut yogurt or silken tofu. Both options keep the creaminess and flavor. You can also use nut-based yogurts for a different twist. Each choice adds its own unique taste to your oats. This blog post covered how to make delicious overnight oats. We went over key ingredients, like rolled oats and almond milk, along with optional toppings. You learned how to prepare, store, and enhance your oats. The tips helped you avoid common mistakes and explore fun variations. Incorporate these ideas for tasty and nutritious breakfasts. Enjoy experimenting with flavors and feel proud of your creations!

Maple Pecan Overnight Oats Easy and Tasty Recipe

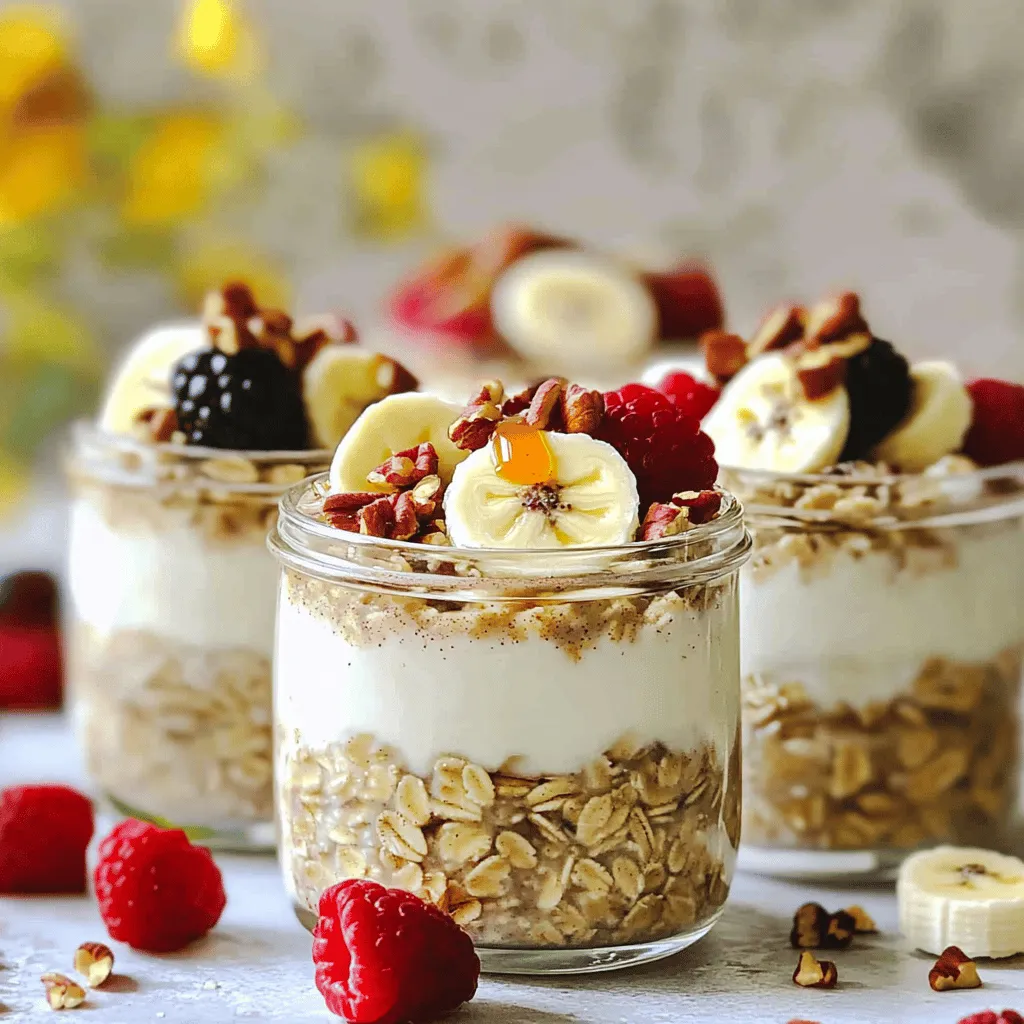
Are you looking for a quick and delicious breakfast? Look no further than Maple Pecan Overnight Oats! This easy recipe

To make a delicious veggie frittata, you need a few simple ingredients. Here’s what you will gather: - 6 large eggs - 1 cup spinach, chopped - ½ bell pepper, diced (any color) - ½ cup cherry tomatoes, halved - ¼ cup onion, finely chopped - ½ cup zucchini, diced - 1 tablespoon olive oil - ¼ cup feta cheese, crumbled - Salt and pepper to taste - Fresh herbs (parsley or basil) for garnish These fresh ingredients bring flavor and color to your dish. Eggs serve as the base, while the veggies add texture and nutrition. Feta cheese gives a nice salty bite, and fresh herbs brighten the taste. Using seasonal produce can enhance the dish. You can choose your favorite vegetables too. This frittata is versatile and lets you express your style in the kitchen. For the full recipe, check out "Garden Delight Veggie Frittata." 1. First, preheat your oven to 375°F (190°C). This step gets the oven ready for baking. 2. Next, grease a 9-inch oven-safe skillet. You can use cooking spray or a little olive oil to coat the bottom. 1. Heat the olive oil in the skillet over medium heat. 2. Add the chopped onion and diced bell pepper. Sauté them for about 3 to 4 minutes until they soften. 3. Then, add the diced zucchini and halved cherry tomatoes. Cook these for another 2 to 3 minutes until they start to soften. 4. Finally, stir in the chopped spinach. Cook until it wilts, about 1 to 2 minutes. 1. In a large bowl, whisk together the eggs. Season them with salt and pepper to taste. Set this aside. 2. Spread the veggie mixture evenly across the bottom of your skillet. 3. Pour the egg mixture over the veggies, making sure everything is covered. 4. Sprinkle the crumbled feta cheese on top. 5. Now, transfer the skillet to the preheated oven. Bake for about 15 to 20 minutes. The frittata is done when the eggs are set and the top is lightly golden. You can find the complete recipe in "Garden Delight Veggie Frittata." Enjoy your cooking adventure! - Use fresh vegetables for best flavor. Fresh veggies make your frittata bright and tasty. - Ensure even cooking by spreading veggies in the skillet. This helps them cook at the same rate. Toss them lightly before adding the eggs. - Garnish with herbs for presentation. Fresh parsley or basil adds color and taste. A little goes a long way. - Pair with mixed greens or a simple salad. This adds crunch and freshness to your meal. A light drizzle of olive oil enhances the dish's flavor. These tips keep your frittata delicious and appealing. Enjoy your cooking adventure! {{image_2}} You can mix up the frittata with different ingredients. If you want a change from zucchini, try using mushrooms or kale instead. Both add great flavor and texture. You can also switch out the cheese. Goat cheese or cheddar works wonderfully. Each cheese brings its own taste, making the dish unique. To boost the flavor, add fresh herbs like thyme or oregano. These herbs will give the frittata a nice aroma. Want some heat? Sprinkle in chili flakes or paprika. This little addition can change the whole dish. It makes it exciting and full of flavor. So, feel free to get creative with your veggie frittata! Store your veggie frittata in an airtight container. It will stay fresh for up to 3 days. This makes it easy for meal prep or quick snacks during the week. Just remember to let it cool before sealing it up. This helps keep moisture in check. When you want to enjoy your frittata again, reheating is simple. You can reheat slices in the oven or the microwave. If using the oven, set it to 350°F (175°C) and warm for about 10 minutes. In the microwave, heat in 30-second bursts. Be careful not to overcook it. Overcooking can make the eggs tough and rubbery. A quick warm-up will keep it fluffy and tasty. Enjoy every bite of your delicious creation! A veggie frittata generally lasts up to 3 days when stored properly. Store it in an airtight container. This keeps it fresh and safe to eat. Check for any signs of spoilage before consuming. If it smells off or looks strange, it's best to toss it. Yes, you can make a frittata ahead of time and store it. This makes meal prep easy and quick. Prepare your frittata on a Sunday, and enjoy it throughout the week. Just make sure to cool it down before storing. This helps keep the flavor intact. Cut the frittata into wedges and serve it warm or at room temperature. This dish is versatile. You can serve it for breakfast, lunch, or dinner. Pair it with a light salad or some crusty bread for a complete meal. For the detailed recipe, refer to "Garden Delight Veggie Frittata." You learned how to make a tasty veggie frittata with simple steps. We covered the ingredients, cooking tips, and variations to suit your taste. You can store it for up to three days, making it a great meal prep option. Enjoy this dish warm or at room temperature. Remember, cooking is about trying new things. Enjoy your time in the kitchen and get creative with flavors!

Easy Veggie Frittata Simple and Healthy Recipe

Looking for a simple, healthy meal? You’ll love this Easy Veggie Frittata recipe! Packed with fresh veggies and protein-rich eggs,

- 1 pound boneless, skinless chicken breasts - 1 cup buttermilk (or milk mixed with 1 tablespoon vinegar) - 1 cup all-purpose flour - 1 cup panko breadcrumbs - 1 teaspoon paprika - 1 teaspoon garlic powder - 1 teaspoon onion powder - 1 teaspoon salt - 1/2 teaspoon black pepper - 1/2 teaspoon cayenne pepper (optional for heat) - 2 large eggs, beaten - Vegetable oil (for frying) To make crispy chicken tenders, you need a few key items. Start with boneless, skinless chicken breasts. This cut cooks evenly and stays juicy. You can use buttermilk to soak the chicken. If you don’t have buttermilk, mix milk with vinegar. Next, gather the dry ingredients. All-purpose flour gives a great base for the crunch. Panko breadcrumbs add a light and crispy layer. They create a perfect texture when fried. Now, let's talk about flavor. Season your mixture with paprika, garlic powder, and onion powder. These spices give the chicken a warm and savory taste. Add salt and black pepper for balance. If you want heat, include cayenne pepper. Lastly, you need two eggs for coating and vegetable oil for frying. The oil helps achieve that golden brown color. For the full recipe, check the steps to bring this dish to life! - Start by soaking the chicken strips in buttermilk for at least 30 minutes. This step makes the chicken tender and juicy. The buttermilk adds flavor too. If you don't have buttermilk, mix regular milk with a tablespoon of vinegar. This will work just fine! - While the chicken soaks, prepare your coating station. You will need three bowls: one for the flour mixture, one for the eggs, and one for breadcrumbs. Place everything in a row to make the process smooth and easy. - In your first bowl, mix the dry ingredients. Combine all-purpose flour, paprika, garlic powder, onion powder, salt, black pepper, and cayenne pepper. This mix adds a punch of flavor to your tenders. - In your second bowl, crack the eggs and beat them lightly. This will help the breadcrumbs stick to the chicken. - Now, take the chicken out of the buttermilk. Let the excess liquid drip off. First, coat each strip in the flour mixture, shaking off any extra flour. Next, dip the chicken into the beaten eggs, ensuring it’s well-coated. Finally, roll the chicken strips in panko breadcrumbs. Press gently to ensure the crumbs stick well. - Heat about 1/4 inch of vegetable oil in a large skillet over medium-high heat. To check if the oil is hot enough, drop in a breadcrumb. It should sizzle right away. - Carefully add the breaded chicken tenders to the hot oil. Fry them in batches to avoid overcrowding. Cook for about 4-5 minutes on each side. Look for a golden brown color and ensure the chicken is cooked through. - Once done, transfer the chicken tenders to a paper towel-lined plate to drain excess oil. This helps keep them crispy and not greasy. For the full details on this delicious recipe, refer to the Full Recipe. Panko breadcrumbs are key to making your chicken tenders crispy. They are light and airy, which helps create a perfect crunch. Regular breadcrumbs can’t match that texture. For the best results, use fresh panko. Oil temperature matters, too. Heat the oil over medium-high heat. Drop a breadcrumb into the oil. If it sizzles, the oil is ready. If it’s too hot, the outside will burn before the chicken cooks. Too cool, and the chicken will absorb oil, making it greasy. Dipping sauces add fun to your meal. Try honey mustard, BBQ sauce, or ranch. Each sauce adds its unique flavor and makes every bite special. For presentation, serve your crispy chicken tenders on a colorful platter. Arrange them in a fan shape. Add fresh parsley for a pop of color. This not only looks great but also makes the meal feel special. Avoid overcrowding the pan when frying. If you add too many chicken strips, they will steam instead of fry. This leads to soggy tenders. Fry in small batches for the best results. After frying, let the chicken drain properly. Place the tenders on a paper towel-lined plate. This step helps remove excess oil and keeps your chicken crispy. If you skip this, your tenders may become soggy fast. For the full recipe, check out the detailed instructions above. {{image_2}} You can switch things up with different cooking methods. Baking chicken tenders is simple. Preheat your oven to 400°F (200°C). Place the breaded chicken on a baking sheet. Spray the tenders lightly with oil for a crispy finish. Bake for about 20 minutes, flipping halfway through. This method cuts down on oil and keeps them crispy. Air frying is another great option. Set your air fryer to 375°F (190°C). Arrange the chicken tenders in a single layer in the basket. Cook for about 10 to 12 minutes. Flip halfway to ensure even cooking. You will get a crunchy texture without frying in oil. Want to spice things up? You can make a spicy version by adding more cayenne pepper or your favorite hot sauce to the egg mixture. This adds a kick that many will enjoy. For a more herbal taste, try mixing dried herbs like thyme or oregano into the flour. These herbs give a fresh twist to your chicken tenders. If you want to make it healthier, consider using whole wheat flour. It adds fiber and nutrients. You can also use gluten-free flour if needed. This keeps the recipe inclusive for all diets. Baking instead of frying is another smart choice. It helps reduce calories and fat but still gives you tasty tenders. Explore these options to find what fits your needs! For the full recipe, check out the earlier section. To store leftover chicken tenders, let them cool first. Place them in a shallow container. Make sure to cover the container tightly with a lid or plastic wrap. This keeps the chicken moist and fresh. You can keep them in the fridge for up to three days. Glass or BPA-free plastic containers work best for storage. They help maintain the chicken's flavor and texture. You can freeze chicken tenders before or after cooking. If you freeze them raw, coat them and place them on a baking sheet. Freeze until solid, then transfer to a freezer bag. If you freeze them cooked, let them cool first. Then, wrap each piece in plastic wrap and place in a freezer bag. This keeps them fresh for up to three months. When you’re ready to eat, thaw them overnight in the fridge. To reheat chicken tenders and keep them crispy, the oven or air fryer works best. Preheat your oven to 400°F (200°C). Place the tenders on a baking sheet and heat for about 10-15 minutes. For the air fryer, set it to 350°F (175°C) and heat for about 5-7 minutes. This method restores their crunchiness. You can also use a microwave, but they may get soggy. Always check the temperature to ensure they are fully heated. To make crispy chicken tenders, start by soaking the chicken in buttermilk. This step keeps the meat juicy. Next, prepare your coating. Mix flour with spices like paprika, garlic powder, and onion powder. The flour adds crunch. Then, dip the soaked chicken in flour, eggs, and finally panko breadcrumbs. Fry the chicken in hot oil until golden brown. This method ensures a crispy coating. For a detailed guide, check the Full Recipe. The best way to season chicken tenders is to use a mix of spices. I recommend paprika, garlic powder, and onion powder for a tasty base. Add salt and black pepper for flavor. If you like heat, cayenne pepper gives a nice kick. You can also experiment with dried herbs like thyme or oregano for added taste. Yes, you can make chicken tenders in advance. Prep the chicken by soaking it in buttermilk and coating it. You can store the breaded strips in the fridge for a few hours. This saves time on busy days. Just fry them when you’re ready to eat. You can also freeze them. Just make sure to thaw them before cooking. You can serve chicken tenders with many sides. French fries are a classic choice. For a healthier option, pair them with a fresh salad. You can also serve them with coleslaw or vegetable sticks. Dipping sauces like honey mustard, BBQ sauce, or ranch make great complements too. These sides enhance the meal and make it more fun! In this blog post, I covered the key ingredients and steps for making crispy chicken tenders. We explored important ingredients, like buttermilk and panko breadcrumbs, and shared tips for perfect frying. We discussed healthy variations and storage methods to keep your chicken fresh. Remember, using the right techniques ensures delicious results. Whether you fry, bake, or air fry, these tips make cooking fun. Enjoy your tasty chicken tenders, and don't hesitate to get creative with your flavors!

Crispy Chicken Tenders Irresistible and Flavorful Meal

If you crave a meal that’s both crispy and full of flavor, these chicken tenders are for you! I’ll guide

To make Lemon Poppy Seed Muffins, you will need the following ingredients: - 1 ½ cups all-purpose flour - ½ cup granulated sugar - 2 teaspoons baking powder - ¼ teaspoon baking soda - ¼ teaspoon salt - 1 tablespoon poppy seeds - ½ cup unsalted butter, melted - 2 large eggs - ½ cup buttermilk - Zest of 1 large lemon - 2 tablespoons fresh lemon juice - 1 teaspoon vanilla extract You can easily swap some ingredients if you need to. Here are a few ideas: - Use whole wheat flour for a healthier option. - Swap granulated sugar with brown sugar for a richer taste. - If you don’t have buttermilk, mix regular milk with a splash of vinegar. - Olive oil can replace unsalted butter if you want a dairy-free option. - For eggs, consider using applesauce or flaxseed meal for a vegan choice. Choosing fresh ingredients is key to making great muffins. Here are some tips: - Look for flour that is not past its expiration date. - Check sugar for clumps; it should feel dry and free-flowing. - Poppy seeds should be fresh and aromatic. If they smell stale, don’t use them. - Choose lemons that are heavy for their size; they should feel firm. - Use eggs that are clean and free from cracks. Fresh eggs have a bright yellow yolk. Using the right ingredients makes a big difference in flavor. Enjoy making Lemon Poppy Seed Muffins! For the full recipe, check the earlier part of the article. To start making lemon poppy seed muffins, gather your ingredients. This recipe needs simple items, so it’s easy to prepare. Begin by preheating your oven to 350°F (175°C). This step is important for even baking. Next, line a muffin tin with paper liners or grease it lightly with cooking spray. This helps the muffins release easily after baking. In a large bowl, whisk together the dry ingredients. Combine 1 ½ cups of all-purpose flour, ½ cup of granulated sugar, 2 teaspoons of baking powder, ¼ teaspoon of baking soda, ¼ teaspoon of salt, and 1 tablespoon of poppy seeds. Make sure to mix well so every bite is tasty. In another bowl, mix the wet ingredients. Combine ½ cup of melted unsalted butter, 2 large eggs, ½ cup of buttermilk, the zest of 1 large lemon, 2 tablespoons of fresh lemon juice, and 1 teaspoon of vanilla extract. Stir until everything is smooth and blended. Now it’s time to combine the wet and dry mixtures. Pour the wet ingredients into the dry ones. Use a spatula to gently fold them together. Be careful not to overmix; a few lumps are okay. This helps keep the muffins light and fluffy. Next, use a spoon or an ice cream scoop to fill each muffin cup about ¾ full with the batter. This gives them room to rise. Then, place the muffin tin in the preheated oven. Bake for 18 to 20 minutes. To check if they are done, insert a toothpick into the center. If it comes out clean, your muffins are ready. Once baked, take the muffins out of the oven. Let them cool in the tin for about 5 minutes. After that, transfer them to a wire rack to cool completely. This helps them stay fluffy. To make perfect lemon poppy seed muffins, here are a few tips. First, make sure your ingredients are fresh. Old baking powder or butter can ruin your muffins. Second, don’t overmix the batter. Mixing too much can lead to tough muffins. For added flavor, you can dust the cooled muffins with powdered sugar. A slice of lemon on top adds a nice touch. Serve them warm for the best taste. These little tips will help you create a delightful treat that everyone will love. For the full recipe, check out the detailed instructions above. To make great lemon poppy seed muffins, follow these tips: - Measure Ingredients Accurately: Use measuring cups for dry and liquid ingredients. - Mix Gently: Combine wet and dry ingredients without overmixing. A few lumps are fine. - Preheat Oven Properly: Ensure your oven is at 350°F (175°C) before baking. - Use Fresh Ingredients: Fresh lemons and buttermilk bring out the best flavors. Here are some common mistakes to watch for: - Overmixing the Batter: This can lead to tough muffins. Mix just until combined. - Skipping Lemon Zest: The zest adds a bright flavor. Don’t skip it! - Not Filling Muffin Cups Enough: Fill them about ¾ full for the right height. - Ignoring Baking Time: Check muffins a few minutes before the timer goes off. Having the right tools makes baking easier: - Muffin Tin: Use a standard 12-cup muffin tin for even baking. - Mixing Bowls: Have a large bowl for dry ingredients and a medium bowl for wet. - Whisk and Spatula: A whisk helps mix ingredients well, and a spatula gently folds the batter. - Cooling Rack: A cooling rack allows muffins to cool evenly after baking. With these tips and tricks in mind, you'll create delicious lemon poppy seed muffins every time! Check out the Full Recipe for all the details. {{image_2}} You can make gluten-free lemon poppy seed muffins easily. Start by using gluten-free flour. Look for a blend that works well for baking. This helps keep the muffins light and fluffy. Make sure to check for a good rise. You could also add a bit of xanthan gum. This ingredient helps bind the muffins together. To create a vegan version, swap the eggs for flax eggs. Mix one tablespoon of flaxseed meal with three tablespoons of water to replace one egg. Use almond milk or soy milk instead of buttermilk. You can also use coconut oil in place of melted butter. These changes keep the muffins soft and tasty. You can mix things up by adding ingredients. Try blueberries or raspberries for a fruity twist. Chopped nuts like walnuts or almonds add a nice crunch. For a spicy kick, add a bit of cinnamon or ginger. You can also experiment with different citrus fruits. Orange zest or lime zest can give a fresh flavor. You can find the full recipe for lemon poppy seed muffins above. To keep lemon poppy seed muffins fresh, place them in an airtight container. You can store them at room temperature for up to two days. If you want them to last longer, keep them in the fridge. Just make sure to seal them well to avoid drying out. If you have more muffins than you can eat, freezing is a great option. Let the muffins cool completely first. Wrap each muffin tightly in plastic wrap, then place them in a freezer-safe bag. They can last in the freezer for up to three months. When you're ready to enjoy, simply take out a muffin and let it thaw at room temperature. To make your muffins taste fresh again, reheat them in the oven. Preheat your oven to 350°F (175°C). Place the muffins on a baking sheet and heat for about 5 to 10 minutes. You can also microwave them for about 15 to 20 seconds, but the oven method keeps them crispier. Enjoy your warm, tasty muffins! For the full recipe, check out [Full Recipe]. The secret to moist lemon poppy seed muffins lies in the buttermilk and melted butter. Buttermilk adds moisture and a slight tang, while melted butter gives a rich flavor. The balance of wet and dry ingredients matters too. If you mix them just right, you’ll get that soft, fluffy texture. Yes, you can use whole wheat flour instead of all-purpose flour. Whole wheat adds fiber and a nutty taste. Start by replacing half the all-purpose flour with whole wheat flour. This way, you keep the muffins light and fluffy while adding extra nutrients. Lemon poppy seed muffins can last for up to three days at room temperature. Store them in an airtight container to keep them fresh. If you want them to last longer, consider freezing them. They can stay good for up to three months in the freezer. To cut back on sweetness, reduce the sugar by one-third. You can also add more lemon juice or zest for a tangy kick. If you want a hint of sweetness, consider using a natural sweetener like honey or maple syrup. This blog post covered everything you need to make great lemon poppy seed muffins. We explored the key ingredients, tips for proper baking, and tasty variations you can try. I shared advice on storage and answered common questions. Making muffins can be fun and easy if you follow these simple steps. Remember, fresh ingredients and careful baking lead to tasty results. Enjoy your muffins, and feel free to experiment with flavors and textures!

Lemon Poppy Seed Muffins Simple and Tasty Recipe

If you’re craving a delightful treat that bursts with flavor, you’ll love these Lemon Poppy Seed Muffins! This simple and

To make a Nutella swirl cheesecake, you need fresh and simple ingredients. Here is the list of what you will need: - 1 ½ cups graham cracker crumbs - ½ cup unsalted butter, melted - 2 tablespoons sugar - 3 (8 oz) packages of cream cheese, softened - 1 cup granulated sugar - 3 large eggs - 1 teaspoon vanilla extract - 1 cup sour cream - ¾ cup Nutella Each ingredient plays a key role. The graham cracker crumbs make a sweet and crunchy crust. The melted butter binds them together. Sugar adds sweetness to the crust and the cheesecake itself. Cream cheese is the main base for the cheesecake. It gives a rich and smooth texture. The eggs help the cheesecake set. They add structure and creaminess. Vanilla extract brings a warm flavor to the mix. Sour cream adds tanginess, balancing the sweetness. Lastly, Nutella swirls in creamy chocolate goodness, making each bite a dream. Gather these ingredients for a delightful treat. You’ll love the blend of flavors and textures in this dessert! {{ingredient_image_1}} First, preheat your oven to 325°F (160°C). This step is key for a good bake. Next, in a medium bowl, mix 1 ½ cups of graham cracker crumbs, ½ cup melted unsalted butter, and 2 tablespoons of sugar. Stir well until combined. Then, press this mixture into the bottom of a 9-inch springform pan. Make sure it is even and compact. Bake this crust for 10 minutes. Once done, take it out and let it cool. In a large mixing bowl, start by beating 3 packages of softened cream cheese with a hand mixer on medium speed. Blend until it is nice and fluffy. Gradually add in 1 cup of granulated sugar. Mix well until smooth. Now, add 3 large eggs one by one. Ensure each egg is fully mixed in before adding the next. After that, mix in 1 teaspoon of vanilla extract and 1 cup of sour cream until everything is smooth and creamy. Pour half of the cheesecake batter over the cooled crust in the springform pan. Then, spoon half of the ¾ cup Nutella over this layer of batter. Use a knife or spatula to gently swirl it in. Next, add the remaining cheesecake batter on top. Spoon the rest of the Nutella and swirl again for a lovely marbled look. Now, it's time to bake! Place it in the preheated oven for 55 to 60 minutes. The center should be set but still slightly jiggly. Once baked, turn off the oven and slightly crack the door open. Let the cheesecake cool inside for about an hour. This helps prevent cracking. After it cools, refrigerate the cheesecake for at least 4 hours or overnight for the best taste. Before serving, remove the sides of the springform pan and slice the cheesecake to enjoy! To swirl Nutella into your cheesecake, use a knife or spatula. Spoon Nutella onto the batter, then gently move it around. Don’t over-swirl, or you’ll lose the beautiful marbling. For a smooth cheesecake texture, beat the cream cheese well. Make sure it’s soft and fluffy before adding other ingredients. To avoid cracks, let your cheesecake cool slowly. After baking, turn off the oven and crack the door open. This step allows the cheesecake to cool gradually. It helps keep the surface smooth and pretty. For a lovely finish, top your cheesecake with whipped cream and chocolate shavings. Fresh berries also add color. Slice the cheesecake with a hot knife for clean cuts. Serve it on a beautiful plate to impress your guests. Pro Tips Chill the Cream Cheese: Ensure your cream cheese is at room temperature for easier blending, resulting in a smoother cheesecake texture. Swirl Technique: For beautiful marbling, use a toothpick or a skewer to swirl the Nutella gently, being careful not to overmix. Prevent Cracking: Allow the cheesecake to cool in the oven with the door slightly ajar after baking to minimize the risk of cracks. Optimal Refrigeration: Refrigerate the cheesecake overnight for the best flavor and texture; this allows the flavors to meld beautifully. {{image_2}} You can mix Nutella with many flavors. Try adding peanut butter for a nutty twist. You could also swirl in caramel for added sweetness. If you love coffee, mix in espresso for a rich flavor. For a fruity touch, add raspberry puree to the cheesecake batter. This gives a fresh taste that pairs well with Nutella. You can also top your cheesecake with fresh berries or whipped cream for a beautiful finish. If you want a gluten-free cheesecake, use gluten-free graham cracker crumbs. This simple swap makes it safe for those with gluten issues. For a vegan version, use plant-based cream cheese. You can find many brands that taste great. Instead of eggs, use flaxseed meal mixed with water. This works well as a binding agent. These adjustments make it easy for everyone to enjoy this dessert. To keep your Nutella swirl cheesecake fresh, store it in the fridge. First, cover it with plastic wrap or foil. This helps keep it moist and stops it from absorbing other smells. Place your cheesecake on a flat surface in the fridge. Avoid stacking items on top of it. If you want to save it for later, freezing is a great option. Slice the cheesecake into pieces. Wrap each piece in plastic wrap tightly. Then, place the wrapped slices in a freezer-safe bag. This helps prevent freezer burn. In the fridge, Nutella swirl cheesecake lasts about 5 to 7 days. Check for any signs of spoilage before eating. If you freeze it, it can stay good for about 2 to 3 months. Just remember, the longer it stays frozen, the more it may lose its texture. Always thaw it in the fridge for best results before serving. To serve Nutella swirl cheesecake, slice it into equal pieces. Place each slice on a plate. For a nice touch, add a dollop of whipped cream on top. You can also drizzle extra Nutella over each slice. If you want a crunchy element, sprinkle some chopped hazelnuts on top. Serve it chilled for the best flavor. Yes, you can use a different chocolate spread. Brands like Hershey's or Cadbury work well. Each spread brings a unique taste. You might try a peanut butter spread for a twist. Just remember that each option will change the flavor somewhat. Keep it fun and explore new combinations! To check if the cheesecake is done, look for slight jiggle in the center. It should not be liquidy. The edges should look set and firm. You can also use a toothpick to test. Insert it into the center; if it comes out clean, it’s ready! If it sticks, bake a bit longer. You now have a complete guide to making Nutella swirl cheesecake. From the rich ingredients to easy steps, you can create a delicious treat. Remember to use the tips for a perfect swirl and prevent cracks. Explore variations to make it your own, and follow storage tips to keep it fresh. With this recipe, you’ll impress everyone. Enjoy making and sharing your cheesecake masterpiece!

Nutella Swirl Cheesecake Irresistible Dessert Treat

Are you ready to indulge in a dessert that’s as creamy as it is delicious? Let me introduce you to

For Cheesy Spinach Stuffed Mushrooms, you need: - 12 large portobello or cremini mushrooms, stems removed - 1 cup fresh spinach, chopped - 1 cup ricotta cheese - 1 cup shredded mozzarella cheese - 1/2 cup grated Parmesan cheese - 2 cloves garlic, minced - 1/4 teaspoon crushed red pepper flakes (optional) - Salt and pepper to taste - 2 tablespoons olive oil - Fresh parsley, chopped for garnish These ingredients come together to create a tasty and cheesy snack. The mushrooms hold the filling well and add a nice earthy flavor. You can add a few optional items to change up the flavor: - Crushed red pepper flakes for heat - Different cheeses like goat cheese or cheddar - Chopped sun-dried tomatoes for sweetness These options help you personalize your dish. Feel free to mix and match based on what you like. Each serving of Cheesy Spinach Stuffed Mushrooms offers: - Calories: 210 - Protein: 12g - Carbohydrates: 8g - Fat: 15g - Fiber: 2g This recipe is not only delicious but also packed with nutrients. You get protein from the cheese and fiber from the spinach, making it a balanced snack. Be sure to check the [Full Recipe] for more details on how to make these tasty bites! First, you need to prepare the mushrooms. I love using large portobello or cremini mushrooms. They hold the filling well. Start by preheating your oven to 375°F (190°C). Next, clean the mushrooms with a damp cloth. This removes dirt and keeps them fresh. Place them on a baking sheet with the hollow side facing up. Now it’s time for the filling. In a skillet, heat 2 tablespoons of olive oil over medium heat. Add 2 minced garlic cloves and sauté for about 1 minute. This makes your kitchen smell amazing! After that, add 1 cup of chopped fresh spinach. Cook it until it wilts, which takes about 2 minutes. Remove the skillet from heat and let it cool a bit. In a mixing bowl, combine 1 cup of ricotta cheese, half of the 1 cup of shredded mozzarella cheese, and 1/2 cup of grated Parmesan cheese. Add the sautéed spinach, crushed red pepper flakes, salt, and pepper. Stir until everything mixes well. Now, fill each mushroom cap with the cheese and spinach mixture. Be sure to pack it slightly for a good fit. Top each stuffed mushroom with the remaining mozzarella cheese. Place the filled mushrooms back on the baking sheet and bake them for about 20-25 minutes. You want the mushrooms to be tender and the cheese to be melted and bubbly. Once done, take them out of the oven. Let them cool for a few minutes. Garnish with fresh chopped parsley before serving. For the full recipe, check out the section above. Enjoy your tasty Cheesy Spinach Stuffed Mushrooms! For Cheesy Spinach Stuffed Mushrooms, I love using ricotta, mozzarella, and Parmesan. These cheeses blend well and create a creamy filling. You can also try goat cheese for a tangy twist. If you want more flavor, add feta cheese. It brings a salty bite to the mix. Mixing cheese gives you a rich taste and a nice texture. To prevent soggy mushrooms, start by cleaning them gently. Use a damp cloth instead of water. This helps keep their structure. Next, make sure to sauté the spinach until it wilts. This reduces moisture in the filling. When you stuff the mushrooms, pack the filling without overloading. This helps the mushrooms cook properly. Serve these stuffed mushrooms warm. They taste best fresh from the oven. For extra flavor, drizzle a bit of olive oil before serving. A sprinkle of fresh parsley adds color and freshness. You can pair them with a simple salad or crusty bread. This adds crunch and complements the dish. For more tips and the full recipe, check the earlier section. {{image_2}} If you want a veggie-packed twist, try adding other vegetables. You can mix in finely chopped bell peppers, artichokes, or even sun-dried tomatoes. These ingredients add color and texture. They also boost the flavor of your Cheesy Spinach Stuffed Mushrooms. You can keep the ricotta and mozzarella for creaminess. This keeps it tasty and vegetarian-friendly. To make these stuffed mushrooms heartier, consider adding protein. Cooked crumbled sausage or diced chicken works well. You can also use beans for a plant-based option. Adding protein makes the dish more filling, perfect for a meal. Just mix your protein of choice with the cheese filling. This way, you add flavor and nutrition. For gluten-free eaters, the good news is that this recipe is naturally gluten-free! Just make sure to check your ingredient labels. Some brands of cheese or seasonings may contain gluten. To keep it safe, use fresh ingredients. Enjoy these stuffed mushrooms without worrying about gluten. They are a perfect snack for everyone! For the full recipe, check out the details above. To store leftovers, let the stuffed mushrooms cool down first. Place them in an airtight container. Make sure to keep them in the fridge. They will last for about three days. If you want to enjoy them later, you can freeze them too. To freeze, wrap each mushroom tightly in plastic wrap. Then, place them in a freezer-safe bag. They can stay frozen for up to three months. When you are ready to eat, thaw them in the fridge overnight. Reheat them in the oven at 350°F (175°C) until warm. This keeps the cheese melted and the mushrooms soft. For storing, I recommend using glass containers with lids. They seal well and do not absorb smells. If you plan to freeze, use heavy-duty freezer bags. They help prevent freezer burn. Always label your containers with the date. This way, you'll know when to enjoy your tasty snacks! For the full recipe, check out the details above. Yes, you can prepare Cheesy Spinach Stuffed Mushrooms ahead of time. You can stuff the mushrooms and store them in the fridge. Just cover them with plastic wrap or foil. They will stay fresh for up to two days. When you are ready to bake, add a few extra minutes to the cooking time. This makes it easy for parties or family dinners. If you don’t have ricotta cheese, you can use cottage cheese. Just blend it a bit to make it smooth. Cream cheese also works well, but it may change the taste a bit. For a dairy-free option, try using tofu blended until creamy. Each substitute gives a unique flavor and texture. You will know the mushrooms are done when they look tender and the cheese is melted. The tops should be golden brown and bubbly. A good cooking time is about 20-25 minutes at 375°F (190°C). Check them after about 20 minutes. Cheesy Spinach Stuffed Mushrooms go well with a fresh salad. A simple green salad with a light vinaigrette is perfect. They also pair nicely with grilled chicken or fish. For a cozy meal, serve them with pasta in a tomato sauce. These flavors mix well and make a great dinner. You can find the full recipe to make these tasty snacks above. This article covered how to make cheesy spinach stuffed mushrooms. We looked at all the ingredients, cooking steps, and tips. You learned about variations and storage options too. In conclusion, these mushrooms are easy to make and fun to eat. With the right cheese and careful baking, they will impress everyone. Play with ingredients to match your taste. Enjoy your delicious stuffed mushrooms!

Cheesy Spinach Stuffed Mushrooms Flavorful Snack Idea

Looking for a tasty snack that’s easy to make? Cheesy Spinach Stuffed Mushrooms are here to save the day! Packed

- 4 medium zucchinis: Spiralize these into noodles. They are the base of the dish. - 1 cup cauliflower florets: Steam these until tender. This adds creaminess. - 1 cup unsweetened almond milk: This keeps the sauce light and adds flavor. - 2 tablespoons nutritional yeast: This gives a cheesy taste without dairy. - 2 cloves garlic: Mince them for a strong, aromatic flavor. - 1 tablespoon olive oil: Use this to sauté the garlic for a rich taste. - Salt and pepper: These enhance all the flavors. Add to taste. - 1 tablespoon fresh lemon juice: This brightens the dish and adds zing. - Fresh parsley: Chop this for garnish; it adds color and freshness. - Grated Parmesan cheese: Use this or a vegan alternative for extra flavor. For the complete recipe, check out the Full Recipe. First, spiralizing zucchinis is easy. You can use a spiralizer or a peeler. Make sure to create long, thin noodles. Set them aside in a bowl. Next, steam the cauliflower florets. This makes them soft and ready for blending. You can steam them on the stove or in the microwave. Aim for about 5 minutes until tender. Now, let's sauté the garlic. Heat the olive oil in a small pot over medium heat. Add the minced garlic and cook for 1-2 minutes. Watch closely so it doesn’t burn; you want it fragrant and golden. Time to blend the creamy sauce. In a blender, combine the steamed cauliflower, almond milk, nutritional yeast, sautéed garlic, lemon juice, salt, and pepper. Blend until smooth and creamy. You might want to taste it and adjust the seasoning. Sauté the zucchini noodles in a large skillet. Cook them over medium heat for about 2-3 minutes. They should be slightly soft but still have a bite. Now, pour the creamy sauce over the zucchini noodles. Toss them gently to coat evenly. Cook for another 1-2 minutes until everything is hot. Serve the Zucchini Noodle Alfredo right away. Garnish with fresh parsley and grated Parmesan cheese or a vegan alternative. Enjoy this creamy healthy delight! For the full recipe, refer to the above instructions. To get the best texture from zucchini noodles, start by sautéing them right. First, make sure you spiralize the zucchinis well. This gives you long, thin noodles. When cooking, heat a large skillet over medium heat. Add the noodles and sauté for 2-3 minutes. You want them slightly soft but not mushy. This quick cook keeps them fresh and bright. For a creamy sauce, blending is key. Use steamed cauliflower florets for smoothness. Combine them with almond milk, nutritional yeast, and sautéed garlic in a blender. Blend until the mixture is silky. If it’s too thick, add a little more almond milk. Adjust the seasoning to your taste, too. Adding seasonings can make a big difference. Besides salt and pepper, try adding a pinch of nutmeg for warmth. You can also sprinkle in some Italian herbs like basil or oregano. These flavors bring out the best in your dish. For toppings, fresh parsley is a must. It adds a pop of color and freshness. You might also want to use grated Parmesan cheese or a vegan alternative. This adds richness and makes the dish even more satisfying. For a crunch, consider toasted pine nuts or walnuts on top. They add a nice bite to your creamy meal. For the full recipe, check out the detailed steps to create your Zucchini Noodle Alfredo. {{image_2}} You can easily swap some ingredients in this recipe. If you lack almond milk, use oat milk or soy milk. These will still keep your dish creamy. For nutritional yeast, try using cashew cheese or a vegan Parmesan. They give a nice cheesy flavor too. Also, if you want to mix it up, consider using butternut squash or spaghetti squash. Both add a different taste and texture to your dish. This recipe fits many diets. For vegans, stick to almond milk and skip the Parmesan. This dish stays creamy and tasty without dairy. If you need gluten-free options, check that your almond milk is certified gluten-free. This dish is naturally gluten-free if you use no flour. Lastly, if you follow a low-carb diet, you are in luck! Zucchini noodles are great for this. They contain fewer carbs than pasta. Enjoy your creamy Zucchini Noodle Alfredo guilt-free! For the full recipe, check out the Full Recipe section. To keep your Zucchini Noodle Alfredo fresh, store it in an airtight container. Make sure it cools down before sealing. Place it in the fridge as soon as possible. This dish can last up to three days in the fridge. If you notice any off smells or changes in texture, it’s best to toss it. When you are ready to enjoy your leftovers, use the stovetop for reheating. Heat a skillet over medium heat with a splash of almond milk. Add your Zucchini Noodle Alfredo and stir gently. This method helps keep the noodles from getting too soft. To refresh the flavors, add a squeeze of lemon juice or a sprinkle of fresh parsley. This little touch can revive your dish, making it taste fresh again. You can also microwave it, but be careful not to overheat. Heat it in short bursts, stirring in between, to maintain that creamy texture. How do you make zucchini noodles without a spiralizer? You can make zucchini noodles using a vegetable peeler. Just peel the zucchini into thin strips. You can also use a box grater. Grate the zucchini lengthwise to create long, thin noodles. Both methods work well for this dish. Can I use regular pasta instead of zucchini noodles? Yes, you can use regular pasta if you prefer. Cook the pasta according to package instructions. Just note that it won't be as low in carbs as zucchini noodles. The sauce will still taste great with any pasta you choose. Health benefits of zucchini and cauliflower Zucchini is low in calories and high in water. It supports hydration and digestion. Cauliflower is rich in fiber and vitamins. It may help to lower cholesterol and improve heart health. Both veggies boost your meal's nutrition. Caloric and nutritional breakdown per serving Each serving of Zucchini Noodle Alfredo has about 150 calories. It contains 5 grams of protein and 8 grams of fat. The dish is also low in carbs, making it a great choice for many diets. What to serve alongside Zucchini Noodle Alfredo? You can serve a simple green salad with this dish. A side of garlic bread adds a nice touch. Roasted vegetables also pair well, bringing more flavor and texture to your meal. Ways to make it a complete meal Add grilled chicken or shrimp for protein. You can also toss in sautéed spinach or kale for extra greens. This way, you create a balanced and filling meal for everyone to enjoy. For the full recipe, check out the earlier section. In this article, we explored how to prepare a delicious Zucchini Noodle Alfredo. We covered key ingredients like zucchini and cauliflower, step-by-step cooking instructions, and tips for perfecting texture and flavor. Remember, you can easily customize this dish with various ingredients and dietary options. Enjoy making this healthy meal that tastes great and fits your needs. With these insights, you can impress anyone at your table. Get cooking and savor the rich flavors!

Zucchini Noodle Alfredo Creamy Healthy Delight

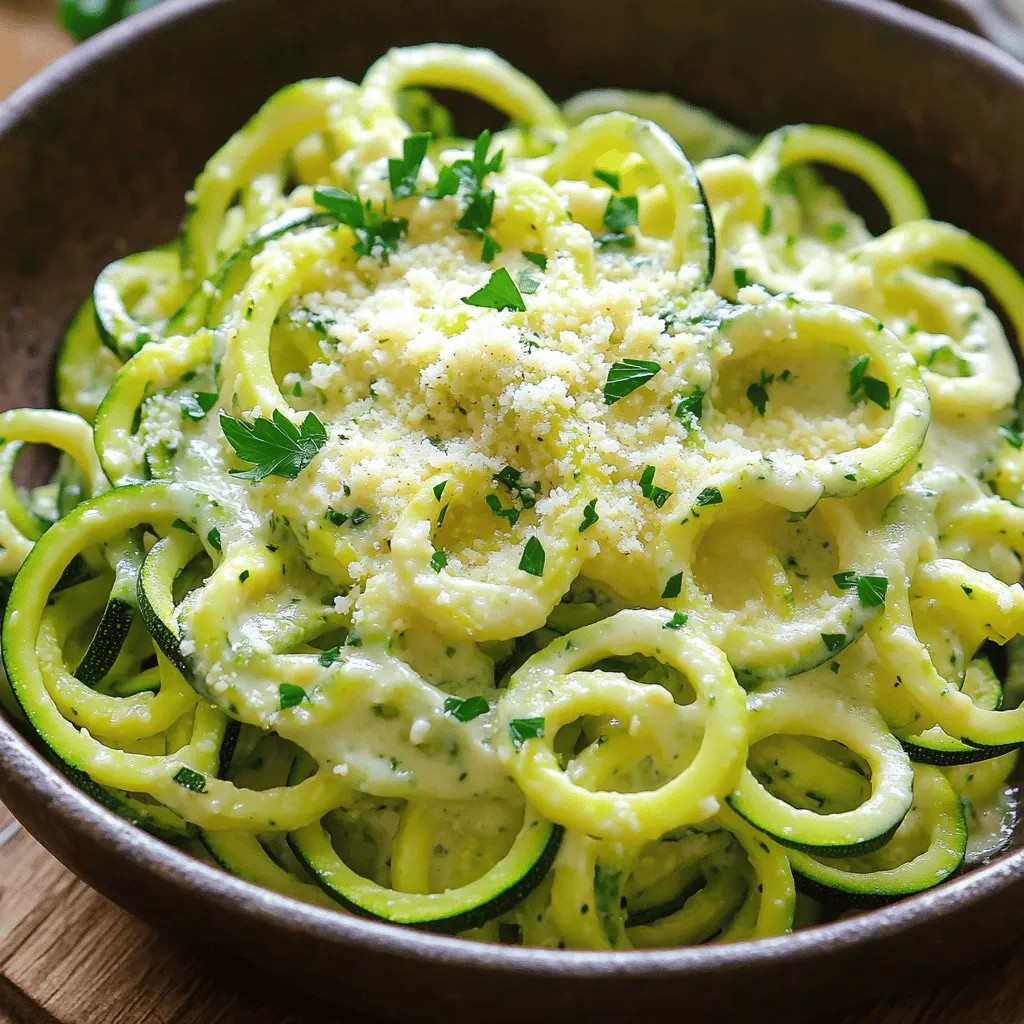
Are you craving a creamy delight that’s both healthy and satisfying? Zucchini Noodle Alfredo is the answer! By swapping traditional

Older posts
Newer posts
← Previous Page1 … Page66 Page67 Page68 … Page84 Next →

dsad

© 2026 juliesdish • Built with GeneratePress

Our Policies

  • Copyright Policy
  • Cookie Policy
  • GDPR Policy
  • Privacy Policy
  • Disclaimer
  • Terms Of Use

More Information

  • Home
  • About
  • Contact
  • Appetizers
  • Dessert
  • Dinner
  • Drinks
©2026, juliesdish About Back To Top