Skip to content
DisclaimerTerms Of UseGDPR PolicyCookie Policy

juliesdish

  • Home
  • Drinks
  • Appetizers
  • Dinner
  • Dessert
  • About
  • Contact
  • Privacy Policy
DisclaimerTerms Of UseGDPR PolicyCookie Policy

NO-ING-IMG

To make tasty honey mustard chicken tenders, gather these ingredients: - 1 pound chicken tenderloins - 1/3 cup honey - 1/3 cup Dijon mustard - 1 tablespoon apple cider vinegar - 1 teaspoon garlic powder - 1 teaspoon onion powder - 1/2 teaspoon paprika - Salt and pepper to taste - 1 cup breadcrumbs (panko for extra crunch) - 1/2 cup all-purpose flour - 2 eggs, beaten These ingredients create the perfect blend of sweet and tangy. Chicken tenderloins are the star, offering a juicy bite. The honey and Dijon mustard make a rich sauce that’s both sweet and savory. The seasonings add depth, while the coating gives a nice crunch. You can find the full recipe in the earlier section. Enjoy the process of preparing these delicious tenders! - Preheat the Oven: Start by preheating your oven to 400°F (200°C). This step helps cook the chicken evenly. - Prepare the Baking Sheet: Line a baking sheet with parchment paper or lightly grease it. This keeps the tenders from sticking. - Whisking the Ingredients: In a bowl, combine honey, Dijon mustard, apple cider vinegar, garlic powder, onion powder, paprika, salt, and pepper. Mix until smooth. - Dividing the Sauce: Set aside half of the sauce for later use. This will be your drizzle for serving. - The Triple Dipping Method: Get three bowls ready. Fill one with flour, the second with beaten eggs, and the third with breadcrumbs. - Dip each chicken tender in the flour first. Shake off the extra flour. - Next, dip it into the eggs. Let any excess drip off. - Finally, coat it in breadcrumbs. Press gently so they stick well. - Arranging on the Baking Sheet: Place the coated tenders in a single layer on the prepared baking sheet. Do not overcrowd them. - Drizzling with Sauce: Drizzle a small amount of your honey mustard sauce over the top of the tenders. This adds flavor while they bake. - Baking Time and Internal Temperature: Bake the tenders for 15-20 minutes. They should be golden brown. Check that they reach an internal temperature of 165°F (74°C). - Cooling the Tenders: Once cooked, take them out of the oven and let them cool for a couple of minutes. This helps keep them juicy. You can find the full recipe for Honey Mustard Chicken Tenders in the earlier sections. Enjoy making this tasty dish! Ensuring Even Cooking To cook your chicken tenders evenly, cut them into similar sizes. This helps them cook at the same rate. For the best results, use tenderloins instead of larger cuts. They cook faster and stay juicy. Adjusting Cooking Time Cooking time may vary based on your oven. Keep an eye on your chicken tenders. They should bake for about 15 to 20 minutes. Look for a golden brown color and an internal temperature of 165°F (74°C). Additional Seasonings to Try You can easily boost the flavor of your tenders. Consider adding cayenne pepper for heat or dried herbs like thyme for an earthy touch. A bit of lemon zest can also brighten the dish. Marinating Options For extra flavor, marinate your chicken before cooking. Mix honey, mustard, and some garlic. Let the chicken soak in this mix for at least 30 minutes. This step adds depth to the taste. Best Accompaniments Honey mustard chicken tenders pair well with fresh veggies. Try serving them with carrot sticks or cucumber slices. They also go great with a creamy coleslaw or a light salad. Pairing with Sides For sides, think about crispy fries or roasted potatoes. Mac and cheese is a fun choice too! You can even serve them with rice or a grain salad for a filling meal. For the complete recipe, visit the [Full Recipe]. {{image_2}} You can change the flavor of your honey mustard chicken tenders by using different mustards. Try using whole grain mustard for a nutty taste. Yellow mustard gives a classic flavor. Spicy brown mustard adds a kick. Each type brings a new twist to the dish. For a gluten-free version, swap all-purpose flour with almond flour or a gluten-free blend. Use gluten-free breadcrumbs for crunch. This way, everyone can enjoy these tasty tenders without worry. The air fryer cooks tenders quickly and gives them a nice crunch. Preheat your air fryer to 400°F (200°C). Cook the chicken tenders in a single layer for about 10-12 minutes. Flip them halfway for even cooking. They’ll be crispy and delicious! For a pan-fried version, heat oil in a skillet over medium heat. Cook the tenders for about 5-7 minutes on each side. This method will give them a golden, crispy exterior. Be sure not to crowd the pan so they cook evenly. If you like it spicy, add cayenne pepper or chili powder to the breadcrumbs. You can also stir crushed red pepper into the honey mustard sauce. This adds a fiery flavor that balances the sweetness. Mix honey with sriracha or hot sauce for a sweet and spicy dip. This combo enhances the flavor profile and makes each bite exciting. You can also drizzle a bit of chili-infused honey over the cooked tenders for extra zing. For the full recipe, check out the [Full Recipe]. To store leftover chicken tenders, let them cool first. Place them in an airtight container. They can last in the fridge for up to four days. Make sure to keep them away from strong-smelling foods to avoid flavor changes. If you want to freeze the tenders, wrap each piece tightly in plastic wrap. Then, place them in a freezer bag. They will stay good for up to three months in the freezer. To reheat, bake them at 375°F (190°C) for about 15-20 minutes. This method keeps them crispy and tasty. For the best quality, eat the chicken tenders within the recommended time. After four days in the fridge, the taste and texture may change. For frozen tenders, use them within three months for the best flavor. Always check for any signs of spoilage before eating. To make honey mustard chicken tenders, follow these key steps: - Prep your ingredients: Preheat your oven to 400°F (200°C). Line a baking sheet with parchment paper. - Make the sauce: Whisk together honey, Dijon mustard, apple cider vinegar, and spices. Set aside half for later. - Coat the chicken: Dip each tenderloin in flour, then eggs, and finally breadcrumbs. - Bake: Arrange on the baking sheet and drizzle with sauce. Bake for 15-20 minutes until golden. These steps ensure your chicken is tasty and crispy. You can find the full recipe for more details. Yes, you can use chicken breasts instead of tenderloins. Just cut the breasts into strips. Ensure they are about the same size as tenderloins for even cooking. The cooking time may vary slightly, so check for an internal temperature of 165°F (74°C). These chicken tenders go well with many sides. Here are some popular options: - French fries - Coleslaw - Green salad - Mashed potatoes - Steamed vegetables You can also serve them with dipping sauces like ranch or barbecue for extra flavor. Bake the chicken tenders for 15-20 minutes. You want them to be golden brown. Always check that they reach an internal temperature of 165°F (74°C) for safety. If they are not done, bake a few more minutes and check again. Yes, you can make this recipe gluten-free. Use gluten-free flour and gluten-free breadcrumbs instead of regular ones. Ensure all other ingredients are labeled gluten-free. This way, you can enjoy the same great taste without the gluten. In this post, we covered everything about making honey mustard chicken tenders. We discussed the key ingredients and shared easy steps to prepare and bake them. I also shared tips for enhancing flavor and variations to try. Remember to store leftovers properly for the best taste. This dish is versatile and great for any meal. Enjoy creating tasty chicken tenders that you and your family will love. Happy cooking!

Savory Honey Mustard Chicken Tenders Quick Recipe

Are you ready to delight your taste buds with a simple yet tasty meal? My Savory Honey Mustard Chicken Tenders

- 1 pound fresh green beans, trimmed - 4 cloves garlic, minced - 3 tablespoons olive oil - 1 teaspoon lemon zest - 1 tablespoon balsamic vinegar - 1/2 teaspoon salt - 1/4 teaspoon black pepper - 1/4 teaspoon red pepper flakes (optional) - 2 tablespoons toasted almonds, sliced (for garnish) To make roasted garlic green beans, you need fresh ingredients for the best taste. Start with fresh green beans. They should be bright green and firm. Trim the ends to prepare them. Next, use garlic for flavor. Mince four cloves for that rich taste. For pantry staples, grab olive oil, lemon zest, and balsamic vinegar. Olive oil helps the beans roast well. Lemon zest adds a nice zing to the dish. Balsamic vinegar gives it a hint of sweetness. Seasonings are key to bringing all the flavors together. You’ll need salt and black pepper for basic seasoning. If you like heat, add red pepper flakes. Lastly, garnish with toasted almonds. They add a crunchy texture and nutty flavor. This simple list of ingredients makes it easy to whip up a tasty side. Follow the [Full Recipe] for detailed cooking steps. Enjoy every bite of this dish! - Preheat your oven to 425°F (220°C). - In a large bowl, combine the green beans, minced garlic, olive oil, lemon zest, balsamic vinegar, salt, black pepper, and red pepper flakes if you want some heat. Toss everything together until the green beans are well coated. This step adds flavor to every bite. - Spread the green beans in a single layer on a baking sheet. Make sure they are not overcrowded. This helps them roast evenly. - Roast in the preheated oven for about 20-25 minutes. Stir halfway through to ensure they cook well. You want them tender and lightly caramelized. - Once you take them out of the oven, sprinkle toasted almonds over the green beans for a nice crunch. - Serve them warm as a side dish. They pair well with many main courses. You can also enjoy them with grilled chicken or a hearty veggie dish. For a fun twist, try serving them with a squeeze of fresh lemon juice right before eating. For the full recipe, you can refer back to the top of this article. To make sure your green beans shine, choose fresh ones. Look for bright green beans with a firm texture. Avoid any that have wilted leaves or dark spots. Fresh beans taste better and stay crispier. For the perfect roast, preheat your oven to 425°F (220°C). This high heat helps caramelize the garlic and gives the beans a nice texture. Spread the beans out on the baking sheet. Give them room to breathe. Overcrowding leads to steaming, not roasting. Stir them halfway through to ensure even cooking. You can add more flavor with simple spices or herbs. Try a pinch of garlic powder or a dash of lemon juice for extra zing. Fresh herbs like thyme or rosemary can also add great taste. If you want a twist on balsamic vinegar, use lemon juice or apple cider vinegar. Both add a bright flavor and balance the dish well. For gatherings, serve the roasted green beans in a large, colorful bowl. Sprinkle sliced toasted almonds on top for a lovely touch. The crunch adds texture and looks great. When plating, arrange the beans in a neat pile. You can also fan them out for a more elegant look. Drizzle a little extra olive oil or balsamic vinegar on top. This makes the dish pop and invites your guests to dig in. If you're curious about the full recipe for Roasted Garlic Green Beans, check out the [Full Recipe]. {{image_2}} You can easily make roasted garlic green beans vegan and gluten-free. This dish is already vegan, as it contains no animal products. To ensure it is gluten-free, check your balsamic vinegar. Most brands are gluten-free, but some may not be. If you want a nut-free version, just skip the toasted almonds. The green beans still taste great without them. You can add sunflower seeds for a nice crunch, too. You can swap green beans for other veggies. Asparagus or broccoli works well. Just adjust the cooking time. Carrots are another tasty option. They add a bit of sweetness to the dish. For extra flavor, try adding shallots or leeks. These aromatics bring a different taste that pairs well with garlic. You can mix and match to find your favorite combination. Roasted garlic green beans pair nicely with meats. Try serving them with grilled chicken or steak. They also work well with vegetarian dishes. Serve them next to quinoa or a hearty grain salad. If you want some heat, add more red pepper flakes. For sweetness, drizzle a bit of honey or maple syrup. This adds a nice contrast to the garlic's bold flavor. Ready to try this recipe? Check out the Full Recipe for all the details! After you enjoy your roasted garlic green beans, you may have some leftovers. To store them, place the green beans in an airtight container. This keeps them fresh in the fridge. Use them within three days for the best taste. To maintain texture, do not cover them while they cool. This prevents sogginess from steam. If you want to save them for later, freezing is a great option. First, let the green beans cool completely. Then, spread them on a baking sheet in a single layer. Freeze them for about an hour. After that, transfer them to a freezer-safe bag. This helps keep their flavor intact. When you’re ready to eat, reheat them in the oven at 350°F (175°C) for about 10 minutes. This brings back the crispiness. In the fridge, roasted garlic green beans last up to three days. In the freezer, they can last for about three months. Always check for signs of spoilage. Look for off smells, discoloration, or mushy texture. If you see any of these, it's best to toss them. Enjoy the freshness while you can! For the full recipe, see the section above. How can I make my green beans crispier? To get crispier green beans, try a few simple tricks: - Make sure to spread them out on the baking sheet. - Avoid overcrowding to allow even heat. - Roast them at a high temperature, like 425°F. - Stir them halfway through, so they cook evenly. Can I use frozen green beans instead? Yes, you can use frozen green beans. Just remember: - Thaw them before cooking for best results. - You may need to adjust the cooking time. - Frozen beans may not get as crispy but will still taste good. How do I properly trim green beans? Trimming green beans is simple: - Hold a bean in one hand and use a sharp knife. - Cut off the stem end where it is tough. - You can also line up several beans and trim them together. What can I serve with roasted garlic green beans? Roasted garlic green beans pair well with many dishes: - Try them with grilled chicken or fish. - They also go great with pasta or rice. - For a vegetarian option, serve them alongside quinoa or tofu. Are green beans healthy? Yes, green beans are very healthy! - They are low in calories and high in fiber. - They contain vitamins A, C, and K, which boost immunity. - Eating green beans can help support heart health too. What are the health benefits of garlic? Garlic offers several health benefits: - It can boost your immune system. - Garlic helps lower blood pressure and cholesterol. - It has anti-inflammatory properties that can improve health. This blog post covered how to make tasty roasted garlic green beans. We explored fresh ingredients and pantry staples, plus seasonings for flavor. You learned the preparation steps and roasting process for the best results. I shared tips to enhance flavor and ideas for presentation. Variations and storage methods help you adapt this dish to your needs. Roasted green beans are easy and delicious, making them a perfect side. Enjoy experimenting with this recipe!

Roasted Garlic Green Beans Flavorful and Simple Side

Looking for a side dish that’s both simple and bursting with flavor? You’re in for a treat! My Roasted Garlic

- 2 cups all-purpose flour - 1 teaspoon active dry yeast - 1 teaspoon sugar - 1 teaspoon salt - 3/4 cup warm water (about 110°F) - 1 tablespoon olive oil - 1 cup crushed tomatoes (preferably San Marzano) - 1 cup fresh mozzarella cheese, sliced - Fresh basil leaves - Salt and pepper to taste - Extra olive oil for drizzling Why use San Marzano tomatoes? San Marzano tomatoes have a sweet taste and low acidity. They are perfect for pizza sauce. Their rich flavor makes your pizza stand out. Fresh mozzarella vs. processed cheese: Fresh mozzarella has a creamy texture. It melts beautifully, giving your pizza that classic look. Processed cheese lacks this quality. Choose fresh for the best taste. Role of fresh basil in flavor enhancement: Fresh basil adds a bright, herbal note. It balances the rich cheese and sweet tomatoes. Scatter it on top just before serving for the best flavor. For the full recipe, refer to the section above. Start by making the dough. In a small bowl, combine warm water, yeast, and sugar. Let it sit for about 5 minutes until it looks frothy. This means the yeast is alive! Next, in a large bowl, mix flour and salt together. Make a well in the center of your flour. Pour the yeast mixture and olive oil into the well. Use a wooden spoon to mix until you form a rough dough. Then, transfer the dough to a floured surface and knead it. Knead for about 8 to 10 minutes until it feels smooth and elastic. Now it’s time to let the dough rise. Place the dough in a lightly oiled bowl and cover it with a damp cloth. Set it in a warm area. Let the dough rise for about an hour, or until it doubles in size. While the dough rises, preheat your oven to 475°F (245°C). If you have a pizza stone, place it in the oven. This helps create a crispy crust. Next, prepare the tomato sauce. In a bowl, season the crushed tomatoes with salt and pepper. You don’t need to cook them! This keeps the sauce fresh and vibrant. Once your dough has risen, punch it down and transfer it to a floured surface. Divide the dough into two equal parts and roll each into a 10 to 12-inch circle. Carefully move the rolled-out dough onto parchment paper. Spread a thin layer of tomato sauce on top, making sure to leave a small border for the crust. Now, it's time to add your toppings! Place the mozzarella slices evenly on the pizza. Scatter fresh basil leaves over the top, and drizzle with a little olive oil. Slide the pizza, on the parchment, onto the preheated pizza stone or baking sheet. Bake for about 10 to 12 minutes. You want the crust to turn golden and the cheese to be bubbly and slightly browned. Once done, take it out and add a few more fresh basil leaves and a drizzle of olive oil. Follow these steps to make a Classic Margherita Pizza, and don’t forget to check the Full Recipe for more details! To get a great crust, start by kneading the dough well. Knead it for about 8-10 minutes. This builds strength and helps the dough rise. Use your palms to push the dough down and fold it over. Repeat until it feels smooth and elastic. For a crispy crust, preheat your oven to 475°F (245°C) with a pizza stone inside. The hot stone cooks the bottom fast, giving it a nice crunch. Roll the dough thinly, about 1/4 inch thick. This helps it bake evenly. Seasoning your sauce correctly is key. Use good quality crushed tomatoes like San Marzano. They are sweet and flavorful. Add a pinch of salt and pepper to taste. No cooking is needed; just mix and spread. Drizzle a bit of olive oil over the pizza before baking. This adds richness and depth. Use high-quality extra virgin olive oil for the best taste. A little goes a long way. If your dough isn’t rising, check the water temperature. It should be warm but not hot. Too much heat can kill the yeast. Also, give it enough time to rise in a warm spot. To prevent soggy pizza, avoid using too much sauce. Spread a thin layer over the dough. Make sure the cheese is well-drained too. This keeps the crust crispy. {{image_2}} You can change up your Margherita pizza with different toppings. Try adding various cheeses. A sprinkle of sharp parmesan can make it richer. Or, use burrata for that creamy texture. For veggies, consider bell peppers, mushrooms, or spinach. These add color and nutrition. If you like meat, slices of prosciutto or pepperoni work well too. Just remember to keep the balance. You want your base flavors to shine through. If you need a gluten-free option, use gluten-free flour for the crust. Many brands offer good mixes that work well in pizza. Just follow the package instructions for best results. For those who prefer vegan options, try vegan cheese. There are many tasty kinds available today. You can also add toppings like artichokes, olives, or a drizzle of balsamic glaze. These enhance flavor without dairy. Want to mix it up? Experiment with sauces! Pesto can add a fresh twist. Spread a thin layer instead of the classic tomato sauce. You can also try a white sauce. A simple blend of ricotta, garlic, and olive oil can create a creamy base. This makes for a unique and tasty pizza. For more tips on creating your pizza masterpiece, check the Full Recipe! Once you finish your delicious pizza, let it cool down. This step helps keep the crust from getting soggy. After cooling, place the pizza in an airtight container. If you don’t have one, wrap it tightly in plastic wrap or aluminum foil. This keeps the flavors fresh. Store it in the fridge. It stays good for about three days. To enjoy your pizza again, the oven works best. Preheat your oven to 375°F (190°C). Put the pizza on a baking sheet. Heat it for about 10 to 15 minutes. This warms it through and keeps it crispy. You can also use a skillet. Heat the skillet over medium heat. Place the pizza in the skillet, cover it, and heat for about 5 to 7 minutes. This method melts the cheese perfectly. Want to save some pizza for later? You can freeze unbaked pizza. After shaping the dough, add the sauce and toppings. Then, wrap it well in plastic wrap and foil. It can stay in the freezer for up to three months. When you’re ready to bake, thaw it in the fridge overnight. Preheat your oven and bake as usual. Enjoy your pizza fresh from the oven! Margherita pizza started in Naples, Italy, in the late 1800s. Queen Margherita of Savoy visited Naples and tried a local pizza. The chef, Raffaele Esposito, made her a special pizza with tomatoes, mozzarella, and basil. These colors matched the Italian flag: red, white, and green. This dish honored the queen and became famous. Today, it is a classic loved worldwide. Yes, you can make the dough ahead. Prepare it and let it rise. After rising, you can store it in the fridge for up to three days. Just wrap it tightly in plastic wrap. When you are ready to use it, let it sit at room temperature for about 30 minutes before shaping. This way, you save time on pizza night. Margherita pizza pairs well with many sides. Here are some ideas: - Simple salad: A mix of greens with a light vinaigrette. - Bruschetta: Toasted bread with tomatoes and basil. - Olives: A small bowl of marinated olives adds a nice touch. - Wine: A light red wine like Chianti or a crisp white pairs well. You can find great Margherita pizza at many places. Look for pizzerias that focus on fresh ingredients. Some notable spots include: - Pizzeria Bianco: Known for its artisanal pies. - Lombardi's: One of New York's first pizzerias. - Pizzana: Famous for its Neapolitan-style pizzas. These places make delicious Margherita pizza that honors its roots. For the detailed cooking instructions, check out the Full Recipe. It will guide you step by step to make your own perfect Margherita pizza at home. Making your own Margherita pizza can be fun and rewarding. With fresh ingredients like San Marzano tomatoes and mozzarella, you'll taste the difference. Following the steps helps you create a perfect crust and delicious toppings. Remember to store leftovers properly for later enjoyment. Don't shy away from experimenting with toppings and sauces. This allows you to personalize every pizza. Enjoy sharing this delicious creation with friends and family. With practice, you’ll master the art of pizza making!

Classic Margherita Pizza Irresistible Homemade Delight

Are you ready to savor a slice of classic Margherita pizza? This irresistible homemade delight brings together simple ingredients for

To make a great chicken pot pie, you need some key ingredients. Here’s a simple list to follow: - 1 lb (450g) cooked chicken, shredded - 1 cup frozen mixed vegetables (peas, carrots, corn) - 1 cup chicken broth - 1/2 cup heavy cream - 1/2 cup onion, finely chopped - 1 clove garlic, minced - 1 teaspoon dried thyme - 1 teaspoon salt - 1/2 teaspoon black pepper - 1 tablespoon olive oil - 1 pre-made pie crust (or 2 if top crust is desired) - 1 egg, beaten (for egg wash) These ingredients work together to create a warm and cozy dish. The cooked chicken gives you that nice protein base. The frozen mixed vegetables add color and flavor without much fuss. Chicken broth and heavy cream make the filling rich and creamy. Using onion and garlic adds a lovely aroma. Don’t forget the seasonings like thyme, salt, and pepper for that extra kick. Olive oil helps to cook the onion and garlic, making everything taste better. You can use one pie crust on top or two for an extra flaky treat. Lastly, the egg wash gives the crust a shiny, golden look when baked. For the full recipe, check the section below. - Preheat Oven Start by preheating your oven to 425°F (220°C). This high heat helps the crust become crisp and golden. - Cook Onion and Garlic In a large skillet, heat 1 tablespoon of olive oil over medium heat. Add 1/2 cup of finely chopped onion and 1 minced clove of garlic. Cook for about 3-4 minutes until the onion becomes soft and clear. - Combine Ingredients in Skillet Next, stir in 1 pound of shredded cooked chicken, 1 cup of frozen mixed vegetables, 1 cup of chicken broth, and 1/2 cup of heavy cream. Season with 1 teaspoon of dried thyme, 1 teaspoon of salt, and 1/2 teaspoon of black pepper. Let this mix simmer for 5-7 minutes until it thickens a bit, then remove it from the heat. - Fill the Pie Dish with Mixture Transfer the chicken mixture into a pie dish. If you want a top crust, lay the second pie crust over the filling. Seal the edges well and cut a few slits in the top. If using one crust, just place it over the filling and seal the edges. - Top Crust Application Brush the top with a beaten egg for a nice golden finish. This step makes your pot pie look great! - Brush Crust with Egg Wash Take your beaten egg and brush it over the top crust. This adds shine and color as it bakes. - Bake Time and Temperature Place the pot pie in your preheated oven. Bake for 25-30 minutes until the crust is golden brown and the filling bubbles. - Cooling Down Before Serving Once baked, remove the pie from the oven. Let it cool for 10 minutes. This waiting time helps the filling set and makes serving easier. For the full recipe, check the complete instructions above. Enjoy your cooking! How to Thicken the Filling To thicken your chicken pot pie filling, use a simple method. Simmer the mixture longer. This lets the liquid cook down. You can add a bit of flour or cornstarch mixed with water to help too. Stir it in slowly until it thickens. Always stir while cooking to avoid lumps. Proper Pie Crust Handling When working with pie crust, keep it cold. If it warms up, it gets hard to work with. Roll it out on a floured surface. Use a rolling pin for even thickness. Don’t stretch the crust; it will shrink when baking. If your crust cracks, just patch it with extra dough. Recommended Tools and Equipment Use a sturdy skillet for cooking the filling. A pie dish helps shape your pot pie. A rolling pin is key for crust. A whisk works well for mixing in thickening agents. Lastly, a pastry brush is perfect for applying the egg wash. Pairing with Sides Chicken pot pie pairs well with simple side dishes. A fresh green salad adds crunch. Roasted vegetables bring color and flavor. You can also serve it with crusty bread for dipping. Ideal Garnishes Garnish your pot pie with fresh herbs. Chopped parsley or thyme adds color and taste. A sprinkle of black pepper gives it a nice finish. For a fun twist, serve with a dollop of sour cream on the side. For the full recipe, check out Cozy Comfort Chicken Pot Pie. {{image_2}} You can change the protein in your chicken pot pie. Turkey works well if you want a twist. If you prefer vegetarian, try using mushrooms or lentils. Both options give great flavors. You can also swap vegetables. Instead of mixed veggies, use broccoli, green beans, or even sweet potatoes. Each choice adds its own taste and texture to the dish. Adding herbs and spices is a fun way to boost flavor. Try rosemary or parsley for fresh notes. A pinch of cayenne can add a little heat if you like spice. You can also play with the sauce. Instead of chicken broth, use vegetable broth for a lighter taste. Cream of mushroom soup can add depth and creaminess. These changes make your pot pie unique and exciting. For the full recipe, check out the Cozy Comfort Chicken Pot Pie section. To keep your chicken pot pie fresh, start by refrigerating leftovers. First, let it cool at room temperature for about an hour. Then, cover it with plastic wrap or foil. Store it in the fridge for up to three days. This keeps the filling safe and tasty. If you want to save it for longer, freezing is a great option. Wrap the pie tightly in plastic wrap, then in foil. This helps prevent freezer burn. You can freeze it for up to two months. When you’re ready to eat, thaw it in the fridge overnight before reheating. The best way to reheat chicken pot pie is in the oven. Preheat your oven to 350°F (175°C). Place the pie on a baking sheet to catch any drips. Heat for 20 to 25 minutes. This method keeps the crust crisp and the filling warm. To prevent drying out, cover the pie with foil for the first part of reheating. Remove the foil for the last few minutes to crisp up the crust. If you are in a hurry, you can use the microwave. Heat it in short bursts, about one minute at a time. Check often to avoid overcooking. How to make the filling less watery? To make the filling less watery, use less broth. You can also cook it longer to let it thicken. A cornstarch slurry works great too. Mix cornstarch with a little cold water, then stir it in until thickened. Can I use a homemade pie crust? Yes, you can use a homemade pie crust. It adds a personal touch. Just roll it out to fit your pie dish. If you’re short on time, a store-bought crust is a good option too. Is it possible to make it ahead of time? Absolutely! You can make the filling a day early. Store it in the fridge until you are ready to bake. Just add the crust right before baking to keep it fresh. How long does chicken pot pie last in the fridge? Chicken pot pie lasts about 3-4 days in the fridge. Be sure to cover it well. This keeps it fresh and tasty. What can be served alongside chicken pot pie? Great sides include a simple salad, steamed veggies, or mashed potatoes. These add color and balance to the meal. Can I use rotisserie chicken for convenience? Yes, rotisserie chicken is perfect for quick meals. It saves time and still tastes great. Just shred the chicken and mix it in with the other ingredients in the filling. For the full recipe, check out the Cozy Comfort Chicken Pot Pie section. This blog post covered how to make a tasty chicken pot pie. We discussed essential ingredients like chicken, veggies, and broth. I shared step-by-step instructions for preparation and baking. You learned cooking tips for beginners and how to enhance flavors. We also reviewed variations to keep the dish fresh and fun. Lastly, I provided storage techniques to enjoy leftovers. Making chicken pot pie is simple and rewarding. I hope you feel excited to try it for yourself!

Easy Chicken Pot Pie Comfort Food for Everyone

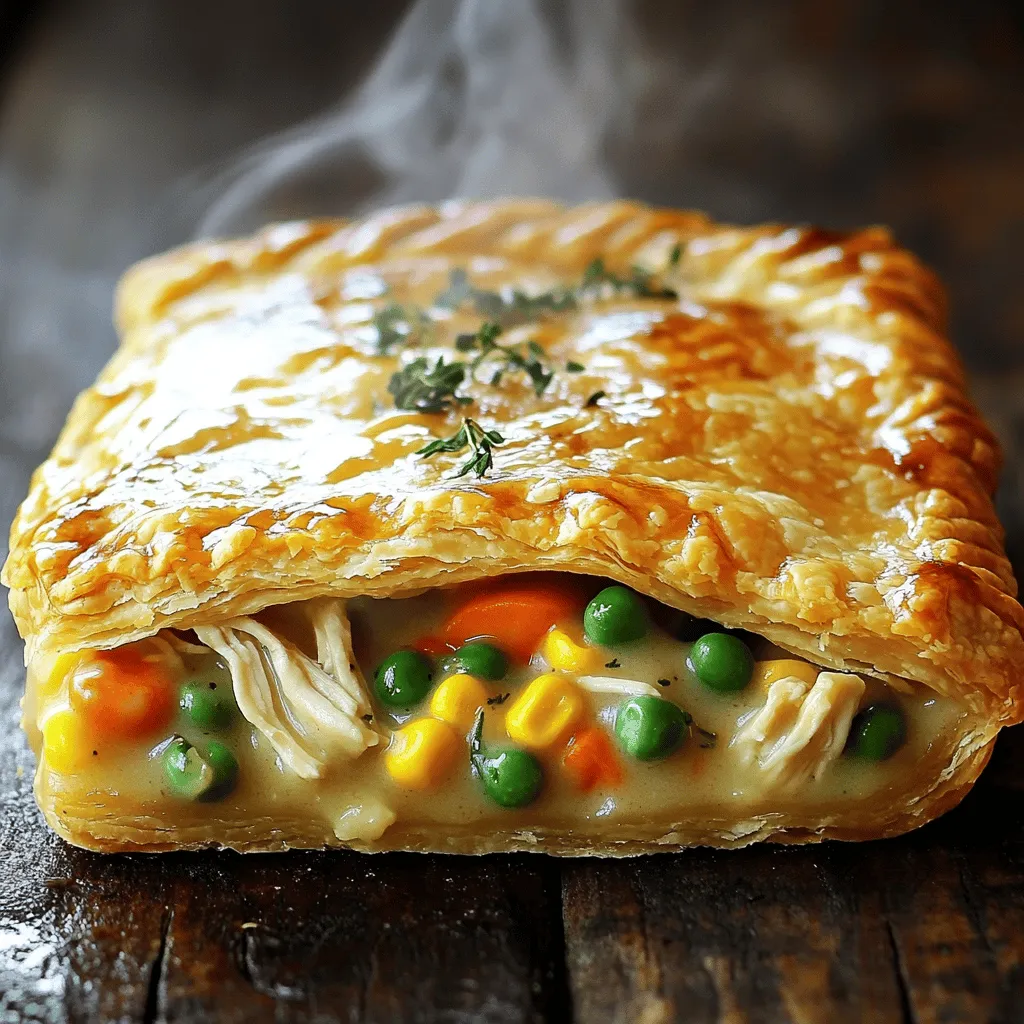
Comfort food doesn’t get better than chicken pot pie! This recipe is simple, tasty, and perfect for everyone. You can

To make sweet potato black bean tacos, you need a few simple ingredients. These ingredients will help you create a tasty and filling meal. Here’s what you need: - Sweet Potatoes Use 2 medium sweet potatoes. Peel and dice them into small cubes. - Black Beans One can (15 oz) of black beans works well. Drain and rinse them before use. - Seasonings and Oils You will need: - 1 tablespoon olive oil - 1 teaspoon cumin - 1 teaspoon smoked paprika - ½ teaspoon garlic powder - ½ teaspoon onion powder - Salt and pepper to taste - Tortillas and Toppings Use 8 small corn tortillas. For toppings, pick: - 1 avocado, sliced - 1 cup red cabbage, shredded - ¼ cup fresh cilantro, chopped - Lime wedges for serving These ingredients combine to create a delicious meal. The sweet potatoes add a nice sweetness, while the black beans give protein and fiber. The spices bring a warm flavor that enhances every bite. For the full recipe, check out the cooking instructions. To start, preheat your oven to 400°F (200°C). Take two medium sweet potatoes, peel them, and dice them into small cubes. In a large bowl, mix the diced sweet potatoes with one tablespoon of olive oil. Add one teaspoon of cumin, one teaspoon of smoked paprika, half a teaspoon of garlic powder, half a teaspoon of onion powder, and salt and pepper to taste. Toss everything well so the sweet potatoes are coated evenly. Spread them on a baking sheet in a single layer. Roast for 25-30 minutes, stirring halfway through. You want them tender and slightly caramelized. While the sweet potatoes roast, grab a small saucepan. Open a can of black beans and drain them. Rinse the beans under cold water and add them to the saucepan. Heat over medium heat until they are warmed through. Stir occasionally, and add salt and pepper to taste. This simple step brings out the rich flavor of the beans. Once your sweet potatoes are done roasting, it's time to assemble the tacos. Warm the corn tortillas in a skillet over medium heat for about 30 seconds on each side. This makes them soft and easy to fold. On each tortilla, layer a spoonful of black beans first. Next, add a generous portion of the roasted sweet potatoes. Top it off with sliced avocado and shredded red cabbage. Sprinkle chopped cilantro on top and finish with a squeeze of fresh lime juice. - Additional Assembly Tips: - Feel free to mix and match toppings to suit your taste. - Add salsa or your favorite hot sauce for extra flavor. - Serve warm with lime wedges on the side for that fresh zest. For the full recipe, check out the detailed instructions above. Enjoy your cooking! Roasting sweet potatoes gives them a nice flavor. Start by cutting them into small, even pieces. This helps them cook evenly. Toss them with olive oil and spices. I love using cumin and smoked paprika for warmth. Spread them out on a baking sheet. Avoid crowding the pan, or they won’t brown. Roast at 400°F (200°C) for about 25-30 minutes. Stir halfway through for a perfect caramelization. These tacos are great for personal choices. You can add more veggies like bell peppers or corn. Try using different beans, too, like pinto or kidney beans. If you want heat, add jalapeños or hot sauce. For a creamy touch, try a yogurt sauce or a tahini drizzle. You can even swap corn tortillas for flour ones if you prefer. Serve these tacos warm for the best taste. I love adding fresh toppings right before serving. Lime wedges add a nice zing. You can also serve them with salsa or guacamole on the side. For a fun twist, pair them with a refreshing salad or a bowl of soup. - Pairing Ideas - Cilantro lime rice - Fresh corn salad - Simple green salad with lemon vinaigrette - Roasted veggies for extra texture Each of these options complements the tacos well. They add variety and make the meal more filling. For more details, check out the Full Recipe. {{image_2}} Sweet potato black bean tacos are naturally vegetarian and vegan. The main components are sweet potatoes and black beans, both plant-based. You can enjoy this meal without animal products. Adding avocado provides healthy fats and a creamy texture. This makes the dish heartier and keeps it vegan-friendly. To make these tacos gluten-free, use corn tortillas. They are naturally gluten-free and pair well with the other flavors. Always check the label to ensure there is no cross-contamination. If you want more crunch, try using lettuce wraps instead of tortillas. This gives you a fresh, crisp bite. Feel free to get creative with toppings! Here are some great ideas: - Diced tomatoes for a fresh burst. - Jalapeños for some heat. - Corn for sweetness and texture. - Sliced radishes for crunch. - Pico de gallo for a fresh, zesty flavor. These toppings add color and make your tacos unique. You can mix and match based on what you like. If you want to change things up, consider these swaps: - Replace black beans with pinto beans or lentils. - Use butternut squash in place of sweet potatoes. - Try different spices, like chili powder or oregano, for new flavors. These variations keep the recipe fun and exciting. You can find more details in the Full Recipe. To store leftover tacos, place them in an airtight container. You can keep them in the fridge for up to three days. Separate the filling from the tortillas to keep them fresh. This way, the tortillas stay soft and do not get soggy. You can freeze the filling for later use. Place the sweet potato and black bean mix in a freezer-safe bag. Make sure to remove as much air as possible before sealing. You can freeze the filling for up to three months. Just remember, do not freeze the tortillas. They do not hold up well in the freezer. When you are ready to eat your tacos again, reheat the filling on the stove. Use low heat and stir often. For the tortillas, warm them in a dry skillet for about 30 seconds on each side. This makes them soft and ready for filling. - Best Practices for Longevity - Store tacos in an airtight container. - Keep tortillas and filling separate. - Reheat gently to avoid drying out. - Use within three days if refrigerated. - Freeze filling for longer storage. Following these tips helps you enjoy your sweet potato black bean tacos even longer. For the full recipe, check the main section above. To make sweet potato black bean tacos, gather your ingredients first. Here’s how to do it: 1. Preheat your oven to 400°F (200°C). 2. Toss diced sweet potatoes with olive oil and spices. 3. Spread them on a baking sheet and roast for about 25-30 minutes. 4. Heat black beans in a saucepan until warm. 5. Warm corn tortillas in a skillet for 30 seconds on each side. 6. Assemble the tacos with black beans, sweet potatoes, avocado, and cabbage. 7. Top with cilantro and lime juice. For exact measurements, check the Full Recipe. Sweet potatoes are rich in vitamins A and C. They have fiber that helps digestion. Black beans provide protein and iron, which support energy. They also have antioxidants that help fight disease. Together, they make a healthy meal. Yes, you can make sweet potato black bean tacos ahead of time. Prepare the sweet potatoes and black beans first. Store them in the fridge for up to three days. When ready to eat, warm them up and assemble the tacos. This saves time on busy days. - Other common questions: - Can I use other beans? Yes, you can use pinto or kidney beans. - What if I don’t have corn tortillas? Flour tortillas work too. - Can I add meat? Yes, shredded chicken or beef can be a tasty addition. This blog post covered all you need to make sweet potato black bean tacos. We explored ingredients, simple steps, and helpful tips. You learned ways to customize your tacos and how to store leftovers. Remember, this dish is versatile and can fit many diets. Enjoy the flavors and make it your own. With practice, you’ll master this tasty meal in no time!

Sweet Potato Black Bean Tacos Flavorful and Easy Meal

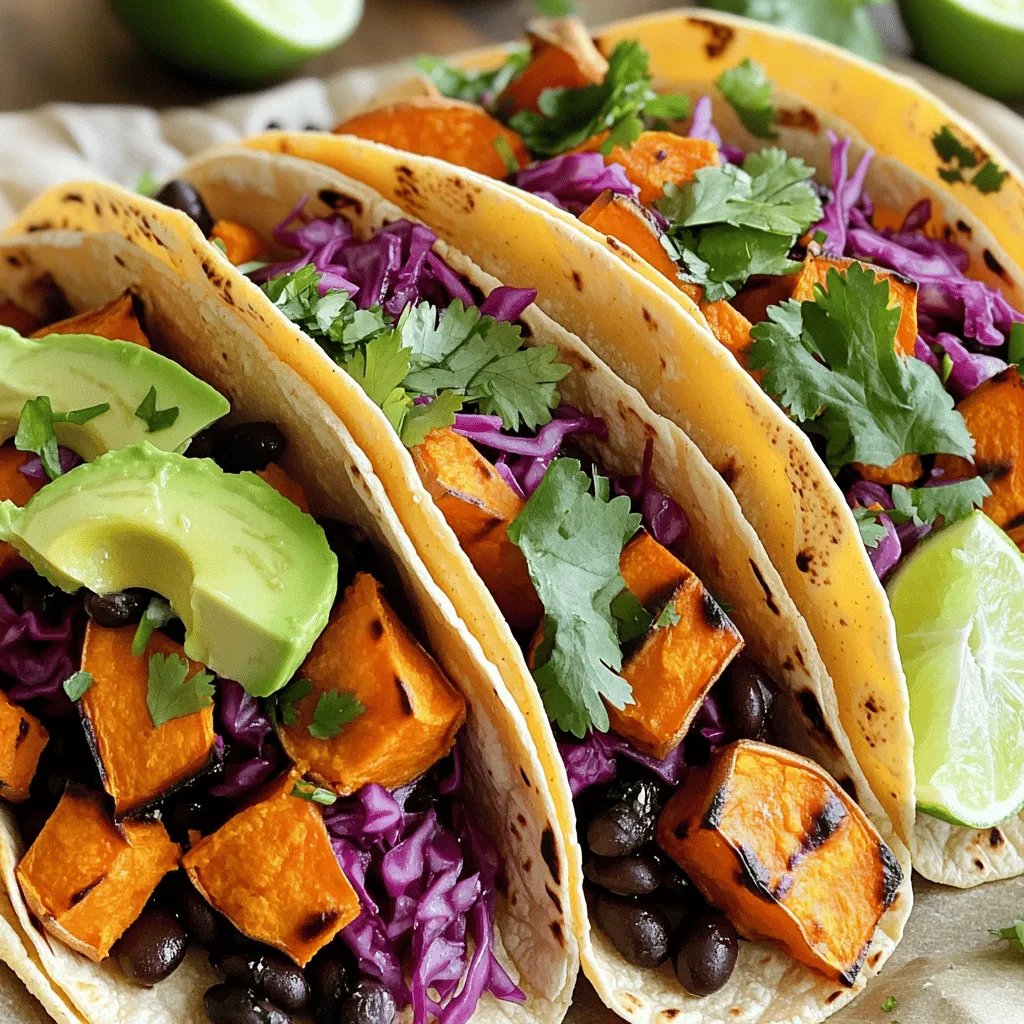
If you’re looking for a quick and tasty meal, you’ve found it! Sweet Potato Black Bean Tacos are not only

For the base of your Chicken Shawarma Bowl, you need simple, fresh ingredients. The star is the chicken. Here’s what you should gather: - 1 lb boneless, skinless chicken thighs - 2 cups cooked quinoa (or rice) - 1 cup cherry tomatoes, halved - 1 cucumber, diced - ½ red onion, thinly sliced - ½ cup hummus (store-bought or homemade) - Fresh parsley, chopped (for garnish) - Lemon wedges (for serving) The magic of shawarma comes from its spices. Use these for a tasty marinade: - 3 tablespoons olive oil - 2 cloves garlic, minced - 1 tablespoon ground cumin - 1 tablespoon ground coriander - 1 teaspoon paprika - 1 teaspoon turmeric - ½ teaspoon cayenne pepper (adjust to taste) - Salt and pepper, to taste Mix these spices with olive oil and garlic. This is where the flavor starts. The marinade makes the chicken juicy and packed with taste. Feel free to customize your bowl with fun toppings. Here are some ideas: - Feta cheese for a salty kick - Sliced olives for brininess - Roasted red peppers for sweetness - Avocado for creaminess - Mixed greens for added crunch These extras can take your bowl to the next level. Enjoy making it your own! For the complete recipe, check out the Full Recipe section. First, make your marinade. In a large bowl, mix together olive oil, minced garlic, ground cumin, ground coriander, paprika, turmeric, cayenne pepper, salt, and pepper. This blend gives the chicken its rich flavor. Make sure it’s well mixed. Add the chicken thighs to the marinade. Coat them evenly in the mixture. Cover the bowl with plastic wrap. Let it sit in the fridge for at least 1 hour. You can leave it overnight for a deeper taste. Next, preheat your oven to 400°F (200°C). Grab a baking sheet and line it with parchment paper. Place the marinated chicken on the sheet. Bake it for 20 to 25 minutes. You want it golden brown and cooked through. Check the internal temperature; it should reach 165°F (75°C). While the chicken cooks, prepare your quinoa or rice as per package instructions. Chop your tomatoes, cucumber, and red onion. Once your chicken is done, take it out of the oven and let it rest for a few minutes. Then, slice it into strips. Now, it’s time to build your bowl! Start with a base of cooked quinoa or rice. Layer on the sliced chicken, followed by halved cherry tomatoes, diced cucumber, and red onion. Add a big dollop of hummus on top. Finish it off with fresh chopped parsley for color. Serve with lemon wedges on the side for extra flavor. Enjoy your delicious Chicken Shawarma Bowls! For the complete recipe, check out the Full Recipe section. To get the most flavor, marinate your chicken well. Use a mix of olive oil, garlic, and spices. I recommend letting the chicken sit in the marinade for at least one hour. If you can, try to marinate it overnight. This helps the spices soak in and makes the chicken taste amazing. You can cook chicken shawarma in the oven or on the grill. Baking is easy and requires less fuss. Preheat your oven to 400°F. Place the chicken on a baking sheet and cook until golden brown. If you want a smoky flavor, use a grill. Grill the chicken on medium heat for about 5-7 minutes per side. Both methods create juicy and flavorful chicken. To build a balanced meal, layer your bowl with healthy ingredients. Start with quinoa or rice as your base. Add sliced chicken for protein. Then, pile on fresh veggies like tomatoes and cucumbers. Finish with a dollop of hummus for creaminess. A squeeze of lemon brightens up the flavors. These steps ensure every bite is tasty and satisfying. For a full recipe, check out the complete details above. {{image_2}} You can easily make this dish vegetarian or vegan. Instead of chicken, use chickpeas or marinated tofu. Both options soak up the spices well. For a hearty base, try using quinoa or brown rice. Add roasted veggies like bell peppers or zucchini for extra flavor and texture. If you want to mix it up, consider other proteins. Grilled shrimp or beef can work great too. For a lighter option, try using fish like salmon. You can switch the grains too. Use couscous or farro for a fun twist. Each grain brings its own taste and texture. Feel free to get creative with flavors. Add a spicy tahini sauce for a kick. Try mixing in fresh herbs like mint or cilantro for freshness. You can also play with toppings. Feta cheese or olives can add a briny bite. The goal is to make it your own! For the full experience, don’t forget to follow the Full Recipe. After enjoying your Chicken Shawarma Bowls, store any leftovers in airtight containers. This keeps them fresh and safe to eat. Place the chicken, quinoa, and veggies in separate containers if you can. This helps maintain their texture and flavor. Use leftovers within three days for the best taste. To reheat your Chicken Shawarma, use the oven or stovetop. These methods help keep the chicken juicy and the quinoa fluffy. If you use the microwave, cover the bowl with a damp paper towel. This keeps moisture in and prevents drying out. Heat until warm, but not too hot, to avoid losing flavor. You can freeze Chicken Shawarma Bowls for later use. First, let the chicken cool completely. Then, slice it and pack it in freezer-safe bags. Add cooked quinoa and veggies to separate bags. Label them with the date. You can freeze for up to three months. Thaw overnight in the fridge before reheating. This makes meal prep easy! To make Chicken Shawarma Bowls at home, you need to prepare a tasty marinade. Start by mixing olive oil, garlic, cumin, coriander, paprika, turmeric, and cayenne pepper. Add salt and pepper to taste. Coat the chicken thighs with this marinade. Let it sit for at least one hour in the fridge. Next, bake the chicken in a preheated oven at 400°F for about 20-25 minutes. While the chicken cooks, prepare your quinoa or rice. Once done, slice the chicken and assemble your bowl with quinoa, chicken, cherry tomatoes, cucumber, red onion, and hummus. Finally, enjoy your delicious creation! If you want to replace quinoa, you have many options. Rice is a great choice, both white and brown. You can also use couscous or bulgur wheat. For a low-carb option, try cauliflower rice or zucchini noodles. Each of these choices brings different flavors and textures to your bowl. Yes, you can marinate chicken overnight for deeper flavor. This long marination time helps the spices soak in well. Just remember to cover the bowl tightly with plastic wrap. This keeps the chicken fresh and flavorful until you are ready to cook. Chicken Shawarma Bowls are tasty on their own, but sides can enhance the meal. Fresh pita bread is a great option. You can also serve a simple green salad with lemon dressing. Roasted vegetables add color and flavor too. For a fun twist, try pickled vegetables for a zesty kick. In this article, we explored making delicious Chicken Shawarma Bowls. We discussed key ingredients, spices, and marinade preparation. You learned how to cook the chicken and assemble your bowl. Tips for marination and cooking methods help boost flavor. We even covered veggie options and storage tips. The Chicken Shawarma Bowl is easy to make and offers great variety. Enjoy creating and customizing these bowls to fit your taste. You’ll love every bite!

Chicken Shawarma Bowls Flavorful and Easy Recipe

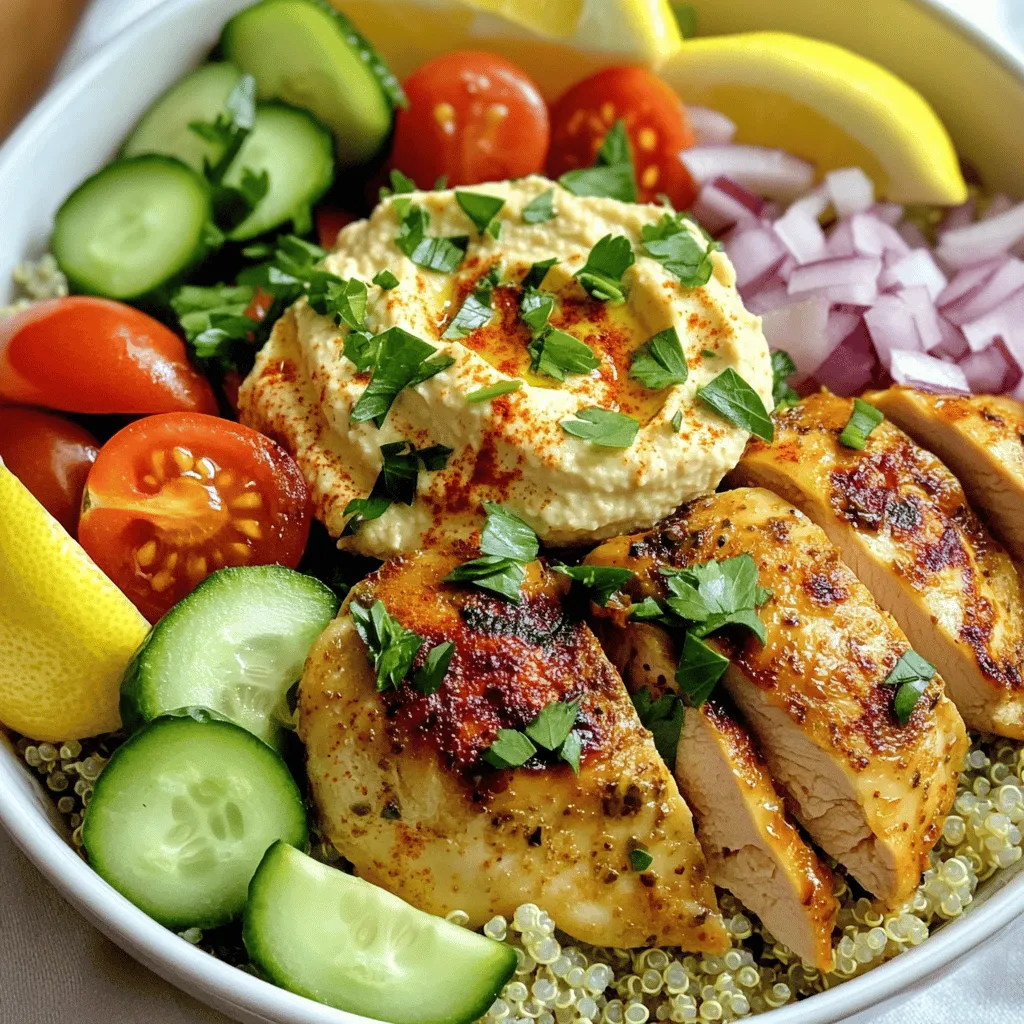
If you’re craving a meal that’s packed with flavor and easy to make, chicken shawarma bowls are your answer. You

To make a tasty spinach artichoke dip, gather these main ingredients: - 2 cups fresh spinach, chopped - 1 can (14 oz) artichoke hearts, drained and chopped - 1 cup cream cheese, softened - 1/2 cup sour cream - 1/2 cup mayonnaise - 1 cup shredded mozzarella cheese - 1/2 cup grated Parmesan cheese - 2 cloves garlic, minced - 1 teaspoon lemon juice - Salt and pepper to taste These ingredients blend together to create a creamy, cheesy dip. The spinach adds a fresh flavor, while the artichokes give it a unique taste. The cream cheese, sour cream, and mayonnaise provide a rich, smooth base. Mozzarella and Parmesan add a lovely cheese pull that makes this dip so enjoyable. You can adjust the dip to fit your taste. Here are some optional ingredients: - 1/2 teaspoon red pepper flakes for heat - Fresh herbs like parsley or basil for a burst of flavor - A splash of hot sauce for extra kick - Chopped sun-dried tomatoes for a sweet twist Feel free to mix and match these options. They will change the flavor and make the dip your own. Each serving of this spinach artichoke dip contains: - Calories: 250 - Protein: 6g - Fat: 20g - Carbohydrates: 8g - Fiber: 1g Knowing the nutritional content helps you enjoy your dip in moderation. This dip can be a fun treat for parties or game days. You can find the full recipe above to get started on this delicious dish! To make this dip, start by gathering your ingredients. You will need fresh spinach, artichoke hearts, cream cheese, sour cream, mayonnaise, mozzarella cheese, Parmesan cheese, garlic, lemon juice, and red pepper flakes. 1. First, preheat your oven to 350°F (175°C). This step warms up your oven for baking later. 2. In a large mixing bowl, mix the softened cream cheese, sour cream, and mayonnaise. Stir until smooth. This base makes your dip creamy. 3. Now, add the chopped spinach and drained artichoke hearts. Also, include the minced garlic, lemon juice, and red pepper flakes if you want some heat. Mix everything well. 4. Next, fold in the shredded mozzarella and grated Parmesan cheese. This cheese blend adds flavor and texture. 5. Season with salt and pepper to your taste. This step is key for balancing flavors. Once your dip is mixed, it’s time to bake. 1. Transfer the mixture to an oven-safe dish. Spread it evenly across the dish. This helps it cook evenly. 2. Place the dish in your preheated oven. Bake for 25 to 30 minutes. Look for bubbling and a golden top. This shows it’s ready. 3. After baking, take the dip out of the oven. Let it cool slightly before serving. This makes it easier to enjoy. To get the best texture for your dip, follow these tips: - Use softened cream cheese. This ensures a smooth blend with the other ingredients. - Do not over-bake. Keep an eye on the dip. You want it hot but not dried out. - For a creamier dip, add a bit more sour cream or mayonnaise. Adjust based on your preference. These steps will help you make a delicious spinach artichoke dip. For the full recipe, check the earlier section. Enjoy your cooking! When making spinach artichoke dip, avoid using frozen spinach. Fresh spinach gives a better taste and texture. Make sure to drain the artichoke hearts well. Any extra liquid can make the dip runny. Also, do not skip the garlic. It adds a lovely flavor that enhances the dish. Lastly, be careful with the salt. The cheeses already add saltiness, so taste as you go. To boost the flavor, try adding a splash of hot sauce. It gives a nice kick without being too spicy. You can also mix in some chopped sun-dried tomatoes for a touch of sweetness. Fresh herbs like basil or parsley can brighten the dip. For a smoky taste, add a bit of smoked paprika. Each of these options gives a unique twist. Serve your dip warm, and it will be a hit. Pair it with tortilla chips or pita bread. Fresh veggies like carrots and celery add crunch and color. You can also use it as a spread on sandwiches or wraps. For a fun twist, offer it with crusty bread for dipping. This makes a great appetizer for parties or gatherings. Enjoy the flavors with friends or family! {{image_2}} You can make a tasty vegan version of spinach artichoke dip. Start by swapping the cream cheese and sour cream for cashew cream. To make cashew cream, blend soaked cashews with lemon juice and a little water until smooth. Use a dairy-free mayo in place of regular mayo. You can still enjoy artichokes and spinach in this dip. Just mix everything as you would in the original recipe. Bake until hot, and serve with your favorite snacks. If you want a low-fat version, you can reduce calories without losing flavor. Use low-fat cream cheese and Greek yogurt instead of sour cream and mayonnaise. This swap keeps the dip creamy and rich. You can also cut the cheese amount in half or use a reduced-fat cheese. Follow the same steps in the [Full Recipe]. The dip will still taste great and be a healthier choice. For a spicy kick, add some heat to your dip. Mix in diced jalapeños or a few dashes of hot sauce. You can also increase the red pepper flakes for more spice. If you enjoy smoky flavors, stir in some smoked paprika. Bake as directed in the [Full Recipe] for a warm and zesty treat. Serve with crunchy chips or fresh veggies for a fun appetizer. After you enjoy your Spinach Artichoke Dip, cool it to room temperature. Then, transfer it to an airtight container. This helps keep it fresh. Store it in the fridge for up to three days. If you want to keep it longer, freezing is a great option. To reheat your dip, use an oven or microwave. If using the oven, preheat it to 350°F (175°C). Place the dip in an oven-safe dish and cover it with foil. Bake for about 15-20 minutes. Check that it heats all the way through. In the microwave, heat it in short bursts, stirring in between. This helps avoid hot spots. For freezing, place the dip in a freezer-safe container. Leave some space at the top, as it may expand. It can last up to three months in the freezer. When you're ready to use it, thaw it in the fridge overnight. Reheat using the methods above for the best taste. Enjoy your creamy dip anytime! Yes, you can make Spinach Artichoke Dip in advance. Just prepare the dip and store it in the fridge. Cover it tightly with plastic wrap or a lid. You can keep it for up to two days. When ready to serve, just bake it as normal. This saves time for your party or gathering. If you want a substitute for cream cheese, try using Greek yogurt or ricotta cheese. Both options work well. They give a nice creamy texture without losing flavor. You can also use vegan cream cheese if you're looking for a plant-based option. Making Spinach Artichoke Dip gluten-free is easy! All the ingredients in the recipe are naturally gluten-free. Just make sure your mayonnaise and any extra ingredients are labeled gluten-free. Serve it with gluten-free chips or veggies for a great snack. Spinach artichoke dip is a tasty and fun dish to make. We covered key ingredients, step-by-step instructions, and tips for the best results. You can even customize it with variations like vegan or spicy options. Storing leftovers is easy, too. With these insights and tricks, you’ll impress your friends and family. Enjoy creating your perfect dip, and share it at your next gathering!

Spinach Artichoke Dip Delicious and Easy Recipe

Are you ready to dive into a creamy, cheesy delight? This Spinach Artichoke Dip is not only delicious but also

- 1.5 pounds baby Yukon gold potatoes - 4 tablespoons unsalted butter, melted - 4 cloves garlic, minced - 2 tablespoons fresh parsley, chopped - Salt and pepper to taste - 1/4 teaspoon red pepper flakes (optional) - Olive oil for drizzling You can use other potato types like red or fingerling potatoes. For a dairy-free option, try using margarine or olive oil instead of butter. If you want more flavor, switch up the herbs. Fresh chives or rosemary can work well. Feel free to add your favorite spices to make the dish your own. For the full recipe, click here: [Full Recipe]. To start, you need to boil the potatoes. Take 1.5 pounds of baby Yukon gold potatoes and put them in a large pot. Cover them with cold water and add salt. Bring the water to a boil. Let the potatoes cook for 15 to 20 minutes until they are fork-tender. While the potatoes are boiling, preheat your oven to 425°F (220°C). This temperature helps the potatoes get crispy later. Once the potatoes are cooked, drain them and let them cool for a few minutes. You want to handle them safely. When they are cool enough, place the potatoes on a baking sheet lined with parchment paper. Now comes the fun part! Using the bottom of a glass or a potato masher, gently smash each potato until it is about 1/2-inch thick. This creates a nice texture for crisping. Next, we need to prepare the garlic butter. In a small bowl, mix 4 tablespoons of melted unsalted butter with 4 cloves of minced garlic. If you like a little heat, add 1/4 teaspoon of red pepper flakes. Brush this garlic butter mixture generously over each smashed potato. Make sure to get some garlic on each one! Then, sprinkle salt and pepper over the potatoes to taste. Now, place the baking sheet in your preheated oven. Bake the potatoes for 20 to 25 minutes. You want them to turn golden and crispy. When they are done, sprinkle fresh parsley on top and drizzle with a little olive oil. For the full recipe, check out the complete instructions! To get the best flavor in your garlic butter smashed potatoes, choose fresh garlic. Fresh garlic gives a strong, rich taste. You can also use herbs like thyme or rosemary. They add depth and aroma. For crispiness, make sure you smash the potatoes evenly. This helps them bake evenly. Drizzle a little olive oil before baking. It helps create a nice golden crust. One big mistake is overcooking or undercooking the potatoes. Overcooked potatoes become mushy. Undercooked potatoes stay hard. Aim for fork-tender potatoes for the best texture. Another mistake is not using enough seasoning. Garlic butter adds flavor, but potatoes need salt and pepper too. Don’t be shy with the seasoning. Taste as you go! Garlic butter smashed potatoes pair well with many dishes. They go great with meats like chicken or steak. You can also serve them with roasted veggies for a healthy meal. For a balanced plate, add a fresh salad. The crunch of greens contrasts nicely with the soft potatoes. Think about adding a tangy dressing to brighten the meal. For the full recipe, check out the complete guide on making these tasty potatoes! {{image_2}} You can make garlic butter smashed potatoes even more exciting with a few tweaks. - Cheesy garlic butter smashed potatoes: Add shredded cheese like cheddar or Parmesan on top before baking. The cheese melts and creates a rich, creamy texture. - Spicy smashed potatoes with added chili: Mix in diced jalapeños or a sprinkle of cayenne to add heat. This will give your dish a nice kick. If you have specific dietary needs, you can still enjoy this dish. - Vegan options: Swap the butter for vegan butter or olive oil. Use nutritional yeast for a cheesy flavor without dairy. - Gluten-free adaptations: This recipe is naturally gluten-free. Just ensure that all your ingredients are labeled gluten-free. Changing up the herbs and ingredients can bring fresh flavors. - Using seasonal herbs and ingredients: In spring, add fresh chives or dill. In the fall, try rosemary or thyme for a cozy touch. Seasonal veggies like roasted garlic or sun-dried tomatoes can also enhance the dish. For the full recipe, you can refer to the earlier section. Enjoy exploring these variations! To keep your garlic butter smashed potatoes fresh, store them properly. First, let the potatoes cool completely after baking. Then, place them in an airtight container. This helps to lock in flavor and moisture. You can refrigerate them for up to three days. If you want to keep them longer, freezing is a great option. To freeze, wrap each potato in plastic wrap. Then, place them in a freezer-safe bag. This way, they won’t stick together. Frozen smashed potatoes can last for up to three months. Just remember to label the bag with the date! When it's time to enjoy your leftovers, reheating correctly is key. The best method is using the oven. Preheat your oven to 375°F (190°C). Place the smashed potatoes on a baking sheet. Heat them for about 15-20 minutes. This will help keep them crispy. If you’re short on time, you can use the microwave. Place the potatoes on a microwave-safe plate. Heat them for 1-2 minutes. To retain their texture and flavor, cover them with a damp paper towel. This helps to keep them from drying out. For the best results, always check that they are heated through before serving. Enjoy your delicious garlic butter smashed potatoes! You can find the full recipe [here](Full Recipe). Garlic butter smashed potatoes last about 3 to 5 days in the fridge. Store them in an airtight container. This keeps them fresh and tasty for later meals. Yes, you can make smashed potatoes ahead of time. Cook and smash them, then store in the fridge. Just reheat and add garlic butter before serving. Serve these potatoes hot with a sprinkle of fresh parsley. They go well with roasted meats and grilled veggies. You can also drizzle olive oil for extra flavor. Yes, you can use other potatoes. Russet or red potatoes work well too. Just ensure they are similar in size for even cooking. To make garlic butter, mix melted butter with minced garlic. You can add herbs for more flavor. It’s easy and takes just a few minutes. For the full recipe, check out the Garlic Butter Smashed Potatoes section above. You learned how to make delicious garlic butter smashed potatoes. We covered the best ingredients, simple cooking steps, and helpful tips. Remember to substitute ingredients as needed. Experiment with flavors to make these potatoes your own. Store them well to enjoy later, and don’t forget the reheating tips. Smashed potatoes can be a great side dish and are easy to share. Now, it’s time to enjoy your tasty creation. Happy cooking!

Garlic Butter Smashed Potatoes Delicious Side Dish

Are you ready to elevate your side dish game? Garlic Butter Smashed Potatoes are here to impress! This simple recipe

- 1 whole chicken (3-4 pounds) - 3 tablespoons olive oil - 4 cloves garlic, minced - 2 lemons (1 sliced, 1 juiced) - 2 tablespoons fresh rosemary, chopped - 2 tablespoons fresh thyme, chopped - Salt and pepper to taste - 1 onion, quartered - 2 cups baby carrots - 1 cup baby potatoes, halved Gathering the right ingredients is key to making a great lemon herb roasted chicken. A whole chicken is the star of the dish, bringing a juicy flavor. I use olive oil to keep the chicken moist and add garlic for a punch of taste. The lemons, both juiced and sliced, brighten the dish with fresh citrus notes. Fresh rosemary and thyme provide an earthy aroma that pairs well with chicken. Salt and pepper are essential to enhance all flavors. The onion, carrots, and baby potatoes round out the meal. They roast beautifully alongside the chicken, soaking up its savory juices. Make sure to have these items ready before you start cooking. You’ll love how easy it is to create a flavorful meal from these simple ingredients. For more details on preparing this dish, check the Full Recipe. - Roasting pan - Meat thermometer - Kitchen twine - Mixing bowl Having the right tools makes cooking easier. A roasting pan holds everything nicely while the chicken cooks. A meat thermometer ensures the chicken reaches the right temperature for safety and taste. Kitchen twine helps you keep the chicken legs together for even cooking. A mixing bowl is handy for combining the herb mixture. These tools help you create a delicious lemon herb roasted chicken that you and your loved ones will enjoy. 1. Preheat the oven and prepare the roasting pan First, preheat your oven to 425°F (220°C). This high heat helps the skin get crispy and golden. While the oven heats, grab a roasting pan and set it aside. 2. Create herb and oil mixture In a small bowl, mix together 3 tablespoons of olive oil, 4 minced garlic cloves, the juice of 1 lemon, 2 tablespoons of chopped rosemary, and 2 tablespoons of chopped thyme. Add salt and pepper to taste. This blend will add great flavor to your chicken. 1. Patting dry and seasoning the chicken Take your whole chicken (3-4 pounds) and pat it dry with paper towels. This step helps the skin crisp up when roasting. Place the chicken in the roasting pan. 2. Loosening the skin and applying the herb mixture Carefully loosen the skin on the chicken breast and thighs. You can use your fingers for this. Be gentle to avoid tearing the skin. Rub the herb and oil mixture generously under the skin and on the outside of the chicken. This will keep the meat moist and flavorful. 1. Arrange vegetables in the pan Place sliced lemon, quartered onion, 2 cups of baby carrots, and 1 cup of halved baby potatoes around the chicken in the pan. Season the veggies with salt and pepper. Drizzle a bit of olive oil over them for extra flavor. 2. Roasting time and checking for doneness Tie the chicken legs with kitchen twine and tuck the wing tips under the bird. Roast the chicken for about 1 hour and 15 minutes. Use a meat thermometer to check that the internal temperature reaches 165°F (75°C). The juices should run clear when pierced. This ensures your chicken is cooked perfectly. For the full recipe, make sure to check out the complete cooking instructions! To keep your chicken juicy, always let it rest after cooking. This step helps the juices settle back into the meat. After roasting, set the chicken aside for ten minutes. This wait makes a big difference. Use a meat thermometer to check the chicken's doneness. Insert it into the thickest part of the thigh. It should read 165°F (75°C). This step ensures that your chicken is safe to eat and perfectly cooked. For added flavor, consider marinating the chicken before roasting. A simple mix of olive oil, lemon juice, and herbs works well. Marinate it for at least one hour, or even overnight, if you have time. This enhances the taste greatly. You can also explore different herbs and spices. Try adding oregano or tarragon for a twist. Each herb brings its unique flavor, making your dish special every time. Pair your lemon herb roasted chicken with sides like roasted veggies or a fresh salad. Baby carrots and potatoes work well, as they roast alongside the chicken. To complement the dish, serve a light salad with citrus dressing. The bright flavors of lemon and herbs in the chicken match perfectly with fresh greens. These side dishes will elevate your meal and make it more enjoyable. For the full recipe, check out the entire guide. {{image_2}} You can change the herbs for fun flavors. An Italian herb blend works well. Just mix basil, oregano, and parsley. This gives the chicken a fresh taste. You can also try citrus variations. Use oranges instead of lemons. Slice them and add them around the chicken. The sweetness of the orange adds a nice touch. You can cook this dish in different ways. A slow cooker is a great option. Just put all the ingredients in and set the cooker. It keeps the chicken moist and tender. Grilling is another fun choice for summer. It adds a smoky flavor. Just marinate the chicken first to keep it juicy. If you need gluten-free options, this recipe works great. All the ingredients are naturally gluten-free. For those watching sodium, use low-sodium seasonings. This way, you still get great flavor without too much salt. You can also skip the added salt entirely. Fresh herbs and lemon juice can boost taste without added sodium. For the full recipe, check out the detailed steps provided. To keep your Lemon Herb Roasted Chicken fresh, store leftovers in the fridge. - Use airtight containers: This keeps the chicken moist and safe. - Divide portions: Smaller pieces cool faster and make reheating easier. If you want to save some for later, freezing works great. - Cool the chicken: Let it sit at room temperature for about 30 minutes. - Wrap well: Use plastic wrap and then foil to prevent freezer burn. - Label the packaging: Write the date and type of dish on the outside. When ready to eat, thaw in the fridge overnight. To reheat, place in the oven at 350°F until warm. Leftovers can last in the fridge for about 3 to 4 days. - Signs of spoilage: Look for off-smells, slimy texture, or discoloration. If you see any of these signs, it's best to toss the chicken. For longer storage, freeze it. The chicken will stay fresh for about 2 to 6 months in the freezer. For more details on the recipe, check the Full Recipe. The cooking time for a whole chicken depends on its weight. - For a chicken weighing 3-4 pounds, cook it for about 1 hour and 15 minutes. - A 4-5 pound chicken needs roughly 1 hour and 30 minutes. - Use a meat thermometer to check the internal temperature. It should reach 165°F (75°C) for safe eating. Yes, you can use frozen chicken, but it needs careful handling. - If using frozen chicken, thaw it safely in the fridge overnight. - Do not cook frozen chicken directly; it requires longer cooking times. - Make sure the chicken is fully thawed for even cooking. If the chicken is undercooked, follow these steps. - Return it to the oven right away. - Cook until the internal temperature reaches 165°F (75°C). - Always check the thickest part of the meat, especially near the bone. You can prep this recipe in advance easily. - Season the chicken and store it in the fridge for up to 24 hours. - You can also chop the veggies ahead of time. - When ready, just roast the chicken with the vegetables. - This saves time and keeps the flavors fresh. For the complete instructions, check the Full Recipe. This recipe gives you a simple way to roast a whole chicken. You have learned about ingredients, cooking methods, and tips for juicy results. Remember to use a meat thermometer for best results. Feel free to explore variations, like different herbs or cooking styles, to match your taste. Proper storage can help keep your leftovers fresh. With these easy steps, you'll impress everyone at the table. Enjoy your delicious meal!

Lemon Herb Roasted Chicken Simple and Savory Dish

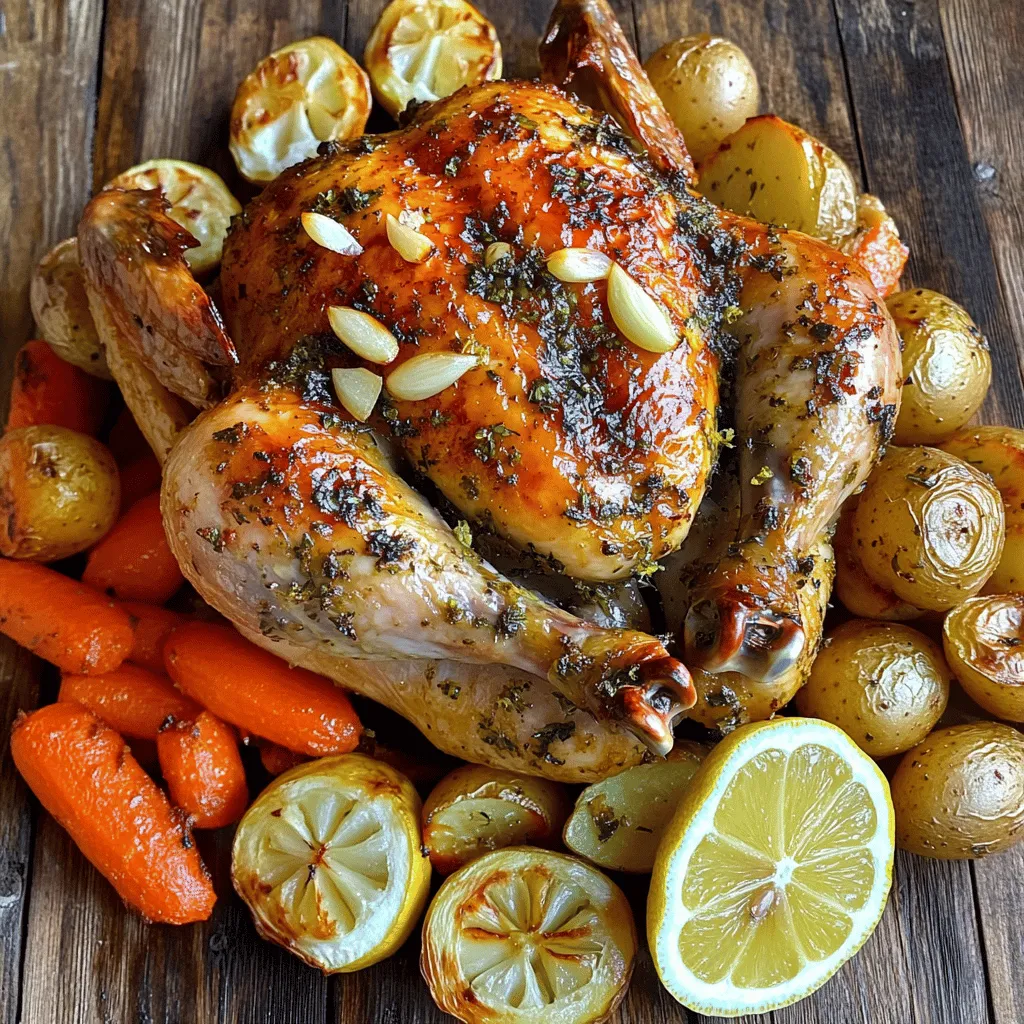
Roasting a whole chicken can seem daunting, but it doesn’t have to be! With my simple lemon herb roasted chicken

- Green tea bags - Ripe peaches - Honey or other sweeteners - Lemon juice - Fresh mint for garnish Peach iced green tea is both tasty and simple. Each ingredient plays a key role in flavor. - Green tea bags: Use high-quality green tea bags. They offer a fresh taste and health benefits. Green tea is rich in antioxidants. - Ripe peaches: Choose sweet, ripe peaches. They add a fruity flavor and natural sweetness. Look for peaches that are slightly soft. - Honey or other sweeteners: Honey is my favorite, but you can use any sweetener. Adjust the amount to suit your taste. - Lemon juice: Fresh lemon juice brightens the drink. It adds a zesty kick that balances the sweetness. - Fresh mint for garnish: Mint gives a refreshing touch. It also adds a lovely aroma to your drink. - Large saucepan - Blender - Pitcher - Glasses for serving Having the right tools makes cooking easier. Here’s what you need to make this drink: - Large saucepan: This is for boiling water and steeping tea. It should hold enough water for your ingredients. - Blender: Use a blender to puree the peaches. It creates a smooth mixture that blends nicely with the tea. - Pitcher: A pitcher is perfect for mixing and serving the drink. It should be large enough to hold all the ingredients. - Glasses for serving: Choose your favorite glasses to serve this drink. Clear glasses show off the beautiful color. Now you have all the ingredients and tools. Get ready to make a delicious Peach Iced Green Tea! For the complete recipe, check out the [Full Recipe]. To start, boil 4 cups of water in a large saucepan. Bring it to a rolling boil. Once boiling, remove it from heat. This step is key to unlock the tea's flavor. Next, add the 4 green tea bags to the hot water. Let them steep for about 3-4 minutes. This time gives you a nice balance of taste. If you want stronger tea, steep a bit longer. When finished, remove the tea bags and let the tea cool to room temperature. Now, let’s focus on the peaches. First, take 2 ripe peaches. Cut them in half and remove the pit. Slice the peaches into smaller pieces for easy blending. Place the sliced peaches into a blender. Blend until smooth, aiming for a puree-like consistency. If it seems too thick, add a splash of water to help it blend. This peach puree will add natural sweetness and flavor to your drink. In a large pitcher, combine the cooled green tea and peach puree. Add in 1/4 cup of honey, or adjust to your taste. Pour in 1 tablespoon of lemon juice for a tangy kick. Stir the mixture well. Make sure the honey dissolves completely. This helps ensure even flavor throughout your drink. Once mixed, you’re ready to serve your refreshing peach iced green tea! To make the best peach iced green tea, start with sweetness. You can adjust the honey. Add more for sweeter tea or less for a mild taste. I love using ripe peaches, as they add great flavor. If the tea is too sweet, add more lemon juice. It gives a nice balance. To enhance peach flavor, blend the peaches well. A smooth puree works best. You can also try using peach juice. Just mix it into the tea. This adds a lovely peachy kick. The right glassware can make a big difference. I recommend tall glasses. They show off the pretty color and look great on a table. Use clear glasses to highlight the peach puree. For the best taste, serve the tea cold. Use plenty of ice cubes to keep it chilled. If it sits too long, it can lose its freshness. So, enjoy it right away for the best flavor. Garnishing adds flair to your drink. Fresh mint leaves are a perfect choice. They bring a cooling effect and look nice. You can also try basil for a different twist. Adding fruit slices makes it special. Use extra peach slices or even lemon. Place them on the rim of your glass. This not only looks good but also adds great taste. For the full recipe, please refer to the Full Recipe section. {{image_2}} You can change the sweetener in your peach iced green tea. Natural sweeteners, like agave or maple syrup, work well and add unique flavors. These options are often healthier than regular sugar. They can give your drink a nice twist. For low-calorie choices, try stevia or monk fruit sweetener. They help keep sugar levels low while still tasting sweet. Want to mix things up? Add fresh herbs like basil or thyme. These herbs give the tea a refreshing taste. You can also infuse your tea with extra fruits. Think berries, citrus, or pineapple! Each fruit adds its own flavor and makes your drink more exciting. You can make a warm version of peach green tea, too. Just steep the tea bags in hot water without ice. This version is cozy and perfect for cooler days. Drinking warm peach green tea has benefits. It can soothe your throat and help with digestion. Plus, the warm drink can bring out the peach flavor. Try these variations to find your favorite way to enjoy peach iced green tea. For a full recipe and more tips, check out the [Full Recipe]. To keep your peach iced green tea fresh, use a glass or plastic pitcher with a lid. This prevents the tea from absorbing other smells in the fridge. If you do not have a pitcher, a mason jar works well too. Store the tea in the fridge for up to 3 days. After that, the flavor may fade, and it might taste less fresh. Make sure to check for any signs of spoilage before drinking. Yes, leftover peach puree can be reused! You can mix it into yogurt, oatmeal, or smoothies. It adds a nice fruity flavor and boosts nutrition. For the tea bags, you can reuse them for a second brew. Just steep them in hot water for a shorter time. You may notice the flavor is lighter, but it's still tasty. You can swap out honey for other sweeteners. Here are some great options: - Agave syrup - Maple syrup - Stevia - Coconut sugar Each sweetener has its own taste. If you use agave, start with less. Maple syrup is richer but adds depth. Stevia is low-calorie, so use it carefully. Taste as you go to find your sweet spot. Peach iced green tea is tasty and healthy. Here are some key benefits: - Green tea is rich in antioxidants. - Peaches provide vitamins A and C. - Lemon juice adds vitamin C. These ingredients help boost your immune system. Green tea may also aid in weight loss. Plus, it hydrates you in the summer heat. Enjoying this drink is a simple way to feel good. You can find pre-made peach iced green tea at many stores. Look for these popular brands: - Pure Leaf - AriZona - Snapple They offer bottled versions, which are convenient for busy days. Check local grocery stores or online. Enjoy the taste without the work! For the full recipe, check the link above. You learned how to make tasty Peach Iced Green Tea. We covered key ingredients like ripe peaches and honey, plus tools needed for the job. I walked you through each step, from boiling water to mixing everything together. Don’t forget the tips on sweeteners and garnishes to make your drink special. Enjoy the fresh flavors and health benefits of this refreshing tea. Now, grab your ingredients and get started on this fun drink!

Peach Iced Green Tea Refreshing Summer Drink Recipe

Looking for a cool drink to beat the summer heat? Peach Iced Green Tea is your answer! This sweet, refreshing

Older posts
Newer posts
← Previous Page1 … Page63 Page64 Page65 … Page84 Next →

dsad

© 2026 juliesdish • Built with GeneratePress

Our Policies

  • Copyright Policy
  • Cookie Policy
  • GDPR Policy
  • Privacy Policy
  • Disclaimer
  • Terms Of Use

More Information

  • Home
  • About
  • Contact
  • Appetizers
  • Dessert
  • Dinner
  • Drinks
©2026, juliesdish About Back To Top