Skip to content
DisclaimerTerms Of UseGDPR PolicyCookie Policy

juliesdish

  • Home
  • Drinks
  • Appetizers
  • Dinner
  • Dessert
  • About
  • Contact
  • Privacy Policy
DisclaimerTerms Of UseGDPR PolicyCookie Policy

NO-ING-IMG

- 1 pound ground turkey - 1 tablespoon olive oil - 1 small onion, finely chopped - 2 cloves garlic, minced - 1 tablespoon chili powder - 1 teaspoon cumin - 1/2 teaspoon smoked paprika - Salt and pepper to taste - 1 cup cherry tomatoes, halved - 1/2 cup corn (fresh or canned) - 1/4 cup fresh cilantro, chopped - Juice of 1 lime - 1 head of iceberg or butter lettuce, leaves separated Let’s talk about these ingredients. Ground turkey serves as the main protein. It’s lean and flavorful. I always look for quality turkey. The olive oil adds a nice richness. Onions and garlic are your flavor base. They bring depth to the dish. I chop the onion finely for even cooking. The chili powder, cumin, and smoked paprika add warmth and spice. Adjust these to fit your taste. Cherry tomatoes add a fresh, juicy pop. I love their sweetness in this recipe. Corn gives a nice texture. Fresh cilantro brightens the flavor. The lime juice adds acidity, balancing everything. Lastly, the lettuce wraps hold everything together. I prefer iceberg or butter lettuce. They’re crisp and sturdy, perfect for wrapping. For the full recipe, check the section above. 1. Heat 1 tablespoon of olive oil in a large skillet over medium heat. 2. Add 1 small chopped onion. Sauté the onion until it turns soft and clear, about 3-4 minutes. 3. Next, add 2 minced cloves of garlic. Cook this for about 1 minute, stirring often to keep it from burning. 4. Increase the heat to medium-high. Add 1 pound of ground turkey to the skillet. Brown the turkey, breaking it up with a spatula. This should take about 5-7 minutes. 1. Now it’s time to add flavor. Stir in 1 tablespoon of chili powder, 1 teaspoon of cumin, and 1/2 teaspoon of smoked paprika. 2. Season with salt and pepper to taste. Mix this well and cook for another 2-3 minutes. The spices should smell amazing. 3. Remove the skillet from the heat. Gently fold in 1 cup of halved cherry tomatoes, 1/2 cup of corn, 1/4 cup of chopped cilantro, and the juice of 1 lime. 4. To serve, take a lettuce leaf and spoon a generous amount of the turkey mix onto it. 5. Wrap the lettuce around the turkey mix like a taco. Repeat this with the rest of the leaves and filling. These turkey taco lettuce wraps are full of flavor and are great for a fresh meal. Check out the Full Recipe for more details! - Ensuring the turkey is cooked thoroughly: Cook the turkey until it’s brown. Use a meat thermometer to check the internal temperature. It should reach 165°F (75°C) for safe eating. This keeps your meal healthy and tasty. - Adjusting spice levels to taste: If you like heat, add more chili powder. For a milder taste, reduce it. Always taste the meat mixture before you serve. This way, you can tweak it to your liking. - Keeping the mixture moist: To avoid dryness, don’t overcook the turkey. Adding lime juice and fresh tomatoes at the end helps keep the mix juicy. If it seems dry, a splash of broth can help. - Arranging wraps visually appealing: Place the lettuce wraps on a large platter. Arrange them neatly for a colorful display. This makes your meal inviting and fun to eat. - Garnishing suggestions with cilantro and lime: Sprinkle fresh cilantro on top of the wraps. Add lime wedges around the platter. This adds color and a fresh scent, enhancing the dish's appeal. - Serving ideas for a complete meal: Serve these wraps with a side of black beans or rice. You can also add some tortilla chips for crunch. This gives a nice balance to your meal. For the full recipe, be sure to check out the main article! {{image_2}} You can easily swap out the turkey for chicken or beef. Each option gives a different taste. Chicken is lighter, while beef is richer and heartier. Try them based on what you like. If you want to change the wraps, consider using collard greens or Swiss chard. These greens add a fun twist. They also hold the filling well, just like lettuce. Adding extra veggies or beans is a great way to boost nutrition. Bell peppers, zucchini, or black beans can mix well with the turkey. These additions make your meal colorful and tasty. For a richer flavor, add cheese. Options like cheddar, feta, or pepper jack can work well. Just sprinkle cheese on top before wrapping the lettuce. Using different spices can make your tacos special. Try taco seasoning, paprika, or even curry powder. Each spice adds its own flair to the dish. You can also spice things up with hot sauce. A few drops can add heat and flavor. Or, serve your wraps with dipping sauces like salsa or guacamole. These add extra layers of taste and fun to your meal. If you want the full experience, check out the Full Recipe for detailed steps! To keep your turkey taco lettuce wraps fresh, follow these tips: - Place the turkey mixture in an airtight container. - Store it in the fridge for up to 3 days. - Keep the lettuce leaves separate to prevent wilting. After a few days, the turkey mixture may lose flavor and quality. It’s best to enjoy them fresh. If you have extra turkey mixture, you can freeze it. Here’s how: - Let the mixture cool completely. - Spoon it into a freezer-safe bag or container. - Remove as much air as possible before sealing. - Label the bag with the date and freeze for up to 3 months. When you’re ready to eat, thaw the mixture in the fridge overnight. To reheat: - Warm it in a skillet over medium heat until hot. - You can also microwave it for 1-2 minutes, stirring halfway. Serve the reheated mixture in fresh lettuce leaves for a tasty meal. For the full recipe, check out the earlier section! Can I use different types of lettuce? Yes, you can use various lettuces. Iceberg is great for its crispness. Romaine adds a nice crunch. Butter lettuce is soft and easy to wrap. Choose what you like best. What are some side dishes to pair with turkey taco lettuce wraps? You can serve corn salad for freshness. Black beans add protein and flavor. A side of guacamole or salsa is always a hit. Rice can be a nice touch too. How can I make this recipe gluten-free or dairy-free? To make it gluten-free, ensure your spices are free from gluten. Use corn tortillas if you want a wrap. For dairy-free, skip cheese or use a dairy-free option. Can I meal prep these wraps ahead of time? Yes, you can prep the turkey mix in advance. Store it in the fridge for up to three days. Prepare lettuce just before serving for the best crunch. What are the nutritional benefits of using lettuce wraps? Lettuce wraps are low in carbs and calories. They add fiber and hydration. You can fill them with lean protein and fresh veggies for a balanced meal. How do I know when the turkey is fully cooked? Cook the turkey until it's no longer pink. Use a meat thermometer for safety. The internal temperature should reach 165°F. This ensures it is safe to eat. In this blog post, we explored a tasty turkey taco lettuce wrap recipe. We covered every aspect, from ingredients to step-by-step instructions and helpful tips. You learned about variations, storage options, and common questions. Cooking should be fun and simple. This recipe offers healthy choices and exciting flavors. Try it out and enjoy making it your own! With a few tweaks, you can create the perfect meal for you and your family.

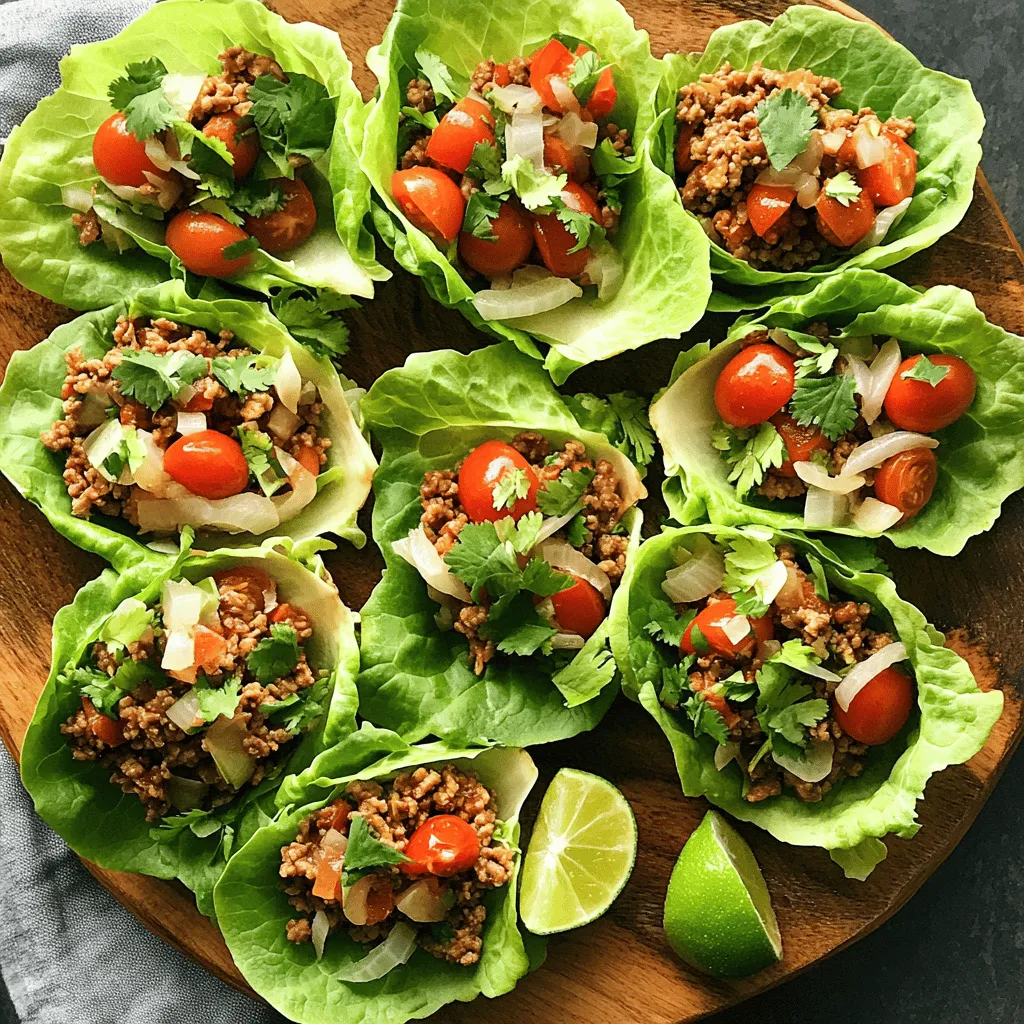
Turkey Taco Lettuce Wraps Flavorful and Fresh Meal

Looking for a fresh and healthy meal idea? Turkey Taco Lettuce Wraps are your answer! Packed with flavor and simple

To create a bright and tasty Lemon Dill Potato Salad, you need just a few key items: - 2 pounds baby potatoes, halved - 1/4 cup fresh dill, chopped - 1/3 cup Greek yogurt - 1 lemon, zested and juiced - 2 green onions, thinly sliced - 1 clove garlic, minced - Salt and pepper to taste - 1/4 cup celery, finely diced - 1/4 cup red bell pepper, finely diced These ingredients form the base of your salad, making it fresh and flavorful. The baby potatoes give a nice texture. The dill and lemon bring bright, zesty notes that make your taste buds dance. You can customize your salad with some optional ingredients: - 2 tablespoons mayonnaise (for creaminess) - Additional vegetables like diced cucumbers or radishes Adding mayonnaise can make the salad creamier. If you want to add more crunch, diced cucumbers or radishes work great too. Choose what you like best! To prepare this salad, you will need a few simple tools: - Cooking pot (for boiling potatoes) - Mixing bowls (for combining ingredients) - Whisk (for mixing dressing) Having these tools ready will make your cooking process smooth and easy. With just a pot and some bowls, you can whip up this delicious dish in no time. For the full recipe, check [Full Recipe]. First, take 2 pounds of baby potatoes and cut them in half. Place them in a large pot. Cover the potatoes with cold water and add a pinch of salt. Bring the water to a boil over high heat. Once it boils, reduce the heat to medium-low. Let the potatoes cook for 15 to 20 minutes. You want them tender, so check with a fork. Once done, drain the potatoes and let them cool a bit. Then, transfer them to a large mixing bowl. Next, we will make the dressing. In a small bowl, add 1/3 cup of Greek yogurt. If you like, you can also add 2 tablespoons of mayonnaise. Then, zest and juice 1 lemon and add that to the bowl. Add in 1 clove of minced garlic, salt, and pepper to taste. Whisk everything together until smooth and creamy. This dressing will bring great flavor to your salad. Now it's time to mix it all together. Pour the dressing over the warm potatoes in the large bowl. Next, add 1/4 cup of chopped fresh dill, 2 sliced green onions, 1/4 cup of finely diced celery, and 1/4 cup of finely diced red bell pepper. Gently fold everything together until the potatoes are well coated with the dressing. Taste it and adjust the seasoning if needed. Chill the potato salad in the refrigerator for at least 30 minutes. This chill time helps the flavors blend. For the full recipe, check out the section above. For a great potato salad, use baby potatoes. They are tender and sweet. I love using Yukon Gold or red potatoes. These types hold their shape well after cooking. You can try other varieties, but these work best for salads. Their creamy texture adds to the dish's richness. Chill time is key for flavor. After mixing the salad, let it sit in the fridge. I suggest chilling it for at least 30 minutes. This allows the flavors to blend nicely. The coldness enhances the taste and makes every bite refreshing. If you skip this step, the salad may taste flat. Balancing flavors is important. Start with salt and pepper, and taste as you go. Add more lemon juice if you want a tangy kick. If you find the salad too sour, a pinch of sugar can help. Trust your taste buds; they guide you in creating the perfect mix. For a fun twist, try adding more dill or a sprinkle of paprika. For the full recipe, check out the [Full Recipe]. {{image_2}} You can make this salad lighter by swapping Greek yogurt for mayonnaise. Greek yogurt adds creaminess without the extra fat. It also boosts protein, making your salad more filling. I love the tangy flavor it brings to the dish. To do this, simply use 1/3 cup of Greek yogurt instead of mayonnaise. This change not only makes it healthier but also keeps the salad fresh and zesty. Want to change up the flavor? You can add other herbs or spices to the mix. Fresh parsley or chives work well and add a nice pop of color. If you like a bit of heat, consider adding a pinch of cayenne pepper. For a Mediterranean twist, try mixing in some oregano or basil. These herbs can elevate the dish and give it a unique taste. Experiment with your favorites to find what you love. Garnishing can make your Lemon Dill Potato Salad even more appealing. Try topping it with a sprinkle of extra dill or some lemon zest. You could also add some sliced radishes for a crunchy texture. This salad pairs well with grilled chicken or fish, making it a great side dish. Serve it on a bed of greens for a lovely presentation. Get creative and make it your own! For the full recipe, check out the details above. To keep your Lemon Dill Potato Salad fresh, place it in an airtight container. Make sure it cools down before sealing. This helps prevent moisture buildup inside. Store it in the fridge for best results. I don't recommend freezing Lemon Dill Potato Salad. The texture of the potatoes can change when frozen. The creamy dressing may separate, which affects the taste. Enjoy the salad fresh instead. In the fridge, Lemon Dill Potato Salad stays fresh for about 3 to 5 days. After that, it may lose its flavor and texture. Always check for any signs of spoilage before eating. Enjoy your delicious salad while it’s at its best! For the complete recipe, check out the [Full Recipe]. You can use several dairy-free alternatives for Greek yogurt. A good choice is coconut yogurt. It has a creamy texture and adds a sweet hint. Almond yogurt can also work well. It gives a nice taste and is lower in calories. If you want a nut-free option, try silken tofu. Blend it until smooth for a great texture. For a tangy flavor, you might like using cashew cream. Just soak cashews in water, blend, and season. Each of these options will change the taste slightly, but they can still create a delicious lemon dill potato salad. Yes, you can make this salad ahead of time! It tastes even better after sitting in the fridge for a while. Prepare the salad and store it in an airtight container. This keeps it fresh and flavors meld perfectly. I recommend making it a few hours before serving, or even the night before. Just remember to give it a good stir before serving. If the salad seems dry, add a dash of lemon juice or a little extra yogurt to bring it back to life. Lemon dill potato salad goes well with many dishes. It pairs nicely with grilled chicken. The bright flavors complement each other. You can also serve it with fish, like salmon. The fresh taste enhances the meal. For a vegetarian option, serve it alongside grilled veggies or a hearty bean burger. It also makes a great side for picnics or barbecues. You can enjoy it with a sandwich or wrap for a tasty lunch. This blog post detailed how to make a tasty Lemon Dill Potato Salad. We covered key ingredients, helpful tools, and step-by-step instructions. I shared tips on choosing potatoes, enhancing flavors, and creative variations. You learned how to store leftovers and the shelf life of the salad. In the end, this dish is simple and great for any meal. Enjoy making it your own and sharing it with family and friends. Your kitchen adventures just got more flavorful!

Lemon Dill Potato Salad Fresh and Flavorful Recipe

Looking for a fresh and zesty side dish? My Lemon Dill Potato Salad is perfect for you! This easy recipe

- Zucchini - Bell Peppers (Red & Yellow) - Red Onion - Cherry Tomatoes - Eggplant Using fresh vegetables makes a big difference. Each veggie adds its own flavor and texture. Here’s a closer look at the key ingredients. - Zucchini: This veggie is soft and mild. It cooks quickly and absorbs other flavors well. Slice it into half-moons for even cooking. - Bell Peppers (Red & Yellow): These peppers bring sweetness and color. Their crisp texture contrasts nicely with softer veggies. Cut them into bite-sized pieces for easy roasting. - Red Onion: This onion adds a slight bite and sweetness when roasted. Slice it into wedges to keep it chunky. - Cherry Tomatoes: These little gems burst with flavor. Halve them to release their juices and get that delicious caramelization. - Eggplant: This veggie has a unique texture. It soaks up oil and spices well. Dice it into cubes to help it cook evenly. - Olive Oil - Dried Oregano - Dried Thyme - Garlic Powder - Salt and Pepper Good seasonings elevate roasted vegetables. Here’s what you need to bring out the best in your dish. - Olive Oil: This oil adds richness and helps brown the veggies. Use a generous drizzle to ensure even coating. - Dried Oregano: This herb gives a classic Mediterranean flavor. It works well with all the veggies. - Dried Thyme: Another great herb, thyme adds earthiness. It pairs nicely with the sweetness of the peppers and zucchini. - Garlic Powder: This adds a savory kick without the fuss of fresh garlic. Just one teaspoon goes a long way. - Salt and Pepper: Simple but essential. These enhance all the flavors and bring the dish together. With these ingredients, you’re ready to make a delightful roasted Mediterranean vegetable medley. For the full recipe, check out the detailed instructions. First, set your oven to 425°F (220°C). This temperature helps the vegetables cook well. Preheating is key. It ensures even cooking and browning. You don’t want soggy veggies. Next, take a large bowl. Add the sliced zucchini, chopped red and yellow bell peppers, red onion wedges, halved cherry tomatoes, and diced eggplant. To slice the zucchini, cut it into half-moons. For the bell peppers, chop them into bite-sized pieces. You want uniform sizes for even cooking. Now, drizzle three tablespoons of olive oil over the veggies. Sprinkle two teaspoons of dried oregano and two teaspoons of dried thyme on top. Add one teaspoon of garlic powder, salt, and pepper to taste. Use your hands or a large spoon to toss everything together. Make sure each piece gets coated. This helps bring out the flavors. Take a large baking sheet and spread the seasoned vegetables in a single layer. This way, they roast better. If they overlap, they may steam instead of roast. Once you place the baking sheet in the oven, roast the veggies for about 25 to 30 minutes. Halfway through, stir the vegetables. This gives them an even cook and nice caramelization. You’ll know they’re done when they’re tender and slightly browned. Enjoy the process! This dish is not just easy to make; it’s also packed with flavor. For a full recipe, check out the Full Recipe section. Seasonal Considerations Pick vegetables that are in season. They taste better and cost less. In summer, use zucchini, bell peppers, and eggplant. In fall, add root veggies like carrots or squash. Always check what looks fresh at your local market. Organic vs. Conventional Organic vegetables are often better for you. They have fewer chemicals. But, conventional veggies can still be tasty and are usually cheaper. Choose based on your budget and what’s available. Signs of Doneness Look for color and tenderness. The veggies should be golden brown and soft to the touch. A fork should easily pierce them. If they look a bit crispy, that’s a great sign! Adjusting Cooking Times Every oven is different. Check your veggies a few minutes early. If they need more time, add it in small amounts. Stirring halfway helps them roast evenly, so don’t forget that step! Adding Fresh Herbs Fresh herbs can change your dish. Try adding basil, parsley, or thyme right before serving. This adds brightness and a fresh taste. Just chop them up and sprinkle on top. Incorporating Citrus Squeeze some lemon or orange juice over your veggies after roasting. This adds a zesty kick that wakes up the flavors. You can also add lemon zest for more aroma. For more details, check out the Full Recipe for Roasted Mediterranean Vegetable Medley. {{image_2}} You can mix in other vegetables for more flavor. Try adding: - Carrots, cut into sticks - Mushrooms, sliced - Asparagus, cut into pieces Adding these gives you fun textures and tastes. You can even use what you have on hand. Just remember to cut them to similar sizes for even cooking. Changing the spices can make a big difference. Use different seasonings to switch things up. Some great options include: - Rosemary for a piney taste - Paprika for a smoky kick - Cumin for an earthy flavor If you like a bit of heat, add red pepper flakes. Start with a pinch, and taste as you go. You can always add more if you want a spicy punch! These roasted veggies are great on their own, but they shine with proteins. Pair them with: - Grilled chicken for a hearty meal - Fish, like salmon, for a light option - Tofu for a vegetarian choice Don’t forget garnishes! Fresh herbs like parsley or a squeeze of lemon brighten the dish. You can also sprinkle feta cheese on top for a salty touch. Enjoy experimenting with these variations to make your meal unique! For the full recipe, check out the details above. Store your roasted vegetables in an airtight container. Make sure the container seals tightly to keep air out. You can use glass or plastic containers. After cooking, let the veggies cool down to room temperature before sealing. This helps avoid moisture buildup. Place the container in the refrigerator. They'll taste great for about 3 to 5 days. To freeze roasted vegetables, first let them cool. Spread them out on a baking sheet. This keeps them from sticking together. Freeze them for about 1 to 2 hours. Once frozen, transfer them into freezer bags. Squeeze out as much air as you can. Label the bags with the date. To thaw, place them in the fridge overnight. Reheat them in the oven or microwave. They taste best when reheated in the oven. Roasted Mediterranean vegetables last up to 5 days in the fridge. If frozen, they stay good for about 3 months. Check for spoilage signs like a bad smell or strange color. If the veggies look slimy or dry out, it’s best to toss them. Always trust your senses when it comes to food safety. For more details, check the Full Recipe. Roasted Mediterranean vegetables can last about 3 to 5 days in the fridge. Store them in an airtight container. If you want to enjoy them later, you can freeze them. When frozen, they can last for about 2 to 3 months. Just make sure to cool them first before freezing. Absolutely! You can switch out any vegetable in the recipe. For example, carrots or mushrooms work great. You can also use seasonal vegetables like asparagus in spring or squash in fall. This gives you flexibility based on what you have at home. Roasted Mediterranean vegetables are very versatile. They pair well with grilled chicken or fish. You can also serve them over rice or quinoa for a full meal. For a creative twist, try them in tacos or wrap them in pita bread. They add color and flavor to any dish! For the full recipe, check out the details above! Roasting Mediterranean vegetables is easy and fun. You learned about fresh veggies, seasonings, and cooking tips. I shared ways to choose great vegetables and make flavors pop. Don't forget to try pairing them with your favorite proteins. These roasted veggies are tasty and can liven up any meal. Enjoy your cooking, and have fun experimenting with different flavors and textures!

Roasted Mediterranean Vegetables Flavorful and Easy Dish

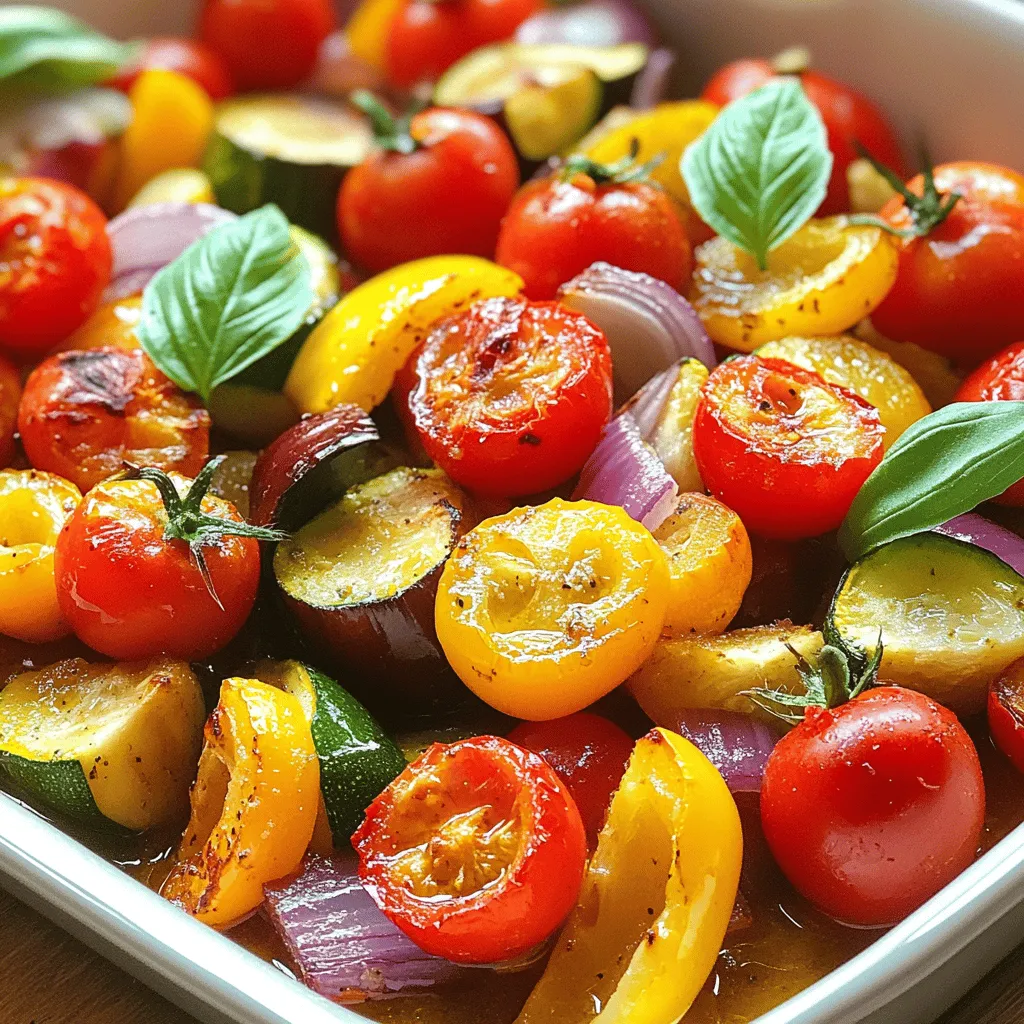
Looking for a fresh and easy dish that bursts with flavor? Roasted Mediterranean vegetables are your answer! This vibrant mix

- 8 oz whole grain pasta (fusilli or penne) - 1 cup cherry tomatoes, halved - 1 cucumber, diced - 1 bell pepper (any color), chopped - 1 cup frozen peas, thawed - ½ cup red onion, finely chopped - 1 avocado, diced - ½ cup fresh parsley, chopped - ½ cup fresh basil, chopped - 1 tablespoon lemon juice - ¼ cup Greek yogurt - ¼ cup olive oil - 1 tablespoon Dijon mustard - Salt and pepper to taste Green Goddess Pasta Salad is a fresh and vibrant dish. Each ingredient adds flavor and color. Whole grain pasta forms the base and gives a hearty touch. I love using fusilli or penne for their shape. They hold the dressing and pair well with veggies. Cherry tomatoes bring sweetness and acidity. They burst with flavor in every bite. The cucumber adds a crisp and refreshing crunch. I often choose a bell pepper to add more color. The peas bring a slight sweetness and bright green hue. Red onion gives a sharp taste that balances well. I like to use diced avocado for creaminess. It makes the salad richer and more filling. Fresh parsley and basil add herbal notes. They enhance the dish with freshness. The dressing is where the magic happens. Greek yogurt creates a creamy texture. Olive oil adds richness and smoothness. A splash of lemon juice brightens the flavors. Dijon mustard gives it a slight tang. Don’t forget the salt and pepper to taste. This Green Goddess Pasta Salad is not just a meal. It's a celebration of fresh ingredients. You can find the full recipe to make it at home. Enjoy making it as much as I do! Start by boiling a large pot of salted water. Once it reaches a rolling boil, add 8 oz of whole grain pasta, like fusilli or penne. Cook the pasta according to the package instructions until it is al dente. This usually takes about 8-10 minutes. When done, drain the pasta in a colander and rinse it with cold water. This step stops the cooking and helps keep the pasta firm. While the pasta cooks, you can make the dressing. In a blender, add ¼ cup Greek yogurt, ¼ cup olive oil, and 1 tablespoon lemon juice. Then, add 1 tablespoon of Dijon mustard, ½ cup fresh parsley, and ½ cup fresh basil. Blend all the ingredients until smooth and creamy. Taste the dressing and add salt and pepper as needed. This green goddess dressing adds a fresh, vibrant flavor to the salad. In a large mixing bowl, combine the cooled pasta with the veggies. Add 1 cup halved cherry tomatoes, 1 diced cucumber, 1 chopped bell pepper, and 1 cup thawed frozen peas. Then, mix in ½ cup finely chopped red onion and 1 diced avocado. Pour the dressing over the pasta and gently toss everything together. Make sure each ingredient gets coated with the delicious dressing. The flavors will blend beautifully as it chills in the fridge. For the full recipe, check the [Full Recipe]. Use fresh herbs to bring out the best flavors. I love using parsley and basil. They add a bright taste and color. If you can, grow your own herbs. Fresh ones always taste better. Garnish the salad with extra herbs or some avocado slices. This makes it look pretty and adds a creamy touch. You can also sprinkle some nuts on top for crunch. You can change the dressing's thickness. If you like it creamier, add more yogurt. For a lighter feel, mix in more olive oil. This helps to find the right balance for your taste. {{image_2}} You can make your Green Goddess Pasta Salad even better by adding proteins. Grilled chicken works great for meat lovers. It adds a tasty, savory bite. For a plant-based option, try chickpeas. They bring a nice texture and extra fiber. Both choices make your salad more filling and nutritious. Experimenting with vegetables keeps the salad fresh and fun. Seasonal veggies shine in this dish. Try using zucchini for a light crunch. Bell peppers add sweetness and color. You can also include radishes or asparagus for a unique twist. The key is to use what you love or what is in season. If you need a gluten-free meal, don’t worry! You can easily swap out the pasta. Many brands offer gluten-free pasta varieties, like brown rice or chickpea pasta. These options taste great and hold up well in salads. You won't miss the gluten at all. For the complete recipe, check out the [Full Recipe]. You can keep any leftover pasta salad in the fridge. Just cover it well. It stays fresh for up to 3 days. Make sure it’s in an airtight container to avoid drying out. Freezing this salad is not a good idea. When you freeze pasta salad, the texture changes. The pasta may become mushy, and the veggies might lose their crunch. It’s best to enjoy it fresh. To bring your leftovers back to life, add a splash of lemon juice. You can also mix in some extra dressing. This helps refresh the flavors and makes it taste almost new again! Yes, it’s best served chilled after allowing flavors to blend. If you make it early, let it sit in the fridge for at least 30 minutes. This time helps the tastes mix well. The salad will be fresh and tasty when you serve it. Try sour cream or a dairy-free yogurt alternative. Both options can work well. If you prefer a lighter taste, choose a yogurt with less fat. This swap keeps the dish creamy and delicious. Use vegan yogurt and omit dressing with non-dairy options. You can also add some lemon juice for extra flavor. This makes the salad just as tasty while keeping it plant-based. Enjoy a fresh and vibrant dish without dairy! This blog post shared a simple and tasty pasta salad recipe. We covered all the key ingredients, from whole grain pasta to fresh herbs. You learned how to boil the pasta, make a zesty dressing, and assemble everything together. Remember, you can adjust flavors and textures to fit your taste. Don’t hesitate to add proteins or seasonal veggies. Enjoy making this salad fresh or as leftovers, and always keep it covered in the fridge. Happy cooking!

Green Goddess Pasta Salad Flavorful and Fresh Dish

If you crave a meal packed with flavor and freshness, this Green Goddess Pasta Salad is your answer. With a

To make Roasted Red Pepper Hummus Wraps, gather these key ingredients: - 1 cup roasted red peppers (jarred or homemade) - 1 cup canned chickpeas, rinsed and drained - 3 tablespoons tahini - 2 tablespoons olive oil - 2 tablespoons lemon juice - 1 garlic clove, minced - Salt and pepper to taste - 4 large whole wheat tortillas - 1 cup fresh spinach leaves - 1 medium cucumber, sliced - 1 large carrot, grated - 1 avocado, sliced These ingredients work together to create a tasty and colorful wrap. The roasted red peppers provide a sweet, smoky flavor. Chickpeas add protein and creaminess. Tahini offers a rich, nutty taste, while lemon juice gives a fresh zing. You can customize your wraps with these optional garnishes and fillings: - Feta cheese, crumbled - Sliced bell peppers - Olives, pitted and sliced - Fresh herbs, like parsley or cilantro - A drizzle of balsamic glaze Adding these extras can enhance the flavor and texture. Choose what you love to make your wraps even more special. Each key ingredient in these wraps brings unique health benefits: - Roasted red peppers are high in vitamins A and C. They also boost your immune system. - Chickpeas are rich in protein and fiber. They help keep you full and satisfied. - Tahini contains healthy fats and calcium. It supports bone health. - Spinach is packed with iron and antioxidants, great for overall health. - Avocado provides healthy fats and fiber, promoting heart health. These ingredients not only taste great but also nourish your body. Enjoying these wraps means enjoying a meal that is both good for you and bursting with flavor. For the full recipe, check out the section above. To start, gather your ingredients. You need roasted red peppers, chickpeas, tahini, olive oil, lemon juice, garlic, salt, and pepper. In a food processor, add the roasted red peppers and chickpeas. Next, include tahini, olive oil, lemon juice, and minced garlic. Blend the mix until it is smooth and creamy. If it seems thick, just add a little water. Taste it and add salt and pepper if needed. Blend again to mix well. This hummus is rich in flavor and perfect for your wraps. Now, take your large whole wheat tortillas. Lay them flat on a clean surface. Spread a nice layer of the roasted red pepper hummus on each tortilla. Leave a bit of space around the edges. On top of the hummus, add fresh spinach leaves, sliced cucumber, grated carrot, and avocado slices. This mix gives you a crunchy and fresh bite. When you are ready to roll, start at one end of the tortilla. Tightly roll it while tucking in the sides as you go. This helps keep everything inside. Once you finish rolling, slice the wraps in half diagonally. This makes them easy to eat. Serve the wraps right away or wrap them in parchment paper. This way, they stay fresh for later. Enjoy your tasty creation! For the complete recipe, check out the Full Recipe. To make the hummus creamy, use ripe roasted red peppers. They add a sweet and smoky taste. Use a good food processor for a smooth blend. If it’s too thick, add a bit of water. This will help reach the right consistency. Taste your hummus and adjust the salt and pepper. You want a balanced flavor that pops! To keep your wraps fresh, use whole wheat tortillas. They hold fillings well and stay soft. Layer your fillings carefully. Start with hummus, then add greens and veggies. This keeps the tortillas from getting soggy. Wrap them tightly to maintain shape. If you can, eat them soon after making. Freshness makes a big difference in taste and texture. For a fun serving idea, present your wraps on a wooden board. Add some extra slices of avocado on the side. Sesame seeds can add a nice crunch. You can also serve a small bowl of hummus for dipping. This enhances the flavor and makes it interactive. Try adding some fresh herbs for extra zing. Enjoy your colorful, tasty meal! {{image_2}} You can change the fillings in your wraps for more fun. Try adding roasted veggies like zucchini or eggplant. They bring a nice, smoky flavor. You can also use different greens like arugula for a peppery kick. If you love cheese, add feta or goat cheese for creaminess. For a spicy touch, add jalapeños or hot sauce. Think outside the box! If you want to make these wraps gluten-free, choose gluten-free tortillas. Many stores offer great options now. For a vegan twist, make sure to use plant-based tahini and skip any dairy. You can still enjoy the creamy texture and rich flavors without animal products. Always check labels to ensure they fit your diet needs. Tortillas come in many styles! Whole wheat is great for fiber, but you can also use spinach or tomato tortillas. These add colors and flavors to your meal. Corn tortillas are another tasty choice, but they can be smaller. If you want a wrap that is different, try a lavash or pita. Each tortilla gives a new taste to your wraps. To store leftover hummus, place it in an airtight container. Make sure to keep it in the fridge. Hummus will stay fresh for about four to five days. You can also drizzle a bit of olive oil on top to keep it moist. This helps prevent it from drying out. To keep your wraps fresh, wrap them tightly in plastic wrap or parchment paper. This keeps air out and moisture in. Store them in the fridge for up to two days. If you notice any sogginess, try adding ingredients like spinach or cucumber just before serving. You can freeze hummus for later use. Place it in a freezer-safe container and leave some space at the top. It can last up to three months in the freezer. For wraps, it’s best to freeze them before you add fresh veggies. Wrap them tightly in foil or plastic wrap. When you’re ready to eat, let them thaw in the fridge overnight. Enjoy your homemade Roasted Red Pepper Hummus Wraps even when you’re short on time! For the full recipe, check the earlier sections. If you don’t have tahini, you can use sunflower seed butter. This gives a nutty flavor. You can also try peanut butter for a different taste. Both options work well in hummus. Another choice is to skip it altogether. Your hummus will still taste great! Yes, you can make these wraps in advance. Just prepare the hummus and assemble the wraps. Wrap them in plastic wrap to keep them fresh. Store them in the fridge for up to two days. This is a great time-saver for busy days! The wraps last up to three days in the fridge. After that, they may lose some freshness. Make sure to store them in an airtight container. This helps keep the flavors bright and tasty. Enjoy your wraps at their best! Roasted red pepper hummus wraps offer great taste and nutrition. We covered key ingredients, tips for creamy hummus, and how to store leftovers. You can customize your wraps with different fillings and modifications. Remember, fresh ingredients are key for the best flavor. Enjoy making these fun and healthy wraps at home. They’re easy to prepare and perfect for any meal. Dive into this tasty recipe and impress your friends and family. Happy wrapping!

Roasted Red Pepper Hummus Wraps Fresh and Flavorful Meal

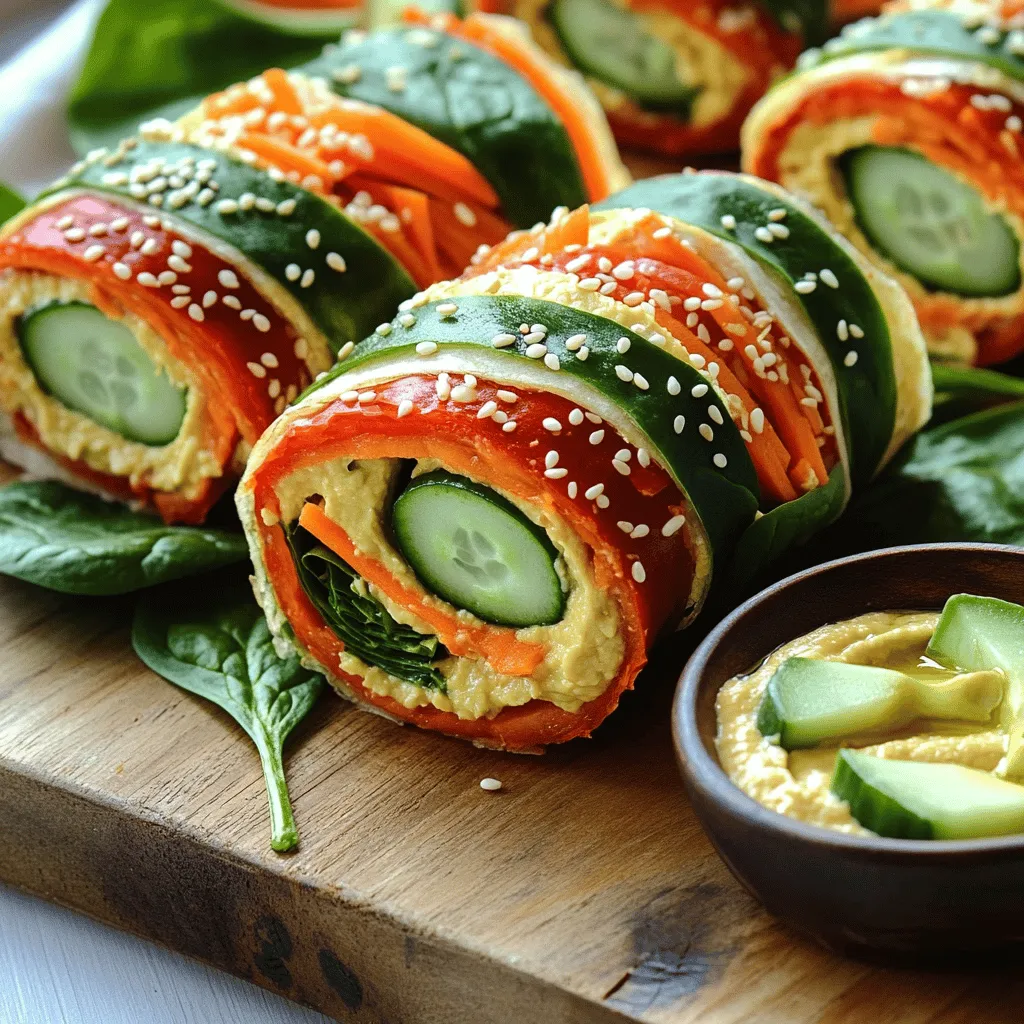
Looking for a fresh and tasty meal? Roasted red pepper hummus wraps are the answer! With creamy hummus and vibrant

To create your spicy black bean tacos, gather these key items: - 2 cans black beans, rinsed and drained - 1 tablespoon olive oil - 1 small onion, finely chopped - 2 cloves garlic, minced - 1 jalapeño, seeded and finely chopped These ingredients form the tasty base of your dish. The black beans are rich in protein and fiber. The onion and garlic add depth, while the jalapeño gives a nice kick. Next, you’ll need some seasonings to boost the flavor: - 1 teaspoon ground cumin - 1 teaspoon smoked paprika - 1 teaspoon chili powder - Salt and pepper, to taste These spices make the black beans bold and exciting. Cumin offers a warm flavor, while smoked paprika adds a hint of smokiness. Adjust the salt and pepper to fit your taste. Finally, prepare these fresh toppings for your tacos: - 8 small corn tortillas - 1 cup fresh corn kernels (cooked) - 1 avocado, sliced - 1 cup cherry tomatoes, halved - 1/2 cup fresh cilantro, chopped - Lime wedges, for serving Toppings give each taco a burst of freshness. The avocado adds creaminess, while the cherry tomatoes provide sweetness. Fresh cilantro brightens everything up. Don't forget the lime wedges for a zesty finish! For the complete recipe, check out the Full Recipe section. - Heat olive oil in a skillet over medium heat. - Sauté onion until translucent, about 3-4 minutes. - Add garlic and jalapeño, cooking for 1-2 minutes. In this step, the olive oil helps the onion soften. When you sauté the onion, it adds a nice sweetness. The garlic and jalapeño bring a great flavor. Keep stirring to avoid burning the garlic. - Stir in black beans and spices. - Cook and mash some beans with a fork. - Allow mixture to heat through for about 5-7 minutes. The black beans give you protein and fiber. Mashing some beans creates a creamy texture. This part of the process lets all the spices mix well. You will really start to smell those amazing aromas! - Warm corn tortillas in a skillet or microwave. - Keep them soft and pliable for easy folding. - Assemble tacos with the bean mixture and toppings. Warming the tortillas makes them easier to fold. If they are cold, they can break apart. Fill them with the bean mixture, corn, avocado, and more. Each bite will be a burst of flavor! For the full recipe, check the main section above. - Choose the right tortilla type: Use small corn tortillas for best flavor. They hold the filling well and add a nice bite. - Don't overfill the tacos: Keep it simple. A little filling goes a long way, making it easier to eat. - Ensure even heating of tortillas: Warm tortillas until soft. This helps them stay intact and tasty. - Experiment with spice levels: Adjust the jalapeño to find your perfect heat. More or less can change the whole dish. - Adjust seasonings to taste: Taste as you cook. Add more cumin or chili powder if you want a stronger flavor. - Use fresh ingredients for best results: Fresh corn, ripe tomatoes, and bright cilantro make a big difference in taste. - Pair with your favorite salsa: A good salsa adds zest. Choose one that matches your spice level. - Offer additional toppings like cheese: Crumbled queso or shredded cheese adds a creamy touch. - Serve with a side of rice or salad: A simple salad or rice balances the meal and adds more nutrition. For more details, check the Full Recipe. {{image_2}} You can easily make these tacos vegan. Just swap the olive oil for a plant-based alternative, like avocado oil. Check your toppings, too. Make sure everything is vegan-friendly. Use fresh veggies and herbs, and you’ll have a tasty vegan meal. For a gluten-free meal, choose gluten-free tortillas. These are easy to find at most stores. Also, check your spices and toppings. Ensure they don’t contain gluten. This way, you can enjoy your tacos without worry. If you love heat, try adding more jalapeños or other hot peppers. You can also use spicy salsa or your favorite hot sauce on top. This gives your tacos a delicious kick. Adjust the spice level to match your taste. Enjoy experimenting with flavors! For the full recipe, check the [Full Recipe]. After your taco feast, store the bean mixture in an airtight container. This keeps the beans fresh and tasty. Remember to keep the tortillas separate. This prevents them from getting soggy and losing their nice texture. When you're ready to enjoy leftovers, reheat the bean mixture over low heat. This warms it gently without making it dry. For the tortillas, warm them in a skillet or microwave. This helps them stay soft and pliable, just like when you first made them. For long-term storage, you can freeze the bean mixture. Make sure to use a freezer-safe container. When you're ready for a quick meal, thaw it in the fridge overnight. After thawing, just reheat the mixture for a fast and tasty taco night. Yes, you can use dried black beans. Start by soaking them overnight. This helps soften them. Rinse and drain the beans after soaking. Then, boil them in fresh water for about 1 to 1.5 hours. Check for tenderness. Once they are soft, you can use them in your tacos. To make the tacos milder, skip the jalapeño. You can use bell peppers instead. They add nice flavor without heat. You can also reduce chili powder and cumin. Add more avocado or sour cream to balance the spice. If you need a change, try flour tortillas. They are soft and easy to work with. Lettuce wraps are also a great, low-carb option. If you need gluten-free, look for certified gluten-free tortillas. They work well for tacos too. In this post, we covered delicious black bean tacos. We explored key ingredients, step-by-step cooking, and creative variations. Remember to adjust flavors and toppings to suit your taste. Whether you prefer spicy or mild, there’s something for everyone. Store leftovers properly for quick meals later. Making these tacos is fun and rewarding. Enjoy the fresh tastes and get ready to impress your friends and family. Happy cooking!

Spicy Black Bean Tacos Flavorful and Simple Meal

Are you ready to spice up your dinner routine? These Spicy Black Bean Tacos are not just flavorful; they are

- 2 cups cooked chicken (shredded or diced) - 1/2 cup dried cranberries - 1/2 cup pecans (chopped) - 1/2 cup celery (finely chopped) - 1/4 cup red onion (finely chopped) - 1/2 cup Greek yogurt (or mayonnaise) - 1 tablespoon honey - 1 tablespoon apple cider vinegar - Salt and pepper (to taste) - Mixed greens or lettuce To make a tasty cranberry pecan chicken salad, gather these ingredients. You can use leftover chicken or rotisserie chicken for ease. I love the sweetness of the dried cranberries mixed with the crunch of the pecans. They add great texture and flavor. The celery and red onion offer a fresh crunch and a bit of bite. For the dressing, I often choose Greek yogurt. It makes the salad creamy while keeping it light. Honey adds a touch of sweetness. Apple cider vinegar brightens the flavor. Adjust salt and pepper to your taste. If you want to serve it, lay the salad on mixed greens or lettuce. This adds color and freshness to your plate. You can find the full recipe in the main article. Happy cooking! - Combine the chicken, cranberries, pecans, celery, and red onion in a mixing bowl. - Prepare the dressing by whisking together yogurt, honey, apple cider vinegar, salt, and pepper. To start, take your cooked chicken and chop or shred it into bite-sized pieces. I love using rotisserie chicken for its flavor and ease. Next, toss in the dried cranberries, chopped pecans, finely chopped celery, and red onion. This mix gives a nice crunch and sweetness. For the dressing, grab a small bowl. Whisk your Greek yogurt, honey, and apple cider vinegar until smooth. Add salt and pepper to your taste. This dressing is creamy and tangy, perfect for our salad. - Pour dressing over chicken mixture and toss until well coated. - Taste and adjust seasoning as necessary. Now, pour the dressing over the chicken mixture. Toss everything together gently. You want each piece of chicken and veggie to be coated well. After mixing, taste your salad. If it needs more flavor, add a pinch of salt, pepper, or honey. - Serve on a bed of mixed greens or as a sandwich filling. For serving, I suggest laying down a bed of mixed greens. This adds color and freshness. You can also scoop the salad into a sandwich. Use your favorite bread for a quick and tasty lunch. Check out the Full Recipe for more options! For the best chicken, I suggest using rotisserie chicken. It saves time and adds great flavor. You can also grill chicken breasts for a healthier option. Look for high-quality cranberries. Choose ones that are soft and plump, as they add sweetness and texture. Fresh pecans are key too. They should smell nutty and taste crisp. Avoid old or stale nuts for the best crunch. Adjust the sweetness and saltiness to fit your taste. If you like it sweeter, add more honey. For saltiness, a pinch of salt can enhance the flavor. If the dressing feels too thick, stir in a splash of water or vinegar. This helps create the right consistency. Aim for a creamy, yet spreadable dressing that coats all the ingredients well. To make your salad pop, add colorful garnishes. Fresh herbs like parsley or dill look great on top. You can also sprinkle extra pecans for crunch. Use vibrant vegetables like red bell peppers or carrots mixed in. This adds nutrition and makes each bite more exciting. Serve the salad on a large platter for a beautiful display. It will impress your guests and make the meal feel special. Check out the [Full Recipe](#) to get started on this tasty dish! {{image_2}} You can make this salad your own by switching up a few ingredients. If you want a lighter dressing, use Greek yogurt instead of mayo. This keeps it creamy but cuts down on calories. You can also try different nuts or fruits. Walnuts add a nice crunch. Sliced apples will give a sweet and crisp bite. If you need a gluten-free option, this salad is perfect. All its ingredients are naturally gluten-free. Just make sure any added items, like nuts or dressings, are safe too. You can also make this salad vegan. Replace the chicken with chickpeas or tofu. Swap Greek yogurt for a plant-based yogurt. It keeps the creaminess while being kind to all diets. To spice things up, you can add curry powder or chili flakes. These spices will give your salad an exciting twist. Fresh herbs can also boost the flavor. Chopped parsley or dill adds a refreshing taste. This makes each bite more delightful and aromatic. The cranberry pecan chicken salad stays fresh in the fridge for about three days. Store it in an airtight container to keep it from drying out. Glass or plastic containers with tight lids work best. This helps keep the flavors intact and stops odors from other foods. You can freeze this chicken salad, but it may change the texture. If you freeze it, use an airtight container or freezer bag. When you're ready to eat, thaw it in the fridge overnight. Avoid using a microwave to thaw, as it can make the chicken rubbery. To prepare in advance, mix all the salad ingredients except the dressing. Store the dressing separately to keep the salad crisp. Portion the salad into single servings using small containers. This makes it easy to grab and go during busy days. How to make cranberry pecan chicken salad ahead of time? You can easily prepare this salad ahead of time. Just make the salad and store it in the fridge. Keep the dressing separate until you are ready to serve. This keeps the salad fresh and crunchy. Can I use canned chicken for this recipe? Yes, you can use canned chicken. It saves time and is convenient. Just drain and rinse the chicken before adding it to the salad. This works well if you’re in a hurry. What can I serve with cranberry pecan chicken salad? This salad is great on its own. You can serve it with mixed greens or in a sandwich. It pairs well with a light soup or some fruit on the side. Approximate calorie count per serving Each serving has around 350 calories. This makes it a filling yet healthy meal option. Breakdown of main nutrients - Protein: 30 grams - Fats: 15 grams - Carbohydrates: 25 grams This balance provides energy and supports a healthy diet. Alternatives for common allergens in the recipe If you have nut allergies, skip the pecans. You can use sunflower seeds instead. For dairy allergies, replace Greek yogurt with a dairy-free option like cashew cream. Tips for ensuring no cross-contact for allergies Always wash your hands and tools before cooking. Use separate cutting boards for different ingredients. This helps prevent cross-contact and keeps your food safe. You learned how to make a tasty cranberry pecan chicken salad. This dish combines chicken, cranberries, and nuts for a delightful mix. I shared tips on ingredient selection, adding flavors, and making it look appealing. You also discovered how to store the salad and variations to fit different diets. Remember, this recipe is simple and versatile. Enjoy making it your own with different flavors and ingredients. It's sure to be a hit at your next meal. Happy cooking!

Cranberry Pecan Chicken Salad Healthy and Simple Recipe

Looking for a fresh, tasty meal that’s healthy and simple? You’ve found it! My Cranberry Pecan Chicken Salad brings together

To make this tasty flatbread, you need the following ingredients: - 1 pre-made flatbread or pizza dough - 2 large onions, thinly sliced - 2 tablespoons olive oil - 1 tablespoon balsamic vinegar - 4 ounces goat cheese, crumbled - 1 tablespoon fresh thyme leaves (or 1 teaspoon dried thyme) - Salt and pepper to taste - Optional: 1/4 cup fresh arugula for topping Each ingredient plays a vital role in bringing flavors together. The onions provide sweetness when caramelized. Goat cheese adds creaminess and tang. Olive oil helps cook the onions and crisp the dough. If you can't find goat cheese, use feta or ricotta. Both cheeses offer a nice taste. For the dough, you can use pita bread or naan. They make great bases. If you lack fresh thyme, dried herbs or Italian seasoning work too. These swaps keep the dish delicious while adding your twist. To add more flavor, consider these toppings: - Sliced mushrooms for earthiness - Cherry tomatoes for a pop of color - Crushed red pepper for some heat - Fresh basil or parsley for a bright finish These options help you personalize your flatbread. Mix and match to find your favorite. You can explore even more ideas in the Full Recipe. To start, grab two large onions. Thinly slice them and set them aside. Heat two tablespoons of olive oil in a skillet over medium heat. Next, add the sliced onions and a pinch of salt. Stir them occasionally for about 15 to 20 minutes. You want the onions to soften and turn golden brown. After that, pour in one tablespoon of balsamic vinegar. Cook for an extra 2 to 3 minutes. This will reduce the vinegar and coat the onions nicely. Once done, remove the skillet from the heat and let the onions cool. While the onions cool, preheat your oven to 450°F (232°C). If you use store-bought flatbread, you can skip this step. If you prefer pizza dough, roll it out on a floured surface. Make it the size and thickness you like. Ensure it fits your baking sheet or pizza stone. Once your flatbread is ready, place it on your baking sheet or pizza stone. Now, spread the caramelized onions evenly over the flatbread. Next, sprinkle four ounces of crumbled goat cheese on top. Add one tablespoon of fresh thyme or one teaspoon of dried thyme. Make sure to distribute everything evenly. Bake the flatbread in your preheated oven for about 10 to 12 minutes. You want the edges to be crispy and the cheese slightly melted. If you like, top it with fresh arugula after baking for a peppery crunch. Slice it into pieces and serve warm. For the full recipe, check the details in the earlier section. Caramelizing onions takes time, but it’s worth it. Start with fresh onions. Slice them thinly for even cooking. Use a large skillet to give them space. Heat the olive oil over medium heat. Add a pinch of salt to help draw out moisture. Stir the onions every few minutes. This keeps them from burning. Cook for about 15-20 minutes. Look for a deep golden color. If they stick, add a splash of water. Don’t rush the process; patience makes them sweet. For a crispy flatbread, preheat your oven to 450°F (232°C). Use a baking sheet or pizza stone, but make sure it’s hot. If using dough, roll it out evenly. Aim for a thin base for extra crispiness. Spread the caramelized onions evenly across the surface. Crumble the goat cheese on top; it melts beautifully. Bake for 10-12 minutes. Check for golden edges and melted cheese. Let it cool for a minute before slicing. To add more depth, consider using different herbs. Fresh rosemary or oregano can elevate the taste. A drizzle of honey can add sweetness to contrast the tangy goat cheese. Want some heat? A sprinkle of red pepper flakes will do the trick. For a fresh finish, add arugula after baking. It gives a nice peppery crunch. Try different cheeses, like feta or mozzarella, for unique flavors. For the full recipe, check the details above. Each addition can make this flatbread your own. {{image_2}} You can easily make this flatbread vegetarian. Replace the goat cheese with feta or ricotta. Both cheeses add a nice creamy texture. You can also use vegan cheese for a plant-based option. It melts well and tastes great. For a gluten-free flatbread, use a gluten-free pizza crust. Many stores sell these ready-made. You can also make your own using almond flour or cauliflower. Just ensure you have the right mix to hold it together. You can play with flavors to suit your taste. Add sliced mushrooms for an earthy touch. Caramelized apples can give a sweet, fruity flavor. For a spicy kick, sprinkle red pepper flakes on top. You can also mix in herbs like basil or rosemary for freshness. Don’t forget to check the Full Recipe for more ideas! To keep your leftover flatbread fresh, place it in an airtight container. You can also wrap it in plastic wrap. Make sure to store it in the fridge. Leftover flatbread is best eaten within 2-3 days. Keeping it sealed helps it stay soft and tasty. When reheating, use the oven for the best taste. Preheat your oven to 350°F (175°C). Place the flatbread on a baking sheet. Heat it for about 5-10 minutes or until warm. This method keeps the flatbread crisp. You can also use a skillet on low heat. Just flip it carefully to warm evenly. If you want to save flatbread for later, freezing is a great option. First, let it cool completely. Wrap the flatbread tightly in plastic wrap. Then place it in a freezer bag or container. It can last up to 3 months in the freezer. To use it, thaw it overnight in the fridge before reheating. Enjoy your flatbread any time! For more details on making this dish, check out the Full Recipe. You will know your onions are ready when they turn a deep golden brown. They should feel soft and have a sweet smell. This process takes about 15-20 minutes. Stir them often to avoid burning. If they brown too fast, lower the heat. The key is patience; take your time for rich flavor. Yes, you can use other cheeses. Feta, mozzarella, or ricotta work well. Each cheese brings a unique taste. Feta adds a salty kick, while mozzarella melts nicely. Ricotta offers a creamy texture. Try what you like best. Mix and match for fun flavors! This flatbread pairs well with many sides. A fresh salad with greens and a light dressing is great. You can also serve it with a warm soup. For a snack, try it with olives or a cheese platter. Each option enhances the flatbread's taste. Enjoy your meal! This blog post covered how to make a delicious caramelized onion and goat cheese flatbread. We discussed key ingredients, cooking steps, and valuable tips. You learned about variations and storage methods to keep your flatbread fresh. In closing, this flatbread is more than just a meal; it’s a tasty way to impress. With these simple steps and options, you can customize it to fit your style. Enjoy creating your own version!

Caramelized Onion and Goat Cheese Flatbread Delight

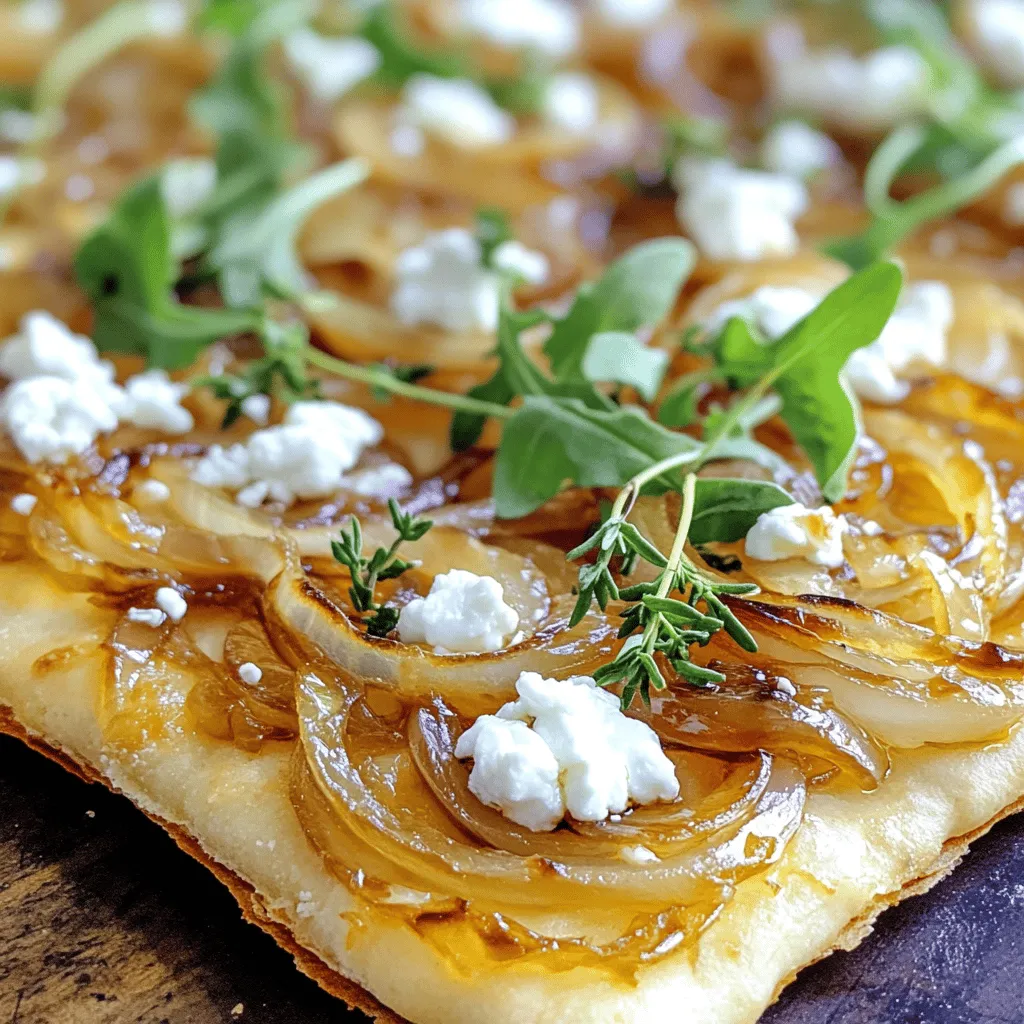
Get ready to savor a dish that’s simple yet bursting with flavor: Caramelized Onion and Goat Cheese Flatbread. This delightful

- 4 cups kale, chopped (stems removed) - 1/2 cup cherry tomatoes, halved - 1/4 cup shredded Parmesan cheese (or vegan alternative) - 1/2 cup croutons (store-bought or homemade) - 1/4 cup tahini - 2 tablespoons lemon juice - 1 clove garlic, minced - 1 teaspoon Dijon mustard - 1 tablespoon olive oil - Salt and pepper to taste - Optional: a pinch of red pepper flakes for heat - Large salad bowl - Small mixing bowl - Whisk - Knife and cutting board When I make my Chopped Kale Caesar Salad, I gather the best ingredients. Fresh kale is key. I love to chop it into small bits for the right texture. Cherry tomatoes add a nice burst of sweetness. I choose either Parmesan or a vegan cheese for that rich flavor. Croutons give a crunchy element that everyone enjoys. Next, I whip up a simple dressing. Tahini brings a creamy texture, and lemon juice adds brightness. Garlic gives it a nice kick, while Dijon mustard adds depth. I finish it with a drizzle of olive oil, salt, and pepper. If you like some heat, a pinch of red pepper flakes works well. Having the right tools makes my preparation smooth. A large bowl holds everything, while a small bowl is perfect for mixing the dressing. I always keep a whisk handy to blend the dressing well. A knife and cutting board help me chop ingredients easily. This recipe is quick and fits into any meal. Check out the Full Recipe for all the details! To start, rinse the kale leaves under cool water. This removes any dirt or grit. Next, remove the tough stems. They can be too chewy. Chop the kale into bite-sized pieces. This makes it easier to eat and mix with the dressing. In a small bowl, mix together the tahini, lemon juice, minced garlic, Dijon mustard, olive oil, salt, and pepper. Use a whisk to blend until smooth. If the dressing is too thick, thin it out with a little water or more lemon juice. You want it to coat the kale nicely. In a large salad bowl, combine the chopped kale and halved cherry tomatoes. Drizzle the dressing over the salad. Now, gently massage the kale with your hands for about 2-3 minutes. This helps soften the leaves and improves the flavor. Finally, add the croutons and shredded Parmesan cheese. Toss everything together so the ingredients mix well. Enjoy your Chopped Kale Caesar Salad! For detailed ingredients and steps, check the Full Recipe. To make the kale nice and tender, I use a simple massage method. After washing and chopping the kale, I add the dressing directly to it. Then, I gently squeeze and rub the leaves with my hands for about two to three minutes. This breaks down the tough fibers. It makes the kale softer and more enjoyable to eat. Letting the salad sit for a bit helps the flavors mix well. I often let mine rest for ten minutes before serving. This time allows the kale to absorb the dressing, making each bite packed with flavor. If you want to switch up the dressing, there are many options. A classic Caesar dressing can work great too. You can swap tahini for Greek yogurt or even a store-bought dressing. Each choice brings a new taste to your salad. You can also adjust the creaminess. If you prefer a lighter dressing, add a bit more lemon juice or water. I like to play with flavors, so I often add herbs like dill or parsley for extra zing. When serving, I love using a large bowl. It makes the salad look inviting. You can also arrange it on a platter for a fancy touch. For garnishing, I suggest adding more Parmesan cheese on top. A sprinkle of red pepper flakes gives a nice color and a hint of heat. You can even toss in some edible flowers for a vibrant look. This way, your salad not only tastes good but looks stunning too. {{image_2}} For a vegan twist, swap the Parmesan cheese with nutritional yeast. This adds a cheesy flavor without dairy. You can also use cashew cream or a creamy avocado dressing to replace traditional Caesar dressing. To boost protein, add chickpeas or lentils. They make the salad filling and add great texture. If you want a different taste, try other greens like spinach or arugula. These can give your salad a new flair. Seasonal veggies like roasted beets, shredded carrots, or bell peppers also work well. They add color and crunch to your dish. To make your salad heartier, add proteins like grilled chicken or chickpeas. Both add depth and flavor. You can also toss in nuts or seeds like sunflower seeds or walnuts for added crunch. These will give your salad a delightful surprise with every bite. For more details on how to make this delicious dish, check out the Full Recipe. To store your Chopped Kale Caesar Salad, place it in an airtight container. This helps keep the flavors intact. If you plan to eat leftovers, try to separate the dressing from the salad. This way, the kale stays crisp. Use glass or BPA-free plastic containers for the best results. They help prevent any unwanted odors from mixing. Typically, your salad will stay fresh for about three days in the fridge. However, if you see any wilting or browning on the kale, it’s time to toss it. Also, if the dressing separates or smells off, discard it. Always trust your senses; they guide you well. Preparing your ingredients ahead of time can save you effort during the week. Chop the kale and store it in the fridge. Keep the cherry tomatoes, croutons, and cheese in separate containers. This helps keep everything fresh. When you’re ready to eat, simply mix the ingredients and add the dressing. This keeps the salad crisp and tasty all week long. To make a Chopped Kale Caesar Salad, start by preparing the kale. Rinse it well, remove the tough stems, and chop it into bite-sized pieces. Next, mix the dressing in a small bowl. Combine tahini, lemon juice, minced garlic, Dijon mustard, olive oil, salt, and pepper. Whisk until smooth. In a large bowl, add the chopped kale and cherry tomatoes. Drizzle the dressing over the salad. Massage the kale for about 2-3 minutes to soften it. Finally, toss in croutons and Parmesan cheese. The full recipe can guide your process step-by-step. Yes, you can use other greens instead of kale. Romaine lettuce is a great alternative. It has a crunchy texture and mild flavor. Spinach works well too, giving your salad a softer bite. Arugula adds a peppery taste, while Swiss chard brings a unique twist. Experiment with mixed greens for a fun flavor blend. For extra protein, consider adding grilled chicken or shrimp. Both options add great flavor and nutrition. Chickpeas or black beans also work well for a plant-based option. You might try hard-boiled eggs for a classic touch. Nuts like almonds or walnuts provide healthy fats and protein too. Yes, this recipe can be gluten-free. To keep it gluten-free, use gluten-free croutons or skip them altogether. Be sure to check the labels on any store-bought ingredients like tahini. Most of the components are naturally gluten-free, making it easy to enjoy. This salad lasts about 2-3 days in the fridge. To keep it fresh, store it in an airtight container. If possible, keep the dressing separate until you're ready to eat. This will help prevent sogginess in the kale and other ingredients. Always check for freshness before serving. In this blog post, we covered how to make a delicious kale salad. We discussed the main ingredients, how to prepare the dressing, and tips for perfecting texture. I shared variations for vegan options and ingredient swaps. Finally, we talked about storage and meal prep tips to keep your salad fresh. A well-made salad can be a healthy choice for any meal. So, gather your ingredients and try this tasty recipe today. You won’t be disappointed!

Chopped Kale Caesar Salad Healthy and Flavorful Dish

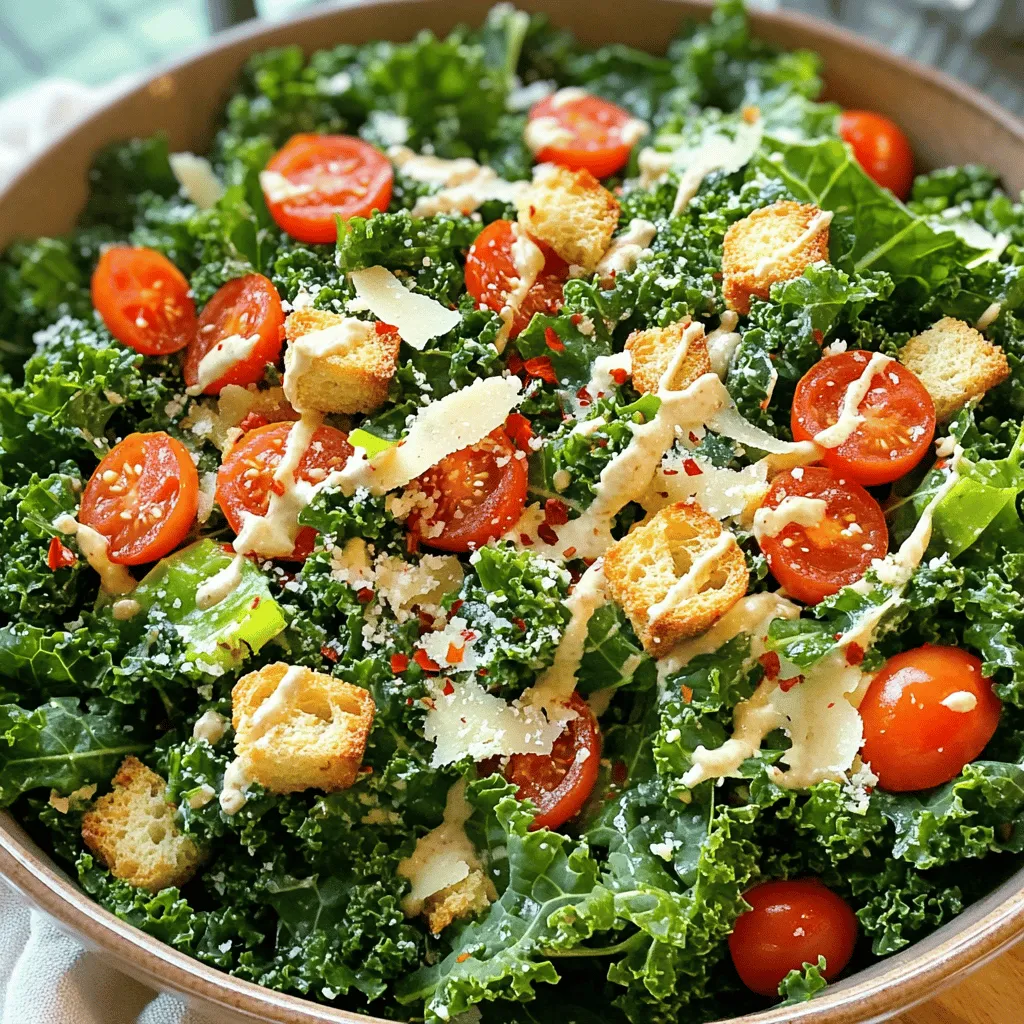
If you want a dish that’s both healthy and full of flavor, this Chopped Kale Caesar Salad is for you.

- Zucchini: Use 4 medium zucchinis. They are the star of this dish. - Basil leaves: You need 1 cup of fresh basil. This gives the pesto its bold flavor. - Garlic: Use 2 cloves of garlic. Garlic adds a nice kick to the pesto. - Pine nuts: Use 1/4 cup of toasted pine nuts. They bring a nutty taste. - Parmesan cheese: You can use 1/4 cup of grated Parmesan cheese, or nutritional yeast for a vegan option. Both will give great flavor. - Olive oil: You’ll need 1/2 cup of extra virgin olive oil. This makes the pesto creamy. - Cherry tomatoes: Halve some cherry tomatoes for freshness. They add color and taste. - Crushed red pepper flakes: Add a pinch for heat. This is optional. - Salt and pepper: Season to taste. These basic spices enhance all flavors. For the full recipe, check out the complete guide. Enjoy making your meal! First, you need to make your zucchini noodles. You can use a spiralizer or a vegetable peeler for this. A spiralizer gives you fun, long noodles. A peeler makes flat, wide ribbons. Both work well, so choose what you like best. After you cut the zucchini, it is important to drain the moisture. Place the noodles in a colander and let them sit for about 10 minutes. This helps keep your dish from getting soggy later. Next, let’s make the pesto. Start by combining the fresh basil leaves, toasted pine nuts, grated Parmesan cheese, and garlic in a food processor. Pulse these ingredients until they are finely chopped. Then, while the processor runs, slowly drizzle in the olive oil. This makes the pesto smooth and creamy. Taste it and add salt and pepper as needed. You want it to be bright and fresh, so don’t skip this step! Now, it’s time to cook the zucchini noodles. Heat a bit of olive oil in a large skillet on medium heat. Add the zucchini noodles and sauté for 2-3 minutes. You want them tender but still a little crunchy. Once they are cooked, remove the skillet from heat. Toss the hot noodles with the pesto until they are well coated. This step combines all the flavors beautifully. Serve your zucchini noodles in bowls, and top with halved cherry tomatoes. Add crushed red pepper flakes if you want some heat. For the complete recipe, be sure to check the Full Recipe section. Enjoy your fresh and flavorful meal! To create perfect zucchini noodles, use a spiralizer or a vegetable peeler. This helps you make long, thin strands. Make sure to slice evenly for the best texture. After slicing, place the noodles in a colander. Let them sit for a few minutes to drain excess moisture. Too much moisture can make your dish watery. To boost the flavor of your pesto, you can adjust the ingredients. For a richer taste, add more garlic or a squeeze of lemon juice. You can also play with the nuts; try walnuts instead of pine nuts for a different twist. For extra kick, sprinkle in some red pepper flakes. This adds a nice heat to your pesto. When serving your pesto zucchini noodles, use a large bowl to show off the colors. Top with halved cherry tomatoes for a fresh look. You can sprinkle some extra Parmesan cheese or nutritional yeast on top. For a fun twist, add fresh basil leaves as a garnish. This not only looks good but also enhances the flavor. For the full recipe, check out the section above! {{image_2}} To make a vegan version of pesto zucchini noodles, you can swap out the cheese. Use nutritional yeast instead of Parmesan. Nutritional yeast adds a cheesy flavor without dairy. For nuts, pine nuts are traditional, but you can also use walnuts or cashews. These nuts make for a rich and tasty pesto. If you want to boost your meal with proteins, grilled chicken or shrimp are great choices. They add flavor and make the dish more filling. If you're looking for a plant-based option, try firm tofu. Just press it to remove excess moisture, then cube and sauté it until golden. Tofu soaks up flavors well, making it a perfect match for pesto. To keep your dish fresh, add seasonal vegetables. In the summer, try cherry tomatoes or bell peppers. These veggies add color and crunch. In the fall, consider roasted butternut squash or broccoli. They will add a lovely depth of flavor. Don't forget to mix in different herbs too! Try parsley or cilantro for a twist. For the full recipe, click here. Store leftovers in an airtight container. This keeps them fresh and safe. If you have extra zucchini noodles, place them in the fridge. They stay good for up to three days. To keep them crisp, avoid mixing them with pesto until you are ready to eat. You can freeze zucchini noodles, but they will change texture. To freeze, lay them flat in a single layer on a baking sheet. Once frozen, transfer to a freezer bag. This way, you can grab just what you need later. When ready to use, thaw them in the fridge overnight. Keep pesto fresh by storing it in a jar with a layer of olive oil on top. This prevents air from reaching it. Homemade pesto lasts about a week in the fridge. If you want it to last longer, freeze it in ice cube trays. This makes it easy to use later. Each cube is a perfect portion for your zucchini noodles. For the full recipe of Pesto Zucchini Noodles, check out the detailed instructions above. You can make zucchini noodles using a few simple tools. A vegetable peeler works well. Just peel the zucchini into long strips. You can also use a box grater. Grate the zucchini lengthwise to get thin noodles. Both methods create tasty noodles without needing fancy tools. Yes, store-bought pesto is a quick option. It saves time and effort. However, fresh pesto has more flavor. Store-bought versions may contain preservatives. Choose one with minimal ingredients for the best taste. You can also mix store-bought pesto with fresh herbs to enhance its flavor. Zucchini noodles last about 2-3 days in the fridge. To store them, place them in an airtight container. Keep them dry to avoid sogginess. You can layer paper towels in the container to absorb excess moisture. This keeps them fresh and tasty longer. Pesto zucchini noodles pair well with many dishes. Try grilled chicken or shrimp for protein. A side salad adds freshness. Roasted vegetables bring more flavor and texture. You can also serve garlic bread to round out the meal. These options make a complete and satisfying dinner. Yes, you can eat zucchini noodles raw. Raw zucchini is crunchy and refreshing. It keeps more nutrients compared to cooked. Enjoy them in salads or with dips. Toss them with lemon juice and olive oil for a light snack. Raw zucchini noodles are a healthy choice. This blog covers how to make delicious zucchini noodles and pesto. Fresh ingredients, pantry staples, and optional garnishes bring flavor and fun to your dish. The step-by-step instructions make the process easy, from spiralizing to cooking. With helpful tips and tasty variations, you can customize this meal any way you like. Enjoy experimenting with new flavors and ingredients. Remember, these dishes are not only tasty but also healthy. Gather your ingredients and start cooking! You’ll love the results.

Pesto Zucchini Noodles Fresh and Flavorful Meal

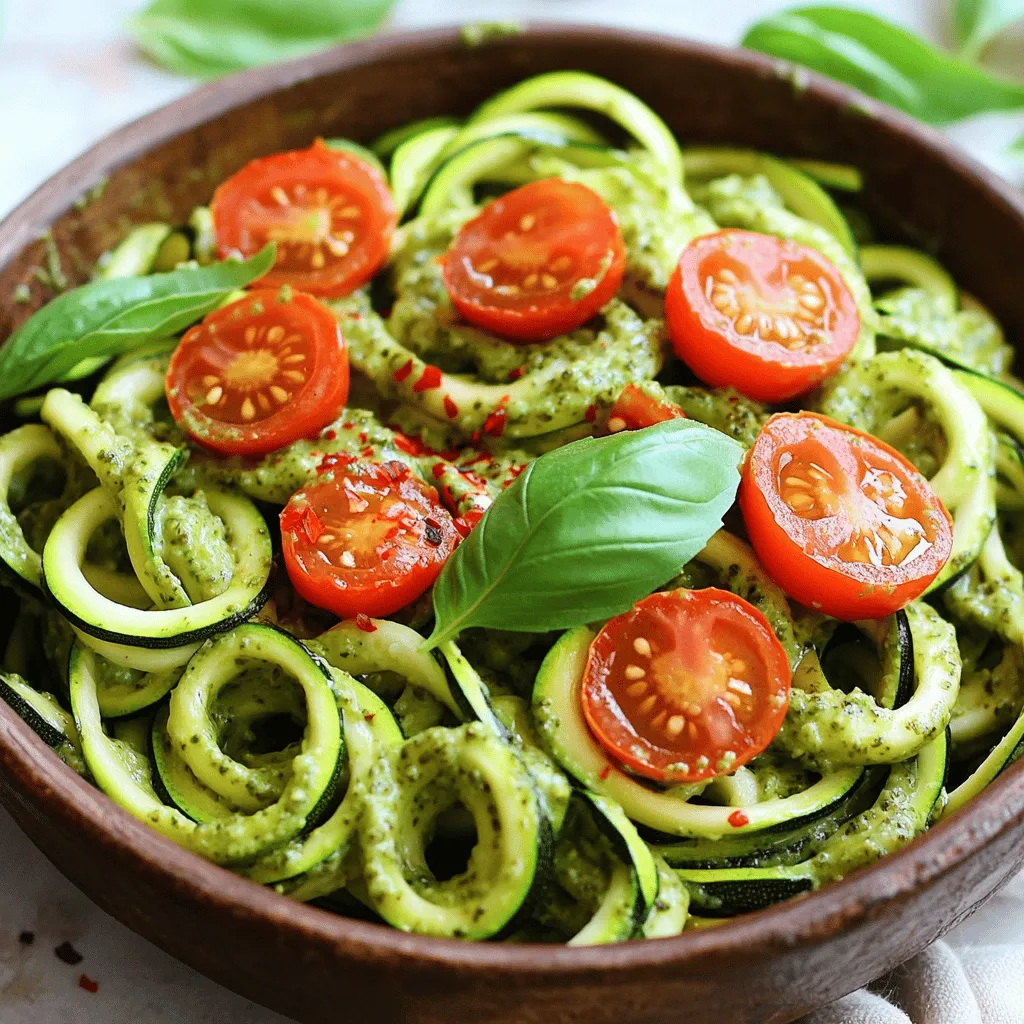
Looking for a fresh and tasty meal that’s quick to whip up? Pesto zucchini noodles are the answer! I’ll guide

Older posts
Newer posts
← Previous Page1 … Page61 Page62 Page63 … Page84 Next →

dsad

© 2026 juliesdish • Built with GeneratePress

Our Policies

  • Copyright Policy
  • Cookie Policy
  • GDPR Policy
  • Privacy Policy
  • Disclaimer
  • Terms Of Use

More Information

  • Home
  • About
  • Contact
  • Appetizers
  • Dessert
  • Dinner
  • Drinks
©2026, juliesdish About Back To Top