Skip to content
DisclaimerTerms Of UseGDPR PolicyCookie Policy

juliesdish

  • Home
  • Drinks
  • Appetizers
  • Dinner
  • Dessert
  • About
  • Contact
  • Privacy Policy
DisclaimerTerms Of UseGDPR PolicyCookie Policy

NO-ING-IMG

- 1 pound large shrimp, peeled and deveined - 2 cups asparagus, trimmed and cut into 2-inch pieces - 1 red bell pepper, sliced - 1 yellow bell pepper, sliced Large shrimp form the star of this dish. They have a sweet taste and cook quickly. Asparagus adds a nice crunch and vibrant color. The bell peppers bring sweetness and flavor that balance the meal. - 4 cloves garlic, minced - 1 lemon, zested and juiced - 3 tablespoons olive oil Garlic gives a bold flavor that pairs well with shrimp. The lemon zest and juice add freshness and brightness. Olive oil helps blend the flavors together and keeps the shrimp moist. - 1 teaspoon smoked paprika - 1 teaspoon dried oregano - 1/2 teaspoon red pepper flakes (optional for heat) Smoked paprika adds a warm, smoky taste. Dried oregano brings earthy notes that enhance the dish. If you like heat, red pepper flakes can boost the spice level. Adjust it to fit your taste buds! - Preheat your oven to 400°F (200°C). - In a large bowl, mix minced garlic, lemon zest, lemon juice, olive oil, smoked paprika, dried oregano, red pepper flakes, salt, and pepper. This marinade will add tons of flavor. - Add the shrimp to the bowl with the marinade. Toss them well until they are fully coated. - Let the shrimp marinate for about 15 minutes. This time lets the shrimp soak up all the tasty flavors. - While the shrimp sits, prepare a large sheet pan. You can line it with parchment paper or grease it with olive oil. - Add the trimmed asparagus and sliced bell peppers to the pan. Drizzle with olive oil, then sprinkle with salt and pepper. Toss the veggies to coat them evenly. - After marinating, spread the shrimp evenly over the vegetables on the pan. - Bake in the preheated oven for about 12-15 minutes. You’ll know it’s done when the shrimp are opaque and the veggies are tender-crisp. How long to marinate shrimp? Marinate shrimp for about 15 minutes. This short time allows the shrimp to soak up the flavors. If you marinate too long, the shrimp can become mushy. Benefits of marinating Marinating adds flavor and moisture. The garlic and lemon work together to give a bright taste. This makes the shrimp more delicious and enjoyable. Tips for achieving tender-crisp vegetables Cut your vegetables into even pieces. This helps them cook at the same rate. Drizzle a bit of olive oil and season with salt and pepper. Toss them well before baking. This will keep them tender but still crisp. Adjusting oven temperature for different ovens Ovens can vary in heat. If your oven runs hot, lower the temperature by 25°F. If it runs cool, keep it at 400°F. Always check your food a few minutes early. This helps prevent overcooking. Suggestions for fresh herbs Chopped parsley is a great choice for garnish. It adds color and freshness to the dish. You can also try fresh basil or cilantro for a different taste. Serving ideas with sides Serve the shrimp with rice or quinoa for a full meal. A simple green salad pairs well too. You can also add crusty bread to soak up the tasty sauce. {{image_2}} You can switch up the veggies in this dish. Try using: - Broccoli florets - Zucchini slices - Cherry tomatoes These options add new flavors and colors. You can also change the seafood. If you prefer fish, use: - Salmon fillets - Scallops - White fish like cod These options work well with the marinade and bake just as nicely. If you want to add more flavor, consider these spices: - Cumin for a warm touch - Lemon pepper for extra zest - Italian seasoning for an herby blend For heat, adjust the red pepper flakes. Start with a pinch and add more if you like it spicy. You can also add a dash of hot sauce before serving for a kick. For a vegan version, replace the shrimp with: - Firm tofu - Cauliflower florets These options soak up the marinade well. For gluten-free needs, check your seasonings. Most spices are gluten-free, but always read labels to be safe. Enjoy the meal while keeping your dietary needs in mind! To keep your leftover Garlic Lemon Shrimp Sheet Pan fresh, follow these tips: - Cool the dish to room temperature before storing. - Use airtight containers to avoid moisture loss. - Glass or plastic containers work well for storage. Reheat your dish for the best flavor and texture: - Preheat your oven to 350°F (175°C). - Place the leftovers in a baking dish. - Cover with foil to keep moisture in. - Heat for about 10-15 minutes or until warm. You can freeze this dish for later meals: - Allow it to cool completely before freezing. - Use freezer-safe containers or bags. - Label with the date for easy tracking. - Thaw in the fridge overnight before reheating. You can tell shrimp are done when they turn opaque and curl slightly. They should look pink and firm. Cook them for about 12-15 minutes at 400°F (200°C). If you see a C shape, that’s a good sign. Overcooked shrimp can become rubbery, so keep an eye on them. Serve them right away for the best taste. Yes, you can use frozen shrimp! Just make sure to thaw them first. The best way to thaw shrimp is to place them in a bowl of cold water for about 15-20 minutes. You can also leave them in the fridge overnight. Once thawed, pat them dry with paper towels before marinating. This helps the marinade stick better and adds more flavor. Absolutely! You can replace shrimp with firm tofu or chickpeas. Both options soak up the marinade nicely. For tofu, press it to remove extra moisture, then cut it into cubes. For chickpeas, use canned ones and rinse them well. These swaps keep the dish tasty and satisfying. Add more veggies like zucchini or mushrooms to enhance the flavors! This blog post shared a simple and tasty recipe for Garlic Lemon Shrimp Sheet Pan. We explored the key ingredients, including shrimp, asparagus, and bell peppers. I provided step-by-step instructions to marinate and bake the dish, along with tips to enhance flavor and texture. You can easily adapt this recipe for different diets and preferences. With careful storage and reheating methods, you can enjoy leftovers too. Now, you can impress your family and friends with a delicious meal that’s easy to prepare!

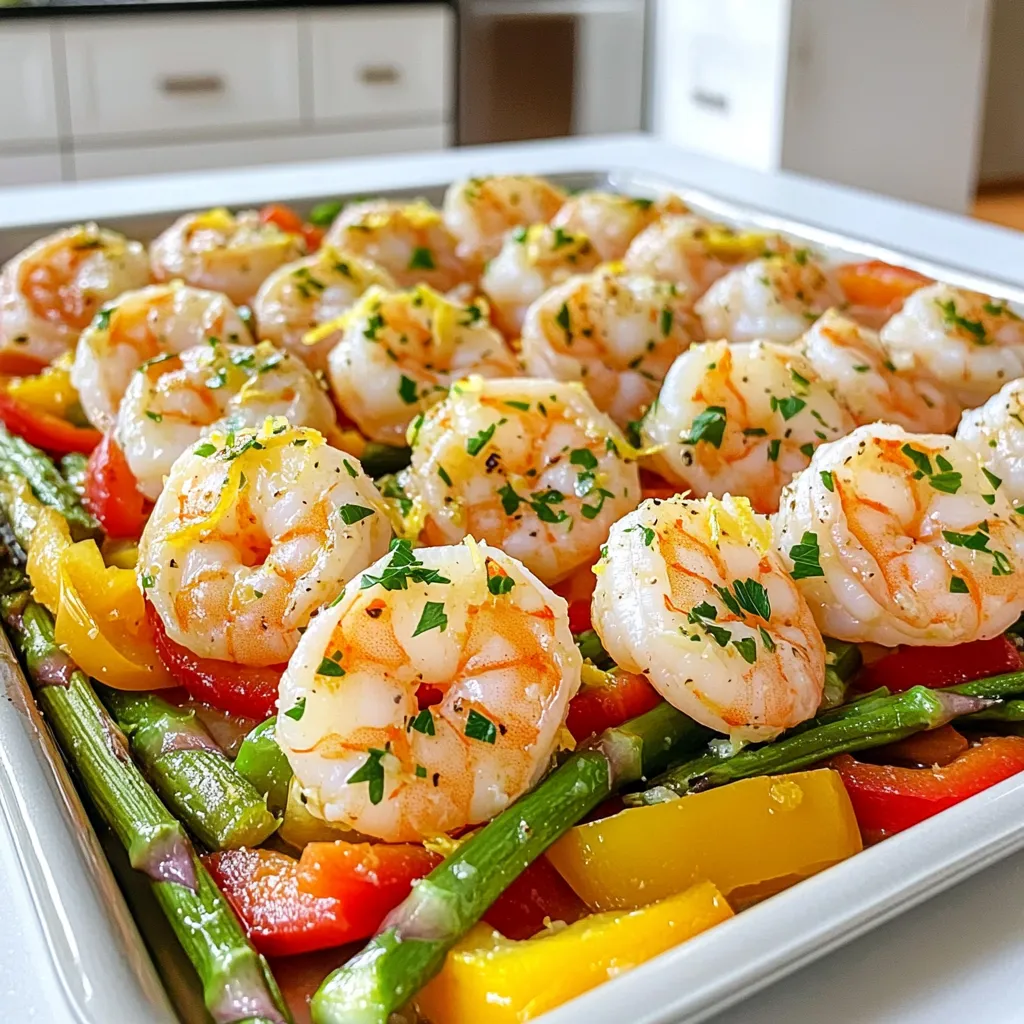
Garlic Lemon Shrimp Sheet Pan Quick and Tasty Meal

Looking for a quick and tasty meal? This Garlic Lemon Shrimp Sheet Pan recipe is your answer! With vibrant veggies

- 1 cup Arborio rice - 4 cups vegetable broth - 2 cups mixed mushrooms (cremini, shiitake, oyster), sliced - 1 small onion, finely chopped - 2 cloves garlic, minced - 1/2 cup heavy cream - 1/2 cup grated Parmesan cheese (optional for serving) - 2 tablespoons olive oil - 2 tablespoons butter - Salt and pepper to taste - Zest of 1 lemon - Fresh parsley, chopped for garnish Gathering the right ingredients is key to a great risotto. Arborio rice is a must. It has the right starch level. This gives risotto its creamy texture. You will need vegetable broth. Using warm broth helps the rice cook evenly. For the mushrooms, choose a mix. Cremini, shiitake, and oyster mushrooms add depth. The umami flavor from these mushrooms makes the dish rich. You will also need a small onion and garlic. These aromatics add great flavor to the base. Heavy cream adds richness. It makes the risotto silky and smooth. Parmesan cheese is optional but adds a nice touch. Olive oil and butter will help sauté the vegetables. Seasonings are also important. Salt, pepper, and lemon zest brighten the dish. Fresh parsley adds color and freshness when you serve. With these ingredients, you can create a tasty and creamy mushroom risotto. Enjoy the blend of flavors and textures! {{ingredient_image_1}} Start with a medium saucepan. Pour in 4 cups of vegetable broth. Heat it over low heat. Keep it warm but do not boil. This will help the rice cook evenly. Next, grab a large skillet. Add 2 tablespoons of olive oil and 2 tablespoons of butter. Heat them over medium heat. Once hot, add 1 small chopped onion. Stir it for about 3 to 4 minutes. Then, add 2 minced garlic cloves. Cook until fragrant. Now, toss in 2 cups of sliced mixed mushrooms. Stir them until they turn brown and tender, around 5 to 7 minutes. Season with salt and pepper to your taste. Now it’s time for the rice. Add 1 cup of Arborio rice to the skillet. Stir well to coat the rice with oil and butter. Cook for about 2 minutes. You want the rice to look slightly translucent. After that, take a ladle of the warm broth. Pour it into the skillet while stirring. Wait until the liquid is mostly absorbed before adding more broth. Repeat this process for 18 to 20 minutes. You want the rice to be al dente and creamy. Once done, turn off the heat. Stir in 1/2 cup of heavy cream and the zest of 1 lemon. Taste it and add more salt and pepper if needed. Serve hot and enjoy your creamy mushroom risotto! To get that creamy texture, you must stir often. Stirring helps release the starch from the Arborio rice. This starchy goodness makes risotto creamy. Always add warm broth, one ladle at a time. Let each ladle soak in before adding more. This slow process creates the best texture. Don't rush it; patience is key. Choose fresh mushrooms for the best flavor. I love mixing cremini, shiitake, and oyster mushrooms. Each type adds a unique taste. Look for firm mushrooms with no dark spots. Store them in a paper bag, not plastic. This keeps them fresh longer. Always clean mushrooms with a damp cloth, not water. Too much water can make them soggy. Many cooks make the mistake of adding too much broth at once. This can lead to a gluey texture. Always remember to stir and taste often. If you feel the risotto is too thick, add more broth. Another mistake is not seasoning enough. Season each layer as you cook. This builds great flavor. Lastly, don’t forget to let it rest for a few minutes after cooking. This helps the flavors meld together beautifully. Pro Tips Use Quality Mushrooms: For the best flavor, choose fresh, high-quality mushrooms. A mix of different types adds depth to your risotto. Stir Constantly: Continuous stirring helps release the starch from the rice, creating the creamy texture you want in risotto. Add Broth Gradually: Adding the broth one ladle at a time allows the rice to absorb the liquid slowly, ensuring perfectly cooked grains. Finish with Butter: For an extra rich taste, stir in a tablespoon of butter right before serving to enhance the creaminess. {{image_2}} You can easily add proteins to your risotto. Chicken adds a savory taste. Cook diced chicken in the skillet before adding the mushrooms. Shrimp gives a nice seafood flavor. Sauté the shrimp until pink and tender. For a vegetarian option, use tofu. Firm tofu works best. Cube it and sauté until golden. Adding proteins makes the dish heartier and more filling. Mixing in different veggies can change the dish. Spinach adds a fresh, green flavor. Stir it in when the rice is nearly done. Peas give a sweet pop and bright color. They cook quickly, so add them in the last few minutes. Asparagus brings a crunchy texture. Cut it into small pieces and sauté with mushrooms. These veggie swaps keep the dish exciting and nutritious. You can boost the flavor with simple additions. Truffle oil adds richness and a unique taste. Drizzle a little on top before serving. Fresh herbs like thyme or basil brighten the dish. Stir them in at the end for a fresh kick. Spices like smoked paprika or nutmeg give warmth. Just a pinch can elevate the flavors. These enhancements create a gourmet feel in your risotto. After enjoying your creamy mushroom risotto, you might have some left. To store it, place the risotto in an airtight container. Make sure it cools first. This keeps it fresh and tasty for a few days. Leftovers can last in the fridge for up to three days. If you want to store risotto for longer, freezing works well. First, let the risotto cool completely. Then, divide it into portions. Use freezer-safe bags or containers. Be sure to remove as much air as possible. Risotto can last up to three months in the freezer. When it's time to eat your risotto again, reheat it gently. You can use the microwave or a saucepan. If using the stove, add a splash of broth or water to help it warm up. Stir often for even heating. It should be creamy again in no time! Risotto gets its creamy texture from Arborio rice. This rice has high starch content. When you cook it slowly and stir often, the starches release. This creates a rich, smooth sauce. Adding heavy cream at the end also boosts the creaminess. Lemon zest brightens the flavors too. You can use regular rice, but it won't be the same. Arborio rice is short-grain and absorbs liquid well. It creates a creamy texture that long-grain rice cannot. If you use regular rice, your risotto may be less creamy and more watery. So, stick with Arborio for the best results. Risotto can last in the fridge for about three days. Store it in an airtight container. Make sure it cools down before putting it in the fridge. If you plan to keep it longer, you should freeze it. You can make risotto ahead of time, but it won’t be as creamy. It is best to cook it fresh. If you must prepare it in advance, stop cooking just before it’s fully done. When you reheat it, add a bit of broth to bring back the creaminess. This blog post covers how to make a rich, creamy mushroom risotto. We explored the necessary ingredients, step-by-step cooking instructions, and tips for perfect texture. I shared variations to customize your dish and storage tips to keep your risotto fresh. Remember, risotto is versatile, allowing you to add different proteins or veggies. With these steps and insights, you can create a delicious meal for any occasion. Enjoy cooking!

Creamy Mushroom Risotto Simple and Tasty Recipe

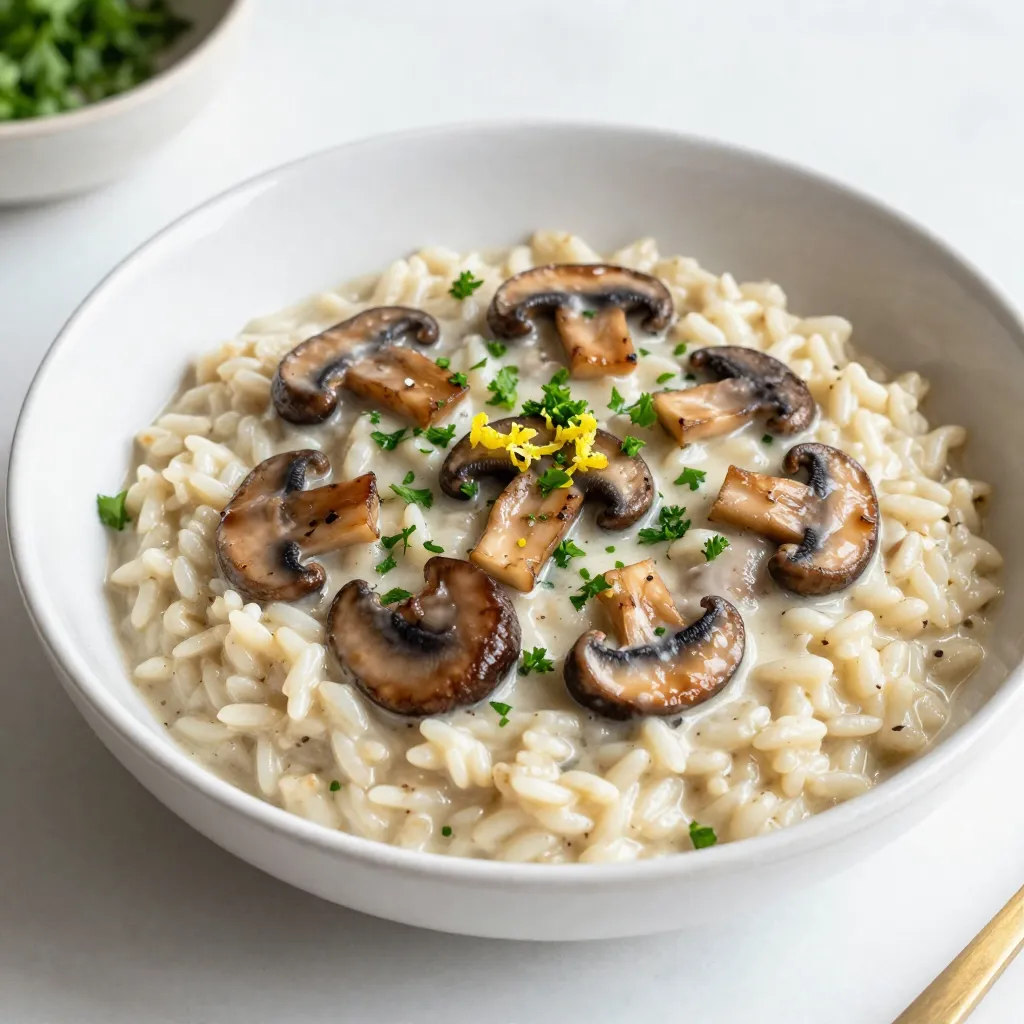
Are you ready to impress your family and friends with a delicious dish? This Creamy Mushroom Risotto is both simple

To make your Pumpkin Spice Affogato, you'll need these simple items: - 2 cups brewed espresso or strong coffee - 1 cup pumpkin puree - 1 cup vanilla ice cream - 2 tablespoons brown sugar - 1 teaspoon pumpkin pie spice - Whipped cream, for garnish - Toasted pumpkin seeds, for garnish These ingredients come together to make a tasty treat. The espresso or coffee gives a rich base, while pumpkin adds warmth and flavor. If you do not have some ingredients, here are easy swaps: - Espresso: You can use strong brewed coffee instead. - Pumpkin Puree: If you can't find pumpkin puree, use sweet potato puree. - Brown Sugar: White sugar or maple syrup works well too. - Vanilla Ice Cream: Try cinnamon or caramel ice cream for a twist. Feel free to mix things up based on what you have! Adding toppings can enhance the flavor and look of your affogato: - Whipped cream adds creaminess and a nice touch on top. - Toasted pumpkin seeds give a crunchy texture. - A sprinkle of cinnamon or nutmeg boosts the fall vibe. - Chocolate shavings can add a sweet element. These garnishes not only make your dish pretty but also add layers of flavor! Start by gathering your ingredients. You will need pumpkin puree, brown sugar, and pumpkin pie spice. In a small saucepan, mix these three ingredients over medium-low heat. Stir them constantly for about 3 to 4 minutes. The key is to heat until the sugar dissolves fully. Once done, remove the pan from the heat and set it aside. This mixture will add warmth and flavor to your affogato. Next, brew your coffee or espresso. Aim for 2 cups of strong brew. If you have an espresso machine, use it for a rich flavor. If not, a strong coffee will work well too. After brewing, let your coffee cool slightly. This step ensures that it won’t melt the ice cream too quickly. Now for the fun part: assembly! Grab your serving glasses or bowls. Place one scoop of vanilla ice cream in each glass. Pour the warm pumpkin mixture evenly over the ice cream. Then, slowly pour the hot coffee or espresso over the pumpkin ice cream. This will create a lovely contrast between hot and cold. Finally, add a dollop of whipped cream on top. Sprinkle toasted pumpkin seeds for crunch. Serve immediately and enjoy the cozy flavor! To get the best flavor, mix the pumpkin puree with brown sugar and spice. Heat this mix well but don’t let it boil. The warm pumpkin will blend nicely with the cold ice cream. This contrast creates a rich taste. Keep tasting as you go. You can add more spice or sugar if you want. Use strong coffee or espresso for this recipe. A dark roast works best. It gives a bold flavor that pairs well with pumpkin. If you want a smoother taste, try a medium roast. Experiment with flavored coffees too. A little cinnamon or nutmeg can add a fun twist. Serve the pumpkin spice affogato right away. The ice cream needs to stay cold while the coffee is hot. Pour the warm pumpkin mix over the ice cream first. Then, drizzle the hot coffee on top. This method keeps the ice cream from melting too fast. Enjoy the mix of warm and cool flavors! {{image_2}} You can make a vegan version of pumpkin spice affogato. Use coconut milk ice cream instead of vanilla ice cream. This choice keeps the treat creamy and rich. For the pumpkin mixture, stick to the same ingredients. Just ensure the brown sugar is vegan. This way, you can enjoy the flavors without dairy. If you're looking for dairy-free options, try almond or oat milk ice cream. These ice creams offer great texture and flavor. You can also use cashew-based ice cream. It has a smooth finish that works well with pumpkin spice. Just follow the same steps in the recipe to assemble your treat. Want to spice things up? Add extra flavors like cinnamon or nutmeg. Try mixing a pinch of these spices into the pumpkin mixture. You can also sprinkle them on top with the whipped cream. This adds a cozy twist to your affogato. Another option is to use flavored coffee. A pumpkin spice or hazelnut brew can enhance the drink. Feel free to play around with your favorite flavors! To store leftover pumpkin mixture, pour it into an airtight container. Seal it tight to keep air out. Place it in the fridge. It stays fresh for up to five days. You can also freeze it. Use freezer-safe bags or containers. It will last for up to three months. Just remember to label it with the date. Keep ice cream in its original container. Make sure the lid is on tight. If you use a different container, choose one that is airtight. Store it in the coldest part of your freezer. This helps prevent ice crystals from forming. Ice cream can last for about two months but tastes best fresh. When you are ready to use the pumpkin mixture, heat it slowly. Use a small saucepan over low heat. Stir it gently until warm. If it gets too thick, add a splash of water or milk. Serve the warm mixture over ice cream right away for the best taste. Enjoy the warm and cold blend! Affogato is a simple Italian dessert. It usually combines ice cream and espresso. The hot espresso pours over the cold ice cream, making it melt. This mix of hot and cold creates a unique taste. In this pumpkin spice version, we add pumpkin puree and spices. The flavors blend nicely, giving you a cozy fall treat. You can prepare some parts ahead. Make the pumpkin mixture and store it in the fridge. Just keep it in an airtight container. Brew your coffee fresh when you're ready to serve. Ice cream should be kept in the freezer until you need it. This way, your affogato stays fresh and tasty. If you can't find pumpkin puree, use butternut squash puree instead. It has a similar flavor and texture. You can also try sweet potato puree for a different taste. Just ensure the puree is smooth for the best results. This blog post covered how to make a delicious Pumpkin Spice Affogato. We looked at ingredients, substitutions, and garnishes to enhance your dish. I shared step-by-step instructions for preparation, brewing coffee, and assembling your affogato. You also learned tips for flavor balance and temperature. Variations include vegan and dairy-free options. Finally, I explained how to store leftovers and answered common questions. Now, you can enjoy a tasty treat any time and impress your friends.

Pumpkin Spice Affogato Rich and Cozy Fall Treat

Fall is the perfect time to enjoy warm flavors, and what better treat than Pumpkin Spice Affogato? This rich and

- 400g baby portobello mushrooms, cleaned and stems trimmed - 4 tablespoons unsalted butter, melted - 4 cloves garlic, minced - 1 tablespoon fresh thyme leaves (or 1 teaspoon dried thyme) - ½ teaspoon salt - ¼ teaspoon black pepper - 1 tablespoon fresh parsley, chopped (for garnish) You can swap the baby portobello mushrooms for other types. White button mushrooms work well. If you want a richer flavor, try shiitake mushrooms. For the unsalted butter, you can use olive oil for a vegan option. You might also try other herbs, like oregano or rosemary, if you don’t have thyme. Using fresh herbs gives a bright flavor. Fresh thyme adds a nice touch to the dish. Dried thyme also works, but use less. Dried herbs are stronger. Use about one-third of the amount. Fresh herbs enhance the taste more than dried ones in this recipe. First, set your air fryer to 200°C (390°F). Preheat it for about 5 minutes. This step helps cook the mushrooms evenly and keeps them juicy. In a large bowl, mix the melted butter, minced garlic, thyme, salt, and pepper. Stir well to make a smooth garlic butter sauce. This sauce is what makes the mushrooms so tasty. Next, add the cleaned portobello mushrooms to the bowl. Toss them gently in the garlic butter sauce. Make sure each mushroom is well-coated. After that, place them in the air fryer basket. Arrange them in a single layer. Do not overcrowd the basket. This helps them cook evenly. Air fry the mushrooms for 8 to 10 minutes. Shake the basket halfway through cooking. This helps the mushrooms brown nicely. When done, they should be golden brown and tender. Carefully take them out and place them on a serving plate. Drizzle any leftover garlic butter sauce over the mushrooms and sprinkle with chopped parsley for a fresh touch. To cook mushrooms just right, start with fresh baby portobello mushrooms. Clean them well and trim the stems. This keeps them tender and tasty. Set your air fryer to 200°C (390°F) before cooking. Preheating helps them cook evenly. When you arrange the mushrooms, make sure they are in a single layer. This way, they won’t steam. Shake the basket halfway through cooking to ensure all sides get crispy. Aim for 8-10 minutes of cooking for golden brown results. One common mistake is overcrowding the air fryer. If you fill the basket too much, the mushrooms will not cook evenly. Another issue is not preheating the air fryer. This can lead to mushy mushrooms instead of crisp ones. Always coat the mushrooms well with the garlic butter sauce. If you skip this, they will lack flavor. Lastly, don’t skip the fresh herbs. They really boost the taste. You can add more to your mushrooms for extra flavor. Try a dash of red pepper flakes for some heat. A sprinkle of lemon juice right before serving adds brightness. If you like it cheesy, sprinkle some grated Parmesan on top after cooking. Fresh herbs like basil or oregano can also mix in well. Don’t be afraid to experiment with flavors you love! {{image_2}} You can use many types of mushrooms in this recipe. Baby portobello mushrooms are great, but consider these options: - Cremini mushrooms: They are similar to portobellos but smaller. - Button mushrooms: These are mild and easy to find. - Shiitake mushrooms: They add a rich, earthy flavor. - Oyster mushrooms: These have a unique texture and taste. Each type brings a new flavor and texture. Experiment to find your favorite! You can easily boost the flavor of your garlic butter mushrooms. Here are some ideas: - Add a pinch of red pepper flakes for heat. - Squeeze fresh lemon juice for brightness. - Toss in some grated Parmesan cheese for a savory touch. - Mix in a splash of soy sauce for umami. These simple changes can make your dish even better! If you have dietary needs, I’ve got you covered. To make this recipe gluten-free, use gluten-free soy sauce or tamari. For a vegan option, swap the butter for vegan butter or olive oil. You can also replace the garlic butter with a mix of olive oil, garlic, and herbs. This way, everyone can enjoy these tasty mushrooms! To store leftover mushrooms, first let them cool. Place them in an airtight container. You can keep them in the fridge for up to three days. If you want to enjoy them later, avoid adding any extra sauce. This keeps them fresh and tasty. To reheat your mushrooms, use the air fryer for the best results. Set it to 180°C (350°F) for about 3-5 minutes. This method keeps them warm and crispy. You can also microwave them for 1-2 minutes, but they may become softer. You can freeze these mushrooms if you have extra. Place them in a single layer on a baking sheet. Freeze them for 1-2 hours until firm. Then, transfer them to a freezer bag. They can stay frozen for up to three months. When you want to eat them, thaw in the fridge before reheating. Yes, you can use frozen mushrooms. However, they may release extra water. This can change the texture. If you use them, thaw and drain them first. Pat them dry with a paper towel. This helps keep the mushrooms firm and tasty. To add heat, try using red pepper flakes. Start with a pinch and adjust to your taste. You can also add a dash of hot sauce to the garlic butter mix. Another option is to use spicy garlic. This gives a nice kick without overpowering the dish. Garlic butter mushrooms are very versatile. They go well with steak, chicken, or pasta. You can also serve them with rice or quinoa. For a vegetarian option, try them on a salad. Their rich flavor enhances many meals. Yes, you can! This recipe works great with other veggies like asparagus or bell peppers. Just cut them into similar sizes. Coat them in the garlic butter mix and air fry. Adjust the cooking time as needed for different vegetables. This blog post shared key steps to make garlic butter mushrooms. We covered what to use, how to cook, and even how to store leftovers. You learned about ingredient swaps and tips for perfect mushrooms. Explore different types and spice it up with your own twists. Remember, cooking is all about having fun. Enjoy these mushrooms as a side or in other dishes. You now have all the tools to make this tasty recipe shine!

Air Fryer Garlic Butter Mushrooms Simple and Tasty

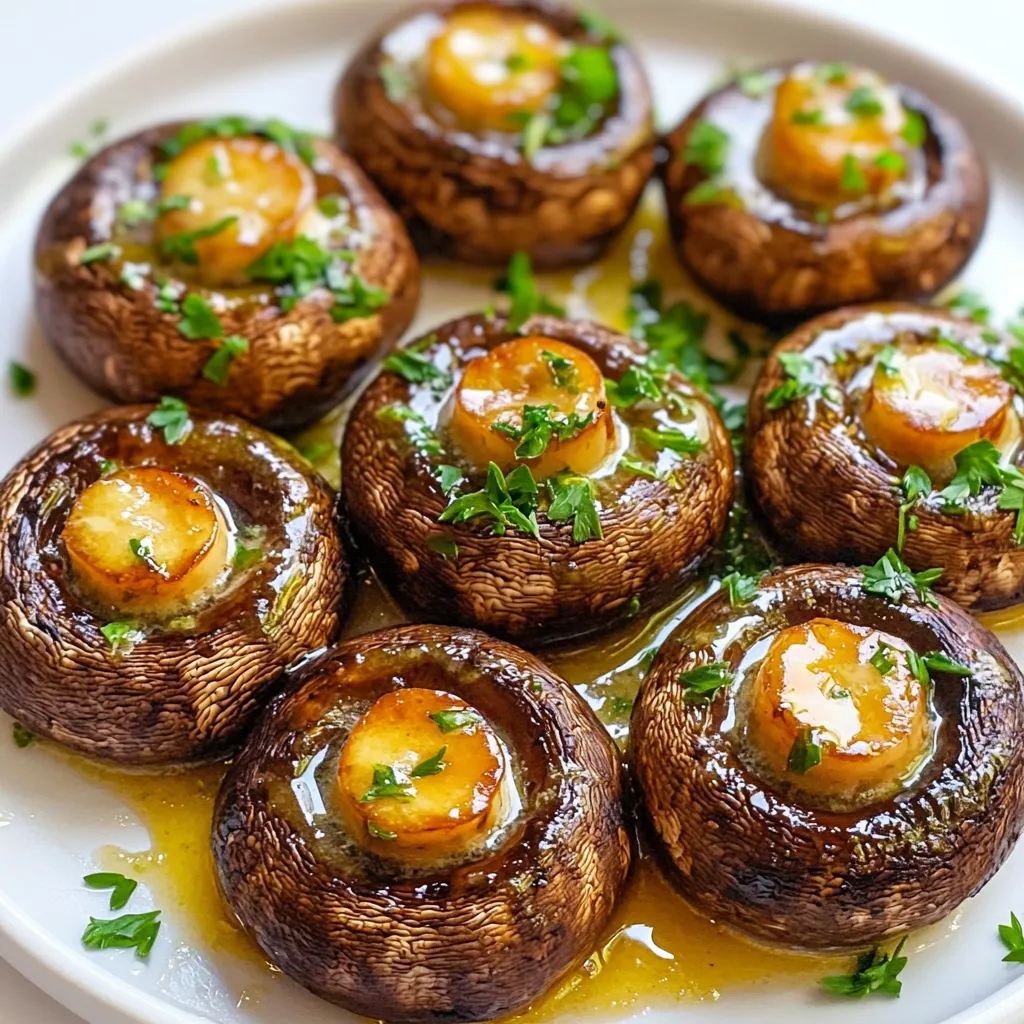
Looking for a simple and tasty side dish? You’ll love these air fryer garlic butter mushrooms! They are quick to

- 2 cups all-purpose flour - 1/2 cup sugar - 1/2 cup warm milk (about 110°F) - 1 packet (2 1/4 teaspoons) instant yeast - 1/4 cup unsalted butter, melted - 1/2 teaspoon salt - 1 large egg - 1 teaspoon vanilla extract - 1 cup pecans, roughly chopped - 1/2 cup brown sugar, packed - 1/4 cup unsalted butter, softened - 1/4 cup corn syrup - 1 teaspoon ground cinnamon The key to great caramel pecan sticky buns is in the ingredients. For the dough, you need basic items like flour, sugar, and yeast. Each part plays a role. The yeast makes the dough rise, giving it that fluffy texture. Warm milk helps activate the yeast, while butter adds richness. The caramel layer is just as important. Chopped pecans give a nice crunch and flavor. Brown sugar adds deep sweetness. Corn syrup helps the caramel stay smooth. Cinnamon brings warmth and spice to the mix. By using quality ingredients, you ensure your sticky buns taste amazing. You can also experiment with different nuts or sugars to make it your own. This recipe is simple, yet it leads to a delightful treat. Enjoy the process of mixing and baking these sweet buns. Start by taking a mixing bowl. Combine warm milk and sugar. Sprinkle the yeast on top of the milk. Let this sit for 5 to 10 minutes. You want the mixture to become frothy. This means the yeast is active and ready. In another bowl, mix the all-purpose flour and salt. After that, add the melted butter, egg, and the yeast mixture to the flour. Stir it all together. When the dough starts to come together, it’s time to knead. Knead the dough on a floured surface for about 8 to 10 minutes. You want it to be smooth and elastic. Now, place the dough in a greased bowl. Cover it with a cloth. Let it rise in a warm place for about 1 hour. The dough should double in size. While the dough rises, prepare the filling and the caramel layer. Once the dough has risen, roll it out on a floured surface. Aim for a rectangle shape, about 12 by 18 inches. Spread the cinnamon filling mixture evenly over the dough. Starting from the long edge, tightly roll the dough into a log. Cut the log into 12 equal pieces. Place the rolls in a greased baking dish over the caramel layer. Cover with plastic wrap and let them rise for another 30 minutes. Preheat the oven to 350°F (175°C). Bake the buns for 25 to 30 minutes. You want them to be golden brown. After baking, let them cool for a few minutes in the pan. Carefully invert the buns onto a serving platter. Serve them warm and enjoy! To make the best caramel pecan sticky buns, focus on the dough. Kneading is key. Knead your dough for about 8-10 minutes. This builds elasticity and strength. Use your palms to push the dough away and fold it back. You want a smooth and soft dough. For rising, find a warm spot. Cover the bowl with a cloth. Let it rise for about 1 hour. It should double in size. This gives your buns a light and fluffy texture. Creating a smooth caramel layer is easy if you follow a few steps. Start with low heat to melt the butter and corn syrup. Stir them together well. This helps avoid lumps. When adding nuts, chop them roughly for a good texture. Spread them evenly in the baking dish. This ensures every bite has a nice crunch. Presentation matters! When serving, place the sticky buns on a nice platter. Drizzle extra caramel over the top for a sweet touch. Pair these buns with coffee or tea. The rich flavors go well together. You can also serve with a scoop of vanilla ice cream for a fun twist! {{image_2}} You can change the nuts in your sticky buns. Walnuts add a nice crunch. Almonds give a different taste and texture. If you want something sweet, try adding chocolate chips. Dried fruit like raisins or cranberries can also add flavor. Mix and match to find what you love. To make a healthier version, use whole wheat flour instead of all-purpose flour. You can also use sugar substitutes like honey or agave. For gluten-free sticky buns, choose a gluten-free flour blend. This way, everyone can enjoy this sweet treat without worry. To make mini sticky buns, cut the rolled dough into smaller pieces. Bake them in a mini muffin tin for bite-sized treats. This helps reduce baking time to about 12-15 minutes. Watch them closely to avoid overbaking. These tiny buns are perfect for sharing! To keep your caramel pecan sticky buns fresh, store them at room temperature. Place them in an airtight container. This keeps them soft and prevents them from drying out. You can also wrap them tightly in plastic wrap. They will last for about three days. If you want to save some for later, freezing is a great option. First, let the buns cool completely. Then, wrap each bun in plastic wrap. Place the wrapped buns in a freezer-safe bag or container. They can stay fresh for up to three months in the freezer. When you're ready to enjoy them, take them out and let them thaw. For the best taste and texture, reheat them in the oven. Preheat the oven to 350°F (175°C) and warm them for about 10-15 minutes. This will bring back their gooey caramel and soft texture. Enjoy your delightful treat! Caramel pecan sticky buns can last for about 3 to 5 days at room temperature. To keep them fresh, store them in an airtight container. If you want to keep them longer, you can freeze them. Wrap each bun in plastic wrap, then place them in a freezer bag. They can last up to three months in the freezer. Yes, you can make the dough ahead of time. Prepare the dough as per the recipe and let it rise. After it rises, you can cover it tightly and place it in the fridge. This will slow the yeast action. You can keep it in the fridge for up to 24 hours. When you are ready, let the dough come to room temperature before rolling it out. If you don’t have corn syrup, you can use honey or maple syrup as a substitute. Both give a nice sweetness, but they may change the flavor slightly. You can also use brown rice syrup if you have it. Just keep in mind that these substitutes can make the caramel layer a bit less thick. You can tell when the sticky buns are done by their color. They should be golden brown on top. You can also insert a toothpick into the center; if it comes out clean, they are ready. The buns should feel soft but not doughy. A good way to check is to tap the bottom of the pan; if it sounds hollow, they are done. In this blog post, we explored how to make delicious caramel pecan sticky buns. You learned about the key ingredients, from the dough to the caramel layer. I walked you through step-by-step instructions, plus tips for perfecting your buns. You now have fun variations and storage tips to keep your treats fresh. Making these sticky buns is easier than you might think. Enjoy the warmth they bring to your kitchen and the smiles they create. Happy baking!

Caramel Pecan Sticky Buns Irresistible Sweet Treat

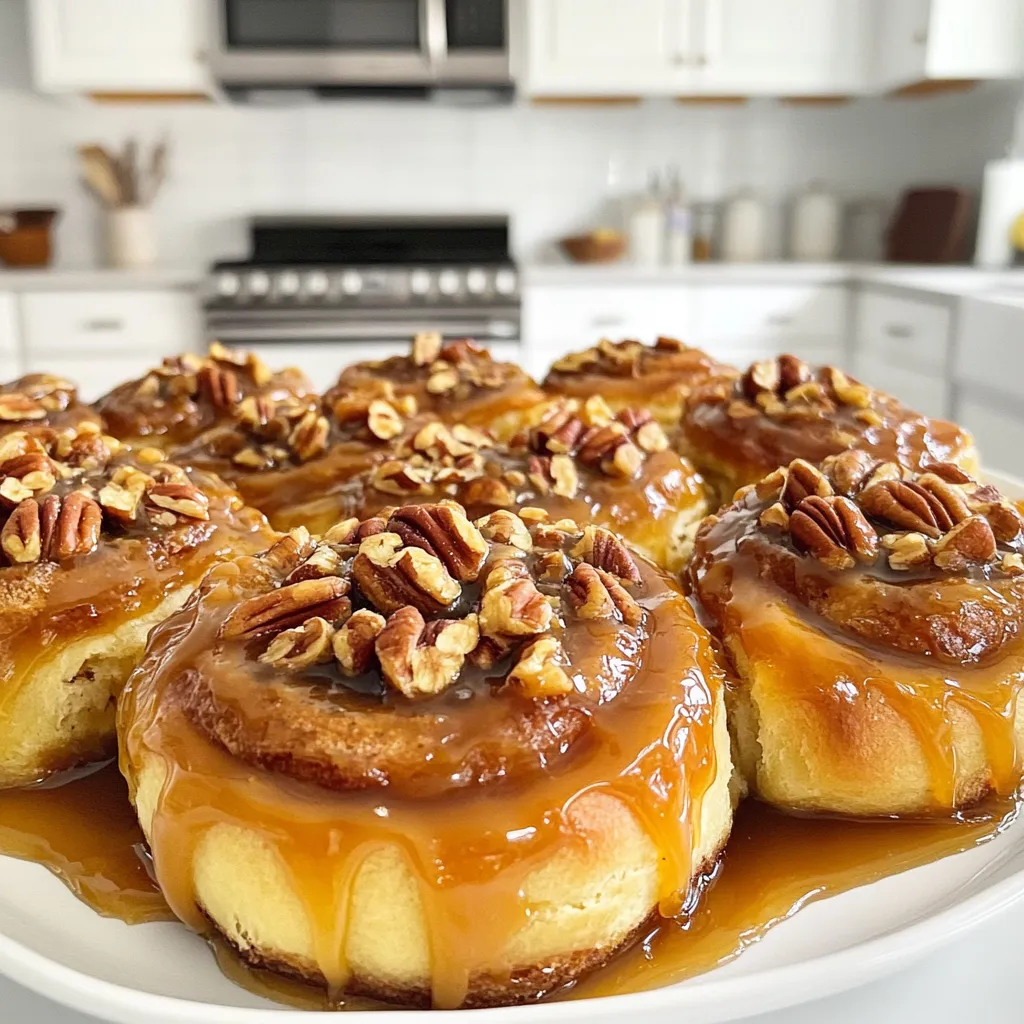
If you crave a sweet treat that’s sure to impress, look no further! My Caramel Pecan Sticky Buns deliver a

- 1 cup natural peanut butter - 1 cup canned pumpkin puree - 1/4 cup honey or maple syrup The main ingredients form the heart of these tasty treats. Natural peanut butter gives a rich flavor. Canned pumpkin puree adds moisture and a hint of sweetness. Honey or maple syrup sweetens the mix and keeps it sticky. Each ingredient works together to create a creamy and delicious base. - 2 cups rolled oats - 1 teaspoon pumpkin pie spice - 1/4 teaspoon salt Next, we need dry ingredients to balance the wet ones. Rolled oats provide a hearty texture, making each bite satisfying. Pumpkin pie spice adds warm flavors that remind us of fall. A little salt enhances the sweetness and brings out the flavors. These dry ingredients are key to the perfect consistency. - 1/2 cup dark chocolate chips - 1/4 cup crushed pecans or walnuts For extra fun, consider adding some optional ingredients. Dark chocolate chips bring a rich, sweet touch. They melt slightly and make the balls even yummier. Crushed pecans or walnuts add a nice crunch and nutty flavor. You can mix and match to create your favorite version. Use what you love! First, gather all your ingredients. You need natural peanut butter, canned pumpkin puree, honey or maple syrup, and vanilla extract. In a big bowl, mix the peanut butter, pumpkin, honey, and vanilla. Stir until you see a smooth blend. Next, add rolled oats, pumpkin pie spice, and salt. Keep stirring until all the dry bits disappear into the mix. If you want extra taste, fold in dark chocolate chips and crushed nuts. Now, it’s time to create the balls. Use your hands to scoop out small amounts of the mix. Roll each scoop into a ball about one inch wide. Make sure they are round and firm. Once finished, place the peanut butter pumpkin balls on a baking sheet or plate lined with parchment paper. This keeps them from sticking. To get the right firmness, you must chill the balls. Put the baking sheet in the fridge. Leave them there for at least 30 minutes. This step helps them hold their shape better. After chilling, they are ready to eat! You can enjoy them right away or save them for later. To get the right texture for your no-bake peanut butter pumpkin balls, focus on mixing. Start with smooth peanut butter and pumpkin puree. They should blend easily. If your mixture feels too dry, add a bit more honey or maple syrup. This will help bind the oats. If it feels too wet, add more oats until it feels right. Taste your mix before forming the balls. If you want it sweeter, add more honey or syrup. Remember, sweetness can change based on your toppings too, like dark chocolate chips. Make your treat look appealing with simple plating. Use a colorful plate to contrast with the orange and brown colors. Arrange the balls neatly in a circle or pyramid. Drizzle melted chocolate over them for a fancy touch. Sprinkle some crushed pecans or walnuts on top for crunch. You can also use a dusting of pumpkin spice for extra flair. This makes your balls even more fun to eat and look at. These pumpkin balls are great for snacks, parties, or lunch boxes. Serve them with a glass of milk or hot chocolate for a cozy treat. Each ball is about one inch in size. This is a perfect bite-sized snack. You can also make them smaller for kids or larger if you want a bigger treat! {{image_2}} You can switch up the flavor by using different nut butters. Almond butter or sunflower seed butter works great too. Each nut butter gives a unique taste and texture. You can also try alternative sweeteners like agave or coconut sugar. These can change the flavor and sweetness to match your taste. To make these treats gluten-free, use certified gluten-free rolled oats. They still taste yummy and stay safe for those with gluten issues. For vegan-friendly swaps, use maple syrup instead of honey. You can also use a vegan chocolate option for those who want it dairy-free. Adding holiday spices can make these treats even more special. Try mixing in cinnamon, nutmeg, or ginger for a festive flair. You can also get creative with fillings. Think about adding dried fruit, like cranberries or raisins, for a chewy texture. Each variation can add a new twist to your no-bake peanut butter pumpkin balls. Store your no-bake peanut butter pumpkin balls in the fridge. Use an airtight container to keep them fresh. This will help maintain their taste and texture. The balls need to stay cool, so do not leave them out for too long. You can freeze these treats for longer storage. Place the balls in a single layer on a baking sheet. Once frozen, transfer them to a freezer-safe bag. Make sure to remove as much air as possible from the bag. To eat, just take out the number you need. Thaw them in the fridge for a few hours or overnight. These pumpkin balls last about one week in the fridge. If frozen, they can last up to three months. Check for any off smells or changes in texture. If they feel sticky or look dry, it's time to toss them. Yes, you can make these without peanut butter. You can use almond butter, sunflower seed butter, or any nut-free spread. These options keep the texture smooth and tasty. For a different flavor, try using tahini or coconut butter. These choices work well in the recipe and give a nice twist. To make these nut-free, choose sunflower seed butter instead of peanut butter. This keeps the taste great while avoiding nuts. You can also use soy nut butter, which tastes similar. Make sure any additional ingredients, like chocolate chips, are also nut-free. This way, everyone can enjoy these yummy treats. Yes, you can add protein powder to these pumpkin balls. Start with one scoop and mix it in with the dry ingredients. This helps boost the nutrition without changing the taste too much. If the mixture feels too dry after adding, add a small splash of water or more pumpkin puree. This keeps the balls moist and tasty. To wrap this up, we explored how to make delicious pumpkin energy balls. You learned about simple ingredients like natural peanut butter, canned pumpkin, and rolled oats. I shared easy steps to prepare, form, and cool your balls. You now have tips for perfecting texture and serving ideas. Don’t forget about variations and storage options! With this knowledge, you can get creative with flavors and adjustments. Enjoy making these tasty snacks for any occasion!

No-Bake Peanut Butter Pumpkin Balls Easy and Tasty Treat

Looking for a quick, tasty treat? These No-Bake Peanut Butter Pumpkin Balls are just what you need! Packed with healthy

For these tasty muffins, you will need: - 2 cups all-purpose flour - 1 tablespoon baking powder - 1 teaspoon baking soda - 1 teaspoon ground cinnamon - ½ teaspoon salt - ¾ cup granulated sugar - ½ cup brown sugar, packed - 2 large eggs - ½ cup unsalted butter, melted and cooled - 1 cup buttermilk - 2 medium apples, peeled, cored, and diced (like Granny Smith or Honeycrisp) - 1 teaspoon vanilla extract These ingredients come together to create a warm and cozy treat. The apples add moisture and sweetness, while the spices give it a rich flavor. To make the crunchy streusel topping, gather these items: - ½ cup all-purpose flour - ½ cup old-fashioned rolled oats - ¼ cup brown sugar, packed - 1 teaspoon ground cinnamon - ¼ cup unsalted butter, cold and cut into small cubes The streusel topping gives your muffins that extra special touch. It adds a nice contrast to the soft muffins beneath. To make your baking easier, have these tools ready: - Muffin tin - Mixing bowls - Whisk - Measuring cups - Pastry cutter or your fingers for mixing the streusel These tools help you mix and bake efficiently. With the right equipment, you can focus on creating tasty muffins. First, you need to preheat your oven to 375°F (190°C). This step warms up the oven for even baking. While the oven heats, prepare your muffin tin. You can use paper liners for easy cleanup, or simply grease the tin with cooking spray. This helps the muffins pop out easily after baking. Next, let's make the streusel topping. In a medium bowl, mix together ½ cup of flour, ½ cup of rolled oats, ¼ cup of packed brown sugar, and 1 teaspoon of ground cinnamon. This combo gives a sweet crunch. Now, add ¼ cup of cold butter cut into small cubes. Use your fingers or a pastry cutter to blend until the mix looks crumbly. Set this aside while you work on the muffins. In a large bowl, whisk together the dry ingredients. Combine 2 cups of all-purpose flour, 1 tablespoon of baking powder, 1 teaspoon of baking soda, 1 teaspoon of ground cinnamon, and ½ teaspoon of salt. Add ¾ cup of granulated sugar and ½ cup of packed brown sugar to this mix. Whisk until everything is well combined. This step ensures your muffins are fluffy and sweet. Now it's time for the wet ingredients. In another bowl, beat 2 large eggs. Then, add ½ cup of melted butter, 1 cup of buttermilk, and 1 teaspoon of vanilla extract. Mix this until it is smooth. This blend adds moisture and flavor to your muffins. Carefully combine the wet and dry mixes. Pour the wet ingredients into the bowl with the dry ingredients. Gently stir until just combined. Be careful not to overmix; the batter should be slightly lumpy. This helps keep the muffins light and airy. Now, fold in the diced apples until they are evenly spread throughout the batter. It's time to fill the muffin tins! Spoon the batter into each muffin cup, filling them about 2/3 full. This allows space for the muffins to rise. Next, generously sprinkle the streusel topping over each muffin. Bake for 18-22 minutes. To check if they are done, insert a toothpick into the center. If it comes out clean, they are ready! Let them cool in the pan for 5 minutes before moving them to a wire rack to cool completely. Enjoy your delicious apple cinnamon streusel muffins! To get the best muffins, you need to mix just right. When you combine the wet and dry ingredients, stir gently. Your batter should look a bit lumpy. This ensures the muffins rise well and stay fluffy. If you mix too much, your muffins can turn out dense and tough. You can customize your muffins by adding fun extras. Consider mixing in some chopped nuts like walnuts or pecans. Dried fruits, such as raisins or cranberries, also add a nice touch. These add-ins make your muffins even tastier and more interesting. The type of apple you choose matters a lot. For a great balance of sweet and tart, I suggest using Granny Smith or Honeycrisp apples. They hold their shape well and give a nice crunch. You can also try Fuji or Gala apples if you prefer sweeter muffins. Each type will change the flavor, so feel free to experiment! {{image_2}} To make gluten-free apple cinnamon streusel muffins, swap all-purpose flour with a gluten-free blend. Look for a mix with a good rise, like one made from rice flour or almond flour. You may also add a teaspoon of xanthan gum to help with structure. Keep the other ingredients the same for a tasty treat! For a vegan version, replace eggs with flax eggs. Mix one tablespoon of ground flaxseed with three tablespoons of water for each egg. Let it sit for five minutes to thicken. Use plant-based butter or coconut oil in place of unsalted butter. Substitute buttermilk with almond milk mixed with a tablespoon of vinegar or lemon juice. This will give you that tangy flavor! Want to kick up the taste? Try adding a pinch of nutmeg or cardamom for a warm, cozy feel. You could also mix in some chopped nuts like walnuts or pecans for crunch. For a sweet twist, add a splash of maple syrup or honey. A teaspoon of almond extract can also bring a new layer of flavor. To keep your apple cinnamon streusel muffins fresh, store them at room temperature. Place them in an airtight container. They will stay good for up to three days. If you leave them out, make sure they are in a cool spot. Avoid direct sunlight, as it can dry them out. For longer storage, you can freeze the muffins. First, let them cool completely. Wrap each muffin in plastic wrap. Then, put them in a freezer-safe bag. They can last for up to three months in the freezer. When you're ready to enjoy them, take one out and let it thaw at room temperature. You can also reheat them in the oven at 350°F for about 10 minutes. To check if your muffins are still good, look for a few signs. Fresh muffins feel soft and moist. If they feel hard or dry, they may not taste good. Also, check for any mold or off smells. If you notice either, it’s best to toss them. Keeping an eye on these signs will help you enjoy your muffins at their best. Yes, you can use other fruits. Try diced pears, peaches, or berries. Each fruit adds its own taste. Mixing fruits can create a fun flavor. Just keep the amount similar to apples, about one cup. Check the muffins at 18 minutes using a toothpick. Insert it into the center. If it comes out clean, they are done. Look for a golden brown color too. The tops should spring back when lightly pressed. You can make the batter ahead. Store it in the fridge for up to 24 hours. Cover the bowl with plastic wrap to keep it fresh. Stir gently before you fill the muffin tins. These muffins pair well with many things. Serve them with butter or cream cheese. Jams like apple or berry work great too. A hot cup of tea or coffee makes a lovely drink choice. You now have all the details to make delicious apple cinnamon streusel muffins. We covered the key ingredients and tools you'll need. Step-by-step instructions guide you through each part of the process. With tips for perfect texture and fun variations, you can adapt this recipe to fit your taste. Proper storage helps keep your muffins fresh. Whether you stick with the classic or try new flavors, these muffins will surely delight. Enjoy baking and sharing these treats!

Apple Cinnamon Streusel Muffins Cozy and Tasty Delight

If you’re craving a warm, tasty treat, look no further than my Apple Cinnamon Streusel Muffins! These muffins are fluffy,

- 1 cup dried white beans (cannellini or navy beans), soaked overnight and drained - 1 medium onion, chopped - 3 cloves garlic, minced - 2 medium carrots, diced - 2 stalks celery, diced - 1 can (14.5 oz) diced tomatoes, with juice - 4 cups vegetable broth - 1 teaspoon dried oregano - 1 teaspoon dried thyme - 1 teaspoon smoked paprika - 1/2 teaspoon red pepper flakes (adjust to taste) - Salt and pepper to taste - 2 tablespoons olive oil These ingredients form the heart of the soup. The dried white beans give the soup a creamy texture and rich flavor. Soaking them overnight makes them tender. The fresh vegetables add color and nutrition. Onions and garlic provide a tasty base, while carrots and celery add sweetness and crunch. The spices are key to the Tuscan flavor. Oregano and thyme bring a warm earthiness. Smoked paprika adds depth, and red pepper flakes give it a gentle kick. - 1 cup fresh spinach, roughly chopped - Grated Parmesan cheese for serving (optional) - Fresh basil leaves for garnish Adding fresh spinach boosts the soup's nutrition. It wilts nicely and adds a pop of green. Grated Parmesan cheese enhances the flavor and adds creaminess. Fresh basil leaves make a fragrant garnish and bring brightness to the dish. Using vegetable broth is important for flavor. It infuses the soup with rich taste while keeping it light. You can use homemade broth or store-bought for convenience. Make sure it’s low-sodium to control the salt level in your soup. To make a great soup, start by preparing your beans. You can soak dried white beans overnight. This method softens the beans and reduces cooking time. Just place them in a bowl and cover with water. Let them sit for at least eight hours. After soaking, drain and rinse the beans. If you forget to soak them overnight, there’s a quick method. Place the beans in a pot with water. Bring it to a boil for two minutes, then turn off the heat. Let them sit for one hour, then drain and rinse. Next, sauté the aromatics. You will need a skillet and some olive oil. Heat the oil over medium heat. Add the chopped onion, minced garlic, diced carrots, and diced celery. Sauté for about five to seven minutes. The goal is to soften the vegetables and make the onions translucent. This step builds flavor in your soup. Now, it’s time to combine the ingredients. Transfer the sautéed vegetables to your slow cooker. Next, add the soaked beans, diced tomatoes with juice, and vegetable broth. Sprinkle in the oregano, thyme, smoked paprika, and red pepper flakes. Stir everything to mix well. Layering the ingredients this way ensures even cooking. You can choose between two cooking settings. Use the low setting for 6 to 8 hours or the high setting for 3 to 4 hours. Both methods will make the beans tender and delicious. Just remember to check the beans toward the end of cooking. In the last 30 minutes, add chopped spinach to the soup. This boosts flavor and adds nutrients. Finally, season with salt and pepper to taste. Adding these final touches makes the soup even better. Enjoy your comforting bowl of Tuscan white bean soup! To make sure your beans are fully tender, soak them overnight. This helps them cook evenly. If you forget to soak them, no worries! Use the quick soak method. Boil the beans for two minutes, then let them sit for an hour before draining. Adjusting the soup's consistency is easy. If you like it thicker, mash some beans with a fork. For a thinner soup, add more vegetable broth. You can boost the flavor with other herbs and spices. Try adding rosemary or bay leaves for a fresh twist. A splash of lemon juice at the end brightens the soup too. Got leftovers? Use them in a pasta dish or mix them into a salad. You can also blend the soup for a smooth texture, which is great for dipping bread. Serve the soup in deep bowls to show off its rich color. A drizzle of olive oil on top adds a nice touch. Crusty bread pairs perfectly with this soup. It’s great for dipping and adds crunch. You can also serve a simple green salad on the side to balance the meal. {{image_2}} You can boost the soup’s protein by adding cooked meats. Shredded chicken or crumbled sausage works well. Just stir them in before serving. This addition makes the soup heartier and more filling. If you prefer vegetarian options, try using canned chickpeas or lentils. Both add protein without meat. They blend nicely with the beans. This way, you get a rich texture and a satisfying meal. For a vegan twist, skip the Parmesan cheese. Instead, use nutritional yeast. It gives a cheesy flavor without dairy. You can also mix in a splash of lemon juice for extra zing. This brightens the soup and enhances its taste. To boost vegan flavor, add a dash of liquid smoke. It gives a smoky depth that complements the beans. You can also add some sautéed mushrooms for umami. They add a wonderful texture and taste. Using seasonal vegetables makes the soup fresh and vibrant. In fall, add diced butternut squash. In summer, zucchini or fresh corn works great. These additions keep the soup exciting and full of flavor. You can also adjust spices based on the season. In winter, add warm spices like cumin or coriander. In spring, try fresh herbs like parsley or dill. These changes bring new life to this classic dish. How long can the soup be stored? You can store your soup in the fridge for up to five days. Make sure it cools before you put it away. This helps keep it fresh and tasty. Containers best for soup storage Use airtight containers for the best results. Glass jars or plastic containers work well. These keep the soup from absorbing other smells in the fridge. Proper freezing techniques and tips To freeze the soup, let it cool first. Pour it into freezer-safe bags or containers. Leave some space at the top for expansion. Seal them tightly to prevent freezer burn. Thawing and reheating guidance When you want to eat the soup, take it out and thaw it in the fridge overnight. You can also use the microwave for quick thawing. Reheat on the stove over medium heat until it's hot. Stir well to make sure it warms evenly. Yes, you can use canned beans. Canned beans save time. They usually cook faster. If you use them, reduce cooking time to 2-3 hours on low. The flavor may change slightly. Canned beans can taste less fresh than dried ones, but they still work well. This soup pairs nicely with crusty bread. A slice of sourdough or a baguette works well. You can also add a fresh salad on the side. A simple green salad with lemon dressing adds a nice touch. For a heartier meal, consider serving it with grilled cheese sandwiches. To add heat, increase red pepper flakes. Start with a little and taste. You can also add diced jalapeños for more spice. Hot sauce is another option; just stir it in before serving. For a smoky flavor, try adding chipotle peppers. Making Slow Cooker Tuscan White Bean Soup is easy and fun. We covered the key ingredients, like dried beans, fresh veggies, and spices. I shared step-by-step instructions, including soaking beans and sautéing aromatics. You learned about storage tips and ways to personalize your soup with different proteins or herbs. Remember, cooking should be enjoyable. Have fun experimenting with flavors and variations. This soup can be a staple in your meal plan, perfect for any season. So gather your ingredients and get cooking!

Slow Cooker Tuscan White Bean Soup Comforting Delight

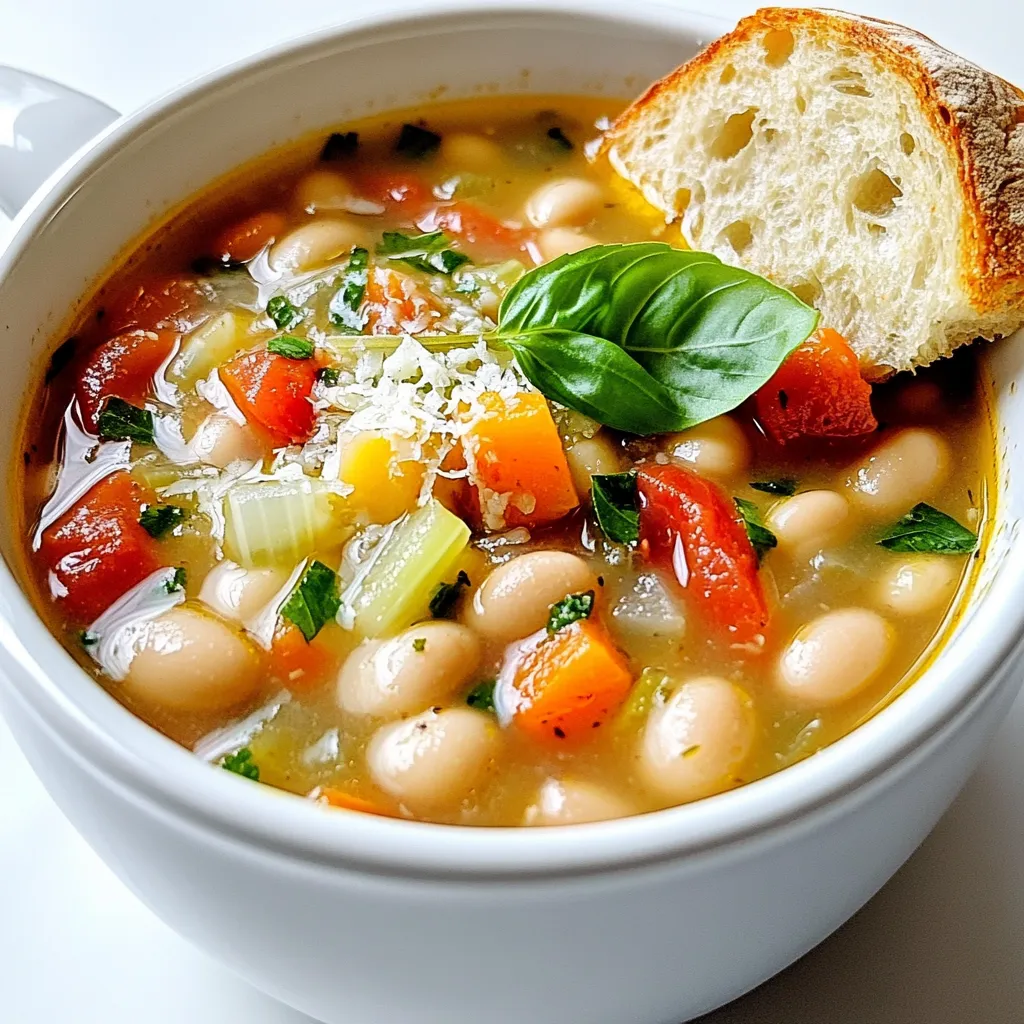
Are you ready to warm up your kitchen with a bowl of Slow Cooker Tuscan White Bean Soup? This easy

To make these tasty bowls, gather these fresh ingredients: - 1 medium zucchini, sliced into half-moons - 1 red bell pepper, diced - 1 yellow bell pepper, diced - 1 medium red onion, sliced - 1 cup cherry tomatoes, halved - 1 can chickpeas, drained and rinsed - 3 tablespoons harissa paste - 2 tablespoons olive oil - 1 teaspoon garlic powder - 1 teaspoon smoked paprika - Salt and pepper to taste - Fresh parsley, chopped (for garnish) - Cooked quinoa or couscous (for serving) If you want to swap out some ingredients, here are a few ideas: - Use eggplant instead of zucchini for a richer taste. - Try different beans, like black beans, in place of chickpeas. - Replace harissa with a milder spice like tahini or curry paste. - Use any seasonal veggies you love, such as broccoli or carrots. To bring extra flavor and texture, consider these garnishes: - Sprinkle fresh lemon juice over the bowl for brightness. - Add a dollop of yogurt or vegan yogurt for creaminess. - Top with avocado slices for healthy fats. - Use nuts or seeds, like pumpkin seeds or toasted almonds, for crunch. These ingredients and suggestions will make your Sheet Pan Spicy Harissa Veggie Bowls shine. Enjoy the mix of flavors and textures! First, gather all your ingredients. You need zucchini, bell peppers, red onion, cherry tomatoes, and chickpeas. Preheat your oven to 425°F (220°C). This step is key, as hot air helps brown the veggies. Make sure to line your sheet pan with parchment paper for easy cleanup. In a large bowl, add your prepared veggies and drained chickpeas. Next, make the harissa sauce. In a small bowl, mix harissa paste, olive oil, garlic powder, smoked paprika, salt, and pepper. Stir until smooth. Pour this sauce over the veggies. Toss everything well, ensuring each piece is coated. This step adds a punch of flavor to your dish. Spread the coated veggie mix evenly on your sheet pan. Make sure not to crowd them. This allows for even roasting. Place the pan in the oven and roast for 25-30 minutes. Stir halfway through to ensure all sides get that lovely char. When they’re tender and slightly browned, they are ready. Enjoy the aroma that fills your kitchen! When picking vegetables, look for bright colors. The veggies should feel firm when you touch them. Avoid any that are bruised or soft. For zucchini, choose ones that are small and smooth. For bell peppers, select ones that are shiny and wrinkle-free. Check cherry tomatoes for a vivid hue and a sweet smell. Fresh veggies lead to a better taste in your sheet pan spicy harissa veggie bowls. To get perfect roast veggies, cut them into even pieces. This ensures they cook at the same rate. Make sure to coat them well with the harissa mix. Spread them out on the pan so they’re not crowded. This allows them to get that nice char. Stir halfway through cooking for even roasting. The ideal temperature is 425°F (220°C) for a crispy finish. To boost the flavor of your dish, think beyond harissa. You can add cumin for warmth or a pinch of cayenne for heat. Try using fresh herbs like thyme or rosemary for a fragrant touch. A squeeze of lemon juice brightens the dish. For a smoky flavor, add more smoked paprika. Experimenting with spices can elevate your veggie bowls and make them even more delicious. {{image_2}} You can swap vegetables based on what's fresh. Try using asparagus in spring or squash in fall. Broccoli and cauliflower work great too. Seasonal veggies add new flavors and colors. Adding protein makes your meal heartier. Tofu absorbs flavors well, while tempeh adds a nutty taste. You can also use cooked chicken or shrimp if you prefer. Mix in these proteins before roasting. Grains are your canvas for this dish. Quinoa offers a nutty flavor, while couscous cooks quickly. Rice is another great choice, adding a chewy texture. Experiment with different grains to find your favorite! To keep your Sheet Pan Spicy Harissa Veggie Bowls fresh, store them in an airtight container. Let the veggies cool to room temp before sealing them. This prevents steam from making them soggy. Keep the leftovers in the fridge for up to four days. If you want to enjoy them later, follow the freezing tips below. Reheat the veggie bowls in the oven for the best flavor. Preheat your oven to 350°F (175°C). Spread the leftovers on a baking sheet. Heat for about 10-15 minutes, until warmed through. This method keeps the veggies nice and crispy. You can also microwave them if you’re in a hurry. Just heat in short bursts, stirring in between to avoid hot spots. Freezing the veggie bowls is a great way to meal prep. Portion them into freezer-safe containers. Make sure to leave space at the top, as the veggies may expand when frozen. These bowls can last up to three months in the freezer. When you're ready to eat, thaw them overnight in the fridge. Then, reheat as mentioned above for a quick, tasty meal. Yes, you can use a different type of harissa. There are many kinds, each with its own taste. Some are mild, while others are hot. If you want a milder dish, look for a sweet harissa. You can also try making your own if you prefer. Blend roasted peppers, garlic, and spices to create a custom flavor. Leftovers of the sheet pan spicy harissa veggie bowls stay fresh for about three days. Store them in an airtight container in the fridge. When ready to eat, reheat them in the oven or microwave. This helps keep the flavors bright and the veggies tasty. Yes, this dish is gluten-free! The main ingredients are veggies and chickpeas, which are both gluten-free. If you serve it with quinoa or rice, ensure they are gluten-free as well. Always check the labels of any packaged items you use to be sure. In this article, we explored the exciting world of Sheet Pan Spicy Harissa Veggie Bowls. You learned about the key ingredients, step-by-step cooking methods, and helpful tips for the best results. We discussed tasty variations and how to store your bowls for later. Remember, this dish is flexible. You can mix up flavors and ingredients to keep it fresh. Enjoy your cooking journey with spicy harissa and vibrant veggies!

Sheet Pan Spicy Harissa Veggie Bowls Flavor Boost

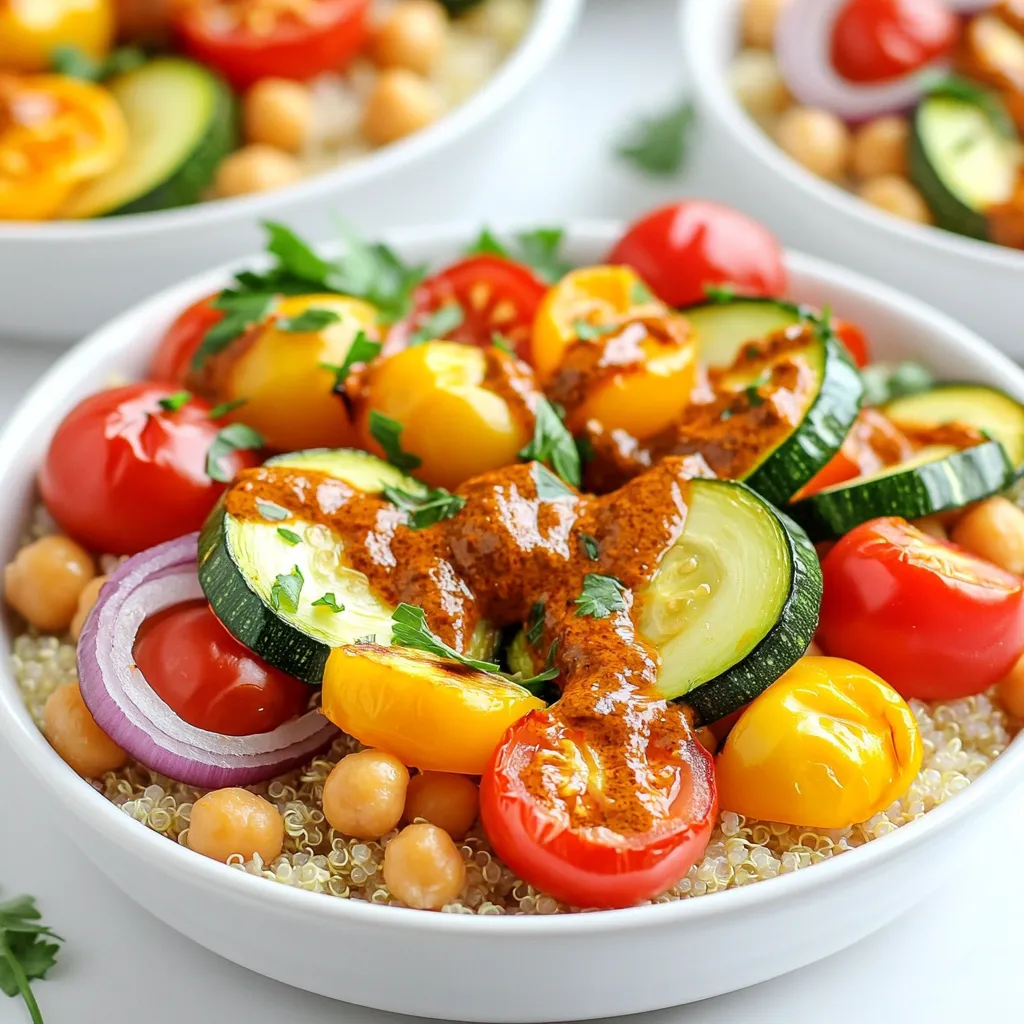
Looking to spice up your mealtime? These Sheet Pan Spicy Harissa Veggie Bowls offer bold flavors and easy prep. I’ll

To make these tasty apple cinnamon protein muffins, gather these simple ingredients: - 1 cup whole wheat flour - 1 cup rolled oats - 1/2 cup almond flour - 1/2 cup vanilla protein powder - 1 tablespoon baking powder - 1 teaspoon ground cinnamon - 1/2 teaspoon salt - 2 large eggs - 1/4 cup honey or maple syrup - 1 cup unsweetened applesauce - 1/2 cup unsweetened almond milk - 1 teaspoon vanilla extract - 1 large apple, peeled and diced (I prefer Granny Smith) - Optional: 1/4 cup chopped walnuts or pecans These muffins are not just delicious; they are also healthy! Each muffin provides a good mix of protein, fiber, and healthy fats. Here’s a quick breakdown: - Calories: About 150 per muffin - Protein: 6 grams - Fiber: 4 grams - Sugars: 5 grams (from natural sources) - Healthy fats: 4 grams (with nuts) These numbers can change based on the exact brands of ingredients you use. You can easily adjust these muffins to fit different diets. Here are some ideas: - Gluten-Free: Use gluten-free flour blends instead of whole wheat flour. - Vegan: Replace the eggs with flax eggs (1 tablespoon ground flaxseed + 2.5 tablespoons water per egg). - Nut-Free: Omit almond flour and use more whole wheat flour or oats. - Lower Sugar: Use less honey or maple syrup, or substitute with a sugar-free sweetener. These substitutions help you enjoy the muffins while catering to your dietary needs. Feel free to mix and match! Start by preheating your oven to 350°F (175°C). This step is key for even baking. Line a muffin tin with paper liners or grease it lightly. In a large bowl, mix these dry ingredients: - 1 cup whole wheat flour - 1 cup rolled oats - 1/2 cup almond flour - 1/2 cup vanilla protein powder - 1 tablespoon baking powder - 1 teaspoon ground cinnamon - 1/2 teaspoon salt Whisk these together until they blend well. In another bowl, whisk together the wet ingredients: - 2 large eggs - 1/4 cup honey or maple syrup - 1 cup unsweetened applesauce - 1/2 cup unsweetened almond milk - 1 teaspoon vanilla extract Mix them until smooth. Now, pour the wet mix into the dry mix. Stir gently until combined but don’t overmix. Fold in 1 large apple, peeled and diced, and nuts if you want. This will add a nice crunch. Now, divide the batter evenly among the muffin cups. Fill each cup about 2/3 full. This helps them rise perfectly. Place the muffin tin in the oven and bake for 20-25 minutes. Check for doneness by inserting a toothpick into the center. It should come out clean. Once baked, let the muffins cool in the tin for about 5 minutes. After that, transfer them to a wire rack to cool completely. You can serve these muffins warm or at room temperature. For a fancy touch, drizzle a little extra honey on top or sprinkle with powdered sugar. If you have leftovers, store them in an airtight container for up to three days. Enjoy your healthy treat! To bake the best apple cinnamon protein muffins, follow these tips: - Preheat the oven: Always preheat to 350°F (175°C). This helps muffins rise well. - Use fresh ingredients: Fresh baking powder and spices boost flavor and texture. - Don't overmix: Stir the batter until just combined. Overmixing makes muffins tough. - Fill muffin cups properly: Fill each cup about 2/3 full. This allows room to rise. - Check for doneness: Insert a toothpick. If it comes out clean, the muffins are ready. Accurate measurements matter for great muffins. Here’s how to do it right: - Use dry measuring cups: For flour and oats, scoop and level off with a knife. - Use liquid measuring cups: For almond milk and applesauce, pour until the meniscus is at the line. - Weigh ingredients: If you have a kitchen scale, it gives the best results. - Sift dry ingredients: Sifting helps to aerate and remove lumps from the flour. To keep your muffins fresh, follow these storage tips: - Store in an airtight container: This keeps them moist for up to three days. - Cool completely before storing: This prevents condensation from making muffins soggy. - Reheat in the microwave: Warm muffins for 10-15 seconds for a fresh taste. - Freeze for longer storage: Place muffins in a freezer bag. They can last for up to three months. {{image_2}} You can change the flavor of these muffins easily. Try adding different fruits. Blueberries or bananas work well. You can also use pears for a sweet twist. Each fruit gives a new taste and keeps it fun. If you need gluten-free muffins, swap the whole wheat flour. Use a gluten-free flour blend instead. Almond flour can also help keep the texture nice. Make sure all your other ingredients, like oats, are gluten-free too. Want to make these muffins even better? Add-ins can boost flavor and texture. You can mix in chocolate chips for a sweet treat. Seeds like chia or flax can add crunch and nutrition. Try adding nuts too. Walnuts or pecans give a great crunch. After you bake the apple cinnamon protein muffins, let them cool. Place the muffins in an airtight container. This keeps them fresh. You can store them at room temperature for up to three days. If you want to keep them longer, refrigeration is a good option. Just remember to wrap them well to avoid drying out. Freezing is a smart way to enjoy these muffins later. To freeze, allow the muffins to cool completely. Then, wrap each muffin tightly in plastic wrap. Place them in a freezer bag or an airtight container. They will stay good for about three months. When you are ready to eat, take a muffin out and let it thaw at room temperature. You can also warm it in the microwave for about 20 seconds. The shelf life of apple cinnamon protein muffins depends on how you store them. At room temperature, they last for three days. If refrigerated, they can last about a week. In the freezer, they can stay fresh for three months. Always check for any signs of spoilage before enjoying. Yes, you can use any protein powder you like. Whey, pea, or soy protein work well. Just keep in mind that each type has a unique flavor and texture. If you use a flavored powder, it may change the taste of the muffins. You might need to adjust the sugar, too. To make these muffins vegan, replace the eggs with flax eggs. Mix one tablespoon of ground flaxseed with three tablespoons of water. Let it sit for about five minutes to thicken. Use maple syrup instead of honey for sweetness. These swaps keep the muffins tasty and healthy. Yes, you can substitute applesauce with mashed banana or pumpkin puree. Both options add moisture and flavor. If you choose banana, the muffins will have a slight banana taste. Pumpkin adds a warm spice flavor. Adjust any sweeteners as needed based on your choice. In this post, we covered everything you need to know about making delicious muffins. We explored ingredients, step-by-step instructions, and tips for perfect baking. Remember to experiment with flavor variations and substitutions to meet your needs. Muffins are versatile and can fit any diet. Store them well for the best taste. Enjoy your baking journey and make muffins that delight your taste buds!

Apple Cinnamon Protein Muffins Easy and Healthy Treat

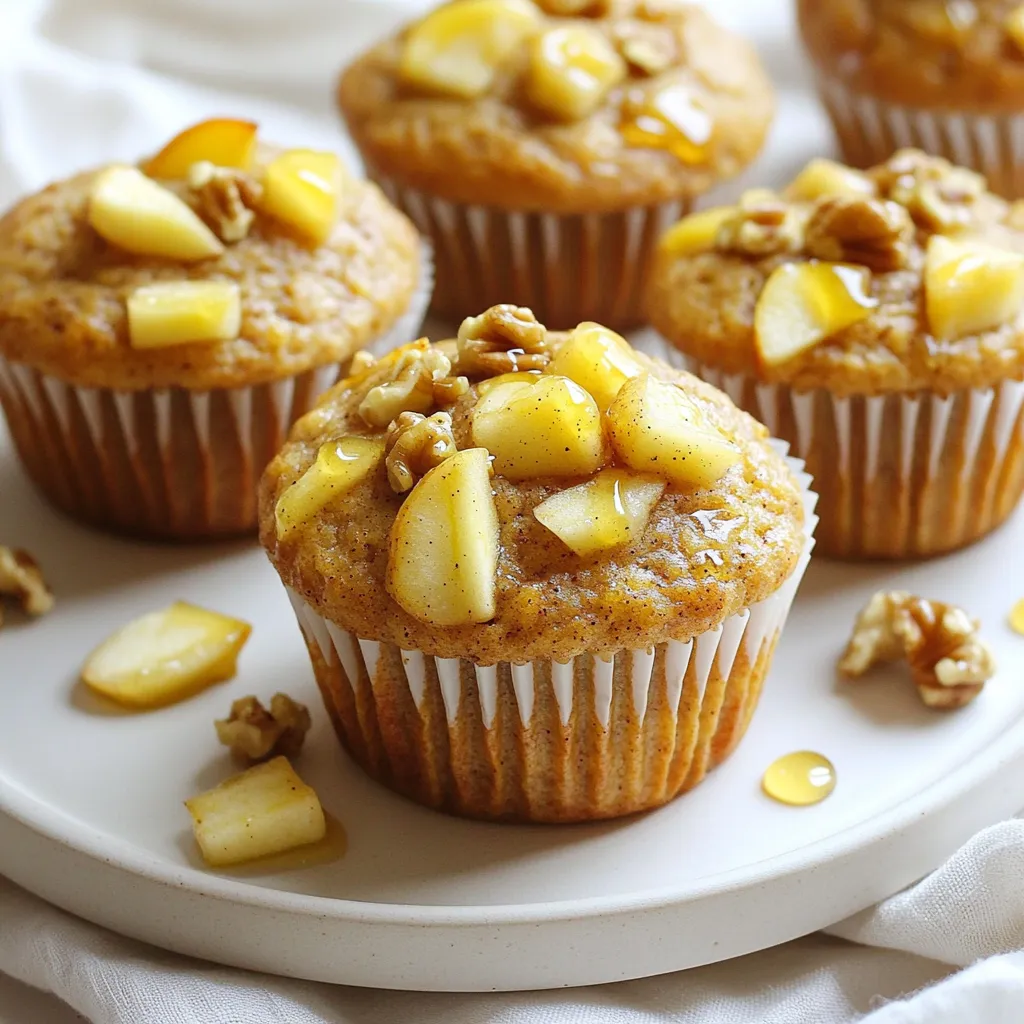
Looking for a tasty and healthy treat? You’ll love my easy Apple Cinnamon Protein Muffins! Packed with protein and full

Older posts
Newer posts
← Previous Page1 … Page5 Page6 Page7 … Page84 Next →

dsad

© 2026 juliesdish • Built with GeneratePress

Our Policies

  • Copyright Policy
  • Cookie Policy
  • GDPR Policy
  • Privacy Policy
  • Disclaimer
  • Terms Of Use

More Information

  • Home
  • About
  • Contact
  • Appetizers
  • Dessert
  • Dinner
  • Drinks
©2026, juliesdish About Back To Top