Skip to content
DisclaimerTerms Of UseGDPR PolicyCookie Policy

juliesdish

  • Home
  • Drinks
  • Appetizers
  • Dinner
  • Dessert
  • About
  • Contact
  • Privacy Policy
DisclaimerTerms Of UseGDPR PolicyCookie Policy

NO-ING-IMG

- 1 pound fresh okra, trimmed and cut in half - 2 tablespoons olive oil - 1 teaspoon smoked paprika - 1 teaspoon garlic powder - 1 teaspoon onion powder - 1/2 teaspoon cayenne pepper (optional for extra heat) - Salt and pepper to taste - Fresh parsley, chopped (for garnish) To make smoky roasted okra, you need fresh okra. Choose bright green pods, firm to the touch. Trim off both ends and cut them in half. The olive oil helps the spices stick. It also gives the okra a nice crisp. Smoked paprika adds a rich, smoky flavor. It brings warmth without heat. Garlic powder and onion powder enhance the taste too. If you like spice, sprinkle in cayenne pepper. Adjust salt and pepper to fit your taste. For garnish, fresh parsley adds color and freshness. It makes the dish look nice and bright. You can find all these ingredients at your local grocery store. This simple list helps create a flavorful side dish that everyone will enjoy. For the full recipe, check the section above. - Preheat your oven to 425°F (220°C). - In a large mixing bowl, combine 1 pound of trimmed and halved okra with 2 tablespoons of olive oil, 1 teaspoon of smoked paprika, 1 teaspoon of garlic powder, and 1 teaspoon of onion powder. If you want some heat, add 1/2 teaspoon of cayenne pepper. Season with salt and pepper to taste. Toss everything until the okra is well-coated in the spices. - Spread the seasoned okra on a baking sheet in a single layer. This helps it roast evenly. - Roast in the preheated oven for 20-25 minutes. Stir halfway through to ensure even cooking. You want the okra to be tender with a slight crisp on the edges. - Once the okra is ready, remove it from the oven. Garnish with fresh chopped parsley before serving. This adds a nice pop of color and flavor. For the complete Smoky Roasted Okra recipe, check out the [Full Recipe]. Enjoy! To pick fresh okra, look for bright green pods. They should feel firm and smooth. Avoid okra with brown spots or blemishes. The ideal size for roasting is about three to four inches long. Smaller pods tend to be more tender and less fibrous. Remember, fresh okra is key to great flavor. Smoked paprika is my go-to spice for this dish. It adds depth and warmth. You can also try smoked garlic powder for extra flavor. To enhance the smoky taste, use a splash of liquid smoke. A little goes a long way! Mix the spices well with the okra to coat every piece. Smoky roasted okra pairs well with grilled meats and rice dishes. It adds a nice crunch and flavor. You can serve it with a tangy yogurt dip or a spicy salsa. These condiments balance the smoky taste perfectly. For more ideas, check out the Full Recipe for inspiration! {{image_2}} You can change the flavor of smoky roasted okra with different spices. For a Mediterranean twist, try adding dried herbs like oregano, thyme, and rosemary. These herbs give a fresh taste and pair well with okra. You can also add lemon zest for a bright note. For a Southwestern flavor, use chili powder, cumin, and a touch of lime juice. This mix adds warmth and depth to the okra. Don't forget to adjust salt and pepper to fit your taste. If you want crispy okra fast, use an air fryer. Set it to 400°F (200°C). Spread the seasoned okra in a single layer in the air fryer basket. Cook for 12-15 minutes, shaking the basket halfway through. You'll enjoy a crispy texture without much oil. Grilling is another fun method. Preheat your grill to medium-high heat. Place skewers with the okra over direct heat. Grill for about 10 minutes, turning often. This method gives a nice smoky flavor, perfect for summer cookouts. This dish is easy to adapt for various diets. It is vegan and naturally gluten-free, making it great for many people. For those who like it spicy, simply add more cayenne pepper or fresh jalapeños. If you prefer a milder taste, skip the spicy ingredients and focus on herbs. You can enjoy smoky roasted okra in many ways. For the full recipe, see above. To keep your smoky roasted okra fresh, let it cool first. Place it in a clean, airtight container. This helps prevent moisture loss and keeps flavors strong. You can store it in the fridge for up to three days. For best taste, eat it within two days. When you reheat okra, you want it to stay crispy. The oven works best for this. Preheat it to 350°F (175°C). Spread the okra on a baking sheet and heat for about 10 minutes. Stir it halfway through to ensure even warming. The microwave is quicker but may make it soggy. If you use the microwave, heat it in short bursts, checking often. Yes, you can freeze roasted okra! Start by letting it cool completely. Place it in a freezer-safe bag, removing as much air as possible. Label the bag with the date. It can last up to three months in the freezer. When you're ready to eat, thaw it overnight in the fridge. Reheat it in the oven for the best texture. This keeps the crispy edges you love. For the full recipe, check out the Smoky Roasted Okra section. You know okra is roasted when it is tender and has a slight crisp. Look for a nice golden brown color on the edges. It should feel firm when you touch it. You can also check by poking a piece with a fork; it should slide in easily. Yes, you can use frozen okra, but it may not be as crispy. Thaw the okra first, then pat it dry with a towel. This step gets rid of excess moisture. If you use frozen okra, cook it a bit longer to get the same texture. Fresh okra has a better taste, but frozen is still good! If you don’t have smoked paprika, try regular paprika mixed with a bit of chili powder. This mix gives a nice kick and some smokiness. Another option is to use chipotle powder for a spicy twist. Each substitute adds its own unique flavor to the dish, so feel free to experiment! In this article, we explored how to make smoky roasted okra, from essential and optional ingredients to step-by-step instructions. We discussed tips on selecting the right okra, achieving smoky flavor, and serving suggestions. Variations included cooking methods and dietary adaptations. Remember, roasted okra is easy to store and reheat. Enjoy trying different spices or dips to make it your own. With these methods, you’ll create a dish that’s tasty and fun to share.

Smoky Roasted Okra Simple and Flavorful Side Dish

Looking for a simple and tasty side dish? Smoky Roasted Okra is the answer! This dish is packed with flavor

For these vegan zucchini brownies, you will need: - 1 medium zucchini, grated and excess moisture squeezed out - 1 cup all-purpose flour - 1/2 cup unsweetened cocoa powder - 1/2 teaspoon baking soda - 1/2 teaspoon baking powder - 1/4 teaspoon salt - 1/3 cup coconut oil, melted - 1/2 cup maple syrup - 1/4 cup almond milk (or any plant-based milk) - 1 teaspoon vanilla extract - 1/2 cup dark chocolate chips (dairy-free) - 1/2 cup chopped walnuts (optional) These ingredients create rich and moist brownies. The zucchini adds a nice texture while keeping the brownies tender. You can customize your brownies with some fun add-ins or swaps. Consider adding: - Chopped nuts like pecans or hazelnuts for crunch. - Dried fruit such as cranberries or cherries for sweetness. - A pinch of cinnamon or espresso powder for depth in flavor. - Swap coconut oil with another oil like vegetable or canola oil. Feel free to experiment! Each variation can bring a new twist to the classic recipe. Using fresh ingredients is key to making the best vegan zucchini brownies. Fresh zucchini keeps the brownies moist and flavorful. Quality cocoa powder enhances the chocolate taste. Always check the expiration dates on your baking soda and powder. Freshness ensures your brownies rise well and taste great. For the best results, I recommend using organic or locally sourced ingredients whenever possible. This not only improves flavor but also supports sustainable farming practices. Start by washing the zucchini. A medium zucchini works best for this recipe. Grate it using a box grater or food processor. After grating, place the zucchini in a clean kitchen towel. Squeeze the towel to remove excess moisture. This step is crucial. Too much water can make the brownies soggy. In a large bowl, mix the grated zucchini with melted coconut oil, maple syrup, almond milk, and vanilla extract. Stir until everything blends well. In another bowl, combine the flour, cocoa powder, baking soda, baking powder, and salt. Whisk them together to remove any lumps. Gradually add the dry mix to the wet mix. Stir gently until just combined. Be careful not to overmix, as this can make the brownies tough. Lastly, fold in the dark chocolate chips and walnuts if you choose to add them. This will give your brownies a lovely texture and rich flavor. Preheat your oven to 350°F (175°C). Line an 8-inch square baking pan with parchment paper, leaving some overhang. This helps with easy removal later. Pour the batter into the pan and spread it out evenly. Bake for 25-30 minutes. To check if they are done, insert a toothpick into the center. If it comes out mostly clean with a few moist crumbs, they are ready. Let the brownies cool in the pan for about 10 minutes. Then, lift them out using the parchment overhang and transfer them to a wire rack. Allow them to cool completely before cutting them into squares. Enjoy the rich, decadent flavor of your vegan zucchini brownies! For the full recipe, refer back to the ingredients listed above. To make your vegan zucchini brownies perfect, follow these tips. Use fresh zucchini; it adds moisture and flavor. Squeeze out extra water from the grated zucchini. This step helps keep your brownies from getting too wet. Measure your ingredients carefully. Too much flour can make the brownies dry. To check if your brownies are done, use a toothpick. Insert it into the center of the brownies. If it comes out mostly clean, they are ready. A few moist crumbs are fine. If batter sticks to the toothpick, bake for a few more minutes. These brownies shine when served warm. Cut them into squares and add a scoop of dairy-free ice cream. You can also sprinkle some cocoa powder on top for a nice finish. For a richer flavor, drizzle with melted dark chocolate. Enjoy these treats with friends and family for a fun dessert! For the complete recipe, see the Full Recipe. {{image_2}} You can mix things up with your brownies in fun ways. Try adding spices like cinnamon or nutmeg for warmth. You might also enjoy a hint of espresso powder to boost the chocolate flavor. For a fruity twist, add mashed bananas or pureed pumpkin. Swap in different nuts, like pecans or almonds, for crunch. You can even try using flavored extracts, like almond or orange, to change the taste. Each variation can bring a new life to your vegan zucchini brownies. To make these brownies gluten-free, simply replace the all-purpose flour with a gluten-free blend. Look for a mix that works well for baking. Ensure it has a good balance of starches and proteins. You may need to adjust the liquid slightly, as gluten-free flours can absorb moisture differently. This swap allows everyone to enjoy these brownies without worry. If you want a less sweet brownie, cut down on the maple syrup. Use only 1/3 cup instead of 1/2 cup. You can also try adding unsweetened applesauce to keep moisture while lowering sugar. This change keeps the brownies tasty and rich without the extra sweetness. Enjoy your healthier treat guilt-free! For the complete recipe and more tips, check out the Full Recipe. To keep your vegan zucchini brownies fresh, store them in an airtight container. Place a piece of parchment paper between layers if stacking. This helps avoid sogginess. Keep them at room temperature for up to three days. If you want them to last longer, refrigerate them. They stay good in the fridge for about a week. Freezing your brownies is a smart way to save them for later. First, cut the cooled brownies into squares. Wrap each piece tightly in plastic wrap. Then, place them in a freezer-safe bag or container. This keeps them fresh. You can freeze them for up to three months. Just remember to label the bag with the date. When you’re ready to enjoy your brownies, you can reheat them. For the best taste, try using an oven. Preheat it to 350°F (175°C). Place the brownies on a baking sheet and warm them for about 10 minutes. This makes them soft and gooey again. You can also microwave them for about 10-15 seconds if you're in a hurry. Enjoying these brownies warm makes them even more delicious! These brownies are vegan because they do not use any animal products. I replace eggs with grated zucchini, which adds moisture and binds the ingredients. Instead of dairy, I use almond milk and coconut oil. The sweetener is maple syrup, making it plant-based. This way, you get rich flavor without any animal ingredients. Yes, you can! If you want to switch it up, try using carrots or sweet potatoes. Both add natural sweetness and moisture, just like zucchini. Make sure to grate them finely and remove excess moisture, just like with zucchini. This keeps your brownies from getting too soggy. To boost the chocolatey flavor, add more cocoa powder or dark chocolate chips. You can also mix in some chocolate chunks for extra richness. If you want a hint of espresso, add a small amount of instant coffee. It deepens the chocolate flavor without tasting like coffee. For the full recipe, check out the details above. In this article, we explored how to make delicious vegan zucchini brownies. We covered key ingredients, step-by-step instructions, and useful tips. Fresh ingredients matter, while mixing wet and dry items correctly gives great texture. I also shared variations and storage advice, so you can enjoy them longer. Remember, you can customize these brownies to fit your taste. With these easy steps, you can bake great brownies that everyone will love! Enjoy the process and your tasty treats!

Vegan Zucchini Brownies Rich and Decadent Delight

Are you ready to indulge in a tasty treat that’s both rich and healthy? My Vegan Zucchini Brownies offer a

To make zucchini and corn quesadillas, gather these main ingredients: - 2 medium zucchinis, grated - 1 cup fresh corn kernels (or frozen, thawed) - ½ cup diced red bell pepper - 2 green onions, sliced - 1 teaspoon ground cumin - 1 teaspoon paprika - ½ teaspoon garlic powder - Salt and pepper to taste - 4 large flour tortillas - 2 tablespoons olive oil These fresh veggies add great flavor and texture. The spices give the quesadillas a warm kick. Cheese is key to a tasty quesadilla. I suggest using: - 1 cup shredded cheddar - 1 cup shredded Monterey Jack Both options melt well and enhance the flavor. You can mix them for a creamy, cheesy delight. Garnishing makes your meal look pretty and tasty. Consider these options: - Fresh cilantro, for garnish - Sour cream, for dipping - Greek yogurt, for a lighter option These add fresh flavors and a nice contrast to the warm quesadilla. For the full recipe, check the details above. Start by grating the zucchinis. Use a box grater or food processor. You want about two medium zucchinis. Next, grab a large bowl. Add the grated zucchini, corn, cheese, diced red bell pepper, and sliced green onions. Then, sprinkle in the cumin, paprika, garlic powder, salt, and pepper. Mix all the ingredients well. This step is key for flavor. Now, heat one tablespoon of olive oil in a large skillet over medium heat. Once the oil is hot, add half of the filling mixture to the skillet. Spread it evenly. Take one tortilla and place it over the filling. Press down gently with a spatula. Let it cook for about 3-4 minutes. You want the tortilla golden brown and the cheese to start melting. Carefully flip the quesadilla with a large spatula. Drizzle more olive oil around the edges. Cook for another 3-4 minutes until the other side is crispy and golden. Once done, remove the quesadilla and place it on a cutting board. Repeat this process with the remaining filling and tortillas. When finished, cut each quesadilla into wedges. Serve warm with fresh cilantro and some sour cream or Greek yogurt. Check out the Full Recipe for more tips! To get that nice crispy texture for your quesadillas, follow these steps: - Use enough oil. A good amount helps the tortilla brown well. - Heat the skillet properly before adding the quesadilla. A hot pan gives a better crunch. - Press down with a spatula while cooking. This helps the filling and tortilla stick together. - Flip carefully to avoid spills. A large spatula works best for this. For the crispiest results, cook on medium heat. If the heat is too low, they can turn soggy. If it's too high, they might burn before the cheese melts. Seasoning makes a big difference in flavor. Start with the basic spices listed in the recipe. Adjust as you like: - Add more salt or pepper for a bolder taste. - Try fresh herbs like cilantro for extra zest. - Squeeze in lime juice for brightness. Taste the filling before cooking. This way, you can tweak it to your liking. You can always add more spices, but it’s hard to take them out once added! These quesadillas are already vegetarian, but you can mix it up! Here are some ideas: - Swap zucchini for spinach or bell peppers. - Add black beans for extra protein and fiber. - Use a blend of cheeses for different flavors. Explore different veggies and beans to find your favorite combo. These swaps keep the meal fresh and fun! Check out the Full Recipe for more details on how to make these tasty quesadillas. {{image_2}} You can spice up your quesadillas with Southwest flavors. Add black beans for protein and fiber. Consider using pepper jack cheese for a kick. You might also mix in diced jalapeños for heat. These small changes create a fun twist on the classic. They bring a deeper flavor and excitement to each bite. If you want a heartier meal, add protein. Cooked chicken or shrimp works well. You can also use tofu for a vegetarian option. Simply chop it into small pieces and mix it with the filling. This will make your quesadilla more filling and nutritious. Protein boosts energy and keeps you satisfied longer. For a gluten-free version, use corn tortillas. They are naturally gluten-free and add a nice crunch. You can also try using lettuce wraps for a fresh approach. Just skip the tortilla and use large lettuce leaves instead. This option is low-carb and refreshing. It’s perfect for summer days or anyone avoiding gluten. These variations keep your meal interesting and cater to your taste. Feel free to experiment! For more ideas, check out the Full Recipe for Zesty Zucchini & Corn Quesadillas 🥒. To store leftover quesadillas, let them cool first. Place them in an airtight container. You can keep them in the fridge for up to three days. This keeps them fresh and tasty for later. If you want to save space, stack them with parchment paper between each one. To reheat your quesadillas, use a skillet for best results. Heat the skillet over medium heat. Place the quesadilla in the pan and cover it. Cook for about three to four minutes on each side. This method gives you a warm, crispy quesadilla. You can also use a microwave, but it may not stay crispy. If you want to freeze quesadillas, wrap each one in plastic wrap. Then, place them in a freezer bag. They can last up to three months in the freezer. When you're ready to eat them, thaw them overnight in the fridge. Reheat in a skillet for the best texture. This way, you can enjoy your zesty zucchini and corn quesadillas anytime! For the full recipe, check out the earlier section. Yes, you can use canned corn in your quesadillas. Just drain it well before adding. Canned corn gives you a sweet flavor and saves time. Fresh corn, however, adds a crisp texture. Choose based on your taste and what you have on hand. If you need a substitute for tortillas, try using lettuce wraps or rice paper. You can also use pita bread or even thinly sliced vegetables. Each option brings a unique flavor and texture to your quesadilla. Just make sure your choice can hold the filling well. To make your quesadillas crispy, use enough oil when cooking. Heat the oil well before adding the quesadilla. Press down gently with a spatula while cooking to get a good seal. Flip carefully to avoid spills. Cooking longer on low heat also helps achieve a nice crispiness. For the best results, I recommend following the full recipe for optimal cooking times and techniques. Zucchini and corn quesadillas are simple and tasty. We went through key ingredients, cooking steps, and storage tips. You can customize these quesadillas with your favorite cheeses and proteins. Remember, crispiness comes from cooking them right. Feel free to adjust flavors to your liking. With these tips, you can make a great meal any time. Enjoy making this fun dish with fresh ingredients! You'll love how easy and delicious they are.

Zucchini and Corn Quesadillas Flavorful Meal Idea

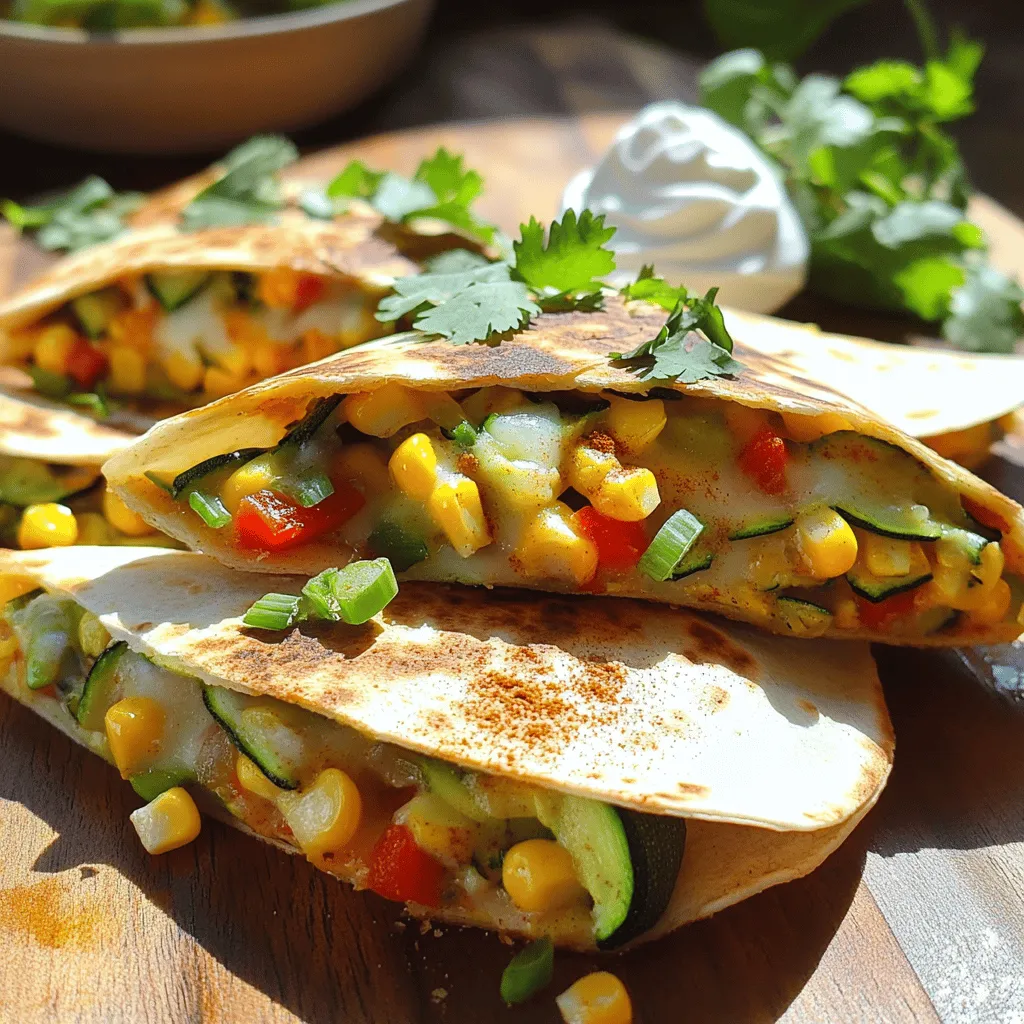
Craving a fun and tasty meal? Zucchini and corn quesadillas are the answer! They’re quick to make and packed with

- 4 large ripe peaches, peeled and sliced - 1 cup mixed berries (strawberries, blueberries, raspberries) - 1/4 cup granulated sugar - 1 tablespoon lemon juice - 1 teaspoon cinnamon - 1 cup rolled oats - 1/2 cup all-purpose flour - 1/2 cup brown sugar, packed - 1/2 cup unsalted butter, melted - 1/4 teaspoon salt In this recipe, the fresh fruit brings a burst of flavor. Choose peaches that feel firm yet slightly soft. This will guarantee a sweet taste. The mixed berries add color and tang. You can use any berries you love. For sweeteners, I use granulated sugar to balance the tartness of the fruit. The lemon juice brightens the flavors, making each bite pop. Cinnamon adds warmth and depth, enhancing the overall taste. The topping is where the magic happens. Rolled oats provide a nice crunch. The all-purpose flour helps bind everything together. Brown sugar gives extra sweetness and a hint of caramel flavor. Melting the butter allows the topping to crisp up nicely. A pinch of salt brings all the flavors together. For a detailed guide, refer to the Full Recipe. This simple dessert can easily wow your guests! - Preheat your oven to 350°F (175°C). - In a large mixing bowl, combine sliced peaches and mixed berries. Start by setting your oven to warm up. This step is key for a crispy topping. Next, slice your ripe peaches and mix them with your berries. You can use strawberries, blueberries, or raspberries. This combo gives a sweet and tangy flavor. - Add granulated sugar, lemon juice, and cinnamon. Gently toss to coat the fruit evenly. Now, add granulated sugar, lemon juice, and cinnamon to your fruit mix. These ingredients make the fruit sweet and zesty. Toss everything gently, so the fruit gets coated evenly. This step ensures every bite is flavorful. - In a separate bowl, mix rolled oats, all-purpose flour, brown sugar, melted butter, and salt until crumbly. In another bowl, combine rolled oats, all-purpose flour, brown sugar, melted butter, and salt. Mix these until they become crumbly. This topping adds a delicious crunch to your crisp. - Transfer the fruit mixture to a greased 9x13-inch baking dish and spread it out evenly. - Evenly sprinkle the oat mixture over the fruit layer in the baking dish. - Bake for 30-35 minutes or until the topping is golden brown and the fruit is bubbly. Pour your fruit mix into a greased 9x13-inch baking dish. Spread it out to make sure it cooks evenly. Next, sprinkle your oat topping over the fruit layer. Bake for 30 to 35 minutes. Look for a golden brown topping and bubbly fruit. That’s when you know it’s ready. To get the full recipe, check out the [Full Recipe]. Enjoy making this sweet treat! To achieve the best Peach and Berry Crisp, I have a few tips for you. - Use ripe but firm peaches for best texture. They should be sweet and slightly soft but not mushy. - Adjust sugar based on the sweetness of your fruit. Taste your peaches and berries first. If they are sweet, use less sugar. If they are tart, add a bit more. Serving your crisp can elevate the dish even further. - Serve warm with a scoop of vanilla ice cream. The cold ice cream melts into the warm crisp, creating a delicious mix. - Garnish with fresh mint leaves for added color. The mint adds a nice touch and a fresh taste. Sometimes, things don’t go as planned in the kitchen. Here are some tips to avoid common issues. - How to avoid a soggy base? Ensure fruit is not overly juicy. Drain any excess liquid after mixing. - How to keep topping crunchy? Mix in nuts or coconut. This adds texture and flavor to the topping. For more details on making this delightful dessert, check the Full Recipe. {{image_2}} You can easily change the fruit in your Peach and Berry Crisp. Swap peaches for nectarines or plums for a new twist. Both fruits have a similar texture and taste, making them great substitutes. If you want a berry explosion, use only berries. A mixed berry crisp with strawberries, blueberries, and raspberries is a delightful choice. Each berry adds its own flavor and sweetness, making this option a favorite among berry lovers. If you need a gluten-free version, don’t worry! You can substitute all-purpose flour with almond flour or a gluten-free flour blend. Both options work well and keep the crisp delicious. Almond flour adds a nice nutty flavor, while the gluten-free blend will bring the right texture. Just be sure to check that your oats are certified gluten-free. To make your crisp even better, consider adding vanilla extract or nutmeg. A splash of vanilla adds warmth and richness to the dish. Nutmeg gives a cozy flavor that pairs well with fruits. If you want an extra kick, try adding a bit of ginger. This spice adds a unique twist and enhances the overall taste. Each of these enhancements brings new life to your Peach and Berry Crisp, making it a delightful treat. For the full recipe, check out the details above! Store your Peach and Berry Crisp in an airtight container. It will keep well in the refrigerator for up to 3 days. This way, you can enjoy it later without losing any flavor. To reheat, preheat your oven to 350°F. Place the crisp in the oven and heat until warmed through. This helps keep the topping crisp and the fruit warm. You can freeze your Peach and Berry Crisp before baking. Wrap it tightly and store it in the freezer for up to 3 months. When you are ready to bake, just cook it straight from frozen. You may need to increase the baking time to ensure it cooks evenly. This method makes it easy to enjoy this dessert anytime! Yes, you can prepare the filling and topping separately and combine before baking. This way, you save time when guests arrive. Just store each part in the fridge. When you're ready, mix them together and bake. Yes, frozen fruit works well but may require a longer baking time. Frozen fruit can add extra juice during baking. Keep an eye on it so the topping doesn't burn. If needed, bake for 5-10 more minutes. Try serving it with whipped cream, yogurt, or a drizzle of caramel sauce. Each option adds a tasty layer. A scoop of ice cream makes it even more special. You can also add fresh mint leaves for color. Peeling is optional; leaving the skin on adds flavor and texture. The skin gives a nice bite and boosts nutrients. If you prefer a softer dish, go ahead and peel them. It's all about what you like! You can now make a delicious Peach and Berry Crisp with fresh fruit and simple toppings. Follow the steps to create the sweet, crunchy treat. Use tips to ensure perfect texture and explore variations to mix things up. You can also store and reheat leftovers easily. This dessert is great warm or cold, and it pairs well with ice cream or yogurt. Enjoy your baking adventure and savor each bite!

Peach and Berry Crisp Delight Simple Dessert Recipe

Are you ready to impress your friends and family with a delicious dessert? Let me introduce you to the Peach

- 2 ripe peaches, pitted and sliced - 1 banana, frozen - 1 cup almond milk (or any preferred milk) - 1/2 cup Greek yogurt - 1 tablespoon honey or maple syrup (optional) - 1/2 teaspoon vanilla extract - Ice cubes (optional, for a thicker consistency) You can use other types of milk if you don’t have almond milk. Options include oat milk, soy milk, or coconut milk. Each one will add a different flavor. For Greek yogurt, regular yogurt works too. You can also try plant-based yogurt for a dairy-free version. Fresh ingredients make a big difference in taste. Ripe peaches add sweetness and flavor. Look for peaches that have a nice aroma and give slightly when pressed. Avoid hard peaches, as they won't taste as good. Choosing fresh fruit ensures your smoothie is both tasty and healthy. To make your peach smoothie, start with fresh, ripe peaches. Rinse them under cold water. Use a knife to slice them in half and remove the pit. Then, cut the peach flesh into smaller pieces. This helps them blend smoothly. For the banana, slice it into chunks before freezing. Freezing it makes the smoothie creamy. Place the banana pieces in a freezer bag. Lay them flat in the freezer. This way, they freeze evenly and are easy to grab later. When you are ready to blend, gather your ingredients. First, add the sliced peaches into the blender. Next, toss in the frozen banana. Pour in the almond milk and Greek yogurt. If you choose to add honey or maple syrup, include that too. Don’t forget the vanilla extract! Blend everything on high for about 30-45 seconds. You want it smooth, with no chunks left. If it’s too thick, add a splash more milk and blend again. If you want your smoothie thicker, add some ice cubes. Blend again until it reaches your desired thickness. Taste your smoothie to check the sweetness. If it needs more, add a little honey or syrup. Blend once more to mix it in well. Now, you have a creamy and delicious peach smoothie ready to enjoy! Blending your smoothie in stages helps you get the best texture. Start with the liquid first. This way, your blades spin freely and mix everything well. After that, add your fruits and yogurt. If your mix is too thick, you can use a tamper. This tool pushes ingredients down into the blades. It helps blend everything without adding more liquid. To make your peach smoothie stand out, try adding spices or herbs. A pinch of cinnamon adds warmth and depth. You can also sprinkle a bit of mint for a fresh twist. If you want to mix things up, add other fruits. Berries, like strawberries or blueberries, pair well with peaches. They boost the flavor and add color. If you have extra smoothie, store it in a glass jar. Make sure the jar has a tight lid. This keeps it fresh and prevents spills. Smoothies are best in the fridge for about one day. If you need to keep it longer, consider freezing it. Pour the smoothie into ice cube trays or freezer-safe containers. When you want it, just thaw it in the fridge overnight. This way, you can still enjoy your peach smoothie later. {{image_2}} You can mix it up by adding berries to your peach smoothie. Blueberries, strawberries, or raspberries add great flavor. They also give a nice color to your drink. Just toss in a handful before blending. For a tropical twist, add pineapple or mango. These fruits make the smoothie taste like summer. They blend well with peaches and create a refreshing drink. Use about half a cup of any tropical fruit for a fun change. If you want a dairy-free smoothie, try plant-based yogurt. Almond or coconut yogurt works great. This keeps the smoothie creamy without dairy. You can also use coconut milk instead of almond milk for a richer taste. For vegan diets, skip the honey and use maple syrup instead. This keeps everything plant-based and just as tasty. Always check ingredient labels to ensure they fit your dietary needs. To make your smoothie more filling, add a scoop of protein powder. Vanilla or unflavored protein works best. This gives you extra energy for your day. You can also add nut butter like almond or peanut butter. This adds creaminess and healthy fats. Seeds like chia or flax add fiber and nutrients too. Just sprinkle a tablespoon in, and blend it all together. Try these variations to create your perfect peach smoothie. For the full recipe, check out the Sunshine Peach Paradise Smoothie. You can keep your peach smoothie in the fridge for up to two days. Store it in an airtight container. This helps keep it fresh and tasty. Before drinking, give it a good shake. The ingredients may separate, but that's normal. If you want to save your smoothie for later, freezing is a great option. Pour the smoothie into ice cube trays or freezer bags. This makes it easy to use later. For best results, use freezer-safe glass or plastic containers. They prevent freezer burn and keep your smoothie fresh. To thaw your frozen smoothie, place it in the fridge overnight. This is the safest way to do it. If you're in a hurry, you can run the container under warm water. Blend it again after thawing to keep it smooth. This helps restore the creamy texture. To make your peach smoothie extra creamy, use ripe peaches. Ripe peaches have more juice and provide great texture. Here are more tips for creaminess: - Use a frozen banana. It adds thickness and smoothness. - Opt for full-fat Greek yogurt. It creates a rich, creamy base. - Add a splash of almond milk slowly. Blend until smooth to reach your desired consistency. Yes, you can prepare your smoothie ahead of time! Here are some best practices: - Blend and store the smoothie in an airtight container. - Keep it in the fridge for up to 24 hours. - Shake or stir before drinking, as it may separate. - For longer storage, freeze the smoothie in ice cube trays. Blend later for a quick treat! If you don’t have peaches, don’t worry! You can try these fruits for a similar taste: - Mangoes offer a sweet, tropical flavor. - Apricots add a nice tartness. - Berries can give a fruity kick and a vibrant color. Experiment with these options to find your favorite mix! For the full recipe, check the recipe section above. Using ripe peaches and bananas gives you a tasty smoothie. Freshness is key for great flavor. Remember, blending techniques and ingredient order make a difference. You can switch up fruits or add protein for variety. Store your smoothies wisely to keep them fresh longer. Utilize these tips to create delicious combinations every time. Enjoy experimenting with flavors and textures to find your perfect mix!

Easy Peach Smoothie Creamy and Delicious Recipe

Looking for a quick and tasty treat? You’ve found it! This Easy Peach Smoothie recipe is creamy, delicious, and super

- 2 medium zucchinis, sliced - 2 medium yellow squashes, sliced - 1 red bell pepper, diced - 1 green bell pepper, diced - 1 cup cherry tomatoes, halved - 1 onion, finely chopped - 3 cloves garlic, minced Fresh vegetables make this dish colorful and healthy. Zucchini and yellow squash provide soft textures. Red and green bell peppers add crunch and sweetness. Cherry tomatoes burst with flavor, while onion and garlic bring depth. Using fresh produce ensures better taste and nutrients. - 1 teaspoon dried oregano - 1 teaspoon dried thyme - Salt and pepper to taste - Fresh parsley, chopped (for garnish) Herbs and spices are key to great flavor. Oregano and thyme are classic Mediterranean herbs. They add warmth and earthiness to the bake. Salt and pepper enhance the flavors of the vegetables. Fresh parsley makes a lovely garnish, adding a pop of color. - 1 cup feta cheese, crumbled - 2 tablespoons olive oil Feta cheese adds a creamy and tangy element. It melts slightly during baking, coating the veggies. Olive oil helps the vegetables roast perfectly. It keeps them from sticking and adds richness. You can find these ingredients in most grocery stores. Check the Full Recipe for exact measurements and tips. - Preheat oven to 375°F (190°C). - Grab a large baking dish and add your sliced zucchinis, yellow squashes, diced red and green bell peppers, cherry tomatoes, chopped onion, and minced garlic. This mix brings great color and flavor. - Drizzle the veggies with 2 tablespoons of olive oil. - Sprinkle 1 teaspoon of dried oregano, 1 teaspoon of dried thyme, salt, and pepper over the top. - Gently toss everything together. Make sure the oil and seasonings coat all the veggies well. - Cover the baking dish with aluminum foil. Bake for 25 minutes. - After 25 minutes, take off the foil. This helps the top get a nice, golden color. - Bake for an additional 15 minutes until the vegetables are tender. - Once done, let it cool slightly. Then, garnish with fresh chopped parsley. Enjoy your Mediterranean Squash Bake! For the full recipe, check the details above. For the best taste, use fresh, ripe vegetables. Look for zucchinis and yellow squashes that feel firm. Choose bell peppers that have bright colors and smooth skin. These signs mean the veggies are fresh and full of flavor. When seasoning, less is often more. Start with salt and pepper to bring out the natural taste. Add oregano and thyme for a Mediterranean twist. Sprinkle these herbs evenly over the veggies. It helps each bite burst with flavor. To check for tenderness, use a fork. Insert it into the squash; it should go in easily. If it feels hard, give it more time. You want the veggies soft, not mushy. Avoid overcooking by keeping an eye on the bake time. After 40 minutes, start checking. The top should turn golden. If the veggies begin to brown too much, cover them with foil again. This dish pairs well with many options. Serve it with grilled chicken or fish for a complete meal. You can also enjoy it with a fresh salad. Mediterranean Squash Bake works as a main or side dish. Serve it hot to let the flavors shine. For a special touch, sprinkle more feta cheese on top before serving. Check out the Full Recipe for details on making this delicious dish! {{image_2}} For those who want a vegan dish, you can swap out the feta cheese. Use a plant-based feta or try a cashew cream. This will keep the dish creamy and add flavor. If you need a gluten-free option, you can enjoy this recipe as is. All the ingredients are naturally gluten-free. Just ensure any added products, like bread crumbs, are also gluten-free. Adding different herbs and spices can change the taste. Try basil, rosemary, or even a pinch of red pepper flakes for some heat. Each herb adds a unique twist that brings out the flavors. You can also mix in other vegetables. Consider adding spinach, mushrooms, or even eggplant. Each addition makes the dish more colorful and nutritious. For Mediterranean-style variations, think about adding olives or capers. These ingredients bring a salty kick that pairs well with the squash. You can also draw inspiration from other cuisines. Adding curry powder gives an Indian twist, while a sprinkle of cumin can lend a Middle-Eastern flair. Each of these adds a new layer of flavor to the dish. For the full recipe, check the main article. To store leftovers, let the Mediterranean Squash Bake cool down. Then, cover it tightly with plastic wrap or aluminum foil. You can also use an airtight container. Keep it in the fridge for up to three days. This helps keep the flavors fresh and prevents drying out. To reheat without losing texture, use the oven. Preheat it to 350°F (175°C). Place the bake in an oven-safe dish and cover it with foil. Heat for about 15 to 20 minutes. Check it often to make sure it doesn’t overcook. You can also use the microwave if you're in a hurry. Heat in short bursts and stir in between to warm it evenly. Yes, you can freeze the Mediterranean Squash Bake. To do this, allow it to cool completely. Cut it into portions and place them in freezer-safe bags or containers. Be sure to remove as much air as possible. For best results, eat it within three months. When you're ready to enjoy it, thaw it in the fridge overnight. Reheat it in the oven or microwave as described above. This way, you keep the tasty flavors and textures intact. Mediterranean Squash Bake is a warm, colorful dish. It features fresh vegetables like zucchini, yellow squash, and bell peppers. We also add cherry tomatoes, onion, and garlic for flavor. Feta cheese brings a tangy taste that makes this dish special. You can bake it all in one dish, making it easy to prepare and serve. The blend of herbs like oregano and thyme gives it a delightful Mediterranean flair. You can enjoy it as a main dish or a side. To make Mediterranean Squash Bake vegan, swap the feta cheese for a plant-based alternative. You can use vegan cheese made from nuts or soy. You can also skip the cheese and add more spices for flavor. Nutritional yeast is a great option too; it adds a cheesy taste without dairy. Use olive oil as usual, and all the other veggies stay the same. This way, you keep the dish tasty and satisfying. Mediterranean Squash Bake goes well with many sides. A simple green salad is a great choice. You can toss together mixed greens, cucumbers, and a light vinaigrette. Grilled bread or pita chips also work well. For a heartier option, serve it with quinoa or couscous. These sides complement the flavors of the bake without overpowering them. Yes, you can make Mediterranean Squash Bake ahead of time. Prepare the dish fully, but don’t bake it yet. Cover it and store it in the fridge for up to 24 hours. When you're ready to cook, just pop it in the oven. If you want to save time, you can also chop the veggies a day ahead. This way, you make meal prep easy and quick. Mediterranean Squash Bake can last in the fridge for about 3 to 4 days. Make sure to store it in an airtight container. If you want to keep it fresh longer, cover it tightly with plastic wrap or foil. Always check for any changes in smell or texture before eating. If it looks or smells off, it’s best to discard it. Absolutely! Mediterranean Squash Bake is great for meal prep. You can make a large batch and portion it out. Store it in individual containers for easy grab-and-go meals. It reheats well in the microwave or oven. Just be sure to keep some extra herbs or spices on hand to freshen it up when you reheat. This dish is perfect for busy weeks when you want healthy meals ready to eat. Mediterranean Squash Bake combines fresh veggies, cheese, and spices for a tasty dish. You learned how to layer flavors by combining seasonal vegetables and adding simple seasonings. I shared tips for perfect baking and ideas for variations and substitutions. This recipe is easy to make and great for meal prep or serving a crowd. Enjoy the fresh flavors and feel free to get creative with your own twists!

Mediterranean Squash Bake Flavorful and Easy Recipe

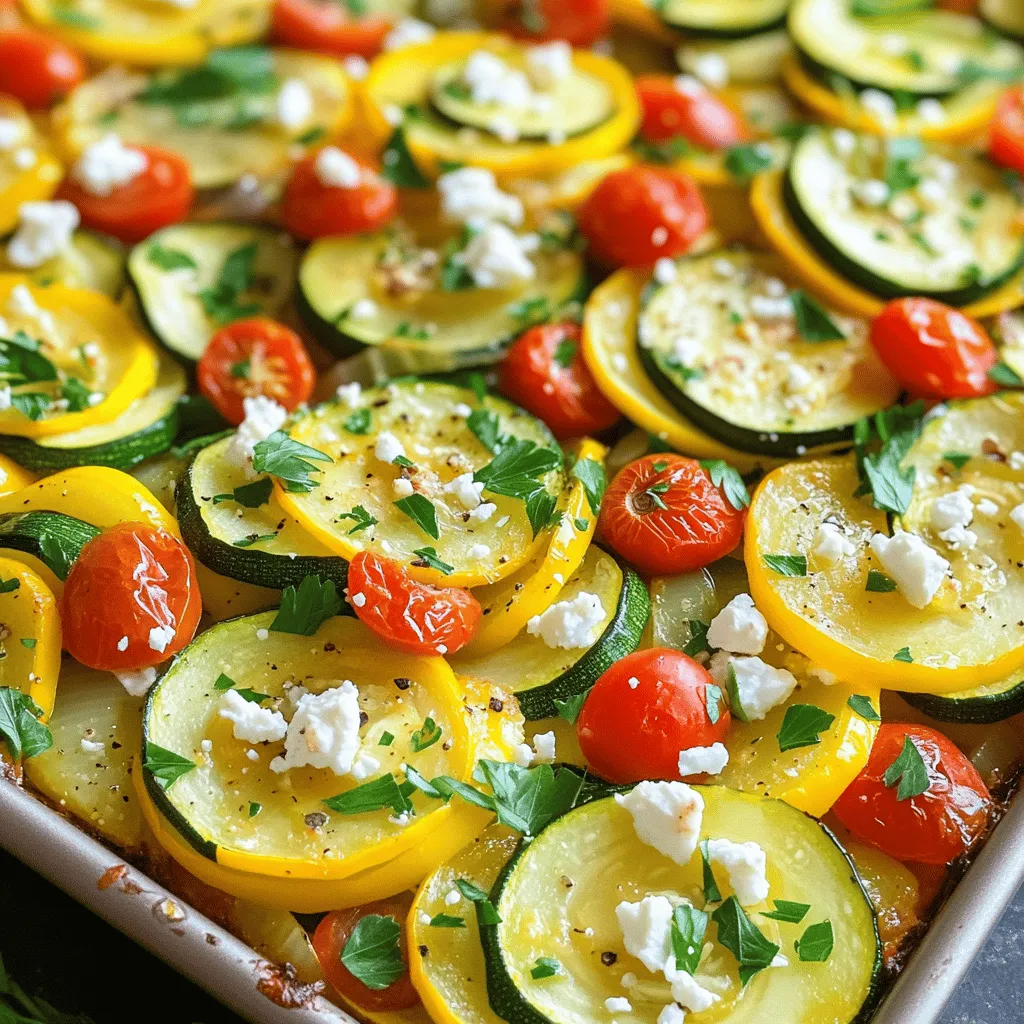
If you love fresh flavors and easy recipes, you’ll adore this Mediterranean Squash Bake. Packed with seasonal veggies, this dish

- 1 ½ cups rolled oats - ½ cup natural peanut butter - ¼ cup honey or maple syrup - ½ cup mixed nuts (almonds, walnuts, pecans) chopped - ¼ cup mini dark chocolate chips (optional) - ¼ cup dried fruits (raisins, cranberries, or apricots) chopped - 1 teaspoon vanilla extract - ½ teaspoon cinnamon - ¼ teaspoon salt Each ingredient plays a key role in the health benefits of these bars. - Rolled oats: They provide fiber, which helps keep you full and aids digestion. - Natural peanut butter: This adds protein and healthy fats, giving you energy. - Honey or maple syrup: Both are natural sweeteners that give quick energy. - Mixed nuts: These nuts add healthy fats, protein, and crunch to the bars. - Dark chocolate chips: They offer antioxidants and a hint of sweetness. - Dried fruits: These provide natural sugars and vitamins, making them a great snack. - Vanilla extract: It adds flavor without extra sugar. - Cinnamon: This spice can help regulate blood sugar levels. - Salt: Just a pinch enhances flavor and balances sweetness. If you have allergies or preferences, here are some great swaps: - Peanut butter: Use almond or sunflower seed butter for nut-free options. - Honey: Swap for agave syrup or brown rice syrup for vegan choices. - Mixed nuts: Use seeds like pumpkin or sunflower seeds for nut allergies. - Dried fruits: Substitute with fresh fruits for a different taste. - Rolled oats: Use gluten-free oats if you're avoiding gluten. These substitutes allow everyone to enjoy these tasty granola bars while meeting their dietary needs. For the complete recipe, check out [Full Recipe]. Start by gathering all your ingredients. This makes it easy to follow the recipe. Preheat your oven to 350°F (175°C). Line an 8x8 inch baking pan with parchment paper. Leave some paper hanging over the edges. This helps you lift the bars out later. In a large bowl, mix together the rolled oats, chopped nuts, chocolate chips, dried fruits, cinnamon, and salt. Stir well to combine everything evenly. In another bowl, whisk the peanut butter, honey, and vanilla extract. Make sure the mixture is smooth and creamy. Pour this mixture over the dry ingredients. Stir until all the oats and nuts are well-coated. Transfer the mixture into your baking pan. Press it down firmly with a spatula or your hands. This helps the bars hold together. Bake in the oven for 20 to 25 minutes. Look for golden brown edges to know they are done. Once they are baked, take the pan out of the oven. Let the bars cool in the pan for about 10 minutes. You can then lift them out using the parchment paper. Place the bars on a wire rack to cool completely for at least 30 minutes. Once cooled, slice them into bars of your desired size. Enjoy your Healthy Peanut Butter Granola Bars for instant energy! For detailed instructions, check the Full Recipe. To get the best texture in your granola bars, start with fresh oats. Old oats can lead to a dry bar. Make sure to mix the peanut butter and honey until smooth. This step ensures even flavor throughout the bars. Press the mixture firmly into the baking pan. A tight pack helps the bars hold their shape. Bake until the edges turn golden brown, but don’t overbake. This helps keep the bars chewy. Store your granola bars in an airtight container. They stay fresh for about a week at room temperature. If you want to keep them longer, freeze them. Wrap each bar individually in plastic wrap. Place the wrapped bars in a freezer bag. They can last up to three months in the freezer. When you want to eat one, just thaw it at room temperature. One common mistake is not measuring the ingredients correctly. This can change the texture and taste. Avoid skipping the salt; it enhances the flavor of the bars. Don't forget to let the bars cool completely before cutting them. Cutting too soon can make them crumbly. Lastly, avoid using too many wet ingredients. This can make your bars soggy instead of chewy. For the full recipe, check out the Healthy Peanut Butter Granola Bars recipe above. {{image_2}} You can make these granola bars even better. Try adding seeds like chia or flaxseed. They boost fiber and healthy fats. You can use nut butter blends for different flavors. Sunflower seed butter works well too. For sweetness, toss in some coconut flakes or cacao nibs. The options are endless! If you want a different sweet taste, try agave nectar or brown rice syrup. They give a nice flavor without harming your diet. You can also use mashed bananas or apple sauce. They add natural sweetness and moisture. Just keep the same amount in the recipe. To make these bars gluten-free, use certified gluten-free oats. Many oats have gluten, so check the label. You can also add gluten-free cereal for crunch. It gives extra texture and taste. Enjoy your tasty treat without worry! For the full recipe, check the details above. To keep your healthy peanut butter granola bars fresh, store them properly. I recommend wrapping each bar in plastic wrap. Then, place them in an airtight container. This helps to prevent moisture and keeps them tasty. You can also use parchment paper between layers if you stack them. When stored correctly, these bars can last up to one week at room temperature. If you want them to last longer, you can freeze them. In the freezer, they can stay good for about three months. Just remember to wrap them well to avoid freezer burn. If your bars lose some freshness, don’t worry! You can revive them. Simply warm them in the microwave for about 10-15 seconds. This softens them and brings back their chewy texture. If you want a crispy bite, toast them lightly in the oven for a few minutes. Enjoy them warm for a delightful snack! For the full recipe, check out the Healthy Peanut Butter Granola Bars section. Yes, you can make these granola bars vegan. To do this, simply swap honey for maple syrup. Use a plant-based peanut butter. Check the chocolate chips too. Many brands offer vegan options. Homemade granola bars can last about one week at room temperature. Store them in an airtight container. If you want them to last longer, keep them in the fridge. They can stay fresh for up to two weeks there. For even more shelf life, freeze them. They can last up to three months in the freezer. You can mix up the flavors in fun ways. Try adding coconut flakes for a tropical vibe. Use pumpkin seeds for a tasty crunch. Swap the dried fruits for fresh berries. You can also add spices like ginger or nutmeg for a warm taste. Experiment with your favorites to find what you love! For the full recipe, check out the detailed instructions above. You learned about healthy peanut butter granola bars. We discussed the key ingredients and their benefits. I shared step-by-step instructions for making these bars perfectly. You also got tips on texture and storage. Remember, feel free to change ingredients to suit your tastes or needs. Always store bars well to keep them fresh. Enjoy experimenting with flavors or variations! You now have the tools to make tasty snacks easily.

Healthy Peanut Butter Granola Bars for Instant Energy

Looking for a quick energy boost without the guilt? These Healthy Peanut Butter Granola Bars are your answer! Packed with

- 1 bunch of fresh kale, stems removed - 2 tablespoons olive oil - 1 teaspoon garlic powder - 1 teaspoon smoked paprika - 1 teaspoon nutritional yeast (optional) - Salt and pepper to taste Kale is a superfood. It is low in calories and high in nutrients. One cup of raw kale has about 33 calories. It offers 2 grams of protein and 1 gram of fiber. This makes it a great snack choice. Kale is a powerhouse of vitamins. It is rich in vitamins A, C, and K. These help with skin, eyes, and blood health. Kale also has antioxidants. Antioxidants fight free radicals in the body. This can lower the risk of diseases. Eating kale can also help with weight loss. It is filling and low in calories. Plus, it can improve digestion due to its fiber content. Try these crispy kale chips for a tasty snack. They are easy to make. You can find the full recipe above. Enjoy the crunch and health benefits! 1. Preheat your oven to 350°F (175°C). This step is crucial for even cooking. 2. Line a baking sheet with parchment paper. This helps with easy cleanup. 3. Remove the stems from the kale. Use your hands to tear the leaves into bite-sized pieces. 1. Place the torn kale leaves in a large bowl. 2. Drizzle two tablespoons of olive oil over the leaves. 3. Add one teaspoon of garlic powder and one teaspoon of smoked paprika. 4. If you like a cheesy flavor, add one teaspoon of nutritional yeast. 5. Sprinkle salt and pepper to taste. 6. Gently massage the kale with your hands for about 2-3 minutes. This helps the leaves get fully coated. 1. Spread the seasoned kale in a single layer on the baking sheet. Avoid overlapping. 2. Bake for 10-15 minutes. Check the edges; they should be crispy and slightly browned. 3. Keep a close eye on the kale to avoid burning. Every oven is different. 4. Once done, take the kale chips out of the oven and let them cool for a few minutes. They will get crunchier as they cool. For the full recipe, you can refer to the earlier sections. Enjoy your crispy kale chips as a tasty snack! To make crispy kale chips, spread them in a single layer on the baking sheet. This helps them bake evenly. If they overlap, some will get soggy. I learned this the hard way! To prevent soggy kale chips, massage the leaves well with oil and spices. This makes them tender but not wet. Always keep an eye on your chips while baking. They can burn fast if left unattended. You can make these chips more exciting by trying different spices. Garlic powder and smoked paprika work well, but don’t stop there! Using different oils can change the taste too. Olive oil gives a nice flavor, but you could try avocado oil for a twist. Don’t be afraid to experiment with your favorites! For the full recipe, check out the details above. {{image_2}} You can change the flavor of your kale chips easily. Try making spicy kale chips. Just add chili powder to your mix. This gives your chips a nice kick. The heat pairs well with the crunchy texture. For a sweeter option, make sweet kale chips. Sprinkle cinnamon on the kale before baking. The warmth of the cinnamon adds a great twist. You can enjoy this version as a snack or dessert. If you want to swap out olive oil, try avocado oil. It has a mild taste and works just as well. You can also use coconut oil for a unique flavor. Just melt it before mixing with the kale. For seasonings, there are many options. Try using lemon zest for a fresh taste. You can also use onion powder or cumin for added depth. Get creative and mix flavors you love! With these variations and substitutions, your crispy kale chips can be fun and tasty every time. Check out the Full Recipe for all the steps and details! To keep your leftover kale chips fresh, store them in an airtight container. This helps keep moisture out. You can use a zip-top bag too. Just make sure to squeeze out any air before sealing. If stored well, your chips can last up to a week. If you place them in the fridge, they may stay crisp for about five days. However, avoid storing them with moisture-rich foods. If your kale chips lose their crunch, don’t worry. You can easily revive them. Preheat your oven to 350°F (175°C). Spread the soggy chips on a baking sheet. Bake for about 5 minutes. Keep an eye on them to prevent burning. This should bring back their crispy texture. Enjoy your kale chips just like fresh! For the full recipe, check out Kale Crunchies . How do you make kale chips crispy? To make kale chips crispy, start with fresh kale. Wash it and dry it well. Remove the thick stems and tear the leaves into bite-sized pieces. Coat the kale with olive oil and seasonings. Massage the leaves to ensure even coverage. Spread them on a baking sheet in a single layer. Bake at 350°F for 10-15 minutes. Watch them closely to avoid burning. Let them cool for extra crunch. Can you make kale chips in an air fryer? Yes, you can make kale chips in an air fryer. Set the air fryer to 300°F. Prepare the kale as you would for baking. Place the kale in the basket in a single layer. Cook for about 5-7 minutes. Shake the basket halfway through cooking to ensure even crisping. This method can give you a great crunch with less oil. Ideas for pairing kale chips with dips or other snacks Kale chips pair well with many dips. Try hummus for a creamy texture. Guacamole adds a fresh, zesty touch. Salsa is great for a spicy kick. You can also enjoy them with a yogurt dip for a cool contrast. Serving them alongside cheese or charcuterie can elevate your snack game. Best drinks to complement kale chips For drinks, try a light herbal tea or sparkling water with lemon. These options enhance the chip's flavors without overpowering them. A crisp white wine can also work well. If you prefer non-alcoholic drinks, opt for a fresh juice or a smoothie. These drinks balance the saltiness of the chips. Recommendations for high-quality store-bought kale chips You can find great store-bought kale chips at health food stores. Look for brands that use fresh ingredients and no preservatives. Some popular options include Rhythm Superfoods and Brad's Plant-Based. Always check the ingredient list for added sugars or unhealthy oils. Brands and health food stores to consider Many local health food stores carry high-quality kale chips. Whole Foods and Trader Joe's often have good selections. You can also find options online. Brands like Kale Krunch and Eat Your Vegetables offer tasty choices. These brands focus on organic ingredients and unique flavors. In this post, I covered how to make crispy kale chips, from ingredients to storage. You learned about the best spices, prep steps, and baking tips to get that crunch. While making these chips, feel free to try different flavors or oils for fun. Store leftovers properly to keep them fresh, and remember to revive any soggy chips. Enjoy your healthy snack! Making kale chips is easy, and they taste great with many dips. Try them out today!

Crispy Kale Chips Snack That Packs a Punch

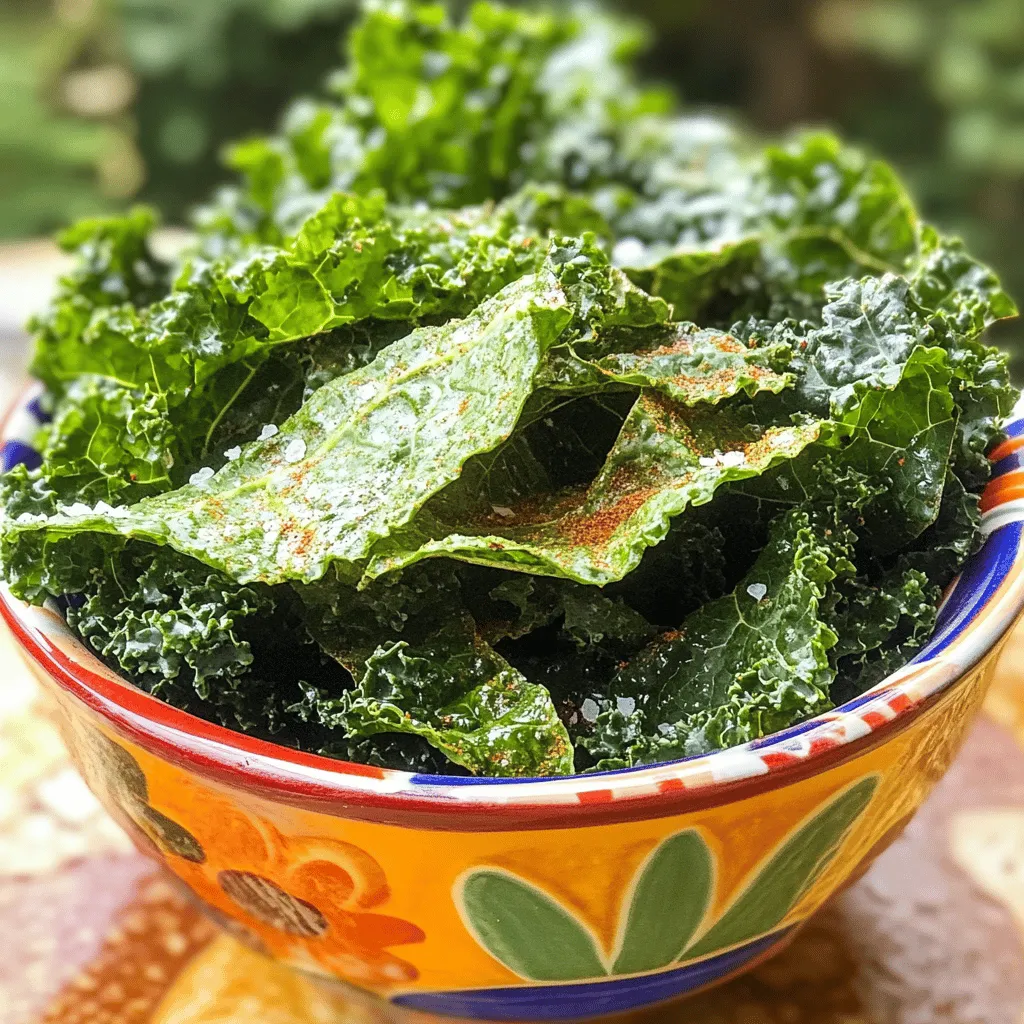
Crispy kale chips are a tasty treat that not only satisfy your cravings but also boost your health. With just

- 2 cups cooked chicken breast, diced - 4 cups mixed greens (spinach, arugula, and romaine) - 1 cup cherry tomatoes, halved - 1/2 cucumber, sliced - 1/4 red onion, thinly sliced - 1/2 cup walnuts, toasted - 3 tablespoons honey - 3 tablespoons Dijon mustard - 2 tablespoons olive oil - Salt and pepper to taste - Optional: fresh herbs for garnish The key to a great Honey Mustard Chicken Salad lies in the balance of flavors. The cooked chicken breast adds protein and heartiness. I love using mixed greens like spinach, arugula, and romaine. They create a colorful base that’s crunchy and fresh. Cherry tomatoes bring a sweet burst to each bite. For extra crunch, I add sliced cucumber and thinly sliced red onion. Toasted walnuts give that delightful nutty flavor. You can also sprinkle some feta cheese on top for creaminess. For the dressing, I mix honey and Dijon mustard for a sweet and tangy flavor. Olive oil adds richness, while salt and pepper enhance everything. Fresh herbs can elevate the dish and bring a pop of color. I suggest you check out the Full Recipe for detailed steps and tips. - Combine the chicken, mixed greens, tomatoes, cucumber, and onion in a large bowl. This mix gives you a bright and tasty base. The colors make your salad fun to eat. - Whisk together honey, mustard, olive oil, salt, and pepper in a small bowl. This dressing adds a sweet and tangy twist that makes each bite special. - Drizzle the dressing over the salad mixture and toss gently. Make sure everything gets a nice coating. This step makes the flavors blend well. - Top with walnuts and feta cheese, then incorporate gently. The nuts add crunch, and the cheese brings creaminess. Each bite has a fun texture. - Garnish with fresh herbs. This adds a pop of color. You can use parsley or basil for a fresh touch. - Serve in a large bowl or plate individually. For extra flair, drizzle a little more dressing on top. This makes the salad look as good as it tastes. This honey mustard chicken salad makes a wholesome and flavorful meal. You can find the complete recipe in the Full Recipe section. To make the best honey mustard dressing, you need the right balance of sweet and tangy. Use three tablespoons each of honey and Dijon mustard. This mix brings a lovely flavor to your salad. I recommend brands like Grey Poupon or Maille for their strong taste. They add a nice kick that works great with the honey. To keep your salad crisp, don’t over-dress it. Start with a small amount of dressing and add more if needed. This way, every bite stays fresh. Use fresh, crunchy greens like spinach, arugula, and romaine. They add color and crunch, making your salad feel light and tasty. Adding fruits can really boost your salad's flavor. I love using diced apples or dried cranberries for a sweet touch. They pair well with the honey mustard dressing. For the chicken, season it well with salt and pepper before cooking. You can also add herbs like thyme or rosemary for extra taste. These small steps make a big difference in flavor. For the full recipe, check out Honey Mustard Chicken Salad! {{image_2}} For those who need gluten-free meals, swap in gluten-free Dijon mustard. Ensure your other ingredients are also gluten-free. You can use quinoa or brown rice in place of chicken for a hearty vegan option. Instead of feta cheese, try using a nut-based cheese for creaminess without dairy. Want a kick? Use a spicy honey mustard dressing. Just mix in some hot sauce or chili flakes. You can also add different nuts or seeds for extra crunch. Try sunflower seeds or almonds for a tasty twist. You can change your salad with seasonal fruits and veggies. In spring, add fresh peas or radishes. In summer, try ripe peaches or strawberries. In fall, use apples or roasted pumpkin. The key is to use what’s fresh and available. This keeps your salad exciting all year round. To keep your honey mustard chicken salad fresh, store the salad and dressing separately. This prevents sogginess. Use an airtight container for the salad. The dressing can go in a small jar. In the fridge, the salad lasts about three days. If you want to enjoy it longer, freeze the chicken separately. When reheating chicken, aim for a gentle heat. Use a microwave or a skillet. Add a little water or broth to keep it moist. Avoid high heat, as this dries chicken out quickly. Only reassemble your salad just before serving. This keeps the greens crisp and fresh. You can freeze honey mustard chicken salad, but it’s best to freeze components. The chicken can freeze well in a zip-top bag. The greens and dressing do not freeze well. For best results, freeze chicken and use fresh greens later. This way, you enjoy a fresh salad anytime! To make honey mustard dressing, mix three tablespoons of honey and three tablespoons of Dijon mustard. Add two tablespoons of olive oil. Whisk until smooth. You can adjust the sweetness by adding more honey. This simple recipe brings a sweet and tangy flavor that elevates your salad. Yes, you can use leftover chicken for this salad. Just dice it and add it to the mix. You can also add leftover veggies like bell peppers or carrots. This not only saves food but adds great taste and texture to the salad. This salad pairs well with a variety of sides. Consider serving it with: - Garlic bread - Quinoa salad - Roasted vegetables - Fresh fruit salad These sides balance the salad's flavors and make for a complete meal. Yes, this salad is healthy. It is packed with nutrients from the mixed greens and veggies. Chicken provides protein, while walnuts add healthy fats. Honey and mustard offer flavor without excessive calories. Eating this salad supports a balanced diet. You can prepare this salad in advance. Just keep the dressing separate until serving. This helps maintain the salad's freshness and crunch. Store the salad in an airtight container in the fridge for up to two days. You can use grilled or roasted chicken for this salad. Grilled chicken adds a smoky flavor, while roasted chicken is tender and juicy. Both options work well and make the salad more satisfying. Just ensure the chicken is cooked and cooled before adding it to the mix. For more information, check the Full Recipe for Honey Mustard Chicken Salad. This blog post covered how to make a delicious Honey Mustard Chicken Salad. We explored fresh ingredients, a simple dressing, and easy steps for preparation. You learned ways to customize the salad to fit your needs. Remember to store leftovers correctly and enjoy this dish any time. It’s healthy, tasty, and adaptable for any season. Enjoy your culinary adventure and make this salad your own!

Honey Mustard Chicken Salad Wholesome and Flavorful Meal

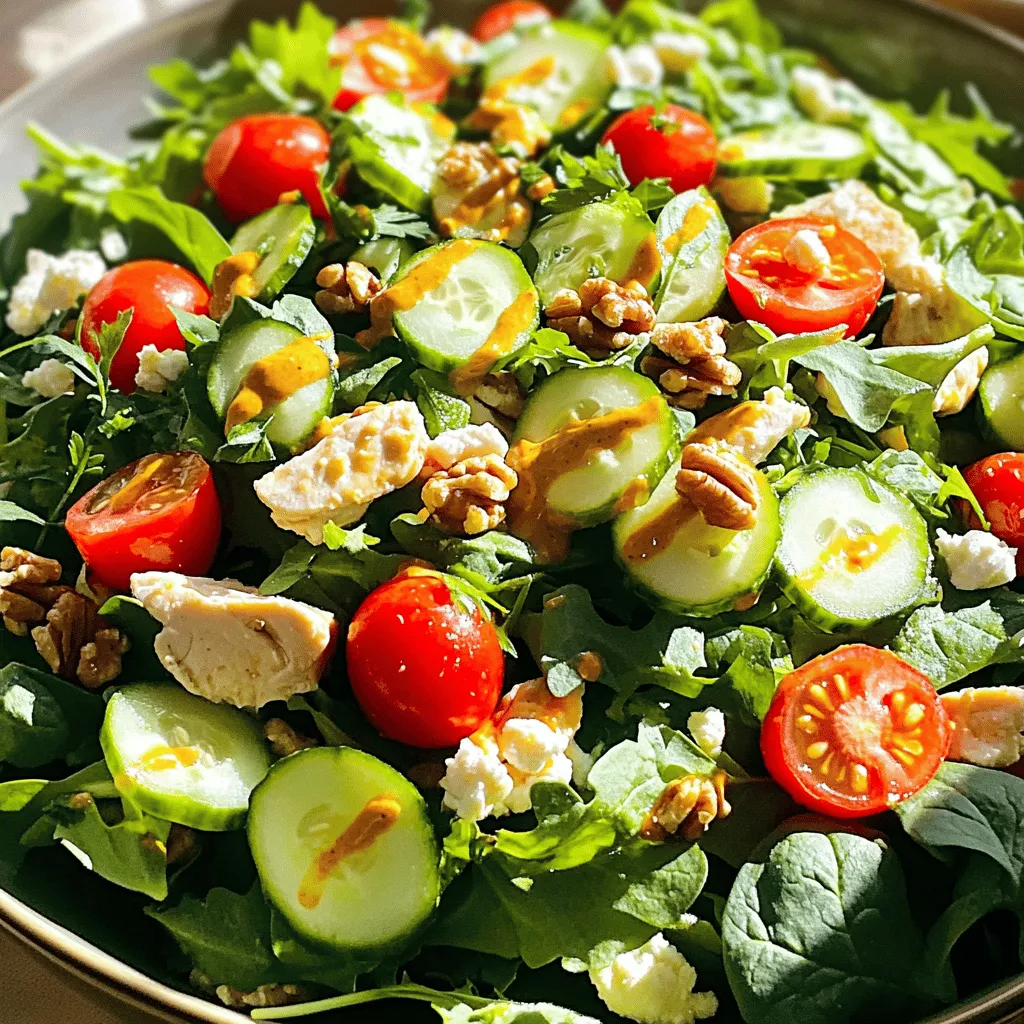
Looking for a meal that’s both wholesome and bursting with flavor? Look no further than my Honey Mustard Chicken Salad!

To make this creamy broccoli cheddar soup, gather the following ingredients: - 4 cups fresh broccoli florets - 1 medium yellow onion, chopped - 3 cloves garlic, minced - 3 tablespoons unsalted butter - 3 cups vegetable broth - 1 cup heavy cream - 2 cups sharp cheddar cheese, shredded - 1 teaspoon Dijon mustard - Salt and pepper to taste - 1/4 teaspoon nutmeg (optional) - Croutons (for garnish) - Fresh parsley (for garnish) These items combine to create a rich and tasty treat. You can add extra flavor with these optional ingredients: - A pinch of cayenne pepper for heat - A squeeze of lemon juice for brightness - Fresh herbs like thyme or chives for freshness Adding these can take your soup to the next level. If you have dietary needs, here are some substitutions: - Use almond milk or oat milk instead of heavy cream for a lighter option. - Swap cheddar cheese for dairy-free cheese if you want a vegan version. - Use chicken broth instead of vegetable broth for a heartier taste. These swaps ensure everyone can enjoy this soup. For more detailed cooking steps, check the Full Recipe. To make Creamy Broccoli Cheddar Soup, start by melting butter in a large pot. Use medium heat for this. Add chopped onion and minced garlic, cooking for 3-4 minutes. The onion should become clear but not brown. Next, toss in the broccoli florets. Sauté them for 2 more minutes. This helps the flavors blend nicely. Now, pour in the vegetable broth. Bring it to a boil. Once boiling, lower the heat and let it simmer for 10-12 minutes. You want the broccoli to be tender. After that, grab an immersion blender. Blend the soup until it’s smooth and creamy. If you don’t have one, carefully pour the soup into a blender in batches. Then, blend it and return it to the pot. Stir in heavy cream, sharp cheddar cheese, and Dijon mustard. Mix it well until the cheese melts. This should take about 3-5 minutes. Finally, season with salt, pepper, and a pinch of nutmeg if you like. Serve the soup hot, topped with croutons and fresh parsley for a nice touch. Here are some tools I recommend for making this soup: - Large pot - Immersion blender (or regular blender) - Cutting board - Sharp knife - Measuring cups and spoons - Ladle These tools will help you make the process easy and quick. For perfect sautéing, keep the heat moderate. This prevents burning the garlic and onion. Stir often to mix the flavors well. When blending, be careful with hot soup. If using a blender, blend in small batches to avoid spills. You can also let the soup cool a bit before blending. This makes it safer to handle. Enjoy making your Creamy Broccoli Cheddar Soup! For the full recipe, check out the details above. To make your soup extra creamy, use heavy cream. It adds a rich texture that makes every bite delightful. You can also blend in some cream cheese. This gives a nice tang and even more creaminess. If you want a lighter option, try half-and-half instead of heavy cream. Herbs and spices can really boost the flavor of your soup. Try adding thyme or parsley for a fresh taste. A pinch of cayenne pepper can add a nice kick. If you love garlic, consider adding more minced garlic for depth. You can also add a splash of lemon juice for brightness. If your soup is too thick, add more broth or cream until you reach the right consistency. If it’s too salty, add a bit of sugar. This can balance the saltiness. For a grainy texture, make sure to blend the soup well. An immersion blender works best for a smooth finish. Follow the [Full Recipe] for step-by-step guidance to avoid any mishaps. {{image_2}} You can swap cheddar for other cheeses. Try gouda for a smoky taste. Swiss gives a nutty flavor. Cream cheese adds richness and a smooth texture. Mix and match for unique soups. Boost your soup with protein. Cooked chicken makes it hearty. Crumbled bacon adds a crispy twist. You can also use sausage for a spicy kick. Just stir it in before serving. You can make this soup vegan. Use coconut milk instead of cream. Swap cheddar for vegan cheese. Use vegetable broth to keep it plant-based. This version is still rich and tasty. For the best results, follow the Full Recipe. Store leftover soup in an airtight container. Let the soup cool before sealing. Keep it in the fridge for up to three days. Use clear glass containers for better visibility. Always label your container with the date. This helps track freshness. You can freeze creamy broccoli cheddar soup. Pour it into freezer-safe containers, leaving space for expansion. Seal tightly and freeze for up to three months. For best results, avoid adding cheese before freezing. Add the cheese when you reheat the soup. When reheating, do it slowly on the stove. Stir often to prevent sticking. If the soup seems thick, add a bit of broth or water. Avoid boiling the soup; this helps keep it creamy. You can also microwave it in short bursts. Stir in between to ensure even heating. For the best flavor, taste and adjust seasonings as needed. For the full recipe, check out Creamy Broccoli Cheddar Soup. Yes, you can make this soup ahead of time. Store it in the fridge for up to three days. Just heat it up on the stove before serving. The flavors may even improve after a day. To thicken the soup, you can blend more broccoli. This adds texture and keeps it healthy. Another option is to use extra cheese. Adding more cheddar will also help thicken the soup and boost the cheese flavor. You can serve the soup with crusty bread or a fresh salad. Grilled cheese sandwiches pair well too. If you want something light, a simple green salad is great. For a fun twist, try adding croutons on top for extra crunch. Check out the Full Recipe for more ideas! This blog post covered all you need for creamy broccoli cheddar soup. We went through key ingredients, step-by-step cooking tips, and creative variations. I shared ways to enhance flavor and make it your own. You can store this soup easily for later or even freeze it. Finally, the FAQs should help answer your main questions. Enjoy making this soup your way and share it with others!

Creamy Broccoli Cheddar Soup Easy and Flavorful Recipe

Looking for a comfort food that warms your heart? You’ll love this Creamy Broccoli Cheddar Soup! This easy and flavorful

Older posts
Newer posts
← Previous Page1 … Page58 Page59 Page60 … Page84 Next →

dsad

© 2026 juliesdish • Built with GeneratePress

Our Policies

  • Copyright Policy
  • Cookie Policy
  • GDPR Policy
  • Privacy Policy
  • Disclaimer
  • Terms Of Use

More Information

  • Home
  • About
  • Contact
  • Appetizers
  • Dessert
  • Dinner
  • Drinks
©2026, juliesdish About Back To Top