![For this Mango Avocado Salsa, I keep it simple yet fresh. Here’s what you need: - Ripe mango, diced - Avocados, diced - Red onion, finely chopped - Red bell pepper, diced - Jalapeño, seeded and minced - Fresh cilantro, chopped - Lime juice - Honey (or agave syrup) - Salt and pepper to taste Each ingredient adds its own flair. The ripe mango gives sweetness, while the avocado adds creaminess. Red onion and bell pepper add crunch. Jalapeño brings heat, and cilantro gives it a fresh taste. Lime juice brightens it all up. Honey adds a hint of sweetness, balancing the flavors. Don't forget salt and pepper for the final touch! I love how every bite bursts with flavor. This salsa pairs well with many dishes. You can serve it with chips or on grilled meats. You can find the full recipe above to help you create this delightful dish. To start, you need to peel and dice the mango. Cut the mango in half, remove the pit, and slice the flesh into cubes. Use a sharp knife to get nice pieces. Next, dice the avocados. Cut them in half, remove the pit, and scoop the flesh out. Chop the red bell pepper in small pieces. Then, finely chop the red onion. For some heat, take the jalapeño, remove the seeds, and mince it well. In a large mixing bowl, combine the diced mango, avocados, red onion, red bell pepper, and minced jalapeño. Mix these fresh fruits and vegetables gently. This helps keep the avocado pieces intact. Now, add chopped cilantro to the bowl. The cilantro adds a nice touch and fresh flavor. In a small bowl, whisk together the juice of two limes and one tablespoon of honey. Mix it until well combined. This dressing will brighten the salsa. Pour this mixture over your salsa ingredients. It gives the salsa a tasty zing. Gently toss all the ingredients together. You want everything mixed but not mushy. Next, season the salsa with salt and pepper to taste. This is where you adjust the flavors. Let the salsa sit for about 10-15 minutes. This resting time helps all the flavors meld together. You can find the full recipe at the beginning of this article. - Choosing ripe ingredients: For a great salsa, start with ripe mangoes and avocados. Look for mangoes that feel slightly soft when you press them. Avocados should yield gently to pressure. This ensures a creamy texture and sweet flavor. - Preventing avocado browning: To keep your avocado green, use lime juice. The acid slows down browning. If you have leftover salsa, cover it tightly with plastic wrap. Press the wrap onto the surface to limit air exposure. This helps keep it fresh longer. - Best ways to present the salsa: Serve your salsa in a bright bowl to make it pop. Add a garnish of cilantro on top for color. This makes your dish look even more appealing and fresh. - Pairing with main dishes: Mango avocado salsa pairs well with many meals. Use it as a topping for grilled fish or chicken. It also tastes great with tacos or served with tortilla chips for a fun appetizer. - Additional spices or herbs to try: Consider adding chopped mint or basil for a twist. A pinch of cumin can boost the flavor too. Experiment to find what you like best. - Adjusting heat levels: If you want more heat, add more jalapeño or try a serrano pepper. For less heat, remove the seeds and membranes from the jalapeño. You can also use bell peppers for a milder taste without losing the crunch. For the complete recipe, check out the [Full Recipe]. {{image_2}} You can make mango avocado salsa even more fun by adding other fruits. Pineapple and kiwi pair well with mango. They add sweetness and a nice tang. You can also use papaya for a unique taste. Adding beans can boost the protein in your salsa. Black beans or chickpeas are great choices. They also add more texture and make your salsa heartier. Spice is all about personal taste. You can use mild peppers like poblano for less heat. If you want more kick, add serrano or habanero peppers. You can also change heat levels by removing seeds from your peppers. This will make your salsa less spicy. Another option is to use a dash of hot sauce for a quick heat boost. Making this salsa vegan is easy. Just swap honey for agave syrup. It keeps the sweet flavor without any animal products. If you have gluten issues, you are in luck. This salsa is naturally gluten-free. You can enjoy it without worry. It’s also a great choice for many diets, making it very versatile. Explore these variations to keep your mango avocado salsa fresh and exciting! For the complete recipe, check the [Full Recipe]. To keep your mango avocado salsa fresh, store it in the fridge. Use an airtight container. This helps keep moisture out. If you don't have one, use plastic wrap tightly over the bowl. This works too. How long is salsa good for? Fresh mango avocado salsa lasts about 2 to 3 days in the fridge. After that, you may notice changes. Signs of spoilage include: - Change in color - Unpleasant smell - Slimy texture If you see any of these signs, it's best to throw it away. Can you freeze mango avocado salsa? Yes, but note that the texture may change. To freeze it, first blend the salsa until smooth. Pour it into a freezer-safe container. Leave some space at the top for expansion. You can freeze it for up to 3 months. When you are ready to eat it, thaw it in the fridge overnight. For best texture, after thawing, stir in fresh diced avocado again. Enjoy your salsa with a burst of fresh flavor! For the full recipe, check out the details above. To stop avocados from browning, use lime juice. The acid in lime juice slows down browning. As you prepare the salsa, add lime juice right after dicing the avocados. This keeps them fresh and green. Yes, you can make this salsa ahead of time. However, it's best to mix the avocados and lime juice just before serving. If you mix too early, the avocados may brown. Store the salsa in a sealed container in the fridge. If you want a substitute for honey, use agave syrup. It gives a similar sweetness. You can also use maple syrup or even a bit of sugar. These options work well without changing the flavor much. Mango Avocado Salsa tastes great at room temperature. Let it sit for 10-15 minutes after mixing. This time allows the flavors to blend. However, you can also chill it in the fridge if you prefer a cold salsa. Check the [Full Recipe] for more details. This blog post covered how to make a fresh Mango Avocado Salsa. You learned about the key ingredients and easy steps to prepare it. Remember to choose ripe items for the best flavor. I shared tips to keep your salsa fresh and tasty, plus many fun variations to try. Finally, I provided useful storage info to help you enjoy your salsa longer. With these insights, you can create a delicious dish that wins every time. Happy salsa making!](https://juliesdish.com/wp-content/uploads/2025/07/6b0543fa-75ce-4ab9-99e0-33a33bcefd8d.webp)
Mango Avocado Salsa Fresh and Flavorful Delight
Are you ready to elevate your snack game? Mango Avocado Salsa is a fresh, vibrant treat that bursts with flavor.
Are you ready to elevate your snack game? Mango Avocado Salsa is a fresh, vibrant treat that bursts with flavor.

Looking for a quick and tasty meal idea? This Easy Chicken Taco Casserole is your answer! With just a few
. To make your chunky guacamole salad look great, use a big bowl. Choose a colorful bowl that complements the bright green of the avocados. - Add a sprinkle of extra cilantro on top for a fresh touch. - Arrange tortilla chips around the bowl for easy serving. This adds a festive vibe. - For a fun twist, use different colored tortilla chips. The colors will pop against the salad. Storing unused ingredients helps cut down on waste. After cutting, place leftover veggies in airtight containers. This keeps them crisp and fresh for later use. To prevent avocados from browning, use lime juice right after cutting. Lime juice acts as a shield against oxidation. - If you prepare the salad ahead of time, keep the avocado separate. - Mix it in just before serving to keep that chunky texture. For more tips, check out the Full Recipe. {{image_2}} You can easily swap out items in this recipe. If you lack jalapeño, use a milder pepper like a green bell pepper. It keeps the crunch without the heat. For a richer taste, try adding a poblano or serrano pepper. This recipe is also great for vegans and those needing gluten-free options. All ingredients are naturally vegan and gluten-free. Check your labels for any packaged items, like chips, to be sure. Want to amp up the flavor? Add black beans for extra protein and texture. You can also mix in some chickpeas if you like. Fresh herbs like parsley or mint can add a new twist. Adjust the spice level by adding more jalapeño or a dash of cayenne pepper. For a milder version, remove the seeds from the jalapeño. You can even skip the jalapeño altogether if you prefer no heat. Feel free to experiment with flavors! The beauty of Chunky Guacamole Salad is its versatility. To keep your chunky guacamole salad fresh, store it in an airtight container. This helps prevent air from getting in and making it brown. Place a layer of plastic wrap directly on the surface of the salad before sealing the container. This extra step helps keep it fresh longer. In the refrigerator, the salad stays fresh for about 1 to 2 days. After that, the avocados may start to brown, and the flavors can fade. Always check for any off smells or changes in texture before digging in. You can freeze chunky guacamole salad, but it changes the texture. The avocados may become mushy when thawed. If you like, freeze the components separately for better results. For freezing, here are some tips: - Avocados: Mash them and mix with lime juice to prevent browning. - Vegetables: Chop them and freeze in single layers on baking sheets. Once frozen, transfer to bags. - Corn: Cook and cool it before freezing. This way, you can enjoy fresh ingredients in your salad later! For the full recipe, refer back to the main article. Yes, you can make this salad in advance. Prepare the ingredients and mix them in a bowl. To keep the salad fresh, add the lime juice just before serving. This helps to keep the avocados bright and green. If you mix the lime juice in early, the avocados might turn brown. It’s best to make it no more than a few hours ahead. Chunky guacamole salad pairs well with many dishes. You can serve it with grilled chicken or fish for a full meal. It also works great with tacos or burritos. For a light snack, enjoy it with tortilla chips. You can even use it as a topping on nachos. The creamy texture and fresh taste make it a perfect match for many foods. Yes, this recipe is very customizable. If you have nut allergies, you can skip any nuts and still enjoy the flavor. For those on low-carb diets, use fewer beans or skip them altogether. You can also add more veggies to make it heartier. This salad remains tasty while fitting your needs. Feel free to get creative with your ingredients! In this blog post, we explored how to make a chunky guacamole salad. We listed the key ingredients and walked through simple steps to prepare it. I shared tips on serving and storing, plus ideas for variations. This salad is not only tasty but also easy to customize. Remember, you can mix in your favorite veggies and adjust spice levels. Enjoy this fresh dish with tortilla chips any time. A delicious salad awaits, ready to impress your friends and family!](https://juliesdish.com/wp-content/uploads/2025/07/c48053f6-ff06-49bb-89a1-0e1481015839.webp)
Are you ready for a fresh and flavorful treat? My Chunky Guacamole Salad is not just a side; it’s a

Looking for a simple and tasty appetizer that never fails to impress? Classic deviled eggs are your answer! As a
![- 1 cup rice noodles - 1 cup shredded carrots - 1 cup red cabbage, thinly sliced - 1 cucumber, julienned - 1 bell pepper (any color), julienned - 1 avocado, sliced - 1 cup cooked shrimp or tofu for protein (optional) In my experience, rice noodles are the backbone of these bowls. They soak up flavors well and have a lovely texture. Next up, the veggies add color and crunch. Carrots bring sweetness, while cabbage adds a nice bite. Cucumber and bell pepper add freshness, and avocado gives that creamy finish. You can add cooked shrimp or tofu for protein, making the meal more filling. - 3 tablespoons soy sauce or tamari (gluten-free option) - 1 tablespoon sesame oil - 1 tablespoon lime juice The dressing is simple but packs a punch. Soy sauce or tamari provides the salty depth. Sesame oil adds a nutty flavor, while lime juice brightens everything up. This dressing ties the dish together beautifully. - 1/4 cup fresh cilantro, chopped - 1/4 cup mint leaves, chopped - 1/4 cup peanuts, crushed (for garnish) Fresh herbs like cilantro and mint add a burst of flavor. They make each bite exciting and fresh. Crushed peanuts provide a crunchy texture, enhancing the overall experience. For the full recipe, check out the details above. First, you need to cook the rice noodles. Boil a pot of water. Once boiling, add the noodles. Cook them according to the package instructions. After they are ready, drain the noodles. Rinse them under cool water to stop cooking. This will help keep them firm. While the noodles cook, grab your vegetables. Shred the carrots and slice the red cabbage. Julienne the cucumber and bell pepper. Make sure to cut them evenly. This will make your bowl look pretty. Once done, combine all the veggies in a large mixing bowl. Toss them gently to mix. Next, we will make the dressing. In a small bowl, whisk together soy sauce, sesame oil, lime juice, and a pinch of salt and pepper. Mix until everything is well combined. Taste it! If you want more flavor, adjust the seasoning as needed. Now comes the fun part: assembling your bowls! Start with a layer of rice noodles in each serving bowl. Top them with a colorful mix of veggies. If you want protein, add cooked shrimp or tofu on top. Finish with slices of avocado, fresh cilantro, and mint. Drizzle the dressing over everything. Finally, sprinkle crushed peanuts for a nice crunch. Enjoy your Rainbow Spring Roll Bowls fresh and flavorful! For the complete recipe, check the Full Recipe. To make your Rainbow Spring Roll Bowls pop, choose clear or brightly colored bowls. This choice highlights the vibrant colors of your ingredients. Arrange each component in layers. This artful display draws the eye and makes the dish more inviting. Remember, we eat with our eyes first! For the best texture, do not overcook the rice noodles. Follow the package instructions closely. Rinse them well in cool water after cooking. This step keeps them from sticking together. Fresh ingredients are key to great flavor. Always opt for seasonal veggies when possible. Serve your bowls right away for the best taste. The freshness of the veggies makes a big difference. Adding lime wedges on the side gives a zesty kick. Simply squeeze the lime over the bowl for extra flavor. These little touches elevate your meal. For more details on assembling, check out the Full Recipe. {{image_2}} You can easily make this dish vegetarian or vegan. Simply swap shrimp for tofu or extra veggies. Tofu adds a nice texture and absorbs flavor well. Use agave or coconut aminos instead of soy sauce for a sweeter taste. These swaps keep your bowl vibrant and tasty. If you need gluten-free options, choose rice noodles labeled gluten-free. You can also use tamari instead of soy sauce. Tamari gives a rich flavor without gluten. These small changes help everyone enjoy this fresh bowl. To make your bowl even more colorful, add veggies like bell peppers or radishes. They add crunch and brightness. For a sweet twist, try adding fruits like mango or pineapple. These fruits balance the savory flavors and make each bite a delight. For the complete recipe, check out the [Full Recipe]. To keep your leftover Rainbow Spring Roll Bowls fresh, store them in the fridge. Use airtight containers to lock in flavors and moisture. Place each ingredient in separate containers if possible. This way, veggies stay crisp, and noodles avoid becoming soggy. To help ingredients last longer, use fresh produce and avoid overcooking. Check your fridge for leftover herbs or proteins to add to future meals. They can bring new life to your bowls! When reheating rice noodles, avoid using a microwave. Microwaving can make them mushy. Instead, try soaking them in hot water for a few minutes. This method revives their texture and prevents clumping. If you need to serve them fresh after storage, mix in fresh herbs and a splash of lime juice. This will brighten the flavors and enhance the meal's appeal. For quick assembly, prep your ingredients in advance. Cook the rice noodles and store them in a separate container. Slice your veggies and keep them ready to go for busy days. Use clear containers to see your colorful ingredients. You can also create an assembly line for bowls. This makes putting together a meal easy and fun. Just grab your noodles, veggies, and toppings for a fresh feast anytime! For the full recipe, refer to the Rainbow Spring Roll Bowls section above. To make Rainbow Spring Roll Bowls, start by cooking rice noodles. Boil water and cook them as per the package. Drain and rinse the noodles with cool water. While the noodles cook, shred carrots, slice red cabbage, julienne cucumber and bell pepper. In a small bowl, whisk soy sauce, sesame oil, lime juice, and some salt and pepper. In each serving bowl, layer the noodles, then add the mixed veggies, avocado, and protein if you want. Drizzle the dressing on top and finish with fresh herbs and crushed peanuts. Enjoy your colorful bowl right away! Yes, you can use various proteins in this recipe. If you prefer shrimp, that works great. You can also use tofu for a vegetarian option. Grilled chicken or sliced beef can add more flavor. Feel free to choose your favorite protein to match your taste! You can store Rainbow Spring Roll Bowls in the fridge for up to three days. Keep the dressing separate. This way, the veggies stay fresh and crunchy. Use airtight containers to keep them fresh longer. Just remember to eat them within three days for the best taste! If you want to swap rice noodles, there are great options. You can use zucchini noodles for a low-carb choice. For gluten-free, try quinoa or soba noodles made from buckwheat. Cauliflower rice is another excellent choice for a healthy twist. Each substitute adds its own flavor and texture! Yes, Rainbow Spring Roll Bowls are very healthy! They are filled with fresh veggies that provide vitamins and minerals. Rice noodles offer quick energy. If you add shrimp or tofu, you get good protein. These bowls have healthy fats from avocado and peanuts too. Enjoy a tasty and nutritious meal! In this blog post, we explored how to make Rainbow Spring Roll Bowls with fresh ingredients and delicious dressing. We discussed key components like rice noodles, colorful veggies, and protein options. I shared tips for perfect presentation and storage, making meal prep easy. Remember, these bowls are not only beautiful but also healthy. Experiment with flavors and ingredients to create your own twist. Enjoy the process and the tasty results!](https://juliesdish.com/wp-content/uploads/2025/07/ff6bcafe-2a83-4847-80a2-ea869bc38522.webp)
Looking for a fresh and tasty meal? Rainbow Spring Roll Bowls are your answer! Bursting with colorful veggies, flavorful proteins,
![To make a tasty Greek orzo pasta salad, you will need: - 1 cup orzo pasta - 1 ½ cups vegetable broth (or water) - 1 cup cherry tomatoes, halved - ½ cucumber, diced - ¼ red onion, finely chopped - ½ cup kalamata olives, pitted and sliced - 1 cup feta cheese, crumbled - ¼ cup fresh parsley, chopped - 2 tablespoons lemon juice - 2 tablespoons olive oil - 1 teaspoon dried oregano - Salt and pepper to taste These ingredients provide a fresh and vibrant taste. The orzo pasta acts as a base, while the veggies add crunch. Feta cheese brings creaminess, and olives give a salty kick. You can make this salad even better with a few add-ins: - 1 bell pepper, diced - ½ cup artichoke hearts, chopped - ¼ cup sun-dried tomatoes, sliced - 1 avocado, diced - 1 teaspoon capers, rinsed These options add layers of flavor and texture. Each ingredient can change the taste profile, so feel free to mix and match. If you need alternatives, here are some ideas: - Substitute orzo with quinoa or farro for a different grain. - Use goat cheese instead of feta for a tangy flavor. - Swap cherry tomatoes with grape tomatoes or diced regular tomatoes. - If you want a nutty flavor, add toasted pine nuts or walnuts. These substitutions keep the essence of the salad while allowing for personal preference. Enjoy making your Greek orzo pasta salad with the [Full Recipe] as your guide. Start by boiling the vegetable broth in a medium saucepan. Once it bubbles, add 1 cup of orzo pasta. Follow the package instructions, which usually takes about 8 to 10 minutes. You want it al dente, so keep an eye on it. When it's ready, drain the pasta and rinse it with cold water. This stops the cooking process and cools it down. While the orzo cools, it's time to chop some fresh veggies. Take 1 cup of cherry tomatoes and slice them in half. Dice ½ cucumber into small pieces. Then, finely chop ¼ of a red onion. You can adjust these amounts based on your taste, but these veggies add great flavor and crunch. In a large mixing bowl, add the cooled orzo and all your chopped veggies. Now, it’s time for the dressing. In a separate small bowl, whisk together 2 tablespoons of lemon juice, 2 tablespoons of olive oil, 1 teaspoon of dried oregano, salt, and pepper. Pour this dressing over the orzo and veggies, then toss gently to mix everything well. Finally, fold in 1 cup of crumbled feta cheese and ¼ cup of chopped fresh parsley. Be gentle here; you don’t want to break up the feta too much. For a vibrant look, serve the salad in a large bowl. You can garnish it with extra parsley and a few whole olives on top. This not only makes it pretty but also adds a splash of color. Chill the salad in the fridge for at least 30 minutes before serving. This helps all the flavors meld together, creating a delicious dish. For the full recipe, refer back to the section above. Enjoy your fresh Greek orzo pasta salad! To make your Greek Orzo Pasta Salad really pop, focus on fresh ingredients. Use ripe cherry tomatoes and crisp cucumbers. Fresh herbs like parsley or dill add bright notes. Don't skip the lemon juice; it brings the whole dish together. Combine your dressing well. A good mix of olive oil, lemon juice, and oregano gives a rich taste. Taste as you go. Adjust salt, pepper, and lemon juice to suit your liking. One common mistake is overcooking the orzo. Cook it al dente so it stays firm. Another mistake is adding the dressing too early. Let the orzo cool first. This helps the salad stay fresh. Avoid using bland vegetables. Choose colorful, fresh ones for better taste. Lastly, don’t skip chilling the salad. It allows the flavors to mix and deepen. Meal prep makes this salad easy to enjoy all week. Cook a big batch of orzo and store it in the fridge. Chop your veggies in advance and keep them separate. Mix everything together just before serving. This keeps the salad crisp. You can also make the dressing ahead of time. Store it in a jar for quick use. For the best flavor, eat the salad within three days. Check the full recipe for more details. {{image_2}} You can easily change the flavor of your salad. Try adding roasted red peppers for a smoky taste. Sun-dried tomatoes give a sweet and tangy twist. Artichoke hearts add a nice texture and flavor. For a touch of heat, add sliced jalapeños or pepperoncini. Each of these ingredients brings a unique vibe to your Greek orzo pasta salad. Want to make your salad more filling? Adding protein is a great idea. Grilled chicken or shrimp works well and adds tasty flavors. If you prefer plant-based options, try chickpeas or black beans. These ingredients boost protein and make the salad heartier. You can also add diced tofu for a vegetarian option. You can make this salad suit different diets easily. To keep it vegetarian, simply skip the meat options. Use vegetable broth to cook your orzo instead of chicken broth. For a vegan twist, replace the feta cheese with a dairy-free alternative. You can also use avocado slices for creaminess without dairy. These changes keep the taste fresh and enjoyable while meeting dietary needs. For more details, check out the Full Recipe. To keep your Greek Orzo Pasta Salad fresh, store it in an airtight container. This helps lock in flavor and moisture. Make sure to place the salad in the fridge within two hours of making it. The salad will stay good for about three days. If you notice any change in color or smell, it's best to toss it. While I recommend eating this salad fresh, you can freeze it for later use. First, let the salad cool completely. Then, divide it into smaller portions in freezer-safe bags. Remove as much air as possible to prevent freezer burn. This salad can last up to three months in the freezer. When ready to eat, thaw the salad in the fridge overnight. To refresh your Greek Orzo Pasta Salad, first, check the texture. If it feels dry, add a splash of olive oil or lemon juice. Mix it well to combine. You can also serve it cold or at room temperature. If you prefer it warm, gently heat it in a pan over low heat. Stir often to avoid sticking. Enjoy the flavors just like the first time! For the full recipe, check out the Mediterranean Orzo Delight! Orzo pasta is a small, rice-shaped pasta. It cooks quickly and has a mild flavor. You can find orzo in many stores, often near other pasta. It is great in salads, soups, and casseroles. In Greek Orzo Pasta Salad, it acts as a hearty base. To make this salad gluten-free, use gluten-free orzo. Many brands offer rice or corn-based options. You can also use quinoa as a substitute. This will keep the salad tasty while being gluten-free. Always check labels for hidden gluten. Yes, you can prepare this salad ahead of time. Make it a few hours or a day before serving. This time allows the flavors to mix well. Just store it in the fridge until you are ready to serve. Give it a quick toss before serving to refresh it. Greek Orzo Pasta Salad pairs well with grilled chicken or fish. It also goes great with lamb or roasted vegetables. For a lighter meal, serve it with a side of fresh fruit. You can even enjoy it on its own as a filling lunch. For the complete recipe, check out Full Recipe. Greek Orzo Pasta Salad brings fresh flavors and easy prep to your table. We explored the key ingredients, cooking methods, and ways to enhance this dish. I shared tips to ensure your salad tastes great. You can even adapt it for different diets! Remember to store leftovers properly and enjoy them later. This dish is fun to make and share anytime. Try these ideas, and you’ll impress everyone with a tasty, healthy salad.](https://juliesdish.com/wp-content/uploads/2025/07/2fd08110-7687-4c4c-9a69-8e728ee04873.webp)
Are you ready to enjoy a burst of fresh flavors? Greek Orzo Pasta Salad is a perfect dish for any
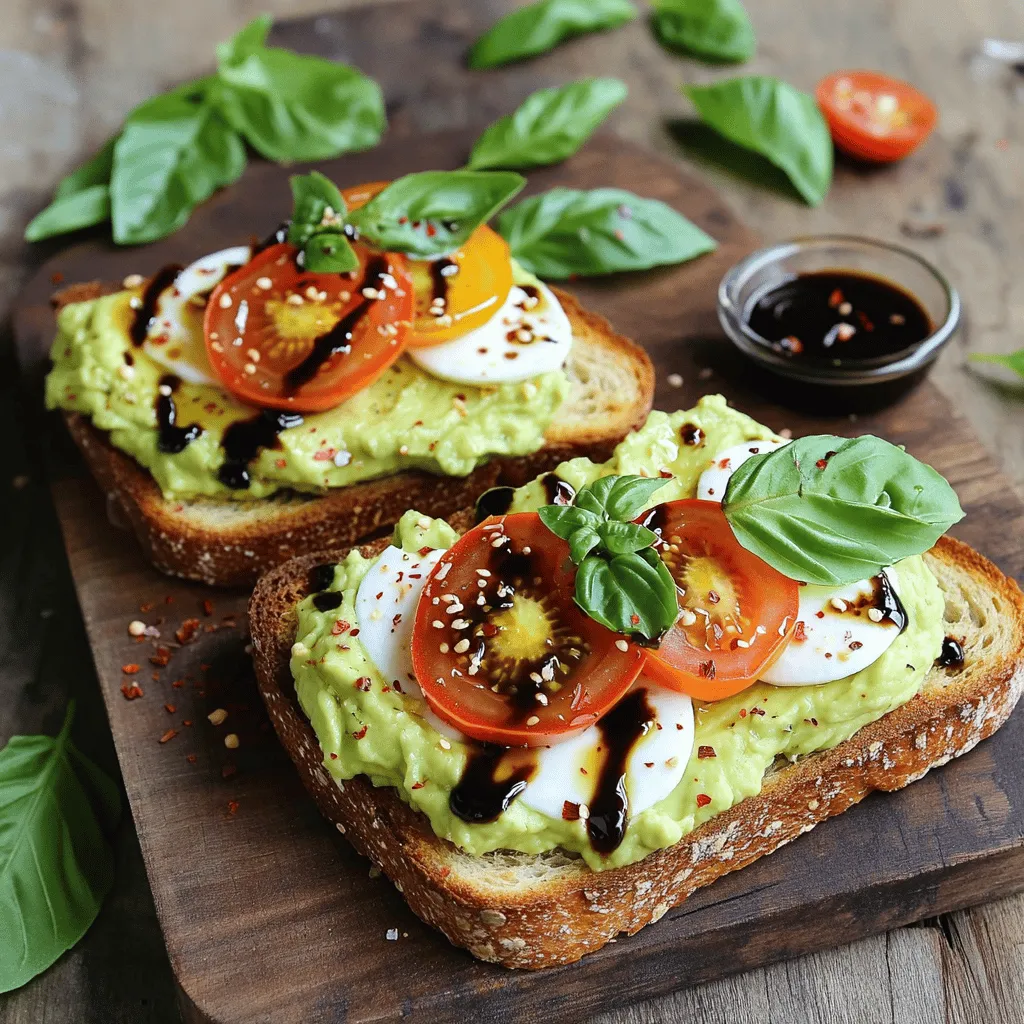
If you’re craving a fresh twist on a classic dish, you’re in for a treat! Caprese Avocado Toast combines creamy

Looking for a healthy snack that actually satisfies? Baked cucumber chips are your answer! Easy to make and full of
![- 2 medium zucchinis, thinly sliced lengthwise - 1 cup ricotta cheese - 1 cup shredded mozzarella cheese - ½ cup grated Parmesan cheese - 1 egg, beaten - 2 cloves garlic, minced - 1 teaspoon dried oregano - Salt and pepper to taste - ½ cup marinara sauce (for dipping) - Fresh basil leaves (for garnish) - Baking dish - Mixing bowls - Kitchen towel - Sharp knife To make Cheesy Zucchini Roll-Ups, you need fresh ingredients and some basic tools. Start with two zucchinis. Slice them thinly. Aim for about ¼ inch thick slices. This thickness helps them roll up easily. Next, gather your cheeses: ricotta, mozzarella, and Parmesan. These cheeses give a creamy and rich flavor. You also need one beaten egg. The egg helps bind the cheese together. Add minced garlic for a nice kick. One teaspoon of dried oregano adds an herbaceous note. Finally, season with salt and pepper to taste. Don't forget about the marinara sauce. This sauce is great for dipping. Fresh basil leaves make a lovely garnish. For tools, grab a baking dish. You will need mixing bowls to combine your cheese mixture. A kitchen towel is helpful for drying the zucchinis. Lastly, use a sharp knife for slicing. With these ingredients and tools, you are ready to create something tasty. For the full recipe, check the details listed above. 1. First, preheat your oven to 400°F (200°C). This step is key for a crispy finish. 2. Next, take the zucchini and slice it lengthwise into thin strips, about ¼ inch thick. 3. Lay the slices on a clean kitchen towel and sprinkle them with salt. Let them sit for about 10 minutes. This helps to draw out excess moisture. 4. After 10 minutes, pat the slices dry with another towel. This keeps your roll-ups from being soggy. 1. In a mixing bowl, combine the ricotta cheese, shredded mozzarella, grated Parmesan, beaten egg, minced garlic, dried oregano, salt, and pepper. 2. Mix these ingredients until they blend well. You want a creamy and tasty filling. 3. Now, take a zucchini slice and place a spoonful of the cheese mixture at one end. 4. Roll the slice tightly, sealing the filling inside. Repeat this for all the slices. 1. Take a greased baking dish and arrange the roll-ups seam side down in it. 2. Bake the roll-ups in the preheated oven for 15-20 minutes. Cook until the cheese is bubbly and the zucchini is tender. 3. Once done, serve hot. You can drizzle some marinara sauce on top and add fresh basil leaves for a nice touch. For the full recipe, check the details earlier. Enjoy your delicious Cheesy Zucchini Roll-Ups! To make the best Cheesy Zucchini Roll-Ups, cut your zucchini slices about ¼ inch thick. This thickness helps the roll-ups stay firm and easy to roll. If the slices are too thin, they may tear. If they are too thick, they won't cook well. To prevent soggy roll-ups, sprinkle salt on the zucchini slices. Let them sit for about 10 minutes. This step draws out excess moisture. Afterward, pat them dry with a towel. This keeps the roll-ups from getting too watery as they bake. To kick up the flavor, consider adding fresh herbs to the cheese mix. Basil or parsley works great. Just chop them finely before mixing them in with the cheese. You can also try different cheeses. If you want a change, use goat cheese or feta instead of ricotta. These options add a tangy flavor and creamy texture. Pair your Cheesy Zucchini Roll-Ups with a simple side salad. A fresh green salad adds a nice crunch. You can also serve them with crusty bread for a filling meal. For gatherings, arrange the roll-ups on a large platter. Drizzle marinara sauce over the top and garnish with basil leaves. This makes for a beautiful presentation that will impress your guests. For the full recipe, check out the [Full Recipe]. {{image_2}} You can change the cheese mix in these roll-ups. Using goat cheese or feta gives a tangy twist. This adds a unique taste that pairs well with zucchini. Just swap out the ricotta for your choice. Adding cream cheese creates a richer filling. It makes the texture creamier and adds more flavor. Cream cheese blends well with herbs and spices. You can also mix in different vegetables for extra color and taste. Spinach adds a fresh flavor and boosts nutrition. Roasted peppers bring a sweet, smoky taste. Simply chop them up and add to the cheese filling. Other options include mushrooms or carrots. These veggies add crunch and make your roll-ups more fun. Feel free to experiment with what you have at home. Spices can take your roll-ups to the next level. Adding red pepper flakes gives a kick. You can also drizzle a bit of hot sauce before baking. Infusing your filling with pesto or sundried tomatoes adds depth. These ingredients enhance the overall flavor. Just mix them in with your cheese for a burst of taste. For the full recipe, check out the complete instructions. After you enjoy your Cheesy Zucchini Roll-Ups, store any leftovers in an airtight container. This keeps them fresh. Place a layer of paper towel in the container to absorb any moisture. You can reheat these roll-ups easily. Preheat your oven to 350°F (175°C). Place the roll-ups on a baking tray and cover them with foil. Bake for about 10-15 minutes until warm. Yes, you can freeze Cheesy Zucchini Roll-Ups! First, let them cool completely. Then, place them in a single layer on a baking sheet. Freeze until firm, about 1-2 hours. Once frozen, transfer the roll-ups to a freezer-safe bag. Squeeze out as much air as possible before sealing. They can last up to three months in the freezer. Cheesy Zucchini Roll-Ups last about 3-5 days in the fridge. Always check for signs of spoilage before eating. If you see any mold or if they smell bad, throw them away. Freshness is key for the best taste! Can I make Cheesy Zucchini Roll-Ups ahead of time? Yes, you can prepare these roll-ups ahead of time. Simply follow the recipe up to the baking step. Store them in the fridge for up to 24 hours. When you are ready, bake them as directed. This saves time during busy weeknights or special dinners. What to substitute for zucchini if allergies exist? If you have a zucchini allergy, you can use eggplant or thinly sliced yellow squash. Both can roll nicely and hold the cheese filling well. These options provide a similar texture and flavor. You might also try thin slices of bell pepper for a crunchy twist. How do I make healthier versions of this recipe? To make a healthier version, consider these swaps: - Use low-fat ricotta and mozzarella cheese. - Add spinach or kale to the cheese filling for extra nutrients. - Replace the marinara sauce with a homemade, low-sugar tomato sauce. These changes keep the dish tasty while lowering calories and fat. You can enjoy a guilt-free treat! For more details and to explore the recipe, check the Full Recipe. Cheesy Zucchini Roll-Ups are easy and fun to make. This dish uses fresh zucchini and a mix of delicious cheeses. You can customize it to fit your tastes by adding herbs or using different veggies. Storing leftovers is simple, too. Whether you want a quick meal or a starter for a gathering, these roll-ups are ideal. Try them out and enjoy the flavors they bring! You won’t be disappointed.](https://juliesdish.com/wp-content/uploads/2025/07/aaa397a0-723d-455b-94ae-2e4eca5c2787.webp)
Craving a dish that’s both cheesy and packed with veggies? Cheesy Zucchini Roll-Ups are the answer! This easy recipe combines
![- 1 cup rolled oats - 2 cups almond milk - 1 ripe peach, diced - 1/4 cup almond butter - 2 tablespoons honey or maple syrup - 1/4 teaspoon cinnamon - 1 tablespoon chia seeds - 1/4 teaspoon vanilla extract - Sliced almonds for topping - Additional peach slices for garnish For the perfect Peach Almond Overnight Oats, you need a few simple ingredients. Each one plays a key role in flavor and nutrition. Rolled oats are the base. They provide fiber and help you feel full. Almond milk makes this dish creamy and rich. It’s a great dairy-free choice. The ripe peach adds sweetness and fresh flavor. Choose a peach that is firm but slightly soft. Almond butter gives healthy fats and a nutty taste. It also boosts the creaminess of your oats. You can use honey or maple syrup as sweeteners. Adjust the amount based on your taste. Cinnamon adds warmth and depth to the dish. Chia seeds are tiny but mighty. They provide protein and omega-3 fatty acids. A touch of vanilla extract enhances the sweetness and flavor. Finally, you can garnish with sliced almonds and peach slices for a pretty finish. These ingredients come together to create a tasty and nutritious meal. Check out the Full Recipe for all the steps! To make Peach Almond Overnight Oats, start by mixing the ingredients in a bowl. You will need: - 1 cup rolled oats - 2 cups almond milk - 1 ripe peach, diced - 1/4 cup almond butter - 2 tablespoons honey or maple syrup - 1/4 teaspoon cinnamon - 1 tablespoon chia seeds - 1/4 teaspoon vanilla extract In a medium bowl, combine the rolled oats, almond milk, chia seeds, cinnamon, and vanilla extract. Stir until everything is well mixed. Next, add the diced peach and almond butter. Make sure they are evenly spread throughout the mixture. Sweeten your mixture with honey or maple syrup, based on your taste. Cover the bowl with plastic wrap or put the mixture into jars with lids. Refrigerate the oats for at least four hours or overnight. This helps the oats absorb the liquid and become soft. When you are ready to serve, stir the oats again. If they feel too thick, add a splash of almond milk to loosen them up. Serve the Peach Almond Overnight Oats in bowls or jars. Top each serving with sliced almonds and extra peach slices for a tasty garnish. - Prep time: 10 minutes - Total time: 4 hours (or overnight) - Servings: 2 These oats make a great breakfast or snack. Enjoy the delicious and nutritious flavors! For the complete recipe, check [Full Recipe]. To make your oats creamy, use rolled oats. They soak up milk better than quick oats. Mix your oats with almond milk and let them sit overnight. This helps them soften. If you want more sweetness, add honey or maple syrup. Start with a small amount. You can always add more later. Avoid over-soaking your oats. If you let them sit too long, they can become mushy. Stick to soaking overnight or four hours. Also, choose the right type of oats. Rolled oats work best for this recipe. Instant oats may turn too gooey. To add spice, try cinnamon or nutmeg. These give a warm flavor. You can also mix in some cardamom for a unique twist. For texture and crunch, add sliced almonds or walnuts. They pair well with the peach flavor and add a nice bite. Don't forget to check the Full Recipe for more ideas! {{image_2}} You can easily switch up the fruit in your overnight oats. If you love berries, add strawberries or blueberries. Bananas also work great. You can even mix different fruits for fun flavors. Seasonal fruits are a smart choice too. In summer, use ripe peaches. In fall, try apples or pears. This keeps your breakfast fresh and exciting. While almond butter is delicious, you can try other nut butters. Peanut butter adds a rich taste, while cashew butter is creamier. When picking nut butters, check the label. Look for options without added sugars or oils. This choice helps you enjoy the health benefits without extra calories. If you want a dairy-free option, choose non-dairy milk. Almond milk is great, but oat milk or coconut milk also works well. For sweetness, use maple syrup or agave nectar. These vegan-friendly sweeteners add flavor without dairy. They make your Peach Almond Overnight Oats both tasty and accessible for everyone. For the Full Recipe, you can refer back to the main article. To keep your Peach Almond Overnight Oats fresh, choose the right container. I recommend using glass jars or airtight containers. Glass jars are great because they are easy to clean and do not retain odors. An airtight container helps keep moisture in, which prevents your oats from drying out. In the fridge, your overnight oats can last up to five days. Keep an eye on them after the first few days. If you notice any off smell or mold, it’s best to toss them. Freshness is key, so enjoy them while they are still tasty! Making a batch of Peach Almond Overnight Oats for the week is smart and easy. Just prepare several jars at once. You can also freeze them if you want to store them longer. To do this, fill your jars but leave a little space at the top. This gives the oats room to expand as they freeze. When you’re ready to eat, just thaw them in the fridge overnight. For the full recipe, check out the detailed instructions above. The best time to prepare overnight oats is in the evening. Spend about 10 minutes mixing everything together. Then, let the oats soak overnight for at least 4 hours. This soaking time helps the oats absorb the liquid and become soft. Yes, you can use other types of milk. Cow's milk, soy milk, or oat milk all work well. Each type of milk changes the taste and texture a bit. Almond milk gives a nutty flavor, while cow's milk adds creaminess. To make your overnight oats more filling, add protein-rich ingredients. Consider mixing in yogurt or nuts. Greek yogurt adds creaminess and protein. Nuts like almonds or walnuts also boost protein and add a crunchy texture. You can use steel-cut oats, but the texture will be different. Steel-cut oats take longer to soften. If you use them, soak them for at least 8 hours. They will have a chewier bite compared to rolled oats, which are softer and creamier. Peach Almond Overnight Oats offer a tasty and easy breakfast option. We discussed simple ingredients like oats, almond milk, and peaches that pack a nutritional punch. I shared tips for making perfect oats and avoiding common mistakes, so you can enjoy creamy, tasty results. Remember, you can customize with different fruits and nut butters. Store your oats correctly and they’ll last for days. Enjoy this healthy meal that fits your busy life and boosts your day!](https://juliesdish.com/wp-content/uploads/2025/07/c78ab85a-dbda-4d38-a612-523d45799a73.webp)
Are you ready to kickstart your mornings with a tasty and healthy option? Peach Almond Overnight Oats are not just
