Skip to content
DisclaimerTerms Of UseGDPR PolicyCookie Policy

juliesdish

  • Home
  • Drinks
  • Appetizers
  • Dinner
  • Dessert
  • About
  • Contact
  • Privacy Policy
DisclaimerTerms Of UseGDPR PolicyCookie Policy

NO-ING-IMG

- 1 pound large shrimp, peeled and deveined - 3 tablespoons olive oil - 3 cloves garlic, minced Lemon garlic shrimp skewers shine with fresh flavors. The shrimp brings sweetness, while garlic adds a bold punch. Olive oil gives it a lovely, rich base. - Zest and juice of 2 lemons - 1 teaspoon red pepper flakes (optional) - Salt and pepper to taste The zest and juice of lemons brighten the dish. They add a tangy kick that makes each bite refreshing. Red pepper flakes bring heat. You can skip them if you prefer mild flavors. Salt and pepper help balance all the tastes. - Wooden or metal skewers (instructions for prepping wooden skewers) - Fresh parsley for garnish For skewers, you can choose wood or metal. If you use wooden skewers, soak them in water for 30 minutes. This step prevents burning on the grill. Fresh parsley adds a pop of color and taste. It brightens the dish and makes it look more inviting. For the full recipe, check out the Lemon Garlic Shrimp Skewers recipe. First, I mix the olive oil, minced garlic, lemon zest, and lemon juice in a medium bowl. This mix becomes the heart of the dish. Next, I add red pepper flakes, salt, and pepper. This blend brings a warm kick that pairs well with the shrimp's natural flavor. Now, I coat the shrimp in the marinade. I make sure each piece gets a good cover. Then, I place the shrimp in the fridge. I recommend letting them marinate for 30 minutes to 1 hour. This time allows the flavors to soak in, making the shrimp very tasty. Next, I prepare the grill. I preheat it on medium-high heat. I use wooden skewers, so I soak them in water for 30 minutes. This step prevents them from burning. Then, I thread the marinated shrimp onto the skewers, about 4 to 5 shrimp per skewer. Once the grill is ready, I place the skewers on it. I cook the shrimp for 2 to 3 minutes on each side. I watch them closely. They turn pink and opaque when done. After grilling, I let them rest for a couple of minutes. Finally, I garnish with fresh parsley before serving. For more details, check out the Full Recipe. To get those great grill marks, heat your grill to medium-high. This gives the shrimp a nice sear. Place the skewers on the grill and let them cook. Flip them after 2 to 3 minutes. This timing helps create those beautiful grill lines. To keep shrimp tender, avoid overcooking. Shrimp cook fast, so watch them closely. They turn pink and opaque when done. This usually takes about 2 to 3 minutes per side. Remove them from the heat as soon as they are ready. Pair your lemon garlic shrimp skewers with fresh salads or garlic bread. A cool dip, like tzatziki, can add a nice touch. For plating, arrange the skewers on a large platter. A sprinkle of fresh parsley on top makes it look fancy. Serve with lemon wedges to enhance the flavor. You can find the full recipe above for more details. {{image_2}} You can change up the flavors in many ways. Citrus fruits, like lime or orange, can add zest. Fresh herbs, such as basil or cilantro, provide depth. You can also adjust the spice level. Add more red pepper flakes for heat or leave them out for a milder taste. Don't be afraid to experiment! If you can't grill, don’t worry! You can bake lemon garlic shrimp skewers in the oven. Preheat your oven to 400°F (200°C). Place the skewers on a baking sheet lined with foil. Bake for about 10-12 minutes. This method gives a nice, roasted flavor too. Another option is stovetop cooking. Heat a grill pan over medium-high heat. Cook the shrimp skewers for 2-3 minutes on each side. This works well when you want that grilled taste indoors. Lemon garlic shrimp skewers are great in salads or pasta dishes. Toss them into a fresh salad with greens and a light dressing. You can also add them to pasta, making a delightful, quick meal. Serving with rice or quinoa is another tasty option. The shrimp pairs well with these grains. They soak up the lemony garlic flavors, making each bite a delight. For a complete meal, try using the [Full Recipe] for perfect results. To keep your Lemon Garlic Shrimp Skewers fresh, store leftovers in the fridge. Place them in an airtight container. This method helps maintain flavor and texture. Try to eat them within two days for the best taste. When you are ready to enjoy your leftovers, reheating is key. The best way to warm shrimp is in a skillet. Heat it over medium-low heat and add a splash of olive oil. This method helps keep the shrimp moist. Avoid the microwave, as it can make shrimp rubbery. If you want to freeze your skewers, wrap them tightly in plastic wrap. Then, place them in a zip-top freezer bag. This prevents freezer burn. For best results, use them within three months. When you're ready to eat, thaw them in the fridge overnight. This ensures even thawing and keeps the shrimp tasty. I recommend using large shrimp, around 16 to 20 per pound. This size holds up well on the grill. Look for shrimp that are fresh, firm, and have a slight sea smell. If you can, choose wild-caught shrimp for better taste and quality. Yes, you can use frozen shrimp. Just make sure to thaw them first. To do this, place the shrimp in a bowl of cold water for about 15 to 20 minutes. Change the water halfway through. Once thawed, pat them dry with a paper towel before marinating. Cooked shrimp turn pink and opaque. They should curl into a C shape. If they curl into an O shape, they might be overcooked. Typically, shrimp take about 2 to 3 minutes per side on the grill. Yes, you can make the marinade a day ahead. Just store it in an airtight container in the fridge. When you are ready to use it, give it a quick stir before adding your shrimp. This helps keep the flavors fresh. Lemon garlic shrimp skewers are easy, tasty, and fun to make. With fresh shrimp, a zesty marinade, and simple grilling tips, you can create a delicious dish for any occasion. Remember to avoid overcooking the shrimp for the best results. You can also try different flavors or cooking methods to suit your taste. Enjoy your meal with great sides and garnishes. These skewers are perfect for sharing and impressing your friends and family. Happy grilling!

Lemon Garlic Shrimp Skewers Flavorful Grilled Delight

Get ready to fire up your grill! These Lemon Garlic Shrimp Skewers are a quick, tasty delight that will impress

To make delicious Pepperoni Pizza Quesadillas, gather these ingredients: - 4 large flour tortillas - 1 cup shredded mozzarella cheese - 1 cup sliced pepperoni - 1/2 cup marinara sauce (for dipping) - 1/2 cup sliced bell peppers (any color) - 1/4 cup sliced black olives - 1 tablespoon Italian seasoning - Olive oil (for cooking) - Fresh basil leaves (for garnish, optional) These ingredients create a tasty twist on classic pizza. You can adjust the toppings based on your taste. Want more veggies? Add mushrooms or spinach. Prefer a different cheese? Try cheddar or provolone. The key is to have fun and be creative. The full recipe will guide you through each step to make these quesadillas perfect every time. 1. Preheat the skillet: Start by heating a large skillet on medium heat. Add a small drizzle of olive oil to coat the bottom. 2. Assemble the quesadilla layers: Place one large flour tortilla in the skillet. Sprinkle half of the shredded mozzarella cheese evenly over it. Next, add half of the sliced pepperoni, bell peppers, and black olives. Sprinkle the Italian seasoning on top. Finish this layer with another portion of mozzarella cheese and cover with a second tortilla. 3. Cook the quesadilla until golden brown: Let it cook for about 3-4 minutes. Check the bottom; it should be golden brown, and the cheese should start melting. - How to flip the quesadilla safely: Use a wide spatula to slide under the quesadilla. Hold the skillet with one hand. Gently lift the quesadilla and flip it over quickly. - Ensuring a crispy texture: Cook the quesadilla on medium heat. This helps it brown evenly without burning. If you want extra crispiness, you can press down gently with the spatula while it cooks. - Pairing with marinara sauce: Serve your quesadillas warm with marinara sauce on the side. It adds a nice tangy flavor that complements the richness of the cheese and pepperoni. - Ideas for side dishes: Consider a fresh salad or some veggie sticks as a side. These can balance the richness of the quesadillas and make a complete meal. For the full recipe, including cooking times and serving sizes, please refer to the Full Recipe section. To make the best pepperoni pizza quesadillas, focus on cheese melting. Use a mix of mozzarella and provolone for a richer taste. Grate your cheese instead of using pre-shredded. Freshly grated cheese melts better. You can also adjust your ingredients based on your taste. Want more spice? Add red pepper flakes. Prefer veggies? Use more bell peppers or mushrooms. The key is to find what you love. A common mistake is not preheating the skillet. Always heat it first to get a nice crisp. If your skillet is cold, the quesadillas will steam instead of crisp. Another mistake is overloading the quesadilla. Too many toppings can make it hard to flip. Stick to a balanced amount of cheese and toppings for the best results. Keeping it simple helps your quesadilla cook evenly. {{image_2}} You can switch up the cheese for a different taste. Try cheddar or pepper jack for extra flavor. Both melt well and add a fun twist. If you want to replace the pepperoni, consider using turkey pepperoni. You can also try cooked sausage or diced chicken for a different protein. For a vegetarian option, use sautéed mushrooms or zucchini. To make these quesadillas vegetarian, skip the pepperoni. Load them with more veggies like spinach or artichokes. You can also add some beans for protein. If you need a gluten-free option, use corn tortillas instead of flour ones. They hold up well and still taste great. Spice things up! Add red pepper flakes or a dash of hot sauce for heat. You can mix spices like chili powder or cumin to the cheese for a unique flavor. Don’t forget to combine with other toppings too! Try adding fresh herbs like oregano or even some jalapeños for extra zing. These little changes can make your quesadillas exciting and full of flavor. For the full recipe, visit the recipe section above. To keep your Pepperoni Pizza Quesadillas fresh, place them in an airtight container. This method helps seal in moisture and flavor. You can also wrap each quesadilla in plastic wrap or foil. This extra layer protects them from drying out. Store them in the fridge for up to three days. For best results, let them cool to room temperature before storing. When it's time to enjoy leftovers, reheating is key. The best method is to use a skillet. Heat the skillet over medium heat, then add the quesadilla. Cook for about two to three minutes on each side. This keeps the quesadilla crispy. You can also use an oven. Set it to 350°F and place the quesadilla on a baking sheet. Bake for about ten minutes. This method warms it evenly and melts the cheese. Pepperoni pizza quesadillas last about 3 to 4 days in the fridge. Store them in an airtight container. This keeps them fresh and tasty. Yes, you can make these quesadillas in advance. Cook them and let them cool. Then, wrap them well and store them in the fridge. When you are ready, just reheat them in a skillet. You can serve quesadillas with various sides. Great options include: - Marinara sauce for dipping - Fresh salad - Guacamole - Sour cream Yes, you can freeze them. Make sure they cool completely before wrapping them tightly. Use freezer-safe bags or containers. They can last for about 2 months in the freezer. The best way to cut quesadillas is to use a sharp knife or pizza cutter. Cut them into wedges. This makes them easy to share and eat. Enjoy the full recipe to learn how to make these tasty treats! You learned how to make delicious Pepperoni Pizza Quesadillas. Each step guides you from prep to cooking. I shared expert tips to help you avoid mistakes and get the best flavor. Remember to personalize your quesadillas with different cheeses or veggies. These recipes are easy and fun, perfect for family meals or snacks. Enjoy experimenting with variations and side dishes. With this knowledge, you can make tasty quesadillas any time. Happy cooking!

Pepperoni Pizza Quesadillas Quick and Tasty Meal

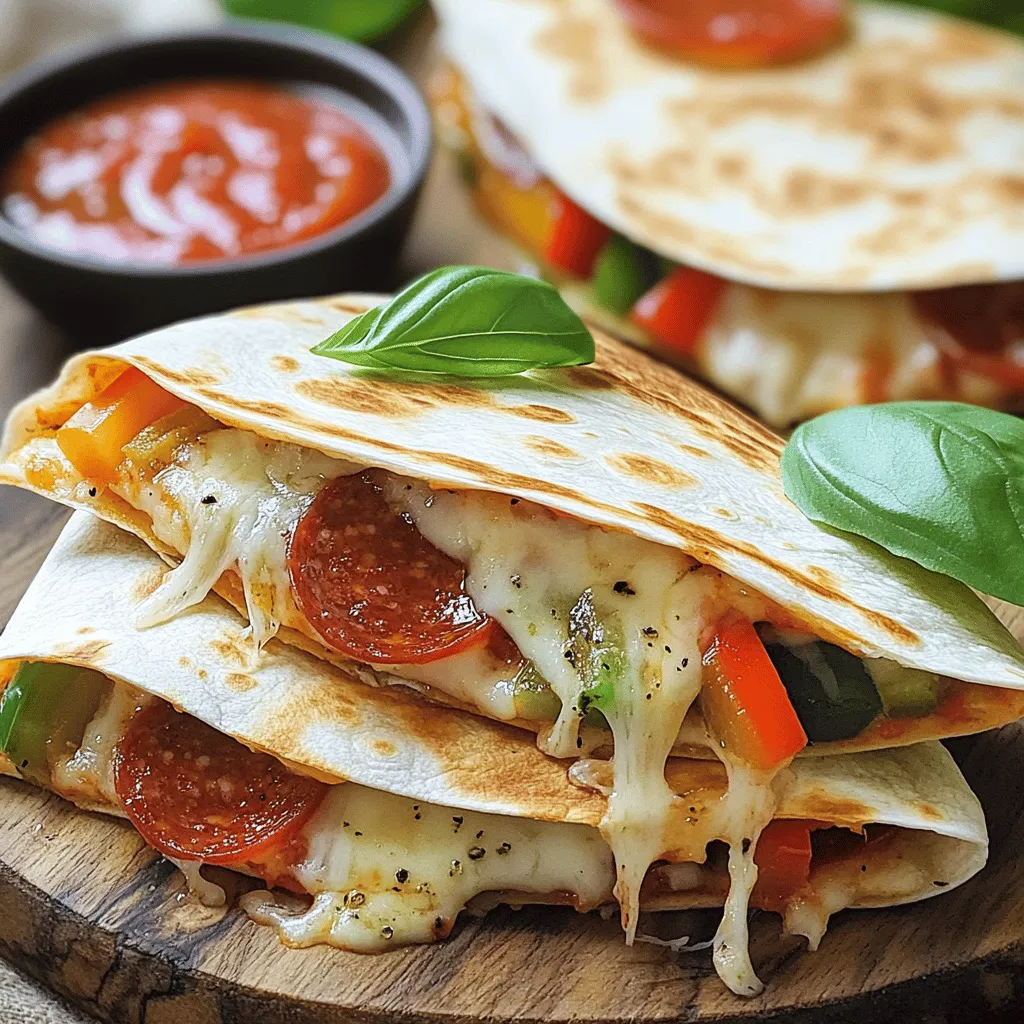
Are you craving a quick and tasty meal? Look no further than Pepperoni Pizza Quesadillas! With simple ingredients and easy

- 1 cup cream cheese - 1 cup pumpkin puree - ½ cup powdered sugar - 1 teaspoon vanilla extract - 1 teaspoon ground cinnamon - ½ teaspoon ground nutmeg - ½ teaspoon ground ginger - 1 cup whipped topping - Graham crackers for dipping - Apple slices for dipping - Pretzels for dipping To make pumpkin cheesecake dip, start with cream cheese. I use one cup of softened cream cheese for that smooth texture. Next, add one cup of pumpkin puree. You can use canned or fresh pumpkin; both work well. Then, mix in half a cup of powdered sugar. This adds sweetness to balance the flavors. For a hint of flavor, include one teaspoon of vanilla extract. Ground spices also bring depth. Use one teaspoon of ground cinnamon, half a teaspoon of ground nutmeg, and half a teaspoon of ground ginger. These spices give the dip a cozy fall taste. Finally, fold in one cup of whipped topping. This makes the dip light and fluffy. Now it's time to think about what to dip! Graham crackers, apple slices, or pretzels all pair nicely. Each option adds a fun crunch to the creamy dip. You can find the full recipe for more details. Enjoy creating this simple yet delicious treat! 1. Mixing the base ingredients Start by taking a mixing bowl. Beat 1 cup of softened cream cheese with an electric mixer. Mix until it is smooth and creamy. This step is key for a rich dip. 2. Incorporating spices and flavorings Next, add 1 cup of pumpkin puree and ½ cup of powdered sugar to the cream cheese. Continue to mix until everything is well combined. Then, stir in 1 teaspoon of vanilla extract, 1 teaspoon of ground cinnamon, ½ teaspoon of ground nutmeg, and ½ teaspoon of ground ginger. Mix until the dip is smooth and all flavors blend well. 3. Folding in whipped topping Now, gently fold in 1 cup of whipped topping, like Cool Whip. Be careful not to deflate it too much. This step makes the dip light and fluffy. 4. Chilling the dip Transfer the dip into a serving bowl. Refrigerate for at least 30 minutes. This chilling time helps the flavors meld together and improves taste. - Best ways to serve pumpkin cheesecake dip Serve it in a decorative bowl. Surround it with graham crackers, apple slices, and pretzels for dipping. - Creative plating ideas You can also add a few pumpkin spice cookies on the side. This adds a nice touch and gives extra options for your guests. - Portion sizes for gatherings This recipe serves 6 to 8 people. Adjust the amount based on your gathering. Make more if you know your guests love it! For the full recipe, check the earlier section. Enjoy every bite of this creamy and simple delight! To get a smooth dip, start with softened cream cheese. Cold cream cheese makes mixing hard. Beat it alone first until fluffy. Then, add the pumpkin puree and powdered sugar. Mix until there are no lumps. This step is key for a creamy texture. Chilling your dip is also important. Let it sit in the fridge for at least 30 minutes. This time allows the flavors to blend. A cold dip tastes fresh and delicious. If you skip this, the taste might not be as good. To boost the flavor, consider adding more spices. Try a pinch of allspice or cloves for depth. You can also use a little maple syrup for a unique twist. This makes the dip taste even better. Adjusting the sweetness is easy too. If you like it sweeter, add more powdered sugar. Taste as you go. This way, you can find the right balance. {{image_2}} Pumpkin cheesecake dip is fun to customize. You can play with flavors and textures. Here are some tasty ideas. - Chocolate pumpkin cheesecake dip: Add a half cup of cocoa powder to the mix. This creates a rich, chocolatey twist. The blend of chocolate and pumpkin is a match made in heaven. It gives a new depth to the dip that is hard to resist. - Nutty variations with pecans or walnuts: Toss in a half cup of chopped nuts. Pecans add a sweet crunch, while walnuts bring a bit of bitterness. You can mix them in or sprinkle them on top for garnish. This adds a delightful texture and a nutty flavor that pairs well with the creamy dip. - Gluten-free and dairy-free alternatives: For a gluten-free dip, use gluten-free graham crackers. To make it dairy-free, swap regular cream cheese for a plant-based version. You can also use coconut cream for a creamy texture. Pumpkin puree is naturally dairy-free, so no worries there! - Lower sugar substitutions: If you're looking to cut down on sugar, try using a sugar substitute. Stevia or monk fruit sweetener works great. You can also reduce the amount of powdered sugar. Remember, taste as you go to find your perfect balance. These variations help to craft a pumpkin cheesecake dip that suits your taste and dietary needs. For the full recipe, check out the earlier sections! To keep your pumpkin cheesecake dip fresh, use an airtight container. Glass or plastic containers work well. These containers keep air out and prevent spoilage. If you have a lot leftover, separate it into smaller portions for easy access. You should refrigerate the dip for short-term storage. This keeps it safe to eat for a few days. If you want to store it longer, consider freezing. The dip can freeze well for about a month. Just remember to thaw it in the fridge before serving. In the refrigerator, your pumpkin cheesecake dip stays fresh for about 3 to 5 days. Check for signs of spoilage if it sits longer. Look for any changes in color or texture. If the dip smells off or has mold, it’s best to throw it away. Trust your senses. If it doesn’t look or smell right, don’t eat it. Keeping an eye on these signs helps you enjoy your tasty dip at its best! For the full recipe, check out the details above. How do I make pumpkin cheesecake dip thicker? To thicken your dip, add more cream cheese. You can also use less whipped topping. Another trick is to chill the dip longer. This helps it set up nicely. Can I use fresh pumpkin instead of canned? Yes, you can use fresh pumpkin. Just cook and puree it first. Make sure it is smooth. Canned pumpkin is easy, but fresh can taste great too. What can I serve with pumpkin cheesecake dip? Graham crackers are a classic choice. You can also use apple slices or pretzels. These pair well with the sweet and creamy dip. How long can I keep leftovers? Store leftovers in the fridge for about three days. Make sure to cover it well. If it smells or looks off, it’s best to toss it. Is pumpkin cheesecake dip suitable for vegan diets? This dip is not vegan as it contains cream cheese and whipped topping. You can use vegan cream cheese and coconut whipped cream to make it vegan-friendly. Can I make this dip in advance? Absolutely! You can prepare it a day ahead. Just store it in the fridge. This gives the flavors more time to blend. What are some easy variations to try? Try adding chocolate chips for a fun twist. You can also mix in nuts for some crunch. Another idea is to add a splash of maple syrup for extra sweetness. This blog post covered how to make a tasty pumpkin cheesecake dip. You learned about key ingredients, steps, and serving ideas. I shared tips for a smooth dip and fun variations you can try. Remember, you can adjust sweetness and use different flavors. Store leftovers properly to keep them fresh. With all this knowledge, you can impress your friends at your next gathering. Enjoy making and sharing this delicious dip!

Pumpkin Cheesecake Dip Creamy and Simple Delight

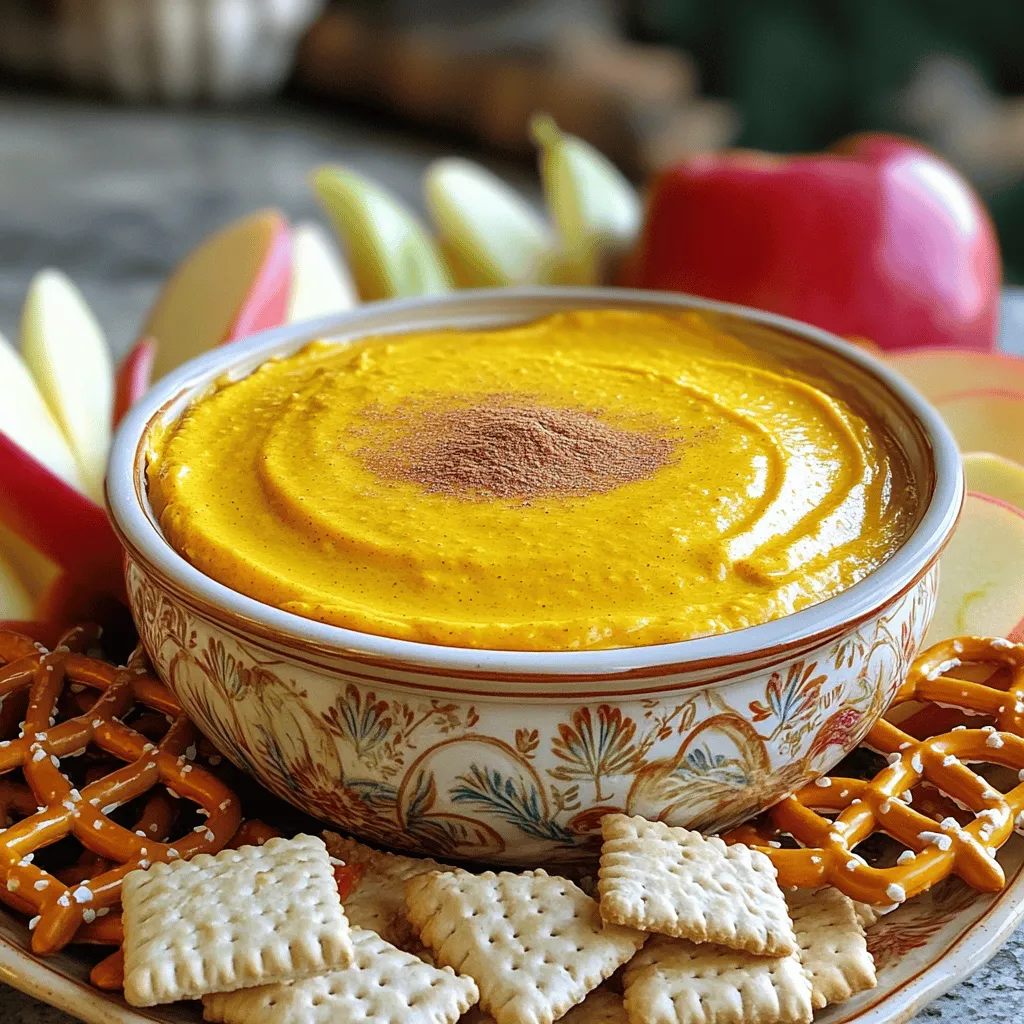
Are you ready to dive into a creamy and simple delight? This Pumpkin Cheesecake Dip is easy to make and

- 2 pounds chicken wings - 1/2 cup honey - 1/4 cup soy sauce - 4 cloves garlic, minced - 1 tablespoon fresh ginger, grated - 1 teaspoon sesame oil - 1 tablespoon rice vinegar - 1 teaspoon chili flakes - Salt and pepper to taste To make sticky honey garlic wings, you need simple yet powerful ingredients. The chicken wings form the base of the dish. For sweetness, honey adds a rich flavor. The soy sauce brings a salty note that balances the sweetness. Next, the flavor enhancers take the wings to a new level. Garlic gives a nice kick, while fresh ginger adds warmth and zest. The sesame oil rounds it all out. This mix creates a sticky glaze that makes your wings shine. You can also add optional ingredients for extra flavor. Rice vinegar brightens the taste, while chili flakes can add heat. Salt and pepper help enhance all the flavors. These ingredients come together in the full recipe to create a dish that's hard to resist. Each bite offers a delightful blend of sweet, salty, and savory, making every wing a treat. To start, grab a mixing bowl. In that bowl, whisk together: - 1/2 cup honey - 1/4 cup soy sauce - 4 cloves garlic, minced - 1 tablespoon fresh ginger, grated - 1 tablespoon rice vinegar - 1 teaspoon sesame oil - Chili flakes (optional for heat) - A pinch of salt and pepper This mix creates a sweet and savory marinade. The honey adds stickiness, while the soy sauce brings depth. Garlic and ginger add a fresh kick. Next, take 2 pounds of chicken wings. Place them in a large resealable bag or a shallow dish. Pour the marinade over the wings. Make sure they are well-coated. Seal the bag or cover the dish tightly. Refrigerate for at least 1 hour. For the best flavor, let them marinate overnight. Now, it’s time to bake. Preheat your oven to 400°F (200°C). Line a baking sheet with foil. Place a wire rack on top of the baking sheet for even cooking. Remove the wings from the marinade. Let any excess marinade drip off. Arrange the wings on the wire rack, leaving space between each wing. Bake for 40-45 minutes. Turn the wings halfway through for even crispiness. The last 10 minutes of baking is key. Drizzle some leftover marinade over the wings to enhance the stickiness. This extra glaze allows the wings to caramelize, making them even more delicious. You can check out the Full Recipe for more details! To make your wings super sticky, use the marinade glaze in the last few minutes of baking. This helps caramelize the sauce and gives the wings that shiny, mouth-watering look. Just drizzle it over the wings and let them bake for about ten more minutes. This step is key for achieving that irresistible sticky finish that everyone loves. I recommend using a wire rack when you bake the wings. This allows hot air to circulate around them, making them crispy all over. Be sure to turn the wings halfway through baking. This way, you get even cooking and a nice golden color. It only takes a minute and makes a big difference in how they turn out. For a great presentation, serve the wings on a large platter. You can use fresh lettuce or parsley as a base to add color. To make your meal even better, consider making a dipping sauce from the leftover marinade. Just simmer it in a saucepan until it thickens. This adds extra flavor and makes your dish look professional. Check the full recipe for more details! {{image_2}} To make your wings hot, add more chili flakes or hot sauce. Start with a teaspoon of chili flakes. If you want more heat, increase it to two teaspoons. For a spicy kick, mix in your favorite hot sauce. This adds depth and flavor to the sauce. You can adjust the spice level based on your taste. Remember, it’s easy to add heat, but hard to take it away! Grilling wings gives them a smoky flavor. Preheat your grill to medium heat. Cook the wings for about 20-30 minutes, turning often. This method adds a nice char and crispness. If you prefer a healthier option, try air frying. Set your air fryer to 400°F (200°C). Cook the wings for 25-30 minutes, shaking the basket halfway through. Both methods yield tasty, crispy wings! If you're gluten-free, use tamari instead of soy sauce. Honey adds sweetness, but you can swap it for agave syrup or maple syrup. These options bring their own unique flavors. If you're avoiding sugar, try using coconut sugar or a sugar substitute. Be mindful of the taste; each swap can change the final flavor. Always taste as you go for the best results. Check out the Full Recipe for more guidance! To keep your sticky honey garlic wings fresh, place them in an airtight container. Make sure they cool down before sealing them. Store them in the refrigerator for up to three days. If you want to keep them longer, consider freezing. For freezing, wrap the wings tightly in plastic wrap or aluminum foil. Place them in a freezer-safe bag, removing as much air as you can. They can last up to three months in the freezer. When you are ready to eat them, thaw them in the fridge overnight before reheating. To reheat your wings while keeping them crispy, use the oven. Preheat it to 375°F (190°C). Place the wings on a baking sheet and heat for about 15-20 minutes, flipping them halfway. This method helps restore the crunch. You can also use an air fryer for a quicker option, heating them for about 10 minutes at 375°F (190°C). I suggest marinating the chicken wings for at least one hour. This time allows the wings to soak up the flavors well. For the best taste, marinate them overnight. The longer they sit in the marinade, the more delicious they become. Yes, you can use frozen chicken wings. If you do, make sure to thaw them first. Cooking frozen wings without thawing will make them unevenly cooked. Thawing helps the wings absorb the marinade better, leading to a tastier dish. There are many great sides to pair with honey garlic wings. Here are a few ideas: - Fresh vegetable sticks like carrots and celery. - A simple green salad with a light dressing. - Crispy fries or sweet potato fries for a fun twist. - Dips like ranch or blue cheese dressing enhance the meal. For the full recipe, check out the Sticky Honey Garlic Wings section! In this post, we explored making delicious honey garlic chicken wings. You learned about key ingredients like chicken, honey, and garlic. We provided step-by-step instructions for marinating, baking, and serving these wings. Tips on achieving stickiness and ideas for variations added extra value. Now you have all the tools to create tasty wings. Enjoy experimenting with flavors and cooking methods. Homemade wings can be a hit at your next gathering. With practice, your skills will shine. Happy cooking!

Sticky Honey Garlic Wings Irresistible Flavor Recipe

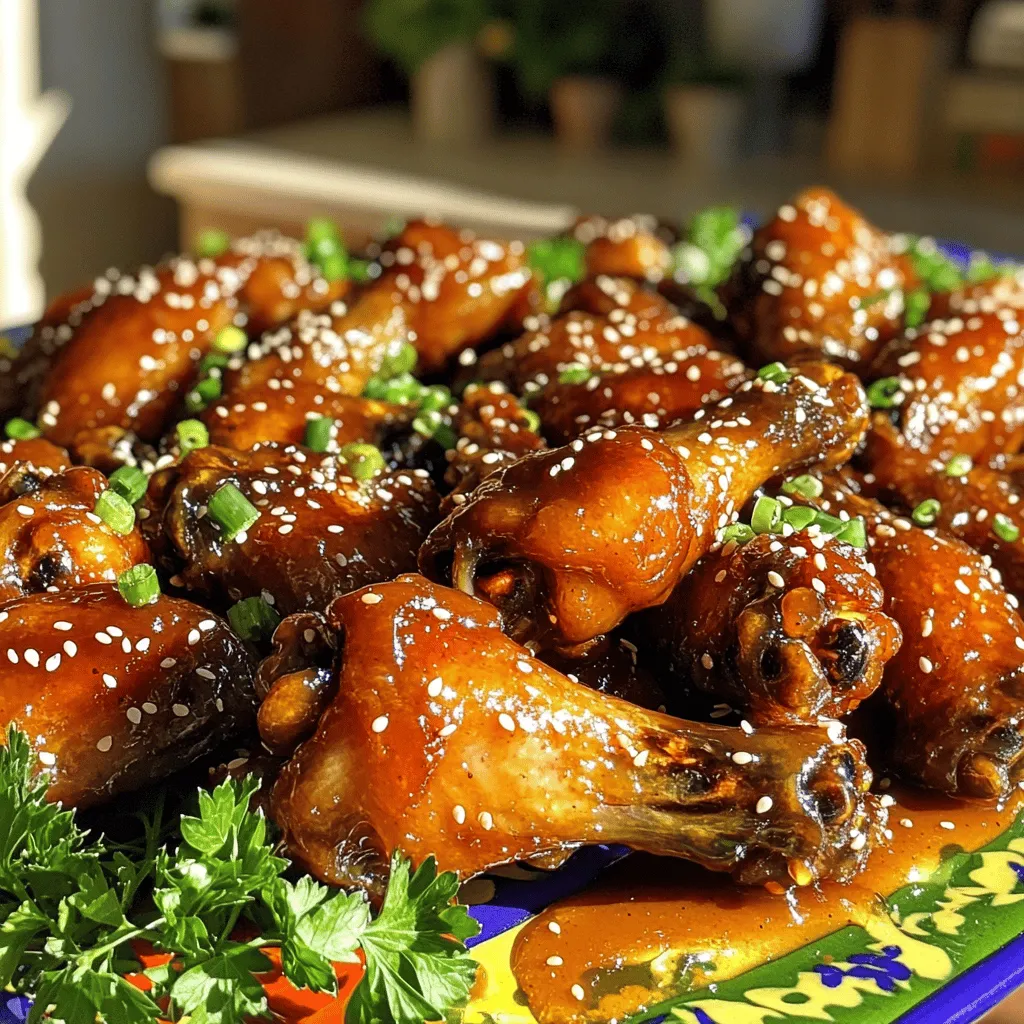
Dive into the world of flavor with my Sticky Honey Garlic Wings recipe! These wings are a mouthwatering blend of

To make a Mason Jar Greek Salad, you need fresh and simple ingredients. Here’s what you will need: - 1 cup cherry tomatoes, halved - 1 cucumber, diced - 1 red bell pepper, diced - 1 cup Kalamata olives, pitted and halved - 1 cup feta cheese, crumbled - 1/4 red onion, thinly sliced - 1/4 cup fresh parsley, chopped - 1/4 cup olive oil - 2 tablespoons red wine vinegar (or lemon juice for a twist) - 1 teaspoon dried oregano - Salt and pepper to taste These ingredients create a vibrant flavor and a beautiful look. The colors and textures make the salad both appealing and tasty. You can easily change the salad to fit your taste. Here are some optional ingredients you might enjoy: - Artichoke hearts - Sun-dried tomatoes - Avocado - Chickpeas or white beans - Grilled chicken for protein - Quinoa for extra fiber Feel free to mix and match. Adding your favorite items makes it fun and personal. Each serving of this salad packs a healthy punch. Here’s a rough estimate of what you get: - Calories: 350 - Protein: 10 grams - Carbs: 20 grams - Fat: 25 grams - Fiber: 3 grams These numbers show that this salad is not just tasty but also good for you. Eating fresh ingredients helps you feel great. You can find the full recipe to make this delicious meal easily. Start by making the dressing. In a small bowl, mix olive oil, red wine vinegar (or lemon juice), dried oregano, salt, and pepper. Whisk it all together until it blends well. This dressing adds a zesty flavor to your salad. If you want a bit more kick, try adding minced garlic or a pinch of crushed red pepper. Now comes the fun part: layering! Take your mason jar and pour 2 tablespoons of the dressing into the bottom. This keeps the greens fresh and prevents sogginess. Next, add the diced cucumber and red bell pepper. These veggies hold up well and maintain their crunch. Then, add the halved cherry tomatoes, sliced red onion, and Kalamata olives. Layering helps keep each flavor separate until you're ready to eat. Finally, sprinkle the crumbled feta cheese on top. It gives the salad a creamy finish. Top it off with the chopped fresh parsley for a pop of color. Once you finish layering, seal the jars with their lids. Store them in the fridge. They can last up to 5 days, making them perfect for meal prep. When you’re ready to eat, just shake the jar to mix everything together. Enjoy your fresh and tasty Mason Jar Greek Salad! For the full recipe, check out the details above. To keep your Mason Jar Greek salads fresh, layer wisely. Start by adding the dressing first. Use about two tablespoons of dressing at the bottom. This keeps the dressing away from the veggies. Next, place sturdy items like cucumbers and bell peppers on top of the dressing. These veggies hold up well. Follow with softer items like tomatoes and onions. This way, they won't get mushy. Finish with cheese and herbs at the top. This keeps everything crisp and tasty until you eat it. Meal prep is key for busy days. Set aside some time on the weekend. Chop all your veggies, and make the dressing. Store the veggies in airtight bags. This saves time during the week. When you're ready, grab your jars and layer the salad. It takes just a few minutes. You can also make enough for the whole week. These salads last up to five days in the fridge. Grab one in the morning for lunch. You can enjoy a fresh meal without any hassle. When it's time to eat, shake the jar well. This mixes the dressing and ingredients. You can also pour the salad into a bowl for serving. Add some extra toppings if you like. Nuts or seeds add crunch. Fresh herbs can give a nice touch. Pair your salad with a slice of crusty bread or pita. This makes a complete meal. For a full meal idea, check out the Full Recipe for Mason Jar Greek Salads. {{image_2}} You can switch up the cheese in your Mason Jar Greek salads. Feta is great, but try goat cheese or ricotta for a creamy twist. These cheeses add unique flavors. You can even use a sharp cheddar for a fun change. Just remember to crumble or cut the cheese into small pieces for easy layering. Each cheese brings something special to the salad. Adding protein makes your salad more filling. Grilled chicken is a top choice. Cut it into bite-sized pieces for easy layering. If you want a vegetarian option, use chickpeas. They are packed with protein and have a nice texture. Rinse the chickpeas well before adding them to the jar. This keeps your salad fresh and tasty. You can change the veggies based on what's in season. In summer, add sweet corn or zucchini. In fall, try roasted butternut squash or brussels sprouts. Seasonal swaps keep your salads exciting and fresh. Use what's available at your local market. This not only boosts flavor but also supports local farmers and reduces your carbon footprint. Feel free to explore these variations with the full recipe. Each change can make your Mason Jar Greek salads fun and unique! To store your Mason Jar Greek Salads, keep them in the fridge. Use clean, dry jars with lids. Layer the ingredients as described in the full recipe. Start with dressing at the bottom. This keeps the veggies fresh and crisp. Seal the jars tightly to keep air out. These salads can last up to five days in the fridge. Check for any signs of spoilage, like bad smells or slimy veggies. If you see either, toss the jar. Always keep the salad cold. If you take it to work or on a trip, use an ice pack to keep it fresh. You can easily reuse these jars for future meals. Wash them well with soap and water. Let them air dry completely. You can use the same jars for other salads or snacks. They are great for meal prep. This cuts down on waste and saves you money. Mason Jar Greek Salads can last up to five days in the fridge. The key is how you layer them. Start with the dressing at the bottom. This keeps the veggies fresh. When you’re ready to eat, shake the jar to mix everything. Yes, you can use many dressings for this salad. Olive oil and red wine vinegar work great. You can also try lemon juice for a fresh twist. A tahini dressing adds a nice creaminess. Experiment to find your favorite flavors! You can add many veggies to your salad. Try bell peppers in different colors for sweetness. Zucchini adds a nice crunch. Carrots give a bit of sweetness, too. Even artichokes and radishes can make great additions. Just keep in mind how each vegetable will hold up over time. For the full recipe, check out the ingredients and steps above. Mason jar Greek salads are simple and fun to make. You learned about key ingredients, how to layer them, and smart tips to keep your salad fresh. Customizing the salad lets you enjoy different flavors. Remember to store your salads safely for the best taste. With a little prep, you can have a tasty meal ready for busy days. Embrace these salads as a quick and healthy option for any time!

Mason Jar Greek Salads Fresh and Flavorful Meal Prep

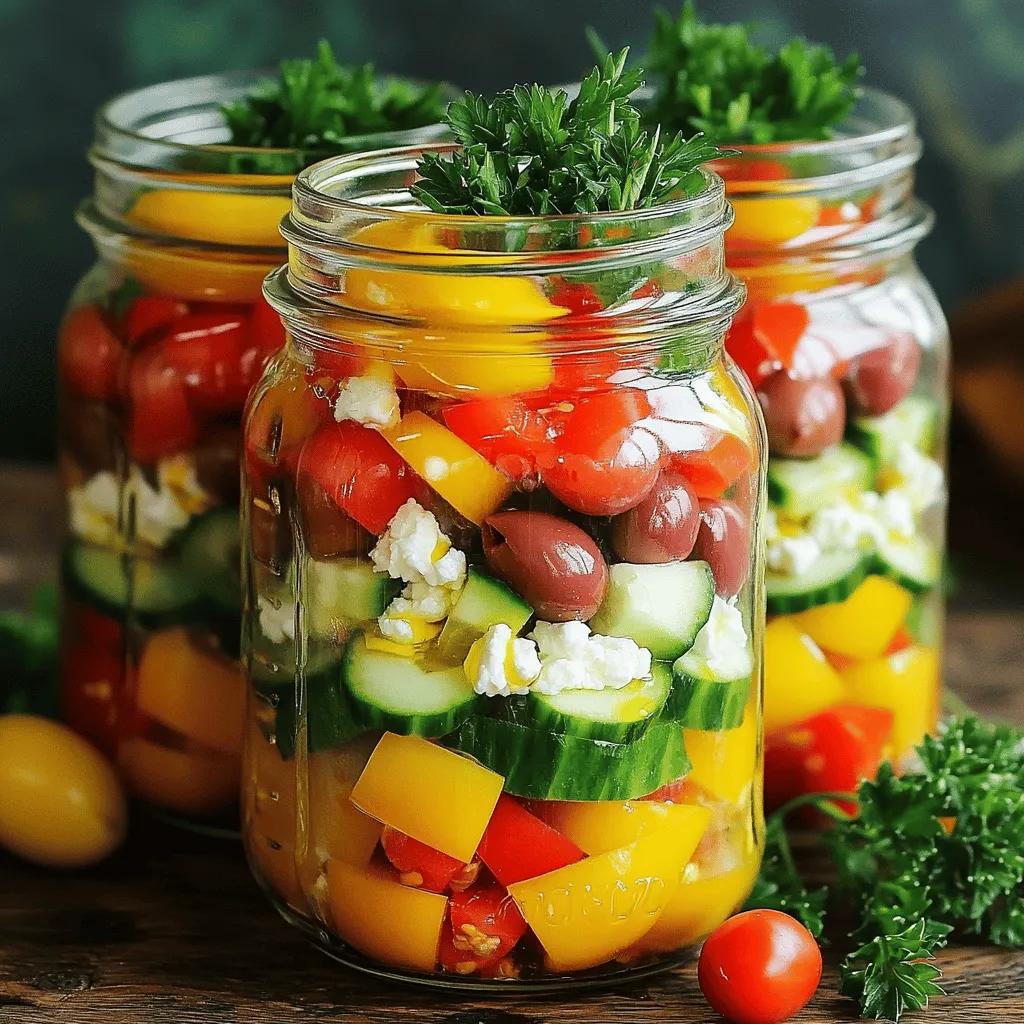
Are you ready to make healthy eating fun and easy? Mason Jar Greek Salads are your answer! Packed with fresh

To make the creamy white chicken chili, you'll need some simple and fresh ingredients. Here is the list of what you will need: - 1 lb boneless, skinless chicken breasts, cut into bite-sized pieces - 1 tablespoon olive oil - 1 medium onion, diced - 3 cloves garlic, minced - 2 jalapeños, seeded and diced - 1 cup frozen corn - 2 cans (15 oz each) white beans, drained and rinsed - 4 cups chicken broth - Seasonings: cumin, chili powder, oregano, salt, and pepper - 1 cup heavy cream - Garnishes: fresh cilantro, lime wedges These ingredients work together to create a hearty, flavorful dish. The chicken provides protein, while the beans add fiber. The spices bring warmth and depth to the chili. You can find the full recipe in the earlier section. Using fresh ingredients makes all the difference. For the best flavor, choose good-quality chicken and fresh vegetables. You can also adjust the spice level by adding more or fewer jalapeños. Enjoy your cooking adventure! - Heat 1 tablespoon of olive oil in a large pot over medium heat. - Add 1 medium diced onion and sauté until soft, about 5 minutes. - Next, stir in 3 minced garlic cloves and 2 diced jalapeños. Cook for 2 more minutes. - Add 1 pound of bite-sized chicken pieces. Season with salt, pepper, 1 teaspoon of cumin, 1 teaspoon of chili powder, and 1 teaspoon of oregano. Brown the chicken for 5 to 7 minutes. - Pour in 4 cups of chicken broth. Bring the mixture to a gentle simmer. - Add 2 cans of drained white beans and 1 cup of frozen corn. Stir well to combine. - Let the chili simmer on low heat for 20 to 25 minutes. Stir occasionally until the chicken cooks through and flavors meld. - Stir in 1 cup of heavy cream. Simmer for another 5 minutes to thicken. - Taste and adjust seasoning with more salt and pepper, if needed. - Serve the chili hot in deep bowls. Garnish with chopped cilantro and a lime wedge for extra flavor. For the full recipe, check out the details above! To make tender chicken for your chili, use these steps: - Sear the chicken pieces in hot oil. This locks in moisture and flavor. - Avoid overcrowding the pot, as this can steam the chicken. - Cook until golden brown, about 5-7 minutes per side. For the perfect chili consistency: - Start with a good balance of broth and cream. - If it's too thick, add more chicken broth. - If too thin, let it simmer longer to reduce. Serve your creamy white chicken chili with these sides: - Crumbled tortilla chips for crunch. - Warm, crusty bread to soak up the chili. - A simple green salad for freshness. For a beautiful presentation: - Use deep bowls to showcase the creamy chili. - Top with fresh cilantro and a lime wedge on the side. To boost flavor, consider these spices: - Add smoked paprika for a deeper taste. - A pinch of cayenne pepper can add heat. - Fresh herbs like thyme or oregano can brighten the dish. To adjust the spice level: - Add more jalapeños for heat. - For a milder version, remove the seeds from the jalapeños. - A dollop of sour cream can also cool it down. For the full recipe, check the complete guide on creamy white chicken chili. {{image_2}} You can swap the chicken for turkey if you want a lighter meal. Turkey has a similar taste and texture, making it a great choice. For a plant-based option, try using tofu. Press the tofu to remove water, then cube it. Sauté the cubes until golden brown. This gives you a tasty and healthy vegetarian version of the chili. You can change the beans in the recipe if needed. Black beans or kidney beans work well and add different flavors. For the broth, vegetable broth is a good choice for a vegetarian option. You can also add more vegetables for nutrition. Try bell peppers, zucchini, or spinach. They all blend well and boost the dish's color and taste. Think about adding flavors from different cuisines. A dash of curry powder gives a nice twist. You could also add coconut milk for a creamy richness. For a Mexican twist, try adding corn tortillas or some cheddar cheese on top. Use seasonal ingredients too. In summer, fresh corn or tomatoes can brighten the chili. In fall, use squash or pumpkin for warmth. For the complete recipe, check the [Full Recipe]. After you enjoy your creamy white chicken chili, store leftovers in the fridge. Use an airtight container to keep it fresh. This method helps prevent spills and keeps the chili flavorful. Make sure to cool the chili to room temperature before sealing it in. If you want to freeze chili for future meals, divide it into smaller portions. Use freezer-safe bags or containers. Label them with the date so you know when to use them. Chili can stay fresh in the freezer for up to three months. When you want to enjoy your chili again, reheating it properly is key. You can use the stovetop or microwave. For the stovetop, pour the chili into a pot on low heat. Stir often and heat until it's warm throughout. If using the microwave, place the chili in a microwave-safe bowl. Heat in short intervals, stirring between each. To keep the flavor and texture, add a splash of broth or cream if it seems thick. In the fridge, your creamy white chicken chili lasts about three to four days. Always check for signs of spoilage before eating. If the chili has an off smell or changes color, it's best to toss it. Trust your senses! Keeping an eye on these signs ensures you enjoy your meals safely. What is the best chicken to use for this chili? I recommend using boneless, skinless chicken breasts. They cook quickly and stay tender. You can also use thighs for a richer taste. Can I make this recipe in a slow cooker? Yes, you can use a slow cooker! Brown the chicken and veggies first. Then, add them to the slow cooker with the broth and beans. Cook on low for 6-7 hours. Is it possible to prepare this chili ahead of time? Absolutely! You can make it a day before. Just store it in the fridge. Reheat it on the stovetop when you're ready to serve. Approximate calories per serving This creamy white chicken chili has around 400 calories per serving. Information on dietary restrictions This chili is gluten-free and can be made dairy-free by using coconut milk instead of heavy cream. How long does it take to cook from start to finish? From prep to finish, it takes about 45 minutes. Tips for speeding up the cooking process To save time, chop all your veggies first. You can also use rotisserie chicken to cut down on cooking time. Just add it in the last 15 minutes. For a full recipe, check out the complete instructions above! This blog post covered all you need for a great chili. You learned about the ingredients, step-by-step cooking, and tasty tips. Remember, variations allow you to make this dish your own. Explore alternative proteins or spice levels to suit your taste. Proper storage keeps leftovers fresh, so you enjoy this dish longer. Try this chili for a comforting meal. Its flavors and warmth will surely delight!

Creamy White Chicken Chili Hearty and Flavorful Dish

Are you ready to warm your soul with a dish that’s creamy and comforting? This Creamy White Chicken Chili is

To create a delightful Chocolate Hazelnut Croissant Bake, gather these simple ingredients: - 4 large chocolate croissants, torn into pieces - 1 cup hazelnuts, roughly chopped - 4 large eggs - 1 cup whole milk - 1/2 cup heavy cream - 1/2 cup granulated sugar - 1 teaspoon vanilla extract - 1/4 teaspoon salt - 1/2 cup chocolate hazelnut spread (like Nutella) - Powdered sugar for dusting These ingredients work together to make a rich and tasty treat. The chocolate croissants provide a soft base. Hazelnuts add a nice crunch. The eggs and cream create a creamy custard. Sugar and vanilla bring sweetness and flavor. Do not forget the chocolate hazelnut spread; it adds a decadent touch. Lastly, a dusting of powdered sugar makes this dish look beautiful. With this list in hand, you are ready to bake a delicious dish. For the full recipe, check the instructions included above. Start by preheating your oven to 350°F (175°C). This step is key for a great bake. Grease a 9x13 inch baking dish with butter or cooking spray. This helps prevent sticking. Next, tear the chocolate croissants into bite-sized pieces. Make sure they are not too small. Chop the hazelnuts roughly, so you get crunchy bits in each bite. In a large bowl, crack open four eggs. Add one cup of whole milk and half a cup of heavy cream. This mix makes the custard rich and creamy. Then, pour in half a cup of granulated sugar and one teaspoon of vanilla extract for sweetness and flavor. Add a pinch of salt, about 1/4 teaspoon, to balance the taste. Whisk everything together until it is well combined. The custard should be smooth and creamy. Now it’s time to layer your ingredients. Place the torn croissant pieces evenly in the greased baking dish. Sprinkle the chopped hazelnuts over the croissants, adding extra crunch. Pour the custard mixture evenly over the croissants, making sure all the pieces soak up that delicious liquid. Let it sit for about 10 minutes. This allows the croissants to absorb the custard. Now, take half a cup of chocolate hazelnut spread and dollop it in small globs throughout the dish. Use a spoon to gently swirl it, creating a marbled effect. Be careful not to over mix it. Finally, pop the baking dish into your preheated oven. Bake for 30 to 35 minutes until the top is golden brown and the custard is set. For the full recipe, check the details above. To get the best texture, soak your croissants for about 10 minutes. This allows them to absorb the custard fully. If you skip this step, your croissants might turn out dry. The custard should be creamy, not too runny. Stir gently to keep it thick. Choose rich chocolate croissants for a deep flavor. The darker the chocolate, the better the taste. If you want to boost the hazelnut flavor, add more chopped hazelnuts. You can also mix in a bit of hazelnut extract for an extra kick. For the full recipe, check out the detailed instructions above. {{image_2}} To make this Chocolate Hazelnut Croissant Bake fit your needs, here are some swaps. - Dairy-free alternatives: You can use almond milk or coconut milk in place of whole milk. For cream, use coconut cream or a dairy-free heavy cream. This keeps the bake rich without dairy. - Gluten-free croissants: Look for gluten-free croissants at your local bakery or grocery store. They may not rise like traditional ones, but they will still taste great! You can enhance this bake even more with some exciting flavors. - Incorporating fruits or spices: Try adding sliced bananas or berries for a fruity twist. You can also sprinkle in cinnamon or nutmeg for a warm spice flavor. These additions will make each bite even more tasty! To keep your Chocolate Hazelnut Croissant Bake fresh, start by cooling it completely. Once cool, cover the dish tightly with plastic wrap or foil. You can store it in the fridge for up to three days. If you want to save it longer, consider freezing it. Cut the bake into portions and wrap each piece in plastic wrap. Then place them in a freezer bag. This way, you can enjoy a piece anytime! When it’s time to enjoy leftovers, you have two great options: the microwave or the oven. - Microwave: Place a portion on a microwave-safe plate. Heat it for about 30-45 seconds. Check to see if it’s warm throughout. If not, heat for another 10-15 seconds. - Oven: Preheat your oven to 350°F (175°C). Place the bake in an oven-safe dish and cover it with foil. Heat for about 10-15 minutes, or until warmed through. This method keeps the texture nice and soft. Whichever way you choose, your chocolate hazelnut treat will still taste amazing! Chocolate Hazelnut Croissant Bake lasts for about three to four days in the fridge. Store it in an airtight container. You can also freeze it for up to two months. Just wrap it tightly in plastic wrap and foil to prevent freezer burn. When ready to eat, thaw it in the fridge overnight. Yes, you can make this dish ahead of time. Prepare it the night before and let it sit in the fridge. This lets the croissants soak up the custard well. When you're ready to bake, just pop it in the oven. Reheating is easy; just warm it in the oven until heated through. This bake is great for breakfast or dessert. You can serve it with fresh fruit, like strawberries or bananas, to add a nice touch. A scoop of vanilla ice cream or whipped cream makes it even better for dessert. Enjoy it with a cup of coffee or tea for a delightful pairing. You learned how to make a delicious Chocolate Hazelnut Croissant Bake. This dish uses chocolate croissants, hazelnuts, and a creamy custard. Remember to soak the croissants well for a soft texture. You can also adjust ingredients for dietary needs. Store leftovers carefully for later enjoyment. Enjoy experimenting with flavors and variations. Whether it’s a cozy breakfast or a sweet dessert, this bake is sure to impress. Happy baking!

Chocolate Hazelnut Croissant Bake Rich and Tasty Treat

Are you ready to dive into a rich and tasty treat? This Chocolate Hazelnut Croissant Bake is the perfect blend

To make the best air fryer sweet potato chips, you need a few simple items. Here’s what you’ll need: - Sweet potatoes - Olive oil - Seasoning options: - Garlic powder - Smoked paprika - Sea salt - Black pepper - Nutritional yeast (optional for a cheesy flavor) The key to great chips lies in the sweet potatoes. Look for large, firm ones with smooth skin. They should be bright in color. You can use any seasoning you like, but I suggest starting with garlic powder and smoked paprika for a tasty twist. Sea salt adds just the right touch, while black pepper brings some heat. If you want a cheesy flavor, sprinkle on some nutritional yeast. It gives a nice umami boost. Using olive oil helps the chips crisp up nicely. Just remember, a little goes a long way. If you use too much oil, the chips can turn out soggy. For the full recipe, follow the steps carefully. Enjoy the process of slicing, mixing, and cooking your chips. The result is a crunchy, satisfying snack that’s hard to resist! To make great sweet potato chips, start with slicing the sweet potatoes. Use a mandoline or a sharp knife for even cuts. Aim for slices that are about 1/8 inch thick. This thickness helps them get crispy. Next, mix the sweet potato slices with the seasoning. In a large bowl, add the sliced potatoes, 2 tablespoons of olive oil, 1 teaspoon of garlic powder, 1 teaspoon of smoked paprika, ½ teaspoon of sea salt, and ¼ teaspoon of black pepper. If you want a cheesy flavor, add 1 tablespoon of nutritional yeast. Toss everything well to coat the slices evenly. You want each chip to be flavorful. Now, it’s time to cook! Preheat your air fryer to 380°F (190°C) for about 5 minutes. Preheating helps the chips cook evenly. Once the air fryer is ready, place the sweet potato slices in a single layer in the basket. Make sure not to overcrowd them. If needed, work in batches to keep the chips crisp. Cook the sweet potato chips for 10-12 minutes. Remember to shake the basket halfway through. This step ensures even cooking. Keep a close eye on them. They should turn golden brown and crispy, but you don’t want them to burn. Once they are done, take the chips out and let them cool for a few minutes. They will crisp up even more as they cool. You can enjoy your crispy chips right away! For added fun, try garnishing them with fresh herbs or a sprinkle of sea salt. They also pair well with dips like hummus or guacamole. The choice is yours! For the full recipe, see the details above. To get the best crispiness in your sweet potato chips, slice them thin. Aim for about 1/8 inch thick. Thinner slices cook better and crisp up nicely. If your slices are too thick, they may end up chewy instead of crispy. The amount of oil matters too. Use just enough olive oil to coat the slices. Too much oil will make them soggy. A light coat helps them crisp up perfectly in the air fryer. When cooking, work in batches. Do not overcrowd the air fryer basket. If you fill it too much, the chips won't cook evenly. It's better to do smaller amounts. This way, each chip gets hot air and cooks well. Shake the basket halfway through cooking. This helps the chips brown evenly. It also keeps them from sticking together. A little movement makes a big difference. If your chips come out soggy, check your oil use. Too much oil can lead to a wet texture. Also, make sure your slices are thin enough. If they are thick, they won't crisp nicely. For uneven cooking, try shaking the basket more often. You can also rearrange the chips. If some areas are browner, swap them with lighter ones. This helps them all cook at the same rate. {{image_2}} You can easily switch up the flavor of your sweet potato chips. For a sweet and spicy version, add a dash of cinnamon or cayenne pepper to the mix. This combo gives you that sweet kick with a hint of heat. Alternatively, try using different seasoning blends. Italian herbs add a fresh, savory touch. Mix dried basil, oregano, and thyme for a delightful twist. Another fun option is chili lime seasoning. Just sprinkle it on after cooking for a zesty finish. Making these chips vegan-friendly is simple. The original recipe is already plant-based. Just skip the nutritional yeast for a lighter taste. If you need a gluten-free option, you’re in luck! The ingredients are naturally gluten-free. Just avoid any store-bought seasonings that may contain gluten. You can enjoy these tasty chips without worry! For the full recipe, check out the complete guide. To keep your sweet potato chips fresh, store them in an airtight container. This prevents moisture from getting in. A glass jar or a plastic container with a tight lid works best. If you want the chips to stay crisp, avoid stacking them. Lay them flat in a single layer if possible. When you want to enjoy your chips again, you can easily restore their crispiness. The best way is to use the air fryer. Preheat it to 350°F (175°C), then place the chips in for about 3-5 minutes. This method keeps them crunchy and tasty. You can also use an oven if you prefer. Just make sure to watch them closely. Enjoy your crispy air fryer sweet potato chips! For the full recipe, check out the complete guide above. To make sure your sweet potato chips are crispy, follow these tips: - Slice thin: Aim for 1/8 inch thick slices. This thickness helps them cook evenly and become crispy. - Dry well: After washing, make sure to dry the sweet potato slices. Extra moisture will make them soggy. - Use enough oil: Coat the slices lightly with olive oil. This helps with crispiness. - Don't overcrowd: Place the slices in a single layer in the air fryer basket. If they overlap, they won't crisp up well. - Shake during cooking: Halfway through cooking, shake the basket. This helps all sides get hot air. - Watch closely: Cooking times can vary. Check for a golden brown color to know they are done. This method will give you tasty, crispy chips every time! Yes, you can use other types of potatoes. However, here are some key differences: - Texture: Regular potatoes, like russets, are starchier. They may not get as crispy as sweet potatoes. - Cooking times: Different potatoes cook at different rates. For example, russet potatoes may need a bit longer to cook. - Flavor: Sweet potatoes have a natural sweetness. Other potatoes will have a milder taste. If you try other types, adjust the cooking time as needed to get the best results. Sweet potato chips taste best fresh, but you can store them. Here’s how: - Storage: Keep them in an airtight container at room temperature. This helps maintain crispiness. - Timeline: They will stay fresh for about 2 to 3 days. After that, they might lose their crunch. - Avoid moisture: Keep them away from humidity. Moisture can make them soft. For the best taste, enjoy them soon after making! In this guide, you learned how to make crispy sweet potato chips. We covered ingredients, preparation, and cooking methods. You found tips for crispiness and troubleshooting common issues. You also explored flavor variations and proper storage techniques. Enjoy making these easy, tasty chips. With practice, you'll create your own perfect snacks every time. Keep experimenting with flavors to find your favorite combinations. Happy cooking!

Air Fryer Sweet Potato Chips Crisp and Tasty Snack

Craving a crunchy snack that’s both tasty and healthy? You’re in the right place! Air fryer sweet potato chips are

- 12 oz cheese tortellini - 1 cup cherry tomatoes, halved - 1 cup fresh spinach, roughly chopped For this salad, cheese tortellini is key. You want it to be soft and chewy. The tortellini holds the creamy pesto well, making every bite flavorful. Cherry tomatoes add a burst of sweetness. Their juicy texture pairs well with the creamy dressing. Fresh spinach brings a nice crunch and color to the dish. - ½ cup pesto (store-bought or homemade) - ½ cup cream cheese, softened - ¼ cup Parmesan cheese, grated The creamy dressing is what makes this salad stand out. I like to use pesto as a base. It adds a bright, herby flavor. Mixing in softened cream cheese gives rich creaminess. Grated Parmesan cheese adds a salty kick that ties everything together. This combination makes the salad rich but not too heavy. - 2 tablespoons olive oil - Salt and pepper to taste - Pine nuts for garnish (optional) A drizzle of olive oil enhances the flavors. It adds a smooth finish. Don’t forget to season with salt and pepper. These simple ingredients let the other flavors shine. If you want extra crunch, pine nuts are a great option. They add a nice nutty flavor and texture. You can find the full recipe for this delicious dish above. First, cook the cheese tortellini. Follow the package instructions closely for the best results. Once done, drain the tortellini and rinse it under cold water. This stops the cooking process and keeps the pasta firm. Set the tortellini aside while you prepare the dressing. In a large mixing bowl, combine the softened cream cheese and pesto. Use a whisk or fork to blend them together well. Your goal is a smooth and creamy dressing. If it feels too thick, add a splash of water or olive oil to make it easier to mix. Now, fold the cooled tortellini into the pesto dressing. Gently mix until every piece of pasta is coated. Next, add the halved cherry tomatoes and chopped spinach. Carefully mix them in without breaking the tortellini. Drizzle in the olive oil, and season with salt and pepper to taste. Stir gently one last time to blend everything nicely. Chill the salad in the fridge for at least 30 minutes. This lets the flavors meld together perfectly. For a finishing touch, you can sprinkle on some grated Parmesan cheese and toasted pine nuts before serving. This is how you create a fresh and flavorful Creamy Pesto Tortellini Salad. For the full recipe, refer to the earlier section. Enjoy your cooking! To make this salad shine, focus on seasoning. Salt enhances all the flavors. Start with a pinch, then taste and adjust. Freshly cracked black pepper adds a nice kick. You can also try red pepper flakes for some heat. To boost creaminess, mix in a splash of milk or a bit more cream cheese. This will give your dressing a smoother texture. You can even fold in some Greek yogurt for extra tang and creaminess. Cook the tortellini according to the package instructions. Be careful not to overcook them. Overcooked tortellini turn mushy. Aim for a perfect al dente texture. This means the pasta should be firm but cooked through. Once done, drain and rinse them under cold water. Timing is key. If you cook them just right, they will hold up beautifully in the salad. Chilling the salad is very important. It helps all the flavors blend together. Without chilling, the salad may taste flat. Aim to chill your salad for at least 30 minutes. If you have more time, an hour is even better. This extra time allows the tortellini to soak up the flavors of the pesto and cream cheese. For the full recipe, check the instructions above. {{image_2}} You can easily swap out cream cheese for Greek yogurt. Greek yogurt gives a nice tang and keeps it creamy. If you want to try different greens, arugula or kale work well, too. You can also add bell peppers or cucumbers for crunch. These swaps keep the salad fresh and fun. Adding protein makes this salad even more filling. Cooked chicken or shrimp brings great flavor. If you prefer a plant-based option, try chickpeas or tofu. Both give you protein without meat. Just make sure to season them well before adding. You can make your own pesto for a fresh taste. Try blending basil, garlic, nuts, and olive oil. If you like it creamier, add more cream cheese or yogurt. You can even mix in some lemon juice for a zesty kick. Adjust the creaminess to suit your taste. For the full recipe, check out the [Full Recipe]. For short-term storage, use airtight containers. Glass containers work well because they do not stain. Store your creamy pesto tortellini salad in the fridge. It stays fresh for up to three days. Make sure to seal it tightly to keep out air. If you want to keep it longer, consider freezing. Place the salad in a freezer-safe container. Leave some space at the top since it will expand as it freezes. It can last up to three months in the freezer. To serve, thaw it in the fridge overnight. Stir it gently before serving to mix the flavors. To maintain flavor and texture, store the salad without added toppings. Keep nuts and cheese separate until you're ready to serve. This helps keep everything crunchy. Signs your salad has spoiled include an off smell or a change in color. If it looks or smells bad, throw it away. Enjoy your creamy pesto tortellini salad fresh! You can find the full recipe to create this delightful dish. Yes, you can make this salad ahead of time. I recommend preparing it up to one day in advance. This allows all the flavors to blend well. Just store it in an airtight container in the fridge. If you want the best taste, mix in the fresh spinach just before serving. If you need a substitute for pesto, try using hummus or a simple olive oil and garlic mix. You could also use a sun-dried tomato spread for a different flavor. These options keep the salad creamy and tasty. Yes, this salad is vegetarian. It uses cheese tortellini and fresh veggies. You can feel good about serving it to vegetarian friends. Just make sure to check the ingredients of your tortellini and pesto. To make this salad gluten-free, use gluten-free tortellini. Many stores sell them now. You can also make your own using gluten-free flour. The rest of the ingredients are naturally gluten-free, so your salad will still be delicious. You can check the [Full Recipe] for more details on how to prepare this dish. This article explored a delicious creamy pesto tortellini salad recipe. We covered the main ingredients like cheese tortellini, cherry tomatoes, and spinach. You learned how to make a tasty dressing, assemble the salad, and enhance the flavors. We also shared tips for chilling and storing your salad. For a perfect meal, don’t be afraid to mix and match ingredients. Whether you add chicken or switch to gluten-free pasta, it’s all about your taste. Enjoy creating a dish that’s not just good, but great!

Creamy Pesto Tortellini Salad Fresh and Flavorful Dish

Looking for a fresh salad that’s both creamy and bursting with flavor? My Creamy Pesto Tortellini Salad is the perfect

To make these tasty bites, you'll need: - 2 large cucumbers - 1 cup cream cheese, softened - 1/2 cup Greek yogurt - 2 tablespoons fresh chives, chopped - 1 tablespoon fresh dill, chopped - 1 tablespoon lemon juice - 2 teaspoons everything bagel seasoning - Salt and pepper to taste These ingredients work together to create a creamy, flavorful mix that pairs perfectly with fresh cucumber. You can add some fun garnishes to make your bites even better: - Cherry tomatoes, halved - Extra chopped herbs - A sprinkle of everything bagel seasoning These garnishes can add color and a burst of taste to your dish. You don't need fancy tools for this recipe. Here’s what I recommend: - A cutting board - A sharp knife - A mixing bowl - A small spoon or piping bag - A serving platter Using simple equipment makes it easy to bring these Everything Bagel Cucumber Bites to life. For the full recipe, you can check the complete guide. Start by washing the cucumbers well. This step ensures they are clean and fresh. Next, slice each cucumber into 1-inch thick rounds. These rounds will be the base for your bites. Aim for even cuts to keep them looking nice. Grab a mixing bowl and add the softened cream cheese. Then, scoop in the Greek yogurt. Use a fork or spatula to mix them until smooth. This combination gives a creamy texture. Now, add chopped chives and dill for flavor. Don't forget the lemon juice and everything bagel seasoning! A pinch of salt and pepper rounds out the taste. Mix until everything is well blended. Now comes the fun part! Use a small spoon or a piping bag to dollop the cream cheese mixture onto each cucumber round. Make sure to add a generous amount. For a pop of color, you can add a half cherry tomato on top. This garnish adds flavor and makes the bites look pretty. Arrange all the cucumber bites on a platter nicely. Chill them in the fridge for about 15-20 minutes. This wait helps the flavors blend beautifully. For the full recipe, check out the details above! When picking cucumbers, look for ones that are firm and smooth. Check for shiny skin. Avoid cucumbers with soft spots or blemishes. Fresh cucumbers taste best in your bites. You can use slicers or English cucumbers. Both are great for this recipe. Their mild flavor pairs perfectly with the cream cheese mixture. To get that smooth and creamy texture, use softened cream cheese. Mix it with Greek yogurt for extra creaminess. The yogurt adds a tangy flavor that brightens each bite. Blend the two until there are no lumps. This base will hold all the added flavors well. Stir in fresh herbs and seasoning for a delicious taste. These cucumber bites make perfect appetizers for any gathering. Arrange them on a nice platter for a colorful display. You can add halved cherry tomatoes on top for a pop of color. Garnish the platter with herbs or extra seasoning. Chill the bites before serving for maximum freshness. They look and taste delightful at any event. For the full recipe, check out the link above. {{image_2}} You can switch up the cheese in your Everything Bagel Cucumber Bites. Cream cheese is rich and smooth, but you can try other types. Here are some great choices: - Goat cheese: It adds a tangy kick. - Feta cheese: It gives a salty flavor and crumbly texture. - Ricotta cheese: It’s light and creamy, perfect for a fresh taste. Each cheese brings its unique flavor profile, making your bites even more exciting. Want to add more flavor? Consider these seasoning options. They can enhance your bites: - Garlic powder: A little bit adds depth. - Smoked paprika: It brings a nice smokiness. - Crushed red pepper flakes: Use these for heat. - Fresh herbs: Try basil or parsley for brightness. Mix and match to find your favorite flavor combination. If you follow a vegetarian or vegan diet, you can still enjoy these bites. Here are some swaps: - For cream cheese, use vegan cream cheese or tofu spread. Both options work well. - Instead of Greek yogurt, try coconut yogurt or cashew cream for creaminess. - Check the everything bagel seasoning to ensure it has no animal products. These alternatives make the bites delicious while fitting your dietary needs. Enjoy experimenting! To keep your Everything Bagel Cucumber Bites fresh, store them in the fridge. Use an airtight container to prevent drying. This keeps the bites crisp and the cream cheese creamy. If you stack them, place parchment paper between layers. This avoids squishing and keeps them looking nice. These tasty bites stay fresh for about 2-3 days in the fridge. After that, the cucumbers may become soggy. The cream cheese mix can lose its flavor, too. So, enjoy them soon for the best taste and texture. Freezing these bites is not the best idea. Cucumbers contain a lot of water. When frozen, they become mushy when thawed. If you must freeze, only freeze the cream cheese mix. Thaw it in the fridge overnight before spreading it on fresh cucumber rounds. This way, you still get the great taste of Everything Bagel Cucumber Bites. For the full recipe, check the earlier section. Yes, you can prepare these bites ahead of time. Make them a few hours in advance. Just keep them in the fridge. This will help the flavors blend well. The cucumbers stay crunchy and fresh. Just avoid adding garnishes until close to serving. If you want a lighter option, try using Greek yogurt. You can also use ricotta or a dairy-free cream cheese. Each adds a unique flavor. Choose what fits your taste or dietary needs. Just keep the same ratio for the best results. To add some heat, mix in chopped jalapeños or red pepper flakes. If you like a kick, try using spicy cream cheese. You can also add a dash of hot sauce to the mixture. Adjust the spice level based on your personal taste. Enjoy experimenting with flavors! Making Everything Bagel Cucumber Bites is easy and fun. We looked at ingredients, equipment, and step-by-step instructions. We also covered tips for the best cucumbers and creaminess. There are many delicious variations and storage tips to keep them fresh. Remember, you can prepare them in advance or change up the cheese to suit your taste. Enjoy these bites as a tasty snack or a party favorite. Happy cooking!

Everything Bagel Cucumber Bites Flavorful Snack Idea

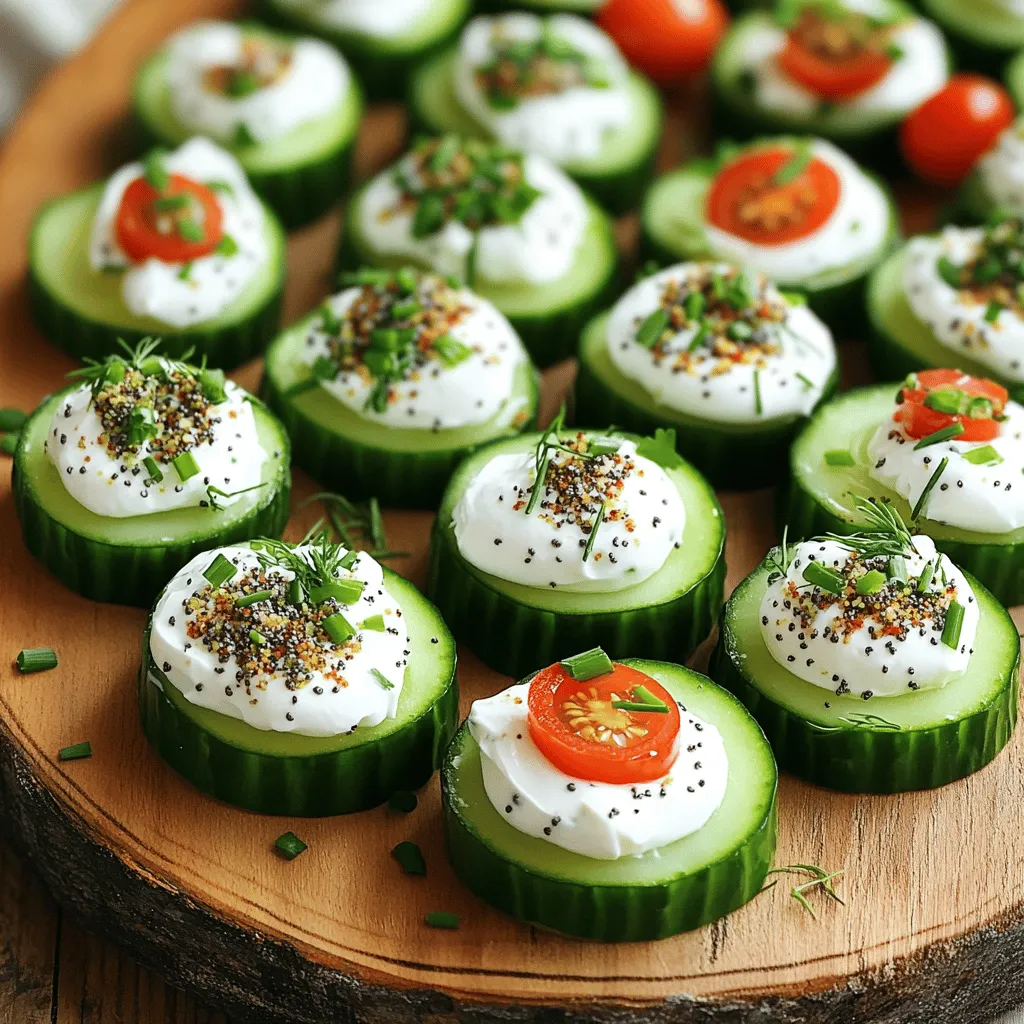
Looking for a tasty snack that’s easy to make? Everything Bagel Cucumber Bites are your answer! These bites burst with

Older posts
Newer posts
← Previous Page1 … Page51 Page52 Page53 … Page84 Next →

dsad

© 2026 juliesdish • Built with GeneratePress

Our Policies

  • Copyright Policy
  • Cookie Policy
  • GDPR Policy
  • Privacy Policy
  • Disclaimer
  • Terms Of Use

More Information

  • Home
  • About
  • Contact
  • Appetizers
  • Dessert
  • Dinner
  • Drinks
©2026, juliesdish About Back To Top