Skip to content
DisclaimerTerms Of UseGDPR PolicyCookie Policy

juliesdish

  • Home
  • Drinks
  • Appetizers
  • Dinner
  • Dessert
  • About
  • Contact
  • Privacy Policy
DisclaimerTerms Of UseGDPR PolicyCookie Policy

NO-ING-IMG

To make the perfect Pumpkin Spice Hot Chocolate, you will need the following ingredients: - 2 cups whole milk (or non-dairy milk) - 2 tablespoons pumpkin puree - 2 tablespoons unsweetened cocoa powder - 1/4 cup granulated sugar (adjust to taste) - 1/2 teaspoon pumpkin pie spice - 1/4 teaspoon vanilla extract - Pinch of salt - Whipped cream (for topping) - Cinnamon stick (for garnish) For a dairy-free option, choose almond, soy, or oat milk. These non-dairy milks add a creamy texture without the dairy. You can also use coconut milk for a richer flavor. If you prefer a healthier option, consider using maple syrup or honey instead of granulated sugar. Both natural sweeteners can enhance the taste without added refined sugars. When selecting pumpkin puree, I recommend using pure pumpkin and not pumpkin pie filling. Look for brands that only contain pumpkin. This gives you better control over the flavor. For cocoa powder, I suggest using high-quality brands like Ghirardelli or Valrhona. They provide a rich chocolate taste that makes your hot chocolate extra special. Lastly, ensure your vanilla extract is pure. It can make a big difference in flavor compared to imitation vanilla. 1. Combine Ingredients: Start by pouring 2 cups of whole milk into a medium saucepan. Add 2 tablespoons of pumpkin puree to the milk. Stir these together gently. 2. Heat Carefully: Place the saucepan on the stove over medium heat. Whisk the mixture continuously. This keeps it from boiling and helps it heat evenly. You want it warm, not hot enough to bubble. 3. Add Cocoa and Spice: Once the milk and pumpkin mix is warm, it’s time to add flavor. Stir in 2 tablespoons of unsweetened cocoa powder. Then, add 1/4 cup of granulated sugar. Next, include 1/2 teaspoon of pumpkin pie spice, 1/4 teaspoon of vanilla extract, and a pinch of salt. 4. Whisk for Creaminess: Keep whisking until everything dissolves. The goal is a smooth and creamy texture. This may take a couple of minutes. 5. Heat Further: Continue to heat the mixture for another 2-3 minutes. Stir frequently to keep it from sticking to the bottom. 6. Serve in Mugs: Remove the saucepan from heat. Pour the hot chocolate into your favorite mugs. 7. Top It Off: Add a generous dollop of whipped cream on top. Sprinkle some extra pumpkin pie spice for an added kick. 8. Garnish: Finish by placing a cinnamon stick in each mug. This adds a nice aroma and makes stirring easy. These steps will help you create a rich and creamy pumpkin spice hot chocolate that warms the heart. Enjoy every sip! To make the best pumpkin spice hot chocolate, proper whisking and heating are key. Start with a medium saucepan. Heat the milk and pumpkin puree gently over medium heat. Whisk constantly. This keeps the mixture smooth and avoids boiling. Boiling can change the texture and flavor. Next, balance sweetness and spice. Use 1/4 cup of granulated sugar as a base. You can adjust this to fit your taste. If you like it sweeter, add more sugar. The pumpkin pie spice adds warmth. Use 1/2 teaspoon for a nice kick. If you prefer more spice, feel free to add a bit more. Presentation makes a difference too! Serve this drink in your favorite mugs. Top each mug with a generous amount of whipped cream. Sprinkle extra pumpkin pie spice on top for a festive touch. A cinnamon stick in each mug adds both flavor and charm. It also gives you a fun way to stir. Enjoy experimenting with your hot chocolate. Each cup can be a little different! {{image_2}} You can easily switch up your Pumpkin Spice Hot Chocolate. Try adding salted caramel for a sweet twist. Just drizzle some caramel sauce on top. Or mix in peppermint extract for a refreshing flavor. This version is perfect for winter nights. If you want a chilled treat, make an iced version. Just blend the hot chocolate with ice. It tastes great in summer, too! You can also add other seasonal flavors. Maple syrup adds a rich sweetness. Just replace some sugar with maple syrup. A pinch of nutmeg gives a warm bite. Experiment with these flavors to find your favorite mix. Each variation brings a new taste. It keeps this drink exciting all year long! To keep your Pumpkin Spice Hot Chocolate fresh, store it in an airtight container. Place it in the fridge if you have leftovers. It will stay good for about three days. If you want to enjoy it later, just follow these simple steps: - Storing: Use a glass jar or a plastic container. Make sure it seals tight. This keeps out air and helps the drink stay fresh. - Reheating: When you're ready to drink it, pour the hot chocolate into a saucepan. Heat it on low heat. Stir it gently. This way, you keep its creamy texture. Avoid boiling, as it can change the flavor. - Shelf Life: The prepared hot chocolate lasts three days in the fridge. For unused ingredients, check their expiration dates. Whole milk lasts about a week when opened, while pumpkin puree stays fresh for about a week too. By following these steps, you can enjoy your tasty Pumpkin Spice Hot Chocolate whenever you want! Is pumpkin spice hot chocolate healthy? Pumpkin spice hot chocolate can be a cozy treat. It has some health benefits due to pumpkin puree. Pumpkin is high in vitamins and fiber. However, it can be high in sugar. You can reduce the sugar to make it healthier. Use non-dairy milk for a lighter option. Can I use pumpkin spice versus pumpkin puree? You can use pumpkin spice, but it won't taste the same. Pumpkin spice adds flavor but lacks the creamy texture. Pumpkin puree gives the drink a rich taste and creaminess. I recommend using both for the best flavor. How to make it vegan-friendly? To make vegan pumpkin spice hot chocolate, use non-dairy milk. Almond, oat, or soy milk works great. Replace whipped cream with coconut whipped cream for a vegan treat. Use maple syrup instead of sugar for added sweetness. Can I freeze pumpkin spice hot chocolate? Yes, you can freeze it! Pour it into an airtight container. Leave some space for expansion. When ready to enjoy, thaw in the fridge overnight. Reheat gently on the stove or in the microwave. Where can I find pre-made versions or mixes? You can find pre-made mixes at many grocery stores. Look in the hot beverage aisle. Some brands offer pumpkin spice hot chocolate mixes. If you prefer homemade, the recipe is quick and easy! Making Pumpkin Spice Hot Chocolate is simple and fun. We covered the key ingredients and how to choose the best ones. I shared step-by-step instructions for a creamy drink, along with tips to perfect it. You can also explore variations to suit your taste. Lastly, I explained how to store and reheat your delicious treat. Enjoy experimenting with flavors and textures. Whether it’s a cozy night or a festive gathering, this drink brings joy. Now, grab your ingredients and start creating your own version!

Pumpkin Spice Hot Chocolate Delightfully Creamy Treat

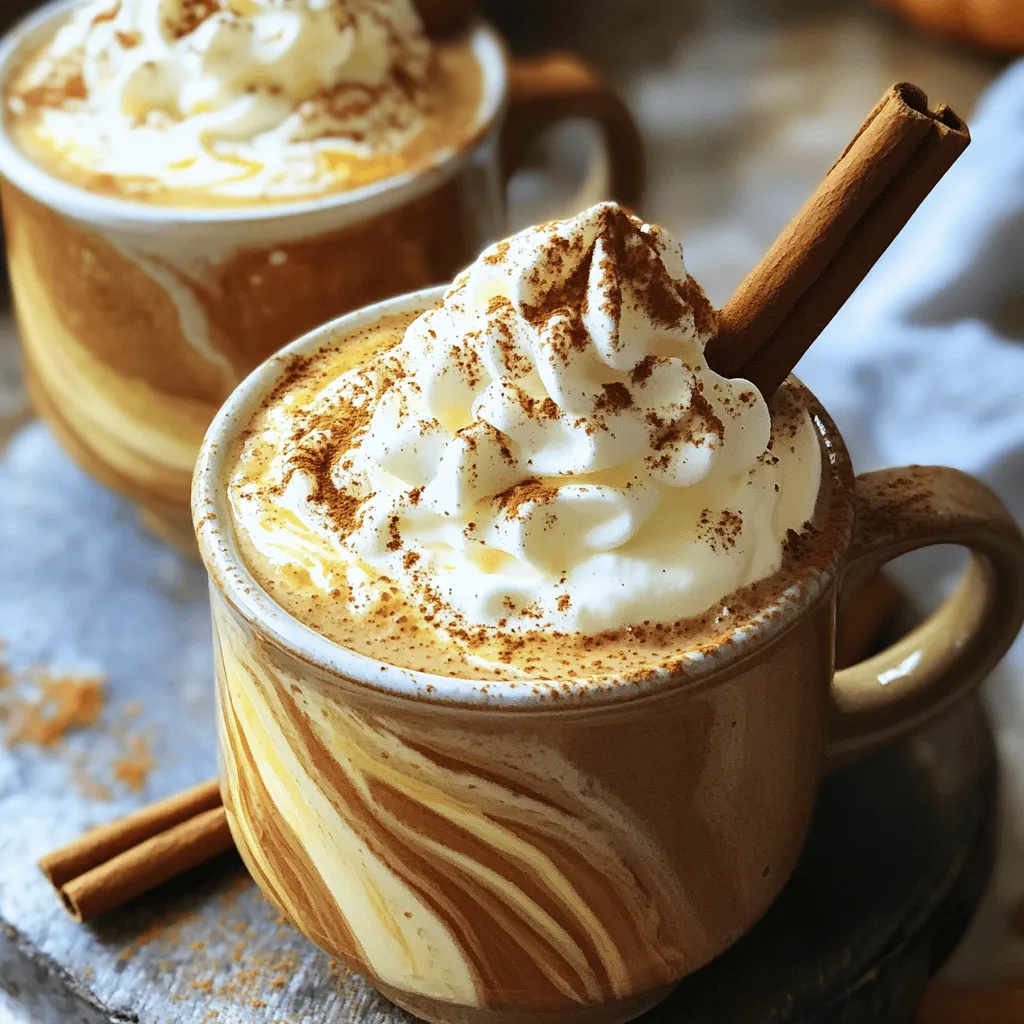
If you love cozy drinks, then Pumpkin Spice Hot Chocolate is a must-try! This delightfully creamy treat blends rich chocolate

- All-purpose flour: This is the base of our dough. It gives the rolls structure. - Granulated sugar: Adds sweetness and helps with browning. - Active dry yeast: This makes the rolls rise. It creates a light and fluffy texture. Apple butter is the star of this recipe. It adds rich flavor and moisture. It also gives the rolls a sweet and fruity taste. You can use store-bought apple butter or make your own. - Ground cinnamon: This spice brings warmth and sweetness. It pairs well with apple butter. - Nutmeg: Just a pinch adds depth. It gives a cozy, fall-like flavor. These spices work together. They create a lovely aroma and taste. When you bake these rolls, your kitchen will smell amazing. The mix of apple butter and spices makes every bite delightful. To start, gather your dry ingredients. In a mixing bowl, combine 1 cup of all-purpose flour, granulated sugar, active dry yeast, salt, and ground cinnamon. Mix these well. This blend helps the dough rise and adds flavor. Next, we need to add the wet ingredients. In another bowl, whisk together 1/2 cup of warmed milk, 1/4 cup of melted butter, and 1 large egg. Now, pour this mixture into the dry ingredients. Stir until you form a soft dough. Now it's time to knead. Sprinkle more flour on your work surface. Knead the dough for about 5-7 minutes. You want it smooth and elastic. This helps develop gluten, which gives the rolls their great texture. Once the dough has risen, we roll it out. Flour your surface again and roll the dough into a rectangle, about 1/4-inch thick. This gives us enough space for the filling. Spread 1 cup of apple butter evenly over the dough, leaving a small border around the edges. Now, let’s prepare the spice mix. In a small bowl, mix together 1/4 cup of brown sugar, 1 teaspoon of ground cinnamon, and 1/4 teaspoon of nutmeg. Sprinkle this mixture over the apple butter. The spices add warmth and depth to the rolls. Next, roll the dough tightly into a log, starting from one long side. Pinch the seam to seal it. This keeps the filling inside. Cut the rolled dough into 1-inch thick slices. Place these in a greased baking dish. Cover them and let them rise again for about 30 minutes. Now, let’s get ready to bake. Preheat your oven to 350°F (175°C). After the second rise, the rolls should look puffy. Bake them for 20-25 minutes. Look for a golden-brown color on top. To ensure the perfect bake, check the rolls a few minutes early. If they look golden, they are likely done. While the rolls bake, mix 1 cup of powdered sugar with 2 tablespoons of milk for icing. Stir until smooth. Once the rolls cool slightly, drizzle the icing over the top. Enjoy the sweet smell as they cool! To get the best dough for your apple butter cinnamon rolls, focus on kneading. Knead the dough for about 5-7 minutes. This helps develop gluten, which gives the rolls their soft texture. If the dough feels sticky, sprinkle a bit of flour on your hands and the surface. The ideal temperature for rising is warm, around 75°F to 85°F (24°C to 29°C). If your kitchen is cool, place the dough near a warm oven. Cover it with a clean towel to keep it cozy. This will help it rise nicely. If you want to try different flour, you can use bread flour instead of all-purpose. Bread flour has more protein, which gives the rolls extra chewiness. Whole wheat flour is another option, but it may make the dough denser. To boost the flavor of your rolls, think about add-ins. Chopped nuts, like pecans or walnuts, add a nice crunch. Dried fruits, such as raisins or cranberries, can bring extra sweetness. When using apple butter, spread it evenly. This ensures every bite is packed with flavor. You can also mix in some spices, like ginger or cloves, for added warmth. For icing, you can mix powdered sugar with milk for a simple drizzle. For a twist, try adding vanilla extract or cream cheese to the icing. This will give your rolls a richer taste. {{image_2}} You can make these apple butter cinnamon rolls even more fun! Here are some ideas: - Adding nuts or dried fruits: Chopped walnuts, pecans, or dried cranberries add a nice crunch. Just sprinkle them over the apple butter before rolling up the dough. - Using different fruit butters: Try peach or pumpkin butter for a twist. Each fruit butter gives a unique taste and aroma to the rolls. - Spicing it up with other extracts: Experiment with vanilla or almond extract in the dough. This adds extra depth and flavor to each bite. You can also tweak this recipe to fit your diet. Here’s how: - Gluten-free dough alternatives: Use a gluten-free flour blend. This keeps the rolls soft and fluffy, just like the original. - Vegan substitutes for the recipe: Swap the egg with a flax egg and use plant-based milk and butter. These changes keep the rolls tasty and kind to animals. - Lower sugar options: Reduce the sugar in the dough and use a sugar substitute for the filling. This way, you can enjoy sweet rolls without too much sugar. To keep your apple butter cinnamon rolls fresh, you should store them properly. First, let the rolls cool down completely. This helps avoid excess moisture in your storage container. Place the rolls in an airtight container. You can also wrap them tightly in plastic wrap. This keeps them soft and moist for longer. For best results, use a container that fits the rolls snugly. This prevents them from moving around and getting squished. If you have a large batch, consider stacking them with parchment paper between layers. This prevents sticking and helps maintain their shape. When you want to enjoy them again, reheating is key. Preheat your oven to 350°F (175°C). Place the rolls on a baking sheet and cover them with foil. Bake for about 10 minutes to warm them through. This keeps the outside soft and the inside fluffy. If you want to save your apple butter cinnamon rolls for later, freezing is a great option. First, let the rolls cool completely. Next, wrap each roll in plastic wrap. This helps prevent freezer burn and keeps the flavor intact. You can also place them in a freezer-safe bag or container. Be sure to remove as much air as possible. To thaw, move the rolls from the freezer to the fridge for about 8 hours. If you're in a hurry, you can thaw them at room temperature for 1-2 hours. Once thawed, you can bake them. Preheat your oven to 350°F (175°C) and bake for about 15-20 minutes. This gives you fresh-tasting rolls again! Frozen cinnamon rolls can last for about 3 months in the freezer. After that, they may lose some flavor and texture. Enjoy them while they are at their best! Yes, you can use homemade apple butter. Homemade apple butter often tastes fresher and has more flavor than store-bought. You control the ingredients and can adjust the sweetness. Plus, using homemade apple butter can make your rolls unique. It adds a personal touch to your baking. If your dough doesn't rise, check a few things. First, make sure your yeast is active. You can test it by mixing it with warm water and sugar. It should bubble in about 5 minutes. If it doesn’t, your yeast may be old. Next, check the temperature. Yeast needs warmth to grow. If your kitchen is cold, find a warm spot to let the dough rise. A turned-off oven with the light on can work well. Lastly, if the dough is too dry, add a bit of warm milk. This can help it rise. You can prepare these cinnamon rolls ahead of time! After shaping the rolls, cover them well and place them in the fridge. They can stay there overnight. When ready to bake, let them rise for about 30 minutes before preheating the oven. This way, you can enjoy fresh rolls in the morning with less effort. We’ve covered how to make delicious apple butter cinnamon rolls, from gathering ingredients to baking. The apple butter adds rich flavor, while spices enhance the taste. Remember to knead your dough well for the best texture. You can even try different fruits and diets. Store leftovers properly to keep them fresh. With these tips, your cinnamon rolls will be a hit. Enjoy your baking journey!

Apple Butter Cinnamon Rolls Delightfully Soft Treat

Get ready to treat yourself with my Apple Butter Cinnamon Rolls! These delightfully soft treats are perfect for breakfast or

To make a delicious pineapple coconut cake, gather these key ingredients: - 2 cups all-purpose flour - 1 ½ cups granulated sugar - 1 cup shredded coconut (unsweetened) - ½ cup unsalted butter, softened - 1 cup crushed pineapple, drained - 3 large eggs - 1 cup coconut milk - 1 tablespoon baking powder - 1 teaspoon vanilla extract - ½ teaspoon salt These ingredients work together to create a moist and flavorful cake. The crushed pineapple adds sweetness, while the coconut brings a lovely tropical vibe. If you want to mix things up, consider these optional ingredients: - ½ cup chopped walnuts - Cream cheese for frosting - Toasted coconut flakes for garnish Chopped walnuts add a nice crunch. Cream cheese frosting can make the cake extra creamy and rich. Toasted coconut flakes on top make for a beautiful presentation. You can swap some ingredients if needed: - Use whole wheat flour for a healthier option. - Swap granulated sugar for brown sugar for a deeper flavor. - Substitute coconut milk with almond milk for a nutty taste. These substitutions can change the flavor and texture of the cake. Experimenting with different ingredients can lead to fun and tasty results. To make the cake batter, start by preheating your oven to 350°F (175°C). Grease and flour a 9x13 inch baking pan. In a large bowl, cream together the softened butter and sugar until it looks light and fluffy. This step is key for a soft cake. Next, add the eggs one at a time. Beat well after each egg. Then, stir in the vanilla extract for extra flavor. In another bowl, combine the flour, baking powder, salt, and shredded coconut. Mix these dry ingredients well. Now, slowly add the dry mix to the wet mix, alternating with the coconut milk. Start and end with the flour mix. Mix just until everything comes together. Finally, fold in the crushed pineapple and chopped walnuts if you choose to use them. Once your batter is ready, pour it into the prepared pan. Use a spatula to smooth the top evenly. Bake in your preheated oven for 30-35 minutes. Check for doneness by inserting a toothpick into the center. If it comes out clean, your cake is ready. If not, give it a few more minutes. After baking, let the cake cool in the pan for about 10 minutes. Then, transfer it to a wire rack to cool completely. For a lovely finish, dust it with powdered sugar. You can also top it with coconut frosting made from softened cream cheese, coconut cream, and powdered sugar. To make it even more special, garnish with toasted coconut flakes and fresh pineapple slices. Enjoy your tropical delight! To keep your Pineapple Coconut Cake moist, use crushed pineapple. Drain it well, but keep some juice. This juice adds flavor and moisture. Always use room temperature eggs and butter for a smoother batter. Mixing the wet and dry ingredients together gently helps keep air in the batter. This makes a fluffier cake. One common mistake is overmixing the batter. Mix just until everything blends. Too much mixing can make the cake tough. Also, make sure to measure your flour correctly. Too much flour can dry out the cake. Lastly, avoid opening the oven door too soon. This can cause the cake to sink in the middle. Using the right tools makes baking easier. A good mixing bowl is key. I recommend a large one for easy stirring. A hand mixer or stand mixer helps blend ingredients well. For baking, a 9x13 inch pan works perfectly. Don’t forget a toothpick for checking doneness! A cooling rack is also great for cooling the cake evenly. {{image_2}} You can make a vegan version of this cake. Replace eggs with flax eggs. To make one flax egg, mix one tablespoon of ground flaxseed with three tablespoons of water. Let it sit for five minutes. For butter, use coconut oil or vegan margarine. Use almond or oat milk instead of coconut milk. This keeps the cake moist and tasty while being dairy-free. To make this cake gluten-free, swap out the all-purpose flour. Use a good gluten-free flour blend. Make sure it has xanthan gum, which helps with texture. This allows the cake to rise well and stay fluffy. The other ingredients remain the same, so your cake will still be delicious. You can add extra flavors to this cake. Consider mixing in a teaspoon of almond extract for a nutty twist. You might also include a bit of lime zest for a fresh burst. For those who love spices, a pinch of cinnamon or nutmeg can add warmth. Each of these options will make your pineapple coconut cake unique and exciting. To keep your pineapple coconut cake fresh, store it in an airtight container. This helps keep moisture in and prevents the cake from drying out. If you don’t have a container, wrap the cake tightly in plastic wrap. Place it in a cool, dry spot, like your kitchen counter or pantry. When stored correctly, pineapple coconut cake lasts about 3 to 5 days at room temperature. If you place it in the fridge, it can stay fresh for about a week. Just remember, the cake may dry out faster in the fridge than at room temperature. You can freeze pineapple coconut cake for longer storage. First, let the cake cool completely. Then, wrap it tightly in plastic wrap, making sure to cover it well. After that, place it in a freezer bag or airtight container. The cake can stay in the freezer for up to 3 months. When you're ready to enjoy it, thaw it in the fridge overnight before serving. Yes, you can use fresh pineapple. Just peel and chop it into small pieces. Make sure to drain any juice so the cake doesn’t get soggy. Fresh pineapple adds a bright, sweet taste. It can enhance the cake's freshness. The best way to serve this cake is chilled. You can slice it and place it on a pretty plate. Add a dusting of powdered sugar on top for a nice look. For extra flavor, serve it with whipped cream or coconut frosting. You can even add fresh pineapple slices on the side. To boost coconut flavor, use extra shredded coconut in the batter. You can also add coconut extract for a stronger taste. Topping the cake with toasted coconut flakes gives a nice crunch and adds more flavor. This blog covers how to make a tasty Pineapple Coconut Cake. You learned about key ingredients, plus fun variations to try. I shared step-by-step instructions, tips to keep your cake moist, and common baking mistakes to avoid. Don’t forget about storage practices to keep your cake fresh longer. With these ideas, you can create a cake everyone will love. Enjoy baking and experimenting with your own flavor twists!

Pineapple Coconut Cake Delightful and Simple Recipe

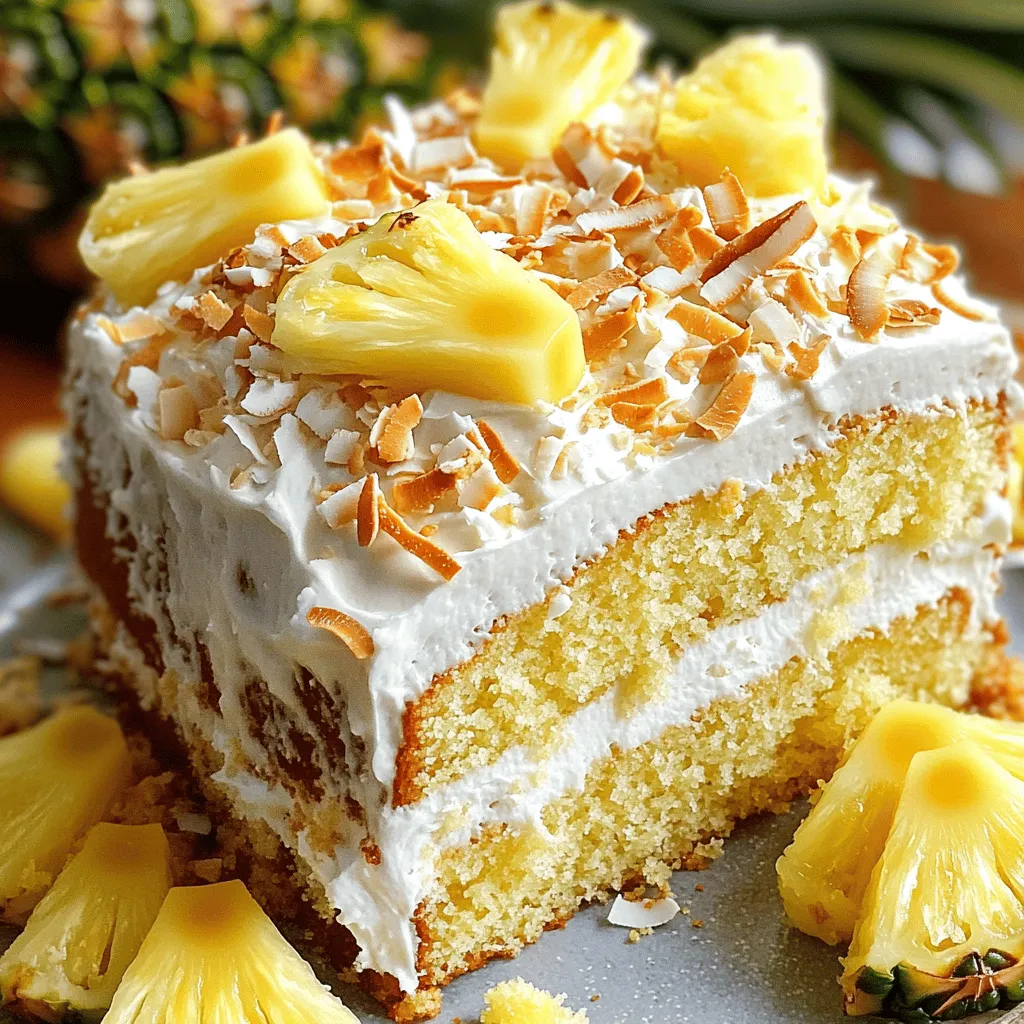
Are you ready to dive into a delicious treat? My Pineapple Coconut Cake is a sweet fusion of tropical flavors

To make Garlic Parmesan Knotted Rolls, you need the following items: - 3 cups all-purpose flour - 1 packet (2 1/4 teaspoons) active dry yeast - 1 cup warm water (110°F/45°C) - 2 tablespoons sugar - 1 teaspoon salt - 1/4 cup unsalted butter, melted - 1 teaspoon garlic powder - 1/2 cup grated Parmesan cheese - 2 tablespoons fresh parsley, chopped (optional for garnish) - Extra flour for dusting You can swap some ingredients if needed: - Use bread flour instead of all-purpose flour for a chewier roll. - If you don’t have active dry yeast, try instant yeast; just use the same amount. - For a dairy-free option, replace unsalted butter with a plant-based butter. - You can use dried parsley instead of fresh if you don’t have any. Gather these tools before you start: - A large mixing bowl for the dough - A small bowl for the yeast mixture - A wooden spoon for mixing - A clean surface for kneading - A kitchen towel to cover the dough - A parchment-lined baking sheet for the rolls - An oven for baking - A brush for melted butter, if desired These ingredients and tools will help you create the perfect Garlic Parmesan Knotted Rolls. Enjoy the process of making these tasty treats! To start, you need to make the dough. First, take a small bowl and mix warm water, sugar, and active dry yeast. Let this sit for about 5-10 minutes. You want it to look frothy. Next, grab a large mixing bowl and whisk together the flour and salt. Make a well in the middle, then pour in the melted butter and yeast mix. Now, start mixing the dough. Use a wooden spoon at first. When it starts to come together, switch to your hands. If the dough feels sticky, add a bit more flour, one tablespoon at a time. Knead the dough on a floured surface for about 5-7 minutes. It should feel smooth and elastic. Once done, place it in a greased bowl and cover it with a kitchen towel. Let it rise in a warm spot for about 1 hour, or until it doubles in size. After the dough has risen, it’s time to shape it. Punch down the dough to release air, and turn it onto a floured surface. Now, divide the dough into 12 equal pieces. Roll each piece into a rope that is about 8 inches long. Then, tie each rope into a knot. Place these knotted rolls on a parchment-lined baking sheet. In a small bowl, mix garlic powder and grated Parmesan cheese. Sprinkle this mixture generously over the knotted rolls. Cover them again with a kitchen towel and let them rise for another 30 minutes. Now, let's bake! Preheat your oven to 375°F (190°C). Once the oven is hot, place the knotted rolls inside. Bake for about 15-20 minutes. You want them to turn golden brown. After baking, remove them from the oven and let them cool slightly. If you like, brush them with melted butter and add a sprinkle of fresh parsley before serving. Enjoy your warm and tasty Garlic Parmesan Knotted Rolls! To get the best rolls, focus on the dough. When you mix the flour and salt, create a well in the center. Pour in the yeast mixture and melted butter. This helps blend the wet and dry parts well. Knead the dough for about 5-7 minutes. You want it smooth and elastic. If it feels sticky, add flour a little bit at a time. This will help you avoid a dense roll. For an extra kick, try adding fresh herbs. Rosemary or thyme pairs well with garlic. Mix these into your dough for added flavor. You can also use fresh garlic instead of garlic powder. Just chop it finely and mix it in. Don't forget to sprinkle more Parmesan on top before baking. This makes the rolls even more tasty. One common mistake is not letting the dough rise enough. Always wait until it doubles in size. This step is key for fluffy rolls. Another mistake is overbaking. Keep an eye on your rolls. They should be golden brown but not too dark. Lastly, don’t skip the butter brush after baking. It gives a lovely shine and flavor. {{image_2}} You can mix up the flavors in these knotted rolls. Try adding fresh herbs like rosemary or thyme. Just chop a tablespoon of your chosen herb and mix it into the dough. This adds a nice touch and brings more aroma to the rolls. If you need gluten-free rolls, use a gluten-free all-purpose flour. Ensure it has xanthan gum for better structure. Follow the same steps, but watch the dough closely. Gluten-free dough may need less water, so add slowly until it feels right. Switching cheese is fun! Use mozzarella for a melty twist. Grate it and mix it in the dough or sprinkle it on top. Cheddar adds a sharp taste. Just replace half of the Parmesan with cheddar. This gives a rich flavor while still keeping the classic taste. To keep your Garlic Parmesan Knotted Rolls fresh, place them in an airtight container. This helps to lock in moisture and flavor. If you leave them out, they can dry out quickly. For short-term storage, you can keep them at room temperature for up to two days. If you want them to last longer, move them to the fridge. They will stay good for about a week in the fridge. When you're ready to enjoy your rolls again, reheating is easy. Preheat your oven to 350°F (175°C). Place the rolls on a baking sheet. Cover them with foil to prevent them from getting too dry. Heat for about 10-15 minutes until warmed through. If you want a crispy top, remove the foil for the last few minutes. You can also reheat in a microwave for about 15-20 seconds, but the oven is best for that fresh-baked taste. You can freeze Garlic Parmesan Knotted Rolls too! Once they cool completely, wrap each roll in plastic wrap. Then, place them in a freezer bag or an airtight container. They can stay in the freezer for up to three months. When you want to eat them, thaw overnight in the fridge. Reheat as mentioned above. This way, you can enjoy these tasty rolls whenever you want! Yes, you can make these rolls ahead. After shaping them, you can cover and chill them in the fridge. This way, they stay fresh overnight. Just let them rise for about 30 minutes before baking. This makes a great option for busy days or gatherings. To make the rolls fluffier, ensure the dough rises well. Use warm water for the yeast, and let it sit until frothy. Knead the dough until smooth and elastic. You can also add a bit of extra flour when needed, but avoid too much. This keeps the rolls light and airy. These rolls pair well with many dishes. You can serve them with soups or salads for a complete meal. They also go great with marinara sauce or garlic butter for dipping. Try them alongside pasta dishes or grilled meats for a tasty feast. In this blog post, we covered the key steps to make Garlic Parmesan Knotted Rolls. We listed the ingredients, gave alternatives, and shared the tools you need. You learned how to prepare the dough, shape the rolls, and bake them to perfection. We also discussed tips for texture, flavor, and common mistakes. Variations like gluten-free options and cheese types make these rolls unique. Finally, you know how to store and reheat them. Enjoy baking these rolls and wow your friends with your skills!

Garlic Parmesan Knotted Rolls Easy and Delicious Recipe

If you love warm, buttery rolls with a zesty kick, this Garlic Parmesan Knotted Rolls recipe is for you! I’ll

To make these tasty cookies, gather the following key ingredients: - 1 cup unsalted butter, softened - 1/2 cup granulated sugar - 1/2 cup brown sugar, packed - 1 large egg yolk - 1 teaspoon vanilla extract - 2 1/4 cups all-purpose flour - 1/4 teaspoon salt - 1 cup cherry pie filling (store-bought or homemade) These ingredients create a rich, buttery dough with a sweet cherry center. The butters and sugars blend well, giving your cookies a nice texture. The egg yolk adds moisture and helps bind the dough. For extra crunch and flavor, consider adding: - 1/2 cup chopped pecans Chopped pecans add a nutty taste and a delightful crunch to each bite. You can also try adding a pinch of cinnamon or almond extract for a twist. If you need substitutes, here are some options: - For unsalted butter, use salted butter but reduce added salt. - If you lack brown sugar, use white sugar and add a bit of molasses. - Use an egg substitute like applesauce or a flax egg if you're vegan. These substitutes can help you make delicious cookies even if you’re missing an ingredient! Start by getting your space ready. First, preheat your oven to 350°F (175°C). This helps the cookies bake evenly. Next, line a baking sheet with parchment paper. This keeps the cookies from sticking. Having everything ready makes the process smooth. In a large bowl, combine 1 cup of softened unsalted butter with 1/2 cup of granulated sugar and 1/2 cup of brown sugar. Use a mixer to beat them until they are light and fluffy. This step is key for a nice cookie texture. Now, add in 1 large egg yolk and 1 teaspoon of vanilla extract. Mix well until it’s smooth. Next, gradually add 2 1/4 cups of all-purpose flour and 1/4 teaspoon of salt. Stir until a soft dough forms. If you want extra crunch, fold in 1/2 cup of chopped pecans. This step is optional but adds great flavor. Roll the dough into 1-inch balls. Place them on the prepared baking sheet, leaving about 2 inches between each ball. Use your thumb or the back of a small spoon to create a little dent in each ball. This is where the cherry pie filling will go. Spoon about 1/2 teaspoon of cherry pie filling into each indentation. It’s okay if some filling spills out; it makes them look homemade. Bake the cookies for 15-18 minutes. They should be lightly golden around the edges when done. Let them cool on the baking sheet for 5 minutes. Then, move them to a wire rack to cool completely. Once cooled, dust the cookies lightly with powdered sugar. This adds a nice touch of sweetness and makes them look pretty. Enjoy your tasty Cherry Pie Thumbprint Cookies! To get the best cookie texture, start with softened butter. This helps create a light and fluffy mix. Make sure to cream the butter well with both sugars. This step adds air to your dough. Don't rush it; take your time. When mixing in the flour, do it slowly. Over-mixing can lead to tough cookies. Aim for a soft dough that is still a bit sticky. If it’s too dry, add a splash of water or milk. One common mistake is not measuring ingredients accurately. Use measuring cups for dry and wet ingredients. Each measurement counts! Another mistake is skipping the parchment paper. It helps prevent sticking and makes cleanup easy. Also, don’t forget to space the cookie balls. They need room to spread while baking. Lastly, keep an eye on the bake time; every oven is different. Check for light golden edges to know when they are done. Adding chopped pecans can give a nice crunch. Fold them into the dough before rolling into balls. You can also swap in other nuts like walnuts or almonds. If you like a bit of spice, add a pinch of cinnamon. For a twist on flavor, try using almond extract instead of vanilla. This can change the whole taste. Remember, keep it fun and personal. Each add-in can make these cookies uniquely yours! {{image_2}} You can swap cherry pie filling for other fruits. Blueberries, raspberries, or peaches work great. Each fruit adds its special taste. For a fun twist, try lemon curd for a zesty kick. You can also mix two fruits for new flavors. These changes keep your cookies exciting and fresh. You can make these cookies gluten-free. Just use a gluten-free flour blend instead of all-purpose flour. For vegan cookies, replace butter with coconut oil or vegan butter. Use a flax egg in place of the egg yolk. Mix one tablespoon of flaxseed meal with three tablespoons of water. Let it sit until thick. These options ensure everyone can enjoy these yummy treats. Toppings can make your cookies even better. After baking, try adding a drizzle of chocolate on top. A sprinkle of crushed nuts adds crunch. You can also top them with a dollop of whipped cream or yogurt for creaminess. Fresh fruit or mint leaves can add color and flavor. These fun ideas make your cookies stand out at any gathering. To keep your cherry pie thumbprint cookies fresh, let them cool completely. Place them in an airtight container. This will help keep them soft and tasty. Store them at room temperature for up to a week. If you want to keep them longer, try freezing them. Freezing these cookies is simple and smart. After they cool, arrange them in a single layer on a baking sheet. Pop them in the freezer for about an hour. This makes sure they don't stick together. Once frozen, transfer them to a freezer-safe bag. They will stay good for up to three months. When you're ready to eat them, let them thaw at room temperature. To maintain the best taste and texture, use these tips: - Avoid humidity: Keep them in a dry place to prevent sogginess. - Use parchment paper: Layer parchment paper between cookies if stacking them. - Check for freshness: Always look for changes in smell or texture before eating. Following these steps will help you enjoy your cherry pie thumbprint cookies longer! Yes, you can make these cookies ahead of time. You can prepare the dough and shape the cookies. Store the shaped dough balls in the fridge for up to three days. When you're ready to bake, just add the cherry filling and bake as directed. This makes it easy to enjoy fresh cookies anytime. If you don't have cherry pie filling, you can use other fruit fillings. Blueberry, raspberry, or even apple filling work well. You may also use homemade fruit compotes or jams. Just ensure the filling isn't too runny to keep the cookies from getting soggy. These cookies last about a week when stored properly. Keep them in an airtight container at room temperature. If you want to keep them longer, you can freeze them. They can last up to three months in the freezer. Just thaw them before serving for the best taste. You can now make tasty cherry pie thumbprint cookies with ease. You've learned the key ingredients, simple steps, and helpful tips. Plus, I shared fun variations and smart storage methods. Enjoying these cookies doesn't stop with just making them; you can also try different fruits and toppings. With practice, your cookies will shine. So, gather your ingredients and start baking! You’ll impress everyone with your skills and delicious treats.

Cherry Pie Thumbprint Cookies Simple and Tasty Treat

Looking for a fun and easy treat? Cherry Pie Thumbprint Cookies are your answer! With a delicious filling and soft,

- 2 cups all-purpose flour - 2 cups granulated sugar - 1 cup vegetable oil - 3 cups grated carrots The main ingredients create a rich and moist cake. The flour gives structure, while the sugar adds sweetness. Vegetable oil keeps the cake soft. Grated carrots bring natural sweetness and moisture. - Baking soda and powder - Ground spices: cinnamon and nutmeg - Optional mix-ins: walnuts and raisins Baking soda and powder help the cake rise. Cinnamon and nutmeg add warm flavor. You can mix in walnuts and raisins for texture and taste. They also enhance the overall flavor profile. - 8 oz cream cheese - 1/2 cup unsalted butter - 4 cups powdered sugar - Vanilla extract and milk For the frosting, cream cheese and butter create a smooth base. Powdered sugar sweetens and thickens the mix. Vanilla extract adds depth, and milk adjusts the texture. This frosting complements the cake perfectly. First, preheat your oven to 350°F (175°C). While the oven warms up, grease and flour two 9-inch round cake pans. This step keeps the cake from sticking. Next, take a large bowl and combine the dry ingredients. Whisk together 2 cups of all-purpose flour, 2 cups of granulated sugar, 1 teaspoon of baking soda, 1 teaspoon of baking powder, 1 teaspoon of ground cinnamon, 1/2 teaspoon of ground nutmeg, and 1/2 teaspoon of salt. Mix well for even flavor. In a separate bowl, whisk together 1 cup of vegetable oil and 4 large eggs. Beat them until they blend well. Gradually add this oil and egg mixture to the dry ingredients. Stir until just combined. Be careful not to overmix. Now, fold in 3 cups of grated carrots, 1 cup of crushed pineapple (drained), and optional ingredients like 1/2 cup of chopped walnuts or 1/2 cup of raisins. These add great taste and texture. Pour the batter evenly into your prepared cake pans. Bake in the preheated oven for about 25 to 30 minutes. A toothpick inserted in the center should come out clean when done. After baking, let the cakes cool in the pans for 10 minutes. Then, transfer them to a wire rack to cool completely. This cooling step is crucial for the frosting to stick later. To make a moist carrot cake, fresh ingredients are key. When you use fresh carrots, they add natural moisture. Old or dried-out carrots can make your cake dry. Always choose firm, vibrant carrots for the best results. Next, measure your flour correctly. Too much flour will lead to a dense cake. I recommend spooning the flour into your measuring cup and leveling it off. This way, you won’t pack it down and end up with a dry cake. For a smooth cream cheese frosting, ensure your cream cheese and butter are at room temperature. This helps them blend well. If the frosting is too thick, add a splash of milk. Mix until it reaches your desired consistency. When it comes to decorating, let your creativity shine! You can sprinkle chopped walnuts or grated carrots on top. This adds a nice touch and makes the cake look appealing. To slice and serve your cake, use a sharp knife. Clean the knife between slices for neat cuts. I suggest serving the cake at room temperature for the best flavor. Pair your carrot cake with a warm cup of tea or coffee. The flavors complement each other beautifully. You can also serve it with a scoop of vanilla ice cream for a delightful treat. {{image_2}} You can easily make this carrot cake healthier. Start by swapping all-purpose flour for whole wheat flour. This change adds more fiber and nutrients without losing flavor. Another smart swap is using unsweetened applesauce instead of some oil. It keeps the cake moist but cuts down on fat. You can replace half of the oil with applesauce. This small change makes a big difference! Want to mix things up? Add some shredded coconut to the batter. It gives the cake a nice chew and a tropical taste. You can also add a bit of orange zest. Just a teaspoon can brighten up the flavor. It adds freshness and pairs well with the carrots. Don’t forget to experiment with spices! You can try adding ginger or cloves for a warm kick. This gives your cake a unique twist. If you need gluten-free options, you can use a gluten-free flour blend. Make sure to check the blend for the best results. It keeps the texture light and fluffy. For vegan adaptations, replace the eggs with ground flaxseed mixed with water. Use plant-based butter and cream cheese for frosting. This way, everyone can enjoy this tasty treat! To keep your carrot cake fresh, allow it to cool completely. Once cool, wrap it in plastic wrap. This helps lock in moisture and flavor. If you have cream cheese frosting, store the cake in the fridge. Cover it with foil or place it in an airtight container. At room temperature, the cake stays fresh for about three days. If you want to keep it longer, freezing is a great option. Wrap the cake tightly in plastic wrap and then in foil. This keeps it safe from freezer burn and preserves its taste. When you reheat the cake, add a little moisture. Place a damp paper towel over the cake. Heat it in the microwave for about 10-15 seconds. If the cake was frozen, let it thaw in the fridge overnight before reheating. After freezing, the frosting may lose its texture. Consider making a fresh batch of frosting to ensure a creamy finish. You can use several egg alternatives. For each egg, try: - 1/4 cup unsweetened applesauce - 1/4 cup mashed banana - 1 tablespoon ground flaxseed mixed with 2.5 tablespoons water These options help bind the cake and keep it moist. Using applesauce adds a slight sweetness. Flaxseed provides healthy fats and fiber. Yes, you can use various nuts. Some great options are: - Pecans - Almonds - Hazelnuts Each nut gives a unique taste and crunch. Make sure to chop them into small pieces. This helps distribute the flavor evenly throughout the cake. To restore moisture, you can: - Brush the cake layers with simple syrup - Serve with a dollop of cream cheese frosting Simple syrup is made by mixing equal parts sugar and water. Heat until the sugar dissolves. Brush it over the cooled cake layers for added moisture. To frost a layered cake evenly, follow these steps: 1. Place one cake layer on a plate. 2. Spread a thin layer of frosting on top. 3. Add the second layer and frost the top and sides. Use a spatula for smooth edges. If you want a clean look, chill the frosted cake for a bit before adding more frosting. You can find the complete recipe for Classic Cream Cheese Frosted Carrot Cake [here](#). It includes detailed instructions and tips for perfect results. You now have the tools to make a classic carrot cake with cream cheese frosting. We covered key ingredients, step-by-step instructions, and helpful tips. Don't forget to explore variations that suit your taste or dietary needs. Whether you're baking for a special occasion or just a treat, this cake will impress. Try out what you've learned, and enjoy every delicious bite!

Classic Cream Cheese Frosted Carrot Cake Delight

Welcome to my kitchen! Today, I’m sharing my Classic Cream Cheese Frosted Carrot Cake Delight. This cake is moist, sweet,

To make the perfect Pumpkin Spice Hot Chocolate, you need a few key ingredients: - 2 cups whole milk (or any milk of your choice) - 1/2 cup canned pumpkin puree - 1/4 cup unsweetened cocoa powder - 1/4 cup sugar (adjust to taste) - 1 teaspoon vanilla extract - 1/2 teaspoon pumpkin pie spice (plus extra for garnish) - 1/4 teaspoon cinnamon - Whipped cream, for topping - Dark chocolate shavings, for garnish If you prefer non-dairy options, you can swap whole milk for almond, oat, or soy milk. Each choice adds a unique flavor and texture. You can also use sugar substitutes like maple syrup or agave nectar to fit your taste. Pumpkin puree is a great source of vitamins A and C. It has fiber that helps digestion. The antioxidants in cocoa powder may boost heart health. Using different types of milk can also have health perks. - Whole milk gives creaminess and calcium. - Almond milk is low in calories and high in vitamin E. - Oat milk offers fiber and can help lower cholesterol. Choosing your ingredients wisely can make this cozy drink not just tasty but also good for you! To make Pumpkin Spice Hot Chocolate, start with a medium saucepan. Combine 2 cups of whole milk and 1/2 cup of canned pumpkin puree. Heat this mixture over medium heat. Whisk it well until everything blends. This takes about 3 to 4 minutes. Next, add 1/4 cup of unsweetened cocoa powder, 1/4 cup of sugar, 1 teaspoon of vanilla extract, 1/2 teaspoon of pumpkin pie spice, and 1/4 teaspoon of cinnamon. Keep whisking until the cocoa powder mixes in fully. Heat until it steams but do not let it boil. This step should take about 5 minutes. If it gets too thick, add a splash of milk. Once your hot chocolate is warm, remove it from the heat. Pour it into mugs or heatproof glasses. For the best serving, top each mug with a dollop of whipped cream. Sprinkle extra pumpkin pie spice on top. Add dark chocolate shavings for a fancy touch. You can pair this drink with snacks like cookies or brownies. It also goes well with pastries or a slice of pie. Enjoying a cozy drink while nibbling on treats makes it even better! To make the best Pumpkin Spice Hot Chocolate, avoid a few common mistakes. First, do not rush the whisking. Slow, steady mixing keeps the cocoa powder from clumping. Second, don’t let the mixture boil. Boiling can change the flavor and texture. Instead, heat it gently until it steams. The right consistency is creamy, not too thick or thin. If it feels too thick, just add a splash of milk. Taste it after mixing. If it needs sweetness, add more sugar until it’s just right. If you have leftovers, store them in an airtight container in the fridge. It can last up to three days. Before reheating, stir well. This helps mix any settled ingredients. Heat it gently on the stove over low heat. Stir often to keep it smooth and creamy. You can also use a microwave, but do it in short bursts. Heat and stir until warm. This way, your hot chocolate stays delicious and cozy for your next sip! {{image_2}} You can easily make this drink fit your needs. For a vegan version, use almond milk or oat milk. These are great non-dairy options. You can also try coconut milk for a richer taste. If you're watching your sugar, use a sugar substitute like stevia or erythritol. This way, you enjoy the flavor without the added calories. Want to spice things up? Try adding a pinch of nutmeg or a splash of caramel. These flavors mix well with pumpkin spice. If you want an adult twist, consider adding a splash of spiced rum or bourbon. These options make your drink fun for gatherings. Just remember, start with a little and taste as you go. This ensures the flavors blend well without overpowering the cocoa. How do I make Pumpkin Spice Hot Chocolate without dairy? You can use any non-dairy milk. Almond, oat, or coconut milk all work well. Start by warming the non-dairy milk with pumpkin puree. Then, add cocoa powder, sugar, vanilla, pumpkin pie spice, and cinnamon as you normally would. Whisk everything together over medium heat until it’s hot but not boiling. Can I use flavored cocoa powder? Yes, flavored cocoa powder can add a twist. Try using a chocolate mint or hazelnut flavor. Just remember to adjust your sugar. Flavored cocoa can be sweeter, so taste as you go. This way, you keep the perfect balance of flavors. What are the best mugs for serving hot chocolate? Choose thick, ceramic mugs for serving. They keep the drink hot longer. Larger mugs let you add more toppings, too! Look for fun designs or seasonal themes to make it festive. A good mug enhances the cozy feel of your drink. How can I make it ahead of time for parties? You can prepare Pumpkin Spice Hot Chocolate up to a day in advance. Just follow the recipe, let it cool, and store it in the fridge. When ready to serve, reheat it gently on the stove. Stir well and serve with whipped cream and toppings. This saves time and keeps the party stress-free! You can find the full recipe for Pumpkin Spice Hot Chocolate right here. This cozy drink takes only 10 minutes to prep and 15 minutes total. It serves two, making it perfect for sharing. - 2 cups whole milk (or any milk of your choice) - 1/2 cup canned pumpkin puree - 1/4 cup unsweetened cocoa powder - 1/4 cup sugar (adjust to taste) - 1 teaspoon vanilla extract - 1/2 teaspoon pumpkin pie spice (plus extra for garnish) - 1/4 teaspoon cinnamon - Whipped cream, for topping - Dark chocolate shavings, for garnish 1. Start by heating your milk with pumpkin puree in a medium saucepan over medium heat. Whisk the two ingredients together until they blend well. This takes about 3 to 4 minutes. 2. Next, add cocoa powder, sugar, vanilla extract, pumpkin pie spice, and cinnamon. Keep whisking until the cocoa powder mixes in completely. You want it to steam but not boil, which takes about another 5 minutes. 3. Taste the mixture. If you want it sweeter, add more sugar. If it's too thick, add a splash of milk to thin it out. 4. When it's hot enough, pour the mixture into mugs or heatproof glasses. 5. Top your drink with whipped cream. Add a sprinkle of pumpkin pie spice and dark chocolate shavings to make it look fancy. This drink is rich, creamy, and full of fall flavors. Enjoy every sip! In this post, we explored how to make the perfect Pumpkin Spice Hot Chocolate. We covered ingredients, health benefits, and step-by-step instructions. You learned tips for storage and reheating and ways to customize your drink. Remember, you can adjust flavors and ingredients to meet your tastes and dietary needs. Enjoy this tasty treat with friends or on your own. Get creative and find your perfect blend, and let every sip warm your day.

Pumpkin Spice Hot Chocolate Irresistible Cozy Drink

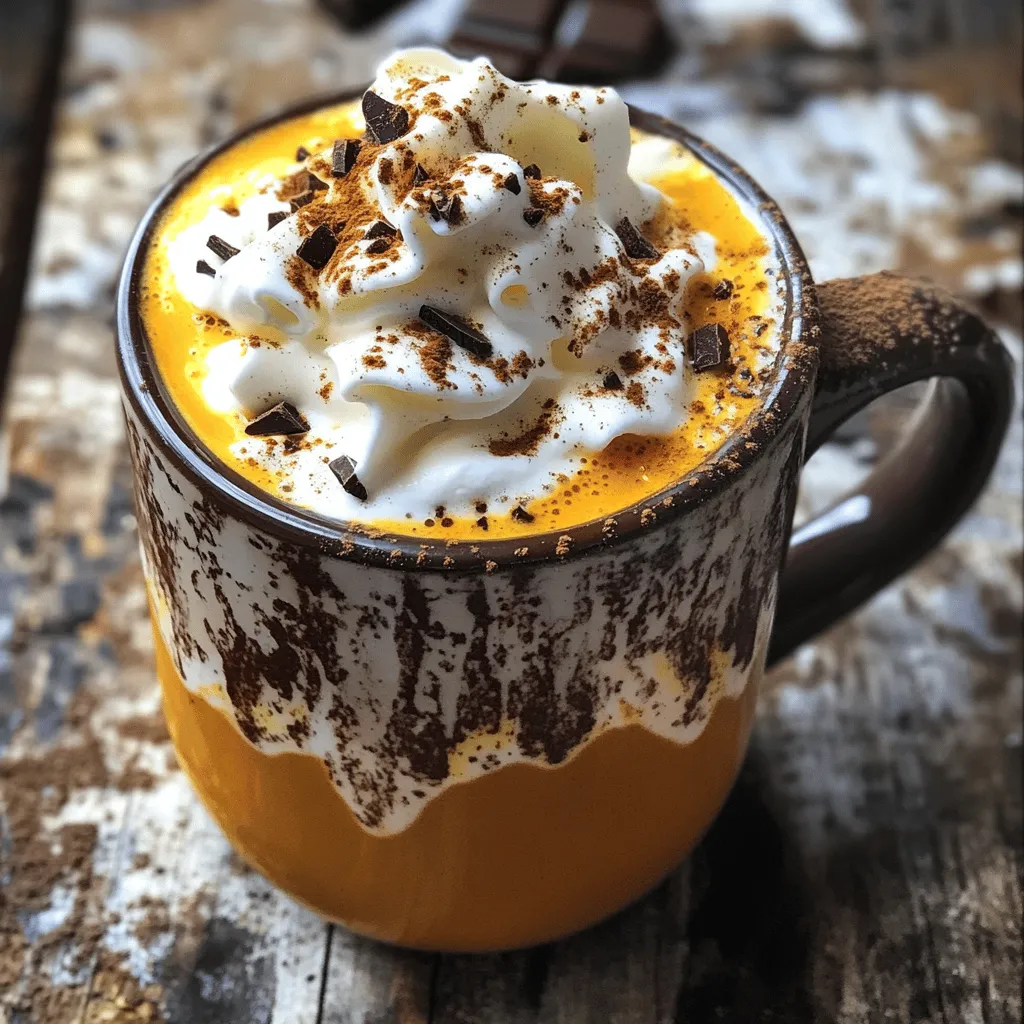
If you love a warm, cozy drink, Pumpkin Spice Hot Chocolate is for you. This delicious treat combines rich chocolate

- 2 cups all-purpose flour - 1/4 cup granulated sugar - 1 packet (2 1/4 teaspoons) active dry yeast - 1/2 teaspoon salt - 1/2 teaspoon ground cinnamon - 1/4 cup unsweetened applesauce - 1/2 cup warm milk (110°F / 43°C) - 1 large egg - 1/4 cup unsalted butter, melted - 1/2 cup apple butter (store-bought or homemade) - 1 tablespoon brown sugar - 1/2 teaspoon vanilla extract - 1/4 teaspoon nutmeg - Optional: Powdered sugar for icing Gather these ingredients before you start. Each one plays a key role in making your rolls soft and fluffy. The all-purpose flour gives the dough its structure. Sugar sweetens and helps with browning. Active dry yeast is crucial for the rise, while salt enhances flavor. Ground cinnamon adds warmth, and applesauce keeps the rolls moist. Warm milk activates the yeast, and the egg adds richness. Unsalted butter brings flavor, and apple butter gives a sweet and spiced filling. Brown sugar, vanilla, and nutmeg add more depth of flavor. Finally, if you want a sweet finish, powdered sugar makes a lovely icing. Having everything ready makes the process smooth and fun. You can experiment with some ingredients too, like using whole wheat flour for a different texture. Enjoy this journey of making Apple Butter Cinnamon Rolls! - Mixing dry ingredients: In a large bowl, combine 2 cups of flour, 1/4 cup of sugar, 2 1/4 teaspoons of yeast, 1/2 teaspoon of salt, and 1/2 teaspoon of cinnamon. Stir these together until mixed well. - Preparing wet ingredients: In another bowl, whisk together 1/2 cup of warm milk, 1/4 cup of applesauce, 1/4 cup of melted butter, and 1 large egg. Make sure the mixture is smooth. - Combining and kneading the dough: Slowly add the wet mix to the dry mix. Stir until a soft dough forms. Then, knead the dough on a floured surface for about 5-7 minutes. The dough should feel smooth and elastic. - First rise duration and conditions: Place the dough in a greased bowl and cover it with a clean kitchen towel. Let it rise in a warm spot until it doubles in size, about 1 hour. - Shaping and rolling the dough: After it has risen, punch the dough down to release air. Roll it out on a floured surface into a rectangle about 1/4 inch thick. Spread 1/2 cup of apple butter over the dough, leaving a small border. - Second rise before baking: Mix 1 tablespoon of brown sugar, 1/2 teaspoon of vanilla extract, and 1/4 teaspoon of nutmeg in a small bowl. Sprinkle this blend over the apple butter layer. Roll the dough tightly from the long side into a log. Pinch the seam to seal it and slice into 12 equal pieces. Arrange the rolls in a greased baking dish, leaving space between them. Cover and let rise again for 30 minutes. - Preheating the oven: Preheat your oven to 350°F (175°C). - Baking time and visual cues for doneness: Bake the cinnamon rolls for 20-25 minutes. They are done when they turn golden brown on top. Allow them to cool slightly before adding optional icing. To make soft and fluffy rolls, knead the dough well. Kneading helps develop gluten. This gives the rolls their soft texture. Aim for about 5-7 minutes of kneading. You want the dough to feel smooth and elastic. If the dough sticks, add a little flour. If it feels too dry, wet your hands and knead again. For the perfect rise, keep the dough warm. After kneading, place it in a greased bowl. Cover it with a clean kitchen towel. Let it rise until it doubles in size, which takes about 1 hour. The warmth helps the yeast activate. If your kitchen is cold, try placing the bowl in a warm spot. When it comes to icing, I suggest a simple powdered sugar glaze. Mix powdered sugar with a little water or milk. This creates a smooth, sweet topping. For extra flavor, add a splash of vanilla or a sprinkle of cinnamon. You can also experiment with different flavors. For a twist, mix in some maple syrup. This makes the icing extra special. Another option is to make a cream cheese icing. It pairs well with the apple butter flavor. Just blend cream cheese with powdered sugar and a bit of vanilla. {{image_2}} You can make these rolls even better by adding nuts or raisins. Chopped walnuts or pecans give a nice crunch. Just sprinkle them over the apple butter before you roll the dough. If you like raisins, add a handful for a sweet touch. You can also change the spices in the apple butter. Try adding ginger or allspice for a warm flavor. A little extra cinnamon boosts the sweetness too. Make it fun by mixing spices to find your favorite combo. When it comes to icing, you have choices! Cream cheese icing is rich and tangy. It pairs well with the sweet rolls. For a lighter option, use a simple glaze made from powdered sugar and milk. You can also top the rolls with seasonal fruits. Fresh apple slices or berries add color and flavor. They make your rolls look pretty and taste great. Get creative and enjoy your own twist on these tasty treats! To keep your apple butter cinnamon rolls fresh, follow these steps: - Cool Completely: Let the rolls cool to room temperature. This helps prevent moisture buildup. - Use Airtight Containers: Store the rolls in an airtight container. You can also wrap them tightly in plastic wrap. - Refrigerate for Longer Storage: If you want to keep them for more than a couple of days, place them in the fridge. They can last up to a week this way. - Avoid Soggy Rolls: Place a paper towel inside the container. This absorbs excess moisture and keeps the rolls soft. When it’s time to enjoy your cinnamon rolls again, reheating is key: - Oven Method: Preheat your oven to 350°F (175°C). Place the rolls on a baking sheet and cover with foil. Heat for about 10-15 minutes until warm. - Microwave Method: For a quick fix, place a roll on a microwave-safe plate. Heat for 10-15 seconds. Add a small cup of water in the microwave to keep them soft. - Tips for Stale Rolls: If your rolls feel dry, brush them with a bit of melted butter before reheating. This adds moisture and flavor. Following these steps ensures your apple butter cinnamon rolls stay soft and tasty, ready for a second round of enjoyment! How to make apple butter homemade? To make apple butter, peel and core apples. Chop them and cook in a pot with sugar and cinnamon. Stir often for 45 minutes until thick. Blend until smooth. Can I use store-bought apple butter, or is homemade better? You can use store-bought apple butter. It saves time and still tastes great. Homemade has a fresher flavor, but store-bought works well in a pinch. How long do apple butter cinnamon rolls last? These rolls last for up to 3 days at room temperature. They stay fresh in an airtight container. You can also freeze them for up to 3 months. What can I substitute for active dry yeast? You can use instant yeast instead. Use the same amount for best results. Another option is to use 2 teaspoons of baking powder but adjust your liquid slightly. My rolls didn't rise; what might have gone wrong? If your rolls didn’t rise, the yeast might be old or the milk too hot. Yeast needs warmth but not heat above 120°F. Make sure to check the temperature. How to fix dry dough in cinnamon rolls? If your dough feels dry, add a bit of warm milk. Mix it in slowly until the dough feels soft. Knead gently until the dough becomes smooth and pliable. This blog covered making delicious apple butter cinnamon rolls, from ingredients to storage. You learned how to mix and knead the dough, achieve the perfect rise, and bake them to golden perfection. We explored icing options and ways to vary your rolls with nuts or spices. Don’t forget to follow our tips for storing and reheating leftovers. Enjoy your baking journey, and remember that practice makes perfect. You’ll impress everyone with your tasty treats!

Apple Butter Cinnamon Rolls Soft and Fluffy Treat

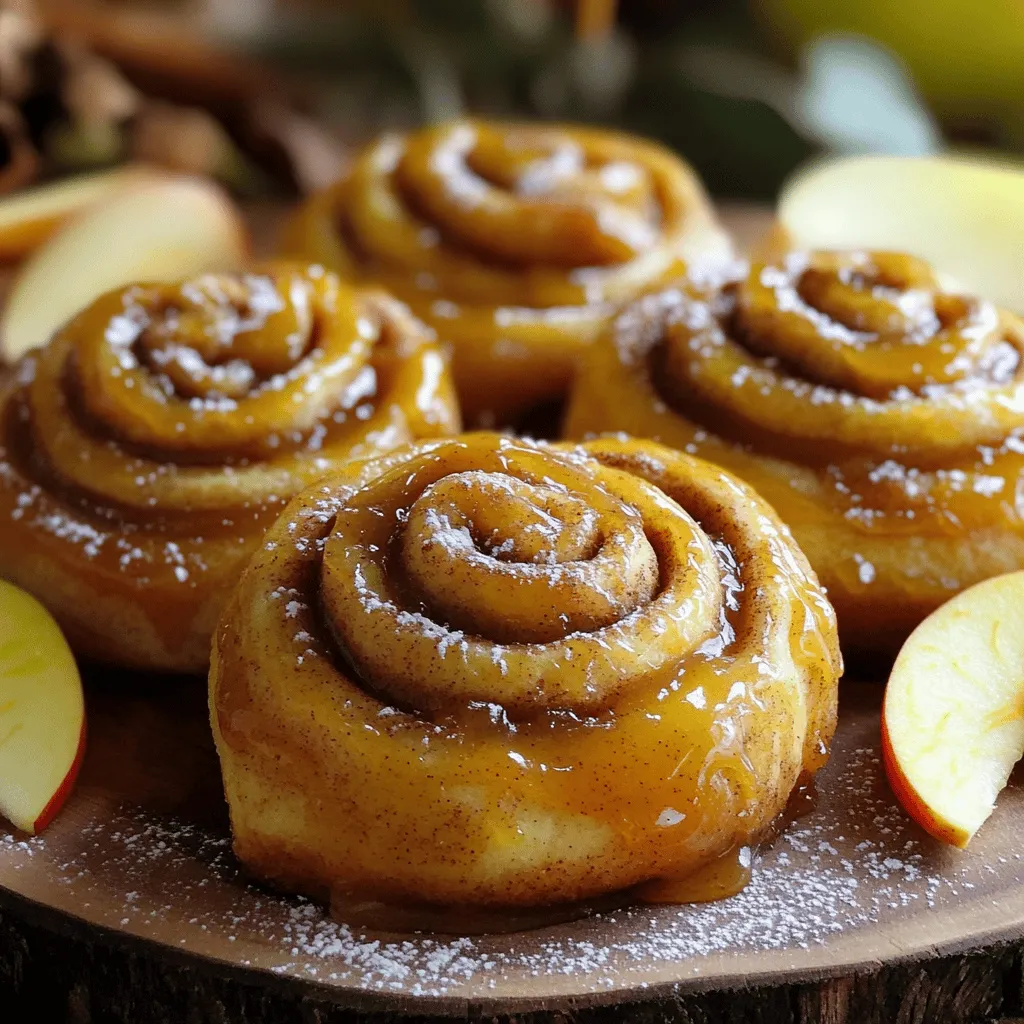
Get ready to savor the warm, sweet delight of Apple Butter Cinnamon Rolls. In this easy guide, I’ll walk you

- 2 cups all-purpose flour - 1 cup granulated sugar - 1 cup unsweetened shredded coconut - 1 cup crushed pineapple, drained - 1/2 cup unsalted butter, softened - 1 cup coconut milk - 3 large eggs - 1 tablespoon baking powder - 1/2 teaspoon salt - 1 teaspoon vanilla extract - 1/2 cup powdered sugar (for frosting) - 2 tablespoons coconut cream (for frosting) For this cake, I recommend using standard measurements. If you want a lighter cake, try using cake flour instead of all-purpose flour. You can swap coconut milk with almond milk for a different flavor. If you prefer a dairy-free cake, use vegan butter and a dairy-free milk. For the eggs, you can use flax eggs or applesauce as a substitute. One flax egg equals one tablespoon of ground flaxseed mixed with three tablespoons of water. Use fresh and high-quality ingredients for the best taste. Select shredded coconut that is unsweetened. This gives a better flavor and helps control sweetness. Make sure your butter is softened. This helps it blend smoothly with sugar. For the crushed pineapple, drain it well. Too much juice can make the cake soggy. Lastly, check the expiration dates on your baking powder and vanilla extract. Fresh ingredients ensure a successful bake. To start, preheat your oven to 350°F (175°C). Grease and flour a 9x13 inch baking pan. This helps the cake release easily after baking. Gather all your ingredients before you begin. You will need flour, sugar, coconut, pineapple, butter, coconut milk, eggs, baking powder, salt, and vanilla extract. In a large mixing bowl, cream the softened butter and granulated sugar. Mix for about 3 to 4 minutes until it looks light and fluffy. Then, add the eggs one by one. Make sure to mix well after each egg. Stir in the vanilla extract next. In another bowl, combine flour, baking powder, shredded coconut, and salt. Gradually add this dry mix to the wet mix, alternating with the coconut milk. Start and end with the dry mix. Be careful not to overmix. Finally, gently fold in the crushed pineapple until it is well mixed. Pour the batter into your prepared pan. Smooth the top with a spatula for an even bake. Bake it in the preheated oven for 30 to 35 minutes. To check if it’s done, insert a toothpick into the center. If it comes out clean, your cake is ready. Once baked, let it cool in the pan for 10 minutes. After that, transfer it to a wire rack to cool completely. This cooling step is crucial for the frosting to stick well later on. Baking can be tricky, but I have some tips to help you. - Overmixing the batter: This can make the cake tough. Mix gently and just until combined. - Wrong oven temperature: Always preheat your oven to 350°F. An oven thermometer helps. - Not measuring ingredients correctly: Use measuring cups for dry and liquid ingredients. Precision matters. - Skipping the cooling step: Let the cake cool completely before frosting for the best result. To bring out the best taste in your cake, try these ideas: - Use fresh ingredients: Fresh eggs and coconut milk make a big difference. - Let the pineapple drain well: This keeps your batter from getting too wet. - Add a pinch of salt: A little salt enhances sweetness and balances flavors. - Experiment with vanilla: Try using vanilla bean paste for a richer taste. The frosting adds a lovely touch to your cake. Here are some tips: - Make the frosting smooth: Whisk the powdered sugar and coconut cream well. - Adjust consistency: If the frosting is too thick, add more coconut cream until just right. - Garnish creatively: Add extra shredded coconut and pineapple slices on top for flair. - Slice neatly: Use a sharp knife dipped in warm water for clean cuts. {{image_2}} You can change the flavors in this cake. Try adding fresh mango or banana for a twist. Chopped macadamia nuts add a nice crunch. You can also swap coconut milk for almond milk or oat milk. This makes the cake lighter and just as tasty. While I love the coconut cream frosting, you can try other options. A simple cream cheese frosting pairs well with the tropical flavors. You can also use whipped cream for a lighter touch. For chocolate lovers, a chocolate ganache gives a rich contrast. To make a layer cake, split the batter into two or three pans. Bake them for a shorter time, around 25-30 minutes. Once cooled, stack the layers with frosting in between. This gives a stunning look and makes every slice extra special. Store leftover cake in an airtight container. This keeps it fresh and moist. Place the cake at room temperature if you plan to eat it within two days. If it will be longer, refrigerate it. Use parchment paper between layers to prevent sticking. To freeze the cake, first, let it cool completely. Wrap it tightly in plastic wrap. Then place it in a freezer-safe bag or container. Label it with the date. The cake can last in the freezer for up to three months. When you’re ready to eat it, thaw it in the fridge overnight. If you want to enjoy warm cake, preheat your oven to 350°F (175°C). Place slices on a baking sheet. Heat for about 10-15 minutes. You can also use the microwave for a quick reheat. Just warm slices for 15-20 seconds. Enjoy your cake warm with a fresh texture! Pineapple Coconut Cake can last about 3 to 5 days. Keep it in an airtight container. If you store it in the fridge, it may last a bit longer. The cake can become dry if left out too long. Yes, you can use fresh pineapple! Just chop it into small pieces and drain any juice. Fresh pineapple adds a bright flavor and texture to the cake. Make sure to measure the same amount as canned pineapple. To make this cake gluten-free, use a gluten-free flour blend. Many blends work well in baking. Look for ones that include xanthan gum for the best texture. You may need to adjust the baking time slightly. This blog post covered all the key parts to make a tasty Pineapple Coconut Cake. I shared the right ingredients, detailed steps, and helpful tips to avoid mistakes. You learned ways to customize the cake with fun flavors and how to store leftovers or freeze them for later. With this guide, you can bake a delicious cake that impresses friends and family. Enjoy the process and make it your own!

Pineapple Coconut Cake Delightfully Easy Recipe

If you love tropical flavors, you’re in for a treat! My Pineapple Coconut Cake is not only delightfully easy to

To make Garlic Parmesan Knotted Rolls, you need simple and fresh ingredients. Here is the detailed list of ingredients: - 3 cups all-purpose flour - 1 packet active dry yeast (2 ¼ teaspoons) - 1 teaspoon sugar - 1 teaspoon salt - 1 cup warm water (110°F/45°C) - ¼ cup unsalted butter, melted - 4 cloves garlic, minced - ¾ cup grated Parmesan cheese - 2 tablespoons chopped fresh parsley (optional for garnish) These ingredients blend together to create soft, tasty rolls. The garlic adds a warm kick, while the Parmesan gives a nice cheesy flavor. Using fresh parsley makes the rolls look pretty and adds a fresh taste. Choose good-quality ingredients for the best results. To start, you need warm water, sugar, and yeast. Pour 1 cup of warm water into a bowl. Add 1 teaspoon of sugar and 1 packet of active dry yeast. Stir gently. Now, let this sit for about 5 minutes. You will see bubbles form. This means your yeast is ready. Next, grab another bowl. Mix 3 cups of all-purpose flour and 1 teaspoon of salt together. Once mixed, add the yeast mixture to the flour. Stir until a dough starts to form. Now, knead the dough on a floured surface. Do this for about 5 to 7 minutes. The dough should feel smooth and elastic. Place your kneaded dough into a greased bowl. Cover it with a kitchen towel. Let it rise in a warm place for 1 hour. After this time, the dough should double in size. Punch it down gently. Turn it onto a floured surface. Divide the dough into 12 equal pieces. Roll each piece into a long rope, and tie it into a knot. Now, preheat your oven to 375°F (190°C). Prepare a baking sheet by lining it with parchment paper. Place your knotted rolls on the sheet, leaving space between them. In a small bowl, mix ¼ cup of melted butter, 4 minced garlic cloves, and half of the ¾ cup of grated Parmesan cheese. Brush this butter mix over each roll. Sprinkle the rest of the Parmesan cheese on top. Bake in the oven for 15 to 20 minutes until golden brown. Enjoy the aroma! - Roll each piece into a smooth, even rope. This helps them bake evenly. - To tie knots, create a simple loop with the rope. Then, pull one end through the loop. This keeps the shape tight. - You can mix up your garlic butter with more herbs. Try adding oregano or thyme for a twist. - Feel free to adjust the garlic amount. If you love garlic, add more! A pinch of red pepper flakes gives a nice kick. - Look for rolls that are golden brown on top. This shows they are baked well. - Tap the bottom of a roll; it should sound hollow if it’s done. - For a nutritional boost, add some ground flaxseed or chia seeds to the dough. They pack extra fiber and nutrients without changing the taste. {{image_2}} You can easily add herbs to your Garlic Parmesan Knotted Rolls. Fresh rosemary or thyme gives a nice touch. Just chop them finely and mix them into the dough. This adds a burst of flavor. You can also switch up the cheese. Instead of Parmesan, try mozzarella for a gooey center. Cheddar works well too, adding a sharp bite to the rolls. If you need a gluten-free option, use a gluten-free flour blend. Just make sure it has xanthan gum for the right texture. The rolls may taste different but will still be soft and yummy. For a vegan twist, substitute the butter with olive oil. Use a plant-based cheese or leave it out. You can replace the milk with almond or soy milk too. These small changes keep the rolls tasty and friendly for all diets. Get creative with seasonal flavors. In fall, add pumpkin puree to the dough. For winter holidays, mix in dried cranberries for a sweet surprise. These little changes make your rolls fit any occasion. To keep your leftover rolls fresh, store them in an airtight container. This helps prevent them from drying out. You can also wrap them in plastic wrap or aluminum foil. For the best taste, eat them within three days. When reheating, preheat your oven to 350°F (175°C). Place the rolls on a baking sheet. Heat for about 5-10 minutes. This keeps them soft and warm. Avoid using the microwave, as it can make them chewy. If you want to save some for later, freezing is a great option. Let the rolls cool completely before freezing. Wrap each roll in plastic wrap, then place them in a freezer bag. This helps keep them fresh. They can stay frozen for up to three months. To thaw, take the rolls out of the freezer. Leave them in the fridge overnight. When you are ready to eat, reheat them in the oven at 350°F (175°C) for about 10 minutes. This helps restore their texture and taste. Garlic Parmesan Knotted Rolls are perfect with dips like marinara or garlic butter. You can also serve them alongside soups or salads for a complete meal. If you have leftover rolls, try making garlic bread croutons. Cut the rolls into cubes and toast them in the oven. They add great flavor to salads or soups. You can even slice them and make mini sandwiches with your favorite fillings. You can tell your knotted rolls are done by looking for a few signs: - They should be golden brown on top. - The rolls will sound hollow when tapped on the bottom. - If you use a thermometer, the inside should reach 190°F (88°C). These signs will help you achieve the perfect texture and flavor. Yes, you can prep these rolls ahead of time! Here are some tips: - Make the dough and let it rise, then shape the rolls. - Cover the rolls with plastic wrap and store them in the fridge. - Bake them the next day, just remember to let them come to room temp first. This will save time on busy days. These rolls pair well with many dishes, such as: - A warm bowl of soup, like tomato or minestrone. - A fresh salad with vinaigrette dressing. - Dipping sauces like marinara or garlic butter. For drinks, serve with a light white wine or sparkling water. You can find the full recipe for Garlic Parmesan Knotted Rolls on our website. Just visit the recipe section to get all the details you need! To make Garlic Parmesan Knotted Rolls, we combined simple ingredients, followed easy steps, and added tips for best results. Remember to customize flavors and store them properly for later enjoyment. These rolls are not just tasty; they offer many fun variations for any meal. With a bit of practice, you can master this recipe and impress everyone. Enjoy the process and savor the results of your hard work. Happy baking!

Garlic Parmesan Knotted Rolls Simple and Tasty Treat

Are you ready to impress your family with a simple yet delicious treat? Garlic Parmesan Knotted Rolls are the perfect

Older posts
Newer posts
← Previous Page1 … Page41 Page42 Page43 … Page84 Next →

dsad

© 2026 juliesdish • Built with GeneratePress

Our Policies

  • Copyright Policy
  • Cookie Policy
  • GDPR Policy
  • Privacy Policy
  • Disclaimer
  • Terms Of Use

More Information

  • Home
  • About
  • Contact
  • Appetizers
  • Dessert
  • Dinner
  • Drinks
©2026, juliesdish About Back To Top