Skip to content
DisclaimerTerms Of UseGDPR PolicyCookie Policy

juliesdish

  • Home
  • Drinks
  • Appetizers
  • Dinner
  • Dessert
  • About
  • Contact
  • Privacy Policy
DisclaimerTerms Of UseGDPR PolicyCookie Policy

NO-ING-IMG

- 4 large bell peppers (any color) - 1 lb (450g) boneless, skinless chicken breast, cubed - 1 tablespoon olive oil - 1 medium onion, sliced - 1 red bell pepper, sliced - 1 green bell pepper, sliced - 2 cloves garlic, minced - 1 tablespoon chili powder - 1 teaspoon cumin - 1 teaspoon paprika - Salt and pepper to taste - 1 cup corn kernels (fresh or frozen) - 1 cup black beans, rinsed and drained - 1 cup shredded cheddar cheese - Fresh cilantro for garnish - Lime wedges for serving You can swap the bell peppers for zucchini or eggplant if you want a twist. Ground turkey or beef works well instead of chicken. Use olive oil or any cooking oil you like. For a dairy-free option, try vegan cheese or skip the cheese entirely. If you don’t have black beans, kidney beans or pinto beans are great alternatives. Each serving of Chicken Fajita Stuffed Peppers contains roughly: - Calories: 350 - Protein: 30g - Carbohydrates: 40g - Fat: 10g - Fiber: 8g These peppers pack a healthy punch! They contain protein from chicken and beans, fiber from corn, and vitamins from the peppers. Enjoy this meal while keeping your nutrition in check. {{ingredient_image_1}} Start by preheating your oven to 375°F (190°C). This helps cook the peppers evenly. While the oven heats, take four large bell peppers. Slice off the tops and remove the seeds and membranes. This step is key to making room for the tasty filling. Place the peppers upright in a baking dish. They need a sturdy base to hold the filling. Next, grab a large skillet and heat one tablespoon of olive oil over medium heat. Once hot, add one pound of cubed boneless chicken breast. Season the chicken with salt, pepper, chili powder, cumin, and paprika. Cook it for about 5 to 7 minutes. You want the chicken browned and fully cooked. After the chicken is ready, toss in one sliced onion and the sliced red and green bell peppers. Sauté these for about 5 minutes until they soften. Add two minced garlic cloves and cook for one more minute. Finally, stir in one cup of corn and one cup of black beans. Make sure everything is mixed well and heated through. Now it’s time to fill your peppers! Remove the skillet from heat and carefully spoon the chicken mixture into each bell pepper. Pack the filling tightly. Then, top each pepper with one cup of shredded cheddar cheese. Cover your baking dish with foil. Bake the peppers for 25 minutes. After that, take off the foil and bake for an extra 10 minutes. This will make the cheese bubbly and golden. Once done, garnish with fresh cilantro and serve with lime wedges for a zesty kick! To make sure your peppers are soft, choose large, fresh ones. Cut off the tops and remove the seeds. Pre-baking them for 10 minutes at 375°F helps. This step softens them before filling. It also makes them cook evenly. You want your peppers to be tender and easy to eat. Seasoning is key to great flavor. Start with salt and pepper as your base. Add chili powder, cumin, and paprika for warmth. These spices bring out the best in the chicken and veggies. Mix them in while cooking the chicken. Taste as you go. This way, you can adjust to your liking. Try adding lime juice for a zesty kick. Fresh cilantro adds a bright touch. You can also top with avocado or sour cream. If you want extra heat, add jalapeños. For a smoky flavor, try smoked paprika. These small tweaks make a big difference. Your stuffed peppers will burst with flavor! Pro Tips Choose Colorful Peppers: Using a variety of colored bell peppers not only makes your dish visually appealing but also adds different flavors to the mix. Season Generously: Don't be shy with your spices! Proper seasoning is key to enhancing the flavors of the chicken and vegetables. Customize Your Fillings: Feel free to add other ingredients like diced tomatoes or jalapeños for an extra kick and more complexity in flavors. Serve with Fresh Sides: Pair your stuffed peppers with a fresh salad or guacamole to complement the dish and add a refreshing contrast. {{image_2}} You can make a tasty version without meat. Use beans, lentils, or quinoa as the base. Mix in some sautéed onions, corn, and spices. Add diced tomatoes for a fresh kick. Top with cheese or a dairy-free option. These stuffed peppers are just as satisfying and colorful. Want to switch up the protein? Ground turkey or beef works great. You can also use shredded rotisserie chicken for a quick option. For seafood lovers, try shrimp or crab meat. Each protein brings a unique taste, so feel free to experiment. Just adjust cooking time based on the protein you choose. If you're watching carbs, opt for cauliflower rice instead of beans or corn. Zucchini or mushrooms can replace the peppers altogether. You can bake the filling in a casserole dish for an easy, hearty meal. These low-carb options keep the flavor but trim the carbs. Enjoy your meal without the guilt! To keep your Chicken Fajita Stuffed Peppers fresh, let them cool down first. Place them in an airtight container. Store them in the fridge for up to four days. If you have extra filling, store that separately. This helps keep the peppers from getting soggy. When you want to enjoy the leftovers, simply preheat your oven to 350°F (175°C). Place the stuffed peppers in a baking dish. Cover them with foil to prevent drying out. Heat for about 15-20 minutes, or until they are warmed through. You can also microwave them for a quicker option. Heat on high for about 2-3 minutes, checking to ensure they are hot. If you want to save some for later, freezing is a great option. First, let the stuffed peppers cool completely. Wrap each pepper tightly in plastic wrap. Then, place them in a freezer-safe bag or container. They can last for up to three months in the freezer. To reheat, thaw them overnight in the fridge, then follow the reheating instructions above. Yes, you can use any cheese you enjoy! Try Monterey Jack for a milder taste. Queso fresco adds a nice crumbly texture. Pepper jack gives it a spicy kick. Just remember, the cheese needs to melt well for that gooey topping. Leftovers can last up to four days in the fridge. Store them in an airtight container to keep them fresh. Make sure to cool them down before sealing. You can reheat them in the oven or microwave when you're ready to eat. Many side dishes pair well with stuffed peppers. A simple green salad adds freshness. Mexican rice or quinoa can make it heartier. You might also try guacamole and tortilla chips for a fun twist. Each side dish complements the flavors in the stuffed peppers nicely. This post covered everything you need for stuffed peppers. We explored key ingredients, cooking steps, and ways to customize your dish. Plus, I shared storage tips and answered common questions. Stuffed peppers are tasty and easy to make. With the right mix of flavors, you can create a family favorite. Enjoy experimenting with different ingredients to make each dish unique. Happy cooking!

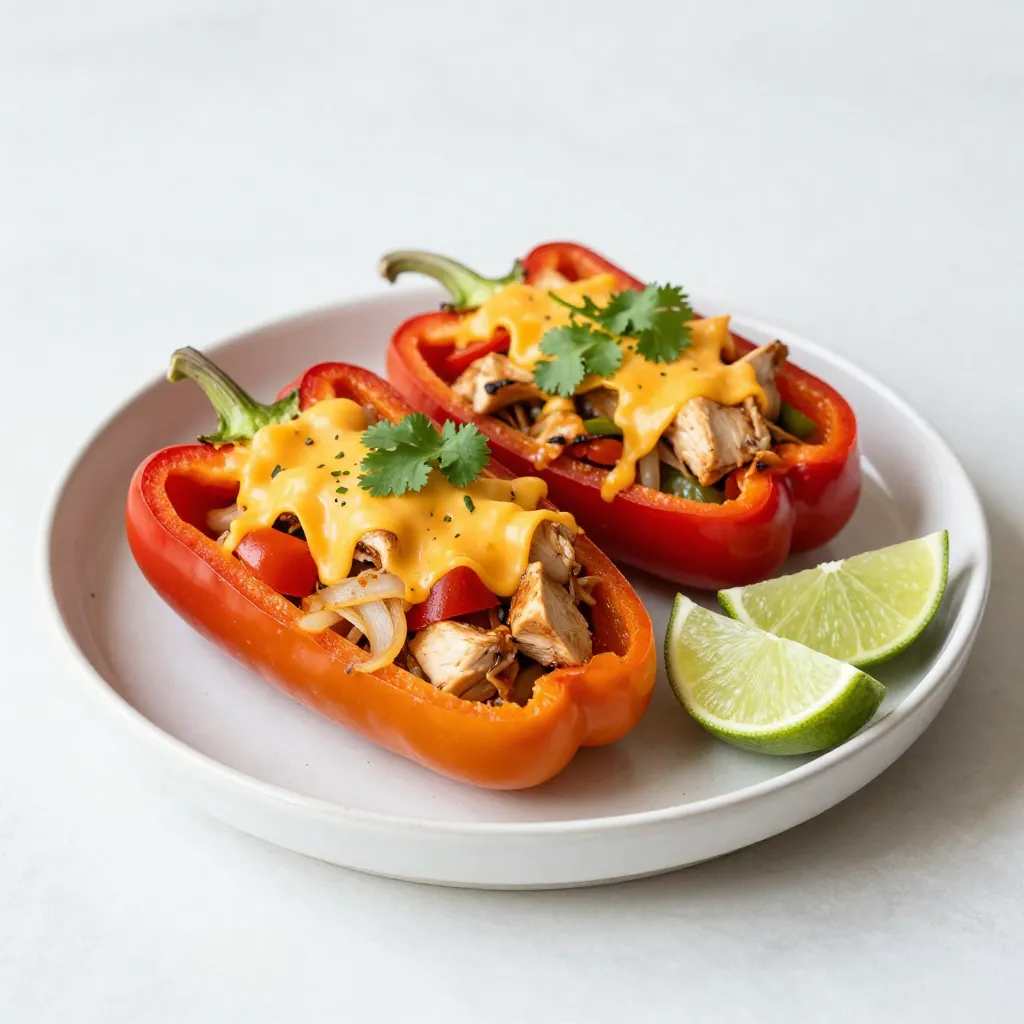
Chicken Fajita Stuffed Peppers Flavorful and Easy Meal

If you want a quick, tasty meal, try my Chicken Fajita Stuffed Peppers. They’re packed with bold flavors and are

- 2 cups all-purpose flour - 1/4 cup granulated sugar - 1 tablespoon baking powder - 1/2 teaspoon salt - 1/2 teaspoon ground cinnamon - 1/4 cup unsalted butter, melted - 3/4 cup milk - 1/2 cup apple butter - 1/4 cup brown sugar - 1 tablespoon ground cinnamon (for filling) - 1/2 cup chopped nuts (optional) - 1/2 cup powdered sugar (for icing) - 2 tablespoons milk (for icing) - 1/4 teaspoon vanilla extract To make apple butter cinnamon rolls, you need simple ingredients. First, gather all-purpose flour. It forms the base of the dough. Next, granulated sugar adds sweetness. Baking powder makes the rolls rise. Then, salt brings out the flavors. Ground cinnamon gives warmth. Unsalted butter adds richness while melted. You will also need milk for a moist dough. Apple butter is key for flavor. Brown sugar enhances the sweetness. Ground cinnamon for the filling is a must. Chopped nuts can add crunch, but they are optional. For icing, powdered sugar is essential. You will mix it with milk and vanilla extract for a creamy finish. Each ingredient plays a role in creating these delightful treats. 1. Start by mixing dry ingredients. In a large bowl, combine 2 cups of all-purpose flour, 1/4 cup of granulated sugar, 1 tablespoon of baking powder, 1/2 teaspoon of salt, and 1/2 teaspoon of ground cinnamon. Stir until mixed well. 2. Now combine wet ingredients. In another bowl, whisk together 1/4 cup of melted unsalted butter and 3/4 cup of milk. Pour this mixture into the dry ingredients. Mix until just combined. 3. Knead the dough. Place the dough on a floured surface. Gently knead it for about 2-3 minutes. You want it smooth and soft. Roll the dough into a rectangle about 1/4 inch thick. 1. Roll out the dough. Make sure your rectangle is even. This helps in even baking. 2. Spread apple butter. Take 1/2 cup of apple butter and spread it evenly over the dough. Leave a small border around the edges. 3. Add the cinnamon-sugar filling and nuts. In a small bowl, mix 1/4 cup of brown sugar with 1 tablespoon of ground cinnamon. Sprinkle this over the apple butter. If you like nuts, add 1/2 cup of chopped walnuts or pecans. 1. Roll and slice the dough. Starting from the long edge, roll the dough tightly into a log. Pinch the seam to seal it. Slice the roll into 12 equal pieces. 2. Let the rolls rise. Place the rolls in a greased baking dish. Cover them with a clean kitchen towel and let them rise in a warm place for about 30 minutes. 3. Bake the rolls. Preheat your oven to 350°F (175°C) while the rolls rise. Bake them for 25-30 minutes. They should look golden brown and cooked through. After baking, let them cool for about 10 minutes before icing. To get that perfect bakery-style cinnamon roll, start with the right ingredient temperature. Use room temperature butter and milk. This helps the dough blend well. If the butter is too cold, it can make the dough tough. Kneading is key for the right texture. After mixing, knead the dough for about 2-3 minutes. You want it smooth and soft. Don't over-knead. Too much can make the rolls dense. For optimal rising, place your rolls in a warm spot. Cover them with a clean kitchen towel. This helps the dough rise nicely. A good rise makes the rolls fluffy and light. Icing can make or break your cinnamon rolls. To get the right consistency, mix powdered sugar with milk and vanilla extract. Start with two tablespoons of milk. If it’s too thick, add more milk a little at a time. Adjusting sweetness levels is easy. If you prefer a sweeter icing, add more powdered sugar. Taste as you go. This way, you can find the perfect balance for your rolls. {{image_2}} You can change the filling to make these rolls even better. Try using different fruit butters like peach or pear. Each fruit adds its unique taste. You can also add chocolate or caramel for a sweet twist. Just spread the chocolate or caramel over the apple butter before rolling. This gives an extra layer of flavor. If you need gluten-free options, use gluten-free flour instead of all-purpose flour. This keeps the rolls soft and tasty. For vegan substitutes, replace the butter with coconut oil and use plant-based milk. You can also skip the icing or use a vegan version. These changes let everyone enjoy these rolls. To keep your apple butter cinnamon rolls fresh, store them in an airtight container. If you plan to eat them within two days, room temperature is fine. Just place the container on your kitchen counter. If you want them to last longer, refrigerate them. They can stay fresh for about a week in the fridge. Make sure to wrap them well to prevent drying out. When you are ready to enjoy your rolls again, reheating is key. The best method is to use the oven. Preheat it to 350°F (175°C). Place the rolls on a baking sheet, covered with foil. Heat them for about 10 minutes. This method keeps them soft and tasty. If you're in a hurry, you can use the microwave. Heat them for about 15-20 seconds. But be careful not to overheat. Too much time can dry them out. Yes, you can use homemade apple butter. Making your own apple butter lets you control the flavor and sweetness. Homemade apple butter often has a fresher taste and fewer additives than store-bought versions. You can use any apples you like, making it personal. Plus, it can be a fun project to share with family or friends. If you have extra, you can always enjoy it on toast or pancakes! If your cinnamon rolls come out dry, there are a few fixes. First, check your oven temperature. Too hot can cause quick drying. Make sure to measure flour correctly; too much can lead to dryness. Adding a little more milk in the dough can help keep it moist. After baking, brush the rolls with melted butter for added moisture. If they still feel dry, serve them warm with extra icing or cream cheese spread. Yes, you can prepare these rolls ahead of time. Make the dough and roll them, then cover with plastic wrap. You can place them in the fridge overnight. When ready to bake, let them sit at room temperature for about 30 minutes before baking. This allows them to rise nicely. You can also bake them in advance and store them. Just reheat them before serving for a warm treat! This blog post covered how to make delicious cinnamon rolls. We started with ingredient lists, then moved to step-by-step dough prep, assembling, and baking. I shared tips for achieving a bakery-style finish and perfect icing. We also explored variations and storage info. In my final thoughts, remember, the key to soft, tasty rolls is in the details. Enjoy baking and experimenting! Your perfect cinnamon roll awaits.

Apple Butter Cinnamon Rolls Bakery Style Delightful Treat

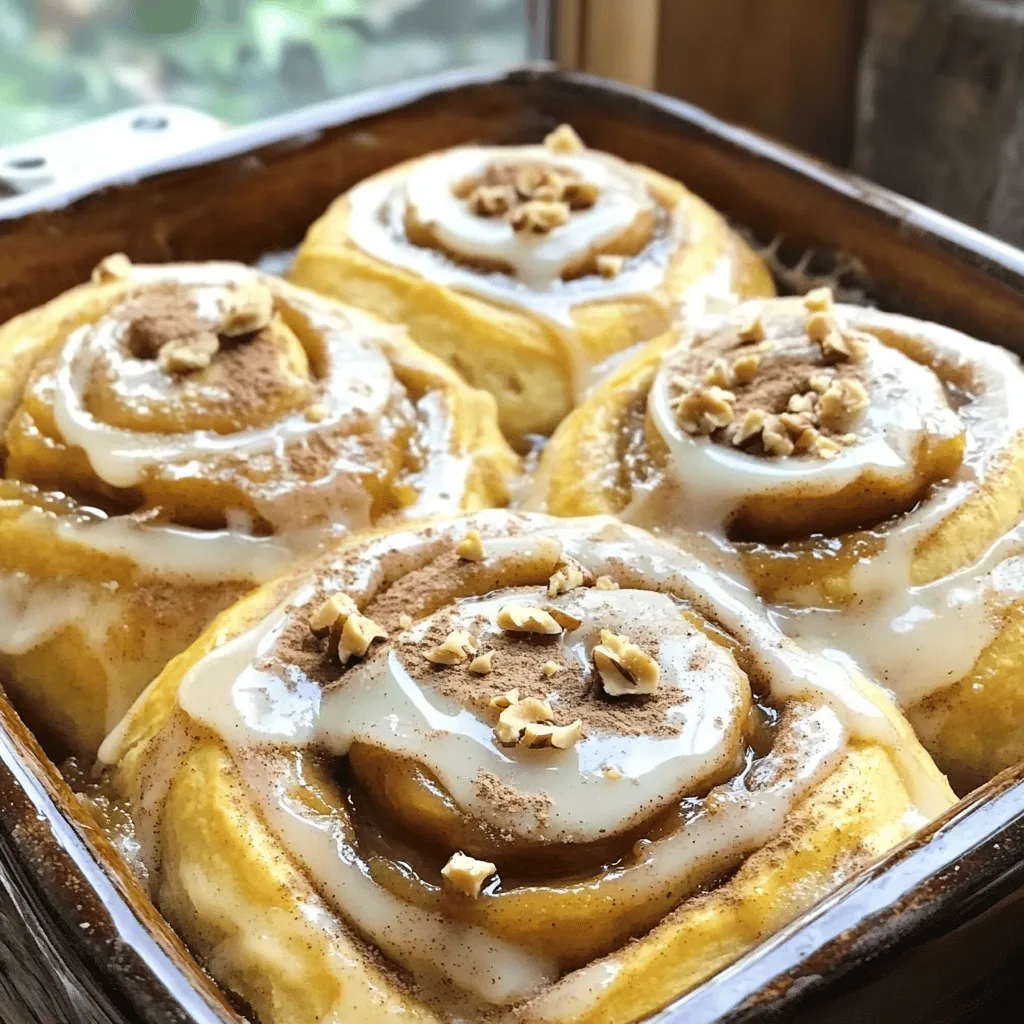
Treat yourself to a warm, delicious delight with my Apple Butter Cinnamon Rolls! These bakery-style rolls burst with flavor, thanks

To make Creamy Chicken Alfredo with Spinach, you will need: - 2 boneless, skinless chicken breasts, diced - 2 tablespoons olive oil - 4 cloves garlic, minced - 1 cup heavy cream - 1 cup chicken broth - 8 ounces fettuccine pasta - 1 cup spinach, fresh - 1 cup grated Parmesan cheese - Salt and pepper to taste - 1 teaspoon Italian seasoning - ¼ teaspoon nutmeg (optional) - Fresh parsley for garnish You can swap some ingredients to suit your taste or needs: - Chicken: Use turkey or shrimp for a different protein. - Pasta: Swap fettuccine for penne or gluten-free pasta. - Cream: Substitute heavy cream with coconut milk for a lighter sauce. - Cheese: Try using Pecorino Romano instead of Parmesan for a sharper flavor. - Spinach: Kale or Swiss chard can replace spinach for added texture. To enhance your dish, consider these quality tips: - Chicken: Choose fresh, high-quality chicken for the best flavor. - Olive Oil: Use a good extra virgin olive oil for richer taste. - Garlic: Fresh garlic adds more flavor than pre-minced options. - Cream: Select heavy cream with a high fat content for a thicker sauce. - Parmesan: Grate your own cheese for a fresher taste compared to pre-grated. These tips and substitutions can help you create a dish that suits your taste and dietary needs while maintaining the essence of this creamy delight! Start by gathering your chicken. You need two boneless, skinless chicken breasts. Dice them into bite-sized pieces. Heat two tablespoons of olive oil in a large pot over medium heat. Once the oil is hot, add the diced chicken. Sprinkle with salt, pepper, and Italian seasoning. Cook for about five to seven minutes, stirring often. This ensures even cooking and browning. The chicken should be cooked through and no longer pink. Once done, remove the chicken from the pot and set it aside. In the same pot, add four minced garlic cloves. Sauté for about thirty seconds. You want to release its fragrant flavor but avoid burning it. After the garlic is fragrant, pour in one cup of chicken broth and one cup of heavy cream. Give it a good stir to combine the liquids. Bring this mixture to a gentle simmer. It should start bubbling lightly, which means it’s ready for the next step. Now, add eight ounces of fettuccine pasta directly into the pot. Make sure the pasta is submerged in the creamy liquid. Cover the pot and cook for about ten to twelve minutes. Stir occasionally to prevent sticking. The pasta should be al dente, soaking up the flavors from the broth and cream. Once cooked, reduce the heat to low. Stir in one cup of grated Parmesan cheese. This will make your sauce rich and creamy. Add the cooked chicken back in along with one cup of fresh spinach. Stir until the spinach wilts and everything mixes well. Taste and adjust the seasoning with salt and pepper as needed. Let it sit for a couple of minutes to thicken. To make the sauce creamy, use heavy cream. It gives the dish a rich flavor. Add the cheese slowly while stirring. This helps melt it well. The nutmeg adds warmth and depth. If you prefer, try cream cheese for a different texture. Always cook the chicken until browned. This adds great flavor to the dish. Sauté garlic until fragrant, but don’t let it burn. Adding pasta directly to the sauce is key. This helps the pasta absorb all the yummy flavors. Remember to stir often to prevent sticking. Serve this dish in shallow bowls. Top with more Parmesan cheese for a nice touch. A sprinkle of fresh parsley adds color and flavor. You can also add extra spinach on top for a vibrant look. This makes your meal not only tasty but eye-catching, too! {{image_2}} You can switch up the pasta in this dish. Try penne or rigatoni for fun shapes. Gluten-free pasta works too! Just follow the cooking time on the package. You want it al dente to mix well with the creamy sauce. If you're not into chicken, shrimp is a tasty choice. Just cook shrimp until pink. Tofu is a great option for a plant-based meal. Use firm tofu, diced, and sauté until golden. Both options keep the meal hearty and satisfying. Add herbs for extra flavor. Fresh basil or thyme brighten the dish. A pinch of red pepper flakes gives heat if you like spice. You can also mix in sun-dried tomatoes for a sweet twist. These small changes make your Alfredo unique and delicious. You can store your Creamy Chicken Alfredo with Spinach in the fridge. Let it cool first. Place it in an airtight container. It will last for about 3 to 4 days. To enjoy it later, simply reheat it. Make sure to check for any off smells before eating. If you want to save some for later, freezing is a great option. Cool the dish completely before freezing. Use a freezer-safe container or a heavy-duty freezer bag. It can stay fresh for up to 2 months in the freezer. When ready to eat, thaw it in the fridge overnight. To reheat, you can use the stove or microwave. If using the stove, add a splash of chicken broth or cream to keep it creamy. Heat it over low heat, stirring often. If using the microwave, cover it loosely to avoid splatter. Heat in short bursts, stirring in between. This ensures even heating and keeps the sauce smooth. Yes, you can make this recipe ahead of time. Cook the chicken and pasta as directed. After that, store the dish in the fridge. When you are ready to serve, reheat it on the stove. Add a splash of chicken broth if it seems dry. This dish tastes great even after a day or two! If you want a lighter option, you can use half-and-half or whole milk. Coconut milk is a great dairy-free choice. For a thicker sauce, blend silken tofu with milk. Both options keep the flavor rich while cutting some fat. To make this dish gluten-free, use gluten-free pasta. Look for brands that offer fettuccine made from rice or corn. The rest of the ingredients are gluten-free, so you can enjoy this meal without worry. Just check labels to ensure all items meet your needs. To sum up, we explored key ingredients for your dish and their substitutes. I shared step-by-step cooking instructions for chicken and fettuccine. You also learned tips for a rich sauce and serving it well. We discussed various pasta and protein options to keep things exciting. Plus, I provided storage tips for later enjoyment. This recipe offers flexibility and flavor, making it easy to impress everyone. Enjoy your cooking!

Creamy Chicken Alfredo with Spinach One Pot Delight

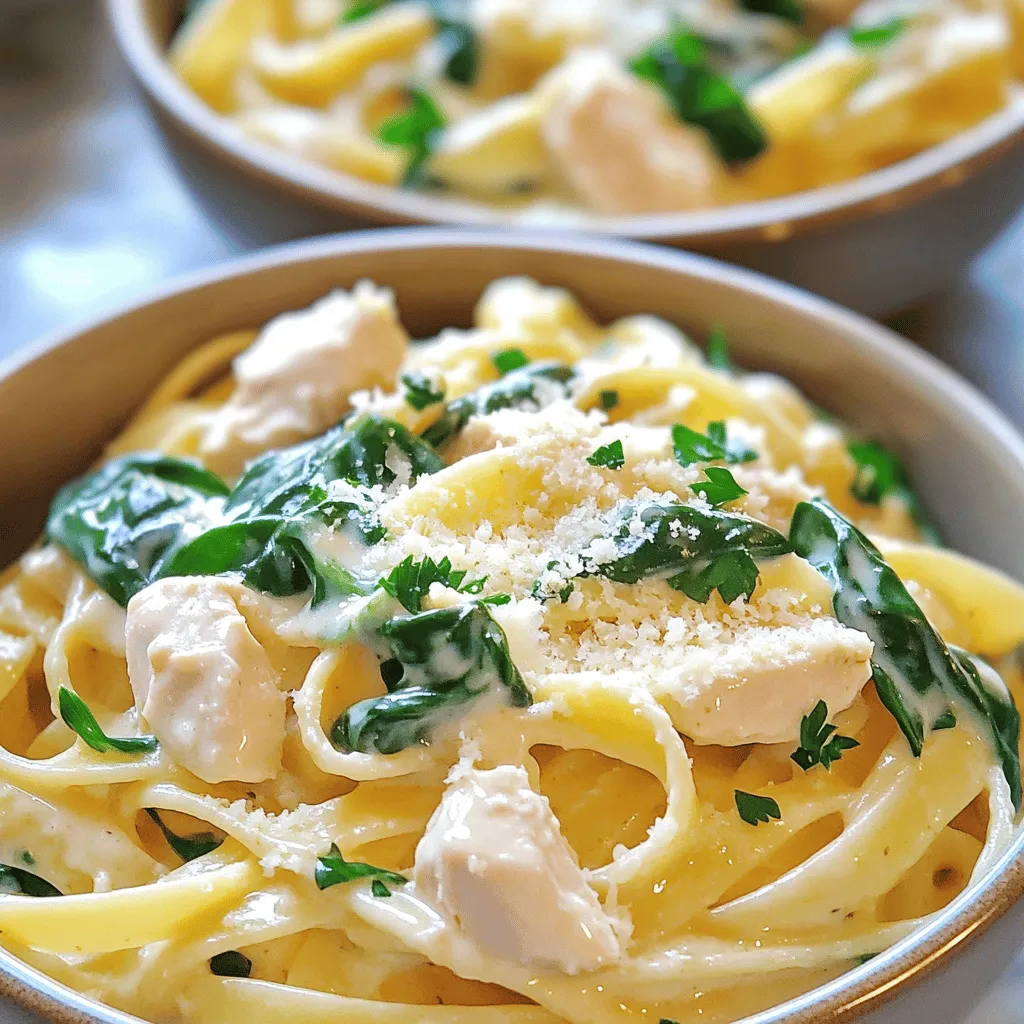
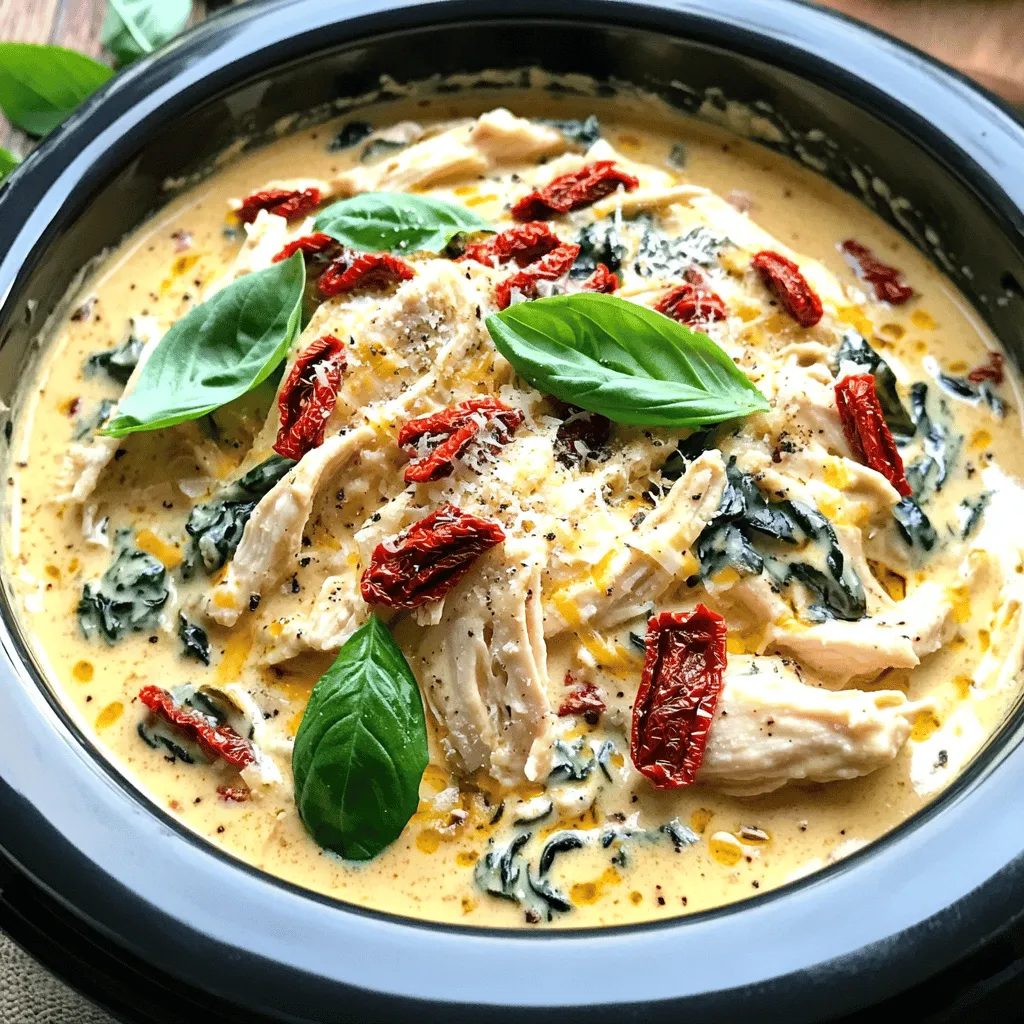
Welcome to Creamy Chicken Alfredo with Spinach One Pot Delight! If you crave a meal that’s rich, tasty, and easy

- 2 boneless, skinless chicken breasts - Salt and pepper, to taste - 1 cup all-purpose flour - 2 large eggs, beaten - 1 cup panko breadcrumbs - Vegetable oil, for frying To make great chicken katsu, you need fresh chicken breasts. Salt and pepper add flavor. All-purpose flour makes a dry coating. The eggs help the breadcrumbs stick. Panko breadcrumbs give a crispy texture when fried. Make sure you have enough vegetable oil to fry evenly. - 1 tablespoon sesame oil - 1 onion, finely chopped - 2 carrots, diced - 2 cloves garlic, minced - 1 tablespoon ginger, minced - 1 tablespoon curry powder - 4 cups chicken broth - 1 tablespoon soy sauce - 1 tablespoon honey For the curry sauce, sesame oil adds a rich flavor. Use a finely chopped onion for sweetness. Diced carrots bring color and crunch. Garlic and ginger add depth. Curry powder gives it that unique taste. Chicken broth makes the sauce rich and hearty. Soy sauce adds umami, while honey balances the flavors. - Cooked jasmine rice, for serving - Chopped green onions, for garnish - Sesame seeds, for garnish Serve your katsu curry with cooked jasmine rice. It soaks up the curry sauce. Chopped green onions add freshness. A sprinkle of sesame seeds gives a nice crunch. These garnishes make your dish look and taste amazing. First, take the chicken breasts and season them with salt and pepper. This step adds flavor. Then, place the chicken in a plastic bag and pound it gently. Make sure each piece is an even thickness. This helps the chicken cook evenly and stay juicy. Next, set up a breading station. You will need three shallow dishes. Fill the first dish with flour. In the second dish, beat two large eggs. In the third dish, pour in panko breadcrumbs. Take one chicken breast, dredge it in the flour, and shake off the excess. Then, dip it in the beaten eggs. Finally, coat it well with panko. Repeat this for each chicken breast. Now, heat vegetable oil in a large skillet over medium heat. You want enough oil to cover the bottom of the skillet. Once it is hot, carefully add the breaded chicken breasts. Cook them for about 3-4 minutes on each side. Look for a golden brown color. When done, remove the chicken and place it on a paper towel-lined plate. This drains excess oil and keeps it crispy. In the same skillet, lower the heat and add a tablespoon of sesame oil. Then, add a finely chopped onion and diced carrots. Sauté these for about 5 minutes until they soften. Next, stir in minced garlic and ginger, cooking for one more minute. Sprinkle in the curry powder and stir for about 30 seconds. This step releases the spice's fragrance. Now, pour in four cups of chicken broth, soy sauce, and honey. Stir well and bring it to a simmer. Let it cook for about 10 minutes. This allows all the flavors to meld together. To serve, take a deep plate and add a portion of cooked jasmine rice. Lay slices of the crispy chicken katsu on top. Then, ladle the curry sauce generously over the chicken. For a fun garnish, sprinkle chopped green onions and sesame seeds on top. This dish looks great and tastes even better! To make the best crispy chicken katsu, start with the right chicken. Use boneless, skinless chicken breasts. Pound them to an even thickness for even cooking. Season them well with salt and pepper for great flavor. Set up a breading station with flour, beaten eggs, and panko breadcrumbs. Dredge the chicken in flour first. Then dip it in eggs and coat with panko. The panko gives a lovely crunch. Fry the chicken in hot vegetable oil until golden brown. Drain it on a paper towel to keep it crispy. For a rich curry flavor, sauté onions and carrots first. This brings out their natural sweetness. Add minced garlic and ginger next. These ingredients add depth. Don’t skip the curry powder; it’s key. Toast it briefly in the pan to boost its flavor. Then, pour in chicken broth, soy sauce, and honey. The honey adds a hint of sweetness that balances the spices. Simmer the sauce for about 10 minutes. This allows all the flavors to meld beautifully. Use medium heat when frying chicken. High heat can burn the coating before the chicken cooks through. Monitor the oil temperature closely. If the oil is too hot, the coating will brown too fast. If it's too cool, the chicken will soak up oil and become greasy. For the curry, let it simmer gently. This helps the flavors develop and keeps the sauce nice and smooth. Serve the katsu over jasmine rice, letting the curry pool around it. This adds to the dish's visual appeal and flavor. {{image_2}} You can switch up the chicken for other proteins. Try using pork or fish. Both options offer great flavors and textures. For a vegetarian choice, use firm tofu. Slice it into thick pieces and follow the same breading steps. Tofu absorbs flavors well, making it a tasty option. Just remember to press it first to remove excess water. While traditional curry sauce is delicious, you can explore other flavors. Try adding coconut milk for a creamier texture. This adds a sweet note that balances the spices. You can also use different curry pastes like red or green curry paste. Each adds a unique twist to the dish. Don't hesitate to mix in vegetables like bell peppers or peas for added nutrition and color. Serve your crispy chicken katsu curry over warm jasmine rice. This rice soaks up the sauce nicely. You can also try serving it with udon noodles for a fun twist. On the side, consider a simple salad with cucumber and radish. This adds crunch and freshness. For a drink, serve with green tea or a light beer. These options complement the flavors perfectly. To keep your leftover chicken katsu fresh, place it in an airtight container. Make sure it cools to room temperature before sealing it. This helps avoid sogginess. Store it in the fridge for up to three days. If you want to keep it longer, you can freeze it. Just wrap each piece in plastic wrap and place it in a freezer bag. Chicken katsu can last up to three months in the freezer. For the curry sauce, let it cool down before storing. Pour it into a separate airtight container. It can stay in the fridge for about four days. If you have extra sauce, consider freezing it. Use ice cube trays to freeze small portions. Once frozen, transfer the cubes to a freezer bag. This makes it easy to use later. When reheating chicken katsu, the oven is best. Preheat your oven to 375°F (190°C). Place the chicken on a baking sheet. Bake for about 10-15 minutes. This keeps it crispy. For the curry sauce, heat it in a saucepan over low heat. Stir it often to avoid burning. If it’s too thick, add a splash of water or broth. Enjoy your reheated meal just like it was fresh! Yes, you can use an air fryer. Preheat the air fryer to 375°F (190°C). Lightly spray the breaded chicken with oil. Place them in the air fryer basket. Cook for about 10-12 minutes, flipping halfway through. This method gives you a crispy texture with less oil. If you can’t find panko, use regular breadcrumbs. You can also crush crackers or cornflakes for a crunchy coating. Just make sure the texture is coarse to keep that crispy finish. To make the curry sauce vegetarian, simply swap chicken broth for vegetable broth. You can also add extra vegetables like potatoes or peas for more flavor. This keeps the dish hearty and satisfying without meat. Yes, this recipe is great for meal prep. You can cook the chicken katsu and curry sauce ahead of time. Store them separately in airtight containers. When ready to eat, just reheat and serve over jasmine rice. Serve your Chicken Katsu Curry with cooked jasmine rice. You can also add a side salad or pickled vegetables. These add freshness and balance the flavors of the rich curry. In this blog post, I covered how to make Chicken Katsu Curry. We explored the main ingredients, the step-by-step instructions, and helpful tips for perfect results. I also included fun variations and storage info to keep your meal fresh. Remember, practice makes perfect. You can adjust flavors and sides to boost your dish. I hope you feel ready to try this delicious recipe at home. Enjoy every bite of your Chicken Katsu Curry!

Crispy Chicken Katsu Curry Better Than Takeout Dish

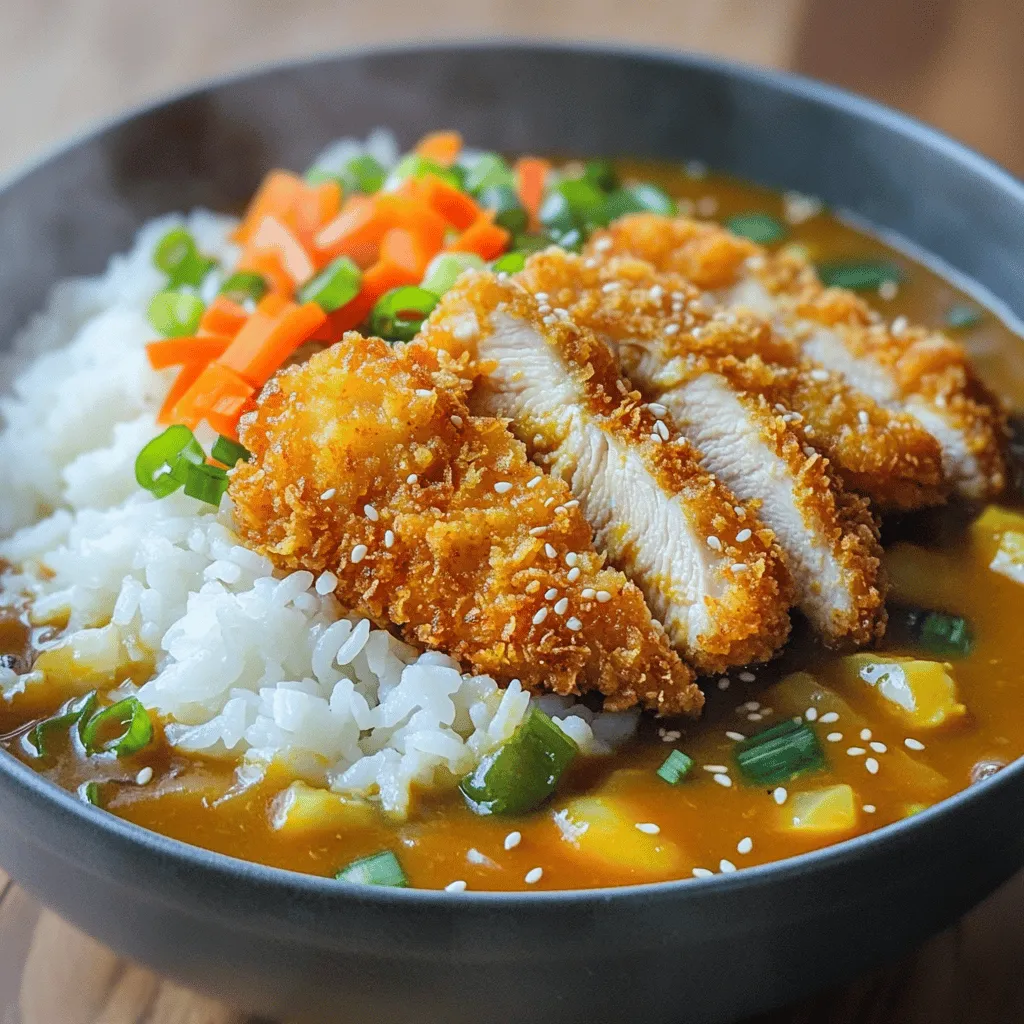
If you’re craving a delicious meal that beats takeout, you’re in the right place! My Crispy Chicken Katsu Curry recipe

- 8 oz noodles (egg, udon, or rice) - 3 tablespoons sesame oil - 4 cloves garlic, minced - 1 tablespoon ginger, grated - 2 tablespoons soy sauce - 1 tablespoon chili paste - 1 tablespoon honey or maple syrup - 2 green onions, sliced - 1 tablespoon toasted sesame seeds - Fresh cilantro (optional) - Crushed red pepper flakes (optional) Gather these simple ingredients to make your spicy sesame garlic noodles. You can choose any noodle type you like. I often use egg noodles for a rich taste. The sesame oil adds a nice, nutty flavor. Garlic gives the dish its bold punch, while ginger adds warmth. Soy sauce brings in that umami kick, and chili paste gives it a spicy edge. Honey or maple syrup balances the heat with sweetness. Green onions and sesame seeds add a lovely finish, and fresh cilantro brightens the dish. If you enjoy heat, sprinkle on some crushed red pepper flakes. These ingredients come together quickly. You can make this dish in just 15 minutes. Keep these items on hand for a quick meal that’s packed with flavor. Start by boiling a large pot of water. When the water is bubbling, add 8 ounces of your favorite noodles, like egg, udon, or rice noodles. Cook them according to the package instructions, usually around 4 to 6 minutes. Once they are al dente, drain the noodles in a colander and set them aside for later. Next, grab a large skillet and heat 3 tablespoons of sesame oil over medium heat. Wait until the oil shimmers. Then, add 4 minced garlic cloves and 1 tablespoon of grated ginger. Sauté for 1 to 2 minutes until you smell a wonderful aroma. Be careful not to burn the garlic; it turns bitter fast. Stir it constantly to keep it from browning too much. Now, it’s time to make the sauce. In the same skillet, mix in 2 tablespoons of soy sauce, 1 tablespoon of chili paste, and 1 tablespoon of honey or maple syrup. Stir everything well and let it cook for about 2 minutes. This helps the flavors blend nicely. Add the cooked noodles to the skillet with the sauce. Toss the noodles well to ensure they are fully coated in the spicy garlic mixture. Cook for an additional minute, stirring all the time. This will heat everything together and make the noodles extra tasty. Remove the skillet from the heat. Add 2 sliced green onions and sprinkle 1 tablespoon of toasted sesame seeds on top. If you like more heat, toss in some crushed red pepper flakes for an extra kick. To serve, divide the spicy sesame garlic noodles into bowls or plates. If you want, add fresh cilantro as a garnish. Serve hot and enjoy your quick and delicious meal! - Best noodle types for this recipe: You can use egg, udon, or rice noodles. Each type adds its own charm. Egg noodles are rich and chewy. Udon noodles are thick and hearty. Rice noodles are light and gluten-free. Choose what you love best! - Ideal cooking times for different noodles: Follow the package instructions. For egg noodles, cook for about 4-5 minutes. Udon noodles take around 5-6 minutes. Rice noodles often need only 3-4 minutes. Always taste them for perfect doneness. - How to adjust spice level: If you want less heat, use less chili paste. A teaspoon or even half can work well. For more spice, add crushed red pepper flakes on top. You can also use a milder chili sauce for a different taste. - Tips for balancing flavors: Sweetness helps balance the heat. If it’s too spicy, add more honey or maple syrup. You can also add a splash of soy sauce for saltiness. Taste as you mix to find the right balance for your palate. - Plating techniques for an appealing look: Twirl the noodles with a fork or chopsticks. This creates a nice nest on the plate. Use a shallow bowl for an elegant look. - Garnishing ideas for color and texture: Top with sliced green onions and toasted sesame seeds. Fresh cilantro adds a pop of color. A sprinkle of crushed red pepper flakes gives a nice finish. Make it look as good as it tastes! {{image_2}} You can easily add protein to your spicy sesame garlic noodles. Here are some great options: - Chicken: Use diced chicken breast. Cook it for about 5-7 minutes, until it's no longer pink. - Tofu: Use firm tofu. Cut it into cubes and pan-fry for about 4-5 minutes until golden brown. - Shrimp: Add peeled shrimp. Cook for about 3-4 minutes, until they turn pink. These proteins will make the dish heartier and add more flavor. Adding vegetables can boost nutrition and flavor. Here are some tasty choices: - Bell Peppers: Chop into strips and sauté for 2-3 minutes. - Broccoli: Cut into small florets and add for the last 2-3 minutes of noodle cooking. - Carrots: Slice thinly and sauté for 2-3 minutes. Mix these veggies into the sauce and noodles to brighten the dish. You can change this dish for your dietary needs. Here are some ideas: - Gluten-Free: Use rice noodles or gluten-free noodles. They cook just like regular noodles. - Vegan Sweeteners: Swap honey for maple syrup or agave nectar. This keeps the dish vegan-friendly. These changes make the recipe fit various diets while keeping it delicious. To store your spicy sesame garlic noodles, place them in an airtight container. This keeps them fresh and tasty. Refrigerate the container right away. These noodles last about 3 to 4 days in the fridge. After that, they may lose flavor and texture. When reheating, use a skillet for the best results. Heat the skillet over medium heat and add a splash of water or oil. This keeps the noodles moist. Stir often to prevent sticking. You can also use a microwave. Place noodles in a bowl, cover with a damp paper towel, and heat in short bursts. This helps keep them soft. You can freeze spicy sesame garlic noodles, but they may lose some texture. To freeze, let the noodles cool completely. Then, place them in a freezer-safe bag. Remove any air before sealing. They can last up to 2 months in the freezer. When you're ready to eat, thaw in the fridge overnight. Reheat them gently to enjoy! Yes, you can use various noodles. I recommend egg noodles, udon, or rice noodles. Each type has its own texture and flavor. Egg noodles add richness, while udon gives a chewy bite. Rice noodles are light and perfect for this dish. Feel free to choose based on what you have or prefer! To reduce spice, simply cut down on the chili paste. Start with half a tablespoon and taste it. You can also add more honey or maple syrup. This will balance the heat with sweetness. Another option is to serve with a side of plain yogurt. It helps cool down the dish. These noodles pair well with light sides. Try a simple cucumber salad for crunch. You could also serve steamed broccoli or snap peas. For drinks, a cold iced tea or lemonade works nicely. They complement the flavors without overpowering them. Yes, you can prepare the noodles and sauce in advance. Cook the noodles and store them in the fridge. Keep the sauce in a separate container. When ready to eat, just heat them up together in a skillet. This makes for a quick meal on busy days! In this blog post, I shared how to make spicy sesame garlic noodles. You learned about key ingredients, from noodles to flavor boosters. I provided step-by-step cooking instructions and essential tips to ensure success. You also discovered variations to make it fit your tastes. Overall, this recipe offers a quick and delicious meal option. Enjoy customizing it and impress your family or guests with your skills. Happy cooking!

Spicy Sesame Garlic Noodles 15 Minutes Quick Dish

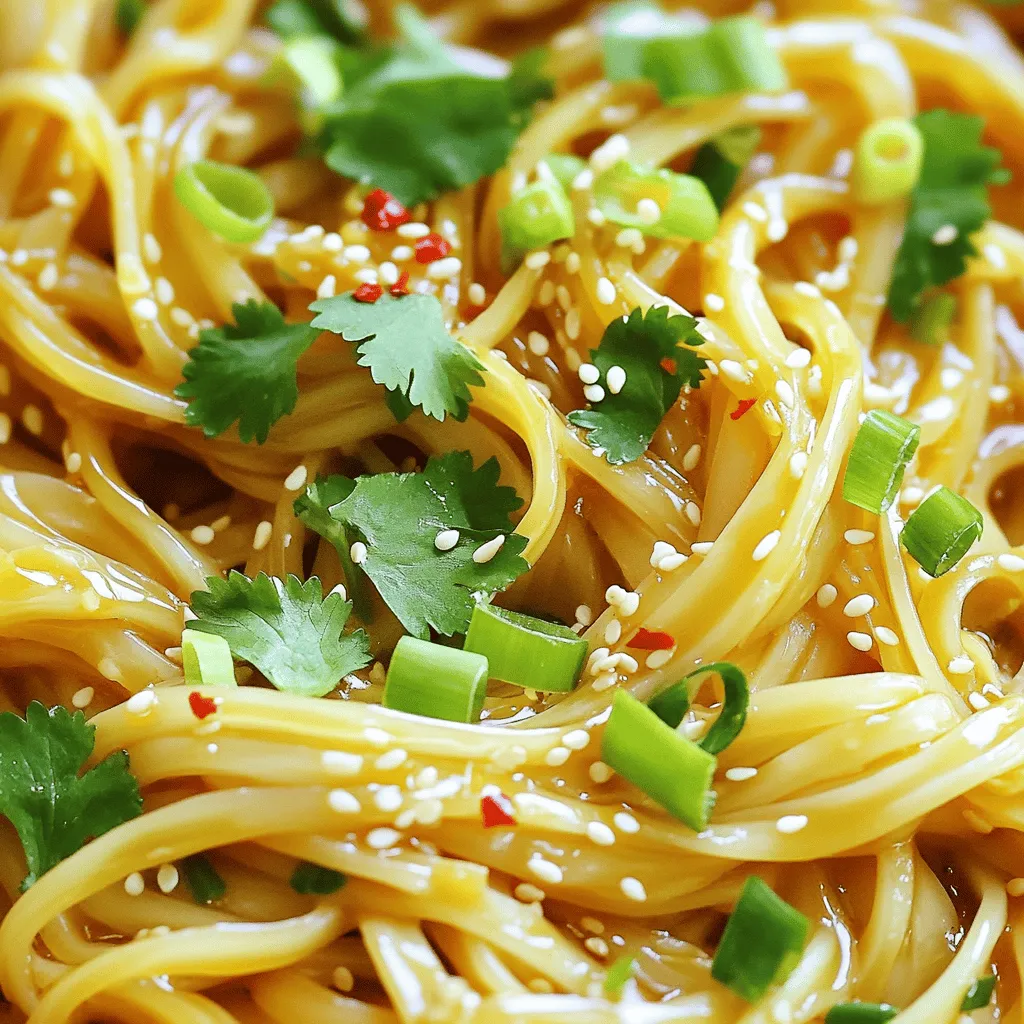
Looking for a quick and tasty dinner? These Spicy Sesame Garlic Noodles come together in just 15 minutes! This dish

- Vanilla ice cream: 2 cups - Milk selection: whole or almond, 1 cup - Fresh apple: 1 medium, peeled and diced - Spices: 1 teaspoon cinnamon, 1/2 teaspoon nutmeg - Flavoring: 1 teaspoon vanilla extract - Apple pie filling: 1/4 cup, homemade or store-bought - Toppings: whipped cream, caramel sauce (optional), crushed graham crackers or pie crust crumbs To create a rich and creamy apple pie milkshake, you need simple yet tasty ingredients. Start with vanilla ice cream, which forms the base. It gives the shake a smooth texture and a lovely flavor. You will need milk too. You can use whole or almond milk, depending on your preference. For that fresh apple taste, grab one medium apple. Be sure to peel and dice it for the best results. Cinnamon and nutmeg add warmth, and their sweet aromas remind me of fresh apple pie. Just one teaspoon of cinnamon and half a teaspoon of nutmeg will do the trick. A touch of vanilla extract brings everything together. It enhances all the flavors and adds depth. Next, you can use apple pie filling. It can be homemade or store-bought, depending on your time and comfort level. When it comes to toppings, don't skip the whipped cream; it’s essential for that classic shake experience. If you feel fancy, drizzle some caramel sauce on top. To add a little crunch, sprinkle some crushed graham crackers or pie crust crumbs. This will make your milkshake look stunning and taste even better! - Step 1: Combine base ingredients in blender Start by adding 2 cups of vanilla ice cream to your blender. Next, pour in 1 cup of milk. You can choose whole or almond milk based on your taste. Now, add 1 medium apple, peeled and diced. Sprinkle in 1 teaspoon of cinnamon, 1/2 teaspoon of nutmeg, and 1 teaspoon of vanilla extract. - Step 2: Blend for desired consistency Blend the mixture on high speed. Keep blending until it is smooth and creamy. If you want a thicker shake, add more ice cream. If you like it thinner, pour in a bit more milk. - Step 3: Incorporate apple pie filling Add 1/4 cup of apple pie filling to the blender. Pulse a few times to mix it in. Make sure to leave some chunks for a nice texture. This gives your milkshake that classic apple pie taste. - Step 4: Serve in glasses and add toppings Pour your milkshake into tall glasses. Now, top each one with a generous amount of whipped cream. For extra fun, drizzle caramel sauce on top. Finally, sprinkle crushed graham crackers or pie crust crumbs for a lovely finish. Serve right away with a straw or spoon. Enjoy your delicious apple pie milkshake! To get the right thickness, adjust the milk. If your shake is too thick, add more milk. If it's too thin, add more ice cream. Blend it well for a smooth mix. Use a high-speed blender to break down the apple pieces. This gives a creamy texture. For extra spice, add more cinnamon or nutmeg. You can mix in some vanilla or brown sugar for depth. Choose homemade apple pie filling for fresh taste. Store-bought works well too if you’re short on time. Each option brings its own unique flavor. {{image_2}} You can switch up the apple pie milkshake for fun. One tasty choice is a pumpkin pie milkshake. Just swap the apple with pumpkin puree. Add the same spices: cinnamon and nutmeg. Blend it up, and you have a fall treat. Another idea is a cinnamon roll milkshake. Use the same base but add cinnamon rolls. Blend them in for a sweet twist. Top with whipped cream and a drizzle of icing. This will give you a dessert that tastes like a warm cinnamon roll. If you need dairy-free options, try using almond milk and dairy-free ice cream. This way, you can enjoy the milkshake without dairy. It still tastes great! For low-sugar options, use unsweetened almond milk and skip the caramel. You can also use a sugar substitute in the milkshake. This keeps it sweet but cuts down on the sugar. Enjoy your milkshake, guilt-free! To keep your apple pie milkshake fresh, store it in the fridge. Use a covered container. Enjoy it within a day or two for the best taste. If you want to freeze it, pour the milkshake into an airtight container. Leave some space at the top for expansion. When you want to enjoy it again, let it thaw in the fridge overnight. You might have leftover apple pie filling. Use it in many ways! Try making a quick apple crisp or topping pancakes. You can also mix it into yogurt for a tasty snack. As for the other ingredients, make a smoothie with the remaining milk and ice cream. Or, whip up a delicious vanilla milkshake. The options are endless! How to make apple pie milkshake thicker? To thicken your milkshake, add less milk. Use a bit more ice cream too. Blend until smooth. You can also add more apple pie filling for extra thickness. Can I use different types of apples? Yes, you can use any apples you like. Sweet apples like Fuji or Gala work well. Tart apples like Granny Smith add a nice contrast. Just peel and dice them before blending. How long can I store leftovers? You can store leftovers in the fridge for one day. Keep it in a sealed container. It may separate, so stir it before enjoying again. Can I make this milkshake ahead of time? Yes, you can prepare the mix ahead. Blend the ingredients and store in the fridge. When ready to serve, blend again to smooth it out. Add toppings just before serving. This blog post shared how to make a tasty apple pie milkshake. You learned the key ingredients, from vanilla ice cream to spices. We covered easy steps and helpful tips for the best taste and texture. You can even try fun variations or make adjustments for different diets. Finally, I provided great storage tips for leftovers. Enjoy your homemade milkshake, and have fun experimenting!

Apple Pie Milkshake with Whipped Cream Delight

Craving a sweet, creamy treat that screams comfort? The Apple Pie Milkshake with Whipped Cream Delight is just what you

- 4 bone-in, skin-on chicken thighs - 1 head of garlic, cloves separated and peeled - 1 lemon, zested and juiced - 2 tablespoons olive oil - 1 teaspoon dried oregano - 1 teaspoon dried thyme - 1 teaspoon smoked paprika - 1 teaspoon salt - ½ teaspoon black pepper - 1 pound baby potatoes, halved - 2 cups green beans, trimmed These main ingredients work together to create a rich and savory dish. The chicken thighs provide juicy meat, while garlic adds a sweet, roasted flavor. Baby potatoes soak up the herbs, and green beans give a fresh crunch. - Red pepper flakes - Fresh rosemary or thyme - Additional vegetables like carrots or bell peppers You can spice things up with red pepper flakes for heat. Feel free to add herbs like rosemary or thyme for extra aroma. More veggies can also add color and flavor to the dish. - Fresh parsley, chopped - Lemon wedges A sprinkle of fresh parsley adds a pop of color and a hint of freshness. Lemon wedges can brighten the flavors when served alongside the chicken. 1. Start by preheating your oven to 425°F (220°C). This gets it hot and ready for cooking. 2. In a small bowl, mix together olive oil, lemon zest, and lemon juice. Add oregano, thyme, smoked paprika, salt, and black pepper. This mix is your herb marinade. 3. Take the chicken thighs and place them in a large bowl. Pour half of the marinade over the chicken. Make sure every piece is coated well. Let it sit for at least 15 minutes. This helps the chicken soak in all the good flavors. 4. While the chicken marinates, grab a large sheet pan. Arrange the halved baby potatoes and garlic cloves on it. Drizzle the remaining marinade over them and toss to coat. Spread them out evenly. 5. Now, nestle the marinated chicken thighs skin-side up among the potatoes and garlic. This allows the chicken to roast nicely with the veggies. 6. Place the sheet pan in the preheated oven and roast for 25 minutes. This will start to cook the chicken and brown the potatoes. 7. After 25 minutes, add the green beans to the pan. Toss them with the juices from the chicken and veggies. Return the pan to the oven and roast for another 15-20 minutes. 8. Check if the chicken is done by using a food thermometer. It should reach an internal temperature of 165°F (74°C). The potatoes should be golden and tender. 9. Once everything is cooked, take the sheet pan out of the oven. Let it rest for 5 minutes. This helps the chicken stay juicy. 10. Before serving, sprinkle chopped fresh parsley over the dish. This adds a nice pop of color and flavor. Serve the chicken with potatoes and green beans on each plate. Enjoy your roasted garlic herb chicken dinner! Marinating chicken adds great taste. I use a simple mix of olive oil, lemon juice, and herbs. The lemon gives it a fresh zing. Let the chicken sit in the marinade for at least 15 minutes. This helps the flavors soak in. If you have more time, marinate it for a few hours. The longer, the better! To get veggies that are crispy and tender, cut them evenly. I like to use baby potatoes and green beans. They roast well together. Toss them in the same marinade as the chicken. This makes sure they soak up all the tasty flavors. Spread them out on the sheet pan. Don’t overcrowd them; this helps them roast evenly. To know if the chicken is done, use a meat thermometer. It should read 165°F (74°C) inside. Check the thickest part of the thigh. The juices should run clear, not pink. If the chicken is not done, return it to the oven. Roast until it reaches the right temperature. This ensures your meal is safe and delicious! {{image_2}} You can switch out chicken for other meats. Try bone-in pork chops or thighs for a tasty change. If you prefer a lighter meal, use skin-on chicken breasts. For a plant-based version, tofu or tempeh works well. Just ensure they soak in the herb marinade for flavor. Feel free to mix up the veggies. You can use carrots, bell peppers, or zucchini instead of green beans. Sweet potatoes are a great swap for baby potatoes. Just cut them into similar sizes so they cook evenly. This way, you create a colorful and tasty dish. Spice things up with different herbs and spices. Add fresh rosemary or basil for a new twist. For heat, try red pepper flakes or cayenne pepper. You can also use balsamic vinegar instead of lemon juice for a deeper flavor. Experiment with these options to find your favorite combination! After you enjoy this roasted garlic herb chicken, save any leftovers. Let the dish cool down to room temperature. Then, transfer the chicken, potatoes, and green beans to an airtight container. Store the leftovers in the fridge for up to three days. This helps keep the flavors fresh and tasty. To reheat, you can use the oven or the microwave. If using the oven, preheat it to 350°F (175°C). Place the chicken and veggies on a baking tray. Cover with foil to keep it moist. Heat for about 15 minutes or until warm. If using a microwave, put the leftovers in a microwave-safe dish. Heat in short bursts, checking often, until hot. If you want to freeze the dish, it’s best to do this before reheating. First, let it cool completely. Then, pack the chicken and veggies in a freezer-safe bag or container. Be sure to remove as much air as possible. You can freeze it for up to three months. To eat, thaw in the fridge overnight before reheating. You can tell the chicken is done when it reaches 165°F (74°C). Use a meat thermometer to check. The juices should run clear, not pink. If you see clear juices, the chicken is ready to eat. Let it rest for five minutes before serving. This step keeps it juicy. Yes, you can use boneless chicken thighs. They will cook faster than bone-in thighs. Adjust the cooking time to about 20-25 minutes. Check for doneness with a meat thermometer. They should also reach 165°F (74°C). Roasted garlic herb chicken goes well with many sides. You can serve it with: - Rice or quinoa - A fresh green salad - Crusty bread - Roasted vegetables - Mashed potatoes These add variety and balance to your meal. Leftovers can be stored in the fridge for up to four days. Make sure to place them in an airtight container. For longer storage, freeze the chicken. It can last up to three months in the freezer. Yes, you can prep this recipe ahead of time. Marinate the chicken and cut the vegetables the day before. Store everything in the fridge. When you are ready to cook, just follow the roasting steps. This makes dinner easy and quick! This blog post covered key ingredients, step-by-step cooking, and helpful tips. We explored variations and how to store leftovers. Remember, cooking is about trying new things. Don't hesitate to alter ingredients and flavors. Enjoy the fun of making meals that stand out. With practice, you will gain confidence and skill in the kitchen. Happy cooking!

Roasted Garlic Herb Chicken Dinner Sheet Pan Delight

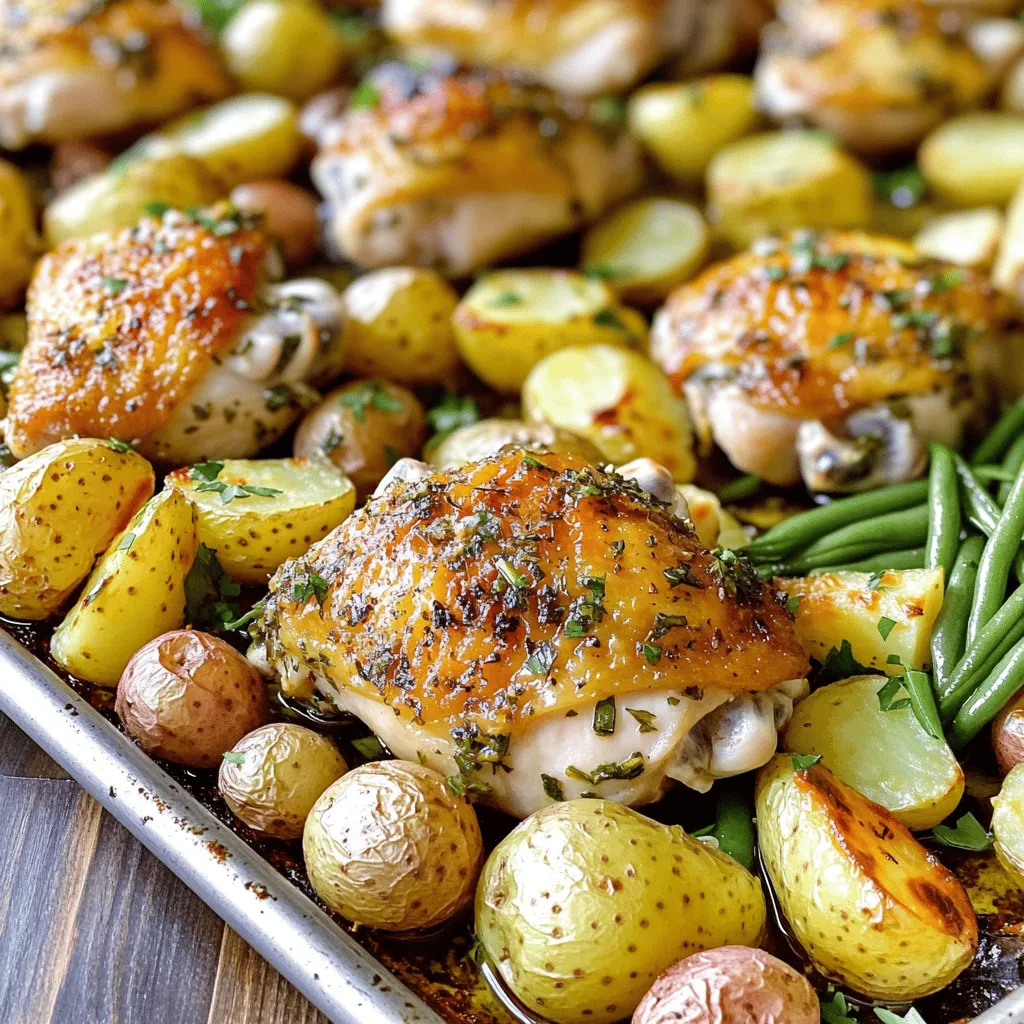
Are you ready for a simple, tasty meal? My Roasted Garlic Herb Chicken Dinner Sheet Pan Delight will make your

- 4 cups Rice Krispies cereal - 1 cup pumpkin puree - 1/2 cup unsalted butter - 1 package (10 oz) mini marshmallows - 1 teaspoon pumpkin pie spice - 1/2 teaspoon vanilla extract - 1/2 cup chocolate chips - 1/4 cup chopped pecans (optional) - Pinch of salt Gather these ingredients before you start. The Rice Krispies cereal gives a nice crunch. The pumpkin puree adds a rich flavor. The butter and marshmallows create a gooey base. Pumpkin pie spice brings warmth and a hint of fall. Don’t forget the vanilla extract for extra depth! The chocolate chips add sweetness. I recommend semisweet or dark for balance. If you love nuts, the chopped pecans add a nice texture. Just a pinch of salt enhances all the flavors. Make sure your butter is unsalted. It keeps the bars from tasting too salty. Keep everything handy, so you can work fast. This recipe comes together quickly, so prep is key. Enjoy the process! First, you need to grease a 9x13 inch baking dish. Use butter or non-stick spray to coat the bottom and sides. This step helps the bars come out easily later. Next, take a large saucepan and set it over medium heat. Add the unsalted butter and let it melt. Once it’s melted, add the mini marshmallows. Stir continuously until the marshmallows turn completely smooth. This mixture will be the base for your bars. After melting, remove the saucepan from heat. Now, stir in the pumpkin puree, pumpkin pie spice, vanilla extract, and a pinch of salt. Mix well until everything is blended nicely. This combination brings that warm, cozy flavor. Gradually add the Rice Krispies cereal to the melted pumpkin mixture. Stir gently to coat each piece of cereal. Make sure all the Rice Krispies are covered. This will help create that classic Rice Krispie texture. Now it’s time to add the fun part! Fold in the chocolate chips and optional chopped pecans. Mix just until combined. The chocolate adds sweetness, while the nuts give a nice crunch. Pour the mixture into your greased baking dish. Use a buttered spatula or your hands to pack it tightly into the pan. Press down firmly so it holds together when cut. Let the bars cool at room temperature for about 30 minutes. This allows them to set properly. Once they are cool, use a sharp knife to slice them into squares or rectangles. Enjoy your delicious treats! To get the best texture for your Pumpkin Spice Rice Krispie Bars, mix gently. When you add the Rice Krispies, fold them in slowly. This keeps the bars from getting too hard. Press them down lightly in the pan. A buttered spatula works great for this. If you pack them too tightly, they can turn out tough. Aim for a nice, chewy texture. Want to kick up the flavor? Try adding a bit of nutmeg or ginger. These spices pair well with pumpkin spice. You can also mix in some mini chocolate chips for extra sweetness. If you love nuts, chopped walnuts or almonds can add a nice crunch. Don't forget to taste as you go to find your favorite mix! Make your bars look great for guests! Stack them on a colorful plate. Drizzle melted chocolate on top for a fancy touch. You can add a sprinkle of pumpkin pie spice for color. Whole pecans on top also add a nice visual element. This small effort makes your bars feel special for any gathering! {{image_2}} You can make your Pumpkin Spice Rice Krispie Bars even better with fun add-ins. Try using different nuts like walnuts or almonds. They add a nice crunch and flavor. Dried fruits like cranberries or raisins also work well. They give a sweet and chewy surprise in every bite. If you need gluten-free or dairy-free options, don't worry. You can easily adjust this recipe. Use gluten-free Rice Krispies for a safe choice. Substitute the butter with coconut oil or a dairy-free butter. This way, everyone can enjoy these delicious bars. You can switch up the spices for a new twist. Try using cinnamon or nutmeg instead of pumpkin pie spice. These spices also bring great fall flavors to your bars. You can even mix in some ginger for a spicy kick. Each change can give your bars a fresh taste every season! To keep your Pumpkin Spice Rice Krispie Bars fresh, store them in an airtight container. This helps prevent them from getting stale. Place a piece of parchment paper between layers if you stack them. This keeps them from sticking together. Store them at room temperature for the best texture. Avoid the fridge, as cold can make them hard. You can freeze these bars for later enjoyment. Cut them into squares first. Wrap each square in plastic wrap. Then, place them in a freezer-safe bag or container. Label the bag with the date. When you're ready to enjoy, take them out and let them thaw at room temperature. This keeps their shape and taste intact. These delightful bars last about a week at room temperature. If stored properly in the freezer, they can last up to three months. Just remember to check for any signs of freezer burn when you pull them out. Enjoying them fresh is best, but freezing gives you options for later! Yes, you can make these bars up to two days in advance. Store them in an airtight container at room temperature. This keeps them fresh and tasty. If you want to make them even earlier, you can freeze them. Just wrap them well and store them in the freezer. When you want to eat them, let them thaw overnight in the fridge. To slice these treats easily, use a sharp knife. First, make sure the bars are cool and set. Lightly grease the knife with butter or cooking spray. This helps prevent sticking. Cut the bars into squares or rectangles. If they are too sticky, let them cool a bit longer before slicing. Yes, homemade pumpkin puree works great! Just make sure it is thick and not watery. You can make it by roasting a pumpkin and blending it until smooth. Store-bought puree is also fine. It saves time and is often thicker. Both options will give you a tasty treat. If you want nut-free bars, simply leave out the pecans. You can also use seeds like sunflower seeds or pumpkin seeds instead. They add a nice crunch without the nuts. Just make sure to check labels if you use store-bought products to avoid cross-contamination. These Rice Krispie pumpkin bars combine simple ingredients for a tasty treat. We discussed how to prepare the mixture, cool it, and store the bars. You can adjust flavors and enhance crunch with tips provided. Remember, you can tweak ingredients for dietary needs or seasonal flavors. So, get creative in your kitchen! Enjoy making these bars with friends and family. They'll surely impress everyone at your next gathering.

Pumpkin Spice Rice Krispie Bars with Chocolate Delight

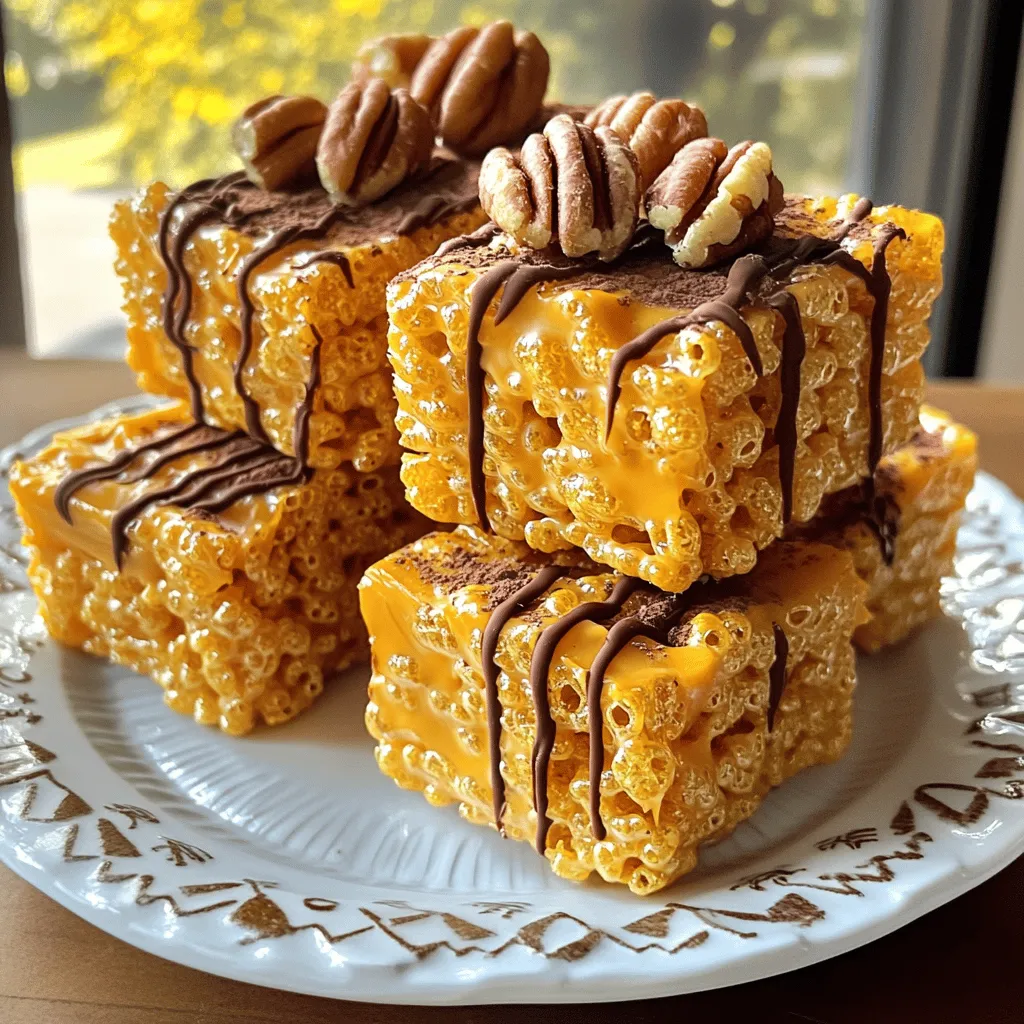
Are you ready to indulge in a sweet fall treat? My Pumpkin Spice Rice Krispie Bars with Chocolate Delight are

- 1 can of refrigerated crescent roll dough - 1 cup brie cheese, cut into wedges - 1/2 cup cranberry sauce - 1/2 cup pecans, chopped - 1 tablespoon fresh rosemary, finely chopped - 1 egg for egg wash - Salt and pepper to taste - Optional: honey for drizzling The main star of this dish is the brie cheese. It melts beautifully and adds a creamy texture. I like to use fresh rosemary for a fragrant touch. The pecans give a nice crunch, while the cranberry sauce adds sweetness. You can use homemade cranberry sauce or store-bought, depending on your time. The crescent roll dough is easy to work with and forms a lovely golden crust. Don't skip the egg wash; it helps the dough turn golden and shiny. If you want a sweet finish, drizzling honey on top adds a lovely touch. Make sure to have all your ingredients ready before you start. This dish comes together quickly, and having everything at hand makes the process smooth. Enjoy the mix of flavors in this tasty holiday treat! {{ingredient_image_1}} 1. Preheat oven and prepare baking sheet: Start by setting your oven to 375°F (190°C). Line a baking sheet with parchment paper. This helps with easy cleanup later. 2. Unroll and arrange crescent roll dough: Open the can of crescent roll dough. Unroll it onto a lightly floured surface. Separate the dough into triangles. Arrange these triangles in a circle on the baking sheet. The wide ends should overlap a little to form a ring. 3. Layer brie, cranberry sauce, pecans, and rosemary: In the center of the dough ring, place your brie cheese wedges. Spread the cranberry sauce over the cheese. Sprinkle the chopped pecans on top, then add the fresh rosemary. Season with a pinch of salt and pepper to enhance the flavors. 4. Fold and seal the crescent dough over filling: Take the points of the crescent dough and fold them over the filling. Pinch and tuck the dough to seal the ring. Make sure the filling is well-covered. 5. Brush with egg wash and bake: Beat one egg in a small bowl. Use a brush to apply the egg wash over the crescent dough. This will give it a nice golden color. Place the baking sheet in the oven and bake for 20-25 minutes. Watch for a golden brown color on the dough. 6. Cooling time and drizzling honey: Once baked, remove the ring from the oven. Let it cool for a few minutes. If you like, drizzle honey over the top for extra sweetness. 7. Presentation tips for serving: Serve the crescent ring warm on a wooden charcuterie board. Add extra nuts and cranberries around the ring for a rustic look. Providing toothpicks will make it easy for your guests to enjoy. To get a golden crescent ring, even cooking is key. Start by preheating your oven to 375°F. This ensures the heat is just right. If you use a baking sheet lined with parchment paper, the dough won't stick. To avoid a soggy bottom, make sure the brie cheese is not too wet. Press the cranberry sauce gently to remove some liquid. When you layer the filling, a little goes a long way. This helps keep the dough crisp. If you want to switch up the cheese, try goat cheese or cream cheese. Both can add a different flavor. For added texture, sprinkle in some walnuts or almonds. To add fun toppings, think of fresh herbs like thyme or sage. You can also use different jams, like raspberry or apricot. Want some spice? Add a dash of chili flakes for a little kick! Pro Tips Chill the Brie: For easier handling and cutting, chill the brie cheese in the refrigerator for about 30 minutes before using it in the recipe. Customize the Filling: Feel free to experiment with other ingredients like dried fruits, different nuts, or even a sprinkle of cinnamon for added flavor. Egg Wash Alternatives: If you want a vegan option, brush the dough with almond milk or a mixture of water and cornstarch for a nice sheen. Perfectly Golden Dough: For an even bake, rotate the baking sheet halfway through the baking time to ensure all sides get that perfect golden color. {{image_2}} You can easily change up the flavors in your Cranberry Pecan Brie Crescent Ring. For the holidays, try adding spices like cinnamon or nutmeg. These spices bring warmth and cheer, making your dish perfect for festive gatherings. In summer, think fresh fruits! Swap cranberry sauce with a mix of strawberries or peaches. Their sweetness will brighten your dish and add a fresh twist. If you need gluten-free options, look for gluten-free crescent dough. Many brands offer this, making it easy to keep the taste intact. For vegan versions, use plant-based cheese instead of brie. You can also make a flaxseed egg to brush on the dough. This way, everyone can enjoy this tasty treat, no matter their diet. After enjoying your Cranberry Pecan Brie Crescent Ring, store leftovers in the fridge. Wrap the ring in plastic wrap or foil. This keeps it fresh and prevents it from drying out. I recommend using an airtight container for extra protection. You can keep your leftovers for about 3 to 4 days. After that, the flavors may fade. If you want to enjoy it longer, consider freezing it. To reheat the crescent ring, use your oven. Preheat it to 350°F (175°C). Place the ring on a baking sheet and cover it with foil. This helps it heat evenly and keeps it moist. Bake for about 10 to 15 minutes. If you want to keep that crunchiness, try reheating in a toaster oven. This method helps maintain the flaky texture. Remember, nobody likes a soggy crescent ring! You can serve this dish with many tasty sides. Here are some great pairings: - Fresh fruit, like apple slices or grapes - Crackers for a crunchy bite - A simple green salad with light dressing - Cheese boards with assorted cheeses and nuts - Warm bread or baguette slices These sides add flavor and texture. They also make the dish more fun to share. Watch for a few signs to check if it’s ready: - The dough should look golden brown. - The filling should be bubbly and warm. - A toothpick inserted into the dough should come out clean. These signs show the ring is baked well. It should smell amazing too! Yes, you can prepare this dish in advance. Here are some tips: - You can assemble the ring and cover it with plastic wrap. - Store it in the fridge for up to a day. - Bake it just before serving for the best taste. This makes it easy to serve at parties. Just pop it in the oven when you need it! The Cranberry Pecan Brie Crescent Ring is a delightful dish made with simple ingredients. You learned how to prepare, bake, and serve it perfectly. With tips on variations, substitutions, and storage, you can customize this recipe to fit any occasion. Remember to have fun while cooking and experimenting. This dish is sure to impress at any gathering, and I hope you enjoy making it as much as I do.

Cranberry Pecan Brie Crescent Ring Tasty Holiday Treat

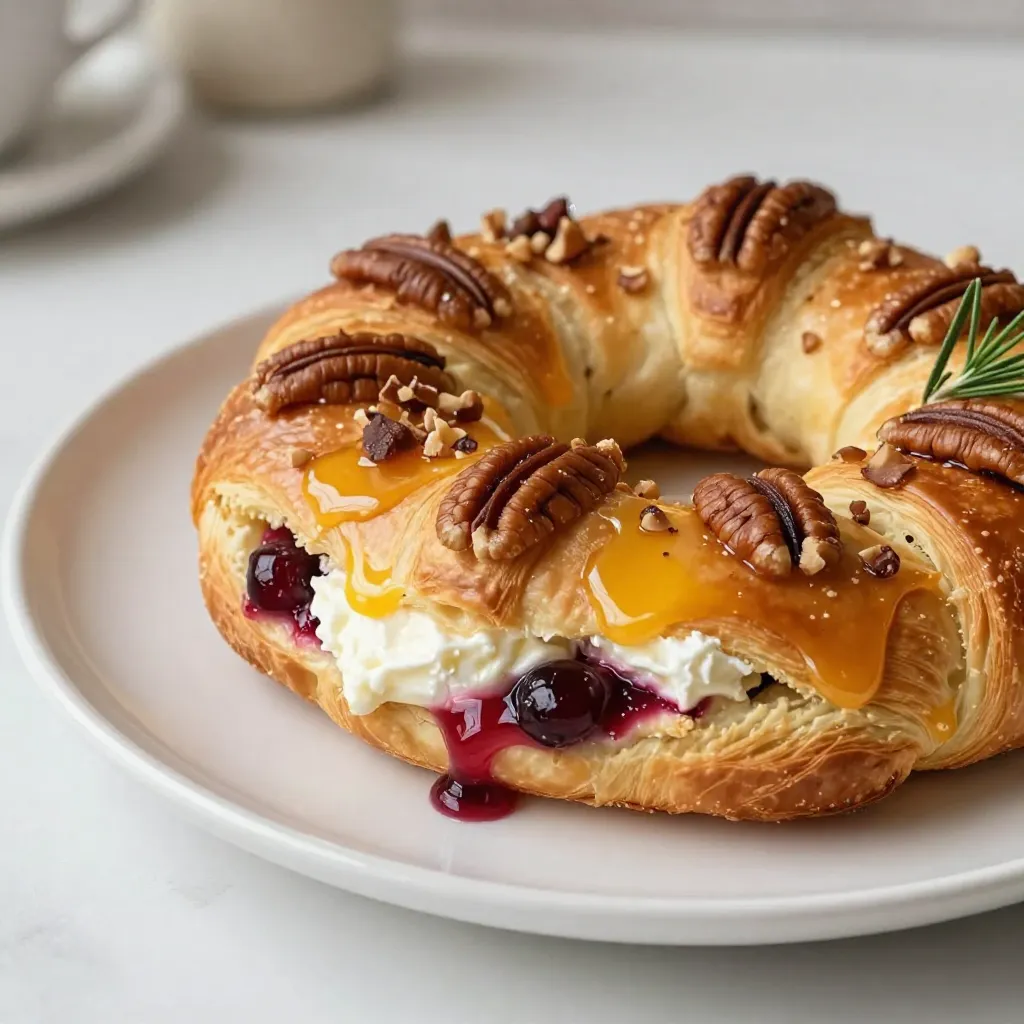
Looking for a holiday treat that dazzles? The Cranberry Pecan Brie Crescent Ring is your answer! This simple yet elegant

- 4 boneless, skinless chicken breasts - 1 cup sun-dried tomatoes, chopped - 3 cups fresh spinach, roughly chopped - 1 cup heavy cream - 1 cup chicken broth - 1 teaspoon garlic powder - 1 teaspoon Italian seasoning - Salt and pepper to taste - ½ cup grated Parmesan cheese - 2 tablespoons olive oil - Fresh basil leaves for garnish To create this creamy Tuscan chicken, you need simple yet flavorful ingredients. Start with boneless, skinless chicken breasts. They cook evenly and soak up the rich sauce well. Sun-dried tomatoes add a punch of flavor that shines through every bite. Fresh spinach brings a nice color and nutrients to the dish. Next, you’ll want to use heavy cream for that creamy texture. It blends perfectly with chicken broth to create a rich sauce. Garlic powder and Italian seasoning bring warmth and depth to the flavors. Don’t forget salt and pepper to enhance everything. Grated Parmesan cheese adds a salty kick and creaminess. A drizzle of olive oil gives a smooth finish. Finally, fresh basil leaves are a must for garnish. They add a fragrant touch that brightens the dish. Now, gather these ingredients, and you are ready to make a comforting meal that will impress everyone. To start, grab your slow cooker. Lay the chicken breasts flat at the bottom. This helps them cook evenly. Next, mix your sauce. In a medium bowl, combine chicken broth, heavy cream, garlic powder, Italian seasoning, salt, and pepper. This blend gives great flavor. Once mixed, pour this sauce over the chicken. Then, sprinkle the chopped sun-dried tomatoes and half of the Parmesan cheese on top. Now it’s time to cook. You can choose low heat for 6 hours or high heat for 3 hours. Cooking on low gives a tender chicken. On high, it cooks faster but may be less juicy. About 30 minutes before serving, add the fresh spinach. It will wilt nicely in the sauce. After the cooking time, take out the chicken. Use two forks to shred it. Return the shredded chicken to the slow cooker and mix well with the sauce. Before serving, sprinkle the rest of the Parmesan cheese on top. Give it a quick stir to mix in the cheese. Serve the creamy Tuscan chicken over pasta or rice. For a nice touch, garnish with fresh basil leaves. This adds color and flavor. Enjoy your delicious meal! - For the best slow-cooked chicken, choose boneless, skinless breasts. They cook evenly and stay moist. - Season the chicken well with salt and pepper before cooking. This enhances its flavor. - Use low heat for six hours or high heat for three hours. Low heat gives the best results. - To achieve the creaminess in the sauce, do not skip the heavy cream. It adds richness and depth. - Add fresh spinach about 30 minutes before serving. This keeps it vibrant and fresh. - Serve your creamy Tuscan chicken over pasta, like fettuccine or penne. The sauce clings well to these shapes. - Rice is another great option. It soaks up the creamy sauce and balances the meal. - Pair with a side salad or garlic bread for a complete meal. They add freshness and a nice crunch. - If you want to lighten the dish, try using half-and-half instead of heavy cream. It still adds creaminess. - Greek yogurt can also work well. It gives a tangy flavor and a creamy finish. - For veggies, consider using kale or zucchini instead of spinach. Both add nice texture and flavor. - Sun-dried tomatoes can be swapped with fresh tomatoes for a lighter taste. Just add them earlier in the cooking time. {{image_2}} You can easily make this dish gluten-free. Just swap out regular pasta or rice for gluten-free versions. Many brands offer great options, like brown rice pasta or quinoa. Both pair well with the creamy sauce and add a nice texture. If you want a dairy-free meal, you can make a few simple changes. Use coconut milk or almond milk instead of heavy cream. For cheese, try a dairy-free alternative. There are many tasty vegan cheese options that melt well. This way, you can enjoy the creamy goodness without dairy. Want to spice things up? Consider adding different herbs and spices. Fresh thyme, oregano, or even red pepper flakes can boost the flavor. You can also try adding a squeeze of lemon for a bright touch. This can make the dish even more exciting and tailored to your taste. Store leftovers in an airtight container. This keeps them fresh and safe. Let the dish cool before sealing. Place it in the fridge within two hours of cooking. Consume within three to four days for best taste. To freeze, use a freezer-safe container. Divide into portions for easy thawing. Label the container with the date. When ready to eat, thaw in the fridge overnight. Reheat in the microwave or on the stove. Stir well to ensure even heating. In the fridge, Slow Cooker Creamy Tuscan Chicken lasts about three to four days. In the freezer, it can stay good for up to three months. Always check for signs of spoilage before eating. If it smells odd or looks off, throw it away. Cooking time varies by heat setting. On low heat, it takes about 6 hours. On high heat, it takes 3 hours. The low setting allows flavors to meld well. The high setting gives faster results but may not be as rich in taste. I prefer the low heat for the best flavor. Yes, you can use frozen chicken breasts. Just add an extra hour to the cooking time. Ensure the chicken reaches a safe internal temperature of 165°F. This method makes it easy for busy cooks. The slow cooker will still keep the chicken moist. This dish pairs well with several sides. You can serve it over pasta or rice. Garlic bread makes a great addition, too. A fresh salad adds a nice crunch. Choose sides that can soak up the creamy sauce. Absolutely! You can use a stovetop or oven. For the stovetop, cook on medium heat for about 30 minutes. In the oven, bake at 350°F for 30-40 minutes. Adjust liquid amounts slightly to prevent drying out. This way, you can still enjoy the same great flavors! In this post, I shared how to make Slow Cooker Creamy Tuscan Chicken. We covered key ingredients, step-by-step instructions, and tips for great flavor. Variations cater to different diets, and I included storage advice for your leftovers. Remember, slow cooking makes the chicken tender and tasty. Enjoy experimenting with flavors and sides that you love. Your kitchen can shine with this easy, comforting dish.

Slow Cooker Creamy Tuscan Chicken Flavorful Delight

Are you ready to dive into a dish that transforms ordinary chicken into a creamy masterpiece? My Slow Cooker Creamy

Older posts
Newer posts
← Previous Page1 … Page29 Page30 Page31 … Page84 Next →

dsad

© 2026 juliesdish • Built with GeneratePress

Our Policies

  • Copyright Policy
  • Cookie Policy
  • GDPR Policy
  • Privacy Policy
  • Disclaimer
  • Terms Of Use

More Information

  • Home
  • About
  • Contact
  • Appetizers
  • Dessert
  • Dinner
  • Drinks
©2026, juliesdish About Back To Top