Skip to content
DisclaimerTerms Of UseGDPR PolicyCookie Policy

juliesdish

  • Home
  • Drinks
  • Appetizers
  • Dinner
  • Dessert
  • About
  • Contact
  • Privacy Policy
DisclaimerTerms Of UseGDPR PolicyCookie Policy

NO-ING-IMG

- 1 ½ cups all-purpose flour - 1 cup pumpkin puree - 4 oz cream cheese, softened These three main ingredients form the backbone of this muffin bread. All-purpose flour gives structure. Pumpkin puree adds moisture and flavor. Cream cheese brings a rich, creamy swirl that makes every bite special. - 1 teaspoon baking soda - 1 teaspoon baking powder - ½ teaspoon salt - 1 teaspoon ground cinnamon - ½ teaspoon ground nutmeg - ½ teaspoon ground ginger Baking soda and baking powder help the bread rise. The salt enhances flavors. The spices create warmth and depth. Cinnamon, nutmeg, and ginger bring a cozy taste that pairs perfectly with pumpkin. - ½ cup granulated sugar - ½ cup brown sugar, packed - ½ cup vegetable oil Granulated sugar adds sweetness, while brown sugar gives a hint of caramel. Vegetable oil keeps the bread moist. This balance makes for a delightful and tender crumb. First, preheat your oven to 350°F (175°C). This will help your bread bake evenly. Next, take a 9x5 inch loaf pan. Grease it with butter or oil, or line it with parchment paper. This makes it easy to remove the bread later. In a medium bowl, whisk together the dry ingredients. Combine 1 ½ cups of all-purpose flour, 1 teaspoon of baking soda, 1 teaspoon of baking powder, and ½ teaspoon of salt. Then, add 1 teaspoon of ground cinnamon, ½ teaspoon of ground nutmeg, and ½ teaspoon of ground ginger. Mix well and set it aside. In a larger bowl, mix the wet ingredients. Combine 1 cup of pumpkin puree, ½ cup of granulated sugar, ½ cup of brown sugar, ½ cup of vegetable oil, 2 large eggs, and 1 teaspoon of vanilla extract. Stir until it is smooth and well mixed. Now, add the dry ingredients to the wet mixture. Stir gently until just combined. Remember, it is okay if there are a few lumps. Overmixing can make the bread tough. Next, prepare the cream cheese mixture. In a small bowl, mix 4 oz of softened cream cheese, 2 tablespoons of powdered sugar, and 1 tablespoon of milk. Stir it well until it is smooth and creamy. Now, we will add this mixture to the batter. Pour half of the muffin bread batter into the prepared pan. Then, dollop the cream cheese mixture over the top. Use a knife to swirl it gently into the batter. This creates a tasty cream cheese layer. Pour the remaining batter over the cream cheese layer. Smooth the top with a spatula. For an extra touch, you can sprinkle more cinnamon or pumpkin spice on top. It is time to bake! Place the loaf pan in the oven. Bake for 55 to 65 minutes. Check for doneness by inserting a toothpick into the center. If it comes out clean, your bread is done. If the top browns too much, cover it with aluminum foil. Once baked, remove the pan from the oven. Let it cool for 10 minutes in the pan. Then, transfer the bread to a wire rack to cool completely. This helps maintain a perfect texture. Enjoy the wonderful smell of your Pumpkin Cream Cheese Muffin Bread! To get a soft and fluffy bread, mix the batter just until combined. It’s fine if some lumps remain. Overmixing can lead to tough bread. Remember, gentle hands make perfect muffins! Want to boost the flavor? Try adding nuts or chocolate chips to the batter. They add great texture and taste. You can also sprinkle spices on top before baking. A little extra cinnamon makes everything nice! If your bread turns out dense, it might be due to too much mixing or too many wet ingredients. To fix this, try adding a bit more flour next time. If you notice your bread browning too fast, use aluminum foil to cover the top. This keeps it from burning while the inside cooks through. {{image_2}} You can make your pumpkin cream cheese muffin bread even tastier. Try adding chocolate chips for a sweet touch. They melt and mix well with the bread. Dried fruits like raisins or cranberries also add a nice texture. Their sweetness pairs well with the pumpkin flavor. Another fun idea is to experiment with different cream cheese flavors. You could use cinnamon cream cheese for a warm spice kick. A honey-flavored cream cheese brings a delightful sweetness. These small changes can give your bread a new twist each time. If you need gluten-free options, swap the all-purpose flour for a gluten-free blend. Many blends work well in baking. Just make sure to follow the package’s instructions for the best results. For a vegan version, replace the eggs with flaxseed meal or applesauce. Use a plant-based cream cheese, and choose vegetable oil that is vegan-friendly. These substitutions can keep the bread moist and delicious. Using fresh pumpkin gives your bread a unique taste. If you have fresh pumpkin, cook and puree it first. This adds a rich flavor to your bread. However, canned pumpkin is just as tasty and saves time. Don’t forget to play with seasonal spices! In addition to cinnamon, add allspice or cloves for a fall twist. You can also adjust the spice amounts to suit your taste. A pinch more nutmeg can create an aromatic experience. Store your Pumpkin Cream Cheese Muffin Bread at room temperature for the best taste. Place it in an airtight container to keep it fresh. If you live in a humid area, store it in the fridge. This helps prevent mold. Just remember, the bread may dry out a bit in the fridge. To keep it soft, wrap it tightly in plastic wrap before placing it in the container. You can freeze slices or the whole loaf of muffin bread. To freeze, wrap each slice in plastic wrap. For the whole loaf, wrap it tightly as well. Then, place it in a freezer bag. Squeeze out any air before sealing. When you want to eat it, thaw it in the fridge overnight. You can also use the microwave for quick thawing, but watch it closely so it does not get too hot. Pumpkin Cream Cheese Muffin Bread lasts about 3 to 4 days at room temperature. In the fridge, it can last up to a week. If you freeze it, it will stay good for about 2 to 3 months. Check for signs of spoilage like a sour smell or mold. If you see any, it's best to toss it out. Enjoy your pumpkin bread while it’s fresh for the best flavor! To check if your Pumpkin Cream Cheese Muffin Bread is done, use a toothpick. Insert it into the center of the bread. If it comes out clean or with a few crumbs, your bread is ready. If it has wet batter, bake it a bit longer. This simple test helps ensure a perfect bake every time. Yes, you can make this recipe ahead of time. To prep in advance, mix the dry ingredients and store them in a bowl. You can also prepare the cream cheese mixture and keep it in the fridge. When you are ready to bake, simply combine the wet and dry ingredients. This method saves time and makes baking easy. You can serve Pumpkin Cream Cheese Muffin Bread with various toppings. A pat of butter adds richness. A drizzle of honey gives a sweet touch. You could also serve it with warm apple cider or a cup of coffee. For a fun twist, pair it with whipped cream or yogurt for a tasty breakfast treat. You now have all the tools to create a delicious Pumpkin Cream Cheese Muffin Bread. We discussed the main ingredients, baking essentials, and step-by-step instructions. Tips and tricks will help you avoid common mistakes and enhance flavors. Variations allow for personal touches to fit your taste. Finally, proper storage techniques ensure your bread stays fresh. With this knowledge, you'll enjoy baking and sharing this tasty treat. Dive in and relish the fun of baking!

Pumpkin Cream Cheese Muffin Bread Delightful Recipe

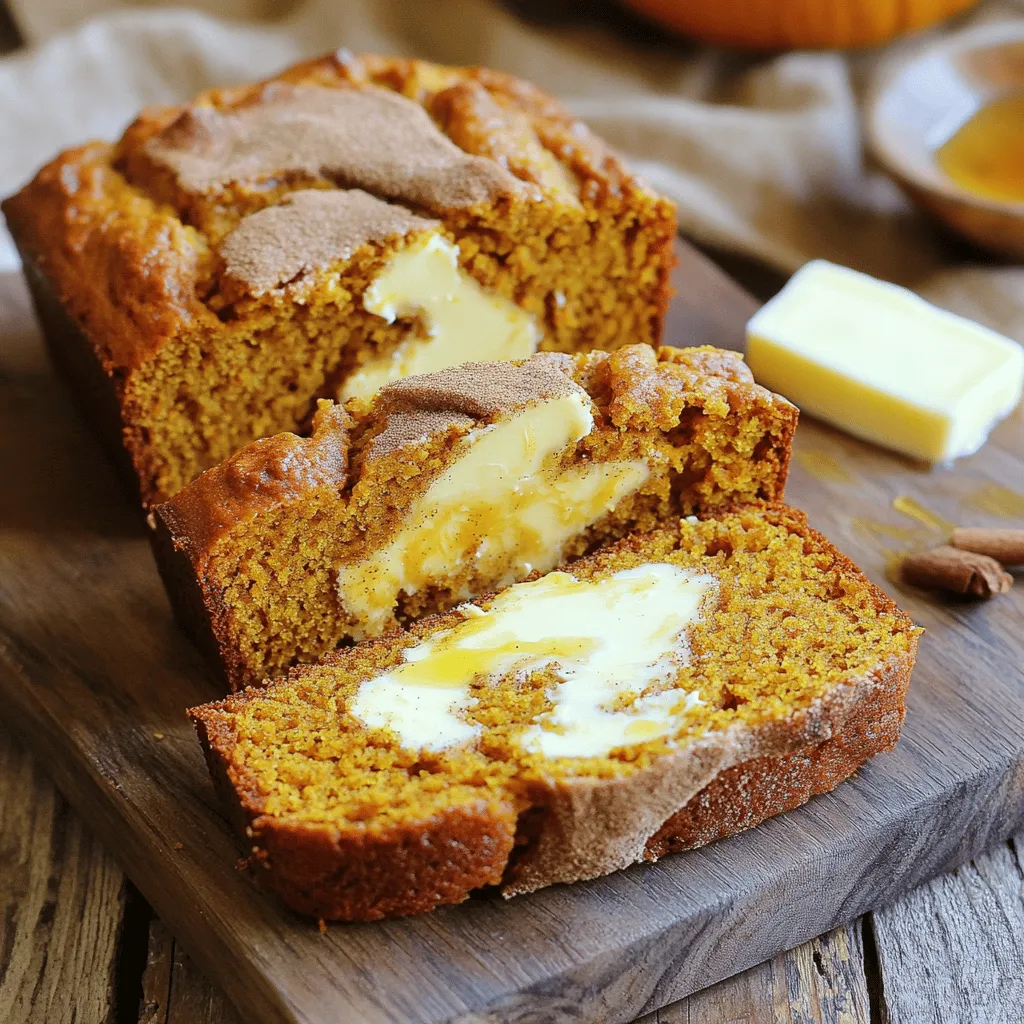
Welcome to my kitchen, where fall flavors shine! Today, I’m excited to share a delightful recipe for Pumpkin Cream Cheese

- 4 chicken thighs, bone-in and skin-on - 1 teaspoon dried thyme - 1 teaspoon paprika - Salt and pepper to taste For this recipe, I use bone-in, skin-on chicken thighs. They offer rich flavor and stay juicy. The skin crisps up nicely in the oven, giving a great texture. I season them with dried thyme, paprika, salt, and pepper. These spices bring warmth and depth to the dish. - 1 lb baby potatoes, halved - Additional seasonings: salt and pepper I choose baby potatoes for their creamy texture and easy prep. Halving them allows for even cooking and browning. I simply season them with salt and pepper. This keeps the focus on the garlic butter sauce while adding a nice flavor base. - 1/4 cup unsalted butter, melted - 6 cloves garlic, minced - Fresh parsley, chopped (for garnish) The garlic butter is a game changer. I melt unsalted butter and mix in minced garlic, dried thyme, and paprika. This mixture coats the chicken and potatoes, infusing them with flavor. The fresh parsley adds a pop of color and freshness when serving. 1. Preheat your oven to 400°F (200°C). This heat cooks the chicken and potatoes evenly. 2. Prepare the sheet pan by lining it with parchment paper. This makes cleanup quick and easy. 1. Combine ingredients for the marinade. In a large bowl, mix 1/4 cup melted butter, 6 minced garlic cloves, 1 teaspoon dried thyme, 1 teaspoon paprika, salt, and pepper. This mix packs a punch! 2. Coat chicken thighs. Add 4 bone-in, skin-on chicken thighs to the bowl. Make sure every piece is well-covered in the garlic butter mix. Let it sit for a few minutes to soak in the flavor. 1. Prepare and season potatoes. Take 1 pound of halved baby potatoes. Place them on the sheet pan and drizzle half of the leftover garlic butter mix on top. Toss them well for an even coat. 2. Position chicken and potatoes. Place the marinated chicken thighs on the sheet pan, skin-side up. Nestle them among the potatoes. Drizzle the rest of the garlic butter over everything. 1. Roasting time and temperature. Roast your sheet pan dish in the preheated oven for about 35-40 minutes. This timing ensures the chicken and potatoes cook perfectly. 2. Checking doneness. Make sure the chicken reaches an internal temperature of 165°F (75°C). The potatoes should be tender and golden brown. Enjoy the aroma as it cooks! To make your chicken burst with flavor, marinate it well. I suggest letting it soak for at least 30 minutes. Use a mix of melted butter, minced garlic, thyme, and paprika. This blend really brings out the best in the chicken. If you want to switch things up, try adding lemon zest or chili flakes for a kick. Experimenting with spices can lead to tasty surprises! For tender and crispy potatoes, choose baby potatoes. Halve them for even cooking. Toss them in some of the garlic butter before baking. This step helps them absorb all that great flavor. Watch them closely while they cook. If they are undercooked, they will be hard. If overcooked, they may become mushy. Aim for a golden brown color. Garnishes can elevate your dish. Fresh parsley adds a pop of color and freshness. Serve with lemon wedges for a zesty touch. As for sides, consider a green salad or steamed vegetables. They balance out the meal and add a nice crunch. {{image_2}} You can change the protein in this dish. Try using chicken breasts for a leaner option. Pork works well too; it adds a nice flavor. For vegetables, swap the baby potatoes for carrots or broccoli. Both options add color and taste. Carrots give sweetness, while broccoli adds crunch. Want to change the taste? Add some citrus! Lemon or orange juice brightens up the meal. The zesty flavor pairs well with garlic butter. You can also mix in different herbs. Rosemary or dill can add a fresh twist. Both herbs complement chicken and potatoes nicely. If you need gluten-free options, this recipe is a great choice. All the ingredients are naturally gluten-free. For low-carb diets, skip the potatoes and use cauliflower. Cauliflower roasts well and tastes great with garlic butter. You can enjoy a similar dish without the carbs. To keep your sheet-pan garlic butter chicken and potatoes fresh, follow these steps: - Place leftovers in an airtight container. - Refrigerate them within two hours of cooking. - Use the leftovers within three to four days for best taste. Keeping your food sealed helps avoid drying out and keeps flavors intact. Reheating chicken and potatoes can be simple. Here are a few methods: - Oven: Preheat your oven to 350°F (175°C). Place the chicken and potatoes in an oven-safe dish. Cover with foil to keep moisture in. Heat for about 20-25 minutes. - Microwave: Use a microwave-safe plate. Cover with a damp paper towel. Heat in 30-second intervals, checking often to avoid overcooking. Both methods help keep the chicken juicy and the potatoes tender. If you want to save some for later, freezing works well. Here’s how to do it: - Allow the chicken and potatoes to cool completely. - Place portions in freezer-safe bags or containers. Remove as much air as possible. - Label with the date. You can freeze them for up to three months. When ready to eat, thaw in the fridge overnight for the best results. Reheat as described above for a quick meal. I recommend marinating chicken for at least 15-30 minutes. This time allows the flavors to soak in. If you have more time, marinating for up to 2 hours works great. Just keep it in the fridge during this time. Yes, you can use boneless chicken thighs. They cook faster, so check them at about 25-30 minutes. Bone-in thighs add moisture and flavor, but boneless is a great choice for quicker meals. To check if chicken is cooked, use a meat thermometer. The safe temperature for cooked chicken is 165°F (75°C). Insert the thermometer into the thickest part of the thigh without touching the bone. You can prepare this recipe a day ahead. Marinate the chicken and cut the potatoes, then store them in the fridge. When ready to cook, just place them on the sheet pan and roast. This saves time and makes weeknight dinners easier. This article covered a simple, tasty dish of chicken and potatoes. We explored ingredients and their roles, from marinating the chicken to seasoning the potatoes. I shared step-by-step instructions to ensure success in the kitchen. Tips for perfect cooking and variations offer more ways to enjoy this meal. Embrace these guidelines, and you'll create delicious dishes that delight your family. With practice, you'll gain confidence and impress yourself and others with your cooking skills. Happy cooking!

Savory Sheet-Pan Garlic Butter Chicken and Potatoes

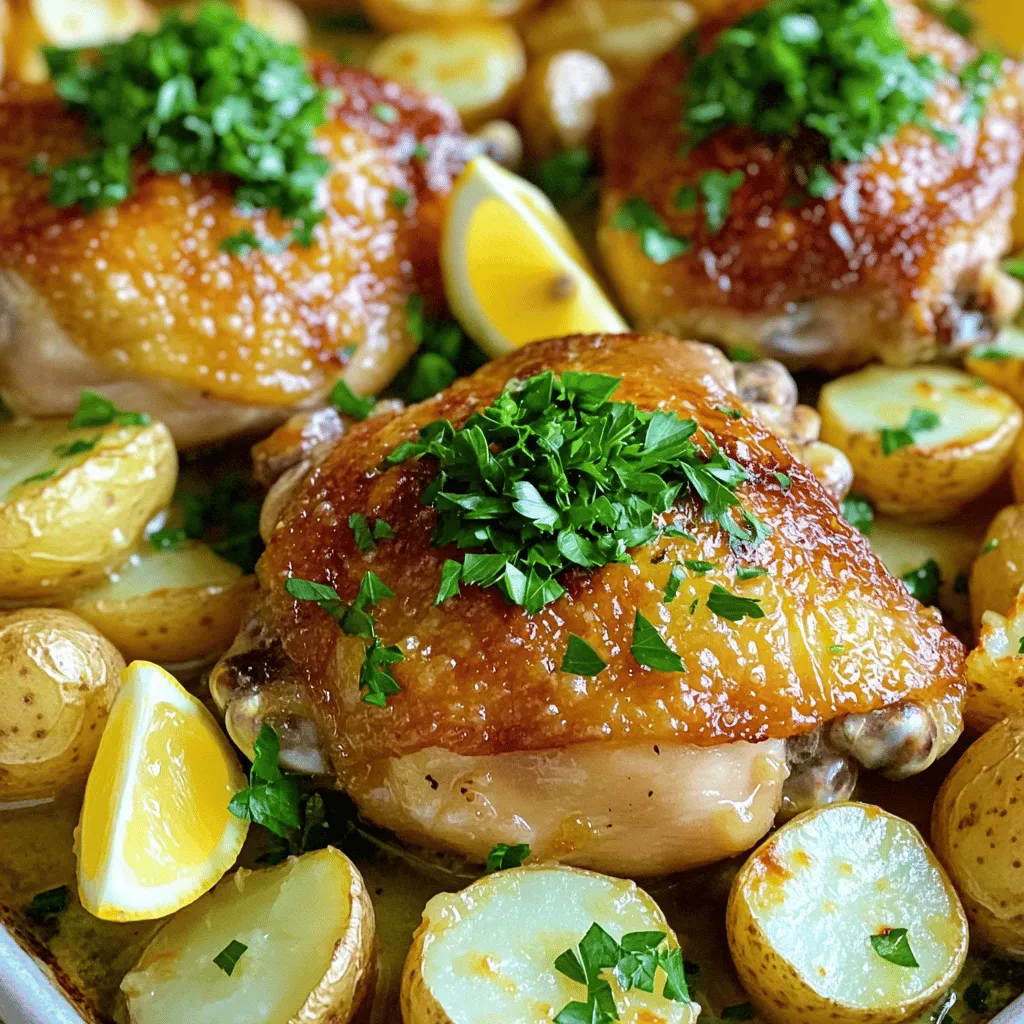
Welcome to a delicious journey of flavor with my Savory Sheet-Pan Garlic Butter Chicken and Potatoes! This dish is a

- 1 lb salmon fillet: Use skinless salmon for easy cooking. Cut it into bite-sized cubes. This ensures even cooking and great flavor. - 3 tablespoons unsalted butter: Melt the butter before mixing. It helps blend the flavors well. - 4 cloves garlic: Mince the garlic finely to release its strong flavor. - 1 teaspoon smoked paprika: This gives a nice smoky touch to the dish. - 1 teaspoon chili powder: Adds a mild kick. You can adjust the amount for more heat. - 1/2 teaspoon cayenne pepper: This brings the spice! You can add less if you prefer it milder. - Salt and pepper: Use these to taste. They enhance all the flavors. - 1 tablespoon fresh lemon juice: This brightens the dish and adds zest. - Chopped fresh parsley: Sprinkle this on top for a burst of color and freshness. It makes the dish look beautiful. - Lemon wedges: Serve these on the side. They add a zesty touch when squeezed over the salmon bites. To start, mix the melted butter, minced garlic, smoked paprika, chili powder, cayenne pepper, salt, pepper, and lemon juice in a small bowl. Stir well until everything combines smoothly. This spicy garlic butter sauce is the magic that flavors our salmon bites. Next, take the salmon cubes and place them in a large bowl. Pour the spicy garlic butter sauce over the top. Gently toss the salmon to ensure each piece is well coated. This step is crucial for even flavor. Now, preheat your air fryer to 400°F (200°C) for about 5 minutes. Preheating helps the salmon cook evenly and develop a nice crust. Once preheated, arrange the salmon bites in a single layer in the air fryer basket. Make sure they do not overlap. This allows hot air to circulate around each piece, ensuring they cook perfectly. Air fry the salmon bites for 8 to 10 minutes. At the 5-minute mark, check the salmon to see how it's cooking. You're looking for a golden brown exterior and a cooked-through center. To check for doneness, the salmon should flake easily with a fork. It should look opaque and not translucent. Enjoy the delicious aroma filling your kitchen as you wait for these bites to finish cooking! To get a golden brown crust on your salmon bites, follow these tips: - Pat the salmon dry: Use paper towels to remove moisture. This helps the coating crisp up nicely. - Use a single layer: Place the salmon in a single layer in the air fryer. This allows hot air to flow around each piece. - Don’t overcrowd: If you stack the bites, they won’t cook evenly. Give each piece room to breathe. To avoid overcooking, monitor the time closely. Start checking at 5 minutes. The salmon should be opaque and flake easily with a fork. Adjust the spice level to fit your taste. If you like it spicier, add more cayenne pepper. For a milder flavor, reduce the chili powder. Pair your salmon bites with fresh sides. A crisp salad or garlic rice works great. You can also serve it with a tangy dipping sauce like tzatziki or a simple lemon aioli. These pairings enhance the meal and make it even more delicious. {{image_2}} You can change the flavor of your salmon bites easily. Try different spices for new tastes. Here are some options: - Cumin: Adds a warm, earthy flavor. - Ginger: Gives a spicy and fresh kick. - Lemon pepper: Brightens the dish with zest. Citrus can also change the taste. Instead of lemon, use lime or orange juice. Each adds a unique twist. Experimenting with different seasonings keeps your dish exciting. If you want a different fish, try these options: - Trout: Similar texture and flavor profile. - Cod: Mild flavor that absorbs spices well. You can also use non-fish proteins: - Chicken: Cut into bite-sized pieces and marinate. - Tofu: Firm tofu works great when marinated. These substitutions can make the dish work for various diets. Just adjust cooking times according to the protein you choose. Enjoy the versatility of this recipe! After enjoying your Air Fryer Spicy Garlic Butter Salmon Bites, let them cool first. This step prevents excess moisture when you store them. Use a shallow container or a plate covered with plastic wrap for easy storage. Avoid using a deep bowl, as it can trap steam and make the salmon soggy. If you have a lot of leftovers, consider dividing them into smaller portions. This helps with quick meals later. To reheat salmon bites, use your air fryer again. Preheat it to 350°F (175°C). Place the bites in a single layer for even heating. Heat them for about 3-5 minutes. This method keeps the bites crispy and flavorful. Avoid using the microwave, as it may make the salmon rubbery. Check for warmth before serving. If you want, add a squeeze of fresh lemon juice for extra flavor. You can tell the salmon is cooked by looking for a few signs. The fish should be opaque and easily flake with a fork. The color changes from bright pink to a lighter shade. For the best results, check the internal temperature. It should reach 145°F (63°C) to ensure it is safe to eat. Use a food thermometer to check. Yes, you can prepare this dish ahead of time. To do this, mix the marinade and coat the salmon cubes. Then, cover them and place them in the fridge. Marinate for at least 30 minutes, or up to 2 hours for more flavor. Just remember to cook the salmon bites right before serving for the best taste. This recipe is great for meal prep. You can portion the salmon bites into containers for easy meals. Pair them with sides like rice, quinoa, or steamed veggies. These sides complement the salmon well and make for a balanced meal. Store everything together or separately, as you prefer. This blog post explored how to make delicious air-fried salmon bites. We covered main ingredients like salmon, butter, and seasonings. You learned about preparing garlic butter sauce and how to air fry the salmon correctly. Perfect texture comes from the right cooking times and techniques. We also shared tips for storage and reheating your leftovers. With these steps and ideas, you can make this dish your own. Enjoy cooking and savoring every bite!

Air Fryer Spicy Garlic Butter Salmon Bites Recipe

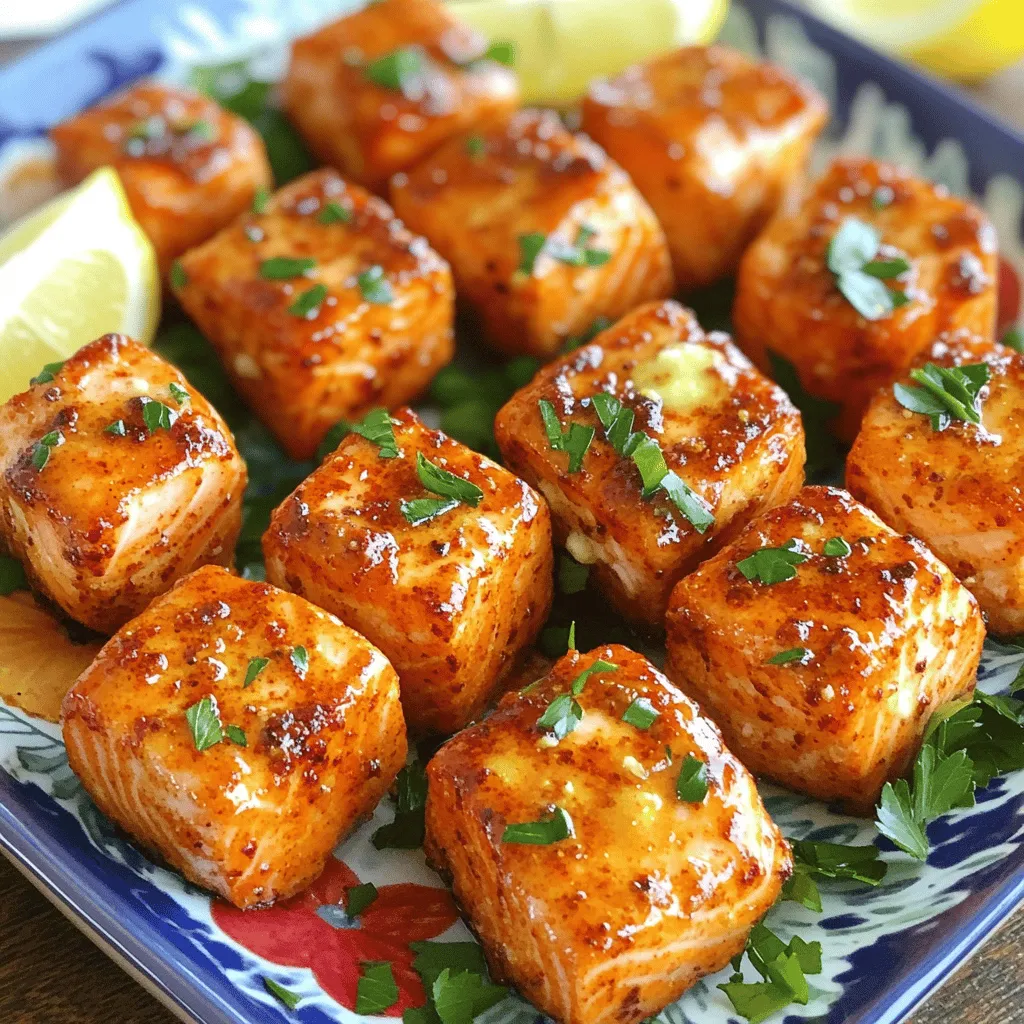
Are you ready to spice up your dinner? This Air Fryer Spicy Garlic Butter Salmon Bites recipe is sure to

- 1 cup unsalted butter, melted - 2 cups granulated sugar - 1 cup brown sugar, packed - 4 large eggs - 1 teaspoon vanilla extract - 1 ⅓ cups all-purpose flour - ½ cup unsweetened cocoa powder - 1 teaspoon baking powder - ½ teaspoon salt - 1 cup pecans, chopped - 1 cup caramel sauce (store-bought or homemade) - Sea salt for topping Using high-quality ingredients makes a big difference in flavor. Fresh eggs create a fluffier brownie. Pure vanilla extract adds depth. Unsweetened cocoa powder should be rich and dark for the best taste. Choose good butter, as it enhances the brownie’s richness. Pecans should be fresh and crunchy. When you use quality ingredients, your brownies will shine. If you need to make swaps, here are some easy ideas: - Use coconut oil instead of butter for a dairy-free option. - Swap granulated sugar with coconut sugar for a healthier choice. - You can replace all-purpose flour with almond flour for a gluten-free treat. - If you don’t have pecans, walnuts or almonds work well too. - For caramel sauce, you can make your own or use a store-bought version. These substitutes keep the flavor while making the recipe work for your needs. To make these caramel pecan pie brownies, you need to follow simple steps. First, gather your ingredients. You will need butter, sugars, eggs, and more. Preheat your oven to 350°F (175°C). Prepare your baking pan by greasing it or lining it with parchment paper. 1. In a large bowl, mix melted butter, granulated sugar, and brown sugar. Whisk it until smooth. 2. Add eggs one by one, mixing well after each. Then, stir in the vanilla extract. 3. In a separate bowl, sift together flour, cocoa powder, baking powder, and salt. Gradually mix this dry blend into the wet mixture. Stir until it is just combined. 4. Gently fold in chopped pecans into the brownie batter. 5. Pour half of the brownie batter into your prepared baking pan. Spread it evenly. 6. Drizzle half of the caramel sauce over the first brownie layer. Then spoon the remaining batter on top. Spread it gently. 7. Drizzle the rest of the caramel sauce over this layer. 8. Use a knife to swirl the caramel slightly into the brownie batter. This creates a marbled look. Bake the brownies for about 30-35 minutes. Check for doneness by inserting a toothpick in the center. If it comes out with a few moist crumbs, they are ready. If it has wet batter, bake a bit longer. Once done, sprinkle a pinch of sea salt on top while they are warm. Baking can be tricky. Here are some mistakes to watch for: - Not measuring ingredients: Always measure flour and sugar accurately. - Skipping the egg temperature: Use room temperature eggs for a smoother batter. - Overmixing the batter: Mix just until combined to keep brownies soft. - Incorrect oven temperature: Use an oven thermometer to ensure proper heat. - Not letting brownies cool: Cutting them too early can lead to messy squares. You can jazz up your brownies easily. Try these toppings: - Chopped nuts: Add more pecans or walnuts for extra crunch. - Chocolate chips: Sprinkle some on top for rich flavor. - Whipped cream: A dollop adds creaminess. - Fresh fruit: Slices of strawberries or bananas can brighten the dessert. - Extra caramel drizzle: A little more caramel sauce makes it irresistible. Cutting brownies can be an art. Here’s how to do it right: - Use a sharp knife: A clean cut prevents crumbling. - Warm the knife: Dip it in hot water for smooth slicing. - Cut in a grid: Start with a clean line down the center, then cut again. - Wipe the knife: Clean it between cuts to keep edges neat. - Let them cool: Wait until they are cool for easier cutting. These tips will help you create perfect Caramel Pecan Pie Brownies every time! {{image_2}} You can change the nuts in your brownies. Try walnuts or almonds for a twist. You can also add chocolate chips for extra sweetness. Mix in dried fruits like cranberries or cherries for a chewy texture. Each nut and fruit gives a new flavor. This makes each batch unique and fun to eat. Making these brownies gluten-free is easy. Use almond flour or a gluten-free flour blend instead of regular flour. This keeps the texture rich and moist. Be sure to check the labels on your caramel sauce too. Some sauces may contain gluten. With these swaps, everyone can enjoy these tasty treats! You can play with flavors in your brownies. Adding espresso powder boosts the chocolate taste. It gives a rich, deep flavor. Vanilla extract is a classic that adds warmth. For a fun twist, try adding orange zest. It brightens the flavor and makes the brownies stand out. Each variation can make your brownies feel new and exciting! To keep your caramel pecan pie brownies fresh, store them in an airtight container. Place parchment paper between layers to avoid sticking. They will last for up to five days at room temperature. If your kitchen is warm, you can store them in the fridge. This will help them stay firm and tasty. If you want to keep brownies for longer, freezing is a great option. First, cut the brownies into squares. Wrap each piece tightly in plastic wrap, then place them in a freezer bag. This helps prevent freezer burn. You can freeze them for up to three months. When you are ready to eat them, just thaw in the fridge overnight. To enjoy brownies warm, you can reheat them easily. Place a square on a microwave-safe plate. Heat on low for about 10-15 seconds. This will soften the brownie without making it dry. For an extra treat, add a scoop of ice cream on top as it warms! Serve these brownies warm for the best taste. Place a scoop of vanilla ice cream on top. Drizzle extra caramel sauce over the ice cream and brownies. This makes a rich dessert that everyone will love. Yes, you can! Try walnuts or almonds if you prefer. Just chop them up and add them to the batter. Each nut gives a different crunch and flavor, making your brownies unique. Check the brownies after 30 minutes. Insert a toothpick into the center. If it comes out with a few moist crumbs, they are done. Do not wait until it’s completely clean; that means they might be overbaked. Absolutely! You can bake them one day before serving. Just store them in an airtight container. They taste great the next day. If you want, warm them up before serving for that fresh-baked feel. In this post, we explored how to make delicious Caramel Pecan Pie Brownies. We discussed the right ingredients, the care needed for quality, and offered smart substitutes. I shared step-by-step baking instructions and tips to avoid common mistakes. You can even make unique variations to fit your taste or dietary needs. Finally, I covered how to store and reheat your brownies for the best results. Remember, baking is fun, so experiment and enjoy every bite!

Caramel Pecan Pie Brownies Delightful and Rich Treat

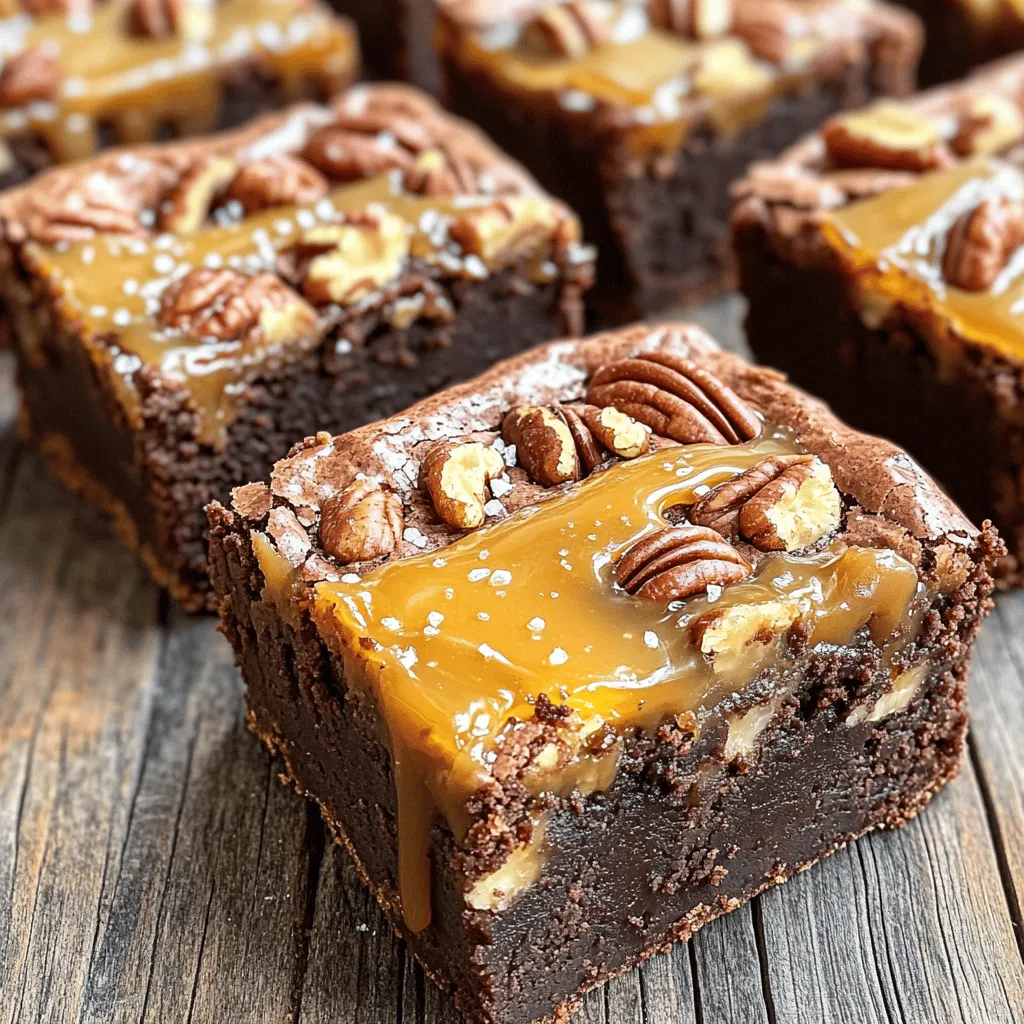
If you love rich desserts, you’re in for a treat! My Caramel Pecan Pie Brownies combine gooey caramel with crunchy

- 4 salmon fillets - 2 cups fresh green beans, trimmed - 3 tablespoons honey - 2 tablespoons Dijon mustard - 1 tablespoon olive oil Salmon fillets are the star of this dish. They are rich in omega-3 fatty acids. The fresh green beans add a nice crunch and vibrant color. Honey brings sweetness, while Dijon mustard adds a tangy kick. Olive oil binds everything together and adds richness. - 2 cloves garlic, minced - Zest and juice of 1 lemon - Salt and pepper to taste - 1 teaspoon dried thyme Garlic adds depth to the glaze. It gives off a lovely aroma when baking. Lemon zest brightens the dish and makes it refreshing. The lemon juice adds acidity, balancing the sweetness of the honey. Salt and pepper enhance the flavors, while dried thyme adds an earthy note. - Lemon wedges for garnishing Lemon wedges are perfect for serving. They give a fresh burst of flavor when squeezed over the salmon. You can also sprinkle some fresh thyme on top for a nice touch. This adds color and makes the dish look more appealing. Start by preheating your oven to 400°F (200°C). This step is key. A hot oven helps cook the salmon and green beans evenly. Make sure you set your timer. It takes a few minutes for the oven to reach the right heat. Next, you will make the honey mustard glaze. In a small bowl, mix together these ingredients: - 3 tablespoons honey - 2 tablespoons Dijon mustard - 1 tablespoon olive oil - 2 cloves garlic, minced - Zest and juice of 1 lemon - Salt and pepper to taste - 1 teaspoon dried thyme Whisk them all together until the mixture is smooth. This glaze adds sweetness and tang to the salmon. Now, it's time to prepare the sheet pan. Line a large baking sheet with parchment paper. This helps with easy cleanup. Place the salmon fillets in the center of the sheet, skin side down. Then, arrange the fresh green beans around the salmon. Next, brush half of the honey mustard glaze over the salmon. Make sure each fillet is evenly coated. Then, take the remaining glaze and drizzle it over the green beans. Toss them gently to coat well. Now, you are ready to bake! Place your baking sheet in the oven and let it do its magic. To get the best salmon, aim for a cook time of 15-20 minutes at 400°F (200°C). Use a fork to check if the salmon flakes easily. If it does, it's done! The center should look a bit opaque and moist. This means your salmon is juicy and ready to eat. For green beans, you want them tender yet still crisp. To achieve this, bake them alongside the salmon. Toss them in the glaze to add flavor. Keep an eye on them; they should be bright green with a slight bite. If they look too soft, you may have overcooked them. When serving, use a rustic wooden platter to add charm. Place the salmon and green beans together, drizzling any extra glaze on top. Add fresh lemon wedges for a pop of color. A sprinkle of thyme can make your dish look professional and appetizing. {{image_2}} You can switch the salmon for chicken or tofu. If you use chicken, choose boneless thighs or breasts. They cook well with the glaze. For tofu, use firm or extra-firm types. Cut the tofu into cubes and coat them just like the salmon. Both options soak up the honey mustard flavor nicely. Feel free to add or swap in different veggies. Asparagus works great with this dish. It cooks quickly and adds a nice crunch. Brussels sprouts are another tasty choice. Halve them before adding to the sheet pan. Both add vibrant colors and nutrients to your meal. Try adding more herbs or spices to boost flavor. Fresh parsley or dill can brighten the dish. You can also add a pinch of cayenne pepper for some heat. Experiment with what you love. Each new twist makes this recipe your own. To keep your honey mustard salmon and green beans fresh, use airtight containers. Glass containers work great, as they do not stain. If you use plastic, choose BPA-free options. Store leftovers in the fridge for up to three days. Make sure to cool the food to room temperature before sealing it. This helps avoid condensation, which can make food soggy. When it's time to enjoy your leftovers, use the oven for best results. Preheat the oven to 350°F (175°C). Place the salmon and green beans on a baking sheet. Cover them loosely with foil to keep them moist. Heat for about 10-15 minutes, or until warmed through. You can also use a microwave, but keep it on low power to avoid drying out the fish. If you want to save your meal for later, freezing is a good option. First, ensure the food is completely cool. Portion the salmon and green beans into freezer-safe bags. Remove as much air as possible to prevent freezer burn. Label the bags with the date. You can freeze the meal for up to three months. When you are ready to eat, thaw it in the fridge overnight before reheating. To cook the salmon perfectly, preheat your oven to 400°F (200°C). Bake the salmon for about 15 to 20 minutes. The salmon is done when it flakes easily with a fork. You want it cooked through but juicy. Keep an eye on it as cooking time can vary by thickness. Yes, you can make the honey mustard glaze ahead of time. Store it in a sealed container in the fridge. It will stay fresh for up to three days. Before using it, give it a good stir. The flavors will be even better after sitting for a while. Honey mustard salmon pairs well with various sides. Here are some options: - Rice: A fluffy jasmine or basmati rice works great. - Quinoa: This adds a nutty flavor and is healthy. - Salad: A light green salad with a vinaigrette is refreshing. - Potatoes: Roasted potatoes or mashed potatoes are classic choices. - Extra Veggies: Try roasted carrots or a medley of seasonal veggies. Feel free to mix and match to create a balanced meal! This blog post guides you through making a simple honey mustard salmon dish. We covered main ingredients like salmon, green beans, and a tasty glaze. I shared tips to serve it well and offered tasty variations. Remember to adjust cooking times for perfect salmon. Storing leftovers properly can keep your meal fresh. Try different veggies or proteins to mix things up. Enjoy cooking and exploring these delicious options!

Honey Mustard Salmon & Green Beans Sheet Pan Delight

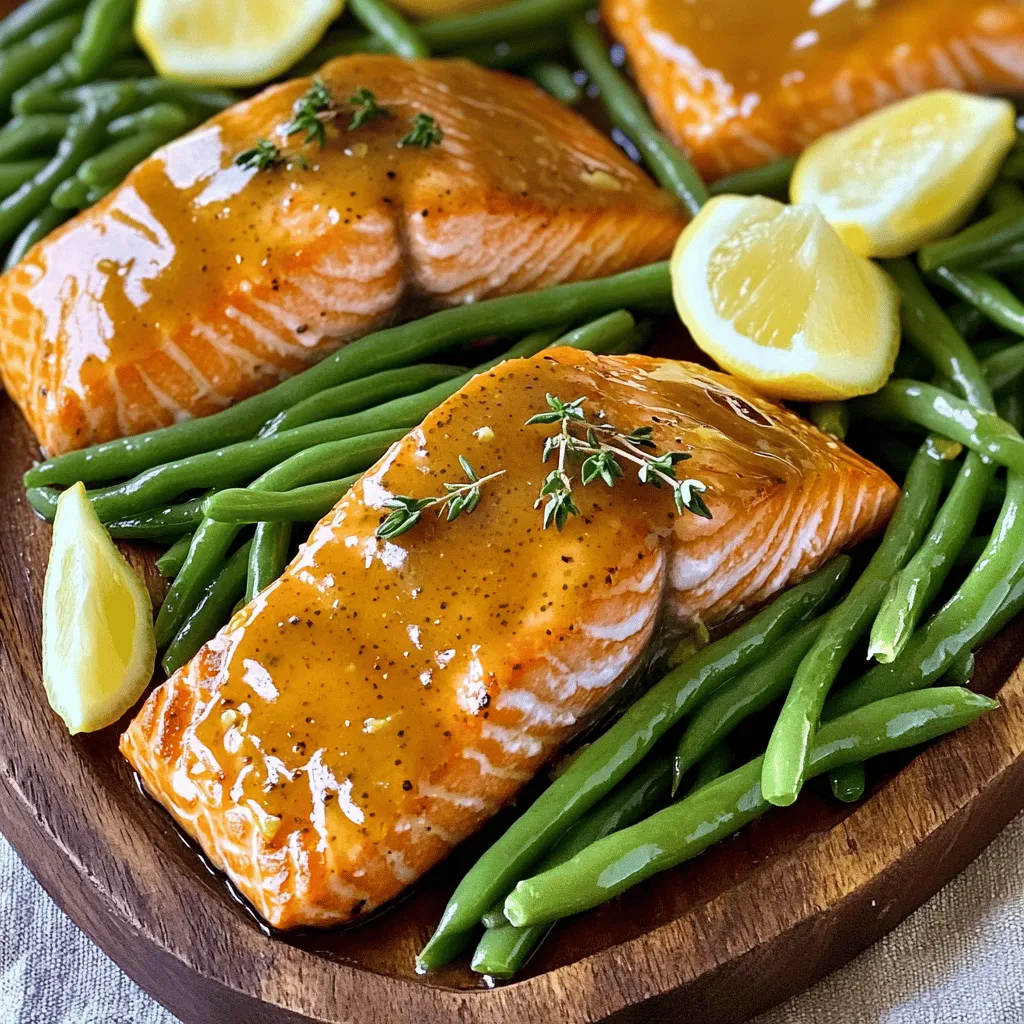
Looking for a quick and tasty dinner idea? Try my Honey Mustard Salmon & Green Beans Sheet Pan Delight! This

- 1 cup all-purpose flour - 1/2 cup granulated sugar - 1/4 cup brown sugar - 1 tsp baking powder - 1/2 tsp baking soda - 1/2 tsp ground cinnamon - 1/4 tsp ground nutmeg - 1/4 tsp ground ginger - 1/4 tsp salt - 1/2 cup unsalted butter, melted - 2 large eggs - 1 tsp vanilla extract - 1 cup canned pumpkin puree - 8 oz cream cheese, softened - 1/4 cup powdered sugar - 1 tsp pumpkin pie spice - Whipped cream, for topping (optional) - Ground cinnamon or nutmeg, for garnish (optional) When measuring ingredients, use dry measuring cups for flour and sugar. For sticky items, like pumpkin, use a liquid measuring cup. This method ensures you get the right amount. Be sure to level off dry ingredients with a straight edge for accuracy. - All-purpose flour: You can swap it for gluten-free flour if needed. - Granulated sugar: Replace it with coconut sugar or honey for a healthier option. - Unsalted butter: Use coconut oil or a vegan butter for dairy-free cupcakes. - Cream cheese: Opt for a dairy-free cream cheese for vegan cupcakes. These swaps can help you cater to dietary needs without losing flavor. Enjoy your baking journey! Start by preheating your oven to 350°F (175°C). Line a cupcake pan with cupcake liners. In a large bowl, mix the dry ingredients. Combine 1 cup of all-purpose flour, 1/2 cup of granulated sugar, 1/4 cup of brown sugar, 1 tsp of baking powder, 1/2 tsp of baking soda, 1/2 tsp of ground cinnamon, 1/4 tsp of ground nutmeg, 1/4 tsp of ground ginger, and 1/4 tsp of salt. Stir these until blended. In a separate bowl, whisk together 1/2 cup of melted unsalted butter, 2 large eggs, 1 tsp of vanilla extract, and 1 cup of canned pumpkin puree. Mix until smooth. Then, pour the wet mixture into the dry ingredients. Stir gently until just combined. Be careful not to overmix, as this keeps the cupcakes light and fluffy. For the cream cheese filling, take 8 oz of softened cream cheese and beat it in a bowl until smooth. Add 1/4 cup of powdered sugar and 1 tsp of pumpkin pie spice. Mix these until creamy and fully blended. Fill each cupcake liner halfway with the pumpkin batter. Next, add a spoonful of the cream cheese mixture on top of each one. Use a toothpick or a small knife to gently swirl the cream cheese into the pumpkin batter. Place the pan in the preheated oven and bake for 18-20 minutes. Check doneness by inserting a toothpick into the center. If it comes out clean, the cupcakes are ready. Let them cool in the pan for 5 minutes before moving them to a wire rack to cool completely. 1. Use Fresh Ingredients: Always use fresh eggs and cream cheese. This gives the best taste. 2. Do Not Overmix: Mix the batter just until combined. Overmixing makes cupcakes tough. 3. Measure Carefully: Use a kitchen scale if possible. This ensures the right texture. 4. Room Temperature Ingredients: Let your cream cheese and eggs sit out. This helps them blend smoothly. - Skipping the Cooling Step: Letting cupcakes cool is vital. It prevents soggy bottoms. - Not Swirling Enough: Swirl the cream cheese filling well. This makes each bite creamy and delicious. - Ignoring Oven Temperature: Always preheat your oven fully. An underheated oven can ruin your cupcakes. - Using Old Spices: Fresh spices boost flavor. Old spices can dull the taste of your cupcakes. - Whipped Cream Topping: Add a dollop of whipped cream on top. It looks inviting and tastes great. - Garnish with Spices: Sprinkle a little ground cinnamon or nutmeg on top. It adds a nice touch and flavor. - Use Cute Cupcake Liners: Choose festive liners that match the season. This makes your cupcakes more fun. - Add a Caramel Drizzle: A light drizzle of caramel sauce can enhance sweetness. It also adds visual appeal. These tips will help you create perfect pumpkin cheesecake cupcakes every time. Enjoy the process and the delicious results! {{image_2}} You can make these pumpkin cheesecake cupcakes gluten-free. Simply replace all-purpose flour with a gluten-free blend. Brands like Bob's Red Mill or King Arthur Flour work well. Make sure the blend contains xanthan gum for better texture. Most other ingredients are naturally gluten-free, so you can enjoy these treats without worry. To create vegan pumpkin cheesecake cupcakes, replace eggs with flax eggs. Mix one tablespoon of ground flaxseed with three tablespoons of water. Let it sit for five minutes. Use vegan cream cheese instead of regular cream cheese. Also, swap butter with coconut oil or vegan butter. The flavor will still shine through, making these cupcakes a hit for all. You can add fun flavors to these cupcakes. For a chocolate twist, mix in 1/4 cup cocoa powder with the dry ingredients. You can also add chocolate chips to the batter. For extra spice, up the cinnamon and nutmeg. Try adding a pinch of clove or allspice for warmth. Each variation gives a fresh take on this classic treat! To keep your pumpkin cheesecake cupcakes fresh, place them in an airtight container. I recommend letting them cool completely first. Once cooled, stack them carefully to avoid squishing. Store them in the fridge if you plan to eat them within three days. For longer storage, freezing is a better option. You can freeze these cupcakes for up to three months. To freeze, wrap each cupcake tightly in plastic wrap. Then, place them in a freezer-safe bag or container. This keeps the air out and prevents freezer burn. When you’re ready to enjoy them, thaw them in the fridge overnight. To reheat your frozen cupcakes, take them out of the fridge. Let them sit at room temperature for about 30 minutes. Then, preheat your oven to 350°F (175°C). Place the cupcakes on a baking tray and heat for about 10 minutes. This warms them up without drying them out. You can also use a microwave. Heat them for about 15-20 seconds. Just be careful not to overheat, as they can become tough. Enjoy your sweet treats! Yes, you can use fresh pumpkin. First, cook the pumpkin until soft. Then, mash it well. Make sure to drain excess water for a thicker texture. Canned pumpkin is easy and saves time, but fresh adds a nice touch. If you choose fresh, pick a small sugar pumpkin for the best flavor. You can bake the cupcakes a day before. Let them cool, then store them in an airtight container. Keep them in the fridge to keep them fresh. You can also prepare the cream cheese filling ahead. Just keep it in the fridge until you are ready to use it. This way, you save time on the day you want to serve them. Serve the cupcakes chilled or at room temperature. Top them with whipped cream for extra flavor. A sprinkle of ground cinnamon or nutmeg adds a nice touch. Arrange them on a pretty plate for a festive look. They are perfect for parties or cozy gatherings. Enjoy each bite! To make the perfect pumpkin cheesecake cupcakes, focus on quality ingredients. Follow the steps to prepare the batter and the filling. Remember the baking tips to avoid common mistakes. Explore variations for special diets and flavors. Store any leftovers correctly for the best taste later. In conclusion, these cupcakes are tasty and fun to make. Enjoy them at gatherings or as a treat for yourself. Happy baking!

Pumpkin Cheesecake Cupcakes Delightfully Sweet Treat

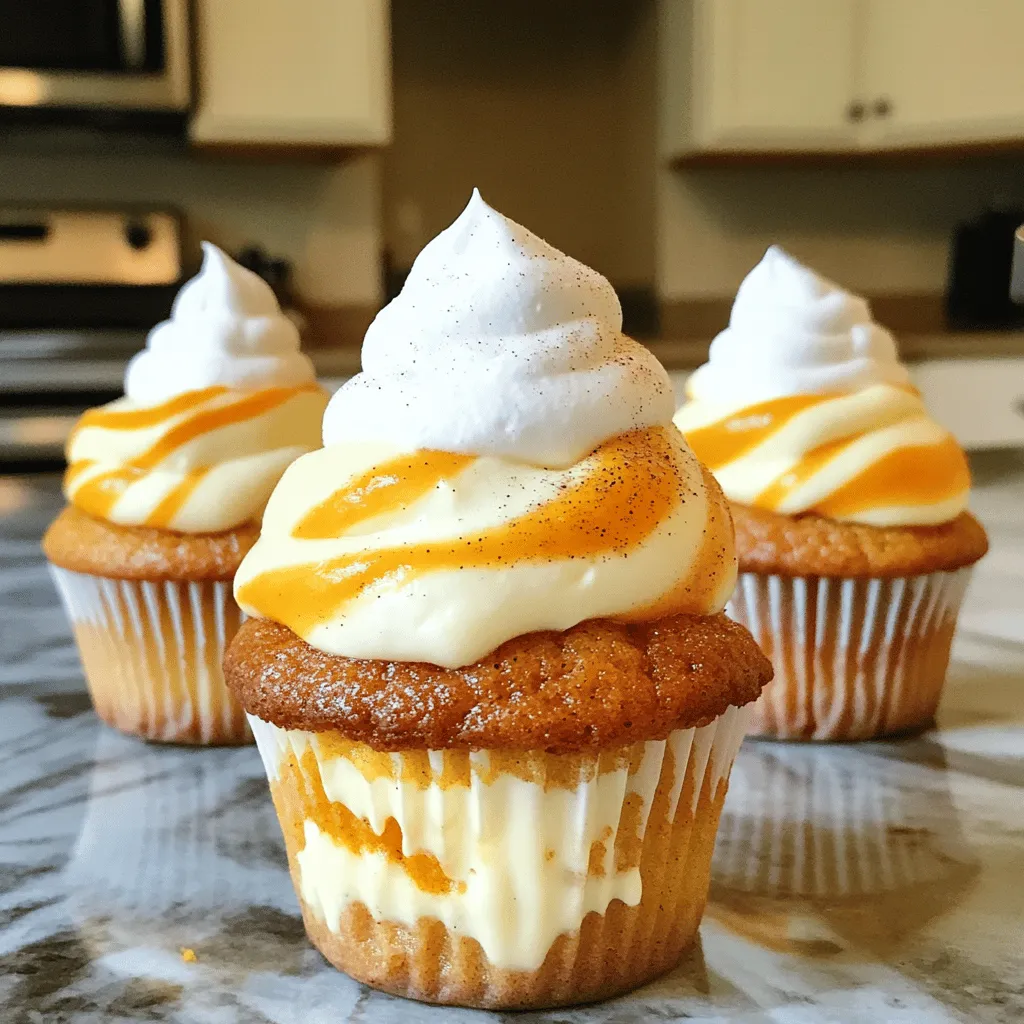
Get ready for a treat that blends fall flavors with sweet indulgence! Pumpkin Cheesecake Cupcakes are a delightful way to

- 4 tilapia fillets - 1 cup grated Parmesan cheese - 1/2 cup breadcrumbs (preferably Italian seasoned) - 1 teaspoon garlic powder - 1 teaspoon paprika - 1/2 teaspoon salt - 1/4 teaspoon black pepper - 2 tablespoons olive oil - 1 tablespoon fresh parsley, chopped - Lemon wedges Using fresh, high-quality tilapia makes a big difference. Look for fillets that are firm and smell clean. For the cheese, choose finely grated Parmesan. It melts better and gives a great crust. The breadcrumbs should be Italian seasoned for extra flavor. If you can, use fresh herbs for garnishes. They add color and taste. Always check the expiration dates on your ingredients. Fresh ingredients lead to the best results. Start by setting your air fryer to 400°F (200°C). Preheating takes about 5 minutes. This step warms up the air fryer and helps create a nice, crispy crust on your fish. In a shallow bowl, combine these ingredients: - 1 cup grated Parmesan cheese - 1/2 cup breadcrumbs (preferably Italian seasoned) - 1 teaspoon garlic powder - 1 teaspoon paprika - 1/2 teaspoon salt - 1/4 teaspoon black pepper Mix them well until they are fully blended. This mix adds a savory crunch to the tilapia. First, pat the tilapia fillets dry with paper towels. This step removes extra moisture. Then, brush both sides of each fillet with 2 tablespoons of olive oil. This helps the crust stick better. Next, dredge the oiled fillets in the Parmesan-breadcrumb mixture. Press down slightly to ensure good coverage. Make sure every part of the fish is coated. Place the coated fillets in a single layer in the air fryer basket. Avoid overlapping the fillets for even cooking. Cook them for 8 to 10 minutes. The tilapia is done when it reaches an internal temperature of 145°F (63°C) and the crust is golden brown. Once cooked, carefully remove the fillets from the air fryer. Place them on a serving platter. To add a fresh touch, garnish with chopped parsley. Serve the tilapia with lemon wedges and a side of mixed greens for a colorful plate. To get that perfect crispy crust, follow these steps. First, make sure you pat your tilapia fillets dry. This helps the coating stick better. Next, brush both sides with olive oil. This not only adds flavor but also helps the crust crisp up in the air fryer. When dredging, press down firmly on the fillets in the Parmesan mixture. This ensures a thick, even coating. Lastly, avoid overcrowding the air fryer basket. Give each fillet space to cook evenly. You can change the flavor of your crust with easy tweaks. Try adding lemon zest for a bright touch. A dash of cayenne pepper can spice things up if you like heat. For a herby flavor, mix in dried oregano or thyme with the Parmesan. Feel free to experiment with your favorite spices. This keeps your dish fresh and exciting each time you make it. Cooking fish in an air fryer is quick and simple. Always preheat the air fryer for even cooking. Set it to 400°F (200°C) and let it heat for about 5 minutes. Cook your tilapia for 8-10 minutes, checking the internal temperature. It should reach 145°F (63°C) when done. Use a meat thermometer to check for doneness. Finally, let the fish rest for a minute before serving. This helps the juices settle, making each bite juicy and flavorful. {{image_2}} You can swap tilapia for other fish. Cod, haddock, and sole work well too. They all have mild flavors and cook quickly. Each type brings its own taste and texture. Experimenting can make mealtime fun. If you need a gluten-free option, use crushed rice crackers or almond flour. Both add crunch. You can also try gluten-free breadcrumbs, which are easy to find. These options keep the dish tasty without gluten. You can boost flavor with herbs and spices. Try adding lemon zest for freshness. Fresh dill or thyme also works well. If you like heat, add cayenne pepper to the mix. These simple tweaks can make your dish unique and exciting. Store leftover Air Fryer Parmesan Crusted Tilapia in an airtight container. Place it in the fridge. It will stay fresh for up to three days. Make sure it cools down before sealing. This helps keep the fish from getting soggy. To reheat, use your air fryer for the best results. Set it to 350°F (175°C). Heat the tilapia for about 5 minutes. Check if it's warm throughout. This method keeps the crust crispy. You can also use a microwave, but the crust may lose its crunch. You can freeze cooked tilapia if you want to save it for later. Wrap each fillet tightly in plastic wrap. Then, place them in a freezer bag. Label the bag with the date. Frozen tilapia will last up to three months. When ready to eat, thaw it in the fridge overnight before reheating. Yes, you can use frozen tilapia fillets. Just make sure to thaw them first. Thawing helps the crust stick better. You can leave them in the fridge overnight or run them under cold water. Once thawed, follow the same steps for coating and air frying. I recommend serving this tilapia with mixed greens or a fresh salad. Lemon wedges add a nice touch of brightness. You can also pair it with rice or roasted vegetables for a hearty meal. The flavors of the tilapia mix well with light sides. Tilapia is done when it reaches an internal temperature of 145°F (63°C). You can check this with a meat thermometer. The fish should look opaque and easily flake with a fork. If it’s golden brown and crispy on the outside, that’s a good sign too. Yes, you can use an oven instead. Preheat your oven to 400°F (200°C) and bake the tilapia on a lined baking sheet. Bake for about 12-15 minutes, or until cooked through. The crust may not be as crispy, but it will still taste great. This blog post covered how to make Air Fryer Parmesan Crusted Tilapia. We discussed key ingredients, preparation steps, and tips for the best results. Using fresh ingredients and techniques will give you a tasty, crispy dish. Remember, you can try different fish and flavors to make it your own. Follow the storage tips to enjoy leftovers later. Cooking this dish will impress anyone at your table and give you a win in the kitchen. Enjoy your culinary adventure with air frying!

Air Fryer Parmesan Crusted Tilapia Savory Delight

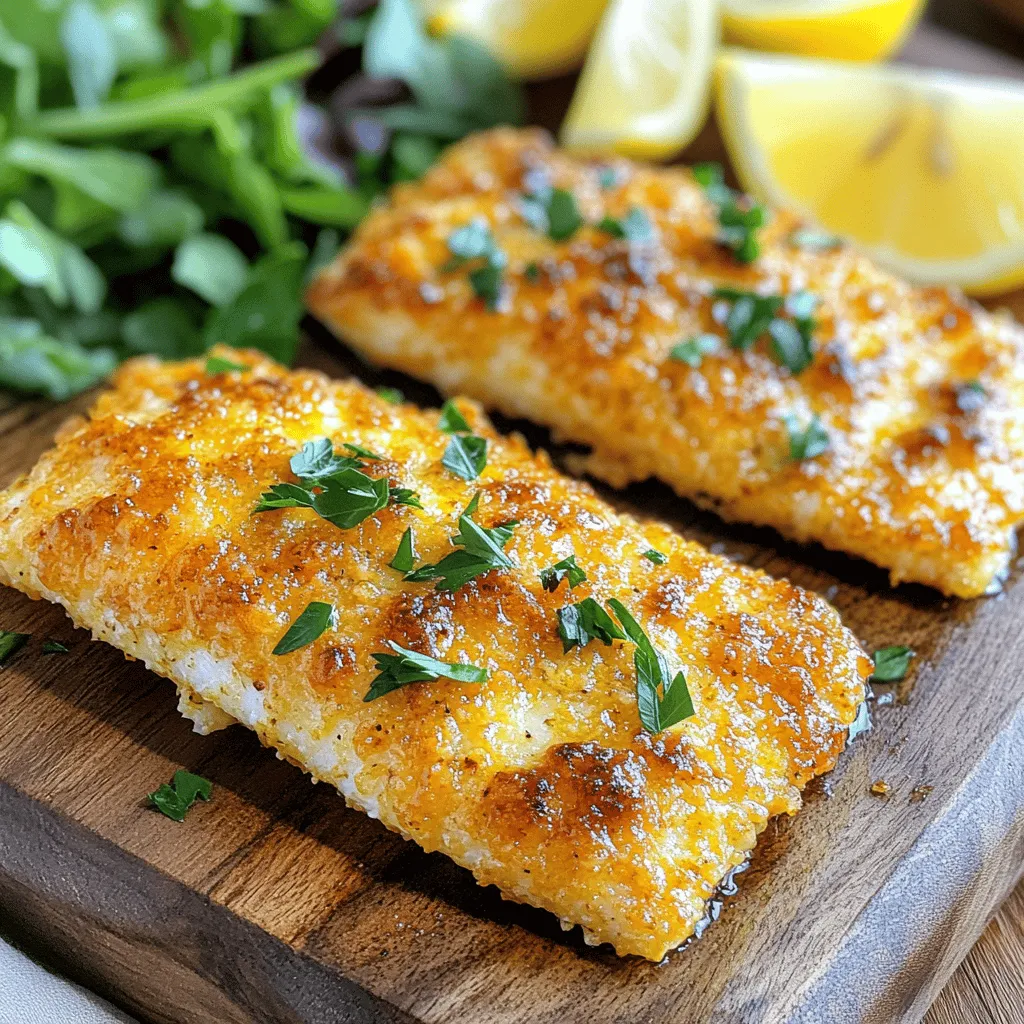
If you crave a meal that’s both easy and delicious, you’ll love my Air Fryer Parmesan Crusted Tilapia. This recipe

To make these donuts, you need a few key items. Here is what you will need: - 2 cups all-purpose flour - 1 cup granulated sugar - 2 teaspoons baking powder - 1/2 teaspoon baking soda - 1/2 teaspoon salt - 1 teaspoon ground cinnamon - 1/2 teaspoon nutmeg - 2 large eggs - 3/4 cup buttermilk - 1/4 cup unsalted butter, melted - 1 teaspoon vanilla extract - 1 cup powdered sugar (for glaze) - 3 tablespoons maple syrup - 1/2 teaspoon ground cinnamon (for glaze) These ingredients work together to create soft, flavorful donuts. Each item adds something special to the mix. Besides the ingredients above, gather a few kitchen tools: - Donut pan - Mixing bowls - Whisk - Piping bag or zip-top bag - Wire rack These tools help you prepare and bake the donuts easily. Having them ready makes the process smoother. You might not have every ingredient on hand. Here are some easy swaps: - All-purpose flour: Use whole wheat flour for a nutty taste. - Granulated sugar: Brown sugar adds a deeper flavor. - Buttermilk: Mix milk with a splash of vinegar or lemon juice. - Unsalted butter: Coconut oil or vegetable oil works well. These substitutes keep your donuts tasty, even if you are out of some items. Feel free to mix and match! Start by preheating your oven to 350°F (175°C). Grease your donut pan with non-stick spray. In a large bowl, mix the dry ingredients: 2 cups of all-purpose flour, 1 cup of granulated sugar, 2 teaspoons of baking powder, 1/2 teaspoon of baking soda, 1/2 teaspoon of salt, 1 teaspoon of ground cinnamon, and 1/2 teaspoon of nutmeg. Whisk them until well combined. In another bowl, beat 2 large eggs with 3/4 cup of buttermilk, 1/4 cup of melted, unsalted butter, and 1 teaspoon of vanilla extract. Mix until smooth. Pour the wet ingredients into the dry mix. Stir gently until just combined. Be careful not to overmix; lumps are okay. Now, use a piping bag or a zip-top bag with a cut corner. Fill each donut cavity about 3/4 full with batter. Place the pan in the oven and bake for 10-12 minutes. To check if they are done, insert a toothpick into the center. It should come out clean. After baking, let the donuts cool in the pan for about 5 minutes. Then, transfer them to a wire rack to cool completely. While the donuts cool, you can make the glaze. In a bowl, whisk together 1 cup of powdered sugar, 3 tablespoons of maple syrup, and 1/2 teaspoon of ground cinnamon. Mix until the glaze is smooth. If it is too thick, add more maple syrup. If too thin, add more powdered sugar. Once the donuts are cool, dip the tops into the glaze. Allow any excess glaze to drip off. For a fun touch, sprinkle a pinch of ground cinnamon on top of the glaze before it sets. Enjoy your sweet creation! To get the best donut texture, start with fresh ingredients. Use room temperature eggs and buttermilk. This helps the batter mix well. Mix the dry and wet ingredients until just combined. Overmixing makes your donuts tough. Fill the donut pan only three-quarters full. This allows room for rising. For the perfect glaze, whisk together powdered sugar, maple syrup, and cinnamon. Start with the listed amounts. If the glaze is too thick, add more maple syrup. If it’s too thin, add more powdered sugar. The glaze should coat the donuts but not drip off too much. Dip the tops quickly for a nice finish. Serve your donuts on a tiered cake stand for a fun look. Dust with extra cinnamon for charm. You can also add chopped nuts or sprinkles for texture. Pair the donuts with coffee or tea to enhance the experience. Enjoy sharing these delightful treats with friends and family! {{image_2}} You can switch up the flavor in your donuts easily. For a fruity twist, add mashed bananas or applesauce to your batter. These fruits add natural sweetness and moisture. Another option is to mix in some cocoa powder for a chocolatey delight. Just replace a bit of flour with cocoa powder. You can also try flavors like lemon zest or almond extract. Each change makes a unique donut. While maple cinnamon glaze is amazing, you have other choices. A simple vanilla glaze is easy to make. Just mix powdered sugar with milk and vanilla. For a chocolate glaze, melt dark chocolate and mix with a little butter. You can also add citrus zest to your glaze for a fresh taste. Try mixing maple syrup with honey for a different sweet flavor. Baking donuts is quick and easy. They are lighter and less oily. You get a soft texture and a nice rise. Frying gives you a rich, crispy exterior. Fried donuts are denser and have a classic taste. Both methods are tasty, so choose based on your mood. If you want a healthier option, baking is the way to go. If you crave a treat, frying is a fun choice! To keep your maple cinnamon glazed donuts fresh, store them in an airtight container. You can place parchment paper between layers to avoid sticking. This helps maintain their soft texture. Store them at room temperature for up to two days. If you want them to last longer, refrigeration is an option. Just remember, cold storage may change their texture slightly. If you want to freeze your donuts, first let them cool completely. Wrap each donut tightly in plastic wrap. Then, place them in a freezer bag or container. Make sure to remove as much air as possible. This method keeps the donuts fresh for up to three months. When you're ready to enjoy them, simply thaw them overnight in the fridge. To reheat your donuts, preheat your oven to 350°F (175°C). Place the donuts on a baking sheet for about 5-7 minutes. This warms them up and restores some of their original texture. If you prefer, you can use a microwave. Heat each donut for about 10-15 seconds. Just be careful not to overheat them, or they can become tough. Enjoy your delicious treats! To make these donuts vegan, you can swap the eggs for flaxseed meal. Mix one tablespoon of flaxseed meal with three tablespoons of water. Let it sit for a few minutes to thicken. Use a plant-based milk instead of buttermilk, like almond or soy milk. For the butter, choose a dairy-free version. This way, you keep the great flavor without any animal products. Yes, you can use different types of flour! If you want to go gluten-free, try almond flour or a gluten-free blend. These flours may change the texture slightly, but the taste will still be yummy. You can also use whole wheat flour for a healthier option. Just know that whole wheat flour will make the donuts denser. You can find Maple Cinnamon Glazed Donuts at many bakeries and coffee shops. Check local places first. If you want a quick fix, some grocery stores sell pre-made versions. But if you want the best taste, I suggest making them at home! It’s simple and fun, plus you can enjoy them fresh from the oven. Making Maple Cinnamon Glazed Donuts is simple and fun. We covered key ingredients, step-by-step baking, and creative decorating tips. Remember, you can swap ingredients and try new flavors. Storing and reheating leftovers is easy, so enjoy them later! With this guide, you have all you need to make delicious donuts at home. Get ready to impress your friends and family with these tasty treats! Happy baking!

Maple Cinnamon Glazed Donuts Delightful and Simple Recipe

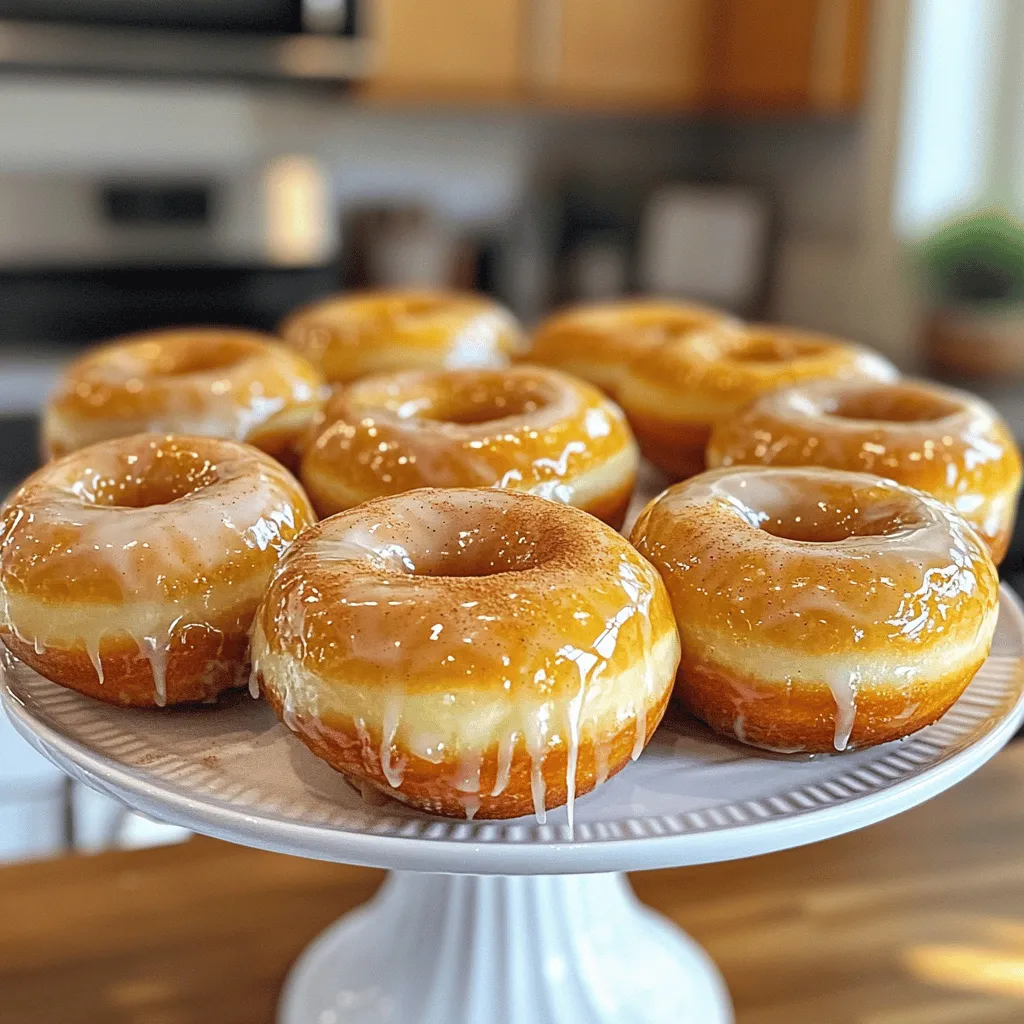
Are you ready to treat yourself to something sweet? In this simple recipe, I’ll show you how to make Maple

- 2 large Granny Smith apples, diced - 1 cup granola or crushed graham crackers - 1 cup chocolate pudding (store-bought or homemade) - ½ cup caramel sauce (store-bought or homemade) - 1 teaspoon cinnamon - 1 tablespoon lemon juice - Whipped cream for topping - Optional: Chopped nuts (like pecans or walnuts) for garnish To make No-Bake Chocolate Caramel Apple Pie Cups, start with fresh Granny Smith apples. Their tartness pairs well with sweet caramel and rich chocolate. Dice two large apples into small pieces. In a bowl, add one tablespoon of lemon juice and one teaspoon of cinnamon to the apples. This step adds flavor and prevents browning. Next, choose your base. You can use one cup of granola for a crunchy texture or crushed graham crackers for sweetness. Both options work great for this dessert. For the creamy layer, use one cup of chocolate pudding. You can buy it or make it from scratch. If you make your own, ensure it's thick and smooth. You will also need half a cup of caramel sauce. Store-bought is easy, but homemade adds a special touch. Finally, gather whipped cream for topping and optional chopped nuts, like pecans or walnuts, for that extra crunch. With these ingredients, you create a delightful dessert that is sure to impress! To start, take your two large Granny Smith apples and dice them. Place the diced apples in a medium bowl. Add one tablespoon of lemon juice and one teaspoon of cinnamon. Mix them well. This step helps the apples stay fresh and gives them a sweet spice. Next, grab your serving cups or small bowls. Add about two tablespoons of granola or crushed graham crackers at the bottom of each cup. Press down lightly to create a firm base. This crunchy layer adds texture and balance to the creamy dessert. Now, it's time to add some rich chocolate flavor. Spoon in the chocolate pudding until the cups are half full. Spread it evenly over the granola. Then, layer the cinnamon-coated apples on top of the pudding. Drizzle some caramel sauce over the apples for that extra sweet touch. If your cups are big enough, repeat the layers. Add another layer of granola, followed by more pudding, and finish with the apple layer. Top it with another drizzle of caramel sauce. Once done, place the cups in the refrigerator for about 30 minutes. This chill time allows the flavors to blend. For this pie, I love using Granny Smith apples. They offer a nice tartness that balances the sweet chocolate and caramel. Other great choices are Honeycrisp or Fuji apples. These apples have a crisp texture. They hold up well in the cups and add great flavor. Using homemade ingredients can make a big difference. Homemade chocolate pudding tastes rich and creamy. You can control the sweetness too. But store-bought options are quick and easy. They save time, especially on busy days. If you want to save time, go for store-bought caramel sauce. It works well and tastes good too. To make these cups look amazing, use clear glasses or small bowls. This way, you can show off the layers. Top each cup with a generous dollop of whipped cream. Add a sprinkle of chopped nuts for an extra crunch. You can even drizzle more caramel on top. This makes each cup pop with flavor and color. {{image_2}} You can mix things up with this dessert! Try adding chopped nuts like pecans or walnuts for a crunchy texture. You can also toss in chocolate chips for more sweetness. Different fruits like strawberries or bananas can add fresh flavors too. Each option will give your pie cups a unique twist. If you need gluten-free options, choose gluten-free granola or graham crackers. For a vegan version, select plant-based chocolate pudding and caramel sauce. You can also use coconut whipped cream instead of traditional whipped cream. This way, everyone can enjoy this tasty treat! You can easily adjust the recipe for gatherings. For larger groups, simply double or triple the ingredients. Serve in bigger cups or bowls. If you want single servings, use smaller cups or even shot glasses. Each guest will love their own little pie cup! You can store the no-bake chocolate caramel apple pie cups in the fridge. They stay fresh for up to three days. Keep them covered to avoid drying out. This way, you can enjoy their sweet, creamy goodness later on. Yes, you can freeze these cups. However, I recommend enjoying them fresh for the best taste. If you freeze them, use an airtight container. They can last up to one month in the freezer. Just remember to defrost them in the fridge before serving. To keep your ingredients fresh, store apples in the fridge. This helps them stay crisp longer. For granola or crushed graham crackers, keep them in a sealed bag or container. This prevents them from getting stale. If using store-bought pudding or caramel, check the expiration date. Use them before they expire to ensure the best flavor. Yes, you can make these cups in advance. The best time frame is up to one day ahead. This allows the flavors to blend nicely. Just keep them in the fridge. The longer they chill, the better they taste! If you want to skip the caramel, try honey or maple syrup. You can also use chocolate sauce for a different twist. Nut butter is another great option for a creamy layer. Each choice gives a unique flavor to the cups. To amp up the chocolate flavor, mix in chocolate chips with the pudding. You can also add cocoa powder to the pudding for a richer taste. Drizzle some chocolate sauce on top before serving. These tips will make your dessert even more chocolatey! This blog post covered a fun dessert using Granny Smith apples, granola, and chocolate pudding. You learned how to prepare, layer, and chill the ingredients for a delicious treat. We also discussed tips for choosing apples, using homemade or store-bought items, and enhancing presentation. Variations allow for gluten-free or vegan options. Lastly, we shared storage guidelines and answered common questions. With these steps, you can create a tasty dessert that pleases everyone. Enjoy making these delightful cups and impress your friends and family with your tasty skills!

No-Bake Chocolate Caramel Apple Pie Cups Delight

Get ready for a sweet treat that requires no oven! My No-Bake Chocolate Caramel Apple Pie Cups combine crunchy apples,

To make a delicious creamy Tuscan shrimp pasta, you need a few key ingredients. These will help create a rich and flavorful dish that everyone will love. - 8 oz (225g) fettuccine pasta - 1 lb (450g) shrimp, peeled and deveined - 2 tablespoons olive oil - 3 cloves garlic, minced - 1 cup cherry tomatoes, halved - 1 cup baby spinach - 1 cup heavy cream - ½ cup grated Parmesan cheese - 1 teaspoon Italian seasoning - Salt and pepper to taste - Fresh basil leaves for garnish Each ingredient plays a special role. The fettuccine gives a nice base. Shrimp adds protein and flavor. Olive oil helps cook the shrimp and adds richness. Garlic brings a wonderful aroma. Cherry tomatoes add sweetness and color. Baby spinach gives freshness. Heavy cream makes the sauce rich. Parmesan cheese adds depth. Italian seasoning gives a warm, herby taste. Salt and pepper enhance all the flavors. Fresh basil leaves finish the dish beautifully. Gather these ingredients before you start. They will help ensure a smooth cooking process. This dish is not just tasty; it's also easy to prepare. Enjoy the process of making it! 1. Start by bringing a large pot of salted water to a boil. This step is essential for flavor. 2. Add 8 oz of fettuccine pasta to the boiling water. Cook the pasta according to the package instructions. Usually, it takes about 8-10 minutes to reach al dente. 3. Once cooked, reserve ½ cup of pasta water. Drain the rest and set the pasta aside. This water will help adjust your sauce later. 1. In a large skillet, heat 2 tablespoons of olive oil over medium heat. Wait until the oil shimmers to know it's ready. 2. Add 1 pound of peeled and deveined shrimp to the skillet. Season with salt and pepper. Cook the shrimp for about 2-3 minutes on each side. They should turn pink and opaque. 3. After cooking, remove the shrimp from the skillet. Set them aside on a plate while you make the sauce. 1. In the same skillet, add 3 cloves of minced garlic. Sauté for about 30 seconds until you smell the aroma. 2. Next, add 1 cup of halved cherry tomatoes. Cook for about 3 minutes until they start to soften. 3. Lower the heat and stir in 1 cup of baby spinach. Cook just until it wilts. 4. Now, pour in 1 cup of heavy cream and add ½ cup of grated Parmesan cheese. Stir well until the cheese melts and the sauce becomes creamy. 5. Mix in 1 teaspoon of Italian seasoning. Adjust the flavor with salt and pepper as needed. Follow these steps closely, and you’ll create a delicious base for your creamy Tuscan shrimp pasta. To make the sauce creamy, you can adjust the amount of heavy cream. If you want it richer, add more cream. If you prefer a lighter sauce, use less. You can also add a bit of reserved pasta water to thin it out if needed. For enhancing flavors, season well with salt and pepper. Italian seasoning adds a nice touch. You can also try adding a splash of lemon juice for brightness. Fresh herbs like basil or parsley can also boost the flavor. Cooking shrimp just right is key. Make sure your skillet is hot before adding the shrimp. Cook them for 2-3 minutes on each side until they turn pink and opaque. Overcooking can make shrimp tough and rubbery. If you see them curling too much, take them off the heat. Garnish your creamy Tuscan shrimp pasta with fresh basil leaves and extra Parmesan cheese. This adds color and flavor. For side dishes, pair it with garlic bread or a fresh salad. A crisp white wine, like Pinot Grigio, goes great with this dish. It complements the creamy sauce and seafood nicely. {{image_2}} You can change the pasta type to fit your taste. Try penne or spaghetti for a fun twist. These shapes hold the sauce well and add a unique bite. If you're feeling adventurous, swap in whole wheat or gluten-free pasta. For seafood, shrimp isn’t your only option. You can use scallops, crab, or even lobster. These will bring new flavors. Each seafood choice can make the dish special. Just remember to adjust cooking times as needed. If you're looking for a dairy-free version, coconut milk works great. It adds creaminess and a hint of sweetness. Just replace heavy cream with the same amount of coconut milk. For a lighter option, use lower-fat cheese. Part-skim mozzarella or reduced-fat Parmesan can cut calories. They still melt well and keep the dish tasty. Add spices to boost the flavor. A pinch of red pepper flakes gives a nice kick. Fresh herbs like parsley or chives can brighten the dish. You can also mix in basil for a fresh taste. Incorporating extra veggies can add nutrition. Try bell peppers, zucchini, or mushrooms. Sauté them along with the garlic for a colorful, tasty dish. To keep your creamy Tuscan shrimp pasta fresh, store it in an airtight container. Place the pasta and shrimp together with the sauce. This helps keep everything moist. You can refrigerate it for up to three days. Just make sure it cools before sealing it. When reheating, use a microwave or a skillet. If using a microwave, cover it loosely. Stir halfway through for even heating. In a skillet, add a splash of water or cream to prevent sticking. If you want to freeze the pasta, it’s best to do this before adding the sauce. Cook the fettuccine and shrimp, then let them cool. Place them in a freezer-safe bag or container. This keeps them fresh for about three months. To thaw, move it to the fridge for a few hours or overnight. You can also use the microwave on a defrost setting. After thawing, gently reheat in a skillet. Stir in the sauce and enjoy your meal! You can add heat with chili flakes or fresh peppers. Start with a pinch of red pepper flakes when cooking the garlic. For more heat, chop fresh jalapeños or serrano peppers. Adjust the amount based on your spice level. You can also serve hot sauce on the side for those who like it extra spicy. Yes, you can use frozen shrimp. Just thaw them before cooking. Place them in cold water for about 15 minutes. This helps speed up the thawing process. Make sure to pat them dry with a paper towel. This way, they will sear better in the pan. You can pair this pasta with a light salad or crusty bread. A simple green salad with lemon dressing works well. Garlic bread also makes a great side. For wine, try a Chardonnay or Sauvignon Blanc. These wines complement the creamy sauce and shrimp nicely. This blog post covered how to make delicious Creamy Tuscan Shrimp Pasta. You learned about the key ingredients like fettuccine, shrimp, and olive oil. I shared step-by-step instructions for cooking the pasta and shrimp, plus tips for a perfect sauce. You would also discover variations and storage tips. Try this dish for a tasty meal that impresses. Enjoy cooking, and don’t forget to experiment with flavors!

Creamy Tuscan Shrimp Pasta Flavorful Dinner Delight

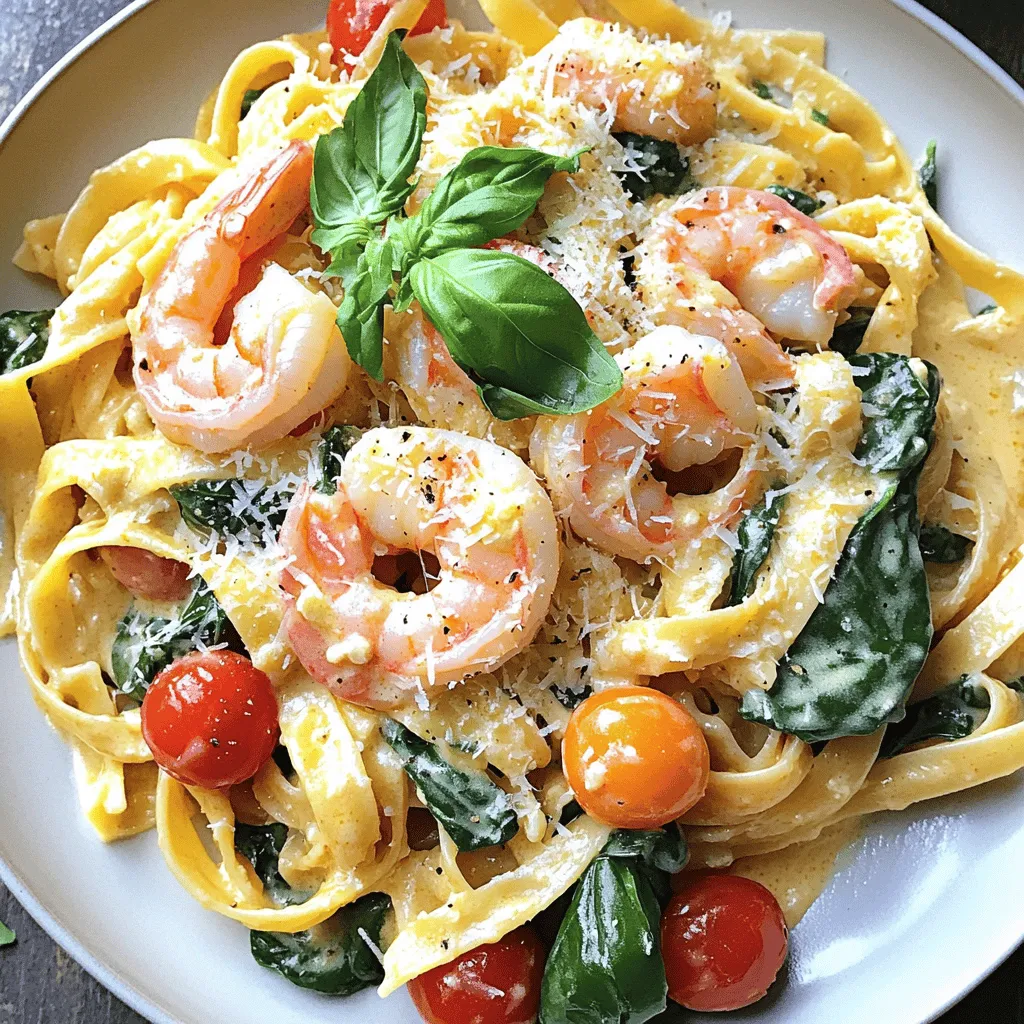
If you’re craving a delicious, creamy dish, you’ll love this Creamy Tuscan Shrimp Pasta. This meal combines tender shrimp, fresh

Older posts
Newer posts
← Previous Page1 … Page28 Page29 Page30 … Page84 Next →

dsad

© 2026 juliesdish • Built with GeneratePress

Our Policies

  • Copyright Policy
  • Cookie Policy
  • GDPR Policy
  • Privacy Policy
  • Disclaimer
  • Terms Of Use

More Information

  • Home
  • About
  • Contact
  • Appetizers
  • Dessert
  • Dinner
  • Drinks
©2026, juliesdish About Back To Top