Skip to content
DisclaimerTerms Of UseGDPR PolicyCookie Policy

juliesdish

  • Home
  • Drinks
  • Appetizers
  • Dinner
  • Dessert
  • About
  • Contact
  • Privacy Policy
DisclaimerTerms Of UseGDPR PolicyCookie Policy

NO-ING-IMG

- 1 cup all-purpose flour - 1 cup whole wheat flour - 1 teaspoon baking powder - 1/2 teaspoon baking soda - 1/2 teaspoon salt - 1 teaspoon ground cinnamon - 1/2 teaspoon ground nutmeg - 1/2 teaspoon ginger powder - 1/2 cup unsalted butter, softened - 1 cup brown sugar, packed - 1/2 cup granulated sugar - 2 large eggs - 1 cup canned pumpkin puree - 1/4 cup milk - 1 teaspoon vanilla extract - 1 cup chopped pecans - 1/4 cup pecans, for topping (optional) Each ingredient plays a key role in the flavor and texture. The all-purpose and whole wheat flour gives the cake a nice structure. Baking powder and baking soda help it rise. Salt balances out the sweet notes. The spices, like cinnamon, nutmeg, and ginger, add warmth and depth. Butter adds richness, while brown sugar and granulated sugar create a sweet contrast. Eggs bind everything and add moisture. Pumpkin puree brings a lovely texture and a hint of earthiness. Milk and vanilla extract enhance the overall taste. Finally, chopped pecans give crunch and flavor. If you like, sprinkle more on top for extra texture. Each bite of this cake is a delightful mix of flavors and textures, making it a must-try! 1. Preheat your oven to 350°F (175°C). This helps the cake bake evenly. Grease a 9x9 inch baking dish. Use butter or cooking spray to prevent sticking. 2. Mix dry ingredients together in a medium bowl. Combine 1 cup all-purpose flour, 1 cup whole wheat flour, 1 teaspoon baking powder, 1/2 teaspoon baking soda, 1/2 teaspoon salt, 1 teaspoon ground cinnamon, 1/2 teaspoon ground nutmeg, and 1/2 teaspoon ginger powder. Whisk them well and set aside. 3. Cream butter and sugars in a large bowl. Beat 1/2 cup softened unsalted butter, 1 cup packed brown sugar, and 1/2 cup granulated sugar. Mix until light and fluffy. This takes about 3 to 4 minutes. 4. Incorporate eggs, pumpkin puree, milk, and vanilla. Add 2 large eggs one at a time, mixing well after each. Then, pour in 1 cup canned pumpkin puree, 1/4 cup milk, and 1 teaspoon vanilla extract. Stir until well combined. 5. Gradually add dry ingredients to wet mixture. Carefully fold the dry mix into the wet mix. Do this until just combined. Avoid overmixing for a lighter cake. 6. Fold in chopped pecans. Add 1 cup chopped pecans to the batter. Gently mix them in to distribute evenly. 7. Pour batter and top with pecans. Transfer the batter into the greased baking dish. Smooth the top with a spatula. If you like, sprinkle 1/4 cup pecans over the top for extra crunch. 8. Baking time and toothpick test for doneness. Bake for 35 to 40 minutes. To check if it’s done, insert a toothpick into the center. If it comes out clean, your cake is ready. Mixing well is key for a good cake. Start by whisking your dry items. This helps spread the baking powder and spices. When you mix wet and dry, do it gently. Use a spatula to fold them together. Stop once you see no dry flour. Overmixing makes the cake tough. To check if your cake is done, stick a toothpick in the center. If it comes out clean, your cake is ready. If it has wet batter, bake a few more minutes. Keep an eye on it to avoid overbaking. Want to boost the flavor? Add more spices! A pinch of allspice or cloves adds warmth. You can also try a bit of vanilla bean paste for richer taste. If you love citrus, a little orange zest brightens the cake nicely. Mix and match to find your perfect blend. Presentation matters! Cut the cake into squares. Dust the top with powdered sugar for a sweet touch. For extra indulgence, serve it warm with whipped cream or a scoop of vanilla ice cream. These little extras make your coffee cake a true delight at any gathering. {{image_2}} You can easily adapt this pumpkin pecan coffee cake to meet your needs. - Gluten-free option: Substitute all-purpose flour with a blend of almond flour and coconut flour. Use about three-quarters of the amount you would normally use. This will keep the cake moist and delicious. - Nut-free substitutions: If you want a nut-free cake, skip the pecans. You can use sunflower seeds or pumpkin seeds instead. They add a nice crunch without the nuts. Get creative with flavors and add-ins! Here are some fun ideas: - Chocolate chips: Add a cup of chocolate chips to the batter for a sweet twist. They melt and blend perfectly with the pumpkin. - Dried fruit: Try adding chopped dried cranberries or raisins. They bring a chewy texture and a burst of flavor. - Other nuts: Swap pecans for walnuts or hazelnuts. Each nut offers a unique taste and texture. - Modifying spice ratios: Want a stronger flavor? Increase the cinnamon or add allspice. You can also use pumpkin pie spice for extra warmth. With these variations, your pumpkin pecan coffee cake will always feel fresh and exciting! After you bake the pumpkin pecan coffee cake, let it cool down. This cooling step is key to keeping the cake moist. Once cool, store it in an airtight container. This will keep it fresh for up to three days at room temperature. If your kitchen is warm, you may want to place it in the fridge. Just remember, cold air can dry it out, so cover it well. If you want to keep the cake longer, freezing is a great option. First, cut the cake into squares. Wrap each piece tightly in plastic wrap. Then, place the wrapped slices in a freezer bag or container. This helps prevent freezer burn. You can freeze the cake for up to three months. When you're ready to enjoy, take a piece out and let it thaw in the fridge overnight. For a quick fix, you can microwave it for about 20 seconds. This warms it up nicely and brings back some of that fresh-baked taste. Enjoy your cake without the wait! Yes, you can use fresh pumpkin. First, cook the pumpkin until soft. Then, mash it to get a smooth puree. This will give your cake a fresh taste. Just make sure to measure out one cup, just like with canned pumpkin. To check if the cake is done, insert a toothpick into the center. If it comes out clean, your cake is ready. If it has wet batter on it, bake for a few more minutes. Always trust the toothpick test! Yes, you can reheat leftovers. Place a piece in the microwave for 15-20 seconds. This warms it up nicely. For a crispier texture, heat it in the oven at 350°F for about 10 minutes. You can serve the coffee cake warm with a dusting of powdered sugar. A dollop of whipped cream adds a nice touch. For a richer treat, try a scoop of vanilla ice cream on the side. Enjoy it with a warm cup of coffee! This blog post covered the key steps to make a delicious Pumpkin Pecan Coffee Cake. I shared the essential ingredients, preparation methods, and baking tips. You can also explore variations to fit your diet or taste. Remember, storing it right keeps it fresh for longer. Baking is all about having fun and trying new things. Enjoy your cake creation and share it with others! Happy baking!

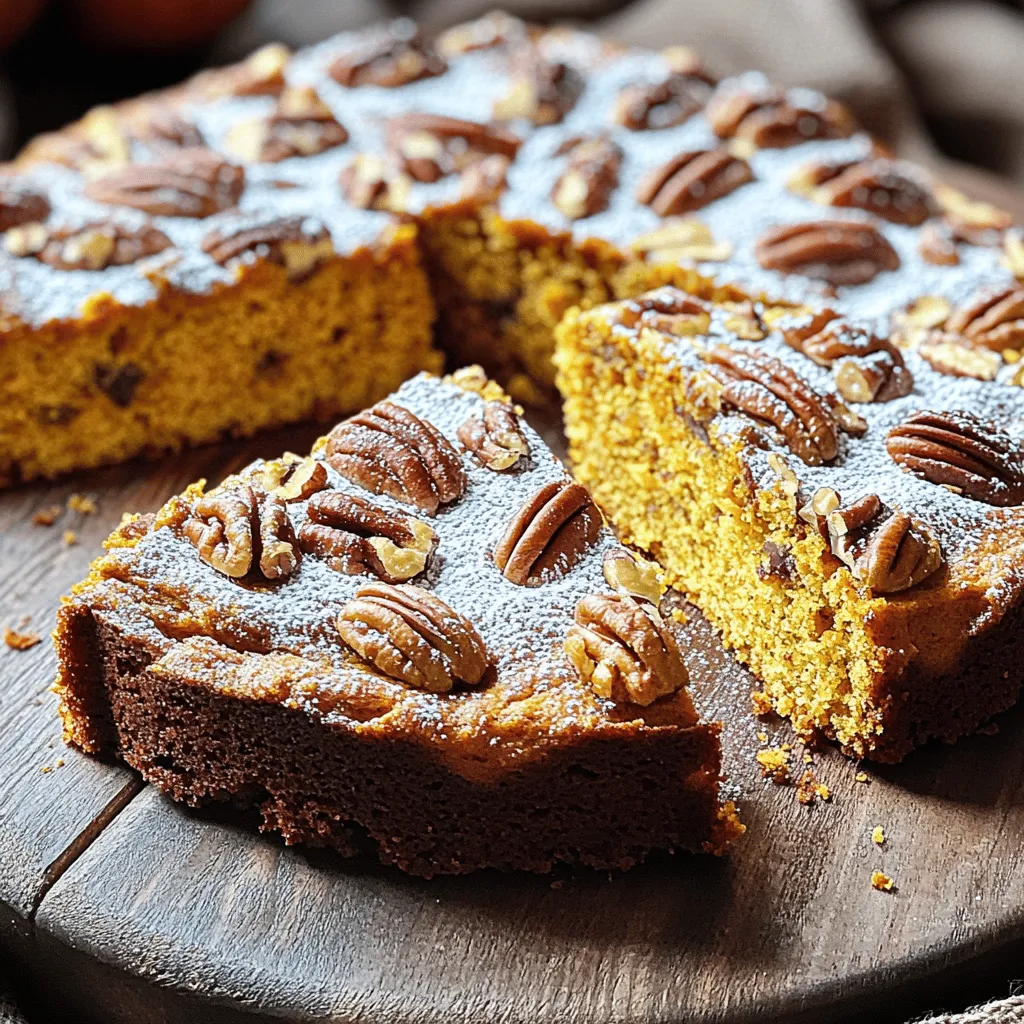
Pumpkin Pecan Coffee Cake Irresistible Flavor Delight

Are you ready to bake a delicious treat that screams fall? Pumpkin Pecan Coffee Cake combines rich spices and nutty

To make Caramel Apple Mini Cheesecakes, gather these key items: - 1 cup graham cracker crumbs - 1/4 cup unsalted butter, melted - 2 tablespoons sugar - 8 oz cream cheese, softened - 1/2 cup powdered sugar - 1 teaspoon vanilla extract - 1 large egg - 1/2 cup apples, peeled and finely chopped - 1 teaspoon cinnamon - 1/2 cup caramel sauce (store-bought or homemade) - Whipped cream for topping - Extra apple slices and caramel sauce for garnish You can play with flavors and textures! Here are some ideas: - Add a pinch of nutmeg for extra warmth. - Use crushed cookies instead of graham crackers for the crust. - Swap apples for pears or peaches for a fruity twist. - Try a swirl of chocolate or peanut butter in the filling. To create these mini delights, you will need: - Muffin tin - Mini cupcake liners - Mixing bowls - Electric mixer or whisk - Measuring cups and spoons - Rubber spatula - Wire rack for cooling With these ingredients and tools, you're ready to create a festive treat that bursts with flavor! First, set your oven to 325°F (160°C). This step warms the oven for baking. While the oven heats, line a muffin tin with mini cupcake liners. This makes it easy to lift out the mini cheesecakes later. In a medium bowl, mix the graham cracker crumbs, melted butter, and sugar. Stir until the crumbs are well coated. This mixture forms a tasty crust. Press about a tablespoon of the crumb mix into each cupcake liner. Make sure you pack it down firmly. Bake the crusts for 5 minutes. This short bake helps set the crust. Once done, take the pan out of the oven and let it cool. In a clean mixing bowl, beat the softened cream cheese until it’s creamy. This step is key for a smooth filling. Gradually add the powdered sugar while mixing. Keep mixing until it’s smooth and fluffy. Next, add the vanilla extract, then the egg. Mix just until combined. Be careful not to overmix, as this can change the texture. Now, gently fold in the chopped apples and cinnamon. This adds a lovely flavor to your filling. Pour the cream cheese mixture over the cooled crusts in the muffin tin. Fill each liner about 3/4 full. This allows room for the cheesecake to rise. Bake for 15-20 minutes. You want the centers to be just set and slightly jiggly. After baking, let them cool in the pan for about 10 minutes. Then, transfer them to a wire rack to cool completely. Once the mini cheesecakes are cool, drizzle caramel sauce on top. Refrigerate them for at least 2 hours. Serving them cold enhances the flavors. When ready to serve, add whipped cream, a sprinkle of cinnamon, and extra apple slices for a beautiful touch. Arrange them on a decorative plate for a festive look. To make the best mini cheesecakes, follow these tips: - Use room temperature cream cheese for a smooth batter. Cold cream cheese can make lumps. - Don’t overmix the batter after adding the egg. This keeps the cheesecakes light. - Fill each liner to 3/4 full for the perfect rise. They need space to puff up. - Cool them slowly in the pan before transferring to a wire rack. This helps prevent cracks. Watch out for these common mistakes: - Skipping the crust prep can lead to soggy bases. Make sure to press the crumbs firmly. - Overbaking can dry them out. Check them at 15 minutes; they should jiggle slightly. - Not chilling long enough makes them too soft to serve. Aim for at least 2 hours in the fridge. - Using too much caramel can overwhelm the flavors. A light drizzle is perfect. Presentation makes a big impact. Here are some ideas: - Use a decorative plate to show off your mini cheesecakes. - Drizzle extra caramel sauce around the plate for a sweet touch. - Garnish with thin apple slices for color and freshness. - Top with whipped cream and a sprinkle of cinnamon for a festive look. {{image_2}} You can change the flavor of these mini cheesecakes easily. For a pumpkin twist, add 1/2 cup of pumpkin puree instead of apples. Mix in 1 teaspoon of pumpkin pie spice for warmth. If you crave chocolate, use chocolate cream cheese. You can also fold in mini chocolate chips for extra delight. These swaps keep the base the same but add new tastes. Do you need gluten-free options? You can use gluten-free graham cracker crumbs. Look for brands that are certified gluten-free. This way, everyone can enjoy a treat. If you want a dairy-free version, try vegan cream cheese. Substitute with almond or coconut milk as needed. These options make it easier for those with dietary needs. Toppings can really make these mini cheesecakes shine. Try adding chopped nuts for a nice crunch. Pecans or walnuts work great. You can drizzle more caramel sauce on top for extra sweetness. If you like, add a sprinkle of sea salt to balance the flavors. Fresh apple slices or whipped cream make perfect garnishes too. These simple ideas can turn your mini cheesecakes into a showstopper. To keep your caramel apple mini cheesecakes fresh, store them in the fridge. Use an airtight container to prevent drying out. If you stack them, place parchment paper between layers. This keeps the whipped cream from sticking. You can freeze these mini cheesecakes too! Wrap each cheesecake in plastic wrap tightly. Then, place them in a freezer-safe bag. They will stay fresh for up to three months. When you want to enjoy them, thaw them in the fridge overnight. In the fridge, these mini cheesecakes last about one week. If you want the best taste, eat them within three to five days. Always check for any signs of spoilage before serving. Yes, you can use low-fat cream cheese in this recipe. It will change the taste and texture a bit. The mini cheesecakes may be less rich but still tasty. Just make sure it is softened for easy mixing. You can tell they are done when the centers are slightly jiggly. They should not look wet or shiny. A toothpick inserted should come out clean or with just a few crumbs. If you overbake, they will be dry. Absolutely! You can make them a day or two before serving. Just store them in the fridge after they cool. This way, they will set nicely and be ready when you are. If you don’t have apples, try using pears or even mashed bananas. They will give a different flavor but can work well. You can also add berries or chocolate chips for a fun twist. Using cupcake liners helps with easy removal. They also keep the mini cheesecakes from sticking to the pan. If you don’t have liners, you can grease the pan well, but liners are best for this recipe. In this blog post, we explored the art of making mini cheesecakes. We covered key ingredients, equipment, and step-by-step instructions. I shared tips for perfecting your creation and ways to add unique flavors. We also discussed storage techniques to keep your treats fresh. With these insights, you can craft delightful mini cheesecakes with ease. Remember, practice makes perfect. Enjoy your baking journey!

Caramel Apple Mini Cheesecakes Easy Festive Delight

If you’re craving a sweet treat that screams fall, look no further! In this post, I’ll show you how to

- 4 boneless, skinless chicken breasts - 2 cups cremini mushrooms, sliced - 1 cup heavy cream - 1 cup chicken broth - 1 tablespoon Dijon mustard - 1 teaspoon dried thyme - 1 teaspoon paprika - Salt and pepper to taste - 2 tablespoons olive oil - 1 tablespoon fresh parsley, chopped - Searing the chicken breasts: Start by heating 2 tablespoons of olive oil in a skillet over medium heat. Once hot, add 4 boneless, skinless chicken breasts. Sear each side for about 3-4 minutes until they turn golden brown. This step adds flavor and keeps the chicken juicy. After searing, transfer the chicken to your slow cooker. - Cooking onion and garlic: In the same skillet, add 1 cup of diced onion and 3 minced garlic cloves. Sauté them for about 2-3 minutes until they become soft and translucent. After this, toss in 2 cups of sliced cremini mushrooms. Cook for another 5 minutes until the mushrooms start to soften. This mix will create a rich base for your dish. - Mixing the creamy broth: In a separate bowl, whisk together 1 cup of chicken broth, 1 cup of heavy cream, 1 tablespoon of Dijon mustard, 1 teaspoon of dried thyme, 1 teaspoon of paprika, and salt and pepper to taste. Make sure everything is well combined and smooth. - Layering in the slow cooker: Pour the onion, garlic, and mushroom mix over the chicken in the slow cooker. Then, pour the creamy broth mixture on top. This layering ensures each bite is full of flavor. - Low and high setting times: Cover the slow cooker and set it to cook. If you choose low, let it cook for 6-7 hours. For the high setting, it will take about 3-4 hours. The chicken should be cooked through and tender. - Shredding the chicken: Once the cooking time is up, gently shred the chicken using two forks. Mix it well into the sauce. This step helps the chicken absorb all the creamy goodness. Enjoy your creamy mushroom chicken served hot over mashed potatoes or rice! Searing the chicken helps add a nice flavor. Heat olive oil in a skillet. Cook the chicken breasts for about 3-4 minutes on each side. You want them golden brown. Then, transfer the chicken to your slow cooker. This step boosts the dish's taste. Using a slow cooker with a timer is smart. Set it to cook on low for 6-7 hours. If you are short on time, use the high setting for 3-4 hours. This way, your meal cooks perfectly, even while you are busy. Serve your creamy mushroom chicken over mashed potatoes or rice. This adds a nice base for the sauce. Drizzle extra sauce on top for flavor. It makes the dish look more appealing. Garnish with fresh parsley for a pop of color. Just sprinkle it on before serving. This small touch makes your dish look restaurant-worthy. You can add more seasonings to enhance the taste. Consider using garlic powder or onion powder for extra flavor. A pinch of crushed red pepper can add a nice kick. If you want to change things up, try substituting ingredients. Use chicken thighs instead of breasts for a juicier bite. You can also swap heavy cream for coconut milk for a dairy-free version. These tweaks can create new flavors in your dish. {{image_2}} You can switch to chicken thighs for a richer taste. Thighs have more fat, which adds flavor. If you need a dairy-free option, use coconut milk instead of cream. This change keeps the dish creamy and adds a hint of sweetness. If you want to change the taste, try adding herbs like rosemary or oregano. These will create new flavors that surprise your taste buds. You can also throw in veggies like spinach or peas. They add color and boost nutrition. Just toss them in during the last hour of cooking. To spice it up, add jalapeños. This will give the dish a kick that warms you up. For an Italian twist, mix in some pesto. The basil flavor makes the dish unique and fresh. These small changes make the creamy mushroom chicken even more exciting! To store any leftovers, let the dish cool first. Place it in a container with a tight lid. Use glass or plastic containers that seal well. This keeps the chicken moist and fresh. You can store it in the fridge for up to three days. The best way to reheat creamy mushroom chicken is on the stove. Use a low heat to prevent burning. Stir gently to keep the cream smooth. You can also use a microwave. Heat it in short bursts, stirring in between. This keeps the chicken creamy and delicious. You can freeze creamy mushroom chicken for up to three months. Use freezer-safe bags or containers. Make sure to leave some space for expansion. When you’re ready to eat, thaw it in the fridge overnight. Reheat on the stove or microwave until hot. This way, it stays tasty and creamy. Yes, you can use frozen chicken in this recipe. Just keep in mind a few things. First, you need to add extra cooking time. If you cook on low, plan for about 8 hours. If you cook on high, aim for 5-6 hours. Make sure the chicken reaches 165°F for safety. Frozen chicken works well, but fresh chicken is best for flavor. To check if the chicken is done, look for a few signs. The chicken should be white throughout with no pink. Use a meat thermometer for the best results. Insert it into the thickest part of the chicken. It should read at least 165°F. The chicken will also be tender and easy to shred. Creamy mushroom chicken goes well with many sides. Here are some great options: - Mashed potatoes: Creamy and buttery, they soak up the sauce. - Rice: Fluffy rice balances the rich sauce well. - Steamed vegetables: Broccoli or green beans add color and texture. - Crusty bread: Perfect for dipping into the creamy sauce. - Salad: A fresh salad can lighten the meal. These sides will enhance your meal and make it even more satisfying. This article covered making creamy mushroom chicken step by step. You learned about key ingredients, cooking methods, and smart tips. We explored tasty variations and how to store leftovers. Cooking with care and creativity leads to great meals. Don’t hesitate to try new flavors or adjust ingredients. Enjoy making this dish your own. Your culinary journey begins here, so have fun in the kitchen!

Creamy Mushroom Chicken Slow Cooker Delight

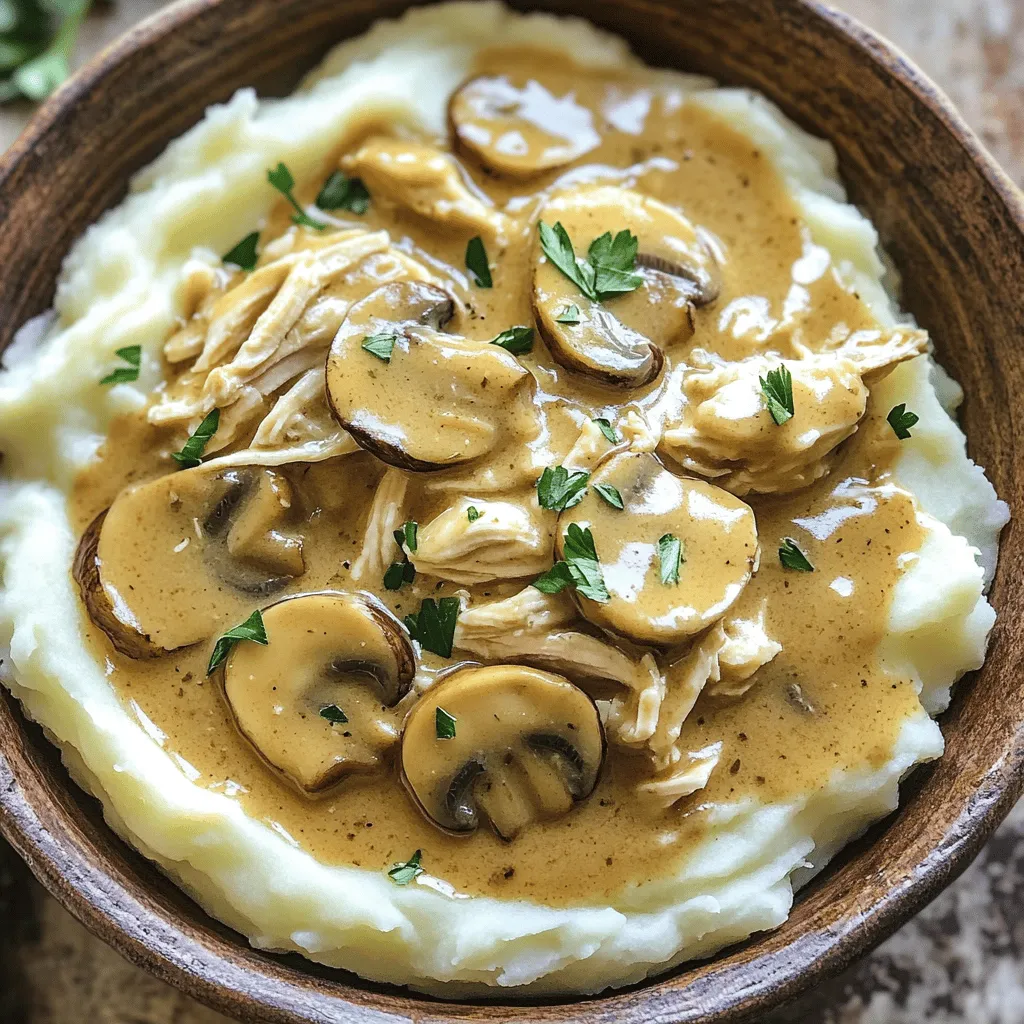
Welcome to your new favorite dinner! My Creamy Mushroom Chicken Slow Cooker Delight is an easy, comforting meal. With tender

- 4 boneless, skinless chicken thighs - 2 medium sweet potatoes, peeled and diced - 1 red bell pepper, sliced - 1 yellow bell pepper, sliced - 1 red onion, chopped - 1 cup BBQ sauce (your favorite brand) - 2 tablespoons olive oil - 1 teaspoon smoked paprika - 1 teaspoon garlic powder - Salt and pepper to taste - Fresh parsley for garnish (optional) For this BBQ Chicken Sweet Potato Sheet Pan, you need simple but fresh ingredients. Start with the chicken. I like using boneless, skinless thighs. They are juicy and cook evenly. Next, sweet potatoes add a nice sweet touch. Peel and dice them into small cubes. Add color with red and yellow bell peppers. Slice them thin for even cooking. Chop a red onion for depth in flavor. Now for the seasoning and sauce. Choose your favorite BBQ sauce. It brings that smoky, sweet taste. You will need olive oil for roasting. This helps the veggies get crispy and brown. Smoked paprika and garlic powder add a warm flavor. Don’t forget salt and pepper to taste! For a fresh look, garnish with parsley at the end. This dish is not just tasty; it’s a feast for the eyes too! - Preheat the oven to 425°F (220°C). - Peel and dice the sweet potatoes. - Slice the red and yellow bell peppers. - In a large bowl, mix the sweet potatoes, bell peppers, and chopped red onion. - Drizzle with olive oil and sprinkle with smoked paprika, garlic powder, salt, and pepper. - Toss the mix until all the veggies are coated. - Spread the vegetable mix evenly on a large sheet pan. - In the same bowl, add the chicken thighs. - Pour half of the BBQ sauce over the chicken. - Toss to coat the chicken well. - Place the chicken on top of the veggies on the sheet pan. - Brush the remaining BBQ sauce over the chicken for extra flavor. - Bake in the preheated oven for 25-30 minutes. - Check that the chicken reaches an internal temperature of 165°F (75°C). - The sweet potatoes should be tender. - If you want a charred look, broil for 3-5 minutes. - Keep a close eye to prevent burning. To make sure your chicken is safe to eat, check the internal temperature. It should reach 165°F (75°C). Use a meat thermometer for best results. Ovens can vary, so you might need to adjust your cooking time. If your oven runs hot, watch your food closely to avoid burning. Choosing the right BBQ sauce is key to great taste. Go for a sauce that you enjoy. Sweet, tangy, or spicy, pick what fits your mood. You can also try different seasoning ideas. Add a pinch of cayenne for heat or switch smoked paprika for regular paprika. This can change the dish's flavor profile. Garnish your dish with fresh parsley for a pop of color. It adds a nice touch and makes the meal look special. For serving suggestions, place everything on a large platter. This makes it easy for everyone to help themselves. You can also pair it with a crisp salad for a fresh contrast. {{image_2}} You can switch up the protein in this dish. Using chicken breasts works well if you prefer a leaner option. They cook fast and stay juicy. Just keep an eye on them while baking. If you want a vegetarian choice, try tofu or tempeh. Both soak up flavors well. Cut them into cubes and toss them with BBQ sauce. Place them on the pan with the veggies. Bake until heated through. This recipe is flexible with veggies. Add zucchini for a fresh twist. It cooks fast and adds a nice crunch. Broccoli is another great option. It pairs well with BBQ flavors. You can also swap in seasonal vegetables. Think carrots in the fall or asparagus in spring. This keeps the meal fresh and exciting all year round. Don’t be afraid to play with flavors. Different BBQ sauces can change the whole dish. Try a smoky sauce for a bold taste. A sweet sauce adds a nice glaze. You can also add spice blends for some heat. Paprika gives warmth, while cayenne pepper adds a kick. Mix and match to find your favorite flavor profile. To keep your BBQ chicken and sweet potatoes fresh, place leftovers in airtight containers. This helps prevent moisture loss and keeps flavors intact. Store them in the fridge. Leftovers can last up to 3-4 days. If you want to save some for later, freeze the leftovers. Place them in freezer-safe bags. Remove as much air as possible before sealing. This helps avoid freezer burn. When you are ready to eat them, thaw overnight in the fridge. To reheat, bake in the oven at 350°F (175°C) until heated through. This keeps the chicken juicy and the sweet potatoes soft. You can also use a microwave for quick reheating. Just be sure to cover the container to keep the moisture in! Yes, you can prep some parts ahead of time. Chop the sweet potatoes, peppers, and onions a day before. Store them in the fridge in a sealed bag. You can also marinate the chicken in the BBQ sauce overnight. This makes cooking quick and easy on the day you want to serve it. This meal pairs well with simple sides. Try a green salad for freshness. Corn on the cob adds sweetness. You can also serve some garlic bread for a nice crunch. If you want something warm, baked beans work great too. The best way is to check the internal temperature. Use a meat thermometer to ensure it reaches 165°F (75°C). This guarantees the chicken is safe and juicy. If you don’t have a thermometer, check that the juices run clear when you cut into it. Sure! You can grill the chicken for a smoky flavor. Cook the sweet potatoes on the grill in a basket. If you prefer slow cooking, place everything in a slow cooker. Cook on low for about 6 hours. Both methods will give a tasty twist to this dish. In this blog post, we explored how to make a delicious BBQ Chicken Sweet Potato Sheet Pan meal. We covered the main ingredients, prep, and cooking steps. I shared tips for perfecting flavor and presentation. You can even substitute proteins or vegetables for variety. Remember to store leftovers properly to enjoy later. This dish is simple and tasty, making it a great choice for busy nights. Enjoy cooking, and don't hesitate to make it your own!

BBQ Chicken Sweet Potato Sheet Pan Delight

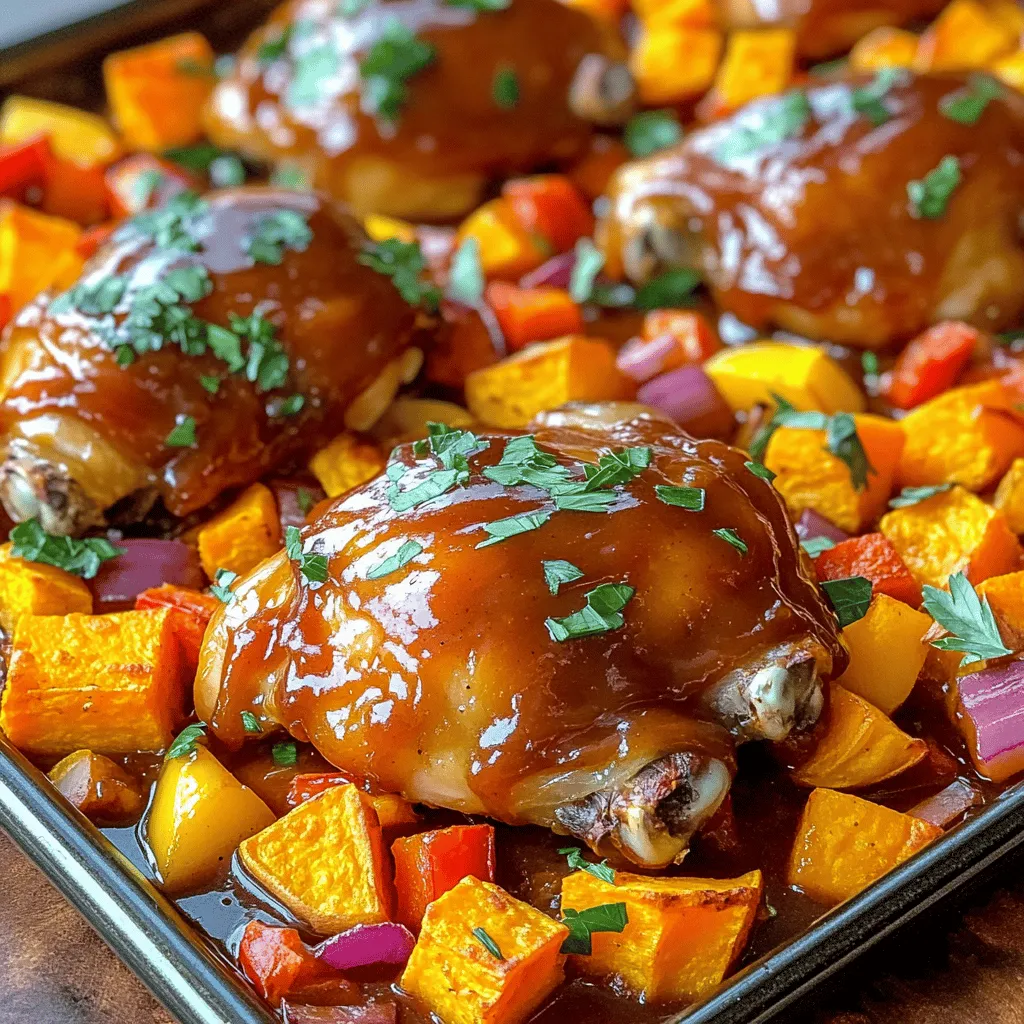
Craving a simple yet delicious meal? My BBQ Chicken Sweet Potato Sheet Pan Delight is here to save the day!

- 4 cod fillets (about 6 oz each) - 1 cup panko breadcrumbs - 1/2 cup grated Parmesan cheese - 1 teaspoon garlic powder - 1 teaspoon onion powder - 1 teaspoon dried parsley - 1/2 teaspoon paprika - Salt and black pepper to taste - 2 tablespoons melted butter - 1 tablespoon olive oil When making Air Fryer Parmesan Crusted Cod, I love using fresh ingredients. The cod fillets are the star of the dish. They should be about 6 ounces each for even cooking. Panko breadcrumbs give the dish a light and crunchy texture. I always choose high-quality grated Parmesan cheese. It adds a rich, salty flavor that works perfectly with the cod. Spices like garlic powder and onion powder enhance the taste without overpowering the fish. Dried parsley adds a nice touch of color and freshness. Paprika gives a slight kick and beautiful color. I use salt and black pepper to season the fillets just right. The melted butter and olive oil help the coating stick to the fish while adding flavor. - Calories per serving: 360 - Macronutrient breakdown: - Protein: 30g - Carbohydrates: 20g - Fat: 18g This dish is not only tasty but also healthy. Each serving has about 360 calories, making it a great choice for dinner. It packs 30 grams of protein, helping you feel full and satisfied. The carbs and fats balance the meal nicely. Enjoy this meal knowing you’re eating something delicious and nutritious! {{ingredient_image_1}} 1. Preheating the air fryer Start by preheating your air fryer to 400°F (200°C) for about 5 minutes. This step helps create a crispy crust on the cod. 2. Mixing the breadcrumb coating In a mixing bowl, combine 1 cup of panko breadcrumbs, 1/2 cup of grated Parmesan cheese, 1 teaspoon of garlic powder, 1 teaspoon of onion powder, 1 teaspoon of dried parsley, 1/2 teaspoon of paprika, and salt and black pepper to taste. Stir well until everything mixes evenly. 1. Coating the cod fillets Take each cod fillet and dip it into a mixture of 2 tablespoons of melted butter and 1 tablespoon of olive oil. Make sure each fillet gets a good coat. Then, dredge the fillet in the breadcrumb mix. Press lightly to help the crumbs stick. 2. Air frying the cod fillets Place the coated cod fillets in the air fryer basket. Arrange them in a single layer. Cook the cod for 10-12 minutes, flipping them halfway through. They are ready when they turn golden brown and reach an internal temperature of 145°F (63°C). 1. Resting time before serving After cooking, remove the fillets from the air fryer. Let them rest for a couple of minutes. This time helps the juices settle and keeps them moist. 2. Presentation suggestions Serve the Parmesan crusted cod on a plate. Garnish with lemon wedges and some fresh parsley. A side of steamed vegetables or a light salad makes a great addition to your meal. To get the best crust on your cod, use panko breadcrumbs. They give a light, crispy texture. Mix the breadcrumbs with cheese and spices well. This helps the flavors stick to the fish. When coating the fillets, press down gently. This ensures the mixture stays on during cooking. If your cod fillets are thick, adjust the cooking time. Thicker pieces need more time to cook through. Start with 12 minutes, then check if they are golden brown and flake easily with a fork. The fish should reach an internal temperature of 145°F (63°C). You can flip them halfway for even cooking. Cleaning your air fryer is key. After each use, wipe the basket with a damp cloth. Make sure to clean off any food bits. This keeps your air fryer in great shape and ready for next time. Avoid common air fryer mistakes. Don’t overcrowd the basket. Leave space for air to flow. This helps your food cook evenly. Also, don’t forget to preheat the air fryer. This step makes a big difference in cooking time and texture. Pro Tips Use Fresh Cod: Fresh cod fillets will yield the best flavor and texture. Check for bright, clear eyes and a mild scent when selecting your fish. Customize the Coating: Feel free to add your favorite herbs or spices to the breadcrumb mixture for a personal touch. Thyme or oregano can enhance the flavor nicely. Don't Overcrowd the Basket: For even cooking and crispy coating, ensure that the cod fillets are spaced out in the air fryer basket. Cook in batches if necessary. Check for Doneness: Use a meat thermometer to ensure the cod reaches an internal temperature of 145°F (63°C) for optimal safety and taste. {{image_2}} You can change the taste of your cod easily. Fresh herbs can add great flavor. Try using dill or thyme. These herbs bring a fresh taste to the dish. You can also spice things up. Adding cayenne pepper gives a nice kick. Just a pinch can make a big difference. You don’t have to stick to breadcrumbs. Almond flour is a great choice. It makes a tasty and gluten-free option. You can also try different cheeses. Cheddar or mozzarella can work well too. Each cheese gives a unique flavor. Experimenting with coatings can lead to new favorites. To store cooked cod fillets, let them cool first. Place the fillets in an airtight container. You can keep them in the fridge for up to three days. If you want to reheat, use the air fryer. Preheat it to 350°F (175°C). Heat the fillets for about 5 to 7 minutes, or until they are warm and crispy. This method keeps the crust nice and crunchy. You can freeze both uncooked and cooked fillets. For uncooked cod, wrap each fillet tightly in plastic wrap. Then place them in a freezer bag. This helps prevent freezer burn. They can last up to three months in the freezer. For cooked fillets, let them cool completely. Then wrap them in foil and put them in a freezer bag. They can also freeze well for up to three months. When you’re ready to use the frozen fillets, thaw them in the fridge overnight. For quicker thawing, place them in a sealed bag and submerge in cold water for about an hour. This way, you can enjoy your delicious cod anytime! Can I use frozen cod fillets? Yes, you can use frozen cod fillets. Just be sure to thaw them first. Place them in the fridge overnight or run cold water over them. This will help them cook evenly. How do I know when the cod is cooked through? The cod is done when it reaches 145°F (63°C) inside. You can also check if it flakes easily with a fork. Cook until the coating is golden brown and crispy. What to serve with Parmesan crusted cod? I love serving this cod with lemon wedges and fresh parsley. You can also pair it with steamed veggies or a light salad. These sides balance the richness of the dish. Can I make this recipe without an air fryer? Yes, you can bake the cod in a regular oven. Preheat your oven to 400°F (200°C). Place the coated fillets on a baking sheet. Bake for 15-20 minutes until golden brown. What side dishes pair well with it? Some great sides include garlic mashed potatoes or quinoa salad. You can also serve it with a tangy coleslaw. These complement the flavors of the cod nicely. This blog post covered how to make delicious Parmesan crusted cod in an air fryer. We discussed key ingredients like cod fillets and panko breadcrumbs. You learned about the preparation and cooking steps, plus tips for perfecting the dish. I also shared storage and freezing tips, along with answers to common questions. For tasty variations, feel free to experiment with herbs and spices. Enjoy your cooking and remember, trying new things makes meals fun!

Air Fryer Parmesan Crusted Cod Delightful Dinner Option

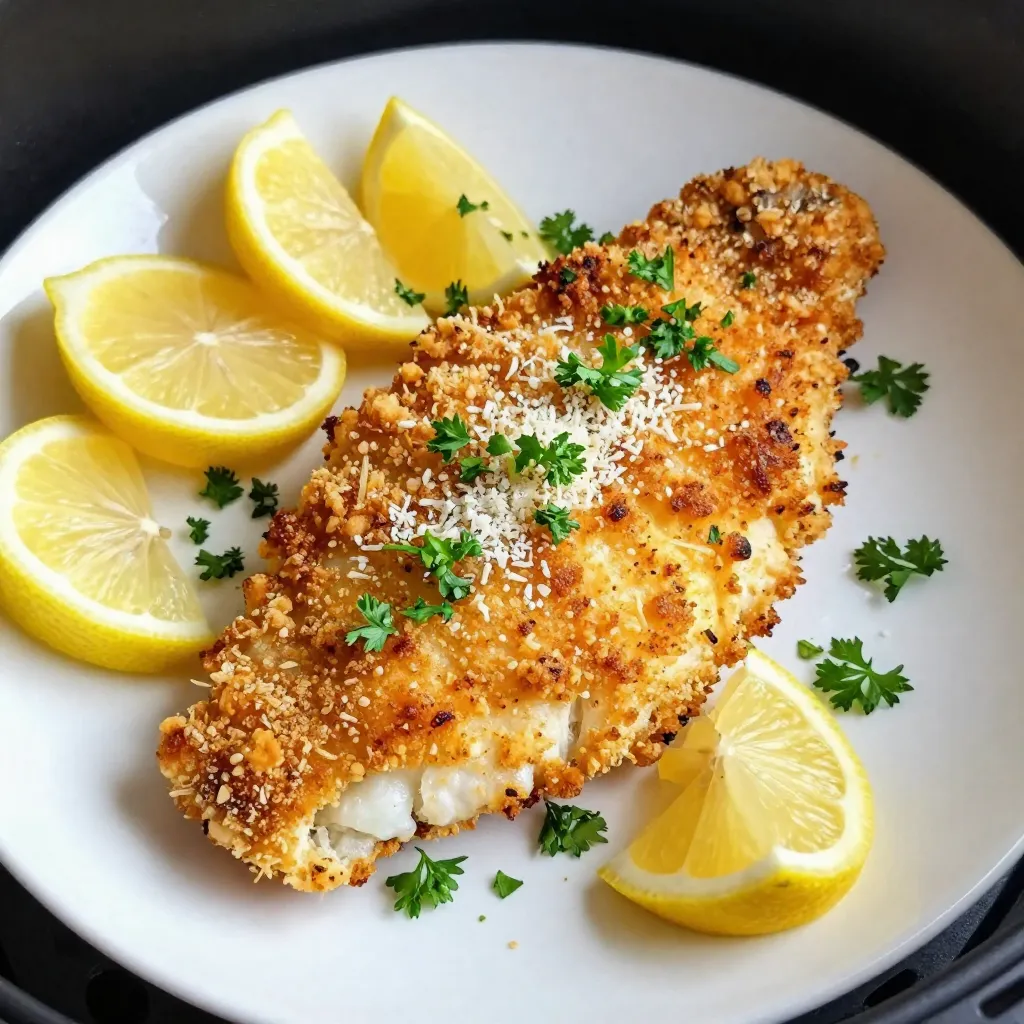
Looking for a quick and tasty dinner? Try my Air Fryer Parmesan Crusted Cod! This dish is simple, crispy, and

- 4 boneless, skinless chicken thighs - 2 medium zucchinis, sliced into half-moons - 1 lemon (zested and juiced) - 4 cloves garlic, minced - 2 tablespoons olive oil - 1 teaspoon dried oregano - 1 teaspoon dried thyme - Salt and pepper to taste - Fresh rosemary sprigs for garnish Gather these fresh ingredients before you start. The chicken thighs provide a juicy base. The zucchini adds color and crunch. Lemon brightens the flavors with its zest and juice. Garlic gives a savory touch. Olive oil helps everything cook evenly. Using dried oregano and thyme brings depth. Don't forget salt and pepper for seasoning. These simple items combine to create a delightful dish. Fresh rosemary at the end adds a pop of flavor. Enjoy the process of cooking with these fresh ingredients! To prepare the chicken, first, make a marinade. In a large bowl, mix olive oil, lemon juice, lemon zest, minced garlic, oregano, thyme, salt, and pepper. This mix adds a bright flavor. Next, add the chicken thighs to the bowl. Make sure each piece is well coated. Let the chicken marinate for at least 15 minutes. You can also marinate it for up to 2 hours in the fridge for deeper flavor. Now, let's slice the zucchini. Cut them into half-moons, about half an inch thick. This size helps them cook evenly. In another bowl, season the zucchini with a little olive oil, salt, and pepper. Toss them gently to coat. This step enhances their taste and keeps them tender. Grab a baking sheet and line it with parchment paper or foil. This makes cleanup easy. Place the marinated chicken thighs on one side of the sheet pan. Spread the seasoned zucchini on the other side. Make sure there is space between them for even cooking. Set your oven to 400°F (200°C) and roast everything for 25-30 minutes. The chicken should reach an internal temperature of 165°F (74°C). The zucchini will become tender and slightly caramelized. For a nice finish, broil the chicken and zucchini for an extra 2-3 minutes. This gives them a lovely golden color. After that, let everything rest for 5 minutes before serving. Enjoy your meal! To create a great marinade, adjust spices and herbs to your taste. You can add more garlic for a stronger flavor or extra lemon zest for brightness. The key is to find a balance that excites your palate. Marinating time is also key. Aim for at least 15 minutes to let the flavors soak in. For deeper flavor, marinate for up to 2 hours in the fridge. Broiling at the end gives your dish a nice golden finish. To broil, set your oven to high and watch closely. This step adds color and a bit of crunch. Always check chicken doneness with a meat thermometer. It should read 165°F (74°C) for safe eating. Fresh herbs can elevate your dish. Use rosemary for a fragrant touch. Chopped parsley can also add color. For sides, consider serving with rice or a simple salad. These pair well and complete your meal beautifully. {{image_2}} You can add more vegetables to your sheet pan dish. Seasonal veggies work best. Here are some great choices: - Bell peppers - Cherry tomatoes - Red onion - Carrots These add color and flavor. They also boost nutrition. Just cut them into similar sizes to the zucchini. Toss them lightly with olive oil, salt, and pepper before adding to the sheet pan. If you want to switch up the protein, try these options: - Boneless, skinless chicken breasts - Salmon fillets - Tofu cubes Each protein brings its own taste. Adjust the cooking time as needed. For example, salmon cooks faster than chicken. Make sure it reaches the right temperature for safety. Feel free to play with flavors. Here are some ideas: - Use fresh herbs like basil or parsley. - Add spices like paprika or cumin. - Mix in a splash of balsamic vinegar for a tangy kick. Experimenting can lead to new favorites. Try different combinations to find what you love best. The joy of cooking lies in creativity! To keep your Lemon Herb Chicken and Zucchini fresh, follow these tips. First, let the dish cool completely. This prevents steam from building up in the container. Next, transfer the leftovers to an airtight container. Glass or plastic containers work well. Store them in the fridge for up to three days. When you’re ready to enjoy leftovers, aim to keep them moist. The best way is to use the oven. Preheat it to 350°F (175°C). Place the chicken and zucchini in an oven-safe dish. Add a splash of water or broth to keep things juicy. Cover it with foil to trap steam. Heat for about 15-20 minutes until warm. Alternatively, you can use a microwave. Heat in 30-second bursts, stirring in between. This helps avoid drying out the food. If you want to save your dish for later, freezing works great. First, let the chicken and zucchini cool. Then, portion them into freezer-safe bags. Remove as much air as possible before sealing. Label the bags with the date. You can freeze them for up to three months. To thaw, place the bag in the fridge overnight. For quicker results, use the microwave on the defrost setting. Reheat as instructed above. For the best flavor, marinate the chicken for at least 15 minutes. You can also let it sit in the fridge for up to 2 hours. This allows the chicken to absorb the lemon and herb flavors fully. Shorter times work, but longer marinating gives a richer taste. Yes, you can use bone-in chicken. Bone-in chicken can add more flavor and moisture. However, it takes longer to cook. Make sure to adjust the cooking time. Thighs cook faster and stay juicier. Choose what fits your taste and time. Chicken should reach an internal temperature of 165°F (74°C). This ensures it is safe to eat. Use a meat thermometer to check the temperature in the thickest part of the chicken. Always prioritize safety when cooking poultry. Yes, you can prep this recipe ahead. Marinate the chicken and slice the zucchini a day before. Store them in the fridge until ready to cook. This saves time and makes weeknight dinners easier. Just make sure to cook it fresh for the best flavor. In this blog post, we covered a simple chicken thigh recipe with zucchini. You learned about the key ingredients, marinating tips, and cooking steps. We also shared variations for customizing your dish and storage tips for leftovers. Remember, marinating enhances flavor, and using fresh herbs makes a big difference. Whether you stick to chicken or mix in other proteins, you can create a tasty meal. Enjoy experimenting and making this recipe your own. Happy cooking!

Sheet Pan Lemon Herb Chicken Zucchini Delight

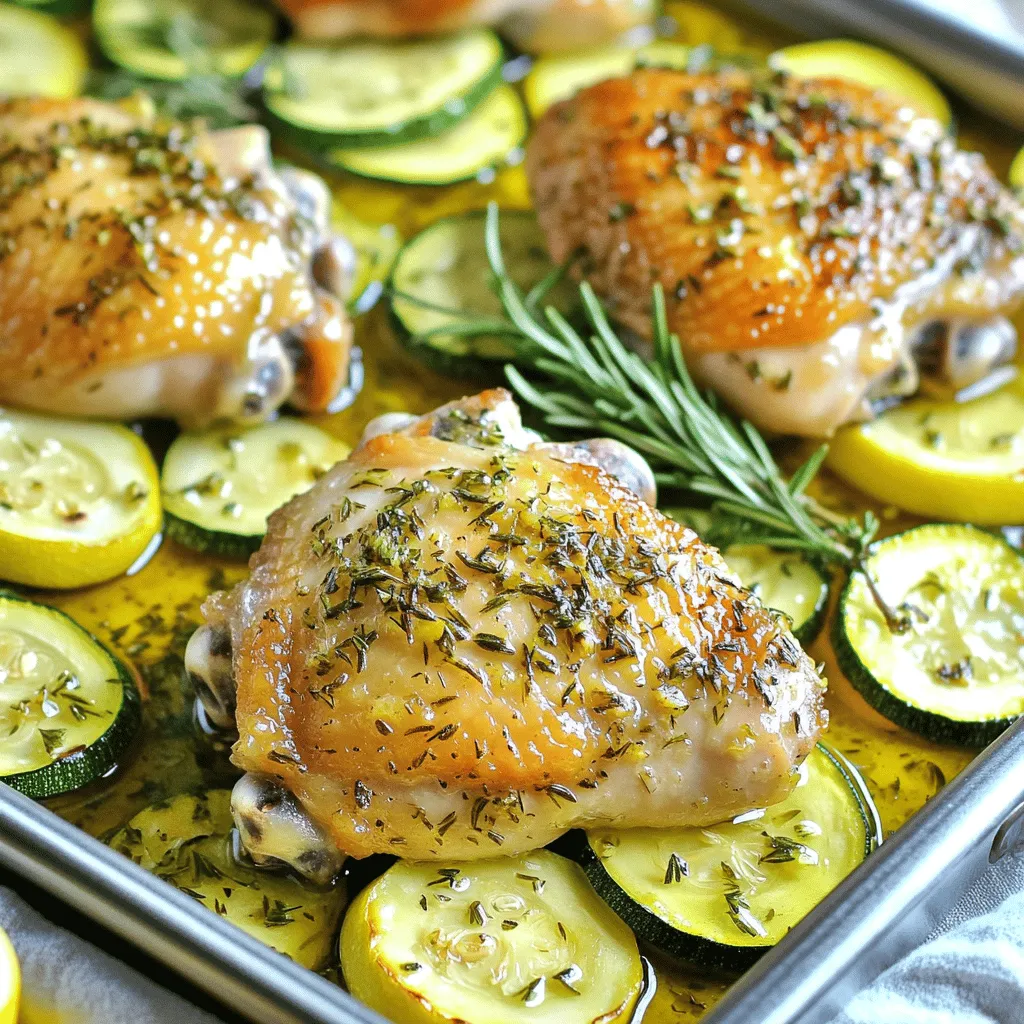
Are you ready to delight your taste buds with a quick and yummy dinner? My Sheet Pan Lemon Herb Chicken

- 1 medium spaghetti squash - 4 tablespoons unsalted butter - 4 cloves garlic, minced - 1 teaspoon Italian seasoning - 1/4 teaspoon red pepper flakes (optional) - Salt and pepper to taste - 1/2 cup grated Parmesan cheese - 1/2 cup chopped fresh parsley - Zest of 1 lemon - Lemon wedges for serving - Extra red pepper flakes for heat - Chopped nuts for crunch - Other herbs like basil or thyme - Sharp chef's knife - Baking sheet - Large skillet - Fork for shredding squash - Measuring cups and spoons Gathering the right ingredients sets the stage for your Garlic Butter Spaghetti Squash Boats. Start with a medium spaghetti squash. The squash is the star of this dish, and it gives a fun twist to pasta. For flavor, we need unsalted butter, fresh garlic, and Italian seasoning. These three will create a rich garlic butter sauce. Salt and pepper help to bring out all the flavors. For a cheesy finish, grab some grated Parmesan cheese. Fresh parsley adds a pop of color and freshness. Lastly, lemon zest and wedges make the dish bright and zesty. Optional ingredients like red pepper flakes can add heat if you like. Chopped nuts can give a nice crunch. You can also use fresh herbs to change up the flavor. Make sure you have the right tools. A sharp knife helps cut the squash safely. A baking sheet is needed for roasting. A large skillet is best for mixing everything together. Don't forget measuring cups and spoons for accuracy. With these ingredients and tools, you're ready to create a delightful dish! First, we need to get the spaghetti squash ready. Start by preheating your oven to 400°F (200°C). Next, take a medium spaghetti squash and cut it in half lengthwise. Be careful with the knife. Scoop out the seeds using a spoon. Season the insides with salt and pepper. Place the squash halves cut-side down on a baking sheet. Roast them in the oven for about 40-50 minutes. You will know they are done when the flesh is tender and can be pulled apart with a fork. While the squash roasts, it’s time to make the garlic butter. In a skillet, melt four tablespoons of unsalted butter over medium heat. Once the butter melts, add four minced garlic cloves. Sauté the garlic for about 1-2 minutes until it smells nice. Be careful not to burn the garlic; it cooks fast! Now, stir in one teaspoon of Italian seasoning and optional red pepper flakes. Cook this mixture for another minute and then remove it from the heat. After the squash is roasted, take it out of the oven. Use a fork to scrape the flesh into spaghetti-like strands. Transfer these strands to your skillet with the garlic butter mixture. Toss everything together until the strands are well coated. Add half a cup of grated Parmesan cheese and half a cup of chopped fresh parsley. Mix it all well. Now, fill the empty squash halves with the garlic butter spaghetti. If you want, you can sprinkle a bit more Parmesan cheese on top. Return the filled squash to the oven for an extra 10 minutes to heat through. When done, zest a lemon over the top and serve with lemon wedges on the side. Enjoy your tasty Garlic Butter Spaghetti Squash Boats! To cook spaghetti squash well, I recommend roasting it. Roasting gives it a sweet flavor and soft texture. Start by cutting the squash in half. Remove the seeds and season the inside with salt and pepper. Place the squash cut-side down on the baking sheet. Roast it at 400°F for 40-50 minutes. The squash is done when the flesh is soft and easy to shred with a fork. To make garlic butter spaghetti squash truly special, consider adding extra ingredients. Fresh herbs like basil or thyme can boost flavor. You can also try adding crushed nuts for crunch. A squeeze of lemon juice adds brightness and freshness. If you like heat, sprinkle in more red pepper flakes. Mixing in sautéed mushrooms or spinach can add depth and nutrients. One common mistake is not seasoning enough. Salt and pepper are key to enhancing the squash's taste. Another mistake is overcooking the garlic. Garlic can burn quickly, turning bitter. Keep an eye on it while sautéing. Lastly, don’t skip the zesting step! Lemon zest adds a fresh aroma and taste that brightens the dish. {{image_2}} You can make Garlic Butter Spaghetti Squash Boats even better by adding veggies. Try adding spinach, bell peppers, or mushrooms. These veggies mix well with garlic butter. They bring great taste and color. You can also add cherry tomatoes for a burst of sweetness. Just sauté them in the garlic butter before mixing. If you want to add protein, there are many choices. Cooked chicken, shrimp, or sausage works well. Shredded rotisserie chicken is quick and tasty. For a plant-based option, use chickpeas or black beans. They add protein and keep the dish healthy. Just stir them in when you mix the spaghetti strands. This dish is already gluten-free because it uses spaghetti squash. If you want more fiber, try using quinoa or brown rice instead. You can serve the garlic butter mix over these grains. They soak up the flavors well. Make sure to check any added sauces or toppings for gluten. Store any leftover garlic butter spaghetti squash boats in an airtight container. Let them cool first. Place them in the fridge for up to three days. This keeps the flavors fresh. If you want to keep them longer, consider freezing. To reheat, use the oven for the best results. Preheat it to 350°F (175°C). Place the squash boats on a baking sheet. Cover with foil to keep moisture in. Heat for about 15-20 minutes. You can also use the microwave. Just place a boat on a microwave-safe plate. Heat for 2-3 minutes, checking often. You can freeze these tasty boats too. Scoop the spaghetti strands out of the squash. Place them in a freezer-safe bag. Remove as much air as possible. This helps prevent freezer burn. They can last up to three months in the freezer. When ready to eat, thaw in the fridge overnight before reheating. You can tell when spaghetti squash is cooked by its softness. When you press it gently, it should yield a bit. After roasting for 40-50 minutes, the flesh should feel tender. You can also check by using a fork. If it scrapes away into strands easily, it is ready to go! Yes, you can make Garlic Butter Spaghetti Squash Boats ahead of time. You can roast the squash and mix it with the garlic butter. Store it in the fridge for up to three days. When you are ready to eat, just reheat it in the oven. This makes meal prep quick and easy! Garlic Butter Spaghetti Squash Boats pair well with many dishes. You can serve them with grilled chicken or shrimp for protein. A fresh salad adds a nice crunch too. You can also enjoy them with crusty bread to soak up all that delicious garlic butter. In this post, we covered ingredients, tools, and steps for Garlic Butter Spaghetti Squash. I shared tips on cooking techniques, flavor enhancers, and mistakes to avoid. You can also explore variations and storage options to fit your needs. Cooking this dish can be fun and easy. You will impress your friends and family with your skills. Enjoy making it your own, and don’t be afraid to try new things. Now, get cooking and savor every bite!

Garlic Butter Spaghetti Squash Boats Flavorful Dish

If you’re seeking a fresh, tasty dish, Garlic Butter Spaghetti Squash Boats are a game changer. This recipe is simple

- 8 oz (225 g) fettuccine or spaghetti - 2 cups fresh spinach, roughly chopped - 1 cup mushrooms, sliced (button or cremini) - 1 medium onion, finely chopped - 3 cloves garlic, minced - 1 cup heavy cream - 1/2 cup grated parmesan cheese - 2 tablespoons olive oil - 1 teaspoon dried oregano - Salt and pepper to taste - Fresh parsley or basil for garnish Gathering the right ingredients makes cooking easier. You will need pasta as the base. Fettuccine or spaghetti works well. Fresh spinach adds color and nutrition. Choose button or cremini mushrooms for a tasty boost. You’ll also need an onion and garlic for flavor. They create a wonderful aroma when cooked. Heavy cream gives the dish its creamy texture. Parmesan cheese adds richness and depth. Olive oil acts as the cooking fat. Dried oregano brings in an earthy taste. Lastly, don’t forget salt and pepper to season. Fresh herbs like parsley or basil make an excellent garnish. They add a pop of flavor and color to your dish. To cook fettuccine or spaghetti, start with a big pot. Fill it with water and add salt. Bring the water to a boil. Add your pasta and cook it as the package says. You want it to be al dente, which means it should be firm but not hard. To check, bite a piece. If it feels right, it’s done! Remember to save one cup of pasta water before draining. This water helps to make your sauce creamy. Now, let’s sauté some veggies. Heat olive oil in a big skillet over medium heat. Add the chopped onion first. Cook it for about 3-4 minutes. You want it to be soft and see-through. Next, stir in minced garlic and cook for one more minute. Garlic adds a nice smell. Then, add the sliced mushrooms. Cook them for 5-6 minutes until they are soft and brown. Mushrooms need just the right time to cook. If you rush, they can become rubbery. It’s time to make the cream sauce. Lower the heat in your skillet and pour in the heavy cream. Stir it well. Then add grated parmesan cheese and dried oregano. Season with salt and pepper. Keep stirring until the cheese melts and the sauce is creamy. Now, add your cooked pasta to the skillet. Mix everything together well. If the sauce feels too thick, use the reserved pasta water to thin it. Just add it slowly until you like the sauce’s texture. To make the sauce creamy, always use heavy cream. Heat it slowly to avoid curdling. Stir in the parmesan cheese while the cream is warm. This helps it melt smoothly. If the sauce is too thick, use reserved pasta water. Add a little bit at a time until you get the right consistency. For flavor balance, taste as you cook. Start with salt and pepper. Add a pinch of salt, then mix well. If it needs more, add just a bit more. Oregano gives a nice touch, but go easy. You want the flavors to blend, not overwhelm. You can make this dish in advance. Cook the pasta and sauce separately. Store them in airtight containers in the fridge. When you are ready to eat, warm the sauce in a skillet. Add the pasta and mix well. To reheat creamy pasta, use low heat. This keeps the sauce from separating. Add a splash of cream or pasta water to help it stay creamy. Stir often as it warms to keep everything mixed well. Enjoy your delicious meal! {{image_2}} You can swap heavy cream for a lighter option like Greek yogurt or almond milk. This change will still give you a creamy sauce without the extra fat. If you want more protein, add cooked chicken or shrimp. These additions make the dish heartier and more filling. Feel free to get creative with veggies. You can add bell peppers, zucchini, or cherry tomatoes for extra flavor and color. If you want to make this dish vegetarian or vegan, simply use plant-based cream or tofu instead of heavy cream and cheese. This keeps the dish tasty while meeting dietary needs. To keep your creamy spinach mushroom pasta fresh, store it in an airtight container. Make sure the pasta has cooled down to room temperature before sealing it up. This helps prevent moisture buildup, which can make the pasta soggy. You can place the container in the fridge for up to three days. Here are some great storage tips: - Use glass or plastic containers with tight lids. - Avoid aluminum foil, as it can react with the cream. - Label the container with the date to keep track of freshness. You can freeze creamy pasta, but it may change a bit in texture. The sauce can separate when thawed, but it will still taste good. To freeze, use a freezer-safe container. Leave some space at the top for the pasta to expand. You can freeze it for up to three months. When you're ready to eat, follow these steps: 1. Thaw the pasta overnight in the fridge. 2. Reheat it slowly in a skillet over low heat. 3. Add a splash of cream or reserved pasta water to help revive the sauce. Enjoy your creamy spinach mushroom pasta even after a few days! I love using fettuccine or spaghetti for creamy spinach mushroom pasta. Fettuccine has a nice width that holds the sauce well. Spaghetti is also great for a lighter feel. Both options will give you a delicious and satisfying meal. You can choose based on your mood or what you have at home! Yes, you can use frozen spinach! Just make sure to thaw and drain it well before adding. Frozen spinach often has a softer texture, but it still works nicely in this dish. It saves time and still adds that lovely green color and flavor. To make creamy spinach mushroom pasta gluten-free, swap regular pasta for gluten-free pasta. Many brands offer great options. You can find rice pasta, chickpea pasta, or even lentil pasta. Just cook them according to the package. The creamy sauce will still shine through! This pasta pairs well with a crisp salad or garlic bread. A simple green salad with vinaigrette is refreshing. Garlic bread adds a nice crunch to the meal. You can also serve it with grilled chicken or shrimp for extra protein. Enjoy your meal! This recipe for creamy spinach and mushroom pasta combines fresh ingredients with simple steps. We discussed how to cook the pasta, sauté the vegetables, and mix in a rich cream sauce. I shared tips for perfecting the sauce, storing leftovers, and meal prep. Remember, you can customize the dish with different veggies or proteins. No matter how you make it, this meal will impress. Enjoy making your pasta dish and experimenting with flavors!

Creamy Spinach Mushroom Pasta Flavorful Dinner Dish

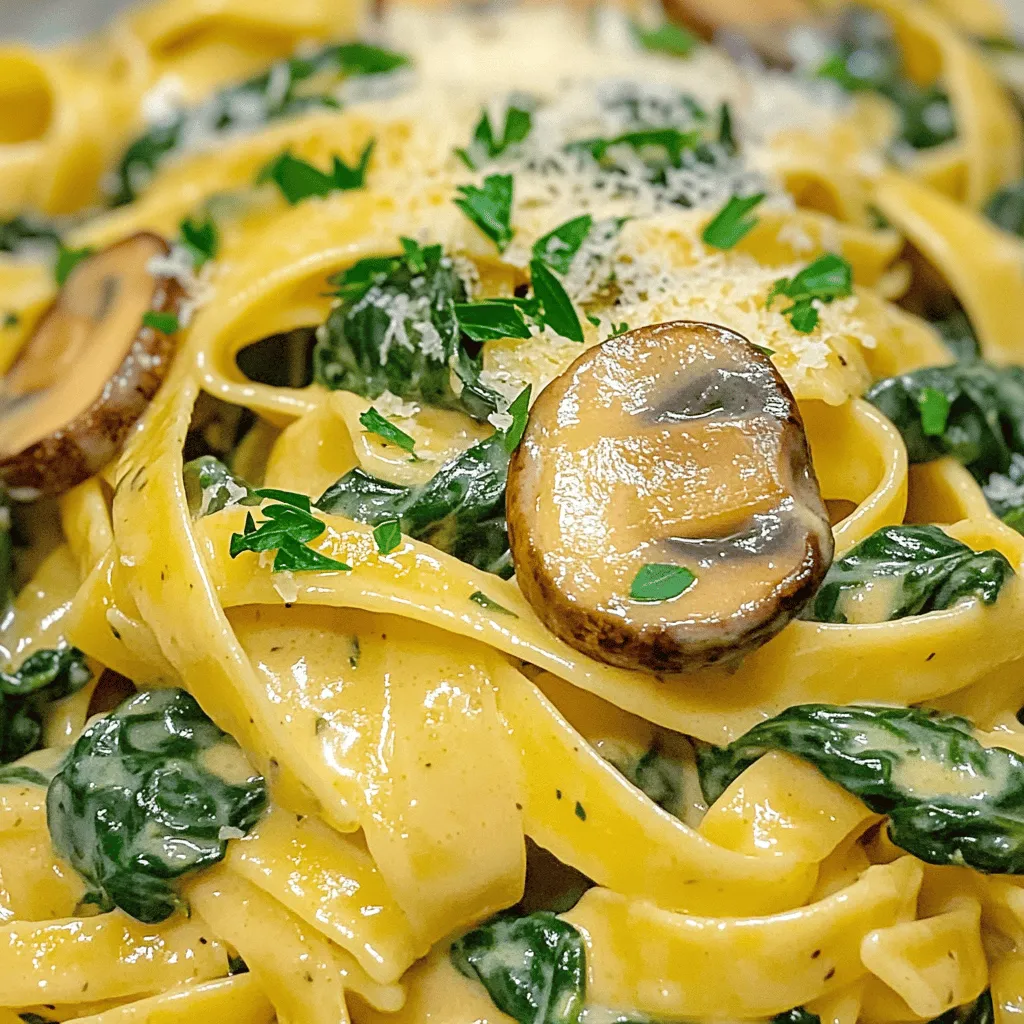
If you’re craving a comforting, tasty dish, look no further! This Creamy Spinach Mushroom Pasta is the perfect blend of

To make the Maple Pecan Cream Cheese Danish Braids, you will need the following ingredients: - Puff pastry sheet - Cream cheese - Maple syrup - Powdered sugar - Chopped pecans - Vanilla extract - Egg for egg wash - Additional maple syrup for drizzling - Optional toppings like cinnamon Each ingredient plays a key role in making this treat delightful. The puff pastry sheet provides a flaky and buttery base. The cream cheese gives a rich, creamy filling. Maple syrup adds sweetness and a unique flavor. Powdered sugar helps in sweetening the cream cheese mixture. Chopped pecans add crunch and a nutty taste. Vanilla extract enhances the overall flavor. The egg is used for an egg wash that gives the pastry a golden color. Finally, drizzle with more maple syrup for a sweet finish, and consider adding a sprinkle of cinnamon for extra warmth. These ingredients come together to create a warm, gooey, and visually stunning pastry. First, preheat your oven to 375°F (190°C). This helps the Danish cook evenly. Next, line a baking sheet with parchment paper. This step keeps the pastry from sticking. It also makes clean-up easier. In a mixing bowl, beat 8 oz of softened cream cheese until smooth. This is key for a creamy filling. Add 1/2 cup of maple syrup and 1/4 cup of powdered sugar. Don't forget 1 teaspoon of vanilla extract for flavor. Mix all the ingredients until they blend well together. Now it's time to spread the filling. Place the cream cheese mixture in the center of the pastry rectangle. Leave about an inch border on all sides. Next, sprinkle 1/2 cup of chopped pecans over the filling. This adds crunch and flavor. Cut slits along both sides of the pastry, about 1 inch apart. Be careful not to cut through the filling. To braid, fold the strips over the filling, alternating from left to right. Pinch the ends to seal them tight. For a golden finish, brush the top with a beaten egg. This egg wash gives the Danish a nice color. Place the baking sheet in the oven. Bake for 25-30 minutes until the pastry is golden brown and puffy. After baking, take it out and let it cool slightly. Drizzle extra maple syrup over the top for added sweetness. If you like, dust with cinnamon for an extra touch. To get the best puff pastry, you need to roll it out with care. Start on a clean, lightly floured surface. This helps keep the pastry from sticking. Use a rolling pin to flatten the dough evenly. Aim for a rectangle of about 12 x 9 inches. For flakiness, keep the pastry cold. Warm dough will not puff well. If it gets too warm, pop it in the fridge for about 10 minutes. This helps the layers stay separate during baking. The more layers you have, the flakier your pastry will be. You can make your Danish even tastier with a few spices. Try adding a pinch of cinnamon or nutmeg to the cream cheese filling. These spices mix well with maple syrup. You could also add a splash of almond extract for a nice twist. For a nutty edge, use toasted pecans. Toasting them brings out their flavor and adds crunch. You can also swap pecans for walnuts or hazelnuts. The key is to keep experimenting until you find your favorite mix. Presentation matters! Once your Danish cools, drizzle extra maple syrup over the top. This adds a shiny finish and makes it look inviting. A light dusting of cinnamon can also enhance the look and taste. When serving, slice the Danish into even pieces. Arrange them on a platter for a beautiful display. Pair with coffee or tea to elevate your treat time. Enjoy the smiles on everyone’s faces as they taste your creation! {{image_2}} You can change the filling in these Danish braids to suit your taste. Try adding fruits like blueberries or sliced apples. Chocolate chips also work great. These options give a fun twist to the classic recipe. You can mix and match flavors for a new treat each time. Just remember to keep the balance of sweetness. For those who need a gluten-free choice, use gluten-free puff pastry. Many brands now offer this option. Look for one that holds up well when baked. You should be able to find it in stores or online. Follow the same steps in the recipe. The taste will still be wonderful, and everyone can enjoy it! If you want a vegan version, swap the cream cheese with a plant-based cream cheese. You can also use a flax egg instead of the beaten egg for the wash. Mix one tablespoon of ground flaxseed with three tablespoons of water. Let it sit for a few minutes until it thickens. This will help give your Danish a nice shine. Enjoy your vegan treat! To keep your Maple Pecan Cream Cheese Danish Braids fresh, place them in an airtight container. You want to store them at room temperature for up to three days. If you have extra braids, refrigerate them for up to a week. Just make sure they are sealed well to avoid drying out. To reheat without losing quality, use an oven. Preheat your oven to 350°F (175°C). Place the Danish braids on a baking sheet. Heat for about 10-15 minutes. This method keeps the pastry flaky. You can also use a microwave, but it may make the pastry soft. Heat in short bursts of 10 seconds until warm. To freeze your Danish braids, wrap each one in plastic wrap. Then, place them in a freezer bag. This way, they stay fresh for up to three months. When you want to enjoy them, thaw in the fridge overnight. Reheat in the oven as described above for the best taste and texture. To thaw puff pastry, take it out of the freezer and place it in the fridge overnight. If you're short on time, you can leave it at room temperature for about 30 minutes. This keeps the dough chilled and easy to work with. Avoid using the microwave, as it can cook parts of the pastry, making it tough. Yes, you can prepare the braids ahead of time. After assembling, cover them tightly with plastic wrap and place them in the fridge. They can stay there for up to 24 hours. When you're ready to bake, just take them out, brush with egg wash, and bake as directed. This saves time on busy mornings. Danish pastries stay fresh for about 2 days at room temperature. Make sure to keep them in an airtight container. If you want them to last longer, you can refrigerate them for up to a week. For best results, reheat slightly in the oven to regain some crispiness. This blog post covered how to make delicious Danish braids. You learned about the main ingredients, step-by-step instructions, and useful tips. We discussed flavor variations, storage methods, and answered common questions. Finally, experiment with your own twists on this recipe. Danish braids are fun to make and share. Enjoy making them for friends or family, and let your creativity shine. Start baking and savor every bite!

Maple Pecan Cream Cheese Danish Braids Delightful Treat

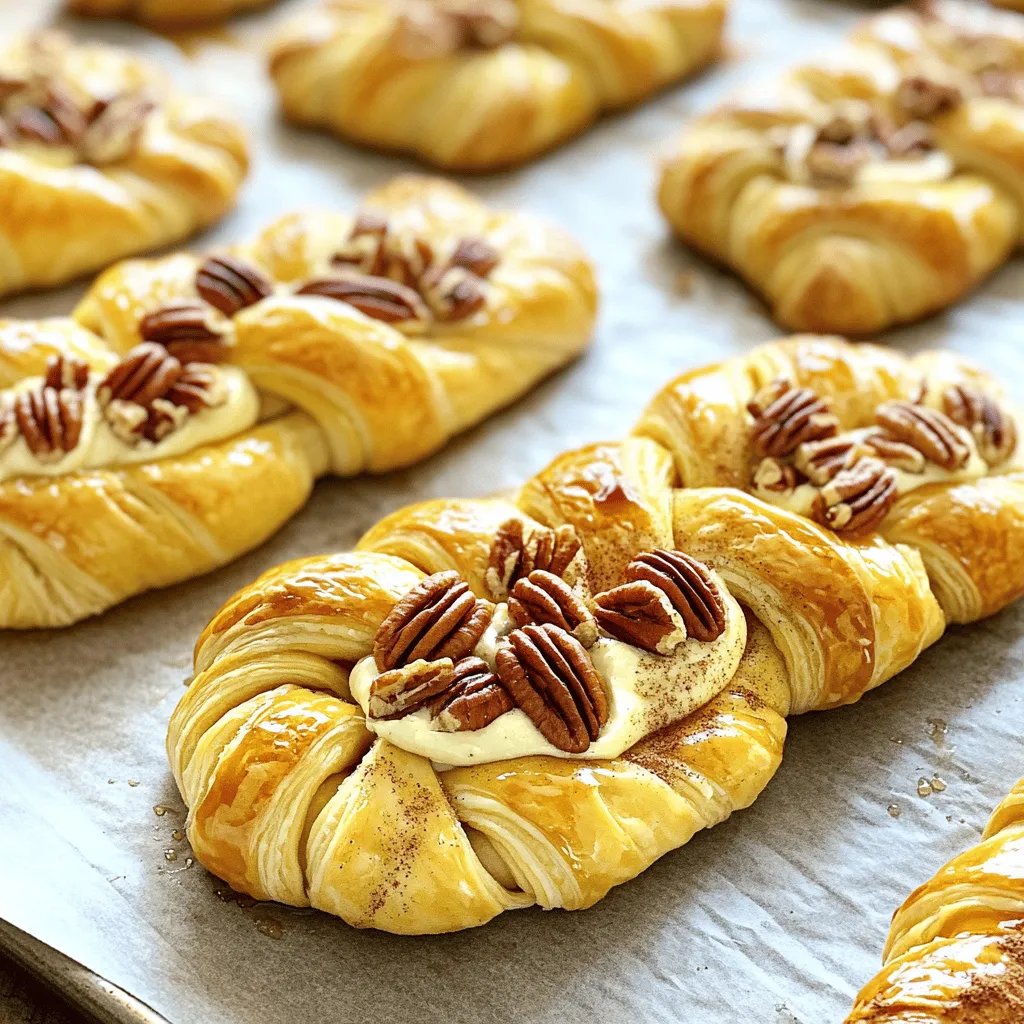
Are you ready to indulge in a sweet treat that’s simple to make? These Maple Pecan Cream Cheese Danish Braids

To make Chocolate Peanut Butter Pumpkin Bites, you need some simple and tasty ingredients. Here’s the complete list: - 1 cup canned pumpkin puree - 1/2 cup creamy peanut butter - 1/4 cup maple syrup - 1 teaspoon vanilla extract - 1 cup rolled oats - 1/2 teaspoon ground cinnamon - 1/4 teaspoon ground nutmeg - 1/4 teaspoon sea salt - 1 cup dark chocolate chips - 1 tablespoon coconut oil Each ingredient plays a key role. The canned pumpkin puree gives a rich, smooth base. Creamy peanut butter adds a nutty flavor and creamy texture. Maple syrup sweetens the bites while adding a nice depth. Vanilla extract brings warmth to the mix. Rolled oats provide structure and chewiness. Ground cinnamon and nutmeg add warm spice notes. Sea salt enhances all the flavors. Dark chocolate chips give a sweet finish, while coconut oil helps melt the chocolate smoothly. You can easily find these ingredients at your local store. Be sure to gather everything before you start. This will make the process smooth and enjoyable! - In a large bowl, combine: - 1 cup canned pumpkin puree - 1/2 cup creamy peanut butter - 1/4 cup maple syrup - 1 teaspoon vanilla extract Stir the mixture until it is smooth and well mixed. This blend gives the bites their creamy texture and rich flavor. - Next, add: - 1 cup rolled oats - 1/2 teaspoon ground cinnamon - 1/4 teaspoon ground nutmeg - 1/4 teaspoon sea salt Mix everything together until it is fully combined. You want to see the oats evenly spread throughout. This adds great texture and taste. - Line a baking sheet with parchment paper. - Use a tablespoon to scoop out the mixture. Roll it into bite-sized balls. Place these bites on your prepared baking sheet. They should be about the size of a small cookie. - Freeze the pumpkin bites for about 30 minutes. This helps them firm up. - While the bites freeze, melt: - 1 cup dark chocolate chips - 1 tablespoon coconut oil Use a microwave-safe bowl for this. Heat in 30-second intervals. Stir in between until it is smooth. - Once the bites are firm, dip each one into the melted chocolate. Use a fork to coat them evenly. Let any extra chocolate drip off before placing them back on the baking sheet. - Return the chocolate-covered bites to the freezer for another 15 minutes to set the chocolate. Now your Chocolate Peanut Butter Pumpkin Bites are nearly ready to enjoy! To get the right sweetness in your bites, you can adjust the maple syrup. If you want it sweeter, add a bit more syrup. If you like less sweetness, reduce the amount. Just remember to mix well after each change. When rolling the bites, keep your hands slightly damp. This helps the mixture stick less and form smooth balls. Aim for about one tablespoon of mixture for each bite. It helps keep them even and easy to eat. For a smooth chocolate coating, melt the chocolate chips slowly. Use a microwave-safe bowl and heat it in 30-second bursts. Stir in between to avoid hot spots. Keep an eye on it to prevent burning. Adding coconut oil to the chocolate makes it shiny and easy to dip. If you notice the chocolate thickening, heat it gently again. A smooth finish makes your bites look professional and taste great! {{image_2}} You can change the flavor of your Chocolate Peanut Butter Pumpkin Bites easily. Adding spices like ginger or allspice can bring warmth and depth to the taste. These spices pair well with pumpkin and make your bites more interesting. You can also try using white or milk chocolate instead of dark chocolate. This switch will give you a sweeter treat that many people love. Experiment with flavors to find what you enjoy most. If you have nut allergies, you can still enjoy these bites. Almond or sunflower butter works great as a substitute for peanut butter. Both options provide a nice creaminess and flavor. For those who need gluten-free options, use gluten-free oats. They will keep the texture and taste just right without the gluten. Making these simple swaps can help cater to different diets while keeping the bites delicious. Store your Chocolate Peanut Butter Pumpkin Bites in an airtight container. This helps keep them fresh. You can use a glass jar or plastic container with a tight lid. If you prefer, keep them in the fridge for a quick treat. For longer storage, the freezer works well too. Just make sure to separate the bites with parchment paper if stacking them. These bites stay fresh for about one week in the fridge. In the freezer, they can last up to three months. Check for signs of spoilage before eating. If you notice any off smells or changes in texture, it's best to toss them. Enjoy your treats while they are fresh for the best flavor! You can easily make these bites vegan by swapping a few ingredients. Here are some suggestions: - Peanut Butter: Make sure to use natural peanut butter without added oils or sugars. - Maple Syrup: This is already vegan, so you can keep it. - Dark Chocolate Chips: Look for dairy-free dark chocolate chips. Many brands offer vegan options. - Coconut Oil: You can use any neutral oil, but coconut oil adds a nice flavor. These simple swaps keep the flavor while making the treats suitable for vegans. Yes, you can use fresh pumpkin! Here are some tips: - Choosing Pumpkin: Pick a small sugar pumpkin. These have a sweeter taste and smoother texture. - Preparation: Cut the pumpkin in half and remove the seeds. Roast the halves face down in the oven until soft, about 45 minutes at 400°F (200°C). - Puree: Once cooled, scoop the flesh and blend it until smooth. Measure one cup for the recipe. - Adjustments: Fresh pumpkin can have more moisture. If your mix seems too wet, add a bit more oats. This method gives you fresh flavor and a fun cooking experience! These pumpkin bites pair well with many snacks and desserts. Here are some ideas: - Fruit: Serve with sliced apples or pears for a fresh contrast. - Yogurt: A scoop of creamy yogurt makes a great dip. - Hot Drinks: Enjoy them with coffee, tea, or hot chocolate for a cozy treat. - Nuts: A handful of mixed nuts adds crunch and protein. These bites are versatile and work well with many flavors! These Chocolate Peanut Butter Pumpkin Bites blend flavor and health. We covered key ingredients like canned pumpkin and oats. You learned how to prepare, shape, and coat the bites in chocolate. With tips on texture and variations, these treats can fit your taste. Store them right to keep them fresh longer. Try swapping ingredients for vegan options or using fresh pumpkin. Enjoy creating these tasty snacks that are both fun and easy to make!

Chocolate Peanut Butter Pumpkin Bites Delicious Treat

Looking for a delicious treat that blends fall flavors with a satisfying crunch? You’ve found it! My Chocolate Peanut Butter

Older posts
Newer posts
← Previous Page1 … Page21 Page22 Page23 … Page84 Next →

dsad

© 2026 juliesdish • Built with GeneratePress

Our Policies

  • Copyright Policy
  • Cookie Policy
  • GDPR Policy
  • Privacy Policy
  • Disclaimer
  • Terms Of Use

More Information

  • Home
  • About
  • Contact
  • Appetizers
  • Dessert
  • Dinner
  • Drinks
©2026, juliesdish About Back To Top