Skip to content
DisclaimerTerms Of UseGDPR PolicyCookie Policy

juliesdish

  • Home
  • Drinks
  • Appetizers
  • Dinner
  • Dessert
  • About
  • Contact
  • Privacy Policy
DisclaimerTerms Of UseGDPR PolicyCookie Policy

NO-ING-IMG

- 1 lb ground turkey - 2 tablespoons sesame oil - 4 cloves garlic, minced - 1 tablespoon fresh ginger, minced - 2 tablespoons soy sauce - 1 tablespoon honey - 1 tablespoon rice vinegar - 1 cup broccoli florets - 1 cup cooked jasmine rice - 2 green onions, thinly sliced - 1 tablespoon sesame seeds - Salt and pepper to taste Gathering the right ingredients is key to making these tasty bowls. Ground turkey is lean and cooks quickly, making it perfect for busy nights. Sesame oil adds a lovely nutty flavor. Using fresh garlic and ginger brings depth to the dish. You’ll need soy sauce for that savory kick, honey for sweetness, and rice vinegar for balance. For the veggies, broccoli adds color and crunch. Jasmine rice serves as a fluffy base. Top with green onions and sesame seeds for an extra pop. Don’t forget salt and pepper to taste! These ingredients come together fast, making this meal a winner for anyone. To start, you need to cook the jasmine rice. You can use a rice cooker or cook it on the stove. For every cup of rice, use about two cups of water. Bring the water to a boil, then add the rice. Cover and lower the heat. Let it steam for about 15 minutes. This will give you fluffy rice. Next, heat two tablespoons of sesame oil in a large skillet over medium-high heat. Once the oil is hot, add four cloves of minced garlic and one tablespoon of minced ginger. Sauté for about 30 seconds until you smell the aroma. This step builds a strong flavor base for your dish. Now, it’s time to add the ground turkey. Turn the heat up to high and add one pound of turkey to the skillet. Use a spatula to break it apart. Cook it for about 5 to 7 minutes until it turns brown. Once browned, add two tablespoons of soy sauce, one tablespoon of honey, one tablespoon of rice vinegar, salt, and pepper. Mix well and cook for another 2 to 3 minutes. After the turkey is cooked, toss in one cup of broccoli florets. Stir and cook for an additional 3 to 4 minutes. You want the broccoli to be bright green and tender-crisp. This keeps the dish fresh and colorful. Now it's time to put everything together. Divide the cooked jasmine rice into serving bowls. Top each bowl with the sesame garlic turkey and broccoli mixture. For a finishing touch, sprinkle sliced green onions and sesame seeds on top. This adds flavor and a nice crunch. Serve on a large plate or wooden board for a beautiful presentation. - Speeding up prep time: Chop garlic and ginger in advance. Store them in the fridge for quick use. Pre-measured sauces help too. - Choosing pre-cooked rice: Use store-bought, pre-cooked rice for instant meals. Just heat it up in the microwave. - Suggestions for additional spices: Add red pepper flakes for heat. A dash of five-spice powder gives depth. - Alternative sauces or sweeteners: Swap honey for maple syrup for a new taste. Try coconut aminos instead of soy sauce for a lighter flavor. - Presentation techniques for serving bowls: Use colorful bowls for a pop. Layer rice, turkey, and broccoli for height. Scatter extra sesame seeds and green onions on top for a nice touch. Place chopsticks on the side for fun! {{image_2}} You can easily change the ground turkey to fit your needs. - Swap ground turkey for other proteins: Use chicken, beef, or pork for a different taste. Each meat brings its own flavor and texture. - Vegetarian or vegan options: Try crumbled tofu or tempeh instead. Both options soak up the flavors well. Don't be afraid to play with flavors. - Altering seasoning for different tastes: Use lime juice instead of rice vinegar for a zesty twist. Add herbs like cilantro for freshness. - Adding heat with spices or sauces: Incorporate chili flakes or sriracha for some spice. This will give your bowls a warm kick. Mix and match your bowl's ingredients. - Exploring different grains: Quinoa or brown rice can replace jasmine rice. Both grains add nutrition and texture. - Adding more vegetables or toppings: Try bell peppers, snap peas, or carrots. They add color and crunch to your dish. Top with avocado or nuts for extra flavor. To keep your Sesame Garlic Ground Turkey Bowls fresh, store leftovers in an airtight container. Make sure they cool down to room temperature before sealing. This helps avoid condensation, which can lead to soggy food. In the fridge, the dish lasts up to 3 days. Always check for off smells or changes in color before eating. If you want to save some turkey mixture for later, freeze it. First, let it cool completely. Then, place it in a freezer-safe bag or container. Make sure to remove as much air as possible. This keeps it from freezer burn. When you’re ready to eat, thaw it in the fridge overnight. Reheat it in a skillet over medium heat until hot. You can also microwave it in short bursts, stirring in between. You can prep ingredients ahead of time. Chop garlic, ginger, and green onions a day before. Store them in separate containers in the fridge. You can also cook the rice in advance and keep it in the fridge for up to a week. For quick meals, assemble the bowls the night before. Just keep the turkey and veggies separate from the rice to avoid sogginess. When ready to eat, mix everything together and enjoy! It takes just 15 minutes to make these tasty turkey bowls. - Prep Time: 5 minutes - Cooking Time: 10 minutes You can cook the rice while you prepare the turkey. This makes it quick and easy. Yes, you can use chicken or beef instead of ground turkey. - Ground Chicken: It’s lean like turkey and has a mild taste. - Ground Beef: It adds a richer flavor but has more fat. Choose what you like best. Each option will give a different taste to your meal. You can add many sides to make your meal complete. - Steamed Vegetables: Carrots or snap peas pair well. - Salad: A simple green salad adds crunch. - Egg Rolls: These can give a fun crunch and flavor. These sides add variety and balance to your meal. Yes, this recipe can be made gluten-free. - Soy Sauce Substitute: Use tamari instead of regular soy sauce. - Rice Vinegar: This is usually gluten-free, but always check the label. These swaps keep the flavor while keeping it safe for gluten-free diets. In this article, we covered a delicious recipe for Sesame Garlic Ground Turkey Bowls. We discussed the main ingredients, cooking steps, and tips for a great meal. You can customize this dish to fit your taste and dietary needs. These bowls offer variety and flavor, making them fun and easy to prepare. Take what you learned here and create your own version. Enjoy trying new combinations and sharing them with others. Now, get cooking and savor every bite!

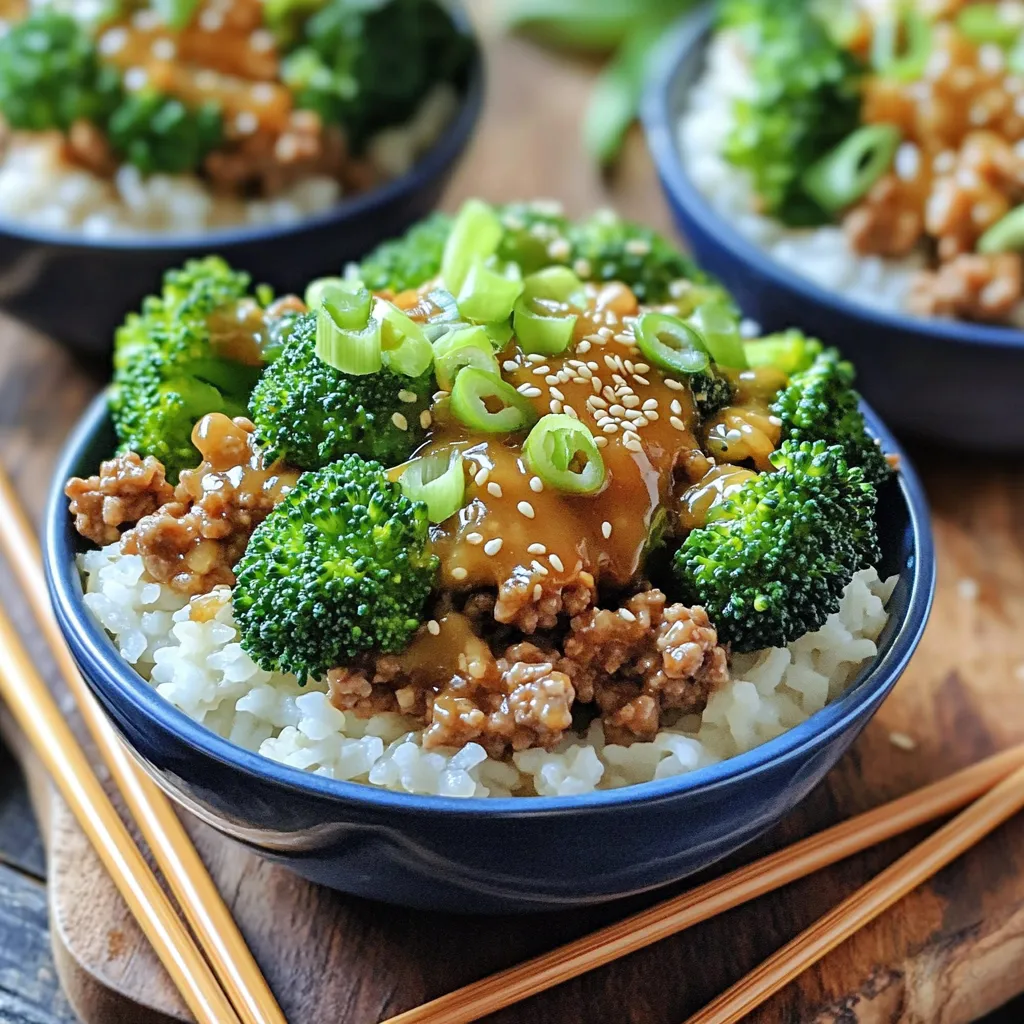
Sesame Garlic Ground Turkey Bowls Quick and Easy Meal

Looking for a quick and tasty meal? These Sesame Garlic Ground Turkey Bowls are ready in just 15 minutes! Packed

- 2 cups all-purpose flour - 1 cup granulated sugar - 1 tablespoon baking powder - ½ teaspoon baking soda - 1 teaspoon ground cinnamon - ½ teaspoon salt - 1 large egg - 1 cup buttermilk (or milk with vinegar) - ½ cup unsalted butter, melted - 2 cups peeled and diced apples - ½ cup brown sugar - ½ cup rolled oats - ¼ cup flour (for crumble) - 1 teaspoon cinnamon (for crumble) - ¼ cup cold butter (for crumble) You can swap apple varieties. Use Granny Smith for tartness or Fuji for sweetness. For buttermilk, mix 1 cup milk with 1 tablespoon vinegar. If you want to cut sugar, try honey or maple syrup instead. Gather these tools to get started: - Muffin tin - Mixing bowls - Whisk - Pastry cutter or fork Each of these items helps make your baking smooth and fun. The muffin tin shapes your muffins. Mixing bowls help combine ingredients easily. A whisk mixes wet and dry items. Finally, a pastry cutter breaks butter into the crumble. With these tools on hand, you'll be ready to bake delicious apple cinnamon muffins! - Preheat the oven to 350°F (175°C). - Prepare the muffin tin with liners or cooking spray. - In a medium bowl, mix ½ cup brown sugar, ½ cup rolled oats, ¼ cup all-purpose flour, and 1 teaspoon cinnamon. - Cut in ¼ cup cold butter until it looks crumbly. Set this aside. - In a large bowl, combine 2 cups of flour, 1 cup sugar, 1 tablespoon baking powder, ½ teaspoon baking soda, 1 teaspoon cinnamon, and ½ teaspoon salt. - Make a well in the center of this mixture. - In another bowl, beat 1 large egg. Then, mix in 1 cup buttermilk and ½ cup melted butter until smooth. - Pour the wet mixture into the well of the dry ingredients. Fold gently until just mixed. Do not overmix. - Carefully fold in 2 cups of peeled and diced apples, ensuring they are evenly spread. - Spoon the batter into the prepared muffin tin, filling each cup about ¾ full. - Generously sprinkle the crumble topping over each muffin. - Bake in the preheated oven for 18-22 minutes. Check with a toothpick; it should come out clean. - Once baked, let the muffins cool in the pan for 5 minutes. Then, transfer them to a wire rack to cool completely. To get a soft muffin, avoid overmixing the batter. Mix until just combined, and stop. Overmixing makes muffins dense and tough. Use room temperature ingredients for the best results. Cold eggs or buttermilk can lead to uneven mixing. Incorporate nuts or dried fruit to add texture and taste. Chopped walnuts or raisins work well. When choosing apples, go for varieties like Granny Smith or Honeycrisp. They add a nice tartness and hold their shape during baking. To check if your muffins are done, insert a toothpick into the center. If it comes out clean or with a few crumbs, they are ready. Cooling is key, so let them sit for five minutes in the pan. This helps them set and makes them easier to remove. {{image_2}} You can add more spice to your muffins! Try mixing in nutmeg or ginger. These spices pair well with apples and cinnamon. They create layers of flavor that surprise your taste buds. You can also make chocolate chip apple muffins. Just fold in some chocolate chips with the apples. The melting chocolate adds a sweet surprise. Kids love this twist, and it makes muffins even more fun. If you need gluten-free muffins, swap the all-purpose flour with a gluten-free blend. Many blends work well in this recipe. Just ensure the mix has xanthan gum for best results. For vegan muffins, replace the egg with a flax egg. Mix 1 tablespoon of flaxseed meal with 3 tablespoons of water. Let it sit for a few minutes until it thickens. Use almond milk instead of buttermilk and coconut oil instead of butter. In fall, you can make a pumpkin and apple muffin. Mix in 1 cup of pumpkin puree with the batter. This gives the muffins a rich flavor and moist texture. In summer, try berry and apple muffins. Use a cup of mixed berries like blueberries or raspberries along with the apples. This adds a burst of color and flavor that brightens your muffins. To keep your muffins fresh, let them cool completely on a wire rack. Place them in an air-tight container. This helps to lock in moisture and flavor. If you stack the muffins, separate them with parchment paper. This prevents them from sticking together. On the countertop, these muffins stay fresh for up to three days. If you want to keep them longer, freeze them. They can last up to three months in the freezer. Just wrap each muffin tightly in plastic wrap. Place them in a freezer bag to avoid freezer burn. For reheating, you can use a microwave or an oven. In the microwave, heat for about 15-20 seconds. Check to make sure they don't get too hot. For the oven, preheat to 350°F (175°C). Heat for about 5-10 minutes. This helps keep the muffins soft and tasty. Enjoy them warm for the best flavor! Yes, you can use different types of apples. The best apples for baking include Granny Smith, Honeycrisp, and Fuji. Granny Smith apples add a nice tartness, while Honeycrisp and Fuji bring sweetness and crispness. Mixing a few varieties can enhance flavor and texture too. You can make buttermilk at home easily. Just mix one cup of milk with one tablespoon of vinegar. Let it sit for five to ten minutes. This will create a tangy flavor similar to real buttermilk. For best results, use whole milk or 2% milk. Several reasons can cause muffins not to rise. First, check if your baking powder and baking soda are fresh. Old leavening agents may not work well. Second, avoid overmixing the batter, as it can make muffins dense. Lastly, make sure your oven temperature is correct. You can tell muffins are done baking by checking for a golden brown color. Insert a toothpick in the center; if it comes out clean, they are ready. You can also gently press the tops. If they spring back, they are done. You now have a great recipe for apple cinnamon muffins. We covered key ingredients and smart substitutions. You learned how to mix, bake, and store these tasty treats. Remember, avoiding overmixing is key to a perfect muffin texture. Feel free to experiment with flavors and dietary options too. Enjoy baking these muffins, and share them with friends or family! Your kitchen will smell amazing. These muffins are sure to please anyone who loves a sweet snack.

Apple Cinnamon Muffins with Crumble Bakery Delight

Are you ready to fill your kitchen with the warm, sweet aroma of freshly baked muffins? Let’s dive into making

To make these nuggets, start with 1 pound of fresh salmon fillet. Remove the skin and cut the salmon into small cubes. Fresh salmon gives the best flavor and texture. Look for bright orange color and a firm feel. This ensures your nuggets are juicy and tender. You will need a few simple ingredients for the marinade: - 4 tablespoons unsalted butter, melted - 4 cloves garlic, minced - 1 tablespoon lemon juice - 1 teaspoon dried dill - 1 teaspoon smoked paprika - Salt and pepper to taste These ingredients work together to create a tasty garlic butter marinade. The garlic adds a nice kick, while the lemon juice gives a fresh zing. Dill and smoked paprika add depth and warmth to the flavor. For the coating, use 1/2 cup of panko breadcrumbs. Panko gives your nuggets a crispy texture. It’s lighter and crunchier than regular breadcrumbs. When you press the salmon cubes into the panko, it sticks well and creates a perfect crust when cooked. To start, gather your ingredients. You need melted butter, minced garlic, lemon juice, dried dill, smoked paprika, salt, and pepper. In a mixing bowl, combine these items. Stir well until they mix into a smooth garlic butter marinade. This mix is what makes your salmon so tasty. Take your fresh salmon fillet and cut it into small cubes. Add the salmon to the bowl with the marinade. Gently toss the salmon cubes until every piece is coated evenly. This step is key for flavor. Once coated, let the salmon marinate for about 15 minutes. This helps the flavors soak in. While the salmon marinates, preheat your air fryer to 400°F (200°C). In another shallow dish, spread out the panko breadcrumbs. After the salmon has marinated, take each cube and press it into the breadcrumbs. Make sure each piece is coated well on all sides. Now, place the salmon nuggets in the air fryer basket. Arrange them in a single layer. Leave some space between each nugget for even cooking. Cook the nuggets for 8 to 10 minutes. Shake the basket halfway through to ensure they cook evenly. When they turn golden brown and crispy, they are ready. Finally, remove the nuggets from the air fryer. Garnish them with freshly chopped parsley for a nice touch. Enjoy your delicious garlic butter salmon nuggets! To get the best texture, choose fresh salmon. Make sure to remove the skin first. Cut the salmon into even cubes. This helps them cook at the same rate. When you coat them with panko, press down lightly. This makes a nice, crunchy layer. Don’t overcrowd the air fryer. Leave space for hot air to move. This keeps the nuggets crispy. For more flavor, use fresh garlic instead of dried. You can also add a pinch of cayenne pepper for heat. Sprinkle some lemon zest into the marinade for a bright taste. Consider mixing in fresh herbs, like dill or parsley, for extra flavor. If you like smoky tastes, try adding extra smoked paprika. These small changes make a big difference! The air fryer should always be preheated to 400°F (200°C). This helps the nuggets cook evenly. Cook them for 8-10 minutes. You should shake the basket halfway. This helps them brown nicely. If your nuggets are larger or smaller, adjust the time. Check for a golden color on the outside. That’s when they are done! {{image_2}} To make spicy garlic butter salmon nuggets, add heat to your mix. Use 1 teaspoon of cayenne pepper or red pepper flakes. This gives your nuggets a nice kick. The spicy flavor pairs well with the buttery garlic. It adds a new layer to your dish. You can adjust the heat based on your taste. Serve these with a cooling dip, like yogurt or sour cream. For herb-infused salmon nuggets, switch up your herbs. Use fresh herbs like parsley, basil, or thyme. You can chop them finely and add them to the garlic butter mix. This gives a fresh taste to the nuggets. You can also mix in 1 teaspoon of Italian seasoning. It adds depth and makes the flavor bright. Serve these nuggets with a light salad for a refreshing meal. To create sweet and savory salmon nuggets, add sweetness to your mix. Use 1 tablespoon of honey or maple syrup in the marinade. This gives a nice balance to the salty and buttery flavors. You can also add a pinch of cinnamon for warmth. This combo makes a unique dish that stands out. Serve these nuggets with a side of sweet potato fries for a colorful plate. You will want to store your salmon nuggets in an airtight container. Place them in the fridge if you have leftovers. They will stay fresh for up to three days. Make sure to let them cool before sealing the container. This helps to keep them crispy. To reheat your salmon nuggets, use the air fryer again. Set it to 350°F (175°C). Heat for about 5 minutes. This method keeps them crispy and warm. You can also use an oven if you don't have an air fryer. Just place them on a baking sheet and heat until warm. You can freeze salmon nuggets for later use. First, let them cool completely. Then, arrange them in a single layer on a baking sheet. Freeze them for about an hour. After that, transfer them to a freezer bag. Make sure to remove as much air as possible. They can stay in the freezer for up to three months. When ready to eat, just reheat them directly from frozen. Yes, you can use frozen salmon. Just make sure to thaw it first. You can do this by placing it in the fridge overnight. If you are in a hurry, use cold water to defrost it quickly. After thawing, remove the skin and cut it into cubes. Follow the rest of the recipe as usual. These salmon nuggets pair well with many sides. You can serve them with a fresh salad. A tangy coleslaw adds a nice crunch. Roasted vegetables or sweet potato fries are also great options. For dipping, try a zesty lemon aioli or a creamy tartar sauce. Each side adds a unique twist to your meal. To keep your salmon moist, do not overcook it. Cook the nuggets for 8-10 minutes in the air fryer. Check them halfway through to see if they are done. Also, marinate the salmon for at least 15 minutes. This helps to lock in flavors and moisture. Lastly, using fresh salmon instead of frozen can also help keep them juicy. In this post, we explored making easy air fryer garlic butter salmon nuggets. We covered ingredients, step-by-step instructions, and helpful tips. You learned about flavor variations and storage options. My final thoughts: this dish is flexible and tasty. Enjoy experimenting with different flavors and find your favorite. Happy cooking!

Air Fryer Garlic Butter Salmon Nuggets Tasty and Simple

Craving a tasty meal that’s both simple and satisfying? Air Fryer Garlic Butter Salmon Nuggets are the answer! I’ll guide

To make this cake, you need the following items: - 4 medium apples, peeled, cored, and sliced - 1 cup brown sugar - 1/2 cup unsalted butter - 1 teaspoon vanilla extract - 1 teaspoon cinnamon - 1 1/2 cups all-purpose flour - 1 teaspoon baking powder - 1/2 teaspoon baking soda - 1/4 teaspoon salt - 2 large eggs - 1/2 cup granulated sugar - 1/2 cup milk You can add your twist to this cake with these options: - Chopped nuts like pecans or walnuts for crunch - Extra spices such as nutmeg or ginger for warmth - Dried fruits like raisins or cranberries for added flavor - A splash of rum or bourbon for a grown-up touch If you need to swap some ingredients, consider these ideas: - Use coconut oil instead of butter for a dairy-free option - Substitute almond flour for a gluten-free version - Choose honey or maple syrup in place of brown sugar for a natural sweetener - Use plant-based milk, like almond or oat milk, instead of regular milk Each ingredient plays a key role in creating the rich, sweet flavor of this caramel apple upside-down cake. Enjoy experimenting with different combinations! Start by preheating your oven to 350°F (175°C). Grease a 9-inch round cake pan. I like to line the bottom with parchment paper too. This makes it easy to take the cake out later. Next, peel, core, and slice four medium apples. Arrange the apple slices in a nice circular pattern. Overlap them a bit for a beautiful look. In a small saucepan, melt half a cup of unsalted butter over medium heat. Once melted, add one cup of brown sugar. Stir this mix until it is smooth and bubbly for about 2-3 minutes. Remove the pan from heat. Now, stir in one teaspoon of vanilla extract. Pour the caramel into the bottom of the prepared cake pan. Spread it evenly across the bottom. In a separate bowl, whisk together one and a half cups of all-purpose flour, one teaspoon of baking powder, one-half teaspoon of baking soda, and one-fourth teaspoon of salt. In another large bowl, beat two large eggs with half a cup of granulated sugar. Mix this for about 3-4 minutes until it looks light and fluffy. Gradually add the dry ingredients to the egg mixture. Then, pour in half a cup of milk. Mix until everything is smooth. Carefully pour this batter over the apples in the pan. Bake your cake in the oven for 40-45 minutes. Check if it is done by inserting a toothpick into the center. It should come out clean. Once baked, let the cake cool in the pan for about 10 minutes. After that, carefully invert the cake onto a serving plate. The apple slices will be on top, looking amazing. Let the cake cool completely before you slice it. To bake a great upside-down cake, follow these tips: - Choose the right apples: Use firm apples like Granny Smith or Honeycrisp. They hold up well when baked. - Prepare your pan: Grease the pan well and use parchment paper. This helps the cake come out easily. - Spread the caramel evenly: Ensure the caramel covers the bottom completely. This creates a rich flavor. - Layer the apples neatly: Overlap the apple slices slightly. This makes for a beautiful top when you flip the cake. - Don’t overmix the batter: Mix until just combined. This keeps the cake light and fluffy. Watch out for these common mistakes: - Using too many apples: Stick to four medium apples. Too many can make the cake soggy. - Not monitoring the baking time: Check the cake at 40 minutes. Ovens vary, and you want it just right. - Skipping the cooling time: Let it cool for 10 minutes before inverting. This helps avoid a messy flip. - Not measuring ingredients accurately: Use a scale or measuring cups. Baking is a science, and precision matters. - Forgetting to add salt: A little salt enhances flavor. Don’t skip it! You can boost the flavor of your cake easily: - Add nuts: Chopped pecans or walnuts add crunch and richness. Sprinkle them over the apples before adding batter. - Use spices: Besides cinnamon, try nutmeg or ginger for a warm note. These spices pair well with apples. - Incorporate citrus: A bit of lemon zest brightens the cake. Mix it into the batter for a fresh kick. - Try caramel sauce: Drizzle homemade or store-bought caramel over the top. This adds sweetness and makes it even more tempting. - Serve with ice cream: Vanilla ice cream complements the warm cake perfectly. It’s a classic combo that never fails. {{image_2}} You can swap out apples for other fruits in this cake. Pears add a sweet touch. Pineapples bring a tropical vibe. Peaches also work well when in season. Just make sure the fruit is ripe and juicy. Cut them into slices for even cooking. Each fruit will give the cake a unique flavor. To make this cake gluten-free, use a gluten-free flour blend. Look for one that contains xanthan gum. This helps to mimic the texture of all-purpose flour. You may also want to add a bit more baking powder. This can help the cake rise better. Be sure to check all other ingredients for gluten content. If you want a vegan version, replace the eggs with flaxseed meal. Mix 1 tablespoon of flaxseed with 2.5 tablespoons of water. Let it sit for a few minutes to thicken. For the milk, use almond milk or oat milk. Use coconut oil instead of butter for a rich flavor. The cake will remain tasty and moist without animal products. To keep your caramel apple upside-down cake fresh, store it in an airtight container. If you don't have one, wrap it tightly in plastic wrap. This will help prevent it from drying out. Place the cake at room temperature for up to three days. If you live in a warm area, you may want to refrigerate it to keep it fresh longer. Just remember that chilling can change the cake's texture. If you want to enjoy your cake later, freezing is a great option. First, let the cake cool completely. Then, slice it into pieces for easy servings. Wrap each slice in plastic wrap, and then place them in a freezer bag. Remove as much air as possible to avoid freezer burn. Label the bag with the date. You can freeze the cake for up to three months. When you're ready to eat it, just thaw in the fridge overnight. To reheat your caramel apple upside-down cake, you have a couple of options. For a quick method, use the microwave. Heat a slice on medium power for about 15–20 seconds. If you prefer a crispier texture, use the oven. Preheat it to 350°F (175°C). Place the cake on a baking sheet and heat for about 10 minutes. Serve warm, maybe with a scoop of ice cream on the side! Yes, you can use different apples. Good choices include Granny Smith, Honeycrisp, or Fuji. Each type gives a unique taste and texture. Granny Smith adds tartness, while Honeycrisp brings sweetness. Experiment to find your favorite. To check if the cake is done, use a toothpick. Insert it into the center of the cake. If it comes out clean, the cake is ready. You can also gently press the top. If it springs back, it’s done. This cake pairs well with vanilla ice cream or whipped cream. A drizzle of caramel sauce adds extra sweetness. You can also add chopped nuts for crunch. Serve warm for the best taste. Yes, you can make the cake ahead of time. Bake it and let it cool completely. Store it in an airtight container at room temperature. You can also freeze it for longer storage. Just thaw it before serving. This blog post covered all you need for a delicious Caramel Apple Upside-Down Cake. We explored essential ingredients, step-by-step instructions, and useful tips. You learned about variations and how to store leftovers. Creating your perfect cake is easier with these insights. Remember, baking is about fun and creativity, so don't hesitate to try new things. Enjoy your baking adventure and treat yourself and others to this tasty delight!

Irresistible Caramel Apple Upside-Down Cake Recipe

Are you ready to treat yourself to a sweet delight? This Caramel Apple Upside-Down Cake is not just easy to

- 12 oz cheese tortellini (fresh or frozen) - 2 cups cherry tomatoes, halved - 1 cup heavy cream - 1 cup vegetable broth - 1 cup grated Parmesan cheese - 3 cloves garlic, minced - 1 teaspoon Italian seasoning - 2 tablespoons olive oil - Salt and pepper to taste - Fresh basil Gather these ingredients to create a rich, creamy dish. Use fresh tortellini for a delightful texture. Cherry tomatoes add sweetness and color. Heavy cream gives the sauce a luscious feel. Vegetable broth adds depth to the flavor. Parmesan cheese enriches the dish with a savory touch. Garlic brings warmth and aroma to every bite. Italian seasoning ties the flavors together with herbs. Olive oil helps sauté the garlic and tomatoes. Don’t forget salt and pepper to enhance the taste. For garnish, fresh basil adds a pop of color and freshness. These ingredients make your Creamy Tomato Parmesan Tortellini One Pot a true delight. Enjoy the mix of flavors and textures in every spoonful. - Sautéing garlic Start by heating 2 tablespoons of olive oil in a large pot over medium heat. Add 3 minced garlic cloves. Sauté them for 1-2 minutes. Watch closely so they don’t burn. The garlic should smell good, not charred. - Cooking cherry tomatoes Next, add 2 cups of halved cherry tomatoes to the pot. Sprinkle in salt, pepper, and 1 teaspoon of Italian seasoning. Cook for around 5 minutes. The tomatoes will soften and burst, releasing their sweet juices. - Adding broth and cream Pour in 1 cup of vegetable broth and 1 cup of heavy cream. Stir well to mix everything together. Bring this mixture to a gentle boil. You want it hot but not splattering. - Incorporating tortellini Once boiling, add 12 ounces of cheese tortellini to the pot. Lower the heat to a simmer. Cook the tortellini for about 5-7 minutes. Stir occasionally to keep them from sticking together. They are done when they feel tender. - Melting Parmesan cheese Remove the pot from heat. Stir in 1 cup of grated Parmesan cheese. Keep stirring until the cheese melts. The sauce will turn creamy and rich. - Adjusting sauce consistency Taste the sauce and add more salt or pepper if needed. If the sauce is too thick, splash in more vegetable broth. Stir until it reaches the thickness you like. Serve hot and enjoy the creamy goodness! How to avoid overcooking tortellini To avoid mushy tortellini, follow the package instructions closely. Check the tortellini a minute or two early. They should be tender but still firm. Stir gently while cooking. This helps them cook evenly. Tips for making the sauce creamy To get a creamy sauce, use heavy cream. Add it after the broth. Stir often while it heats. Once you add the tortellini, mix in the cheese right after cooking. This ensures the cheese melts well into the sauce. Best accompaniments for the dish Serve this dish with a side salad. A simple green salad works well. You can also add garlic bread. Both sides complement the rich flavors of the tortellini. How to enhance flavors with herbs Fresh basil adds a bright taste. Sprinkle it on top right before serving. You can try adding parsley or oregano too. These herbs will boost the dish's flavor and aroma. Recommended pots and utensils Use a large pot for this recipe. A sturdy wooden spoon is great for stirring. A measuring cup will help you with liquids. Keep a sharp knife handy for chopping. These tools make cooking easy and fun! {{image_2}} You can switch up the tortellini to suit your taste. Use spinach or mushroom tortellini for a new twist. If you're dairy-free, try coconut cream or cashew cream instead of heavy cream. Nutritional yeast can also replace Parmesan cheese for a cheesy flavor. Boost the dish with vegetables. Spinach, bell peppers, or zucchini add color and nutrition. You can also toss in some cooked chicken or shrimp for extra protein. This makes the meal more filling and adds great taste. Make this dish a baked delight. After mixing in the cheese, transfer it to a baking dish. Top with more cheese and bake until golden. Alternatively, serve it cold as a pasta salad. Just chill it in the fridge and enjoy a refreshing meal on hot days. To keep your creamy tomato Parmesan tortellini fresh, store it in an airtight container. Place it in the fridge as soon as it cools. This dish lasts about 3 to 4 days in the refrigerator. Always check for any signs of spoilage before consuming. If you want to freeze this dish, let it cool completely first. Then, transfer it to a freezer-safe container. Be sure to leave some space for expansion. It can stay good in the freezer for up to 3 months. When you're ready to enjoy it again, thaw it in the fridge overnight. You can reheat it on the stove or in the microwave. For the best texture when reheating, use a skillet on low heat. Add a splash of vegetable broth or cream to keep it creamy. Stir gently until warmed through. You can also microwave it in short bursts, stirring in between. This helps to avoid hot spots and keeps your pasta tender. Can I use dried tortellini instead? Yes, you can use dried tortellini. Just cook it longer than fresh or frozen. Follow package instructions for timing. The sauce will still taste great! How can I make this dish healthier? To make this dish healthier, try these options: - Use whole wheat tortellini for more fiber. - Swap heavy cream for low-fat milk or a plant-based option. - Add more veggies like spinach or zucchini for extra nutrients. What is the total time needed to make this recipe? The total time to make Creamy Tomato Parmesan Tortellini is about 20 minutes. This includes 10 minutes for prep and 10 minutes for cooking. It’s quick and easy! Can I prep this dish in advance? Yes, you can prep some parts ahead. Chop the tomatoes and garlic the day before. You can also measure out the broth and cream. Store everything in the fridge. Cook the dish on the day you want to serve it for best taste. This blog post shared a simple and tasty tortellini recipe. You learned about key ingredients, like cheese tortellini and cherry tomatoes. I also covered how to cook and combine each item for the best flavor. You found tips on perfecting your dish and variations to try. Finally, I explained how to store leftovers and answered common questions. Cooking this meal can be fun and easy. Enjoy making it your own!

Creamy Tomato Parmesan Tortellini One Pot Delight

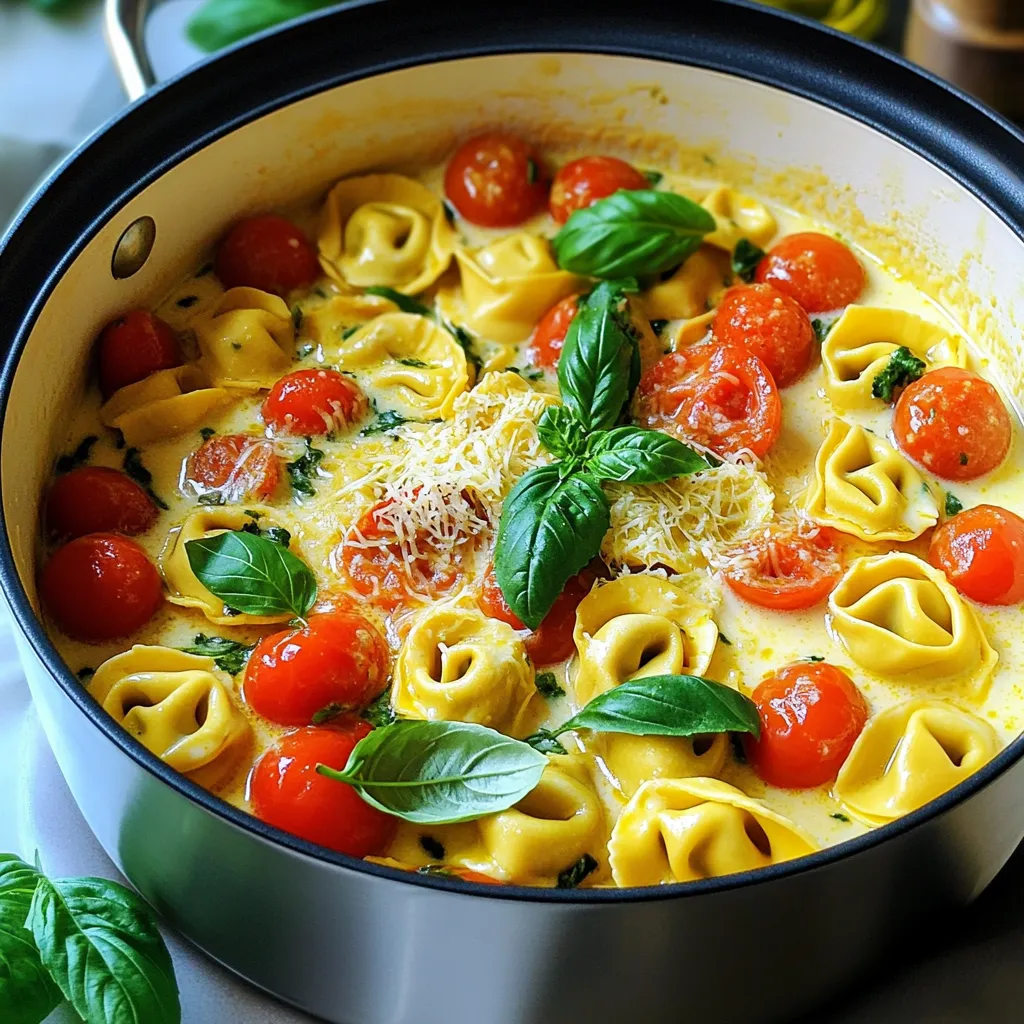
Welcome to my kitchen! Today, I’m excited to share a simple and delicious recipe for Creamy Tomato Parmesan Tortellini. This

- 1 pound boneless, skinless chicken thighs, diced - 1 cup pearl barley, rinsed - 4 cups low-sodium chicken broth - 2 medium carrots, diced - 2 celery stalks, diced - 1 medium onion, chopped - 3 cloves garlic, minced - 1 teaspoon dried thyme - 1 teaspoon dried rosemary - 1 bay leaf - Salt and pepper to taste - 2 cups kale or spinach, chopped - 1 tablespoon olive oil - Juice of 1 lemon (for serving) Gathering the right ingredients is key. Start with the chicken thighs. I prefer boneless, skinless ones because they are tender and easy to work with. Dicing them into bite-sized pieces helps them cook evenly. Next, pearl barley adds a chewy texture and nutty flavor. Rinse it well to remove any dust. Low-sodium chicken broth gives a great base. It adds flavor without being too salty. For the veggies, I use carrots, celery, and onion. They form a classic mirepoix, adding depth. Dice the carrots and celery and chop the onion finely. Garlic is a must for aroma and taste. Mince it well to release its oils. Herbs like thyme and rosemary bring a fresh taste. Use dried herbs for ease. A bay leaf enhances the flavor but remember to remove it before serving. Season with salt and pepper to your liking. Finally, add greens like kale or spinach for color and nutrients. Chop them up. Don't forget the olive oil! It helps cook the veggies. To finish, a squeeze of lemon juice brightens the soup. It adds a nice zing. With these ingredients, you are all set to make a cozy, hearty soup. Enjoy the process! - Sauté vegetables in the slow cooker: Start by heating 1 tablespoon of olive oil in your slow cooker. If your slow cooker has a sauté option, use it. Add the chopped onion, diced carrots, and diced celery. Sauté these for about 4 to 5 minutes. They should become soft and fragrant. - Add chicken and spices: Now, it’s time to add the diced chicken thighs. Sprinkle in 1 teaspoon of dried thyme, 1 teaspoon of dried rosemary, and a bay leaf. Don’t forget to season with salt and pepper to taste. Stir everything together to mix the flavors well. - Combine with chicken broth: Pour in 4 cups of low-sodium chicken broth. Ensure all the ingredients are well submerged. Give it a gentle stir to combine everything evenly. - Set slow cooker to low or high: You have two options here. Set your slow cooker to low for 6 to 8 hours or high for 3 to 4 hours. Both will make the chicken and barley tender and delicious. - Add kale or spinach before serving: About 30 minutes before you plan to serve, add 2 cups of chopped kale or spinach. This step brings a fresh touch to the soup and packs in extra nutrients. - Adjust seasonings and serve: Once the cooking time is up, take out the bay leaf. Taste the soup and adjust the salt and pepper as needed. Serve it hot with a squeeze of fresh lemon juice on top to brighten the flavors. - Best practices for sautéing in slow cooker Start by heating olive oil in your slow cooker. If it has a sauté function, use it. Add chopped onions, carrots, and celery. Cook these for about 4-5 minutes. This will make them soft and sweet. Next, add minced garlic and sauté for one more minute. This brings out the garlic's great flavor. - Ensuring chicken and barley are tender To make sure the chicken is juicy and the barley is soft, set your slow cooker to low heat. Cook for 6-8 hours. If you're in a hurry, you can set it to high heat. In this case, cook for 3-4 hours. Always check if the chicken is tender. The barley should be chewy but not hard. - Perfect side dishes for the soup This soup pairs well with crusty bread or a fresh salad. A simple green salad adds a nice crunch. You can also serve it with a side of garlic bread for a tasty combo. - Additional garnishes To make your soup even better, add fresh herbs like parsley or thyme. They add color and flavor. You can also sprinkle some grated cheese on top. A squeeze of fresh lemon juice brightens the soup and adds a nice zing. {{image_2}} You can change the base of this soup easily. Instead of chicken thighs, use chicken breasts or turkey. Both work well and offer a lighter taste. If you prefer a vegetarian option, try using mushrooms or a can of chickpeas. For grains, barley is hearty, but you can swap it for quinoa or farro. Each adds a unique texture and flavor. If you want a gluten-free version, use brown rice instead of barley. Feel free to add more vegetables. Peas, corn, or green beans bring color and nutrition. You can also add legumes like lentils or black beans. They add protein and fiber, making the soup even more filling. To boost the flavor, add spices or herbs. A pinch of smoked paprika gives a warm, smoky taste. If you like heat, try adding red pepper flakes. Fresh herbs like parsley or cilantro can brighten the soup. For a creamier texture, stir in a splash of cream or coconut milk right before serving. This adds richness and makes every bite feel luxurious. You can also mix in some grated cheese, like Parmesan, for extra depth. These simple changes let you customize the soup to your taste. Enjoy experimenting! To keep your Rustic Chicken Barley Soup fresh, let it cool first. Then, store it in airtight containers. Glass or BPA-free plastic containers work best. This helps keep flavors and moisture locked in. You can refrigerate the soup for up to three days. Make sure to label the containers with the date. This way, you know when to use them. If you want to save some soup for later, freezing is a great option. Pour the cooled soup into freezer-safe containers or bags. Leave space at the top for expansion. Seal them tightly to avoid freezer burn. You can freeze the soup for up to three months. When you're ready to eat, thaw the soup in the fridge overnight. You can also use the microwave. Heat it in short bursts, stirring in between. This helps prevent hot spots. For best taste, reheat it on the stove over low heat. Stir occasionally until hot. Enjoy your warm, comforting soup even after freezing! How long does chicken take to cook in a slow cooker? Chicken usually takes about 6-8 hours on low or 3-4 hours on high in a slow cooker. The low setting cooks the chicken evenly. This helps it stay tender and juicy. Always check that the chicken reaches 165°F to ensure it is safe to eat. Can I use frozen chicken in this recipe? Yes, you can use frozen chicken. Just add it directly to the slow cooker. However, cooking time may increase by about an hour. Make sure the chicken is fully cooked before serving. How to make this soup gluten-free? To make this soup gluten-free, simply swap the pearl barley for a gluten-free grain. Quinoa or rice are great options. Both cook well in the slow cooker and add nice texture. Can I add more vegetables? Absolutely! You can add more vegetables to boost flavor and nutrition. Consider using zucchini, bell peppers, or green beans. Just chop them up and toss them in with the other ingredients. This makes the soup even heartier. This blog post provides a clear guide to making a delicious chicken barley soup. We covered the key ingredients, step-by-step instructions, and helpful tips for best results. I shared ways to adjust flavors and suggested storage tips for leftovers. This soup is easy to make and offers tasty variations. With these insights, I hope you feel ready to create a warm, hearty meal for yourself or your loved ones. Enjoy every spoonful!

Rustic Chicken Barley Soup Slow Cooker Delight

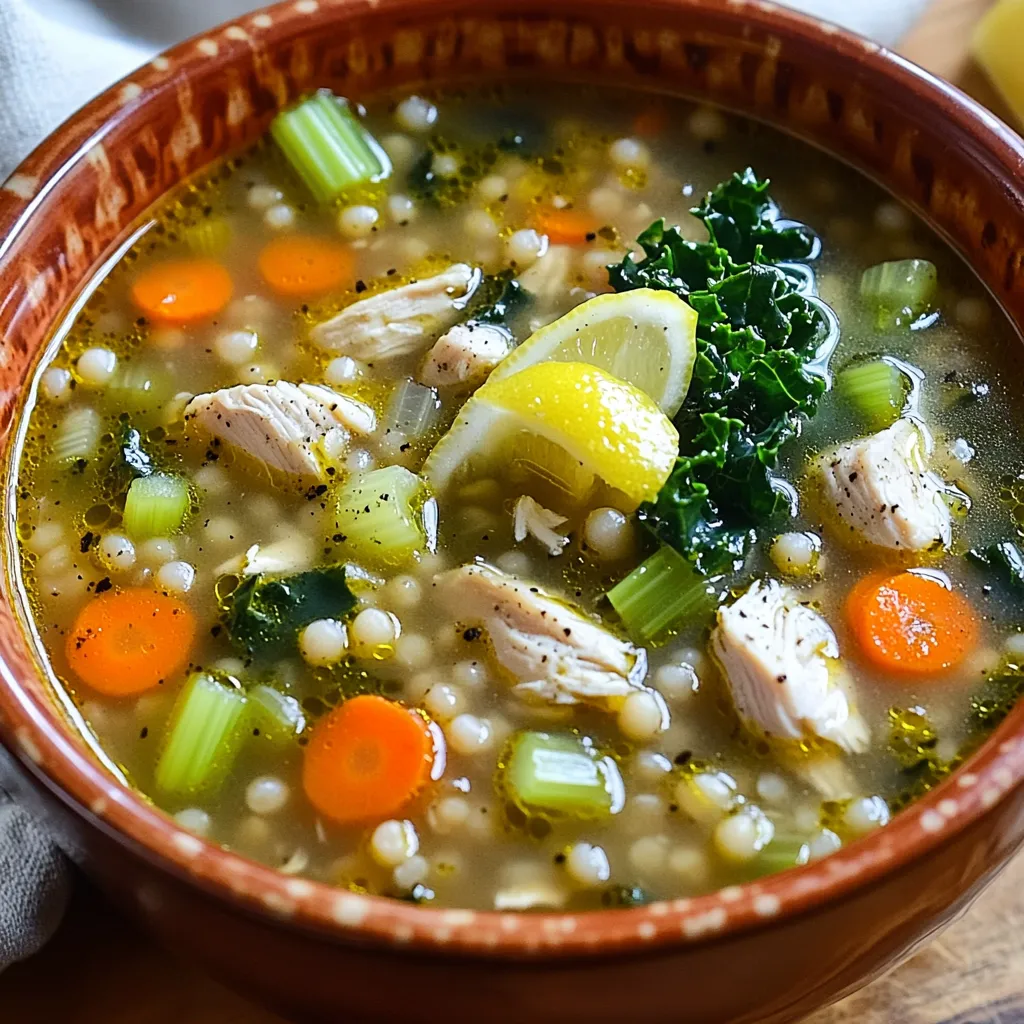
Looking for a heartwarming dish to warm your soul? My Rustic Chicken Barley Soup Slow Cooker Delight is the answer.

- 6 cups Rice Krispies cereal - 1 cup mini marshmallows - 1/2 cup pumpkin puree - 1/4 cup unsalted butter - 1 teaspoon pumpkin pie spice - 1/2 teaspoon vanilla extract - A pinch of salt - Optional toppings: 1/2 cup white chocolate chips, 1/4 cup chopped pecans The main ingredients for Pumpkin Spice Rice Krispie Treats are simple yet full of flavor. Rice Krispies cereal gives the treats their classic crunch. Mini marshmallows add sweetness and help bind everything together. Pumpkin puree brings a rich and creamy texture, making each bite taste like fall. For the additional ingredients, unsalted butter is key for that smooth melt. Pumpkin pie spice adds warmth with its blend of cinnamon, nutmeg, and ginger. A hint of vanilla enhances the flavor, while a pinch of salt balances the sweetness. If you want to get fancy, you can top your treats with white chocolate chips and chopped pecans for an extra crunch and sweetness. This mix of ingredients creates a cozy treat perfect for any fall gathering. You will love how easy it is to make and how delightful it tastes! Start by melting the butter in a large saucepan over medium heat. Keep an eye on it, so it does not burn. Once the butter is melted, add in the pumpkin puree. Then, pour in the vanilla extract and sprinkle the pumpkin pie spice. Stir well until everything is mixed and bubbly. Next, add the mini marshmallows to the pan. Stir continuously until they melt completely. This should take just a few minutes. The mixture will become smooth and sticky. Remove the saucepan from heat. Add a pinch of salt to the mixture for flavor. Now, slowly fold in the Rice Krispies cereal. Make sure each piece is coated well with the marshmallow mix. If you want to add white chocolate chips, do it now, and gently fold them in too. Transfer the mixture to a greased 9x13 inch baking pan. Press it down evenly using a spatula or your hands. You can lightly butter your hands to keep it from sticking. If you like, sprinkle chopped pecans on top while the mixture is still warm. Press them in gently for decoration. Let the treats cool at room temperature for at least 30 minutes before slicing them into squares or rectangles. To get the best texture, use lightly buttered hands for pressing. This helps keep the mixture from sticking to your fingers. Press down firmly but gently to make sure the treats hold together. Allow adequate cooling time before slicing. If you cut them too soon, they may fall apart. You can boost the flavor by adding a pinch of cinnamon or nutmeg. These spices complement the pumpkin spice nicely. For added sweetness, drizzle melted chocolate on top. This makes your treats even more special and adds a nice touch of richness. Get creative with how you present your treats. Arrange them on a festive platter. Scatter a few mini marshmallows or chopped pecans around for decoration. You can also pair these treats with other fall desserts, like apple pie or pumpkin muffins. Enjoy the season with flavors that everyone loves! {{image_2}} You can make your treats extra special by adding chocolate. Start with chocolate-flavored Rice Krispies. This boosts the taste and adds a fun twist. If you want more chocolate flavor, mix in cocoa powder with the melted marshmallows. This gives you a rich and creamy texture. The chocolate pairs well with the pumpkin spice. If you have nut allergies, you can still enjoy these treats. Instead of pecans, use seeds like sunflower or pumpkin seeds. This keeps the crunch without the nuts. You might want to adjust the flavors a bit. A dash of cinnamon can enhance the taste without using nuts. You can make these treats vegan by swapping out the butter. Use coconut oil instead for a rich flavor. For the marshmallows, look for dairy-free options. Many brands now offer vegan marshmallows that melt just as well. This way, everyone can enjoy the fall delight of pumpkin spice treats! To keep your Pumpkin Spice Rice Krispie Treats fresh, store them in an airtight container. This helps keep them soft and chewy. Place the container in a cool, dry spot. Avoid places that get warm, like near the stove or in direct sunlight. These treats stay fresh for about a week at room temperature. If you want to save some for later, you can freeze them. Wrap each treat in plastic wrap, then place them in a freezer bag. They can last up to three months in the freezer. When you’re ready to eat, let them thaw at room temperature for a few hours. Enjoy them soft and tasty! Yes, you can use other cereals! Options include: - Cornflakes - Cheerios - Golden Grahams These cereals will change the taste and texture. Each will add a fun twist to your treats. If you don’t have pumpkin puree, try applesauce or mashed banana. These will give a sweet flavor. You can also use sweet potato puree for a yummy option. Absolutely! You can prepare them a day ahead. Store them in an airtight container. Keep them at room temperature to maintain their softness. To keep your treats soft, follow these tips: - Don’t overcook the marshmallows. - Use fresh marshmallows. - Store in an airtight container. These steps will help keep your treats chewy and delicious! This blog post covered how to make Pumpkin Spice Rice Krispie Treats. We looked at main ingredients, mixing steps, and tips for perfecting texture. I shared easy variations for chocolate lovers and those needing nut-free or vegan options. Remember, cooling properly keeps your treats soft and tasty. Enjoy these fun snacks this fall, whether for a party or a cozy night in. Your kitchen will smell great, and your friends will love them!

Pumpkin Spice Rice Krispie Treats Simple Fall Delight

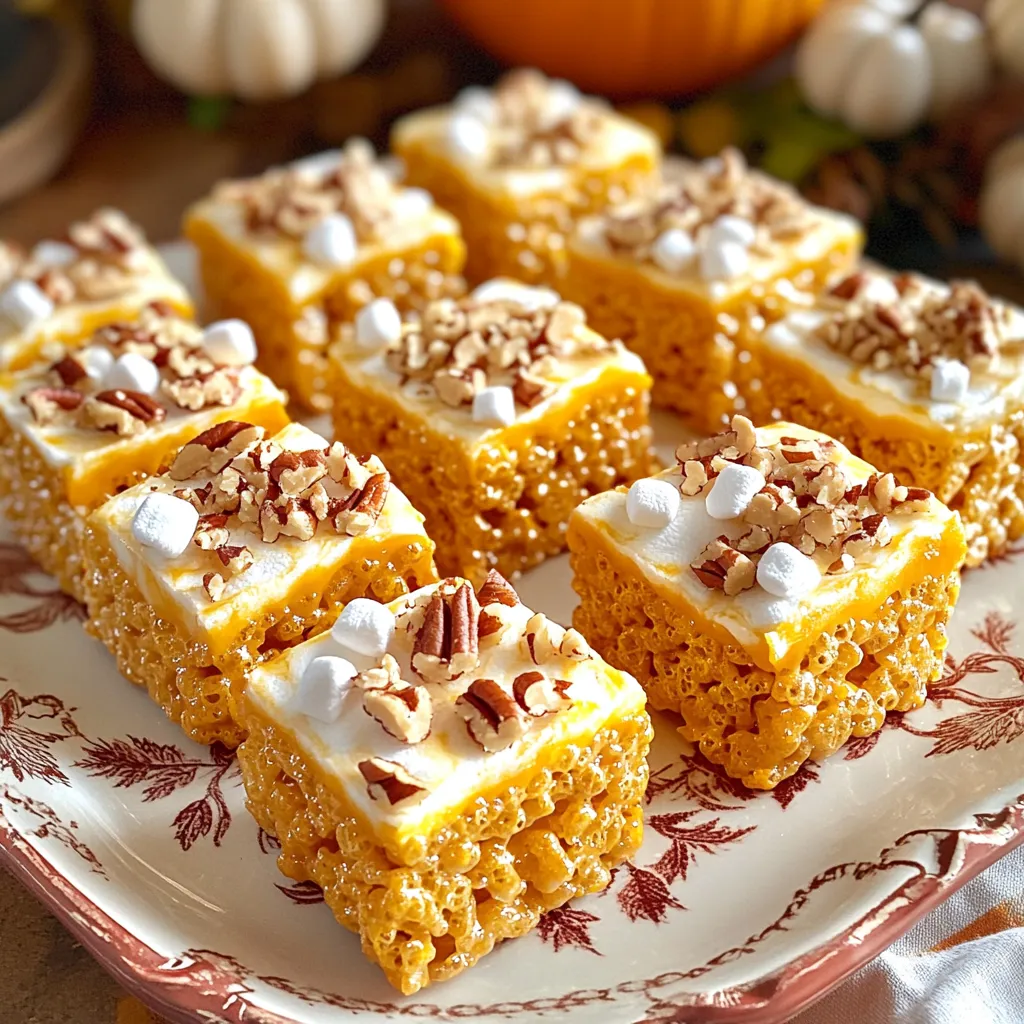
Fall is here, and it’s time to indulge in a cozy treat! Imagine the sweet scent of pumpkin spice filling

- 1 medium butternut squash, peeled and cubed - 1 medium onion, diced - 2 cloves garlic, minced - 4 cups vegetable broth - 1 can (13.5 oz) coconut milk - 1 teaspoon ground nutmeg - 1 teaspoon ground cinnamon - 2 tablespoons olive oil - Salt and pepper to taste - 10 fresh sage leaves - 1 tablespoon lemon juice - Optional: Pumpkin seeds for garnish Butternut squash is rich in vitamins A and C. It helps support good vision and skin health. Onion adds flavor and boosts your immune system. Garlic has strong anti-inflammatory effects. Coconut milk brings healthy fats, which are great for heart health. Sage leaves are packed with antioxidants, aiding digestion. Overall, this bisque gives you a warm, tasty meal with many health benefits. If you don't have butternut squash, you can use pumpkin or sweet potato. For a lighter option, swap coconut milk with almond milk. You can also replace sage with thyme or rosemary for a different taste. If you prefer, use chicken broth instead of vegetable broth. Each change can give your bisque a unique flair while keeping it delicious. To start, gather all your ingredients. You need: - 1 medium butternut squash, peeled and cubed - 1 medium onion, diced - 2 cloves garlic, minced - 4 cups vegetable broth - 1 can (13.5 oz) coconut milk - 1 teaspoon ground nutmeg - 1 teaspoon ground cinnamon - 2 tablespoons olive oil - Salt and pepper to taste - 10 fresh sage leaves - 1 tablespoon lemon juice - Optional: Pumpkin seeds for garnish First, peel and cube the butternut squash. Dice the onion and mince the garlic. This will help you get ready for cooking. In a large pot, heat the olive oil over medium heat. Add the diced onion. Sauté it for about 5 minutes until it looks soft and clear. Next, add the minced garlic. Cook it for another minute. You want to smell its lovely scent. Now, stir in the cubed butternut squash. Add the vegetable broth, nutmeg, and cinnamon. Bring this mix to a boil. Then, lower the heat and let it simmer for 20 to 25 minutes. The squash should be soft when done. Once cooked, take the pot off the heat. Use an immersion blender to blend the mixture until it’s smooth. If you don’t have one, pour the mix into a standard blender. Blend it in batches if needed. Return the smooth bisque to the pot. Stir in the coconut milk and lemon juice. Add salt and pepper to taste. Heat the bisque for another 5 minutes to warm it up. While the bisque warms, prepare the crispy sage. Take a small pan and heat a teaspoon of olive oil over medium heat. Add the fresh sage leaves. Cook them for about 1 to 2 minutes. Watch them turn bright green and crispy. Once done, remove the leaves and let them drain on paper towels. This will keep them crispy. Now, you’re ready to serve your warm bisque. Top it with crispy sage and a sprinkle of pumpkin seeds if you like. Enjoy this cozy dish! To get a smooth bisque, start with cooked squash. Cook it until it’s soft. Blending is key! Use an immersion blender for ease. If you prefer, a regular blender works too. Make sure to blend until you see no chunks. Adding coconut milk brings creaminess without dairy. Stir it in just before serving for the best flavor. You can boost flavor with spices. Ground nutmeg and cinnamon add warmth. Don’t skip the lemon juice; it brightens the taste. For deeper flavor, roast the squash before cooking. You might also try adding a pinch of cayenne for heat. Garnish with crispy sage for a crunchy texture and fresh flavor. One mistake is not cooking the squash enough. Undercooked squash will yield a grainy bisque. Another error is not seasoning well. Taste before serving, and adjust salt and pepper. Avoid blending in too many batches; it can be messy. Lastly, don't skip the crispy sage; it elevates the dish! {{image_2}} To make this bisque vegan, swap coconut milk for cashew cream. Cashew cream is rich and creamy. You can make it by soaking cashews and blending them with water. This change keeps the taste smooth and satisfying. Want to boost nutrition? Add cooked lentils or beans. They add protein and fiber. You can also mix in carrots or spinach for extra flavor and color. These additions make the bisque heartier and more filling. If you love heat, add a pinch of red pepper flakes. This will give the bisque a nice kick. For a milder taste, skip the extra spices. Adjusting spice levels lets you customize the bisque to your liking! After you finish your meal, let the bisque cool. Pour it into an airtight container. Store it in the fridge. It will taste great for up to three days. Make sure to seal it well to keep flavors fresh. If you want to save some for later, freezing is easy. Use freezer-safe containers or bags. Leave some room for air as the bisque expands. It can last up to three months in the freezer. When you're ready, just thaw it in the fridge overnight. Reheat your bisque gently for the best taste. Use a pot on low heat, stirring often. This keeps it creamy and prevents burning. You can also use a microwave, but do it in short bursts. Stir in a splash of coconut milk if it thickens. Enjoy the rich flavors just like the first time! Butternut squash bisque will last about 3 to 5 days in the fridge. Make sure to store it in an airtight container. This helps keep it fresh and tasty. If you want to enjoy it later, just reheat it on the stove or in the microwave. Yes, you can use frozen butternut squash! It saves time and cooks quickly. Just thaw it before using. This option is great if fresh squash is not available. The flavor and creaminess of the bisque will still shine through. You can pair butternut squash bisque with many sides. Here are some ideas: - Crusty bread or rolls - A fresh green salad - Grilled cheese sandwiches - Roasted vegetables These sides add texture and balance to the meal. Absolutely! You can make butternut squash bisque a day or two ahead. Just store it in the fridge until you are ready to serve. When reheating, add a splash of coconut milk for extra creaminess. This makes the flavors even better! You now know how to make a tasty butternut squash bisque. We covered the key ingredients and their benefits. You learned important tips for a creamy texture and how to avoid common mistakes. I shared variations to fit your diet and storage tips for leftovers. Use this guide to impress others with your cooking skills. Enjoy every rich spoonful and feel proud of your homemade bisque.

Butternut Squash Bisque with Crispy Sage Delight

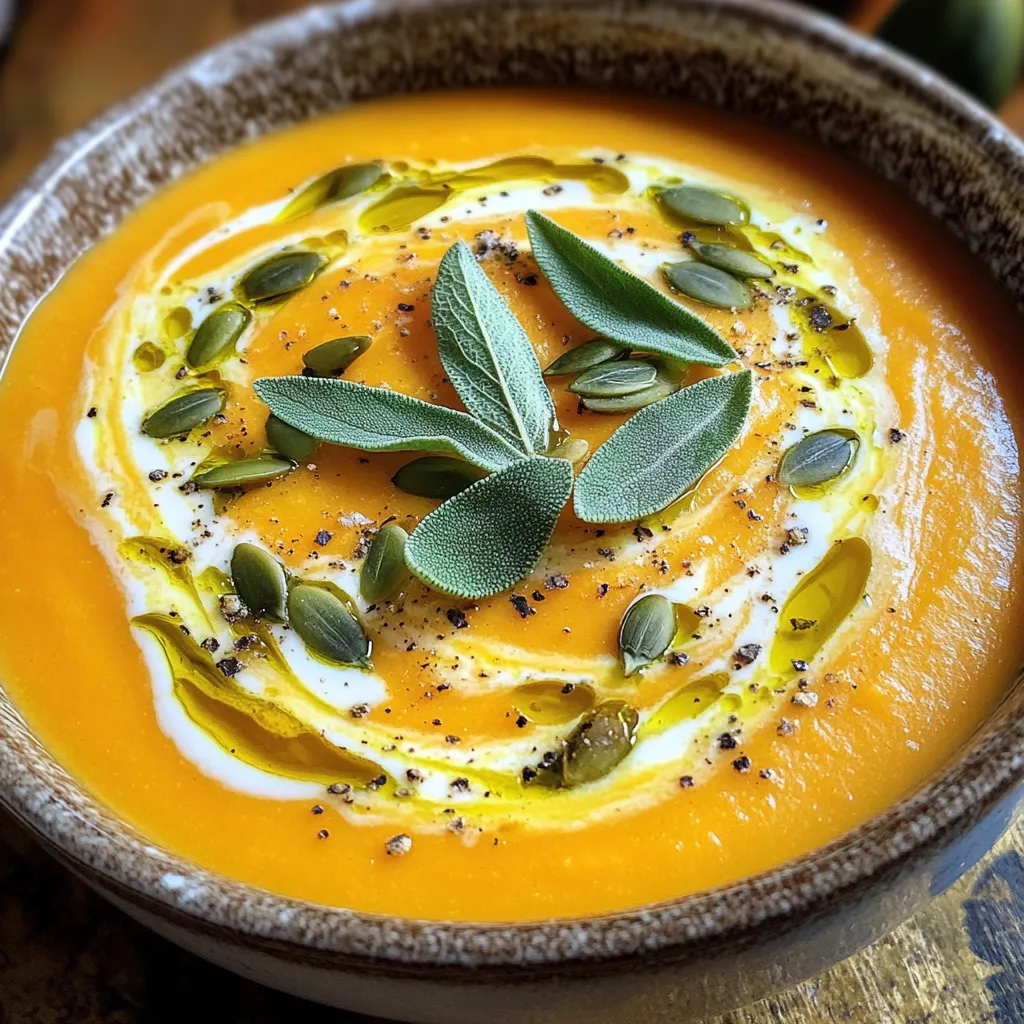
Ready to warm up your dinner routine? My Butternut Squash Bisque with Crispy Sage is the perfect dish for chilly

To make the No-Bake Apple Pie Energy Bites, you need a few simple ingredients. Here’s what you’ll need: - 1 cup rolled oats - 1/2 cup almond butter or peanut butter - 1/2 cup finely chopped dried apples - 1/4 cup honey or maple syrup - 1 teaspoon ground cinnamon - 1/4 teaspoon nutmeg - 1/4 cup chopped walnuts or pecans (optional) - A pinch of salt - 1/4 cup shredded coconut (optional for coating) These ingredients create a tasty mix that mimics the flavors of apple pie. The rolled oats give a great base, while the almond or peanut butter adds creaminess. Dried apples bring natural sweetness and chewiness. Honey or maple syrup adds even more flavor. The ground cinnamon and nutmeg add warmth and spice. If you love nuts, the walnuts or pecans add nice crunch. Lastly, the shredded coconut can add a fun texture and extra flavor. These bites are healthy and easy to make. You can enjoy them anytime as a quick snack. 1. Mixing dry ingredients: Start by grabbing a large mixing bowl. Add 1 cup rolled oats, 1/2 cup finely chopped dried apples, 1 teaspoon ground cinnamon, 1/4 teaspoon nutmeg, and a pinch of salt. Stir these together well. This mix will give your bites a great base. 2. Combining wet ingredients: In the same bowl, add 1/2 cup almond butter (or peanut butter) and 1/4 cup honey (or maple syrup). Mix until you have a sticky, cohesive mixture. If it feels dry, just add a bit more almond butter. 3. Forming energy bites: Now, take a small amount of the mixture. Use your hands to roll it into a ball about 1 inch in diameter. If you like, you can also fold in 1/4 cup chopped walnuts or pecans for extra crunch. If you want a fun twist, roll the bites in 1/4 cup shredded coconut for coating. 1. Firming up in the refrigerator: Once you’ve shaped all your bites, place them on a baking sheet lined with parchment paper. Pop them in the fridge for at least 30 minutes to firm up. This step helps them hold their shape better. 2. Transferring to an airtight container: After chilling, move the bites to an airtight container. They will stay fresh in the fridge for up to a week. Enjoy these tasty snacks anytime! Making the mixture too dry can ruin your energy bites. If it feels crumbly, add more almond butter. You want a sticky mix that holds together well. Not chilling the bites long enough can lead to a mushy texture. Refrigerate them for at least 30 minutes. This step is key to getting that perfect bite. Substituting nut butter can change the taste. Try peanut butter for a stronger flavor. Sunflower seed butter is another great option, especially for nut allergies. Adjusting sweetness is easy. If you like it sweeter, add more honey or maple syrup. Taste the mix before forming the bites to get it just right. {{image_2}} You can switch nut butters in this recipe. Almond butter works great, but peanut butter is tasty too. Each nut butter brings its own flavor and texture. If you want a nut-free option, try sunflower seed butter. For sweeteners, honey is popular, but maple syrup is a fun choice as well. You can also use agave syrup for a vegan option. Each sweetener adds a unique taste to the bites. Want to spice things up? Incorporate ground ginger for a warm kick. A little nutmeg or allspice can also enhance the flavor. You can add a handful of chocolate chips for a sweet surprise. Dried fruits like cranberries or raisins work well too. They add chewiness and extra flavor. Play around with what you have. Enjoy the process! Store your No-Bake Apple Pie Energy Bites in airtight containers. This keeps them fresh longer. You can use glass or plastic containers. Make sure they close tightly to block air. You can refrigerate or freeze these bites. Refrigeration works well for short-term storage. Freezing is best for keeping them fresh for weeks. In the fridge, these energy bites last about a week. If you want to keep them longer, freezing is a great option. They can stay good for about three months in the freezer. Just remember to thaw them in the fridge before eating. To make these energy bites vegan, simply swap honey for maple syrup. Both sweeteners work well, but maple syrup is plant-based. You can also choose almond butter or peanut butter, as both are vegan. Be sure to check the labels for any added ingredients that may not be vegan. Fresh apples won't work well in this recipe. They have more moisture than dried apples. This extra moisture can make the mixture too wet. If you want to use fresh apples, consider drying them first. You can slice and dehydrate them in an oven or a dehydrator. Yes, these energy bites can be gluten-free if you use certified gluten-free oats. Regular oats may be processed in facilities that handle gluten. Always check the label to be sure. The rest of the ingredients are naturally gluten-free, so you’re safe there! You learned how to make tasty energy bites with simple ingredients. I shared step-by-step instructions to help you create them easily. We explored tips to avoid common mistakes and how to enhance their flavor. You can also swap ingredients for different tastes. Remember to store them well for freshness. Making these bites is fun and can fit many diets, like vegan or gluten-free. Enjoy your snack, knowing it's healthy and easy to prepare. Now, get in the kitchen and start creating!

No-Bake Apple Pie Energy Bites Delicious Snack Idea

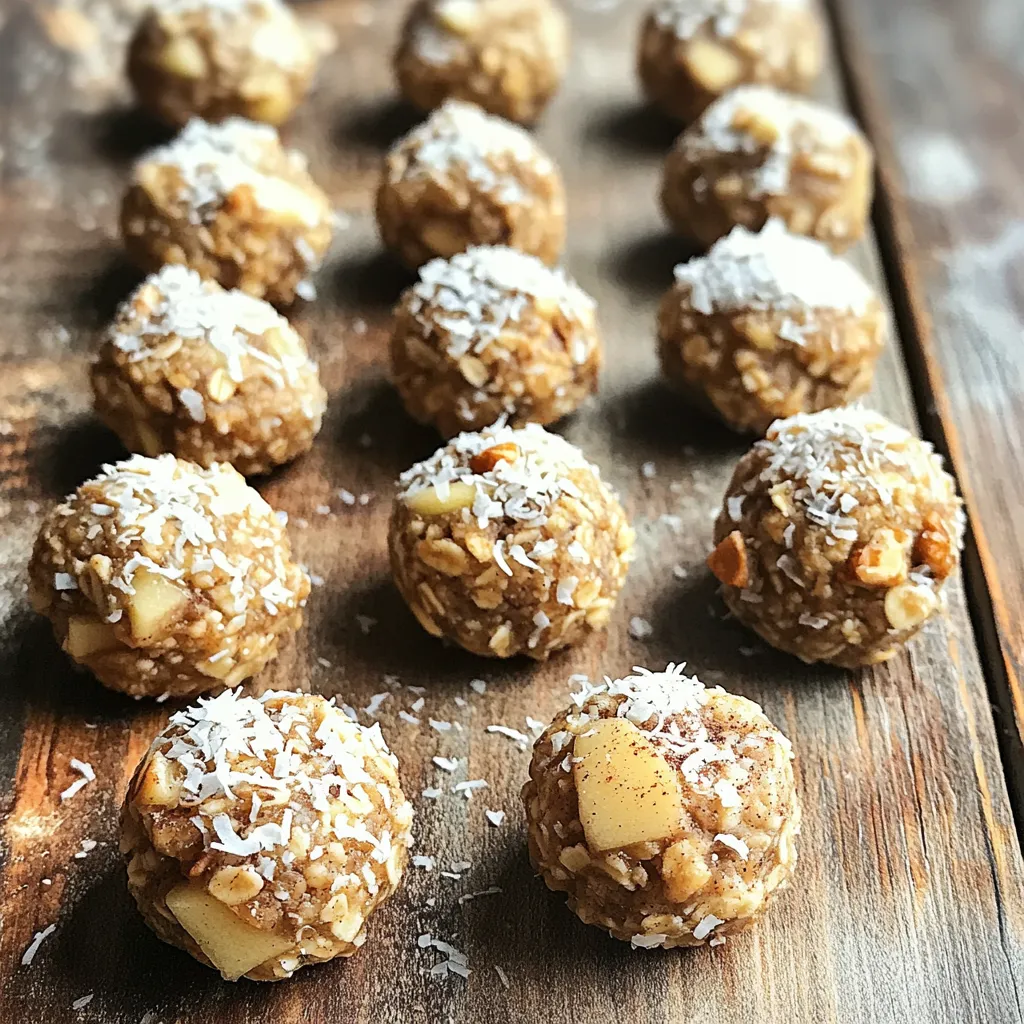
Are you craving a snack that’s both tasty and easy to make? Try these No-Bake Apple Pie Energy Bites! Packed

- 2 cups all-purpose flour - 1 cup pumpkin puree - 1 cup granulated sugar - 1/2 cup brown sugar - 4 oz cream cheese - 1/4 cup powdered sugar - 1 teaspoon lemon juice (optional) - 1 teaspoon baking soda - 1/2 teaspoon baking powder - 1 teaspoon ground cinnamon - 1/2 teaspoon ground nutmeg - 1/4 teaspoon ground ginger - 1/4 teaspoon salt The ingredients for bakery-style pumpkin cream cheese muffins come together to create magic. The all-purpose flour forms the base and gives structure. The pumpkin puree adds moisture and a lovely fall flavor. The blend of granulated and brown sugar provides sweetness and a hint of caramel. For the cream cheese filling, you need soft cream cheese, powdered sugar, and optional lemon juice. This filling makes your muffins extra special. The lemon juice adds a nice zing that balances the sweetness. The seasoning ingredients play a crucial role. Baking soda and baking powder help the muffins rise. The spices—cinnamon, nutmeg, and ginger—bring warmth and depth, making each bite cozy and delicious. Finally, a pinch of salt enhances all the flavors. With these ingredients, you're set to create muffins that taste like they came straight from a bakery! - Preheat the oven to 350°F (175°C). - Line the muffin tin with paper liners or grease it with oil. Start by getting your oven hot. This step helps the muffins rise perfectly. I like to use paper liners for easy cleanup. Greasing the tin works too. - Mix cream cheese, powdered sugar, and lemon juice. For the cream cheese filling, grab a small bowl. Add softened cream cheese, powdered sugar, and lemon juice. Mix until smooth. This filling adds a nice surprise in each bite. - Combine pumpkin, sugars, oil, milk, eggs, and vanilla. - Whisk dry ingredients together before combining. In a large bowl, combine the pumpkin, granulated sugar, brown sugar, vegetable oil, milk, eggs, and vanilla. Whisk until smooth. In another bowl, mix the flour, baking soda, baking powder, cinnamon, nutmeg, ginger, and salt together. This helps blend the dry ingredients evenly. - Portion muffin batter and cream cheese filling into molds. - Bake for 18-20 minutes, checking doneness with a toothpick. Spoon a bit of the muffin batter into each cup, filling them about one-third full. Then add a teaspoon of the cream cheese filling in the center. Top with more batter until the cups are two-thirds full. Bake for 18 to 20 minutes. Use a toothpick to check if they are done. If it comes out clean, the muffins are ready! To make the best muffins, avoid overmixing the batter. When you combine the wet and dry ingredients, stir until just blended. A few lumps are fine! Overmixing makes muffins dense. Always check for doneness with a toothpick. Insert it in the center of a muffin. If it comes out clean, your muffins are ready! Serve your muffins warm for the best flavor. A light sprinkle of powdered sugar adds a nice touch. You can also drizzle maple glaze on top for extra sweetness. For a cozy look, pair the muffins with fresh apple slices. They not only taste great together but also look pretty on a plate. To bake these muffins, gather a few key tools: - Muffin tin and liners - Mixing bowls and whisk - Toothpick for testing doneness These tools help you create tasty muffins with ease. Enjoy your baking! {{image_2}} You can make your muffins more fun with add-ins. Consider adding chocolate chips or chopped nuts. These add a nice crunch and sweetness. You can also try spices like clove or allspice. They can give your muffins a warm, cozy flavor. Switching up the cream cheese filling is easy. Use flavored cream cheeses like maple or vanilla for a new taste. If you want a healthier option, substitute Greek yogurt for cream cheese. This keeps the muffins tasty and lighter. If you need a gluten-free choice, don’t worry. Just swap all-purpose flour for a gluten-free blend. This change still gives you soft and fluffy muffins. You can enjoy this treat without gluten and still have fun! To keep your muffins fresh, store them in an airtight container at room temperature. This method helps them stay moist and tasty. If you do not eat them within 2-3 days, place them in the fridge. This will add a few more days before they start to dry out. If you want to keep the muffins longer, freeze them. Wrap each muffin individually in plastic wrap. This will help maintain their freshness. When you're ready to enjoy them, reheat in the microwave or the oven. For the oven, preheat to 350°F (175°C) and heat for about 10-15 minutes. These muffins taste best within a week. If you freeze them, they can last up to 3 months. Just remember to label your containers with dates. This way, you always know when they were made. Enjoy your bakery-style pumpkin cream cheese muffins anytime! You can use butternut squash puree as a great swap. It has a similar flavor. Applesauce also works, but it is sweeter. You can make your own pumpkin puree by roasting a pumpkin. Just scoop out the flesh and blend it until smooth. Canned sweet potato puree can be another option. Always check the texture and sweetness to match your recipe. Yes, you can easily make these muffins ahead of time. Bake them and let them cool. Store the muffins in an airtight container. They stay fresh for 2-3 days at room temperature. You can also freeze them for longer storage. Just wrap them well in plastic wrap or foil. To enjoy later, thaw them overnight in the fridge or reheat in the microwave. To check if your muffins are done, use a toothpick. Insert it in the middle of a muffin. If it comes out clean or with a few crumbs, they are ready. Sometimes, the cream cheese may leave a little residue. It is good to look for a nice golden color on top. If they look too soft, bake them a few more minutes. You now have all the ingredients and steps to make delicious muffins. Remember to mix well and avoid overmixing. Feel free to get creative with add-ins for extra flavor. Store your muffins properly to keep them fresh, and enjoy them warm or chilled. Baking these muffins can be a fun activity and a tasty treat. With these tips, you’ll bake perfect muffins every time! Enjoy your baking journey!

Bakery-Style Pumpkin Cream Cheese Muffins Delight

Get ready to indulge in the warm, cozy flavors of autumn with my Bakery-Style Pumpkin Cream Cheese Muffins. Imagine biting

Older posts
Newer posts
← Previous Page1 … Page15 Page16 Page17 … Page84 Next →

dsad

© 2026 juliesdish • Built with GeneratePress

Our Policies

  • Copyright Policy
  • Cookie Policy
  • GDPR Policy
  • Privacy Policy
  • Disclaimer
  • Terms Of Use

More Information

  • Home
  • About
  • Contact
  • Appetizers
  • Dessert
  • Dinner
  • Drinks
©2026, juliesdish About Back To Top