Skip to content
DisclaimerTerms Of UseGDPR PolicyCookie Policy

juliesdish

  • Home
  • Drinks
  • Appetizers
  • Dinner
  • Dessert
  • About
  • Contact
  • Privacy Policy
DisclaimerTerms Of UseGDPR PolicyCookie Policy

NO-ING-IMG

To make this chili, you need a few key items: - 1 lb ground beef - 2 medium sweet potatoes, peeled and diced - 1 can (15 oz) black beans, rinsed and drained - 1 can (15 oz) kidney beans, rinsed and drained - 1 can (28 oz) crushed tomatoes - 1 medium onion, chopped - 2 cloves garlic, minced - 1 red bell pepper, diced - 2 tablespoons chili powder - 1 teaspoon cumin - 1 teaspoon smoked paprika - 1/2 teaspoon salt - 1/4 teaspoon black pepper - 1 cup beef broth These ingredients create a rich, hearty chili that warms you up. Each one plays a role in adding flavor and texture. You can add some optional items to kick up the taste: - 1-2 jalapeños, finely chopped (for heat) - Fresh cilantro, for garnish - Sour cream or Greek yogurt, for serving The jalapeños add spice, while cilantro brightens the dish. A dollop of sour cream adds creaminess, making each bite even better. Accurate measurements help your chili taste great. Use a kitchen scale for the beef to ensure you have exactly 1 lb. For sweet potatoes, dice them evenly for even cooking. When using canned beans, rinse them under water to reduce sodium. If you want spiciness, adjust the jalapeño amount to your taste. Keep these tips in mind to make sure your chili turns out perfect every time! Start by heating a large skillet on medium. Add 1 pound of ground beef. Cook it until brown. This usually takes about 5 to 7 minutes. Make sure to drain any extra fat. Next, add 1 chopped onion and 2 minced garlic cloves. Cook until the onion turns clear, about 3 minutes. This builds great flavor. Now it’s time to mix everything in the slow cooker. Transfer the beef mixture you cooked into it. Then, add 2 diced sweet potatoes, 1 can of black beans, and 1 can of kidney beans. Don’t forget to include 1 can of crushed tomatoes and 1 diced red bell pepper. Pour in 1 cup of beef broth. Then, sprinkle in 2 tablespoons of chili powder, 1 teaspoon of cumin, 1 teaspoon of smoked paprika, 1/2 teaspoon of salt, and 1/4 teaspoon of black pepper. If you like heat, add 1 or 2 finely chopped jalapeños. Stir everything well to mix. Set your slow cooker to low for 6 to 8 hours. If you are short on time, you can set it to high for 4 to 5 hours. The sweet potatoes should be soft and tender. Once done, taste the chili. Adjust the seasoning if needed. Enjoy your hearty chili! To make your chili burst with flavor, focus on the spices. Use fresh chili powder, cumin, and smoked paprika. These ingredients add deep, rich notes. I find that browning the beef first brings out its savory taste. Don't skip the garlic and onion; they create a great base. If you want more heat, add jalapeños. Adjust the spice level to your taste. A touch of salt at the end enhances the flavors too. The balance of your chili's texture is key. If it’s too thick, add more beef broth or water. Stir slowly while adding liquid to avoid clumps. If it’s too thin, let it cook longer with the lid off. This helps it thicken naturally. Sweet potatoes also help absorb some liquid, giving a nice texture. Aim for a hearty consistency that’s still spoonable. Garnishing adds flair to your chili. Fresh cilantro brings a bright touch. A dollop of sour cream or Greek yogurt adds creaminess. You can also sprinkle some cheese on top. Serve the chili hot in bowls. Pair it with crusty bread or tortilla chips for dipping. The right garnish makes your dish look inviting and appetizing. Enjoy the colorful presentation! {{image_2}} You can easily make this chili vegetarian or vegan. Swap the ground beef for a can of lentils or chickpeas. These add protein and texture. Use vegetable broth instead of beef broth. Replace sour cream with a vegan alternative like cashew cream. The sweet potatoes still give it a hearty feel, making it delicious and satisfying. You can adjust the heat level to your liking. If you want a mild chili, leave out the jalapeños. For a spicy kick, add more jalapeños or try diced serrano peppers. Use hot chili powder instead of regular. Just remember to taste as you go, so it’s just right for you! Feel free to swap ingredients based on what you have. Black beans and kidney beans can be replaced with pinto or navy beans. If you don't have sweet potatoes, use regular potatoes or butternut squash. You can also use fresh tomatoes instead of canned. Just chop about four medium tomatoes, and they will work great! You can keep leftover chili in the fridge. Use an airtight container to store it. It stays fresh for about 3 to 4 days. Make sure it cools down first. This helps keep flavors intact. You can freeze this chili for longer storage. Use freezer-safe containers. It stays good for up to 3 months in the freezer. To reheat, let it thaw in the fridge overnight. Heat it on the stove or in the microwave. Stir well to ensure even heating. When saving leftovers, portion them out. This makes it easy to grab a meal later. Add some fresh toppings when serving again. A little cilantro or sour cream can brighten the dish. Always check for any off smells or changes in texture before eating. Yes, you can use frozen vegetables in this chili. Frozen corn or diced peppers work well. Just add them in with the other ingredients. They will cook perfectly in the slow cooker. However, fresh veggies give a better taste and texture. To boost the heat, add more jalapeños. You can also mix in some chili flakes or hot sauce. Start with small amounts, then taste as you go. This way, you can find the right heat level for you. Chili pairs great with several sides. Here are some favorites: - Crusty bread for dipping - Tortilla chips for crunch - Rice for a filling option - A fresh salad for balance Each side adds a nice touch to your meal. Enjoy exploring different pairings! In this post, we explored the key ingredients for beef and sweet potato chili. I shared step-by-step instructions, tips to enhance flavor, and variations for all tastes. Remember, freshness matters, and storage affects taste. Chili can be adjusted to fit your needs. Try different spices or swap ingredients. Crafting chili is fun and satisfying. Enjoy every bowl you make, and share it with friends!

Slow Cooker Beef and Sweet Potato Chili Recipe Guide

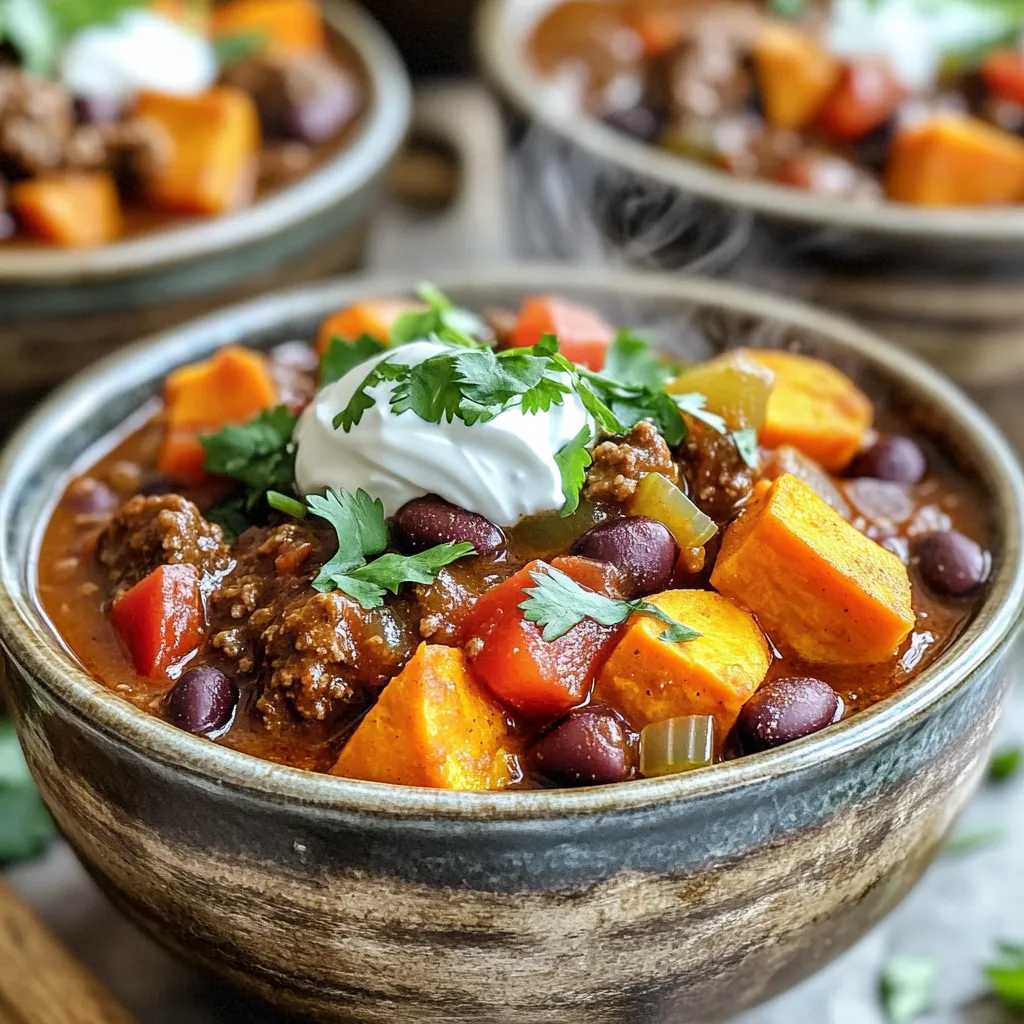
Welcome to my Slow Cooker Beef and Sweet Potato Chili Recipe Guide! This hearty dish warms you up with rich

- 1 package (15.25 oz) Pumpkin Spice Oreo cookies - 8 oz cream cheese, softened - 1 cup white chocolate chips - 1 tablespoon coconut oil - 2 tablespoons crushed graham crackers for garnish - 1/2 teaspoon pumpkin pie spice These ingredients make the No-Bake Pumpkin Oreo Truffles simple yet delicious. The Pumpkin Spice Oreo cookies bring a rich flavor that fits well with the cream cheese. The white chocolate chips add sweetness and a nice coating. You can also use coconut oil to help the chocolate melt smoothly. The graham crackers give a fun texture on top of the truffles. If you love pumpkin spice, a bit of pumpkin pie spice adds more warmth to the flavor. All these choices make this treat a must-try! To start, take your Pumpkin Spice Oreo cookies. You will need to crush them into fine crumbs. You can use a food processor for this. If you don’t have one, place the cookies in a ziplock bag. Then, roll them with a rolling pin until they are crushed. Once you have your crumbs, add in the softened cream cheese. This makes the mixture creamy and smooth. Next, stir in one teaspoon of vanilla extract and half a teaspoon of pumpkin pie spice. Mix everything until it forms a dough. You can use a spatula or your hands for this step. Make sure it’s well combined for the best flavor. Now it’s time to shape the mixture into truffles. Use a small cookie scoop, about one tablespoon, to scoop the dough. Roll it into small balls with your hands. Place them on a parchment-lined baking sheet. Once you have shaped all the mixture, put the tray in the fridge. Chill the truffles for about 30 minutes. This helps them firm up and hold their shape. While your truffles chill, it’s time to prepare the coating. In a microwave-safe bowl, add one cup of white chocolate chips and one tablespoon of coconut oil. Heat this mixture in the microwave. Do it in 30-second intervals, stirring in between until it’s smooth. Take each chilled truffle and dip it into the melted white chocolate. Use a fork for this step. Let the excess chocolate drip off before placing the truffle back on the baking sheet. While the chocolate is still wet, sprinkle crushed graham crackers on top for a nice finish. After you coat all the truffles, return them to the fridge for about 15-20 minutes. This will help the chocolate set. Now, you have delicious No-Bake Pumpkin Oreo Truffles ready to enjoy! To make great truffles, start with softened cream cheese. This step is key. Softened cream cheese blends well with the cookie crumbs. If it's cold, it won't mix nicely. The mix may end up lumpy. Ensure you mix all the ingredients evenly. Use a spatula or your hands. Take your time to combine the cream cheese, vanilla, and pumpkin pie spice with the cookie crumbs. A good mix gives a smooth texture. It helps your truffles hold together nicely. Melting white chocolate can be tricky. To do this well, use a microwave-safe bowl. Heat it in 30-second bursts. Stir in between each burst. This way, you avoid burning the chocolate. If you notice any lumps, keep stirring. The heat will help smooth it out. If you want to try something different, consider using dark chocolate or milk chocolate. These can add a unique flavor twist. You could also coat the truffles in crushed nuts or sprinkles. This adds a fun crunch to each bite. {{image_2}} You can change the flavor of your truffles easily. Try using different Oreo flavors. For example, you might use regular Oreos for a classic taste. Golden Oreos add a fun twist with their vanilla flavor. Mint Oreos can bring a refreshing touch, too. You can also add nuts or sprinkles. Chopped nuts add a nice crunch. Try using finely crushed walnuts or pecans. Sprinkles can make your truffles more colorful. Use fall-themed sprinkles for a festive look. The options are endless, so get creative! If you need gluten-free options, it's simple. Look for gluten-free Oreo cookies. There are many brands that offer gluten-free choices. You can swap the cream cheese with a gluten-free cream cheese alternative. For vegan alternatives, use vegan cream cheese. You can also choose dairy-free chocolate chips. This way, you can enjoy the truffles without animal products. With these swaps, everyone can enjoy these tasty treats! To keep your No-Bake Pumpkin Oreo Truffles fresh, use an airtight container. This helps prevent them from drying out. A glass or plastic container works well. Line the bottom with parchment paper. This makes it easy to remove the truffles later. Store the container in the fridge. The cool air keeps the truffles firm and tasty. They stay good for about a week. If you want to enjoy them longer, freezing is a great option. To freeze your truffles, first, place them in a single layer on a baking sheet. This helps them freeze without sticking together. After a few hours, they will be firm. Transfer the frozen truffles to an airtight container or a ziplock bag. When you want to eat one, take it out and let it sit at room temperature. This usually takes about 15-20 minutes. Avoid using the microwave to thaw them. This can change their nice texture. Enjoy your frozen treats anytime! No-Bake Pumpkin Oreo Truffles will last for about one week in the fridge. Store them in an airtight container. This keeps them fresh and tasty. If you want to enjoy them later, you can freeze them. They can last up to three months in the freezer. Just remember to let them thaw in the fridge before serving. Yes, you can use regular Oreos. However, the flavor will change. Pumpkin Spice Oreos give a warm spice taste that fits fall. Regular Oreos will taste more chocolatey and less pumpkin. You might also want to add a bit more pumpkin pie spice for flavor if you switch. You can mix in many fun ingredients! Here are some ideas: - Chopped nuts like pecans or walnuts for crunch - Mini chocolate chips for extra sweetness - Crushed candy corn for a festive touch - Sprinkles for a colorful finish Feel free to get creative! Each addition can give your truffles a unique twist. In this blog post, we explored how to make No-Bake Pumpkin Oreo Truffles. We covered key ingredients like Pumpkin Spice Oreos, cream cheese, and white chocolate. I shared step-by-step instructions for preparing, shaping, and coating the truffles. We discussed tips for perfect texture and variations to try. Remember, storing and freezing your truffles properly keeps them fresh. Enjoy making these treats, and don't hesitate to experiment with your favorite flavors. The fun is in creating and sharing your unique twist!

No-Bake Pumpkin Oreo Truffles Easy and Tasty Treat

Fall is here, and it’s time to treat yourself to a yummy snack! No-Bake Pumpkin Oreo Truffles are easy to

- 4 salmon fillets (6 oz each) - 2 cups broccoli florets - 1 cup snap peas For this flavorful sheet-pan dish, I start with salmon fillets. They are rich and tasty. I choose fresh broccoli florets and snap peas. These add crunch and color to the plate. - 1/4 cup teriyaki sauce - 2 tablespoons sesame oil - 1 teaspoon fresh ginger, minced - 2 cloves garlic, minced Next, I make a delicious marinade. I mix teriyaki sauce and sesame oil in a bowl. Then, I add minced ginger and garlic. This mix gives the salmon and veggies a sweet and savory taste. - 1 tablespoon sesame seeds (for garnish) - 3 green onions, sliced (for garnish) - 1 tablespoon honey or maple syrup Finally, I sprinkle sesame seeds and sliced green onions on top. They make the dish look nice and add extra flavor. I also use honey or maple syrup for a touch of sweetness. This recipe is both simple and packed with flavor! 1. Preheat the oven and prepare the sheet pan: Start by setting your oven to 400°F (200°C). This helps the salmon cook evenly. Line a large sheet pan with parchment paper. This makes cleanup easy and keeps things tidy. 2. Whisk together marinade ingredients: In a small bowl, mix the teriyaki sauce, sesame oil, minced ginger, minced garlic, and honey or maple syrup. This marinade adds a rich flavor to the dish. 1. Position salmon on the sheet pan: Place the salmon fillets skin-side down on one side of your pan. Season them with salt and pepper. Brush half of the marinade over the salmon. This ensures they soak up all the tasty flavors. 2. Add broccoli and snap peas: On the other side of the sheet pan, arrange the broccoli florets and snap peas. Drizzle the remaining marinade over the veggies. Toss them gently to coat well. This step gives the vegetables a nice glaze. 1. Set the timer and check for doneness: Bake the pan in the preheated oven for about 12-15 minutes. Check the salmon to make sure it flakes easily with a fork. The vegetables should be tender and roasted. 2. Add garnishes before serving: After baking, sprinkle sesame seeds and sliced green onions on top. This adds a nice crunch and fresh flavor. Serve warm, drizzling any leftover teriyaki sauce over the salmon and vegetables as you like. To ensure your salmon cooks perfectly, monitor the time closely. Bake it for 12 to 15 minutes. The fish should flake easily with a fork when done. If you like a crisp top, broil it for the last minute. For the best roasted vegetables, cut broccoli and snap peas evenly. This helps them cook at the same rate. Toss them in the marinade well for flavor. Make sure to spread them out on the pan. Crowding can cause steaming, not roasting. You can enhance the teriyaki flavor by adding a splash of lime juice. It brightens the dish and adds a fresh taste. You might also try mixing in some chili flakes for a hint of heat. If you want different flavors, use a miso glaze instead. A honey soy marinade also works well if you prefer a sweeter taste. Don’t shy away from experimenting; cooking is all about creativity! For ideal side dishes, serve this meal with fluffy rice or quinoa. They soak up the teriyaki sauce well. You can also add a simple salad for crunch. For special occasions, plate the salmon and veggies nicely. Drizzle extra teriyaki sauce over the top. Garnish with sesame seeds and green onions for a pop of color. This makes the dish feel festive and inviting! {{image_2}} You can easily swap the salmon for other proteins. - Chicken Breast: Use skinless chicken breasts for a lean option. - Tofu: Firm tofu is a great choice for a vegetarian meal. For a vegan option, try marinated tempeh. It absorbs flavors well and adds protein. Feel free to get creative with your veggies! - Bell Peppers: Add sliced bell peppers for a sweet crunch. - Carrots: Thinly sliced carrots add color and sweetness. You can also use seasonal vegetables. In summer, try zucchini or asparagus. In fall, opt for Brussels sprouts or butternut squash. Want more heat? - Add red pepper flakes to the marinade. - For a spicy kick, drizzle sriracha over the finished dish. If your family prefers milder flavors, skip the spices. You can also serve the teriyaki sauce on the side for dipping. To keep your dish fresh, store leftovers in the fridge. Use airtight containers for best results. This will keep the salmon and veggies safe and tasty. Place the salmon and broccoli in separate sections. This way, they stay fresh longer. Eat leftovers within three days for the best flavor. When it’s time to eat again, reheating is key. The best way to reheat salmon is in the oven. Set your oven to 350°F (175°C). Place the salmon and veggies on a baking sheet. Heat for about 10 minutes. This warms the food without drying it out. You can also use a microwave. If you do, heat in short bursts. Check every 30 seconds to keep it moist. A damp paper towel over the dish helps too. You can freeze this dish if you want to save it for later. First, let it cool completely. Then, place the salmon and veggies in freezer-safe bags. Squeeze out all the air before sealing. This prevents freezer burn. For the best taste, use within three months. When you’re ready to eat, thaw it in the fridge overnight. This keeps it juicy and flavorful. Cooking time depends on the thickness of the salmon. For fillets that are about 1 inch thick, it usually takes 12 to 15 minutes at 400°F (200°C). Thicker pieces might need an extra 2 to 3 minutes. Always check that the salmon flakes easily with a fork to know it’s done. Yes, you can use frozen salmon. Just make sure to thaw it first. To do this, place the salmon in the fridge overnight. If you're short on time, you can run it under cold water for about 30 minutes. Frozen salmon may take a minute or two longer to cook, so keep an eye on it. Serving ideas include white rice or quinoa for a filling base. You can also add a fresh salad or some steamed rice noodles. For a crisp touch, try pairing it with cucumber salad or pickled vegetables. These sides enhance the flavors and make your meal even more delightful. This blog post covered how to make a tasty teriyaki salmon sheet pan meal. We discussed ingredients like fresh salmon, broccoli, and snap peas. I shared step-by-step instructions for preparing, arranging, and baking. You learned cooking tips, variations for proteins and veggies, and how to store leftovers. Now, you can impress friends and family with this easy, flavorful dish. Enjoy exploring your options and making this meal your own!

Flavorful Sheet-Pan Teriyaki Salmon and Broccoli Dish

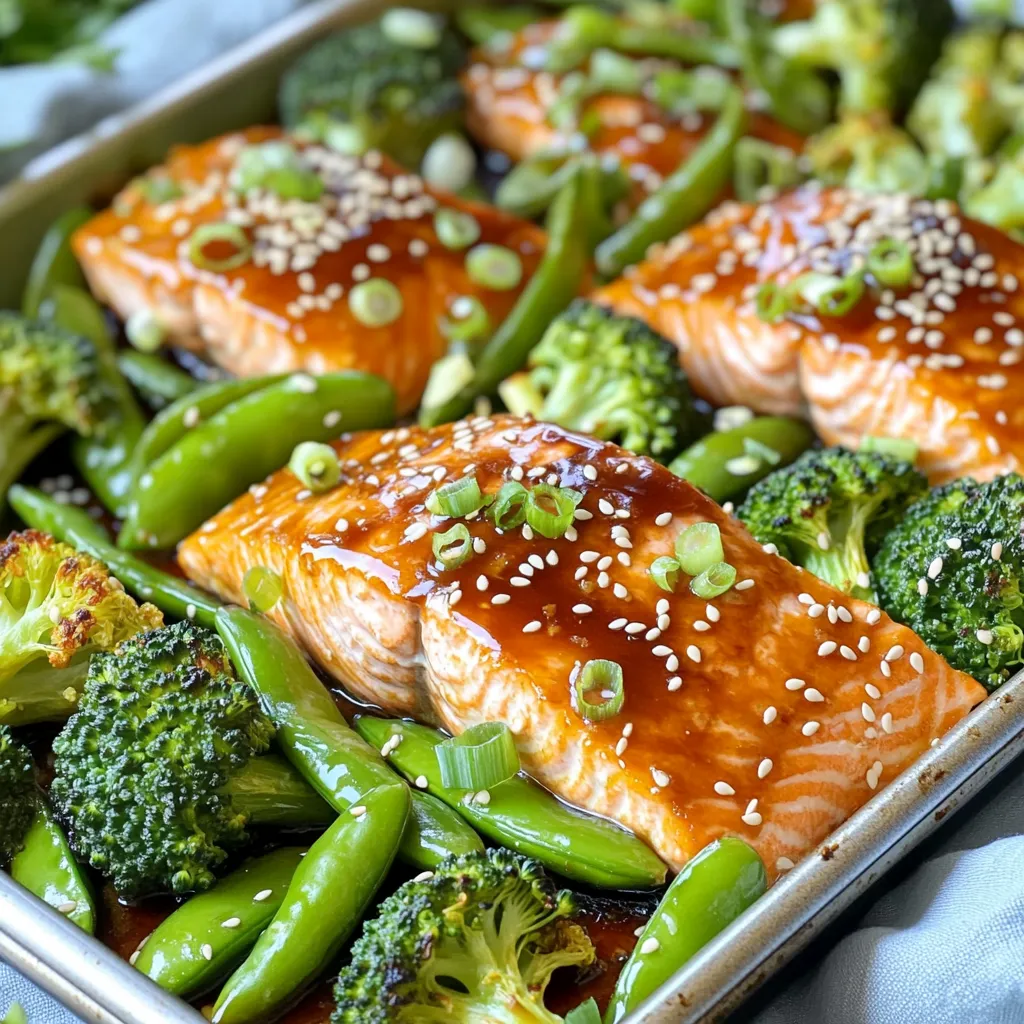
If you’re craving a quick and tasty dinner, you’ll love this Flavorful Sheet-Pan Teriyaki Salmon and Broccoli Dish! With just

To make fudgy mint chocolate brownies, you need the following ingredients: - 1 cup unsalted butter (2 sticks) - 2 cups granulated sugar - 4 large eggs - 1 teaspoon pure vanilla extract - 1 cup all-purpose flour - 1 cup unsweetened cocoa powder - 1/2 teaspoon baking powder - 1/4 teaspoon salt - 1/2 cup semi-sweet chocolate chips - 1/2 cup mint chocolate chips (or crushed mint candies) You can swap ingredients if needed. Here are some ideas: - Use coconut oil for a dairy-free option. - Substitute brown sugar for a richer flavor. - Use egg substitutes like applesauce or flaxseed for a vegan version. - Replace all-purpose flour with almond flour for a gluten-free version. - If you don’t have mint chocolate chips, crushed peppermint candies work well. Using quality ingredients makes a big difference. Fresh butter adds a rich taste. Good cocoa powder brings out the chocolate flavor. Your brownies will taste better with high-quality chocolate chips. Fresh eggs improve texture and moisture. Always choose the best ingredients you can find. This will lead to delicious, fudgy brownies that everyone will love. {{ingredient_image_1}} First, preheat your oven to 350°F (175°C). This helps the brownies bake evenly. Next, grab a 9x13-inch baking pan. You can grease it with butter or line it with parchment paper. Lining helps with easy removal later. Make sure you get the edges too, so nothing sticks. Now, let’s melt the butter. Take a medium saucepan and place it over low heat. Add 1 cup of unsalted butter to the pan. Stir it often until it melts and bubbles a bit. It should take just a few minutes. Once melted, remove the pan from the heat. Let it cool for a couple of minutes before mixing in the sugar. Add 2 cups of granulated sugar to the melted butter. Stir until it blends well. Now, it’s time to add the eggs. Crack 4 large eggs into the mixture. Whisk them in one at a time. Make sure each egg mixes in fully before adding the next. After that, add 1 teaspoon of pure vanilla extract for flavor. In another bowl, mix 1 cup of all-purpose flour, 1 cup of unsweetened cocoa powder, 1/2 teaspoon of baking powder, and 1/4 teaspoon of salt. Combine these dry ingredients. Gradually add them to the wet mixture. Stir until just combined. Be careful not to overmix! Finally, fold in 1/2 cup of semi-sweet chocolate chips and 1/2 cup of mint chocolate chips. Mix gently until they are evenly spread in the batter. Pour the batter into your prepared baking pan. Use a spatula to smooth the top. Now, place the pan in the preheated oven. Bake for 25 to 30 minutes. To check if they are done, insert a toothpick in the center. It should come out with a few moist crumbs, not wet batter. Once baked, remove the pan from the oven. Place it on a wire rack to cool completely. This step is key; it helps the brownies firm up. After cooling, cut them into squares. Serve them on a decorative plate, maybe dusted with powdered sugar and garnished with fresh mint leaves. Enjoy your fudgy mint chocolate brownies! To get that rich, fudgy texture, use the right method. Start with melted butter. It helps create a moist base. Mix the wet and dry ingredients until just combined. Overmixing can make them cake-like. Aim for a dense, gooey texture. The right baking time is key too. Bake for 25 to 30 minutes. You want a toothpick to come out with a few moist crumbs. This shows the brownies are perfectly fudgy. If you have leftovers, store them well. Let the brownies cool completely first. Cut them into squares for easy storage. Place them in an airtight container. This keeps them fresh for days. You can also wrap them in plastic wrap for extra protection. If you want to keep them longer, freeze them. They last up to three months in the freezer. Just thaw them before enjoying again. Serve these brownies warm for a special treat. Top them with vanilla ice cream for a tasty contrast. You can dust them with powdered sugar for a nice touch. Fresh mint leaves add a lovely look and flavor. You can also drizzle some chocolate sauce on top. This adds a rich touch. Enjoy these fudgy mint chocolate brownies anytime. They make any occasion sweeter! Pro Tips Use Room Temperature Eggs: Allow your eggs to come to room temperature before mixing them in. This helps create a smoother batter and results in fudgier brownies. Don’t Overmix the Batter: Mix the wet and dry ingredients just until combined. Overmixing can lead to cakey brownies instead of the desired fudgy texture. Check for Doneness: Use a toothpick to check for doneness; aim for a few moist crumbs sticking to it rather than completely clean, to ensure a fudgy center. Cool Completely Before Cutting: Let the brownies cool completely in the pan before slicing. This helps them set up properly and makes cutting easier. {{image_2}} You can switch up the chocolate in your brownies. Instead of semi-sweet chocolate chips, try dark chocolate chips for a rich taste. If you like milk chocolate, use milk chocolate chips. You can even blend different types for a unique twist. This gives your brownies a whole new flavor. Want to add more flavor? A splash of peppermint extract can make them even mintier. For a different taste, try a bit of orange zest or espresso powder. Both can give your brownies a fun twist. Just be careful not to add too much, or it may overpower the mint. Toppings are a great way to make your brownies shine. You can sprinkle crushed nuts on top for a crunch. Try adding a drizzle of chocolate or white chocolate over the cooled brownies. For a festive touch, add crushed candy canes or a scoop of ice cream on the side. These toppings make your brownies special and fun to eat! To keep your fudgy mint chocolate brownies fresh, store them in an airtight container. Use parchment paper between layers to prevent sticking. This helps maintain their texture and flavor. You can keep them at room temperature for up to three days. If you want them to last longer, consider refrigerating them. You can freeze brownies for later enjoyment. First, let them cool completely. Then, cut them into squares. Wrap each square tightly in plastic wrap. Place the wrapped brownies in a freezer-safe bag or container. They can last up to three months in the freezer. When ready to eat, just thaw them at room temperature. These brownies stay fresh for about three days at room temperature. If refrigerated, they can last about a week. In the freezer, they can last for three months. Make sure to check for any off smells or changes in texture before eating. Enjoy your fudgy treat at its best! You can check if your brownies are done by using a toothpick. Insert it in the center. If it comes out with a few moist crumbs, they are ready. If it comes out with wet batter, they need more time. Bake for 25-30 minutes for best results. Yes, you can use margarine in place of butter. Just make sure it is unsalted. Margarine can give a similar taste, but butter adds a richer flavor. If you want the best taste, stick with butter. If you don't have mint chocolate chips, you can use crushed mint candies instead. You could also try regular chocolate chips with a few drops of mint extract. This way, you still get a nice mint flavor. Absolutely! You can make these brownies a day or two ahead. Just let them cool completely before storing them. This can enhance the flavors as they sit. Store your fudgy brownies in an airtight container. Keep them at room temperature for up to three days. If you want to keep them longer, store them in the fridge or freeze them for later. To make great brownies, quality ingredients are key. You can try different flavors and toppings to make them unique. I shared step-by-step tips to ensure your brownies come out fudgy and delicious. Don’t forget about storage to keep them fresh. Remember, these tips will help you bake better brownies every time. Enjoy your baking journey!

Fudgy Mint Chocolate Brownies Easy and Delicious Recipe

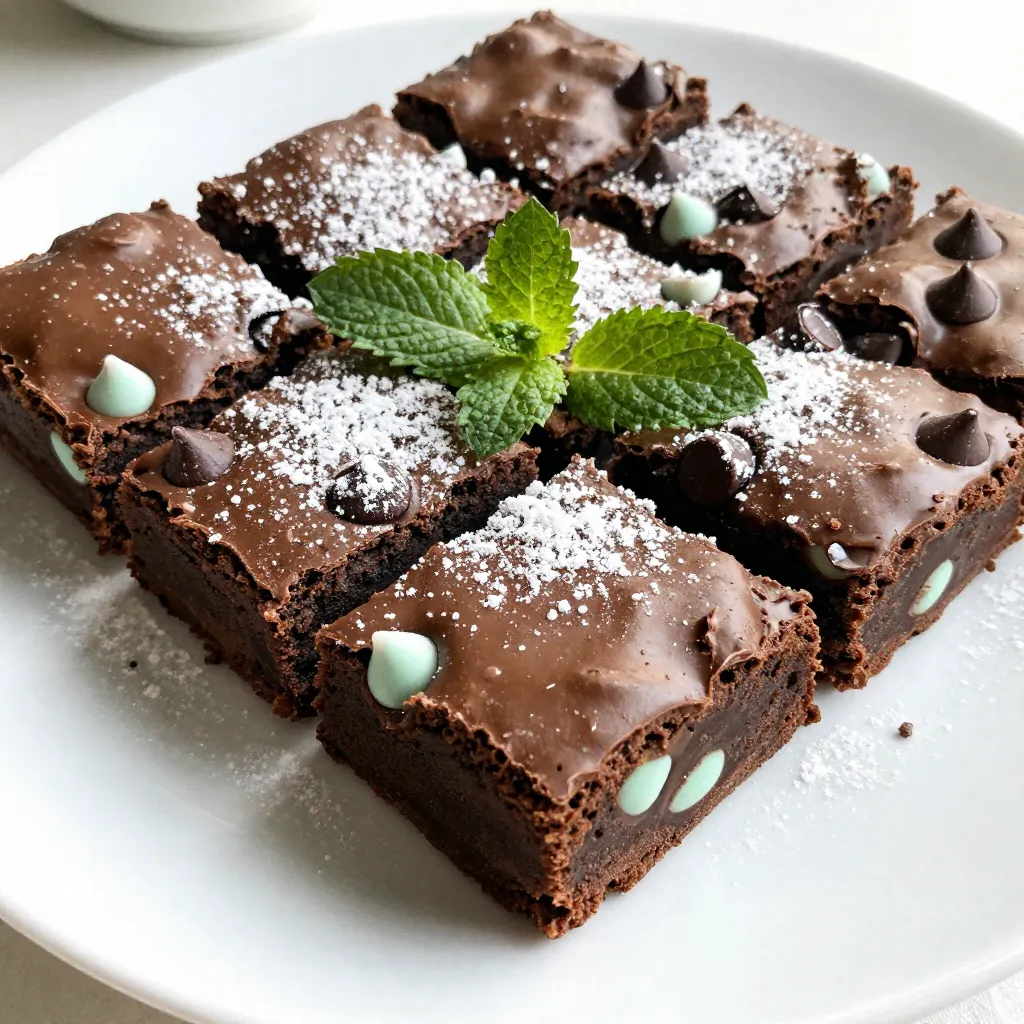
Get ready to indulge in the perfect treat with my Easy and Delicious Fudgy Mint Chocolate Brownies recipe! With just

- 2 cups all-purpose flour - 1/2 cup unsalted butter, cold and cubed - 1/4 cup granulated sugar - 3 medium apples (Granny Smith or Honeycrisp) - 1/2 cup caramel sauce - 1 tablespoon lemon juice - 1 teaspoon ground cinnamon - 1/4 teaspoon nutmeg - 1/4 cup brown sugar - 1/2 cup rolled oats - 1/4 cup all-purpose flour - 1/4 cup unsalted butter, melted When I plan to make caramel apple mini pies, I gather these ingredients first. The all-purpose flour gives a great base for my pie crust. I use cold, cubed unsalted butter to keep the crust flaky. The granulated sugar mixes in to add sweetness. For the filling, I prefer Granny Smith or Honeycrisp apples. These apples balance tartness and sweetness well. For the filling, I use caramel sauce to give a rich flavor. A splash of lemon juice brightens the apples. I add ground cinnamon and nutmeg for warmth and spice. The streusel topping adds a crunchy layer. Brown sugar gives it a deep sweetness, while rolled oats add texture. I use a bit more flour in the streusel to help it bind. Finally, I melt some unsalted butter and mix it all together for that perfect crumbly topping. Each ingredient plays an important role in making these mini pies delicious. They help create a balance of flavors and textures. To start, mix the dry ingredients. In a bowl, combine 2 cups of all-purpose flour, 1/4 cup of granulated sugar, and 1/4 teaspoon of salt. This mix brings balance to your crust. Next, incorporate the butter. Add 1/2 cup of cold, cubed unsalted butter. Use your fingers or a pastry cutter to blend until it looks like coarse crumbs. This step is key for a flaky texture. Now, add cold water. Gradually pour in 5-6 tablespoons of cold water, one tablespoon at a time. Mix until the dough holds together. Wrap it in plastic and chill in the fridge for at least 30 minutes. Chilling helps the dough relax for easy rolling later. For the filling, prepare the apples first. Peel and dice 3 medium apples, like Granny Smith or Honeycrisp. These apples add a nice tartness. Next, add caramel and spices. In a bowl, mix the diced apples with 1 tablespoon of lemon juice, 1/2 cup of caramel sauce, 1 teaspoon of ground cinnamon, and 1/4 teaspoon of nutmeg. Stir well to coat the apples. This creates a sweet and spicy filling. Now, let’s make the streusel topping. In a bowl, combine 1/2 cup of rolled oats, 1/4 cup of flour, and 1/4 cup of brown sugar. This mix will add a crunchy texture. Combine with melted butter. Pour in 1/4 cup of melted unsalted butter and stir until crumbly. This will give your topping a rich flavor. Roll out the dough next. Once chilled, roll the dough out on a floured surface to 1/8-inch thick. Use a round cutter to cut circles about 4 inches in diameter. Place the dough rounds in a greased muffin tin. Fill each cup with the caramel apple mixture. Top each pie with the streusel topping. Make sure to cover the apples well. Preheat the oven now. Set it to 375°F (190°C) so it's hot when the pies go in. Bake the mini pies. Place the muffin tin in the oven and bake for about 20-25 minutes. You want the crust to be golden brown and the apples bubbling. The aroma will fill your kitchen! Let the pies cool. Once baked, allow them to cool in the muffin tin for about 10 minutes. This makes them easier to remove. Drizzle with caramel sauce before serving. If you like, add extra caramel sauce on top for a sweet finish. Enjoy your delicious caramel apple mini pies! For baking, I love using Granny Smith or Honeycrisp apples. These types have the right mix of tartness and sweetness. Granny Smith apples bring a nice zing, while Honeycrisp adds a soft, sweet bite. To balance flavors, I suggest mixing both types. This mix gives your pies depth and makes each bite exciting. You can also try Fuji apples for a sweeter taste. To make a flaky pie crust, keep your butter cold. I cube it straight from the fridge. When mixing, stop when you see small lumps of butter. This creates those nice, flaky layers. Preventing sogginess is key. I recommend chilling your crust before filling it. A quick chill helps keep the crust firm when the filling goes in. You can also brush the inside with a little melted butter before adding the apples. For the perfect streusel, focus on crumb texture. You want it to be crumbly but still hold together. Mix the oats, flour, and sugar well. Then add melted butter gradually until it looks like wet sand. You can add flavors to your streusel too! Try mixing in chopped nuts, like pecans or walnuts. You can also add some cocoa powder for a chocolate twist. This makes your pies even more special. {{image_2}} To mix things up, try adding nuts or chocolate to your streusel. Chopped walnuts or pecans add a nice crunch. If you love chocolate, consider mixing in mini chocolate chips. Both options elevate the flavor and texture. You can also experiment with different fruits. While apples shine, pears or berries can be delicious too. Each fruit brings its own unique taste. You can even mix them for a fun twist. If you need a gluten-free option, substitute all-purpose flour with a gluten-free blend. Many great blends work well in pie crusts. Make sure to check if your blend has a binding agent like xanthan gum. Adjust your baking times slightly. Gluten-free crusts can bake faster. Keep an eye on the mini pies to avoid over-baking. For a vegan version, replace butter with plant-based alternatives. Coconut oil or vegan butter works well. You can also use coconut cream or a nut-based cream as a caramel substitute. Other dairy-free options include almond or soy milk. These swaps keep your mini pies tasty and suitable for a plant-based diet. Don’t hesitate to get creative! To keep your caramel apple mini pies fresh, store them in the fridge. Place them in an airtight container. This helps keep the crust crisp and the filling tasty. Your mini pies will last up to five days in the fridge. They make a great snack or dessert anytime! If you want to save some for later, freezing works well. First, let the mini pies cool completely. Then, wrap each pie in plastic wrap and place them in a freezer-safe bag. Make sure to remove as much air as you can before sealing. They can stay good in the freezer for about three months. When you're ready to eat, take one out and let it thaw in the fridge overnight. To reheat, place it in a warm oven for about 10 minutes. This way, the crust stays crisp! These mini pies are perfect with a scoop of vanilla ice cream or a dollop of whipped cream. The cold creaminess goes well with the warm pie. For a fun touch, drizzle some extra caramel sauce on top before serving. You can also sprinkle a little cinnamon for extra flavor. Serve them on a pretty plate to impress your guests! Yes, you can make the dough ahead of time. It saves you time later. Here are some tips for preparing dough in advance: - Chill the Dough: After mixing, wrap the dough in plastic wrap. Chill it for at least 30 minutes. - Store It Right: If you want to keep it longer, freeze it. Just wrap it tightly in plastic wrap and then in foil. - Thaw Before Use: When ready to bake, thaw the dough in the fridge overnight. To avoid a watery filling, use these techniques: - Choose Firm Apples: Select apples like Granny Smith or Honeycrisp. They hold their shape well. - Add Thickeners: Mix in a tablespoon of cornstarch or flour with your filling. This helps absorb excess moisture. - Cook the Filling: You can cook the apple mixture for a few minutes. This will reduce some moisture before filling the pies. If you don’t have caramel sauce, you have options: - Homemade Caramel: You can make your own with sugar and cream. It’s simple and tasty. - Sweetened Condensed Milk: Heat it lightly for a caramel-like flavor. - Maple Syrup: This gives a different flavor but still adds sweetness. In this post, we covered how to make delicious mini apple pies. You learned about key ingredients like flour, butter, and apples. We detailed the steps for mixing, filling, and baking the pies. You also got tips on choosing apples and perfecting the crust. Remember the variations to customize your pies and the storage tips for keeping them fresh. Making these mini pies can be fun and rewarding. Enjoy sharing them with friends and family!

Caramel Apple Mini Pies with Streusel Delight

Get ready to impress your family and friends with delightful Caramel Apple Mini Pies with Streusel! These tasty treats blend

- 1 cup unsalted butter, melted - 1 cup granulated sugar - 1 cup brown sugar, packed - 4 large eggs - 1 teaspoon vanilla extract - 1 cup all-purpose flour - 1/2 cup unsweetened cocoa powder - 1/2 teaspoon baking powder - 1/4 teaspoon salt - 8 oz cream cheese, softened - 1/2 cup granulated sugar - 1/2 cup pumpkin puree - 1 large egg - 1 teaspoon vanilla extract - 1 teaspoon pumpkin spice (cinnamon, nutmeg, ginger mix) - 1/4 teaspoon salt I love using these ingredients for my pumpkin spice cheesecake brownies. The brownie layer needs rich butter and sugar. The mix of granulated and brown sugar gives a nice depth of flavor. The creaminess of four eggs binds everything well. In the brownie layer, I use all-purpose flour and cocoa powder. These two create a soft and chocolatey base. Baking powder helps the brownies rise just right. A pinch of salt rounds out the sweetness. Now, the cheesecake layer is where the magic happens. Cream cheese is key for that creamy texture. I always soften it first. It blends well with sugar and pumpkin puree. The pumpkin adds a nice fall flavor. One egg and vanilla extract give it a lovely taste. I add pumpkin spice for that warm, cozy feeling. This mix of spices makes each bite feel like autumn. With these ingredients, you can create a dessert that everyone will love. They will ask for seconds! - Preheat oven to 350°F (175°C). - Grease or line a 9x13-inch baking pan with parchment paper. - In a large bowl, whisk together 1 cup of melted butter, 1 cup of granulated sugar, and 1 cup of brown sugar. - Add 4 large eggs, one at a time, whisking well after each. - Stir in 1 teaspoon of vanilla extract. - In another bowl, mix 1 cup of all-purpose flour, 1/2 cup of unsweetened cocoa powder, 1/2 teaspoon of baking powder, and 1/4 teaspoon of salt. - Gradually add this dry mixture to the wet ingredients. Mix until just combined. - In a clean bowl, beat 8 oz of softened cream cheese with 1/2 cup of granulated sugar until smooth. - Mix in 1/2 cup of pumpkin puree, 1 large egg, 1 teaspoon of vanilla extract, 1 teaspoon of pumpkin spice, and 1/4 teaspoon of salt. Blend until creamy. - Spoon this cheesecake mix over the brownie layer in the pan. Use a knife to gently swirl the two layers for a marbled look. - Bake the brownies for 30-35 minutes. - Use a toothpick to check for doneness. It should come out with a few moist crumbs. - Let the brownies cool in the pan for at least 30 minutes. Then, refrigerate for about an hour before slicing into squares. - Ensure ingredients are at room temperature. This helps the batter mix well. - Avoid overmixing the batter. Stir until just combined for a chewy texture. - Use a hand mixer for a smoother consistency. This makes the cream cheese blend easily. - Let cream cheese soften for easier mixing. It should be soft to avoid lumps. - Serve with whipped cream and a sprinkle of pumpkin spice. This adds flavor and looks great. - Best served cold or at room temperature. The flavors shine when they are not too cold. Enjoy your delicious pumpkin spice cheesecake brownies! They make a great treat for any occasion. {{image_2}} You can make the brownie layer even more fun. Here are some ideas: - Chocolate chips: They add sweetness and a nice texture. - Nuts: Walnuts or pecans give a great crunch. - Swirls of caramel: Drizzle it in for a rich flavor. - Nutella: A swirl of this chocolate hazelnut spread adds creaminess. These add-ins will give your brownies a unique twist. You can mix and match based on what you love. You can change up the cheesecake layer too! Here are ways to do it: - Substitute purees: Butternut squash works well if you want a different taste. - Add maple syrup: A bit of this sweet syrup adds a lovely flavor. These changes let you create a dessert that fits your taste. Don’t be afraid to experiment! To keep your pumpkin spice cheesecake brownies fresh, place them in an airtight container. Store them in the refrigerator. They will stay good for about a week. If you want to keep them longer, freeze them. They can last up to three months in the freezer. When you are ready to enjoy your brownies again, take them out of the freezer. Let them thaw in the refrigerator overnight. If you want a warm treat, you can warm them up lightly in the microwave. Just heat in short bursts to keep them soft and tasty. Yes, a homemade blend of cinnamon, nutmeg, and ginger works well. It gives your brownies a fresh and warm flavor. I often mix these spices to create my own pumpkin spice. Just use equal parts of each spice to get a balanced taste. This change can make your brownies even more special. A toothpick inserted should come out with a few moist crumbs, not wet batter. This test helps you check the doneness without ruining your brownies. If you see wet batter, they need more time in the oven. Keep an eye on them to avoid overbaking. Yes, just use a larger baking pan and adjust baking time as needed. Doubling the recipe is a great idea for parties or big gatherings. Just remember to watch the baking time closely. Brownies may need a bit more time to bake when the pan is larger. Enjoy sharing these delicious treats! This recipe combines rich brownies with spiced cheesecake for a tasty treat. You learned how to make the layers, tips for perfection, and ways to store your brownies. Play around with flavors and add-ins to make it your own. Remember, a little patience yields big rewards! Enjoy this dessert with friends or family for a delightful experience. Happy baking!

Pumpkin Spice Cheesecake Brownies Delightful Treat

Get ready to indulge in a dessert that screams fall! These Pumpkin Spice Cheesecake Brownies combine rich chocolatey goodness with

To make Apple Pecan Blondies with Brown Butter, gather these items: - 1 cup unsalted butter (2 sticks), browned - 1 cup packed brown sugar - 1/2 cup granulated sugar - 1 teaspoon vanilla extract - 2 large eggs - 2 cups all-purpose flour - 1 teaspoon baking powder - 1/2 teaspoon baking soda - 1/2 teaspoon salt - 1 cup peeled and diced apples (about 1 large apple) - 1/2 cup toasted pecans, roughly chopped - Optional: 1/2 teaspoon ground cinnamon You can swap some ingredients if needed. Use salted butter instead of unsalted. This change adds flavor. For a gluten-free option, replace all-purpose flour with a gluten-free blend. Brown sugar can be replaced with coconut sugar for a different taste. If you don’t have pecans, walnuts work well too. If you prefer a lighter flavor, skip the cinnamon. Using fresh ingredients makes a big difference. Choose apples that are firm and crisp. They should be free from blemishes. When buying pecans, look for nuts that are whole and smell nutty. Store your butter in the fridge and check its date. Fresh eggs are key for the best texture. Always use quality sugars for rich flavor. Fresh ingredients lead to better blondies! To brown butter, start with unsalted butter. Place it in a medium saucepan over medium heat. Stir the butter frequently. Watch as it melts and starts to bubble. Continue cooking until it turns a golden brown color. This should take about 5 to 7 minutes. You will notice a nutty smell as it cooks. Remove the pan from heat and let the butter cool slightly. This step adds a rich flavor to your blondies. In a large bowl, mix the browned butter with brown sugar and granulated sugar. Stir well until it's smooth. Add in the vanilla extract and two large eggs. Mix each egg in one at a time. Make sure everything is fully combined. In another bowl, whisk together flour, baking powder, baking soda, salt, and ground cinnamon if you choose to use it. Gradually add this dry mix into the wet mix. Stir until everything is just combined. Preheat your oven to 350°F (175°C). Grease an 8x8 inch baking pan or line it with parchment paper. Pour the batter into the pan, smoothing the top with a spatula. Bake for 25 to 30 minutes. Check with a toothpick; it should come out clean. Once baked, let the blondies cool in the pan on a wire rack for about 20 minutes. After cooling, cut them into squares. Enjoy your delicious Apple Pecan Blondies! To get the best texture in your apple pecan blondies, start with brown butter. Brown the butter until it is golden and smells nutty. This adds depth and flavor. Use room temperature eggs for a smooth batter. When mixing, don’t over-stir; this keeps the blondies soft. Aim for a thick batter, so it holds the apples and pecans well. To boost flavor, consider adding spices like cinnamon. Just half a teaspoon gives a warm touch. You can also add a pinch of nutmeg for extra warmth. If you love chocolate, fold in some chocolate chips. They pair well with apples and pecans. For a sweet finish, drizzle warm caramel sauce on top before serving. This makes them even more special. If your blondies are too dry, you might have baked them too long. Always check doneness with a toothpick. It should come out with a few moist crumbs, not wet batter. If they turn out too gooey, they may need more baking time. Keep an eye on them in the oven. If your blondies sink in the middle, it could be because of underbaking. Ensure your oven is calibrated correctly for perfect results. {{image_2}} You can change the fruit in these blondies for a unique twist. Try using pears or peaches instead of apples. Both fruits add nice sweetness and moisture. For a fall flavor, consider diced butternut squash. During the summer, use fresh berries like blueberries or raspberries. Each fruit gives a new taste to these blondies. Pecans add crunch, but you can swap them for other nuts. Walnuts or almonds work well for a different flavor. You can even mix in a combination of nuts. If you want a nut-free version, use seeds like sunflower or pumpkin seeds. These still give that delightful crunch without the nuts. To make these blondies gluten-free, use a gluten-free flour blend. Many blends work well and keep the texture nice. If you want a vegan option, replace the eggs with flax eggs. Mix one tablespoon of ground flaxseed with three tablespoons of water for each egg. This will bind the batter just like eggs do. Use a vegan butter substitute to replace the regular butter. To keep your Apple Pecan Blondies fresh, store them in an airtight container. This helps keep them moist. You can also use plastic wrap. Make sure to place a layer of parchment paper between the blondies and the wrap. This prevents sticking and keeps them nice. Freezing blondies is easy and a great way to save leftovers. First, let the blondies cool completely. Then, cut them into squares. Wrap each piece in plastic wrap and place them in a freezer-safe bag. Make sure to remove as much air as you can. They can stay fresh for up to three months in the freezer. When you're ready to enjoy your blondies again, reheating is simple. You can warm them in the microwave for about 10-15 seconds. For a crisp edge, use an oven. Preheat it to 350°F (175°C) and place the blondies on a baking sheet. Heat for about 5-10 minutes. This brings back the soft and gooey texture. Enjoy them warm for the best taste! Yes, you can use other nuts in this recipe. Try walnuts or almonds for a twist. They add great flavor and crunch. Just make sure they are toasted for the best taste. You can also skip nuts if you prefer a nut-free version. The blondies will still be delicious! To check if the blondies are done, insert a toothpick into the center. If it comes out clean, they are ready. The edges should look golden and slightly firm. If the toothpick has batter on it, bake for a few more minutes. Keep an eye on them to avoid overbaking. Apple pecan blondies pair well with many toppings. Try serving them warm with a scoop of vanilla ice cream. Drizzle caramel sauce on top for extra sweetness. You can also add whipped cream or a dusting of powdered sugar for a nice touch. These simple additions make them even more enjoyable! This blog post covered everything you need to make great Apple Pecan Blondies. We discussed the full list of ingredients, how to brown butter, and tips for perfect texture. You learned about ingredient substitutions and storage methods, too. Now you have the tools to create tasty blondies. Experiment with variations to find your favorite flavor. Enjoy the process and share your delicious results!

Apple Pecan Blondies with Brown Butter Delight

Get ready to indulge in a sweet treat like no other! My Apple Pecan Blondies with Brown Butter are the

To create a delicious pumpkin streusel coffee cake, you need these main ingredients: - 2 cups all-purpose flour - 1 cup granulated sugar - 1 teaspoon baking powder - 1 teaspoon baking soda - 1 teaspoon ground cinnamon - ½ teaspoon ground nutmeg - ½ teaspoon salt - ¾ cup unsalted butter, softened - 1 cup canned pumpkin puree - 2 large eggs - 1 teaspoon vanilla extract - ½ cup sour cream These ingredients come together to form a moist and flavorful cake. The pumpkin puree adds a lovely texture and a hint of sweetness. The spices like cinnamon and nutmeg give warmth and depth to each bite. The streusel topping is what makes this cake feel extra special. For that crunchy, sweet layer, you will need: - ½ cup all-purpose flour - ½ cup brown sugar, packed - ½ teaspoon ground cinnamon - ¼ cup unsalted butter, melted - ¼ cup chopped pecans or walnuts (optional) Mixing these ingredients creates a crumbly texture. The nuts add a nice crunch, but you can skip them if you prefer a simpler topping. If you want to take your coffee cake to the next level, try adding these optional ingredients: - ½ teaspoon vanilla extract (for extra flavor) - A dash of pumpkin spice (for more warmth) - Chocolate chips (for a sweet surprise) These options can personalize your cake. Feel free to experiment and make it your own! First, preheat your oven to 350°F (175°C). Grease a 9x13-inch baking pan. This helps the cake not stick. Gather all your ingredients and tools. In a big bowl, add 2 cups of all-purpose flour, 1 cup of sugar, 1 teaspoon of baking powder, 1 teaspoon of baking soda, 1 teaspoon of ground cinnamon, ½ teaspoon of ground nutmeg, and ½ teaspoon of salt. Whisk them together well. This step is key for even flavor. In another bowl, cream ¾ cup of softened unsalted butter until it looks light and fluffy. Next, add 1 cup of canned pumpkin puree, 2 large eggs, and 1 teaspoon of vanilla extract. Mix them until smooth. This will make your cake moist and tasty. Now, slowly add the dry mix to the wet mix. Alternate with ½ cup of sour cream. Start and end with the dry ingredients. Mix until just combined. Don’t overmix. Pour this batter into the prepared baking pan. For the streusel topping, combine ½ cup of flour, ½ cup of brown sugar, ½ teaspoon of cinnamon, and ¼ cup of melted butter in a small bowl. If you like, add ¼ cup of chopped pecans or walnuts. Mix it until crumbly. Sprinkle this topping over the cake batter evenly. Bake your cake for 30-35 minutes. Use a toothpick to check if it’s done. If it comes out clean, it’s ready! Let it cool in the pan for 10 minutes. After that, transfer it to a wire rack to cool completely. Enjoy the warm, sweet scent filling your kitchen! For a soft and moist cake, use room-temperature ingredients. This helps the butter blend well. Make sure to cream the butter until it’s light and fluffy. This process adds air, making the cake rise nicely. Don’t over-mix the batter; mix until just combined. This keeps the cake tender. Oven temperatures vary, so check your cake a bit early. Start checking at 30 minutes. Insert a toothpick into the center. If it comes out clean, the cake is done. If not, continue baking for a few more minutes. Cover the top with foil if it browns too much. Serve the cake warm for the best flavor. Dust with powdered sugar for a pretty touch. A drizzle of maple syrup adds sweetness and depth. Pair it with coffee or tea for a delightful treat. You can also serve it with whipped cream or vanilla ice cream for a special dessert. {{image_2}} You can make this recipe gluten-free. Use a gluten-free flour blend instead of all-purpose flour. Make sure it has xanthan gum for the best texture. This swap keeps the cake light and fluffy while still tasting great. You can enjoy this fall treat without worry if you have gluten sensitivity. For a sweet twist, add chocolate chips or dried fruits. You can mix in 1 cup of chocolate chips or your favorite dried fruits. Dried cranberries, raisins, or apricots work well. Stir them into the batter before baking. This addition makes each bite even more delicious and adds fun flavors. You can change the nuts for a new flavor. Instead of pecans or walnuts, try almonds or hazelnuts. You can also leave the nuts out if you prefer a nut-free cake. This flexibility allows you to customize the cake to your taste. Each nut brings a unique crunch and flavor that enhances the cake. To keep your pumpkin streusel coffee cake fresh, wrap it tightly in plastic wrap. You can also place it in an airtight container. This method helps retain moisture and flavor. Store it at room temperature for up to three days. If you want to keep it longer, consider freezing it. To freeze your coffee cake, first let it cool completely. Cut the cake into squares for easy serving later. Wrap each square in plastic wrap and then place them in a freezer-safe bag. Remove as much air as possible before sealing. You can freeze the cake for up to three months. Label the bags with the date for easy tracking. When you're ready to enjoy your frozen coffee cake, take a piece out and let it thaw at room temperature. This usually takes about an hour. For a warm treat, heat it in the oven at 350°F for about 10-15 minutes. You can also use a microwave. Microwave each piece for about 30 seconds. Enjoy it warm, perhaps with a sprinkle of powdered sugar or a drizzle of maple syrup! You can use plain yogurt as a substitute for sour cream. It gives a similar tang and moisture. You can also use buttermilk or cream cheese. Each option adds a nice flavor to the cake. Yes, you can make the batter ahead of time. Just cover it tightly and store it in the fridge for up to 24 hours. If you make the whole cake, let it cool first. Then, wrap it and keep it in the fridge for up to three days. The cake is done when a toothpick inserted in the center comes out clean. You can also look for a golden-brown color on top. If it springs back when you touch it, it is ready. Yes, you can use fresh pumpkin. Just cook and puree it until smooth. Make sure it is thick and not watery. This can change the taste and texture, but it adds freshness. To make the cake moist, use room temperature ingredients. Adding an extra egg can help too. You can also use more pumpkin puree or a bit more butter. This will keep the cake soft and tender. In this post, we explored making pumpkin streusel coffee cake. We looked at key ingredients for both the cake and the topping. I shared easy steps for mixing, baking, and cooling your cake. You learned tips for perfect texture and fun variations, like gluten-free options. Finally, I covered how to store leftovers and answered common questions. Now, you’re ready to bake a delicious coffee cake. Enjoy your creation with family and friends!

Pumpkin Streusel Coffee Cake Bakery Style Delight

If you love warm, cozy treats, then you’re in for a real delight! This Pumpkin Streusel Coffee Cake is a

For this Spicy Garlic Shrimp Fried Rice, you will need: - 1 cup cooked jasmine rice (preferably cold) - 200g shrimp (peeled and deveined) - 3 cloves garlic, minced - 1 small onion, diced - 1 red bell pepper, diced - 2 green onions, chopped - 2 tablespoons soy sauce - 1 tablespoon sriracha (adjust to taste) - 1 tablespoon sesame oil - 1 egg, beaten - Salt and pepper to taste - Fresh cilantro for garnish Using cold rice is key for this dish. When rice cools down, it firms up. This helps the grains stay separate when you fry them. Warm rice can clump together, making it mushy. Cold jasmine rice gives you that perfect texture. It absorbs flavors well while keeping its shape. For the best shrimp, start with fresh or thawed shrimp. Peel and devein them before cooking. This saves time and ensures they taste great. Rinse the shrimp under cold water to remove any grit. Pat them dry with a paper towel. This helps them sear better in the hot pan. Season the shrimp lightly with salt and pepper before cooking for added flavor. Start by heating 1 tablespoon of sesame oil in a large non-stick skillet. Use medium-high heat to warm the oil. This will help bring out the flavor. Next, add 3 cloves of minced garlic and 1 small diced onion. Sauté these for about 1 minute. You want them to smell great and become a bit clear. Now, toss in 200 grams of peeled and deveined shrimp. Cook them for about 2-3 minutes. They will turn pink and look opaque when done. Then, stir in 1 diced red bell pepper. Cook for another 2 minutes. This will soften the bell pepper and add nice color. Now, it's time to add 1 cup of cold jasmine rice. Break up any clumps as you stir. Mix well to combine everything. Drizzle 2 tablespoons of soy sauce and 1 tablespoon of sriracha over the rice. Stir to coat all the ingredients well. Taste and add salt and pepper as needed. Push the rice to one side of the pan. Pour 1 beaten egg into the empty spot. Scramble it until fully cooked. Then mix it into the rice. Finally, take the pan off the heat. Stir in 2 chopped green onions. Garnish with fresh cilantro to make it look bright and tasty. To get the right spice level, start with one tablespoon of sriracha. This gives a nice kick without being too hot. If you love heat, add more sriracha. Taste as you go. You can also mix in red pepper flakes for extra spice. Remember, you can always add more, but you can't take it out. For this recipe, I recommend using jasmine rice. It has a nice aroma and a fluffy texture. Make sure the rice is cold. Cold rice helps to prevent clumps and keeps it fluffy. You can also use basmati rice if you prefer. Just avoid sticky rice, as it won't give you the right texture. To make your fried rice fluffy, use a non-stick skillet or wok. Heat the pan well before adding the oil. This helps to fry the rice instead of steaming it. Break up any clumps of cold rice with your hands before adding it to the pan. Stir gently to mix everything without squishing the rice. Scrambling the egg separately also keeps it fluffy. {{image_2}} You can switch shrimp for chicken, beef, or tofu. Chicken adds a nice texture. Beef gives a hearty flavor. Tofu is great for a vegetarian option. Each protein works well with the spices. Adjust cooking times based on the protein you choose. Cook chicken until it’s fully done. Beef needs to be tender. Tofu should be heated through. Feel free to change up the veggies! Broccoli, carrots, or peas all work well. You could also use corn for sweetness. Each vegetable brings its own taste. Just chop them into small pieces for even cooking. Add them after the shrimp for a perfect fit. This gives a colorful and healthy dish. Mix and match to suit your taste. Soy sauce is a must, but try others too! Teriyaki sauce adds a sweet twist. Oyster sauce gives a rich, deep flavor. If you like heat, add more sriracha or chili sauce. You can also mix in some lime juice for brightness. These sauces will change the dish in a fun way. Always taste as you go to find your perfect mix. To keep your spicy garlic shrimp fried rice fresh, let it cool first. Then, place it in an airtight container. Make sure to store it in the fridge. It will stay good for about 3 days. If you want to save it longer, consider freezing it. When you’re ready to eat leftovers, reheat them on the stove. Use a non-stick skillet for the best results. Add a splash of water or oil to keep it moist. Heat over medium heat for about 5-7 minutes, stirring often. You can also use a microwave, but it may not taste as fresh. For freezing, portion out the fried rice into smaller containers. This makes it easy to thaw only what you need. Use freezer-safe bags or containers to avoid freezer burn. It can last up to 2 months in the freezer. When you’re ready to eat, thaw it overnight in the fridge. Then, reheat as mentioned above. Yes, you can use frozen shrimp. Just thaw them before cooking. Place them in cold water for about 10-15 minutes. This way, they cook evenly. If you use frozen shrimp, adjust cooking time slightly. To reduce the spice, cut back on sriracha. You can start with just a teaspoon. Taste as you cook, and add more if you want. Another option is to add a bit of sugar. This helps balance the heat. Jasmine rice is the best choice for fried rice. It has a lovely aroma and a fluffy texture. Make sure your rice is cold when you use it. This helps it fry up nicely without clumping. Absolutely! You can swap shrimp for tofu or mushrooms. Use the same cooking steps. For extra flavor, add more veggies like carrots or peas. Just remember to adjust seasonings according to taste. In this post, we explored the key ingredients, preparation, and cooking steps for making shrimp fried rice. Using cold rice is vital for the perfect texture. I shared tips for adjusting spice levels, choosing rice types, and cooking techniques. You can easily vary the recipe with different proteins and veggies. Plus, I covered storage and reheating methods to keep leftovers tasty. With these insights, you can enjoy cooking and serving your own delicious shrimp fried rice. Try it out and make it your own!

Spicy Garlic Shrimp Fried Rice in 15 Minutes Delight

Looking to spice up your dinner without spending hours in the kitchen? You’re in the right place! I’ll show you

To make pumpkin chocolate chip energy balls, you will need: - 1 cup rolled oats - 1/2 cup pumpkin puree - 1/3 cup natural peanut butter (or almond butter) - 1/4 cup honey or maple syrup - 1/2 cup chocolate chips (dark or milk) - 1 teaspoon vanilla extract - 1 teaspoon pumpkin spice (or a mix of cinnamon, nutmeg, and ginger) - A pinch of salt These simple ingredients create a tasty and nutritious snack that packs a punch. You can swap ingredients based on your taste or what you have. Here are some ideas: - Nut Butter: Use almond butter if you prefer. Sunflower seed butter works too for nut-free options. - Sweetener: If you want a lower sugar option, use mashed bananas or dates instead of honey. - Chocolate Chips: Try using white chocolate chips or even dried fruit for a different twist. - Spices: If you don't have pumpkin spice, mix cinnamon, nutmeg, and ginger for a similar flavor. This recipe can fit many dietary needs. Here’s how: - Gluten-Free: Use certified gluten-free oats to keep these energy balls gluten-free. - Vegan: Replace honey with maple syrup or agave syrup for a vegan-friendly treat. - Nut-Free: Use sunflower seed butter instead of peanut or almond butter to make it nut-free. These easy swaps ensure everyone can enjoy these energy balls! To make pumpkin chocolate chip energy balls, gather your ingredients first. This no-bake treat is quick and easy. You need rolled oats, pumpkin puree, natural peanut butter, honey, chocolate chips, vanilla extract, pumpkin spice, and a pinch of salt. 1. In a large mixing bowl, combine 1 cup of rolled oats, 1/2 cup of pumpkin puree, and 1/3 cup of peanut butter. Mix these well until they blend. 2. Next, add 1/4 cup of honey or maple syrup, 1 teaspoon of vanilla extract, and 1 teaspoon of pumpkin spice. Don’t forget the pinch of salt! Stir everything together until it’s smooth and well combined. 3. Now, gently fold in 1/2 cup of chocolate chips. Make sure they are evenly spread throughout the mixture. 1. Take small portions of the mixture with your hands. Roll them into balls about the size of a tablespoon. 2. Place the energy balls on a baking sheet or a plate lined with parchment paper. 3. Put the energy balls in the fridge for at least 30 minutes. This helps them firm up. 4. Once they are set, enjoy your tasty energy balls as a snack or a quick breakfast! To get the perfect texture for your energy balls, you need the right mix. Use rolled oats for a chewy base. The pumpkin puree adds moisture and creaminess. Make sure to use natural peanut butter, as it binds well. If the mixture feels too dry, add a splash of water or more pumpkin. If it’s too wet, add more oats. The key is to find balance. To keep your energy balls fresh, store them in an airtight container. Place a sheet of parchment paper between layers if you stack them. This prevents sticking and keeps them safe. You can also pop them in the fridge for up to a week. For longer storage, freeze them. Just make sure they are well-wrapped. When you are ready to eat, let them thaw for a few minutes. These energy balls are great for any time of day. Serve them as a quick breakfast. They also make a perfect snack for kids after school. Want a boost? Pair them with a cup of yogurt or a smoothie. You can even use them as a topping on oatmeal. The options are endless, and they taste amazing! {{image_2}} You can change up the flavor of your energy balls easily. Swap the peanut butter for almond butter, sun butter, or cashew butter. Each nut butter offers a unique taste and texture. If you want a spicier kick, add more pumpkin spice or try cinnamon and ginger. You can even experiment with chocolate protein powder for an extra boost. Add-ins can make your energy balls even better. Chopped nuts like walnuts or pecans add crunch and flavor. Seeds, like chia or flaxseeds, boost nutrition. If you like a touch of sweetness, add dried fruits like cranberries or raisins. These can enhance the texture and taste, making each bite a surprise. These energy balls are great for any season. In fall, enjoy them with apple pie spice for a cozy flavor. In winter, add peppermint extract for a festive twist. You can even roll the balls in cocoa powder for a chocolatey touch. Each season brings new flavors you can explore. To keep your Pumpkin Chocolate Chip Energy Balls fresh, store them in an airtight container. This helps prevent moisture and keeps them tasty. You can place them in the fridge or at room temperature. If you put them in the fridge, they stay firm and cool. If you store them at room temperature, they may get softer. If you want to keep these energy balls longer, freezing is a great option. First, place them on a baking sheet in a single layer. Freeze them for about an hour. Once they are firm, transfer the balls to a freezer-safe bag or container. Make sure to remove any extra air before sealing. They can last for up to three months in the freezer. When ready to eat, just thaw them in the fridge overnight. These energy balls can last up to a week in the fridge. Keep an eye on them for any signs of spoilage. If you notice changes in smell or texture, it's best to toss them. Always check for freshness before you enjoy your snack. The great thing about these energy balls is that they are easy to make again, so you can always whip up a new batch! Yes, you can make these energy balls vegan. Just replace honey with maple syrup. Use almond butter instead of peanut butter. This keeps the recipe plant-based and tasty. These energy balls last about one week in the fridge. Just store them in an airtight container. This helps keep them fresh and tasty for snacking. Yes, you can substitute pumpkin puree. Use unsweetened applesauce or mashed banana instead. Both options add moisture and flavor, making your energy balls still delicious. You now have a clear guide to making great energy balls. We covered ingredients, substitutions, and dietary needs. You learned step-by-step instructions for mixing and chilling. Tips for texture and storage will help your energy balls stay fresh. Variations add fun flavors and creative add-ins. By following these steps, you can create energy balls that fit your taste and needs. Enjoy making them for yourself and your loved ones!

Pumpkin Chocolate Chip Energy Balls No-Bake Treat

Craving a tasty snack that’s both easy to make and good for you? Let’s whip up some no-bake Pumpkin Chocolate

Older posts
Newer posts
← Previous Page1 … Page14 Page15 Page16 … Page84 Next →

dsad

© 2026 juliesdish • Built with GeneratePress

Our Policies

  • Copyright Policy
  • Cookie Policy
  • GDPR Policy
  • Privacy Policy
  • Disclaimer
  • Terms Of Use

More Information

  • Home
  • About
  • Contact
  • Appetizers
  • Dessert
  • Dinner
  • Drinks
©2026, juliesdish About Back To Top