Skip to content
DisclaimerTerms Of UseGDPR PolicyCookie Policy

juliesdish

  • Home
  • Drinks
  • Appetizers
  • Dinner
  • Dessert
  • About
  • Contact
  • Privacy Policy
DisclaimerTerms Of UseGDPR PolicyCookie Policy

NO-ING-IMG

To make No-Bake Peanut Butter Pretzel Cheesecake Bars, you need simple yet tasty ingredients. Here’s the list to gather: - 2 cups pretzel crumbs - ½ cup unsalted butter, melted - 1 cup cream cheese, softened - 1 cup creamy peanut butter - 1 cup powdered sugar - 1 teaspoon vanilla extract - 1 cup heavy whipping cream - ½ cup chocolate chips (for drizzle) These ingredients create a balance of sweet and salty. The pretzel crumbs give a nice crunch. The creamy filling is rich and smooth. Each layer offers a different texture that makes these bars so delightful. Make sure your cream cheese is soft for easy mixing. The heavy cream needs to be whipped to form stiff peaks. This helps the filling stay light and fluffy. When you melt the chocolate chips, be careful not to overheat them. Stir every 30 seconds to keep it smooth. Each ingredient plays a key role, so follow this list closely for the best results! First, grab a medium bowl. Combine 2 cups of pretzel crumbs with ½ cup of melted butter. Mix until the crumbs are fully coated. Next, take a lined 9x9 inch baking pan. Press the pretzel mixture firmly into the bottom. Make sure it forms an even crust. Place this in the fridge to set while you prepare the filling. Now, let’s make the filling. In a large mixing bowl, beat together 1 cup of softened cream cheese, 1 cup of creamy peanut butter, 1 cup of powdered sugar, and 1 teaspoon of vanilla extract. Blend until smooth and creamy. In a separate bowl, whip 1 cup of heavy cream until it forms stiff peaks. Gently fold the whipped cream into the peanut butter mixture. This step adds lightness to your filling. Time to assemble your bars! Pour the peanut butter filling over the pretzel crust. Use a spatula to spread it evenly. Smooth out the top for a clean look. Return the pan to the fridge so it can chill for at least 4 hours, or until firm. Once the cheesecake is firm, it’s time to add the chocolate. Melt ½ cup of chocolate chips in the microwave. Do this in 30-second intervals, stirring in between until smooth. Drizzle the melted chocolate over the chilled cheesecake. This adds a rich touch. Finally, cut the cheesecake into bars. Serve them chilled for the best taste. Enjoy the mix of creamy cheesecake, salty pretzel crust, and rich chocolate drizzle. To get soft cream cheese, take it out of the fridge early. Let it sit for 30 minutes to warm. This helps it mix well. For whipping cream, use a cold bowl and beaters. Start on low speed, then increase. Stop when you see stiff peaks. This cream will hold its shape in the bars. Press the pretzel crust firmly into the pan. Use your hands or a flat-bottomed cup. This helps it stick together. Avoid making the crumbs too fine. If they are too small, the crust may crumble. A mix of coarse and fine crumbs works best. These bars pair nicely with fresh fruit. Try berries or banana slices on the side. For garnishing, add whipped cream on top. A sprinkle of crushed pretzels adds a nice crunch. You can also drizzle some extra chocolate on each slice for more flavor. {{image_2}} You can make some easy swaps for a healthier treat. Try using coconut oil instead of butter. This swap adds a nice flavor and healthy fats. You can also replace sugar with a sweetener like honey or maple syrup. These options keep the bars sweet but healthier. Get creative with your flavors! Add a drizzle of chocolate peanut butter or caramel on top for extra richness. You can also mix in nuts or other toppings. Chopped peanuts or crushed pretzels add a nice crunch. These additions make each bite exciting and fun. Want to make these bars gluten-free? Just use gluten-free pretzels for the crust. It’s easy and still tasty! For a vegan-friendly version, swap out the cream cheese for a plant-based cream cheese. Use coconut cream instead of heavy cream. These changes ensure everyone can enjoy these delicious bars. To keep your no-bake peanut butter pretzel cheesecake bars fresh, use an airtight container. Glass or plastic containers work well. Line them with parchment paper to help with easy removal. This keeps the bars from sticking. To prevent crust sogginess, always store the bars in a cool, dry place. If you notice moisture, place a paper towel inside the container. This will absorb excess moisture and help maintain the crust's crispness. You can freeze these cheesecake bars for future treats. Cut them into portions before freezing. Wrap each piece in plastic wrap, then place in a freezer bag. This protects the bars from freezer burn. When you're ready to eat them, thaw the bars in the fridge overnight. Freezing may change the texture slightly, but the taste stays great. The crust may soften a bit, but the creamy filling remains delicious. Yes, you can use crunchy peanut butter. It adds a nice texture. Some people like the extra crunch. Just know that it can change the smoothness of the bars. These cheesecake bars stay fresh for about five days in the fridge. Store them in an airtight container to keep them nice and tasty. If they last that long, you’re lucky! If you do not have pretzel crumbs, you can use graham cracker crumbs or crushed cookies. Both will give a nice base. The flavor will change slightly, but they will still be delicious. Yes, you can make these bars a day or two ahead. They need time to chill and set, so making them early is a great idea. Just cover them well in the fridge. You will know the bars are firm when they feel set and not jiggly. They should hold their shape when you press lightly. Chill them for at least four hours to ensure they set properly. In this article, we explored the ingredients and steps to make delicious cheesecake bars. We looked at each part, from preparing the crust to drizzling with chocolate. I also shared tips for a creamy texture and variations to suit your taste. Remember, storing these bars properly keeps them fresh longer. With the right ingredients and techniques, you can delight anyone with this treat. Enjoy making these cheesecake bars, and don't be afraid to get creative!

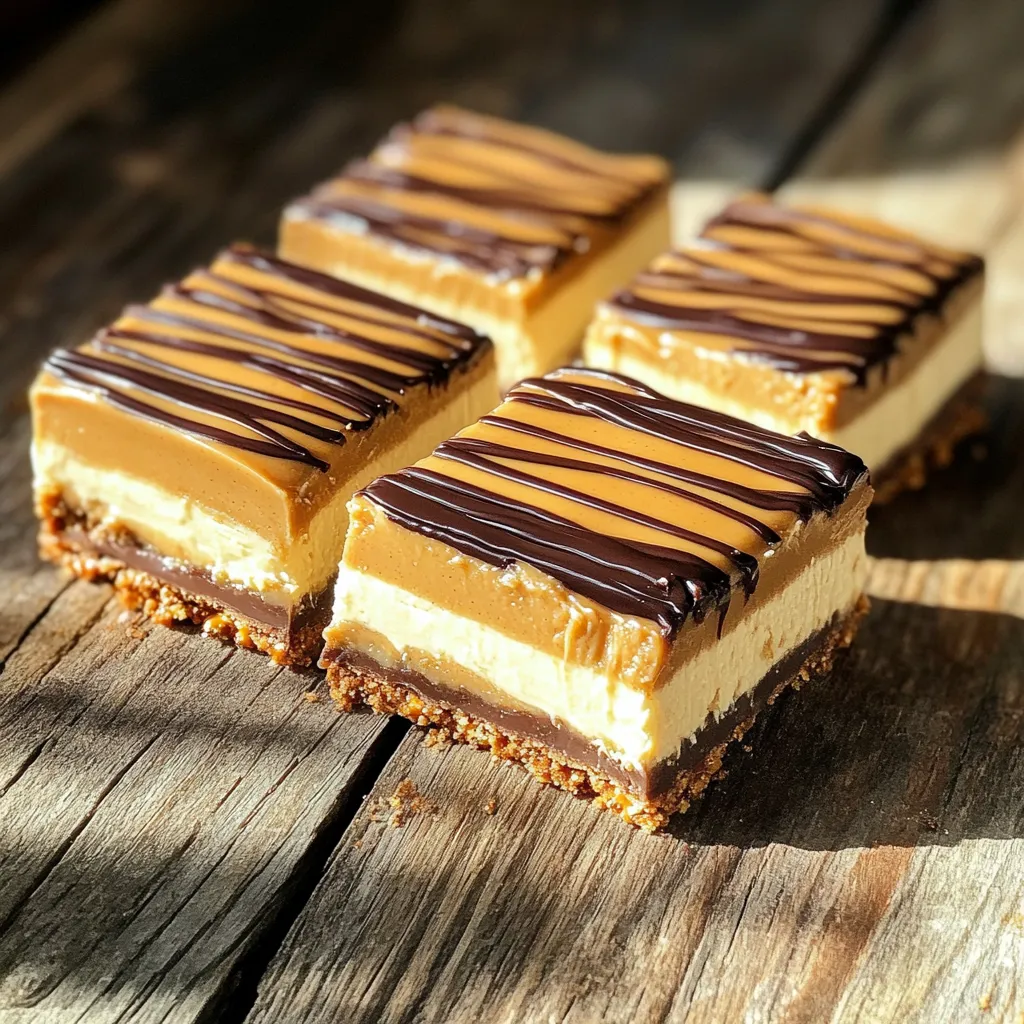
No-Bake Peanut Butter Pretzel Cheesecake Bars Delight

Craving a sweet treat that’s simple to make? These No-Bake Peanut Butter Pretzel Cheesecake Bars are your answer! They combine

- 2 chicken thighs, boneless and skinless - 4 cups chicken broth - 2 packages of instant ramen noodles (discard the seasoning packets) - 2 tablespoons chili crisp (store-bought or homemade) - 2 teaspoons soy sauce - 1 teaspoon sesame oil - 1 tablespoon fresh ginger, grated - 2 cloves garlic, minced - 1 cup baby spinach - 2 green onions, sliced - 1 boiled egg, halved (optional) - Sesame seeds for garnish - Salt and pepper to taste Getting the right ingredients is key to a great meal. You'll need juicy chicken thighs. They add rich flavor and texture. I prefer skinless and boneless thighs for easy cooking. Next, grab some chicken broth for a warm base. Instant ramen noodles create a quick and hearty meal. Chili crisp is where the magic happens. This spicy condiment brings heat and depth. Use soy sauce for umami flavor and sesame oil for a nutty touch. Fresh ginger and garlic boost the dish's aroma and taste. Don’t forget baby spinach; it wilts nicely and adds color. Green onions bring a fresh crunch. Optional toppings like boiled eggs and sesame seeds add a gourmet touch. I always encourage you to measure carefully. Each ingredient plays a role in making this dish rich and satisfying. - Sautéing garlic and ginger Start by heating 1 teaspoon of sesame oil in a medium pan over medium heat. Add 2 cloves of minced garlic and 1 tablespoon of grated ginger. Cook these for about 1 minute until they smell great. - Cooking chicken thighs Next, add 2 boneless, skinless chicken thighs to the pan. Cook them for 5 to 7 minutes on each side. Make sure they turn golden brown. Season with salt and pepper to taste. Once done, take them out and let them cool for a few minutes. - Shredding the meat After cooling, shred the chicken into bite-sized pieces. This makes it easy to eat and mix in the ramen. - Boiling chicken broth In the same pan, pour in 4 cups of chicken broth. Bring it to a gentle boil over medium heat. - Incorporating soy sauce and chili crisp Stir in 2 teaspoons of soy sauce and 2 tablespoons of chili crisp. Adjust the amount of chili crisp to fit your taste. This adds a nice kick to the broth. - Adding noodles to broth Now, add 2 packages of instant ramen noodles to the boiling broth. Cook them for 3 to 4 minutes as per package instructions. - Incorporating spinach In the last minute of cooking, toss in 1 cup of baby spinach. It will wilt nicely and add color to your dish. - Dividing noodles and broth into bowls Once the noodles are done, divide them into two serving bowls. Ladle the hot broth and spinach over the noodles. - Adding chicken and garnishes Top each bowl with the shredded chicken. If you like, add a halved boiled egg on the side. Finish with sliced green onions and a sprinkle of sesame seeds for extra flair. Drizzle more chili crisp on top if you want more heat. Enjoy your hearty bowl of Chili Crisp Chicken Ramen! To get the best taste from your Chili Crisp Chicken Ramen, focus on spice. Chili crisp can change the heat. Start with two tablespoons, then taste. You can always add more if it’s not spicy enough. For the chicken, seasoning is key. Salt and pepper are great, but don’t stop there. Try adding garlic powder or even a pinch of smoked paprika. These will boost the flavor. Always taste while cooking to find your perfect mix. Presentation matters! Use deep bowls to hold all the goodness. Layer the toppings for a beautiful look. Place the shredded chicken on top, then add the vibrant green onions and a sprinkle of sesame seeds. As for sides, consider a light cucumber salad or steamed edamame. These will balance the meal. For drinks, a chilled green tea or even a light beer pairs well. Both will enhance your dining experience. {{image_2}} You can make a delicious vegetarian version of this ramen. Start by substituting chicken with tofu. Tofu adds protein and absorbs flavors well. Use firm tofu and press it to remove excess water. Cut it into cubes and sauté it like you would the chicken. Next, switch to vegetable broth instead of chicken broth. It keeps the dish flavorful without meat. You can find many good options at stores or make your own. Adding more veggies can boost taste and nutrients. Try mushrooms, bell peppers, or carrots for a tasty mix. Toppings can really change the game for your ramen. You might want to add nori, which is seaweed, for a salty taste. Fresh cilantro brightens the dish and adds a nice touch. You can also mix in other vegetables. I love adding bok choy or bean sprouts for crunch. You can even toss in corn for a subtle sweetness. These toppings not only make your ramen look great, but they also add flavor and texture. Enjoy experimenting! To store leftover Chili Crisp Chicken Ramen, let it cool to room temperature. Then, place it in an airtight container. This keeps it fresh for up to three days in the fridge. When you’re ready to eat, reheat it in a saucepan over low heat. Stir occasionally to warm it evenly. You can also use a microwave. Heat it for 1-2 minutes, stirring halfway through. Make sure it’s hot throughout before serving. You can freeze Chili Crisp Chicken Ramen for up to three months. To freeze, cool the ramen completely. Then, portion it into freezer-safe bags or containers. Remove as much air as possible to prevent freezer burn. When you want to enjoy it again, take it out of the freezer and place it in the fridge overnight to thaw. For reheating, use a saucepan on low heat or a microwave. If the broth is thick, add a splash of water or broth while warming. Enjoy your tasty bowl of ramen! Chili crisp adds a nice kick to your ramen. The spice level varies based on the brand and amount you use. Most chili crisps offer a mix of heat, garlic, and oil. If you want it spicier, feel free to add more chili crisp. Start with a small amount, then taste and adjust. You can always add more, but it's hard to take heat away! Yes, you can prepare some parts ahead of time. Cook the chicken and store it in the fridge for a few days. You can also make the broth and chill it. Just reheat the broth when you're ready to eat. Cook the noodles fresh to keep them from getting soggy. This way, you enjoy a hot meal quickly! If you don’t have ramen, try other noodles like udon or soba. You can also use rice noodles or even zucchini noodles for a low-carb option. Each type brings its own taste and texture. Just follow the cooking times on the package for best results. Enjoy your meal with the noodles you love! This blog post covered how to make Chili Crisp Chicken Ramen, highlighting key ingredients like chicken thighs and broth. I shared step-by-step instructions for preparation, cooking, and presentation. I offered tips for enhancing flavors and discussed variations, like a vegetarian option. Storing and reheating methods were also included to help you enjoy this dish later. In summary, this recipe is simple yet delicious, perfect for any day. Enjoy making it your own with different toppings and flavors!

Chili Crisp Chicken Ramen Hearty and Flavorful Dish

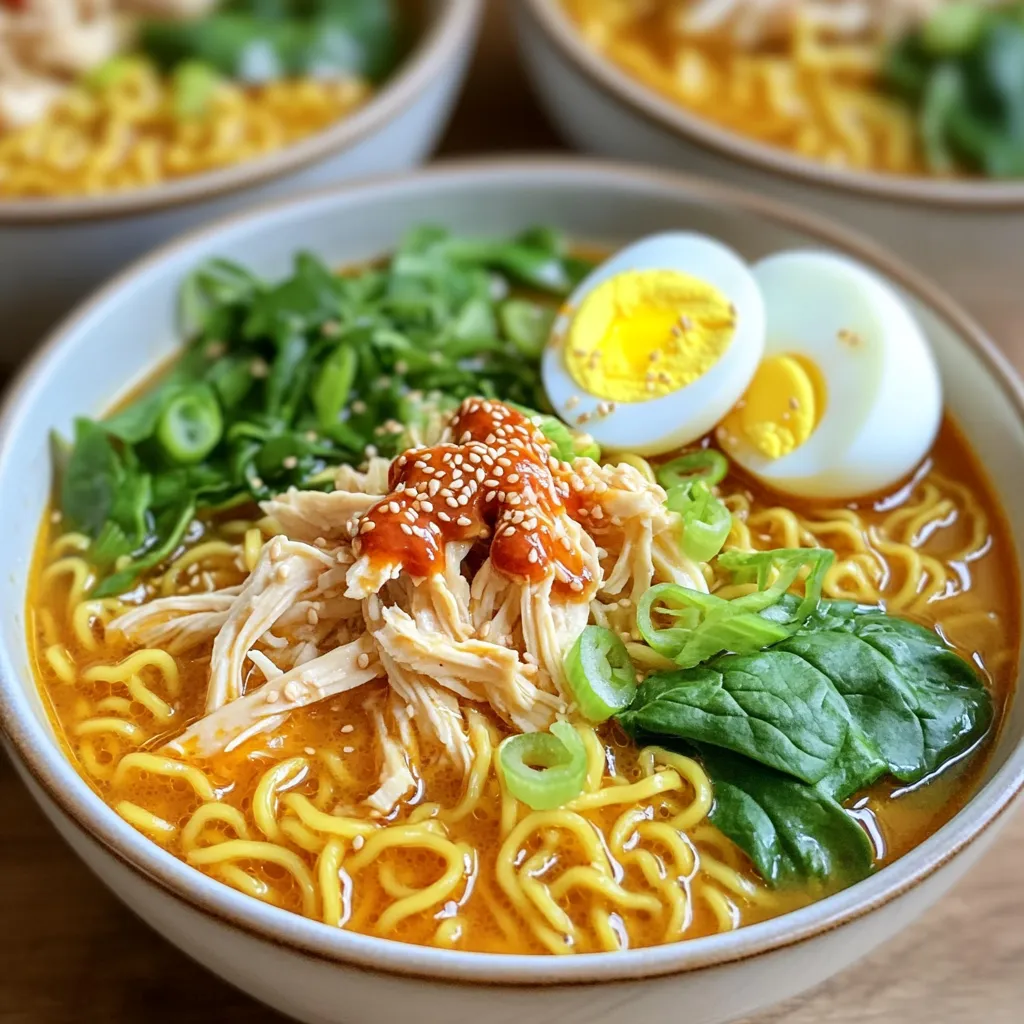
If you’re craving something hearty, flavorful, and easy to make, I have just the dish for you: Chili Crisp Chicken

- 1 pound large shrimp, peeled and deveined - 1 cup orzo pasta - 2 cups vegetable broth I love using large shrimp in this dish. They cook up juicy and tender. The orzo pasta adds a nice texture and absorbs all the flavor. Vegetable broth serves as a great base, giving depth to the dish. - 1 cup heavy cream - 1 cup cherry tomatoes, halved - 2 cups fresh spinach Heavy cream makes the sauce rich and creamy. Cherry tomatoes burst with flavor, adding sweetness. Fresh spinach wilts down and adds color and nutrients to the mix. - 3 cloves garlic, minced - 1 teaspoon Italian seasoning - 2 tablespoons olive oil - Salt and pepper to taste Garlic gives the dish a wonderful aroma. Italian seasoning brings the essence of Italy to your plate. Olive oil helps sauté the garlic and shrimp, adding richness. Salt and pepper enhance every bite, so don’t skip these! Start by heating olive oil in a large pot over medium heat. Add minced garlic and sauté for about one minute. The aroma will fill your kitchen, setting the stage for a great dish. Next, add the shrimp to the pot. Season them with salt, pepper, and red pepper flakes if you like some heat. Cook until the shrimp turn pink and opaque. This usually takes about 2-3 minutes. Once cooked, remove the shrimp from the pot and set them aside. In the same pot, pour in the vegetable broth and bring it to a boil. Stir in the orzo pasta. Cook according to the package instructions until it reaches al dente. This should take around 8-10 minutes. The orzo will soak up the flavors from the broth. Once the orzo is cooked, reduce the heat to low. Stir in the heavy cream, halved cherry tomatoes, and fresh spinach. Add the Italian seasoning for that Tuscan flair. Cook for an additional 3-4 minutes. The spinach will wilt, and the sauce will thicken slightly. Return the cooked shrimp to the pot. Mix everything gently until well combined. Taste and adjust the seasoning with salt and pepper as needed. Remove from heat and let it sit for a couple of minutes before serving. Enjoy this delightful dish! To get that rich and creamy texture, use heavy cream. It makes the dish smooth and adds a lovely depth of flavor. When you add cream, do it after the orzo cooks. This timing helps keep the sauce thick and luscious. Stir gently and let it warm through. Don't rush this step; let the flavors mingle. To make the taste just right, adjust your spices. Start with the Italian seasoning. Taste as you go, and add more if needed. If you like it spicy, sprinkle in more red pepper flakes. Balance is key, so find what works best for you. A pinch of salt can also enhance all the flavors. For a beautiful presentation, serve in shallow bowls. This lets everyone see the vibrant colors of the dish. Garnish with fresh basil leaves for a pop of green. A drizzle of olive oil on top adds extra flavor and looks nice. Remember, we eat with our eyes first! {{image_2}} You can switch shrimp for chicken or veggies. For chicken, cut it into small pieces. Sauté it just like shrimp until it cooks through. Use the same spices for flavor. If you choose veggies, try bell peppers or zucchini. Cook them until tender before adding the orzo. This keeps the dish fresh and tasty. If you need gluten-free, use gluten-free orzo or pasta. Many brands make good options now. Check the label to ensure it fits your diet. Cook it just like regular orzo. This way, you can enjoy the dish without worry. Want to boost the taste? Add pesto or sun-dried tomatoes. Stir in a couple of tablespoons of pesto when you add the cream. This adds a rich, herby flavor. For sun-dried tomatoes, chop them up and mix them in with the spinach. Both options add a nice twist to this creamy dish. To keep your One-Pot Creamy Tuscan Shrimp Orzo fresh, store it in an airtight container. Make sure it cools before sealing. You can refrigerate it for up to three days. This dish tastes great the next day, too! When you want to enjoy your leftovers, reheat them gently. Use a microwave or stovetop. If using the microwave, heat in short bursts. Stir between each burst to warm it evenly. On the stovetop, add a splash of broth or cream to keep it creamy. Heat on low until warm. You can freeze One-Pot Creamy Tuscan Shrimp Orzo, but it's best to leave out the shrimp. Cooked shrimp can turn rubbery after freezing. Store the orzo and sauce in a freezer-safe container. It will last up to three months. When ready, thaw overnight in the fridge and reheat as mentioned. Yes, you can use frozen shrimp for this dish. Just thaw them first. You can do this by placing the shrimp in a bowl of cold water for about 15-20 minutes. After thawing, peel and devein them if needed. Then, follow the same cooking steps. Cook the shrimp until they are pink and opaque. This will take a few minutes longer than fresh shrimp. To add some heat, consider using more red pepper flakes. Start with a full teaspoon instead of half. You can also add diced jalapeños or a dash of hot sauce. If you like it really spicy, try a pinch of cayenne pepper too. Just remember to taste as you go, so it matches your heat preference. Yes, you can prep some parts ahead. Cook the shrimp and orzo separately, then store them in the fridge. When you're ready to eat, reheat them and mix with cream and veggies. This way, each bite stays fresh. You can also chop the garlic and tomatoes in advance to save time. Just keep everything in airtight containers. In this article, we covered how to make a creamy Tuscan shrimp orzo dish. You learned about essential ingredients like shrimp, orzo, and heavy cream. We went through step-by-step cooking instructions and shared tips for perfecting the dish. You also discovered variations like using chicken or gluten-free options. For the best results, keep experimenting with flavors and enjoy your cooking. Remember, practice makes perfect, and each dish is a chance to improve. Your kitchen is a place for creativity. Happy cooking!

One-Pot Creamy Tuscan Shrimp Orzo Delightful Recipe

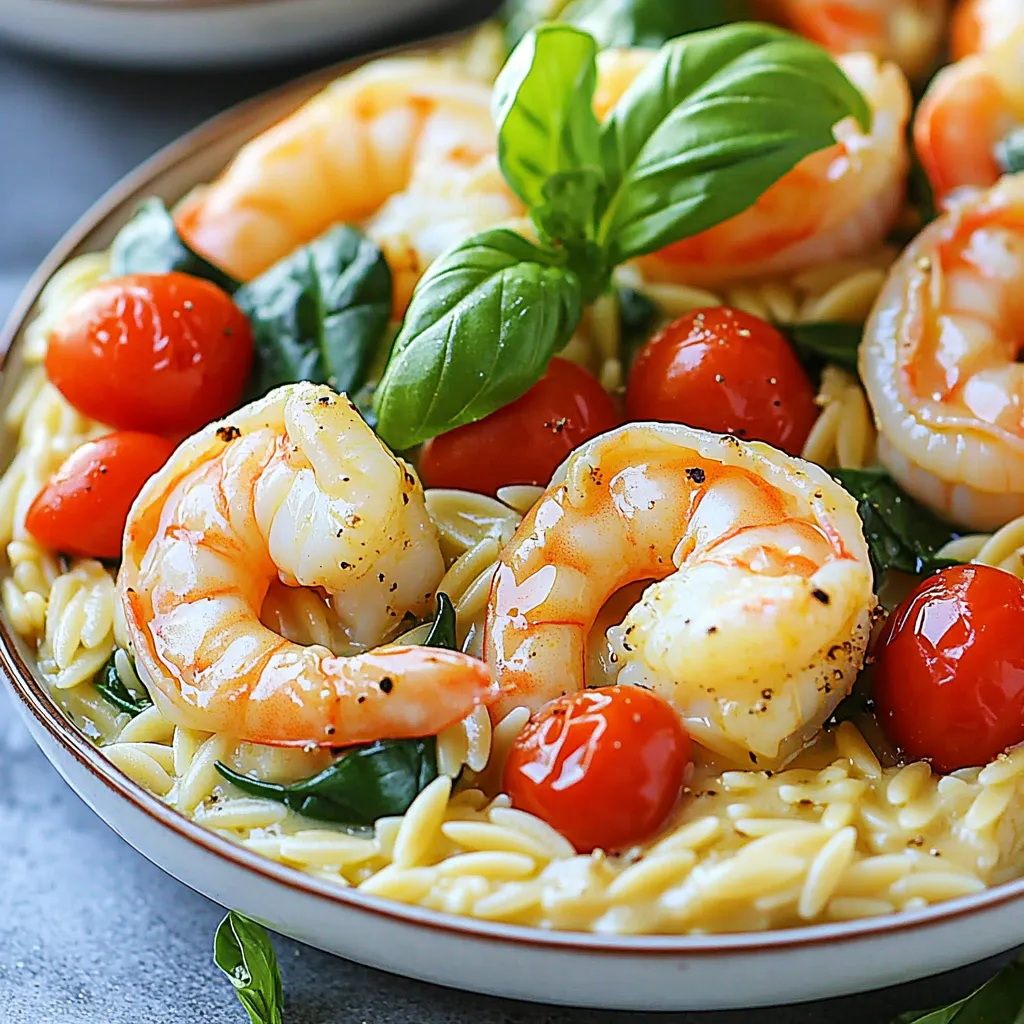
Are you ready to savor a dish that combines creamy goodness with vibrant flavors? This One-Pot Creamy Tuscan Shrimp Orzo

To make these tasty lemon poppy seed muffins, you need the following: - 1 ½ cups all-purpose flour - ½ cup granulated sugar - 2 teaspoons poppy seeds - 1 tablespoon baking powder - ½ teaspoon salt - 1 large egg - ½ cup milk (or a non-dairy alternative) - ½ cup vegetable oil - Zest of 1 large lemon - 2 tablespoons fresh lemon juice - 1 teaspoon vanilla extract When measuring flour, spoon it into the cup and level it off. This gives you the right amount without packing it down. For liquids, use a clear measuring cup. Make sure to read at eye level. For sugar, scoop it with a spoon, then level it with a knife. This helps keep your muffins sweet, not dense. For a dairy-free version, swap milk with almond or oat milk. If you need gluten-free muffins, use a gluten-free flour blend. For egg-free muffins, try using a flax egg. Mix 1 tablespoon of ground flaxseed with 2.5 tablespoons of water. Let it sit for a few minutes until it thickens. You can still enjoy this recipe with these easy swaps! First, you need to preheat your oven to 375°F (190°C). This step is key for baking. While your oven heats, prepare your muffin tin. Line it with paper liners or spray it lightly with cooking spray. This helps the muffins come out easily. Next, grab a large mixing bowl. In it, whisk together the following dry ingredients: - 1 ½ cups all-purpose flour - ½ cup granulated sugar - 2 teaspoons poppy seeds - 1 tablespoon baking powder - ½ teaspoon salt Mix them well until they are combined. This mix gives your muffins a great texture and taste. Now, take a separate bowl. Beat 1 large egg gently. Add in: - ½ cup milk (or a non-dairy alternative) - ½ cup vegetable oil - Zest of 1 large lemon - 2 tablespoons fresh lemon juice - 1 teaspoon vanilla extract Mix these wet ingredients until they blend well. This mixture adds moisture and flavor. Pour the wet ingredients into the dry mix. Stir gently until just combined. It is important not to overmix. A few lumps are okay. This helps your muffins stay soft and fluffy. Spoon the batter into your prepared muffin cups. Fill each about ¾ full. Bake your muffins for 15-20 minutes. To check if they are done, insert a toothpick into the center of a muffin. If it comes out clean, they are ready! Let them cool in the pan for 5 minutes, then move them to a wire rack. This cooling time helps keep them moist. To get soft and fluffy muffins, use the right flour. All-purpose flour works best here. Measure it accurately by spooning it into a cup, then leveling off. This helps avoid a dry muffin. The key is to mix the wet and dry ingredients gently. This keeps the gluten from forming too much. Mixing is important, but too much can ruin your muffins. Stir until the batter is just combined. A few small lumps are fine. This ensures your muffins are light and airy. If you overmix, your muffins may come out tough. Remember, less is more when it comes to mixing. After baking, let the muffins cool for about five minutes in the pan. Then, transfer them to a wire rack. This helps them cool evenly and keeps them moist. For a lovely touch, serve them on a cake stand with some lemon zest on top. You can also drizzle a simple glaze made of powdered sugar and lemon juice for extra sweetness. Enjoy your muffins fresh or warm! {{image_2}} You can add blueberries to your lemon poppy seed muffins for a tasty twist. Use fresh or frozen blueberries. Just fold them in gently after mixing your batter. This adds sweetness and color. The bright blueberries pair well with the lemon. You get a burst of flavor in each bite. To make vegan lemon poppy seed muffins, replace the egg and milk. Use flaxseed meal mixed with water for the egg. For milk, use almond or oat milk. The rest of the recipe stays the same. You will still enjoy that moist texture and zesty flavor. For gluten-free muffins, swap the all-purpose flour for gluten-free flour. Make sure it is a blend that works well in baking. You might need to add a bit more liquid, so watch the batter. These muffins remain just as moist. The lemon and poppy seeds shine through beautifully. To keep your lemon poppy seed muffins fresh, store them in an airtight container. This helps to lock in moisture. You can leave them on the counter for up to three days. If you want them to last longer, refrigerate them for about a week. Just make sure to wrap them tightly to avoid drying out. Freezing is a great way to save muffins for later. Allow the muffins to cool completely before freezing. Then, wrap each muffin in plastic wrap. Place the wrapped muffins in a freezer bag or container. They can stay frozen for up to three months. When you're ready to eat them, just thaw them overnight in the fridge. Reheating your muffins can bring back their fresh taste. To do this, preheat your oven to 350°F (175°C). Place the muffins on a baking sheet and heat them for about 10 minutes. You can also use the microwave for quicker results. Heat each muffin for about 15-20 seconds. Enjoy your warm, flavorful lemon poppy seed muffins! Yes, you can use almond flour. It makes the muffins denser and moister. Replace the all-purpose flour with a 1:1 ratio. You might need to adjust the liquid slightly since almond flour absorbs moisture differently. Keep in mind, the texture and taste will change a bit. Check for doneness by inserting a toothpick into the center of a muffin. If it comes out clean or with a few crumbs, your muffins are ready. They should also spring back when lightly pressed. The tops will be golden brown. You can use melted coconut oil or unsweetened applesauce. Both will keep the muffins moist. If you want a lighter flavor, try using canola oil. Just remember, the taste may change slightly based on your choice. Absolutely! Adding nuts or chocolate chips can enhance the flavor and texture. I recommend using about ½ cup of your favorite mix-ins. Just fold them into the batter gently before baking. This will give your muffins a nice crunch or sweetness. In this post, you learned about making delicious muffins using simple steps. We covered key ingredients, measuring tips, and choices for dietary needs. I shared easy baking steps, texture tips, and creative variations. Also, I offered smart storage methods and answered common questions. Remember, baking is fun and lets you be creative. Enjoy your muffin-making journey and share your tasty results!

Lemon Poppy Seed Muffins Moist and Flavorful Recipe

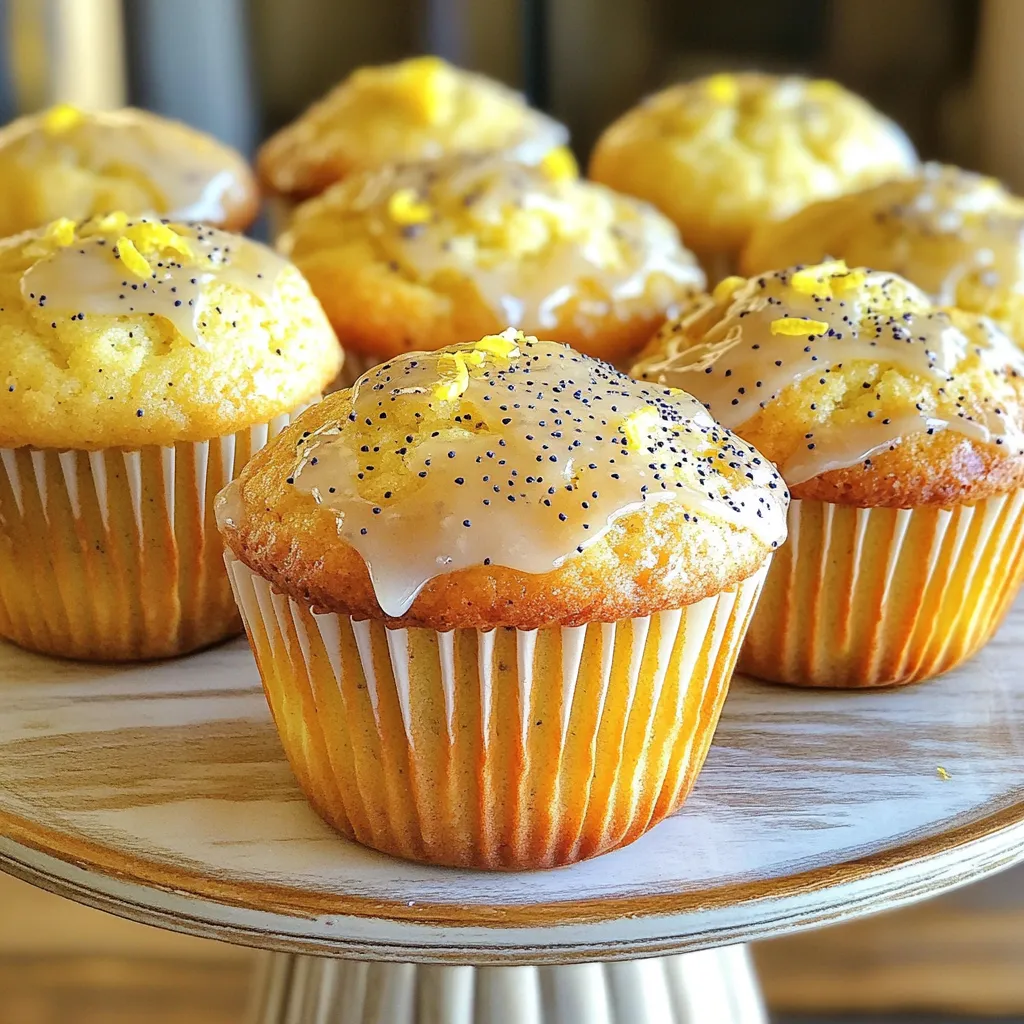
Are you ready to bite into something truly delicious? My Lemon Poppy Seed Muffins are moist, flavorful, and easy to

To make this cozy chicken pot pie soup, you will need: - 1 lb boneless, skinless chicken breasts - 4 cups chicken broth - 1 cup diced carrots - 1 cup diced celery - 1 cup frozen peas - 1 medium onion, chopped - 3 cloves garlic, minced - 1 teaspoon dried thyme - 1 teaspoon dried rosemary - 1 bay leaf - Salt and pepper to taste - 1 cup heavy cream - 1/4 cup all-purpose flour (for thickening) - 1 tablespoon olive oil These ingredients come together to create a rich and creamy soup. The chicken adds protein, while the broth provides a savory base. Carrots, celery, and peas contribute freshness and color. For an extra touch, consider adding: - Biscuit dough or puff pastry These options offer a delightful, flaky side that pairs perfectly with the soup. You can bake them separately and serve them warm alongside the soup. Seasonings elevate the flavor of the soup. You will use: - Dried thyme - Dried rosemary - Bay leaf - Salt and pepper These herbs add warmth and depth. Thyme and rosemary bring a savory note, while bay leaf enhances the overall flavor. Adjust the salt and pepper to suit your taste. This combination of ingredients makes a simple yet rich soup that warms you from the inside out. Enjoy crafting this dish with these key components! Start by heating a skillet over medium heat. Add one tablespoon of olive oil. Place the boneless, skinless chicken breasts in the skillet. Sear each side for about 3 to 4 minutes. You want them to be lightly browned. Once done, remove the chicken from the heat and set it aside. This step adds nice flavor to your soup. In the same skillet, add chopped onion, diced carrots, diced celery, and minced garlic. Cook these for about 5 minutes. Stir them often until the vegetables start to soften. This will build a great base for your soup. After that, transfer the sautéed mixture to the slow cooker. Add the seared chicken, 4 cups of chicken broth, dried thyme, dried rosemary, bay leaf, and some salt and pepper. Stir everything together to mix well. Cover the slow cooker and set it to low for 6 to 7 hours or high for 3 to 4 hours. The chicken needs to be cooked through and tender. Once it's done, take out the chicken and shred it using two forks. Return the shredded chicken back to the pot. In a separate bowl, whisk together 1 cup of heavy cream and 1/4 cup of all-purpose flour until smooth. Stir this mixture into the soup. Cook on high for another 30 minutes to let it thicken up. During the last 10 minutes, add in the frozen peas. Taste the soup and adjust the seasoning if needed. When ready, ladle the soup into bowls and garnish with fresh parsley. If you like, serve with warm biscuit dough or puff pastry on the side. Enjoy your cozy meal! To get the best flavor in your soup, use fresh herbs. Thyme and rosemary add depth. Searing the chicken first brings out great taste. Use good quality chicken broth for a richer base. Don’t skip the salt and pepper; they enhance all the flavors. For a thicker soup, mix flour with cream before adding. You can replace flour with cornstarch for a gluten-free option. If you want a creamier texture, add more cream. You can also use mashed potatoes to thicken. Just stir them in slowly until smooth. Searing the chicken adds a nice brown color and flavor. If you’re short on time, skip it. The soup will still taste good. Searing helps seal in juices, making the chicken tender. If you skip, just add the raw chicken straight to the slow cooker. {{image_2}} For a low-carb version, swap the heavy cream with coconut cream. This change keeps the soup rich while cutting carbs. You can also use cauliflower rice instead of flour for thickening. This keeps the soup thick without added carbs. Replace the potatoes and peas with zucchini and mushrooms for a new twist. These veggies add flavor without the carbs. To make this soup vegetarian, leave out the chicken. Instead, use chickpeas or lentils for protein. You can also add more vegetables, like bell peppers and green beans. Swap chicken broth for vegetable broth for a full flavor. Use the same spices to keep that cozy taste. This version is great for those who want a meat-free meal. You can customize this soup with your favorite vegetables. Try adding corn for sweetness or spinach for extra nutrients. Broccoli or green beans can also add crunch. Just remember to adjust cooking times. Softer veggies, like zucchini, need less time, while root veggies, like potatoes, may need more. This flexibility keeps the soup exciting every time you make it! To store leftovers, let the soup cool down first. Then, use an airtight container. This helps keep it fresh. I recommend using glass containers for best results. Label your container with the date you made it. You can store it in the fridge for up to 3 days. If you want to freeze the soup, let it cool completely. Pour the soup into freezer-safe bags or containers. Leave some space at the top for expansion. Seal them well and label with the date. You can freeze the soup for up to 3 months. Just remember, the cream may change texture after freezing. When ready to eat, thaw the soup overnight in the fridge. Pour the soup into a pot over medium heat. Stir often to avoid sticking. If the soup is too thick, add a little broth or water. Heat until warm. You can also use the microwave. Just heat in short bursts, stirring in between. Enjoy your cozy meal! Yes, you can make this soup without heavy cream. You can use milk or a dairy-free alternative. The soup will be lighter but still taste great. If you want creaminess, try adding a bit of sour cream or Greek yogurt. This adds flavor and keeps it rich. You can store chicken pot pie soup in the fridge for up to four days. Make sure to keep it in a sealed container. If you want to keep it longer, you can freeze it. In the freezer, it lasts for up to three months. A 6-quart slow cooker works best for this recipe. It gives enough space for all the ingredients. If you have a larger cooker, you can still use it. Just watch the cooking time, as larger cookers may cook faster. Yes, you can use frozen chicken for this recipe. Just add the frozen chicken directly to the slow cooker. You may need to increase the cooking time by one hour. Always ensure the chicken reaches a safe temperature before serving. In this article, we explored how to make delicious chicken pot pie soup. We reviewed main and optional ingredients, steps to prepare and cook, plus tips to enhance flavor. You learned about variations for low-carb and vegetarian options. We also covered storage methods to keep your soup fresh. Remember, a good soup is all about using fresh ingredients and having fun. Keep experimenting with flavors and techniques. Each pot you make can be unique and tasty! Enjoy your cooking and share your soup with others!

Slow Cooker Chicken Pot Pie Soup Simple and Rich Flavor

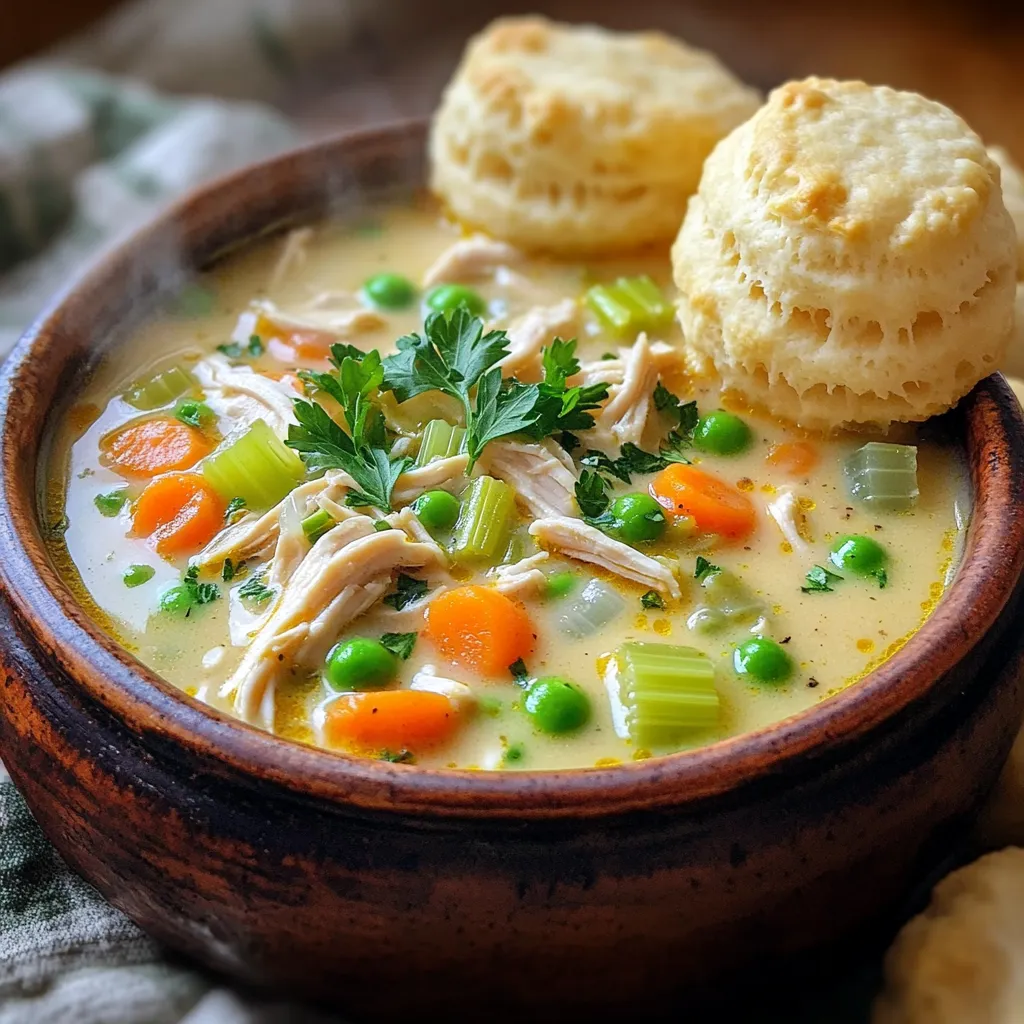
If you crave comfort food that warms the heart, you’re in the right place! Today, I’ll share my recipe for

To make tasty Air Fryer Garlic Butter Steak Bites, you need simple ingredients. Here is the list: - 1 lb sirloin steak, cut into 1-inch cubes - 4 tablespoons unsalted butter, melted - 4 cloves garlic, minced - 1 teaspoon fresh rosemary, chopped - 1 teaspoon fresh thyme, chopped - 1 teaspoon paprika - Salt and pepper to taste - Fresh parsley, chopped (for garnish) Each ingredient plays a key role. The sirloin steak gives a rich flavor. Butter adds a smooth texture, while garlic brings a punch of taste. Fresh herbs like rosemary and thyme add brightness. Paprika gives a hint of warmth, and salt and pepper enhance all the flavors. Finally, parsley adds a fresh touch as a garnish. These ingredients combine to create a meal that is both hearty and delightful. Enjoy cooking! Start by melting the butter in a medium bowl. Add the minced garlic, chopped rosemary, chopped thyme, paprika, salt, and pepper. Whisk everything together until it is smooth. This garlic butter mixture will give your steak bites great flavor. Now, take your cubed sirloin steak and add it to the bowl with the garlic butter. Toss the steak bites well to coat them evenly. Allow the steak to marinate for at least 15 minutes. This step helps the steak absorb the rich flavors. While the steak marinates, preheat your air fryer to 400°F (200°C). This usually takes about 3-5 minutes. Preheating is important for even cooking and a nice sear on your steak bites. Once the air fryer is ready, spread the marinated steak bites in a single layer in the basket. Avoid overcrowding the basket; this ensures even cooking. Cook the steak bites for 8-10 minutes. Shake the basket halfway through for best results. Aim for medium-rare to medium doneness for juicy bites. After cooking, carefully remove the steak bites from the air fryer. Place them on a serving platter. Drizzle any leftover garlic butter over the steak. For a fresh touch, garnish with chopped parsley. Enjoy your delicious and flavorful steak bites! To get perfect steak bites, follow these steps. First, cut your sirloin steak into 1-inch cubes. This size helps them cook evenly. Always preheat your air fryer for 3-5 minutes. This step ensures that the steak bites sear well. Do not overcrowd the basket. Leave space for air to flow, so they cook evenly. Check doneness by using a meat thermometer. For medium-rare, aim for 135°F. For medium, go for 145°F. Remember that the steak will continue to cook a bit after you take it out. Resting the meat for a few minutes helps keep it juicy. These steak bites pair well with many sides. Try serving them with mashed potatoes for comfort. A fresh salad adds a nice crunch. Grilled vegetables can bring color and flavor. You can also enjoy them with rice or garlic bread. Don’t forget a dipping sauce like chimichurri for extra flavor! {{image_2}} You can change the flavor of your steak bites by adding herbs and spices. Try using basil or oregano for a fresh twist. A pinch of cayenne pepper can give it a spicy kick. If you like a smoky flavor, add smoked paprika instead of regular paprika. These small changes can make a big difference. While sirloin works great, other cuts can shine too. Ribeye adds more fat, making it richer. Filet mignon gives a tender bite, perfect for special meals. Flank steak or skirt steak brings a more robust flavor. Just remember, adjust the cooking time for different cuts. You can make this dish even better by adding vegetables. Bell peppers and onions add sweetness and crunch. Zucchini or mushrooms can soak up the garlic butter flavor. Toss in bite-sized pieces with the steak bites before cooking. This adds color and nutrition to your meal. To store your leftover steak bites, place them in an airtight container. Let them cool to room temperature first. This helps prevent condensation and keeps them fresh. Store the container in the fridge for up to three days. When you're ready to enjoy your steak bites again, the air fryer is your best friend. Preheat the air fryer to 350°F (175°C). Place the steak bites in the basket. Heat them for about 4-5 minutes. Shake the basket halfway to warm them evenly. This keeps them juicy and flavorful. You can freeze the steak bites for later use. Just make sure they are completely cooled. Place them in a freezer-safe bag or container. They can last up to three months in the freezer. When you're ready to eat, thaw them in the fridge overnight. Reheat them in the air fryer as mentioned above for the best taste and texture. Cook steak bites in the air fryer for 8-10 minutes. Shake the basket halfway through. This helps them cook evenly. For the best taste, aim for medium-rare to medium doneness. Using frozen steak is not ideal. It will not cook evenly and can be tough. Thaw the steak first for the best results. This ensures the garlic butter flavor seeps in well. These steak bites pair well with many sides. Try mashed potatoes, rice, or a fresh salad. You can also serve them with crusty bread to soak up the garlic butter. You can change the flavors easily. Add spices like cayenne for heat or cumin for warmth. Try different herbs like oregano or basil for a unique twist. Steak bites can be part of a healthy diet. Sirloin is lean and packed with protein. Just watch the butter amount to keep the calories lower. Add veggies for extra nutrients. You now know how to make garlic butter steak bites using an air fryer. We covered ingredients, preparation steps, and tasty tips. I shared variations to fit your tastes and how to store leftovers. These steak bites are quick, tasty, and perfect for almost any meal. By trying different herbs or spices, you can make a new dish every time. Use these ideas to impress your family or friends with a simple, delicious meal. Enjoy the process and happy cooking!

Air Fryer Garlic Butter Steak Bites Tasty and Simple Dish

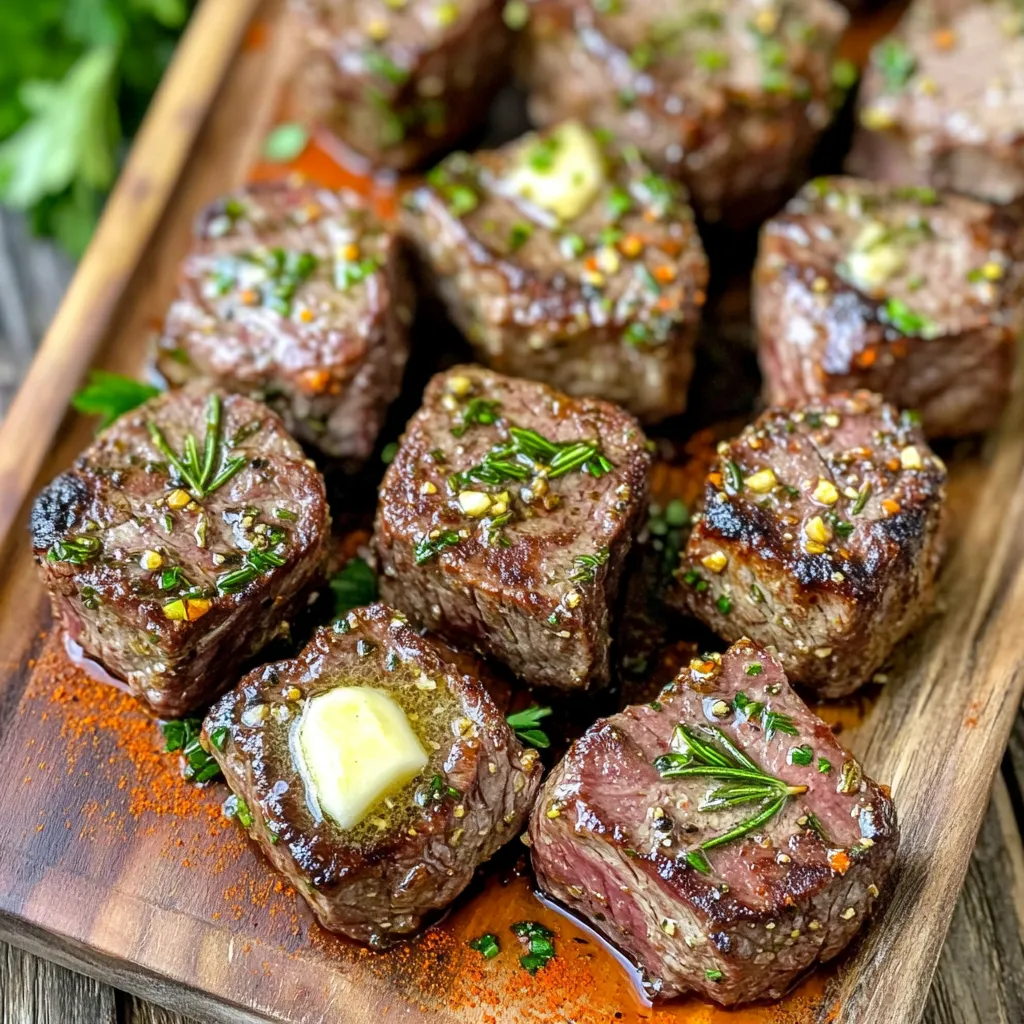
Craving a quick and flavorful meal? Let me introduce you to Air Fryer Garlic Butter Steak Bites! This tasty dish

- 2 cups frozen edamame in pods - 2 tablespoons olive oil - 3 cloves garlic, minced - 1 teaspoon red pepper flakes - 1 teaspoon soy sauce - 1 tablespoon sesame seeds - Salt to taste - Fresh cilantro for garnish (optional) The main ingredients for Air Fryer Spicy Garlic Edamame are simple yet powerful. Edamame provides a great base. It is packed with protein, which makes it a healthy choice. Olive oil adds richness and helps the flavors meld. Garlic brings a strong, aromatic taste. Red pepper flakes give it a spicy kick that you can adjust. Soy sauce adds umami, while sesame seeds add a nice crunch. Salt enhances all these flavors. If you want, add fresh cilantro for a pop of color and freshness. You can vary the spice level by changing the amount of red pepper flakes. If you want it milder, use less. For more heat, add more flakes or use a hot sauce. You can also switch up the oil. Instead of olive oil, try avocado or sesame oil for different flavors. Edamame is not just tasty; it is also nutritious. It is high in protein and fiber, making it filling. Edamame also contains vitamins and minerals, like vitamin K and folate. Garlic is another superfood. It can help boost your immune system and lower blood pressure. Together, these ingredients make a snack that is both delicious and good for you. Start with a large bowl. Add 2 cups of frozen edamame pods. Pour in 2 tablespoons of olive oil. Next, add 3 cloves of minced garlic. Sprinkle in 1 teaspoon of red pepper flakes. Finally, pour in 1 teaspoon of soy sauce. Toss everything well. You want the edamame to be evenly coated. This step is key for flavor. Set your air fryer to 350°F (175°C). Preheat it for about 3 to 5 minutes. Preheating helps cook the edamame evenly. It also gives it a nice crisp. Don’t skip this step if you want great results. Place the coated edamame in the air fryer basket. Spread them out in a single layer. Cook for 10 to 12 minutes. Make sure to shake the basket halfway through. This helps all sides cook well. Keep an eye on them. You want them tender, not overcooked. After 12 minutes, take the basket out. Now, sprinkle 1 tablespoon of sesame seeds over the edamame. Toss them to mix well. Return the basket to the air fryer for another 2 minutes. This gives the seeds a nice toast. Once done, serve the spicy garlic edamame. Adjust salt to taste. Garnish with fresh cilantro if you like. Enjoy this tasty snack! To avoid overcooking your edamame, watch the time closely. Cook for 10-12 minutes at 350°F. Shake the basket halfway through to keep them from sticking. This helps cook them evenly. For a crispy finish, make sure the edamame are in a single layer. Crowding the basket can lead to soggy pods. You can add more flavor by trying different ingredients. A squeeze of lime juice brightens the taste. You might also mix in ginger for a warm spice. If you like it hot, add more red pepper flakes. For sauces, think about adding a drizzle of sriracha or a splash of teriyaki. Both can enhance the flavor nicely. For presentation, serve your edamame in a rustic bowl. Add a small dish of soy sauce on the side for dipping. You can also sprinkle more sesame seeds on top for added crunch. To create a complete meal, pair the edamame with rice or a salad. They make a great side dish to grilled chicken or fish. Enjoy your snack as a tasty appetizer or a healthy snack! {{image_2}} You can change the flavor of your spicy garlic edamame easily. Try a sweet and spicy version. Simply add a tablespoon of honey or maple syrup to the mix. This makes a great balance of heat and sweetness. For an Asian-inspired seasoning, use five spice powder or miso paste instead of soy sauce. This gives a richer taste and adds depth to each bite. If you need gluten-free options, switch to tamari instead of soy sauce. This keeps the dish safe for those who avoid gluten. For a vegan alternative, ensure your soy sauce is labeled vegan. Most soy sauces are already vegan, but it’s good to check. You can also skip the sesame seeds if you want a nut-free snack. Edamame pairs well with many drinks and sides. A light beer or sake complements the spicy flavor. You can also serve it with a fresh salad or rice dish. This snack fits nicely with Asian cuisines like Japanese or Thai food. It adds a healthy touch to your meal while keeping it fun and flavorful. To keep your spicy garlic edamame fresh, store it in an airtight container. Let it cool to room temperature first. Then, place it in the fridge. This method helps maintain its flavor and texture. Aim to eat leftovers within three days for the best taste. - Proper storage techniques: Use a clean, dry container. Avoid stacking too many layers. - Tips for extending freshness: You can sprinkle a little salt to help preserve flavor. Keeping it sealed prevents moisture from ruining your snack. When reheating edamame, your goal is to restore its crispness. The air fryer is the best choice. Set it to 350°F (175°C) and heat for about 5 minutes. This method maintains both flavor and texture. - Best methods for reheating edamame: Air fry for 5 minutes or heat on the stove with a splash of oil. - Tips to maintain texture and flavor: Avoid microwaving, as it can make the edamame soggy. If using the stove, keep the heat low and stir often. It takes about 10-12 minutes to cook edamame in an air fryer. Preheat the air fryer to 350°F (175°C) for a few minutes. Toss the edamame in olive oil and spices, then place them in a single layer in the basket. Shake halfway for even cooking. Yes, you can use fresh edamame. Fresh edamame may cook a bit faster than frozen. Adjust the cooking time to about 8-10 minutes. Make sure to toss them in the same olive oil and spice mix for great flavor. To adjust the spice level, change the amount of red pepper flakes. Start with half a teaspoon if you prefer less heat. You can also add a bit of hot sauce or chili oil. Taste as you go to find your perfect balance. Some tasty dipping sauces include soy sauce, sriracha, or a spicy mayo. You can also try a simple mix of soy sauce and rice vinegar for a lighter taste. These sauces add extra flavor and make the snack even more fun! In this blog post, we explored how to make delicious air-fried edamame. We covered the main ingredients like edamame, olive oil, garlic, and more. You learned step-by-step instructions to prepare and cook it perfectly. We also discussed tips for achieving a great texture and flavor enhancements to try. Finally, we shared storage tips and ways to enjoy leftovers. Air-fried edamame is a healthy snack that’s quick and easy. Enjoy experimenting with different flavors and serving suggestions!

Air Fryer Spicy Garlic Edamame Flavorful Snack Recipe

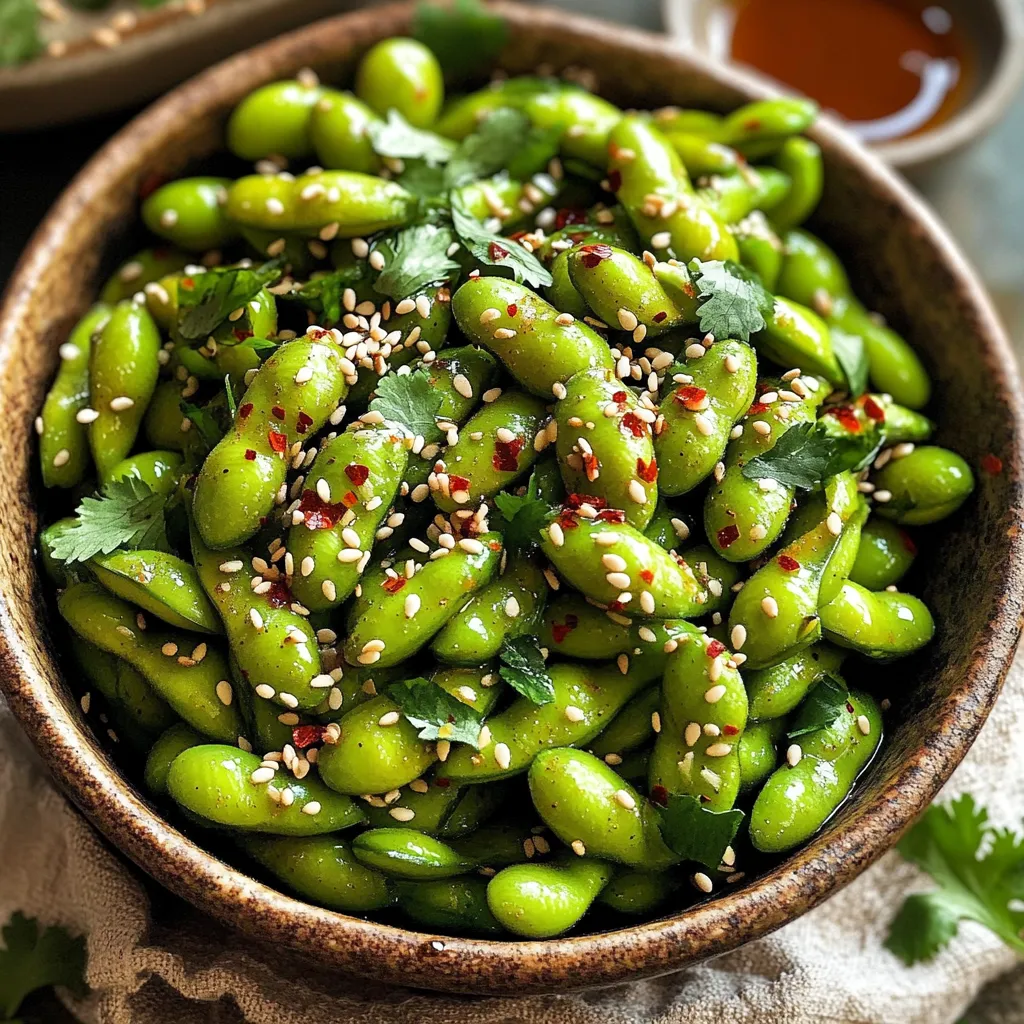
Looking for a quick and tasty snack? Try my Air Fryer Spicy Garlic Edamame recipe! This flavorful treat combines crispy

- 1 cup all-purpose flour - 1 cup whole wheat flour - 2 teaspoons baking powder - 1 teaspoon baking soda - 1 teaspoon ground cinnamon - 1/2 teaspoon ground nutmeg - 1/4 teaspoon ground ginger - 1/2 teaspoon salt - 1 cup canned pumpkin puree - 3/4 cup brown sugar, packed - 1/2 cup granulated sugar - 1/2 cup vegetable oil - 2 large eggs - 1 teaspoon vanilla extract - 1/2 cup chopped walnuts or pecans - 1 tablespoon granulated sugar (for topping) - 1 teaspoon cinnamon (for topping) I love baking these pumpkin coffee cake muffins. The blend of dry and wet ingredients creates a perfect balance. The dry ingredients give the muffins their structure. I use both all-purpose and whole wheat flour. The whole wheat flour adds a nutty flavor and extra fiber. Each spice plays a big role too. The baking powder and baking soda help the muffins rise, while cinnamon, nutmeg, and ginger give them a warm, comforting taste. For the wet ingredients, canned pumpkin puree is the star. It keeps the muffins moist and adds rich flavor. Brown sugar gives a deep sweetness, and granulated sugar adds a light touch. The oil makes the muffins tender, and eggs bind everything together. Vanilla extract enhances the flavors and adds a lovely aroma. If you like a nutty crunch, add walnuts or pecans as a topping. For extra sweetness, sprinkle a mix of sugar and cinnamon on top before baking. This gives the muffins a delightful, crispy crust. These ingredients blend to create muffins that are soft, flavorful, and simply irresistible. - Preheat the oven to 350°F (175°C). - Line a muffin tin with paper liners or grease it with non-stick spray. - In a large mixing bowl, combine: - 1 cup all-purpose flour - 1 cup whole wheat flour - 2 teaspoons baking powder - 1 teaspoon baking soda - 1 teaspoon ground cinnamon - 1/2 teaspoon ground nutmeg - 1/4 teaspoon ground ginger - 1/2 teaspoon salt Mix these ingredients well. This step gives your muffins a great structure. - In a separate bowl, blend: - 1 cup canned pumpkin puree - 3/4 cup brown sugar, packed - 1/2 cup granulated sugar - 1/2 cup vegetable oil - 2 large eggs - 1 teaspoon vanilla extract Mix until smooth. This mixture adds moisture and flavor. - Gradually add the dry ingredients to the wet ingredients. - Stir gently until just combined. It’s okay to have a few lumps. If you want nuts, fold them in now. - Divide the batter into muffin cups, filling each about 3/4 full. - In a small bowl, mix together: - 1 tablespoon granulated sugar - 1 teaspoon cinnamon Sprinkle this topping over the batter in each cup. - Bake in the preheated oven for 18-20 minutes. Check doneness with a toothpick. If it comes out clean, they’re done. - Cool the muffins in the pan for 10 minutes before moving them to a wire rack. - Use room temperature ingredients. This helps your muffins mix better. - Avoid overmixing the batter. This keeps your muffins fluffy and light. - Serve your muffins warm. A dusting of powdered sugar makes them special. - Try them with creamy butter. You can also add a flavored cream cheese spread. - Add a splash of milk. This gives your muffins extra moisture and a soft bite. {{image_2}} Adding nuts to your muffins makes them even better. You can use chopped walnuts or pecans. This gives a nice crunch and adds flavor. Nuts also bring healthy fats to the mix. If you like, fold in the nuts after mixing the wet and dry ingredients. This way, they stay whole and crunchy in each bite. For a sweeter treat, you can add chocolate chips. This change makes the muffins richer and more fun. I recommend using semi-sweet chocolate chips. Just sprinkle them into the batter before you fill the muffin cups. The chocolate melts while baking, creating a gooey surprise inside. Your family will love this twist! If you need a gluten-free option, don’t worry! You can easily swap out the all-purpose flour. Use a gluten-free flour blend instead. Just make sure your blend has a good mix of flours. This way, your muffins still taste great and have the right texture. Follow the same steps in the recipe, and you’ll have delicious gluten-free muffins! Store your pumpkin coffee cake muffins in an airtight container at room temperature. They stay fresh for up to 3 days. This is perfect if you plan to enjoy them right away. Just keep them away from sunlight and heat. If you want to keep your muffins longer, refrigerate them. They can last up to a week this way. Make sure to place them in an airtight container to prevent drying out. This is a great option if you bake a big batch. For even longer storage, freeze the muffins. Use a zip-top bag and squeeze out as much air as you can. They can stay good for up to 3 months. When you’re ready to eat them, just thaw them at room temperature before serving. This way, they taste fresh and delicious, just like when you first made them! You can use applesauce or flaxseed meal instead of eggs. For flaxseed, mix one tablespoon with three tablespoons of water. Let it sit for a few minutes to thicken. Applesauce gives moisture and a hint of sweetness. This method works well and keeps the muffins tasty. Yes, using fresh pumpkin is a great idea! Make sure to cook and puree it first. Cut the pumpkin into pieces, steam it, or roast it until soft. Once it's cool, blend it into a smooth puree. This adds a lovely, fresh flavor to your muffins. These muffins pair wonderfully with coffee or tea. You can also enjoy them as a snack. Spread some butter or cream cheese on top for extra flavor. They are perfect for breakfast or an afternoon treat. Absolutely! Just adjust the baking time. For mini muffins, bake them for about 10-12 minutes. Keep an eye on them, and check for doneness with a toothpick. Mini muffins are fun and easy to share! You have learned how to make delicious pumpkin muffins from this guide. We covered the needed ingredients, step-by-step instructions, and useful tips. You can customize your muffins with toppings or other flavors, like chocolate. Remember, these muffins are best warm and can be stored or frozen for later. Enjoy baking! Your creations will surely impress friends and family. Use these tips to make perfect muffins every time. Happy baking!

Pumpkin Coffee Cake Muffins Irresistible and Tasty

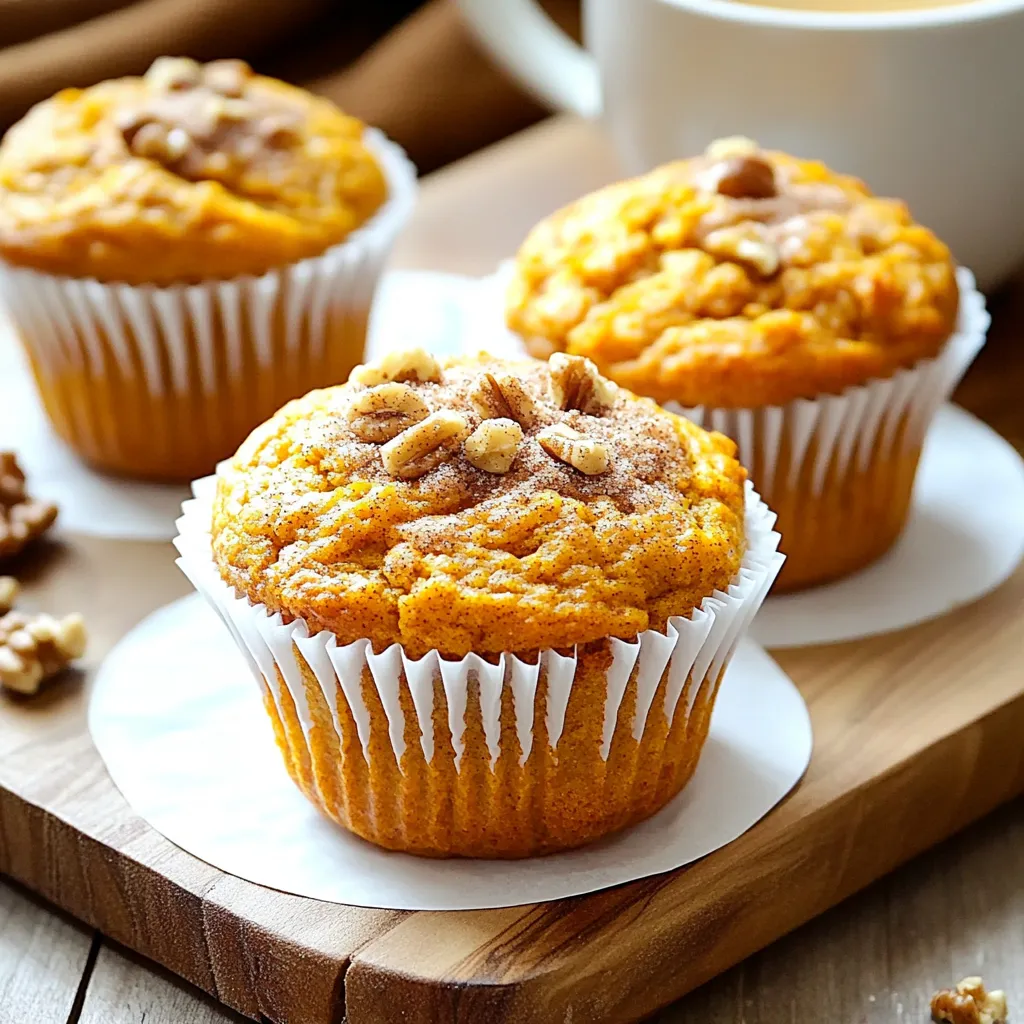
If you love warm, spiced treats, you’ll crave these Pumpkin Coffee Cake Muffins. This easy recipe mixes rich pumpkin puree

To make Caramel Apple Whoopie Pies, gather these simple ingredients: - 1 cup all-purpose flour - 1 teaspoon baking powder - 1/2 teaspoon baking soda - 1/2 teaspoon ground cinnamon - 1/4 teaspoon salt - 1/2 cup unsalted butter, softened - 1 cup brown sugar, packed - 1 large egg - 1 teaspoon vanilla extract - 1/2 cup applesauce - 1 cup finely chopped apple (like Granny Smith) - 1/2 cup caramel sauce (store-bought or homemade) - 1 cup powdered sugar - 2 tablespoons milk If you need to make swaps, here are some ideas: - Butter: Use coconut oil or margarine. - Brown Sugar: White sugar plus molasses works as a substitute. - Applesauce: You can use mashed bananas for a different flavor. - Caramel Sauce: Try chocolate sauce for a unique twist. To make your whoopie pies even more special, consider these options: - Drizzle extra caramel sauce on top. - Add thin apple slices for a fresh touch. - Sprinkle chopped nuts like walnuts or pecans for extra crunch. These ingredients and options help create a sweet treat that captures fall's essence. Enjoy! 1. First, preheat your oven to 350°F (175°C). This step is key for even baking. 2. Line a baking sheet with parchment paper. This helps to prevent sticking. 3. In a medium bowl, whisk together: - 1 cup all-purpose flour - 1 teaspoon baking powder - 1/2 teaspoon baking soda - 1/2 teaspoon ground cinnamon - 1/4 teaspoon salt This mix makes the base for your whoopie pies. 4. In a large bowl, cream together: - 1/2 cup unsalted butter, softened - 1 cup brown sugar, packed Mix until it’s light and fluffy. This adds sweetness and moisture. 5. Beat in: - 1 large egg - 1 teaspoon vanilla extract Mix well until everything is combined. 6. Stir in: - 1/2 cup applesauce This adds flavor and keeps the cookies soft. 7. Gradually mix in your dry ingredients. Stir until just combined. Avoid over-mixing to keep them soft. 8. Fold in: - 1 cup finely chopped apple (I like Granny Smith for a tart taste) Make sure the apple is evenly distributed in the dough. 9. Drop rounded tablespoons of cookie dough onto the prepared sheet. Leave space between each dollop for spreading. 10. Bake for 12-15 minutes. Look for lightly golden edges. 11. Once done, let them cool on the baking sheet for 5 minutes. Then transfer to a wire rack to cool completely. 12. In a small bowl, whisk together: - 1 cup powdered sugar - 2 tablespoons milk This makes a smooth frosting. 13. Once the cookies are cool, spread a dollop of frosting on one cookie's flat side. 14. Drizzle with: - 1/2 cup caramel sauce Top with another cookie to make a sandwich. 15. Repeat this process until all cookies are assembled. These whoopie pies are a fun fall treat. Enjoy the sweet and spiced flavors that remind you of cozy autumn days! To get the best texture in your whoopie pies, use softened butter. Cream it well with the brown sugar. This step adds air and makes your pies fluffy. Make sure you mix the dry and wet ingredients separately before combining them. This helps avoid lumps and ensures a smooth batter. When adding the chopped apple, fold it in gently. This helps keep the batter light. One common mistake is overmixing the batter. This can lead to tough whoopie pies. Mix just until the ingredients blend. Another mistake is not measuring ingredients properly. Use standard measuring cups for accuracy. Also, ensure your oven is at the right temperature. An oven that is too hot can burn the edges. Lastly, don’t skip cooling the pies before frosting them. The frosting will melt if the pies are warm. For a fun presentation, arrange your whoopie pies on a decorative plate. Drizzle extra caramel sauce on top for a sweet touch. Garnish with thin apple slices for color and freshness. You can also serve them with a scoop of vanilla ice cream. This makes a great dessert for fall gatherings or cozy nights at home. Enjoy sharing these treats with family and friends! {{image_2}} You can change the flavor of your whoopie pies by using different spices or apples. Instead of cinnamon, try nutmeg or allspice for a warm twist. You can also mix in some chopped nuts for crunch. For apples, Granny Smith works great, but Honeycrisp or Fuji adds sweetness. These small changes add fun and new tastes to your whoopie pies. Want to make your whoopie pies a bit healthier? You can swap regular sugar for coconut sugar or use a sugar substitute like stevia. For gluten-free options, replace all-purpose flour with almond or oat flour. Applesauce keeps the pies moist without extra fat, making them tasty and guilt-free. Fall brings the chance to try seasonal ingredients. Add pumpkin puree to the batter for a rich flavor. Mixing in some grated ginger gives a spicy kick. You can also sprinkle in some chopped pecans for that perfect autumn crunch. These seasonal twists make your whoopie pies cozy and fun for gatherings. To keep your whoopie pies fresh, store them in an airtight container. This helps prevent them from drying out. You can keep them at room temperature for up to two days. If you want to save them longer, the fridge is a good option. They'll last for about a week in the fridge. If you want to enjoy these treats later, freezing is easy. First, let the whoopie pies cool completely. Then, wrap each pie in plastic wrap. Place them in a freezer-safe bag or container. They can stay frozen for up to three months. When you're ready to eat, just thaw them in the fridge overnight. To enjoy your whoopie pies warm, you can reheat them. Place them in the microwave for about 10-15 seconds. This will make them soft and cozy again. You can also warm them in the oven at 350°F (175°C) for 5-7 minutes. Just keep an eye on them to avoid drying out. Yes, you can use different types of apples. Granny Smith apples work well for their tartness. However, you can also choose sweeter apples like Fuji or Honeycrisp. Just remember to chop them finely. This will help mix them into the dough easily. Each apple type brings its own flavor. Experiment and find your favorite! Store your whoopie pies in an airtight container. This keeps them fresh for up to three days at room temperature. If you live in a hot area, keep them in the fridge. This helps maintain their soft texture. Just let them sit for a few minutes before serving. For longer storage, consider freezing them. Yes, you can make the frosting ahead of time. Just mix the powdered sugar and milk together until smooth. Store it in the fridge in a sealed container. When you are ready, let it sit at room temperature before using. This will ensure it spreads easily on your whoopie pies. Making it ahead saves time on busy baking days! We've covered a lot about whoopie pies today. From ingredients to baking, I hope you feel ready to impress. Remember to explore flavor boosts and healthier choices. Avoid common mistakes to get the best texture. Store your goodies well and enjoy them later. These tips help make your pies a hit. Now it's time to get baking! Enjoy your tasty creations and share them with friends. You’ll love the smiles they bring.

Caramel Apple Whoopie Pies Irresistible Fall Treat

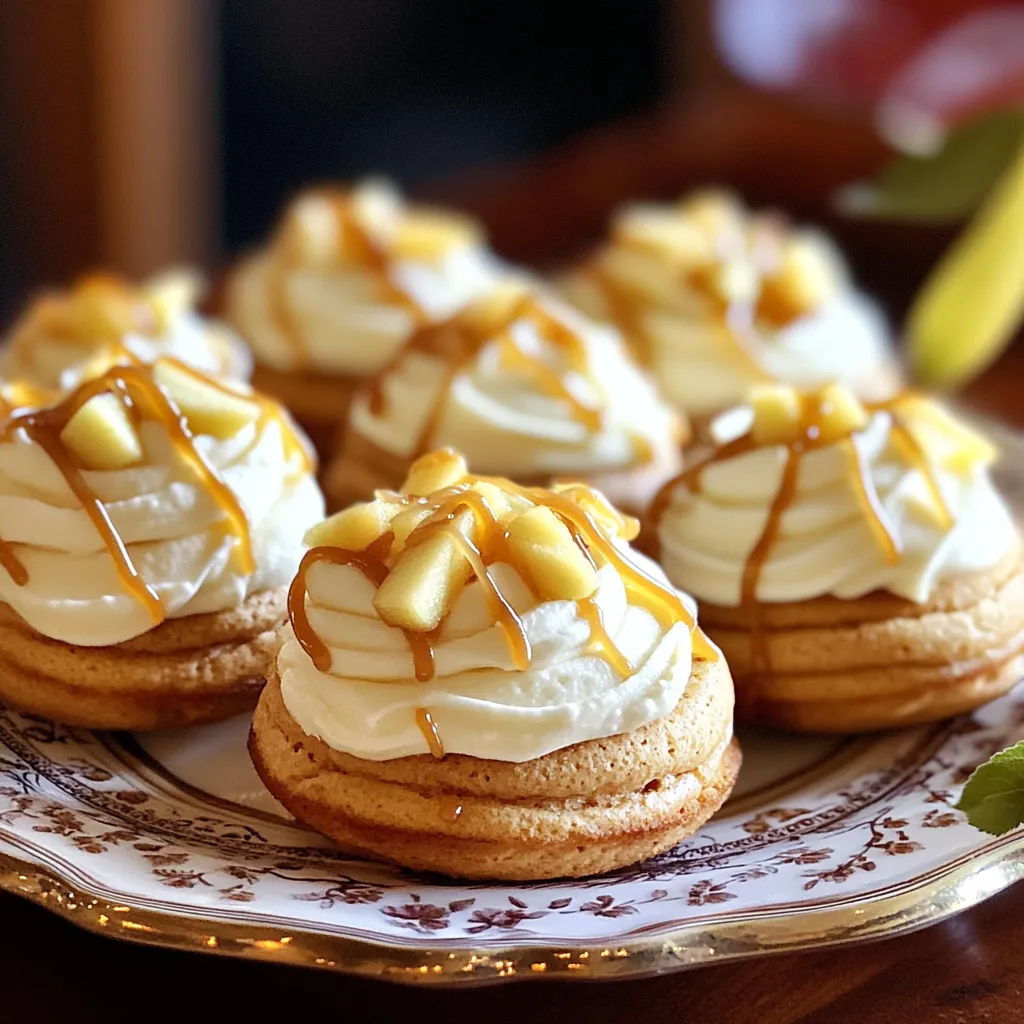
Get ready for the ultimate fall treat: Caramel Apple Whoopie Pies! These soft, chewy desserts blend sweet caramel and tart

To make these delightful cheesecake cups, you need: - 1 cup graham cracker crumbs - 4 tablespoons unsalted butter, melted - 16 oz cream cheese, softened - 1/2 cup granulated sugar - 1 teaspoon vanilla extract - 1 cup heavy whipping cream - 1/4 cup salted caramel sauce (plus extra for drizzling) - A pinch of sea salt These ingredients create a rich and creamy dessert. The graham cracker crumbs form a sweet crust. The cream cheese and whipped cream blend together for a smooth filling. The salted caramel adds that perfect touch of sweetness and salt. You can add some optional ingredients to make your cheesecake cups even better: - Whipped cream for topping This whipped cream adds a light, fluffy layer on top. It makes the dessert feel more special and indulgent. You can also sprinkle some flaky sea salt on top for a gourmet touch. If you need to swap out some ingredients, here are a few ideas: - Use gluten-free graham crackers for a gluten-free crust. - Low-fat cream cheese works well if you want a lighter option. - You can use homemade salted caramel sauce for a fresh taste. These substitutions help you customize the recipe to fit your needs. Always remember to taste as you go to find the best balance of flavors. First, grab a medium bowl. Add 1 cup of graham cracker crumbs and 4 tablespoons of melted unsalted butter. Mix them well. You want the crumbs to be coated nicely. Next, take your serving cups or small jars. Divide the crust mixture evenly into each cup. Use the back of a spoon to press it down firmly. This makes a solid base. Set the cups aside for later. Now, get a large mixing bowl. Beat 16 ounces of softened cream cheese with 1/2 cup of granulated sugar and 1 teaspoon of vanilla extract. Mix until it’s smooth and creamy. Check for lumps; none should be there. In a separate bowl, whip 1 cup of heavy cream until stiff peaks form. This makes it light and fluffy. Gently fold the whipped cream into the cream cheese mixture. Be careful not to deflate the whipped cream. Then, stir in 1/4 cup of salted caramel sauce and a pinch of sea salt. This adds a nice flavor boost. Next, take the cheesecake mixture and spoon it over the graham cracker crusts. Fill each cup about ¾ full. This leaves room for toppings. Place the cups in the refrigerator. Chill them for at least 4 hours, or until set. This helps the flavors meld. Before serving, drizzle some extra salted caramel sauce on top of each cup. If you like, add whipped cream for a treat. Enjoy your delightful dessert! To get that perfect whipped cream, start with cold cream. Cold cream whips better and faster. Whip until you see stiff peaks. This means the cream holds its shape. Then, fold it gently into the cheesecake mix. Be careful not to stir too hard. You want to keep that light and airy texture. This will make your cheesecake cups creamy and fluffy. Salted caramel is all about balance. You need both sweet and salty flavors. When mixing in the salted caramel sauce, taste as you go. Start with a little, then add more if needed. The pinch of sea salt adds depth. It enhances the sweet caramel flavor. Just make sure not to over-salt. A perfect mix will leave you craving more. Make your dessert cups shine with simple touches. After chilling, drizzle extra salted caramel on top. This adds a glossy finish. For a fancy touch, sprinkle flaky sea salt on top. Use a dollop of whipped cream for height. You can even add a small piece of caramel candy as a garnish. These little details will wow your guests and make your dessert look gourmet. {{image_2}} You can change the flavor of your cheesecake cups easily. Try adding fruit purees. Strawberry, blueberry, or raspberry work great. Just mix 1/2 cup of fruit puree into the cream cheese mixture. You can also swap out the salted caramel for chocolate sauce. Melted chocolate mixed in will create a rich flavor. For a citrus twist, add lemon or lime zest to the cream cheese. This gives a bright and fresh taste. If you want a gluten-free option, use almond flour or gluten-free cookies. Simply replace the graham cracker crumbs with 1 cup of almond flour. Mix it with 4 tablespoons of melted butter. This will give you a tasty and crunchy crust. Another option is to use gluten-free digestive biscuits. Crush them and follow the same steps as the original crust. You can make your cheesecake cups special for holidays. In the fall, add pumpkin puree and spices like cinnamon and nutmeg. This gives a cozy taste perfect for autumn. During the winter, try peppermint extract in the cream cheese. Top with crushed candy canes for a festive look. In spring, mix in fresh lemon juice and zest. This makes a light, refreshing dessert for warm weather. Each season brings new flavors to enjoy! To keep your salted caramel cheesecake cups fresh, store them in the fridge. Use an airtight container or cover the cups tightly with plastic wrap. This keeps moisture in and prevents the cheesecake from absorbing odors. Make sure to chill them right after they set. Enjoy them cold for the best taste. You can freeze these cheesecake cups if you want to save some for later. First, let them chill completely in the fridge. Then, place them in a freezer-safe container. Make sure they are well covered to avoid freezer burn. To thaw, move them to the fridge the night before you eat them. This helps them regain their creamy texture. When stored properly, cheesecake cups last about five days in the fridge. For the best taste, eat them within this time frame. If frozen, they can last up to three months. Just remember to check for any signs of spoilage before enjoying them. Keeping an eye on freshness helps you savor every bite. Yes, you can use low-fat cream cheese. It will still taste great. The texture might be a bit different. Your cheesecake cups may be less rich but still creamy. These cheesecake cups last up to five days in the fridge. Store them in an airtight container. Keep them away from strong odors to maintain their flavor. The best toppings include whipped cream and extra salted caramel. You can also use chocolate shavings or fresh fruit. A sprinkle of sea salt adds a nice touch too. Yes, you can make these cups a day or two ahead. They chill well in the fridge. Just add any toppings right before serving for freshness. You can find great salted caramel sauce at local grocery stores. Look for brands that focus on quality ingredients. You can also make your own at home for a personal touch. In this post, we explored making salted caramel cheesecake cups. We covered key ingredients, including optional items that boost flavor. The step-by-step instructions made the process clear and easy. I shared tips to improve whipped cream and balance sweetness. You can even try different flavors or make gluten-free versions. Remember to store your cups properly to keep them fresh. Enjoy creating these simple desserts, and have fun experimenting with variations! Your kitchen will smell amazing, and your taste buds will thank you.

Salted Caramel Cheesecake Cups Delightful Dessert Treat

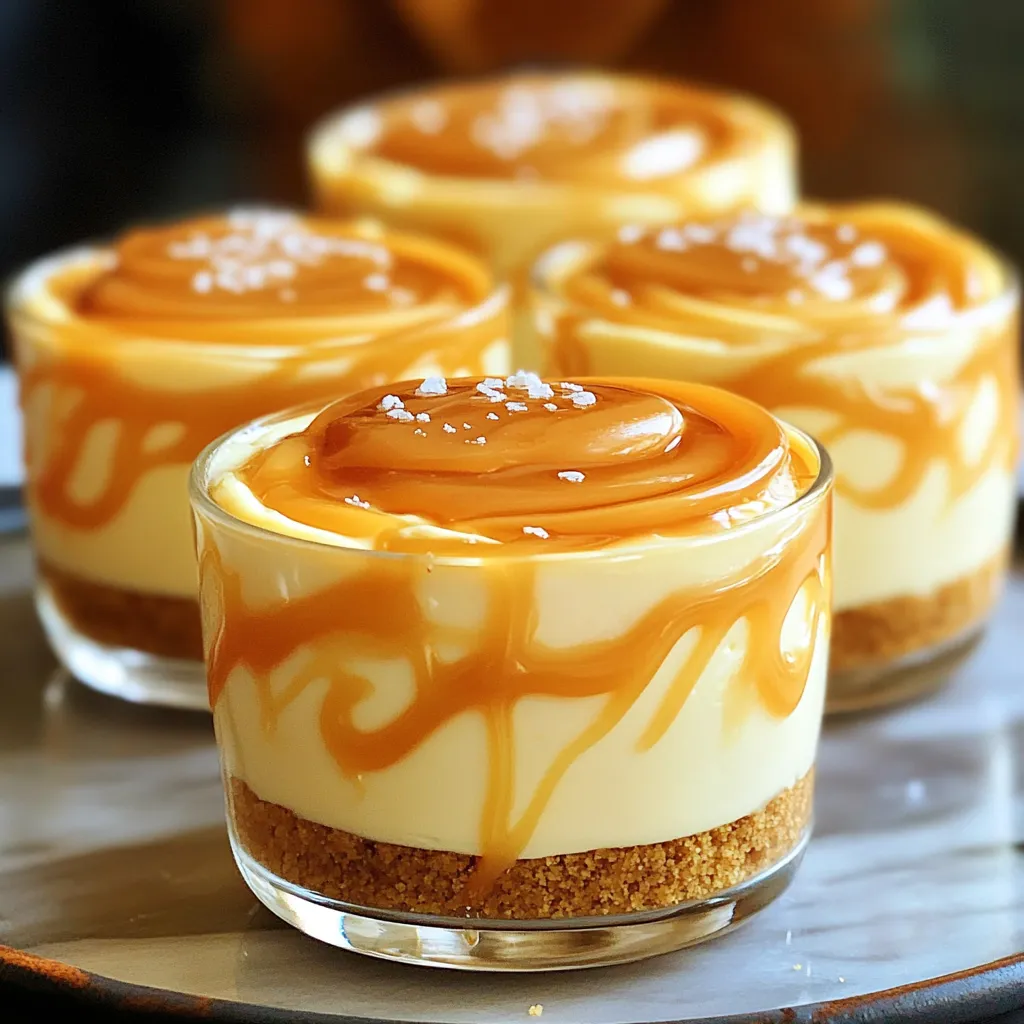
Are you ready for a dessert that feels like a treat but is easy to make? Salted caramel cheesecake cups

Older posts
Newer posts
← Previous Page1 … Page10 Page11 Page12 … Page84 Next →

dsad

© 2026 juliesdish • Built with GeneratePress

Our Policies

  • Copyright Policy
  • Cookie Policy
  • GDPR Policy
  • Privacy Policy
  • Disclaimer
  • Terms Of Use

More Information

  • Home
  • About
  • Contact
  • Appetizers
  • Dessert
  • Dinner
  • Drinks
©2026, juliesdish About Back To Top