Skip to content
DisclaimerTerms Of UseGDPR PolicyCookie Policy

juliesdish

  • Home
  • Drinks
  • Appetizers
  • Dinner
  • Dessert
  • About
  • Contact
  • Privacy Policy
DisclaimerTerms Of UseGDPR PolicyCookie Policy

NO-ING-IMG

- 1 ½ cups all-purpose flour - 1 cup canned pumpkin puree - ¾ cup granulated sugar - ½ cup brown sugar, packed - 1 teaspoon baking powder - ½ teaspoon baking soda - ½ teaspoon salt - 1 teaspoon ground cinnamon - ½ teaspoon ground nutmeg - ½ teaspoon ground ginger - ½ cup vegetable oil - 2 large eggs - 1 teaspoon vanilla extract - ½ cup chopped pecans (optional) - ½ cup all-purpose flour - ⅓ cup brown sugar, packed - ¼ cup rolled oats - ½ teaspoon ground cinnamon - ¼ cup cold butter, cubed To make perfect pumpkin streusel muffins, gather these key ingredients. First, you need flour, pumpkin puree, and sugars. The flour gives structure. Canned pumpkin makes the muffins moist and flavorful. Granulated and brown sugars add sweetness and depth. Next, I add key spices. Baking powder and baking soda help the muffins rise. Salt enhances all the flavors. Cinnamon, nutmeg, and ginger add warmth and spice. Vegetable oil keeps the muffins tender. Eggs and vanilla bring richness to the batter. Don’t forget the pecans! They add a nice crunch. For the streusel topping, mix flour, brown sugar, and oats. Add cinnamon, and finish with cold butter. This topping creates a nice crunch on top of the soft muffins. Once you have your ingredients ready, you can create these tasty treats. This recipe is simple and fun, perfect for any baker. - Preheat the oven to 350°F (175°C). - Line or grease your muffin tin. This step helps the muffins release easily after baking. - In a large bowl, whisk together 1 ½ cups of flour, baking powder, baking soda, salt, and spices. - The spices include 1 teaspoon of cinnamon, ½ teaspoon of nutmeg, and ½ teaspoon of ginger. This mix adds warmth and flavor to your muffins. - In another bowl, combine 1 cup of pumpkin puree, ¾ cup of granulated sugar, and ½ cup of brown sugar. - Add ½ cup of vegetable oil, 2 large eggs, and 1 teaspoon of vanilla extract. - Mix until smooth. This mixture brings moisture and sweetness to the muffins. - Gradually add the dry ingredients to the wet ingredients. - Gently stir until just combined. A few lumps are okay. - If you like nuts, fold in ½ cup of chopped pecans for extra crunch. - In a small bowl, combine ½ cup of flour, ⅓ cup of brown sugar, ¼ cup of rolled oats, and ½ teaspoon of cinnamon. - Cut in ¼ cup of cold butter using a pastry cutter or your fingers. Aim for coarse crumbs. This topping adds a sweet, crunchy layer to the muffins. - Spoon the muffin batter into the prepared muffin tin. Fill each cup about ¾ full. - Generously sprinkle the streusel topping over each muffin. - Bake in the preheated oven for 18-22 minutes. Use a toothpick to check doneness; it should come out clean. - Let the muffins cool in the tin for 5 minutes before moving them to a wire rack to cool completely. These steps will help you create pumpkin streusel muffins that are fluffy, moist, and packed with flavor! To make your muffins soft, avoid overmixing. Mix just until the dry and wet ingredients come together. A few lumps are fine. Using room temperature ingredients also helps. Cold eggs or pumpkin can lead to dense muffins. You can boost flavor by adding spices. Try a bit more cinnamon or a pinch of clove. If you want, adjust the sugar levels to your taste. Adding chocolate chips or dried fruit can give your muffins a sweet twist. Pecans add crunch but are optional. For a special touch, dust the muffins with powdered sugar. This adds beauty and sweetness. Serve them warm on a rustic board or a bright plate. Pair with coffee or tea for a cozy treat. {{image_2}} You can make these muffins gluten-free easily. Use gluten-free all-purpose flour. Brands like Bob's Red Mill work great. Just measure the same amount as regular flour. You may also try almond flour or coconut flour. Each flour provides a unique taste and texture. To make these muffins vegan, replace the eggs with flax eggs. Mix 1 tablespoon of ground flaxseed with 2.5 tablespoons of water. Let it sit for 5 minutes until thick. For dairy, use almond or soy milk instead of regular milk. You can also swap vegetable oil with coconut oil for added flavor. Don’t stop at pumpkin! You can add fruits or nuts to change the flavor. Dried cranberries give a sweet and tart twist. Chopped walnuts add a nice crunch. You could also try chocolate chips for a sweeter treat. Mix and match to find your favorite combo! Store your pumpkin streusel muffins at room temperature. Place them in an airtight container. This keeps them soft and fresh for up to three days. If you want to store them longer, the fridge is not the best choice. It can dry them out. Instead, keep them cool in a dry place away from sunlight. To freeze muffins, wait until they are completely cool. Wrap each muffin tightly in plastic wrap. Place the wrapped muffins in a freezer bag or container. They can last up to three months in the freezer. When ready to eat, take a muffin out and let it thaw at room temperature. For a warm treat, microwave it for 15-30 seconds. Freshly baked pumpkin streusel muffins will stay good for about three days at room temperature. If you freeze them, they will taste great for up to three months. Always check for signs of spoilage before eating, like mold or an off smell. Enjoy them fresh to get the best flavor and texture! To check if the muffins are done, use a toothpick. Insert it into the center of a muffin. If it comes out clean, the muffins are ready. You can also look for a golden-brown top and a slight spring when you touch them. Yes, you can use fresh pumpkin. First, peel and chop the pumpkin into small pieces. Then, steam or roast the pieces until soft. Blend them into a smooth puree. Make sure to measure one cup for the recipe. If you want to skip pecans, try walnuts or almonds. You can also use seeds like pumpkin or sunflower seeds. If you're avoiding nuts, simply leave them out for a nut-free option. To add moisture, you can mix in some yogurt or sour cream. You might also try using applesauce or an extra egg. These ingredients help keep the muffins soft and tender. Yes, you can easily make mini muffins. Fill the mini muffin tin about halfway. Bake for 12-15 minutes. Check for doneness with a toothpick. In this post, we explored making delicious pumpkin streusel muffins. We covered essential ingredients, step-by-step instructions, and helpful tips. Remember, using fresh ingredients and avoiding overmixing helps achieve great texture. You can also try variations like gluten-free and vegan options to suit your needs. With the right storage, your muffins stay fresh longer. Enjoy baking, and share these tasty treats with friends and family!

Pumpkin Streusel Muffins Bakery Style Irresistible Treat

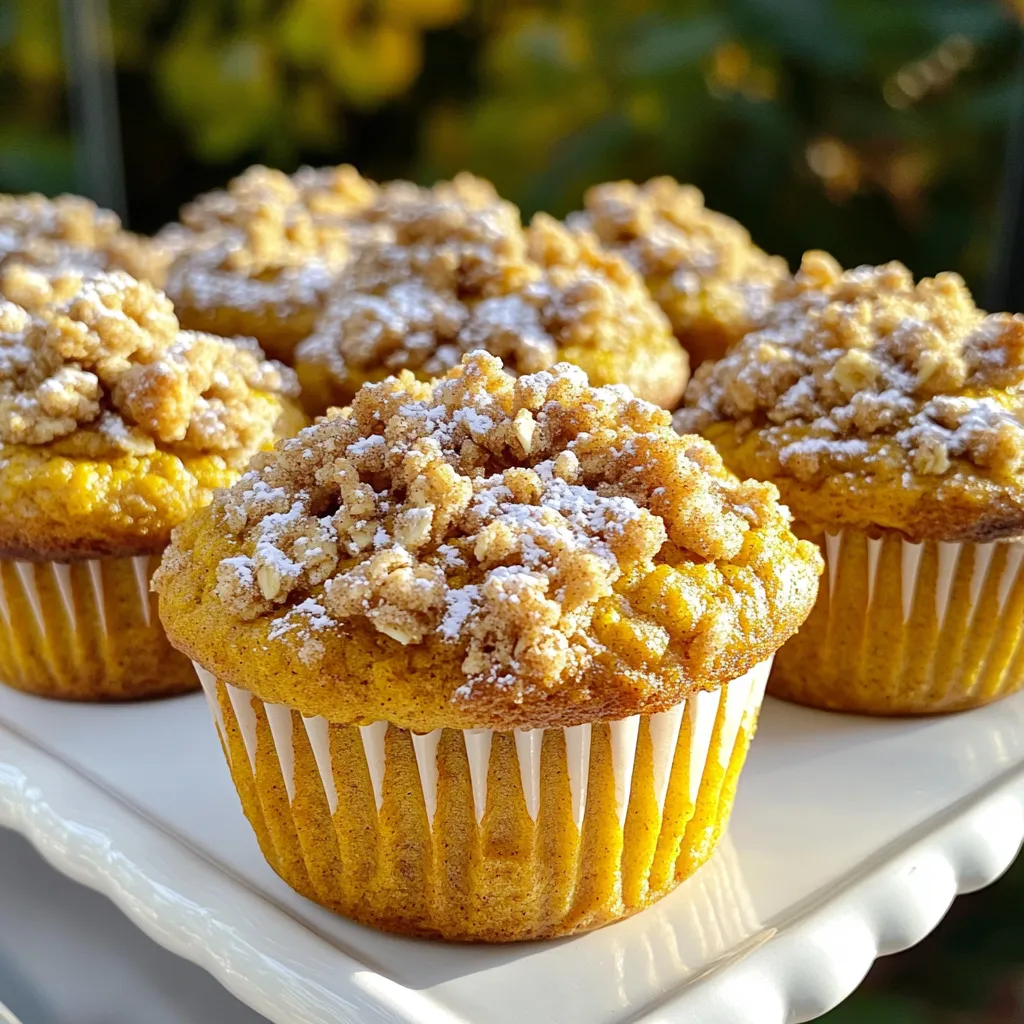
Are you ready to savor the ultimate fall treat? My Pumpkin Streusel Muffins Bakery Style blend warm spices and rich

- 1 package (16 oz) potato gnocchi - 1 cup sun-dried tomatoes in oil, drained and chopped - 1 cup heavy cream - 1 cup vegetable broth - 1 cup fresh spinach - 1/2 cup grated Parmesan cheese - 2 cloves garlic, minced - 1 teaspoon dried oregano - 1 teaspoon red pepper flakes (optional) - Salt and pepper to taste - Fresh basil for garnish This recipe brings together simple yet rich flavors. First, we use potato gnocchi, which is soft and fluffy. The sun-dried tomatoes add a sweet and tangy taste. Their oil helps to add depth to the dish. Heavy cream makes the sauce smooth and rich. Vegetable broth adds a savory layer without being too heavy. Fresh spinach gives the dish a nice color and a healthy boost. Garlic adds a warm, aromatic flavor. Dried oregano brings a hint of earthiness. Red pepper flakes can add a nice kick, but feel free to skip them if you prefer mild flavors. Lastly, salt and pepper are key for seasoning, making sure everything comes together beautifully. Don't forget the fresh basil for garnish! It adds a pop of color and freshness to the dish. Each ingredient plays a role in creating a creamy delight that is both comforting and satisfying. To make creamy sun-dried tomato gnocchi, start by gathering your ingredients. You'll need potato gnocchi, sun-dried tomatoes, heavy cream, vegetable broth, spinach, and cheese. This dish comes together quickly in one pot. It takes about 20 minutes to cook and serves four. First, heat a large pot over medium heat. Add the chopped sun-dried tomatoes and minced garlic. Sauté for 2-3 minutes. The garlic should become fragrant and golden. This step adds a rich flavor base to your dish. Next, pour in the vegetable broth. Bring this mixture to a simmer. Once simmering, add the potato gnocchi. Cook for 3-4 minutes until the gnocchi floats to the top. This means they are cooked through. Lower the heat and slowly stir in the heavy cream. Keep stirring continuously to blend it well. After that, add the fresh spinach, dried oregano, and red pepper flakes if you want some heat. Cook for another 3-4 minutes until the spinach wilts. Finally, mix in the grated Parmesan cheese until it melts and the sauce becomes creamy. Season with salt and pepper to taste. Let it rest for a few minutes before serving. Enjoy this creamy delight! To make the sauce creamy, the heavy cream is key. Add it slowly, stirring all the time. This helps mix the cream well with the rest. If you want a thicker sauce, let it cook a bit longer. The cheese adds creaminess too. Grate it fresh for the best taste. Always taste your sauce. Adjust salt and pepper as needed. A pinch of nutmeg can add a nice twist. I recommend using potato gnocchi for this dish. It has a soft texture that holds sauce well. Look for gnocchi that is fresh or frozen. If you can find it, fresh gnocchi cooks quickly. Cook it until it floats for the best bite. Frozen gnocchi is great too; just add it directly to the pot. No need to thaw! For a beautiful presentation, serve in deep bowls. Garnish with fresh basil leaves and a sprinkle of cheese on top. You can also add a drizzle of olive oil for extra flavor. Pair this dish with a simple salad or garlic bread. Both add a nice crunch to your meal. Enjoy every creamy bite! {{image_2}} You can easily boost the protein in this dish. A few great choices include chicken, shrimp, or sausage. For chicken, add bite-sized pieces after sautéing the garlic. Cook until golden brown before adding the sun-dried tomatoes. For shrimp, toss them in right after the gnocchi. They will cook quickly and add a nice flavor. If you like sausage, remove it from the casing and cook it with the garlic. This adds a savory taste that pairs well with the creamy sauce. This dish is already vegetarian, but you can make it even more filling. Add chickpeas or white beans for a protein boost. You can also toss in more vegetables. Try mushrooms, bell peppers, or zucchini. Sauté them with the garlic for added flavor. They will add texture and make the meal even more colorful. If you want a heartier meal, mix in quinoa or barley as well. To make this dish even more exciting, think about adding fresh herbs. Basil or thyme can elevate the taste. Stir in a handful of fresh basil at the end for a bright finish. You could also sprinkle in some lemon zest for a bit of zing. If you love spice, increase the red pepper flakes or add a dash of hot sauce. Next, try a splash of balsamic vinegar for a sweet touch that balances the creaminess. These small tweaks can bring new life to your creamy sun-dried tomato gnocchi. You can store leftover creamy sun-dried tomato gnocchi in an airtight container. Keep it in the fridge for up to three days. Make sure it cools down first. This way, the gnocchi stays fresh and tasty. If you notice any separation in the sauce, don't worry. Just give it a quick stir before serving. To reheat, put the gnocchi in a pot over low heat. Add a splash of vegetable broth or cream. Stir often to prevent sticking. Heat until warm, about 5-7 minutes. You can also use the microwave. Heat in 30-second bursts, stirring in between. This keeps the dish creamy and delicious. You can freeze this dish if you have extra. Let it cool completely before freezing. Store it in a freezer-safe container for up to three months. When you're ready to eat, thaw it overnight in the fridge. Then reheat as mentioned above. The flavor will still be great, and you’ll enjoy it just as much! Yes, you can use fresh gnocchi. It cooks faster than packaged gnocchi. Reduce the cooking time by 1-2 minutes. Fresh gnocchi may also give a softer texture. You can use coconut cream or cashew cream as a substitute. Both options add creaminess without dairy. Another choice is using a mix of milk and cornstarch. This mix thickens the sauce well. To make this dish vegan, replace heavy cream with coconut cream. Use nutritional yeast instead of Parmesan for a cheesy flavor. Lastly, ensure your gnocchi is egg-free. Many brands offer vegan gnocchi. Enjoy your plant-based delight! This blog post covered a delicious gnocchi dish, from the list of ingredients to step-by-step cooking. I shared tips on perfecting the sauce and suggested tasty variations. You can easily store leftovers and reheat them later. Remember, you can swap ingredients to fit your taste or diet. Cooking should be fun and flexible. Enjoy trying out these ideas in your kitchen. Your next meal could be easy and tasty with these tips.

Creamy Sun Dried Tomato Gnocchi One Pot Delight

If you crave a warm, comforting meal that’s simple to make, you’re in the right place! My Creamy Sun Dried

- 1 cup milk chocolate chips - 1 cup white chocolate chips - 1 teaspoon coconut oil - 2 tablespoons hot cocoa mix - 1 teaspoon pumpkin spice blend - 2 tablespoons mini marshmallows - Optional: Fall-themed sprinkles To craft these pumpkin spice hot chocolate bombs, you need simple and tasty ingredients. Start with milk chocolate chips for a rich base. White chocolate chips add a creamy layer that melts beautifully. You’ll need coconut oil to help the chocolate set. Hot cocoa mix is key for that warm, chocolatey flavor. The pumpkin spice blend brings in that fall taste we all love. Mini marshmallows add a fun texture and sweetness. If you want extra flair, consider using fall-themed sprinkles. They make your bombs look festive and fun! Each ingredient plays a role, creating a delicious treat you can enjoy. Let’s dive into the magic of making these bombs come to life! To melt milk chocolate, I start with a microwave-safe bowl. I add 1 cup of milk chocolate chips and ½ teaspoon of coconut oil. The coconut oil helps the chocolate stay smooth. I microwave the bowl in 30-second bursts. After each burst, I make sure to stir the chocolate. This helps it melt evenly. I repeat this until the chocolate is fully melted and smooth. Next, I use silicone molds for the chocolate shells. I spoon the melted milk chocolate into each mold half. I make sure to cover the sides well. After filling, I gently tap the mold. This removes any air bubbles trapped inside. I then place the molds in the fridge for about 10-15 minutes. This time helps the chocolate set nicely. Once the shells are set, I take them out of the mold. For filling, I use 1 tablespoon of hot cocoa mix and 1 teaspoon of pumpkin spice blend for each bomb. I also add 1 tablespoon of mini marshmallows. To seal the bombs, I melt the edges of the white chocolate shells in the microwave for just 5 seconds. I place the white shell over the filled milk shell and press gently to seal. If there are gaps, I use extra melted chocolate to fix them. For decoration, I drizzle melted white chocolate over the top of the bombs. I find that using a spoon gives me good control. I also add fall-themed sprinkles for extra fun. Finally, I dust the bombs with powdered sugar. This gives them a nice, finished look. To make the best pumpkin spice hot chocolate bombs, control the temperature of your chocolate. I recommend melting the chocolate in short bursts. Use the microwave in 30-second intervals. Stir well each time for even melting. Achieving a smooth finish is key. Ensure your molds are clean and dry. After filling them, tap the mold gently to release air bubbles. This helps the chocolate spread evenly and look great. If you find broken shells or leaks, don’t worry. You can fix them easily. Just melt a bit of chocolate and use it to patch any gaps. Warm the edges slightly before sealing to help them stick better. For storing your hot chocolate bombs, place them in an airtight container. This keeps them fresh and safe from moisture. You can store them in the fridge or at room temperature. For a richer taste, use whole milk or oat milk. These milk types add creaminess and flavor. Pour hot milk over the bomb in your mug to watch it melt. Pair your hot chocolate bombs with whipped cream or a slice of pumpkin pie. This adds a festive touch and enhances the cozy experience. Enjoy your treats with friends and family! {{image_2}} You can change the flavor of your pumpkin spice hot chocolate bombs to fit your taste. Here are some ideas: - Alternative spice blends: Try using chai spice or cinnamon instead of pumpkin spice. These spices add warmth and depth. - Incorporating different types of chocolate: Use dark chocolate or white chocolate for a unique twist. Each chocolate gives a different taste and look to your bombs. If you need to make changes for diet needs, here are some easy swaps: - Making it vegan or dairy-free: Use almond milk or oat milk for the hot drink. Replace chocolate chips with dairy-free options. This keeps it rich without dairy. - Gluten-free options: Ensure your hot cocoa mix is gluten-free. Most brands are safe, but always check the label. Make your hot chocolate bombs fit any season or holiday with these fun ideas: - Holiday-themed decoration ideas: Use red and green sprinkles for Christmas. For Halloween, add orange and black sprinkles. This makes them festive and fun. - Adapting the recipe for different seasons: For winter, add peppermint extract to the mix. In spring, try adding floral flavors like lavender or rose. These small changes keep your treats exciting all year long. To keep your pumpkin spice hot chocolate bombs fresh, store them in an airtight container. This helps prevent moisture and keeps them tasting great. I recommend using a glass or plastic container with a tight lid. You can also line the container with parchment paper to avoid sticking. Make sure to keep the container in a cool, dry place. Avoid direct sunlight, as it can melt the chocolate. If you have extra space in the fridge, you can store them there, but be sure they are in a sealed container. Homemade hot chocolate bombs can last up to two weeks when stored properly. However, the best taste comes within the first week. Watch for any signs of spoilage. If you see a change in color or smell, it’s best to throw them away. Keep an eye out for any white spots on the chocolate. This could be a sign of bloom, which happens when chocolate is exposed to moisture or temperature changes. While they may still be safe to eat, the texture and taste may not be as good. To make these tasty treats, follow these steps: 1. Melt the Chocolate: In a bowl, mix 1 cup of milk chocolate chips with 1/2 teaspoon of coconut oil. Heat in the microwave for 30 seconds. Stir and repeat until smooth. 2. Mold the Shells: Use a silicone sphere mold. Spoon the melted chocolate into each half. Cover the sides well. Tap gently to remove bubbles and chill for 10-15 minutes. 3. Repeat with White Chocolate: In a new bowl, melt 1 cup of white chocolate chips with the other 1/2 teaspoon of coconut oil. Once the milk chocolate shells are set, pop them out of the mold. 4. Fill the Bombs: In half of the milk chocolate shells, add 2 tablespoons of hot cocoa mix, 1 teaspoon of pumpkin spice, and 2 tablespoons of mini marshmallows. 5. Seal the Bombs: Warm the edges of the white chocolate shells in the microwave for 5 seconds. Place them over the filled milk chocolate half and press to seal. Use extra melted chocolate to fix gaps. 6. Decorate: Drizzle melted white chocolate on top. Add fall-themed sprinkles if you like. Dust with powdered sugar for a nice finish. 7. Set and Store: Chill the bombs for another 10 minutes. Store them in an airtight container until you are ready to enjoy. You can find ready-made pumpkin spice hot chocolate bombs online and in stores. Here are some places to check: - Amazon: They often carry a variety of brands. - Etsy: Look for unique, handmade options. - Local Bakeries: Many bakeries sell seasonal treats. - Specialty Food Shops: Stores that focus on gourmet foods may have them. Yes, you can freeze these bombs to keep them fresh longer. Here’s how: - Freezing: Place the bombs in a single layer in a freezer-safe container. Make sure they are not touching each other. - Thawing: When you want to enjoy one, take it out and let it sit at room temperature for about 10-15 minutes before using. If you don’t have coconut oil, try these alternatives: - Vegetable Oil: It works well for melting and sealing. - Shortening: This can help with the mold and sealing process. - Butter: Use unsalted butter for a rich flavor. These substitutes will keep your hot chocolate bombs intact and delicious! Making pumpkin spice hot chocolate bombs is fun and tasty. We covered important ingredients and the steps needed to create them. You learned how to melt chocolate, mold shells, and fill your bombs. I shared tips for perfecting them and offered variations to fit your taste. Remember, storage is key to keeping them fresh. Now, enjoy your warm drink and spread some cheer this season!

Pumpkin Spice Hot Chocolate Bombs Festive Flavor Treat

Get ready to indulge in a fall favorite: Pumpkin Spice Hot Chocolate Bombs! These sweet treats blend rich cocoa with

- 1 pound ground chicken or turkey - 1/2 cup breadcrumbs - 1/4 cup grated Parmesan cheese - 1/4 cup chopped green onions - 1 large egg - 2 cloves garlic, minced - 1 teaspoon ginger, grated - Salt and pepper to taste These main ingredients create a base full of flavor. Ground chicken or turkey keeps the meatballs light and healthy. Breadcrumbs help bind the mixture while adding a nice texture. Parmesan cheese gives a savory kick, and green onions add freshness. - 1/2 cup sweet chili sauce - 1 tablespoon soy sauce (low sodium) - 1 teaspoon sesame oil - 1 teaspoon rice vinegar - 1/2 teaspoon red pepper flakes (optional, for extra heat) The sweet chili glaze is what makes these meatballs shine. Sweet chili sauce adds sweetness and a hint of spice. Soy sauce deepens the flavor, while sesame oil brings a nutty aroma. Rice vinegar brightens the glaze, and red pepper flakes give a kick if you like heat. - Red pepper flakes - Sesame seeds for garnish These optional ingredients can elevate your dish. Red pepper flakes add more heat if desired. Sesame seeds make a lovely garnish, adding crunch and flavor. You can customize your meatballs with these extras based on your taste. To make the meatball mixture, start by gathering all your ingredients. In a large bowl, combine: - 1 pound ground chicken or turkey - 1/2 cup breadcrumbs - 1/4 cup grated Parmesan cheese - 1/4 cup chopped green onions - 1 large egg - 2 cloves garlic, minced - 1 teaspoon ginger, grated - Salt and pepper to taste Mix these ingredients well with your hands or a spoon. Be sure to blend everything evenly. This helps the meatballs hold together when you cook them. When forming the meatballs, scoop out about 2 tablespoons of the mixture. Roll them into balls with your hands. You want them to be about the size of a golf ball. Place the meatballs on a baking sheet lined with parchment paper. This keeps them from sticking and makes clean-up easier. Before baking, preheat your oven to 400°F (200°C). Once it’s hot, bake the meatballs for about 20 minutes. They should be cooked through and have a light golden color. Check their doneness by cutting one in half; it should be no longer pink inside. While the meatballs bake, you can prepare the sweet chili glaze. In a small bowl, mix together: - 1/2 cup sweet chili sauce - 1 tablespoon soy sauce (low sodium) - 1 teaspoon sesame oil - 1 teaspoon rice vinegar - 1/2 teaspoon red pepper flakes (optional) Whisk these ingredients together until smooth. Whisking is important as it helps blend the flavors well. Once the meatballs are done, take them out of the oven. Carefully transfer them to a large skillet. Pour the sweet chili glaze over the meatballs. Toss them gently to coat each meatball with the glaze. Heat over medium-low for 2-3 minutes until the sauce is bubbly. When ready to serve, transfer the glazed meatballs to a serving dish. You can sprinkle sesame seeds on top for a nice touch. Adding more chopped green onions can enhance the look and flavor. Serve these meatballs warm and watch everyone enjoy! To keep your meatballs tender, mix gently. Overmixing makes them tough. Use clean hands to form the meatballs. Aim for about two tablespoons of mixture per ball. This size cooks evenly. For preventing sticking on your baking sheet, line it with parchment paper. This simple step stops meatballs from sticking. You can also lightly oil the paper for extra safety. To add depth to the glaze, try mixing in a splash of orange juice. It balances the sweetness of the chili sauce. You can also add fresh herbs like cilantro or basil for extra flavor. For spicing options in your meatballs, consider adding a pinch of garlic powder or onion powder. You can also use fresh herbs. Chopped parsley or thyme works well here. For creative serving suggestions, stack meatballs on small skewers. This makes them easy to grab. You can also serve them on a bed of rice or noodles. For plating tips that impress, use a clean white dish. This helps the colors pop. Drizzle some extra glaze around the meatballs for a beautiful finish. Sprinkle sesame seeds on top for a nice crunch. {{image_2}} You can change the protein in this recipe. Use ground beef or pork instead. For a plant-based option, try ground tofu or lentils. They add a nice texture and flavor. If you need gluten-free meatballs, swap regular breadcrumbs for gluten-free ones. You can also use crushed rice cakes or ground oats. These work well and keep the meatballs tasty. Want to tweak the sweetness of the glaze? You can add more or less sweet chili sauce. If you like it sweeter, mix in some honey or maple syrup. For a less sweet taste, add a splash of soy sauce or rice vinegar. Adding herbs can also change the flavor. Try fresh cilantro or basil for a fresh twist. You can also mix in garlic powder or onion powder for extra depth. These meatballs shine as appetizers. Serve them with toothpicks for easy eating. You can also drizzle extra glaze on top for a beautiful finish. Another option is to mix the meatballs into rice bowls or salads. They go great with steamed rice, fresh veggies, or noodles. This makes for a complete meal that is both filling and flavorful. After making your sweet chili glazed meatballs, let them cool first. Place leftovers in an airtight container. This keeps them fresh and tasty for up to four days. I recommend glass containers or sturdy plastic ones. They help avoid odors in your fridge. You can freeze meatballs both before and after baking. If you freeze them raw, shape the meatballs and place them on a baking sheet. Once firm, transfer them to a freezer bag. If you freeze baked meatballs, let them cool fully first. For best quality, use them within three months. To thaw, place the frozen meatballs in the fridge overnight. This keeps them safe and ready for reheating. If you need them fast, you can use the microwave on low power. When it's time to enjoy your meatballs again, there are great ways to reheat them. The best method is to warm them in a skillet over medium heat. Add a splash of water or broth to keep them moist. Stir occasionally until they are heated through. You can also use a microwave, but be careful. Heat in short bursts and cover them with a damp paper towel. This helps maintain their texture and moisture. Enjoy your delicious meatballs anytime! Yes, you can use different meats. Ground beef or pork works well, too. If you want a plant-based option, try using lentils or chickpeas. Just make sure to adjust your cooking time as needed. Meatballs can fall apart for a few reasons. Not enough binding agents, like eggs or breadcrumbs, can cause this. Make sure to mix well and form tight balls. Also, ensure your oven is at the right temperature when baking. Sweet chili sauce is not very spicy. It has a nice balance of sweetness and heat. The heat level is mild, making it great for many tastes. You can enjoy it without worrying about it being too hot. To add more heat, consider adding red pepper flakes to the meat mixture. You can also increase the amount in the glaze. Another option is to serve the meatballs with hot sauce on the side. These meatballs pair well with rice or noodles. You can also serve them with steamed veggies for a fresh touch. For a fun twist, try them in a wrap or a sandwich. They are versatile and tasty! This blog post covers how to make tasty Sweet Chili Glazed Meatballs. We discussed the main ingredients like ground chicken, breadcrumbs, and cheese. I shared step-by-step instructions for mixing, shaping, baking, and glazing your meatballs. Remember, you can customize flavors and storage for later enjoyment. Use these tips to make delicious meals or snacks. Enjoy your cooking journey!

Sweet Chili Glazed Meatballs Tasty and Easy Recipe

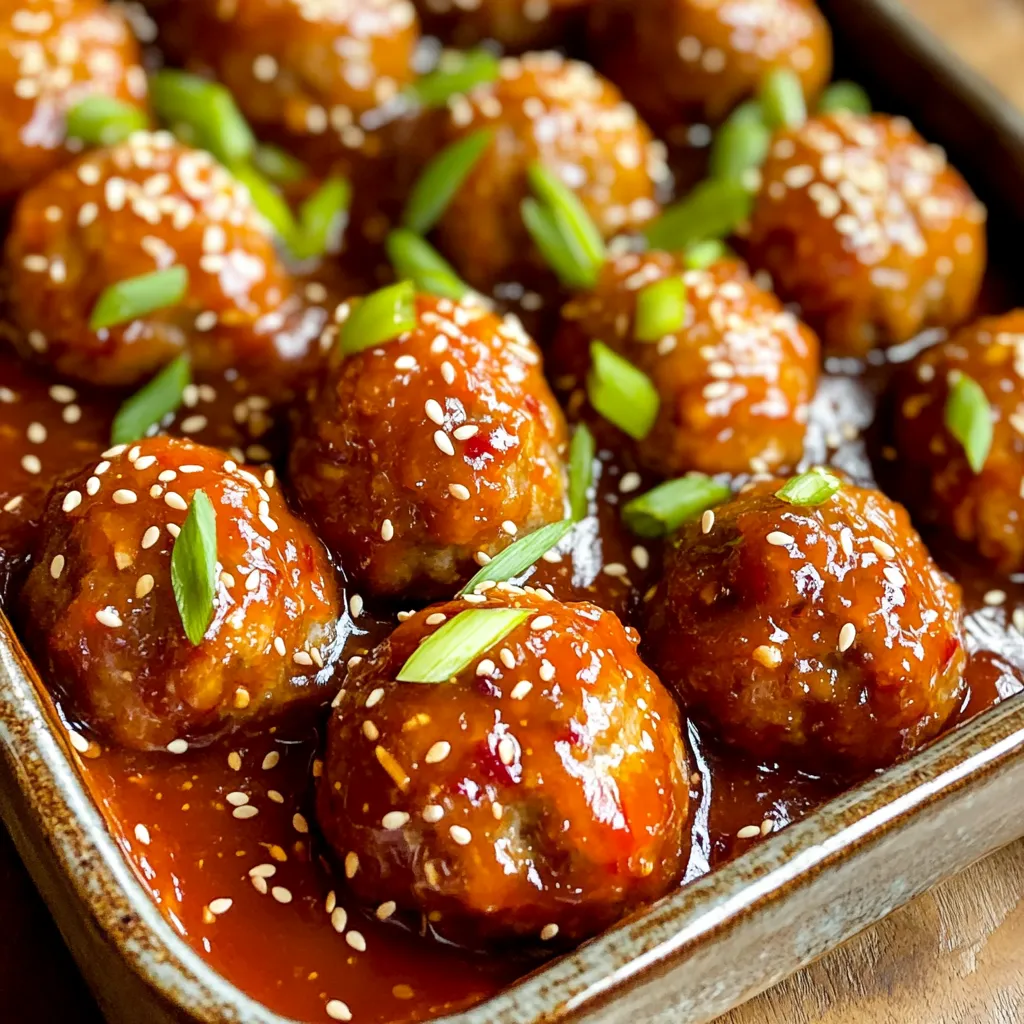
Are you ready to impress your friends and family with an easy-to-make dish? These Sweet Chili Glazed Meatballs pack a

- 1 cup rolled oats - 1 cup unsweetened almond milk (or any milk of choice) - 2 tablespoons cocoa powder - 2 tablespoons hazelnut butter - 1 tablespoon maple syrup (or honey) - 1 teaspoon vanilla extract - 1/4 teaspoon salt - 2 tablespoons chopped hazelnuts, for topping - Dark chocolate shavings (optional, for garnish) To make chocolate hazelnut overnight oats, you need a few simple ingredients. First, you’ll use rolled oats. They give your oats texture and chew. Next, choose your milk. Unsweetened almond milk works well, but you can use any milk you like. This adds creaminess to the mixture. Cocoa powder brings that rich chocolate flavor. Use high-quality cocoa for the best taste. Hazelnut butter adds a nutty twist. It pairs perfectly with chocolate. For sweetness, maple syrup or honey works great. A little vanilla extract adds depth to the flavor. Don't forget the salt! It balances the sweet and rich flavors. Lastly, top your oats with chopped hazelnuts. Dark chocolate shavings make a nice touch, too. They add a bit of luxury to your breakfast. With these ingredients, you’ll create a delicious and filling meal. Each bite will taste like dessert! First, gather all your ingredients. You need rolled oats, almond milk, cocoa powder, hazelnut butter, maple syrup, vanilla extract, salt, and toppings. This recipe makes two servings. In a medium bowl, combine the rolled oats and almond milk. Then, add cocoa powder, hazelnut butter, maple syrup, vanilla extract, and salt. Whisk everything together until smooth. Make sure there are no clumps of cocoa powder. This step is key to a creamy texture. Next, evenly divide the mixture into two jars. Seal the jars tightly with lids. Place them in the fridge overnight, or for at least four hours. This allows the oats to soak up all the flavors. In the morning, stir the oats well. If they seem too thick, add a splash of almond milk. Top each jar with chopped hazelnuts and dark chocolate shavings if you like. Serve chilled and enjoy your tasty creation! To get smooth and creamy oats, mix well. Start with a bowl. Add rolled oats, almond milk, cocoa powder, hazelnut butter, maple syrup, vanilla, and salt. Whisk until there are no lumps. This keeps the oats soft. The oats soak up the milk overnight, so they become plump and tender. If they feel thick in the morning, just stir in a splash of almond milk. This will help reach your favorite texture. Want to boost flavor? Try adding a pinch of cinnamon. It pairs nicely with chocolate. You can also swap maple syrup for honey or agave. Each sweetener gives a unique taste. For extra crunch, mix in some chopped hazelnuts before serving. You can even add a swirl of hazelnut butter on top. Dark chocolate shavings are a great finishing touch too. They add richness and make the dish look fancy. These oats work well for meal prep. You can make them on Sunday for the week ahead. Just store them in sealed jars. They stay fresh in the fridge for about four days. This makes your mornings easy and quick. You can grab a jar, stir it, and enjoy. You can also prepare a double batch for extra servings. This way, you always have a tasty breakfast on hand! {{image_2}} You can easily make this recipe gluten-free. Rolled oats are often safe for gluten-free diets. Just check the label to ensure no cross-contamination. If you want extra texture, consider adding chia seeds. They are gluten-free and add a nice crunch. If you need a dairy option, use regular milk or yogurt. Whole milk will make it creamier. Greek yogurt can also add protein. Just mix it with the oats for a thick, tasty dish. You can still enjoy the chocolate hazelnut flavor with these swaps. For nut-free options, replace hazelnut butter with sunflower seed butter. It gives a similar creamy texture and taste. You can also use soy milk instead of almond milk. This recipe can still delight without nuts. Just make sure to check all labels for allergens. To keep your Chocolate Hazelnut Overnight Oats fresh, store them in the fridge. They stay good for up to five days. Make sure each jar has a tight lid. This helps keep out air and moisture. Always stir them before serving. If they seem thick, add a bit of almond milk to loosen them. You can freeze these oats if you want to save some for later. Place them in a freezer-safe container. Leave some space at the top for the oats to expand. They can last up to three months in the freezer. To enjoy them, thaw overnight in the fridge. Heat them gently in the morning if you prefer warm oats. Use any leftovers within five days for the best taste. If you have toppings, add them fresh. Chopped hazelnuts and chocolate shavings are best when they are crunchy. If you plan to keep extras, do not mix in the toppings right away. This keeps your oats tasty and your toppings fresh for each serving. Chocolate hazelnut overnight oats can last up to five days in the fridge. Store them in airtight containers. The oats absorb liquid and flavors over time. This makes them taste even better. If you see any odd smells or colors, it's best to toss them. Yes, you can use many types of milk. Options include soy, oat, or coconut milk. Choose the one you enjoy the most. Each milk will change the flavor slightly, so feel free to experiment. Absolutely! This recipe is already easy to make vegan. Use maple syrup instead of honey, and choose almond or any plant-based milk. Hazelnut butter is vegan too, making this a tasty plant-based meal. If you don’t have hazelnut butter, use almond or peanut butter. Both options work well. They will still give you a creamy texture and flavor. You might also try sunflower seed butter for a nut-free option. You can make delicious Chocolate Hazelnut Overnight Oats with just a few simple ingredients. We discussed the key components, preparation steps, and storage tips to help you succeed. You learned how to adjust the recipe for different needs, like gluten-free or nut-free options. In closing, this dish is not only tasty but also easy to prep ahead. Now, you can enjoy this healthy breakfast any day of the week. Get started and savor each creamy bite!

Chocolate Hazelnut Overnight Oats Simple and Tasty

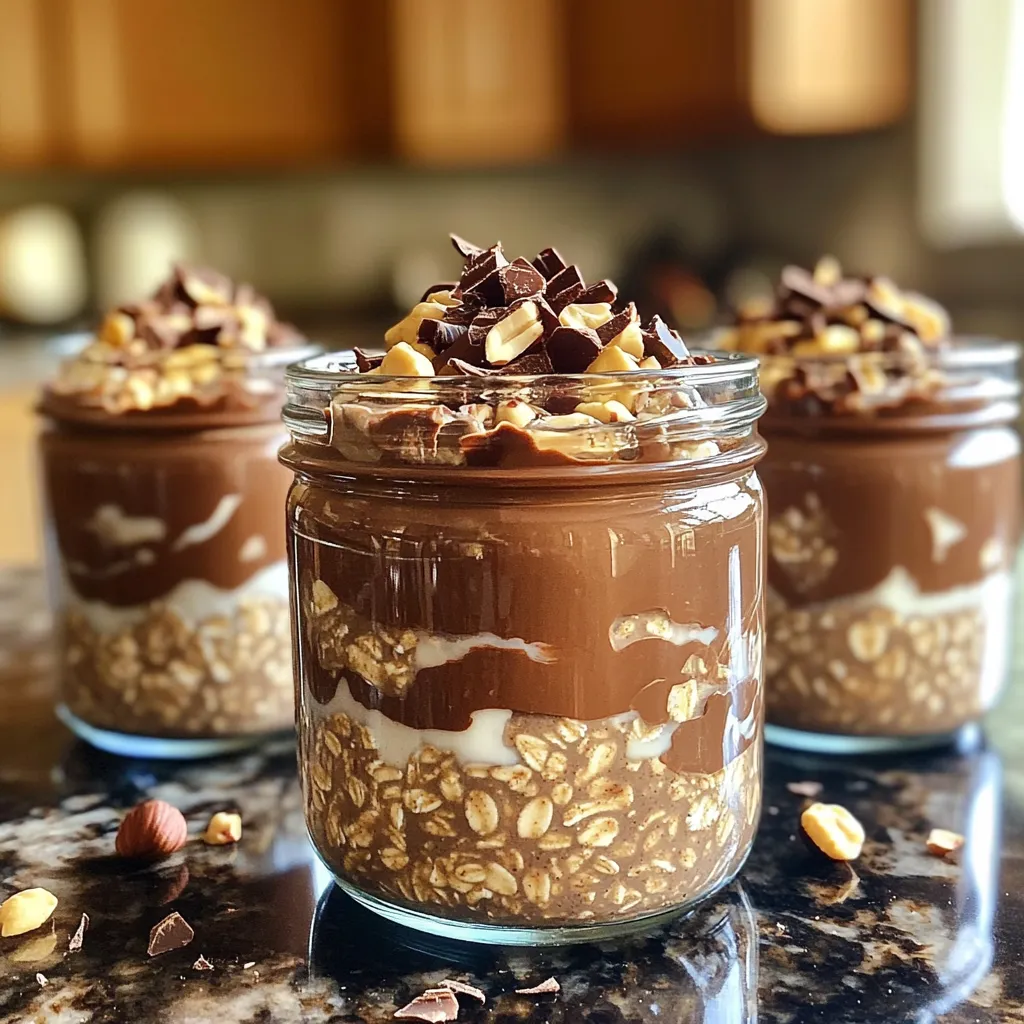
Get ready for a delicious breakfast! My Chocolate Hazelnut Overnight Oats are simple, tasty, and packed with flavor. In just

- 1 lb sea scallops - 3 tablespoons honey - 2 tablespoons fresh lemon juice - 4 cloves garlic, minced - 2 tablespoons olive oil - Salt and black pepper to taste - Fresh parsley for garnish - Lemon slices for garnish For this dish, fresh sea scallops are key. They give a sweet and tender bite. Honey adds a touch of sweetness that balances the tart lemon. Garlic brings depth and warmth to the dish. Olive oil helps achieve a nice sear on the scallops. Don't forget to season with salt and pepper. This enhances all the flavors. When you garnish with parsley and lemon slices, it makes the dish pop. Fresh parsley adds color and a hint of earthiness. Lemon slices brighten the plate and add a fresh smell. This dish is not just tasty; it looks beautiful too. Enjoy every bite of these honey lemon garlic scallops! In a small bowl, whisk together these three ingredients: - 3 tablespoons honey - 2 tablespoons fresh lemon juice - 4 cloves garlic, minced Mix until smooth. This blend adds a sweet and tangy kick to the scallops. Set it aside for now. Season the scallops with salt and black pepper on both sides. This step is key for flavor. Next, pat the scallops dry with a paper towel. This ensures they sear well and do not steam. Heat 2 tablespoons of olive oil in a large skillet over medium-high heat. Once hot, add the scallops. Make sure they do not touch each other. Sear them for about 2-3 minutes until they get a golden brown crust. Then, flip each scallop gently. Now, pour the honey lemon garlic mixture over the scallops. Let them cook for another 2-3 minutes. Baste the scallops with the sauce to coat them evenly. This step adds more flavor and keeps them moist. Remove the scallops from the skillet and place them on a serving plate. Drizzle some sauce from the pan over them. For a lovely touch, garnish with chopped fresh parsley and lemon slices. Enjoy this quick and flavorful dish! To get the best crust on your scallops, make sure they are very dry. Pat them with a paper towel before cooking. This step helps prevent steaming. Heat your skillet properly. Aim for medium-high heat, which helps to create a golden crust. Cook each side for 2-3 minutes. When they flip easily, they are ready. You can add more herbs or spices to boost flavor. Try fresh thyme or a pinch of red pepper flakes. Fresh ingredients always give a brighter taste. If you use dried herbs, use less since they are stronger. Always taste as you go to find your perfect balance. Presentation matters when serving food. Use the fresh parsley and lemon slices for a pop of color. Drizzle some sauce over the scallops to make them shine. Pair these scallops with a fresh salad or rice for a complete meal. This touch adds to the overall experience and makes your dish look stunning. {{image_2}} You can add a spicy kick to your dish. Try incorporating chili flakes for a hint of heat. Just sprinkle a little on the scallops before cooking. For a bolder flavor, drizzle some hot sauce over the finished plate. This adds a fun twist without overpowering the sweet and tangy sauce. If you want to change the sweet taste, use different sweeteners. Maple syrup can give a rich flavor. Agave nectar also works well and is a great substitute. Both options blend nicely with the lemon and garlic. Just keep the same amount as you would with honey for balance. Scallops are fantastic, but you can switch it up. Shrimp is a great alternative and cooks similarly. You can also try white fish like cod or halibut. Just follow the same steps in the recipe, and you’ll have a tasty meal in no time. Each option brings a new layer of flavor and texture. Store any leftover scallops in an airtight container. Keep them in the fridge. They stay fresh for up to two days. Make sure they are cooled before sealing. This helps keep their flavor and texture. To reheat scallops, use a skillet over low heat. Add a splash of water or broth. This helps keep them moist. Heat them for about 2-3 minutes, flipping gently. Avoid overheating, as it can make them tough. If you want to freeze scallops, place them in a single layer on a baking sheet. Freeze them for a few hours until firm. Then, transfer them into a freezer bag. They can stay frozen for up to three months. When ready to use, thaw them in the fridge overnight. Avoid thawing in hot water, as it affects their texture. Yes, you can use frozen scallops. To thaw them safely, place them in the fridge overnight. If you're short on time, put them in a sealed bag and submerge in cold water for about an hour. Avoid using hot water, as it can cook the edges. Once thawed, pat them dry with a paper towel to help them sear well. Honey lemon garlic scallops pair well with several sides. Here are some great options: - Steamed asparagus - Garlic mashed potatoes - Quinoa salad - Simple green salad - Roasted vegetables These sides add color and balance the dish's flavors. Cooking time for scallops varies by size. Generally, large scallops take about 4-6 minutes total. Cook them for 2-3 minutes on each side. If you use smaller scallops, cut the time down to 1-2 minutes per side. The key is to watch for a golden crust and a slightly firm center. This shows they are perfectly cooked. In this blog post, we covered how to make delicious Honey Lemon Garlic Scallops. You learned about the key ingredients, step-by-step cooking instructions, and helpful tips for getting the best flavor. We also explored variations to make the dish your own and provided storage info for leftovers. Remember, perfectly cooked scallops are all about timing and technique. Try these tips, and you’ll impress everyone at your table. Enjoy your cooking journey!

Honey Lemon Garlic Scallops Quick and Flavorful Dish

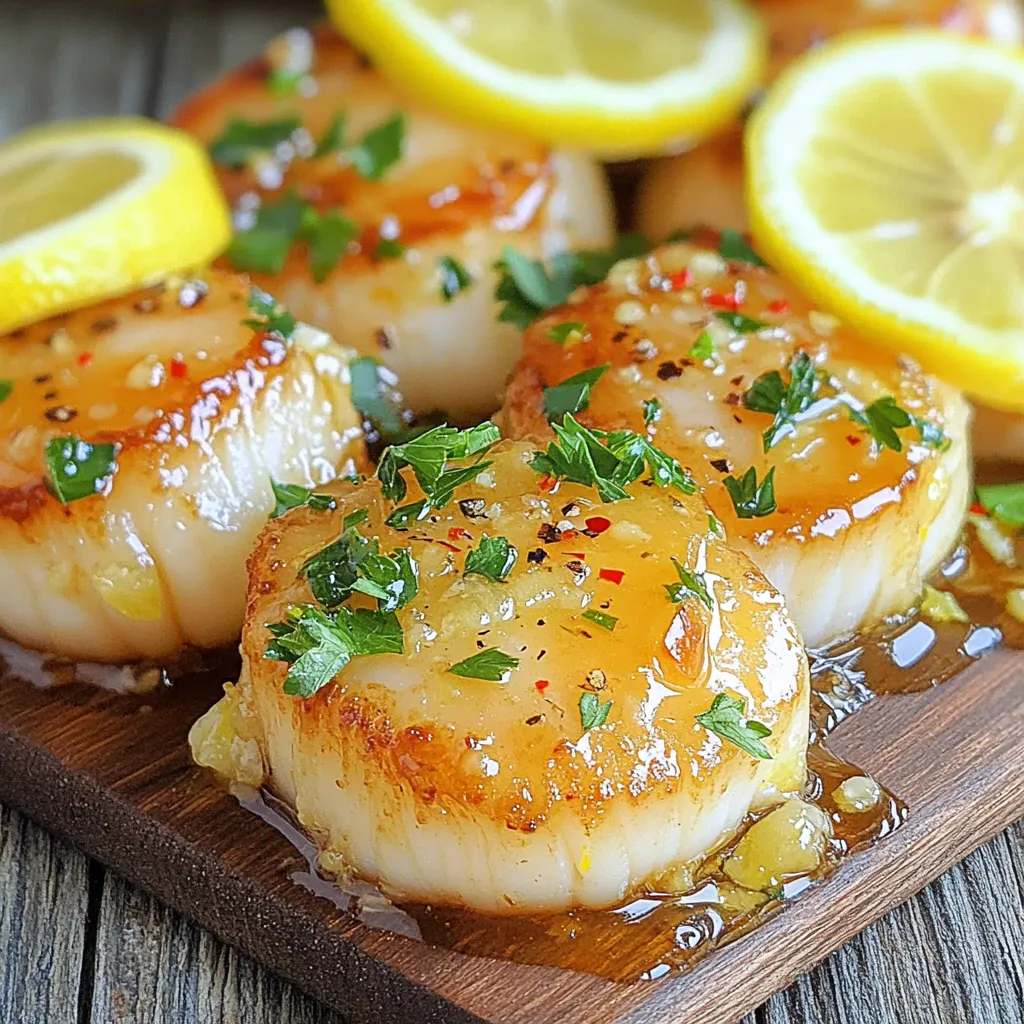
Ready for a dish that bursts with flavor and takes just minutes to make? Honey Lemon Garlic Scallops are your

To make these tasty cheesecake bites, gather these simple ingredients: - 1 cup graham cracker crumbs - 1/4 cup melted coconut oil - 1/4 cup honey or maple syrup - 8 oz cream cheese, softened - 1/3 cup powdered sugar - 1 teaspoon vanilla extract - 1 cup fresh strawberries, chopped - 1/4 cup whipped cream (optional, for topping) - Fresh mint leaves (for garnish, optional) These ingredients blend together to create a creamy, fruity treat that bursts with flavor. You can make your cheesecake bites even more special with some fun toppings: - A dollop of whipped cream adds a nice touch. - A fresh slice of strawberry on top looks pretty and tastes great. - Mint leaves can enhance the look and add a fresh flavor. Feel free to mix and match these toppings to suit your taste! If you need to swap some ingredients, here are a few easy ideas: - Instead of graham cracker crumbs, use crushed cookies or nuts for a different base. - Swap coconut oil for unsalted butter if you prefer. - For a vegan option, use a plant-based cream cheese. - Maple syrup can replace honey for a vegan-friendly sweetener. These substitutions can help you tailor the recipe to your dietary needs while keeping it delicious! For the crust, grab a mixing bowl. Add 1 cup of graham cracker crumbs, 1/4 cup of melted coconut oil, and 1/4 cup of honey or maple syrup. Mix these until everything is well combined. The mixture should feel like damp sand. This texture helps it hold together well. Next, take a mini muffin tin and line it with paper liners. Divide the crumb mixture evenly among the cups. Press down firmly to shape each crust. Make sure it is compact. A firm crust will keep the bites intact. In a separate bowl, take 8 oz of softened cream cheese. Beat it until smooth and creamy. Then, add 1/3 cup of powdered sugar and 1 teaspoon of vanilla extract. Mix well until it is fully combined. This should take only a minute or two. Now, chop 1 cup of fresh strawberries. Gently fold the chopped strawberries into the cream cheese mixture. Be careful not to crush them too much. You want nice bits of strawberry in each bite. Now it's time to fill the crusts. Spoon the strawberry cheesecake filling over each crust in the muffin tin. Use a spatula to smooth the tops. Make sure each bite is filled to the brim. Once filled, place the muffin tin in the fridge. Let them chill for at least 2 hours. This helps the bites firm up nicely. When they are set, carefully remove them from the tin and peel off the paper liners. If you like, you can add a dollop of whipped cream on top of each bite. A slice of fresh strawberry and a mint leaf can add a nice touch as well. Enjoy your tasty no-bake treats! To get a smooth cream cheese mixture, start with softened cream cheese. Cold cream cheese can be lumpy. I like to let it sit at room temp for about 30 minutes. Then, use a hand mixer or a whisk to beat it well. Mix until it's creamy and free of lumps. Adding the powdered sugar and vanilla helps too. Make sure to mix it all together until you see no white bits. Pressing the crust firmly is key for good bites. Use the back of a spoon or your fingers. I find that pressing down in the middle first works best. Then, push it out toward the edges. This helps the crust hold together. Make sure each bite has a solid base. If it feels too loose, give it another press. A firm crust keeps the filling from leaking out. Store these bites in the fridge. Use an airtight container to keep them fresh. They last about 3 days. If you want to serve them later, wait to add toppings. Top each bite just before serving. I love to add a dollop of whipped cream and a fresh strawberry slice. A mint leaf on top adds a nice touch. These bites are great for parties or just a sweet treat at home! {{image_2}} You can switch up the fruit in these cheesecake bites. Blueberries, raspberries, and even peaches work great. Each fruit brings its own flavor and color. For blueberries, use a cup of fresh ones. For raspberries, mash them slightly before mixing. Peaches add a nice sweetness. Whatever fruit you choose, it can make your bites unique and fun. If you want a dairy-free treat, swap cream cheese for cashew cream. Soak cashews in water overnight, then blend until smooth. Use maple syrup instead of honey for a vegan option. Coconut cream can also replace whipped cream. These changes keep the bites creamy and delicious without dairy. Mixing in flavors can make your cheesecake bites special. Try adding lemon zest or a splash of almond extract. This will brighten the taste. You could also fold in chocolate chips for a sweet twist. Another option is to add spices like cinnamon or nutmeg. Each flavor gives a new and exciting taste to your bites. To keep your no bake strawberry cheesecake bites fresh, store them in an airtight container. I like to use glass containers with tight lids. This helps keep the bites from drying out. If you have any toppings, like whipped cream, add them just before serving. These bites usually last for about 3 to 5 days in the fridge. Make sure to check for any signs of spoilage before digging in. If they look or smell off, it’s best to throw them away. I recommend enjoying them within the first few days for the best taste. If you want to keep them longer, you can freeze the cheesecake bites. Place them in a single layer on a baking sheet. Once they are frozen solid, transfer them to a freezer-safe bag or container. They can last up to 2 months in the freezer. To eat, just thaw them in the fridge overnight. Yes, you can make these cheesecake bites ahead of time. They are perfect for meal prep. Just follow the recipe and store them in the fridge. They taste best when chilled. You can make them a day or two in advance. Just keep them covered to stay fresh. If you don't have a mini muffin tin, don't worry! You can use small cups or ramekins instead. Just make sure they are the right size for bites. You can also use a regular muffin tin. Your bites will just be a bit larger. Just adjust the chilling time since larger bites may take longer to set. You can tell they are set when they feel firm to the touch. After chilling for at least 2 hours, check them. If they hold their shape and do not wobble, they are ready. You can also check by gently pressing the top. If it feels solid, they are good to go! In this post, we covered how to make no-bake strawberry cheesecake bites. We discussed key ingredients, optional toppings, and handy substitutions. The step-by-step instructions guide you through preparing the crust and filling, then assembling the bites. We shared tips for a smooth cream cheese mix and firm crust. You learned about variations using different fruits and dairy-free options. Finally, storage tips ensure your bites stay fresh. Enjoy this easy treat, perfect for any occasion!

No Bake Strawberry Cheesecake Bites Easy and Quick Treat

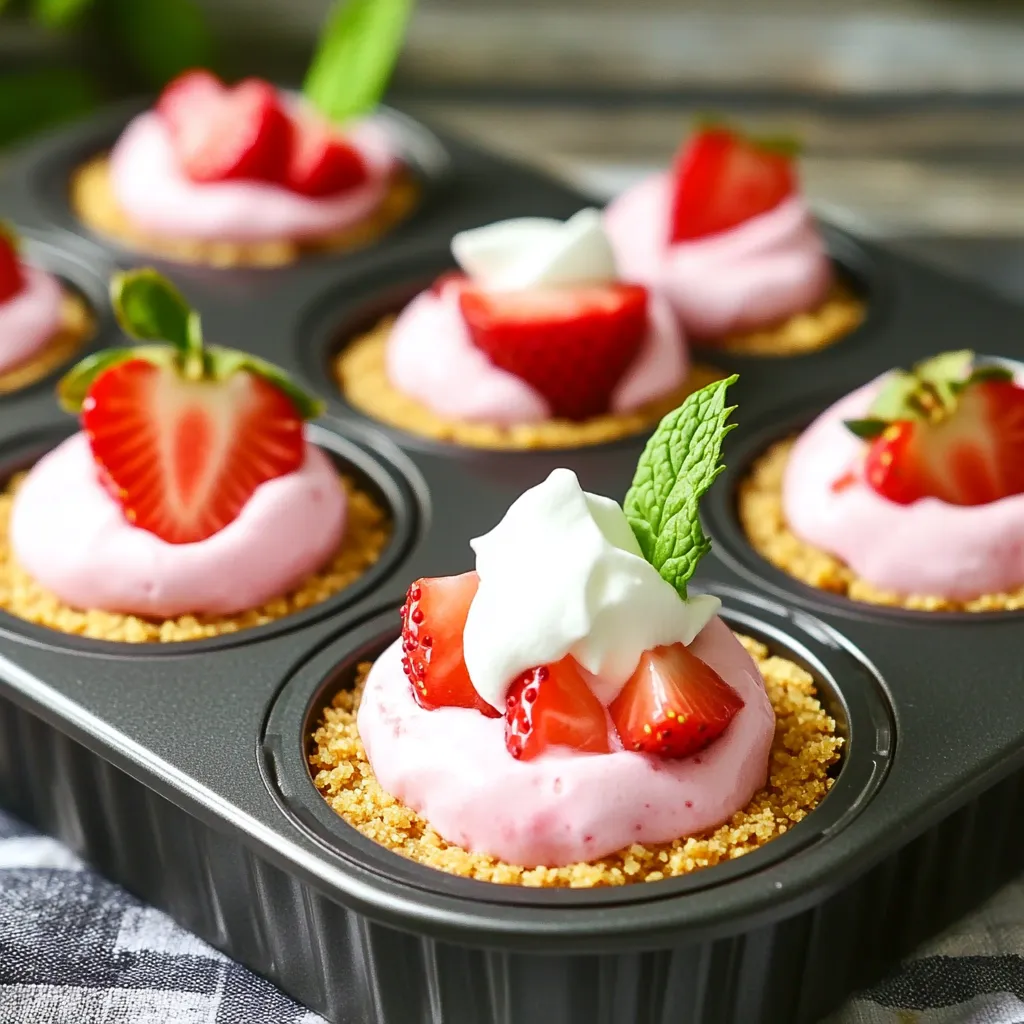
Looking for a sweet and easy treat? You’ll love these No Bake Strawberry Cheesecake Bites! They’re quick to make and

To make Air Fryer Parmesan Crusted Chicken, you need some key ingredients. These will help you create a tasty dish. - 4 boneless, skinless chicken breasts - 1 cup grated Parmesan cheese - 1 cup breadcrumbs (plain or seasoned) - 2 teaspoons garlic powder - 1 teaspoon onion powder - 1 teaspoon dried Italian herbs (oregano, thyme, basil) - 1/2 teaspoon salt - 1/2 teaspoon black pepper - 2 large eggs - 1 tablespoon Dijon mustard - Cooking spray Each ingredient plays a role. Chicken breasts provide the main protein. Parmesan cheese adds a rich, salty flavor. Breadcrumbs give the chicken a nice crunch. The garlic and onion powders boost flavor. Italian herbs add a touch of freshness. Salt and pepper season the dish. Eggs help the coating stick, while Dijon mustard adds a little zing. Finally, cooking spray keeps everything from sticking. Gather all these ingredients before you start cooking. This makes the process smooth and fun. Enjoy preparing your meal! To start, set your air fryer to 380°F (193°C). Let it heat up for about 5 minutes. This step ensures even cooking and crispy results. In a shallow bowl, mix these ingredients: - 1 cup grated Parmesan cheese - 1 cup breadcrumbs (plain or seasoned) - 2 teaspoons garlic powder - 1 teaspoon onion powder - 1 teaspoon dried Italian herbs (oregano, thyme, basil) - 1/2 teaspoon salt - 1/2 teaspoon black pepper Stir until everything is well combined. This mixture gives the chicken its tasty crust. In another bowl, whisk together the eggs and 1 tablespoon Dijon mustard until smooth. Take each chicken breast and dip it into this egg mixture. Make sure it's well-coated. Next, transfer the chicken to the breadcrumb mixture. Press down gently to get the crust to stick well on both sides. Spray the air fryer basket lightly with cooking spray. Place the coated chicken breasts in a single layer. Avoid overcrowding the basket. Cook for 12-15 minutes, flipping halfway through. The chicken should be golden brown and reach an internal temperature of 165°F (74°C). After cooking, remove the chicken from the air fryer. Let it rest for a few minutes. This helps keep the juices inside, making it tender and juicy when you slice it. To get that crispy crust, use fresh breadcrumbs. They stick better than dry ones. Mix in grated Parmesan cheese for added flavor and crunch. Press the mixture firmly onto the chicken. This helps it stick while cooking. A light spray of cooking oil on the chicken before cooking adds extra crispiness. Cooking time matters! For thick chicken breasts, aim for 15 minutes. If they are thinner, reduce the time to 12 minutes. Always flip the chicken halfway through. This ensures even cooking and browning. Use a meat thermometer to check that the chicken reaches 165°F. This keeps it safe and juicy. If you want a different twist, try crushed cornflakes or panko crumbs. These give a unique crunch. You can also use ground nuts for a low-carb option. Almond flour works well as a gluten-free choice. Just ensure the coating stays thick for the best results. {{image_2}} You can switch up the cheese for fun. Try mozzarella for a gooey texture. You can also use cheddar for a sharper taste. If you want something different, go for feta or gouda. Each cheese brings its own flavor, making your chicken unique. Mixing spices adds a personal touch. For a kick, add paprika or cayenne pepper. If you enjoy herbs, try fresh parsley or basil instead. You can even add a dash of cumin for a warm flavor. Feel free to experiment and find your favorite blend. Serve this chicken with a side of veggies. Roasted broccoli or green beans pair well. You can also add a fresh salad for a crunchy contrast. For a fun twist, serve it in a sandwich with your choice of toppings. Don't forget a squeeze of lemon for brightness! After cooking the Air Fryer Parmesan Crusted Chicken, let it cool. Place the chicken in an airtight container. Store it in the fridge for up to three days. Make sure to keep it covered to avoid drying. To reheat, set your air fryer to 350°F (175°C). Place the chicken in the basket for about 5-7 minutes. This keeps the crust crispy. You can also use an oven. Heat it at 350°F (175°C) for about 10 minutes. Check that the chicken is warm all the way through before serving. You can freeze the chicken for longer storage. Wrap each piece tightly in plastic wrap. Place them in a freezer bag and remove as much air as possible. The chicken can stay frozen for up to three months. To thaw, move it to the fridge overnight before reheating. This helps keep its flavor and texture. You cook Air Fryer Parmesan Crusted Chicken for 12 to 15 minutes. Set your air fryer to 380°F (193°C). Flip the chicken halfway through cooking. This helps it get evenly crisp. Make sure the chicken reaches 165°F (74°C) inside for safe eating. Yes, you can use frozen chicken breasts. However, it’s best to thaw them first for even cooking. If you use frozen chicken, increase the cooking time by 5 to 10 minutes. Check the internal temperature to ensure it reaches 165°F (74°C). Parmesan Crusted Chicken pairs well with many sides. You could serve it with: - Steamed broccoli - Garlic mashed potatoes - A fresh salad - Roasted vegetables These sides balance the flavors and make a complete meal. You can also serve it with pasta for a heartier dish. We explored the key steps to make Air Fryer Parmesan Crusted Chicken. You learned about essential ingredients, from chicken breasts to the egg mixture. I shared simple instructions for cooking and resting the chicken for the best results. Tips on achieving the perfect crust and variations highlight how to customize your dish. Remember to store leftovers properly. Enjoy your delicious meals and experiment with flavors! This way, you'll unleash your inner chef each time you cook.

Air Fryer Parmesan Crusted Chicken Crispy Delight

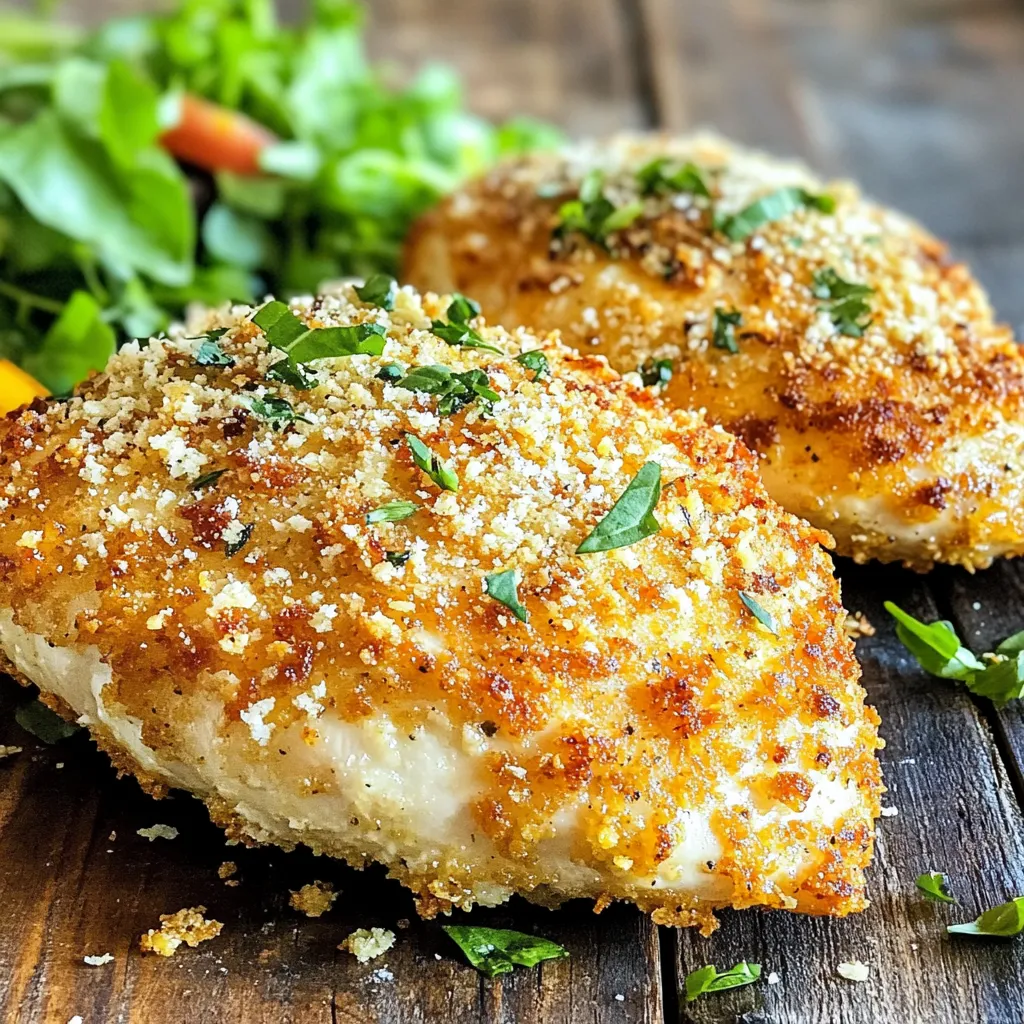
If you’re looking for a tasty chicken dinner, *Air Fryer Parmesan Crusted Chicken* is the answer! With its crispy exterior

- 1 ripe mango, diced - 2 ripe avocados, diced - 1 can (15 oz) black beans, rinsed and drained - 1 red bell pepper, finely chopped - 1/2 red onion, finely chopped - 1 jalapeño, deseeded and minced (optional for heat) - 1/4 cup fresh cilantro, chopped - Juice of 2 limes - 2 tablespoons olive oil - Salt and pepper to taste - 1/4 teaspoon cumin (optional) Using ripe ingredients is key to making this salad shine. Ripe mangoes are sweet and juicy. Ripe avocados are creamy and rich. They add a nice texture. When you use fresh, ripe produce, you create a bright and vibrant dish. To cut the avocado, first slice it in half. Remove the pit carefully. Then, scoop the flesh out with a spoon. For mangoes, peel the skin first. Use a sharp knife to cut the flesh away from the pit. Dice both fruits into bite-sized pieces. This helps the flavors mix well in every bite. When you chop the other veggies, aim for small, even pieces. This ensures a nice balance of flavors and textures. Enjoy making your Mango Avocado Black Bean Salad! First, grab a large bowl. Add the diced mango and avocados. They should be ripe for the best flavor. Next, toss in the rinsed and drained black beans. Black beans add protein and a nice texture. Then, add the finely chopped red bell pepper and red onion. If you like some heat, include the minced jalapeño. Mix all these ingredients gently. Be careful not to mash the avocados. Take a small bowl and pour in the fresh lime juice. Add the olive oil next. These two will create a bright and zesty dressing. Whisk them together until they blend well. Now, add salt and pepper to taste. If you want a bit more flavor, sprinkle in the cumin. This spice gives the dressing a warm touch. Now, pour the dressing over the salad mixture. Gently toss everything together. Make sure the dressing coats all the ingredients. Add the chopped cilantro last for a fresh kick. Give it one final gentle toss. Let the salad sit for about 10-15 minutes. This time allows the flavors to meld nicely. Serve it in a large bowl or individual dishes. Enjoy your fresh and tasty salad! How can you adjust for personal taste? You can play with the flavors. Add more lime juice for extra zing. If you like heat, toss in another jalapeño. You can also add more salt or pepper to suit your taste. How do you avoid avocado browning? To keep your avocados fresh, use lime juice. The acid in lime slows browning. You can also store cut avocados in an airtight container. Cover them tightly to keep air out. What are some good serving suggestions? I love using a large, shallow bowl for this salad. It looks vibrant and inviting. Individual serving dishes also work well for parties. What additional toppings can improve visual appeal? Fresh cilantro leaves make a great garnish. You can also add lime wedges on the side. They add color and freshness. What are some alternative beans or vegetables? If you want a twist, use chickpeas or kidney beans. They add different textures and flavors. You can also swap the red bell pepper for yellow or orange for more color. What are vegan alternatives for dressing? You can use avocado oil instead of olive oil. It has a nice flavor and is plant-based. A splash of apple cider vinegar can also work well for a tangy taste. {{image_2}} You can switch black beans for chickpeas or kidney beans. Chickpeas add a nutty flavor and a nice bite. Kidney beans give a hearty touch. Both options work well in this salad. They keep the dish filling and nutritious. Try different beans to find your favorite mix. For a sweet twist, add corn or diced pineapple. Corn brings a crunchy texture and a mild sweetness. Pineapple adds a tropical flair and a juicy bite. Both fruits brighten the salad's flavors. You can mix and match to suit your taste. These additions make the salad even more fun to eat. Spice blends and different vinegar options can change the salad's taste. A pinch of chili powder or paprika adds warmth. You can also try flavored vinegars like apple cider or red wine vinegar. These changes give the salad a new twist. Experiment with spice and vinegar for a unique flavor journey. To keep your Mango Avocado Black Bean Salad fresh, store it in airtight containers. This helps prevent air from getting in, which can cause spoilage. Place it in the fridge right after serving. It will stay tasty for about two days. Avocados can brown quickly. To slow this down, keep the pit in the leftover avocado. You can also sprinkle lime juice on cut pieces. For the salad, mix in lime juice right before serving. This adds flavor and helps keep everything fresh. If you notice the salad getting soggy, add more diced vegetables to balance it out. This salad is not meant for freezing. When you freeze avocados, they change texture. The same goes for the salad with black beans and mango. If you have extra dressing, you can freeze it. Store it in ice cube trays. When you want to use it, just thaw the cubes in the fridge. Yes, you can make this salad ahead of time. I suggest you prepare the salad but leave out the avocado and dressing. This way, the avocado stays fresh and green. You can mix everything else together. Store it in an airtight container in the fridge. When you are ready to eat, add the avocado and dressing. This keeps the salad tasty and bright. If you do not have lime juice, you can use lemon juice. Lemon gives a nice tang too. You can also try orange juice for a sweeter flavor. Both options work well. Just use the same amount as the lime juice in the recipe. Leftover salad lasts about two days in the fridge. Make sure to store it in an airtight container. Check for signs of spoilage, like a bad smell or browning avocado. If the salad looks off, it’s best to throw it away. Always trust your senses! This blog post covered fresh, vibrant ingredients to create a delicious salad. We discussed ripe mango, avocado, and black beans, plus essential seasonings like lime juice and olive oil. You learned how to mix and serve, ensuring every bite bursts with flavor. Remember, choose ripe ingredients and store them well for the best taste. Feel free to adjust flavors and try different beans or fruits. This recipe is versatile and fun, so enjoy making it your own!

Mango Avocado Black Bean Salad Fresh and Tasty Mix

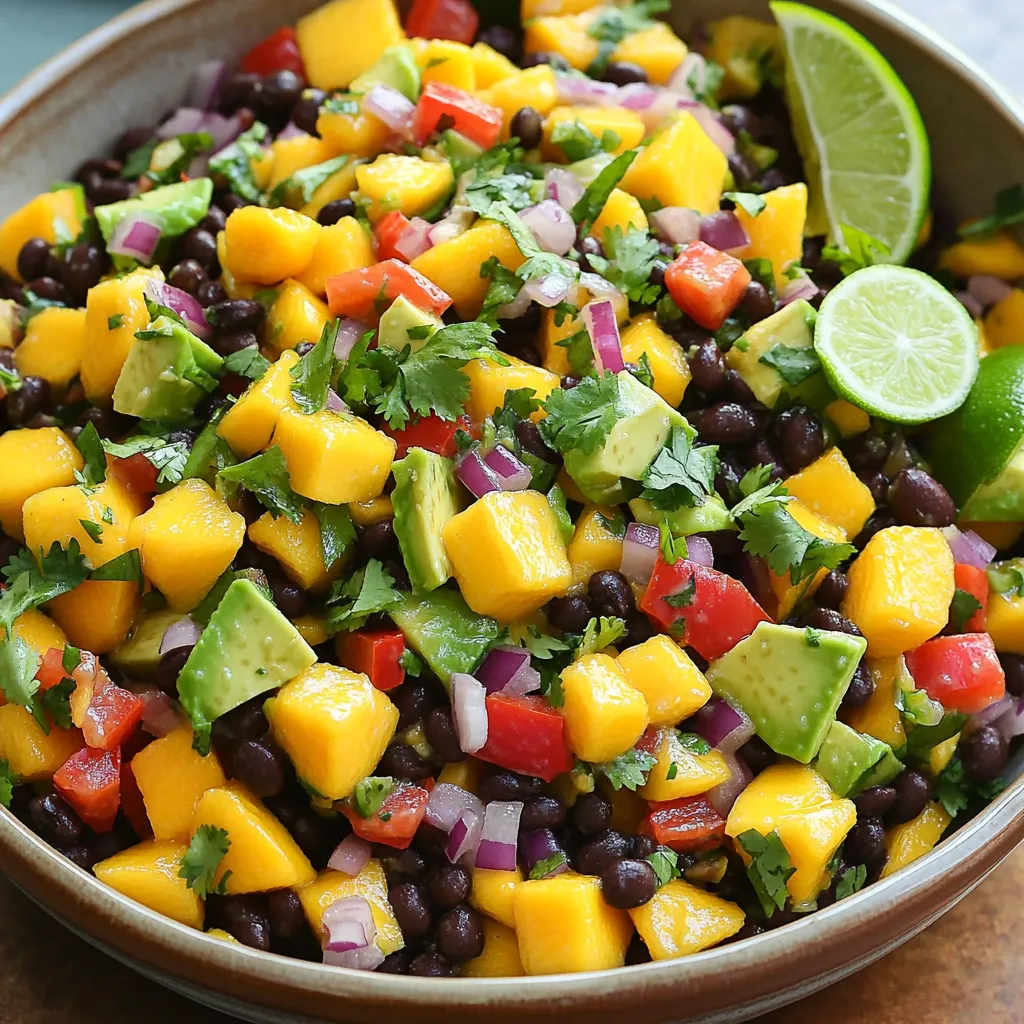
Looking for a fresh, tasty dish that’s as vibrant as it is healthy? This Mango Avocado Black Bean Salad is

- 1 lb boneless, skinless chicken breasts - 1 medium onion, diced - 2 cloves garlic, minced - 1 red bell pepper, diced - 1 can (15 oz) black beans, rinsed and drained - 1 can (15 oz) corn kernels, drained - 1 can (14.5 oz) diced tomatoes with green chilies - 4 cups chicken broth - 1 tablespoon ground cumin - 1 teaspoon chili powder - 1 teaspoon smoked paprika - Salt and pepper to taste - 1 tablespoon olive oil These main ingredients make the base of your soup. Each one adds unique flavors. The chicken breasts bring protein, while the beans and corn add texture. The spices create warmth and depth. - Fresh cilantro, chopped - Tortilla strips - Lime wedges Garnishes can elevate your soup. Cilantro adds freshness, while tortilla strips provide crunch. Lime wedges give a zesty finish that brightens the dish. - Use rotisserie chicken for a quicker option. - Swap black beans for pinto beans if preferred. - Replace chicken broth with vegetable broth for a lighter version. These substitutions can change the soup’s flavor. Rotisserie chicken saves time and adds a rich taste. Feel free to mix it up based on what you have at home. First, I turn on my Instant Pot and choose the Sauté mode. I add one tablespoon of olive oil and let it heat up. Once hot, I add one medium diced onion. I sauté it for about 3-4 minutes until it turns soft and clear. Then, I throw in 2 minced garlic cloves and stir for 30 seconds until it smells great. Next, I add one diced red bell pepper to the pot. I also sprinkle in one tablespoon of ground cumin, one teaspoon of chili powder, and one teaspoon of smoked paprika. I season with salt and pepper to taste. I keep stirring for about 2 minutes, letting all those flavors mix. After that, I place one pound of boneless, skinless chicken breasts into the pot. I add one can of diced tomatoes with green chilies and pour in 4 cups of chicken broth. I gently mix all the ingredients together. Now, I close the lid and set the valve to Sealing. I select the Manual or Pressure Cook mode and cook on high pressure for 10 minutes. Once the cooking time is up, I carefully do a quick release by moving the valve to Venting. After the pressure is gone, I open the lid. I take out the chicken breasts and shred them using two forks. I return the shredded chicken back to the pot along with one can of rinsed black beans and one can of drained corn. I stir to mix everything and let it warm for another 2-3 minutes. To get the best flavor in your chicken tortilla soup, start with fresh ingredients. Use ripe tomatoes for a richer taste. Sauté the onions and garlic until soft. This step adds depth to the soup's flavor. Don't skip the spices! Ground cumin, chili powder, and smoked paprika make a big difference. Adjust the salt and pepper to your liking. For a bright finish, add lime juice right before serving. A common mistake is overcooking the chicken. It can become dry and tough. Always follow the timing in the recipe to keep it juicy. Another mistake is not rinsing the black beans. Rinsing removes extra sodium and helps the soup taste fresher. Ensure you seal the Instant Pot lid correctly. If it's not sealed, the soup won't cook properly. Lastly, taste the soup before serving. Adjust flavors as needed, since every ingredient varies in strength. Serve the soup hot in bowls. Top with chopped cilantro and crunchy tortilla strips. These add great texture! For extra flavor, offer lime wedges on the side. You can also add sliced avocado or shredded cheese for creaminess. Pair the soup with warm tortillas or crusty bread for a full meal. Enjoy with family and friends for a cozy dinner! {{image_2}} To spice up your chicken tortilla soup, add more heat. You can include jalapeños or hot sauce. Start with one finely chopped jalapeño, and adjust to your taste. The heat level is all yours to choose! Want a meat-free option? Swap the chicken for cooked quinoa or chickpeas. Use vegetable broth instead of chicken broth. This way, you keep the soup hearty and delicious without the meat. Enhance your soup with tasty extras. Avocado adds creaminess and healthy fats. You can also top with shredded cheese for a savory kick. Consider adding lime juice for a zesty finish. Tortilla strips add crunch and texture. Enjoy mixing and matching! To store your chicken tortilla soup, first let it cool. Then, pour it into an airtight container. It can last in the fridge for about three to four days. Make sure to seal it well to keep it fresh. You can also store the soup in smaller portions for easy meals later. When you are ready to eat the leftovers, you can reheat them on the stove. Just pour the soup into a pot and warm it over medium heat. Stir often to avoid burning. You can also use the microwave. Place the soup in a microwave-safe bowl and heat it for 1-2 minutes. Stir halfway to ensure even heating. If you want to freeze the soup, make sure it cools completely first. Use freezer-safe containers or bags. Leave some space at the top, as the soup will expand when frozen. It is best to use the soup within three months for the best taste. When ready to eat, thaw it overnight in the fridge before reheating. Yes, you can use frozen chicken in this recipe. Just add a few extra minutes to the cooking time. Frozen chicken usually takes 12 to 15 minutes to cook in the Instant Pot. Remember to check that it reaches 165°F for safety. To spice up your soup, add more chili powder or diced jalapeños. You can also use spicy diced tomatoes instead of regular ones. Experiment with hot sauce or crushed red pepper for an extra kick. Adjust to your taste for the best results. Serve your chicken tortilla soup with tortilla chips for crunch. You can also add fresh avocado or cheese for creaminess. Lime wedges add a zesty touch. For a full meal, pair with a simple salad or cornbread. Enjoy! This blog post shared a simple way to make chicken tortilla soup. We covered key ingredients, step-by-step cooking, and helpful tips. You learned about variations to fit your taste and how to store leftovers well. Remember, cooking is fun and tasty. Enjoy experimenting with flavors and new ideas. Try what you like best and share it with others. Happy cooking!

Instant Pot Chicken Tortilla Soup Quick and Easy Recipe

Craving a warm, hearty meal that’s both quick and easy? You’re in the right place! My Instant Pot Chicken Tortilla

Older posts
Newer posts
← Previous Page1 … Page9 Page10 Page11 … Page84 Next →

dsad

© 2026 juliesdish • Built with GeneratePress

Our Policies

  • Copyright Policy
  • Cookie Policy
  • GDPR Policy
  • Privacy Policy
  • Disclaimer
  • Terms Of Use

More Information

  • Home
  • About
  • Contact
  • Appetizers
  • Dessert
  • Dinner
  • Drinks
©2026, juliesdish About Back To Top