Skip to content
DisclaimerTerms Of UseGDPR PolicyCookie Policy

juliesdish

  • Home
  • Drinks
  • Appetizers
  • Dinner
  • Dessert
  • About
  • Contact
  • Privacy Policy
DisclaimerTerms Of UseGDPR PolicyCookie Policy

NO-ING-IMG

- Ripe mangoes - Coconut milk - Sweetener options (honey or maple syrup) - Chia seeds - Lime juice - Salt To make these mango coconut chia popsicles, you need simple and fresh ingredients. First, grab two ripe mangoes. Their sweet and juicy flesh creates a bright flavor. Use coconut milk for a creamy texture. You can choose honey or maple syrup to sweeten the mix. Chia seeds add a fun texture and boost nutrition. Don’t forget lime juice; it adds a zesty twist. A pinch of salt enhances all the flavors. Each ingredient plays a role in making these popsicles a refreshing treat. - Calories per serving: About 150 - Key nutrients: Fiber, healthy fats, vitamins - Health benefits of chia seeds: Good for digestion, packed with omega-3s, and helps with hydration Each popsicle has around 150 calories, making them a light snack. You get fiber from chia seeds and mangoes, which aids digestion. The healthy fats in coconut milk provide energy and keep you full. Chia seeds are tiny powerhouses. They are high in omega-3 fatty acids, which are great for your heart. Plus, they help keep you hydrated, especially in the summer heat. These popsicles are not just tasty; they are also good for you! {{ingredient_image_1}} - Blending the mango coconut mixture: Start by taking two ripe mangoes. Dice them into small pieces. Then, add them to your blender. Pour in one cup of coconut milk, a quarter cup of honey or maple syrup, one tablespoon of lime juice, and a pinch of salt. Blend this mixture until it is smooth and creamy. - Combining chia seeds with the blended mixture: In a mixing bowl, combine a quarter cup of chia seeds with your blended mango mixture. Stir it well to make sure the chia seeds are spread evenly throughout the mix. - Allowing chia seeds to swell: Let the mixture sit for about 5 to 10 minutes. This time allows the chia seeds to absorb some liquid and swell up. After this, give it another stir to break up clumps of chia seeds. - Pouring into popsicle molds: Next, carefully pour your mixture into popsicle molds. Leave a little space at the top of each mold. The mixture will expand when it freezes. - Inserting popsicle sticks: Once your molds are filled, insert the popsicle sticks. Make sure they stand straight in the mixture. - Freezing process: Place the molds in the freezer. Let them freeze for at least 4 to 6 hours, or until they are completely solid. - Techniques to loosen pops from molds: When you are ready to enjoy your popsicles, take them out of the freezer. Run warm water over the outside of the molds for a few seconds. This helps loosen the pops. - Presentation tips: Gently pull the popsicles out of the molds. Serve them on a colorful platter. For a fun touch, you can garnish with fresh mint leaves or sprinkle some coconut flakes on top. Enjoy your tasty treat! To make these mango coconut chia popsicles just right for you, tweak the sweetness. Start with the recommended 1/4 cup of honey or maple syrup. If you prefer them sweeter, add a little more. If you want less sugar, reduce it gradually. You can also mix in different fruits. Try adding berries, bananas, or pineapple for extra flavor. Each fruit brings a unique taste and color. This way, you can create your own favorite popsicle! Store any leftover popsicles in an airtight container. This keeps them fresh and tasty. Make sure to separate layers with parchment paper if stacking. These popsicles freeze well for about 3 months. For the best flavor and texture, enjoy them within this time. When you're ready to eat, simply run warm water over the mold for a few seconds to loosen them. Enjoy the refreshing taste! Pro Tips Choose Ripe Mangoes: For the best flavor and sweetness, ensure your mangoes are fully ripe and soft to the touch before using them in this recipe. Adjust Sweetness: Depending on the ripeness of your mangoes, you may want to adjust the amount of honey or maple syrup to suit your taste preferences. Chia Seed Soaking: Allowing the chia seeds to sit for 5-10 minutes helps them absorb moisture and create a better texture in the popsicles. Creative Variations: Experiment with other fruits like pineapple or berries for a unique twist on these popsicles; just remember to adjust the sweetness accordingly. {{image_2}} You can change the fruit in these popsicles. Berries, like strawberries or blueberries, add bright flavors. You can also use other tropical fruits, such as pineapple or passion fruit. Mixing fruits makes each popsicle unique. If you want a creamier base, swap coconut milk for almond or oat milk. These alternatives still give you a tasty treat. Each milk has its own flavor, so try them out to find your favorite. These popsicles can fit many diets. They are naturally vegan since they use plant-based ingredients. If you want to keep them dairy-free, stick with coconut milk. For a low-sugar option, reduce the honey or maple syrup. You can also use a sugar substitute, like stevia. This keeps the sweetness without adding extra sugar. Adjusting the sweetener lets you enjoy a refreshing treat without worry. You can make your Mango Coconut Chia Popsicles even better with great drinks. Fresh fruit juices pair well. Try a tall glass of lemonade or iced tea. Coconut water also adds a nice touch. For a fun twist, serve these pops with a splash of sparkling water. Summer gatherings are perfect for these popsicles. They cool you down on hot days. Set up a popsicle bar with toppings. Guests can add toppings like shredded coconut or fresh fruit. This makes the experience interactive and fun. Kids love to get creative with their treats. Make your popsicles look extra special. Use a colorful platter to serve them. Garnish with fresh mint leaves or a sprinkle of coconut flakes. This adds color and a nice aroma. You can also use small bowls for toppings. This way, everyone can customize their pops. For a fun touch, use cute popsicle sticks. You can even write guests' names on them. This adds a personal vibe to your gathering. Guests will enjoy the pops even more when they look great! Can I use frozen mango instead? Yes, you can use frozen mango. It blends well. Just let it thaw a bit before blending. This way, the popsicles stay smooth. Frozen mango also adds a nice chill. How long do these popsicles last in the freezer? These popsicles can last for about two months in the freezer. To keep them fresh, store them in an airtight container. This helps avoid freezer burn. Are chia seeds safe for children? Yes, chia seeds are safe for kids. They are full of fiber and healthy fats. Just make sure to start with small amounts. This helps kids get used to them. What if I don’t have popsicle molds? If you don’t have molds, use paper cups instead. Pour the mixture into the cups, then add sticks. You can also use ice cube trays. Just adjust the freezing time for smaller sizes. You learned how to make tasty mango coconut popsicles using simple ingredients. We covered the main ingredients, step-by-step instructions, tips for storage, and fun variations. These treats are not only delicious but also packed with nutrients. You can customize them to fit your taste or diet. Try serving them at summer gatherings for a refreshing snack. Now, it's your turn to create a fun and healthy treat. Enjoy making your own delicious popsicles!

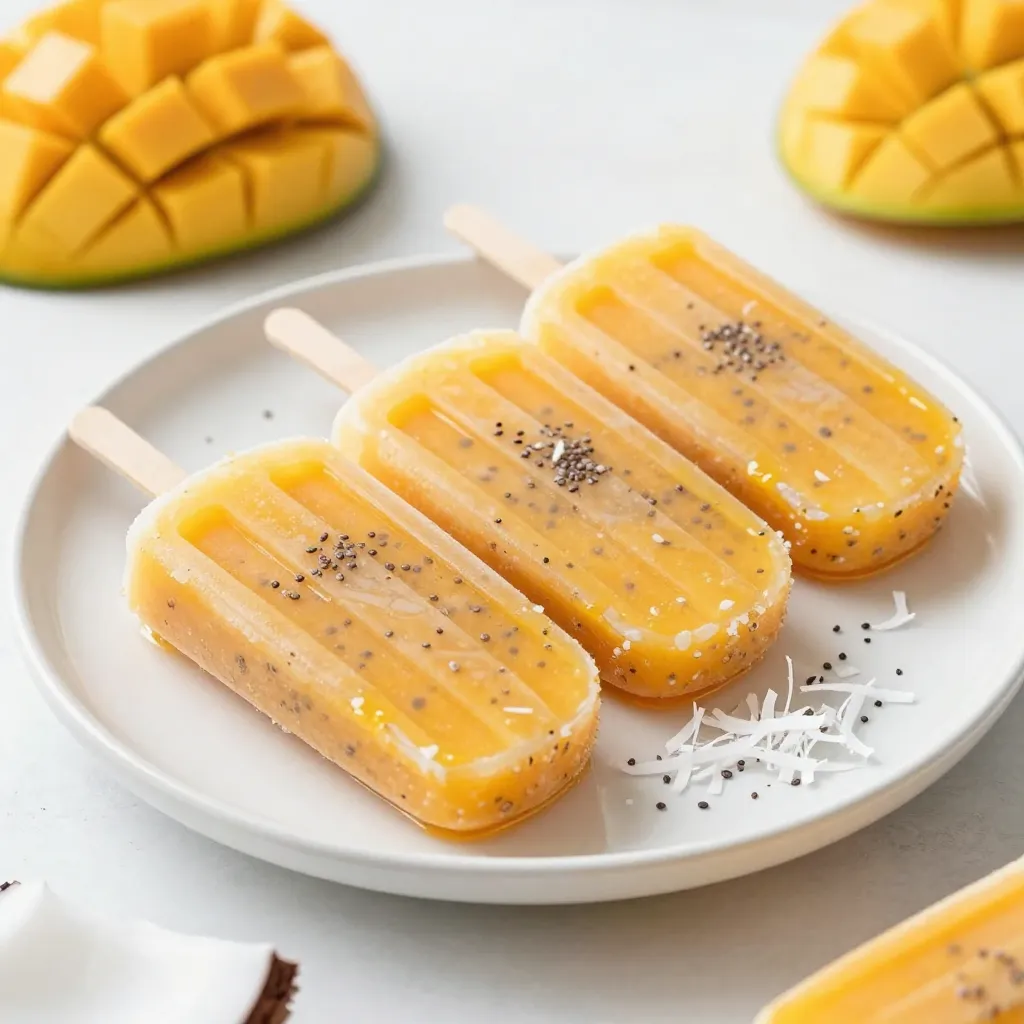
Mango Coconut Chia Popsicles Refreshing Summer Treat

Looking for a fun and easy way to beat the summer heat? Mango Coconut Chia Popsicles are your answer! With

To make herb roasted baby potatoes, gather these simple items: - 1.5 lbs baby potatoes, halved - 3 tablespoons olive oil - 3 cloves garlic, minced - 1 teaspoon dried rosemary - 1 teaspoon dried thyme - 1 teaspoon smoked paprika - Salt and pepper to taste - Fresh parsley, chopped (for garnish) These ingredients create a tasty and crisp dish that shines at any meal. Fresh herbs can elevate the flavor of your potatoes. I suggest using: - Fresh rosemary - Fresh thyme - Fresh parsley These herbs add a bright taste and lovely aroma. You can mix and match them based on what you have. Along with herbs, you can try these seasonings: - Lemon zest for brightness - Red pepper flakes for heat - Parmesan cheese for richness These options add depth and make your dish stand out. Adjust to your taste and enjoy the fun of cooking with flavors! {{ingredient_image_1}} Start by gathering your ingredients. You will need: - 1.5 lbs baby potatoes, halved - 3 tablespoons olive oil - 3 cloves garlic, minced - 1 teaspoon dried rosemary - 1 teaspoon dried thyme - 1 teaspoon smoked paprika - Salt and pepper to taste - Fresh parsley, chopped (for garnish) Next, preheat your oven to 425°F (220°C). This step is key for crisp potatoes. Line a baking sheet with parchment paper. This makes cleanup easy later. In a large bowl, mix the halved baby potatoes with olive oil, minced garlic, rosemary, thyme, smoked paprika, salt, and pepper. Make sure each potato gets coated well. This blend adds great flavor. Spread the potatoes on the baking sheet. Place them cut side down. This helps them crisp up better. Roast the potatoes in the preheated oven for about 25-30 minutes. Flip them halfway through cooking to ensure even browning. They should turn golden brown and crispy. Once they look perfect, take them out of the oven. Let them cool for a few minutes. This helps prevent burns and keeps them from steaming. For extra crispiness, try these tips: - Make sure the potatoes are in a single layer. - Do not crowd the baking sheet. Give them space to brown. - Use fresh herbs if you can. They add a brighter taste. Serve your herb roasted baby potatoes garnished with fresh parsley. A little extra olive oil on top adds shine and flavor. When you pick baby potatoes, look for smooth skin. They should feel firm and not soft. Avoid any potatoes with dark spots or wrinkles. The size of the potatoes matters too. Aim for ones that are about the same size. This helps them cook evenly. To make your herb roasted baby potatoes shine, use fresh herbs when you can. Fresh rosemary and thyme give a great taste. If you use dried herbs, make sure they are not old. Fresh garlic adds a nice kick, while smoked paprika brings depth. Adjust salt and pepper to fit your taste. For this recipe, you need a good baking sheet. I like to line mine with parchment paper. This makes cleanup easy and prevents sticking. A large bowl is also important for mixing. Use a spatula to toss the potatoes well. A meat thermometer can help check the doneness, ensuring they are cooked perfectly. Pro Tips Use Even Sizing: Make sure all potato halves are roughly the same size to ensure they cook evenly. Season Generously: Don’t be shy with salt and pepper; they enhance the natural flavor of the potatoes. Experiment with Herbs: Feel free to mix in other herbs like oregano or basil for a unique flavor twist. Crispiness Check: For extra crispy potatoes, broil them for the last few minutes of baking. {{image_2}} You can change the herbs based on your taste. Try using fresh basil or dill. These herbs will give a different flavor. You can also mix in some oregano or chives. If you want heat, add red pepper flakes. Their spice will give an exciting kick to your dish. Adding more vegetables can make this dish even better. Carrots, bell peppers, or red onions work great. Cut them into bite-sized pieces and toss them with the potatoes. They will roast nicely and add color. This mix not only adds flavor but also makes your meal more nutritious. If you follow a specific diet, you can adjust this recipe. For a vegan option, this dish is already perfect. Just use the ingredients as they are. If you need gluten-free, rest easy. All the ingredients are naturally gluten-free. You can also reduce the oil for a lighter version, but keep in mind it might not get as crispy. To store leftover herb roasted baby potatoes, let them cool first. Place them in an airtight container. This keeps them fresh and tasty. You can keep them in the fridge for up to four days. If you have a lot, split them into smaller containers. This way, you can grab just what you need. When you want to eat the leftovers, reheating is key. Preheat your oven to 350°F (175°C). Spread the potatoes on a baking sheet. Heat them for about 10 to 15 minutes. This helps them get crispy again. You can also use a skillet on medium heat. Just toss them gently for about five minutes. Both methods keep the flavor and texture. If you want to freeze your herb roasted baby potatoes, it's easy! First, let them cool completely. Spread them on a baking sheet in a single layer. Freeze them for about an hour. This prevents them from sticking together. Once frozen, transfer them to a freezer bag. They can last up to three months. When you're ready, just thaw them in the fridge overnight before reheating. Yes, you can use other types of potatoes. Yukon Golds and red potatoes work well. They have a creamy texture and hold their shape. You can even try fingerling potatoes for fun shapes. Just remember that cooking times may vary. Check them often to avoid overcooking. To make your potatoes crispy, follow these tips. First, cut the potatoes in half and place them cut-side down. This helps them brown better. Second, use enough olive oil to coat them lightly. A hot oven is key, so preheat to 425°F (220°C). Flip halfway through cooking for even crispiness. These potatoes pair well with many dishes. Serve them with grilled chicken or fish for a nice meal. They also go great with roasted vegetables or a fresh salad. For a hearty option, try them with steak or pork chops. Don't forget to drizzle a bit of extra olive oil for added flavor. Herb roasted baby potatoes are simple and tasty. We covered ingredients, cooking steps, and tips for crispiness. I shared how to choose the best potatoes and add your favorite flavors. You can even make variations to fit your diet. Always remember to store leftovers properly and reheat them well. Enjoy these potatoes with any meal. They are sure to please!

Herb Roasted Baby Potatoes Simple and Tasty Dish

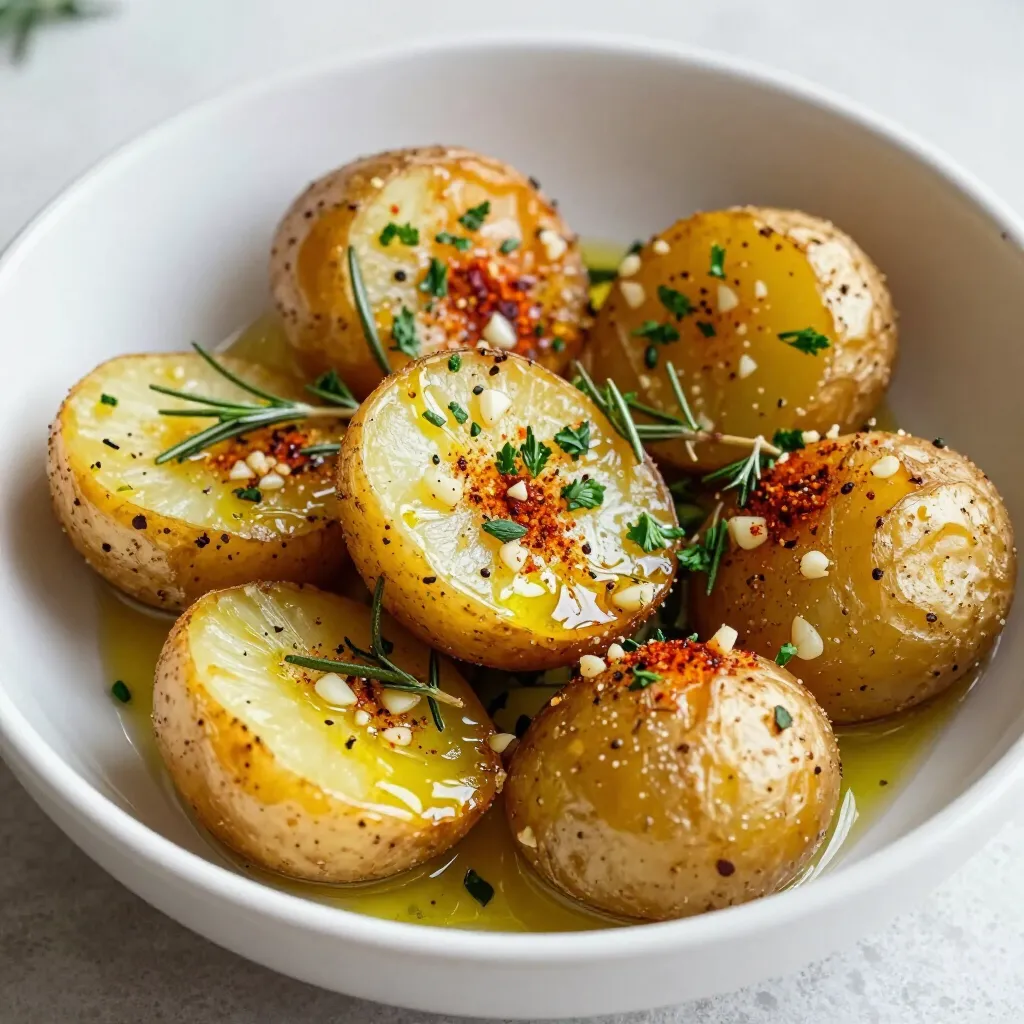
If you’re looking for a simple and tasty dish, you’re in the right place! Herb roasted baby potatoes are a

- 1 block (14 oz) firm tofu, pressed and cubed - 1/4 cup sweet chili sauce - 1 red bell pepper, diced - 1 carrot, grated - 3 green onions, chopped - 1 tablespoon soy sauce - 1 tablespoon lime juice - 1 head of butter or romaine lettuce, leaves separated - Fresh cilantro for garnish - Salt and pepper - Extra toppings or sauces {{ingredient_image_1}} 1. Start by pressing the tofu. Place the block of tofu on a plate. Put another plate on top. Add something heavy. This will help remove extra water. Let it sit for at least 15 minutes. This step makes the tofu firmer and helps it soak up flavors. 2. After pressing, cut the tofu into small cubes. Aim for about 1-inch pieces. This size helps the tofu cook evenly and fit nicely in the wraps. 3. In a bowl, toss the cubed tofu with cornstarch. Make sure each piece is coated well. The cornstarch creates a crispy crust when cooked. 1. Heat the vegetable oil in a large skillet over medium-high heat. Make sure the oil is hot before adding the tofu. This helps it to fry well. 2. Carefully add the cornstarch-coated tofu to the skillet. Fry the tofu for about 8-10 minutes. Turn the pieces often until they are golden and crispy on all sides. This step gives the tofu a nice texture. 3. Once the tofu is crispy, add the diced red bell pepper and grated carrot to the skillet. Sauté for about 3-4 minutes. The goal is to make the veggies tender but still crisp. They will add flavor and color to the dish. 1. Stir in the sweet chili sauce, soy sauce, and lime juice. Mix everything well. Let it simmer for 2-3 minutes. This step warms the sauce and makes sure every piece of tofu and veggie is coated. 2. Season the mixture with salt and pepper to taste. Adjust it based on your preference. 3. To assemble the wraps, take a lettuce leaf. Spoon a generous amount of the tofu mixture into the center. 4. Garnish with chopped green onions and fresh cilantro. 5. Fold the lettuce over the filling. Enjoy your fresh, tasty wraps! Importance of pressing tofu Pressing tofu is key. It removes extra moisture. This helps the tofu absorb flavors better. It also makes the tofu crispier when cooked. Always press for at least 15 minutes for best results. Best ways to cube tofu To cube tofu, first, press it. Then, cut the block in half. Slice each half into strips, then dice into cubes. Aim for about one-inch pieces. This size cooks evenly and fits well in the wraps. Achieving crispy tofu Coating tofu with cornstarch is a must. It creates a nice crust when cooked. Heat the oil in the skillet until hot. Fry the tofu in batches for even cooking. Cook until golden brown, about 8-10 minutes. Sautéing vegetables perfectly When sautéing vegetables, add them after the tofu is crispy. This keeps the tofu crisp. Cook the veggies for just a few minutes. They should be tender yet still crunchy. This adds texture to your wraps. Garnishing with herbs and additional flavors Fresh herbs like cilantro add great flavor. Chop them finely and sprinkle on top. You can also add lime juice for a zesty kick. These flavors brighten the dish. Recommended side dishes Serve your wraps with a side of rice or quinoa. These grains complement the tofu well. You can also add a light salad for freshness. This makes your meal more filling and balanced. Pro Tips Press the Tofu Well: Ensure that the tofu is pressed long enough to remove excess moisture, which helps achieve a crispier texture when cooked. Coat Tofu Evenly: Toss the tofu in cornstarch thoroughly to create a crunchy exterior when frying, enhancing the overall flavor and texture. Fresh Ingredients: Use fresh vegetables and herbs for garnish to elevate the dish’s flavor, adding brightness and a pop of color to your wraps. Adjust the Spice: Customize the heat level by adding chili flakes or using a spicy chili sauce if you prefer an extra kick in your wraps. {{image_2}} You can easily change the protein in this dish. Try tempeh or seitan for a twist. If you want a vegan option, stick with firm tofu. It works great! For sauces, you can swap sweet chili sauce with teriyaki or hoisin sauce. This change gives a new flavor. If you need a gluten-free option, use tamari instead of soy sauce. This keeps the dish safe for those who avoid gluten. For a low-carb version, skip the sweet chili sauce. Instead, use coconut aminos and add more lime juice for taste. To spice things up, add sliced jalapeños or a dash of sriracha to the tofu mix. This adds heat and excitement! If you prefer a sweet and savory taste, mix in some pineapple chunks. This will balance the flavors nicely and make each bite delicious. After you enjoy your sweet chili tofu lettuce wraps, you might have some left. Store leftovers in the fridge. Place the tofu filling in an airtight container. It stays fresh for 3 to 4 days. Keep the lettuce leaves separate. Use a different container for them to avoid wilting. This helps keep everything fresh and crisp. When you want to eat your leftovers, reheating is key. Use a skillet to reheat the tofu mixture. Heat it over medium heat. Stir gently until warm. This keeps the tofu crispy. Avoid using the microwave if you can. It can make the tofu soggy. Serve the warm filling in fresh lettuce leaves for the best taste. To save time, you can prep the tofu and veggies ahead. Press and cube the tofu one day before. Toss it in cornstarch and store it in the fridge. Dice the bell pepper and grate the carrot early, too. Keep them in a sealed container. Assemble your wraps fresh when you're ready to eat. This way, you enjoy the best texture and flavor. To add spice to your wraps, use these ingredients: - Sriracha sauce - Red pepper flakes - Chopped fresh chili peppers Start with a small amount of Sriracha in the sweet chili sauce. Add more based on your taste. Red pepper flakes can be sprinkled on top before serving. Fresh chili peppers can be diced and mixed in with the veggies. This will give your wraps that extra kick! Yes, you can prepare some parts ahead of time. Here are my best practices: - Press and cube the tofu a day before. Store it in the fridge. - Chop the vegetables and keep them in an airtight container. - Mix the sauces and store them separately. On the day you want to serve, just fry the tofu and sauté the veggies. Assemble the wraps fresh to keep the lettuce crisp. These wraps pair well with tasty side dishes. Here are some ideas: - Steamed rice or quinoa - A simple cucumber salad - Fresh spring rolls These sides balance the flavors and make your meal more filling. Enjoy! This blog post covered how to make sweet chili tofu lettuce wraps. We discussed key ingredients, the step-by-step cooking process, and helpful tips. You also learned about variations and how to store leftovers. Now you can create a tasty dish that suits your taste. Whether you want spicy or sweet, the options are endless. Enjoy making these wraps and impress your friends and family with your cooking skills!

Sweet Chili Tofu Lettuce Wraps Flavorful and Easy Dish

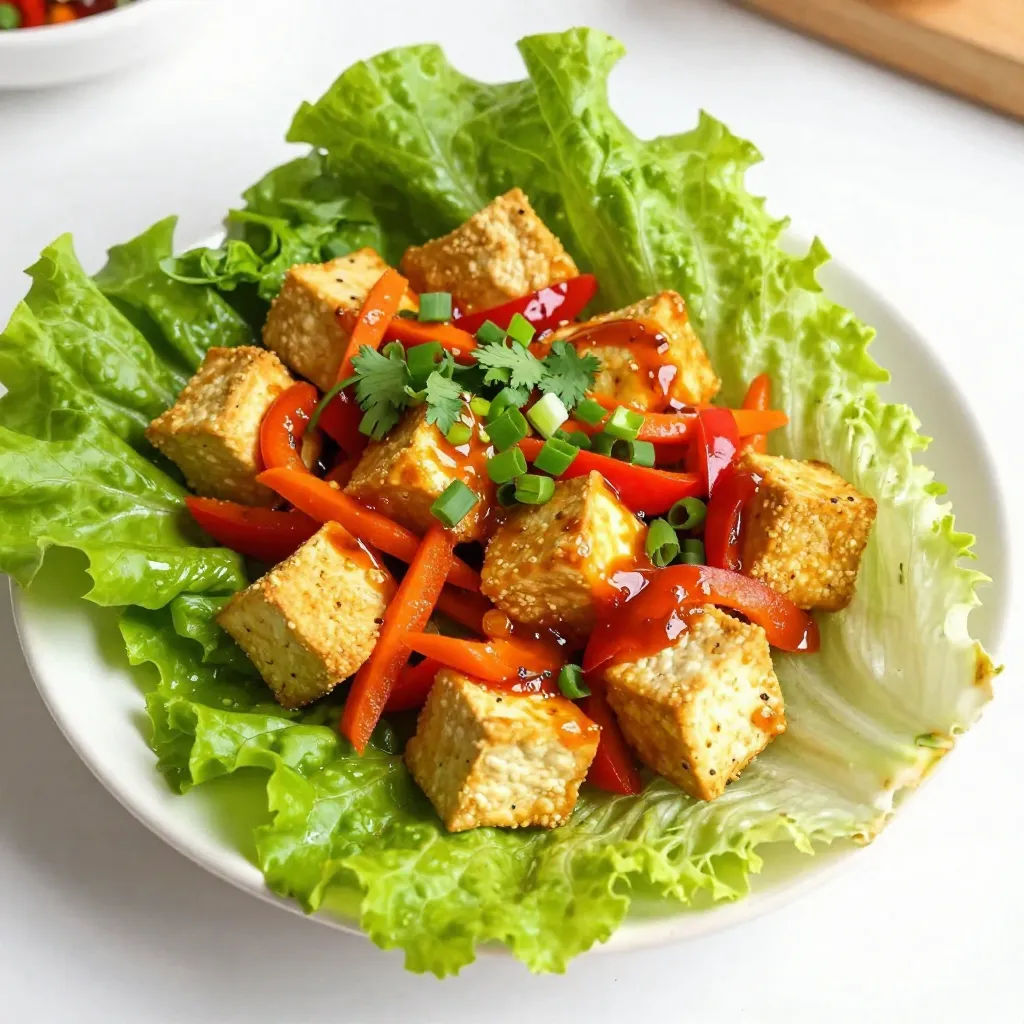
Looking for a quick and tasty meal? You’ve found it! Sweet Chili Tofu Lettuce Wraps are not only flavorful but

Creating Vanilla Almond Energy Bites is simple and fun. You only need a few ingredients. Here’s what you'll need: - 1 cup rolled oats - 1/2 cup almond butter - 1/4 cup honey or maple syrup - 1/4 cup shredded coconut (unsweetened) - 1/4 cup chopped almonds - 1 teaspoon vanilla extract - 1/2 teaspoon almond extract - Pinch of salt - Optional: 2 tablespoons mini chocolate chips (dark or vegan) These ingredients make a tasty and healthy snack. The rolled oats give a good base. Almond butter adds creaminess and protein. Honey or maple syrup offers natural sweetness. Shredded coconut gives a nice texture. Chopped almonds add a satisfying crunch. Vanilla and almond extracts bring out rich flavors. A pinch of salt balances everything. If you want a chocolatey twist, add mini chocolate chips. They mix well and taste great. Each bite will be a little piece of heaven. Now that you have your ingredients, you’re ready to make these energy bites! {{ingredient_image_1}} 1. Start by gathering your ingredients. You need rolled oats, almond butter, honey or maple syrup, shredded coconut, chopped almonds, vanilla extract, almond extract, and a pinch of salt. 2. In a large mixing bowl, combine the rolled oats, almond butter, honey or maple syrup, shredded coconut, chopped almonds, vanilla extract, almond extract, and salt. 3. Mix everything well until it is fully combined. You might find it easier to use your hands. Gently knead the mixture to blend it all together. 4. If you want, you can add mini chocolate chips at this stage. Mix them in until they are evenly spread throughout the mixture. 5. Once mixed, place the bowl in the fridge for about 30 minutes. This helps the mixture firm up. It makes rolling the bites much easier. 6. After chilling, take the mixture out. Use your hands to roll it into small balls, about 1 inch wide. Make sure they are compact and firm. 7. Place the rolled energy bites on a parchment-lined baking sheet. This helps with easy cleanup later. 8. For a fun twist, you can roll the bites in extra shredded coconut or chopped almonds. This adds an extra layer of flavor and texture. 9. After rolling, put the energy bites back in the fridge for another 15 minutes. This helps them set and keeps them from falling apart. 10. Once set, your energy bites are ready to enjoy! Store them in a cool place or in the fridge to keep them fresh. To make the best energy bites, focus on mixing. Start by using your hands. This helps to blend the ingredients well. If you find the mix too sticky, add a bit more oats. For a smooth texture, ensure the almond butter is soft. When rolling the bites, aim for small balls about 1 inch wide. Wet your hands slightly to avoid sticking. This simple trick makes it easier to shape them. If they are uneven, just reshape them gently. Presentation adds charm to your energy bites. Serve them in a small bowl. A sprinkle of shredded coconut on top looks great! You can also arrange them on a platter for gatherings. For drinks, pair these bites with almond milk or herbal tea. They also go well with coffee. This combination makes for a balanced snack or light meal. Pro Tips Chill for Better Texture: Allow the mixture to chill for at least 30 minutes before rolling. This helps the energy bites hold their shape better. Customize Your Add-ins: Feel free to add other ingredients like dried fruits, seeds, or different nut butters for a personalized twist. Storage Tips: Store energy bites in an airtight container in the fridge for up to a week or freeze them for longer-lasting snacks. Perfect Portioning: Use a cookie scoop to ensure each energy bite is the same size, making them perfect for snacks on the go. {{image_2}} You can change the taste of your energy bites easily. Try using different nut butters like peanut or cashew. Each nut butter gives a unique flavor and texture. If you want something sweeter, swap honey for agave syrup or maple syrup. These natural sweeteners offer different taste profiles. Get creative with add-ins! You can add seeds like chia or flax for extra nutrition. Dried fruits, like cranberries or apricots, can also enhance the flavor. You can even switch up the nuts. Use walnuts, pecans, or hazelnuts for a fun twist. Each option brings new flavors and textures to your bites. To keep your Vanilla Almond Energy Bites fresh, store them in the refrigerator. Use an airtight container to prevent moisture and odors. These bites stay firm and tasty for you to enjoy. If you want to save them for later, freezing is a great option. Place the energy bites in a single layer on a baking sheet. Freeze them for about an hour. Once firm, transfer them to a freezer-safe bag. This way, you can grab just what you need. In the fridge, these energy bites last about one week. This gives you plenty of time to snack on them. When you freeze them, they can last for up to three months. Just remember to label your bags with the date. This helps you keep track of how long they have been stored. What are the health benefits of energy bites? Energy bites are a quick snack that packs nutrients. They provide energy from healthy carbs and fats. The oats offer fiber that helps digestion. Almond butter gives you protein and good fats. Honey or maple syrup adds natural sweetness. Plus, the nuts and coconut boost vitamins and minerals. Can I make these gluten-free? Yes, you can make these energy bites gluten-free! Just use certified gluten-free oats. This keeps the recipe safe for those with gluten allergies. All other ingredients are naturally gluten-free, making it easy to enjoy. How many energy bites can I eat in one serving? A serving is about 2 to 3 energy bites. This gives you a nice energy boost without overdoing it. Each bite is packed with nutrients, so enjoy them as a snack during your day. Adjust the number based on your hunger or activity level. We’ve explored how to create tasty energy bites using simple ingredients like oats and almond butter. You learned the steps to mix, chill, and roll these snacks. Tips for perfecting the bites and fun variations make them special. Remember to store them correctly for the best flavor. Energy bites are not just healthy but also quick to make. Enjoy them as a treat or snack. Now, it's time to try making your own and enjoy the benefits!

Vanilla Almond Energy Bites Nutritious Snack Idea

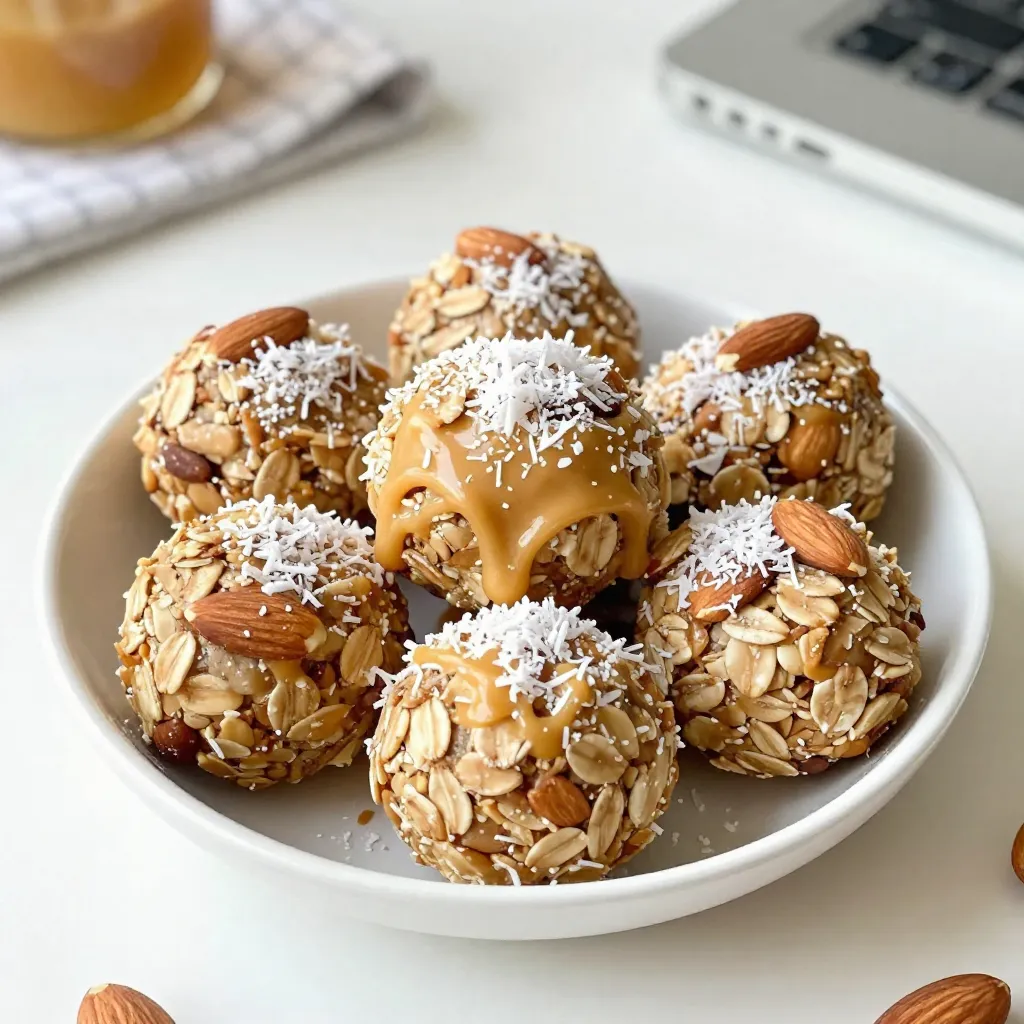
Looking for a quick, nutritious snack? Vanilla Almond Energy Bites are the answer! Packed with wholesome ingredients like rolled oats,

To make Creamy Tuscan Salmon, you need fresh and simple ingredients. Here’s what you'll need: - 4 salmon fillets (about 6 oz each) - Salt and pepper, to taste - 2 tablespoons olive oil - 3 cloves garlic, minced - 1 cup cherry tomatoes, halved - 1 cup fresh spinach - 1 cup heavy cream - ½ cup grated Parmesan cheese - 1 teaspoon Italian seasoning - Fresh basil leaves, for garnish Each ingredient plays a key role in creating rich flavors. The salmon gives a nice base, while the garlic and tomatoes add depth. Fresh spinach brings in color and nutrients. Heavy cream and Parmesan create that dreamy sauce. Don’t forget the basil for a fresh finish! This blend of ingredients makes the meal enjoyable and delicious. {{ingredient_image_1}} 1. First, season the salmon fillets with salt and pepper on both sides. This simple step adds lots of flavor. 2. Next, heat 2 tablespoons of olive oil in a large skillet over medium-high heat. 3. Carefully add the salmon fillets to the skillet. Sear them for about 4-5 minutes on each side. Look for a nice golden crust. Remove the salmon and set it aside. 1. In the same skillet, add 3 cloves of minced garlic. Sauté for about 1 minute until the garlic smells great. 2. Now, add 1 cup of halved cherry tomatoes. Cook them for another 2-3 minutes until they soften. 3. Stir in 1 cup of fresh spinach. Let it wilt for about a minute. 4. Next, pour in 1 cup of heavy cream and sprinkle in ½ cup of grated Parmesan cheese. Stir as the cheese melts and the sauce thickens, which takes about 3-4 minutes. 5. Add 1 teaspoon of Italian seasoning. Taste the sauce and adjust with salt and pepper if needed. 1. Return the cooked salmon to the skillet. Spoon the creamy sauce over each fillet. 2. Let it simmer for a couple of minutes to warm the salmon through. 3. Serve hot, garnished with fresh basil leaves for a beautiful touch. This step-by-step guide makes it easy to create a delicious dinner. Enjoy your meal! - Ideal cook time for salmon fillets: Cook salmon for 4-5 minutes per side. This time gives you juicy fish. You want a nice pink center. Use a fork to check if it's flaky. - How to achieve a crispy sear: To get a crispy skin, start with a hot skillet. Add olive oil before the salmon. Place the fillets skin-side down. Don’t move them for the first few minutes. This helps to build that beautiful crust. - Substitutions for heavy cream: If you want a lighter sauce, use half-and-half or coconut cream. Both options still taste great. They add unique flavors, too. - Adding extra flavors: For more depth, add lemon juice or zest. You can also mix in capers or olives for a briny kick. Fresh herbs like dill or parsley can brighten up the dish. Pro Tips Use Fresh Ingredients: Always opt for fresh spinach and ripe cherry tomatoes to enhance the flavor and nutritional value of your dish. Perfect Salmon Cooking: For perfectly cooked salmon, use a meat thermometer; the internal temperature should reach 145°F (63°C). Customize the Cream Sauce: Feel free to add other vegetables like bell peppers or zucchini to the sauce for added flavor and texture. Serve with Sides: Pair this dish with crusty bread or over a bed of pasta to soak up the delicious creamy sauce. {{image_2}} For gluten-free options, use certified gluten-free pasta or serve the salmon with rice. This keeps your meal tasty and safe. If you're dairy-free, swap the heavy cream for coconut milk. It adds a nice flavor and keeps the sauce creamy. You can also use nutritional yeast instead of Parmesan for a cheesy taste without dairy. Try adding mushrooms or artichokes to the dish. Sauté the mushrooms with the garlic for a rich flavor. Artichokes give a nice tang and texture. You can also mix in fresh herbs like parsley or dill. They add brightness and freshness to the creamy sauce. Just toss them in before serving to keep their flavor vibrant. To keep your Creamy Tuscan Salmon fresh, cool it down quickly. Place the salmon in the fridge within two hours of cooking. Use a shallow container to help it cool faster. Here are some containers that work best: - Airtight glass containers - BPA-free plastic containers - Silicone food bags These keep the flavors intact and prevent spills. When reheating, you want to keep the salmon moist and tasty. Here are some best practices: - Stovetop: This method is best. Heat a non-stick pan over low heat. Add a splash of cream to keep it rich. Heat for 5-7 minutes, flipping gently. - Microwave: If you're short on time, use this method. Place the salmon on a microwave-safe plate. Cover it with a damp paper towel. Heat in 30-second bursts until warmed through. Be careful not to overheat, or it will dry out. You can serve Creamy Tuscan Salmon with several tasty sides. Here are some great options: - Garlic bread: This adds a nice crunch. - Pasta: Tossed with olive oil or butter. - Rice: A simple, fluffy side works well. - Steamed veggies: Broccoli or green beans pair nicely. - Salad: A fresh green salad balances the meal. These sides will enhance your meal and complement the flavors of the salmon. To check if your salmon is done, look for these signs: - The salmon should be opaque and flake easily with a fork. - Use a meat thermometer; aim for 145°F (63°C) at the thickest part. - If the salmon looks shiny and bright, it may need more time. Remember, overcooking can dry out the fish, so keep an eye on it! Yes, you can freeze Creamy Tuscan Salmon. Here are some helpful tips: - Let the salmon cool completely before freezing. - Use airtight containers or freezer bags. - Label the bags with the date and type of dish. To thaw, place it in the fridge overnight. Reheat gently on the stove or in the oven. Enjoy your meal even later! This Creamy Tuscan Salmon dish combines fresh ingredients and easy steps. You learned how to season and cook salmon fillets perfectly. The creamy sauce adds rich flavors from garlic, spinach, and Parmesan. With helpful tips, you can make the dish your own and store leftovers properly. In the end, this meal is tasty, versatile, and simple. Enjoy making it for yourself and others!

Creamy Tuscan Salmon Flavorful and Easy Dinner Recipe

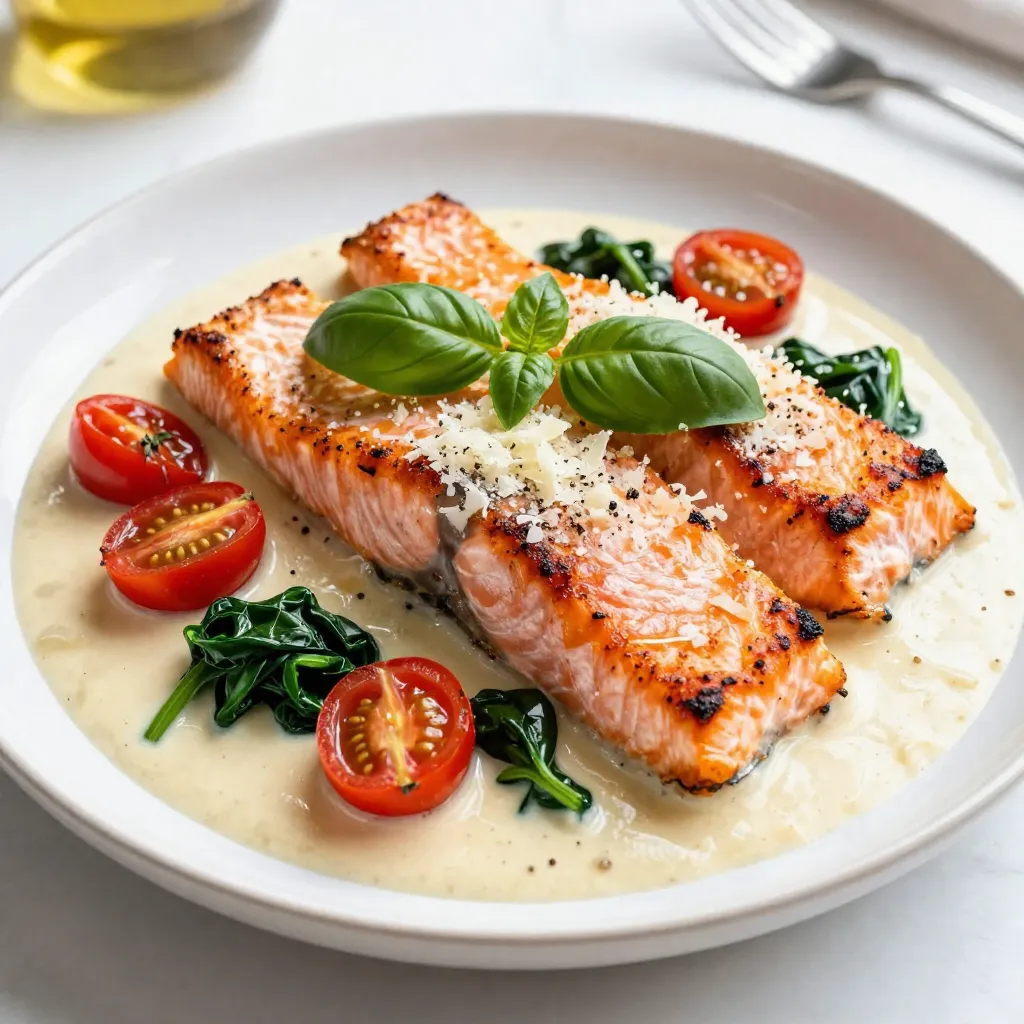
If you’re searching for a quick and tasty dinner, try my Creamy Tuscan Salmon. This dish is packed with flavor

- 1 lb chicken breast, cut into 1-inch cubes - 1 cup pineapple chunks (fresh or canned) - 1 red bell pepper, cut into 1-inch pieces - 1 green bell pepper, cut into 1-inch pieces - 1 small red onion, cut into wedges These main ingredients create a perfect balance of flavors. The chicken is juicy and tender, while the pineapple adds sweetness. The bell peppers and red onion give crunch and color. - 2 tablespoons soy sauce - 2 tablespoons honey - 1 tablespoon sesame oil - 1 teaspoon garlic powder - 1 teaspoon ginger powder - Salt and pepper, to taste The marinade makes the chicken burst with flavor. Soy sauce adds umami, while honey brings sweetness. Sesame oil adds richness that ties everything together. Garlic and ginger give that classic Asian twist. - Additional vegetables (zucchini, mushrooms) - Herbs for flavor enhancement You can customize your kabobs with other veggies. Zucchini and mushrooms add different textures. Fresh herbs like cilantro or basil can brighten the flavors. Feel free to mix and match to your liking! {{ingredient_image_1}} To make a great marinade, mix these ingredients in a large bowl: - 2 tablespoons soy sauce - 2 tablespoons honey - 1 tablespoon sesame oil - 1 teaspoon garlic powder - 1 teaspoon ginger powder - Salt and pepper, to taste Mixing these together gives your kabobs a sweet and savory taste. Marinating the chicken is key. I suggest letting the chicken sit in the marinade for at least 30 minutes. If you have time, refrigerate it for up to 2 hours. This time helps the chicken soak up all those yummy flavors. Now, it’s time to assemble your kabobs. When you thread the ingredients on the skewers, start with the chicken. Then, add pineapple chunks, red bell pepper, green bell pepper, and red onion. Alternate the colors to make your kabobs look fun and bright. I like to use a mix of colors. It makes the dish pop and looks great on the table. Before grilling, preheat your grill to medium-high heat. This step is important to get nice grill marks. Place the kabobs on the grill and cook them for about 10-12 minutes. Turn them every few minutes to ensure even cooking. Check that the chicken is cooked through. It should be no longer pink inside. Enjoy your beautifully grilled Hawaiian chicken kabobs! To make your Hawaiian chicken kabobs really tasty, marinating is key. The best practice is to use a mix of soy sauce, honey, sesame oil, garlic powder, and ginger powder. This mix makes the chicken juicy and flavorful. Marinate the chicken for at least 30 minutes. However, if you can wait, 2 hours is even better. This extra time helps the flavors soak in. Grilling chicken kabobs can be tricky, but I have some tips. First, watch the heat closely. If the grill is too hot, your chicken might dry out. Aim for medium-high heat to keep it juicy. Next, turn the kabobs often to cook them evenly. This way, every piece gets those nice grill marks and stays moist. Making your kabobs look great is easy! Serve them on a large platter for a beautiful display. You can garnish with fresh cilantro and lime wedges. This adds a lovely touch and a pop of color. For a sweet finish, drizzle a little extra honey over the kabobs. This makes them look and taste even better. Enjoy the tropical vibe! Pro Tips Marinate Longer for Flavor: For the best flavor, marinate the chicken for at least 2 hours, or even overnight if possible. Use Fresh Ingredients: Fresh pineapple and vegetables not only enhance the flavor but also add vibrant colors to your kabobs. Soak Skewers for Juiciness: If using wooden skewers, soaking them in water for 30 minutes prevents them from burning on the grill. Rest Before Serving: Let the kabobs rest for a few minutes after grilling to allow juices to redistribute, ensuring a tender bite. {{image_2}} You can swap chicken for shrimp or tofu. Shrimp cooks fast, so grill it for just 5-7 minutes. Tofu needs a bit longer, around 8-10 minutes. Both options taste great with the same marinade. If you want a kick, add chili sauce to your marinade. This gives your kabobs a sweet and spicy twist. You can also switch the pineapple for mango or peach. These fruits add a yummy, fresh flavor. For gluten-free kabobs, use gluten-free soy sauce. This keeps all the taste without the gluten. If you watch your carbs, try using zucchini or bell peppers instead of pineapple. This keeps your meal light and tasty. To keep your Hawaiian chicken kabobs fresh, place them in an airtight container. Store them in the fridge right away. This helps prevent bacteria from growing. The kabobs will stay fresh for up to three days. For reheating, I recommend using the oven or a skillet. Preheat the oven to 350°F. Place the kabobs on a baking sheet for about 10 minutes. If using a skillet, heat it over medium. Cook the kabobs for about five minutes, turning them often. This keeps the flavor strong in reheated kabobs. You can freeze the kabobs both before and after cooking. If freezing raw, marinate them first, then place them in a freezer bag. Squeeze out the air and seal tightly. For cooked kabobs, let them cool down first. Then, pack them in a freezer bag. When ready to eat, thaw them in the fridge overnight. This gives the best results. To check if the chicken is done, use a meat thermometer. Insert it into the thickest part of the chicken. The safe temperature for cooked chicken is 165°F. This ensures that harmful bacteria are killed. If you don't have a thermometer, cut into a piece. The meat should be white, not pink. Juices should run clear, not red. Cooking the chicken fully keeps it safe and tasty. Yes, you can make these kabobs in the oven. Preheat your oven to 400°F. Place the assembled kabobs on a baking sheet lined with foil. Cook for about 15-20 minutes. Turn the kabobs halfway through for even cooking. Ensure the chicken reaches that safe 165°F temperature. This method is great for rainy days or when you can't grill. For a complete meal, serve your kabobs with rice. Coconut rice pairs nicely with the tropical flavors. Grilled corn on the cob is also a great choice. You can add a fresh salad for crunch. Consider a mango salsa to enhance the kabobs' flavor. These sides make your meal balanced and delicious! You can create delicious Hawaiian chicken kabobs using simple ingredients and steps. Start with chicken, fresh pineapple, and peppers. Marinate them for the best flavor and grill for that perfect char. Explore variations by using shrimp or tofu. Store leftovers and reheating correctly keeps them tasty. Your kabobs can bring the tropics to your table, making meals fun and enjoyable. Happy grilling!

Hawaiian Chicken Kabobs Flavorful and Easy Recipe

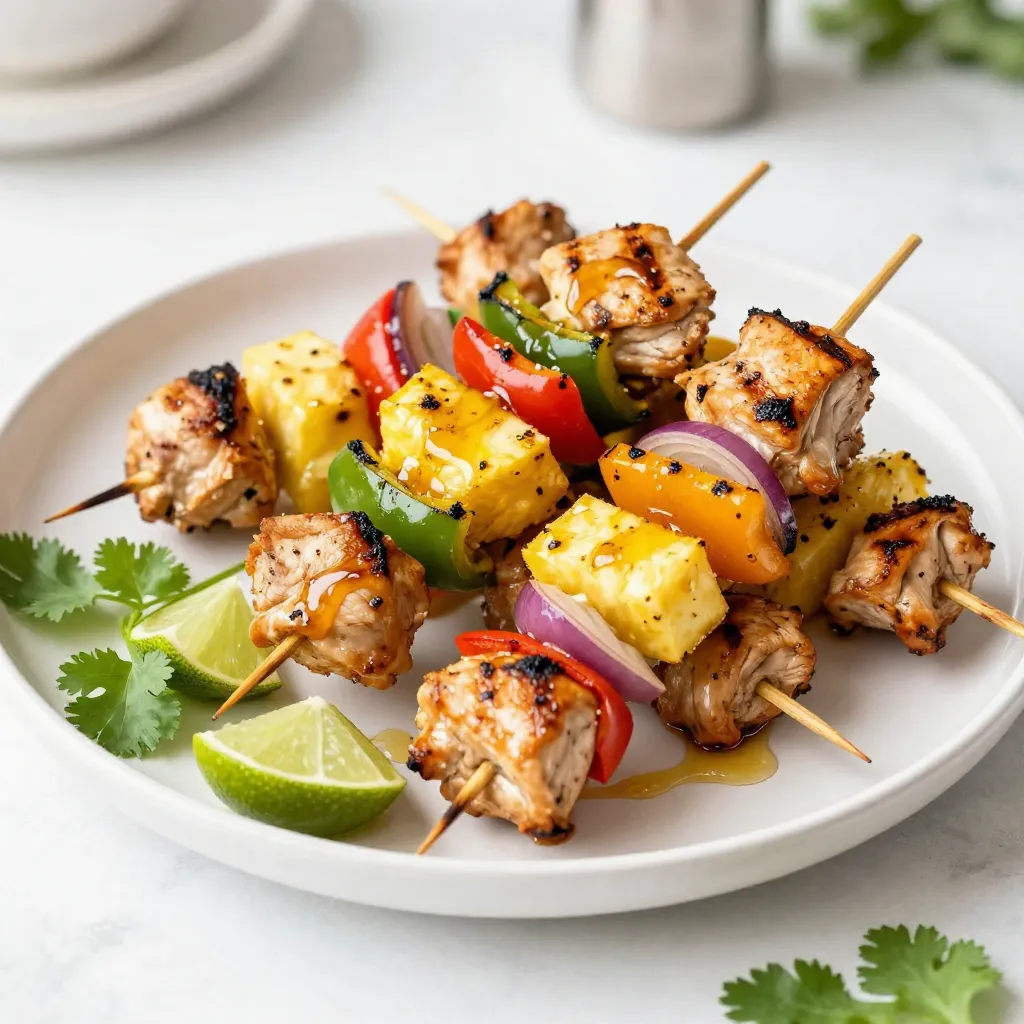
If you’re craving a taste of the tropics, Hawaiian Chicken Kabobs are the perfect choice. Juicy chicken, sweet pineapple, and

To make the best chocolate espresso mousse, you need just a few key ingredients. Each one plays an important role. Here’s what you will need: - 200g dark chocolate (70% cocoa), chopped - 3 large eggs, yolks and whites separated - 1/4 cup granulated sugar - 1 tablespoon instant espresso powder - 1/2 teaspoon vanilla extract - Pinch of salt - 1 cup heavy cream, chilled - Shaved chocolate or cocoa powder for garnish The dark chocolate brings rich flavor. It gives the mousse depth and a smooth texture. Eggs are key too. They add structure and lightness. The yolks create a creamy base, while the whites help the mousse rise. Granulated sugar sweetens the dish, balancing the cocoa's bitterness. Instant espresso powder boosts the chocolate flavor, giving it a nice kick. Vanilla extract adds warmth, while salt enhances all the flavors together. Heavy cream is crucial for that luxurious, whipped finish. Lastly, think about garnish options. You can use shaved chocolate or a sprinkle of cocoa powder. These add a nice touch and a hint of texture. Now that you have your ingredients, you're one step closer to making this delightful dessert! {{ingredient_image_1}} Start by chopping 200g of dark chocolate into small pieces. Place these pieces in a heatproof bowl. Set the bowl over a pot of simmering water, making sure the bowl does not touch the water. Stir the chocolate until it melts and becomes smooth. This method is called a double boiler. Once melted, take it off the heat and let it cool for a few minutes. In a separate bowl, take 3 large eggs and separate the yolks from the whites. Whisk the yolks with 1/4 cup of granulated sugar, 1 tablespoon of instant espresso powder, and 1/2 teaspoon of vanilla extract. Keep stirring until the mixture is creamy and light in color. This step adds a rich flavor to your mousse. Now, slowly add the melted chocolate to the egg yolk mixture. It’s important to stir constantly as you pour in the chocolate. This helps to blend the flavors together. Make sure there are no lumps in your mixture. A smooth blend is key for a great mousse. In another bowl, take the egg whites and add a pinch of salt. Whisk the egg whites until soft peaks form. This means the egg whites will hold their shape but still look soft. Gently fold the beaten egg whites into the chocolate mixture. Be careful not to mix too hard; you want to keep it light and airy. Next, take 1 cup of chilled heavy cream and beat it in a separate bowl. Whip until you see soft peaks form. Just like with the egg whites, be gentle here. Fold the whipped cream into the chocolate mixture. This adds a fluffy texture that makes your mousse feel rich and light. Now, spoon the mousse into individual serving glasses or bowls. Cover them and refrigerate for at least 2 hours. This time helps the mousse to set and become firm. When ready to serve, you can garnish with shaved chocolate or a dusting of cocoa powder. Enjoy your rich and creamy mousse! To make a smooth mousse, melt chocolate gently. A double boiler works best. The chocolate should cool slightly before mixing. This helps keep the texture light. When you fold in the whipped cream, do it gently. This keeps air in the mousse. Soft peaks in whipped cream mean it’s just right. Use fresh eggs for the best flavor. Cold eggs whip better, so separate them while cold. Let them sit at room temperature for a few minutes before use. This helps them mix nicely. Always sift the espresso powder to avoid lumps. A pinch of salt in the egg whites helps them whip better. Don’t overmix your ingredients. This can make your mousse dense. Be careful when folding in the whipped cream and egg whites. If you see streaks, stop mixing. If the chocolate is too hot, it can cook the egg yolks. Always let it cool slightly first. Avoid skipping the chilling step; it’s key for a firm mousse. Pro Tips Use Quality Chocolate: The flavor of your mousse largely depends on the chocolate you use. Opt for high-quality dark chocolate with at least 70% cocoa for a rich and intense flavor. Room Temperature Ingredients: Ensure that your egg yolks and whites are at room temperature before mixing. This helps in achieving better volume and texture when whipping. Gentle Folding Technique: When incorporating the egg whites and whipped cream, use a gentle folding motion to maintain the airy texture of the mousse. Be careful not to overmix. Chill for Best Results: For the best texture and flavor, allow the mousse to chill for at least 2 hours, but overnight is even better. This ensures a more stable and flavorful dessert. {{image_2}} You can add fun flavors to your mousse. Mint and orange work great. To add mint, use a few drops of mint extract. For orange, add some orange zest or juice. Both options brighten the taste. They can make your mousse feel fresh and new. While dark chocolate is rich, you can switch it up. Milk chocolate makes the mousse sweeter. White chocolate gives a creamy texture. Use any chocolate you like. Just remember to adjust sugar if your chocolate is sweeter. This way, you keep a nice balance in flavor. Good news! This mousse is naturally gluten-free. All the ingredients, like eggs and chocolate, are safe. Just make sure your chocolate has no added gluten. This dessert can please everyone at your table, even those with gluten allergies. Enjoy it with peace of mind! To keep your chocolate espresso mousse fresh, place it in an airtight container. This helps to keep the flavors strong and prevents it from absorbing other smells. You can also cover each glass with plastic wrap. Make sure the wrap touches the surface of the mousse to avoid air exposure. Chocolate espresso mousse can last in the fridge for about 3 days. After that, it may lose some texture and flavor. For the best taste, enjoy it within the first two days. Check for any changes in smell or appearance before eating. If you want to save some mousse for later, you can freeze it! Spoon the mousse into freezer-safe containers. Leave some space at the top for expansion. It can last up to 2 months in the freezer. When ready to eat, thaw it in the fridge overnight. This keeps the texture creamy and delicious. Yes, you can use milk chocolate. It will make the mousse sweeter. However, the rich flavor may change. Dark chocolate gives a deeper taste. If you choose milk chocolate, reduce the sugar slightly. This helps balance the sweetness. To make this mousse egg-free, use aquafaba. Aquafaba is the liquid from canned chickpeas. Use three tablespoons to replace one egg white. Whip it until soft peaks form. Then, fold it into the chocolate mixture just like egg whites. You can use coconut cream as a great substitute. It provides a rich texture and flavor. Almond milk or soy cream can work, but they may make the mousse lighter. Choose a thick non-dairy cream for best results. You can keep the mousse in the fridge for up to four days. Store it in an airtight container. It stays fresh and delicious for several days. Make sure to cover each serving well. Yes, you can make this mousse ahead of time. It is perfect for parties or special meals. Prepare it a day before and let it chill overnight. This allows the flavors to blend nicely. For a non-dairy version, use vegan chocolate. Check for dairy-free labels. Use coconut cream or almond cream instead of heavy cream. This keeps the mousse rich and creamy without dairy. This blog post explored making a rich chocolate mousse. You learned about key ingredients like dark chocolate, eggs, and heavy cream. We explained the steps for making the mousse, from melting chocolate to chilling it. I shared tips to avoid common mistakes and variations to make it your own. Lastly, I provided storage options to keep leftovers fresh. Enjoy making this treat and impressing your guests!

Chocolate Espresso Mousse Rich and Indulgent Dessert

Are you ready to indulge in a rich, silky dessert? This Chocolate Espresso Mousse is the perfect blend of deep

To make the stuffed bell pepper casserole, gather these simple ingredients: - 4 bell peppers (any color), diced - 1 cup quinoa, rinsed - 1 pound ground turkey or chicken - 1 small onion, chopped - 2 cloves garlic, minced - 1 can (15 oz) diced tomatoes, drained - 1 cup corn (frozen or canned) - 1 teaspoon cumin - 1 teaspoon paprika - 1 teaspoon dried oregano - Salt and pepper to taste - 1 cup shredded cheese (cheddar or mozzarella) - Fresh parsley for garnish These ingredients create a rich and colorful dish. The bell peppers add a sweet crunch. Quinoa brings protein and fiber. Ground turkey or chicken keeps it light yet filling, while the spices bring warmth. Diced tomatoes and corn add sweetness and texture. Don't forget the cheese! It melts into a gooey topping that everyone loves. Finally, fresh parsley adds a bright finish. Enjoy the blend of flavors in each bite! {{ingredient_image_1}} - Preheat your oven to 375°F (190°C). - Cook 1 cup of quinoa according to package instructions. This usually means boiling 2 cups of water and then adding the quinoa. Let it simmer until the water is gone. This takes about 15 minutes. Set aside. - In a large skillet over medium heat, add 1 pound of ground turkey or chicken. Cook until it is brown. Break it into small pieces with a spatula. Drain any extra fat. - Next, add 1 small chopped onion and 2 minced garlic cloves to the skillet. Sauté for about 3 to 4 minutes until the onion is soft. - Now, stir in the diced bell peppers, 1 can of drained diced tomatoes, 1 cup of corn, the cooked quinoa, and spices. Add 1 teaspoon each of cumin, paprika, and dried oregano. Don’t forget salt and pepper to taste. Mix everything well and cook for 5 more minutes. This helps the flavors blend. - Transfer the mixture into a greased 9x13-inch casserole dish. Spread it out evenly. - If you like, sprinkle 1 cup of shredded cheese over the top. - Cover the dish with aluminum foil and bake it in the preheated oven for 25 minutes. - After 25 minutes, remove the foil. Bake for another 10 minutes until the cheese is melted and bubbly. - Once done, take it out of the oven and let it cool for a few minutes. You can garnish with fresh parsley before serving. To cook quinoa perfectly, start by rinsing it well. Rinsing removes any bitter flavor. Use two cups of water for every cup of quinoa. Bring the water to a boil, then lower the heat. Let it simmer for about 15 minutes. Once done, fluff it with a fork and set it aside. This ensures your quinoa is light and fluffy. For even browning of meat, use a large skillet and preheat it on medium heat. Add the ground turkey or chicken without crowding the pan. Let it cook without stirring for a few minutes. This allows the meat to brown well. Stir it only after a good color forms. For serving, you can present the casserole straight from the dish. This keeps it warm and inviting. Scoop portions onto plates for a nice touch. Add some extra parsley on top for color. You can also add a dollop of sour cream or slices of avocado. These toppings add creaminess and flavor, enhancing the dish. To store leftovers, let the casserole cool completely. Then, cover it tightly with plastic wrap or foil. You can also transfer it to an airtight container. This keeps it fresh for up to three days in the fridge. For reheating, place your portion in the microwave. Heat it in short bursts, stirring in between. This helps it warm evenly. You can also reheat it in the oven at 350°F (175°C). Cover with foil to keep it moist while it warms up. Pro Tips Use Fresh Ingredients: Fresh bell peppers and herbs will enhance the flavor of your casserole significantly. Look for vibrant colors and firm textures when selecting your produce. Customize Your Protein: Feel free to substitute the ground turkey or chicken with lean beef or a plant-based alternative for a different flavor profile. Add More Veggies: Boost the nutritional value by adding more vegetables like zucchini, spinach, or mushrooms to the mix. They will blend beautifully with the other ingredients. Make It Ahead: This casserole can be prepared in advance. Assemble it and refrigerate it overnight; just add an extra 10-15 minutes to the baking time when you're ready to cook. {{image_2}} For a vegetarian stuffed bell pepper casserole, skip the meat. Use beans or lentils instead. This adds protein while keeping it filling. You can also use more veggies like zucchini or mushrooms. For a gluten-free option, use rice or alternative grains like farro or millet. Quinoa is a great choice, too, as it cooks well and adds a nutty flavor. If you want to change the protein, ground beef or plant-based options work well. You can even use tofu for a lighter version. For veggies, get creative! Try adding spinach, diced carrots, or even sweet potatoes. This lets you adjust flavors and textures to your taste. Want to spice things up? Add jalapeños or a splash of hot sauce! This gives the dish a nice kick. You can also swap out cheeses. Try pepper jack for heat, or feta for a tangy twist. Each choice gives the casserole a new and exciting flavor. Can I make Stuffed Bell Pepper Casserole ahead of time? Yes, you can make this casserole ahead of time. Just prepare it and cover it. Store it in the fridge for up to 24 hours before baking. This way, you save time on busy days. How long does Stuffed Bell Pepper Casserole last in the fridge? It lasts about three to four days in the fridge. Make sure to place it in an airtight container for best results. Can I freeze Stuffed Bell Pepper Casserole? Absolutely! You can freeze it before or after baking. Just wrap it well in plastic wrap and then foil. It stays good for about three months in the freezer. What can I serve with Stuffed Bell Pepper Casserole? This casserole pairs well with a fresh salad or some crusty bread. You can also serve it with sour cream or avocado slices on top. How do I know when the casserole is done baking? The casserole is done when the cheese is melted and bubbly. You can check the peppers to see if they are tender. A fork should easily pierce them. Can I use other grains instead of quinoa? Yes, you can use rice, farro, or even couscous. Just make sure to adjust the cooking times based on the grain you choose. Are there any low-carb substitutes for the ingredients? For low-carb options, you can replace quinoa with cauliflower rice. You can also use zucchini or mushrooms instead of bell peppers for a fun twist. This casserole is packed with nutrients. Bell peppers are rich in vitamins A and C. They support your immune system and skin health. Quinoa is a great source of protein and fiber. It helps keep you full longer. This dish also includes lean ground turkey or chicken. These meats provide protein for muscle health. The corn adds sweetness and fiber too. Each serving of this casserole has about 350 calories. The breakdown is simple: - Protein: 25 grams - Carbohydrates: 40 grams - Fat: 12 grams This makes it a balanced meal that keeps you satisfied without too many calories. This casserole fits many diets. It is low in carbs and high in protein. It works well for those watching their carb intake. It is also gluten-free, perfect for those with gluten allergies. However, it contains cheese, which may not work for dairy-free diets. Always check for personal allergens before cooking. In this blog post, we explored creating a tasty Stuffed Bell Pepper Casserole. We covered the key ingredients, step-by-step preparation, and cooking steps. You learned helpful tips for serving and storing leftovers. We also shared variations to suit different diets and preferences. This dish is not only simple but also healthy. With a few tweaks, you can make it your own. Enjoy experimenting with flavors and ingredients. A homemade casserole brings comfort and warmth to any table. Let your creativity shine in the kitchen!

Stuffed Bell Pepper Casserole Easy and Flavorful Recipe

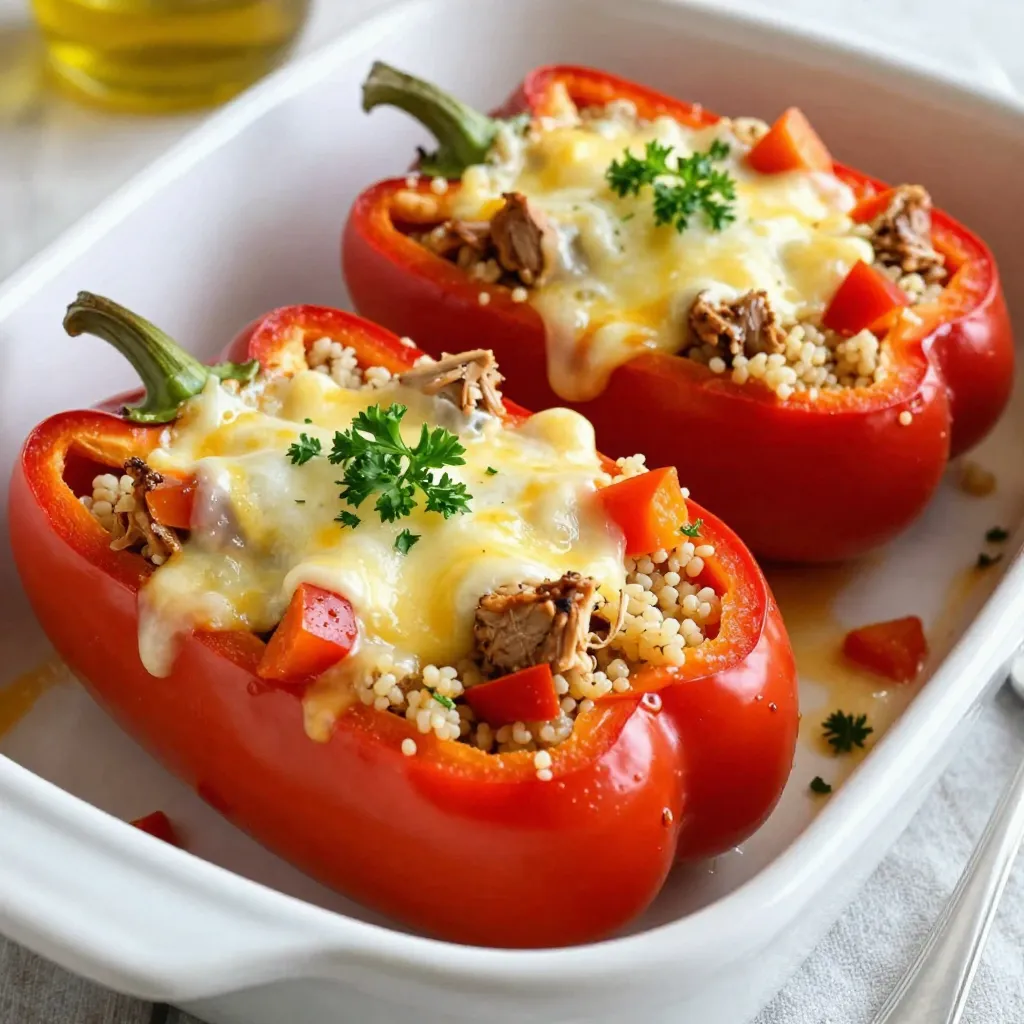
Looking for an easy and tasty dish to brighten your meal? Try my Stuffed Bell Pepper Casserole! This flavorful recipe

- 1 medium head of cauliflower, chopped into florets - 2 cups vegetable broth - 1 clove garlic, minced - 1 tablespoon olive oil - 1 cup unsweetened almond milk (or any plant-based milk) - 1 tablespoon nutritional yeast - 1 teaspoon onion powder - 1/2 teaspoon garlic powder - Salt and pepper to taste - Fresh parsley, chopped (for garnish) - Pasta of your choice (e.g., fettuccine or spaghetti) Gathering the right ingredients is key for making creamy cauliflower Alfredo. You’ll need a medium head of cauliflower, which gives that rich and creamy base. Chop it into florets for easy cooking. Next, measure out 2 cups of vegetable broth. This will help cook the cauliflower and add flavor. Don’t forget the garlic! Just one clove, minced, will bring a wonderful aroma to the dish. Use olive oil to sauté the garlic until fragrant. For creaminess, grab 1 cup of unsweetened almond milk. You can also use any plant-based milk you like. Nutritional yeast adds a cheesy flavor, so include 1 tablespoon. For seasoning, you’ll need 1 teaspoon of onion powder and 1/2 teaspoon of garlic powder. Adjust salt and pepper to your taste to enhance the flavors. Finally, have fresh parsley ready for garnish. It adds a nice color and freshness to your finished dish. Choose your favorite pasta, like fettuccine or spaghetti, to complete this delightful meal. {{ingredient_image_1}} - First, bring 2 cups of vegetable broth to a boil in a medium saucepan. - After boiling, add the chopped cauliflower florets. Cook them for about 10 minutes, or until they are soft. This makes the base for our creamy sauce. - While the cauliflower cooks, heat 1 tablespoon of olive oil in a skillet over medium heat. - Add 1 clove of minced garlic and sauté it for 1 to 2 minutes. Watch closely to avoid burning the garlic. This step adds a great flavor to our dish. - Once the cauliflower is tender, drain it and add it to a blender. - Include the sautéed garlic, 1 cup of almond milk, 1 tablespoon of nutritional yeast, 1 teaspoon of onion powder, 1/2 teaspoon of garlic powder, and a pinch of salt and pepper. - Blend everything until it becomes smooth and creamy. If it’s too thick, add a bit more almond milk to get your desired texture. - While you blend the sauce, cook your choice of pasta according to the package instructions. - Once done, drain the pasta and set it aside. I like using fettuccine for this dish, but any pasta works well. - In the same pan used for the garlic, add the cooked pasta. - Pour the creamy cauliflower sauce over the pasta. Toss everything together until the pasta is well coated. - Taste and adjust the seasoning if needed. For a nice touch, serve the dish hot with fresh parsley on top. You want your sauce to be creamy and smooth. Start with one cup of almond milk. After blending, check the thickness. If it's too thick, add more almond milk, a little at a time. Blend again until you reach the creaminess you like. This step is key to making the perfect sauce. To make your dish pop, consider adding spices. A pinch of red pepper flakes can bring heat. Fresh basil or thyme adds depth. You can also try a dash of smoked paprika for a unique twist. These simple additions can elevate your dish and impress your guests. Presentation matters! Serve your Creamy Cauliflower Alfredo in warm bowls. Drizzle with a bit of olive oil for shine. Add freshly cracked pepper on top for flavor. A sprinkle of extra nutritional yeast can add a cheesy touch. Garnish with fresh parsley for a pop of color. These tips help make your dish look as good as it tastes. Pro Tips Know Your Cauliflower: Choose a medium head of cauliflower that is firm and free from blemishes for the best flavor and texture in your Alfredo sauce. Blending Tips: For an ultra-smooth sauce, blend the cauliflower and other ingredients in batches if your blender is small, and add almond milk gradually to achieve your desired consistency. Seasoning Adjustments: Taste the sauce after blending and feel free to adjust the salt, pepper, or nutritional yeast to suit your palate for maximum flavor. Pasta Pairing: While fettuccine is traditional, feel free to experiment with whole wheat or gluten-free pasta options for a healthier take on this dish. {{image_2}} If you need a gluten-free meal, you can swap regular pasta for gluten-free options. Here are some great choices: - Brown rice pasta - Quinoa pasta - Chickpea pasta - Zucchini noodles (zoodles) These alternatives provide a similar texture and taste. They ensure you enjoy the creamy sauce without any gluten. Want to make your dish heartier? You can add vegetables or proteins. Here are some tasty ideas: - Spinach or kale for greens - Mushrooms for a savory touch - Peas for sweetness - Cooked lentils or chickpeas for protein These add-ins boost flavor and nutrition. They also make your meal more filling. While almond milk works well, you can use other non-dairy options. Here are some great substitutes: - Soy milk for a creamier texture - Oat milk for a naturally sweet flavor - Cashew milk for rich creaminess - Coconut milk for a tropical twist Each option can change the taste of your sauce. Feel free to experiment and find your favorite! To store leftovers, place the pasta and sauce in an airtight container. Make sure to cool them before sealing. Refrigerate the container. This keeps your Creamy Cauliflower Alfredo fresh for up to three days. For the best taste, reheat the pasta and sauce together. You can use a skillet over low heat. Stir often to avoid burning. Add a splash of almond milk to keep the sauce creamy. You can also use a microwave. Heat in short bursts, stirring in between, until warm. You can freeze both the sauce and pasta. For the sauce, let it cool, then pour into a freezer-safe bag. Squeeze out air before sealing. Store pasta in a separate bag. You can freeze for up to three months. When ready, thaw in the fridge overnight and reheat as needed. Each serving of Creamy Cauliflower Alfredo has about 180 calories. It offers a good amount of nutrients. You get around 6 grams of protein, 8 grams of fat, and 22 grams of carbs. It also provides fiber, vitamins, and minerals. This dish is low in calories but high in flavor. Yes, you can use other vegetables. Broccoli works well and adds a nice crunch. You can also try zucchini or carrots for a different taste. Just chop them into small pieces and cook them until tender. This way, you keep the creamy texture while adding new flavors. To spice it up, add red pepper flakes to the sauce. Start with a pinch, then taste and adjust. You can also try a dash of hot sauce for extra heat. Another option is to include some chopped jalapeños. This gives your dish a nice kick while keeping it creamy. This blog post showed how to make a creamy cauliflower Alfredo. We covered the key ingredients, detailed steps, and helpful tips. You can customize the dish with variations, like gluten-free options or extra veggies. Storing and reheating leftovers is easy, ensuring you enjoy this meal later on. Experiment with spices to make it your own. This dish is not only tasty but also healthy. Enjoy cooking and share your personal touches with family and friends!

Creamy Cauliflower Alfredo Tasty Vegan Pasta Dish

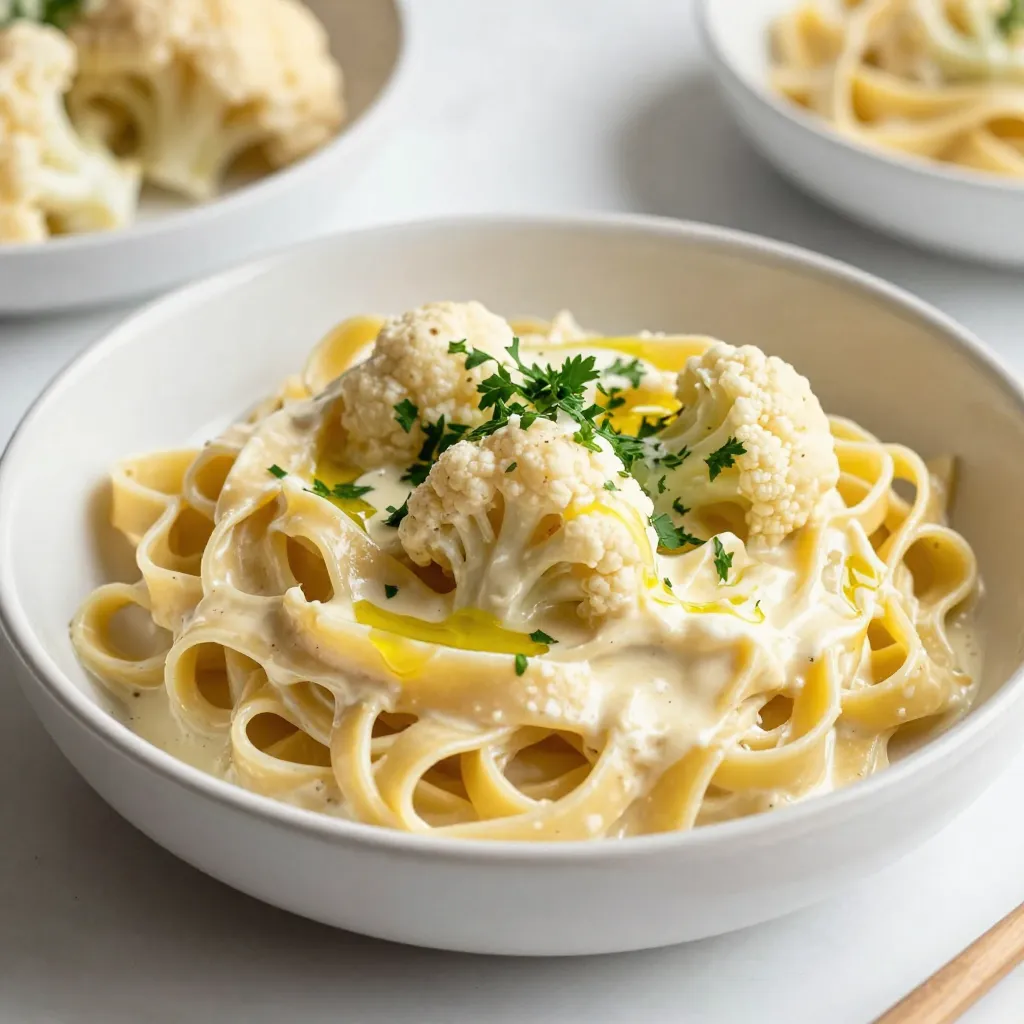
Looking for a delicious vegan pasta dish that’s both creamy and healthy? You’ll love my Creamy Cauliflower Alfredo! This dish

To make Korean beef bulgogi tacos, you need key ingredients. Here’s what you will need: - 1 lb beef sirloin, thinly sliced - 1/4 cup soy sauce - 2 tablespoons sesame oil - 2 tablespoons brown sugar - 1 tablespoon grated ginger - 3 cloves garlic, minced - 1 teaspoon black pepper - 1 tablespoon gochujang (Korean chili paste) - 8 small flour tortillas - 1 cup shredded purple cabbage - 1/2 cup diced cucumbers - 1/4 cup chopped green onions - 1 tablespoon sesame seeds (for garnish) - Lime wedges (for serving) These ingredients blend well to create a sweet and savory flavor. The beef absorbs the marinade, making it tender and delicious. To make your tacos even better, consider adding some garnishes. Here are some tasty options: - Fresh cilantro leaves - Sliced jalapeños - Avocado slices - Sriracha for extra spice These toppings add color and flavor to your dish. Play around with different combinations to see what you like best! If you have dietary needs, don't worry. You can make easy swaps: - Use chicken or tofu instead of beef for a different protein. - Try gluten-free tortillas if you need a gluten-free option. - For a low-sugar choice, use a sugar substitute in the marinade. These substitutions keep the dish tasty while meeting your needs. Enjoy making it your own! {{ingredient_image_1}} To start, grab a medium bowl. In this bowl, mix together the soy sauce, sesame oil, brown sugar, grated ginger, minced garlic, black pepper, and gochujang. Whisk them until the sugar dissolves fully. This marinade gives the beef its rich flavor and tender texture. Next, add the thinly sliced beef to the bowl. Make sure each piece is well coated in the marinade. Once coated, cover the bowl. Place it in the fridge for at least 30 minutes. If you have time, marinate for up to 2 hours. The longer you marinate, the more flavor the beef absorbs. Heat a large skillet or wok over medium-high heat. Once hot, add the marinated beef in batches. Spread it out evenly in the pan. Cook for about 3 to 4 minutes. Stir occasionally to ensure even cooking. Look for a nice brown color to know it’s ready. While the beef cooks, warm your flour tortillas. You can use a separate pan or microwave. When the beef is done, place a portion in the center of each tortilla. Top with shredded purple cabbage, diced cucumbers, and chopped green onions. Finish by sprinkling sesame seeds over the tacos. Squeeze fresh lime juice on top. Enjoy your tasty creation! For the best flavor, marinate the beef for at least 30 minutes. If you have more time, let it sit for up to 2 hours. This longer duration allows the flavors to soak deep into the beef. You will notice a richer taste in each bite. Just remember, don’t go over 2 hours, or the beef may become too soft. When cooking the beef, use a hot skillet or wok. This helps to sear the meat quickly. Cook in small batches to avoid crowding. Crowding the pan can lead to steaming instead of browning. Stir the beef occasionally for even cooking. Aim for about 3-4 minutes until it is browned and cooked through. This gives a nice texture and locks in the flavor. To serve, place a portion of beef in each warm tortilla. Top with shredded purple cabbage, diced cucumbers, and chopped green onions. Don't forget to sprinkle sesame seeds on top for crunch! A squeeze of fresh lime juice adds brightness. For a spicy kick, offer extra gochujang on the side. Arrange the tacos on a colorful platter for a great presentation. This makes your meal look as delicious as it tastes! Pro Tips Marinate Longer for Better Flavor: If time allows, marinate the beef for up to 2 hours to enhance the flavor profile. The longer it sits, the more pronounced the sweet and savory notes will be. Use High Heat for a Sear: Cooking the beef over medium-high heat helps achieve a nice sear, locking in juices and creating a delicious crust. Avoid overcrowding the pan to ensure even cooking. Fresh Ingredients Make a Difference: Opt for fresh vegetables like cabbage and cucumbers for topping to add a crisp texture and vibrant color, enhancing both the taste and presentation of your tacos. Customize Your Spice Level: Adjust the amount of gochujang based on your preference for heat. Start with less and add more to the marinade or as a topping for those who enjoy a spicy kick. {{image_2}} You can make bulgogi tacos without meat. Use mushrooms, tofu, or jackfruit instead. These options soak up the marinade well. For mushrooms, I recommend shiitake or portobello. They have a meaty texture. For tofu, press it first to remove water. This helps it absorb flavors better. Cook them just like the beef, and you’ll have tasty tacos. If you don’t want beef, chicken or pork works great too. Thinly slice chicken breast or pork tenderloin. Marinate them in the same sauce. Cook them the same way as the beef. They will be just as delicious. You can even try shrimp for a seafood twist. Shrimp cooks quickly and pairs well with fresh toppings. Customizing the spice level is easy. For mild tacos, reduce the gochujang. You can also skip it altogether if you prefer no heat. Add a pinch of sugar to balance flavors. If you love heat, add more gochujang or some chopped fresh chili peppers. You can also add a splash of sriracha for extra kick. Adjust to your taste, and enjoy! To store leftovers, first let the tacos cool to room temperature. Place the beef in an airtight container. Add any extra toppings, like cabbage or cucumbers, in a separate container. You can keep the beef and toppings in the fridge for up to three days. If the tortillas are left over, wrap them in foil or plastic wrap. To reheat the beef, you can use a skillet over medium heat. Add a splash of water to keep it moist. Stir until it warms through, usually about 5 minutes. For the tortillas, warm them in a dry skillet for about 30 seconds on each side. This keeps them soft and tasty. If you want to freeze the beef, place it in a freezer-safe bag or container. Make sure to remove as much air as possible. The beef can last up to three months in the freezer. When you are ready to eat, thaw it overnight in the fridge. Reheat it as mentioned above before serving. Bulgogi is a classic Korean dish. It features thinly sliced beef marinated in a sweet and savory sauce. The marinade includes soy sauce, sesame oil, sugar, garlic, and ginger. After marinating, you cook the beef quickly over high heat. This gives bulgogi its tender texture and rich flavor. It's often served with rice and vegetables or wrapped in lettuce. Yes, you can use other cuts of beef for bulgogi. While sirloin is popular, you can try flank steak or ribeye. Just make sure to slice the beef thinly. This helps it cook quickly and stay tender. If you choose a tougher cut, marinating longer can help soften the meat. To make gluten-free tacos, swap soy sauce for a gluten-free version. Tamari is a great choice. You can also use gluten-free tortillas instead of flour ones. Check the labels on your ingredients carefully. This way, you avoid gluten while enjoying the same great flavors. These tacos pair well with many sides. Consider serving them with: - Rice or quinoa for a hearty option. - A fresh salad with lime dressing for crunch. - Pickled vegetables for a tangy contrast. - Extra lime wedges for a zesty kick. These options add flavor and balance to your meal. Korean beef bulgogi tacos combine rich beef, tasty marinades, and fun toppings. You can tailor them to fit your diet, whether you choose a vegan option or a different protein. Follow the steps to marinate, cook, and assemble for a satisfying meal. Remember, flavor improves with longer marinating. Store leftovers wisely and reheat easily. Enjoy these tacos with friends or family. The possibilities are endless, and you’ll love every bite. Dive in and make these tacos a regular in your cooking!

Korean Beef Bulgogi Tacos Savory and Simple Recipe

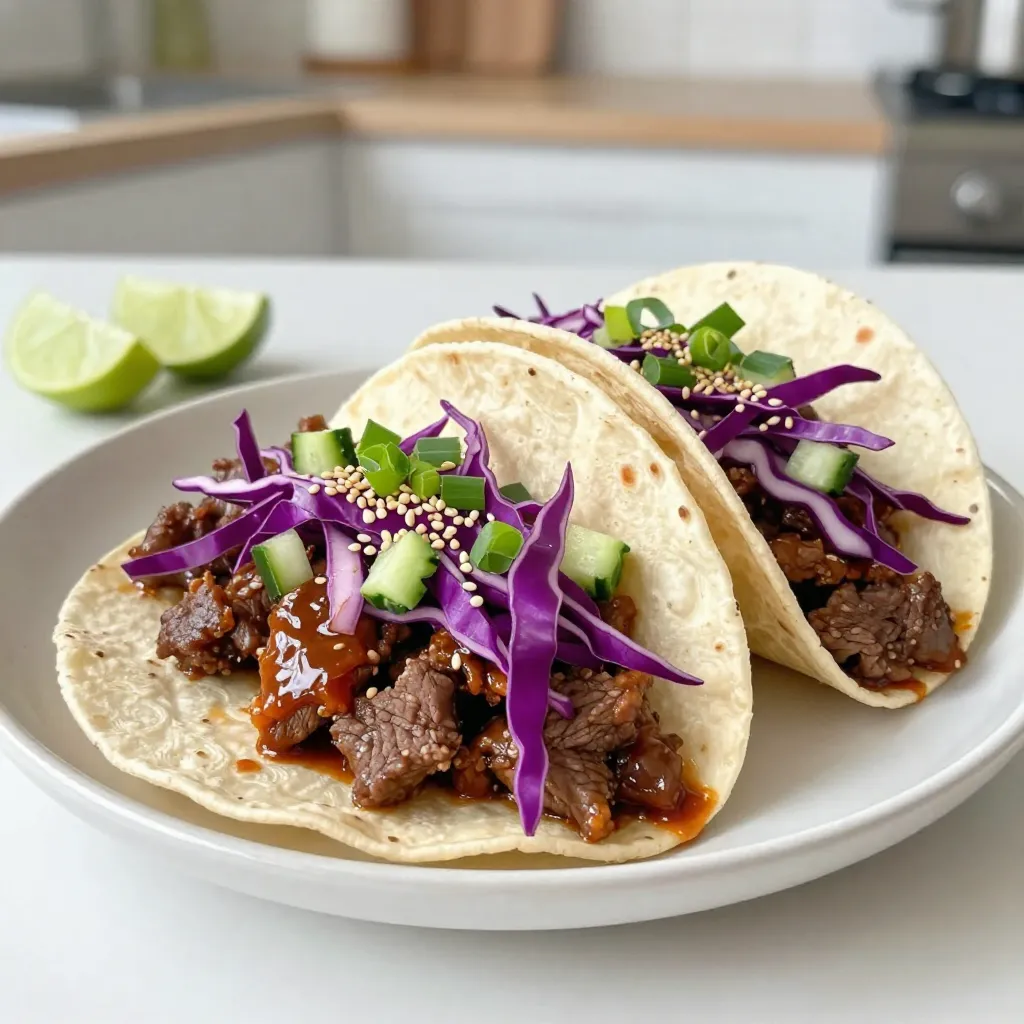
If you’re looking to spice up taco night, try my Korean Beef Bulgogi Tacos. This savory recipe blends sweet and

Older posts
Page1 Page2 … Page84 Next →

dsad

© 2026 juliesdish • Built with GeneratePress

Our Policies

  • Copyright Policy
  • Cookie Policy
  • GDPR Policy
  • Privacy Policy
  • Disclaimer
  • Terms Of Use

More Information

  • Home
  • About
  • Contact
  • Appetizers
  • Dessert
  • Dinner
  • Drinks
©2026, juliesdish About Back To Top