Pistachio Tiramisu Irresistible Flavorful Dessert

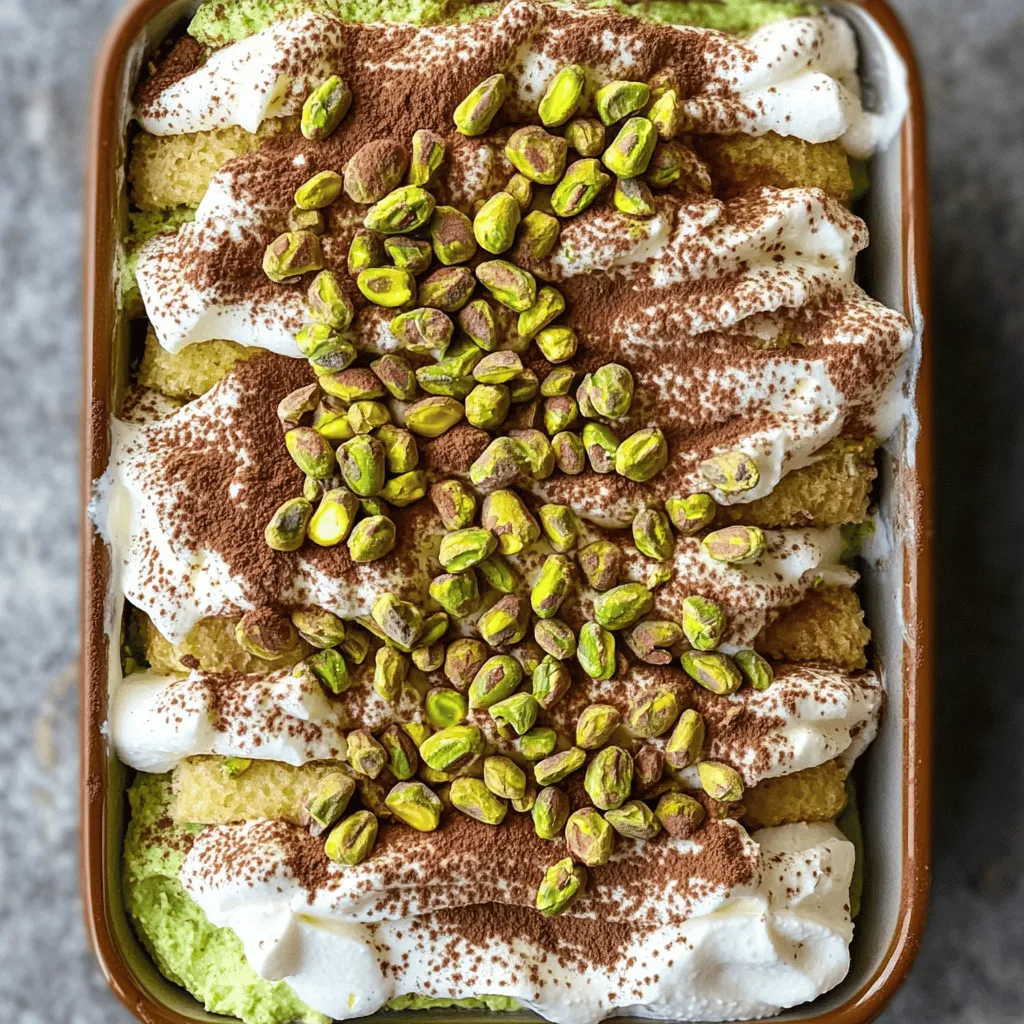
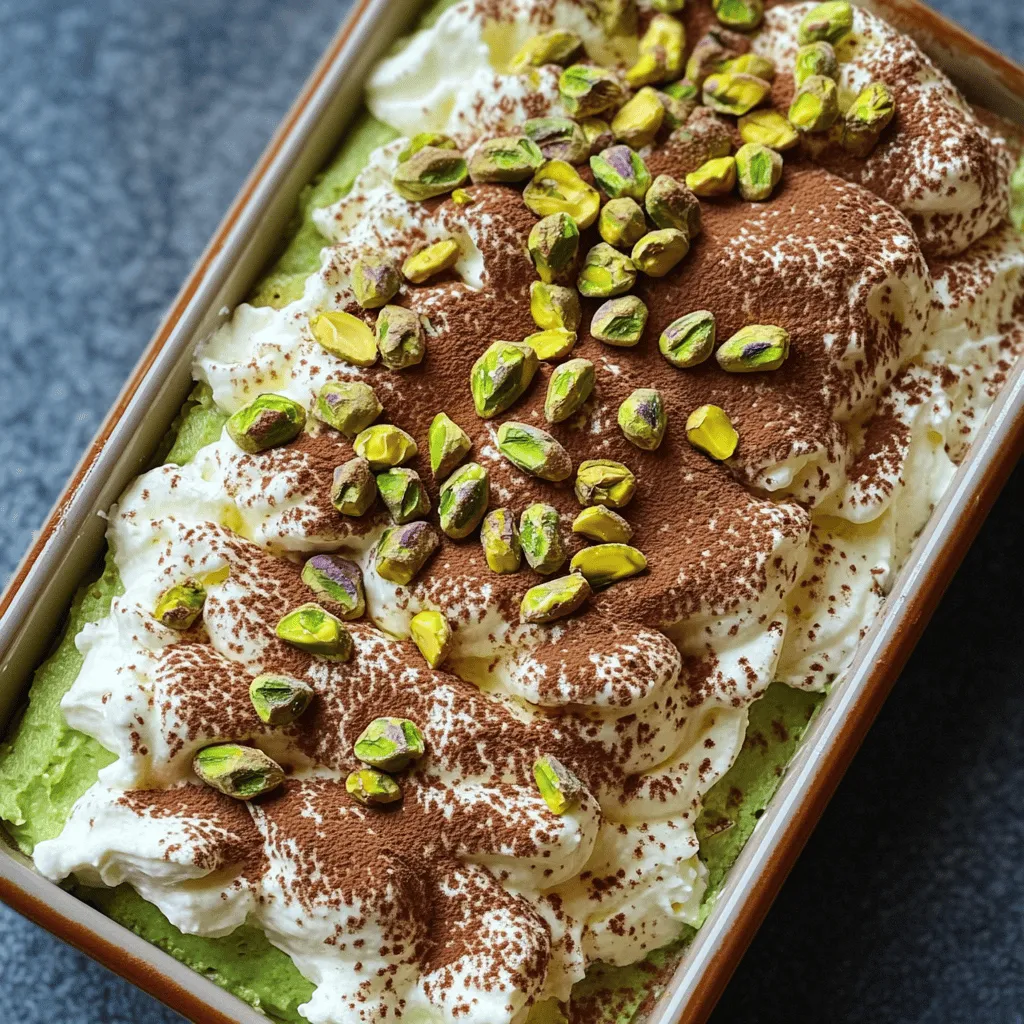
Are you ready to impress your friends with a stunning dessert? Look no further than Pistachio Tiramisu! This unique twist on the classic treat combines rich mascarpone, crunchy pistachios, and soft ladyfingers. It’s simple to make, yet bursting with flavor. In this post, I’ll guide you through each step and share helpful tips. Get ready to make a dessert that everyone will crave!

Ingredients

To make a delicious pistachio tiramisu, you need only a few key ingredients. Here’s the complete list:

– 1 cup unsalted pistachios, shelled and finely ground

– 1 cup mascarpone cheese

– 1 cup heavy cream

– 3/4 cup powdered sugar

– 1 teaspoon vanilla extract

– 1 cup brewed coffee (cooled)

– 12 ladyfinger cookies

– 2 tablespoons cocoa powder (for dusting)

– Additional chopped pistachios for garnish

These ingredients create a rich and creamy dessert with a nutty twist. The pistachios give a unique flavor that sets this tiramisu apart. Remember, using fresh, finely ground pistachios will enhance the taste. Mascarpone cheese brings a luxurious texture, while the heavy cream adds volume and lightness.

The coffee and vanilla extract balance the sweetness, keeping the dessert from being too rich. Ladyfingers help layer the dessert, soaking up all the flavors. Finally, cocoa powder and extra pistachios on top add a beautiful finish.

For the full recipe and steps, check out the link!

Step-by-Step Instructions

Preparation Steps

Step 1: Combine pistachios and mascarpone

Start by adding the finely ground pistachios to a bowl. Then, add the mascarpone cheese. Mix them together well until they blend into a smooth mixture. This is the base of your pistachio flavor.

Step 2: Whip heavy cream with sugar and vanilla

In a second bowl, pour in the heavy cream. Add the powdered sugar and vanilla extract. Whip this mixture until you see stiff peaks forming. This gives your dessert a light and airy texture.

Step 3: Fold whipped cream into the mixture

Now, take the whipped cream and gently fold it into the pistachio and mascarpone mix. Be careful not to mix too hard, or you might deflate the whipped cream. This step is key for a creamy, fluffy filling.

Assembling the Tiramisu

Step 4: Dip and layer ladyfingers

Take each ladyfinger and quickly dip it into the cooled coffee. Make sure they soak just enough but don’t get soggy. This adds a nice coffee flavor to your dessert.

Step 5: Spread pistachio-cream mixture

In a rectangular dish, place a layer of the coffee-soaked ladyfingers at the bottom. Next, spread half of the pistachio-cream mixture over them. Use a spatula to smooth it out evenly.

Step 6: Chill for optimal flavor

Repeat the process with another layer of dipped ladyfingers and the remaining pistachio-cream mixture. Cover the dish with plastic wrap and refrigerate. Let it chill for at least 4 hours, but overnight is best. This lets all the flavors meld beautifully.

For the full recipe, check out the link provided.

Tips & Tricks

Achieving the Best Flavor

Tip 1: Use freshly ground pistachios

Freshly ground pistachios give the best taste. They add a rich, nutty flavor. Buy shelled pistachios and grind them just before using. This way, you keep all the oils and flavors intact.

Tip 2: Opt for high-quality mascarpone

Quality mascarpone cheese is key. It should be smooth and creamy. High-quality mascarpone makes your tiramisu richer and more delicious. Look for mascarpone that has a good texture and flavor.

Tip 3: Allow adequate chilling time

Chilling your tiramisu is important. It helps the flavors mix well. I recommend chilling for at least 4 hours. For the best results, chill overnight. This way, each bite is creamy and flavorful.

Common Mistakes to Avoid

Mistake 1: Over-whipping the cream

Over-whipping can ruin the texture. You want stiff peaks, but not dry cream. Stop whipping as soon as you see stiff peaks. This keeps the cream light and fluffy.

Mistake 2: Soggy ladyfingers

Do not soak ladyfingers too long. A quick dip in the coffee is enough. If you soak them too long, they become mushy. You want them to hold their shape while still being soft.

For a complete guide on making this dessert, check out the Full Recipe.

Variations

Flavor Modifications

Variation 1: Adding chocolate layers

You can easily mix in some chocolate. I recommend using dark chocolate. Melt it and layer it between the pistachio-cream mixture. This adds a rich taste and a lovely contrast to the pistachio. You can even sprinkle chocolate shavings on top for a beautiful finish.

Variation 2: Using different nuts

If you want to change the flavor, try different nuts. Almonds or hazelnuts work well. Simply grind them the same way you do with pistachios. You can also mix two or more nuts for a unique taste. Each nut brings its own flavor and texture.

Dietary Substitutions

Substitution 1: Dairy-free options

To make this dessert dairy-free, swap mascarpone with a dairy-free cream cheese. Use coconut cream instead of heavy cream for a rich texture. Sweeten with a dairy-free powdered sugar. This keeps it creamy while making it suitable for those with lactose intolerance.

Substitution 2: Sugar-free alternatives

You can use a sugar substitute like erythritol or stevia. This option is great for those watching their sugar intake. Just make sure to follow the package’s conversion guidelines. Your dessert will still taste great but with fewer calories.

For the complete cooking instructions, check out the [Full Recipe].

Storage Info

How to Store Leftovers

Refrigerating the tiramisu: Keep the tiramisu in the fridge. It stays fresh for about 3 days. Cover it tightly with plastic wrap. This keeps it moist and flavorful.

Best storage containers: Use a glass or plastic container with a lid. Make sure it seals well. Avoid metal containers, as they can affect taste.

Freezing Tips

Freezing individual portions: Cut the tiramisu into slices. Wrap each piece in plastic wrap. Place them in a freezer-safe bag. This way, you can enjoy a slice anytime.

Thawing for serving: To serve, take out a slice and let it thaw in the fridge overnight. It’s best to enjoy it cold and creamy.

For the complete recipe, check the Full Recipe link.

FAQs

Common Questions

Q1: How long can Pistachio Tiramisu be stored?

You can store Pistachio Tiramisu in the fridge for up to four days. Make sure to cover it well to keep it fresh.

Q2: Can I make this dessert ahead of time?

Yes, you can make it a day or two before serving. This dessert tastes even better after a night in the fridge.

Q3: What can I use instead of ladyfingers?

If you don’t have ladyfingers, you can use sponge cake or even graham crackers. Just soak them briefly in coffee.

Recipe-Related Queries

Q4: How to enhance pistachio flavor?

To boost the pistachio taste, use high-quality, fresh pistachios. You can also add pistachio extract for an extra punch.

Q5: Is Pistachio Tiramisu gluten-free?

The traditional recipe is not gluten-free due to ladyfingers. However, you can use gluten-free cookies as a substitute.

For the Full Recipe, click here for comprehensive cooking instructions.

This blog shared a simple guide to making Pistachio Tiramisu. We covered key ingredients, easy preparation steps, and helpful tips. You can also explore fun variations and find ways to store leftovers. Enjoying this dessert is easy and rewarding. With the right ingredients and steps, you can create a tasty treat. Remember to avoid common mistakes for the best results. Now, you’re ready to impress with your own Pistachio Tiramisu!

To make a delicious pistachio tiramisu, you need only a few key ingredients. Here’s the complete list: - 1 cup unsalted pistachios, shelled and finely ground - 1 cup mascarpone cheese - 1 cup heavy cream - 3/4 cup powdered sugar - 1 teaspoon vanilla extract - 1 cup brewed coffee (cooled) - 12 ladyfinger cookies - 2 tablespoons cocoa powder (for dusting) - Additional chopped pistachios for garnish These ingredients create a rich and creamy dessert with a nutty twist. The pistachios give a unique flavor that sets this tiramisu apart. Remember, using fresh, finely ground pistachios will enhance the taste. Mascarpone cheese brings a luxurious texture, while the heavy cream adds volume and lightness. The coffee and vanilla extract balance the sweetness, keeping the dessert from being too rich. Ladyfingers help layer the dessert, soaking up all the flavors. Finally, cocoa powder and extra pistachios on top add a beautiful finish. For the full recipe and steps, check out the link! - Step 1: Combine pistachios and mascarpone Start by adding the finely ground pistachios to a bowl. Then, add the mascarpone cheese. Mix them together well until they blend into a smooth mixture. This is the base of your pistachio flavor. - Step 2: Whip heavy cream with sugar and vanilla In a second bowl, pour in the heavy cream. Add the powdered sugar and vanilla extract. Whip this mixture until you see stiff peaks forming. This gives your dessert a light and airy texture. - Step 3: Fold whipped cream into the mixture Now, take the whipped cream and gently fold it into the pistachio and mascarpone mix. Be careful not to mix too hard, or you might deflate the whipped cream. This step is key for a creamy, fluffy filling. - Step 4: Dip and layer ladyfingers Take each ladyfinger and quickly dip it into the cooled coffee. Make sure they soak just enough but don’t get soggy. This adds a nice coffee flavor to your dessert. - Step 5: Spread pistachio-cream mixture In a rectangular dish, place a layer of the coffee-soaked ladyfingers at the bottom. Next, spread half of the pistachio-cream mixture over them. Use a spatula to smooth it out evenly. - Step 6: Chill for optimal flavor Repeat the process with another layer of dipped ladyfingers and the remaining pistachio-cream mixture. Cover the dish with plastic wrap and refrigerate. Let it chill for at least 4 hours, but overnight is best. This lets all the flavors meld beautifully. For the full recipe, check out the link provided. - Tip 1: Use freshly ground pistachios Freshly ground pistachios give the best taste. They add a rich, nutty flavor. Buy shelled pistachios and grind them just before using. This way, you keep all the oils and flavors intact. - Tip 2: Opt for high-quality mascarpone Quality mascarpone cheese is key. It should be smooth and creamy. High-quality mascarpone makes your tiramisu richer and more delicious. Look for mascarpone that has a good texture and flavor. - Tip 3: Allow adequate chilling time Chilling your tiramisu is important. It helps the flavors mix well. I recommend chilling for at least 4 hours. For the best results, chill overnight. This way, each bite is creamy and flavorful. - Mistake 1: Over-whipping the cream Over-whipping can ruin the texture. You want stiff peaks, but not dry cream. Stop whipping as soon as you see stiff peaks. This keeps the cream light and fluffy. - Mistake 2: Soggy ladyfingers Do not soak ladyfingers too long. A quick dip in the coffee is enough. If you soak them too long, they become mushy. You want them to hold their shape while still being soft. For a complete guide on making this dessert, check out the Full Recipe. {{image_2}} - Variation 1: Adding chocolate layers You can easily mix in some chocolate. I recommend using dark chocolate. Melt it and layer it between the pistachio-cream mixture. This adds a rich taste and a lovely contrast to the pistachio. You can even sprinkle chocolate shavings on top for a beautiful finish. - Variation 2: Using different nuts If you want to change the flavor, try different nuts. Almonds or hazelnuts work well. Simply grind them the same way you do with pistachios. You can also mix two or more nuts for a unique taste. Each nut brings its own flavor and texture. - Substitution 1: Dairy-free options To make this dessert dairy-free, swap mascarpone with a dairy-free cream cheese. Use coconut cream instead of heavy cream for a rich texture. Sweeten with a dairy-free powdered sugar. This keeps it creamy while making it suitable for those with lactose intolerance. - Substitution 2: Sugar-free alternatives You can use a sugar substitute like erythritol or stevia. This option is great for those watching their sugar intake. Just make sure to follow the package's conversion guidelines. Your dessert will still taste great but with fewer calories. For the complete cooking instructions, check out the [Full Recipe]. - Refrigerating the tiramisu: Keep the tiramisu in the fridge. It stays fresh for about 3 days. Cover it tightly with plastic wrap. This keeps it moist and flavorful. - Best storage containers: Use a glass or plastic container with a lid. Make sure it seals well. Avoid metal containers, as they can affect taste. - Freezing individual portions: Cut the tiramisu into slices. Wrap each piece in plastic wrap. Place them in a freezer-safe bag. This way, you can enjoy a slice anytime. - Thawing for serving: To serve, take out a slice and let it thaw in the fridge overnight. It’s best to enjoy it cold and creamy. For the complete recipe, check the Full Recipe link. Q1: How long can Pistachio Tiramisu be stored? You can store Pistachio Tiramisu in the fridge for up to four days. Make sure to cover it well to keep it fresh. Q2: Can I make this dessert ahead of time? Yes, you can make it a day or two before serving. This dessert tastes even better after a night in the fridge. Q3: What can I use instead of ladyfingers? If you don’t have ladyfingers, you can use sponge cake or even graham crackers. Just soak them briefly in coffee. Q4: How to enhance pistachio flavor? To boost the pistachio taste, use high-quality, fresh pistachios. You can also add pistachio extract for an extra punch. Q5: Is Pistachio Tiramisu gluten-free? The traditional recipe is not gluten-free due to ladyfingers. However, you can use gluten-free cookies as a substitute. For the Full Recipe, click here for comprehensive cooking instructions. This blog shared a simple guide to making Pistachio Tiramisu. We covered key ingredients, easy preparation steps, and helpful tips. You can also explore fun variations and find ways to store leftovers. Enjoying this dessert is easy and rewarding. With the right ingredients and steps, you can create a tasty treat. Remember to avoid common mistakes for the best results. Now, you’re ready to impress with your own Pistachio Tiramisu!

Pistachio Tiramisu

Wow your guests with this Pistachio Tiramisu, a flavorful dessert that elevates the classic recipe! Combining creamy mascarpone, crunchy pistachios, and delicate ladyfingers, this treat is simple to prepare and bursting with irresistible flavor. Follow our easy step-by-step guide for impressive results, and discover tips and variations to customize your dish. Click to explore the delicious recipe and make a dessert everyone will crave!

Ingredients
  

1 cup unsalted pistachios, shelled and finely ground

1 cup mascarpone cheese

1 cup heavy cream

3/4 cup powdered sugar

1 teaspoon vanilla extract

1 cup brewed coffee (cooled)

12 ladyfinger cookies

2 tablespoons cocoa powder (for dusting)

Additional chopped pistachios for garnish

Instructions
 

In a bowl, combine the finely ground pistachios and mascarpone cheese. Mix until well incorporated.

    In a separate bowl, whip the heavy cream with powdered sugar and vanilla extract until stiff peaks form.

      Gently fold the whipped cream into the pistachio-mascarpone mixture, being careful not to deflate the whipped cream.

        Dip each ladyfinger briefly into the cooled coffee, ensuring they are soaked but not soggy.

          In a rectangular dish, arrange a layer of coffee-soaked ladyfingers at the bottom.

            Spread half of the pistachio-cream mixture over the ladyfingers, smoothing the top with a spatula.

              Repeat the process by adding another layer of dipped ladyfingers followed by the remaining pistachio-cream mixture.

                Cover the dish with plastic wrap and refrigerate for at least 4 hours, preferably overnight, to allow the flavors to meld.

                  Before serving, dust the top with cocoa powder and sprinkle with additional chopped pistachios for added texture.

                    Prep Time: 30 minutes | Total Time: 4 hours + chilling | Servings: 8

                      Leave a Comment

                      Recipe Rating