Looking for a sweet treat that combines rich chocolate and refreshing peppermint? I’ve got just the thing! These No-Bake Chocolate Peppermint Cheesecake Cups are simple to make and perfect for any occasion. With just a few ingredients and easy steps, you’ll impress your friends and family. Get ready to indulge in this light yet decadent dessert that will bring joy to your taste buds! Let’s dive into this delightful recipe!
Ingredients
To create these No-Bake Chocolate Peppermint Cheesecake Cups, you need a few key ingredients. Each one adds flavor and texture to this sweet treat. Here’s your list of ingredients:
– 1 cup chocolate graham cracker crumbs
– 1/4 cup unsalted butter, melted
– 2 cups cream cheese, softened
– 1/2 cup powdered sugar
– 1 teaspoon vanilla extract
– 1/2 teaspoon peppermint extract
– 1 cup whipped cream
– 1/2 cup semi-sweet chocolate chips, melted
– Crushed peppermint candies for garnish
Each ingredient plays a special role. The chocolate graham cracker crumbs form a tasty crust. The melted butter helps bind the crumbs together. Cream cheese gives the cheesecake its rich and smooth texture. Powdered sugar adds sweetness without being grainy. The vanilla and peppermint extracts bring out the flavors we love. Whipped cream makes the filling light and fluffy. The melted chocolate chips add a rich chocolate taste. Finally, the crushed peppermint candies give a fun and festive finish.
Gather these ingredients before you start. They come together quickly to create a dessert that will impress everyone.
Step-by-Step Instructions
Prepare the Crust
To start, grab a mixing bowl. Combine 1 cup of chocolate graham cracker crumbs with 1/4 cup of melted unsalted butter. Stir until the crumbs feel like wet sand. This mixture will form the base of your cheesecake cups. You want it to hold together but not be too wet.
Layer the Crust
Next, divide the crumb mixture evenly into small dessert cups. I like to use clear jars for a nice view of the layers. Press the mixture down firmly in each cup. This creates a solid crust to hold the cheesecake filling later.
Make the Cheesecake Filling
In a large mixing bowl, beat 2 cups of softened cream cheese with an electric mixer. Mix until it is smooth and creamy. This step is key for a good texture.
Incorporate Sugar and Extracts
Now, gradually add 1/2 cup of powdered sugar. Also, mix in 1 teaspoon of vanilla extract and 1/2 teaspoon of peppermint extract. Keep mixing until everything blends well. The extracts add a nice flavor to the filling.
Fold in Whipped Cream
Next, gently fold in 1 cup of whipped cream. Use a spatula to mix it in slowly. This helps keep the filling light and fluffy. Avoid mixing too hard, or you might deflate the whipped cream.
Incorporate Chocolate and Layer
Now, fold in 1/2 cup of melted semi-sweet chocolate chips. Mix it until the chocolate is evenly distributed. Then, spoon the cheesecake filling into each cup, filling them about three-quarters full.
Chill and Garnish
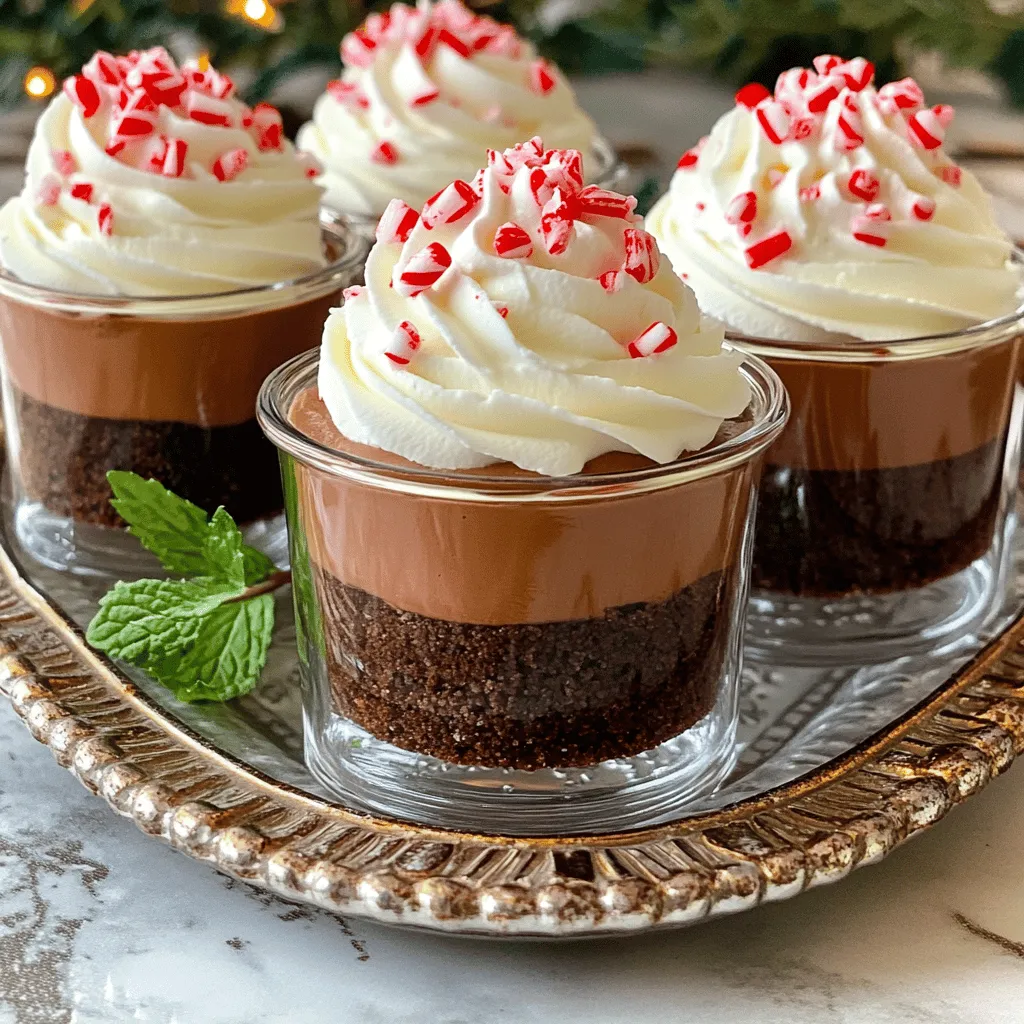
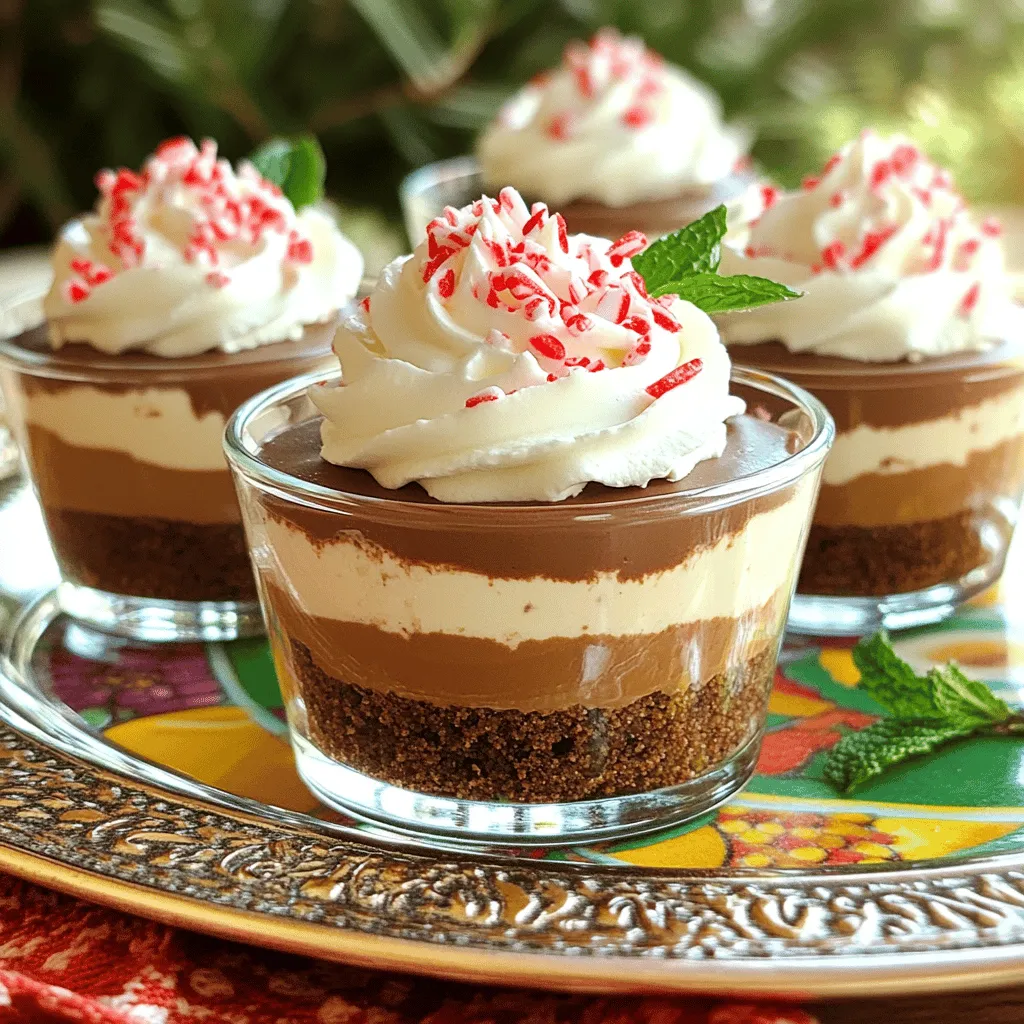
Place the filled cups in the fridge. Let them chill for at least 2 hours. This time helps the cheesecake set up nicely. Just before serving, sprinkle crushed peppermint candies on top for a festive touch. Enjoy your delicious no-bake chocolate peppermint cheesecake cups!
Tips & Tricks
Preparing Ahead
You can make these cheesecake cups a day in advance. Just prepare the crust and filling, then layer them in cups. After that, chill them in the fridge. This helps the flavors blend well. For a quicker serve, keep them covered until you are ready to enjoy.
Serving Suggestions
To serve, place the cheesecake cups on a colorful platter. Add a sprig of fresh mint or a chocolate curl on top. This makes each cup look special and festive. A simple touch can elevate your dessert.
Common Mistakes to Avoid
When folding in the whipped cream, do it gently. Use a rubber spatula for this step. If you mix too hard, the cream can deflate. This will make your cheesecake less fluffy. Remember, gentle folds keep the light, airy texture you want.
Variations
Flavor Combinations
You can easily switch up the flavor of your cheesecake cups. Try using almond or orange extract instead of peppermint. Almond gives a warm, nutty taste, while orange adds a bright, citrusy note. Both options can make your dessert unique while still being delicious. Just use the same amount as the peppermint extract.
Toppings Ideas
Toppings can elevate your cheesecake cups. Instead of crushed peppermint, consider using chocolate shavings or fresh fruit. Shaved chocolate adds richness, while fruit like strawberries or raspberries brings a fresh twist. You can also sprinkle nuts for a crunchy texture. These toppings make each cup feel special and fun!
Dietary Adjustments
If you want to make these cheesecake cups fit your diet, there are simple swaps. Use gluten-free graham crackers for the crust to make it gluten-free. For a dairy-free option, substitute cream cheese with a dairy-free cream cheese. You can also use coconut cream instead of whipped cream. These adjustments let everyone enjoy this tasty treat.
Storage Info
Refrigeration
To keep your no-bake chocolate peppermint cheesecake cups fresh, store them in the fridge. Place them in an airtight container. You can also cover them tightly with plastic wrap. This helps prevent the cheesecake from drying out. Make sure to keep them away from strong-smelling foods. These cups are best when chilled but can last for a few days.
Freezing Options
If you want to freeze the cheesecake cups, place them in a freezer-safe container. This helps to keep them fresh for longer. Before freezing, ensure they are covered well. Thaw them in the fridge overnight before serving. This way, they regain their creamy texture without losing flavor.
Shelf Life
These delightful dessert cups can last up to five days in the fridge. If you freeze them, they can last for up to two months. Just remember to check for any signs of freezer burn. Always serve them chilled for the best taste and texture.
FAQs
Can I make these cheesecake cups in advance?
Yes, you can make these cheesecake cups ahead of time. I recommend preparing them a day before you plan to serve. This way, they have enough time to chill and set perfectly. Just cover them well with plastic wrap, and store them in the fridge. They will taste even better after sitting, as the flavors meld together.
What can I use instead of cream cheese?
If you want a different option, you can use mascarpone cheese or Greek yogurt. Both provide a creamy texture. Mascarpone gives a rich flavor, while Greek yogurt adds tanginess. You can also try silken tofu for a dairy-free choice. Just ensure it is blended well to achieve a smooth consistency.
How long do they need to set in the fridge?
These cheesecake cups need to chill for at least 2 hours. This time allows the filling to firm up. If you can wait longer, that’s even better! They will set more and taste amazing after four hours or overnight.
Can I use other types of chocolate?
Absolutely! You can use dark chocolate or white chocolate instead of semi-sweet chocolate. Each type gives a unique taste. If you choose white chocolate, consider adding a bit more peppermint extract for balance. Just make sure to melt the chocolate properly for mixing.
You can create delicious cheesecake cups using simple ingredients like cream cheese and chocolate. We covered each step, from making the crust to chilling the dessert. Remember to avoid common mistakes like deflating whipped cream. Try fun variations, like different flavors or toppings, to make it your own. Store your desserts properly to keep them fresh. Enjoy these tasty treats, and impress your friends and family with your skills!