
If you’re looking for a bright, tasty dish that’s easy to make, you’re in the right place. This Greek Orzo Salad with Feta packs a flavor punch in every bite. With simple ingredients and quick steps, it’s perfect for a family dinner or a picnic. I’ll guide you through each part of the recipe, so you can impress your friends and enjoy a fresh, Mediterranean delight. Let’s dive in!
Why I Love This Recipe
- Fresh and Flavorful: This salad bursts with Mediterranean flavors, making it a refreshing dish perfect for any occasion.
- Quick to Prepare: With just 15 minutes of prep time, you can have a delicious salad ready for your meal or picnic.
- Customizable Ingredients: Easily adjust the ingredients based on your preferences or what you have on hand, making it versatile for everyone.
- Perfect for Meal Prep: This salad keeps well in the fridge, making it an ideal option for meal prepping for the week ahead.
Ingredients
Main Ingredients for Greek Orzo Salad with Feta
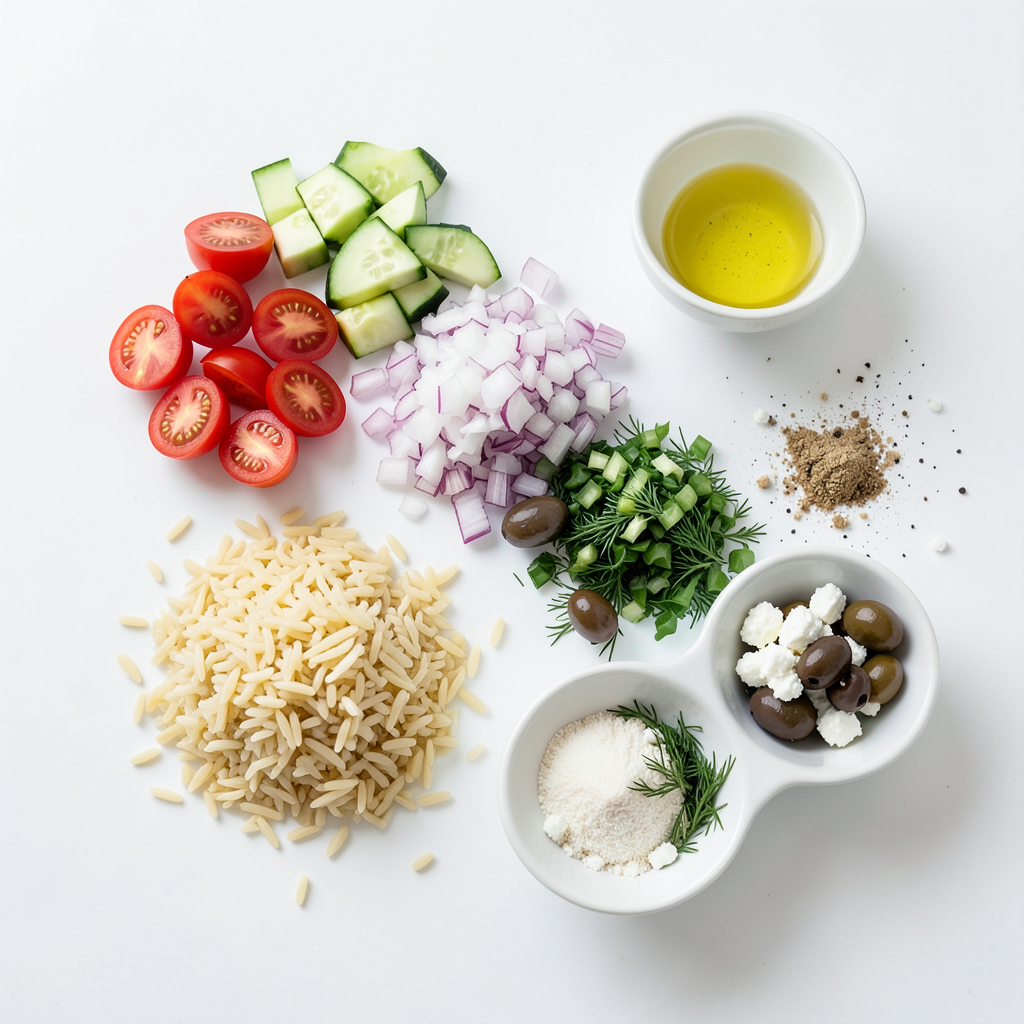
For a tasty Greek Orzo Salad, gather these main ingredients:
- 1 cup orzo pasta
- 1 cup cherry tomatoes, halved
- 1 cucumber, diced
- 1/2 red onion, finely chopped
- 1/2 cup Kalamata olives, pitted and halved
- 1/2 cup feta cheese, crumbled
These ingredients bring a fresh burst of flavor. The orzo pasta serves as a perfect base. Cherry tomatoes add sweetness and color. Cucumbers give a nice crunch. Red onion adds a sharp taste, while Kalamata olives provide a briny touch. Feta cheese brings creaminess and saltiness that ties everything together.
Dressing Components
Next, you need to make a simple dressing. Here are the dressing components:
- 1/4 cup olive oil
- 3 tablespoons lemon juice
- 1 teaspoon garlic powder
- Salt and pepper to taste
This dressing is light and bright. Olive oil adds richness, while lemon juice gives it a zesty kick. Garlic powder brings depth, and salt and pepper balance the flavors. You can whisk these ingredients together for a quick mix.
Suggested Fresh Herbs and Seasonings
To elevate your salad, consider these fresh herbs and seasonings:
- 1/4 cup fresh dill, chopped
Dill adds a herbaceous note that complements the salad. You can also explore other herbs like parsley or mint. Fresh herbs make the dish feel vibrant and lively. Feel free to adjust the amount to suit your taste.
Step-by-Step Instructions
Cooking the Orzo Pasta
First, measure 1 cup of orzo pasta. Bring a pot of water to a boil. Add a pinch of salt to the water. Cook the orzo according to the package instructions, about 8 to 10 minutes. You want it to be al dente, meaning it should still be firm. Drain the pasta in a colander. Rinse it under cold water to stop the cooking. This helps to cool the pasta for the salad.
Preparing the Vegetables
Next, gather your veggies. Slice 1 cup of cherry tomatoes in half. Dice 1 cucumber into small pieces. Finely chop 1/2 red onion. Take 1/2 cup of Kalamata olives, pit them, and slice them in half. In a large bowl, mix all the prepared vegetables together. This colorful mix adds flavor and crunch to your salad.
Whisking the Dressing
Now, let’s make the dressing. In a small bowl, combine 1/4 cup of olive oil and 3 tablespoons of lemon juice. Add 1 teaspoon of garlic powder, along with salt and pepper to taste. Whisk the mixture until it blends well. This dressing ties all the flavors together and gives the salad a bright taste.
With these steps, you set the stage for a tasty Greek Orzo Salad with Feta that everyone will love.
Tips & Tricks
How to Achieve Perfectly Cooked Orzo
To cook orzo, boil water in a pot. Add a pinch of salt. Pour in 1 cup of orzo. Stir it well and cook for 8 to 10 minutes. You want it al dente, which means it should be firm but not hard. Drain the orzo in a colander, then rinse it with cold water. This stops the cooking and cools down the pasta fast.
Best Practices for Tossing the Salad
When you toss the salad, be gentle. Start with the cooked orzo in a large bowl. Add the cherry tomatoes, cucumber, red onion, and Kalamata olives. Use a big spoon or spatula to mix. Pour the dressing over the salad, then toss again. This helps coat all the ingredients well. Finally, fold in the feta cheese and dill. This keeps the cheese intact and adds lovely bursts of flavor.
Flavor Enhancements and Seasoning Adjustments
To boost flavor, consider adding more lemon juice for tartness. A touch more garlic powder can add depth. If you love heat, try a pinch of red pepper flakes. Always taste your salad after mixing. Adjust salt and pepper as needed. If you want to add freshness, some chopped parsley or mint works great too.
Pro Tips
- Fresh Ingredients: Use the freshest vegetables available for the best flavor and texture in your salad.
- Chill for Flavor: Allow the salad to chill in the refrigerator for at least 30 minutes. This helps the flavors meld beautifully.
- Customize Your Olives: Experiment with different types of olives, such as green or stuffed olives, to add a unique twist to the salad.
- Serve with Protein: For a heartier meal, consider adding grilled chicken or chickpeas to the salad.
Variations
Adding Proteins for a Heartier Salad
You can boost this salad by adding proteins. Grilled chicken or shrimp works well. You can also use chickpeas for a plant-based option. Just cook the protein and chop it into bite-sized pieces. Mix it with the salad to make it filling. This way, you can turn the salad into a main dish.
Vegetarian Substitutions and Additions
For a vegetarian twist, consider adding more veggies. Bell peppers or artichoke hearts can add great flavor. You might also throw in some avocado for creaminess. Swap out feta for goat cheese or a dairy-free option if needed. These changes keep the salad fresh and exciting.
Seasonal Ingredient Swaps
Use what’s in season for the best taste. In summer, add zucchini or fresh corn. In fall, try roasted butternut squash or apples. Seasonal swaps keep the dish lively and support local farms. This salad is flexible, so you can change it with the seasons.
Storage Info
How to Store Leftovers
To keep your Greek orzo salad fresh, place it in an airtight container. Make sure to seal it well to prevent air from getting in. This helps the salad stay crisp and tasty. Store it in the fridge for up to three days. If you want to keep it longer, freeze it. Just know that the texture may change a bit after thawing.
Recommended Storage Containers
I recommend using glass or plastic containers with tight lids. Glass containers work great because they do not absorb smells or stains. If you use plastic, choose BPA-free options. Smaller containers are perfect for lunch portions. If you want to take it on picnics, use insulated containers to keep it cool.
Reheating Tips and Serving Suggestions
You can enjoy this salad cold or warm. If you prefer it warm, gently reheat it in a pan over low heat. Add a splash of olive oil to help loosen it up. Stir often to avoid burning. If you like it cold, feel free to serve it straight from the fridge. Top it with extra feta or fresh herbs for added flavor!
FAQs
Can I make Greek Orzo Salad ahead of time?
Yes, you can make Greek Orzo Salad ahead of time. This salad tastes even better after sitting for a while. Prepare it a few hours or a day ahead. Just store it in the fridge. This helps the flavors mix well and gives you a tasty dish when you are ready to serve.
What other cheeses can I use instead of feta?
You can use other cheeses if you don’t have feta. Some good options are goat cheese or ricotta salata. Both have a nice texture and flavor. Goat cheese is creamy, while ricotta salata is firmer. Both add a great taste to the salad. Choose what you like best!
Is there a gluten-free version of orzo?
Yes, there are gluten-free orzo options available. Look for orzo made from rice or quinoa. These grains keep the shape and texture of regular orzo. You can find gluten-free orzo at many grocery stores. Use this in your salad for a tasty, gluten-free meal.
Greek Orzo Salad with Feta is fresh and easy to make. We discussed the main ingredients, dressing components, and herbs. You learned how to cook orzo and prepare the veggies. I shared tips for cooking and tossing the salad well. Variations like proteins and seasonal swaps add fun. Storing leftovers correctly keeps flavors strong.
In closing, this salad is tasty and fun for everyone. Enjoy making it your own!