Roasted Red Pepper Hummus Simple and Tasty Recipe
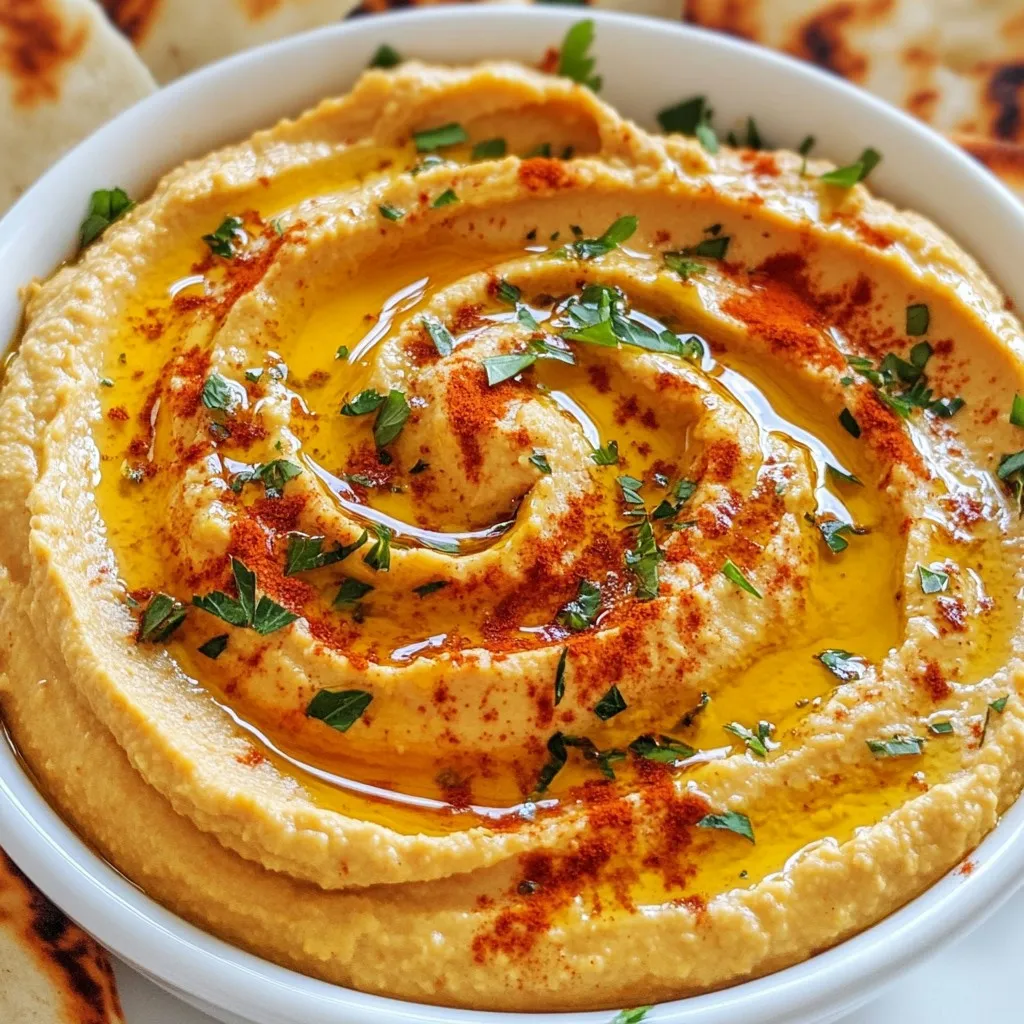
Are you ready to spice up your snacking? This Roasted Red Pepper Hummus is simple, tasty, and packed with flavor!

Are you ready to spice up your snacking? This Roasted Red Pepper Hummus is simple, tasty, and packed with flavor!
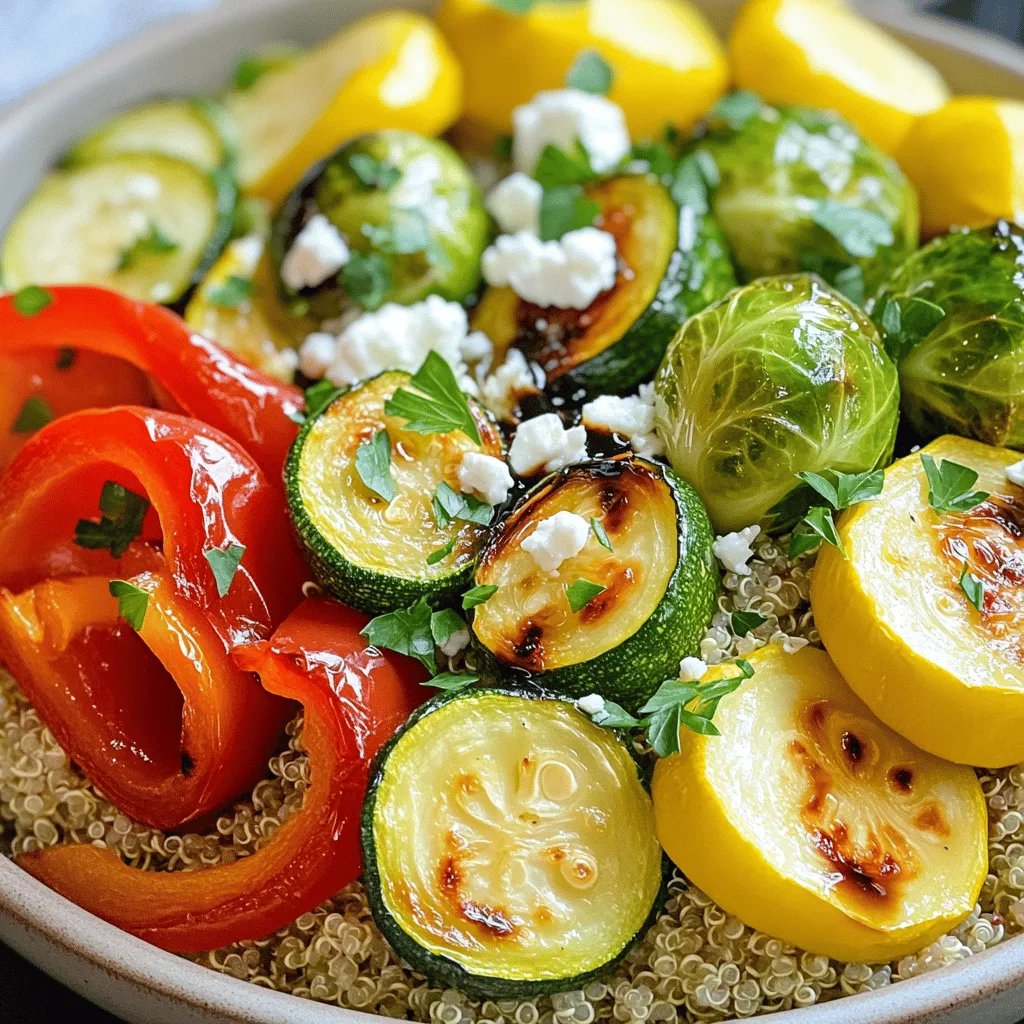
Looking for a quick and healthy meal? Balsamic Roasted Veggie Bowls are packed with fresh veggies and bold flavors. You
![To make these tasty baked pumpkin spice donuts, you will need: - 1 cup pumpkin puree (canned or freshly made) - 2 cups all-purpose flour - 1/2 cup granulated sugar - 1/2 cup brown sugar, packed - 2 teaspoons baking powder - 1 teaspoon baking soda - 1 teaspoon ground cinnamon - 1/2 teaspoon ground nutmeg - 1/2 teaspoon ground ginger - 1/4 teaspoon ground cloves - 1/2 teaspoon salt - 2 large eggs - 1/4 cup vegetable oil - 1/4 cup milk - 1 teaspoon vanilla extract These ingredients create a warm, cozy flavor that defines fall. Pumpkin puree adds moisture and a rich taste. The mix of spices brings out the best in every bite. If you do not have an ingredient, here are some easy swaps: - Replace pumpkin puree with applesauce for a different flavor. - Use whole wheat flour instead of all-purpose for added fiber. - Swap granulated sugar with coconut sugar for a lower glycemic index. - Use almond milk or oat milk instead of regular milk for a dairy-free option. - Apples can replace eggs if you want a vegan version. These swaps make the recipe flexible for different diets and tastes. Toppings can elevate your donuts even more. Here are some ideas: - Dust with powdered sugar for a sweet finish. - Coat in cinnamon sugar for a classic touch. - Drizzle with maple syrup for a rich flavor. - Top with a chocolate glaze for a sweet twist. - Add chopped nuts for crunch and texture. Try different toppings to find your favorite way to enjoy these donuts! For the full recipe, look at the main recipe section. Start by preheating your oven to 350°F (175°C). This step is key for even baking. Next, grab your donut pan. Lightly grease it with cooking spray or brush it with oil. This will help the donuts slide out easily once they are done. In a medium bowl, mix together the pumpkin puree, eggs, vegetable oil, milk, and vanilla extract. Stir until all the ingredients blend well. This mixture brings moisture and flavor to the donuts. Use a whisk or a fork for this task. In a separate large bowl, whisk together the all-purpose flour, granulated sugar, brown sugar, baking powder, baking soda, cinnamon, nutmeg, ginger, cloves, and salt. This step ensures the dry ingredients are evenly mixed. The spices add warmth and that classic pumpkin spice flavor. Now, pour the wet mixture into the dry bowl. Mix gently until just combined. A few lumps are fine; do not overmix. Using a piping bag or a resealable plastic bag with one corner snipped off, pipe the batter into the prepared donut pan. Fill each cavity about 2/3 full for the best rise. Place the filled donut pan in the preheated oven. Bake for 12-15 minutes. Check doneness by inserting a toothpick into the center of a donut. If it comes out clean, they are ready. Allow the donuts to cool in the pan for about 5 minutes. Then, transfer them to a wire rack to cool completely. This cooling step keeps them fluffy and prevents sogginess. To get soft and fluffy donuts, use pumpkin puree. It adds moisture and flavor. Mix wet and dry ingredients just until combined. Overmixing leads to tough donuts. Fill the donut pan only two-thirds full, allowing space for rising. Bake until golden and a toothpick comes out clean. One common mistake is overbaking. Keep an eye on the time. Donuts can dry out quickly. Another mistake is measuring flour incorrectly. Use the spoon-and-level method for best results. Don’t skip greasing the pan, or your donuts may stick. Finally, remember, let them cool before frosting. For a fun touch, dust your donuts with powdered sugar or cinnamon sugar. You can also dip them in a simple glaze made from powdered sugar and milk. Serve on a wooden platter with mini pumpkins for a festive look. Enjoy with a hot drink for the perfect fall treat. For the complete recipe, visit the [Full Recipe]. {{image_2}} You can take your pumpkin spice donuts to a new level with a chocolate glaze. Just melt some chocolate chips with a splash of cream. Dip each cooled donut into the warm chocolate. Let the excess drip off, then place them on a rack to set. The rich chocolate flavor pairs well with the warm spices. It adds a sweet touch that kids and adults love. If you need gluten-free donuts, swap the all-purpose flour for a gluten-free blend. Look for a blend that contains xanthan gum. This helps the donuts rise and stay fluffy. Follow the same steps as in the full recipe. You won't miss the gluten; these donuts will still be light and tasty. To make these donuts vegan, replace the eggs with flax eggs. Mix one tablespoon of flaxseed meal with three tablespoons of water for each egg. Allow it to sit until it thickens. Use plant-based milk instead of regular milk. And opt for a vegetable oil that is labeled vegan. These adjustments keep the donuts delicious and friendly for a vegan diet. To keep your baked pumpkin spice donuts fresh, store them in an airtight container. This helps keep them soft. You can leave them at room temperature for up to two days. If you want them to last longer, store them in the fridge. They can stay fresh for about a week when chilled. If you want to save donuts for later, freezing is a great option. First, let the donuts cool completely. Then, wrap each donut in plastic wrap or foil. Place the wrapped donuts in a freezer bag. Squeeze out the air and seal it tight. You can freeze them for up to three months. When you're ready to enjoy, just take out the number you need. To enjoy warm donuts, reheating is easy. You can use a microwave or an oven. For the microwave, heat each donut for about 10-15 seconds. In the oven, preheat it to 350°F (175°C). Place the donuts on a baking sheet and heat for about 5 minutes. This will help them regain their fluffy texture. For a special touch, add a sprinkle of cinnamon sugar after reheating. Baked pumpkin spice donuts stay fresh for about three days. Store them in an airtight container. You can also place a paper towel at the bottom to absorb moisture. This keeps the donuts soft and tasty. Yes, you can use homemade pumpkin puree in this recipe. Just make sure to drain any excess water. This helps maintain the right texture in your donuts. Fresh puree adds a rich flavor that enhances the pumpkin taste. To make donuts crispy, bake them until they are golden brown. Avoid overfilling the donut pan, as this can lead to sogginess. Let them cool on a wire rack to allow steam to escape. You can also dust them with sugar for added crunch. You can find the full recipe for baked pumpkin spice donuts right here. Just check the recipe section above for all the details you need to create these delicious treats! Baked pumpkin spice donuts are delicious and fun to make. We covered the main ingredients, tips for perfect texture, and even variations for different diets. Remember to store leftovers properly to keep them fresh. I hope you feel ready to try these donuts at home. Enjoy the process and the tasty results. Don’t forget to share your creations!](https://juliesdish.com/wp-content/uploads/2025/07/d8567a0a-1a48-4980-b407-0b687591d4ca.webp)
Get ready to enjoy the warm flavors of fall with my Baked Pumpkin Spice Donuts! These tasty treats combine pumpkin,

Are you ready for a crispy, healthy treat? These Easy Air Fryer Veggie Egg Rolls are a game changer for
. 1. First, preheat your oven to 400°F (200°C). This step is key for even cooking. 2. In a large bowl, mix the sweet chili sauce, soy sauce, sesame oil, minced garlic, and grated ginger. This sauce will be the marinade. 3. Add the chicken thighs to the bowl. Make sure they are well-coated in the marinade. Let them sit for at least 15 minutes. For more flavor, you can refrigerate them for up to an hour. 1. Line a large sheet pan with parchment paper. This makes cleanup super easy. 2. Once the chicken has marinated, place the thighs on one side of the sheet pan. 3. On the other side, arrange the sliced bell peppers, zucchini, and broccoli florets. Toss them in a little olive oil and season with salt and pepper for added taste. 4. Pour any leftover marinade over everything to enhance the flavor. 1. Bake in your preheated oven for 25 to 30 minutes. The chicken should reach an internal temperature of 165°F (74°C). 2. For a caramelized finish, switch the oven to broil for the last 3 to 5 minutes. This will give the chicken a lovely golden crust. 3. After cooking, let the dish rest for a few minutes. Garnish with sesame seeds and fresh cilantro before serving. This method ensures a meal that is both easy and packed with flavor. You can find the full details in the Full Recipe. For the best flavor, marinate the chicken for at least 15 minutes. This time allows the chicken to soak in the sweet chili sauce and spices. If you have more time, let it sit for up to an hour. This extra time gives the chicken a richer taste. To make the marinade richer, add a touch of lime juice or honey. These additions bring a depth of flavor that brightens the dish. To ensure the chicken is cooked perfectly, use a meat thermometer. The chicken should reach an internal temperature of 165°F (74°C). This step guarantees juicy, safe-to-eat chicken. For roasting vegetables, cut them into even pieces. This helps them cook uniformly. Toss them in olive oil, salt, and pepper before placing them on the pan. This method enhances their natural flavors. Serve this dish with steamed rice or quinoa. These sides soak up the sweet chili sauce well. You can also add a fresh salad for a crunchy contrast. If you have leftovers, store them in an airtight container in the fridge for up to three days. For a quick meal, reheat the chicken and veggies in a pan. This method keeps them moist and tasty. {{image_2}} You can easily switch out the chicken for other proteins. Tofu works great for a vegetarian option. Shrimp also cooks fast and adds a nice flavor. For vegetables, think about what’s in season. Try asparagus in spring or squash in fall. Mix and match to keep meals exciting. Want to spice things up? Add red pepper flakes for heat. Honey can make the dish sweeter and richer. You can also use other sauces, like teriyaki or hoisin, for a fun twist. Each sauce brings its own flavor profile, making this dish versatile. If you are busy, prep this meal ahead. Marinate the chicken and chop the veggies the night before. Store them in the fridge for quick cooking. You can also freeze the marinated chicken for future meals. Just thaw it overnight in the fridge before cooking. This way, you have an easy, tasty dinner ready to go. To store leftovers, let your chicken cool first. Then, place it in an airtight container. Make sure to seal it well to keep out air. You can store it in the fridge for up to four days. The chicken and veggies will stay fresh if stored properly. For reheating, the best method is the oven. Preheat it to 350°F (175°C). Place the chicken on a baking sheet. Heat for about 15-20 minutes. This keeps the chicken juicy and the veggies crisp. If you use a microwave, cover the dish with a damp paper towel. This helps to keep moisture in and prevents dryness. To freeze the dish, let it cool completely. Then, wrap the chicken and veggies tightly in plastic wrap. Place it in a freezer-safe bag or container. It can last up to three months in the freezer. For defrosting, move it to the fridge overnight. You can also use the microwave on the defrost setting. This way, you’ll get the best results when you reheat it later. Can I use bone-in chicken thighs? Yes, you can use bone-in chicken thighs. They add great flavor. Just cook them a bit longer. Check for doneness with a meat thermometer. What can I substitute for sweet chili sauce? You can use honey mixed with soy sauce. Another option is a homemade sauce with sugar, garlic, and vinegar. Both give a sweet and tangy taste. How can I make this recipe gluten-free? To make it gluten-free, use gluten-free soy sauce. Also, ensure your sweet chili sauce is gluten-free. This way, you keep all the great flavor without gluten. Can I add different spices or flavors? Absolutely! You can add chili powder for heat or lime juice for zest. Experiment with your favorites to make it your own. What should I do if the chicken isn’t cooking evenly? If the chicken cooks unevenly, check your oven temperature. You can also rearrange the pan halfway through cooking. This helps with even heat distribution. How do I know when my chicken is fully cooked? Use a meat thermometer. The chicken should reach 165°F (74°C). If you don’t have a thermometer, cut into the thickest part. The meat should be white, not pink. This blog post shows you how to prepare a tasty sheet pan chicken dish. We covered the main ingredients, optional extras, and how to make it healthy. You learned about the prep steps, cooking process, and helpful tips for great results. In the end, experiment and have fun with your ingredients. Use new flavors and swaps to keep it exciting. Enjoy creating delicious meals that fit your taste and needs. Happy cooking!](https://juliesdish.com/wp-content/uploads/2025/07/62de884d-73e7-46a5-88ec-8238e5862a0b.webp)
Looking for a simple, tasty meal? Sheet Pan Sweet Chili Chicken is your answer! With juicy chicken and colorful veggies,

Are you craving a warm, cheesy treat? Look no further! This Cheesy Garlic Pull Apart Bread recipe is simple and
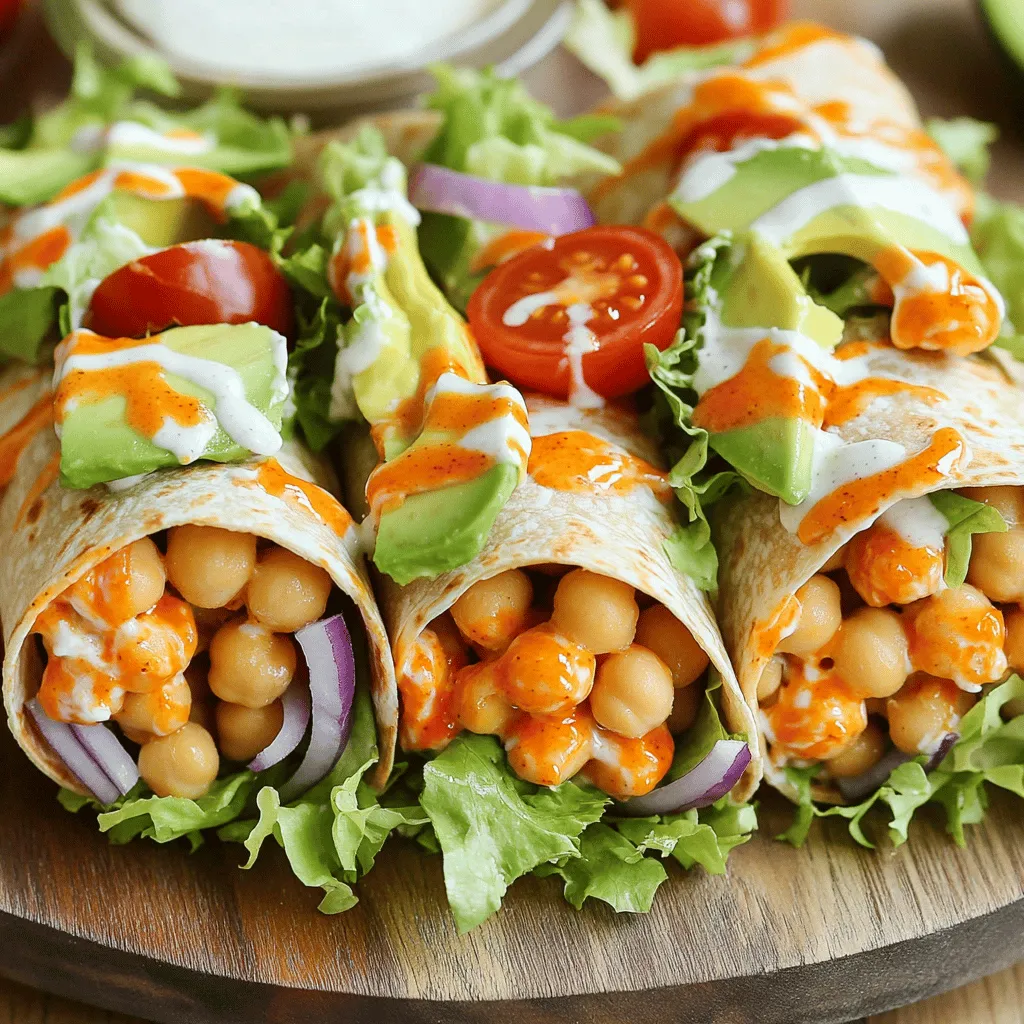
Get ready to spice up your meal prep with my Vegan Buffalo Chickpea Wraps! This tasty and simple dish brings

Looking for a tasty snack that’s both crispy and healthy? You’re in the right place! These Crispy Parmesan Zucchini Chips
![- 2 cups all-purpose flour - 1 cup sugar - 1 tablespoon baking powder - 1 teaspoon baking soda - 1 teaspoon ground cinnamon - ½ teaspoon ground nutmeg - ½ teaspoon salt - 1 cup canned pumpkin puree - ½ cup vegetable oil - 3 large eggs - 1 teaspoon vanilla extract - 1 cup chopped pecans The base of this coffee cake is simple. I use all-purpose flour for a soft texture. The sugar sweetens it just right. Baking powder and baking soda help it rise. A mix of ground cinnamon and nutmeg adds warmth. Salt balances the flavors. Canned pumpkin puree gives it that rich, fall taste. Oil keeps it moist, while eggs bind everything. Finally, I fold in chopped pecans for crunch. - ½ cup all-purpose flour - ½ cup brown sugar - 1 teaspoon ground cinnamon - ¼ cup cold unsalted butter, cubed - ½ cup chopped pecans The streusel topping makes this cake special. I blend flour and brown sugar for sweetness. A touch of cinnamon brings out the spices. Cold butter adds richness. I mix it until it's crumbly, then add more chopped pecans for that nutty flavor. This topping pairs perfectly with the cake below. Check out the [Full Recipe] to start baking and enjoy this delightful treat! - Preheat your oven to 350°F (175°C) and grease a baking pan. - In a large mixing bowl, combine 2 cups of flour, 1 cup of sugar, 1 tablespoon of baking powder, 1 teaspoon of baking soda, 1 teaspoon of cinnamon, ½ teaspoon of nutmeg, and ½ teaspoon of salt. - In another bowl, mix 1 cup of canned pumpkin puree, ½ cup of vegetable oil, 3 large eggs, and 1 teaspoon of vanilla extract until smooth. - Gradually add the wet ingredients to the dry ingredients. Stir until just combined. Be careful not to overmix. - Fold in 1 cup of chopped pecans. - Pour the batter into the prepared baking pan, spreading it evenly. - For the streusel topping, mix ½ cup of flour, ½ cup of brown sugar, and 1 teaspoon of cinnamon with ¼ cup of cold butter until crumbly. Fold in ½ cup of chopped pecans. - Sprinkle the streusel topping evenly over the batter in the pan. - Bake in the preheated oven for 30-35 minutes. Check with a toothpick to see if it comes out clean. - Allow the coffee cake to cool in the pan for about 10-15 minutes before slicing and serving. Enjoy this Pumpkin Pecan Streusel Coffee Cake with a warm cup of coffee! For the full recipe, check out the details above. - Avoid overmixing the batter: When you mix the wet and dry ingredients, stir until just combined. Overmixing makes the cake tough. - How to check for doneness: Insert a toothpick into the center of the cake. If it comes out clean, the cake is done. - Ideas for presentation: Serve the coffee cake warm with a sprinkle of powdered sugar. A dollop of whipped cream adds a nice touch. - Pairing with beverages: This cake pairs well with coffee or a warm spiced tea. The flavors of pumpkin and pecans shine with these drinks. - Best mixing bowls and baking pans: Use a large mixing bowl for the batter. A 9x13 inch baking pan works best for even baking. - Recommended utensils for preparation: A whisk and spatula are great for mixing. A pastry cutter helps make the streusel topping. This Pumpkin Pecan Streusel Coffee Cake will impress your guests with its flavor and looks. For the complete details, check the Full Recipe! {{image_2}} You can easily make this coffee cake fit your diet. For gluten-free options, swap the all-purpose flour with a gluten-free blend. Many brands offer good mixes that work well in baking. For those who follow a vegan diet, replace eggs with flax eggs. Mix one tablespoon of ground flaxseed with three tablespoons of water for each egg. You can also substitute vegetable oil with applesauce for a lighter touch. Want to change things up? Add chocolate chips for a sweet twist. They melt beautifully and add richness. You could also stir in cranberries for a tart bite that balances the sweetness. For the streusel topping, try using walnuts or almonds instead of pecans. Each nut brings a new texture and flavor profile that can surprise your taste buds. Fall flavors take this cake to another level. You can add fresh apple chunks or diced pears for a fruity touch. Cinnamon and nutmeg pair well with these fruits. Another option is to include ginger or clove for an extra kick. These spices add warmth and make your kitchen smell amazing while it bakes. Enjoy experimenting with these ideas! For the complete recipe, check out the [Full Recipe]. To keep your pumpkin pecan streusel coffee cake fresh, follow these tips: - Store in an airtight container. - Place a piece of parchment paper between layers to prevent sticking. - Keep it at room temperature for up to three days. - For longer storage, refrigerate it. I recommend using a glass container with a tight seal. Glass helps reduce odors and keeps your cake moist. You can freeze your coffee cake for later. Here’s how: - Wrap the cake tightly in plastic wrap. - Place it in a freezer-safe bag or container. - Label it with the date and type of cake. For best taste, eat it within three months. To reheat, thaw overnight in the fridge. Then warm it in the oven at 350°F (175°C) for about 10-15 minutes. This method keeps the cake flavorful and soft. Enjoy your treat anytime! Can I use fresh pumpkin instead of canned? Yes, you can use fresh pumpkin. Just cook and puree it first. Make sure it's smooth, like canned pumpkin. Fresh pumpkin has a great taste and works well in this recipe. How long will the coffee cake stay fresh? The coffee cake stays fresh for about 3 to 4 days at room temperature. Keep it covered to avoid drying out. You can also refrigerate it for longer freshness. Can I make this recipe ahead of time? Yes, you can make this coffee cake ahead of time. Bake it, then store it at room temperature for a few days. You can also freeze it for up to 3 months. Just let it cool before wrapping tightly. What if my coffee cake is too dry? If your coffee cake is dry, it might have baked too long. Next time, check it a few minutes early. You can also try adding a little more oil or pumpkin puree to the batter. How to fix burnt edges on the cake? If the edges burn, try lowering the oven temperature next time. You can also place a piece of foil around the edges while baking. This shields them from direct heat. What can I use instead of pecans? You can use walnuts or almonds if you don’t have pecans. Both nuts add great flavor and texture. You can also skip nuts if you prefer a nut-free version. Can I replace sugar with a sugar alternative? Yes, you can replace sugar with a sugar alternative. Look for options like stevia or monk fruit. Just check the package for the right amount to use. This blog post shared a simple recipe for delicious coffee cake. You learned about the key ingredients, step-by-step baking instructions, and useful tips to perfect your dish. Don't forget the fun variations and storage options to keep your cake fresh. With these insights, you can bake with confidence. Experiment with flavors and enjoy the process. Happy baking!](https://juliesdish.com/wp-content/uploads/2025/07/e3e0dcf3-e7a2-4bdf-b4b9-793ba5574b64.webp)
Get ready to indulge in a cozy slice of fall! This Pumpkin Pecan Streusel Coffee Cake recipe combines warm spices,

Welcome to flavor heaven! Today, I’ll guide you through making a Loaded Sheet Pan Quesadilla that packs a punch. With
