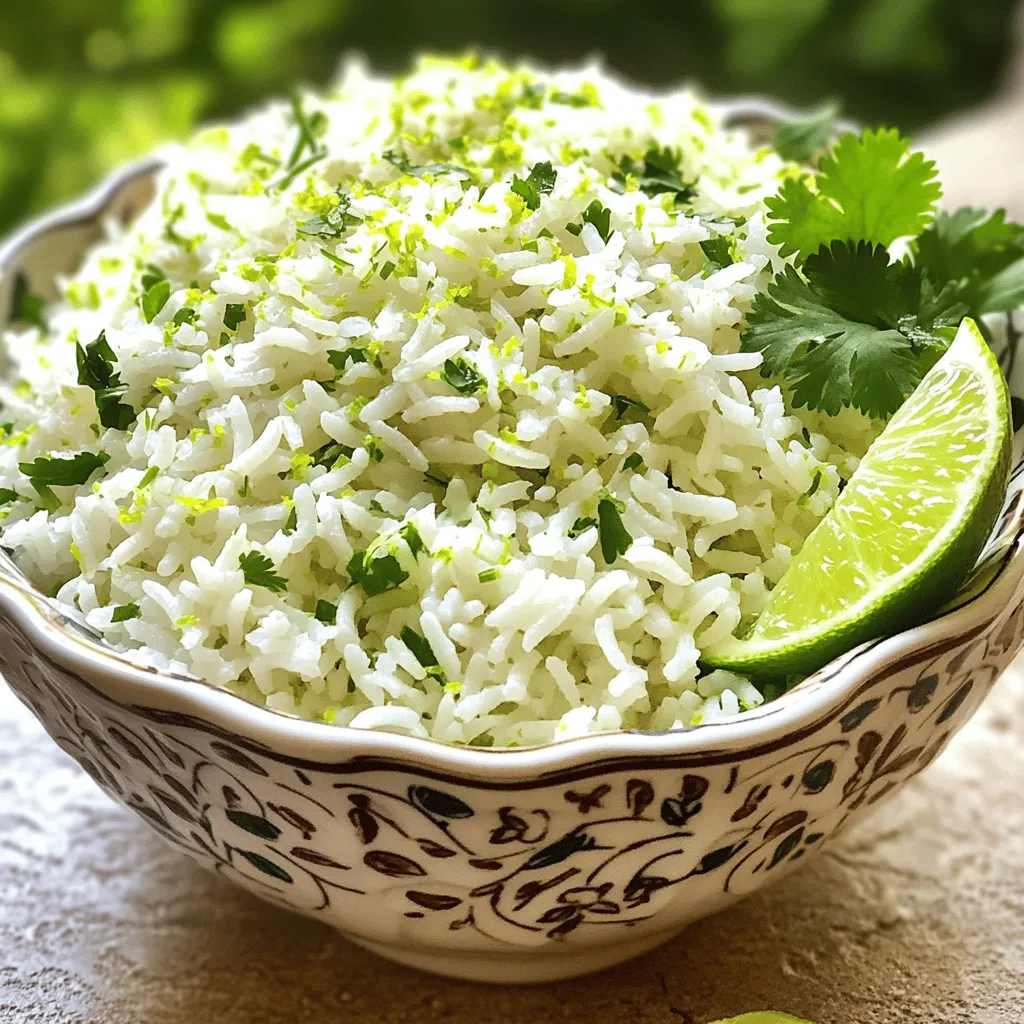
Cilantro Lime Rice Flavorful and Easy Recipe Guide
If you’re looking for a bright, zesty side dish that’s easy to make, you’re in the right place! Cilantro lime

If you’re looking for a bright, zesty side dish that’s easy to make, you’re in the right place! Cilantro lime
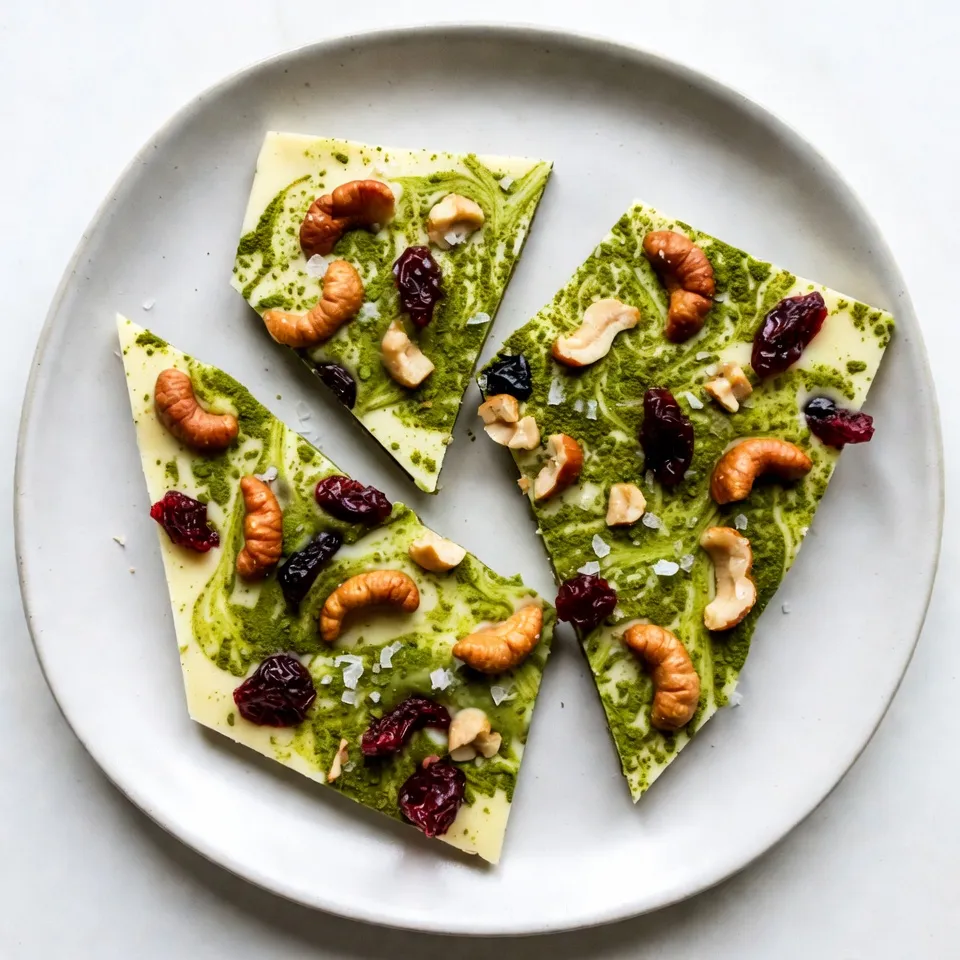
Craving a sweet yet unique treat? My White Chocolate Matcha Bark is the answer! This delightful recipe blends rich white
![To make the Chipotle Chicken Burrito Bowl, you will need these items: - 2 cups cooked jasmine rice - 1 lb chicken breast, diced - 2 tablespoons chipotle powder - 1 teaspoon garlic powder - 1 teaspoon cumin - 1 teaspoon paprika - 1 tablespoon olive oil - 1 can black beans, drained and rinsed - 1 cup corn kernels (fresh or frozen) - 1 cup cherry tomatoes, halved - 1 avocado, sliced - 1/2 cup shredded cheddar cheese - 1/4 cup fresh cilantro, chopped - Salt and pepper to taste - 2 tablespoons lime juice - 1/4 cup plain Greek yogurt or sour cream (for serving) This dish is not only tasty but also packs a healthy punch. Each serving provides: - Calories: Approximately 550 - Protein: 35g - Carbohydrates: 60g - Fat: 20g - Fiber: 10g This bowl is full of protein and fiber, which help you feel full longer. The fresh veggies add vitamins and minerals, making it a balanced meal. You can modify the recipe based on what you have at home. Here are some easy swaps: - Chicken: Use turkey or tofu for a different protein. - Rice: Quinoa or brown rice can replace jasmine rice. - Beans: Try pinto beans or lentils instead of black beans. - Corn: Canned corn or even peas can work in a pinch. - Cheese: Swap cheddar for Monterey Jack or leave it out for a dairy-free option. These substitutions keep the spirit of the dish while fitting your taste and pantry. You can find the Full Recipe for a step-by-step guide. To start, gather your chicken and spices. In a small bowl, mix chipotle powder, garlic powder, cumin, paprika, salt, and pepper. This spice mix gives the chicken its bold flavor. Next, take your diced chicken breast and toss it with olive oil. Make sure to coat it well with the spice mix. This step is key for flavor. Heat a large skillet on medium heat. Once hot, add the chicken. Cook for about 6-8 minutes, stirring occasionally. The chicken should be cooked through and nicely browned. While the chicken is cooking, prepare the jasmine rice. Follow the package instructions for cooking. Typically, you will need to rinse the rice first. This helps remove extra starch. Then, add water and rice to a pot. Bring it to a boil, then cover and simmer until tender. Once cooked, fluff it with a fork. For a zesty touch, stir in some lime juice. This adds a fresh flavor to the rice. Now, it's time to build your burrito bowl. Start with a base of jasmine rice in each bowl. Next, add a generous scoop of the chipotle chicken on top. Then, layer black beans and corn for some texture. Add halved cherry tomatoes and sliced avocado for freshness. Finish the bowl with shredded cheddar cheese. To top it off, add a dollop of Greek yogurt or sour cream and sprinkle with fresh cilantro. This mix of flavors and colors makes the dish fun and inviting. For an extra zest, drizzle more lime juice over the top. Enjoy your meal! For the full recipe, check out the [Full Recipe]. Cooking chicken for your burrito bowl is simple. First, cut the chicken into small pieces. This helps it cook evenly. Always use a hot skillet. A hot skillet gives nice color and flavor. Cook the chicken for about 6-8 minutes. Make sure it is no longer pink inside. Use a meat thermometer if you want to be sure. It should reach 165°F. Letting it rest for a few minutes makes it juicy. Marinades can take your chicken to the next level. Use the spice mix from the recipe. Combine chipotle powder, garlic powder, and cumin. Add a little olive oil for moisture. Let the chicken sit in the marinade for at least 30 minutes. If you have more time, marinate it overnight. This will give the chicken a richer flavor. You can also add lime juice to brighten it up. A great-looking burrito bowl makes it more fun to eat. Start with a base of jasmine rice. Then layer the chicken, beans, and corn. Add colorful toppings like cherry tomatoes and avocado. Make it pop with shredded cheese and fresh cilantro. For a fresh touch, drizzle extra lime juice on top. Serve in colorful bowls for a fun vibe. A lime wedge on the side adds a nice touch. For the full recipe, check the recipe section above. {{image_2}} You can easily make a vegetarian burrito bowl. Replace the chicken with sautéed veggies. Bell peppers, zucchini, and mushrooms work well. You can also use tofu or tempeh for protein. Season them with the same spices to keep the flavors rich. Add more beans for extra protein and fiber. The toppings are where you can get creative. You can add your favorite ingredients. Try using pico de gallo, jalapeños, or diced green onions. For a crunch, add tortilla strips or crushed chips. The more color, the better! This makes your burrito bowl fun and inviting. If you want to switch up proteins, there are great options. Grilled shrimp or beef can replace chicken. You can also use pulled pork for a tasty twist. For a lighter choice, try blackened fish. Each option brings a new flavor to your bowl. Mix and match until you find your favorite! For the full recipe, check out the Spicy Chipotle Chicken Burrito Bowl! You can store your Chipotle chicken burrito bowl in the fridge. Place it in an airtight container. It will stay fresh for up to four days. Make sure it cools down before sealing. If you store the components separately, they will last longer. You can freeze parts of your burrito bowl. Cooked chicken, rice, and beans freeze well. Use freezer-safe bags or containers. Label them with the date. They will last for about three months. When ready to eat, thaw in the fridge overnight. To reheat, use the microwave or stovetop. If using a microwave, place the bowl in for about 2-3 minutes. Stir halfway through. If using the stovetop, heat on low until warm. Add a splash of water if needed to keep it moist. Enjoy your flavorful meal again! For the full recipe, check out the spicy Chipotle chicken burrito bowl! To make Chipotle-style rice, start with jasmine rice. Cook it according to the package. After cooking, fluff the rice with a fork. Add lime juice and cilantro to the rice for flavor. This gives it a fresh taste. You can also add a pinch of salt for extra flavor. The lime and cilantro boost the taste, making it just like Chipotle. Yes, you can use brown rice. It has more fiber and nutrients. Brown rice takes longer to cook, so plan for that. The texture will be a bit chewier than jasmine rice. This swap keeps the dish healthy while adding a nutty flavor. Just remember to adjust cooking time for brown rice. Popular toppings include: - Sliced jalapeños - Shredded lettuce - Salsa or pico de gallo - Guacamole - Sour cream or Greek yogurt - Extra cheese - Chopped green onions These toppings add color and flavor to your bowl. You can mix and match to suit your taste. Get creative and try new combinations! To make this dish healthier, consider these tips: - Use brown rice instead of jasmine rice. - Add more veggies like bell peppers or spinach. - Use grilled chicken or tofu instead of fried proteins. - Skip the cheese or use a lighter version. - Serve with a smaller portion of rice. These changes keep the flavors while making your meal better for you. Enjoy your delicious, healthy burrito bowl! This article covered how to make a tasty burrito bowl. We explored the ingredients, including swaps for your diet. I shared steps to prepare chicken and cook jasmine rice. You learned tips to enhance flavor and present your dish well. I also discussed variations for dietary needs and storage advice. In conclusion, make this dish your own. Enjoy the process and get creative with flavors!](https://juliesdish.com/wp-content/uploads/2025/07/83140479-1c1f-4893-b468-d7b4186e6ef4.webp)
Craving a delicious Chipotle Chicken Burrito Bowl but unsure where to start? You’ve come to the right place! I’ll share
![- 2 cups mini pretzels - 1 cup chocolate chips (milk or dark) - 1/2 cup soft caramel candies, unwrapped - Sea salt for topping - 1/4 cup crushed nuts (like pecans or almonds) - Baking sheet - Parchment paper - Oven The key to making these Chocolate Caramel Pretzel Bites is in the ingredients. The mini pretzels give a nice crunch. They create a perfect base for this sweet treat. The chocolate chips can be milk or dark, depending on your taste. I often prefer dark chocolate for its rich flavor. The soft caramel candies are the star of this recipe. They melt beautifully when baked, creating a gooey layer on top of the pretzel. If you want to elevate the flavor, consider adding sea salt on top after baking. It gives a nice contrast to the sweet caramel and chocolate. You can also add crushed nuts for extra crunch. Pecans work great, but feel free to use any nuts you love. Make sure you have a baking sheet and parchment paper ready. The parchment paper helps with easy cleanup. Prepping your oven ahead of time is key too. Set it to 350°F (175°C) before you start. For the full recipe, check the top of the article. You’ll find everything you need to create this delicious snack. Enjoy making these bites! - Preheat your oven to 350°F (175°C). - Line a baking sheet with parchment paper for easy cleanup. - Spread the mini pretzels evenly on the baking sheet in a single layer. - Place a caramel candy on top of each pretzel. - Bake in the preheated oven for about 5-7 minutes. - Remove from oven and press a chocolate chip onto each caramel-covered pretzel. - Let them cool and sprinkle with sea salt. Making these Chocolate Caramel Pretzel Bites is fast and fun. First, you prepare your baking sheet. Make sure to line it with parchment paper. This step ensures easy cleanup later. Next, you assemble the bites. Spread the mini pretzels on the sheet. Give them enough space so they do not touch. Then, place a caramel candy on each pretzel. This will melt slightly in the oven. Now, it’s time to bake. Keep an eye on them. You want the caramel soft but not melted. After 5-7 minutes, take them out of the oven. Press a chocolate chip down onto each caramel. The heat will help the chocolate stick. Finally, let the bites cool for a few minutes. This step is important for the flavors to blend. After cooling, sprinkle some sea salt on top. This adds a nice salty kick to your sweet treat. For the full recipe, check [Full Recipe]. Enjoy your snack! To make the best Chocolate Caramel Pretzel Bites, watch the baking time closely. Bake until the caramel is soft but not melted. This gives you that perfect gooey center. After baking, let the pretzels cool completely before serving. This helps the chocolate set and makes them easier to eat. These bites shine as party snacks or sweet desserts. You can serve them on a colorful platter for your guests. For extra flavor, pair them with a sweet dip, like chocolate sauce or caramel sauce. It adds a fun twist and makes them even more delicious. Want to switch things up? Use dark chocolate for a richer flavor. It pairs well with the sweet caramel. If you want a different taste, swap the pretzels for crackers. This change gives you a new texture and taste while still being yummy. You can find the full recipe for these tasty bites in the earlier section. {{image_2}} You can easily add nuts to your pretzel bites. This gives them a nice crunch. I love using pecans or almonds. Just crush them into small pieces. After the chocolate melts, sprinkle the nuts on top. This adds flavor and texture. It also makes each bite more exciting. Try new flavors for different seasons. For fall, add pumpkin spice to your bites. Mix a bit of pumpkin pie spice into the chocolate. For winter, use peppermint extract. Drizzle melted white chocolate over the bites and add crushed candy canes. These flavors keep your treats fresh and fun all year. You don’t have to stick to just one type of chocolate. White chocolate is a great choice if you want a sweeter taste. You can also find flavored chocolates, like raspberry or caramel. These will change the flavor of your bites and make them unique. Experiment with different types to find your favorite. For the full recipe, check back to the beginning! To keep your chocolate caramel pretzel bites fresh, store them in an airtight container. This keeps them crispy and tasty. A cool, dry place works best. Avoid direct sunlight to prevent melting. If you want to save some bites for later, freezing is a great option. First, layer them in a single row on a baking sheet. Freeze for about an hour until firm. Then, transfer them to an airtight freezer bag. This helps keep their flavor and texture intact. These bites can stay fresh for about one week at room temperature. If frozen, they can last up to three months. Just make sure to thaw them in the fridge before serving. Enjoy these treats at their best quality! To make Chocolate Caramel Pretzel Bites, follow these simple steps: 1. Preheat your oven to 350°F (175°C). 2. Line a baking sheet with parchment paper. 3. Spread mini pretzels on the sheet in a single layer. 4. Place a soft caramel candy on each pretzel. 5. Bake for about 5-7 minutes until the caramel is soft. 6. Remove the sheet and press a chocolate chip onto each caramel. 7. Cool for a few minutes and sprinkle with sea salt. This process creates a delightful balance of salty and sweet. Yes, you can use various types of chocolate for these bites. Milk chocolate is sweet and creamy. Dark chocolate adds a rich flavor. You can even use white chocolate for a different twist. Each option will change the taste but keep it delicious. Yes, you can make Chocolate Caramel Pretzel Bites gluten-free. Look for gluten-free pretzels at your store. Many brands offer tasty options that fit this need. Just check the label to ensure they meet your dietary needs. To prepare Chocolate Caramel Pretzel Bites ahead of time, follow these tips: - Assemble the bites and store them in an airtight container before baking. - You can also bake them and let them cool completely before storing. - Keep them in the fridge for up to a week or freeze for longer storage. This way, you can enjoy them anytime! For the full recipe, check back to ensure you have all the details. These Chocolate Caramel Pretzel Bites are easy and fun to make. We covered essential and optional ingredients, plus kitchen tools needed. You learned step-by-step how to bake them perfectly. Tips help ensure a great texture and taste. You can also try different flavors and store them for later. Enjoy these tasty treats at parties or just for fun. Get creative with flavors and share them with friends! Happy baking!](https://juliesdish.com/wp-content/uploads/2025/07/00e4edc0-e9f9-485a-8671-233174bf02b1.webp)
If you’re looking for a sweet and salty snack, you need these Chocolate Caramel Pretzel Bites in your life. They

Looking for a warm and tasty meal that’s simple to make? Cheesy Broccoli Rice Casserole checks all the boxes! Packed
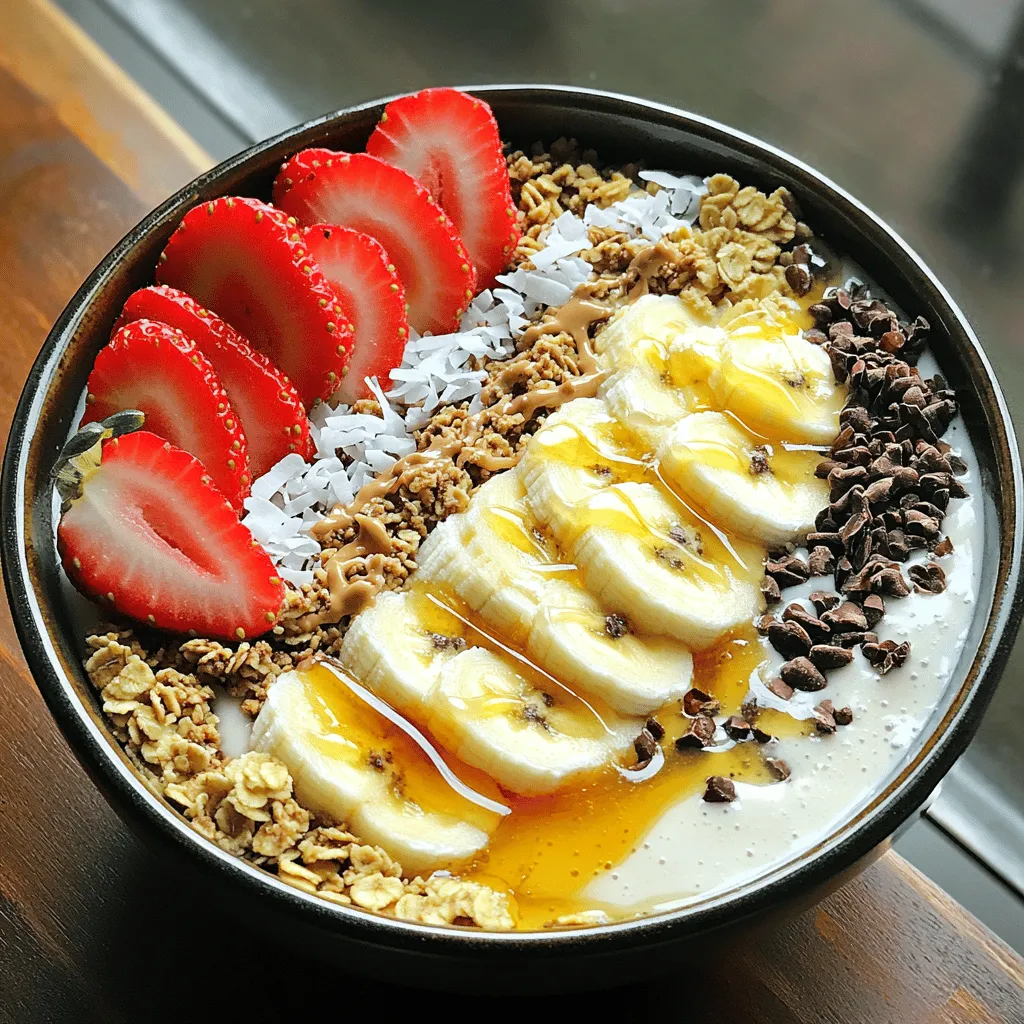
Are you ready to create a tasty, healthy treat that’s quick and easy? This Peanut Butter Banana Smoothie Bowl combines
. Enjoy cooking this easy and healthy meal! 1. Preheat the oven and prepare the baking tray Set your oven to 400°F (200°C). This high heat helps cook the salmon and veggies quickly. Line your baking tray with parchment paper for easy cleanup. 2. Create the herb marinade In a small bowl, mix together 4 cloves of minced garlic, 3 tablespoons of olive oil, the zest and juice of 1 lemon, 1 tablespoon of fresh chopped rosemary, and 1 tablespoon of fresh chopped thyme. This blend packs a lot of flavor. 3. Arrange salmon and vegetables on the sheet pan On your prepared baking tray, place 4 salmon fillets in the center. Surround the salmon with 2 cups of halved cherry tomatoes, 1 cup of broccoli florets, 1 cup of sliced zucchini, and 1 sliced red bell pepper. This mix creates a colorful and tasty meal. 1. Drizzle marinade and season Pour the herb marinade over the salmon and veggies. Make sure everything gets a nice coat. Then, season with salt and pepper to your liking. 2. Baking time and temperature Bake your sheet pan meal in the preheated oven for 15-20 minutes. This time allows the salmon to cook through and the veggies to become tender. 3. Checking for doneness and serving To check if the salmon is done, use a fork. It should flake easily. Once cooked, remove the tray from the oven. Let it rest for a few minutes before serving. Enjoy this delightful dish directly from the pan, or plate it up for a fancy touch. For extra brightness, serve with a lemon wedge on the side. For the full recipe, see the detailed instructions above. To achieve the perfect salmon texture, use fresh fillets. Look for bright color and firm flesh. When cooking, don’t overbake. Salmon should flake easily but remain moist. Ensure your vegetables cook evenly by cutting them into similar sizes. This helps them roast at the same rate. For a nice char, place denser veggies like broccoli and bell pepper further from the heat source. Serve this dish directly from the sheet pan for a cozy, rustic look. For a more polished presentation, transfer the salmon and veggies to individual plates. Add a lemon wedge on the side to brighten the dish. To elevate flavor and aesthetics, sprinkle chopped herbs like parsley or dill on top. A drizzle of balsamic glaze can also add a touch of sweetness and shine. For the full recipe, refer to the earlier sections. {{image_2}} You can mix and match different vegetables in this dish. Seasonal veggies work well. Try asparagus in spring or butternut squash in fall. Other great options include: - Carrots, sliced - Green beans - Cauliflower florets Adjusting cook time is key for different veggies. Softer vegetables, like zucchini, may need less time. Harder ones, like carrots, may need a bit more. Keep an eye on them as they cook. Aim for tender but not mushy. Changing the herbs can give this dish new flavors. If you love dill, use it instead of rosemary. Basil also adds a nice touch. Here are some ideas: - Oregano for a Mediterranean twist - Cilantro for a fresh bite You can create different marinades too. Mix olive oil with lemon juice and your herb of choice. Experiment with spices like paprika or cumin to add more depth. The options are endless! To keep your Garlic Herb Salmon & Veggies fresh, follow these steps. First, let the dish cool to room temperature. This helps avoid condensation in storage. Then, place the leftovers in airtight containers. Glass containers work well, as do BPA-free plastic ones. Label each container with the date. This helps you track freshness. Store the salmon and veggies in the fridge for up to three days. If you want to keep them longer, freeze them. For freezing, use freezer-safe bags or containers. Remove as much air as possible to prevent freezer burn. You can store them for up to three months in the freezer. When it's time to enjoy your leftovers, reheating is key. For best results, use an oven. Preheat it to 350°F (175°C). Place the salmon and veggies on a baking sheet. Cover them loosely with foil. This helps keep moisture in while they warm up. Heat for about 10-15 minutes or until warmed through. You can also use the microwave. Place the food in a microwave-safe dish. Cover it with a lid or a damp paper towel to keep moisture. Heat in short bursts of 30 seconds, stirring in between. Make sure the salmon reaches an internal temperature of 145°F (63°C) for food safety. Enjoy your meal without worry! Can I use frozen salmon? Yes, you can use frozen salmon. Just thaw it in the fridge overnight. If you are short on time, you can also run it under cold water for quicker thawing. After thawing, pat it dry before cooking for the best results. This helps the salmon cook evenly. How to know when the salmon is cooked? The salmon is cooked when it flakes easily with a fork. You can also check the internal temperature. It should reach 145°F (63°C). If you do not have a thermometer, look for a bright pink color that lightens as it cooks. What sides pair well with this dish? This dish pairs well with many sides. Try serving it with a fresh green salad, rice, or quinoa. You can also add a light sauce or a squeeze of lemon for extra flavor. These sides complement the salmon and veggies nicely. How to make this recipe with less oil? To use less oil, look for a light spray or brush it on the salmon and veggies. You can also substitute oil with a splash of broth or lemon juice. This will keep the meal fresh while reducing fat. Tips for making a larger batch for meal prep? To make a larger batch, simply double the ingredients. Use a larger sheet pan or two pans if needed. Just make sure to space out the salmon and veggies. This ensures even cooking. You can store leftovers in airtight containers for easy meals later. This blog post explored making a delicious salmon and vegetable dish. You learned about the key ingredients like salmon fillets, fresh veggies, and different herbs. I provided simple steps to prepare, cook, and serve the meal, along with tips for texture and presentation. To wrap it up, try using seasonal veggies and adjust flavors with various herbs. Store your leftovers well and reheat them safely. Enjoy this healthy meal as a repeat in your kitchen!](https://juliesdish.com/wp-content/uploads/2025/07/32364562-e7d1-4f64-8a58-3c9c2930d939.webp)
If you love quick, healthy meals, you will enjoy my Garlic Herb Salmon & Veggies Sheet Pan Delight. This recipe
![For this salad, use 4 cups of fresh kale. Choose kale that looks bright and crisp. Remove the tough stems and chop the leaves into bite-sized pieces. Kale adds a nice crunch and a lot of nutrients. You need 1 can of chickpeas. Drain and rinse them well. For a tasty crunch, toss the chickpeas with: - 2 tablespoons olive oil - 1 teaspoon garlic powder - ½ teaspoon smoked paprika - Salt and pepper to taste These seasonings give the chickpeas a lovely flavor and make them crispy when baked. The dressing is key for this salad. You'll need: - 2 tablespoons lemon juice - 1 tablespoon Dijon mustard - 1 teaspoon Worcestershire sauce (use a vegan version if you like) - 2 tablespoons tahini Mix these ingredients to create a creamy dressing. If it feels too thick, add a teaspoon of water to thin it out. This dressing adds zing and creaminess to the salad. For the full recipe, check out the details on how to prepare this delightful dish! Start by preheating your oven to 400°F (200°C). Grab a can of chickpeas and drain it well. Rinse them under cold water to remove the canning liquid. This helps with the flavor. In a bowl, mix the chickpeas with olive oil, garlic powder, smoked paprika, salt, and pepper. Make sure they are well coated. Spread them out on a baking sheet in a single layer. Bake for 20 to 25 minutes until they are golden brown and crispy. Remember to shake the pan halfway through to cook them evenly. While the chickpeas bake, let’s whip up the Caesar dressing. In a small bowl, combine lemon juice, Dijon mustard, Worcestershire sauce, and tahini. Use a whisk to mix them until smooth. If the dressing is too thick, add a teaspoon of water. This will help you get the right consistency. Taste it and adjust the flavor as needed. Now for the fun part! In a large bowl, add the chopped kale. Drizzle in half of the dressing. Use your hands to massage the kale for about 2 minutes. This softens the leaves and enhances the flavor. Once the kale is ready, add the crispy chickpeas, grated Parmesan cheese, and croutons. Drizzle the rest of the dressing on top. Toss everything gently until well combined. For a finishing touch, garnish with fresh chopped parsley. Enjoy your Kale Caesar Salad with Crispy Chickpeas! For the full recipe, check out the details above. To make your chickpeas crispy, start with a clean can of chickpeas. Drain and rinse them well. This step removes extra starch. Pat them dry with a towel. Moisture is the enemy of crispness. Toss chickpeas with olive oil and spices. Make sure they are well-coated. Spread them on a baking sheet in a single layer. This helps them cook evenly. Bake at 400°F (200°C) for 20-25 minutes. Shake the pan halfway through to ensure even cooking. Kale can be tough, but massaging it makes a big difference. After chopping your kale, place it in a large bowl. Drizzle half of your dressing over the leaves. Use your hands to gently squeeze and rub the kale. Do this for about two minutes. The leaves will soften and wilt, which makes them easier to eat. This step also helps the flavors soak in better. The dressing should be creamy but not too thick. If it is too thick, add a teaspoon of water to thin it out. Taste the dressing before serving. Adjust flavors by adding more lemon juice or mustard if needed. For an extra kick, add a dash of hot sauce. You can also mix in some fresh herbs like basil or dill for added flavor. For the complete recipe, check out the Full Recipe section. {{image_2}} You can easily make this salad vegan. Instead of Parmesan cheese, use nutritional yeast. It adds a cheesy flavor without dairy. For the dressing, replace the Worcestershire sauce with a vegan version. This keeps all the delicious taste while sticking to plant-based ingredients. Want more protein? You can add grilled chicken or shrimp for a tasty boost. If you prefer plant-based protein, try adding some quinoa or tofu. Both options mix well with the flavors of the salad. They keep you full and satisfied. Spice up your salad with new flavors. Try adding chopped sun-dried tomatoes or olives for a salty kick. You can also mix in some roasted red peppers for a sweet twist. If you like heat, a dash of red pepper flakes can add some zing. Experimenting with these ingredients will make each salad unique. You can follow the Full Recipe to keep it simple while exploring these new ideas. You can store leftover salad in an airtight container. This keeps it fresh for 1-2 days. However, the crispy chickpeas may lose their crunch. To keep the salad tasty, try to eat it soon after making it. To store crispy chickpeas, let them cool completely. Place them in a sealed container at room temperature. They stay crunchy for up to 3 days. Avoid putting them in the fridge, as moisture can make them soft. For the dressing, store it in a jar with a lid. It can last up to a week in the fridge. If it thickens, whisk in a bit of water to loosen it up. This helps maintain a smooth texture for your next salad. Check out the Full Recipe for more tips! To make chickpeas crispy, start with dried chickpeas. If using canned, rinse and drain them well. Then, dry them on a towel. Toss the chickpeas with olive oil, garlic powder, smoked paprika, salt, and pepper. Spread them on a baking sheet. Bake at 400°F (200°C) for 20-25 minutes. Shake the pan halfway through for even cooking. This method gives you crunchy, flavorful chickpeas. Yes, you can use other greens. Spinach, romaine, or arugula work well. Each green has a unique taste and texture. For a lighter salad, try using spinach. Romaine adds a nice crunch, while arugula gives a peppery kick. Just remember to adjust the dressing amount if you change the greens. If the dressing is too thick, add water a teaspoon at a time. Whisk it well after each addition. This helps reach your desired consistency. You can also use a bit of extra lemon juice for added flavor. Make sure the dressing coats the kale nicely for the best taste. For the full recipe, check out the [Full Recipe]. This blog post explored how to make a delicious kale salad. We covered fresh ingredients like kale and chickpeas, the right seasonings, and creamy dressing. I shared step-by-step instructions for preparing crispy chickpeas and mixing everything together. You learned helpful tips for the best results and storage advice to keep your salad fresh. Finally, we discussed fun variations to change up flavors and protein options. Now, you have the tools to create a healthy, tasty dish. Enjoy the process and make it your own!](https://juliesdish.com/wp-content/uploads/2025/07/a06e67a9-1227-4868-b90c-daa272cf6ae2.webp)
Are you ready to elevate your salad game? My Kale Caesar Salad with Crispy Chickpeas is a fresh twist on

Are you ready to whip up a delicious meal in no time? This Instant Pot Butter Chicken recipe is both
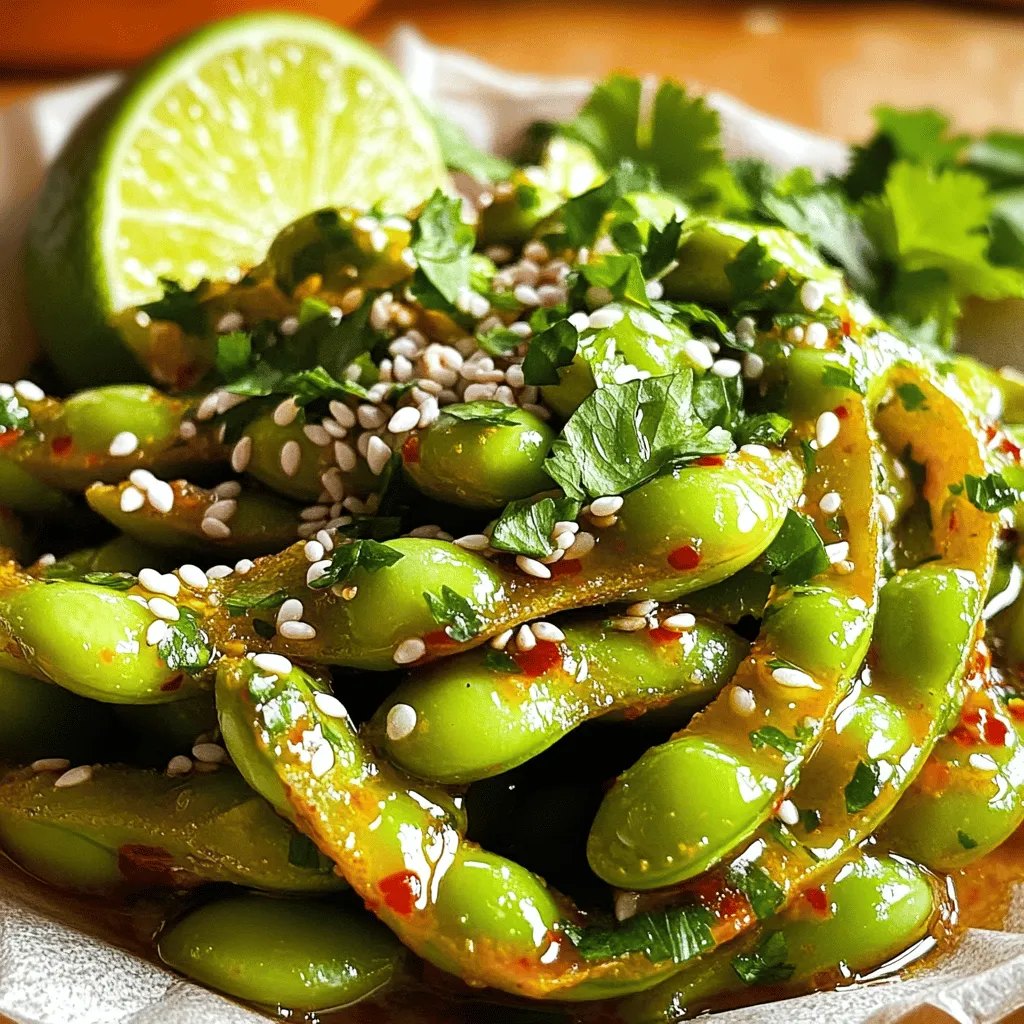
If you’re looking for a snack that packs a punch, Spicy Garlic Edamame is the answer. This easy dish combines
