Transform your dinner routine with my Savory Spinach Artichoke Stuffed Spaghetti Squash! This dish combines creamy spinach artichoke filling with healthy spaghetti squash, making it a perfect choice for anyone aiming for a healthier meal. Follow my easy steps and get inspired by variations that fit your diet needs. Whether you’re a seasoned cook or a beginner, you’ll impress everyone with this delightful dish. Ready to dive in? Let’s get cooking!
Ingredients
Complete Ingredient List
– 1 medium spaghetti squash
– 2 cups fresh spinach, chopped
– 1 cup canned artichoke hearts, drained and chopped
– 1 cup cream cheese, softened
– 1/2 cup Greek yogurt
– 1 cup shredded mozzarella cheese, divided
– 1/4 cup grated Parmesan cheese
– 2 cloves garlic, minced
– 1 teaspoon onion powder
– 1/2 teaspoon salt
– 1/4 teaspoon black pepper
– 1/4 teaspoon red pepper flakes (optional for a kick)
– Fresh parsley for garnish
Notes on Ingredient Types
Using fresh ingredients makes a big difference in flavor. Fresh spinach brings brightness, while canned artichokes offer convenience. Cream cheese gives the filling its creamy texture. Greek yogurt adds tang and cuts some fat. I recommend whole milk mozzarella for the best melt. Parmesan adds a savory depth, so don’t skip it. Use fresh garlic for a stronger taste, or dried if that’s all you have.
Possible Ingredient Substitutions
You can swap cream cheese with ricotta for a lighter texture. If you need a dairy-free option, use cashew cream or a vegan cream cheese. For a lighter spin, replace Greek yogurt with a dairy-free yogurt. If you don’t have spinach, kale works too. No artichokes? Try sun-dried tomatoes instead. You can mix in other cheeses like cheddar or feta for different flavors.
Step-by-Step Instructions
Preparation Steps
Start by preheating your oven to 400°F (200°C). Grab a medium spaghetti squash and slice it in half lengthwise. Use a spoon to scoop out the seeds. Drizzle the inside with olive oil. Sprinkle a little salt and pepper for flavor. Place the squash halves cut-side down on a baking sheet. Roast them in the oven for 30 to 40 minutes. You want the flesh to be tender enough to shred with a fork.
Cooking Process
While the squash roasts, you can make the filling. In a large mixing bowl, combine the softened cream cheese and Greek yogurt. Add in half a cup of shredded mozzarella cheese and the grated Parmesan. Toss in minced garlic, onion powder, salt, black pepper, and red pepper flakes for some heat. Mix everything until it’s smooth. Then, fold in the chopped spinach and artichoke hearts. This mixture should be creamy and packed with flavor.
Once the squash is ready, take it out of the oven. Let it cool for a few minutes. Use a fork to scrape the flesh into spaghetti-like strands. Place these strands into a separate bowl. Now, mix the spaghetti squash with the spinach-artichoke filling. Stir to combine everything well.
Final Touches and Serving Suggestions
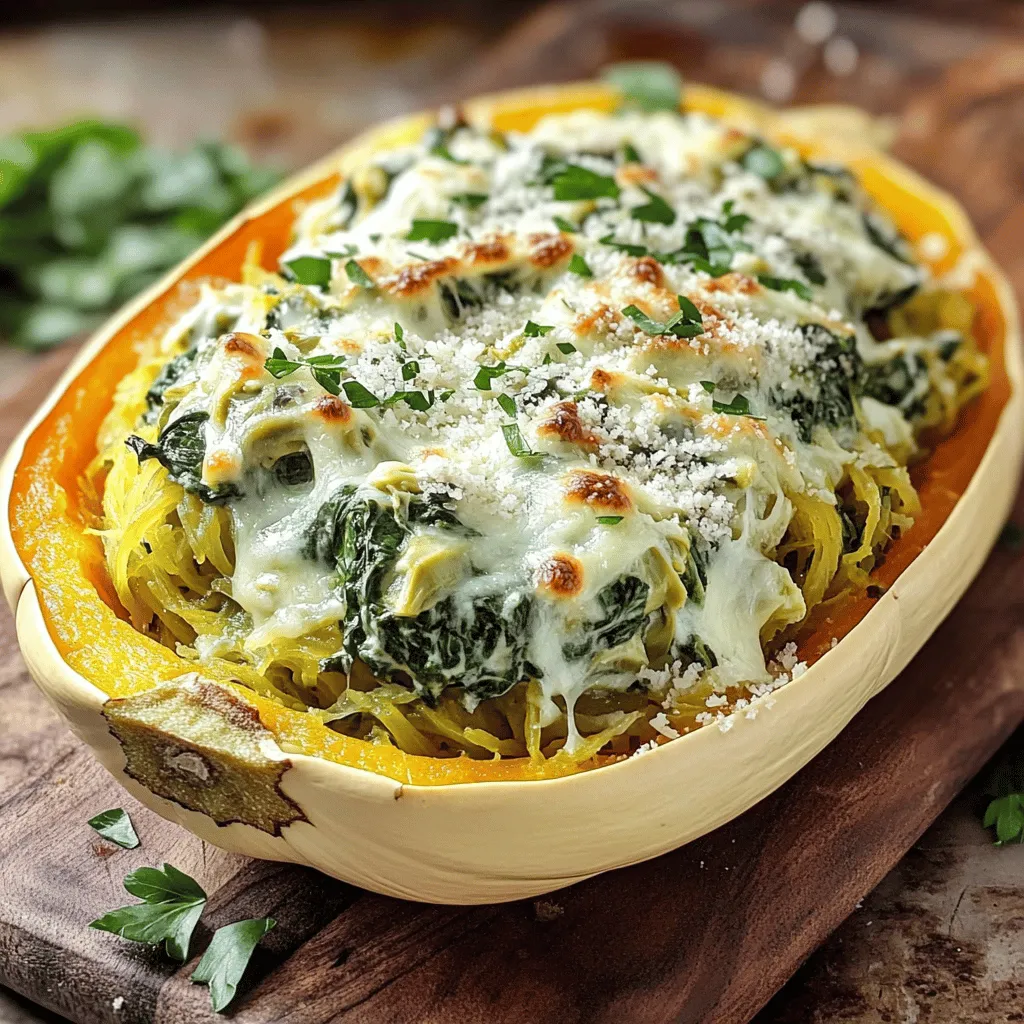
Spoon the filling back into each hollowed squash half. Make sure to divide the mixture evenly. Sprinkle the remaining mozzarella cheese on top of each half. Return the stuffed squash to the oven for another 15 minutes. You want the cheese to melt and bubble. Once it’s done, take it out and let it cool slightly. Garnish your dish with fresh parsley for a pop of color. Serve the stuffed squash on a rustic wooden board. Drizzle some extra olive oil over the top and sprinkle more Parmesan cheese if you like. Enjoy your healthy and hearty meal!
Tips & Tricks
Tips for Perfectly Roasting Spaghetti Squash
To roast spaghetti squash, start by preheating your oven to 400°F (200°C). This high heat helps the squash cook evenly. Slice the squash in half lengthwise. Scoop out the seeds to prepare it for roasting. Drizzle some olive oil on the inside. Sprinkle salt and pepper for extra flavor. Place the squash cut-side down on a baking sheet. Roast for 30-40 minutes until the flesh is tender. A fork should easily shred the flesh into strands.
Storage and Reheating Tips
If you have leftovers, store them in an airtight container. They can stay in the fridge for up to four days. To reheat, use the oven for best results. Preheat it to 350°F (175°C) and bake for about 15-20 minutes. You can also microwave the stuffed squash. Just cover it with a damp paper towel and heat for a few minutes. This will keep it moist and tasty.
Common Mistakes to Avoid
One common mistake is not cutting the squash properly. Always slice it lengthwise for even cooking. Another issue is overcooking it. Check for tenderness at the 30-minute mark. Adding too much seasoning can overpower the dish. Be careful with salt and spices. Lastly, avoid rushing the mixing of the filling. Ensure all ingredients blend well for a creamy texture.
Variations
Vegan Adaptation
To make this dish vegan, swap the cream cheese and Greek yogurt for cashew cream. Blend soaked cashews with lemon juice and garlic for a creamy texture. Use vegan cheese in place of mozzarella and Parmesan. This keeps the flavors rich and satisfying without dairy.
Gluten-Free Options
This recipe is naturally gluten-free. The spaghetti squash acts as the base, making it safe for those with gluten sensitivities. Always check the labels on your cheese and yogurt to ensure they are gluten-free, as some brands may contain gluten.
Additional Fillings and Toppings
Feel free to get creative with your fillings. You can add cooked mushrooms for an earthy flavor or sun-dried tomatoes for a touch of sweetness. Top with fresh basil, sliced olives, or even a drizzle of balsamic reduction for extra flair. These options add layers of flavor and texture to each bite.
Storage Info
How to Store Leftovers
To store your leftovers, let the stuffed spaghetti squash cool down. Then, place it in an airtight container. Make sure to cover it tightly to keep it fresh. Store it in the fridge for up to three days. When you’re ready to enjoy it again, simply reheat it in the oven or microwave.
Freezing Instructions
You can freeze the stuffed spaghetti squash if you want to save some for later. First, let it cool completely. Then, wrap each half in plastic wrap or aluminum foil. Place the wrapped squash in a freezer-safe bag. It will stay good for about three months. When you want to eat it, thaw it in the fridge overnight before reheating.
Shelf Life of Prepared Dish
The prepared dish can last in the fridge for three days. If frozen, it can last up to three months. After that, its taste and texture may change. Always check for any signs of spoilage before eating. If it smells bad or looks off, it’s best to throw it away. Enjoy your healthy meal while it’s still fresh!
FAQs
What can I substitute for cream cheese?
You can use Greek yogurt as a great substitute for cream cheese. It adds creaminess but has a lighter flavor. Another option is cottage cheese, which gives a nice texture. If you want dairy-free choices, use cashew cream or vegan cream cheese. These alternatives keep your dish rich and tasty.
Can I prepare this dish in advance?
Yes, you can prepare this dish ahead of time. Make the filling and stuff the squash, then cover it and store it in the fridge. Just remember to bake it the next day. This saves time and makes for an easy meal. You can even roast the squash a day ahead. Just keep it in an airtight container.
How do I know when the spaghetti squash is done?
Check the squash after 30-40 minutes in the oven. The flesh should be soft and easily scraped with a fork. If it feels firm, leave it in the oven for a few more minutes. When done, it should look like spaghetti strands. This means it is ready for stuffing.
This blog post covered the essential ingredients, instructions, and tips for preparing spaghetti squash. You learned how to choose and substitute ingredients, roast the squash perfectly, and avoid common mistakes. We also explored vegan options and storage tips. Remember to be creative with your dish! With these steps, you can enjoy a tasty meal. Happy cooking!