![- Chicken thighs: I love using chicken thighs for this dish. They stay juicy and tender. Their rich flavor pairs well with the garlic and butter, making each bite delightful. - Garlic and butter: These ingredients are the stars of this recipe. Garlic gives a strong and tasty punch. Butter adds creaminess and depth to the sauce. Together, they create a beautiful base for the chicken. - Optional ingredients: You can add a few extras for more flavor. Try fresh herbs like thyme or rosemary. Cherry tomatoes bring sweetness, while spinach adds a nice green touch. A squeeze of lemon brightens the dish, making it even tastier. - Recommended cookware: A large skillet works best for this recipe. Choose one that heats evenly. This way, you get a nice sear on the chicken. - Measuring tools: Use measuring spoons for precise amounts. This helps ensure the flavors balance perfectly. A meat thermometer can also be handy to check if the chicken is cooked through. For the complete recipe, check out the Full Recipe. To make One Pan Garlic Butter Chicken, start by prepping your chicken and veggies. First, take 4 boneless, skinless chicken thighs. Pat them dry with paper towels. This helps the seasoning stick well. Now, season the chicken. Use salt, pepper, dried thyme, and smoked paprika. Rub this mixture over both sides of the chicken. The spices will add great flavor. For the veggies, wash 1 cup of cherry tomatoes and slice them in half. Rinse 1 cup of fresh spinach. Having everything ready makes cooking easier and faster. Now let's cook! First, heat a large skillet over medium-high heat. Add 2 tablespoons of unsalted butter. Once it melts, place the seasoned chicken in the skillet. Sear the chicken for 5-7 minutes on each side. You want it golden brown and cooked through. After cooking, remove the chicken and set it aside. In the same skillet, add the remaining 2 tablespoons of butter and 8 minced garlic cloves. Sauté for about 1 minute. The garlic should smell amazing. Next, add the halved cherry tomatoes and spinach to the skillet. Cook for 2-3 minutes. You want the tomatoes to soften and the spinach to wilt. Finally, return the chicken to the skillet. Squeeze juice from 1 lemon over everything. Simmer for another 2 minutes. This brings all the flavors together. To finish, taste the dish and adjust the seasoning if needed. Add more salt or pepper to your liking. Now it's time to serve. Use a large plate or a serving dish. Place the chicken in the center and pour the veggies around it. Garnish with chopped fresh parsley. This adds a nice pop of color. Your One Pan Garlic Butter Chicken is ready to enjoy! Check the Full Recipe for all the details. To get the best sear on chicken, start with a hot pan. Heat your skillet on medium-high before adding the butter. This helps the chicken brown nicely. Pat the chicken thighs dry with paper towels. This step removes extra moisture and helps with searing. Season both sides well with salt, pepper, thyme, and smoked paprika. Cook for 5-7 minutes per side. The skin should be golden brown when done. If you use different chicken cuts, adjust your cooking time. Chicken breasts cook faster than thighs. For breasts, aim for about 4-6 minutes per side. Use a meat thermometer to check for doneness. Chicken should reach 165°F (75°C). This ensures it's safe to eat but still juicy. To boost flavor, consider adding more spices or herbs. Try rosemary or oregano for a fresh twist. A pinch of red pepper flakes can add heat. Mix in fresh basil for a fragrant kick too. You can also add a splash of white wine to the skillet. This adds depth and richness to the sauce. Adjusting acidity and sweetness can elevate your dish. Squeeze more lemon juice for extra brightness. If you prefer sweetness, drizzle honey or maple syrup. This balance makes your dish more complex and enjoyable. Check your flavors as you go. Taste often and adjust to your liking. For more ideas, check out the Full Recipe for One Pan Garlic Butter Chicken. {{image_2}} You can easily adapt this dish for different diets. If you need gluten-free options, use gluten-free soy sauce or tamari in place of regular soy sauce. This will keep the flavor while meeting your needs. For dairy-free requirements, swap out the butter for olive oil or a dairy-free butter alternative. These changes still give you a rich taste without the dairy. If you prefer a plant-based diet, you can substitute the chicken with firm tofu or tempeh. Cut them into slices and follow the same cooking method. They will soak up the garlic and butter flavors well. You can also use chickpeas for a protein-packed option that adds great texture. To switch up the flavor, try different herbs and spices. Fresh herbs like basil or oregano can add a unique taste. You can also use dried herbs, such as rosemary or dill, to change the profile. If you want to add a bit of heat, consider red pepper flakes or diced jalapeños. For a twist, include some lemon zest along with the juice. This will brighten the dish and give it a fresh kick. You can also toss in some olives or capers for a briny burst of flavor. Each of these options creates a different experience while keeping the dish simple and delicious. For the full recipe, check out [Full Recipe]. To keep your One Pan Garlic Butter Chicken fresh, use airtight containers. This keeps moisture in and air out. You can store it in the refrigerator for up to three days. For longer storage, freeze it. Place it in freezer-safe bags or containers. Be sure to squeeze out excess air. This way, it can last for about three months. Label your bags so you know when to use them. When reheating, I recommend using the stove or the oven. These methods help keep the chicken juicy. For the stove, heat a skillet over low heat. Add a splash of chicken broth or water to prevent drying. Cover it with a lid to trap steam. For the oven, set it to 350°F (175°C). Place the chicken in an oven-safe dish and cover it with foil. Heat for about 15-20 minutes. This keeps the chicken tender and flavorful. Avoid the microwave if you can, as it can make the chicken rubbery. How can I make One Pan Garlic Butter Chicken ahead of time? You can prepare this dish ahead of time. Cook the chicken and veggies, then cool them. Store them in an airtight container in the fridge for up to three days. When you are ready to eat, reheat in a skillet over medium heat. Add a splash of chicken broth to keep it moist. Can I use chicken breasts instead of thighs for this recipe? Yes, you can use chicken breasts. They will cook faster than thighs. Make sure to check the internal temperature. It should reach 165°F for safe eating. Adjust the cooking time to avoid overcooking. What can I serve with One Pan Garlic Butter Chicken? This dish pairs well with rice or quinoa. You can also serve it with a fresh salad. Garlic bread is a great option too. These sides will soak up the tasty butter sauce. What to do if the chicken is overcooked? If your chicken is overcooked, try slicing it thinly. Serve it in a sauce or with a side of broth. This can help add moisture back to the meat. How to fix an overly salty dish? To fix an overly salty dish, add a few slices of raw potato and let them cook for a few minutes. They can absorb some of the salt. You can also add more veggies or a splash of cream to balance the flavors. In this blog post, we explored the key ingredients and tools for making One Pan Garlic Butter Chicken. I shared preparation steps and cooking techniques to ensure perfect results. You also learned helpful tips for flavor and variations to suit dietary needs. Finally, we discussed storing leftovers and reheating methods. This dish brings comfort and flavor to your table. With these tips, you can cook with confidence. Enjoy delicious meals and impress your family with your skills!](https://juliesdish.com/wp-content/uploads/2025/06/76dd704c-d34f-497d-836b-8788f4c0765d-768x768.webp)
Looking for a quick and tasty meal? One Pan Garlic Butter Chicken is your answer! This easy recipe combines juicy chicken thighs with rich garlic and buttery flavor. In just one pan, you’ll create a dish that impresses everyone at your table. I’ll guide you through every step, from choosing the right ingredients to perfecting the cooking process. Ready to make a meal that’s full of flavor and simple to prepare? Let’s dive in!
Ingredients
Essential Ingredients
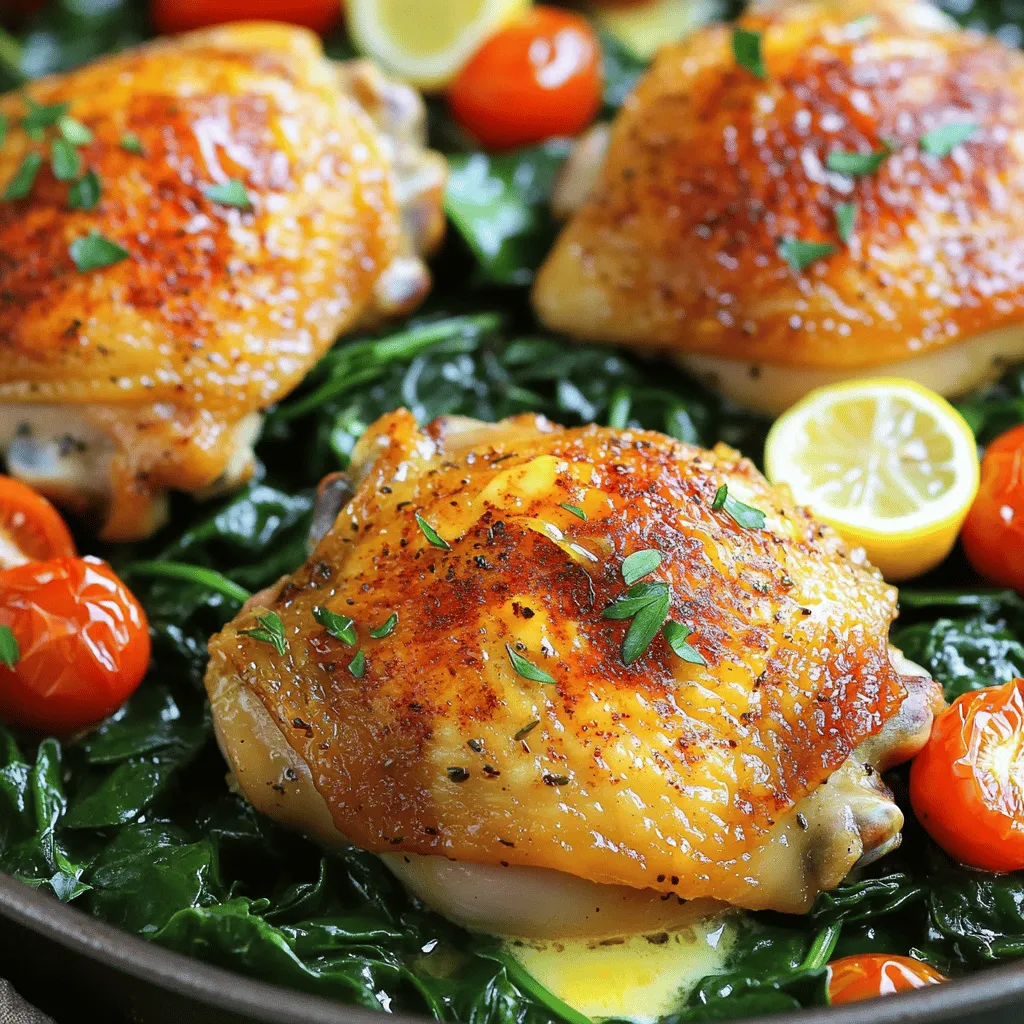
– Chicken thighs: I love using chicken thighs for this dish. They stay juicy and tender. Their rich flavor pairs well with the garlic and butter, making each bite delightful.
– Garlic and butter: These ingredients are the stars of this recipe. Garlic gives a strong and tasty punch. Butter adds creaminess and depth to the sauce. Together, they create a beautiful base for the chicken.
– Optional ingredients: You can add a few extras for more flavor. Try fresh herbs like thyme or rosemary. Cherry tomatoes bring sweetness, while spinach adds a nice green touch. A squeeze of lemon brightens the dish, making it even tastier.
Tools Needed
– Recommended cookware: A large skillet works best for this recipe. Choose one that heats evenly. This way, you get a nice sear on the chicken.
– Measuring tools: Use measuring spoons for precise amounts. This helps ensure the flavors balance perfectly. A meat thermometer can also be handy to check if the chicken is cooked through.
Step-by-Step Instructions
Preparation Steps
To make One Pan Garlic Butter Chicken, start by prepping your chicken and veggies. First, take 4 boneless, skinless chicken thighs. Pat them dry with paper towels. This helps the seasoning stick well.
Now, season the chicken. Use salt, pepper, dried thyme, and smoked paprika. Rub this mixture over both sides of the chicken. The spices will add great flavor.
For the veggies, wash 1 cup of cherry tomatoes and slice them in half. Rinse 1 cup of fresh spinach. Having everything ready makes cooking easier and faster.
Cooking Process
Now let’s cook! First, heat a large skillet over medium-high heat. Add 2 tablespoons of unsalted butter. Once it melts, place the seasoned chicken in the skillet.
Sear the chicken for 5-7 minutes on each side. You want it golden brown and cooked through. After cooking, remove the chicken and set it aside.
In the same skillet, add the remaining 2 tablespoons of butter and 8 minced garlic cloves. Sauté for about 1 minute. The garlic should smell amazing.
Next, add the halved cherry tomatoes and spinach to the skillet. Cook for 2-3 minutes. You want the tomatoes to soften and the spinach to wilt.
Finally, return the chicken to the skillet. Squeeze juice from 1 lemon over everything. Simmer for another 2 minutes. This brings all the flavors together.
Finalizing the Dish
To finish, taste the dish and adjust the seasoning if needed. Add more salt or pepper to your liking.
Now it’s time to serve. Use a large plate or a serving dish. Place the chicken in the center and pour the veggies around it.
Garnish with chopped fresh parsley. This adds a nice pop of color. Your One Pan Garlic Butter Chicken is ready to enjoy!
Tips & Tricks
Cooking Tips
To get the best sear on chicken, start with a hot pan. Heat your skillet on medium-high before adding the butter. This helps the chicken brown nicely. Pat the chicken thighs dry with paper towels. This step removes extra moisture and helps with searing. Season both sides well with salt, pepper, thyme, and smoked paprika. Cook for 5-7 minutes per side. The skin should be golden brown when done.
If you use different chicken cuts, adjust your cooking time. Chicken breasts cook faster than thighs. For breasts, aim for about 4-6 minutes per side. Use a meat thermometer to check for doneness. Chicken should reach 165°F (75°C). This ensures it’s safe to eat but still juicy.
Flavor Enhancements
To boost flavor, consider adding more spices or herbs. Try rosemary or oregano for a fresh twist. A pinch of red pepper flakes can add heat. Mix in fresh basil for a fragrant kick too. You can also add a splash of white wine to the skillet. This adds depth and richness to the sauce.
Adjusting acidity and sweetness can elevate your dish. Squeeze more lemon juice for extra brightness. If you prefer sweetness, drizzle honey or maple syrup. This balance makes your dish more complex and enjoyable. Check your flavors as you go. Taste often and adjust to your liking.
Variations
Substitutions for Dietary Needs
You can easily adapt this dish for different diets. If you need gluten-free options, use gluten-free soy sauce or tamari in place of regular soy sauce. This will keep the flavor while meeting your needs. For dairy-free requirements, swap out the butter for olive oil or a dairy-free butter alternative. These changes still give you a rich taste without the dairy.
If you prefer a plant-based diet, you can substitute the chicken with firm tofu or tempeh. Cut them into slices and follow the same cooking method. They will soak up the garlic and butter flavors well. You can also use chickpeas for a protein-packed option that adds great texture.
Flavor Profiles
To switch up the flavor, try different herbs and spices. Fresh herbs like basil or oregano can add a unique taste. You can also use dried herbs, such as rosemary or dill, to change the profile. If you want to add a bit of heat, consider red pepper flakes or diced jalapeños.
For a twist, include some lemon zest along with the juice. This will brighten the dish and give it a fresh kick. You can also toss in some olives or capers for a briny burst of flavor. Each of these options creates a different experience while keeping the dish simple and delicious.
Storage Info
Storing Leftovers
To keep your One Pan Garlic Butter Chicken fresh, use airtight containers. This keeps moisture in and air out. You can store it in the refrigerator for up to three days. For longer storage, freeze it. Place it in freezer-safe bags or containers. Be sure to squeeze out excess air. This way, it can last for about three months. Label your bags so you know when to use them.
Reheating Tips
When reheating, I recommend using the stove or the oven. These methods help keep the chicken juicy. For the stove, heat a skillet over low heat. Add a splash of chicken broth or water to prevent drying. Cover it with a lid to trap steam. For the oven, set it to 350°F (175°C). Place the chicken in an oven-safe dish and cover it with foil. Heat for about 15-20 minutes. This keeps the chicken tender and flavorful. Avoid the microwave if you can, as it can make the chicken rubbery.
FAQs
Common Questions
How can I make One Pan Garlic Butter Chicken ahead of time?
You can prepare this dish ahead of time. Cook the chicken and veggies, then cool them. Store them in an airtight container in the fridge for up to three days. When you are ready to eat, reheat in a skillet over medium heat. Add a splash of chicken broth to keep it moist.
Can I use chicken breasts instead of thighs for this recipe?
Yes, you can use chicken breasts. They will cook faster than thighs. Make sure to check the internal temperature. It should reach 165°F for safe eating. Adjust the cooking time to avoid overcooking.
What can I serve with One Pan Garlic Butter Chicken?
This dish pairs well with rice or quinoa. You can also serve it with a fresh salad. Garlic bread is a great option too. These sides will soak up the tasty butter sauce.
Troubleshooting
What to do if the chicken is overcooked?
If your chicken is overcooked, try slicing it thinly. Serve it in a sauce or with a side of broth. This can help add moisture back to the meat.
How to fix an overly salty dish?
To fix an overly salty dish, add a few slices of raw potato and let them cook for a few minutes. They can absorb some of the salt. You can also add more veggies or a splash of cream to balance the flavors.
In this blog post, we explored the key ingredients and tools for making One Pan Garlic Butter Chicken. I shared preparation steps and cooking techniques to ensure perfect results. You also learned helpful tips for flavor and variations to suit dietary needs. Finally, we discussed storing leftovers and reheating methods.
This dish brings comfort and flavor to your table. With these tips, you can cook with confidence. Enjoy delicious meals and impress your family with your skills!
![- Chicken thighs: I love using chicken thighs for this dish. They stay juicy and tender. Their rich flavor pairs well with the garlic and butter, making each bite delightful. - Garlic and butter: These ingredients are the stars of this recipe. Garlic gives a strong and tasty punch. Butter adds creaminess and depth to the sauce. Together, they create a beautiful base for the chicken. - Optional ingredients: You can add a few extras for more flavor. Try fresh herbs like thyme or rosemary. Cherry tomatoes bring sweetness, while spinach adds a nice green touch. A squeeze of lemon brightens the dish, making it even tastier. - Recommended cookware: A large skillet works best for this recipe. Choose one that heats evenly. This way, you get a nice sear on the chicken. - Measuring tools: Use measuring spoons for precise amounts. This helps ensure the flavors balance perfectly. A meat thermometer can also be handy to check if the chicken is cooked through. For the complete recipe, check out the Full Recipe. To make One Pan Garlic Butter Chicken, start by prepping your chicken and veggies. First, take 4 boneless, skinless chicken thighs. Pat them dry with paper towels. This helps the seasoning stick well. Now, season the chicken. Use salt, pepper, dried thyme, and smoked paprika. Rub this mixture over both sides of the chicken. The spices will add great flavor. For the veggies, wash 1 cup of cherry tomatoes and slice them in half. Rinse 1 cup of fresh spinach. Having everything ready makes cooking easier and faster. Now let's cook! First, heat a large skillet over medium-high heat. Add 2 tablespoons of unsalted butter. Once it melts, place the seasoned chicken in the skillet. Sear the chicken for 5-7 minutes on each side. You want it golden brown and cooked through. After cooking, remove the chicken and set it aside. In the same skillet, add the remaining 2 tablespoons of butter and 8 minced garlic cloves. Sauté for about 1 minute. The garlic should smell amazing. Next, add the halved cherry tomatoes and spinach to the skillet. Cook for 2-3 minutes. You want the tomatoes to soften and the spinach to wilt. Finally, return the chicken to the skillet. Squeeze juice from 1 lemon over everything. Simmer for another 2 minutes. This brings all the flavors together. To finish, taste the dish and adjust the seasoning if needed. Add more salt or pepper to your liking. Now it's time to serve. Use a large plate or a serving dish. Place the chicken in the center and pour the veggies around it. Garnish with chopped fresh parsley. This adds a nice pop of color. Your One Pan Garlic Butter Chicken is ready to enjoy! Check the Full Recipe for all the details. To get the best sear on chicken, start with a hot pan. Heat your skillet on medium-high before adding the butter. This helps the chicken brown nicely. Pat the chicken thighs dry with paper towels. This step removes extra moisture and helps with searing. Season both sides well with salt, pepper, thyme, and smoked paprika. Cook for 5-7 minutes per side. The skin should be golden brown when done. If you use different chicken cuts, adjust your cooking time. Chicken breasts cook faster than thighs. For breasts, aim for about 4-6 minutes per side. Use a meat thermometer to check for doneness. Chicken should reach 165°F (75°C). This ensures it's safe to eat but still juicy. To boost flavor, consider adding more spices or herbs. Try rosemary or oregano for a fresh twist. A pinch of red pepper flakes can add heat. Mix in fresh basil for a fragrant kick too. You can also add a splash of white wine to the skillet. This adds depth and richness to the sauce. Adjusting acidity and sweetness can elevate your dish. Squeeze more lemon juice for extra brightness. If you prefer sweetness, drizzle honey or maple syrup. This balance makes your dish more complex and enjoyable. Check your flavors as you go. Taste often and adjust to your liking. For more ideas, check out the Full Recipe for One Pan Garlic Butter Chicken. {{image_2}} You can easily adapt this dish for different diets. If you need gluten-free options, use gluten-free soy sauce or tamari in place of regular soy sauce. This will keep the flavor while meeting your needs. For dairy-free requirements, swap out the butter for olive oil or a dairy-free butter alternative. These changes still give you a rich taste without the dairy. If you prefer a plant-based diet, you can substitute the chicken with firm tofu or tempeh. Cut them into slices and follow the same cooking method. They will soak up the garlic and butter flavors well. You can also use chickpeas for a protein-packed option that adds great texture. To switch up the flavor, try different herbs and spices. Fresh herbs like basil or oregano can add a unique taste. You can also use dried herbs, such as rosemary or dill, to change the profile. If you want to add a bit of heat, consider red pepper flakes or diced jalapeños. For a twist, include some lemon zest along with the juice. This will brighten the dish and give it a fresh kick. You can also toss in some olives or capers for a briny burst of flavor. Each of these options creates a different experience while keeping the dish simple and delicious. For the full recipe, check out [Full Recipe]. To keep your One Pan Garlic Butter Chicken fresh, use airtight containers. This keeps moisture in and air out. You can store it in the refrigerator for up to three days. For longer storage, freeze it. Place it in freezer-safe bags or containers. Be sure to squeeze out excess air. This way, it can last for about three months. Label your bags so you know when to use them. When reheating, I recommend using the stove or the oven. These methods help keep the chicken juicy. For the stove, heat a skillet over low heat. Add a splash of chicken broth or water to prevent drying. Cover it with a lid to trap steam. For the oven, set it to 350°F (175°C). Place the chicken in an oven-safe dish and cover it with foil. Heat for about 15-20 minutes. This keeps the chicken tender and flavorful. Avoid the microwave if you can, as it can make the chicken rubbery. How can I make One Pan Garlic Butter Chicken ahead of time? You can prepare this dish ahead of time. Cook the chicken and veggies, then cool them. Store them in an airtight container in the fridge for up to three days. When you are ready to eat, reheat in a skillet over medium heat. Add a splash of chicken broth to keep it moist. Can I use chicken breasts instead of thighs for this recipe? Yes, you can use chicken breasts. They will cook faster than thighs. Make sure to check the internal temperature. It should reach 165°F for safe eating. Adjust the cooking time to avoid overcooking. What can I serve with One Pan Garlic Butter Chicken? This dish pairs well with rice or quinoa. You can also serve it with a fresh salad. Garlic bread is a great option too. These sides will soak up the tasty butter sauce. What to do if the chicken is overcooked? If your chicken is overcooked, try slicing it thinly. Serve it in a sauce or with a side of broth. This can help add moisture back to the meat. How to fix an overly salty dish? To fix an overly salty dish, add a few slices of raw potato and let them cook for a few minutes. They can absorb some of the salt. You can also add more veggies or a splash of cream to balance the flavors. In this blog post, we explored the key ingredients and tools for making One Pan Garlic Butter Chicken. I shared preparation steps and cooking techniques to ensure perfect results. You also learned helpful tips for flavor and variations to suit dietary needs. Finally, we discussed storing leftovers and reheating methods. This dish brings comfort and flavor to your table. With these tips, you can cook with confidence. Enjoy delicious meals and impress your family with your skills!](https://juliesdish.com/wp-content/uploads/2025/06/76dd704c-d34f-497d-836b-8788f4c0765d-250x250.webp)
