WANT TO SAVE THIS RECIPE?
If you’re craving a quick and delicious dessert, look no further! The Chocolate Oreo Icebox Cake is a simple, no-bake treat that combines creamy whipped goodness with the classic taste of Oreos. Perfect for hot summer days or anytime you want a sweet fix, this cake comes together with just a few ingredients. Let me show you how to make this delightful dessert that everyone will love!
Why I Love This Recipe
- Indulgent Flavor: This cake combines the rich taste of chocolate and the crunch of Oreos, creating a dessert that is truly decadent.
- No-Bake Convenience: Perfect for hot days, this icebox cake requires no baking, making it an easy and hassle-free treat.
- Make-Ahead Option: With its chilling time, this dessert is ideal for preparing in advance, allowing you to enjoy stress-free entertaining.
- Customizable Layers: Feel free to customize the layers with different flavors of cream or add additional toppings for a unique twist.
Ingredients
List of Ingredients
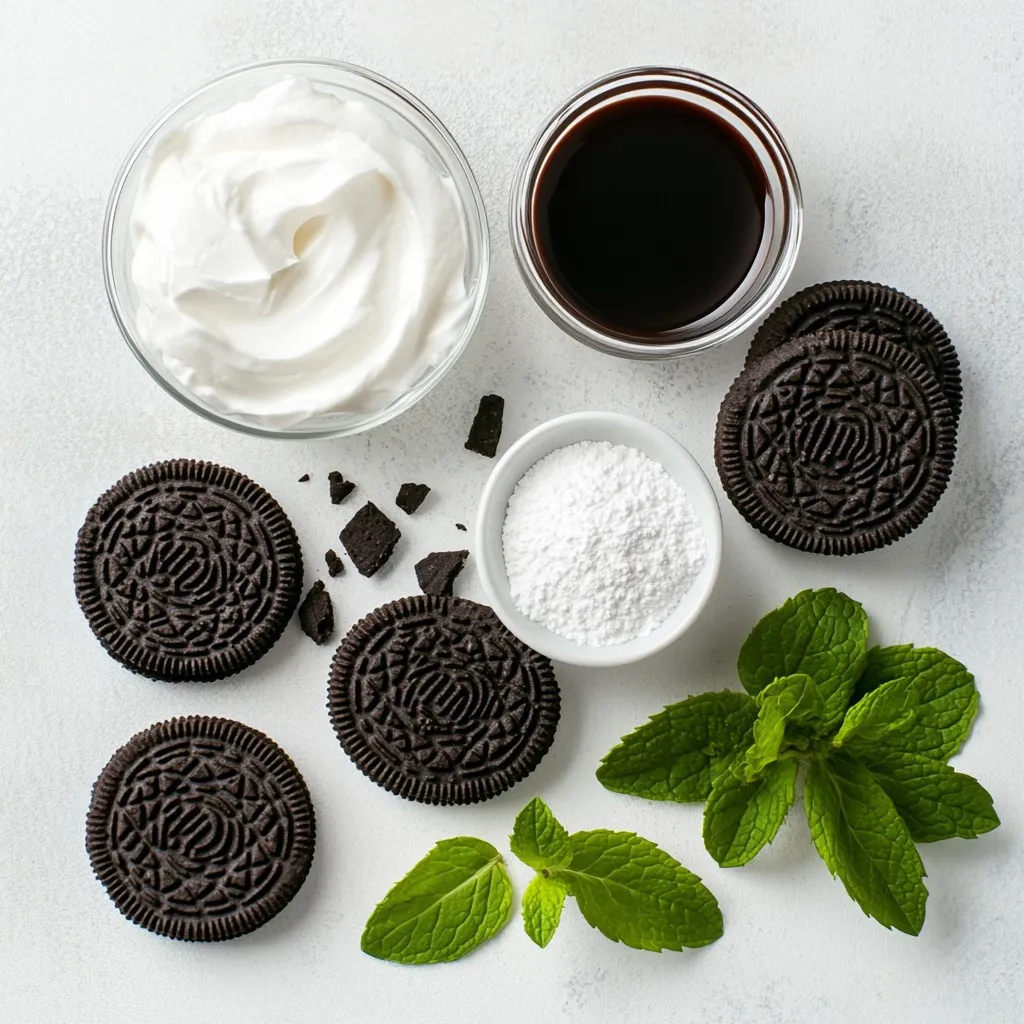
– 2 packs of Oreo cookies (regular or double stuffed)
– 2 cups heavy whipping cream
– 1 cup powdered sugar
– 1 teaspoon vanilla extract
– 1 cup chocolate syrup
– 1 cup crushed Oreos (for garnish)
– Fresh mint leaves (for decoration, optional)
To make the Chocolate Oreo Icebox Cake, you need some simple ingredients. First, you will use Oreo cookies. You can choose regular or double stuffed. Both work great in this cake. Next, get heavy whipping cream. This is key for that creamy texture.
You will also need powdered sugar. This makes the cream sweet and smooth. Vanilla extract adds a nice flavor, bringing all the tastes together. Chocolate syrup is important too. It adds richness and makes the cake taste amazing.
For the finishing touch, gather some crushed Oreos for garnish. This adds a nice crunch. If you like, fresh mint leaves can be used for decoration. They look pretty and give a fresh taste.
This list of ingredients is all you need to create a delightful no-bake treat. Enjoy gathering your supplies!

Step-by-Step Instructions
Preparation Steps
1. Mixing the whipped cream mixture
In a large bowl, add 2 cups of heavy whipping cream, 1 cup of powdered sugar, and 1 teaspoon of vanilla extract. Use an electric mixer to whip the mixture. Mix on high until stiff peaks form. This takes about 3 to 5 minutes.
2. Layering the Oreos and whipped cream
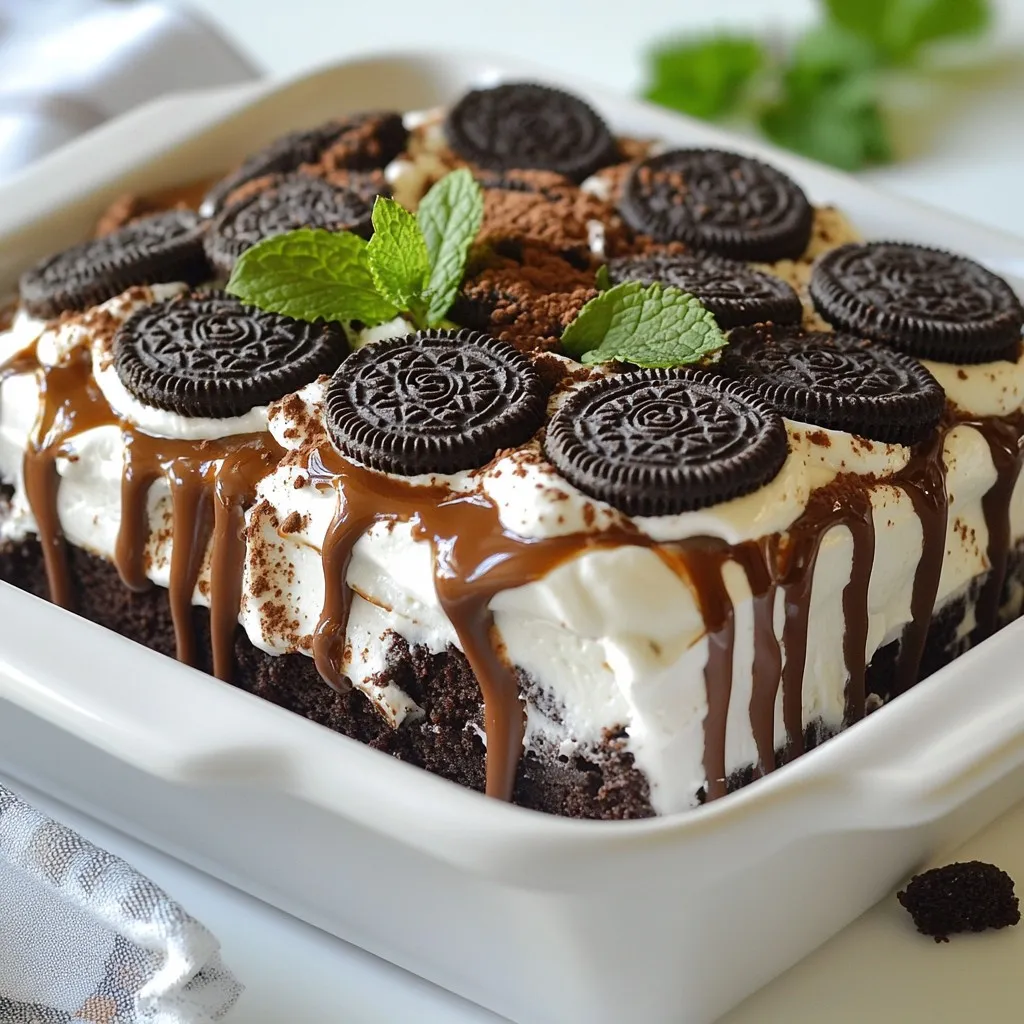
Grab an 8×8 inch baking dish. Dip each Oreo cookie in chocolate syrup quickly. Make sure they are coated but not soggy. Lay the dipped Oreos in a single layer at the bottom of the dish. Spread a layer of whipped cream over the Oreos. Smooth it out evenly. Repeat this process. Add another layer of dipped Oreos followed by whipped cream. Keep going until you run out of ingredients. Finish with a layer of whipped cream on top.
3. Refrigeration process
Cover the dish with plastic wrap. Refrigerate it for at least 4 hours, or overnight for the best taste. This helps the flavors blend and the cookies soften.
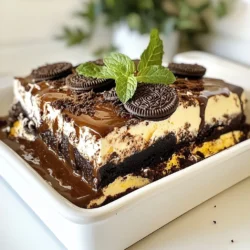
Serving Suggestions
1. Garnishing tips
Before serving, sprinkle crushed Oreos on top for a crunchy finish. You can also add fresh mint leaves for a pop of color and flavor.
2. Presentation ideas
Serve the cake in the dish for a casual look. For a fancier vibe, cut it into squares and place them on dessert plates. You could add a drizzle of chocolate syrup around the cake for an extra touch.
Tips & Tricks
Perfecting Your Icebox Cake
To make your whipped cream perfect, you need the right texture. Start with cold heavy cream. Whip it until it forms stiff peaks. This means it should hold its shape well. It takes about 3-5 minutes at high speed. Don’t over-whip, or it will become butter!
Layering is key for a great icebox cake. After dipping each Oreo in chocolate syrup, place them flat in your dish. Make sure they don’t sit in the syrup too long. One layer of Oreos, then one layer of whipped cream. Repeat until you’re out of ingredients. Finish with whipped cream on top for a nice look.
Troubleshooting Common Issues
Soggy cookies can ruin your cake. To prevent this, dip your Oreos quickly in the chocolate syrup. They should be coated but not drenched. This helps keep them crisp while they chill.
To ensure your cake holds its shape, let it chill properly. Refrigerate for at least 4 hours, or overnight. This helps the flavors blend and the cookies soften just right. If it falls apart, it may not have chilled long enough.
Pro Tips
- Use Cold Ingredients: Ensure your heavy whipping cream is very cold before whipping. Cold cream whips better and holds its shape longer.
- Layering Technique: When dipping Oreos in chocolate syrup, do it quickly to prevent them from becoming too soggy. This helps maintain a nice texture.
- Chill Time: For the best flavor and texture, allow the cake to chill overnight. This gives the cookies ample time to soften and the flavors to meld.
- Garnishing Tips: For an elegant touch, use a microplane to create chocolate shavings as a garnish along with the crushed Oreos and mint leaves.
Variations
Alternative Ingredients
You can switch up the flavor with different Oreo cookies. Try mint, peanut butter, or even birthday cake Oreos. This change will give your icebox cake a fun twist.
If you want a non-dairy version, swap heavy cream with coconut cream. Chill the coconut cream before whipping. This will give you a light and fluffy layer.
Different Layering Ideas
For a fruity taste, add layers of fresh strawberries or bananas. Slice the fruit thin and place it between the Oreo layers. This adds color and freshness to your cake.
You can also throw in chocolate chips or nuts for extra crunch. Sprinkle them over the whipped cream layers. This makes each bite exciting and adds a nice texture contrast.
Storage Info
Best Practices for Storing
To keep your Chocolate Oreo Icebox Cake fresh, always store it in the fridge. Use plastic wrap to cover the dish. This helps to lock in moisture and flavors. The cake stays good for about 3 to 5 days in the refrigerator. After that, the Oreo cookies may become too soft.
Freezing Options
If you want to save some for later, you can freeze it. Cut the cake into slices for easy serving. Wrap each slice in plastic wrap, then place them in an airtight container. This way, they stay fresh for up to a month.
When you are ready to eat, take the slice out of the freezer. Let it sit in the fridge for a few hours to thaw. This keeps the texture nice and creamy. Enjoy your tasty treat whenever you want!
FAQs
Common Questions
How do I make this recipe gluten-free?
To make this recipe gluten-free, use gluten-free Oreo cookies. Many brands offer gluten-free options. Just check the packaging when you shop.
Can I make this without a mixer?
Yes, you can make this without a mixer. Use a whisk to beat the cream. It will take longer, but you can still achieve stiff peaks.
What’s the best way to serve leftovers?
Store leftovers in the fridge, covered, for up to three days. Serve chilled and enjoy the layers. You can add more crushed Oreos on top for extra crunch.
User Suggestions and Feedback
Many who tried the recipe love its creamy texture and chocolate flavor. Some suggest using different flavored Oreos, like mint or peanut butter. This can add a fun twist to the cake.
For ingredient swaps, some readers use coconut cream instead of heavy whipping cream for a dairy-free option. Others suggest using less sugar for a lighter taste. These changes keep the cake tasty while fitting different diets.
You learned how to make a simple and tasty Oreo icebox cake. We discussed key ingredients, step-by-step instructions, and tips for perfecting it. We also explored fun variations and storage ideas. This cake is great for any occasion and sure to impress your friends and family.
Now, it’s time to gather your ingredients and start creating this delightful dessert. Enjoy every bit
Decadent Chocolate Oreo Icebox Cake
A rich and creamy dessert featuring layers of Oreo cookies and whipped cream.
Prep Time 30 minutes mins
Total Time 4 hours hrs
Course Dessert
Cuisine American
Servings 10
Calories 350 kcal
- 2 packs Oreo cookies (regular or double stuffed)
- 2 cups heavy whipping cream
- 1 cup powdered sugar
- 1 teaspoon vanilla extract
- 1 cup chocolate syrup
- 1 cup crushed Oreos (for garnish)
- Fresh mint leaves (for decoration, optional)
In a large mixing bowl, add the heavy whipping cream, powdered sugar, and vanilla extract.
Using an electric mixer, whip the cream mixture on high speed until stiff peaks form (about 3-5 minutes).
Take an 8x8 inch baking dish or similar and start layering: dip each Oreo cookie briefly in chocolate syrup, making sure they’re just coated but not soggy.
Lay the dipped Oreos in a single layer at the bottom of the dish.
Spread a layer of whipped cream mixture over the Oreos, smoothing it out to create an even layer.
Repeat the process by adding another layer of dipped Oreos, followed again by a layer of whipped cream. Continue this process until you run out of Oreos or whipped cream, finishing with a layer of whipped cream on top.
Cover the dish with plastic wrap and refrigerate for at least 4 hours, or overnight for best results. This allows the flavors to meld and the cookies to soften.
Before serving, garnish the top with crushed Oreos and optional mint leaves for a fresh touch.
For best results, refrigerate overnight.
Keyword chocolate, dessert, icebox cake, Oreo
WANT TO SAVE THIS RECIPE?